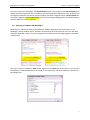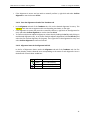
1
Translator Training Guide
Revised: February 2010
LESSON 1 - INTRODUCTION.................................................................................................................................... 1
1.1.
1.2.
1.3.
1.4.
INTRODUCTION TO MULTITRANS..........................................................................................................................1
DESCRIPTION OF THE MULTITRANS MODULES ........................................................................................................1
THE MULTITRANS WINDOW ...............................................................................................................................1
SWITCHING BETWEEN WINDOWS IN MULTITRANS ...................................................................................................2
LESSON 2 - USING THE TEXTBASE........................................................................................................................... 3
2.1.
OVERVIEW OF THE TEXTBASE ..............................................................................................................................3
2.2.
OPENING A TEXTBASE SEARCH SESSION .................................................................................................................3
2.3.
THE TEXTBASE SEARCH WINDOW ........................................................................................................................4
2.4.
SEARCHING IN TEXTBASES...................................................................................................................................5
2.5.
SEARCHING IN TEXTBASES WITH WORDALIGN™ .....................................................................................................7
2.6.
SEARCHING FOR AN EXPRESSION IN A PARTICULAR REFERENCE DOCUMENT ..................................................................8
2.7.
CHANGING THE LANGUAGE DIRECTION ..................................................................................................................8
2.8.
MODIFYING ALIGNMENTS ...................................................................................................................................8
2.8.1.
To align a segment with a completely different segment: ..................................................................9
2.8.2.
To extend or shrink the current source or target selection..................................................................9
2.9.
REALIGNING A FULL TEXT ..................................................................................................................................10
2.10. CONFIRMING ALIGNMENTS ...............................................................................................................................10
2.10.1.
From the TextBase Search Window...................................................................................................10
2.10.2.
From the Alignment sub-tab of the TextBases tab ............................................................................11
2.10.3.
Alignment Status in the Alignment Sub-Tab......................................................................................11
LESSON 3 - USING THE TERMBASE MODULE ........................................................................................................ 12
3.1.
OVERVIEW OF THE TERMBASE MODULE ..............................................................................................................12
3.2.
OPENING TERMBASES......................................................................................................................................12
3.3.
SEARCHING IN A TERMBASE ..............................................................................................................................13
3.3.1.
Quick Search ......................................................................................................................................14
3.3.2.
Regular Search...................................................................................................................................14
3.4.
ADDING A NEW TERMINOLOGY RECORD ..............................................................................................................15
3.5.
MODIFYING A TERMINOLOGY RECORD ................................................................................................................15
3.6.
ADDING A TRANSLATION TO A SOURCE TERM .......................................................................................................16
3.7.
ADDING A SYNONYM .......................................................................................................................................16
3.8.
DELETING A SOURCE TERM OR A TRANSLATION .....................................................................................................17
3.8.1.
Deleting a Source Term or a Translation ...........................................................................................17
3.8.2.
Deleting a Terminology Record .........................................................................................................17
3.9.
SWITCHING BETWEEN TERMBASES .....................................................................................................................17
3.10. CLOSING A TERMBASE .....................................................................................................................................18
LESSON 4 - USING THE MULTITRANS ADD-IN MODULE ........................................................................................ 19
4.1.
4.2.
4.3.
4.4.
4.5.
4.6.
4.7.
4.8.
4.9.
4.10.
4.11.
4.12.
INTRODUCTION ...............................................................................................................................................19
CONNECTING YOUR EDITING ENVIRONMENT TO MULTITRANS .................................................................................19
USING THE TEXTBASE AGENT AND THE FETCH FROM TEXTBASE FUNCTION .................................................................20
USING THE TERMBASE AGENT ...........................................................................................................................20
USING THE TRANSLATION AGENT .......................................................................................................................21
THE TRANSLATION AGENT INTERFACE .................................................................................................................22
TRANSLATION AGENT COLOR CODING .................................................................................................................24
USING THE TRANSLATION AGENT .......................................................................................................................26
TRANSLATING SEGMENTS WITH HYPERLINKS.........................................................................................................26
TRANSLATING SEGMENTS WITH FOOTNOTES OR ENDNOTES .....................................................................................28
USING THE PROPAGATION MEMORY AND TEAM SERVER ........................................................................................29
USING PLACEABLES..........................................................................................................................................30
1
4.13. USING WORDALIGN™ .....................................................................................................................................32
4.14. OTHER MULTITRANS ADD-IN FUNCTIONS ............................................................................................................33
4.14.1.
Using the Term Search Function........................................................................................................33
4.14.2.
Reset Document Colors......................................................................................................................34
4.14.3.
Compute Translated Words...............................................................................................................35
4.15. SETTING MULTITRANS ADD-IN OPTIONS .............................................................................................................35
4.15.1.
General Tab .......................................................................................................................................35
4.15.2.
TermBase Tab ....................................................................................................................................37
4.15.3.
TextBase Tab .....................................................................................................................................38
4.15.4.
Auto-Process Tab ...............................................................................................................................40
4.15.5.
Fuzzy Matching Tab...........................................................................................................................42
4.15.6.
Windows Layout Tab .........................................................................................................................43
4.15.7.
Display Tab ........................................................................................................................................44
LESSON 5 - USER PREFERENCES............................................................................................................................ 45
5.1.
5.2.
5.3.
5.4.
5.5.
5.6.
5.7.
5.8.
5.9.
5.10.
5.11.
5.12.
5.13.
5.14.
LOGON TAB ....................................................................................................................................................45
LANGUAGES TAB .............................................................................................................................................46
TERMBASE TAB ..............................................................................................................................................47
TEXTBASE TAB................................................................................................................................................48
MULTITRANS ADD-IN TAB ................................................................................................................................50
TERM SEARCH TAB ..........................................................................................................................................51
MACHINE TRANSLATION ...................................................................................................................................52
FILE LOCATIONS TAB ........................................................................................................................................53
NETWORK TAB ...............................................................................................................................................54
WEB DIRECT ACCESS TAB .................................................................................................................................55
MULTITRANS SERVER TAB ................................................................................................................................56
PROPAGATION MEMORY TAB ............................................................................................................................57
TRACING .......................................................................................................................................................58
UPDATES TAB .................................................................................................................................................58
2
MultiTrans User Training Guide
Lesson 1 - Introduction
Lesson 1 - Introduction
1.1. Introduction to MultiTrans
Welcome to MultiTrans! This training session is designed to teach you how to fully exploit the search
power of MultiTrans. If anything is unclear, or if you have any questions, feel free to interrupt the
training at any time.
This manual is yours. Take as many notes as you like, and keep it close when you start to use the
program on your own.
1.2. Description of the MultiTrans Modules
At the core of MultiTrans are the following modules:
•
•
•
•
The TextBase and its Alignment Agent: used to easily create and access large searchable, fulltext translation memories of reference texts and their corresponding translated versions;
The TermBase: used to create and access large terminology databases of pre-approved,
standardized terms in multiple languages;
The Translation Agent: used within Microsoft Word or other popular editors to interactively
work with multiple TextBases and TermBases, and a suite of automated search functions to
translate a project;
The Analysis Agent: used to assess the level of effort required to translate a new project by
providing statistical information retrieved from existing TextBases and TermBases.
We will work with the TextBase and TermBase modules as well as the Translation Agent during this
training.
1.3. The MultiTrans Window
When you first open MultiTrans, the following screen is displayed. This window, referred to as the
General References page is used to navigate within MultiTrans and access its various modules.
Often, there is more than one way to complete a task (menus, toolbars, pop-up menus, hyperlinks, etc.),
so try them all to determine which method works best for you.
1
MultiTrans User Training Guide
Lesson 1 - Introduction
MultiTrans
Processes
Menu and
Toolbar
Start-up
Page
Process Bar
When we refer to a menu, we are referring to the menu bar along the top of the screen, which contains
items such as File, Edit, View and Help. Different menu commands will display, depending on the
module you are working with.
Below the menu bar, you see the module toolbar, which consists of shortcuts to the most commonly
used menu commands. The buttons on the toolbar will change depending on the module you are
working with.
Down the left side of the screen is the Process Bar. The Process Bar displays some of the MultiTrans
modules, as well as some of the main functions of the program.
Projects:
TextBases:
TermBases:
Options:
Used to create a new project or open an existing one.
Contains shortcuts to the different tools used in the TextBase module.
Contains shortcuts to the different tools used in the TermBase module.
Allows you to change your preferences in various modules of MultiTrans.
1.4. Switching between windows in MultiTrans
You can switch between the TextBase Search and TermBase Editor windows by clicking on the View
menu and selecting the required module. You can also toggle between the TextBase and TermBase using
Ctrl+W or you can toggle between all windows using Ctrl-Tab.
2
MultiTrans 4.4 Translator Training Guide
Lesson 2 - Using the TextBase
Lesson 2 - Using the TextBase
2.1. Overview of the TextBase
The TextBase module enables you to create and search through large memories of reference text and
their corresponding translated versions in multiple languages. In order to use these reference
documents, you must add them to a translation memory known as a TextBase. You can create multiple
subject specific TextBases that can be searched manually or used with an automated translation
workbench within an editing environment such as Microsoft Word.
In this lesson we will use an existing TextBase to manually search for information in reference
documents. To access your TextBase, you must first start a TextBase Search session and open one or
more TextBases and TermBases (terminology databases).
2.2. Opening a TextBase Search session
When you start a TextBase Search session, a TextBase Search Wizard will guide you through the various
steps to open the required TextBases and TermBases.
To open a TextBase Search Session:
1. From the General references, click on the TextBase Search link. Alternatively, you can select it
from the Process menu or the Process Bar (the gray bar down the left side of the screen). Step 1
of the TextBase Search Wizard window is displayed.
2. Click on the Browse button to display the TextBase Search Manager window. A list of available
local or server TextBases is displayed. If you are on the Server TextBases tab or click on it
without having previously connected to the server, a login window will appear.
3. Select the TextBase(s) you wish to open. and then click the Open button to return to Step 1 of
the TextBase Search Wizard window. To select the TextBases, In the Local TextBases tab, hold
down the Ctrl or Shift key to select multiple contiguous or non-contiguous files at once; in the
Server TextBases tab, select the check box next to the TextBase you want to open. Note that the
Find TextBase field in the Server TextBases tab is a filter-as-you-type field. As you enter text in
this field, the list of TermBases will shrink to display only the TermBases containing the string of
characters typed in the field.
Note: The TextBase Search Manager displays a list of TextBases known on your system. If the TextBase you
are looking for does not appear in this list, click the Browse button to manually locate it. Once it has been
located, it will remain in the list for future use.
The order in which TextBases are added is the order in which they will be searched. You can use the up and
down arrows at the bottom right of the TextBase Search Wizard to rearrange the order of the TextBases, if
need be.
4. Click the Next button.
•
Step 2 Language Selection is displayed.
5. Select the source and target language pair you wish to work with and then click the Next button.
3
MultiTrans 4.4 Translator Training Guide
•
Lesson 2 - Using the TextBase
Step 3 TermBase Selection is displayed.
6. Click on the open folder icon
to open the TermBase Manager window, which displays a list
of available local or server TermBases.
7. Select the TermBase(s) you wish to open (hold down the Ctrl or Shift key to select multiple
contiguous or non-contiguous files at once), and then click the Select button to return to Step 3
of the TextBase Search Wizard.
8. Click the Next button.
•
Step 4 «Start» loading TextBase(s) is displayed.
9. Click the Start button, and then OK after consulting the statistical information window.
•
The TextBase Search window is displayed.
2.3. The TextBase Search Window
Once a TextBase Search session is open, the main working area of MultiTrans is divided vertically into
two panes.
Navigation
tabs
Source
language
file
Search Results
Target
language
file
The left pane contains the search and results. The right pane displays the texts contained in the selected
TextBases: the Source language file and the equivalent Target language file. The left pane has three tabs
running along the top, respectively titled: Search, TextBases and Terminology. The following table
provides a description of each of these tabs:
4
MultiTrans 4.4 Translator Training Guide
TABS
Search
TextBases
Terminology
Lesson 2 - Using the TextBase
Description
This tab is automatically selected when you open a TextBase Search session. It
contains:
• a blank Search field in which you can enter your search criteria;
• a Search Options button that opens a window that allows you to define the
type of search you want to perform, and
• a Search Results pane that displays the instances where your expression has
been found as well as the files in which it appears.
This tab contains information about each open TextBase. If you have opened multiple
TextBases, you can click on the drop-down list to select a different one. The TextBase
tab is divided into two sub-tabs located at the bottom of the pane:
• The File List sub-tab which displays a list of the source and target documents
included in the selected TextBase.
• The Alignment sub-tab which displays a list of the alignments created
between the source and target language documents.
This tab displays terms or expressions found in the selected TextBase and their
frequency. A paperclip icon beside a term indicates that this term exists in a
TermBase. The Terminology tab is divided into two sub-tabs located at the bottom of
this pane as follows:
• The Word Count sub-tab which displays all the single words in the selected
TextBase and their frequency.
• The Term Count sub-tab which displays all expressions longer than one word
that reoccur more than once. You can locate a specific expression in the
TextBase by double-clicking on it.
2.4. Searching in TextBases
One of the most powerful functionalities of MultiTrans is the ability to find expressions and their
equivalencies in your reference documents, which can then be added to a TermBase. When searching,
the search is performed in the source language of the open TextBases.
To search in all open TextBases:
1. Go to the Search tab of the TextBase Search window.
2. Type the word or expression in the Search field.
3. Click the Search Options button to open the dialogue box from which you will select the desired
search parameters.
5
MultiTrans 4.4 Translator Training Guide
Lesson 2 - Using the TextBase
•
Consecutive words: If you select this option, words in the Search field will only be matched
in the order specified. Otherwise, the TextBase Search will display every segment containing
the words entered in the Search field, regardless of the order.
•
All words: If this option is checked, only segments containing all words entered in the
Search field will be shown. Otherwise, segments containing as few as two of the words will
be shown.
•
Newest documents first: When this option is turned on, files that were added to the
TextBase last will be searched first (reverse chronological order). Otherwise, files that were
added first will be searched first (chronological order).
Word matching
•
Exact: Check this radio button if you wish to search for expressions as they are entered in
the Search field.
•
Stemmed search: This option will expand the search to include other words that have the
same stem or root. For example, if you search for “boy” it will also find “boys”, and if you
search for “wonder” it will also find “wonderful”.
•
Fuzzy search: This option will search for a word with a fuzzy factor, which means that found
expressions do not have to match the searched item exactly. To change the fuzzy search
option, select the Fuzzy search radio button. You can now change the maximum number of
differences allowed (the number of characters per word that may differ between a word
searched and a word found).
When all options have been selected according to your needs, click OK.
4. Press Enter or click on the Search icon
.
6
MultiTrans 4.4 Translator Training Guide
Lesson 2 - Using the TextBase
The search results are displayed in the Search Results section. The top area of the Search Results pane
displays the found expression with its frequency and the bottom area displays the name of the file and
the segments where this expression was found. When you select a segment from the Search Results list,
the relevant segment is yellow-highlighted in the source and target languages with the found expression
colored in blue in the source language.
2.5. Searching in TextBases with WordAlign™
Word Align™ is a MultiTrans Add-On that allows for TextBase alignments at the word level. To use
WordAlign™ within TextBase Search, execute a search and you will notice that not only is the searched
expression identified in blue in the source segment but its equivalent in the target segment is identified
in blue as well.
Also, once a search is executed a Stats button appears on the Search tab. If you click on it you will find
the different translations MultiTrans has found for this expression and their frequency expressed in a
percentage form.
7
MultiTrans 4.4 Translator Training Guide
Lesson 2 - Using the TextBase
2.6. Searching for an Expression in a Particular Reference Document
Even though the TextBase search described in the previous point is possible only in the source language,
it is nonetheless possible to search for a word or expression in the file currently displayed. Simply click
on the TextBase Search menu and select Find in > Source… or Find in >Target…. This function will not
search the whole TextBase but only the text that appears in the text pane. Alternatively you can rightclick anywhere in the source or target text and select Find… from the menu that appears. To search
through the entire file (and not just the portion that appears in the text pane), first right-click and select
Show Full Context and then use the Find function.
2.7. Changing the Language Direction
If you wish to search in the target language or work with a different language pair, you can change the
language direction of the open TextBase(s). To change the language direction:
1. Go to the Search tab of the TextBase Search window.
2. From the TextBase Search menu, select Language Direction. The following window will display:
3. Select the language pair that you wish to work with, and then click OK. The right pane of the
TextBase Search window will now display the newly selected language pair.
2.8. Modifying Alignments
MultiTrans uses powerful algorithms to align segments between two languages. Although these
alignments have a high percentage of accuracy, it is still possible for misalignments to occur. It is
possible to correct the alignments manually as you are working within MultiTrans. This section will show
you how to create a basic single segment alignment (1:1), and then it will show you how to create a
multiple segment alignment (2:1, 1:2, 2:2, etc.).
There are two different types of modifications you can make:
a) Align a segment with a completely different segment
Before: Segment 1 ↔ Segment 1
After: Segment 1 ↔ Segment 3
OR
8
MultiTrans 4.4 Translator Training Guide
Lesson 2 - Using the TextBase
b) Extend or shrink the current source or target selection.
Extending
Before: Segment 1 ↔ Segment 2
After: Segment 1 ↔ Segment2, Segment 3
Shrinking
Before: Segment1, Segment 2 ↔ Segment 1
After: Segment 1 ↔ Segment 1
2.8.1.
To align a segment with a completely different segment:
1. Right-click in any segment in the source language, and select Select Segment and Translation.
Alternatively, you can select a segment from a Search Result list. The corresponding segment
will be yellow-highlighted in the source and target documents.
2. Press Ctrl+Up or Ctrl+Down arrows to navigate from one yellow-highlighted segment to another
in both the source and target texts at the same time.
3. Once you have selected the appropriate source segment, click anywhere within the target file
and press the Ctrl+Shift+Up or Ctrl+Shift+Down arrows to navigate between segments in the
target pane only. Alternatively, you can right-click on the target segment and select Previous
Segment or Next Segment. This function allows you to align the yellow-highlighted segment in
the source text with a different one in the target text. Alternatively, you can go directly to the
new segment you wish to align to the source segment by clicking on it, and then clicking on the
Select Segment and Translation button on the toolbar or on the contextual menu (right-click).
4. From the TextBase Search menu, select Align Segment or press Ctrl+A.
2.8.2. To extend or shrink the current source or target selection
1. Right-click in any segment in the source language and select Select Segment and Translation.
Alternatively, you can select a segment from a Search Result list. The corresponding segment
will be yellow-highlighted in the source and target document.
2. Suppose that the highlighted segment in the source pane has been translated by two segments
in the target pane or vice-versa. You realize that an alignment is partially correct but that it
should be aligned with two segments in the source or target pane. To start to fix this issue, first
of all you need to:
• Delete the existing alignments by selecting that segment (right-click in the source language
and select Select Segment and Translation) and delete the alignment by either right-clicking
and selecting Delete Alignment or by clicking on the Delete Alignment icon ( ).
3. To create the correct alignments you can follow these two different strategies after having
selected the segment in question (right-click in the source language and select Select Segment
and Translation):
9
MultiTrans 4.4 Translator Training Guide
Lesson 2 - Using the TextBase
A. If you wish to extend the yellow highlighting in the source document (make a 2:1 alignment),
place your cursor in the source document and press Ctrl+E (or right-click and choose Extend
Selection). If you wish to reduce the yellow highlighting in the source document, place your
cursor in the source document and press Ctrl+R (or right-click and choose Shrink Selection).
B. If you wish to extend the yellow highlighting in the target document, place your cursor in
the target document and press Ctrl+Shift+E (or right-click and choose Extend Selection). If
you wish to reduce the yellow highlighting in the target document, place your cursor in the
target document and press Ctrl+Shift+R (or right-click and choose Shrink Selection).
Once the highlighting has been adjusted, press Ctrl+A or choose Align Segment from the TextBase
Search menu (or right-click and choose Align Segment) to save your alignment.
Note: In TextBase Search, you can modify the alignments regardless of what tab (Search, TextBases, Terminology)
or sub-tab (File List, Alignments, Word Count, Term Count) is active.
You can also modify alignments through the Translation Agent and the XLIFF Editor.
2.9. Realigning a full text
Sometimes a section of a document can have such bad alignments that the rest of the document is
affected by it. This could be the case if a full section of a document exists in the source but not in the
target, or if the documents contain a glossary or list of acronyms sorted alphabetically in the respective
languages. In such situations, you may want to correct the alignments and after a certain point of the
text restart de alignment from scratch.
1. To do so correct the alignments as described in section 2.8.
2. When you reach a point from where the text could be fully realigned, go to the Alignments subtab and locate the last correctly aligned segment in the text that you would like to take as a
starting point.
3. Right-click on the segment and select Realign until end.
4. All previous alignments will be overwritten and new alignments will be established for each
segment.
2.10. Confirming Alignments
Confirming alignments allows you to verify and confirm that all alignments are accurate, thus avoiding
the need to revise alignments every time you translate or pre-translate a document. This step can save
precious amounts of time and money in revision costs.
2.10.1. From the TextBase Search Window
•
Click on the desired segment in the source language, then right click and select Select Segment
and Translation. This highlights both the source segment and its corresponding translation.
10
MultiTrans 4.4 Translator Training Guide
•
Lesson 2 - Using the TextBase
If the alignment is correct and you wish to manually confirm it, right-click and select Confirm
Alignment or use the shortcut Ctrl+A.
2.10.2. From the Alignment sub-tab of the TextBases tab
•
•
•
In the Alignment sub-tab of the TextBases tab, click on the desired alignment list entry. This
highlights both the source segment and its corresponding translation, on the right.
If the alignment is correct and you wish to manually confirm it, right-click on the alignment list
entry and select Confirm Alignment or use the shortcut Ctrl+A.
To confirm multiple non-adjacent alignments, select them by holding the Ctrl key and clicking on
each desired alignment entry, or to confirm multiple adjacent alignments hold the Shift key and
select the first and last alignment of the group. Then right-click on the alignment list entry and
select Confirm Alignment to confirm all entries.
2.10.3. Alignment Status in the Alignment Sub-Tab
In the list of alignments shown under the Alignment sub-tab of the TextBases tab, the first
column displays various coloured icons corresponding to the status of each alignment. Here is
the definition of each colour-coded icon:
Yellow
Green
Blue
Purple
< 0.5 certainty
0.5 - 0.99 certainty
~1 certainty
manually confirmed
11
MultiTrans 4.4 Translator Training Guide
Lesson 3 - Using the TermBase Module
Lesson 3 - Using the TermBase Module
3.1. Overview of the TermBase Module
The TermBase module is the terminology management tool that you use to search through a database
of records that can contain individual words, expressions or whole sentences translated to one or more
languages. You can create multiple domain specific TermBases that can be searched manually or used in
conjunction with automated translation processes within your editing environment such as Microsoft
Word. In this lesson we will open an existing terminology database to manually add and modify
terminology records.
3.2. Opening TermBases
A TermBase can be opened by itself or together with one or more TextBases.
1. Click on the TermBase Manager link on the Start-up page of MultiTrans . Alternatively, you can
go to the TermBases module in the Process Bar (the gray bar on the left of the screen) and click
on the TermBase Manager icon. The TermBase Manager window is displayed.
2. When you activate the Local or Server TermBases tabs, all available TermBases on your
computer or server will be displayed on the list. To view your Server TermBases, you must be
connected to your server.
3. Select the TermBase(s) you wish to open.
a. On the Local TermBases tab click on the TermBase or hold down the Ctrl or Shift key to
select multiple contiguous or non-contiguous TermBases at once, and then click the
Open button.
b. On the Server TermBases tab, select the check box next to the TermBases you wish to
open. Note that if your organization uses multiple servers to store their different servers,
when you establish the server connection all available servers and their TermBases are
displayed. Find TermBase is a filter-as-you type field. As you enter text in this field, the
list of TermBases will shrink to display only the TermBases containing the string of
characters typed in the field.
Note: Local and server TermBases cannot be opened at the same time. You must first open a type of TermBases
and then click on the TextBase Manager icon again to open the other set of TermBases.
4. The TermBase Editor window is displayed.
12
MultiTrans 4.4 Translator Training Guide
Lesson 3 - Using the TermBase Module
The TermBase Editor window is displayed:
Source language term
and term details
Target language term
and term details
Term List
The TermBase Editor allows you to modify existing terms and their equivalencies, add new terms and
equivalencies, and perform searches. The area on the left displays the term list of the active TermBase.
Note: When using a TermBase on the server, only a portion of the term list will be displayed at once. Use the
arrows just below the term list to navigate through the terms which are displayed alphabetically. The section on
the right displays two tabs as follows:
•
•
Details tab: displays all information related to the selected terminology record. This can include
terms, translations in various languages, unlimited definitions and fields, images, and hyperlinks
to other terms in the TermBase as well as to internal or external web sites. In this tab, you can
click on a field name to modify its value. Only underlined fields can be modified.
Search tab: displays the TermBase search tool used to search for specific expressions
To list expressions from other languages, go to the TermBase menu, select Language, and then
select the desired language.
To view information on any given term, simply click once on the entry in the term list.
3.3. Searching in a TermBase
There are a number of ways to find the information you are looking for in your TermBases.
13
MultiTrans 4.4 Translator Training Guide
Lesson 3 - Using the TermBase Module
3.3.1. Quick Search
At the bottom of the Term List, select the Quick Search
icon. In the Search for field, type the desired
search string, and then click OK. Only the source-language terms containing this search string will be
displayed in the Term List. To view the details of any of these terms, select that term from the Term List
and the details will be displayed.
To view the entire Term List again, select the Cancel Search
icon.
3.3.2. Regular Search
To perform any search other than the above Quick Search, follow these steps:
1. Go to the Search tab.
2. Click in the Search for field and type the term you wish to find, or any portion of that term. Then
click the Search button or press the Enter key.
3. By default, you will see the same results as when you used the Quick Search feature. However,
there are many other options available from here. To view these other search options, select the
Options button.
The TermBases tab allows you to select any or all TermBases in which you wish to
search;
The Fields tab allows you to search any or all fields in which you wish to search. If
you select Show system fields, you will also be able to search in fields such as
Created By and Created Date. Note that if you wish to search for a date, you must
select the Date check box beside the Search for field;
The Languages tab allows you to search in a particular language or in all languages;
The Options tab allows you to select any of the following options:
o
Match whole words will only find the character string you are searching for
if it is a whole word (not part of a larger word);
o
Case sensitive will find the search string only if it is in the TermBase with
exactly the same case letters used;
o
Starts with will find all results starting with the search string;
o
Exact match will find results that exactly match the search string;
o
Skip TermBase with empty target language will only return corresponding
results if there is a translation in the target language;
o
Maximum Search Results can also be set to limit the number of search
results.
Click OK to close the TermBase Search Options window.
4. Double-click on a result to view the term details.
14
MultiTrans 4.4 Translator Training Guide
Lesson 3 - Using the TermBase Module
3.4. Adding a New Terminology Record
In order to create new expressions, you must first open the required TermBase. To add a new term to
the active TermBase:
1. From the TermBase menu, select New Term. Alternatively, you can click on the New link located
in the top right of the Details tab, or press Ctrl+E on the keyboard. The Term Manager window is
displayed, which contains four distinct tabs: Source Term, Translations, Definitions and Other
Fields.
2. In the Source Term tab, enter the new term in the blank field labeled Enter new term or modify
existing one.
3. Go to the Definitions tab and click the New button. Enter the definition for the source term and
click Apply.
4. If the TermBase contains customized fields, go to the Other Fields tab and enter the information
as needed.
5. Now go to the Translations tab and click the New button. Type a translation into the Translation
field, select the language, and click the Apply button.
6. Repeat Step 5 for each translation you wish to add for this terminology file.
7. After entering all the information for this new term, click the Apply button.
Note: The Term and Translation Status are set to Temporary by default in your preferences. These can be changed
at the time the term is first created by clicking on the drop-down list for that field or they can be modified later if
required. To change the default, go to the File menu and select Preferences. You can change the Status in the
TermBase tab.
3.5. Modifying a Terminology Record
To modify an existing terminology record:
1. In the Term List, select the term you wish to modify. All relevant information is displayed in the
Details tab.
2. Click on the TermBase menu and select Modify Term. The Term Manager window is displayed.
3. Make the necessary changes by selecting the relevant tab, and then clicking the Apply button.
Alternatively, in the Details tab, you can click on the Modify link corresponding to the part of the term
that you wish to modify.
•
If you click on the Modify link to the right of the source term, the complete Term Manager
window is displayed.
•
If you click on the Modify link to the right of a translation, the Modify Translation window is
displayed for that translation.
15
MultiTrans 4.4 Translator Training Guide
Lesson 3 - Using the TermBase Module
Note: If the Term Prioritization option is selected in the Preferences > TermBase tab, and you click on the
Modify link in top right of the screen, the Terminology Record Manager window is displayed. If there are
synonyms in your Term Record, this window will allow you to specify which term should be displayed first
in the term record. The order in which the terms appear in this window is the order in which they will
appear in the term record regardless of which term you select in the term list to the left. Use the up and
down arrows on the right of the Terminology Record Manager window to put the terms in the order in
which you would like them displayed in the term record.
3.6. Adding a Translation to a Source Term
A terminology record can contain any number of translations. To add a translation to an existing term:
1. In the Term list, select the term to which you wish to add a translation. All relevant information
is displayed in the Details tab.
2. In the Details tab, click on the Modify link to the right of the source term, or click on the
TermBase menu and select Modify term. The Term Manager window is displayed.
3. Go to the Translations tab, and then click the New button. The Add new translation dialogue
box is displayed containing three tabs: Translation, Definitions and Additional Fields.
a. In the Translation tab, enter the translation for the source term in the Translation field
and select the target language.
b. Go to the Definitions tab and Click the New button. Enter the definition for the
translation.
c. If the TermBase contains customized fields, go to the Additional Fields tab and enter
the information as needed.
d. Click the Apply button.
4. Follow the above steps to add as many translations as you wish.
5. When completed, click the Apply button in the Term Manager window.
3.7. Adding a Synonym
A terminology record can also contain synonyms which are treated the same way as translations. To add
a synonym:
1. In the Term list, select the term to which you wish to add a synonym. All relevant information is
displayed in the Details tab.
2. In the Details tab, click on the Modify link to the right of the source term, or click on the
TermBase menu and select Modify term. The Term Manager window is displayed.
4. To add a synonym, go to the Translations tab, and then click the New button. The Add new
translation dialogue box is displayed.
a. In the Translation tab, enter the synonym of the source term in the Translation field.
16
MultiTrans 4.4 Translator Training Guide
Lesson 3 - Using the TermBase Module
b. In the drop-down list below, select the language of the synonym (in this case you will be
selecting the source language).
c. Go to the Definitions tab and Click the New button. Enter the definition for the
synonym.
d. If the TermBase contains customized fields, go to the Additional Fields tab and enter
the information as needed.
e. Click the Apply button. A dialogue box will be displayed saying that the Term and
Translation languages are the same. Click Yes to continue and save the synonym to your
term record.
6. Follow the above steps to add as many synonyms as you wish.
7. When completed, click the Apply button in the Term Manager window.
3.8. Deleting a Source Term or a Translation
3.8.1. Deleting a Source Term or a Translation
1. In the Term List, select the appropriate term. All relevant information is displayed in the Details
tab.
2. Click on the Delete link to the right of the term or translation you wish to delete.
3. When prompted to confirm the deletion, click Yes.
3.8.2. Deleting a Terminology Record
1. In the Term List, select any term in the terminology record you wish to delete. All relevant
information is displayed in the Details tab.
2. From the TermBase menu, select Delete Record. Alternatively, you can click on the Delete link
at the top right of Details tab, right-click on the term in the Term List and select Delete Record,
or press Ctrl+D on the keyboard.
3. When prompted: “Are you sure you want to delete the selected term?”, click Yes.
WARNING! Once you have deleted a synonym, translation or a term, you cannot undo these actions!
Make sure to double check before deleting any information.
3.9. Switching between TermBases
The TermBase name displayed in the toolbar is the active TermBase. If you are adding a term, this is the
TermBase to which your term will be added. However, you can still search in all open TermBases
simultaneously. To change the active TermBase:
1. Go to the TermBase menu and select TermBase
2. Select the name of the TermBase to which you wish to switch. Alternatively, you may select the
required TermBase from the TermBase drop-down list in the TextBase toolbar.
17
MultiTrans 4.4 Translator Training Guide
Lesson 3 - Using the TermBase Module
3.10. Closing a TermBase
When a TermBase is no longer required, you can close either the active TermBase or all open
TermBases.
To close the active TermBase: From the File menu, select Close TermBase > Current TermBase.
To close all open TermBases: From the File menu, select Close TermBase > All Opened
TermBases.
18
MultiTrans 4.4 Translator Training Guide
Lesson 4 - Using the MultiTrans Add-In Module
Lesson 4 - Using the MultiTrans Add-In Module
4.1. Introduction
The MultiTrans Add-In Module contains functions that allow translators to access MultiTrans directly
from their editing environment. The MultiTrans Add-In Module is directly integrated with Microsoft
Word, Microsoft PowerPoint and Corel WordPerfect.
The main functions of the MultiTrans Add-in module
TextBase Agent
The TextBase Agent will scan the document to be translated and identify segments previously
translated and available in your open TextBases.
TermBase Agent
The TermBase Agent will scan the document to be translated and identify or replace all
terminology available in your open TermBases.
Translation Agent
The Translation Agent combines the TextBase Agent and the TermBase Agent in an easy-to-use
interface. It allows you to translate with MultiTrans interactively, one segment up to one
paragraph at a time and automatically identifies any matches from the TermBase as well as any
exact or fuzzy matches from the TextBase, Team Server, or a local Propagation Memory, if
applicable.
When MultiTrans is installed, you will notice a new MultiTrans menu on the toolbar in your editing
environment with the various MultiTrans Add-in functions grayed out. Before you can access these
functions, you must first connect to MultiTrans from your editing environment.
Tip! If you use Microsoft Word 2007, look for the MultiTrans menu under the Add-Ins tab.
4.2. Connecting your Editing Environment to MultiTrans
Depending on the translation process you wish to use, you can either connect to TextBase and
TermBase or TermBases only. To connect to MultiTrans:
1. From the MultiTrans menu, select Connect to... > TextBase and TermBase or TermBase only.
• TextBase and TermBase: will allow you to automatically or interactively replace terminology
found in open TextBases and TermBases.
• TermBase Only: will allow you to automatically replace terminology found in your open
TermBases only.
Once the connection is made, all applicable functions within the MultiTrans menu will be available.
19
MultiTrans 4.4 Translator Training Guide
Lesson 4 - Using the MultiTrans Add-In Module
Note: If the TextBase and TermBase files are not already open in MultiTrans, you will be prompted to open them.
Refer to the relevant sections in this manual to either open a TextBase Search session or a TermBase.
4.3. Using the TextBase Agent and the Fetch from TextBase Function
The TextBase Agent is used to compare your Word document with the open TextBase(s). It identifies
expressions of two or more words found in the reference documents and highlights them, alternating
between red and yellow to make it easier for you to identify the different segments. You can then see
what has previously been translated and select the appropriate translation using the Fetch from
TextBase option. To use the TextBase Agent:
1. Once you are connected to TextBase and TermBase, click the MultiTrans menu, and select
TextBase Agent.
2. Once the process is completed, click the Done button. The previously translated text in your file
is highlighted in alternating colors. The next step is to fetch the equivalent translations from
your reference documents.
3. Place your cursor on the first word of the highlighted expression that you wish to translate, and
then click on the MultiTrans menu and select Fetch from TextBase. Alternatively you can rightclick and select MultiTrans > Fetch from TextBase. This brings up the TextBase Search window
with the corresponding segment yellow-highlighted and the found expression within the
segment colored in blue.
Note: If you are working in Corel WordPerfect, you will need to highlight the entire segment you wish you
find in the TextBase.
4. Select the corresponding translation in the target window and press Ctrl+Ins or click on the
TextBase Search menu and select Insert in TermBase and document. The translated expression
has now been replaced in a different color in your file.
Note: By default, Ctrl+Ins will also generate new entries in the current TermBase for future use. If you do
not wish to add expressions to the TermBase, go to MultiTrans, and click on the TextBase Search menu.
Select Insert Options and deselect Send to TermBase.
4.4. Using the TermBase Agent
The TermBase Agent is used to compare your Word document to your open TermBase(s). Depending on
the options you choose, if a match is found, the translation will automatically be inserted in your Word
document. If more than one potential translation is found, you will be presented with a window asking
you to select the appropriate translation. To use the TermBase Agent, you can either connect to
TextBase and TermBase or TermBase Only. To use the TermBase Agent:
1. Once connected, click on the MultiTrans menu and select TermBase Agent. Alternatively, you
can right-click on the text you wish to translate and select MultiTrans >TermBase Agent.
•
Words or expressions with a single translation in the open TermBase(s) are
automatically inserted in your Word document.
20
MultiTrans 4.4 Translator Training Guide
•
Lesson 4 - Using the MultiTrans Add-In Module
For words or expressions with more than one translation in the open TermBase(s), the
following window will display:
2. Select the translation you wish to use, and click either the Replace or the Replace All button.
Refer to the table below for a description of the additional buttons in this window.
BUTTON
Skip
Skip All
Options
Cancel
Description
To ignore this instance of the found word or expression.
To ignore all instances of the found word or expression.
Allows you to change the MultiTrans Add-in Options.
Allows you to cancel the TermBase Agent at any time without affecting the part of the
document that has already been processed.
Note: In the Add to TermBase section of the Select Translation window, you can click on the drop-down list of the
Add to field and select the TermBase to which you wish to add translation typed in the Target field.
4.5. Using the Translation Agent
The MultiTrans Translation Agent is an interactive translation workbench directly integrated with
Microsoft Word as well as PowerPoint and Corel WordPerfect.
The Translation Agent walks you through your document step-by-step, presenting you with TermBase
and TextBase matches from which you can select the most suitable translation. For each segment (e.g.
sentence, title or list entry) in your active document, the Translation Agent will search your previously
translated reference documents and opened terminology repositories, and present you with relevant
matches. You can then use the matches to create a translation, by replacing the segment in the
document.
21
MultiTrans 4.4 Translator Training Guide
Lesson 4 - Using the MultiTrans Add-In Module
When you start the Translation Agent, the system will begin to search through your open TermBase(s)
and TextBase(s) for matches to the segments in the document you are translating. It will automatically
search for the longest matches, starting with paragraphs, then segment matches, and continuing down
to short expressions and words. As it finds a match, it will present you with the Translation Agent
window, asking you to either replace the source segment with a suggested equivalent or skip it, leaving
the segment unchanged, and moving on to the next match. If you do not agree with the translation, and
you’d like to add your own translation, you can type directly into the Translation pane.
These are the types of matches the Translation Agent will retrieve:
•
•
•
•
•
•
TermBase matches: Terms that appear in your document to translate for which there are term
records in the opened TermBase(s).
Exact confirmed TextBase matches: Segments from your document to translate that appear
word by word in your TextBase and whose alignments you have manually verified.
Exact unconfirmed TextBase matches: Segments from your document to translate that appear
word by word in your TextBase and whose alignments have been established by MultiTrans.
Exact Propagation Memory matches: Segments from your document to translate that appear
word by word in your Propagation Memory or Team Server.
Fuzzy matches: Segments from your document to translate that resemble segments in your
TextBase or Propagation Memory / Team Server and whose match percentages fall above the
fuzzy factor established in your Translation Agent options.
Sub-segment matches: Segments from your document to translate that resemble segments in
your TextBase and whose match percentages fall below the fuzzy factor established in your
Translation Agent options.
When searching, the system will find equivalencies in the following order:
•
•
•
•
•
•
•
•
exact matches from the TermBase(s)
Exact confirmed matches from the TextBase(s)
Exact unconfirmed matches from the TextBase(s)
Exact matches from the Propagation Memory or Team Server (if applicable)
Fuzzy matches from the TextBase(s)
Fuzzy matches from the Propagation Memory or Team Server (if applicable)
Sub-segment matches from the TextBase(s)
Translation proposal from the machine translation engine (if applicable)
4.6. The Translation Agent Interface
The main Translation Agent screen consists of 4 distinct panes:
•
•
•
•
The TextBase pane displays any matches that are found in the TextBase for the active segment.
The TermBase pane displays any matches that are found in the TermBase for the active segment.
The Segment pane contains the segment being translated.
The Translation pane contains the proposed translation which comes from the TextBase in the
case of an exact or fuzzy match.
22
MultiTrans 4.4 Translator Training Guide
Lesson 4 - Using the MultiTrans Add-In Module
The Translation Agent Button Bar
The Translation Agent button bar contains all the tools you need to interactively translate your
document.
Replace: replaces the active source segment with the translation that was either proposed, or that was
typed into the Translation pane.
Replace All: replaces the active source segment as well as any other identical source segments found in
the document with the translation that was either proposed, or that was typed into the Translation
pane as they are found in the document (i.e. not all at once).
Skip: skips the active source segment, leaving it untranslated, and moves on to the next segment.
Back: allows you to go back to the previous segment.
Extend: adds the next segment in your document to the active segment, enabling you to translate two
segments in the source language by one segment in the target language. It is not possible to extend past
a paragraph mark.
Shrink: removes the last segment added to the active segment (i.e. by using the Extend button). It is not
possible to shrink any smaller than one segment.
Options: opens the MultiTrans Options dialogue box where you can modify the Translation Agent
options. Any changes that are made will take effect at the next paragraph.
Context: displays an additional pane called the Context pane. If a match is found in the TextBase, the
Context pane will show the source segment and its corresponding translation in their respective
contexts. The segments will be highlighted in yellow, as in the TextBase. The Context pane also contains
an input area for adding a new term to your TermBase. Highlighting a term in the Context pane will
display that term in the text box below the respective context. Once a term and its translation appear in
23
MultiTrans 4.4 Translator Training Guide
Lesson 4 - Using the MultiTrans Add-In Module
the text boxes, you will be able to click the plus button
to add the term and translation to the
TermBase. You can also type into the text boxes if you wish to modify a term or enter a new term to add
to the TermBase. The sentences where terms are found and file paths to the documents that contain
them will be added to the term record as the context and source of said terms.
Add Term: enables you to select a term from the Segment pane and its corresponding translation from
the Translation pane and add these to the TermBase together with the sentences where they are found
as their context and the file path to the document you are translating as their source. The first time you
use this option in a document, a message will prompt asking you to select and output TermBase. Click
Yes and select the TermBase into which you want to send your terms in the highlighted drop-down
menu from the Options TermBase tab.
Once a translation has been proposed or typed into the Translation pane, you can apply basic formatting
attributes by highlighting the section to which you wish to add formatting and choosing from the five
available attributes: bold, italics, underline, superscript and subscript. There is also a Save button which
will enable to you to save the document you are working on in its editing environment.
4.7. Translation Agent Color Coding
Depending on the type of match (sub-segment, fuzzy, exact) and the origin of the proposed translation
(TextBase or TermBase), the translation proposed in the Translation pane will display in different text
colors. In the case of a fuzzy match, the active segment in the Segment pane will contain colors
indicating where changes needs to be made to the translation proposed in the Translation pane. Here’s
a brief description of the meaning of the colors you will see in the Translation Agent and what to do with
them:
24
MultiTrans 4.4 Translator Training Guide
Section
Color
Black
Blue
underlined
Maroon
underlined
Purple
Teal
Grey
(entire
sentence)
Red
Original
Segment
Pane
Green
strikethrough
Olive
Fuchsia
Grey
Yellow
highlight
Underlined
light blue
Lesson 4 - Using the MultiTrans Add-In Module
Description
Indicates words or segments for which no translation is found. It is necessary to
translate anything in black from scratch.
Indicates a match found in the TermBase. Clicking on this will enter the
translation found in the TermBase into the Translation pane. If you click on a
match in the TermBase pane, the term will go from blue underlined to neon
green, but can be treated in the same way.
Indicates a lemmatized match found in the TermBase. Clicking on this will enter
the translation found in the TermBase into the Translation pane. If you click on a
match in the TermBase pane, the term will go from blue underlined to neon
green, but can be treated in the same way.
Indicates an exact, or 100% match found in the TextBase, whose alignment has
been confirmed by the user.
Indicates an exact, or 100% match found in the TextBase, whose alignment has
been established automatically by MultiTrans.
When the entire sentence appears in grey and a match is proposed, this colour
indicates MultiTrans could not find sufficient indications to create an alignment.
In the case of a fuzzy match, indicates that an element that exists in the
document you are translating is not found in the TextBase. It indicates that
something needs to be added or modified in the proposed translation to make it
equivalent to the active source segment.
In the case of a fuzzy match, indicates that an element that exists in the
TextBase is not found in the document you are translating. It indicates that
something needs to be removed from or modified in the proposed translation to
make it equivalent to the active source segment.
Indicates an exact match from the Propagation Memory or Team Server.
Indicates that the proposed translation was generated by a machine translation
engine.
In the case where a set of words appears in grey within a sentence, indicates a
sub-segment match, meaning that a part of the active segment has been found
in the TextBase, but a match is not proposed. In the TextBase pane you will see a
match with no percentage. Double-clicking on this match in the TextBase pane
will display the Context pane where the sub-segment will be bolded in the
source text. It is up to you to find the translation in the target text. When you
find it, simply highlight it with your mouse, right-click on the highlighted text and
select Insert. The translation will be inserted in to the Translation pane. From
here, you can translate anything that is left to be translated from scratch.
When the Validate Terminology option is selected in the Options > TermBase
tab, some terms will be highlighted in yellow if the translation for that term
found in the TermBase is not found in the translation proposed from the
TextBase. It is an indication that the translator should verify the terminology
being used in the proposed translation and potentially modify it to reflect the
terminology that has been standardized in the TermBase.
Indicates that the expression displayed in this colour contains a hyperlink.
25
MultiTrans 4.4 Translator Training Guide
Blue
Maroon
Purple
Teal
Translati
on Pane
Grey
Olive
Fuchsia
Green
Underlined
blue
Black
Lesson 4 - Using the MultiTrans Add-In Module
Indicates a match proposed from the TermBase that has been entered into the
translation.
Indicates a lemmatized match proposed from the TermBase that has been
entered into the translation.
Indicates an exact, or 100% match found in the TextBase, whose alignment has
been confirmed by the user.
Indicates an exact, or 100% match found in the TextBase, whose alignment has
been established automatically by MultiTrans.
Indicates a match without an indication that the segments in the TextBase are
aligned.
Indicates an exact or fuzzy match from the Propagation Memory or Team Server.
Indicates that the proposed translation was generated by a machine translation
engine.
Indicates a fuzzy match proposed from the TextBase.
Indicates a hyperlink that has been transferred to the translation.
Indicates a sub-segment translation that was added from the Context pane by
the translator or anything that was manually typed in by the translator.
4.8. Using the Translation Agent
Once you have defined all the settings you wish to use, you are ready to launch the Translation Agent.
To do so:
1. Open the document you wish to translate in your editing environment (Word, PowerPoint,
or Word Perfect).
2. You will see that a MultiTrans menu has appeared on the menu bar. From that menu,
select Connect to… > TextBase and TermBase. If you have not yet opened any TextBases
or TermBases, MultiTrans will launch automatically and prompt you to open a TextBase
and TermBase.
3. Once the connection has been made, return to the MultiTrans menu and select
Translation Agent. The Translation Agent will open and the document you are translating
will rearrange itself and appear the way in which you have specified in the Translation
Agent options. As you navigate through your document using the buttons explained above,
the Translation Agent will pick up segments one by one and display any matches found in
your open TextBases and TermBases.
Remember that you can edit the translation in the Translation pane at any time before moving on to the
next segment.
4.9. Translating Segments with Hyperlinks
MultiTrans allows you to transfer hyperlinks (to URLs, e-mail addresses and files) from the source text to
the target text when translating interactively. The Translation Agent will display the text of any sentence
with a hyperlink and the expression carrying the hyperlink will be highlighted and underlined in italicized
light blue. If you hover the mouse over the hyperlink you will be able to see the URL to which it points in
the form of a screen tip box.
26
MultiTrans 4.4 Translator Training Guide
When
steps:
1.
2.
3.
Lesson 4 - Using the MultiTrans Add-In Module
you find a hyperlink in a segment, you can transfer it to the target translation following these
With the cursor, highlight the target expression that will carry the hyperlink.
Right click on the selected expression.
Click on Hyperlink. The menu will expand to show all the available hyperlinks for this sentence.
Select the adequate hyperlink for this expression.
4. The expression will show in underlined blue.
Hyperlinks are transferred pointing to exactly the same URL as the ones found in the source text.
MultiTrans does not allow you to edit the content of the hyperlink. If necessary, this will have to be done
at a revision stage directly in the editing software of choice (MS Word, MS PPT, Corel WordPerfect).
Note:
• Hyperlinks in footnotes will be removed from the text when the footnote is transferred to the target
translation.
• When pre-translating a document, the Translation Agent will not ask you to transfer hyperlinks. If an exact
or fuzzy match is found, the segment will be replaced with the match and no hyperlink will be inserted.
27
MultiTrans 4.4 Translator Training Guide
Lesson 4 - Using the MultiTrans Add-In Module
4.10. Translating Segments with Footnotes or Endnotes
The Translation Agent will always request the user to transfer a footnote or endnote before replacing a
segment with a footnote or endnote regardless of whether the user is translating interactively or pretranslating. The reason for this is that replacing a segment for which there is a note with another one
without the note entails deleting the note in question.
When working interactively, if you try to replace a segment with a footnote or endnote without having
transferred it to the translation box, you will receive the following message:
Click No and proceed to transfer the footnote or endnote. When pre-translating, the Translation Agent
will switch to interactive mode only for that segment.
You will recognize segments with footnotes thanks to the hyperlinked and superscript number (e.g. 1)
representing the footnote. Also, if the segment has an exact match in the TextBase the translation will
display in purple but the original segment will be coloured in green.
To transfer a footnote or endnote from the original segment box to the translation box:
1. Hover the cursor over the superscript number.
2. A yellow box will appear displaying the text of the foot or endnote so that you can decide where
to replace the note.
3. Click once on the superscript number.
4. Now put the cursor in the translation box. You will see the forbidden circle cursor (indicating
that you cannot place the note in the original segment) turn into a white page (indicating that
you can place the note in that area) once you cross over the translation box.
5. Place the cursor where you want to insert the footnote or endnote and click once.
If you want to change the placement of the footnote or endnote, redo steps 3 to 5.
To translate the content of the footnote or endnote, you will have to finish translating the paragraph
where the note is located and only at the end of the paragraph will the Translation Agent open the
footnote or endnote, which will be treated as any other segment. Once you have translated it and
replaced it, the Translation Agent will return to the main text, where it left off. You will only move on
directly to the footnote or endnote when the latter is found in the last sentence of a paragraph or in a
one-line paragraph.
Note: If the footnote or endnote you are replacing contains a URL, the URL will not be transferred. You will need to
recreate the hyperlink.
28
MultiTrans 4.4 Translator Training Guide
Lesson 4 - Using the MultiTrans Add-In Module
4.11. Using the Propagation Memory and Team Server
When using the Translation Agent, you have the option to activate either the Propagation Memory or
the Team Server. Both of these functions allow you to save each segment you translate together with its
translation in a location separate from the TextBase or TermBase for immediate re-use. The difference is
simply that the Propagation Memory is local, meaning that it is only available on one workstation, and
the Team Server works off of a server, meaning that it allows many workstations to access it at once.
This means that each translator can see, in real-time, what another translator has just translated, and is
able to re-use that segment immediately.
To activate the Local Propagation Memory:
1.
2.
3.
4.
Go to the File menu and select Preferences > Propagation Memory.
Select Use Local Propagation Memory.
Click Test Connection to ensure that the connection has been established.
Click OK.
To activate the Team Server:
1. Go to the File menu and select Preferences > Propagation Memory.
2. Select Use Team Server.
3. A Team Server Connection box will appear below. Enter the name of the server, the port number
and the protocol.
4. Click Test Connection to ensure that the connection has been established.
5. Click OK.
Note: You will know whether the Propagation Memory or Team Server is enabled because the name of the
TextBase pane will change from Document Matches to Document Matches / Propagation Memory when the
function is on.
To manage a Local Propagation Memory or Team Server Memory:
Making Changes
Segment pairs sent to the Propagation Memory can be edited and reviewed from within the
Propagation Memory Manager. This can be useful if you have done corrections to a text that will be
repeating in the short term and would not be immediately sent to the TextBase.
1. Go to the Process menu and select Manage Propagation Memory.
2. Select the document you wish to view, and click the View button.
3. To make changes to the translation, select the segment you wish to modify, and click the Modify
Translation button. When you are done modifying the translation, simply hit enter on the
keyboard.
4. To close the viewing window, click the Close button.
29
MultiTrans 4.4 Translator Training Guide
Lesson 4 - Using the MultiTrans Add-In Module
Archiving a File
Once texts have been fed to the TextBase, there is no need to keep them in the Propagation Memory.
Keeping old texts in the Propagation Memory will only create redundancy in our results and increase the
chances of retrieving an unrevised version when the TextBase contains a final one.
1. To send the document to the archives after you’ve added the document and the revised
translation to the TextBase, click the Archive button.
2. Select a classification category and click Select. Alternatively, you can also create a new category
by clicking on Create, entering a new category name and clicking OK. This will permanently send
file’s propagation memory to the Archive. You will be able to view it again, but not to restore it.
3. To open an archived propagation memory. In the main Propagation Memory Manager window
click on View Archive, select the text you want to open and click View. To close the viewing
window, click the Close button.
Exporting to TMX
You can select one or more Propagation Memory files and export them to TMX. Once they are in this
format, you can share them with anybody using a translation memory system, as this is a standard
format that can be imported to all translation memories, including MultiTrans.
1. To export one or more files to TMX, select them from the Propagation Memory main window
and click on Export to TMX.
2. MultiTrans will export the different documents one by one and will propose to name them after
their original documents’ names. You can modify the name and the location where the file will
be exported to from the Output file name field, in the Output File tab.
3. In the General Tab, enter a language code of your choice for each language. For example, you
can enter EN for English and FR for French.
4. Click Save.
5. MultiTrans will proceed to export the next file if you have selected several files at once. Repeat
steps 2 to 4 for each file.
Warning! Remember that Propagation Memory Files only contain segment pairs in the order that the text was
translated, which can differ from the order in which they appear in the text. Moreover, although segment
pairs are grouped under a text’s name in the Propagation Memory, they do not constitute texts and each
segment is devoid of its context.
4.12. Using Placeables
Placeables allow you to automate those predictable changes you may need to do in a text that you can
foresee will result in either more fuzzy matches or fuzzy matches of a lower percentage. For example,
whenever we translate a maintenance contract for a new client or the prospectus of a new painkiller
drug, we can predict that there will be a certain number of sentences that will be fuzzy matches where
we will simply need to replace the name of the old client or drug with the new one. With MultiTrans
placeables you will be able to establish that whenever MultiTrans finds a segment with the name of
Client1, it should replace it with the name of Client2 and not take into account the difference between
the placeables to calculate the match percentage of that segment.
These automatic placeable replacements can be done by transferring the source language term, when it
does not translate or the placeable replacement can be carried out with the source term equivalent.
30
MultiTrans 4.4 Translator Training Guide
Lesson 4 - Using the MultiTrans Add-In Module
To set up your placeables:
1. Open the local Placeables TermBase. If you do not see it directly in your Local TermBases tab of
the TermBase Manager, click on the Search button.
2. Create a term record for the term you want to establish as a placeable (i.e. Client2).
3. Create a term record for the term you want to have replaced from your old translations (i.e.
Client1).
4. If the terms have equivalents in the target language, add the respective translations to these
records.
5. Save your changes to the Placeables TermBase.
6. Open the TextBase(s) and TermBase(s) you need to carry out your translation.
7. Proceed to translate your document with the Translation Agent as usual. You will notice that
when you reach those sentences that you would have expected to be fuzzy matches where you
only would need to replace a word, now you obtain exact matches with the placeable you have
established in the Placeables TermBase.
31
MultiTrans 4.4 Translator Training Guide
Lesson 4 - Using the MultiTrans Add-In Module
Note:
• You can have multiple sets of placeables that apply to a translation project. All you need to do is to create
the respective term records in the Placeables TermBase. MultiTrans will be able to identify what two
placeable terms constitute a pair because it will have the placeable that needs to be preserved in the
source document and the placeable term that needs to be substituted in the TextBase match.
• MultiTrans will not be able to treat segments containing multiple or multi-word placeables.
4.13. Using WordAlign™
You can access WordAlign™ in the Translation Agent in two different ways. On the one hand, whenever
you find a sub-segment match you can right click on the match from the Document Matches box and
select WordAlignment Search… This will bring up a window with WordAlign™ statistics for this
expression. If there is a translation you would like to add to your text, double click on it and it will be
inserted in the translation pane where your cursor last was.
On the other hand, you can use WordAlign™ to check the possible translations of words or expressions
found in the Context. To do so, highlight the expression you want to check with WordAlign™ in the
Context, right click on the expression and choose Word align search…
32
MultiTrans 4.4 Translator Training Guide
Lesson 4 - Using the MultiTrans Add-In Module
4.14. Other MultiTrans Add-in Functions
4.14.1. Using the Term Search Function
Term Search is an option available from the MultiTrans menu of your editing application, that allows
you to search for an equivalent expression in your TermBases and TextBases, as well as consulting the
online Termium Plus®, TermDat Eurodicautom® or IATE® glossaries if you are a registered online user of
these glossaries.
To use Term Search, you may either connect to TextBase and TermBase or TermBase Only. If you
connect to TermBase Only, Term Search will only search in your open TermBase files. To use the Term
Search:
1. Once connected, highlight the word or segment you wish to search for.
2. From the MultiTrans menu, select Term Search.
33
MultiTrans 4.4 Translator Training Guide
Lesson 4 - Using the MultiTrans Add-In Module
Add to TermBase
•
•
•
•
Source: The expression you are searching for will appear in this field.
Target: You may either select a translation from the list of possible equivalents which appear in
the From TermBase(s) tab at the bottom of the dialog box, or you can enter a new translation to
be added to a TermBase.
Add to: From the drop-down list, select the TermBase where you wish to add your new
translation.
Edit term fields: Check this box if you wish to edit the term fields within the TermBase module.
Options
•
•
Replace All: Check this box if you wish Term Search to replace every occurrence of the
expression in your current document.
Look in TextBase Search: Check this box if you wish Term Search to also search in your opened
TextBases. This will display a second tab at the bottom of the dialog box named From TextBases
which is similar to the From TermBase(s) tab.
Tabs
•
•
•
•
•
From TermBase(s): Any equivalent found in the active TermBases will be listed in this tab. To
select it, simply click on the corresponding entry. This will display the translation in the Target
field of the Add to TermBase section.
From TextBases: Any equivalent found in the active TextBases will be listed in this tab. To view
an equivalent in the MultiTrans TextBase Search screen, click on the corresponding entry. This
will display the MultiTrans TextBase Search screen with the equivalent in bold blue characters
and its segment highlighted, as well as the corresponding aligned segment in the target
language.
Termium Plus: If you are a registered TERMIUM Plus® on-line user, you can view any equivalent
that Term Search finds, and then click on the desired entry to add it to your translation.
TermDat Eurodicautom: If you are a registered TermDat Eurodicautom® on-line user, you may
view any equivalent that Term Search finds, and then click on the desired entry to add it to your
translation.
IATE: If you are a registered IATE® on-line user, you can view any equivalent that Term Search
finds, and then click on the desired entry to add it to your translation
4.14.2. Reset Document Colors
If you have selected the Color Replacements option in the Options >General tab, MultiTrans will replace
the segments in your document using the color-coding explained above. This helps you identify which
portions of text have been translated, where the matches came from, and what remains to be
translated. In the MultiTrans menu in your editing environment, selecting Reset Document Colors
allows you to return the text in your document to black.
Note: If you are using PowerPoint as your editing environment, Reset Document Colors will set the colors of the
document back to the default colors of the template that was used to create the source presentation.
34
MultiTrans 4.4 Translator Training Guide
Lesson 4 - Using the MultiTrans Add-In Module
4.14.3. Compute Translated Words
After using any of the MultiTrans Add-in functions, you can calculate how many words have been
translated and how many words remain to be translated. From the MultiTrans menu, select Compute
Translated Words. This will display a window stating the total number of words in your file, the total
number of words already translated, and the total number of words still remaining to be translated.
After consulting the statistical information in the Compute Translated Words window, click OK to close
the window. This option depends on the replacement colors (mentioned above) to function. This
function needs to be run before resetting document colors.
4.15. Setting MultiTrans Add-in Options
Before working with any of the Add-In Agents, it is important to understand the options available to you.
From the MultiTrans menu in your editing environment, select Options….
4.15.1. General Tab
This tab appears by default when you open the MultiTrans Options. It allows you to select the general
options.
Languages: Select the source and target languages. The Source language is the language of the
document you are translating, and the Target language is the language you are translating into.
35
MultiTrans 4.4 Translator Training Guide
Lesson 4 - Using the MultiTrans Add-In Module
Start from cursor: If this is selected, the Translation Agent, TermBase Agent and TextBase Agent
will start processing your document from where the cursor is located. Otherwise, they will start
at the beginning of the document.
Skip segments with no matches: If this option is selected, the Translation Agent will skip any
segment for which no match has been found in any of the open TextBases or TermBases, leaving
it in the source language. If you wish to see each segment, with or without a match, in sequence,
it is best not to select this option.
Duplicate source if no result found: If this option is selected, when no exact or fuzzy matches
are found, the Translation Agent will copy the text of the source segment into the translation
pane.
Process all open documents: If this option is selected, any process selected from the MultiTrans
menu will be performed on all open documents.
Auto-detect language: If this option is selected, MultiTrans will automatically detect the source
language of the document to be translated. This option is only valid for English and French.
Match full paragraphs: If this option is selected, MultiTrans will search for larger segment
matches, i.e. the repetition of multiple consecutive segments, up to the paragraph level. If this
option is not selected, the Translation Agent will search and display the results found segment
by segment.
Place Translation RTF in MS Word: To ensure compatibility with other CAT tools, as well as to
facilitate revision, the Translation Agent can generate “unclean files”. In the translation RTF file
format, the source and the target language texts are both in the same Word document,
enclosed in special tags.
Show this dialog before each process: Select this option if you would like to see these Add-In
options before each process selected from the MultiTrans menu.
Color Replacements: Select this option if you wish to have the translation replaced in your
document using the identification colors used in the Translation Agent. You will have the option
to set the colors back to black at a later stage.
Automatic Number Translation: If this option is selected, numeric expressions will be
automatically translated according to the target locale settings, i.e. replacing periods by commas
or relocating currency symbols. The source and target numeric formats can be specified in the
Languages tab of the Preferences. The sub-options related to Automatic Number Translation
allow you to choose whether you want to apply these functions to matches from the TextBase
and/or the Propagation Memory.
36
MultiTrans 4.4 Translator Training Guide
Lesson 4 - Using the MultiTrans Add-In Module
4.15.2. TermBase Tab
This tab allows you to set options concerning TermBases.
Input TermBases: This will display all open TermBases from which terminology will be identified.
Select those you wish to use.
Output TermBase: If terminology is added from the Translation Agent, it will be added to the
TermBase selected here.
Create TermBase record for each segment replacement: If selected, a TermBase record will be
created each time a segment is replaced using the Translation Agent.
Select tags to be used for translation: Select which TermBase records should be shown to the
translator when using the Translation Agent. By default, Accepted, Temporary and Preferred are
selected.
Match terms with at least # words: Only expressions longer than # words will be identified from
the TermBase.
TermBase Agent only identifies: The TermBase Agent will only highlight identified terminology,
instead of replacing it.
37
MultiTrans 4.4 Translator Training Guide
Lesson 4 - Using the MultiTrans Add-In Module
Case-sensitive TermBase matching: Only terminology in the document to be translated, with
identical capitalization as in the TermBase, will be identified.
Preserve TermBase capitalization: Capitalization of terminology will be preserved. When adding a
translation from the TermBase, it will be added exactly as it is in the TermBase.
Validate Terminology: Select this option if you wish to ensure that, when using the Translation
Agent, the terminology in the translations proposed from the TextBase is the same as the
translations found in the TermBase. If the translation for a term found in the TermBase is not
found in the translation proposed from the TextBase, the term will be highlighted in yellow as an
indication that the translator should verify the terminology being used in the proposed translation.
Note: If you are using a sever TermBase, this menu will display an extra option entitled Enable stemmed
searching. If this option is selected, the Translation Agent will stem the terms found in the TermBase and
find matches whenever a related form of a term appears in the text. For example, if there is a record for
cardio-respiratory disease and in the text the expression appears in its plural form, the term record would
still be found as a match.
4.15.3. TextBase Tab
This tab allows you to set options concerning TextBases.
Select TextBase: This will display all open TextBases from which matches will be identified.
Select those you wish to use.
38
MultiTrans 4.4 Translator Training Guide
Lesson 4 - Using the MultiTrans Add-In Module
Match expressions with at least # words: MultiTrans will only look for matches from the
TextBase for expressions with a minimum of # words.
Match expressions with at least # non-excluded words: MultiTrans will only look for matches
from the TextBase for expressions with a minimum of # words, not including articles,
prepositions, etc.
Maximum matches to search: The Translation Agent will stop searching the TextBases once it
finds this number of matches. We recommend 2-5 matches.
Match sub-segments: Select this option if you wish for MultiTrans to find previously translated
sub-segments, in addition to exact and fuzzy matches.
Automatically create TextBase alignment when segments are realigned: Select this option if
you wish for MultiTrans to automatically realign source and target documents while you are
translating.
Confirm alignment when a segment is replaced: If this option is selected, when the translator
clicks Replace in the Translation Agent without making any modification, the alignment for that
segment is automatically confirmed as if the translator had done so manually in the TextBase.
Preserve TextBase capitalization: Capitalization of terminology will be preserved. When adding
a match from the TextBase, it will be added exactly as it is in the TextBase.
Use exclude list: Select this option if you wish for the TextBase Agent to ignore common words
such as articles and prepositions when searching for TextBase matches.
Enable stemmed searching: Select this option if you would like MultiTrans to search for all
forms of a word. Note that this option will slow down the Translation Agent.
Search most recent documents first: Select this option if you wish to search through the most
recently appended documents first.
Strict Punctuation Matching: Select this option if you would like the Translation Agent to only
find exact matches if not only all text, but all punctuation is identical between the text to be
translated and the text from the TextBase.
39
MultiTrans 4.4 Translator Training Guide
Lesson 4 - Using the MultiTrans Add-In Module
4.15.4. Auto-Process Tab
This tab allows you to determine whether you wish to translate interactively or automatically.
TermBase Options
Interactive: If this option is selected, you will be prompted every time a terminology match is
found.
Auto-Identify: If this option is selected, terminology matches will be identified but not replaced.
Auto-Replace: If this option is selected, terminology matches will be replaced automatically, and
will allow you to choose from the following conditions:
Interactive if multiple translations: With this option selected, if there is more than one
translation found in the TermBase, you will be prompted to select which translation is
appropriate.
Select preferred translation: With this option selected, translations with the Status set to
Preferred will automatically be selected.
Sub-segment matches: Select this option to automatically replace sub-segments with
terminology from the TermBase.
40
MultiTrans 4.4 Translator Training Guide
Lesson 4 - Using the MultiTrans Add-In Module
TextBase Options
Interactive: If this option is selected, you will be prompted every time an exact or fuzzy TextBase
match is found.
Auto-Identify: If this option is selected, TextBase matches will be highlighted, but not replaced.
Auto-Replace: If this option is selected, terminology matches will be replaced automatically, and
will allow you to choose from the following conditions:
Interactive if multiple matches: With this option selected, if there is more than one match
found in the TextBase, you will be prompted to select which one is most suitable.
Replace fuzzy matches: With this option selected, MultiTrans will automatically replace full
segments that are similar to what is found in the TextBase. You will need to determine what
is considered similar, or “fuzzy”.
Confirmed alignments only: With this option selected, segments without manually
confirmed alignments will not be replaced automatically.
Identify unconfirmed alignments: With this option selected, if an exact match is found
from a segment without a manually confirmed alignment the segment will be
highlighted in the text.
Skip unconfirmed alignments: With this option selected, if an exact match is found from
a segment without a manually confirmed alignment the segment will be left
untranslated.
Interactive if unconfirmed alignments: With this option selected, if an exact match is
found from a segment without a manually confirmed alignment, the Translation Agent
will switch to interactive mode for the translator to review the found match.
Note: A fuzzy match will be treated as an exact match if the only differences between the two segments are
numeric. In this case, the corresponding numbers will be updated automatically.
Machine Translation Engine
Auto-Replace from Machine Translation Engine: This option will only be available if you are
integrated with a machine translation engine. In that case, if this option is selected, when no
exact, fuzzy or sub-segment matches are found, the Translation Agent will automatically replace
the source segment by the translation proposed by the machine translation engine.
41
MultiTrans 4.4 Translator Training Guide
Lesson 4 - Using the MultiTrans Add-In Module
4.15.5. Fuzzy Matching Tab
Fuzzy matching means that you can have MultiTrans match segments in your documents with similar
segments contained in your TextBase.
Fuzzy factor: The percentage selected here will determine how similar a segment must be to be
considered a fuzzy match. If, for example, the fuzzy factor is set to 75% and a segment has 10
words, 8 of those words need to be the identical and in the same order for a match to be
proposed. If only 7 words are identical and in the same order, the match will not be proposed to
you.
Penalize unconfirmed alignments: If this option is selected, users will be able to prioritize
confirmed alignments by subtracting percentage points from the matching percentage. In the
Penalty bar you can set the exact value at which your unconfirmed exact segments will be rated.
42
MultiTrans 4.4 Translator Training Guide
Lesson 4 - Using the MultiTrans Add-In Module
4.15.6. Windows Layout Tab
This tab allows you to change the layout of the Translation Agent window according to your
preferences. The right-hand pane displays a preview of the layout.
Main Window Position: This is the location of the Translation Agent window. You can choose
between having the Translation Agent displayed at the top of your screen at the bottom or your
screen, or you can choose a custom display. This is a good idea if you normally work with 2 screens
and would like the Translation Agent to always appear on the second screen. Set the position to
Custom, click ok, and then drag the Translation Agent to the second screen.
Matches and Segments: You can decide whether you want to see the TextBase and TermBase
panes (matches) on top and the Segment and Translation panes (segments) on the bottom or vice
versa.
Matches Layout: This allows you to determine whether you want to see the TextBase Matches on
the left and the TermBase Matches on the right or vice versa.
Segments Layout: This allows you to determine if the source segment should be displayed on top
of the translation, vice versa or if they should be displayed side by side.
43
MultiTrans 4.4 Translator Training Guide
Lesson 4 - Using the MultiTrans Add-In Module
4.15.7. Display Tab
This tab allows you to change the font type and size as well as the background color of the
Translation Agent.
Font: Allows you to change the font is used to display content in the Translation Agent. This will not
modify the font in your document.
Background: Allows you to change the background color of the Translation Agent screen.
Fuzzy deletions: Allows you to change the font colour used to display text that has been removed in
fuzzy matches (i.e. matches that resemble text translated before but that are not exactly identical).
Fuzzy insertions: Allows you to change the font colour used to display new text in fuzzy matches (i.e.
matches that resemble text translated before but that are not exactly identical).
44
MultiTrans 4.4 Translator Training Guide
Lesson 5 – User Preferences
Lesson 5 - User Preferences
You can customize the way MultiTrans displays information by modifying your preferences. To access
your preferences:
1. Go to the File menu and select Preferences….
2. Go to the tab you wish to modify.
3. Once completed click OK.
5.1. Logon tab
Show logon dialog at startup: Check this box if you wish to have the program display the Set Current
User dialog box every time you start MultiTrans.
Automatically logon at startup: Check this box if you wish to logon under the same name every time
you start MultiTrans. In this case, you should enter the user Name in the field below this check box.
45
MultiTrans 4.4 Translator Training Guide
Lesson 5 – User Preferences
5.2. Languages Tab
Select Locale
Click this button if you wish to select the culture set to be used with the
Automatic Number Translation option (MultiTrans Options).
Modify
Click this button if you wish to add/delete values in the Language list. In the
dialog box that opens (Add/Remove Language(s)), check the boxes next to the
languages you wish to add to the list. Uncheck any language you do not wish to
see in your list.
You can also add any language not included in the list by clicking the Add userdefined language radio button, and filling in the Language Name and Language
Code fields appropriately.
User-defined languages can be useful if you wish to distinguish between
regional differences in a same language; for instance, American English (US) and
British English (UK). You can even use this option if you wish to add codes to the
TermBase.
For example, to enter a line of products in French and English, you could create
another language called Product, which you would then use to enter the
product code. You could also create a language called Codes if you need to use
special codes when translating (such as the Standardized Industrial Classification
- SIC - codes).
46
MultiTrans 4.4 Translator Training Guide
Lesson 5 – User Preferences
Any user-defined languages created through your Preferences will only be
available on your own workstation. If you access your TextBases and TermBases
through a server and wish to use user-defined languages, these must be defined
through the Administration Console.
Language 1
Language 2
Set your default languages by selecting the appropriate value for each field. In
general, Language 1 refers to the source language, and Language 2 refers to
the target language. When opening a TextBase containing these languages,
Language 1 will always be proposed as the source language and Language 2
will always be proposed as the target language.
To change the order in which languages are displayed in your TermBase, you may use the arrows under
the selected languages to rearrange the languages. Language 1 will be your source language,
translations in Language 2 will be displayed next, and translations in any other language will be
displayed in the order the languages are listed in this tab.
5.3. TermBase Tab
Default Status: Select the Default Status to assign to any new terms added to a TermBase. Choices are:
Accepted, Refused, Temporary, Preferred and Misspelled.
Check Term Duplicates: Check this box if you wish to identify duplicate terms that are added to the
TermBase. Checking this box activates the Duplicates Manager which will appear if you enter a term
47
MultiTrans 4.4 Translator Training Guide
Lesson 5 – User Preferences
that already exists in the TermBase. If this box is not checked, you will not be warned before manually
entering a term that already exists in the TermBase.
Term Prioritization: Check this box if you wish to set the priority in which terms are displayed within a
single record in the TermBase. If you select this box, regardless of which term you select in the term list,
the terms in the record will always be displayed in the same order.
Insert source and context fields automatically with Insert in TermBase: Check this box if you wish
MultiTrans to automatically add the source and context of the selected term and translation when
sending a pair of expressions to the TermBase (Insert in TermBase option in TextBase Search or Add
Term option in the Translation Agent). Leave the box unchecked if you wish MultiTrans to only send the
source and target terms to the TermBase, without any context.
5.4. TextBase Tab
Color code segments: If you check this box, the segments of the source and target documents which are
displayed in TextBase Search will be color coded for easier viewing. If left unchecked, all text will be
displayed in a black font.
There is no correspondence between the colors in the source document and the colors in the target
document (segments of the same color are not necessarily aligned with each other). The colors simply
alternate for ease of viewing.
48
MultiTrans 4.4 Translator Training Guide
Lesson 5 – User Preferences
Stop searching after # matches: Specify the maximum number of search results displayed in TextBase
Search.
Show source and target documents side by side: Check this box if you prefer to have source and target
documents displayed side by side, instead of top and bottom in the TextBase Search window. If the
TextBase Search is already open, you will need to close and re-open it before documents are displayed
side by side.
Abbreviations (Builder section): Click the Abbreviations button if you wish to edit one of your
abbreviation files. Abbreviation files are used for alignment purposes when you are using TextBase
Builder. This file tells the Builder which abbreviations containing a period (.) should not be used for
segmentation when aligning documents.
Conversion Time Out: The amount of time, in milliseconds, before MultiTrans stops trying to add a
document to a TextBase. If you are routinely getting conversion errors when adding your largest
documents to your TextBases, raising the conversion time out may be beneficial. This allows the
TextBase builder to continue processing documents even if an unusable document is added.
Use WordPerfect for .wpd file conversion: When adding WordPerfect documents to your TextBases,
either Microsoft Word or Corel WordPerfect can be used to remove the formatting from the source
documents. WordPerfect normally treats WordPerfect documents better than Word, however in some
cases, WordPerfect may not be available on the workstation used to create TextBases.
Load Full Context: Check this box if you wish for MultiTrans to display the entire context of a document
in the Source and Target panes in the TextBase Search window. If this box is not selected, MultiTrans will
only display the relevant portion of the document. Note that if this box is selected, the search
performance may be slower, particularly for Unicode languages.
49
MultiTrans 4.4 Translator Training Guide
Lesson 5 – User Preferences
5.5. MultiTrans Add-In Tab
From TermBase
From TextBases
Select the colors to be used by the MultiTrans Add-In module to mark
terminology identified or replaced from your TermBase(s) in your document.
• Replaced expressions (exact): Terms replaced by exact terminology
from your TermBase will display in this font color. Default is Blue.
• Replaced expressions (lemmatized): Terms replaced by non-exact
terminology from your TermBase will display in this font color.
Default is Black.
• Identified expressions: Terms identified (but not replaced) from your
TermBase will display in this font color. Default is Lime.
Select the color to be used by the MultiTrans Add-In module to mark
segments in your document which have been replaced by translations from
your TextBases.
• Replacements with confirmed alignment: Segments that were
replaced by exact matches with confirmed alignments from your
TextBases will display in this color. Default is Purple.
• Replacements with alignment: Segments that were replaced by exact
matches from your TextBases will display in this color. Default is
Teal.
• Replacements without alignment: Segments that were replaced by
exact matches that do not have alignments in the alignment sub-tab
of the TextBases tab from your TextBases will display in this color.
50
MultiTrans 4.4 Translator Training Guide
•
Identified
expressions
•
•
From Propagation
Memory
•
From Machine
Translation
Engine
•
Lesson 5 – User Preferences
Default is Grey.
Fuzzy replacements: Segments that were replaced by similar but not
exact matches from your TextBases or Propagation Memory will
display in this color. Default is Green.
Segments or expressions that are identified by the MultiTrans Add-In
module as being available in your TextBases, but not replaced, will
be highlighted in these colors. Defaults are Yellow and Red.
If Use alternate color is selected, the highlight color will change if
identified words are not consecutive. This tells you that consecutive
words highlighted with the same color in the document can be
found consecutively in the reference material.
Select the color to be used by the MultiTrans Add-In module to mark
segments in your document which have been replaced by exact
matches from your Propagation Memory or Team Server. Default is
Olive.
Select the color to be used by the MultiTrans Add-In module to mark
segments in your document which have been replaced by
translations from a Machine Translation Engine. Default is Fuchsia.
5.6. Term Search tab
51
MultiTrans 4.4 Translator Training Guide
Lesson 5 – User Preferences
In order to have access to the Termium Plus®, IATE® or TermDat Eurodicautom online glossaries
when using the Term Search or the Translation Agent, you must select the relevant check box.
5.7. Machine Translation
Machine Translation Engines Setup
Enable Machine Translation
Check this box if you wish to integrate a machine translation
Engines
engine into the MultiTrans Search.
Note: an online subscription to one of the machine translation engines
supported is required.
Always get results from
machine translation engines
Check this box if you wish MultiTrans to always retrieve results
from the selected machine translation engine(s), whether full
and/or fuzzy matches from TextBases and/or Propagation
Memory are found or not.
If the box is unchecked, then results will ONLY be retrieved from
the selected machine translation engine(s) if NO full and/or fuzzy
matches from TextBases and/or Propagation Memory are found.
List of available Machine
Translation Systems
Select the desired machine translation system(s) by checking the
appropriate box or boxes. Current choices are:
PROMT 7 Translation Server
PROMT 8 Translation Server
SYSTRAN
Click Setup to configure each machine translation engine. This will
display the appropriate Translation Server Add-on Setup dialog
box. For example:
52
MultiTrans 4.4 Translator Training Guide
Lesson 5 – User Preferences
5.8. File Locations Tab
File Types
Note: It is recommended that these values remain unchanged unless a MultiCorpora representative has advised
you or your IT department to change them.
•
•
•
•
•
•
•
Projects: The default project tells MultiTrans what files you had open last time, as well as
recording some of your Add-In options.
TermBases: This should point to the local or network drive where you keep your (local)
TermBases.
General: This should point to your local drive. This identifies the default locations for your
abbreviation files, your exclude lists, etc, all of which are part of your installation (done on your
local drive).
Lists: This should point to wherever your local drive, and you must have write and modify access
to this folder.
TextBases: This should point to the local or network drive where you keep your (local)
TextBases.
Library: This should point to your default Library folder inside your MultiTrans installation folder,
as it has to point to certain files that are part of the installation process.
Export: This can point to wherever you like. This is where any text, HTML, etc., exports will be
saved by default.
53
MultiTrans 4.4 Translator Training Guide
•
•
Lesson 5 – User Preferences
Analysis Agent: This can point to wherever you like. This is where any analysis packages will be
saved by default
TermBases Cache and Corpora Cache: If you connect to a TermBase Server or a TextBase Server,
these file locations should point to your local drive as this will speed up your searches.
5.9. Network Tab
Proxy
If MultiTrans must access a server outside your own network, you may need
to pass through a proxy. If this is the case, select the appropriate proxy
information. Please contact your IT department for the necessary details.
Use default is normally acceptable.
Select Configure manually if you must manually enter the proxy information.
Use Internet Explorer automatic configuration script if this is the option you
normally use to access the internet from your web browser.
Exclusive Rights
If you are accessing MultiTrans from a network, check the appropriate boxes
according to your preferences.
Always grant exclusive rights: Check this box if you will be granting a user
exclusive access rights to the MultiTrans files he/she will be opening. In this
case, only users with exclusive rights will be authorized to modify the
TermBase or TextBase. When a file is opened with exclusive rights, all other
users who open it will be granted read-only rights.
54
MultiTrans 4.4 Translator Training Guide
Lesson 5 – User Preferences
Always open in read-only mode: Check this box if you wish to have a user
open MultiTrans files (such as TermBase Records) in read-only mode. In this
case, users will not be allowed to add/delete/modify data to the files they
open. If no option is selected, the program will ask each user his/her rights
preferences on an individual basis, when opening a TermBase or a TextBase.
5.10. Web Direct Access Tab
These options are used in conjunction with the Fetch from Web function (not covered in this guide).
When you pre-treat a document, the values entered in the TermBase Web URL and TextBase Web URL
fields will be added to the custom properties of the document.
Later, when a user uses the Fetch from Web function from this pre-treated document, MultiTrans will
know which URL to access, in order to fetch the appropriate segment.
55
MultiTrans 4.4 Translator Training Guide
Lesson 5 – User Preferences
5.11. MultiTrans Server Tab
Connection
• Port: If your organization does not use the default connection port, you can modify it here.
• Web. Appl.: Indicate in this field address of the MultiTrans server that hosts the web
applications
Server Calls
Ping servers every # minutes: In the event you have a firewall disconnecting you from the TermBase
Server or TextBase Server, you may choose to "ping" (send a message) to the server every few
minutes to keep your connection active.
Enable Server Events: If this box is checked, the event log on the TermBase Server or TextBase Server
will capture more information from the MultiTrans client.
56
MultiTrans 4.4 Translator Training Guide
Lesson 5 – User Preferences
5.12. Propagation Memory tab
Propagation Memory
Disabled: This option disables the Propagation Memory.
Use local propagation memory: This option activates the local Propagation Memory
Use Team Server: This option activates the Team Server.
Test Connection: Click this button to test your connection with either the local Propagation Memory or
the Team Server.
Team Server Connection: this section is enabled when the Team Server is activated. Enter the name of
the server, port number and protocol.
57
MultiTrans 4.4 Translator Training Guide
Lesson 5 – User Preferences
5.13. Tracing
The purpose of the tracing option is to facilitate and improve troubleshooting capabilities if issues arise
during the MultiTrans installation procedure or when using the software or any of its related
components.
After making changes to the Tracing tab settings, you will need to restart MultiTrans in order for the
changes to become effective.
File path
Set the file path to the location of the Multitrans.log file. This file is usually located in the
installation directory of your MultiTrans software. The default location is:
C:\Program Files\MultiCorpora\MultiTrans 4.4\Multitrans.log
Log mode
Two log modes are available: Append (default value) and Rewrite.
Select Append to have all logged messages appended to the end of the log file.
Select Rewrite to overwrite the log file every time MultiTrans is opened.
Select one of five tracing levels available:
Off – Output no messages
Error – Output only error messages
Warning – Output warnings and error messages
Info – Output informational messages, warnings and error messages
Verbose – Output all messages.
Tracing level
5.14. Updates Tab
58
MultiTrans 4.4 Translator Training Guide
Lesson 5 – User Preferences
Update Settings
Enable Auto-Updates: If this box is selected, Auto-Updates will be turned on, and you will be notified
when a MultiTrans update is available.
MultiCorpora Default Update Site: Selecting this option will automatically insert a web address into
the URL textbox pointing to MultiCorpora’s default website for receiving updates. The Enable
Authentication checkbox in the Authentication Settings section will be selected and the username
and password will be automatically filled in. DO NOT modify this username and password.
Custom Update Site: Selecting this option will allow you to add an address to the URL textbox
pointing to a custom internal website which contains the updates you wish to distribute
(recommended for those connecting to TermBase/TextBase servers to keep workstations and servers
in sync).
Authentication Settings
Enable Authentication: Select this checkbox to activate the user name, password and domain fields
below.
User Name: Enter the user name for your Custom Update Site
Password: Enter the password for your Custom Update Site
Domain: Enter the domain for your Custom Update Site
Text Connection: Click this button to test the connection with the Update Site.
59
MultiTrans 4.4 Translator Training Guide
Additional Notes
Additional Notes
60
MultiTrans 4.4 Translator Training Guide
Questions
Questions?
Where to go for help
Throughout MultiTrans there are many places you can go for help when trying to solve a problem. From
the initial screen that displays when you first open MultiTrans, you have access to options such as:
Tutorial, Translating with MultiTrans , General References and the User Manual.
In addition, along the top tool bar, a Help menu allows you to search through help files, or contact our
support team directly through E-mail.
When performing various MultiTrans functions, you will also be presented with Quick Tips that will
guide you along the way and provide you with descriptions of what you are currently looking at, and
what you need to do next.
Contact Information
If you have problems that you cannot resolve, do not hesitate to contact your sales representative or a
member of the MultiCorpora technical support team.
North America
Tel.: +1 819 778-7070
Toll-free: 1 877 725-7070
Fax: +1 819 778-0801
[email protected]
Europe
Tel.: +32 (0) 2 420 96 00
Fax: +32 (0)2 213 0021
[email protected]
61