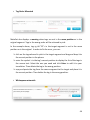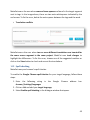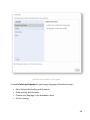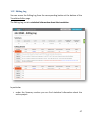
1
MateCat Post-‐editing and outsourcing made easy Working with MateCat User manual and installation guide Introducing MateCat ........................................................................................................................... 4 How MateCat Calculates Payable Words ............................................................................... 4 Volume Analysis Page .................................................................................................................... 5 Supported browser, languages and formats ........................................................................ 6 Translation Process ............................................................................................................................ 8 Start working with MateCat ..................................................................................................... 10 Translation Toolbox ........................................................................................................................ 35 Using TM matches, MT suggestions and Glossary terms ............................................. 35 How to Use Glossary Terms in Your Translated Segment .......................................... 37 Managing Projects with MateCat ............................................................................................... 51 Management Panel ....................................................................................................................... 51 Appendix ............................................................................................................................................... 61 Keyboard Shortcuts ..................................................................................................................... 61 Installing an open source version of MateCat ...................................................................... 64 Overview .......................................................................................................................................... 64 Hardware requirements ............................................................................................................ 64 Getting started with fast setup ................................................................................................ 65 Advanced manual setup on different platforms .............................................................. 66 Configuring the environment from scratch ....................................................................... 68 Configuring components ........................................................................................................... 69 Installing MateCat ......................................................................................................................... 70 Create the virtualhost ................................................................................................................. 71 Install the virtualhost .................................................................................................................. 72 Create and customize MateCat configuration .................................................................. 72 Configure database address ..................................................................................................... 73 Configure memcache location ................................................................................................. 73 Turning on the analysis daemon ............................................................................................ 74 2 Translating other formats than XLIFF (optional) ........................................................... 74 Enabling Google+ login ............................................................................................................... 75 Enable Apache access to the directory ................................................................................ 76 3 Introducing MateCat MateCat is an open source, enterprise-‐level, web-‐based translation software which closely integrates machine translation and human translation. Using MateCat, you obtain between 10% and 20% more matches for your translations thanks to the largest public translation memory in the world and the best machine translation currently in use. How MateCat Calculates Payable Words MateCat counts words by using a combination of advanced TM technology (MyMemory) and application of a reduction in weighting for machine translation suggestions. This allows MateCat to give you more matches than any other translation tool. According to industry standards, words or phrases with a 100% Translation Memory match are given a weighting of 30% and words or phrases with a partial TM match are given a weighting of 60%. Here is an example to calculate weighted words1: No TM match = Lower fuzzy ranges = Higher fuzzy ranges = 100% match = Repetition (same segment repeated in the document) = Context match (more than 100% match, because of same context information in the TM) = 100% 50 and 70% 40% 30% 30% 0% MateCat counts matches according to these standards. 1 This is an example. Each CAT tool counts words differently and each LSP calculates weighted words differently. 4 For Machine Translation, MateCat decides which reduction in weighting to apply on the basis of the extent to which the MT has been useful for the past 1 million words for each language combination. MateCat assumes that the less the machine translation suggestion is edited by translators, the more useful it is. We decided to split the benefits of this technology between the language service provider and the translator. So, if a translator saves 20% of his/her time, the word count is reduced by 10% only. How MateCat counts payable words in a project is indicated in the volume analysis report generated during creation of the project itself. Volume Analysis Page The volume analysis page which opens during the creation of a project in MateCat shows you a global report of the volume to be translated: Standard weighted words: The volume as calculated by industry standard CAT tools. Calculation of the weighted word count takes into consideration repetitions and TM matches. MateCat weighted words: The MateCat word count which not only counts repetitions and TM matches, but also generates reductions in weightings for internal matches and MT suggestions. Raw words: The word count without any reduction in weighting for repetitions or matches. For each language pair, you will find the details of the analysis In case of multiple language pairs, this global report shows you the total project volume. 5 Supported browser, languages and formats All you need to use to start working with MateCat is an up-‐to-‐date version of a supported web browser: • Google Chrome 30, or higher (on Windows, Linux and Mac OS X) • Safari 5.1.7, or higher (on Mac OS X)2 MateCat supports 79 languages, works with many language combinations, and supports 56 file formats. 2 MateCat can be used with Firefox but some of the most advanced features are not available. For the best experience with MateCat, we suggest using the free Google Chrome browser. 6 Here is the list of supported languages and file formats: Supported languages 7 Supported file formats Translation Process The translation process is divided into the following phases: 1. Creating a project: from the MateCat home page (http://www.matecat.com) you can select the source and target language(s) and add the file(s) to translate. Then you can choose one of the following options: o use a machine translation server of your choice. This option allows you to receive machine translation suggestions for each segment from the server you choose. You can disable this option by selecting NONE from the dropdown menu. 8 o associate an existing or new private TM. By associating a private TM, you will be able to store all the translated segments in this private translation memory and add new glossary items if necessary. In this way, you will be able use this private TM for future projects and take advantage of already translated segments. o do without any private TM. In this way, you will receive suggestions and store your translation in a public TM exclusively for MateCat users. You can also disable this option by checking the Disable TM, Concordance and Glossary checkbox. In this way, the translation will not be saved in any TM and you will receive no matches or suggestions during your translation. If you choose to receive suggestions from both the MT and the TM, you can receive from 10 to 20% more matches for all your translations. This can increase your productivity and enable you to work more quickly. 1. Translating: the Translation Editor window shows the translation interface. It has 2 columns: source text in the left column and translated text in the right column. When you open a segment during your translation, MateCat searches for matches from translation memories3 and from machine translations, if enabled. During the translation, MateCat also automatically performs some quality checks on Tag mismatches, Tag order mismatches, Whitespace mismatches and translation conflicts. 2. Finalising a project: A progress bar at the bottom of the Translation Editor window shows the progress of your translation. The translation is finished when the progress bar is at 100% complete, when there are no To-‐do words left and when no errors are reported in the QA module . When the translation is complete and all issues have been fixed, you can click on the Download translation button to download the translated file in the original format. 3 Both your private TM, if any, and the public shared translation memory. 9 Start working with MateCat 1.1 MateCat Home Page and Login There are currently two versions of the MateCat translation tool: • http://demo.matecat.com – Open source version to translate XLIFF files. The user can also install and administer the open source version on his/her own server. For further instructions and details, refer to the installation guide at the following link: http://docs.matecat.com/installation-‐guide • http://www.matecat.com – Proprietary version which includes filters for 56 file formats. This is the version we use as a reference for this user manual. This version of MateCat is free for both personal and business translation jobs. In order to store and recover your projects in MateCat, you should log in by clicking on the login button at the bottom of the MateCat home page. You will be asked to sign in using your Google account. 1.2 Creating Projects In MateCat, translation jobs are organised into projects. A project is made up of one or more translation jobs and each one is associated with a unique job URL. Each project can be created with one source language and one or more target languages. To create a new project in MateCat, visit http:/matecat.com All you need to do is select the language combination and upload the file(s) to translate. This is necessary to create your project. By clicking on More Options, you can add options or change preferential options. 10 If you need to store your project and recover it later, you should firstly log in using the Login button at the bottom of the page. This allows you to add all your projects to your Management Panel, recover all information about projects, such as the volume analysis or job URL, and check the progress of translations. Note: it is not possible to work on MateCat offline. You can only save your translation and receive suggestions from the MT(s) and TM(s) if you work online. 1.3 How To Upload File(s) for Translation Always remember to choose the language combination(s) of your project before uploading the file(s) to translate, otherwise you will be asked to upload the file(s) again and the following message will be displayed: If you need to select more than one target language, please use the Multiple languages? link. A box with the list of all supported languages will be displayed. Check the boxes of all languages you need to translate into, as shown in the screenshot below: 11 In order to upload the file(s) for translation you can: • directly drag and drop them or • browse for them by clicking on the + Add files… button. MateCat automatically checks the source language of your documents to make sure that it matches the one you selected. Otherwise, a warning message is displayed as in the screenshot below 12 It also checks that the private TM key you associated with your project is indeed valid. You can use the dustbin icon to delete a file from the list of files to translate or click on the Clear all button to delete all uploaded files from the list. 1.4 Translation Memory and Machine Translation Clicking on the Options button on the MateCat home page opens a window, as in the screenshot below: 13 Here you can add and/or select additional options to be added to the project you are creating. For example, choose the Machine Translation server, add or create a private TM for your project or disable any suggestions from the TM, MT and glossary. For further details, refer to the Translation Toolbox section. 1.5 Machine Translation Servers With MateCat you can select a number of machine translation servers. In MateCat, the best option is to select MyMemory which uses a combination of Google Translate and Microsoft Translator to provide machine translation suggestions. You can also disable machine translation, by selecting NONE from the dropdown menu. 1.6 Analysis Report During creation of the project, when all files have been uploaded and all information has been correctly set on the MateCat home page, the Analyze button will be displayed. Click on the Analyze button to start the analysis. The analysis page will open. A progress bar shows you the progress on analyses of the files you uploaded for translation. Once the analysis is completed, the volume analysis page displays the Analysis report. It contains information about the number of words (Payable, Total, New, Repeated) for the entire project and for each file/job. Payable words are marked in green and calculated by multiplying the words for each match type by the payable percentage: (1,903*0.3) + (112*0.6) + (144*0.3) + (9,493*0.85) = 8,750 Assume you obtain the following analysis result: 14 In detail, we have the indication of: Payable words Payable word count is the sum of the weighted word count for each match type multiplied by its payable rate percentage. Total words The total word count without leveraging any content from translation memory matches, repetitions or machine translation. This is similar to what Microsoft Word would give as a word count in a .doc or .docx file. New words All words found in segments that: • do not match any fuzzy or complete match in the private TM Key and/or in the public TM; • are not repeated in the project; • do not have a suggestion from a machine translation. Repetition Number of words of identical segments that occurs more than once throughout the project. For example, imagine that we find the following segments in our translation: 15 1. My house is blue 2. My house is blue 3. My house is red Segments 1 and 2 are identical segments, so they are counted as 4 repetitions. Segment 3 is counted as an internal match. Internal Matches Internal matches are similar segments found in the document you are translating. For example, imagine that we find the following segments in our translation: 1. My house is blue 2. My house is red MateCat recognises that segment 2 is similar to segment 1 (3 words out of 4 are identical) so the following would occur during translation: 1. 2. 3. 4. You translate segment 1 The translation memory is updated with this translation You open segment 2 for translation A search is performed in the TM for segment 2 and a 75% fuzzy match is found. MateCat therefore counts four new words for segment 1 but, because a 75% fuzzy match has been found in the TM, the four words in segment 2 are counted as Internal Matches (in terms of weighted words, these are counted as 2.4, or 60% of 4). Partial TM In this case, similarity between the document to be translated and any correspondences found in the translation memory (fuzzy matches) are calculated. For example, imagine that we have following segments in an EN>FR translation: 1. My house is blue 16 2. My house is red and that the TM contains this: Source Target My house is blue Ma maison est bleue For segment 1 (My house is blue), there will be a 100% match in the translation memory. For segment 2 (My house is red), there will be a 75% fuzzy match (segment 2 and the segment found in the translation memory only differ in terms of the colour of the house: blue/red –bleue/rouge, so 1 word out of 4). 100% TM This is a 100% match between a segment in the source language found in the document to translate and an identical sentence found in the source language in the translation memory. 100% TM in context This is more than a 100% match. If you have a 100% context match (the corresponding label is “100% CM”), this means that both of the following 2 conditions exist: • the segment in the document has a 100% match in the translation memory • the segment in the document and the segment in the translation memory must both be preceded by the same segment For example, if you have to translate the following segments in the same order: 1. My house is blue 2. My house is red 17 and you have a 100% match in the translation memory for segment 2, you will actually receive a 100% CM if segment 2 is also preceded by segment 1 in the translation memory. This means that you can be certain that the 100% match is correct according to the context of the document you are translating. Actually this does not mean that, in the list of segments in the translation memory, the segment in the translation memory is indeed preceded by the same segment as the one in the document. What it means is that context information is stored in the translation memory as metadata, so each segment stored in the translation memory contains the following information (not visible in the translation memory contents by the users): • the source segment • the corresponding translation • the segment preceding the segment itself. Click on the Translate button for each language pair to open the Translation Editor window and start translating. If you need to outsource it for translation to someone else, you should just send the job URL to your external resource. The URL is all you need to start translating. 1.7 Public Translation Memory and Translation Memory Key (TM Key) When translating, your translations are saved as bilingual sentences in a so-‐called translation memory (TM), a sort of database containing bilingual segments (sentences, sets of words or single words already translated in one or more language pairs) which can be used during the translation of the same project or future projects. So, when translating, if you find a segment that is identical or similar to another one that has already been translated, the translation memory suggests the wording of the already translated segment so that you can use it, partially or entirely, for translation of the new segment. 18 In MateCat, you can save and store your translations: • in a generic public translation memory which can be accessed via API by all MateCat users. • in a new or already existing private TM assigned to one or more projects or to a specific client that enables you to save your translation in a private translation memory that cannot be accessed by external users. In MateCat, each private TM is identified by a unique alphanumeric value called private TM Key. It is the only value you need in order to associate your TM(s) with your project. It is like a password to access your private TM in the MateCat Translation Memory server. If you save your translations in the private TM, they will be stored in your private translation memory only and you alone have exclusive use of and access to your contributions to that private TM. If you save your translations in the public TM, they can be viewed as suggestions by all MateCat users. It would represent a human contribution to a public TM and would help other MateCat users during their translation jobs in MateCat. 1.8 How to Add or Create a Private Translation Memory If you need to associate a private TM with your project, you can add an existing private TM or create a new one. You can add or create a private TM either during the creation of the project or directly in the Translation Editor window. This way, your translations will be stored in a private TM identified by a key and cannot be ac-‐ cessed by external users, although you will continue to receive suggestions from the public TM and MT. Adding or Creating a Private TM for a New Project To add or create a private TM during the creation of the project, you can choose one of the following options: 19 • Click on the + Create a new Private TM button. In this way, MateCat generates a new private TM Key for this project that can be also used for future projects. This new TM will contain 0 segments and can be populated: o with the segments that you translate in the project you are creating o with the segments that you translate in other projects, provided that the private TM key is associated o with the segments of an existing TM in TMX format • Copy or type an existing private TM key in the box. In this case, the TM may: o already be populated with segments from previous translations that will be given to you as suggestions during the translation. The key will also be updated with the segments that you translate in the new project with which the key is associated o be empty, and can be populated as if it were new. • Upload your translation memory in TMX format4 together with the file(s) to translate. In this case: o if you have already added a private TM key to the project, it will be populated with the segments of the TMX that you uploaded o if no private TM key has been added to the project, MateCat automatically generates a new one and the following message will be displayed: 4 TMX is one of the most common translation memory formats. It is the main translation exchange format. 20 Once the TMX has been uploaded, you can leave the key automatically generated by Matecat, replace it with a different one or leave the private TM Key box empty. If no private TM key is indicated, the segments in your TMX are saved in the generic public translation memory and can be accessed by all MateCat users. Adding or Creating a Private TM for an Existing Project If you would like to add your own translation memory or create a private TM in an already created project you are working on (because you are working on it in outsourcing or because you forgot to add it during the creation of the project), you can add your personal TM directly in your Translation Editor window by clicking on the Add your personal TM button. In this way, you use it and update it privately without sharing with other users. A window will be displayed as in the screenshot below: 21 You have the following options for adding your personal TM(s): • Add an already existing TM key • Click on the Create button to create a new TM key Once you have added the TM key in the box, the Manage TM section in the window below will be activated. Here you can: • Check/Uncheck the Show matches from TM checkbox to receive or not receive suggestions from the TM you are adding, respectively • Check/Uncheck the Add translations to TM checkbox to save or not save your translations in the TM you are adding, respectively • Click on Add segments from a TMX to upload your own TMs in TMX format into the private TM key that you are adding Just reading or also updating your TM depends on whether you have checked or not the Show matches from TM and the Add translations to TM checkboxes. Show matches from TM corresponds to a read mode, thus to receiving suggestions from the TM. Add translations to TM corresponds to a write mode, thus to saving your translations in the TM. We have 4 cases: Both checkboxes are checked. Your TM key has both read and write mode. You will both receive suggestions from the TM and save your 22 translations in the TM. Only the Show matches from TM checkbox is checked. Your TM key is read mode only. You will receive suggestions from the TM but you will not save your translations in the TM. Only the Add translations to TM checkbox is checked. Your TM key is write mode only. You will not receive suggestions from the TM but you will save your translations in the TM. Both checkboxes are unchecked. The following error message will be displayed You must check at least one of them. Click on the Add your TM button to start the upload. The message below is displayed: Once the upload is complete, MateCat advises you that your TM has been correctly uploaded, reminding you of the private TM key associated with it so that you can store it and use it again if needed. 23 You can finally use and/or update your private TM key with the translation of the project you are working on. Note: You can upload your own translation memory in any language combination. This means that you can reuse the same private TM key for more projects in more than one language pair at once. A private TM key can hold data in any language pair. During translation, MateCat recog-‐ nises the language pair of the current project and looks up in the corresponding language com-‐ bination. 1.9 TM backup and updates Adding a private TM Key to your project means that the TM is automatically updated during translation, if previously set. MateCat stores your TMs for you so that you do not need to upload and download the translated segments each time you translate. In this way, you have a constant backup of your translation memory and you can use it again in the future by just storing the private TM key and associating it with a new project, typing it in again if needed.5 5 It is not possible to download the translated segment for a specific project yet. We plan to devel-‐ op such functionality in one of our next releases. 24 1.10 How to add a Glossary A glossary is a bilingual or multilingual database containing the translation of terms6 in a special subject, field or area of usage. It is usually in Excel or CSV format and can help translators with the translations of specific terms that can be translated in several ways depending on the subject matter. For example, imagine that we have to translate a file containing the following phrase from English to French: My house is red. In order to translate the file containing this phrase, we created a project for translating from English to French and associated a private TM key and an EN>FR glossary. In the glossary, we have the following term and its translation: Source Target House Maison Opening the phrase for translation, we have no suggestions from our translation memory but we have the translation of “house” in our glossary. In this case, MateCat suggests how to translate the term “house”. In MateCat, the glossary is included in the private TM key associated with the project. If no private TM key is associated yet, a new one will be created once you insert the first glossary term. Note: please refer to the section How to Use Glossary Terms in Your Translated Segment to know how to add a glossary term while translating. 6 Terms are words or set of words of a particular kind of language or branch of study. 25 CSV is the only supported glossary format. You just have to upload it to your private TM key.7 Why add a glossary for your project? If you upload a glossary, MateCat also looks up single terms. In the translation memory, this function is performed at segment level, whereas in the glossary it is performed at term level. 1.11 Outsourcing with MateCat Once the project has been created, you can decide translate it internally or to outsource the project. If you need to outsource it, all you have to do is save the job URL and send it to the translator(s). With this link, the translator can access the MateCat job in his/her browser and start translating. If you need to split the project and send it to more than one translator, you can refer to the Split-‐ ting Jobs section. 1.12 Translation Editor User Interface Documents are translated in the Translation Editor window. This is the translator’s main interface. You can access this page: • By clicking on the Translate button on the Analysis page • directly from the corresponding previously generated/provided job URL The job URL contains information about the job you are translating. Below, you will find an explanation of the different elements of the URL. 7 The user cannot upload the glossary by him/herself yet. We plan to develop such functionality in one of our next releases. 26 matecat.com – Base URL for the MateCat Pro version. /translate – This indicates that you are in the translation editor page. /Test – The name of the project you are translating. /en-‐US-‐it-‐IT – The language pair of your translation. /43505-‐0d5d8d53c774 – The job ID (43505) followed by the unique job “password” (in this case, 0d5d8d53c774). • #21694626 – The unique identifier of the segment you are translating. This number changes every time you open a new segment. • • • • • The Translation Editor User Interface contains only one environment with all the information necessary for the translator to work on the job. Translation editor The interface contains the following bars and information: 27 1.13 Top bar Click on the logo to go to the homepage of the MateCat tool and create a new project. The name of the job and language pair combination. Click on the arrow to see the list of the files and navigate through them. Click to download the original file(s). Click to download a preview of the translated file(s). The preview contains your translation and machine translation for the remaining untranslated segments. The Preview button is replaced by the Download translation button once the translation is complete (100% on the progress bar). 28 QA module – No errors reported. QA module – 1 error message reported. Click on the icon to go to the segment with the error and fix it. Search tool – Perform a search in the source or target text. If necessary, you can replace the term you searched for with another one. Editor window 29 Click to close the segment in draft status, without saving it in your TM Copy source to target button. Click or use the shortcut ALT+CTRL+i to copy the source text to the target box Translated and go to next untranslated button. Click or use the shortcut CTRL+SHIFT+Enter to confirm your translation of the current segment and to move to the next untranslated segment. Translated button. Click or use the shortcut CTRL+Enter to confirm your translation and save it in the translation memory Translation matches tab. This tab shows the user the TM matches and/or MT suggestions for the current segment. Concordance tab. Open this tab or use the shortcut ALT+CTRL+c to search the translation memory, both public and private, if any, for a particular word, word sequence or phrase 30 Glossary tab. Open this tab to check suggestions from a previous glossary included in the private TM key which is associated with the project or to add new terms to the glossary. Click to add your personal TM to the ongoing translation. 1.14 Bottom bar The progress bar indicates the real time status of your translation. Number of payable (weighted) words for the entire job. Clicking on Payable Words button will take you to the Volume Analysis page of the project. 31 Number of words left to translate for the entire job. The estimated speed of your translating. Based on the average time spent on the last 10 translated segments, MateCat calculates the hourly turnaround for the job if you are currently working on the translation. After one hour of inactivity, this information is no longer available. The estimated time left to complete the translation. Based on the time spent on the last 10 translated segments, MateCat calculates how much time is needed to complete the translation if you are currently working on the translation. After one hour of inactivity, this information is no longer available. Link to access your own Management Panel 32 Link to access the Editing Log page, a statistical page about the current project. (e.g. percentage of MT matches, percentage of TM matches, average post-‐editing efforts, etc.) Link to access the Manual Information about the account you are logged in with. Click on login to sign in using Google. Source text and target text are displayed side by side. Click on any segment in the target column to open it for translation. 33 What if I need to stop translating and switch off my computer? In MateCat your translation is automatically saved in the document when you edit the segment, and in the translation memory, if any, when you click on the Translated or T+>> buttons. If you need to stop translating and switch off your computer, all you need to do is open the job URL again in your browser. MateCat automatically opens the last segment you edited. If you created the project yourself, by logging in with your Google account, you can recover the job URL from your Management Panel. If you were not logged in during the creation of the project or if you did not create the project by your-‐ self, remember to store the job URL in a safe place in order to recover it again easily. 34 Translation Toolbox Using TM matches, MT suggestions and Glossary terms When you open a segment for translation it will automatically populate with the first TM/MT match available for that segment. You will receive TM suggestions if you add a private TM key to the project or in the case of fuzzy matches found in the public translation memory. They will be displayed as first suggestions just below the segment, under the Translation matches tab. If you have a personal translation memory, you can add it to the project. Please refer to the Add-‐ ing or Creating a Private TM for an Existing Project section. On the right, the tool gives information about the source of the match, the creation date and the match percentage, as shown in the screenshot below: In this example, we have: • a 100% match in the private TM key that we added to the project (the private TM key is shown as the source of the suggestion) for the first suggestion; the segment is therefore automatically populated with this suggestion. 35 When you add a private TM to your project, MateCat automatically associates a name with the private TM key in order to recognise the source of the suggestion while translat-‐ ing. It has the MyMemory_XXXX format, where XXXX is a unique alphanumeric value for each private TM key. • an 86% match from the public TM (in this case the source is “anonymous”) for the second suggestion • the Machine Translation suggestion (the label of the source of the suggestion is MT) for the third suggestion. Depending on the source of the match and on the match percentage, the following labels will be displayed: If you have a 100% match from the TM. If it is a MT suggestion. The corresponding match percentage in case of a fuzzy match from the TM. If you are taking part in a collaborative project, you can also receive real time suggestions from the other translators working on the same project. This means that if more than one translator is working on the same project because it has been split among several translators, these translators share a private TM key and each of them receives suggestions for segments already translated within the same project. 36 In this case, the source of the suggestion will have the name of the shared private TM key8. You will see the suggestions ranked from the highest percentage of matching to the lowest. The MT suggestions correspond to an 85% match by default. If there are no higher percentages of matching, you will see the MT as the first suggestion. To select and enter one of the suggestions into the translation input field you can: • Use the shortcut ALT+CTRL+[n] for Windows or ALT+CMD+[n] for Mac OS X where [n] could be 1, 2 or 3, depending on whether you would like to add respectively the first, second or third suggestion. • double-‐click on the match you would like to select If you hover over a TM match, a dustbin icon appears on the right. Click on it to remove the TM match from the translation memory. Note: click on the dustbin icon only if you would like to delete the match from the translation memory because the target text is not the correct translation of the source text. Do not delete it if you think it is not the correct suggestion for the segment you are translating. If you would like to copy the source segment to the target input area, click on the arrow between the source and target segment or press ALT+CTRL+I How to Use Glossary Terms in Your Translated Segment The Glossary tab provides suggestions from the glossary previously included in the private TM key which is associated with the project. Every time you encounter this term in the text, it is displayed by the glossary and the term in the segments underlined, as shown in the screenshot below: 8 For further information about collaborative projects, please refer to the Splitting Jobs section. 37 The translations of these terms are listed under the Glossary tab which indicates in brackets the number of terms in the segment found in the glossary. Each glossary suggestion also gives information about the source of the translation and the creation date. If you hover over a suggested term, a dustbin icon it to remove the term from the glossary. appears on the right. Click on You can also add new terms to the glossary: • Add source and target terms in the corresponding windows • Add comments, if needed, by clicking on the (+) Comment button • Click on the button to add the term to the glossary Note: If no glossary is added to the project, you create your own new glossary by creating a new term, and, if no private TM key had been previously associated with the project, a new private TM key will be generated automatically and added to the project. 38 1.15 Working with Text and Tags Tag autocompletion When you need to input a tag into your translation, enter the symbol < and a list of the tags in the source text is displayed. Select the one you need and click Enter to add it to your translation. Formatting features MateCat uses a simple functionality to change the case of words in the editing area. Just select one or more words and three buttons will appear to allow you to select the formatting you want and switch the case (upper case, lower case and capitalise first letter). Adding line breaks and hidden text If you need to add line breaks in the target segment: 39 • place your cursor where you want the text to break to a new line, • press Shift+Enter and the segment will divide into two separate lines. The same number of lines will also be retained in the target document. MateCat uses symbols for hidden characters such as tabs, non-‐breaking spaces and line breaks, which are respectively , and . If one of them is present in the source text, you must reproduce it in the target segment using the corresponding key or shortcut (the Tab key on your keyboard to add a tab, the Shift+Enter shortcut to add a line break and Ctrl+Shift+Space shortcut to add a non-‐breaking space). Do not copy and paste them from the source text. Placeables and untranslatable text Currently, we cannot manage placeables and untranslatable parts. We plan to develop such functionality in one of our next releases. 1.16 Confirming a Segment Once your translation has been entered or the pre-‐translated segment edited, click on the Translated button to confirm your translation and move to the next segment. Alternatively, you can use the keyboard shortcut Ctrl+Enter. If you want to confirm the translation of the current segment and go to the next untranslated segment, click on the T+>> button or use the keyboard shortcut CTRL+SHIFT+Enter. The segment status bar colour will change from white to blue. In this way you save the segment and update the translation memory. If you do not click on the Translated button, and move manually on to the next (or press CTRL+Down) or to the previous (or press CTRL+Up) segment, your translation will be saved in the file but the translation memory will not be updated. The bar to the right of each segment indicates its status using colours. Click on it to display the following options and to set/change the status of a segment: 40 Status dialogue 1.17 Autopropagation When you approve a segment during translation, MateCat automatically populates your translation with all segments having the same source within the same project. They will be labelled as AUTOPROPAGATED as shown in the screenshot below Your translation will appear in all segments having the same source but the status of the segments will remain “untranslated“. You must approve them manually by clicking on the Translated button (or use the CTRL+Enter shortcut). 1.18 Concordance Search Concordance searching allows you to search the translation memory, both public and private, if any, for a particular word, word sequence or phrase. 41 The search will find and display all previously translated segments in the private TM Key associated with the project and in the public TM containing that word, those words or that phrase. You can perform a concordance search by entering or pasting the text to check in the Concordance tab on the Translation Editor page. Alternatively, you can select the words you would like to check and use the following shortcuts which will automatically open up the Concordance tab: • on Mac OS X: ALT+CMD+C • on Windows: ALT+CTRL+C 1.19 Navigating through Files If you have uploaded more than one file for translation in the same project, you can click on the job name at the top of the page to display a list of the files. Clicking on the file name, you will be redirected to the beginning of that file. Click on Go to current segment to display the segment you are working on. 1.20 QA Messages At the top right of the MateCat window, you will see an icon which warns of any potential QA errors in the translation. The warning sign contains a red circle indicating how many errors have been found in the project. The following example indicates that the project contains one QA error: 42 Click on the icon to open the segment with the error. A message indicates the nature of the error: • Tag Mismatch The tag <g id=“19”> in the source segment, indicated by the red arrow, was not added to the target segment. This generated a tag mismatch. In order to fix the error, you can: ! copy and paste the tag from the source segment to the target and place it in the same position as in the source ! click on the tag in the source segment and drag and drop it to the target segment ! enter the symbol < to display the list of the tags in the source text. Select the one you need and click Enter to add it to your translation. MateCat shows the missing or extra tag(s) marked in red. 43 • Tag Order Mismatch MateCat also displays a warning when tags are not in the same position as in the original segment. Tags in the wrong order will be coloured in pink. In the example above, tag <g id=”24”> in the target segment is not in the same position as in the original. In order to fix the error, you can: ! click on the tag coloured in pink in the target segment and drag and drop it to the correct position in the phrase ! enter the symbol < in the tag’s correct position to display the list of the tags in the source text. Select the one you need and click Enter to add it to your translation. Then delete the tag in the wrong position. ! copy and paste the tag from the source segment to the target and place it in the correct position. Then delete the tag in the wrong position. • Whitespaces mismatch 44 MateCat warns the user when more or fewer spaces are found in the target segment next to tags. In the image above, there are two extra whitespaces indicated by the red arrows. To fix the error, delete the extra spaces between the tags and the word. • Translation conflicts MateCat warns the user when two or more different translations are inserted for the same source segment in the same project. MateCat uses track changes to highlight the differences. To fix this error, choose one of the suggested matches or click on the View button to check and correct the translations. 1.21 Spell-‐checking MateCat uses your browser’s spell-‐checker. To enable the Google Chrome spell-‐checker for your target language, follow these steps: 1. Enter the following string in the Google Chrome address bar: chrome://settings/languages 2. Click on Add and add your target language; 3. Select Enable spell checking in the dialogue window that opens. 45 Spell-checking enabled for US English To enable Safari spell-‐checker for your target language, follow these steps: • • • • Go to Safari>Edit>Spelling and Grammar Show spelling and Grammar Choose your language in the dropdown menu Click on change 46 1.22 Editing Log You can access the Editing Log from the corresponding button at the bottom of the Translation Editor page. The Editing Log contains statistical information about the translation. In particular: • under the Summary section you can find statistical information about the entire project: 47 Words Number of translated words Avg Secs per Word Average number of seconds you needed to translate each word % of MT Percentage of Machine Translation suggestions % of TM Percentage of translation memory suggestions Total Time-‐to-‐edit Total time necessary to complete the translation so far Avg PEE % Average post-‐editing effort as a percentage. This indicates your efforts in updating machine translation suggestions % of words in too SLOW edits Percentage of words on which you spent too much time editing % of words in too FAST edits Percentage of words on which you spent too little time editing 48 Under the Editing details sections you can see all details per segment: Secs/Word Seconds spent per word in that segment Job ID MateCat job ID Segment ID ID of the segment. You can click on it to open the segment in the Translation Editor page. Words Number of words in the segment Suggestion source Source of the first suggestion Match percentage Match percentage of the first suggestion. It is always 85% by default for Machine Translation suggestions Time-‐to-‐edit Time necessary to edit the segment PE Effort Post-‐editing effort to edit the segment Segment Original source segment 49 Suggestion First MateCat suggestion Translation Final translation approved by the translator Diff View Differences between first suggestion and final approved translation highlighted with track changes The warning icon and orange borders indicate that you spent too much or too little time to edit the segment. 1.23 Finalising a Project Once the translation is complete (100% on the progress bar), the Preview button at the top of the page is replaced by the Download translation button. By clicking on the Download Translation button, you can download the translated text in the same format as the original file. If the project contains more than one file, all will be downloaded as compressed in a zip folder. The text can be downloaded at any time during translation by clicking on the Preview button. The portions of text not yet translated will be replaced by a machine translation. 50 Managing Projects with MateCat Management Panel When you create a project, you have the option of adding the project to your Management Panel by logging in with your Google account before creating it. This panel shows you the list of all projects created using your Google account and allows you to check the progress and status of your projects or recover them if needed. To log in with your Google account, click on the Login button at the bottom of the MateCat home page and sign in using your Google account. Note: remember to always log in before creating a project if you want to add it to your Man-‐ agement Panel. If you create a project without logging in with your Google account, the job URL of the project will not be saved automatically so please remember to save it manually in a safe place in order to be able to recover it easily if needed. To access the Management panel you can: • Go to http://www.matecat.com/manage/1, or • Click on Manage at the bottom of the MateCat home page All relevant information is available for each project, as shown in the screenshot below: 51 Management panel For each project you have: • Project name (11605615) 52 • MateCat Project ID (36200) • Total number of words in the project and link to the Volume Analysis Page (2,549 payable words) • Machine Translation Server (MyMemory (All Pairs)) • Creation date (September 05 Friday, 18:21) • Link to the translation jobs divided per language combination and MateCat job ID (under “Job” column) -‐ you can access the Translation Editor window of each job by clicking on the corresponding job URL • Private TM Key (if any; blank column if not present) • Payable words per job (under Payable Words column) • Progress bar of each translation job (under “Progress” column) • Series of buttons that enable you to perform a number of tasks: Change job password – This modifies the password of the job. Cancel job/project – This deletes the job/project and disables the URL. Archive Job/project – This prevents any changes from being applied to the job/project. However, the URL will still work and is accessible in read-‐only mode. Resume project Unarchive project By default, the management panel will show your active projects only, in chronological order. You can filter and see the cancelled and archived projects by clicking on the Filter button or on “Showing active projects” at the top of the page. 53 The following search window will be displayed: You can filter your search by: • Project name • Source or target language (or both) • Status (Active, Archived or Cancelled) Click on the FILTER button to apply your criteria to the search. For reasons of privacy, your projects are automatically archived after 30 days of inactivity. You will still be able to reactivate them in your Management panel or in the Management panel of the person who created the project. 1.24 Splitting Jobs MateCat provides an easy-‐to-‐use split functionality to divide large jobs into smaller parts and assign them to multiple translators. This is useful for large collaborative projects. You can split a job from the Volume Analysis page. After completion of the volume analysis, you can select how many jobs you would like to create and click on the Split button. In the following example, we are going to create 4 jobs: 54 You will then be presented with a dialogue window where you can enter the approximate number of words for each job. Splitting a job in 4 parts. The word count is approximate until you click on the Check button. When you click on the Check button, MateCat checks each part and divides segments into an indicative number of words, avoiding any overlap between segments. 55 Splitting a job in 4 parts after checking the word count. Note that the word count for each part has changed. When you click on Confirm, you will be presented with a detailed analysis of the split jobs and a Translate button for each part. 56 A job split in four parts In the event that you make a mistake and would like to undo the splitting, just click on the Merge all button and the different parts will be merged back into the original job. You just need to send each translator the Job URL for the part they will be working on. When clicking on their link, translators will only see the part of the document assigned to them as editable. They can also see the rest of the file, but they will not be able to edit it. They will see the rest of the document being translated in real time and can refer to the other parts for comparison. 57 They will also share a private TM key, if previously associated, where all translations will be stored, so each translator will also receive suggestions for segments already translated by the other translators within the same project. Each translation is complete once all segments of that job have been translated and marked as translated. The progress bar at the bottom of the screen should be blue and the To-‐do count should be zero. The progress bar, the To-‐do count and the payable words count only refer to the current job. You can check the status and progress of each job from your own Management Panel. Once all jobs are 100% complete, you can click on any of the links and click on the Download translation button. In this way you will download the whole translated file. 1.25 Resources for LSPs MateCat can help LSPs (Language Service Providers) to manage projects easily and perform all checks not only after delivery by the translator but also during the translation job itself. The main tools and functions available for Project Managers are the Management Panel, the Editing log and the QA messages in the Translation Editor window. Through the Management Panel, the Project Manager can easily check the status of all translation jobs in real time. Here, he/she has a list of all active projects in chronological order and the progress bar for each job. 58 By clicking on the job URL of a specific project, it is possible to check errors during the translation and promptly advise the translator working on the project. Through the QA module, it is possible to check if there are tag errors or translation conflicts during the translation, without waiting for delivery by the translator and thus save time. From the Translation Editor window, it is possible to access the Editing Log page by clicking on the Editing Log button at the bottom of the page. In the Editing Log, the Project Manager can check the time spent by the translator for editing each segment, the total time spent by the translator to translate the entire file and check the edits made to suggestions. The changes are highlighted with track changes. This can help the Project Manager identify the Post-‐Editing efforts of the translator to edit the segments. 59 60 Appendix Keyboard Shortcuts MateCat relies heavily on keyboard shortcuts for standard and advanced functionalities. Getting to know the shortcuts below will help you be more productive when translating in MateCat. Functionality Windows Mac Confirm translation (click on Translated) CTRL+Enter CTRL+Enter Confirm translation and go to next untranslated segment (click on [T+>>]) CTRL+SHIFT+Enter Go to next segment CTRL+Down CTRL+Down Return to previous segment CTRL+Up CTRL+Up Go to segment CTRL+Home CMD+SHIFT+up current CMD+Enter CTRL+SHIFT+Enter CMD+SHIFT+Enter 61 Copy source target to ALT+CTRL+i ALT+CTRL+i Undo in segment (available in active segment) CTRL+z CTRL+z Redo in segment (available in active segment) CTRL+y CMD+SHIFT+z Go to beginning of the line Home CMD+left Go to end of the line End CMD+right Move the cursor word by word to the right CTRL+right ALT+right Move the cursor word by word to the left CTRL+left ALT+left Open search (if not yet opened) CTRL+f CTRL+f Perform Concordance search ALT+CTRL+c CMD+z CMD+f ALT+CTRL+c 62 on word(s) selected in the source or target segment ALT+CMD+c Use Translation suggestions (first/second/third suggestion) CTRL+1/2/3 CTRL+1/2/3 Add a new line in the target segment SHIFT+Enter SHIFT+Enter Add a non-‐breaking space CTRL+Shift+Space CTRL+Shift+Space 63 Installing an open source version of MateCat This guide is meant for users who want to install and administer the open source version on their own machines. Overview MateCat is a client-‐server web application. Most of the interaction runs in the user browser (client), while all calculation along with user data permanently resides on the server side (server). To run MateCat as a end-‐user connected to a remote server you only need: 1. Google Chrome or Mozilla Firefox browser 2. A machine with a few GB of RAM 3. Internet connection To run MateCat server on your personal machine (keeping all data on your machine and bearing all the load), you also need administrator privileges to install Apache, PHP and MySQL. Running MateCat locally on your machine does not require an Internet connection. Hardware requirements If you just want to test MateCat on a few million words you will need 1 server with: • Storage: 50GB • CPU: 2 core x 2.5 Ghz • RAM: 4GB To manage 50M words per year of translation capacity, you will need 1 server with: • Storage: 1TB • CPU: 6 core x 2.5 Ghz • RAM: 32GB 64 If you need to manage up to 200M words per year, you can do it using 4TB of storage, 12 CPU core, and 64GB of RAM and placing the MySQL database on a separate machine (easy to do with the MateCat config file). For handling more than 200M words per year you will need to add a load balancer in front of the web servers and databases. Databases will need a master-‐master replica schema. This will require an experienced LAMP and scalability engineer. Getting started with fast setup MateCat ships as a full fledged, self-‐contained appliance you can get up and running in minutes. We provide a virtual machine image that comes with MateCat preinstalled. The image is compatible with VirtualBox software (get VirtualBox here, first: https://www.virtualbox.org/wiki/Downloads). You can download the MateCat Virtual Machine image (.ova) from the following URL: http://docs.matecat.com/matecat-‐0.3.4.3-‐ubuntu-‐12.04-‐x86.ova (~1.9 GB). Once the image has been downloaded, and after VirtualBox software has been installed, double click on the image file to start VirtualBox’s import wizard . If you feel unsure about what to input in the various panels, click your way through the wizard by pressing “Next>” button; the default parameters are good enough for an average machine. Starting MateCat virtual machine Open VirtualBox and start MateCat virtual machine. After some loading (depending mostly upon the performance of your machine), you should be presented with a desktop environment with a welcome message. To start MateCat, click on MateCat icon on the left bar, in the upper-‐left corner of the screen. 65 We have included some files on the desktop to let you experiment with MateCat. Important Notice: Although there is no login request or screen lock, in case the virtual environment prompts you with credentials input, the virtual machine credentials are: • username: matecat • password: matecat Troubleshooting the image import In case you experience importing troubles (most of times due to old VirtualBox setups), the original Virtual Disk Image (.vdi) is also available: you may use it to create a working machine in VirtualBox manually (see instructions below): 1. Download the Virtual Disk Image (.vdi) from the following URL: http://docs.matecat.com/matecat-‐0.3.4.3-‐ubuntu-‐12.04-‐x86.zip (~1.8 GB). 2. Once the download is finished, Open Virtualbox and create a new machine: o Name: MateCat VM o Type: Linux o Version: Ubuntu 32 bit 1. Provide at least 2 GB virtual memory 2. In the Hard Drive selection dialog, choose to use an existing disk and select the vdi file you just downloaded 3. Start the machine Advanced manual setup on different platforms Although you can use MateCat in the virtual machine appliance with only a little performance overhead, high load environments administrators may wish to deploy MateCat on “bare iron”. The rest of this guide is about installing the application on a custom system. MateCat requires Apache, MySQL and PHP and runs on Linux. 66 Windows and Mac Running MateCat natively on Mac or Windows is not supported. If you want to install MateCat on Windows or Mac we suggest using the virtual machine appliance provided. This guide will focus solely on Linux setup. Linux Mandatory dependencies are ● Apache2 Web Server >=2.2.x, with following modules enabled: • • • • o htaccess o rewrite o filter o deflate o headers PHP >=5.2, with following extensions enabled: o php5-‐mysql o libapache2-‐mod-‐php5 o php5-‐curl o php5-‐memcache (not mandatory, but recommended) o php5-‐json MySQL >=5.1 git >1.5 screen utility This guide will assume you are on a Debian based Linux distribution (Debian or Ubuntu). If your server already meets these dependencies, please jump straight to Configuring components section. Otherwise the section that follows, Configuring the environment from scratch, will guide you to a ready to work environment. 67 Configuring the environment from scratch The setup requires root access privileges. Install Apache sudo apt-‐get install apache2 Enable Additional Modules for Apache Apache web server needs to be fine tuned for MateCat to work properly. Switch to Apache directory with cd /etc/apache2 and enter these commands to enable required Apache submodules sudo a2enmod rewrite filter deflate headers expires sudo apache2ctl restart Last command is mandatory for changes to take effect. If you see, upon issuing sudo apache2ctl restart, the following warning: Could not reliably determine the server’s fully qualified domain name, using 127.0.1.1 for ServerName do not worry, it’s not important. Install MySQL sudo apt-‐get install mysql-‐server mysql-‐client The installation process will prompt a few times for a new root password access for MySQL. It’s fine leaving it blank; otherwise, please ensure you type the same every time. You can test the reachability of the database by issuing at a terminal: 68 mysql -‐u root -‐p If you specified a password during MySQL setup, type it when prompted; else, just hit Return. If everything went fine, you should see the greeting message and the shell prompt: mysql> Install PHP5 core and additional packages sudo apt-‐get install php5 php5-‐mysql libapache2-‐mod-‐php5 php5-‐curl php5-‐memcache php5-‐json Install screen utility sudo apt-‐get install screen Install Memcached Server [optional] For a boost of performance during analysis, you can install Memcached server sudo apt-‐get install memcached Configuring components Tune PHP configuration Open PHP configuration file for Apache by typing: sudo gedit /etc/php5/apache2/php.ini find and set the following directives to these values: 69 memory_limit = 1024M post_max_size = 200M upload_max_filesize = 200M short_open_tag = On As usual, restart Apache for changes to take effect: sudo apache2ctl restart Do the above to the command line configuration too (for the analysis daemons): sudo gedit /etc/php5/cli/php.ini and, additionally, disable the disable_functions directive. Installing MateCat This section assumes you’ll install MateCat under the home of user matecat (/home/matecat). Install git and clone the repository If you already have GIT, skip this section. Otherwise, install GIT by typing: sudo apt-‐get install git Then clone the repository in your directory of choice by typing: cd cattool git clone git://git.assembla.com/matecat_source.git cattool The above will create the directory cattool and will download all MateCat codebase in it. Initialize the database Navigate to the configuration directory: 70 cd ~/cattool/lib/model and send the database template to your MySQL instance with the following command (type the root password if prompted) mysql -‐u root -‐p < matecat.sql Create the virtualhost Navigate to the directory cd ~/cattool/INSTALL Open in an editor the file matecat-‐vhost.conf.sample gedit matecat-‐vhost.conf.sample and substitute the string @@@path@@@ with the fullpath of the cattool folder previously created via the clone action (in this guide it’s assumed to be /home/matecat/cattool). Important notice for Apache 2.4.x users The default configuration provided in sample virtualhost file doesn’t work in Apache 2.4.x or higher. Check your version with the following command: apache2ctl -‐v In case you are running a version of branch 2.4.x or higher, please replace in matecat-‐vhost.conf.sample configuration the directives: 71 Order allow,deny Allow from all with the following: Require all granted Install the virtualhost Save the file modified as matecat-‐vhost.conf (try not to overwrite the sample) and enable the web application in Apache with the following commands: sudo cp matecat-‐vhost.conf /etc/apache2/sites-‐available cd /etc/apache2/ sudo a2ensite matecat-‐ vhost.conf sudo apache2ctl restart Create and customize MateCat configuration We are nearly there! Go to the root of MateCat installation and add permissions to the storage directory cd ~/cattool sudo chmod -‐R 777 storage/ Go to configuration subdir cd ~/cattool/inc and create your config file from sample template: cp config.inc.sample.php config.inc.php 72 This configuration works out of the box, with very default settings. Have a look at next sections to further refine basic parameters Configure database address If your database resides on another machine, change the directive: self::$DB_SERVER = “localhost”; to self::$DB_SERVER = “<your_db_server_uri>”; Configure memcache location For a boost of performance during analysis, you can enable fast Memcache counters by enabling the following directive: self::$MEMCACHE_SERVERS = array( /* “localhost:11211″₺ => 1 */ ); to self::$MEMCACHE_SERVERS = array( “localhost:11211″₺ => 1 ); If memcache resides on same machine, leave localhost. Otherwise, put the right URL in place. 73 Turning on the analysis daemon A killer feature of MateCat is the volume analysis function, that counts full or partial repetitions in the file and searches for translation memory matches in the cloud TM MyMemory. To enable the analysis: 1. ensure that in config file the following directive is set to true: 2. self::$VOLUME_ANALYSIS_ENABLED = true; 3. enter daemons directory 4. cd ~/cattool/daemons 5. enable the fast Analysis and TM Analysis daemons (using setuid www-‐data to avoid breaking permissions): 6. sudo ./restartAnalysis.sh Remember to configure your server for the automatic startup of this script on each boot. Translating other formats than XLIFF (optional) Warning: this is advanced stuff for which no support is provided Open source version of MateCat supports out of the box XLIFF files only. However, it includes an API that enables you to attach a conversion service and translate other file formats beyond XLIFF; please note that XLIFF is always internally used as a pivot format. To enable conversion: 1. implement the internal conversion service 2. ensure that the following directive is set to true in config file: 3. self::$CONVERSION_ENABLED = true; Since this API is not yet documented, a developer manual is going to be released in the future. 74 Enabling Google+ login MateCat uses Google+ login as authentication mechanism. In order to enable it, you need 1. a Google account 2. a web domain, either one of the following: • • a public reachable domain (i.e., http://www.yourdomain.com) the localhost domain (only http://localhost; other local domains won’t work) If you don’t have a client id and client secret, please visit Google Developers Console and follow these instructions: 1. click on “Create Project“, specify a project name, a project ID and check “I agree with Google ToS” checkbox; it may take a little to create your project 2. click on your newly created project 3. select “APIs & auth” on left sidebar 4. scroll down the list to “Google+ API” and switch the status of ON 5. go back to left sidebar and, under “APIs & auth” menu, select “Credentials“ 6. click on “Create new client ID” button 7. under APPLICATION TYPE, select “Web application” option 8. under AUTHORIZED JAVASCRIPT ORIGINS, insert the domain MateCat will be accessed from 9. under REDIRECT URIs, insert “http://<domain>/oauth/response” , where <domain> is the domain that you specified in the previous step 10. click on “Create client ID“. Take note of the “Client ID” and a “Client secret” you just obtained 11. go back to left sidebar and, under “APIs & auth” menu, select “Consent screen“ 12. under PRODUCT NAME, choose a meaningful name (for example, MateCat) 13. scroll down the page and click “Save“ 14. Finally, edit the file ~/cattool/inc/oauth_config.ini.sample, replacing the default parameters with those obtained in the previous step: 75 • OAUTH_CLIENT_ID with your client ID • OAUTH_CLIENT_SECRET with your client secret • OAUTH_CLIENT_APP_NAME with your custom app name,or leave MateCat 15. save the file as oauth_config.ini Enable Apache access to the directory Finally, ensure that Apache has write permissions by enabling the storage directory access to Apache (default user/group is www-‐data) and relaxing some permission: sudo chmod g+w -‐R ~/cattool/storage/ sudo chown -‐R :www-‐data ~/cattool/storage/ This is necessary to allow MateCat creating the storage subdirectory, where uploaded files, logs and temporary files are stored. Analysis daemons write their logs here, also. That’s all. Now type http://localhost in Chrome or Firefox and enjoy your fresh install. 76