1
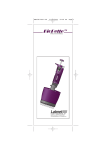
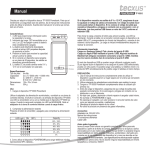
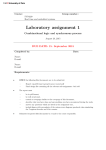
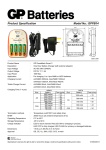
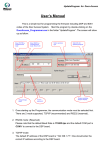
User Manual
Last updated: September 2015
1. Information
The new VIASS Pro aiming system is based upon a high-speed camera with object recognition. In
ordert o achieve the required speed, time-critical calculations are performed and processed within
the camera itself. The system is equipped with two microprocessors (CPUs). One oft hem handles the
image processing, the other one deals with audio, user input and provides an interface to a PC. Due
tot he system’s low weight of 190g, it can be used with a pistol or a small caliber rifle as well.
2. Operation and mounting
The system works autonomously. There is no need for a connection with a PC. Callibration and
configuration can be performed entirly on the unit itself.
The system is ready for use as soon as the included Powerbank (power supply) is connected tot he
micro-USB port on the system and headphones are plugged into the 3.5mm headphone jack.
In electronic setups the included IR LED should be mounted about 6cm above the bull’s eye using a
velcro strip or double-sided adhesive tape (see figure 1).
There is a smaller version of the IR LED featuring a coin cell battery. This LED unit is very light-wiehgt
and can be glued to a cardboard mask that will be placed in front oft he paper target (see figure 1b).
3. Controls
The controls are situated on the back oft he unit (see figure 2). Any user input is accompanied by an
accoustic signal in the headphones.
Arrow keys (1)
Used to perform a correction (Up, Down, Left, Right).
Pressing the key once results in an offset of one length unit of the grid. For a further offset the key
needs tob e relased and pressed again, which allows for an exact adjustment.
F1 key (5)
The F1 key (5) is used to switch between two target diameters. Upon pressing the key, a single beep
indicates that the smaller diameter is selected, two beeps correspond tot he larger target diameter.
The actual size oft he diameter can be changed in the included VIASS software only, but not on the
unit.
F2 – F3 keys (5)
The keys F2 and F3 are used to remote control the VIASS software.
Pressing F2 switches between targets.
F3 is used to change from practise to qualification mode (match).
The software will provide accoustic feedback through the PC’S speakers.
Control dial – Sound (2)
This dial is used to set the pitch oft he base tone (dial can be removed).
Control dial – Volume (3)
This dial sets the audio volume (dial can be removed).
Control dial –Center (4)
This dial alters the tone fort he bull’s eye, which allows for a differentiation oft he target’s center
from the rest oft he target (dial can be removed).
USB port (6)
The USB prort is used to connect the Powerbank power supply. In practise mode, this port is used to
connect the system to a PC, where the PC will provide power and there is no need fort he
Powerbank.
Audio Out (7)
Used to connect the headphones. Using the included Y-cable is recommanded.
This cable allows the assistant to listen in and in case adjust the shooter’s position.
Mount (8)
With the included fixed mount, mounting the unit onto your rifle is a breeze. The mount is suitaed
for almost any air rifle and can be positioned individually.
Reset to factory setting
Pressing and holding the left and right arrow key simmultanously for about five seconds will reset the
unit to its factory default settings.
Mounting the IR-LED (Fig. 1)
a. electronic setup
Controls (Fig.2)
a. mechanical setup