1
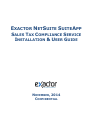
EXACTOR NETSUITE SUITEAPP
SALES TAX COMPLIANCE SERVICE
INSTALLATION & USER GUIDE
NOVEMBER, 2014
CONFIDENTIAL
EXACTOR NETSUITE SUITEAPP
USER GUIDE (NOVEMBER 2014)
TABLE OF CONTENTS
EXACTOR NETSUITE SYSTEM DESCRIPTION ......................................................................................... 1
GETTING STARTED WITH EXACTOR ........................................................................................................... 2
Searching for the EXACTOR NetSuite SuiteApp............................................................................................. 2
Updating the EXACTOR NetSuite SuiteApp ..................................................................................................... 4
Setting up EXACTOR NetSuite SuiteApp .......................................................................................................... 6
SETTING UP THE SKU SOURCE ........................................................................................................................ 9
PRODUCT MAPPING ......................................................................................................................................... 12
Mapping Products’ SKUs to EUCs ................................................................................................................... 12
Shipping to Multiple Addresses ....................................................................................................................... 14
ENTITY EXEMPTIONS ...................................................................................................................................... 15
USING EXACTOR WITHIN NETSUITE ....................................................................................................... 17
Calculating and Committing Tax .................................................................................................................... 17
Creating Invoice/Sales Order .......................................................................................................................... 17
Tracking the Taxes Calculated ........................................................................................................................ 19
Cancelling a Purchase - Refunding the Taxes ........................................................................................... 19
GRANTING PERMISSIONS TO USE EXACTOR SUITEAPP TO NETSUITE USERS .................. 21
NETSUITE FEATURES IMPACTED BY EXACTOR SUITE-APP .......................................................... 23
NOTES FOR ADMINISTRATORS .................................................................................................................. 24
I/O FIELDS ......................................................................................................................................................................... 24
SPECIAL DEPLOYMENT NOTES ................................................................................................................................................ 25
INTEGRATION WITH SITEBUILDER ........................................................................................................................................... 25
SPECIAL NOTES FOR NETSUITE ONEWORLD .............................................................................................................................. 25
November 2014
© EXACTOR CONFIDENTIAL
EXACTOR NETSUITE SUITEAPP
USER GUIDE (NOVEMBER 2014)
EXACTOR NETSUITE SYSTEM DESCRIPTION
This EXACTOR NetSuite SuiteApp was developed to enable businesses to incorporate and
benefit from the EXACTOR sales tax compliance service from within their NetSuite invoices and
sales orders. Once it is installed and setup, users do not need to perform any additional
functions to obtain sales taxes. The taxes are calculated and seamlessly displayed in all
transaction forms which require Sales Tax calculation, and because the invoice and sales orders
communicate with the EXACTOR SYSTEM, the EXACTOR NetSuite SuiteApp generates tax
returns without having to transfer data from one system to another.
More detailed information about the EXACTOR Sales Tax Compliance Service including: Account
Setup, Account Management, Reports, and Filing Returns are outlined in the EXACTOR User
Guide, available for download from the “Support” tab within the EXACTOR Merchant Module
Website.
NOTE: This manual outlines most typical NetSuite scenarios and is not intended to
detail all possible NetSuite configurations.
The EXACTOR NetSuite SuiteApp is compatible with the following platforms:
NetSuite;
NetSuite OneWorld;
NetSuite SuiteCommerce.
For information about other Exactor NetSuite transaction tools, the user should
contact their Exactor Account Manager.
November 2014
© EXACTOR CONFIDENTIAL
Page 1
EXACTOR NETSUITE SUITEAPP
USER GUIDE (NOVEMBER 2014)
GETTING STARTED WITH EXACTOR
The EXACTOR NetSuite SuiteApp is distributed as a bundle, accessed through the NetSuite
repository. It requires searching, installing, configuring the EXACTOR SuiteApp with the
NetSuite application, and finally setting up the SuiteApp in the EXACTOR Merchant Module
Website. The EXACTOR NetSuite SuiteApp also requires occasional updating. This section of
the User Guide takes the user through these processes step-by-step.
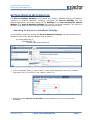
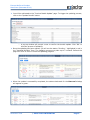
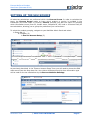
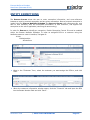
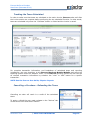
Searching for the EXACTOR NetSuite SuiteApp
For the NetSuite system to identify the EXACTOR NetSuite SuiteApp, the user should log-in to
the Admin Panel of the NetSuite Website and navigate to:
Customization tab (1)
SuiteBundler (2)
Search & Install Bundles (3).
In the “Keywords” field (1), type "Exactor", then select "Repository" from the "Location"
drop-down list (2), and click on the "Search" button (3).
Select the latest EXACTOR Tax Provider version available from the list of identified
SuiteApps.
November 2014
© EXACTOR CONFIDENTIAL
Page 2
EXACTOR NETSUITE SUITEAPP
USER GUIDE (NOVEMBER 2014)
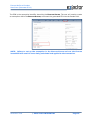
Once the system displays the Bundle Details page for the EXACTOR Tax Provider, click on the
"Install" button (1).
You will be re-directed to the Preview Bundle Install page. To start the EXACTOR NetSuite
SuiteApp installation, click on the "Install Bundle" button (1).
o
A pop-up window may prompt a user to confirm the installation. Click "ОК" to
start the installation process.
Once the installation has been started, you will see the status "Pending…" highlighted in red
in the “Installed Bundles” form. The installation process may take up to 5 minutes. Refresh
the page from time to time to check the installation progress.
November 2014
© EXACTOR CONFIDENTIAL
Page 3
EXACTOR NETSUITE SUITEAPP
USER GUIDE (NOVEMBER 2014)
When the installation process is complete, a green check mark will appear for the EXACTOR
NetSuite SuiteApp in the Status column.
NOTE: After the installation process is completed, it is recommended to clear the
browser cache.
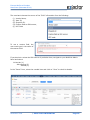
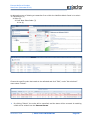
Updating the EXACTOR NetSuite SuiteApp
EXACTOR periodically publishes new versions of its integration files, including that of the
EXACTOR NetSuite SuiteApp. Once the user is notified of the new SuiteApp’s version available,
it is recommended to update to the newest version. The process is triggered from the NetSuite
website and requires the following steps to be completed:
Navigate to:
Customization tab (1)
SuiteBundler (2)
Search & Install Bundles (3)
List (4)
Click on the EXACTOR SuiteApp action icon (1) and select "Update" (2).
November 2014
© EXACTOR CONFIDENTIAL
Page 4
EXACTOR NETSUITE SUITEAPP
USER GUIDE (NOVEMBER 2014)
You will be redirected to the “Preview Bundle Update” page. To trigger the updating process,
click on the “Update Bundle” button.
A pop-up window will prompt a user to confirm the bundle update. Click "ОК" to
start the process of updating.
Once the updating has been started, you will see the status "Pending…" highlighted in red in
the “Installed Bundles” from. The updating process may take up to 5 minutes. Refresh the
page from time to time to check the updating progress.
o
When the update is successfully completed, the status checkmark for the EXACTOR SuiteApp
will appear in green.
November 2014
© EXACTOR CONFIDENTIAL
Page 5
EXACTOR NETSUITE SUITEAPP
USER GUIDE (NOVEMBER 2014)
Setting up EXACTOR NetSuite SuiteApp
Once the EXACTOR NetSuite SuiteApp is installed, a user should set up the EXACTOR
Merchant Account information within the EXACTOR NetSuite SuiteApp. This is necessary to
ensure that NetSuite communicates correctly and accurately with the EXACTOR SYSTEM to
calculate and store transaction information.
NOTE: For more information about the following account set up, the User is also
referred to the EXACTOR User Guide, located in the ‘Support’ tab of the EXACTOR
Merchant Account Panel.
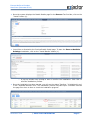
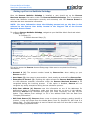
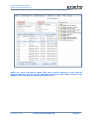
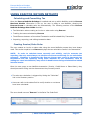
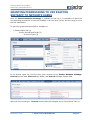
To configure EXACTOR NetSuite SuiteApp, navigate to your NetSuite Admin Panel and select:
Setup tab (1)
Company (2)
Exactor Account Setup (3).
This action opens the EXACTOR Account Setup page. Make sure to complete the following
information:
Account # (1). The account number issued by EXACTOR INC. when setting up your
EXACTOR account.
User Name (2). User name is case-sensitive, insert exactly as received from EXACTOR INC.
Exemption Id Control (3). Enabling this option allows the EXACTOR NetSuite SuiteApp
to cross-reference customer information within the EXACTOR Merchant Account to be
recognized during the invoicing process. If this option is disabled, EXACTOR will not
recognize any entity exemptions during the tax calculation process.
Ship from address (4). EXACTOR uses this information as one of the addresses for
determining taxes on transactions; make sure that there are no errors in the address.
Otherwise, EXACTOR may calculate and report your taxes incorrectly. You may use the
button "Copy address from settings" to fill in the address fields with the data from
"Company Information".
SKU Code Source (5). EXACTOR allows a user to choose the category used to identify a
product. A user can choose from the Vendor Name, Item ID, Shopzilla ID, UPC Code or a
custom field. The SKU information is sent to Exactor with each line item and is used in the
Product Mapping explained below.
November 2014
© EXACTOR CONFIDENTIAL
Page 6
EXACTOR NETSUITE SUITEAPP
USER GUIDE (NOVEMBER 2014)
NOTE: “Reset fields" returns all fields to the last saved state. If you entered invalid
data and clicked “Save”, click “Reset Fields” to restore the page and field contents to
the settings prior to clicking “Save”.
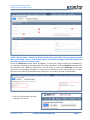
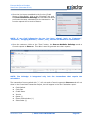
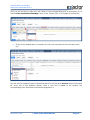
During the EXACTOR Account Setup procedure, you will also need to specify the subsidiary(s)
you want the SuiteApp to associate with during the calculation. Different EXACTOR accounts may
be associated with different subsidiaries. You will need to choose the EXACTOR account and
select the corresponding subsidiary to work with by clicking the left mouse-button (or multiselect the corresponding subsidiaries by holding Ctrl and clicking the left mouse-button).
When the information has been
entered, click "Save".
November 2014
© EXACTOR CONFIDENTIAL
Page 7
EXACTOR NETSUITE SUITEAPP
USER GUIDE (NOVEMBER 2014)
Note: During the EXACTOR Account set-up, the user can obtain help about any field by
hovering their mouse over the field in question and clicking "What's this?".
November 2014
© EXACTOR CONFIDENTIAL
Page 8
EXACTOR NETSUITE SUITEAPP
USER GUIDE (NOVEMBER 2014)
SETTING UP THE SKU SOURCE
All sales tax calculations are performed within the EXACTOR SYSTEM. In order to calculate the
taxes, the EXACTOR SYSTEM needs to know which product or service is included in the
transaction (the Sales Order or Invoice). EXACTOR provides you with the option of choosing
which information to use (Item ID, Vendor name, Shopzilla ID, UPC code or a Custom filed) for
tax calculations, allowing you to group the products at your convenience.
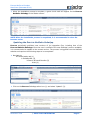
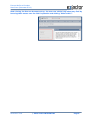
To select the product grouping, navigate to your NetSuite Admin Panel and select:
Setup tab (1)
Company (2)
EXACTOR Account Setup (3).
As previously described, in the “Exactor Account Setup” form you will need to choose the SKU
code source from the drop-down list. Your choice will determine which item information type
will be used for the tax calculations by the EXACTOR NetSuite SuiteApp.
November 2014
© EXACTOR CONFIDENTIAL
Page 9
EXACTOR NETSUITE SUITEAPP
USER GUIDE (NOVEMBER 2014)
The merchant chooses the source of the “SKU” information from the following:
(i)
(ii)
(iii)
(iv)
(v)
Vendor Name,
Item ID,
Shopzilla ID,
Custom field as SKU source,
UPC Code
To use a custom field, the
user must type in the name of
the custom field.
If you desire to review the SKU source of particular item, navigate to your NetSuite Admin
Panel and select:
Lists tab (1)
Accounting (2)
Items (3)
In the “Items” form, select the needed item and click on “View” to check its details.
November 2014
© EXACTOR CONFIDENTIAL
Page 10
EXACTOR NETSUITE SUITEAPP
USER GUIDE (NOVEMBER 2014)
You will be re-directed to the “Inventory Item” form of the chosen item, where you will find
such information, as the Item ID (1), UPC Code (2) and Vendor Name (3) among other.
You would also find the item’s Shopzilla Category ID (4) in the “Web Store” tab of the
“Inventory Item” form.
November 2014
© EXACTOR CONFIDENTIAL
Page 11
EXACTOR NETSUITE SUITEAPP
USER GUIDE (NOVEMBER 2014)
PRODUCT MAPPING
After setting up the account information and the product grouping, the user should proceed to
mapping products to EXACTOR Unified Codes ("EUC"). Product Mapping is the term used
when it is necessary for the EXACTOR SYSTEM to identify the type of products sold in order to
correctly apply taxability rules. EXACTOR applies its internal EUC to determine the tax rules that
would apply to any given transaction – which rules apply to the subject product/service in the
given taxing locality. For example, products and services such as clothing and food may have
special taxability rates in various locations. Because different taxes are applied to different
product categories, EXACTOR requires its customers to map their products to the EUCs, so that
the EXACTOR SYSTEM can provide an accurate calculation in real time without disrupting the
transaction flow.
When using the EXACTOR tax compliance service, the NetSuite internal tax rules are not applied.
As part of the set-up process, the EXACTOR module resets all NetSuite internal tax rates, to
assure there is not a conflict with the EXACTOR processes and tax calculation.
NOTE: EXACTOR assumes total control over the tax calculation process. The User
should not take any action that could interfere with EXACTOR’s operations. Do not
make any change to the NetSuite Internal Rates. Any change that a user makes to the
NetSuite tax items, such as changing the internal NetSuite rates, will result in tax
calculation errors.
Product mapping is performed on the EXACTOR Merchant Module Website and NOT from
within the NetSuite interface. As part of the tax calculation process, the EXACTOR NetSuite
SuiteApp transmits to the EXACTOR SYSTEM that SKU information from the group source that
you selected in the previous section, for each product and service being purchased. The user
must choose the source of SKU information from NetSuite, and then input it into the EXACTOR
Merchant Website, mapped to the appropriate EUC. Based upon how the product is mapped
on the EXACTOR Merchant Website, the EXACTOR SYSTEM will then apply the appropriate tax
rules and rates to each separate line item.
Mapping Products’ SKUs to EUCs
Next the user must enter the Product ID or SKU field into the EXACTOR Merchant Website and
map it to the appropriate EXACTOR Unified Code (EUC).
NOTE: EXACTOR has a bulk upload option for inputting Product Mapping into the
EXACTOR SYSTEM through a .csv file. Please contact EXACTOR Customer Service to receive
the required format of the bulk upload spreadsheet.
November 2014
© EXACTOR CONFIDENTIAL
Page 12
EXACTOR NETSUITE SUITEAPP
USER GUIDE (NOVEMBER 2014)
NOTE: For more information about EUCs and Product Mapping on the EXACTOR
Merchant Website, the user is also referred to the Exactor User Guide, located in the
‘Support’ tab of the EXACTOR Merchant Account Panel.
November 2014
© EXACTOR CONFIDENTIAL
Page 13
EXACTOR NETSUITE SUITEAPP
USER GUIDE (NOVEMBER 2014)
Shipping to Multiple Addresses
One of NetSuite’s features is the opportunity to split a purchase, allowing the customer to ship
different line items to different shipping addresses. The EXACTOR NetSuite SuiteApp will
calculate taxes for each line item independently, showing the total tax for all items purchased.
To enable Multiple Shipping Address feature in NetSuite, from the Admin Panel, navigate to:
Setup tab (1)
Company (2)
Enable Features (3)
You will be redirected to the “Enable Features” form, where you would need to click on the
“Transactions” tab and make sure that the "Multiple Shipping Routes" option (2), under the
“Shipping and Receiving” rubric (1), is enabled.
To use the multiple shipping addresses during the transactions creating, the user must select
the “Enable Item Line Shipping” option from within the transaction page.
November 2014
© EXACTOR CONFIDENTIAL
Page 14
EXACTOR NETSUITE SUITEAPP
USER GUIDE (NOVEMBER 2014)
ENTITY EXEMPTIONS
The EXACTOR SYSTEM allows the user to enter exemption information, and cross-reference
between a buyer's personal exemption and any given transaction. Once a personal exemption is
loaded into the EXACTOR NetSuite SuiteApp, the EXACTOR SYSTEM cross-references any new
sale to that customer with the exemption information of that customer, and applies the
exemption to the sale if applicable (returning $0 taxes owing).
In order for EXACTOR to identify an exemption, Enable Exemption Control ID must be enabled
within the Exactor NetSuite SuiteApp. To input an assigned ECN to a customer using the
NetSuite customer control interface, navigate to:
Lists
Relationships
Customers
Once in the “Customer” form, select the customer you want assign the ECN to, and click
“Edit”.
When the customer information window opens, click the “Financial” tab and input the ECN
into the Resale Number field and click “Save”.
November 2014
© EXACTOR CONFIDENTIAL
Page 15
EXACTOR NETSUITE SUITEAPP
USER GUIDE (NOVEMBER 2014)
The ECN is the exemption identifier issued by the EXACTOR SYSTEM. The user will need to create
an exemption within the EXACTOR SYSTEM, and insert the generated ECN into the Resale field.
NOTE: Failure to set up the exemption in the EXACTOR SYSTEM and use the EXACTOR
issued ECN will result in taxes being calculated and applied to the transaction.
November 2014
© EXACTOR CONFIDENTIAL
Page 16
EXACTOR NETSUITE SUITEAPP
USER GUIDE (NOVEMBER 2014)
USING EXACTOR WITHIN NETSUITE
Calculating and Committing Tax
Once the EXACTOR NetSuite SuiteApp is installed and set up within NetSuite, and the EXACTOR
Merchant Module information is set up, the user is ready to use NetSuite, allowing the
EXACTOR SYSTEM to calculate sales tax automatically. The following sections of the EXACTOR
NetSuite SuiteApp User Guide describe:
Tax Calculation when creating an invoice or sales order using EXACTOR
Tracking the taxes calculated by EXACTOR
The difference between a Committed Transaction and Calculated Only Transaction
Importing, exporting, and editing transaction data.
Creating Invoice/Sales Order
The user creates an invoice or sales order using the same NetSuite process they have always
used. This section explains how EXACTOR displays the tax calculation results in the transaction.
NOTE: In order to calculate taxes correctly and reliably, and for accurate tax
reporting, the user must always use the EXACTOR SYSTEM exclusively for tax calculation
purposes. Disabling or bypassing the EXACTOR SYSTEM may result in inaccurate tax
calculations and tax reporting. Using other methods for tax calculation, such as
adding tax rates into NetSuite, may result in double taxes being calculated and added
into the invoice.
Once the user opens a new NetSuite transaction (Invoice, Credit Memo or Sales Order), they
should proceed to filling out the document as they normally would.
The sales tax calculation is triggered by hitting the “Calculate”
link in the Summary section.
Users can refer to the status field to verify whether or not taxes
have been calculated.
The user should now see “EXACTOR” in the Sales Tax Code field.
November 2014
© EXACTOR CONFIDENTIAL
Page 17
EXACTOR NETSUITE SUITEAPP
USER GUIDE (NOVEMBER 2014)
Once the line items are added to the Invoice (Credit
Memo or Sales Order), click on the "Calculate" link, and
the EXACTOR NetSuite SuiteApp will calculate the taxes
and insert the taxes calculated into the transaction. An
Invoice request will be sent to Exactor.
NOTE: If any field influencing the tax has been altered (such as “Customer”,
“Discount”, “Shipping Address”, “Items”, etc.), the tax will have to be recalculated.
Once the customer clicks on the “Save” button, the EXACTOR NetSuite SuiteApp sends a
Commit request to EXACTOR. This data is used to generate tax return reports.
NOTE: The SuiteApp is integrated only into the transactions that require tax
calculation.
The transaction forms marked with “*”, will not send a Commit request to EXACTOR and will not
show in the Committed Transaction Report, but will appear in the Tax Calculation report.
Cash Refund
Cash Sale
Credit Memo
Invoice
Quote (*)
Return Authorization (*)
Sales Order (*)
November 2014
© EXACTOR CONFIDENTIAL
Page 18
EXACTOR NETSUITE SUITEAPP
USER GUIDE (NOVEMBER 2014)
Tracking the Taxes Calculated
In order to make sure that taxes are calculated on the entire invoice, EXACTOR waits until after
the invoice entries are complete before performing the tax calculation function. In other words,
taxes are calculated only when the “Calculate” button is clicked and the invoice is saved.
For complete transaction information, and breakdown of calculated taxes and reporting
jurisdictions, the user should go to the EXACTOR Merchant Module Website and select the
reporting system under the “Reports” menu. In the EXACTOR reporting system the user can see
all relevant transaction information by selection the “view” or “edit” button for a specific
transaction.
NOTE: See the EXACTOR User Guide, Chapter: Reports
Cancelling a Purchase - Refunding the Taxes
Cancelling an order will result in a credit of the calculated
taxes.
To apply a refund the user must navigate to the “Actions” tab
of the Invoice form and select “Delete”.
November 2014
© EXACTOR CONFIDENTIAL
Page 19
EXACTOR NETSUITE SUITEAPP
USER GUIDE (NOVEMBER 2014)
An alternative way of deleting a transaction from within the NetSuite Admin Panel is to select:
Transactions (1)
Sales (2)
Enter New Sales Order (3)
List (4)
Choose the specific order that needs to be refunded and click “Edit”, under “More Actions”
menu select “Delete”.
By clicking “Delete”, the order will be cancelled, and the taxes will be reversed. A matching
credit will be written into the EXACTOR SYSTEM.
November 2014
© EXACTOR CONFIDENTIAL
Page 20
EXACTOR NETSUITE SUITEAPP
USER GUIDE (NOVEMBER 2014)
GRANTING PERMISSIONS TO USE EXACTOR
SUITEAPP TO NETSUITE USERS
Once the EXACTOR NetSuite SuiteApp is installed and set up, it is necessary to grant the
corresponding permissions to use the SuiteApp to all the users (roles) who are going to work
with tax calculations.
To grant the grant these permissions, navigate to:
Customization tab (1)
Lists, Records and Fields (2)
Record Types (3)
In the Record types list, find the three ones concerning the Exactor NetSuite SuiteApp:
EXACTOR Account Data, EXACTOR Query Buffer, and EXACTOR SuiteApp System Data.
Open the first record type – EXACTOR Account Data and navigate to the “Permissions” tab (1).
November 2014
© EXACTOR CONFIDENTIAL
Page 21
EXACTOR NETSUITE SUITEAPP
USER GUIDE (NOVEMBER 2014)
Here you will be able to grant any role listed (1) the corresponding level of permission (2) to
use the EXACTOR NetSuite SuiteApp: None, View, Create, Edit, or Full range of permissions.
If any of the needed roles in missing in the list, you may select it from the drop-down
list:
You will need to repeat the actions described above for all the three EXACTOR Record Types and
for every role of the NetSuite system. Once a new role is added to the system, the
corresponding level of permission should be assigned to it.
November 2014
© EXACTOR CONFIDENTIAL
Page 22
EXACTOR NETSUITE SUITEAPP
USER GUIDE (NOVEMBER 2014)
NETSUITE FEATURES IMPACTED BY EXACTOR SUITEAPP
The SuiteApp prevents the user from altering Tax information when creating and editing a
transaction. These fields will be greyed out and non-editable:
The “Taxable” column for the list of items will be ignored even if turned on in the form.
When you change shipping data, both “Shipping Cost” and
“Tax” have to be re-calculated. You can press only the
“Calculate” link opposite the Tax field and both Shipping Cost
and Tax sums will be counted again.
The recent version of the SuiteApp, starting from 1.10, supports Project feature of
NetSuite.
November 2014
© EXACTOR CONFIDENTIAL
Page 23
EXACTOR NETSUITE SUITEAPP
USER GUIDE (NOVEMBER 2014)
NOTES FOR ADMINISTRATORS
I/O Fields
Transaction fields involved in the tax calculation process:
Read-only:
altshippingcost
entity
taxitem
istaxable
taxrate
item
expense
taxtotal
shipaddress
taxamountoverride
total
shipaddr1
shipaddr2
shipcity
shipstate
shipzip
shipaddressee
shipcountry
billaddr1
billaddr2
billlcity
billstate
billzip
billaddressee
billcountry
promocode
displaylinediscounts
discounttotal
handlingcost
shipgroup
shippingcost
shipcarrier
Read/Write:
taxtotal
taxamountoverride
total
taxrate
taxitem
istaxable
November 2014
© EXACTOR CONFIDENTIAL
Page 24
EXACTOR NETSUITE SUITEAPP
USER GUIDE (NOVEMBER 2014)
EXACTOR NetSuite SuiteApp adds several fields to the transaction body. Below you can find
the full list, as well as a brief description.
custbodyexactor_settings – special User Event scripts prepopulates it with Exactor
account settings.
custbodyexactorlasttransactionid – field which stores last calculation transaction ID.
custbodyexactorlastcommitid – field which stores last commit transaction ID.
custbodytax_calculation_status – field indicates tax calculation status in Edit mode.
custbodytax_calculation_status_view – field indicates tax calculation status in View
mode.
custbodyexactortax_button – reserved field.
custbodyexactor_checksum – reserved field.
Special Deployment Notes
EXACTOR NetSuite SuiteApp provides several deployments of User Event scripts for
transaction forms. Since tax calculation requires the most updated data for correct and accurate
information, our script needs to be run LAST. Therefore, we strongly recommend to keep our
deployments last in the execution order.
Here is a list of such deployments:
customdeployexactor_event_cash_sale
customdeployexactor_event_credit_memo
customdeployexactor_event_invoice
customdeployexactor_event_quote
customdeployexactor_event_return_auth
customdeployexactor_orderpeocessor_po
customdeployexactor_order_processor
Integration With SiteBuilder
EXACTOR NetSuite SuiteApp uses standard approach of integration with SiteBuilder. It
provides two customized forms that you need to use as scripting template for Credit Card and
Invoice:
Custom Order – Cash Sale Exactor Cart;
Custom Online Order – Invoice Exactor Shopping cart.
Special Notes for NetSuite OneWorld
EXACTOR’s Tax Agency must be applied to all subsidiaries. It is being done during the
installation step. In the future it is possible that a new Subsidiary entity will be created. In this
case, please go to EXACTOR Account Setup (Setup -> Company -> EXACTOR Account Setup)
and hit the button “Save” without making any changes. Our system will be triggered and will
apply all EXACTOR’s Tax Agency to all existing subsidiaries automatically.
Thank you for using the EXACTOR Sales Tax Compliance Service and the EXACTOR
NetSuite SuiteApp. If you have any questions, please do not hesitate to contact your
EXACTOR representative, or e-mail us at [email protected].
November 2014
© EXACTOR CONFIDENTIAL
Page 25