1
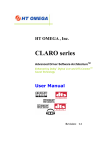
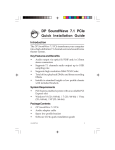
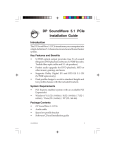
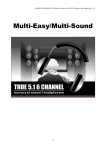
Information in this document is subject to change without notice. No part of this document may be reproduced or transmitted in any form or by any means for any purpose without the express written permission of HT OMEGA, Inc. FENIX® and HT OMEGA logo are trademarks of HT OMEGA, Inc. C-Media, the C-Media logo and Xear3D, Xear Live are trademarks of C-media Electronics Inc. EAX and A3D are trademarks of Creative Technology Ltd. Microsoft, DirectSound3D, Microsoft Windows are trademarks of Microsoft Corporation. Other company and product names may be trademarks of the respective companies with which they are associated. ASIO is a trademark and software of Steinberg Media Technologies GmbH. © 2014 HT OMEGA, Inc. The product described in this manual has been developed and produced by HT OMEGA, Inc. The information furnished in this document is provided for the customers’ reference. However, HT OMEGA, Inc. assumes no liability for any incidental, consequential and certain other damages that arise out of or relating in any way to the software or hardware device. HT OMEGA.Inc. 1912 Augusta Ct. Ontario, CA 91761 USA. Webservice: http://www.htomega.com Table of Contents 1. Instruction..................................................................4 2. Features Overview ..................................................... 5 3. Installing H/W, S/W, and Speakers ........................... 6 3.1 FENIX Hardware ......................................................................................................... 6 3.2 FENIX Installation ....................................................................................................... 9 3.3 FENIX Software ......................................................................................................... 10 4. Using Audio Driver ....................................................12 4.1 FENIX Software Control Panel.................................................................................. 12 4.2 FENIX Output Devices .............................................................................................. 13 4.3 Main Setting ............................................................................................................... 14 5. Support / Contact .....................................................42 HTO FENIX User Manual Rev. 1.1 1. Introduction Thanks for choosing an HT OMEGA audio solution! This manual will guide you in configuring the Advanced Driver Software Architecture (ADSATM) used by the FENIX . Xear TM Living technology, the FENIX provides a value-added PC audio solution with maximum support for all kinds of applications. With this manual, users can quickly take advantage of these great features to enjoy amazing sound quality. Support DS3DTM Games s 7.1 Virtual SPEAKER SHIFTER 2-Speaker Virtual Theater Headphone output DVD Movies Environment Emulation 10-Band Equalizer music (MP3/CD) Magic VoiceTM Noise Reduction M ADSATM Features for All Applications Copyright © 2014, HT OMEGA, Inc. All Rights Reserved. http://www.htomega.com 3 e s s e n g e r / K a r a HTO FENIX User Manual Rev. 1.1 What’s in the box? You should have received the following with your FENIX: FENIX soundcard Drivers/Applications CD Fiber Optical Digital Cable This manual Specifications (1) Sound Processor C-Media CMI8828/PCI-8ch PCI Express Chipset Integrated S/PDIF Optical and Coaxial Digital Output HD CODEC ( Up to 24bit 192Khz) (2) Interface PCI Express x1 High quality Analog Inputs and Outputs connector Onboard Optical and 2pin digital Output and Input connectors Front Panel Audio supports: 10pin connector (Intel HD Front Panel Audio Compliant) for Headphone output through Front Panel Audio of PC case. With the Front Panel Audio enabled, users can connect a high quality headphone output. Swappable Opamps for Front Output and Front Panel Audio output. (3) Supporting OS Windows XP, Windows 7, Windows8 Note: The driver does not support Windows VISTA. Copyright © 2014, HT OMEGA, Inc. All Rights Reserved. http://www.htomega.com 4 HTO FENIX User Manual Rev. 1.1 2. Features Overview The following is an overview of the features of the FENIX. The FENIX driver supports recent generation multi-channel digital features and the following key features: Xear™ Living - 7.1 Virtual Speaker Shifter technology, Environment Effects, and FlexBassII Xear™ Sonic – configurable Virtual Bass and Voice Clarity Xear™ SingFx – Pitch-Shifting, Singing Echo and Vocal Fading. Xear™ Surround – Surround Max, Surround Speaker and Headphone. Xear™ Magic Voice™, a popular feature for disguising voice in online chatting Xear™ VoClear – Environmental Noise Cancellation Supports 3D sound for PC gaming by DirectSound™ Supports 7.1 CH audio playback System Requirements (Minimum) Genuine Intel® Pentium® III 800 MHz or equivalent AMD® processor 256 MB RAM Microsoft® Windows® XP Service Pack 1 (SP1) Available PCI Express X1 slot for the audio card A headphone or 2channel amplified speakers (available separately) 500 MB of free hard disk space CD-ROM or DVD-ROM drive required for software installation from CD Copyright © 2014, HT OMEGA, Inc. All Rights Reserved. http://www.htomega.com 5 HTO FENIX User Manual Rev. 1.1 3. Installing H/W, S/W, and Speakers 3.1 FENIX Hardware Connectors and Opamps sockets 1 MIC IN (3.5mm Stereo-jack): Connects to external condenser or dynamic microphone for voice input. 2 LINE IN (3.5mm Stereo-jack): Connects to external analog line-level sources, such as CD players, MP3 players, MD players, TV card's internal line output and other analog stereo output devices. 3 FRONT (3.5mm Stereo-jack): Connects to Front input on powered analog speakers or an external amplifier. Copyright © 2014, HT OMEGA, Inc. All Rights Reserved. http://www.htomega.com 6 HTO FENIX User Manual Rev. 1.1 4 SIDE SURROUND (3.5mm Stereo-jack): Connects to Rear (or side surround) input on amplifier or powered multi-channel analog speakers. 5 CENTER/S.WOOFER (3.5mm Stereo-jack): Connects to Center/Sub-Woofer inputs on amplifier or powered multi-channel analog speakers. 6 BACK SOURROUND (3.5mm Stereo-jack): Connects back surround input on powered multi-channel analog speakers, an external multi-channel amplifier in 7.1 channel analog playback modes. 7 OPTICAL Digital Input: Connects for external digital output devices such as a digital CD player. Only PCM digital audio (2ch digital) can be recorded. Non-PCM signal like Dolby® Digital and DTS® stream cannot be recorded. 8 OPTICAL Digital Output: Connects to external digital devices like AV receivers, decoders or digital speaker systems. High quality Optical S/PDIF output transmits PCM digital audio. Also allows pass-through of Non-PCM signal like Dolby® Digital and DTS® stream to external DD/DTS decoder and A/V receivers. Note: Optical and Coaxial digital outputs do not support 7.1ch digital output such as Dolby TrueHD or DTS-HD Master Audio. 9 COAXIAL Digital Output: Connects to external digital devices like AV receivers, decoders or digital speaker systems by coaxial digital cable. User can get Optical and Coaxial digital output at the same time. 10 Swappable Op-amp for Front output: FENIX provides swappable op-amp socket for Front Output. The socket uses dual DIP type opamp. 11 Front Panel Audio (10 Pin Header): Connects to the Front Panel Audio Cable of your PC case for headphone output. User can use Headphone : HT OMEGA FENIX playback device thru this Front Panel Audio output. This 10pin header is compatible with Intel HD Audio front panel module. Pin 1 – MIC, Pin 2 – Ground, Pin 5 - Front Right, Pin 9 - Front Left Pin 4,6,7,8 and10 are not available Copyright © 2014, HT OMEGA, Inc. All Rights Reserved. http://www.htomega.com 7 HTO FENIX User Manual Rev. 1.1 12 Swappable Op-amp for Headphone: FENIX provides swappable dual op-amp socket for Headphone output thru 10pin connector. (This output is available thru 10pin connector output only). 13 Coaxial or CD S/PDIF Output (2Pin digital out): Connects to external digital input device such as a digital receiver or HDMI VGA card which has 2pin digital input. 14 Coaxial or CD S/PDIF Input (2Pin digital in): Connects to external digital Output device such as CD digital audio. This connector supports PCM digital input. Optional 2pin- RCA cable Note: This 2pin-RCA cable not included. Please contact HT OMEGA ([email protected]) for purchasing this cable. Copyright © 2014, HT OMEGA, Inc. All Rights Reserved. http://www.htomega.com 8 HTO FENIX User Manual Rev. 1.1 3.2 FENIX Installation Before installing the FENIX card, we recommend that you disable onboard audio device in main board BIOS setting, and uninstall any other sound cards on PC to avoid conflicts. 1 Turn off PC. 2 Open the PC case 3 Insert FENIX to empty PCI Expressx1 slot. 4 Secure sound card to PC case. Copyright © 2014, HT OMEGA, Inc. All Rights Reserved. http://www.htomega.com 9 HTO FENIX User Manual Rev. 1.1 3.3 FENIX Software Please disable any existing sound/audio devices (may need to disable in BIOS) and remove the associated software and drivers before installing "FENIX" to avoid potential device and/or driver conflicts. Drivers and applications can be removed through the “Add or Remove Programs” – XP menu or “Programs and Features” – Windows7, 8 menu in Windows Control Panel. (1) Installing the drivers and software ① Turn on PC. Windows will automatically detect new hardware-Multimedia Audio Controller and prompt the Found New Hardware Wizard. Click the Cancel button to end this process. Note : Under Windows7 and Windows8, High Definition Audio Device will be installed automatically first. Please install FENIX driver for using all FENIX features. ② Insert installation CD into the CD/DVD drive. Installation CD will launch automatically only if the Auto-Insert Notification option is enabled for your CD/DVD drive. If the installation menu does not appear after inserting the installation CD into your CD/DVD drive, browse to the drive letter that contains the installation CD and double-click on the CD/DVD drive icon to explore it. Search for and run "SETUP.EXE" and proceed to the next step. Copyright © 2014, HT OMEGA, Inc. All Rights Reserved. http://www.htomega.com 10 HTO FENIX User Manual Rev. 1.1 ③ When the installation menu appears, select "Next". Follow the instructions that appear during the installation selecting the options that best match your audio setup. ④ When prompted, reboot the system to properly complete the installation. (4) TO UNINSTALL "FENIX" drivers and softwares ① Open the Windows Control Panel (Start => Settings => Control Panel). ② Open the Add/Remove Programs (XP) or Programs and Features (Windows7 and Windows8) in Windows Control Panel. Select "HT OMEGA FENIX" and click ③ To complete the uninstall process, Windows needs to be restarted. Select Yes, I want restart my computer now then press Finish. (Please do not skip restart now before installing updated driver) Copyright © 2014, HT OMEGA, Inc. All Rights Reserved. http://www.htomega.com 11 HTO FENIX User Manual Rev. 1.1 4. Using Audio Driver 4.1 FENIX Software Control Panel Xear Audio Center is the audio control panel that allows the user to manage all audio configurations. After finishing the installation of the driver and rebooting the system, this audio control panel will be available through two locations: 1.Left-Click the icon in the system tray in the right-bottom of your screen. You can also click right button the icon to access the audio-related menu. Note: If you can’t see this icon, please click triangle mark in System Tray for showing hidden icons. 2. Double-click “Xear Audio Center ” icon in Windows “Control Panel”. Note: You can see all Control Panel Items to check “View by: Small icons” in upper right side of Windows Control Panel . Copyright © 2014, HT OMEGA, Inc. All Rights Reserved. http://www.htomega.com 12 HTO FENIX User Manual Rev. 1.1 4.2 FENIX Output Devices There are 3 separate devices for playback. 1. Speakers : HT OMEGA FENIX – It is main playback device. Please set it as Default Device as pictured above. You can use each outputs up to 7.1ch in back-panel of sound card. (Default Gain for all channel: -6dB. Range: -62dB to 2dB) 2. Headphones: HT OMEGA FENIX - It is headphone output device through 10pin output connector. User can use this headphone output device through Front Panel Audio outputs which are compatible with Intel AC97 or Intel HD 10pin connector. Note: This 10pin connector is NOT compatible with Creative Front Panel Audio Connector such as found on some DELL and HP PCs. 3. Digital Audio (S/PDIF) : HTOMEGA FENIX - For using Digital Output, please set it for default playback device in your applications. (Support PCM and AC3 RAW data output) Copyright © 2014, HT OMEGA, Inc. All Rights Reserved. http://www.htomega.com 13 HTO FENIX User Manual Rev. 1.1 4.3 Main Setting Xear Audio Center is the graphic interface for FENIX driver. You can control all features of FENIX on this control panel. The following pictures show a basic overview of the FENIX. 1. Main Window 2. Status Panel 3 5 6 1 2 4 Status panel indicates device current state. It shows playback sample rate, Output device channel configuration, DSP feature on/off state, default device etc Copyright © 2014, HT OMEGA, Inc. All Rights Reserved. http://www.htomega.com 14 7 HTO FENIX User Manual Rev. 1.1 1) Playback (Speakers Out) It indicates the default output device. 2) Capture (Mic In) It indicates the default input device. 3) Speaker Numbers (2/4/5.1/7.1) It indicates the speaker numbers for Speaker device only. 4) Sample Rate It indicates the Playback sample rate for default output device. 5) Output effect indicator It indicates the playback sound effect status. Abbreviation Sound effect EQ Equalizer EM Environment Effects VSS 7.1 Virtual Speaker Shifter FB Flex Bass II KS Xear SingFX Key Shifting VF Xear SingFX Vocal Fading AB Xear Audio Brilliant DB Xear Dynamic Bass SVN Xear Smart Volume VC Xear Voice Clarity 6) Input effect indicator It indicates the recording sound effect status. Abbreviation Sound effect SF Xear SingFX Microphone Echo SF Xear SingFX Magic Voice NR Xear VoClear Noise Reduction 7) Switch to Profile Panel button Click on this button will switch status bar to Profile panel. Copyright © 2014, HT OMEGA, Inc. All Rights Reserved. http://www.htomega.com 15 HTO FENIX User Manual Rev. 1.1 3. ASIO Panel Button Click this button to launch ASIO Control Panel for controlling the ASIO bit depths and latency. The ASIO control Panel in Windows XP is different with Other OS (Windows 7 and Windows 8). 4. DirectSound 3D Game Extensions 2.0 Click this button to enable/disable DirectSound 3D Game Extension 2.0 in Windows7 and later OS. 5. Speakers - Feature Pop Menu These features effect to Speakers: HTO FENIX out device only. Copyright © 2014, HT OMEGA, Inc. All Rights Reserved. http://www.htomega.com 16 HTO FENIX User Manual Rev. 1.1 All available audio features for the device are listed on the pop menu. Users can click mouse right button- on the device icon for pop-up feature menu and select the feature item for using feature. 1) Speaker - Volume Control Volume control shows volume control for each channel. 1 3 2 1 Volume Control Bar Master: Adjust the volume level for all channels. Front, Rear, Cen/LFE, Side : Adjust the volume level for the each channels according to speaker setting. 2 Left/Right Channel Lock Click to lock/un-lock the left/right channel volume sync . 3 Mute/Un-mute Click to mute/un-mute all channels. 4 dB Input Area Key-in a dB value in this text box to set the volume level. The number of volume control sliders depends on Speaker. The number of sliders will fit speaker configuration. Copyright © 2014, HT OMEGA, Inc. All Rights Reserved. http://www.htomega.com 17 4 HTO FENIX User Manual Rev. 1.1 2) Speaker - Speaker Settings Speaker Settings allows the user to choose speaker configuration. Users can test individual speaker output by clicking on its respective speaker icon. 1 3 2 1 Channel Setting - Set the speaker numbers (stereo, quadraphonic, 5.1 and 7.1 surround) 2 LFE/Center Channel Swap - When enabled, channel content of Center and LFE will be swapped 3 Speaker Test - When “Speaker Test” button is clicked, the CPL will auto play test sound in order. Users can click each speaker icon for testing the individual speakers. Also user can click play button to make it automatically test current speaker configuration. Copyright © 2014, HT OMEGA, Inc. All Rights Reserved. http://www.htomega.com 18 HTO FENIX User Manual Rev. 1.1 3) Speaker - Sample Rate Setting Sample Rate feature allows user to configure sample rate and bit depth. 2 1 1 Sample Rate button 44.1 KHz - Set output sample rate to 44.1K 48 KHz - Set output sample rate to 48K 88.2 KHz - Set output sample rate to 88.2K 96 KHz – Set output sample rate to 96K 192 KHz – Set output sample rate to 192K 2 Bits depths button 16 Bits – Set output bit-depth to 16 bits. 24 Bits – Set output bit-depth to 24 bits. (32 bits container with 24 bits valid data) Copyright © 2014, HT OMEGA, Inc. All Rights Reserved. http://www.htomega.com 19 HTO FENIX User Manual Rev. 1.1 4) Speaker – Equalizer User can adjust the EQ band manually and create customized preset items, or use preset EQ modes. 1 3 2 4 1 EQ enable/disable switch Click this check box to enable/disable EQ 2 Preset mode Select a preset mode for equalizer that is designed accordingly. There are 12 preset modes such as Bass, Treble, Live, Rock, Jazz, etc. 3 EQ band controller Change the gain setting for each band 4 Manual mode You can change the gain setting for each band and save your own EQ presets. Copyright © 2014, HT OMEGA, Inc. All Rights Reserved. http://www.htomega.com 20 HTO FENIX User Manual Rev. 1.1 5) Speaker - Environment Effects It provides special environment emulations; you can hear different sound reflection and reverberation. 1 2 3 1 Environment Effect enable/disable switch Click on/off this check box to enable/disable Environment Effect. 2 Environment Effect mode Click on an Environment effect button or open the dropdown list to choose an environment effect. 3 Room Size You can change the “Room Size” to simulate a larger or smaller space. (Default: Small Room) Copyright © 2014, HT OMEGA, Inc. All Rights Reserved. http://www.htomega.com 21 HTO FENIX User Manual Rev. 1.1 6) Speaker - 7.1 Virtual Speaker Shifter This feature is for simulating the speaker direction and distance. 6 1 17 21 8 3 4 5 1 7.1 Virtual speaker shifter enable/disable switch 2 Auto Rotation Mode : The virtual speakers are rotating slowly. 3 Manually Rotation Mode Use mouse to rotate the virtual speakers on screen manually. 4 Manual Shifting (Free Moving Mode) Click-and-drag the speaker icons to move the location of individual virtual speakers. 5 Reset Reset the location of virtual speakers to default positions (as -4dB spot) 6 Virtual Speaker (L/R/Ls/Rs/Lb/Rb/C/W) location. 7 Volume Control 8 Volume Indicator Indicate value for each channel. (Default: -4dB) Copyright © 2014, HT OMEGA, Inc. All Rights Reserved. http://www.htomega.com 22 HTO FENIX User Manual Rev. 1.1 7) Speaker - FlexBass II You can use this feature to increase/decrease the LFE strength. This feature would cut the low frequency band (50~250Hz) of stereo music content (ex. Mp3, WMA, CD Audio) and transfer to subwoofer or each speaker. 1 2 3 5 4 1 Flex Bass II enable/disable switch 2 Cut Off Frequency: The range of low frequency cut-off value is from 50Hz to 250Hz. (Default: 100Hz) 3 Bass Level: The bass level range is from -12 to 12dB. (Default: 0dB) 4 Speaker Size (L/R/Ls/Rs/Lb/Rb/C/LFE) Set each selection based on your individual speakers and Flex Bass II will redirect lower frequencies accordingly: Small Speaker w/o bass Large Speaker w/ bass 5 Speaker Diagram You also can check the speaker size from home theater diagram. Copyright © 2014, HT OMEGA, Inc. All Rights Reserved. http://www.htomega.com 23 HTO FENIX User Manual Rev. 1.1 8) Speaker - Xear SingFX Xear SingFX provides Key Shifting and Vocal fading for karaoke applications. 1 2 1 Key Shifting switch It provides the key change feature. The range is shifting-up 4 steps and shifting-down 4 steps. You can use slider bar to change the key level. 2 Vocal Fading: It provides a vocal removal feature for any stereo music content (ex. Mp3, WMA, CD, etc.) You can use the slider to change the vocal fading level. (Default: 50) Copyright © 2014, HT OMEGA, Inc. All Rights Reserved. http://www.htomega.com 24 HTO FENIX User Manual Rev. 1.1 9) Speaker - Xear Surround Speaker Xear Surround Speaker creates a virtual multi-channel speaker from Stereo Speakers. 1 2 4 3 Note: This effect only works on stereo output. 1 Enable Xear Surround Speaker 2 Surround Max: Click this check box to enable/disable Surround Max. 3 Sound Field Expansion Adjusts sound field expansion from wide to narrow (with narrow as default). 4 Speaker Angle Adjusts speaker angle. (Default set to 5) Note: Enabling Xear Surround Speaker will change Default Format to “Xear Surround 7.1” in Windows7 and 8 OS. Copyright © 2014, HT OMEGA, Inc. All Rights Reserved. http://www.htomega.com 25 HTO FENIX User Manual Rev. 1.1 10) Speaker - Xear Audio Brilliant Xear Audio Brilliant can restore the clarity and details of compressed audio in music, movies and games (MP3, WMA, AAC, AC3, etc.). 1 3 2 1 Enable Audio Brilliant Click this check box to enable/disable Xear Audio Brilliant. 2 Brilliant Level Increase/decrease the Brilliant Level. 3 Reset Reset to default value. Copyright © 2014, HT OMEGA, Inc. All Rights Reserved. http://www.htomega.com 26 HTO FENIX User Manual Rev. 1.1 11) Speaker - Xear Dynamic Bass Xear Dynamic Bass can increase the bass reproduction capability of small speakers by applying psychoacoustic techniques. 1 2 4 3 1 Enable Dynamic Bass Click this check box to enable/disable Xear Dynamic Bass effect. 2 Bass Level Increase/decrease the Bass Level. Default level value is 5. 3 Cut-Off Frequency Adjusts the Cut-Off Frequency value. Default value is 200Hz. 4 Reset Reset to default value. Copyright © 2014, HT OMEGA, Inc. All Rights Reserved. http://www.htomega.com 27 HTO FENIX User Manual Rev. 1.1 12) Speaker - Xear Smart Volume Xear Smart Volume can normalize sound levels of music to avoid the need for frequent manual volume adjustments. 1 2 3 1 Enable Smart Volume Click this check box to enable/disable the Xear Smart Volume 2 Volume Level Set normalized sound level. (Default: 70) 3 Mode Choose Music mode or Speech Mode according to usage scenario. Copyright © 2014, HT OMEGA, Inc. All Rights Reserved. http://www.htomega.com 28 HTO FENIX User Manual Rev. 1.1 13) Speaker - Xear Voice Clarity Xear Voice Clarity increases clarity, intelligibility, and prominence of receiving voice in VOIP, game, music, or movies without suppressing or affecting other audio streams. 1 2 3 4 1 Enable Voice Clarity Click this check box to enable/disable Xear Voice Clarity effect. 2 Voice Clarity Level Increase the volume Level to make the voice clearer. 3 Noise Suppression for communication Eliminate the background noise. 4 Reset Reset to default value. Copyright © 2014, HT OMEGA, Inc. All Rights Reserved. http://www.htomega.com 29 HTO FENIX User Manual Rev. 1.1 14) Speaker - Surround Max Xear Surround Max provides upmix feature. User can enjoy multi-channel outputs from stereo sources. Note: This feature is available only when speaker configuration is set to 4/5.1/7.1 channels. 1 1 Enable Surround Max Click this check box to enable/disable Xear Surround Max. Copyright © 2014, HT OMEGA, Inc. All Rights Reserved. http://www.htomega.com 30 HTO FENIX User Manual Rev. 1.1 6. Headphone - Feature Pop Menu These features affect Headphones: FENIX out device only. 1) Headphone – Volume Control This feature provides volume control for Headphone device. 1 2 4 3 1 Volume control bar: Adjusts volume level for headphone output. 2 Left/ Right Channel Lock: Click to lock/un-lock left/right-channel volume sync. 3 Mute / Un-mute: Click to mute/un-mute all channels. 4 dB Input Area 2) Headphone – Headphone Setting This feature provides Headphone output test. 1 1 Headphone Test – Click this button to start Headphone output test Copyright © 2014, HT OMEGA, Inc. All Rights Reserved. http://www.htomega.com 31 HTO FENIX User Manual Rev. 1.1 3) Headphone – Sample Rate: User can choose Sample rate from 44.1khz to 192khz and Bit (16 or 24bit). 4) Headphone – Equalizer : Refer to “Speaker - Equalizer” 5) Headphone – Environment Effects: Refer to “Speaker - Environment Effects” 6) Headphone – Xear SingFX: Refer to “Speaker - Xear SingFX” 7) Headphone – 7.1 Virtual Speaker Shifter : Refer to “Speaker - 7.1 Virtual Speaker Shifter” 8) Headphone – Xear Surround Headphone Xear Surround Headphone is for virtualized multi-channels context to Stereo Headphone output. User can get multi-channel speaker effect by headphone output. 1 2 4 3 1 Enable Xear Surround Headphone Click this check box to enable/disable Xear Surround Headphone. 2 Surround Max Click this check box to enable/disable Surround Max. 3 Room Size There are 3 room size selections: small, medium and large (with medium room as default). 4 Speaker Test : Test Xear Surround Headphone effect. Note: Enable Xear Surround Headphone will change Default Format to “Xear Surround 7.1” in Windows7 and 8 OS. Copyright © 2014, HT OMEGA, Inc. All Rights Reserved. http://www.htomega.com 32 HTO FENIX User Manual Rev. 1.1 9) Headphone – Xear Audio Brillant: Refer to “Speaker – Xear Audio Brillant” 10) Headphone – Xear Dynamic Bass: Refer to “Speaker -Xear Dynamic Bass” 11) Headphone – Xear Smart Volume: Refer to “Speaker – Xear Smart Volume” 12) Headphone – Xear Voice Clarity: Refer to “Speaker – Xear Voice Clarity” 13) Headphone – Surround Max: Refer to “Speaker – Surround Max” Note: This feature is available only under Xear Surround Headphone is enabled. Copyright © 2014, HT OMEGA, Inc. All Rights Reserved. http://www.htomega.com 33 HTO FENIX User Manual Rev. 1.1 7. S/PDIF Out These features effect Digital Audio (S/PDIF) FENIX out device only. 1) Volume Control 1 2 4 3 1 Volume control bar: S/PDIF-Out – Adjusts SPDIF output level. 2 Left/ Right Channel Lock: Click to lock/un-lock left-channel and right-channel volume sync. 3 Mute / Un-mute: Click to mute/un-mute all channels. 4 dB Input Area You can directly fill-in a dB value into this text box to set the volume level. 2) Sample Rate User can choose Sample rate Khz from 44.1khz to 192khz and Bit (16 or 24bit).. Copyright © 2014, HT OMEGA, Inc. All Rights Reserved. http://www.htomega.com 34 HTO FENIX User Manual Rev. 1.1 8. Microphone These features affect microphone input from Microphone Input and Front Panel Audio Microphone input. 1) Volume Control 1 4 2 3 1 Volume control bar: Mic-In – Adjusts volume level for microphone recording. Monitor- Adjusts volume level for Mic-in monitor. 2 Left/ Right Channel Lock: Click to lock/un-lock left-channel and right-channel volume sync. 3 Mute / Un-mute: Click to mute/un-mute all channels. 4 dB Input Area: You can directly fill-in a dB value into this text box to set the volume level. 2) Microphone – Sample Rate Setting User can choose Sample rate Khz from 44.1khz to 192khz and Bit (16 or 24bit). Copyright © 2014, HT OMEGA, Inc. All Rights Reserved. http://www.htomega.com 35 HTO FENIX User Manual Rev. 1.1 3) Microphone – Xear SingFX 1 2 3 1 Microphone Echo Click this check box to enable the Microphone echo effect. The slider bar can be used to change the echo level. 2 Magic Voice (Monster/Cartoon/Male/Female) Click this check box to enable the Magic Voice effect. Buttons can be used to select the 4 magic voice modes. (Default: Cartoon) 3 Resets Reset to default value. Note: This Microphone Xear SingFX is not monitored directly. You can get result by recording only. Under Windows7 and Windows8, you can monitor signal to turn off Microphone Monitoring and check “Listen to this device” in Microphone Properties. Copyright © 2014, HT OMEGA, Inc. All Rights Reserved. http://www.htomega.com 36 HTO FENIX User Manual Rev. 1.1 4) Microphone – Microphone Boost This is for Microphone boost feature. Microphone boost is for boosting microphone recording and also monitor signal. Boost Slider – adjust Boost level. . 5) Microphone – Noise Reduction This is for microphone recording to reduce stationary noise. This feature can reduce noise from air conditioners, electric fans, etc. Enable – This check box is for enable/disable Noise Reduction feature. Copyright © 2014, HT OMEGA, Inc. All Rights Reserved. http://www.htomega.com 37 HTO FENIX User Manual Rev. 1.1 9. Line In These features effect to Line In 1) Volume Control : Refer to “Microphone – Volume Control”. 2) Sample Rate: User can choose Sample rate Khz from 44.1khz to 192khz and Bit (16 or 24bit). 10. SPDIF-In for Optical and Coaxial There are two S/PDIF-In devices for FENIX. User can choose Optical or Coaxial S/PDIF input connector. digital input. A 2Pin-Coaxial cable (not included) is required for coaxial 1) Volume Control : Refer to “Microphone – Volume Control”. 2) Sample Rate: User can choose Sample rate KHz from 44.1KHz to 192KHz and Bit (16 or 24bit). Note: Please sync sample rate from sources. Ex: For playback of 44.1KHz (16bit) file (typical audio CD), please set sample rate to 44.1KHz and 16bit. Note: User can record PCM (2ch digital data). This digital input does not support multi-channel stream such as AC3, DTS signal. Copyright © 2014, HT OMEGA, Inc. All Rights Reserved. http://www.htomega.com 38 HTO FENIX User Manual Rev. 1.1 3) Monitoring: For digital input signal monitoring, please check Windows Control Panel > Sound > Recording tab> Digital Audio (S/PDIF) HT OMEGA FENIX properties. User can find “Listen to this device” in Listen tab under Windows7 and Windows8. Please check this option for monitoring. Note: S/PDIF input monitoring is not supported under Windows XP 11. Stereo Mix. These features effect the Stereo Mix device. 1) Volume Control: 1 2 4 3 1 Volume Control Bar: Stereo Mix – Adjusts volume level for Stereo Mix Recording. 2 Left/ Right Channel Lock: Click to lock/un-lock left-channel and right-channel volume sync. 3 Mute / Un-mute: Click to mute/un-mute all channels. 4 dB Input Area You can directly fill-in a dB value into this text box to set the volume level. 2) Sample Rate: User can choose Sample rate from 44.1KHz to 192KHz and Bit Copyright © 2014, HT OMEGA, Inc. All Rights Reserved. http://www.htomega.com 39 HTO FENIX User Manual Rev. 1.1 12. Application Setting Click setting item to open the “Xear Audio Center” setting. 1 2 3 4 1 Show System Tray Icon – Check “Show System Tray Icon” box for showing the Xear Audio center icon in the system tray. 2 UI Transparent – Adjusts the UI transparency level 3 Language Select – Xear Audio Center supports multiple languages. 4 Don’t show start up message – it can open/close the UI start-up message. Copyright © 2014, HT OMEGA, Inc. All Rights Reserved. http://www.htomega.com 40 HTO FENIX User Manual Rev. 1.1 13. Tray Icon Feature Introduction Open the “CPL Tray Icon Feature List” by right-clicking on the tray Icon on system tray. 1 2 3 4 5 6 7 1 Open: Open the Xear Audio Center. 2 Volume Control: Open the Volume Mixer of Windows OS. 3 Windows Media Player: Open the Microsoft Windows Media Player. 4 Sound Recorder: Open the Windows Sound Recorder. 5 Multimedia Properties: Opening the Multimedia Properties of Windows OS, you can select the working sample rate & bit rate on the property. 6 Settings: Open the Application Setting of Xear Audio Center. 7 Exit: Close the Xear Audio Center. Note: If you click Exit button, the Xear Audio Center program will be closed. User can find Xear Audio Center in Windows Control Panel > View By: Small icons Copyright © 2014, HT OMEGA, Inc. All Rights Reserved. http://www.htomega.com 41 HTO FENIX User Manual Rev. 1.1 5. Support / Contact HT OMEGA offers various resources to provide customer support. Please visit our website http://www.htomega.com to access our customer service section. The latest FAQ’s, drivers, product documentation and applications can be found on the website, along with any new product development and information. Thank you for choosing an HT OMEGA product. We look forward to providing you with the highest quality products and service. LIMITED WARRANTY HT OMEGA, Inc. warrants to the original purchaser only that the hardware product will be free of defects in materials and workmanship for a period of twelve (12) months from the date of purchase. HT OMEGA, Inc. will, at its sole discretion, repair or replace the product if it is found to be defective. This warranty does not cover a product failure that is the result of misuse, abuse, modification, misapplication, or normal wear and tear. No claim is made for merchantability or fitness for any purpose. In no event will HT OMEGA, Inc. be liable for any direct, indirect, consequential, or incidental damages arising out of the use of this product. In no event will HT OMEGA’s liability exceed the purchase price you paid for the product. The purchaser must contact HT OMEGA, Inc or its regional representative to receive prior approval before returning a faulty unit. All such returns must be shipped to HT OMEGA, Inc in the original packaging including all accessories (documents, cables, software, etc.) along with the original sales receipt. Any costs associated with the return/shipping/insuring the package are the sole responsibility of the end-user. Shipments without freight prepaid will not be accepted. If the returned product is deemed to be defective, the repaired or replacement product will be returned at no extra charge via the carrier chosen by HT OMEGA, Inc. Copyright © 2014, HT OMEGA, Inc. All Rights Reserved. http://www.htomega.com 42 HTO FENIX User Manual Rev. 1.1 NOTE: This equipment has been tested and found to comply with the limits for a Class B digital device, pursuant to part 15 of the FCC Rules. These limits are designed to provide reasonable protection against harmful interference in a residential installation. This equipment generates, uses and can radiate radio frequency energy and, if not installed and used in accordance with the manufacturer’s instructions, may cause harmful interference to radio communications. However, there is no guarantee that interference will not occur in a particular installation. If this equipment does cause harmful interference to radio or television reception, which can be determined by turning the equipment off and on, the user is encouraged to try to correct the interference by one or more of the following measures: -Reorient or relocate the receiving antenna. -Increase the separation between the equipment and receiver. -Connect the equipment into an outlet on a circuit different from that to which the receiver is connected. -Consult the dealer or an experienced radio/TV technician for help. CAUTION: Changes or modifications not expressly approved by the manufacturer responsible for compliance could void the user’s authority to operate the equipment. Copyright © 2014, HT OMEGA, Inc. All Rights Reserved. http://www.htomega.com 43