1
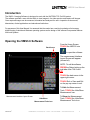
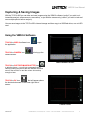
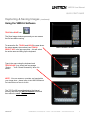
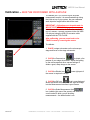
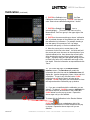
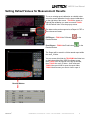
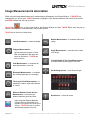
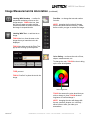
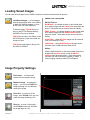
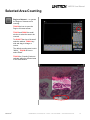
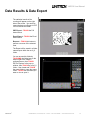
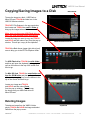
VMS3.6 Software
MANUAL
73 Mall Drive, Commack, NY 11725 • 631-543-2000 (P) • 631-589-6975 (F)
www.unitronusa.com • [email protected]
VMS3.6 User Manual
CONTENTS
INTRODUCTION ........................................................................................................ 3
OPENING THE VSM3.6 IMAGING SOFTWARE ....................................................... 3
CAPTURING & SAVING IMAGES........................................................................... 4-5
CALIBRATION......................................................................................................... 6-7
SETTING DEFAULT VALUES FOR MEASUREMENT RESULTS .............................. 8
IMAGE MEASUREMENT & ANNOTATION ........................................................... 9-10
LOADING SAVED IMAGES ..................................................................................... 11
IMAGE PROPERTY SETTINGS .............................................................................. 11
IMAGE ENHANCEMENT ......................................................................................... 12
SELECTED AREA COUNTING ................................................................................ 13
DATA RESULTS & DATA EXPORT .......................................................................... 14
COPYING/SAVING IMAGES TO A DISK ................................................................. 15
UNITRON®
73 Mall Drive, Commack, NY 11725 • 631-543-2000 • www.unitronusa.com
2
VMS3.6 User Manual
Introduction
The VMS 3.6 Imaging Software is designed to work with the UNITRON TCS Pro 500 system.
The software provides a user with the ability to view images in live video preview and capture still images.
Once captured images can be measured, annotated and analyzed for use in inspection environments,
laboratories, clinical applications and educational institutions.
For purposes of this User Manual it is assumed that the reader has a working knowledge of microscopy,
digital imaging, Android and Windows operating systems as the design of the software incorporates features
from both systems.
Opening the VMS3.6 Software
Back Arrow
From the Home Screen,
TOUCH the VMS3.6 icon
to open the software.
The measurement Interface
Layout Screen will appear
(shown left).
NOTE: To exit the software,
PRESS the Return button on the
right side of the TCS Pro 500
OR
TOUCH the back arrow in the
upper right corner.
TOUCH Exit or Save and Exit
on the pop up screen to exit.
To Hide the Measurement
Tools, TOUCH the Hide/Show
Measurement Icon.
Measurement Interface Layout Screen
Hide/Show
Measurement Tools Icon
UNITRON®
To Show the Measurement
Tools, TOUCH the Hide/Show
Measurement Tools Icon.
73 Mall Drive, Commack, NY 11725 • 631-543-2000 • www.unitronusa.com
3
VMS3.6 User Manual
Capturing & Saving Images
With the TCS Pro 500 you can take and save images using the VSM3.6 software (useful if you wish to do
immediate analysis, measurement or annotation), or just with the camera only (useful if you wish to take and
save multiple photos before analysis).
You can save images to the TCS Pro 500’s internal storage and then copy to a USB flash drive, or a mini SD
card.
Using the VMS3.6 Software
TOUCH the VMS3.6 software icon
the application
TOUCH the CAMERA icon
camera screen.
to open
to bring up the
VMS3.6 Software Screen
TOUCH the CAPTURE IMAGE/SHUTTER icon
to take the picture -- you will get a message that the
camera is taking the picture and then will hear a shutter
sound if the sound is on and the volume is turned up
enough to hear.
TOUCH the OK icon
that will appear where
the shutter button was on the lower right side of
screen.
Camera Screen
UNITRON®
73 Mall Drive, Commack, NY 11725 • 631-543-2000 • www.unitronusa.com
4
VMS3.6 User Manual
QUICK START GUIDE
Capturing & Saving Images
(continued)
Using the VMS3.6 Software
TOUCH the SAVE icon
.
The Save Image window opens and you can rename
the file here before saving.
To rename the file, TOUCH and HOLD the area where
the name appears (as numbers) and TOUCH
SELECT ALL in the pop up screen – this will select
the entire name and bring up the keyboard.
VMS3.6 Software Screen
Type in the name using the keyboard and
TOUCH SAVE (you should see a message
“Saving . . .” then “Saved Sucessfully” when it is
saved.
NOTE: You can measure, annotate, and manipulate
your image here – please refer to the VMS3.6 Manual
for instructions on how to do this.
The TCS Pro 500 saves the photo to the internal
memory and within the ES File Explorer folder and
then within the vms3 6 folder.
UNITRON®
73 Mall Drive, Commack, NY 11725 • 631-543-2000 • www.unitronusa.com
5
VMS3.6 User Manual
Calibration – MUST BE PERFORMED WITH A MOUSE
To calibrate your TCS Pro 500 to give accurate
measurement results, it is recommended that during
the initial set-up of your system, the user calibrates
each objective magnification that will be used.
IMPORTANT: Calibration must be performed via
MOUSE OPERATION ONLY to ensure accuracy.
Instructions in this section for Calibration requires the
use of a mouse – connect a mouse via the mini USB
2.0 side port using the USB 2.0 converter cable
supplied with the TCS Pro 500.
After calibrating, you can revert back to the
TOUCH screen by removing the mouse.
To calibrate:
1. PLACE a stage micrometer on the microscope
stage and focus on the stage micrometer.
2. CLICK the Camera icon
to obtain a live
preview of your stage micrometer. Adjust the lighting
on the microscope and other camera settings to
obtain a good, sharp image on the screen.
3. CLICK the Shutter icon
the screen to capture the image.
(lower right part of
4. CLICK the OK icon
that is now displayed
where the Shutter icon was – this will save the image
into the Measurement Interface Layout Screen.
5. CLICK the Scale Measurement Unit
icon (middle right area of the screen) and select the
correct scale for which you will be doing
measurements – the default scale is um.
UNITRON®
73 Mall Drive, Commack, NY 11725 • 631-543-2000 • www.unitronusa.com
6
VMS3.6 User Manual
Calibration (continued)
6. CLICK the Calibration icon
, the Data
Calibration window will pop up – CLICK “Yes” where it
asks “Start to draw calibrated straight line! Yes/No”.
7. CLICK the Straight Line
icon to
select/highlight it. (This icon is the first icon in the
Measurement Tools icon group in the upper right of the
screen.)
8. CLICK on the screen and drag to draw a “calibration
line” to indicate the span of the standard you wish to be
the calibration line increment. For example, drawing a
line that spans 10 increments of a 0.1um stage
micrometer will specify a 10 micron calibration line.
9. Move the cursor point to a start place on the
micrometer for the line to be drawn. Left click and hold
the mouse and move the cursor to the end place of your
desired calibration line, then release the mouse button.
After releasing the mouse click on another area of the
image -- a pop-up dialog box will appear asking the user
to identify the name of the calibration and length of the
line drawn. Enter the information as requested and click
“Save.”
10. The screen will return to the Measurement
Interface screen. The Data Area will contain the
information about the line and the Calibration Area will
display No. (number designation), Name, Value and Unit
information. To type in any of these boxes, CLICK
inside the box you wish to type in to bring up the
keyboard. CLICK Save when you have finished to close
the keyboard and the Calibration pop up window.
11. If you are not satisfied with the calibration you can
delete it. To delete it: CLICK the name to highlight it in
the Results Window at the bottom of the screen and
CLICK delete from the pop up screen. Repeat the
above steps until you are satisfied.
To delete ALL the Calibrations in the Results Window
CLICK the
icon on the bottom right of the
Results Window and then PRESS Delete from the pop
up screen. Repeat the above steps until you are
satisfied.
UNITRON®
73 Mall Drive, Commack, NY 11725 • 631-543-2000 • www.unitronusa.com
7
VMS3.6 User Manual
Setting Default Values for Measurement Results
To use an existing saved calibration as a default value
select the saved calibration from the stored calibrations
on the right side of the screen. TOUCH the screen to
highlight the calibration you want to use and TOUCH
“Set as Default Value” from the pop up screen.
The data results can be exported as a Report in PDF or
Excel document format.
PDF Export – TOUCH the Pdf button
Results Window.
Excel Export – TOUCH the Excel button
Results Window.
in the
in the
The Report will be saved in a folder named report within
the vms3_6 folder.
You can access this folder by TOUCHING the folder icon
on the bottom right of the VMS3.6 software screen,
then TOUCH ES File Explorer in the pop up window,
then TOUCH the vms3_6 folder – then locate and
TOUCH the report folder to open the report folder.
TOUCH the document you want to view to open it.
Results Window
UNITRON®
73 Mall Drive, Commack, NY 11725 • 631-543-2000 • www.unitronusa.com
8
VMS3.6 User Manual
Image Measurement & Annotation
When using the Image Measurement tools, measurements will appear in the Results Window. To DELETE any,
measurement you do not want, TOUCH the name to highlight it in the Results Window at the bottom of the screen
and PRESS delete from the pop up screen.
TOUCH the
icon on the bottom right of the Results Window and then TOUCH Delete from the pop up
screen to DELETE ALL measurements in the Results Window.
TOUCH any of the tools to select them.
Line Measurement -- measures length.
Radian Measurement – to measure radius and
radian.
Polygon Measurement –
Upon drawing the polygon a Check
Mark icon appears in the upper left
corner of the screen – TOUCH this
icon to confirm.
Angle Measurement – to measure the incline
of an angle.
Included Angle of Two Lines Measurement –
to measure the included angle of two lines.
Oval Measurement – to measure the
area and perimeter of an oval
Set Drawing Arrows – to set the arrow type:
Rectangle Measurement – to measure
the area and perimeter of a rectangle
Three-point Circle Measurement – to
measure the radius, area and perimeter
of a circle.
Distance Between Points & Lines
Measurement – to measure the
distance between points and lines.
Draw Arrow – to draw an arrow.
Upon using the Distance Between
Points & Lines a Check Mark icon
appears in the upper left corner of the
screen – TOUCH this icon to confirm
the distance between one point.
UNITRON®
73 Mall Drive, Commack, NY 11725 • 631-543-2000 • www.unitronusa.com
9
VMS3.6 User Manual
Image Measurement & Annotation (continued)
Labeling With Numbers -- to allow for
sequential numbering of items on the
image sample. TOUCH the icon, then
the area you want to number and the
software will label the areas touched on
the image in sequential order.
Font Size – to change the text and number
font size.
NOTE: changing the font size will change
ALL the text and numbers uniformly – either
before or after you type or number the image.
Labeling With Text – to add text to an
image.
TOUCH the icon, then the area on the
image where you want the text to be
displayed.
TOUCH the white area in the Enter Text
pop up box to bring up the keyboard.
Color Setting – to choose the color of lines,
shapes, measurements, etc.
To change the color, TOUCH the icon to bring
up the color wheel/palette.
TYPE your text
TOUCH “Confirm” to place the text in the
image.
Inner ring/center
TOUCH the area on the color wheel that you
wish to change to, then TOUCH the inner
ring/center to confirm/change it.
NOTE: changing the color will change ALL
the text, numbers, shapes, etc. uniformly –
either before or after you make your
annotations.
UNITRON®
73 Mall Drive, Commack, NY 11725 • 631-543-2000 • www.unitronusa.com
10
VMS3.6 User Manual
Loading Saved Images
You can load saved images into the VMS3.6 software to measure and annotate at any time.
IMAGE FILE LOCATIONS
Load Saved Images -- to load images
from the system hard drive in the Gallery
or within the VMS3.6 software, or from
an SD Card or a USB Flash drive.
To load an image, TOUCH the icon to
bring up the ES File Explorer/Gallery/
Quickoffice Pro pop up window.
TOUCH the bar next to the Gallery or the
ES File Explorer to open and locate the
image you want.
TOUCH the image again to bring it into
the VMS3.6 Software.
ES File Explorer
DCIM folder – the default location on the internal hard
drive where images with the Camera icon were taken are
stored. These also can be retrieved from the Gallery.
VMS3_6 folder – the default location on the internal hard
drive where images with the VMS3.6 software were
taken are stored. These also can be retrieved from the
Gallery.
extsd folder – where SD Card images can be retrieved
(from an inserted SD Card).
udisk folder – where USB Flash card images can be
retrieved (from a USB connected Flash drive).
Gallery
Also the default location on the internal hard drive where
images with the Camera only or with the VMS3.6
software were taken are stored. – these also can be
retrieved from the DCIM folder (Camera) or VMS3_6
folder (imaging software) within ES File Explorer.
Image Property Settings
Full Screen -- to fill the entire
screen with the complete image.
Maximize Image – to enlarge the
image -- you can then TOUCH the
image and drag it to view different
areas of the image.
Zoom Out – to zoom out of the
image –each TOUCH of the icon will
make the image smaller by 10%.
Zoom In – to zoom in the image –
each TOUCH of the icon will make
the image larger by 10%.
UNITRON®
73 Mall Drive, Commack, NY 11725 • 631-543-2000 • www.unitronusa.com
11
VMS3.6 User Manual
Image Enhancement – Saturation/Contrast/Brightness
Image Enhancement -- to adjust
saturation, contrast and brightness
of an image.
TOUCH the icon to open the
parameter slider setting pop up.
TOUCH and DRAG the sliders to
adjust to desired levels.
TOUCH the Hide/Show
Measurement Tools to confirm and
return to the Measurement Tools
palettes.
Grayscale – to change image from
color to grayscale.
Anti-phase – to simulate a phase
image.
Emboss – to emboss the image.
Undo – to undo any of the above
changes/revert back to original.
UNITRON®
73 Mall Drive, Commack, NY 11725 • 631-543-2000 • www.unitronusa.com
12
VMS3.6 User Manual
Selected Area Counting
Region of Interest -- to operate
the Region of Interest are for
counting.
TOUCH the icon to open the
Region of Interest screen.
TOUCH and DRAG the small
window to select the area to be
counted.
To ADJUST the size of the small
selection window, TOUCH any
side and drag to enlarge or
reduce.
The default counting area is set to
“White”. TOUCH the icon to
select “Black”.
TOUCH the “Counting” button to
calculate within the selected area
of the small window.
UNITRON®
73 Mall Drive, Commack, NY 11725 • 631-543-2000 • www.unitronusa.com
13
VMS3.6 User Manual
Data Results & Data Export
The statistical results of the
counting will appear on the right
side of the screen. You can then
export the data as a Report in PDF
or Excel document format.
PDF Export – TOUCH the Pdf
button below.
Excel Export – TOUCH the Excel
button below.
Recount – TOUCH this button to
perform a recount of the selected
area.
The Report will be saved in a folder
named report within the vms3_6
folder.
You can access this folder by
TOUCHING the folder icon on the
bottom right of the VMS3.6
software screen, then TOUCH
ES File Explorer in the pop up
window, then TOUCH the vms3_6
folder – then locate and TOUCH
the report folder to open the report
folder. TOUCH the document you
want to view to open it.
UNITRON®
73 Mall Drive, Commack, NY 11725 • 631-543-2000 • www.unitronusa.com
14
VMS3.6 User Manual
Copying/Saving Images to a Disk
Back Arrow
To save the image to a disk – USB Flash or
Micro SD card, TOUCH the folder icon in the
VMS3.6 Software window.
TOUCH ES File Explorer in the pop up window,
then locate and TOUCH the vms3 6 folder to
bring up the images taken with the camera.
Make sure you have your USB Flash drive or
Micro SD card installed before proceeding.
Locate the image you want to copy and TOUCH
and HOLD and then select Copy from the pop up
window. This will put a copy on the clipboard.
VMS3.6 Software Screen
TOUCH the Back Arrow (upper right side of pad)
once to bring you to the ES File Explorer folder.
For USB Flash drive, TOUCH the udisk folder
and then pull open the clipboard by dragging it
up from the bottom to the top of the screen and
then let go.
ES File Explorer Folder/Screen
For Mini SD Card, TOUCH the extsd folder and
then the DCIM folder and then pull open the
clipboard by dragging it up from the bottom to the
top of the screen and then let go.
Locate your image and TOUCH
and HOLD and then select Paste
from the pop up window. This will copy
the image onto your USB Flash drive or
Micro SD card.
Deleting Images
To delete an image from the VMS3.6 folder,
simply TOUCH and HOLD the image and select
Delete from the pop up menu.
UNITRON®
Clipboard
73 Mall Drive, Commack, NY 11725 • 631-543-2000 • www.unitronusa.com
15