1
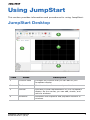
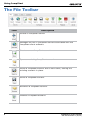
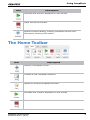
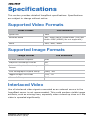
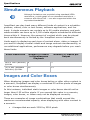
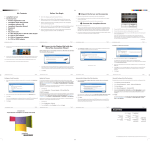
JumpStart 2.0 User Manual 020-101155-03 JumpStart 2.0 User Manual 020-101155-03 NOTICES COPYRIGHT AND TRADEMARKS © 2014 Christie Digital Systems, Inc. All rights reserved. All brand names and product names are trademarks, registered trademarks or trade names of their respective holders. REGULATORY The product has been tested and found to comply with the limits for a Class A digital device, pursuant to Part 15 of the FCC Rules. These limits are designed to provide reasonable protection against harmful interference when the product is operated in a commercial environment. The product generates, uses, and can radiate radio frequency energy and, if not installed and used in accordance with the instruction manual, may cause harmful interference to radio communications. Operation of the product in a residential area is likely to cause harmful interference in which case the user will be required to correct the interference at the user’s own expense. CAN ICES-3 (A) / NMB-3 (A) 이 기기는 업무용 (A 급 ) 으로 전자파적합등록을 한 기기이오니 판매자 또는 사용자는 이점을 주 의하시기 바라며 , 가정 외의 지역에서 사용하는 것을 목적으로 합니다 . GENERAL Every effort has been made to ensure accuracy, however in some cases changes in the products or availability could occur which may not be reflected in this document. Christie reserves the right to make changes to specifications at any time without notice. Performance specifications are typical, but may vary depending on conditions beyond Christie's control such as maintenance of the product in proper working conditions. Performance specifications are based on information available at the time of printing. Christie makes no warranty of any kind with regard to this material, including, but not limited to, implied warranties of fitness for a particular purpose. Christie will not be liable for errors contained herein or for incidental or consequential damages in connection with the performance or use of this material. The product is designed and manufactured with high-quality materials and components that can be recycled and reused. This symbol means that electrical and electronic equipment, at their end-of-life, should be disposed of separately from regular waste. Please dispose of the product appropriately and according to local regulations. In the European Union, there are separate collection systems for used electrical and electronic products. Please help us to conserve the environment we live in! Canadian manufacturing facility is ISO 9001 and 14001 certified. GENERAL WARRANTY STATEMENTS For complete information about Christie’s limited warranty, please contact your Christie dealer. In addition to the other limitations that may be specified in Christie’s limited warranty, the warranty does not cover: a. Problems or damage occurring during shipment, in either direction. b. Projector lamps (See Christie’s separate lamp program policy). c. Problems or damage caused by use of a projector lamp beyond the recommended lamp life, or use of a lamp supplied by a supplier other than Christie. d. Problems or damage caused by combination of a Product with non-Christie equipment, such as distribution systems, cameras, video tape recorders, etc., or use of a Product with any non-Christie interface device. e. Problems or damage caused by the use of any lamp, replacement part or component purchased or obtained from an unauthorized distributor of Christie lamps, replacement parts or components including, without limitation, any distributor offering Christie lamps, replacement parts or components through the internet (confirmation of authorized distributors may be obtained from Christie). f. Problems or damage caused by misuse, improper power source, accident, fire, flood, lightening, earthquake or other natural disaster. g. Problems or damage caused by improper installation/alignment, or by equipment modification, if by other than Christie service personnel or a Christie authorized repair service provider. h. Problems or damage caused by use of a Product on a motion platform or other movable device where such Product has not been designed, modified or approved by Christie for such use. i. Problems or damage caused by use of a projector in the presence of an oil-based fog machine. j. For LCD projectors, the warranty period specified applies only where the LCD projector is in “normal use.” “Normal use” means the LCD projector is not used more than 8 hours a day, 5 days a week. For any LCD projector where “normal use” is exceeded, warranty coverage under this warranty terminates after 6000 hours of operation. k. Image retention on LCD flat panels. l. Failure due to normal wear and tear. PREVENTATIVE MAINTENANCE Preventative maintenance is an important part of the continued and proper operation of your product. Please see the Maintenance section for specific maintenance items as they relate to your product. Failure to perform maintenance as required, and in accordance with the maintenance schedule specified by Christie, will void the warranty. Software Licensing Agreement Agreement a. This Software License Agreement (the “Agreement”) is a legal agreement between the end user, either an individual or business entity, (“Licensee”) and Christie Digital Systems USA, Inc. (“Christie”) for the software known commercially as Christie® MASTERSuite™ that accompanies this Agreement and/or is installed in the server that Licensee has purchased along with related software components, which may include associated media, printed materials and online or electronic documentation (all such software and materials are referred to herein, collectively, as “Software”). If Licensee does not accept the terms of this Agreement, Licensee will return the Software to Christie in accordance with Christie's standard return policy in place from time to time. BY DOWNLOADING, INSTALLING, ACTIVATING OR USING THE SOFTWARE, THE LICENSEE IS AGREEING TO BE BOUND BY THE TERMS OF THIS AGREEMENT. b. The Software contains third party software programs which require notices and/or additional terms and conditions. Such required third party notices and/or additional terms and conditions are located in the Software install location (C:\ProgramFiles\Christie Digital Systems\MASTERSuite\Licenses). By accepting this Agreement and using the Software, you are also accepting any such additional terms and conditions applicable to the third party software programs. To the extent any license for third party software programs requires an offer to provide source code for those third party software programs, this Agreement constitutes such an offer. You may request more information or a copy of such source code by contacting Christie at [email protected]. In conjunction with such request, provide the Christie Product Number, the Software version and the Product Serial Number (if applicable). If applicable, a nominal cost to cover shipping and media charges will be charged. License and Restrictions c. Ownership of Software: Christie retains title and ownership of all rights, including copyright and all other intellectual property rights, in and to the Software and all copies thereof, regardless of form or media. This license is not a sale of any rights in or to the Software or any copy thereof. Licensee acquires no right whatsoever to the Software except the right to use the Software in accordance with the terms of this License. d. Grant of License: Christie grants to Licensee a single license providing a nonexclusive and non-transferable right to use, for personal or internal business purposes, the executable version of the Software, as long as Licensee complies with the terms and conditions of this License. Christie reserves all rights not expressly granted to Licensee. e. Copy Restrictions: Where the Software is provided for download onto a personal computer or similar device, Licensee may make as many copies of the Software as is reasonably required for Licensee's own use with the Device. Licensee may also make a backup copy of the Software which may be used only for reinstallation of the Software. Where the software is pre-installed on a server, Licensee may keep one copy of the Software solely for backup or archival purposes. Unauthorized copying or distribution of the Software is expressly prohibited unless agreed to in writing by Christie. Licensee must reproduce and include the copyright notice on any backup copy of the Software. Licensee may not remove or alter any proprietary rights or copyright notice or identification which indicates the ownership of the Software. f. Use Restrictions: Licensee will not (a) modify, adapt, decompile, disassemble, reverse engineer, or otherwise attempt to derive the source code for the Software, or create derivative works based on the Software; (b) assign this Agreement or redistribute, encumber, sell, transfer, lease, or grant a sublicense of the Software or the license granted herein or otherwise transfer rights to the Software to any person or entity except as and when expressly permitted by this Agreement; (c) directly or indirectly, export or transmit the Software, either alone or bundled with other software, to any country to which such export or transmission is restricted by any applicable laws without the appropriate prior written consent of the applicable government entity or department; and (d) publish or otherwise disclose the Software for others to copy. Licensee will make reasonable efforts to prevent any unauthorized use of the Software by third parties and will advise Licensee's employees of the restrictions upon use restrictions herein. g. Upgrades and Updates: While Christie is not required to do so, Christie may provide Licensee with upgrades or updates to the Software, including but not limited to files that are delivered to Licensee via online transmission or otherwise to “patch” or otherwise modify or enhance the software program. This Agreement covers any upgrades or updates to the Software that Licensee may obtain from Christie or one of its authorized vendors, unless the upgrade or update comes with its own license agreement. If Licensee decides not to download or install an upgrade or update provided by Christie, Licensee understands that this could put the Software at risk to serious security threats or cause the Software to be come unstable. Christie may, at its option, cause an upgrade or update to apply automatically. Maintenance and Support h. Christie may, in its sole discretion and without any obligation, provide maintenance and support services related to the Software (“Support Services”). Support Services are governed by Christie’s policies and programs described in materials available from Christie. Any supplemental software code provided to Licensee as part of the Support Services will be considered part of the Software and subject to the terms and conditions of this Agreement. Warranty and Limitation of Liability i. No Warranties: The Software is provided “as is” and Christie makes no warranty of any kind with regard to the Software. Christie will not be liable for errors contained in the Software or in connection with the performance or use of the Software. Christie does not warrant that the Software is free from any defects or that it will operate uninterrupted. Christie warrants that the media on which the Software is distributed will be free from defects in materials and workmanship under normal use for a period of ninety (90) days from the date of delivery. Christie will replace any defective media returned to Christie within the ninety (90) day period. The foregoing is Licensee’s sole and exclusive remedy for breach of the warranty given pursuant to this Section. Christie does not make any other warranties, either express or implied, including, but not limited to, implied warranties of merchantability, fitness for a particular purpose, title and non-infringement with regard to the Software. j. Limitations of Liability: IN NO EVENT WILL CHRISTIE BE LIABLE TO ANY PARTY FOR DIRECT, INDIRECT, SPECIAL, INCIDENTAL, OR CONSEQUENTIAL DAMAGES, INCLUDING LOST PROFITS, LOST REVENUES AND LOST DATA ARISING OUT OF THE USE OF THIS SOFTWARE AND ITS DOCUMENTATION, EVEN IF CHRISTIE HAS BEEN ADVISED OF THE POSSIBILITY OF SUCH DAMAGE. CHRISTIE SPECIFICALLY DISCLAIMS ANY WARRANTIES OR CONDITIONS, INCLUDING, BUT NOT LIMITED TO, THE IMPLIED WARRANTIES OR CONDITIONS OF MERCHANTABILITY AND FITNESS FOR A PARTICULAR PURPOSE. THE SOFTWARE AND ACCOMPANYING DOCUMENTATION, IF ANY, PROVIDED HEREUNDER IS PROVIDED “AS IS”. CHRISTIE HAS NO OBLIGATION TO PROVIDE MAINTENANCE, SUPPORT, UPDATES, ENHANCEMENTS, OR MODIFICATIONS. CHRISTIE FURTHER DISCLAIMS ANY AND ALL REPRESENTATIONS RELATING TO THIRD PARTY SOFTWARE WHICH IS EMBEDDED IN THE SOFTWARE. Some jurisdictions do not allow exclusions or limitations of certain conditions or warranties. Only those exclusions or limitations that are lawful in Licensee’s jurisdiction will apply to Licensee and, in such instances, Christie’s liability will be limited only to the maximum extent permitted by law. Termination k. Christie may terminate this Agreement at any time and for any reason. Christie may also terminate this Agreement if the Licensee breaches or is in default of any obligation of Licensee under this Agreement. Upon termination of this Agreement, the Licensee will immediately (i) cease using the Software and (ii) uninstall the Software from any personal computers, servers or other devices (to the extent it is installed thereon). The Licensee’s obligation under this provision will survive the termination of this Agreement. General l. Notices: Unless otherwise set forth in this Agreement, all notices, or other communications hereunder will be deemed to have been duly given when made in writing and delivered in person, by courier or deposited in the mail, postage prepaid, and registered mail, return receipt requested, and addressed to Licensee at the billing address supplied to Christie by Licensee, and addressed to Christie at Christie Digital Systems USA, Inc., c/o Christie Digital Systems Canada, Inc. at 809 Wellington Street North, Kitchener, Ontario, Canada N2G 4Y7, with a copy (which will not constitute notice) to Christie’s Legal Department at the same address. m.Severability and Waiver: Any provision of this Agreement which is held by any court to be unenforceable or invalid will be deemed severed from this Agreement, without affecting any other provision of this Agreement. No waiver by Christie of any particular default or omission committed by Licensee will affect or impair the right of Christie in respect of any subsequent default or omission of the same or a different kind. No delay or failure by Christie to exercise any rights in connection with any default or omission committed by Licensee will affect or impair Christie’s rights in respect of that particular default or omission or any subsequent default or omission of the same or different kind. In any event, time will continue to be of the essence without the necessity of specific reinstatement. n. Governing Law: This Agreement is governed by the laws of the State of California, without regard to its conflict of law principles. Any suit or action arising out of or in connection with this Agreement will be brought in the federal or state courts located in Orange County, State of California. Each of Licensor and Licensee hereby irrevocably submit to the jurisdiction of such courts for the purpose of such suit or action and expressly and irrevocably waive, to the fullest extent permitted by law, any objection it may now or hereafter have to the venue of any such suit or action in any such court and any such claim that any suit or action has been brought in an inconvenient forum. Introduction . . . . . . . . . . . . . . . . . . . . . . . . . . . . . . . . . . . . . . 1 Related Documents Technical Support . . . . . . . . . . . . . . . . . . . . . . . . . . . . . . . . .1 . . . . . . . . . . . . . . . . . . . . . . . . . . . . . . . . . .1 Installation and Setup . . . . . . . . . . . . . . . . . . . . . . . . . . . . . . 3 Server Prerequisites . . . . . . . . . . . . . . . . . . . . . . . . . . . . . . . . . 3 Client Prerequisites . . . . . . . . . . . . . . . . . . . . . . . . . . . . . . . . .3 Install JumpStart . . . . . . . . . . . . . . . . . . . . . . . . . . . . . . . . . . . 3 Start JumpStart . . . . . . . . . . . . . . . . . . . . . . . . . . . . . . . . . . . . 4 Close JumpStart . . . . . . . . . . . . . . . . . . . . . . . . . . . . . . . . . . .4 Uninstall JumpStart . . . . . . . . . . . . . . . . . . . . . . . . . . . . . . . . . 4 Reinstall the LAV Filters . . . . . . . . . . . . . . . . . . . . . . . . . . . . . . 5 Using JumpStart . . . . . . . . . . . . . . . . . . . . . . . . . . . . . . . . . . 7 JumpStart Desktop . . . . . . . . . . . . . . . . . . . . . . . . . . . . . . . . .7 The File Toolbar . . . . . . . . . . . . . . . . . . . . . . . . . . . . . . . . . . . . 8 The Home Toolbar . . . . . . . . . . . . . . . . . . . . . . . . . . . . . . . . . . 9 The View Toolbar . . . . . . . . . . . . . . . . . . . . . . . . . . . . . . . . . . 10 The Content Toolbar . . . . . . . . . . . . . . . . . . . . . . . . . . . . . . . . 11 Work with Servers . . . . . . . . . . . . . . . . . . . . . . . . . . . . . . . . . 12 Add a Server . . . . . . . . . . . . . . . . . . . . . . . . . . . . . . . . . . . 12 Connect to a Server . . . . . . . . . . . . . . . . . . . . . . . . . . . . . . 13 Edit a Server Name or IP Address. . . . . . . . . . . . . . . . . . . . . 13 Delete a Server . . . . . . . . . . . . . . . . . . . . . . . . . . . . . . . . . 13 Work with the Canvas . . . . . . . . . . . . . . . . . . . . . . . . . . . . . . . 13 Change Viewing Options . . . . . . . . . . . . . . . . . . . . . . . . . . . 14 Change the Canvas Zoom Level . . . . . . . . . . . . . . . . . . . . . . 14 Work with Scenarios . . . . . . . . . . . . . . . . . . . . . . . . . . . . . . . . 15 Create a Scenario . . . . . . . . . . . . . . . . . . . . . . . . . . . . . . . 15 Save a Scenario . . . . . . . . . . . . . . . . . . . . . . . . . . . . . . . . . 16 Activate a Scenario . . . . . . . . . . . . . . . . . . . . . . . . . . . . . . 16 Stop a Scenario . . . . . . . . . . . . . . . . . . . . . . . . . . . . . . . . . 16 Rename a Scenario . . . . . . . . . . . . . . . . . . . . . . . . . . . . . . 16 Delete a Scenario . . . . . . . . . . . . . . . . . . . . . . . . . . . . . . . . 16 Work with Content . . . . . . . . . . . . . . . . . . . . . . . . . . . . . . . . . 17 Add Media Files to the JumpStart Server . . . . . . . . . . . . . . . . 17 Add Videos to the Content Pane . . . . . . . . . . . . . . . . . . . . . . 18 Add Videos to the Content Pane from a Client Computer . . . . . 18 JumpStart 2.0 User Manual 020-101155-03 Rev. 1 (03/14) i of iv Add a Picture to the Content Pane . . . . . . . . . . . . . . . . . . . . 19 Add a Picture to the Content Pane from a Client Computer. . . . 19 Add an Existing Application to the Content Pane . . . . . . . . . . . 19 Add a New Application to the JumpStart Server . . . . . . . . . . . 20 Add an Input Channel to the Content Pane . . . . . . . . . . . . . . 21 Add a Color Window to the Content Pane. . . . . . . . . . . . . . . . 21 Add a Text Window to the Content Pane . . . . . . . . . . . . . . . . 22 Remove Content . . . . . . . . . . . . . . . . . . . . . . . . . . . . . . . . 23 Work with Windows . . . . . . . . . . . . . . . . . . . . . . . . . . . . . . . . 23 Resize a Window . . . . . . . . . . . . . . . . . . . . . . . . . . . . . . . . 24 Move a Window . . . . . . . . . . . . . . . . . . . . . . . . . . . . . . . . . 24 Rename a Window . . . . . . . . . . . . . . . . . . . . . . . . . . . . . . . 25 Change the Window Order . . . . . . . . . . . . . . . . . . . . . . . . . . 25 Show or Hide Window Names. . . . . . . . . . . . . . . . . . . . . . . . 25 Enable or Disable Window Sound . . . . . . . . . . . . . . . . . . . . . 26 Delete a Window . . . . . . . . . . . . . . . . . . . . . . . . . . . . . . . . 26 Work with Commands . . . . . . . . . . . . . . . . . . . . . . . . . . . . . . . 26 JumpStart Commands. . . . . . . . . . . . . . . . . . . . . . . . . . . . . 27 Send Serial Commands to Other Devices . . . . . . . . . . . . . . . . 27 Create a Command . . . . . . . . . . . . . . . . . . . . . . . . . . . . . . 28 Rename a Command . . . . . . . . . . . . . . . . . . . . . . . . . . . . . 28 Edit a Command . . . . . . . . . . . . . . . . . . . . . . . . . . . . . . . . 28 Delete a Command . . . . . . . . . . . . . . . . . . . . . . . . . . . . . . . 28 Add a Command to a Scenario . . . . . . . . . . . . . . . . . . . . . . . 29 Change the Command Execution Time . . . . . . . . . . . . . . . . . 29 Remove a Command from a Scenario . . . . . . . . . . . . . . . . . . 29 Work with the Schedule . . . . . . . . . . . . . . . . . . . . . . . . . . . . . 29 Show or Hide the Schedule Pane . . . . . . . . . . . . . . . . . . . . . 29 Resize the Schedule Pane . . . . . . . . . . . . . . . . . . . . . . . . . . 30 Change the Schedule Time Interval . . . . . . . . . . . . . . . . . . . 30 Change the Time Duration of a Window . . . . . . . . . . . . . . . . . 30 Move Schedule Content. . . . . . . . . . . . . . . . . . . . . . . . . . . . 30 Change the Color Properties of a Window on the Canvas . . . . . 31 Change the Properties of a Text Window on the Canvas. . . . . . 31 Add Color or Text Windows as New Channels . . . . . . . . . . . . . 31 Automate a MediaServer Restart . . . . . . . . . . . . . . . . . . . . . . . 31 Troubleshooting . . . . . . . . . . . . . . . . . . . . . . . . . . . . . . . . . 35 ii of iv JumpStart 2.0 User Manual 020-101155-03 Rev. 1 (03/14) Specifications . . . . . . . . . . . . . . . . . . . . . . . . . . . . . . . . . . . 43 Supported Video Formats . . . . . . . . . . . . . . . . . . . . . . . . . . . . 43 Interlaced Video . . . . . . . . . . . . . . . . . . . . . . . . . . . . . . . . . . 43 Simultaneous Playback . . . . . . . . . . . . . . . . . . . . . . . . . . . . . . . . . . 44 Images and Color Boxes . . . . . . . . . . . . . . . . . . . . . . . . . . . . . 44 Static Content . . . . . . . . . . . . . . . . . . . . . . . . . . . . . . . . . . . . 45 Capture Card Limitations JumpStart 2.0 User Manual 020-101155-03 Rev. 1 (03/14) . . . . . . . . . . . . . . . . . . . . . . . . . . . . 45 iii of iv Introduction JumpStart software manages tiled displays with up to four video inputs. You can display multiple media files, Microsoft Windows applications, and live video on a 5-10 megapixel digital canvas. JumpStart software is designed to work with Christie MicroTiles, but it can also be used with Christie rear-projection and flat panel solutions. This document provides information and procedures for using the JumpStart client software and assumes a familiarity with Christie tiled displays and with Microsoft Windows functionality. Related Documents For information about setting up a JumpStart Server, see the JumpStart Operation Manual (020-101018-xx). For information about using JumpStart with Christie MicroTiles, see the JumpStart Quick-Start Guide (020-100918-xx) Technical Support If you are unable to resolve your issue, contact Christie support: • North and South America: +1-800-221-8025 or [email protected] • Europe, Middle East, and Africa: +44 (0) 1189 778111 or [email protected] • Asia Pacific: [email protected] JumpStart 2.0 User Manual 020-101155-03 Rev. 1 (03/14) 1 Installation and Setup This section provides information and procedures for installing and configuring JumpStart. Server Prerequisites • Windows 7 (64-bit) • .NET 4.0 Full • 6GB of RAM or higher • 1GB of available disk space • 2.4GHz 64-bit processor (minimum) • DirectX 9 graphics device with WDDM 1.0 or higher drivers • Datapath VisionRGB-E2S Client Prerequisites • Windows XP (32-bit), Windows 7 (32-bit or 64-bit) • .NET 4.0 Client • 2GB of RAM or higher • 500MB of available disk space • Pentium 4 2.8GHz single core (minimum) Install JumpStart There is no limitation on the number of computers on which the JumpStart client software can be installed. However, a maximum of 5 users can use the JumpStart client software concurrently to connect to a single JumpStart server. 1. Insert the installation CD into the computer on which you want to run JumpStart. 2. Click Install Products. JumpStart 2.0 User Manual 020-101155-03 Rev. 1 (03/14) 3 Installation and Setup 3. Click Install JumpStart Client. 4. If a Microsoft Windows security warning appears, click Run. 5. If you want to continue the installation, read the license agreement and then select I accept the terms in the license agreement. 6. Click Install. 7. When the installation is complete, click Finish. Start JumpStart 1. Log on to the computer on which JumpStart is installed. 2. Click Start > All Programs > Christie > JumpStart. 3. Connect to a server. See Connect to a Server on page 13. - or Add a server. See Add a Server on page 12. Close JumpStart Click the close button in the upper right corner of the JumpStart window. Uninstall JumpStart 1. Click Start > Control Panel. 2. Click Programs and Features. 3. Right-click JumpStart and select Uninstall. 4. Click Yes. 4 JumpStart 2.0 User Manual 020-101155-03 Rev. 1 (03/14) Installation and Setup Reinstall the LAV Filters The JumpStart server uses the LAV Filter (version 0.54.1) Microsoft® DirectShow® media splitter and decoder to play video files. If you remove or alter the software, some video file types may not play correctly. 1. Insert the JumpStart CD-ROM into the DVD drive of the JumpStart server. 2. Browse to the following location and launch the following executable: \Prerequisites\LAV Filter\LAVFilters-0.54.1.exe. 3. On the Introduction page, click Next. 4. On the Select Destination Location page, click Next. 5. On the Select Components page, click Next. 6. On the Select Start Menu Folder page, click Next. 7. On the Select Additional Tasks page, under the Use LAV Splitter for these file formats section, select the WMV check box. Click Next. 8. On the Ready to Install page, click Install. 9. On the completion page, click Finish. 10. Click Start > Programs > LAV Filters > LAV Filter Configuration. 11. On the Video Settings tab, select 1 in the Threads for MultiThreading list. 12. Click Apply. Click OK. JumpStart 2.0 User Manual 020-101155-03 Rev. 1 (03/14) 5 Using JumpStart This section provides information and procedures for using JumpStart. JumpStart Desktop 2 3 1 4 Item Name Description 1 Content Pane Contains the content that you can add to your JumpStart display. 2 Toolbar Contains buttons for commonly used tasks. 3 Canvas Provides a visual representation of your JumpStart display. On the canvas, you can add, stretch, and remove windows. 4 Schedule Schedules the sequence and playback duration of windows. JumpStart 2.0 User Manual 020-101155-03 Rev. 1 (03/14) 7 Using JumpStart The File Toolbar Icon Description Selects a JumpStart server. Manages the list of JumpStart servers associated with the JumpStart client software. Creates a new JumpStart scenario. Opens an existing JumpStart scenario. Saves a JumpStart scenario with a new name, leaving the existing scenario in place. Saves a JumpStart scenario. Renames a JumpStart scenario. Deletes a JumpStart scenario. 8 JumpStart 2.0 User Manual 020-101155-03 Rev. 1 (03/14) Using JumpStart Icon Description Activates the scenario displayed on the canvas. Stops the active scenario. Opens the About dialog, showing JumpStart version and third-party licensing information. The Home Toolbar Icon Description Selects a JumpStart server. Creates a new JumpStart scenario. Opens an existing JumpStart scenario. Activates the scenario displayed on the canvas. Stops the active scenario. JumpStart 2.0 User Manual 020-101155-03 Rev. 1 (03/14) 9 Using JumpStart Icon Description Changes the increments of the grid to which you can snap windows for alignment. Selects all of the windows on the JumpStart canvas, so that you can move them together or delete all of them. The View Toolbar Icon Description Shows or hides the schedule. Shows or hides the name of each window on the canvas. Shows or hides the grid lines between virtual output devices (ECUs for MicroTiles) or actual output devices (for other displays). Shows or hides the grid lines between actual output devices. NOTE: For non-MicroTiles displays, the Outputs and Tile Boundaries check boxes have the same effect. Shows a grid representing the screens or MicroTiles connected to the JumpStart server on top of the content windows or behind the content windows. Zooms in to the canvas in 5% increments. Zooms away from the canvas in 5% increments. 10 JumpStart 2.0 User Manual 020-101155-03 Rev. 1 (03/14) Using JumpStart Icon Description Fits the canvas to the current window. Zooms the canvas 100%. Moves the selected window forward one level. Moves the selected window backward one level. Moves the selected window to the front of the canvas. Moves the selected window to the back of the canvas. The Content Toolbar Icon Description Adds a video file to the content panel. Adds a picture file to the content panel. JumpStart 2.0 User Manual 020-101155-03 Rev. 1 (03/14) 11 Using JumpStart Icon Description Adds or removes an application on the content panel. Adds a color box to the content panel. Adds a text box to the content panel. Adds a command to the content panel. Work with Servers To display content, your display wall must be connected to a JumpStart server. The JumpStart server hosts all media content and it is managed by your JumpStart administrator. Add a Server i To add a server quickly, click the File or Home tab, click Select, and then click Add & Connect. 1. On the File tab, click Manage. 2. Click Add. 3. Enter a name for the server in the Name field. Choose a meaningful name so that you can distinguish this JumpStart server from any others you might have. 4. Enter the IP address or host name of the server in the Address field. 5. Click OK. 12 JumpStart 2.0 User Manual 020-101155-03 Rev. 1 (03/14) Using JumpStart Connect to a Server On the File or Home tab, click Select and select a server from the list. Edit a Server Name or IP Address 1. Click File > Manage. 2. Select a server. 3. Click Edit. 4. Edit the server name in the Name field. - or Edit the server IP address in the Address field. 5. Click OK. Delete a Server 1. Click File > Manage. 2. Select a server. 3. Click Delete. 4. Click Yes. 5. Click OK. Work with the Canvas The canvas is a graphical representation of your JumpStart display wall. You add windows to the canvas. A scenario includes a group of windows and the schedule. JumpStart 2.0 User Manual 020-101155-03 Rev. 1 (03/14) 13 Using JumpStart Change Viewing Options 1. Click the View tab. 2. Select these options: Option Description Schedule Displays the Schedule pane in the lower right corner of the JumpStart application window. When the Schedule pane is visible, you can change the size of the canvas relative to the schedule pane. Move your pointer over the split bar between the canvas and the schedule pane until a double-headed arrow appears, and then drag the split bar up or down. Window Names Displays the window names on top of each window. Outputs Displays lines separating the ECU outputs that are connected to your JumpStart server. Tile Boundaries Displays a grid around each of the Christie MicroTiles connected to your JumpStart server. Grid on Top Displays grid lines on top of the windows. Change the Canvas Zoom Level Select one of these options to change the canvas zoom level: 14 • Move the slider at the bottom of the JumpStart window to the right or left. • Click the plus or minus symbols near the slider at the bottom of the JumpStart window. • Click the View tab and then click Zoom In or Zoom Out. • Use the wheel button on your mouse to zoom in and out. • To fit the canvas to the window, click the View tab and then click Fit in Window. • To view the canvas at 100% of its size, click the View tab and then click 100%. JumpStart 2.0 User Manual 020-101155-03 Rev. 1 (03/14) Using JumpStart Work with Scenarios A scenario is a collection of windows that you want to appear on your display wall, along with the order and timing of when and for how long they appear. You start and stop a scenario, much like you would with a play list in a media player. You cannot schedule scenarios to begin at a specific time. The scenario automatically restarts if the JumpStart server restarts due to an event such as a power outage. You must activate a scenario to view it on your display wall. You can create as many scenarios as you want, but can only have one active at a time. Create a Scenario 1. On the File tab, click New. 2. Expand one of these lists in the left pane: • Videos • Pictures • Applications • Input Channels • Color Windows • Text Windows 3. Click and drag content windows from the left pane to the canvas in the right pane. You can have more than 60 windows on your canvas, but you cannot exceed 60 when you save or activate the scenario. 4. Repeat Step 3 to add additional windows to the canvas. 5. Click Save. 6. Enter a name for the scenario in the Scenario Name field. 7. Click OK. JumpStart 2.0 User Manual 020-101155-03 Rev. 1 (03/14) 15 Using JumpStart Save a Scenario i If you save a scenario and specify the name of an existing scenario, the existing scenario is overwritten. Scenarios are stored on the JumpStart server and not on the computer on which the JumpStart client software is installed. A scenario can contain a maximum of 60 windows. If you exceed this number you cannot save the scenario. 1. Click Save on the File ribbon or the quick-launch toolbar. 2. Enter a name for the scenario in the Scenario Name field. 3. Click OK. Activate a Scenario Click Activate on the Home or File ribbons, or on the quick-launch toolbar. Stop a Scenario i The user account on the JumpStart server does not use Microsoft Windows administrative permissions. Applications that require administrative permissions to close cannot be closed when a JumpStart scenario ends. Click Stop on the Home or File ribbons, or on the quick-launch toolbar, or press Ctrl-Shift-T on the keyboard connected to the JumpStart server. Rename a Scenario 1. Click File > Rename. 2. Enter a name in the Scenario Name field. 3. Click OK. Delete a Scenario 1. Click File > Delete. 2. Click OK. 16 JumpStart 2.0 User Manual 020-101155-03 Rev. 1 (03/14) Using JumpStart Work with Content JumpStart can display windows with videos, pictures, applications, input channels, and color and text content. For videos, pictures, applications, and input channels, you need to add the source content to JumpStart before you can add them to a scenario. The items you can add to a scenario are shown in the panels to the left of the canvas. Add Media Files to the JumpStart Server When you add videos and pictures to JumpStart, the content must be located on the JumpStart server hard drive or on another mounted drive (such as a USB drive or network drive). If you are using the JumpStart client software on another computer, you cannot add content directly from that computer using JumpStart. When you add content to the JumpStart server, the JumpStart software opens the default media folder on the JumpStart server hard drive. For example, the Pictures folder is selected when you add pictures. However, you can store media files anywhere on the hard drive. You can also store content on another mounted drive, as long as you can ensure connectivity when playing scenarios. Add Files with the JumpStart Client When you use a JumpStart client to add files, the content is automatically transferred to C:\JumpStartContent. If a file with the same name already exists, it is overwritten. Exports that have failed or been cancelled must be manually removed or overwritten. 1. Install the JumpStart client on the computer from which you want to export content. See Install JumpStart on page 3. 2. Click Start > All Programs > Christie > JumpStart. 3. Add video or pictures files to the Content pane. See Add Videos to the Content Pane on page 18 or Add a Picture to the Content Pane on page 19. JumpStart 2.0 User Manual 020-101155-03 Rev. 1 (03/14) 17 Using JumpStart Add Files With USB 1. Store the files you want to add on a USB flash drive or portable hard drive. 2. Connect the flash or portable drive to the USB port on the JumpStart server. 3. When the drive is mounted, copy the files to a location on the JumpStart server hard drive. Add Files Over a Network If the computer where your media files are stored is on the same network as the JumpStart server, you can share those folders with the JumpStart server and copy the files over your network. For more information, see your Microsoft Windows help. Add Videos to the Content Pane 1. Click the Videos panel and then click Add. - or Click the Content tab and then click Videos. 2. Select a drive in the Drive list and browse to the location of your video files. Only files stored on the JumpStart server are displayed. 3. Select the video files that you want to add. 4. Click OK. Add Videos to the Content Pane from a Client Computer 1. Click Start > All Programs > Christie > JumpStart on the client computer. 2. On the File or Home tab, click Select and select a server from the list. 3. Click the Videos panel. 18 JumpStart 2.0 User Manual 020-101155-03 Rev. 1 (03/14) Using JumpStart 4. Drag a video to the Content pane. The video is automatically sent to the JumpStart server and added to the content list. Add a Picture to the Content Pane 1. Click the Pictures panel and then click Add. - or Click the Content tab and then click Pictures. 2. Select a drive in the Drive list and browse to the location of your pictures. Only files stored on the JumpStart server are displayed. 3. Select the image file. 4. Click OK. Add a Picture to the Content Pane from a Client Computer 1. Click Start > All Programs > Christie > JumpStart on the client computer. 2. On the File or Home tab, click Select and select a server from the list. 3. Click the Pictures panel. 4. Drag an image to the Content pane. The content is automatically sent to the JumpStart server and added to the content list. Add an Existing Application to the Content Pane If you want to add a software application to a scenario, you must install the application on the JumpStart server. When you activate a scenario with an application, the application is started on the JumpStart server and it appears on the display wall. JumpStart 2.0 User Manual 020-101155-03 Rev. 1 (03/14) 19 Using JumpStart The user account on the JumpStart server does not use Microsoft Windows administrative permissions. Applications that require administrative permissions to close cannot be closed when a JumpStart scenario ends. The location and size of applications with preset desktop locations or window sizes, cannot be modified. 1. Click the Applications panel and then click Add. - or Click the Content tab and then click Applications. 2. To display an application on the Applications panel, select it in the Removed pane and then click Add. To remove an application from the display, select the application in the Added pane and then click Remove. When you remove an application from the Applications pane, it is not removed from the JumpStart server. Add a New Application to the JumpStart Server 1. Click the Applications panel and then click Add. - or Click the Content tab and then click Applications. 2. Click Add New Application. 3. Select a drive in the Drive list and browse to the location of your application. Only applications installed on the JumpStart server are displayed. 4. Click Add. 5. Enter a name for the application in the Name field 20 JumpStart 2.0 User Manual 020-101155-03 Rev. 1 (03/14) Using JumpStart 6. Enter parameters to pass to the application when it runs in the Parameters field. Enclose individual parameters with spaces in double quotes (for example, path or file names that contains spaces). Test launching the application with the parameters before you add it to JumpStart. For more information about parameters, see the documentation included with the application. 7. Click OK. Add an Input Channel to the Content Pane The Input Channel panel shows the input channels that are installed on the JumpStart server. This panel is empty if your server does not have DVI inputs. If your server has 4 DVI inputs, the list of channels is dynamically updated based upon what channels are connected. Click Refresh to refresh the list. Add a Color Window to the Content Pane 1. Click the Color Windows panel and then click Add. - or Click the Content tab and click Colors. 2. Enter a name for the color window in the Name field. 3. In the Color Type area, select one of these options: Option Solid Description Applies a solid color to the window. 1. Click Color 1 and select a color. 2. Click OK. JumpStart 2.0 User Manual 020-101155-03 Rev. 1 (03/14) 21 Using JumpStart Option Gradient Description Applies a color gradient to the window. 1. Click Color 1 and select a color for the left or top of the window. 2. Click OK. 3. Click Color 2 and select a color for the right or bottom of the window. 4. Click OK. To have the gradient transition from top to bottom, select the Rotate check box. 5. Click OK. Add a Text Window to the Content Pane 1. Click the Text Windows panel and then click Add. - or Click the Content tab and then click Text. 2. Enter a name for the text window in the Name field. 3. Enter the text you want to appear in the text window in the Text box. 4. Select one of these options to define the appearance of the text box: Option Description Font Color Defines the color of the text. Text Outline Color Defines the color of the border around the text. Background Color Defines the color of the window background. 5. Click OK. 6. Click the left, center, or right alignment buttons to change the horizontal alignment of the text. 7. Click the top, center, or bottom buttons to change the vertical alignment of the text. 8. Click Change Font to change the font used in the text box. The font you select must be installed on the JumpStart server. 22 JumpStart 2.0 User Manual 020-101155-03 Rev. 1 (03/14) Using JumpStart 9. Click OK. 10. Select these options: Option Description Outline Text Applies a different color to the text outline. Fit to Window Makes the text appear larger or smaller when you resize the window on the canvas. No Background Makes the text box background transparent. 11. Click OK. Remove Content When you remove content such as videos or pictures from the JumpStart client software, they remain on the JumpStart server hard drive. However, when you remove color or text boxes, they are permanently deleted. 1. Expand one of these lists in the left pane: • Videos • Pictures • Applications • Input Channels • Color Windows • Text Windows 2. Right-click an item and select Remove. 3. Click Yes. Work with Windows You use windows to organize content in JumpStart. Each window is associated with an individual media file, input channel, or application. Windows can also contain text or color. A scenario includes a group of windows and the schedule. JumpStart 2.0 User Manual 020-101155-03 Rev. 1 (03/14) 23 Using JumpStart Resize a Window To resize a window with your mouse: 1. Click a window on the canvas. 2. Click, hold, and drag a handle to resize the window. Press Shift and click, hold, and drag a handle to maintain the aspect ratio of the window. To enter specific height and width values for a window: 1. Right-click a window on the canvas and select Settings. 2. Increase or decrease the Width value. 3. Increase or decrease the Height value. 4. Click OK. Move a Window To move a window with your mouse, click and drag a window on the canvas. To enter specific values for the location of a window: 1. Right-click a window on the canvas and select Settings. 2. Increase or decrease the Top value. 3. Increase or decrease the Left value. 4. Click OK. To quickly align windows with the Snap option: 1. Click the Home tab. 2. Click Snap, and select one of these options: Option 24 Description Off Turns the snap feature off. Small Sets the snap increment to 8 pixels. Medium Sets the snap increment to 24 pixels. Large Sets the snap increment to 48 pixels. JumpStart 2.0 User Manual 020-101155-03 Rev. 1 (03/14) Using JumpStart Rename a Window 1. Right-click a window on the canvas and select Settings. 2. Enter a name in the Name field. 3. Click OK. You can also double-click the window name in the schedule, or right-click the window name and click Rename. Change the Window Order By default, JumpStart displays the windows in a scenario in the order in which they are added. For example, if you drag a blue window onto the canvas and then add a red window in front of it, the red window appears in front of the blue window because the red window was added after the blue window. To have a window display in front of other windows, drag the window up in the list of windows in the schedule pane. To have a window display behind other windows, drag it down in the list of windows in the schedule pane. You can also use this procedure to change the position of windows: 1. Click a window on the canvas. 2. On the View tab, select one of these options: Option Description Bring Forward Moves the window one position forward in the window order. Send Backward Moves the window one position backward in the window order. Bring to Front Moves the window to the top of the window order. Send to Back Moves the window to the bottom of the window order. Show or Hide Window Names 1. Click View. JumpStart 2.0 User Manual 020-101155-03 Rev. 1 (03/14) 25 Using JumpStart 2. Select Window Names to show window names. - or Clear Window Names to hide window names. Enable or Disable Window Sound Enabling sound on a window disables sound on all other windows in the scenario. 1. Connect your speakers or audio playback device to the audio connector on the rear of the JumpStart server. 2. Left-click the red speaker icon on the upper left corner of the window to enable sound. - or Left-click the green speaker icon on the upper left corner of the window to disable sound. 3. Save the scenario to preserve the audio settings. See Save a Scenario on page 16. Delete a Window 1. Right-click a window on the canvas and select Delete Window, or click a window on the canvas and press the Delete key. 2. Click Yes. Work with Commands To send commands from another device to the JumpStart server, the server must be connected to the device with an Ethernet or serial connection. These are the two types of commands you can run: • Serial commands sent to the JumpStart server to start or stop a scenario. • Serial commands sent to other devices, such as projectors. A JumpStart server cannot run more than one scenario at a time. When you start a scenario, the scenario that is currently running is stopped. 26 JumpStart 2.0 User Manual 020-101155-03 Rev. 1 (03/14) Using JumpStart When a command is sent to the JumpStart server to start a scenario, an acknowledgement message indicating success or failure is returned to the client software. If you run a scenario that starts another scenario immediately, an error message is returned because the first scenario was stopped before the acknowledgement of its starting could be returned. If you are starting one scenario from another, use a schedule to space the commands apart instead of placing the commands at time zero. JumpStart Commands The JumpStart server supports two serial commands; one for starting a scenario and one for stopping a scenario. Typically you invoke these commands on one JumpStart server. However, if your installation has more than one JumpStart server, you can send these commands from one server to another. You can also send commands to a JumpStart server from any device capable of sending a serial command. This is the command syntax: Syntax (SCN+STRT scenarioname) Description Starts a scenario. scenarioname is the name of a scenario on the JumpStart server to which the command is being sent. (SCN+STOP scenarioname) Stops a scenario. scenarioname is the name of a scenario on the JumpStart server to which the command is being sent. Send Serial Commands to Other Devices To send commands to other devices, the JumpStart server must be connected to the device with an Ethernet or serial connection. When defining the command you must use the correct syntax for the device, and you must know the IP address and port number of the device. For example, you send the (PWR1)command to turn a Christie M Series projector on. To display a grid test pattern, you send the (ITP 1)command. JumpStart 2.0 User Manual 020-101155-03 Rev. 1 (03/14) 27 Using JumpStart Create a Command After you create a command it appears in the Commands panel. To view the properties of a command, hover your mouse pointer over it. 1. Click the Commands panel and then click Add. - or Click the Content tab and then click Commands. 2. Enter a name for the command in the Command Name field. 3. Enter the command syntax in the Command field. See JumpStart Commands on page 27. For information on serial command syntax, see the documentation for the device that you want to send the command to. 4. Enter the IP address of the JumpStart server or the device to which the command will be sent in the IP field. 5. Enter the port number of the JumpStart server or the device to which the command will be sent in the Port Number field. Typically, the port number for the JumpStart server is 3002. 6. Enter a description of the command in the Description field. 7. Click OK. Rename a Command 1. Right-click a command in the Commands panel and click Rename. 2. Enter a new name for the command and press Enter. Edit a Command 1. Right-click a command in the Commands panel and click Edit. 2. Edit the command information and then click OK. Delete a Command Right-click a command in the Commands panel and click Remove. 28 JumpStart 2.0 User Manual 020-101155-03 Rev. 1 (03/14) Using JumpStart Add a Command to a Scenario To add a command to a scenario, drag a command from the Commands panel to the canvas. It appears on the timeline. You can also add a command to a scenario by right-clicking in a command row under the timeline, clicking Add, and then selecting a command. Only the first 5 commands in the Commands panel are listed. Change the Command Execution Time After you add a command to a scenario, you can change the execution time of the command by dragging it back and forth on the timeline. You can also use this procedure: 1. Right-click a command in the timeline and select Settings. 2. Enter a launch time in the Launch Time field 3. Click Apply. 4. Click Exit Remove a Command from a Scenario 1. Right-click a command in the timeline. 2. Click Delete. 3. Click Exit. Work with the Schedule You use the schedule to define when and how frequently content appears in a scenario. You can also use the schedule pane to change the order in which content is displayed (which windows are on top and which are underneath). For more information, see Change the Window Order on page 25. Show or Hide the Schedule Pane 1. Click the View tab. JumpStart 2.0 User Manual 020-101155-03 Rev. 1 (03/14) 29 Using JumpStart 2. Select Schedule to show the schedule pane. - or Clear Schedule to hide the schedule pane. Resize the Schedule Pane Move your pointer over the split bar between the canvas and the schedule pane until a double-headed arrow appears, and then drag the split bar up or down. Change the Schedule Time Interval 1. Right-click the time ruler in the schedule. 2. Select Auto, Seconds, Minutes, or Hours. Auto (selected by default) changes the units to match the longest duration you have added to the canvas. Change the Time Duration of a Window 1. Right-click a time line in the schedule pane and select Settings. 2. Click in a segment and type a number or use the arrows to increase or decrease the value. The format of the time field is HH:MM:SS:TT (hours: minutes:seconds:ten-thousandths of a second). 3. Click OK. Move Schedule Content You can have a maximum of 3,000 pieces of content displayed within a window in the schedule. To add additional content to existing windows on the canvas, drag the content from the Content pane into the window in the schedule. You can also rearrange content in the Schedule pane by dragging the content forward or back within one window, or by dragging the content from one window to another. 30 JumpStart 2.0 User Manual 020-101155-03 Rev. 1 (03/14) Using JumpStart Change the Color Properties of a Window on the Canvas When you add a window to a scenario, any changes you make are only applied to the window that appears within the selected scenario. See Add a Color Window to the Content Pane on page 21. Change the Properties of a Text Window on the Canvas When you add a text window to a scenario, any changes you make are only applied to the window that appears within the selected scenario. See Add a Text Window to the Content Pane on page 22. Add Color or Text Windows as New Channels If you have made changes to color or text windows in a scenario and want to re-use them as channels in other scenarios, you can add them to your list of available channels. 1. Right-click a color or text window time line in the schedule and select Add as Channel. 2. Enter a new name in the Name field. 3. Adjust the other settings as required. 4. Click OK. Automate a MediaServer Restart MediaServer is an application installed on the JumpStart server that manages and serves content. Synchronized videos within a scenario can become asynchronous over time. To prevent this issue, do not run scenarios with synchronized content for longer than 24 hours. JumpStart 2.0 User Manual 020-101155-03 Rev. 1 (03/14) 31 Using JumpStart If MediaServer is running a scenario when it restarts, the scenario is restarted. MediaServer will not automatically restart a running scenario more than 3 times within 30 minutes. Schedule MediaServer restarts at 30 minute intervals or greater. 1. Click Start > Control Panel > Administrative Tools. 2. Double-click Task Scheduler. 3. Select Action > Create Task. 4. Click the General tab. 5. In the Name field enter a name for the task. 6. In the Description enter a description for the task. 7. Create a new trigger: a. Click the Triggers tab. b. Click New. c. Select On a schedule in the Begin the task list. d. In the Settings area, click Daily. e. Specify the date when you want the task to be run for the first time, and the time of day when you want the task to be run. f. Enter the frequency of the task, in days, in the Recur every box. g. Click OK. 8. Create two actions: a. Click the Actions tab. b. Click New. c. In the Action list, select Start a program. d. In the Program/script box, enter TASKKILL. e. In the Add arguments box, enter /F /IM Mediaserver.exe. f. Click OK. g. Click New. h. In the Action list, select Start a program. 32 JumpStart 2.0 User Manual 020-101155-03 Rev. 1 (03/14) Using JumpStart i. Click Browse and browse to the location of the mediaserver.exe file (for example, C:\Program Files (x86)\Christie Digital Systems\Mastersuite\Christie\Jetty\mediaserver.exe). j. Click Open. k. Click OK. 9. Specify the task settings: a. Click the Settings tab. b. Select the If the running task does not end when requested, force it to stop check box. c. Select the Allow task to be run on demand check box. d. Clear the remaining check boxes. e. In the If the task is already running, then the following rule applies list, select Stop the existing instance. 10. Click OK. 11. To test the task, right-click it and select Run. JumpStart 2.0 User Manual 020-101155-03 Rev. 1 (03/14) 33 Troubleshooting This table lists information for correcting common JumpStart issues. Issue I cannot set up JumpStart with 1 MicroTile and 1 ECU Resolution You cannot use the JumpStart connection wizard to configure a display wall with a subarray with 1 MicroTile driven by 1 ECU. The DVI output requires a minimum bandwidth of 25 MHz, which is not achievable using 1 MicroTile at native resolution with a refresh rate of 60 Hz, which is what the MicroTiles Setup Wizard uses. To configure this setup manually, use the WebUI for your Master ECU. The images on my 1-tile subarray are cropped The EDID resolution might be set so that the incoming signal is larger than the native resolution of the MicroTile (720x540 pixels). As a result, images and videos might be cropped. Set the EDID values manually so that the entire incoming signal can be displayed. To configure this setup manually, use the WebUI for your Master ECU. I am experiencing performance problems when playing multiple videos simultaneously You can play a maximum of 4 HD or 16 SD videos simultaneously on your display wall. Use the AMD Catalyst Control Center to configure the monitors as a single desktop. To access the AMD Catalyst Control Center, right-click on the JumpStart server desktop and select Catalyst Pro Control Center. The JumpStart server is not restarting properly after configuring my display wall The bandwidth assigned to each ECU is restricted to 150 MHz. If the display wall mapped to an ECU exceeds this value, the JumpStart server may not interact properly with the display wall. Use the WebUI for your Master ECU to manually change your EDID values to lower the bandwidth below 150 MHz. JumpStart 2.0 User Manual 020-101155-03 Rev. 1 (03/14) 35 Troubleshooting Issue An application in my scenario is not closing automatically Resolution Some applications do not close automatically when the scenario that launched them is stopped. Here are possible reasons why this might occur: • The JumpStart client software does not have Microsoft Windows administrative permissions on the JumpStart server. Any applications that require administrative permissions to close them cannot be closed when a JumpStart scenario ends. This is true regardless of whether you are running the JumpStart client software on the JumpStart server or on another computer. • Some applications with splash-screen dialogs cannot be closed. • Some applications that launch multiple windows or processes (for example, Adobe Acrobat) cannot be closed. My desktop appears cropped Christie ECUs default to a WUXGA (1920x1200) resolution. If the native resolution of your MicroTiles configuration is smaller than this, your desktop is cropped on the right or the bottom. Use the WebUI to manually configure the correct EDID settings on the ECU. A thumbnail image does not appear after I add an image or video to JumpStart JumpStart cannot create a thumbnails for some large files. However, the files should work properly in a scenario. Image quality is poor when I use interlaced video Use of interlaced video signals connected as an external source to the JumpStart server is not recommended. This could produce visible image artifacts, such as missing lines, especially when viewed up close or if the video is upscaled significantly. My videos do not stay synchronized Restart MediaServer (the application on the JumpStart server that manages and serves content) at an off-peak time, such as overnight, using the Windows Task Scheduler. See Automate a MediaServer Restart on page 31. 36 JumpStart 2.0 User Manual 020-101155-03 Rev. 1 (03/14) Troubleshooting Issue My Blu-Ray discs do not play Resolution JumpStart uses the Corel® WinDVD® player to play Blu-ray discs. If you uninstall or modify this application, you cannot play Blu-ray discs. Do not uninstall or modify this application. To play Blu-Ray discs with the JumpStart Blu-Ray player, you must turn AMD Eyefinity mode on: 1. Right-click on the JumpStart server desktop and select Catalyst Pro Control Center. 2. Click AMD Eyefinity Multi-Display > Create Eyefinity Group. 3. Select a display in the list. 4. Click Continue. 5. Select a layout for the display group and then click Continue. 6. Click Arrange and then select the screens in the order that they should appear. 7. Click Done. My synchronized content is becoming asynchronous If you have a scenario with synchronized content that is becoming asynchronous, restart MediaServer at an off-peak time, such as overnight, using the Windows Task Scheduler. The MicroTiles Connection Wizard does not appear If you are doing initial setup using more than one ECU with JumpStart, Microsoft Windows chooses one of the ECUs as the one driving the primary display. This may not be the ECU you have designated as the Master ECU. As a result, the display wall attached to your Master ECU may be black. To avoid this issue, perform initial setup with just the Master ECU connected to the JumpStart server using the DVI video cable. JumpStart 2.0 User Manual 020-101155-03 Rev. 1 (03/14) 37 Troubleshooting Issue Resolution Some of my windows are black or white when I play a scenario If the JumpStart server is not displaying content correctly, it may be running low on memory, especially if you are displaying several video or image windows at the same time. Adjust your scenario so that it has fewer windows being displayed simultaneously. JumpStart displayed an out-ofmemory error, and isn’t working If the JumpStart server displays an out-ofmemory exception error, the JumpStart server software should restart automatically. If it has not restarted (for example, if there are no JumpStart windows open), then you can manually launch the JumpStart server software by double-clicking the JumpStart Server shortcut on the server desktop. If JumpStart suddenly stops playing a JumpStart stopped playing a scenario, the media server software may scenario and I cannot see the Windows task bar on my display wall have stopped unexpectedly. If this happens and you cannot see the Windows task bar to restart the server: • Connect to the server using the JumpStart client software on another computer. • Start another scenario in JumpStart. • Stop the scenario. The Windows task bar should reappear. I started a scenario that includes a command to start another scenario, but got an error message 38 If you start a scenario that contains a command to start another scenario, the JumpStart server might return an error message because the command was located at time zero. When starting one scenario from another, place the command a few seconds into the scenario timeline. The command cannot start at zero. JumpStart 2.0 User Manual 020-101155-03 Rev. 1 (03/14) Troubleshooting Issue Resolution I cannot connect to the JumpStart server or I cannot see any scenarios If you cannot open or save a scenario or connect to the JumpStart server using the JumpStart client software, confirm the following items: • The server is turned on and is connected to the display wall. • If you are using the JumpStart client software on another computer, you are connected to the server. • The server has sufficient hard disk space to operate properly. If this issue persists, restart the JumpStart server. If this issue recurs after restarting the server, then the Java installation on the JumpStart server may have been upgraded to a more recent version while the Christie Web Server was running. The Christie Web Server requires Java; upgrading Java while the Web Server is running causes the Java installation process to fail. To upgrade Java safely, or to correct this issue: 1. On the JumpStart server desktop, rightclick Computer, and click Manage. 2. In the Computer Management window, double-click Services and Applications, and then double-click Services. 3. In the list of services, right-click Christie Web Server and then click Stop. 4. From the Start menu, click Control Panel. Double-click Java (32-bit). 5. On the Java Control Panel, click the Update tab. Click Update Now. 6. When the Java update is complete, return to the Services list, right-click Christie Web Server and then click Start. JumpStart 2.0 User Manual 020-101155-03 Rev. 1 (03/14) 39 Troubleshooting Issue A warning message appears indicating that the font specified in the text channel is not installed on the JumpStart server Resolution Click Yes to use the default font in the scenario. Click No and select a different font. The font you select must be installed on the JumpStart server. To view a list of the fonts that are included with Microsoft Windows 7, see http:// www.microsoft.com/typography/fonts/ product.aspx?pid=161. A font warning message appears in the Text Settings dialog This warning message appears when you edit a text box on a JumpStart client computer and you select a font that is not installed on the JumpStart server. Make sure the font you select is installed on the JumpStart server. To view a list of the fonts that are included with Microsoft Windows 7, see http:// www.microsoft.com/typography/fonts/ product.aspx?pid=161. A yellow warning icon appears on a channel A yellow warning icon appears on a channel when the media assigned to the channel cannot be located. You cannot drag a channel with a warning icon onto the canvas to include it in a scenario. An error message appears if you activate or save a scenario with a channel that is missing content. Click Yes to convert the channel to a text box that appears on the canvas with the error message details. Click No to recover the deleted channel or file. If the channel was deleted, add the channel again with the same name as the deleted channel. If the channel appears in the content list, specify a content file. The warning icon is removed when you recover the channel. Save or reopen the scenario and specify the location of the content. 40 JumpStart 2.0 User Manual 020-101155-03 Rev. 1 (03/14) Troubleshooting Issue My text flashes when I apply a transparent background Resolution To display text with a transparent background you must activate Windows Aero on the JumpStart server: 1. On the JumpStart server desktop, rightclick and select Personalize. 2. Select a theme in the Aero Themes area. 3. Close the Personalization window. 4. Restart the JumpStart server. 5. Turn the JumpStart client computer on and then restart the scenario. I cannot hear sound after enabling audio in the window and scenario • Make sure the speakers or audio playback device is turned on and the volume is up. • Make sure the sound volume on the JumpStart server is on and has not been muted. A red X appears over the speaker icon in the task bar if sound is muted. • Make sure the default playback device is set to Speakers/Headphones. I cannot enable sound in a window and the speaker icon is not visible • Make sure an audio track is included with the window content. The speaker icon only appears when audio is included with the content. My file upload was unsuccessful and my content will not play • Upload the file and add it to the scenario again. The existing file is overwritten when the file names are identical. My uploads to the JumpStart server time out or fail • Make sure port 1701 on the JumpStart server and client computer are not assigned to another application or service. • Make sure the JumpStart server and client computer are on the same network. • Make sure the FTP server icon appears in the JumpStart server task bar. If the icon does not appear in the task bar, restart the JumpStart server. JumpStart 2.0 User Manual 020-101155-03 Rev. 1 (03/14) 41 Specifications This section provides detailed JumpStart specifications. Specifications are subject to change without notice. Supported Video Formats Video Format File Extension QuickTime .MOV Windows Media .AVI, .WMV (NOTE: Digital Video (.DV) and Motion JPEG (MJPEG) are not supported.) MPEG .MP4, .MPG, .MPEG Supported Image Formats Image Format File Extension Portable Network Graphics .PNG Graphics Interchange Format .GIF Animated Graphics Interchange Format .GIF Joint Photographic Experts Group .JPEG, .JPG Tagged Image File Format .TIFF, .TIF Microsoft Bitmap .BMP Interlaced Video Use of interlaced video signals connected as an external source to the JumpStart server is not recommended. This could produce visible image artifacts, such as missing lines, especially when viewed up close or if the video is upscaled significantly. JumpStart 2.0 User Manual 020-101155-03 Rev. 1 (03/14) 43 Specifications Simultaneous Playback i Although limitations are provided using standard VESA resolutions, a wide range of non-standard resolutions — common with MicroTiles — are also supported within the equivalent bandwidth. JumpStart can play back many different kinds of content in a schedule: pictures, videos, color or text boxes, software applications, and live input. A single scenario can contain up to 60 media windows, and each media window can have up to 3,000 media objects scheduled at different times within it. However, the amount of content which may be played back simultaneously is limited by the JumpStart server hardware. Limits apply to displaying each type of content alone: video or images. If you want to display several videos and image content simultaneously, or run additional applications, performance may degrade before you reach these limits. Video Resolution Number of Videos in Simultaneous Playback Number of Videos per Output 1920 x 1200 (WUXGA) @ 60Hz 4 3 720 x 480 (Standard Definition) @ 60Hz 16 12 Images and Color Boxes When displaying images and color boxes before or after other content in a scenario, JumpStart can display a combined 25 million pixels of images or color boxes simultaneously. In this instance, individual static images or color boxes should not be larger than 6.25 million pixels. If you exceed this value in a scenario, images, color boxes, or videos may not be displayed correctly. These are examples of image combinations that would exceed the maximum recommended capacity when displaying with other content in a scenario: • 44 4 images that are each 2500 by 2500 pixels JumpStart 2.0 User Manual 020-101155-03 Rev. 1 (03/14) Specifications • 8 images that are each 1750 by 1750 pixels • 12 images that are each 1920 by 1080 pixels Static Content If the images and color boxes remain static throughout the scenario, and are not preceded or succeeded by any other content, JumpStart can display up to a combined 50 million pixels of images or color boxes simultaneously. In this instance, individual static images or color boxes should not be larger than 50 million pixels. If you exceed this value in a scenario, images, color boxes, or videos may not be displayed correctly. Here are examples of image combinations that would reach JumpStart’s maximum recommended capacity when they are being shown alone: • 1 image that is 7000 by 7000 pixels • 16 images that are each 1750 by 1750 pixels • 24 images that are each 1920 by 1080 pixels. Capture Card Limitations i High-bandwidth Digital Content Protection (HDCP) is not supported in JumpStart. The JumpStart server D2R2-E DVI capture cards support the following resolutions: • Digital: 640x480 (VGA), 800x600, 1024x768, 1280x1024, 1600x1200, 1920x1080, 1920x1200 (WUXGA) • Analog: 640x480 (VGA), 800x600, 1024x768, 1280x1024, 1600x1200, 1920x1080, 2048x1536 (QXGA) • HD Modes: 1080p, 720p, 576p, 480p using a Component HD-DVI connector (HDCP not supported). • Supported Frequency: Resolution frequency supported up to 60Hz Resolutions outside of the list may still be captured by the D2R2-E capture card; however, quality is not guaranteed. JumpStart 2.0 User Manual 020-101155-03 Rev. 1 (03/14) 45 United Kingdom ph: +44 118 977 8000 Eastern Europe ph: +36 (0) 1 47 48 100 Singapore ph: +65 6877-8737 Japan ph: 81-3-3599-7481 France ph: +33 (0) 1 41 21 00 36 Middle East ph: +971 (0) 4 299 7575 Beijing ph: +86 10 6561 0240 South Korea ph: +82 2 702 1601 Germany ph: +49 2161 664540 Spain ph: + 34 91 633 9990 Shanghai ph: +86 21 6278 7708