1
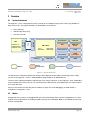
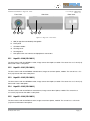
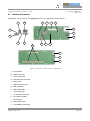
Argos2D - A10x User Manual Version 1.1 Bluetechnix GmbH Waidhausenstraße 3/19 A-1140 Vienna AUSTRIA [email protected] www.bluetechnix.com Argos®2D – A100 – User Manual Document No.: 900-308 / B Publication date: April 9, 2013 Subject to change without notice. Errors excepted. This document is protected by copyright. All rights reserved. No part of this document may be reproduced or transmitted for any purpose in any form or by any means, electronically or mechanically, without expressly written permission by Bluetechnix GmbH. Windows is a registered trademark of Microsoft. © Bluetechnix 2013 Table of Contents 1 General Information .......................................................................................................................... 5 1.1 2 Overview ........................................................................................................................................... 6 2.1 System Architecture .................................................................................................................. 6 2.2 Models ....................................................................................................................................... 6 2.2.1 Argos2D – A100 (150-1001-1) ........................................................................................... 7 2.2.2 Argos2D – A101 (150-1002-1) ........................................................................................... 7 2.2.3 Argos2D – A102 (150-1003-1) ........................................................................................... 7 2.2.4 Argos2D – A103 (150-1004-1) ........................................................................................... 7 2.2.5 Argos2D – A104 (150-1005-1) ........................................................................................... 7 2.3 3 4 Symbols Used ........................................................................................................................... 5 Interfaces & Connectors ........................................................................................................... 8 Software Installation ......................................................................................................................... 9 3.1 Software-Development-Kit SDK ............................................................................................... 9 3.2 Drivers ....................................................................................................................................... 9 3.3 Console ..................................................................................................................................... 9 Hardware Installation ..................................................................................................................... 10 4.1 Connecting the Core Module and the Carrier Board .............................................................. 10 4.2 Connecting CM and CB with housing base ........................................................................... 11 4.3 Connecting the ISM with front plane ...................................................................................... 12 4.4 Connecting the 30pin flex-foil cable to the ISM ..................................................................... 12 4.5 Connecting ISM to housing base ........................................................................................... 12 4.6 Inserting the µSD-Card and the coin cell ................................................................................ 13 4.7 Connecting the housing cover with the base ......................................................................... 14 5 Getting Started ............................................................................................................................... 15 6 Programming Environment ............................................................................................................ 16 Use Eclipse IDE for C/C++ developers or an editor of your choice. ................................................. 16 6.1 7 Setting up the tool chain ......................................................................................................... 16 Appendix ........................................................................................................................................ 17 7.1 Electrical Specifications .......................................................................................................... 17 7.1.1 Operating Conditions ....................................................................................................... 17 7.1.2 Maximum Ratings ............................................................................................................ 17 7.1.3 ESD Sensitivity ................................................................................................................. 17 7.2 Connector and Interface Description ...................................................................................... 18 7.2.1 Reset button a(S4) ........................................................................................................... 18 7.2.2 HDMI connector b(X10) ................................................................................................... 18 7.2.3 Power connector c(X10) .................................................................................................. 18 © Bluetechnix 2013 7.2.4 RJ45 Ethernet connector d(X8)........................................................................................ 18 7.2.5 Status LED e(V7) .............................................................................................................. 18 7.2.6 USB-OTG connector f(X6) ............................................................................................... 18 7.2.7 ISM connector g(X9) ........................................................................................................ 18 7.2.8 µSD-Card holder h(X7)..................................................................................................... 19 7.2.9 JTAG connector i(X12) ..................................................................................................... 19 7.2.10 I/O extender connector j(X11) .......................................................................................... 19 7.2.11 RTC-battery holder k(G1) ................................................................................................ 20 7.2.12 Reset button l(S2) ............................................................................................................ 20 7.2.13 Boot mode switch m(S1) ................................................................................................. 20 7.2.14 Core Module connectors n(X1, X2, X3) ........................................................................... 21 7.3 Mechanical Outline.................................................................................................................. 22 7.4 Support ................................................................................................................................... 22 7.4.1 General Support............................................................................................................... 22 7.4.2 Board Support Packages ................................................................................................ 22 7.4.3 i.MX Freescale Software Support .................................................................................... 22 7.5 Dependability .......................................................................................................................... 23 7.5.1 8 Product History .............................................................................................................................. 24 8.1 9 MTBF ............................................................................................................................... 23 Version Information ................................................................................................................. 24 8.1.1 Argos2D – A100 (150-1001-1) ......................................................................................... 24 8.1.2 Argos2D – A101 (150-1002-1) ......................................................................................... 24 8.1.3 Argos2D – A102 (150-1003-1) ......................................................................................... 24 8.1.4 Argos2D – A103 (150-1004-1) ......................................................................................... 24 8.1.5 Argos2D – A104 (150-1005-1) ......................................................................................... 24 8.2 Anomalies ................................................................................................................................ 24 8.3 Document Revision History .................................................................................................... 25 Index ............................................................................................................................................... 26 © Bluetechnix 2013 © Bluetechnix GmbH 2013 All Rights Reserved. The information herein is given to describe certain components and shall not be considered as a guarantee of characteristics. Terms of delivery and rights of technical change reserved. We hereby disclaim any warranties, including but not limited to warranties of non-infringement, regarding circuits, descriptions and charts stated herein. Bluetechnix makes and you receive no warranties or conditions, express, implied, statutory or in any communication with you. Bluetechnix specifically disclaims any implied warranty of merchantability or fitness for a particular purpose. Bluetechnix takes no liability for any damages and errors causing of the usage of this board. The user of this board is responsible by himself for the functionality of his application. He is allowed to use the board only if he has the qualification. More information is found in the General Terms and Conditions (AGB). Information For further information on technology, delivery terms and conditions and prices please contact Bluetechnix (http://www.bluetechnix.com). Warning Due to technical requirements components may contain dangerous substances. © Bluetechnix 2013 Hardware User Manual - Argos2D - A10x 1 Last change: 9 April 2013 Version 1.1 General Information This guide applies to all smart cameras based on the Argos® smart camera platform from Bluetechnix GmbH. Follow this guide chapter by chapter to set up and understand your product. If a section of this document only applies to certain camera models, this is indicated at the beginning of the respective section. 1.1 Symbols Used This guide makes use of a few symbols and conventions: Warning Indicates a situation which, if not avoided, could result in minor or moderate injury and/or property damage or damage to the device. Caution Indicates a situation which, if not avoided, may result in minor damage to the device, in malfunction of the device or in data loss. Note Notes provide information on special issues related to the device or provide information that will make operation of the device easier. Procedures A procedure always starts with an headline 1. The number indicates the step number of a certain procedure you are expected to follow. Steps are numbered sequentially. This sign indicates an expected result of your action. References This symbol indicates a cross reference to a different chapter of this manual or to an external document. © Bluetechnix 2013 Page | 5 Hardware User Manual - Argos2D - A10x 2 Last change: 9 April 2013 Version 1.1 Overview 2.1 System Architecture • Video/Image processing • Data transmission ISM MT9M131-C MT9M025-M/C MT9M031-M/C Cable Data capturing Camera Interface • Camera Interface The Argos2D – A10x is designed to cover the needs for an intelligent image sensor with a high flexibility in data transmission. The typical workflow can be divided in three actions: CM-i.MX53 1GHz 4MB NOR DC-Plug Module 1GB DDR2 2GB NAND USB-OTG Active Components Reset Buttons RGB LED RTC RGB-LED Driver µSD Card Slot JTAG I/O Extender HDMI Transmitter RJ45 HDMI User Interfaces Connectors Figure 2.1: System Architecture The Bluetechnix standard Image Sensor Interface (BLT-ISM-Connector) allows connecting various image sensors to the Argos2D – A10x (i.e. ISM-MT9M025, ISM-MT9M131 or ISM-MT9P031). To transmit the captured and processed data there are various interfaces on the Argos2D – A10x. Depending on the needed transmission rate you can select between USB, Ethernet, CAN (optional) or just store the data on a micro-SD-card. If there is the need to visualize the processed data or simply for visual debugging, an HDMI output is available on the Argos2D – A10x. 2.2 Models All Argos2D A10x cameras are equipped with the i.MX carrier board, which contains all peripherals, the core module mount and interfaces including the ISM-connector, the CM-i.MX53 SoM as CPU board, the housing and the selected ISM. © Bluetechnix 2013 Page | 6 Hardware User Manual - Argos2D - A10x Last change: 9 April 2013 Version 1.1 Front View a b c Side View c d e Back View f Figure 2.2: Argos2D – A10x views a. ISM (Images Sensor Module) changeable b. Front panel c. CS-Mount holder d. Housing cover e. Housing base f. 2.2.1 Rear panel with user interface and peripherals connectors Argos2D – A100 (150-1001-1) The A100 comes with the MT9M131 color, image sensor form Aptina, module. The sensor has a 1/3-inch (5:4) format with 1280 x 1024 pixels. 2.2.2 Argos2D – A101 (150-1002-1) The A101 comes with the MT9M025 monochrome, image sensor form Aptina, module. The sensor has a 1/3inch (4:3) format with 1280 x 960 pixels. 2.2.3 Argos2D – A102 (150-1003-1) The A102 comes with the MT9M025 color, image sensor form Aptina, module. The sensor has a 1/3-inch (4:3) format with 1280 x 960 pixels. 2.2.4 Argos2D – A103 (150-1004-1) The A103 comes with the MT9P031 monochrome, image sensor form Aptina, module. The sensor has a 1/2.5-inch (4:3) format with 2592 x 1944 pixels. 2.2.5 Argos2D – A104 (150-1005-1) The A104 comes with the MT9P031 color, image sensor form Aptina, module. The sensor has a 1/2.5-inch (4:3) format with 2592 x 1944 pixels. © Bluetechnix 2013 Page | 7 Hardware User Manual - Argos2D - A10x 2.3 Last change: 9 April 2013 Version 1.1 Interfaces & Connectors All Argos2D – A10x cameras are equipped with the same connectors and interfaces. c d h g i j d a c b a e f n k l m d c a Figure 2.3: Argos2D – A10x connectors and interfaces a. Reset button b. HDMI connector c. Power connector d. RJ45 Ethernet connector e. Status LED f. USB-OTG connector g. ISM connector h. µSD-Card holder i. JTAG connector j. I/O extender connector k. RTC-battery holder l. Reset button m. Boot mode switch n. Core Module connectors © Bluetechnix 2013 Page | 8 Hardware User Manual - Argos2D - A10x 3 3.1 Last change: 9 April 2013 Version 1.1 Software Installation Software-Development-Kit SDK The SDK is build up on Linux. Bluetechnix offers a Board Support Package that is based on the U-Boot boot loader and the Linux kernel. The build environment is LTIB, the Linux Target Image Builder, which is Freescale's preferred way to offer Linux board support packages. Bluetechnix provides a patch set that is installed on top of Freescale's i.MX53 LTIB BSP. A guide for downloading and installing the SDK can be found in the CM-i.MX53 Software User Manual. 3.2 Drivers If your Operating system does not install the drivers for a virtual comport, a USB-UART driver installation guide can be found here. 3.3 Console An installation guide for a serial console can be found here. © Bluetechnix 2013 Page | 9 Hardware User Manual - Argos2D - A10x 4 Last change: 9 April 2013 Version 1.1 Hardware Installation Caution Only assemble and dissemble electronic in an ESD-protected environment. 4.1 Connecting the Core Module and the Carrier Board 1. Put the carrier board with the bottom side up on a base. 2. Take the core module and align in on the connectors of the carrier board. Be aware that the CM and the CB is parallel 3. Connect the CM with appropriate force on the marked spots to the CB. 4. Check if the CM is fully aligned on the CB 5. Take three M2 x 5mm screws and mount it. 1 2 3 4 5 Figure 4.1: Connecting the Core Module and the Carrier Board © Bluetechnix 2013 Page | 10 Hardware User Manual - Argos2D - A10x 4.2 Last change: 9 April 2013 Version 1.1 Connecting CM and CB with housing base 1. Take the rear plane and the housing base. 2. Take two M2.9 x 5mm self-tapping screws and mount it. 3. Take the CM-CB compound with the CM looking down. First insert the connectors into the rear plane and then push the CB down to the housing base. 4. Take two M2.9 x 5mm self-tapping screws and mount it on the front. 2 3 1 3 4 Figure 4.2: Connecting CM and CB with housing base © Bluetechnix 2013 Page | 11 Hardware User Manual - Argos2D - A10x 4.3 Last change: 9 April 2013 Version 1.1 Connecting the ISM with front plane 1. Usually the ISM comes mounted with a CS mount holder. This is fixed with two M2 x 5mm srews 2. Take the ISM and align it on the front plane, by using the locating pins. 3. Take four M2.9 x 8mm self-tapping screws and mount them together. 2 1 3 Figure 4.3: Connecting the ISM with front plane 4.4 Connecting the 30pin flex-foil cable to the ISM 1. Take a look on the ISM. There is the possibility that more than one ISM connector is populated, if that’s the case you must use that one with an i.MX mark besides. The flex foil cable must have the contacts on the same side. 2. Pull out the lock of the connector with appropriate force simultaneously on both sides. 3. Insert the flex-foil cable with the visible contacts showing away from the ISM. 4. Secure the cable by pushing the lock back in. 1 2 3 4 5 Figure 4.4: Connecting flex-foil cable with ISM 4.5 Connecting ISM to housing base 1. Take the housing base including the CB and also take the ISM with connected front plane and flexfoil cable. 2. Pull out the lock of the connector with appropriate force simultaneously on both sides. 3. Pull out the lock of the connector with appropriate force simultaneously on both sides. © Bluetechnix 2013 Page | 12 Hardware User Manual - Argos2D - A10x 4. Insert the flex-foil cable with the visible contacts showing away from the ISM. Last change: 9 April 2013 Version 1.1 5. Secure the cable by pushing the lock back in. 6. Insert the ISM into the housing base 7. Turn the whole camera around and mount two M2.9 x 8mm self-tapping screws on the bottom. 1 2 3 4 5 6 7 Figure 4.5: Connecting ISM and front plane to housing base 4.6 Inserting the µSD-Card and the coin cell 1. Open the µSD-Card slot by pushing the slot with appropriate force to the right and then up. 2. Insert the µSD-Card. 3. Close the slot by pushing them town and to the left. © Bluetechnix 2013 Page | 13 Hardware User Manual - Argos2D - A10x Last change: 9 April 2013 Version 1.1 4. Push the 12mm coin cell with the positive side up and appropriate force into the holder. 4 1 3 2 Figure 4.6: Inserting the µSD-Card and the coin cell 4.7 Connecting the housing cover with the base 1. Put the housing cover over the base 2. Take two M2.9 x 8mm self-tapping screws and mount them in front of the cover. 3. Take two M2.9 x 18mm self-tapping screws and mount them in back of the cover. 2 1 3 Figure 4.7: Connecting the housing cover with the base © Bluetechnix 2013 Page | 14 Hardware User Manual - Argos2D - A10x 5 Last change: 9 April 2013 Version 1.1 Getting Started A Guide how to start with your Argos®2D A100 Camera based on the CM-i.MX53 SoM can be found here. © Bluetechnix 2013 Page | 15 Hardware User Manual - Argos2D - A10x 6 Last change: 9 April 2013 Version 1.1 Programming Environment Use Eclipse IDE for C/C++ developers or an editor of your choice. 6.1 Setting up the tool chain The tool chain gets installed with the Software-Development-Kit SDK. © Bluetechnix 2013 Page | 16 Hardware User Manual - Argos2D - A10x 7 Last change: 9 April 2013 Version 1.1 Appendix 7.1 7.1.1 Electrical Specifications Operating Conditions Symbol VIN IIN V3V3 I3V3 VOH VOL Parameter Input supply voltage Input current @ 12V Extender Voltage Supply Extender Current Supply High level output voltage Low level output voltage Min 12 3.0 2.31 - Typical 12 300 3.3 - Max1 16 500 3.6 300 0.99 Unit V mA V mA V V Table 7.1: Electrical characteristics 1 An overstepping of these maximums may cause permanent damage of the CM The voltage levels and currents are only correct with the Bluetechnix default PMIC settings. 7.1.2 Maximum Ratings Stressing the device above the rating listed in the absolute maximum ratings table may cause permanent damage to the device. These are stress ratings only. Operation of the device at these or any other conditions greater than those indicated in the operating sections of this specification is not implied. Exposure to absolute maximum rating conditions for extended periods may affect device reliability. Symbol VIN VIO OH /IOL TAMB TSTO φAMB Parameter Input supply voltage Input or output voltage Current per pin Ambient temperature Storage temperature Relative ambient humidity Min -0.5 -0.5 0 0 -55 - Max 16 3.6 10 701 150 90 Unit V V mA °C °C % Table 7.2: Absolute maximum ratings If extreme high ambient temperatures are expected (75°C in industrial environments or 60°C for commercial products), the user has to apply a heat spreader on CPU and DDR-RAM (avoid heat accumulation!). In addition the die temperature should be monitored regularly, so that the CPU and RAM clock can be throttled if necessary. 1 7.1.3 ESD Sensitivity ESD (electrostatic discharge) sensitive device. Charged devices and circuit boards can discharge without detection. Although this product features patented or proprietary protection circuitry, damage may occur on devices subjected to high energy ESD. Therefore, proper ESD precautions should be taken to avoid performance degradation or loss of functionality. © Bluetechnix 2013 Page | 17 Hardware User Manual - Argos2D - A10x 7.2 Last change: 9 April 2013 Version 1.1 Connector and Interface Description 7.2.1 Reset button a(S4) The push button performs a factory reset. This function is not implemented in Software. 7.2.2 HDMI connector b(X10) The HDMI connector provides a standard interface for digital video and audio signals. The HDMI/DVI transmitter is preprocessing the video signal from the IPU. The audio stream comes from the AUD5 interface of the i.MX53x. 7.2.3 Power connector c(X10) The Argos2D - A10x works with a single power supply of 12V to 16V. 7.2.4 RJ45 Ethernet connector d(X8) As the Ethernet PHY is already integrated on the Core Module, the LAN signals are routed directly to a RJ45 LAN connector. 7.2.5 Status LED e(V7) The RGB LED is connected to the TCA62724FMG RGB-LED driver and can be used for status signaling. 7.2.6 USB-OTG connector f(X6) The i.MX53 USB-OTG internal USB-OTG PHY is routed to a mini USB-A/B connector. 7.2.7 Pin No. 1 2 3 4 5 6 7 8 9 10 11 12 13 14 15 16 17 18 19 ISM connector g(X9) Signal Name VCAMA GND SADDR CAMCLK NRESET SIO.C SIO.D VCAMC GND PPI0.CLK PPI0.SY2 PPI0.SY1 PF45 STROBE PPI0.D0 PPI0.D1 PPI0.D2 PPI0.D3 VCAMIO © Bluetechnix 2013 Type PWR PWR NC O O O I/O PWR PWR I I I O I I I I I PWR Description Camera Analog Voltage Supply Power Ground Not Connected Camera Master Clock Global Reset Configuration Bus Clock Line Configuration Bus Data Line Camera Core Voltage Supply Power Ground Pixel Clock VSYNC HSYNC Camera Trigger Strobe Signal from Camera (available only on solder pad) Pixel Data Pixel Data Pixel Data Pixel Data Camera IO Power Supply Page | 18 Hardware User Manual - Argos2D - A10x Pin No. 20 21 22 23 24 25 26 27 28 29 30 Signal Name GND PPI0.D4 PPI0.D5 PPI0.D6 PPI0.D7 GND PPI0.D8 PPI0.D9 PPI0.D10 PPI0.D11 PF44 Last change: 9 April 2013 Version 1.1 Type PWR I I I I PWR I I I I O Description Power Ground Pixel Data Pixel Data Pixel Data Pixel Data Power Ground Pixel Data Pixel Data Pixel Data Pixel Data Output Enable (Active Low) Table 7.3: ISM connector g(X9) 7.2.8 µSD-Card holder h(X7) The SDHC-Card signals are directly connected to the SD Port of the CM-i.MX53. A Micro SD-Card connector mounted on the top side of the board supports µSD cards. 7.2.9 Pin No. 1 2 3 4 5 6 7 8 9 10 11 12 13 14 15 16 17 18 19 20 JTAG connector i(X12) Signal Name JTAG.REF JTAG.PWR JTAG.nTRST GND JTAG.TDI GND JTAG.TMS GND JTAG.TCK GND 10k PD GND JTAG.TDO GND CTRL.nRESET GND JTAG.nDE GND 10k PD GND Type PWR PWR I 10k PU PWR I 10k PU PWR I 10k PU PWR I 10k PD PWR PWR O 10k PU PWR I PWR I 10k PU PWR PWR Description 2V8 Reference Voltage 3V3 Supply if S1.4 is on JTAG Test Reset Power Ground JTAG Test Data Input Power Ground JTAG Test Mode Select Power Ground JTAG Test Clock Power Ground 10k Pull Down Power Ground JTAG Test Data Output Power Ground Global Reset Power Ground JTAG Debug Power Ground 10k Pull Down Power Ground Table 7.4: JTAG connector i(X12) 7.2.10 I/O extender connector j(X11) Pin No. 1 2 3 4 5 6 Signal Name UART1.RXD I2C3.SDA UART1.TXD I2C3.SCL GND GND © Bluetechnix 2013 Type I I/O 3k PU O O 3k PU PWR PWR Description UART1 Receive Data I2C Data UART1 Transmit Data I2C Clock Power Ground Power Ground Page | 19 Hardware User Manual - Argos2D - A10x Pin No. 7 8 9 10 11 12 13 14 15 16 Signal Name P_SW4_3V3 P_SW4_3V3 UART2.RXD CAN1.RXD UART2.TXD CAN1.TXD ECSPI2.SCLK ECSPI2.MISO ECSPI2.SS0 ECSPI2.MOSI Last change: 9 April 2013 Version 1.1 Type PWR PWR I 10k PU I O O O I O O Description 3.3V 3.3V UART2 Receive Data CAN Receive Data UART2 Transmit Data CAN Transmit Data SPI CLK SPI MISO SPI Select0 SPI MOSI Table 7.5: I/O extender connector j(X11) 7.2.11 RTC-battery holder k(G1) There is also a possibility to add a 12mm coin cell to keep the RTC running. The Argos2D – A10x is delivered only with a coin cell holder but without a battery. 7.2.12 Reset button l(S2) The push buttons perform a reset. 7.2.13 Boot mode switch m(S1) To set the right boot mode for the CM-i.MX53, only the switches 1, 2 and 3 are used. Switch Setting 1 2 3 4 1 2 3 4 1 2 3 4 On Off Boot Description Boot from SPI NOR flash On Off Boot from SD card On Off USB/UART boot mode Some JTAG debuggers, like the PEEDI JTAG, short pins #1 and #2 (VREF and VSUPPLY) of the 20-pin ARM JTAG header (X12). On the Argos®2D A100, these pins are connected to different voltages (2V8 vs. 3V3) and must not be shortened. If your JTAG device/connector shorts pins #1 and #2, the following switch setting must be done on Argos®2. It disconnects 3V3 from JTAG pin #2 (VSUPPLY). Switch Setting 1 2 3 4 1 2 3 4 On Off On Off © Bluetechnix 2013 Description Disconnect 3V3 from JTAG pin #2 (VSUPPLY) Connect 3V3 to VSUPPLY Page | 20 Hardware User Manual - Argos2D - A10x 7.2.14 Core Module connectors n(X1, X2, X3) Last change: 9 April 2013 Version 1.1 The three connectors connecting the CM-i.MX53 Module, for more information take a look into the CMi.MX53 Hardware User Manual. © Bluetechnix 2013 Page | 21 Hardware User Manual - Argos2D - A10x 7.3 Last change: 9 April 2013 Version 1.1 Mechanical Outline 57 All dimensions are given in mm. 57 143 55 5 Figure 7.1: Mechanical outline 7.4 7.4.1 Support General Support General support for products can be found at Bluetechnix’ support site https://support.bluetechnix.at/wiki 7.4.2 Board Support Packages Board support packages and software downloads are for registered customers only https://support.bluetechnix.at/wiki/Argos%C2%AE2D_A100_Camera. 7.4.3 i.MX Freescale Software Support https://community.freescale.com/community/imx 7.4.3.1 Upcoming Products and Software Releases Keep up to date with all product changes, releases and software updates of Bluetechnix at http://www.bluetechnix.com. © Bluetechnix 2013 Page | 22 Hardware User Manual - Argos2D - A10x 7.5 7.5.1 Dependability Last change: 9 April 2013 Version 1.1 MTBF Please keep in mind that a part stress analysis would be the only way to obtain significant failure rate results, because MTBF numbers just represent a statistical approximation of how long a set of devices should last before failure. Nevertheless, we can calculate an MTBF of the Core Module using the bill of material. We take all the components into account. The PCB and solder connections are excluded from this estimation. For test conditions we assume an ambient temperature of 30°C of all Core Module components except the Blackfin® processor (80°C) and the memories (70°C). We use the MTBF Calculator from ALD (http://www.aldservice.com/) and use the reliability prediction MIL-217F2 Part Stress standard. Please get in touch with Bluetechnix ([email protected]) if you are interested in the MTBF result. © Bluetechnix 2013 Page | 23 Hardware User Manual - Argos2D - A10x 8 Last change: 9 April 2013 Version 1.1 Product History 8.1 8.1.1 Version Information Argos2D – A100 (150-1001-1) Version 1.0.0 Component ISM CM CB Type ISM-MT9M131-Color (100-3202-2) CM-i.MX53-C-C-Q24S1024F4N2048 (100-1471-2) eCAM-CM-i.MX53 Carrier Board (100-4122-1) Table 8.1: Overview Argos2D – A100 product changes 8.1.2 Argos2D – A101 (150-1002-1) Version 1.0.0 Component ISM CM CB Type ISM-MT9M025-Mono (100-3200-2) CM-i.MX53-C-C-Q24S1024F4N2048 (100-1471-2) eCAM-CM-i.MX53 Carrier Board (100-4122-1) Table 8.2: Overview Argos2D – A101 product changes 8.1.3 Argos2D – A102 (150-1003-1) Version 1.0.0 Component ISM CM CB Type ISM-MT9M025-Color (100-3206-2) CM-i.MX53-C-C-Q24S1024F4N2048 (100-1471-2) eCAM-CM-i.MX53 Carrier Board (100-4122-1) Table 8.3: Overview Argos2D – A102 product changes 8.1.4 Argos2D – A103 (150-1004-1) Version 1.0.0 Component ISM CM CB Type ISM-MT9P031-Mono (100-3210-2) CM-i.MX53-C-C-Q24S1024F4N2048 (100-1471-2) eCAM-CM-i.MX53 Carrier Board (100-4122-1) Table 8.4: Overview Argos2D – A103 product changes 8.1.5 Argos2D – A104 (150-1005-1) Version 1.0.0 Component ISM CM CB Type ISM-MT9P031-Color (100-3204-2) CM-i.MX53-C-C-Q24S1024F4N2048 (100-1471-2) eCAM-CM-i.MX53 Carrier Board (100-4122-1) Table 8.5: Overview Argos2D – A104 product changes 8.2 Anomalies Version Date © Bluetechnix 2013 Description Page | 24 Hardware User Manual - Argos2D - A10x Version V1.0.0 Date 2013 02 06 Last change: 9 April 2013 Version 1.1 Description No anomalies reported yet. Table 8.6 – Product anomalies 8.3 Document Revision History Version 1 Date 2013 02 06 Document Revision First release V1.0 of the Document Table 8.7: Revision history © Bluetechnix 2013 Page | 25 Hardware User Manual - Argos2D - A10x 9 Last change: 9 April 2013 Version 1.1 Index B I Board Support Packages · 22 Boot mode switch · 20 Interfaces & Connectors · 8 C Connector and Interface Description · 18 E M Maximum Ratings · 17 MTBF Mean Time Between Failure · 23 O ESD Electro Static Discharge · 17 Operating Conditions · 17 G S Getting Started · 15 Software Installation · 9 System Architecture · 6 H Hardware Installation · 10 © Bluetechnix 2013 Page | 26