1
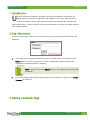
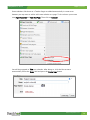
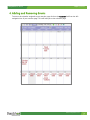
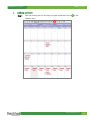
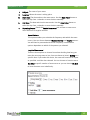
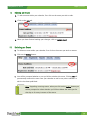
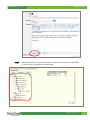
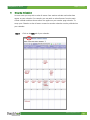
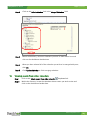
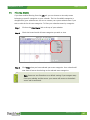
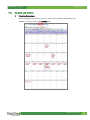
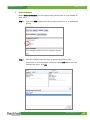
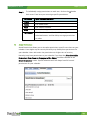
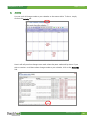
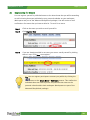
SharpSchool User Manual
Chapter 4 Calendar
SHARPSCHOOL
USER MANUAL
CHAPTER 4
CALENDAR
For more information, please visit:
www.customernet.sharpschool.com
www.sharpschool.com
0
SharpSchool User Manual
Chapter 4 Calendar
TABLE OF
CONTENTS
1.
INTRODUCTION ...................................................................................................................................................1
2.
KEY INFORMATION .............................................................................................................................................1
3.
ADDING A CALENDAR PAGE ............................................................................................................................1
4.
ADDING AND REMOVING EVENTS ...................................................................................................................3
I.
II.
III.
IV.
V.
VI.
VII.
VIII.
IX.
X.
XI.
ADDING AN EVENT ................................................................................................................. 4
EDITING AN EVENT ................................................................................................................. 9
DELETING AN EVENT .............................................................................................................. 9
PUBLISHING EVENTS ............................................................................................................ 10
MERGING CALENDARS ......................................................................................................... 13
VIEWING EVENTS FROM OTHER CALENDARS ........................................................................... 14
FILTERING EVENTS .............................................................................................................. 16
SECURITY AND ACTIVITY....................................................................................................... 17
APPROVAL ........................................................................................................................... 20
ACTIVITY ............................................................................................................................. 21
REGISTERING FOR EVENTS................................................................................................... 22
www.sharpschool.com
Chapter 4 Calendar
SharpSchool User Manual
1. Introduction
U
sing the Classroom Calendars, teachers can ensure that students and parents are
always aware of upcoming assignments and deadlines. This is also a great place to
publish notifications about other important events such as field trips, holidays and
other school events. Events can also be sent to other calendars so others are always aware of
your important dates.
2. Key Information
In order to access your Calendar, you must first log into your site using your Username and
Password.
I.
If you have not yet registered with the site you can request access by clicking on the
Signup button. This will prompt you to create a profile which will be automatically
submitted to an administrator for approval.
Note: If you do not see the Signup link your site’s administrators may have
removed it.
II.
If you have already registered but have forgotten your password, simply click on Forgot
Password to retrieve it.
3. Adding a Calendar Page
www.sharpschool.com
1
Chapter 4 Calendar
SharpSchool User Manual
Some calendars (like those on a Teacher Page) are added automatically. In some cases
however you may want to add to add a new calendar to a page. To do so hover your mouse
over Page Properties and Add New Page. Then click on Calendar.
You will be prompted to Title your calendar. After doing so, click the blue arrow to
automatically fill out the Name field and press the Create Page button.
www.sharpschool.com
2
Chapter 4 Calendar
SharpSchool User Manual
4. Adding and Removing Events
To access the calendar assigned to your teacher page click on the Calendar link from the left
navigation bar of your teacher page. This will lead you to the calendar page.
www.sharpschool.com
3
Chapter 4 Calendar
SharpSchool User Manual
I.
Adding an Event
Step 1
Click the starting date for the event you wish to add and Click on
in the
calendar menu.
www.sharpschool.com
4
Chapter 4 Calendar
SharpSchool User Manual
Step 2
On the ensuing page, add information about the event in the relevant fields
and click Create Event.
www.sharpschool.com
5
Chapter 4 Calendar
SharpSchool User Manual
i.
Subject: The name of your event.
ii.
Location: Where the event is taking place.
iii.
Start Date: The date and time the event starts. Use the Date Picker button to
select the day from a calendar or enter the date manually.
iv.
End Date: The date and time the event ends. Use the Date Picker button to
select the day from a calendar or enter the date manually.
v.
Repeating Events: Check the Enable Recurrence box to have an event occur
more than once at regular intervals.
Repeat Pattern:
This option enables you to decide the frequency with which the event
occurs. You can choose between Weekly, Monthly, and Yearly patterns.
You will then be presented with further frequency customization
options dependent on which of the pattern you selected.
Length of Recurrence:
There are three options to choose from when deciding how long you
want the recurring event to last. You can choose to have it Ending on a
specific date. If you make this choice, the event will continue to repeat,
as specified, until the date selected. You can choose to have the event
End After a specific number of occurrences or you can choose No End
to have the event recur indefinitely.
www.sharpschool.com
6
Chapter 4 Calendar
SharpSchool User Manual
vi.
Event Registration: To allow people to register for your event, click Yes for the
Event Registration field.
a. Registration Deadline: Choose the date and time when users must
register for the event you have created. For obvious reasons, the
registration deadline must be earlier than the End Date (and time) for
the event.
b. Event Capacity: The event capacity allows you to choose how many
users may register for the event.
c. Registration Approval: If this option is enabled then a calendar
administrator must approve users before they will be able to complete
registration for the event.
d. Waiting List: If this option is enabled you can specify a number of users
who may be placed on a waiting list. These users will have the option to
register even after the event capacity has been reached. They will be
told they have been placed on a waiting list and people from this list
will be added to the event whenever an event attendee cancels their
registration.
e. Online Payment: If you have configured an online payment provider you
can choose that provider here. This allows you to charge a fee for
particular events and have users make their payment online.
f.
Administrator Notification: If you enable administrator notification, the
event administrator will receive an email any time a user registers for
the event.
www.sharpschool.com
7
SharpSchool User Manual
vii.
Chapter 4 Calendar
Category: Choose from a list of preset categories (not a mandatory selection).
Choosing a category for your event allows it to be filtered by that category. It
also selects a color and icon for your event.
viii.
Color: The color of the text displayed on your calendar for your event. You can
choose More Colors at the bottom of the color selection pop-up to select from
a larger range of colors, or even input one by its RGB value.
ix.
Icon: The image displayed beside your event name on your calendar. This is
not a mandatory element.
x.
Participants: The individuals that are selected to be part of the event. These
participants are notified of the event by email, and the event is published on
that individual’s calendar within their workspace (Workspaces are part of the
Advanced SharpSchool package).
i.
Members: With the User Picker, choose members from your organization’s
database.
ii.
Non-Members: Enroll external individuals by filling in their email address,
using a comma to separate them.
xi.
Description: Fill out the details of the event using the WYSIWYG (What You See
Is What You Get) editor.
xii.
Published Calendars: Publish created events onto other calendars so that
others can see your event. Refer to Section II: Publishing Events for more
details on how to publish events.
www.sharpschool.com
8
Chapter 4 Calendar
SharpSchool User Manual
II.
Editing an Event
a. To edit an event within your calendar, first click on the event you wish to edit.
b. Click on the Edit tab.
c. When you have finished making your changes, click on Update Event.
III.
Deleting an Event
a. To delete an event within your calendar, first click on the event you wish to remove.
b. Click on the Delete button.
c. You will be prompted whether or not you’d like to delete this event. Clicking OK will
permanently remove this event from your calendar as well as any other calendars in
which it has been published.
Note: Regarding recurring events, when you click on the Delete button you
will be prompted to select whether you’d like to delete the event just for
that day or for every instance of that event.
www.sharpschool.com
9
Chapter 4 Calendar
SharpSchool User Manual
IV.
Publishing Events
Step 1
Click on
to create an event.
Tip: You can also choose to publish existing events from your calendar to
another by clicking on the event and then clicking on the Edit tab.
Step 2
Click the Select calendars link in the Published Calendars field.
www.sharpschool.com
10
SharpSchool User Manual
Step 3
Chapter 4 Calendar
Within the directory, locate the calendars you wish to have your event published
to and click on the checkboxes beside them.
www.sharpschool.com
11
Chapter 4 Calendar
SharpSchool User Manual
Step 4
When you have selected all of the calendars you wish to have your event
published to, click OK.
Step 5
Click Create Event to finish publishing your event.
Note: Unless you have security permissions to create or write events on
the calendars you published to, the event may not be immediately
published on those calendars. If the Require administrator approval to
publish events option has been enabled for the calendar, then the event
will require approval by someone who has Full Control permissions. See
Section IV: Security and Activity for more information on security
permissions.
www.sharpschool.com
12
SharpSchool User Manual
V.
Chapter 4 Calendar
Merging Calendars
In some cases you may wish to take all events from another calendar and make them
appear on your calendar. For example, you may wish to take all events from the main
school calendar and have those events also appear on your teacher page calendar. To
setup your Calendar so that all events created on another calendar are also published on
your calendar:
Step 1
Click on the Edit tab of your calendar.
www.sharpschool.com
13
Chapter 4 Calendar
SharpSchool User Manual
Step 2
Click on the Select calendars link in the Merged Calendars field.
Step 3
Within the directory, locate the calendars you wish to take events from and
click on the checkboxes beside them.
Step 4
When you have selected all of the calendars you wish to be merged with yours,
click OK.
Step 5
VI.
Click Update Calendar to finish merging calendars.
Viewing events from other calendars
Step 1
Click on the Select events from other calendars
dropdown link.
Step 2
Within the directory, locate the calendars whose events you wish to view and
click on the checkboxes beside them.
www.sharpschool.com
14
SharpSchool User Manual
Step 3
Chapter 4 Calendar
When you have selected all of the applicable calendars, click View Selected
Calendars. This will populate your calendar with the selected calendars’ events.
Note: This method does not permanently place events from other calendars on
to your calendar but rather gives you (or any other viewer of your calendar) to
view your events in context with other events. When you refresh the page, the
events from the other calendars will no longer be present.
www.sharpschool.com
15
Chapter 4 Calendar
SharpSchool User Manual
VII.
Filtering Events
If you have enabled filtering from the Edit tab, you can choose to view only events
belonging to specific categories on your calendar. The list of available categories is
designated by your administrator; be sure to contact your system administrator if you
wish to edit the list of event categories. To filter your calendar events by categories:
Step 1
Click on the Filter Events link at the top of your calendar.
Step 2
Check the boxes beside all event categories you wish to view.
Step 3
Click Filter when you have selected your event categories. Your calendar will
now show all events that belong to the selected event categories.
Note: Events are not filtered out as a default setting. If you navigate away
from your calendar and the return, your events will return to the default
status and be unfiltered.
www.sharpschool.com
16
SharpSchool User Manual
VIII.
Chapter 4 Calendar
Security and Activity
i.
Changing Permissions
You can designate which users can see, create, edit or delete events within your
calendar. To do so, click on the Security tab.
www.sharpschool.com
17
Chapter 4 Calendar
SharpSchool User Manual
i.
Direct Permissions
Within Direct Permissions you can assign security permissions on your calendar to
other users.
Step 1
First, click Add to select the users to grant permissions to. A window will
pop up.
Step 2
From this window select the users or groups you’d like to grant
permissions to by clicking their name and clicking Add. When you have
selected your users, click OK.
www.sharpschool.com
18
Chapter 4 Calendar
SharpSchool User Manual
Step 3
To individually assign permissions to each user, click on the
beside
their name. From here you can assign specific permissions.
Permission
What it Allows You to Do
Create
Can create events
Delete
Can delete events
Read
Can view the calendar
Write
Can make changes to events
Full Control
All of the above, as well as the ability to approve
submitted events, and the ability to assign permissions
to others
ii.
Actual Permissions
Actual Permissions allows you to view what permissions specific users have on your
calendar. Users higher up the security hierarchy may already have permissions for
your calendar. Users with entire site permissions (or higher tiers of security
hierarchy) may have permissions to your calendar if you have the Allow Inheritable
Permissions From Parent to Propagate to This Object checkbox selected on the
Direct Permissions screen. System Administrators will always have full control
permissions for your calendar.
www.sharpschool.com
19
Chapter 4 Calendar
SharpSchool User Manual
IX.
Approval
Other teachers may wish to publish events to your calendar. If you have enabled Require
administrator approval for users to publish events on the Edit tab of your calendar, any
events they publish to your calendar will require your approval before they are visible. To
view the status of events published to your calendar:
Step 1
Click on the Approval tab.
Step 2
Here you will see all the events that have been published on your calendar, as
well as any pending requests. Click Approve to publish an event to your
calendar, or click Reject if you do not wish to publish the event. You may
change this status at any time.
www.sharpschool.com
20
SharpSchool User Manual
X.
Chapter 4 Calendar
Activity
You can track all changes made to your calendar or the events within. To do so, simply
click on the Activity tab.
Here it will tell you what changes were made, when they were made and by whom. If you
wish to receive e-mail alerts about changes made to your calendar, click on the Subscribe
link.
www.sharpschool.com
21
Chapter 4 Calendar
SharpSchool User Manual
XI.
Registering for Events
You can register yourself in published events to let others know that you will be attending
as well as having that event published to your personal calendar on your workspace
(Workspaces are part of the Advanced SharpSchool package). You will receive e-mail
notifications for events that you have enrolled in. To enroll in an event:
Step 1
Click on the event you wish to enroll yourself in.
Step 2
Click Register Now.
Step 3
If you are already enrolled in an event, you can un-enroll yourself by clicking
where it says “Click here to unregister.”
Tip: You can register participants to events you publish by clicking the
button on the Create Event or Edit Event screens. This notifies the
individual about the event by email and publishes the event on the
personal calendar within their workspace (Workspaces are part of the
Advanced SharpSchool package).
www.sharpschool.com
22