1
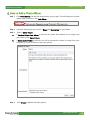
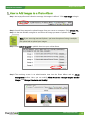
SharpSchool User Manual
Chapter 3 Photo Gallery
SHARPSCHOOL
USER MANUAL
CHAPTER 3
PHOTO
GALLERY
For more information, please visit:
customernet.sharpschool.com
www.sharpschool.com
0
SharpSchool User Manual
Chapter 3 Photo Gallery
TABLE OF
CONTENTS
INTRODUCTION ............................................................................................................ 1
KEY INFORMATION ....................................................................................................... 2
HOW TO ADD A PHOTO GALLERY .................................................................................. 3
HOW TO ADD A PHOTO ALBUM ..................................................................................... 4
HOW TO ADD IMAGES TO A PHOTO ALBUM................................................................... 5
HOW TO EDIT THE PHOTO GALLERY ............................................................................. 6
I.
HOW TO RENAME A PICTURE ............................................................................ 6
II.
HOW TO DELETE A PICTURE ............................................................................. 7
III.
HOW TO CUSTOMIZE AN ALBUM ........................................................................ 8
IV.
HOW TO IMPLEMENT SECURITY FOR YOUR GALLERY ................................................. 11
V.
ALBUM PERMISSIONS ................................................................................... 14
VI.
COMMENTS ............................................................................................. 15
VII.
MANAGE COMMENTS .................................................................................. 16
VIII. REORDER IMAGES ...................................................................................... 17
www.sharpschool.com
SharpSchool User Manual
Chapter 3 Photo Gallery
Introduction
S
harpSchool’s Photo Gallery is a great tool for
administrators, teachers, and students. This tool allows
you to create multiple albums with dynamic features —
such as the ability to view pictures as slideshows, or allow for
moderated commenting. The online Photo Gallery can be used
to:
I.
Showcase Sporting Events: Create team specific albums to showcase highlights of
games.
II.
Present Student Projects: Include a photo gallery of student projects under specific
departments, school events, or teacher pages.
III.
Showcase Staff Events: Staff can post pictures of activities and events for the
community to access.
IV.
Create a Clip Art Gallery: Staff can create a gallery with pictures for teaching aids or for
students to use in their projects and presentations.
www.sharpschool.com
1
SharpSchool User Manual
Chapter 3 Photo Gallery
Key Information
To create a Photo Gallery, you must first log in to your site with a Username and Password.
If you have not yet registered with the site you can request access by clicking the Signup button.
This will prompt you to create a profile that is automatically routed to an administrator for
approval.
Note: If you do not see the Signup button your site administrator may have
removed it.
If you have already registered but have forgotten your password, click Forgot Password? to
retrieve it.
www.sharpschool.com
2
Chapter 3 Photo Gallery
SharpSchool User Manual
How to Add a Photo Gallery
Navigate to the page you would like the gallery to be published under.
Reminder: The Administrative Tool Bar at the top of the page only modifies the
page you are currently viewing.
Go to Page and select Photo Gallery Page.
Enter a name into the Title field. This title will appear in the drop down menu from the
Administrative Tool Bar. The Name field will automatically populate as a user-friendly
URL based on what is entered in the Title field.
The Page Owner field automatically populates with the creator of the page.
Click Select Icon. A window containing many icons will appear. Select an icon and click
Submit.
Click Create Page to publish the page.
www.sharpschool.com
3
SharpSchool User Manual
Chapter 3 Photo Gallery
How to Add a Photo Album
Step 1.
Click Photo Gallery from the left navigation bar of your page. This will lead you to a blank
gallery page. From here, click Add Album.
Step 2.
Step 3.
a.
A window will prompt you to enter a Name and Description for your Album.
Select a Cover Picture.
If Random Picture from Album is selected, the system will randomly use an image from
your album as the Cover Picture.
b.
If Select Cover Picture is selected, you will be prompted to choose an image from your
computer or server to upload as the cover picture.
Step 4.
Click Create to publish the photo gallery.
www.sharpschool.com
4
SharpSchool User Manual
Chapter 3 Photo Gallery
How to Add Images to a Photo Album
Step 1. An empty album will show the message “No Images in Album”. Click Add Image to begin.
Step 2. You will be prompted to upload images from your server or computer. Click Choose File.
Step 3. In the new window, navigate to and select the image you want to upload. Click Open.
Note: If you are using Internet Explorer, you have the option of using a multiple
file upload tab to upload your images.
Step 4. Click Upload Image(s) to publish them into your online album.
Step 5. The resulting screen is an administrative view into the Photo Album and an Album
Management toolbar. Here, you can modify Album Properties, Manage Images, Reorder
Images, and Manage Comments and Security.
www.sharpschool.com
5
SharpSchool User Manual
Chapter 3 Photo Gallery
How to Edit the Photo Gallery
I.
How to Rename a Picture
To rename images, click Manage Images on the Album Management toolbar and
click the picture you wish to rename.
The Image Details box will appear. Here, you can change the Name and add a
Description of the image. Click Update for the changes to be applied to the album.
www.sharpschool.com
6
SharpSchool User Manual
II.
Chapter 3 Photo Gallery
How to Delete a Picture
To delete an image, click Manage Images and then click the
icon corresponding to
the picture you want to delete. Click OK in the pop-up window to confirm the deletion.
www.sharpschool.com
7
Chapter 3 Photo Gallery
SharpSchool User Manual
III.
How to Customize an Album
To customize an album, go to the Photo Gallery Page and select the album you wish to
customize.
Note: In this view you have the ability to delete an album by clicking the
corresponding
Step 1.
icon.
Click Album Properties in the Album Management toolbar.
www.sharpschool.com
8
Chapter 3 Photo Gallery
SharpSchool User Manual
The resulting window includes various customization options as seen shown below:
i.
Name: Rename an album.
ii.
Description: Include a description of an album.
Note: There is a simplified version of the WYSIWYG editor
included here.
iii.
Cover Picture: Change the cover picture. If Random Picture from
Album is selected, the system will randomly use an image from your
album as the Cover Picture. If Select Cover Picture is selected, you
will be prompted to choose an image from your computer or server
to upload as the cover picture.
www.sharpschool.com
9
Chapter 3 Photo Gallery
SharpSchool User Manual
iv.
Comment Moderation: Enable visitor comments by selecting this
option.
v.
Thumbnail: Customize the resolution of thumbnails in the album
here.
vi.
Display: Customize the resolution of individual images.
vii.
Slideshow: Customize the resolution of images when viewed as a
slideshow.
viii.
Thumbnail Listing: Customize the order in which thumbnails are
listed on the album page.
Step 2. Once all customizations are complete, click Update.
www.sharpschool.com
10
Chapter 3 Photo Gallery
SharpSchool User Manual
IV.
How to Implement Security for your Gallery
Photo Gallery Permissions
You can assign permissions to users so that they are able to govern an entire gallery.
These permissions 0apply to all albums and images in your gallery.
To assign permissions click the Security link on the Album Management toolbar.
There are two ways you can assign permissions:
i.
Direct Permissions
Within Direct Permissions you can assign security permissions to other users so
that they can also edit the photo gallery. Click the Direct Permissions tab.
Step 1. Click Add to see the list of system users. You can choose users as well as
permission levels.
www.sharpschool.com
11
Chapter 3 Photo Gallery
SharpSchool User Manual
Step 2. A window containing system groups and users will appear. Select the users
or groups you’d like to grant permissions to by clicking their name and
clicking Add.
Step 3. Click OK when you have selected your users.
To individually assign permissions to each user, click the
beside their name.
From here you can assign specific permissions:
Permissions
Create
What it Allows You to Do
Can add photos/albums
Delete
Can delete photos/albums
Read
Can view the photos/albums
Write
Can make changes to photos/albums, can manage comments
Full Control
All of the above, as well as the ability to assign permissions to others
Note: You can also remove users for the permissions list by clicking
the checkbox beside their name and clicking Remove.
www.sharpschool.com
12
Chapter 3 Photo Gallery
SharpSchool User Manual
ii.
Actual Permissions
Actual Permissions allows you to view what permissions specific users have within
your photo gallery.
Note: Users higher up the security hierarchy may already have
permissions to your photo gallery.
Users with entire site permissions (or higher tiers of security hierarchy) may have
permissions to your photo gallery if you have selected the Allow Inheritable
Permissions from Parent to Propagate to This Object checkbox on the Direct
Permissions screen.
www.sharpschool.com
13
Chapter 3 Photo Gallery
SharpSchool User Manual
V.
Album Permissions
If you prefer to assign more customized permissions, you can instead choose to
assign permissions to an individual album rather than the whole gallery. This may be
useful if you are creating a private album that you only wish a select number of
individuals to see or edit.
The permissions for an album are identical to the permissions for a gallery. To assign
album permissions, first click on the album you wish to configure, then click the
Security link.
Note: Permissions set here will only apply to this album.
Refer to the steps outlined in Direct Permissions to configure your album security
settings.
www.sharpschool.com
14
Chapter 3 Photo Gallery
SharpSchool User Manual
VI.
Comments
Visitors to the gallery can leave comments on individual photos. Additionally, you can
moderate the comments that are published.
To do so, you need to ensure that comments are enabled on your album. To comment
on any photo, click on the photo and enter your comment in the simplified text editor
at the bottom.
To delete a comment, click the
icon next to the comment.
Note: Other than the commenter, only users with Delete permissions
on the album may delete a comment.
www.sharpschool.com
15
SharpSchool User Manual
VII.
Chapter 3 Photo Gallery
Manage Comments
You can view and moderate recent comments made to your album. To view and
moderate recent comments, you are required to at least have Write permission to the
album you are moderating. To view recent comments made within your album, click
on the album name and then click Comments.
On this page you can see who posted a comment, when it was posted, and on which
photo the comment was made. You can delete comments directly by clicking the
icon.
www.sharpschool.com
16
SharpSchool User Manual
VIII.
Chapter 3 Photo Gallery
Reorder Images
If you have Write access for the album, you can change the order in which images
appear in your photo gallery. Click the album name and then click Reorder Images.
On this page you can drag and drop images from one position to another.
www.sharpschool.com
17