1
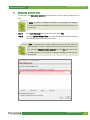
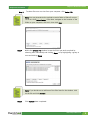
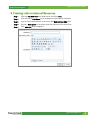
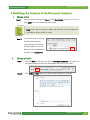
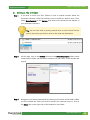
SharpSchool User Manual
Chapter 10 Document Container
SHARPSCHOOL
USER MANUAL
CHAPTER 10
1101010
DOCUMENT
CONTAINER
For more information, please visit:
customernet.sharpschool.com
www.sharpschool.com
0
SharpSchool User Manual
Chapter 10 Document Container
TABLE OF
CONTENTS
1. INTRODUCTION ............................................................................................................ 1
2. KEY INFORMATION ....................................................................................................... 1
3. CREATE A DOCUMENT CONTAINER ............................................................................... 2
4. UPLOADING CONTENTS TO YOUR DOCUMENT CONTAINER ........................................... 3
I.
UPLOADING A SINGLE FILE............................................................................... 3
II.
UPLOADING MULTIPLE FILES............................................................................. 4
III.
DRAG-AND-DROP ...................................................................................... 6
5. CREATING FILE FOLDERS ............................................................................................. 7
6. CREATING LINKS TO EXTERNAL RESOURCES ................................................................ 8
7. MODIFYING THE CONTENTS OF THE DOCUMENT CONTAINER ....................................... 9
I.
EDITING A FILE ........................................................................................... 9
II.
EDITING A FOLDER ....................................................................................... 9
III.
MOVING A FILE OR FOLDER ........................................................................... 10
IV.
DELETING A FILE OR FOLDER .......................................................................... 11
8. CHANGING DOCUMENT CONTAINER COLUMNS – ADMINISTRATORS ONLY ................ 12
www.sharpschool.com
SharpSchool User Manual
Chapter 10 Document Container
1. Introduction
T
he Document Container allows users to upload
files and make those files available to some or all
users on the site. This manual will guide you
through how to upload files, how to store files in
organized folders, how to create links to resources on the
internet, and how to make changes to resources within the
Document Container.
2. Key Information
In order to add, edit, or view your Document Container, to log in to your site using a
Username and Password.
If you have not yet registered with the site you can
request access by clicking the Signup button. This
sends a request that is automatically routed to an
administrator for approval.
Note: If you do not see the Signup link, your site’s administrators may not have
enabled this option.
www.sharpschool.com
1
SharpSchool User Manual
Chapter 10 Document Container
3. Create a Document Container
Step 1
Go to Page on the Administrative Toolbar and click Document Container Page.
Step 2
Title the document container for your site and click Create Page when you are
finished.
www.sharpschool.com
2
Chapter 10 Document Container
SharpSchool User Manual
4. Uploading Contents to your Document Container
I.
Uploading a Single File
Step 1
Click the Add New Item drop down menu and select File.
Step 2
Once selected, you will be taken to another page. To select a single file from
your computer, click Browse.
Step 3
Give your file a Name to be displayed within your document container.
Step 4
You may provide a Description of the file you are uploading for others to see,
but it is not required.
Step 5
Once you have added your description, click Add File.
www.sharpschool.com
3
Chapter 10 Document Container
SharpSchool User Manual
II.
Uploading Multiple Files
To save time, the Document Container module allows users to upload several files at
once.
Note: At present, multiple file upload is only available for Internet
Explorer. We will be adding this functionality for other browsers at a
later date.
Step 1
Click Add New Item drop down menu and select File.
Step 2
Click the Upload Multiple Files tab at the top of the document container.
This will take you to the file upload editor.
Note: You may have to install an ActiveX control to use this editor on
your browser. To do so, simply click on the prompt that directs you
to install the XUpload Upload Control and click Run when the install
window pops up. If this control is already installed you will not see
this prompt.
www.sharpschool.com
4
Chapter 10 Document Container
SharpSchool User Manual
Step 3
To select files one at a time from your computer, click Select File.
Note: You may instead wish to upload an entire folder of files all at once.
To do so, click Select Folder. From here, navigate to the location of the
folder on your computer, click on it, then click Scan.
Step 4
Within the Choose File window, locate the file(s) you wish to upload by
selecting them individually and clicking Open, or by highlighting a group at
once and clicking Open.
Note: If you decide not to add one of the files listed in the window, click
on the file and click Remove.
Step 5
Click Upload when completed.
www.sharpschool.com
5
Chapter 10 Document Container
SharpSchool User Manual
III.
Drag-and-Drop
Another quick and easy way to upload multiple files into the document container is via
Drag-and-Drop.
Step 1
Open a folder on your computer (or locate a folder you would like to upload).
Step 2
Select the files you wish to upload and drag them into the Document
Container interface. This will move all the files over.
www.sharpschool.com
6
Chapter 10 Document Container
SharpSchool User Manual
5. Creating File Folders
Step 1
Click the Add New Item drop down menu and select Folder.
Step 2
Enter a Name to be displayed within the document container.
Step 3
Provide a Description of the folder to let others know of its contents.
Step 4
Click Create Folder when completed.
www.sharpschool.com
7
SharpSchool User Manual
Chapter 10 Document Container
6. Creating Links to External Resources
Step 1
Click the Add New Item drop down menu and select Link.
Step 2
Give your link a Link Name to be displayed in the document container.
Step 3
Type in the full web address of the site in the Web Address (URL) field.
Step 4
Provide a Description to let others know the contents of the linked site.
Step 5
Click Add Link when completed.
www.sharpschool.com
8
Chapter 10 Document Container
SharpSchool User Manual
7. Modifying the Contents of the Document Container
I.
Editing a File
Step 1
You may wish to change the Name or the Description of your file. To do so,
click (edit) next to file name you wish to edit.
Note: If your file is stored in a folder, you will have to first navigate into
the folder to where the file is stored.
Step 2
You will be taken to the edit
window, where you can
make changes to the name
and description of your file.
When you have finished your
changes, click Update File.
II.
Editing a Folder
Step 1
Click the Edit tab along the top of your Document Container. From here you
can make changes to the name, description and icon of your folder.
Step 2
Click Update Folder when you have finished making your changes.
www.sharpschool.com
9
Chapter 10 Document Container
SharpSchool User Manual
III. Moving a File or Folder
Step 1
If you wish to move your files, folders or links to another location within the
document container, check the checkbox next to the file you wish to move. Then,
select Move Selected on the Actions drop down menu (located at the bottom of
your document container).
Tip: You can save time by moving several items at once. Check the box
next to every item you wish to move to the same new destination.
Step 2
On this page, click on the Browse link next to the Select Destination field to select
a new location within your document container for your items. A new window will
pop up.
Step 3
Navigate to your desired destination by clicking on the names of the folders. When
you have located the folder you wish to transfer your selected items to, click on
the Select link on the right side of the window for that folder.
www.sharpschool.com
10
Chapter 10 Document Container
SharpSchool User Manual
Step 4
Click the Move to Here button to move your selected items.
Pitfall: If you move a folder to a new location, all the items within that
folder will be moved as well.
IV. Deleting a File or Folder
Step 1
If you wish to move your files, folders or links to another location within the
document container, check the checkbox next to the file you wish to move, and
select Delete Selected on the Actions drop down menu (located at the bottom of
your document container).
Tip: You can save time and delete several items at once by checking the
box next to every item you wish to remove.
Step 2
Confirm your selection by clicking Yes in the confirmation window. Once deleted,
the items are permanently removed, so make sure the items selected are the
correct ones.
Pitfall: If you delete a folder, all items within that folder will also
be deleted.
www.sharpschool.com
11
SharpSchool User Manual
Chapter 10 Document Container
8. Changing Document Container Columns – Administrators
Only
Administrators have the ability to determine how the Document Container is rendered
throughout the site. There are three primary settings an administrator can set in the
document container:
i.
Hide/show columns in the folder/workspace view.
ii.
Select the default sort (system default is ascending by name)
iii.
Limit the file upload size.
To configure the Document Container:
Step 1
Go to the Shortcuts in the Administrative Toolbar and click System Administration.
Step 2
Click Collaboration Server Settings.
There are three different SharpSchool packages that can be configured from here:
i.
Content Manager: Refers to the type of Document Container available via the Page
drop down in the Administrative Toolbar or found within the Portlet Library.
ii.
e-Learning Server: Refers to the type of document container available in
SharpSchool’s Online Classrooms (LMS).
iii.
Collaboration Sever: Refers to the Workspaces interface.
www.sharpschool.com
12
Chapter 10 Document Container
SharpSchool User Manual
The customizable settings include:
I.
Data Columns: Allows administrators to determine which document container
column information to display for visitors of the site. You can use these
options to hide one or more columns within the document containers.
II.
Default Sort: Set the sorting default of the objects/items in the document
container.
III.
Maximum File Upload: Administrators can set the maximum file upload size
for users. You cannot increase the file size to a value higher than the default
maximum.
IV.
Additional Settings:
i.
Show above settings on each container: This option will add a new tab
called Display Settings to each document container on the site. You will
then be able to use that tab to configure the Data Columns, Default Sort
and Maximum File Upload on individual document containers on the site.
ii.
Disable the File Details Page: Instead of viewing the File Details when you
click on a file in a document container, you will be able to download the
file directly if this option is checked. This allows users to download files
with one fewer click.
Step 3
Click Update Settings when completed.
The same settings are found in the Content Manager and e-Learning Server tabs.
The Collaboration Server tab contains additional configuration settings. These
items are detailed in SharpSchool’s Workspaces Manual.
www.sharpschool.com
13