1
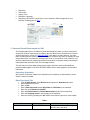
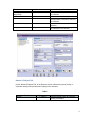
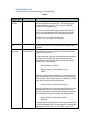
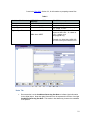
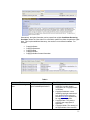
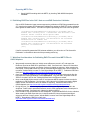
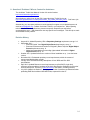
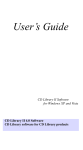
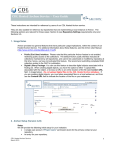
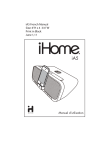
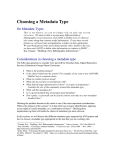
CDL Hosted Archivists' Toolkit Service – User Guide These instructions are intended for reference by users of our CDL Hosted Archivists’ Toolkit service. They are also suitable for reference by repositories that are implementing a local instance of the Archivists’ Toolkit. The following sections are relevant for these cases: Section 1 (see Repository Settings requirements only) and Sections 2-6. 1. Archivists' Toolkit Setup (Version 2.0.0 Update 3) Setup We will provide the following initial setup for your institution: A single back-end MySQL database for your institution. A single user account (Class 5 / “Superuser” permission level). We will provide you with a Username and a temporary Password associated with the account, for use with the client (see Client Settings, below). A single user account (Class 4 / “Repository Manager” permission level) for the primary contact at your repository. We will provide you with a Username and a temporary Password associated with the account, for use with the client (see Client Settings, below). An entry for your repository A Connection URL, Username and Password to connect to our server (see Connection Settings, below). Note on User Accounts The single Class 5 / “Superuser” account should ideally be utilized by a staff member at your repository who is responsible for overall administration of the software. This permission level will allow you to add or edit repositories, add or edit user accounts, and perform all software functions. When creating new user accounts, they should always be set to Class 4 or lower. You can also customize the application with this account. Examples of customizations include: ○ Change the user interface label for data elements ○ Add data elements to, or remove them from the search editor ○ Add data elements to, or remove them from the module browse list ○ Indicate the order (left to right) of data elements in the module browse list ○ Modify rollover text for data elements ○ Configure date formats, notes, lookup lists, and rapid data entry screens The single Class 4 / “Repository Manager” account should be utilized by by a staff member at your repository who is responsible for day-to-day oversight and production use of the software. This permission level will allow you to edit the repository (with which the account is associated), add or edit user accounts (Class 4 or lower), and perform most software functions. Do not edit or delete the user account named “atdscrw”. This Class 5 account is reserved for CDL administrator access to your AT instance. Installing Client You need to download and install the latest version of the AT client (preferably the version bundled with Java) on your computer. This is available from the AT website, on the Download page. 1 Connection Settings Once the client is installed, launch the application and click on the “Select Server” button. Use the following settings when configuring the client to connect to our server. Note that you should only need to enter the connection settings one time only; once the connection settings are successfully entered, you should not need to re-enter this data. Your Connection URL, Username and Password will be provided to you by the CDL. Connection URL: Database Type: Username: Password: [to be supplied] MySQL [to be supplied] [to be supplied] Client Settings You will be prompted to enter your client username and password every time you use the AT. Your Class 5 / “Superuser” and Class 4 / “Repository Manager” client Usernames and Passwords will be provided to you by the CDL. Please change the account passwords once you’ve connected to the application: log in using the first account, and select Setup Users. Select your user record and select “Reset Password”. Close the client, and repeat the process for the second account. 2. Repository Record Requirements for OAC Repository Settings As part of the initial setup process, we will create an entry for your repository; you can use the Class 4 / “Repository Manager” account to modify the entry for the repository -- or add additional repositories. To view the current settings, select Setup Repositories. Select your repository to view the settings. You can feel free to modify the settings, but data is required in the following fields in the "Repository Info" tab in order to meet OAC Best Practice Guidelines for Encoded Archival Description, Version 2.0 (OAC BPG EAD) specifications: 2 Repository Short Name Agency Code Descriptive Language Repository URL (NOTE: Use the form of your institution’s URL that appears on your institution’s landing page in OAC) 3. Resource Record Requirements for OAC The following tables list out AT data entry fields that should have data, in order to meet DACS’ single-level minimum requirements, a subset of the OAC Best Practice Guidelines for Encoded Archival Description, Version 2.0 (OAC BPG EAD) “OAC Basic” encoding scheme. The OAC Basic encoding scheme reflects single-level descriptive outputs at any level, but typically for large accumulations such as collections, record groups, fonds, or record series. It can, however, only describe materials at one explicitly articulated level and does not support multilevel encoding of subsequent lower levels (the "OAC Full" encoding scheme). The third column in these tables references the page in which the elements and attributes guidelines tables appear in the OAC BPG EAD. Please refer to these pages for more detailed information. Repository Information We require a minimal set of data in the "Repository Info" tab (Setup Repositories); consult Section 1 above for details. Basic Description Tab From the Main Screen, select Resources and press the “New Record” button. Select Level for the record. Enter a Title. Enter a Date Expression and/or Begin Date and End Date for the materials. Enter the unique Resource Identifier Enter the Extent Number and Extent Measurement (cubic feet or linear feet). Enter the Language Code for the language of the materials. Save the record by pressing the “Ok” button at the bottom right corner of the window. Table 1 Archivists Toolkit Label Level EAD Mapping <archdesc> OAC BPG EAD Summary Specify the level of description, e.g., collection-level, item-level. 3 Title Date Expression Inclusive Dates (Begin/End) Resource Identifier Extent Number <unittitle> <unitdate> <unitdate> NORMAL <unitid> <extent> Container Summary <extent> Language <langmaterial> Indicate the title of the collection. Indicate dates for the collection. Indicate normalized start/end dates for the collection. Indicate the collection or call number. Provide a numeric value and characterization of the size or extent of the collection. Summarize the size or extent of the collection. Indicate the predominant language of the materials in the collection. Names & Subjects Tab On the “Names & Subjects Tab” of the Resource record, indicate the personal, family, or corporate name(s) of the predominant creator(s) of the collection. Table 2 Archivists Toolkit Label Names EAD Mapping <…name> OAC BPG EAD Summary Indicate personal, family, or corporate name(s) as creators. 4 Notes Etc. & Deaccessions Tab This tab provides 29 notes that can be added at the resource level or at any component level. Note that you may change the default “note” header provided by the AT. Use one Abstract for a brief summary of collection contents and context at highest level only. Use one Conditions Governing Access note to record particular access restrictions, even if the collection has no access. Use one Scope and Contents note to provide a prose statement summarizing the document types, formats, and topical coverage of the collection. Optionally, use one or more Biographical/Historical note(s) to encode concise essays or chronologies providing information about the creator(s) or collector(s) –- note that this is preferred and not mandatory/required. Save the record by pressing the “Ok” button at the bottom right corner of the window. 5 Table 3 Archivists Toolkit Label EAD Mapping OAC BPG EAD Summary Abstract <abstract> Conditions Governing Access note <accessrestrict> Scope and Contents note <scopecontent> Biographical/Historical note <bioghist> Provide a brief summary of the scope/content of the collection. Note particular access restrictions, even if the collection has no access restrictions. In the latter case, use the text "Collection open for research" or a similar statement. Provide a prose statement summarizing the scope/content of the collection, and details about the document types, formats, and topical coverage of the collection. If applicable, provide a concise essay or chronology with information about the creator(s) or collector(s). 6 Finding Aid Data Tab Use this tab to enter required information for the finding aid. Table 4 Archivists Toolkit Label EAD FA Location EAD Mapping OAC BPG EAD Summary <eadid> URL Encode the ARK URL for the finding aid (pg. 9), if one has been pre-assigned to the finding aid -- or if the finding aid is already published in the OAC. (To request an ARK URL, contact us at [email protected]). If you plan to generate METS digital objects and would like them to link to an associated OAC finding aid, then use this field to record the ARK URL for the associated finding aid. Example of an OAC finding aid's ARK URL: http://www.oac.cdlib.org/findaid/ark:/13030/kt5b69q5bc/ Finding Aid Title <titleproper> Finding Aid Filing Title <titleproper> TYPE="FILING" Indicate the formal title of the finding aid itself (e.g., “Guide to the Jane Doe Papers”) and not the title of the collection being described. Indicate the filing title of the finding aid. Note that the filing title is a modified form of the formal title. The filing title appears in browsing lists on the OAC. For papers created, collected, or associated with an individual, the filing title should begin with the individual’s last name, followed by the first name and optional middle initial, which should both be in parentheses: Abel (Theodore F.) Papers Branch (Francis Z.) Correspondence and Papers When two individuals are responsible for a collection and they share the same last name, put the last name at the beginning of the filing title. Then list both names and, optionally, a middle initial, which should both be in parentheses: French (Helen D. and Paul M.) Collection When the individuals do not share the same last name, list the most appropriate name first, with corresponding first name following in parentheses, and then the second last name with its corresponding first name in another set of parentheses: French (Helen D.) and Hightower (Paul) Collection Corporate names and family names should generally be listed as in their established form or as they appear. Use appropriate abbreviations such as Corp., Co., Inc., Misc., Dept., etc. to 7 maintain brevity: Bidwell Family Papers Crowley Maritime Corp. Records Linking from Resource Records to Digital Object Records To create and link to a digital object, within the context of a resource record: From the Main Screen, select Resources and choose the resource record (that you want to add digital objects to). Identify the suitable location where you want to create the link to the new digital object (e.g., file- or item-level component record). At that level, select the “Add Instance” button. Select Digital Object on the list of instance types and click OK. A Digital Object record window will appear. See Section 3 below, for instructions on creating digital objects. To directly create a digital object, and then subsequently add later add a link to it (within the context of a resource record): From the Main Screen, select Digital Objects. A Digital Object record window will appear. See Section 3 below, for instructions on creating digital objects. After the digital object is created: from the Main Screen, select Resources and choose the resource record (which will be subsequently linked to the digital object). 8 From the Resource Record, identify the suitable location where you want to create the link to the new digital object (e.g., file- or item-level component record). At that level, select the “Add Instance” button. Select Digital Object Link on the list of instance types and click OK. Select the digital object, and click Link. 4. Digital Object Record Requirements for OAC/Calisphere The CDL Guidelines for Digital Objects, Version 2.0 (CDL GDO) must be followed when contributing METS digital objects to OAC and Calisphere. The following tables list out AT data entry fields that should have data, in order to meet the CDL GDO "Enhanced Service Level" (Section 3.2) requirements. The third column in these tables references the page in which the elements and attributes guidelines tables appear in the CDL GDO. Please refer to these pages for more detailed information. Repository Information We require a minimal set of data in the "Repository Info" tab (Setup Repositories); consult Section 1 above for details. Basic Description Tab From the Main Screen, select Resources and press the “Add Instance” button (under Instances). Select "Digital Object" from the pull-down menu. Enter a Title for the object. Enter a Date Expression and/or Begin Date and End Date for the object. Specify the type of object using Object Type. Enter the ARK URL for the object in Digital Object ID. (To request an ARK URL -- or a batch of them -- contact us at [email protected]). Use Add File Version to create links to content files associated with the object. At minimum, supply the following: o URI: indicate a URI for the location of the content file on a web-accessible location -- e.g., a URL for an image file, on your webserver. o Use statement: indicate the content file function. For image objects, at least one Image-Service[...] (for an associated JPEG access image) and one Image-Thumbnail (for an associated GIF thumbnail image) must be specified. If supplying a TIFF production master image, specify an additional Image-Master[…]. For text objects comprising scanned images: see specifications above for image objects. For text objects comprising PDFs: use Application-PDF Images: Image-Service[...] Image-Thumbnail Image-Master[…] (optional) Texts (scanned images): Image-Service[...] Image-Thumbnail Image-Master[…] (optional) Texts (PDF) Application-PDF 9 Consult the CDL GDO, Section 3.3, for information on preparing content files. Table 5 Archivists Toolkit Label Title Date Expression Object Type METS/MODS and EAD Mappings <mods:title> <mods:dateCreated> <mets:mets> TYPE Digital Object ID <mets:mets> OBJID EAD: <dao> HREF CDL GDO Summary Title of the object. Date(s) for the object. A general indicator of the object type, e.g., “image” or “text”. The ARK URL for the object. To request an ARK URL -- or a batch of them -- contact us at [email protected]. Example of a digital object ARK URL: http://content.cdlib.org/ark:/13030/kt4h4nc5h8 Notes Tab Recommended: use the Conditions Governing Use Note to indicate rights information for the digital object. Note that rights information can be expressed in the form of a single Conditions Governing Use Note. This results in less data entry; however the metadata is not parsed: 10 Alternatively, the rights information can be parsed into multiple Conditions Governing Use Notes, where the “Note Label” for each field is qualified to reflect the particular rights data. This requires additional data entry, but results in more defined metadata. For example: Copyright Status Copyright Statement Copyright Date Copyright Holder Copyright Holder Contact Information Table 6 Archivists Toolkit Label Conditions Governing Use METS/MODS and EAD <mods:accessCondition type="useAndReproduction"> CDL GDO Summary Copyright Status: indicate if the material is in public domain, copyrighted, or if copyright status is unknown. Copyright Statement: a note indicating copyright restrictions, if any, applying to the resource. See the CDL GDO, Appendix B, for suggested boilerplate. Copyright Date: The year the resource was copyrighted, if applicable. Copyright Holder: The name(s) of the rights holder of the resource. 11 Copyright Holder Contact Information: Indication of who users should contact, for permissions to a copyrighted resource. Linking from Digital Object Records to Resource Records If you plan to generate METS digital objects and would like them to link to an associated finding aid, then use the "EAD FA Location" field (on the Finding Aid Data tab of the Resources data entry screen) to record the URL for the associated finding aid. If the finding aid will be published in the OAC, use the ARK URL for the finding aid. Example of an OAC finding aid's ARK URL: http://www.oac.cdlib.org/findaid/ark:/13030/kt5b69q5bc/ Consult Table 4, above, for more information. 5. Exporting Exporting EAD Files If you described subordinate components (<dsc>), the OAC EAD BPG requires numbered component tags in the output. Check “Number component levels?” If the finding aid has associated digital objects that you've created in the AT, and have already been published in OAC/Calisphere, check "Include DAO's in outputs". Also check "Use Digital Object ID as HREF". See Section 7 below for additional information. 12 Exporting METS Files Specify MODS encoding within the METS, by checking "With MODS descriptive metadata". 6. Publishing EAD Files in the OAC: Note on voroEAD Production Validation Our voroEAD Production ingest process supports the publication of EAD files generated from the AT. Note that the system will first attempt to validate files against the EAD DTD, before validating them against the EAD schema. The EAD DTD-specific processing errors can hence be ignored: /voro/data/oac-ead/submission/[directory]/[filename].xml:2: element ead: validity error : standalone: ead declared in the external subset contains white spaces nodes /voro/data/oac-ead/submission/[directory]/[filename].xml:2: element ead: validity error : No declaration for attribute schemaLocation of element ead /voro/data/oac-ead/submission/[directory]/[filename].xml:2: element ead: validity error : No declaration for attribute xmlns:ns2 of element ead [etc.] If the file successfully passes the EAD schema validation, you will receive a “File Queued for Publication” confirmation at the end of the processing results log. 7. Workflow Considerations for Publishing EAD Files and Linked METS Files in OAC/Calisphere We generally recommend that you initially create a Resource record in AT, and export the Resource record as an EAD file for publication in OAC. See Sections 2-3 above for information on creating Resource records, and Section 5 above for details on exporting. When creating the EAD export, it should not contain any links to associated digital objects (at the time of export, do not select "Include DAO's in oututs" or "Use Digital Object ID as HREF"). Publish the EAD file in OAC (see http://www.cdlib.org/services/dsc/contribute/submitead.html). Once you publish the EAD file in OAC, it'll result in a URL for the finding aid that looks like this: http://www.oac.cdlib.org/findaid/ark:/13030/##########. Copy that URL, and paste it into the "EAD FA Location" field, on the "Finding Aid Data" tab in the Resource record. Next, create Digital Object records in the AT and generate METS exports for those records for publication in OAC/Calisphere. See Sections 2 and 4 above for information on creating Digital Object records, and Section 5 above for details on exporting. Publish the METS files in OAC/Calisphere (see http://www.cdlib.org/services/dsc/contribute/submitmets.html). During this time, you can also begin the process of linking your Digital Object records in the Archivists' Toolkit to their associated Resource record, at the appropriate levels of description in the Resource record. See Sections 3-4 above for details on linking. Once the METS files are published in OAC/Calisphere, re-generate the EAD file for the collection. When creating the EAD export this time, it should contain the links to the associated digital objects (at the time of export, select "Include DAO's in oututs" and "Use Digital Object ID as HREF"). Re-publish the EAD file in OAC (see http://www.cdlib.org/services/dsc/contribute/submitead.html). 13 8. Questions? Problems? Who to Contact for Assistance The Archivists’ Toolkit User Manual, Version 2.0 can be found at: http://archiviststoolkit.org/node/310 We maintain an online forum for the CDL Hosted Archivists' Toolkit Service at: http://www.getsatisfaction.com/dsc/products/dsc_cdl_hosted_archivists_toolkit . Feel free to join discussions with other users, ask questions, report problems, or request support. Alternatively, you can report problems or send requests for support to our helpdesk system via email at [email protected]– indicate “Archivists' Toolkit” in your subject line. When reporting technical issues with the applications, please note specific steps that you took before encountered the error -- and please also note any specific error messages. This will help us track and troubleshoot the problem. Revision History August 2011: Added Repository URL to Repository Settings requirement; see pp. 2-3. September 2011: o Removed “Label” from Digital Object Record requirement; see p. 9. o Removed “Existence and Location of Originals” (Notes Tab) from Digital Object Record requirement; see p. 9. o Added recommendations for encoding rights-related information in Digital Object Record; see p. 10 October 2011: Updated reference to version of client installation on p. 1; use the latest version. November 2011: Reiterated repository record requirements, within the context of resource and digital object records. January 2012: Provided summary descriptions of OAC BPG and CDL GDO specifications. April 2012: Updated Resource record requirements to reflect DACS’ single-level minimum recommendations (a subset of the OAC Best Practice Guidelines for Encoded Archival Description, Version 2.0 (OAC BPG EAD) “OAC Basic” encoding scheme). July 2013: Added new Section 7, providing an overview of workflow considerations when publishing EAD files interlinked with METS files, exported from the AT. 14