1
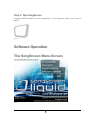
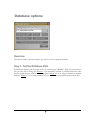
Instant Access P.O. Box 26432 Colorado Springs, CO 80908 Phone (719) 495-0784, e-mail [email protected] Table of Contents Installation 4 Video Card Setup 4 SongScreen Setup 4 Run SongScreen 5 Operating the Software 6 The SongScreen Menu Screen 6 Data Base and Screen Settings 8 Data Base Tips and Tricks 9 The Control Screen 10 To Display a Song 10 Build a Search List 11 Clearing The Screen 11 Control Screen Tips and Tricks 12 Song List Builder Song List Tips and Tricks 13 15, 16 Song Editor 17 Create a New Song 18 Edit an Existing Song 18 Song Editor Tips and Tricks 19 Nursery Numbers 21 Nursery Numbers Tips and Tricks 23 Announcements 24 Display Scripture 27 Display PowerPoint 29 Media – Avi Files 30 Media – Sound FX 31 Media – Sound Tracks 32 1 Media - List Player 33 Media – CD Player 34 Short Cut Keys 35 Color 35 Drop Shado 35 Scrolling 36 Font Adjustment 37 Justification 37 Backgrounds – Bitmap 37 Backgrounds – Clipboard 38 2 Congratulations on your purchase of SongScreen Liquid for Windows XP! SongScreen is a complete software presentation package for the local church. Not only will you be able to display songs with ease, you can also display scripture verses, announcements, nursery numbers also AVI videos and WAV files all from within one software package. SongScreen also works along side PowerPoint to provide a complete presentation solution. SongScreen requires the use of a dual monitor system on your display computer. This will allow you use one monitor for display and the second as a control monitor. The VGA output from your output monitor can then be sent to a TV monitor, LCD projector or rear projection system. SongScreen was created as an alternative to traditional hymnals, making it possible to praise and worship our Lord without the distraction of flipping, trying to find the next song. Now with the added features such as Scriptures, Nursery numbers and Power Point interface churches can move to computerized systems to aid in the presentation of songs for praise and worship the scriptures and slide presentations to our church body and the un-reached. It is the goal of Instant Access to provide you with the necessary tools for this purpose. 3 SongScreen is easy, but it is important that you follow these instructions completely or the program may not operate correctly. Installation and setting up I N S T A L L A T I O N Windows XP SongScreen Setup Step 1. Run SongScreen Install Windows XP Before installing SongScreen, you should make sure that you’ve correctly installed Windows. Try some of the sample programs that come with windows. If you experience any problems, try to resolve them through Microsoft Technical Support before installing SongScreen. Generally it is easier for you to solve one problem at a time, and it is much easier for us to help you if you have a reliable Windows installation. Step 2. SongScreen Setu Step 2. SongScreen Setup 1. Start Windows 2. Insert the SongScreen for Windows disk in the CD ROM drive, and close the drive door. 3. At this point SongScreen setup should begin automatically. Follow the instructions on the screen. If for some reason installation software fails to start follow the instructions beginning at line 4. 4. From Windows task bar click the “Start” button, then click the “Run” button. 5. From the command line type “d:\setup”, “d” being the drive letter for your CD-ROM drive. 6. Press <Enter>. (Note: The SETUP program may take up to two or three minutes to load from the disk. 7. Follow the instructions on the screen. 4 Step 3. Run SongScreen SongScreen SETUP installs the icon for the application. To run SongScreen, click the icon as show in figure 2. Figure 2 Software Operation The SongScreen Menu Screen Figure 3: 5 Overview This menu will be the first screen that appears once the SongScreen icon has been selected. Buttons Clicking the “SongScreen” button will take you directly to the display screen. This is where all songs, announcements, nursery numbers, scriptures, and PowerPoint are selected for display. Song Menu: This option will display a secondary menu where you can choose between the song editor and the song list builder. This is used primarily on remote computer systems for the purpose of editing. Announcements: This option will display a secondary menu where you can choose between the announcement editor and the announcement builder. Again this is used primarily on remote computer systems for the purpose of editing. Database options: Click this button to change the database path, make repairs to your database, backup your song data. SongScreen: 6 Database options Figure 4 Overview This screen is used to select the database you wish to use and to repair the database. Step 1. Set the Database Path By default the database path should be set for “c:\instant\songs\ssdb.mdb”. There are several reasons why you may wish to change this. Reason 1: You installed the software to a different directory other than the default directory used by the setup program. Reason 2: You are using an alternate or multiple databases. Reason 3: You are using a database on a server. For most cases default path should be fine. 7 Buttons Browse: Used to search for an existing database. Compact: Optimizes the database and makes it the smallest possible size. Repair: Will attempt to fix a database that is corrupt. Re Index: Will remove unused song spaces in the database and renumber all songs. Rebuild: Will rebuild the song search fields. Backup Songs: Will backup only the song data to a specified location. Restore Songs: Will restore songs from the backup file to the database. Tips and Tricks Database Path: If you are setting up a secondary display computer in your church and both computers are networked together you can share the “c:\instant\songs” directory on your primary computer and map it on your secondary computer. For the Songs & Local Settings Database Path use your mapped drive. Rebuilding the Index: One thing to keep in mind is that if you re-index the songs by clicking the “Re Index” button all songs will be renumbered. This means that any song lists you have printed in the past will be inaccurate because the song number on the list will no longer match the song. All lists (if you use them) must be reprinted. 8 The Control Screen Figure 5 Overview The Control Screen is the base screen. This is where you choose what you wish to display. This screen will appear on your 1st VGA monitor once you click on the “SongScreen” button on the menu screen. At the same time you will see the output screen on the second monitor. By the use of two screens it is possible to access your song database in real time unknowingly to your viewing audience. To Display a Song Step 1. Select a Song for Display. Click on a song from the Search List or the Song List. All the verses and choruses will show up in the nine fields below. If you don’t have any songs in your Song List read the section below on creating song lists. 9 Step 2. Choose a Verse or Chorus for Display There are three ways to display a verse or chorus. For mouse users: click on the numbered button to the left of the verse or chorus you wish to display or click the verse or chorus field. For keyboard users: use the number pad on the keyboard. Numbers 1 thru 9 are for displaying song parts 1 thru 9. The 0 key is used to clear the screen. The right arrow is used for moving to the next song and the left arrow is used for moving to the previous song. Once you click a verse or press a button 1-9 on the number pad song lyrics will display on the output screen. Build a Search List If the song you wish to put to the Display Screen is not in the Song List you will need to search for the song. SongScreen will search for songs based on the song title, alternate title, verse or chorus and will disregard spaces and punctuation. By typing the first few characters of the song at the Command Line and pressing <Enter> SongScreen will fill the Search List with songs that match what you typed. For example if you type, “This” and press <Enter>, the Search List will display all the songs in your database that begin with the word “This”. The more specific you are, meaning the more characters you type in, the shorter the list of songs in the Search List. Clearing the Screen Option 1. For Mouse Users: Press the “0” key on the number pad. For Mouse Users: Click the “CLR” button with your mouse. Both ways will remove the lyrics from the screen and keep the song resident in memory. Option 2. By pressing the <Enter> key with a blank command line, you will remove the lyrics from the screen and remove the song from memory. 10 Buttons >>: Adds the selected song in the Search List to the Song List. <<: Removes the selected song in the Song List. Song List Builder: Loads the Song List Builder dialog box. Buttons 1 thru 9: Send the respective verse or chorus 1 thru 9 to the display screen. CLR: Clears song lyrics from the display screen but leaves the song in memory. Blackout: Toggle the display screen to a solid black screen. Options: Loads the Global Setup dialog box Monitor: Toggles the Display Screen monitor. For use when only one monitor exists. Song Editor: Displays the current song in the Song Editor. New Song: Displays the Song Editor with a blank song. Nursery Alert: Displays the Nursery Alert dialog box. Announcements: Starts the flow of announcements to the screen. Announce Editor: Displays the Announcement Editor dialog box. Reset Screen: Resets the Z-Order of you output screens. Database: Click this button to change the database path, make repairs to your database, backup your song data. Options: Set search options, enable the song usage tracker and set the scroll value Songs: Switch to the song display screen. Scripture: Switch to the Scripture display screen. PowerPoint: Switch to the PowerPoint display screen. Exit: Shuts down the Control Screen and returns to the Menu Screen. Tips and Tricks Song Removal: It is not necessary that you remove the current song before loading another. For the best results clear the screen at the end of a song using the step #1 method and select your next song. Preview a Song in the Search List: If you build a search list and there are more than one song with the same name highlight a song in the search list and click and hold the right mouse button. All the song lyrics for that song will appear so you can make sure it’s the right song to display. 11 Song List Builder Figure 6 Overview The first place to start when preparing for a service is to create a song list. A song list is a list of song that you intend on using during the coarse of a song service. If your service is anything like ours at our church it will most defiantly change but at least we have a starting point. To create a song list click the “Song List Builder” button from the Control Screen. Next you must search for your songs. SongScreen will always search by song title but will optionally search by verses, choruses and alternate description. SongScreen will also disregard spaces and punctuation when searching. From the command line type part of the title or verse of the song you wish to find and then press <Enter>. The Song List Builder will build a selection list of songs that match what you typed in. Find your song in the list and add it to the song list by clicking the “Add Song” button or by double clicking on the song title in the selection list. To remove a song from the song list just double click on the song title. When your list is complete click the “Close” button to return to the SongScreen control screen. All the songs in your list will now 12 be visible in the song list on the control screen. To modify your search setting click the “Global Setup” button from the control screen, then chick the Select Fields for Song Search button. Step1. Run the Song List Builder From the Control Screen click the “Song List Builder” button. Step 2. Type of Search Select the type of search you wish to use, by ID number, Song Title, or Song Key. The default is Song Title. This will be what you use 95% of the time. Step 3. Search for a Song At the Search Text box type part of the Title or Verse that you wish to locate and press <Enter>. The Song List Builder will fill the Selection List with songs that match what you typed in. Step 4. Add Songs to the Song List Located a song title from the Selection List and either highlight it and click “Add Song” or double click on the song title and it will be added to the Song List. Continue with steps 3 and 4 until you have selected all of the Songs necessary for your list. Step 5. Close and Return Click the “Close” button to return to the Control Screen. The songs from the Song List in the Song List Builder will be transferred to the Song List on the Control Screen. 13 Buttons Clear Song List: Clears all songs in the current song list Save: Saves a song list Open: Opens a song list that has been previously saved. Delete: Deletes a song list that has been previously saved. Print List: Prints a hardcopy of the song list. Print Songs: Prints song lyric sheets for each song in the song list. Clipboard: Copies all of the song lyrics for each song in the song list to the clipboard. Close: Saves the current song list and returns to the Control Screen. Tip and Tricks Saving Song Lists: Once you have completed the song list you can save it by clicking the “Save” button and giving the list a name. This will allow you to open up Song Lists later for reuse or for creating Song Lists for future use. To reopen a Song List click the “Open” button and find the list you wish to recall. You can also edit a Song List once it has been reopened. You can delete any list, when you are done with it by clicking the “Delete” button. Inserting Songs: You can insert a song in the middle of your Song List by highlighting a song title in the Song List where you wish to insert and selecting the song in the Selection List you wish add. Click the “Insert Song” button and the song will be added to your Song List just above the song you highlighted. Moving Songs: You can move the songs around in the Song List by holding your left mouse button down moving the mouse cursor to a new location and releasing the mouse button. Removing Songs from the Song List: To remove a song from the Song List just double click on it. Previewing Song Lyrics: If you search for a song and multiple songs appear with the same song title in the Selection List, highlight a song title by clicking on it and hold your right mouse button down. This will display all the lyrics in the song so you can make sure you are selecting the right song. 14 Edit Song List Text: To edit the song list text highlight the song and the text will appear in the Edit Text text box. At this point the text can be modified. This is great for adding song key information or any other additional information that will help the band or choir. Adding Blank Lines: Adding blank lines can be useful for separating songs for easier readability or for adding comment lines. Blank line can be edited therefore additional comments can be added. For instance you could have a song list that is broken up into Set 1 and Set 2 by comments. 15 Song Editor Figure 7 Overview The Song Editor is for both creating new songs and for editing existing songs. It really depends how you enter the Song Editor that determines if your editing or creating a song. If you are in the Control Screen and click on a song in the Song List or the Selection List you will see the Song Editor button become active. Clicking on the “Song Editor” button would display the Song Editor with that current song. This gives you the option to always edit the current song. To add a new song click the “New Song” button from the Control Screen and Song Editor is displayed with all fields blank ready for you to enter your new song. 16 Create a New Song Step 1. Select the New Song Button on the Control Screen. Step 2. Begin by adding the Song Title, Alternate description, Author, and copyright information. Step 3. By default the radio button is set to Chorus. Click the black text screen and type your first verse or chorus. Next click the “Verse 1” radio button. Again click the black text screen and type your next verse or chorus. Repeat this process until you has completed all verses and choruses. I recommend using hard returns so that the song can remain in logical phrases. Step 4. Make any adjustments to the Local Style Setup, Global Style Setup (See instructions on chapter 3 page ) and Background Setup (See Chapter 3, pages 16 & 17). You can print and preview the song from this screen. Click the “OK” button to finish. Edit an Existing Song Step 1. In your Control Screen search for the song that you need to edit and click on it, then click the “Song Editor” button. The Song Editor will appear as seen in Figure 7. Step 2. Proceed to make your changes to the song (local style setup, global style setup, see instructions chapter 3 page, background setup, see backgrounds chapter 3, Page 16 & 17). You can preview and print the song from this control screen. Click the “OK” button to finish. 17 Buttons Upper: Changes all the text on the current text screen to upper case characters. Lower: Changes all the text on the current text screen to lower case characters. Special: Allows you to insert special characters into your text. Picture: Adds a picture to the current verse or chorus that overrides both local and global settings. Split: Moves all text beyond the current cursor position to the next part. Arrange: Allows you to put chords above the lyrics to create lead sheets. Add to List: Allows you to build a list of the keys you sing the song in. Local Style Setup: Select the font styles separate from all other songs. Global Style Setup: Select the font styles that are shared with other songs. Background setup: Select the local background for this song. Preview Song: Preview the song before you save it to see how it will really look on the screen when you use it later. Print Song: Prints a song lyric sheet. OK: Saves the song and exits. Close: Exits and does not save any changes. Tip and Tricks Copy and Paste an Entire Song: The quickest way to copy a song from another program such as Microsoft Word is to copy the verses and choruses in Word, click on the “New Song” button on the SongScreen Control Screen and paste all the verses into the first part. Next locate the cursor just after the first verse and click the “Split” button. This will move all text beyond the current curser position to the next part. Repeat this process until all verses and choruses are in their own part. Forgot to add a Song Title: This is a problem because you wouldn’t be able to find the song when you do a search. If you forget to type the song title before you save a song SongScreen will use “Song#” plus the song number that given to the song. For instance it would look something similar to this: “Song# 540”. If this happens to you do a search from the command line using “Song”. The song will then show up in the Selection List. Click on it, click the “Song Editor” button and add the song title for the song and click “OK”. Change the Description of each Part: Most people think you must type the chorus in the first part and the verse 1 in the second part and so on. This is not true. All the descriptions for each part can be modified. Click on the name once to select it and one more time to edit it. Change the description to anything you wish, “Bridge”, “Verse 2a” anything. When you load the song from the Control Screen all the descriptions will be visible. 18 Picture Codes: Picture codes are very powerful. This feature will allow you to have a different picture behind every verse and chorus in a song. This picture code will override both local and global settings. This is great for making a song a simple picture presentation. It’s also great for the people that like to use global background for their songs but want one song to have a different background. Don’t take this one for granted. Alternate description: The alternate description can be used to group songs into categories for searching purposes. It could represent a conference you are having or group songs by style like praise or worship. By doing a search on the word “praise” you could build a Selection List of all your praise songs. 19 Nursery Numbers Figure 8 Step 1. Click the “Nursery Alert” button located along the bottom of your Control Screen. Step 2. Check the Font Style, Size, Color, Bold, Italic, underline, and display time for correct settings. The X Axis offset, and the Y Axis offset, allows you to change the placement of the Nursery Number on the Display Screen. Enter the number you need to display in the Message Box, and press <Enter> or click “Add Number”. You will see the number you just entered in the Display List. You may now add another number in the message box and hit the Add Number again, that number will appear in the Display List Box as well. You may repeat this process as many times as needed. 20 Once you have added your number depress the Start/Stop button to begin display. You may add additional numbers at any time. Step 3. You may remove a number at any time by highlighting the number and pressing the “Remove Number” button. Step 4. Once you have completed your nursery list you may press the “close” button and continue on in SongScreen, the Nursery Numbers will continue to display until it has gone through the List. If you wish to have it go through the list more then once remove the check from the Display Only Once box by selecting the box with your mouse. Step 5. If it is necessary to redisplay the list you can open the Nursery Numbers again and click the “Close” button and display the numbers again. Note: you can delete or add any numbers at this time if you wish. Buttons Add: Changes all the text on the current text screen to upper case characters. Font Color: Opens a dialog box that will allow you to select the color of the displayed on the output screen. Remove Number: Removes the currently selected number from the display list. Start/Stop: Starts and starts the flow of nursery numbers to the display screen. Close: Exits the dialog box. 21 nursery number that is Tip and Tricks Display once or continuous loop: If Display Only Once is checked in the Nursery Alert dialog box each number will be displayed once for the number of seconds in the Display Timer box. If Display Only Once is not checked each number in the Display List will be displayed until it manually removed from the Display List. Using keyboard short cuts to display nursery numbers: Some people prefer to use keyboard shortcuts to display nursery numbers. To enter a nursery number, at the Command line enter the # symbol followed by the number you wish to display and press <Enter>. The number is then added to a buffer in SongScreen. Add as many numbers as you wish. To display the Nursery Numbers to the Display Screen press F2 on the keyboard. 22 Announcements Figure 9 Step 1. Click the “Announcement Editor” button at the bottom of the Control Screen. Step 2. Click the “Create New Announcement” button Step 3. Type your announcement, type your announcement title and choose the background. 23 Step 4. Enter your Termination Date for the announcement. This will pull the announcement from the display rotation when the date comes due. Step 5. Click the “OK” button to save the announcement and return to the Edit Announcement dialog box. Step 6. To ready your announcements for display you must move the announcements from the selection list to the display list. You can move an announcement by either double clicking on it or by clicking the “Add” or “Insert” button. Step 7. Check the Announcement Time, this is how long each announcement will run, make changes as needed. When your done click the “OK” button to return to the Control Screen. Step 8. To display the announcements click the “Announcements” button at the bottom of the Control Screen. 24 Buttons Add: Adds the currently selected announcement in the Selection List to the end of the Display List Adds the currently selected announcement in the Selection List to the Display List. The announcements is inserted just above the currently selected announcement in the Display List. Create New Announcement: This button will load a dialog box that will allow you to enter a new announcement. Edit Existing Announcement: This button will load a dialog box that will allow you to edit an existing announcement. Delete Existing Announcement: Deletes the currently selected announcement in the Selection List. OK: Closes the Announcement dialog box. Insert: 25 Displaying Scripture Figure 10 Step 1. Make sure the Display is off until you have made sure you have the correct verse and version. (Display off button will be highlighted) Step 2. Select the scripture you wish to display from your list to the right of the work screen or typing in a scripture in the search box. You do not have to type in the complete book you can type for example Joh 1.2 or 1J2.3 or Ro 1.3. Step 3. Once you are ready turn click the “Display On” button and your scripture will display. You can use your mouse key to go from verse to verse. If the verse is to long to fit on the screen you can use your arrow keys to scroll up or down. 26 Step 4. To select another verse within the same chapter you only have to type the number of the verse you wish to go to and press <Enter>. To select another chapter and verse type the number of the chapter then a period and the number of the verse you wish to go to and press <Enter>. To select another book and chapter, once again choose from your list or type in a book, chapter and verse at the Search line. Example: 1J1.9 for 1 John 1:9. Step 5. When you are done you can hit Display Off. 27 Display PowerPoint Figure 11 To display a PowerPoint presentation click the “Load & Run Side Show” button and browse to locate the presentation file you wish to display. The “Run PowerPoint” button is used only for loading PowerPoint so that a slide show can be created. To the 28 Background Display Controller Figure 10 The Media Player is based on the Microsoft Media Player. It will play anything that the Stand along Media Player will play including MP3’s, WAV’s, Mpeg’s and AVI files. It is recommended that you download and install the latest Window Microsoft Media Player at http://www.microsoft.com/windows/windowsmedia. 29 Step 1. Press the Locate File button and locate the avi file you wish to display. Step 2. Press Play to display the file on the Output Display Screen. Sound FX Controller Figure 10 The Sound FX player will play overlapping WAV files. Sounds may be triggered by using the mouse or using the “F” keys. This player is used mainly for sound FX for theatrical productions. Step 1. To load a file, right click on one of the “F1 – F12” buttons. A dialog box will appear that will allow you to browse for a wav file. Once a wav file is selected the path of the file will be seen in the text box to the right. 30 Step 2. To trigger the sound either clicking the “F” button or press the appropriate “F” key on the keyboard. Step 3. Below the “F” button is a slider to control the volume for the effect. Sound Tracks Controller Figure 10 The Sound Track player will play large WAV files at very high quality. This player was created to play single performance tracks where quality is crucial. Step 1. To load a file, right click on one of the “Sound Track” buttons. A dialog box will appear that will allow you to browse for a wav file. Once a wav file is selected the path of the file will be seen in the text box to the right. 31 Step 2. To trigger the sound click the appropriate “Sound Track” button. Step 3. Below the “Sound Track” button is a slider to control the volume for the effect. MP3 Player Figure 10 The List Player will play both WAV and MP3 files for the purpose of pre and post service music. Step 1. Add files to the list by clicking the Add button, and selecting the files you wish to play. 32 Step 2. To start the files playing either click the play button or double click on a song name in the list. Step 3. A song can be moved within the list by dragging it to a new location. Shortcut keys are “z” to play or pause, “x” to stop, “c” to move to the previous song, and “v” to move to the next song. Short Cut Keys Scrolling Up Arrow If you recall a large song or if the font that you are using within SongScreen is to large, it is very possible that the entire song will not fit on the display screen at one time. Pressing the up arrow will cause the display screen to scroll up. If you switch to a different verse or chorus at this point, the screen will automatically return to its default position. Down Arrow Pressing the down arrow will cause the display screen to scroll down. If you switch to a different verse or chorus the screen will automatically return to its default position. 33