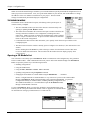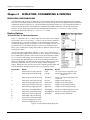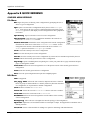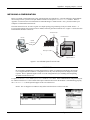
1
Configuration Editor Software Manual Version 5 Software © Copyright Eurotherm Drives, Inc. 1995 All rights strictly reserved. No part of this document may be stored in a retrieval system or transmitted in any form. Although every effort has been taken to ensure the accuracy of this manual, it may be necessary, without notice, to make amendments or correct omissions in this document. Eurotherm Drives, Inc. cannot accept responsibility for damage, injury, or expenses resulting therefrom. Procedures detailed in this manual are designed to be performed by personnel with sufficient training and/or experience. Only sufficiently qualified personnel familiar with the construction and operation of industrial drive equipment and the dangers of working with high-voltage electrical systems should attempt installation, adjustment, operation, or service of this equipment. Failure to follow these guidelines could result in damage to the equipment and severe injury or loss of life to personnel. If you are unsure of your qualifications or do not understand certain procedures in this manual, contact Eurotherm Drives Customer Service for assistance. Before attempting any procedures in this manual, including installation, verify that the model numbers on the product and in this manual match. If any discrepancy is found, contact Customer Service immediately. Procedures in this manual may contain Warnings, Cautions, and Notes. A Warning gives the reader information which, if disregarded, could cause injury or death. A Caution provides the reader with advice which, if disregarded, could cause damage to the equipment. A Note furnishes additional information for added emphasis or clarity. Printed in the United States of America 1096 RG353792 Issue A Safety Warnings Safety Procedures in this manual may contain Warnings, Cautions, and Notes. A Warning gives the reader information which, if disregarded, could cause injury or death. A Caution provides the reader with advice which, if disregarded, could cause damage to the equipment. A Note furnishes additional information for added emphasis or clarity. The customer is responsible for assessing his or her ability to carry out the procedures in this manual. Make sure you understand a procedure and the precautions necessary to carry it out safely before beginning. If you are unsure of your ability to perform a function, or have questions about the procedures listed in this manual, contact Eurotherm Drives Customer Service at (704) 588-3246. WARNING! This software is used specifically to configure the control of potentially dangerous motor control systems. The user assumes all liability and risk for the performance, application and reliability of all control systems configured with this software. It is the user’s responsibility to understand thoroughly and to check independently all configurations before commissioning any equipment controlled by this software. Eurotherm Drives, Inc. accepts no liability for the application of this software. Configuration Editor Software Manual Warn 1 Software Warranty and Rights Limited Warranty I. LIMITED WARRANTY. Eurotherm Drives warrants that: a. The SOFTWARE will perform substantially in accordance with the accompanying printed materials for a period of ninety (90) days from the date of receipt; and b. Any hardware accompanying the SOFTWARE will be free from defects in materials and workmanship under normal use and service for a period of one (1) year from the date of receipt. Any implied warranties on the SOFTWARE and hardware are limited to ninety (90) days and one (1) year, respectively. Some states/jurisdictions do not allow limitations on duration of an implied warranty, so the above limitation may not apply to you. II. CUSTOMER REMEDIES. Eurotherm Drives' entire liability and your exclusive remedy shall be, at Eurotherm Drives' option, either: a. Return of the price paid or b. Repair or replacement of the SOFTWARE or hardware that does not meet Eurotherm Drives' limited warranty and that is returned to Eurotherm Drives with a copy of your receipt. This limited warranty is void if failure of the SOFTWARE or hardware has resulted from accident, abuse, or misapplication. Any replacement SOFTWARE will be warranted for the remainder of the original warranty period or thirty (30) days, whichever is longer. Outside the United States, neither these remedies nor any product support services offered by Eurotherm Drives are available without proof of purchase from an authorized non-U.S. source. III. NO OTHER WARRANTIES. To the maximum extent permitted by applicable law, Eurotherm Drives disclaims all other warranties, either express or implied, including but not limited to implied warranties of merchantability and fitness for a particular purpose, with respect to the SOFTWARE, the accompanying written materials, and any accompanying hardware. This limited warranty gives you specific legal rights. You may have others, which vary from state/jurisdiction to state/jurisdiction. IV. NO LIABILITY FOR CONSEQUENTIAL DAMAGES. To the maximum extent permitted by applicable law, in no event shall Eurotherm Drives or its representatives be liable for any damages whatsoever (including, without limitation, damages for loss of business profits, business interruption, loss of business information, or other pecuniary loss) arising out of the use or inability to use this product, even if Eurotherm Drives has been advised of the possibility of such damages. Because some states/jurisdictions do not allow the exclusion or limitation of liability for consequential or incidental damages, the above limitation may not apply to you. U.S. Government Restricted Rights The SOFTWARE and documentation are provided with RESTRICTED RIGHTS. Use, duplication, or disclosure by the Government is subject to restrictions as set forth in subparagraph (c)(1)(ii) of the Rights in Technical Data and Computer Software clause in DFARS 252.227-7013 or subparagraphs (c)(1) and (2) of the Commercial Computer Software-Restricted Rights at 48 CFR 52.227-19, as applicable. Manufacturer is Eurotherm Drives, Inc. / 9225 Forsyth Park Drive / Charlotte, NC 28273. If you acquired this product in the United States, this agreement is governed by the laws of the State of North Carolina. If this product was acquired outside the United States, then local laws may apply. Should you have any questions concerning this agreement, or if you desire to contact Eurotherm Drives for any reason, please contact the Eurotherm Drives subsidiary serving your country, or write: Eurotherm Drives, Inc. / Customer Service / 9225 Forsyth Park Drive / Charlotte, NC 28273. Warn 2 Configuration Editor Software Manual Chapter 1 Introduction INTRODUCTION 1 Chapter 1 PRODUCT DESCRIPTION The LINK product line is a distributed control system manufactured by Eurotherm Drives which uses fiber optic technologies in industrial control applications.. The LINK network connects all LINK-compatible motor controllers (drives) and modules using a high-speed fiber optic serial communications link. By using the LINK technology, customers eliminate conventional signal and control wiring required by current industrial control systems. Programming of LINK products is performed using the software tool Configuration Editor (ConfigEd). Using the software tool Configuration Editor (ConfigEd), you can access, develop, install, modify, and monitor all drive and module programs for the entire first generation LINK and LINK2 product range. ConfigEd employs a graphical user interface which includes sophisticated drawing tools which allow you to create, diagram, and document your control scheme in an easy-to-understand visual format. This visual format makes commissioning and troubleshooting of industrial control systems simpler and more intuitive for the average user. NOTE. 1. This manual assumes that you are proficient in using either a “mouse” or similar pointing device on a personal computer (PC) . Additionally, to fully benefit from this software package, you must be familiar with the basic concepts of, and the manipulation of data within, the Microsoft Windows™ environment. 2. ConfigEd’s software blocks use standard Boolean logic symbols (e.g., AND, NAND, OR, NOR, and XOR). You must have a basic understanding of Boolean logic. 3. Before using ConfigEd, you must be familiar with the basic concepts of the LINK fiber optic control network as described in the LINK Overview Manual (HA350678). A working knowledge of AC and DC drives is recommended. Specific training in LINK drives is recommended, but not immediately required. For those using this product on a regular basis, training by Eurotherm Drives is available on both ConfigEd and LINK system design. In addition to the software tool ConfigEd, this package also includes LINK Manager, a utility which provides you with the facilities to manage both your LINK database and the projects you create on your PC. Refer to the Manager User Manual (RG352101) for information on this product. NEW FEATURES For users of ConfigEd prior to Version 5, the following is a brief list of new major features: • Support added for all new generation LINK2 products. • New editing commands supporting copying, cutting, pasting, deleting, and moving function blocks and their • • • • associated connections within the same configuration or between different configurations. The ability to install information into LINK modules which supports extracting the configuration from the modules without the original project files on your PC. Graphical Setup and Monitor (SAM) features where data from LINK modules is displayed on your configuration as originally drawn in lieu of the text based format of previous versions. A new on-screen potentiometer feature for incrementing and decrementing SAM parameters while on-line with a LINK control system. Four different SAM communication profiles may be stored for future use. Configuration Editor Software Manual 1 - 1 Chapter 1 Introduction 1 Key Features As previously supported by ConfigEd Version 4.x, you still can: • Create and modify configurations for LINK drives and modules. NOTE. You do not need LINK hardware to create or modify configurations for your control system. All configurations may be generated off-line on your PC and installed later into the appropriate devices while on-line with your LINK system. • Create project folders for your configurations. • Setup and monitor the performance of installed configurations while on-line with your LINK system. • Generate project documentation. WARNING! Errors in configurations can cause unexpected and dangerous machine operation. Do not install configurations, or put any LINK system controlling machinery into service, unless it has been first thoroughly checked and tested by a qualified engineer or technician. WARNING! Installing configurations will interrupt drive and module processing. It is strongly recommended configurations be installed only after the equipment controlled by the LINK system has been fully stopped and disabled. Structure of This Manual Chapters 1 through 3: These chapters give a brief overview of ConfigEd, a listing of the parts included with your ConfigEd package, and instructions on how to install and setup ConfigEd. Chapter 4: This chapter is an in-depth reference guide to all ConfigEd functions related to creating, configuring, and installing LINK configurations and managing LINK projects. Chapter 5: This chapter discusses ConfigEd’s displaying, documenting, and printing features. Chapter 6: This chapter gives an overview of all the functions related to the Setup and Monitor feature within ConfigEd. Chapter 7: This chapter gives tips on troubleshooting in ConfigEd. Appendix A: This appendix gives information on communicating to LINK network devices with your PC through a LINK module’s RTNX (RS232) port. Appendix B: This appendix is a quick reference guide to all ConfigEd functions and features. It is a condensed version of Chapters 5, 6, and 7. Appendix C: This appendix is a tutorial instructing beginners on how to configure an elementary two node LINK system. It is recommended that all new ConfigEd users work through the tutorial. Text Conventions For clarity, all references to ConfigEd’s functions, keyboard commands, or parameters appear in courier type in this manual. 1 - 2 Configuration Editor Software Manual Chapter 2 Package Contents & Handling Chapter 2 PACKAGE CONTENTS & HANDLING PACKAGE CONTENTS Before you install and begin using ConfigEd, first verify that your package is complete. Your ConfigEd package should include: and the LINK database files. At the time of publication of this manual, four diskettes were required with each disk containing the following files: Disk 1: CTL3D.DLL ID.DAT MANAGER.EXE XWMHN415.DLL Disk 2: DATABASE.002 Disk 3: DATABASE.003 Disk 4: DATABASE.004 DATABASE.001 INSTALL.EXE XWMBA415.DLL XWMTE415.DLL • Configuration Editor Software Manual, Version 5 (Part Number RG353792) • Manager User Manual (Part Number RG352101) • LINK Overview Manual (Part Number HA350678) • LINK Hardware Manual and Application Notes (Part Number HA352136) • Installation Instruction for LINK Software (Part Number HG352017) • User licenses for ConfigEd and Manager (Part Number RH352747) • Cable assembly, DE-9 to RJ11, three-meter length, surge arrester (Part Number CM353470) • Zipper pouch for cables and adapters (Part Number IC351351) • Binder for storing manuals and diskettes (Part Numbers IC351284, IC351858, IA352234U000, and IA352235) • Diskette holder to fit binder (Part Number IC351283) If any items are missing, or if the package or any of its contents is damaged, contact the Eurotherm Drives Customer Service Department at (704) 588-3246. Handling Take proper care in the handling the materials used for the program. Keep the distribution disks in a dry, clean environment with a relatively constant range of temperature and humidity. Caution Magnetic or electrical fields may erase the information on the distribution diskettes. Keep the program diskettes far from magnetic and electrical field sources, including permanent magnet motors. Configuration Editor Software Manual 2 - 1 2 • 3.5" floppy diskettes (Part Number RD350672G000) containing the ConfigEd and Manager software programs 2 Chapter 2 Package Contents & Handling 2 - 2 Configuration Editor Software Manual Chapter 4 ConfigEd Functions Chapter 4 CONFIGED FUNCTIONS This chapter describes all of ConfigEd’s features related to creating, editing, and installing LINK configurations, as well as, managing LINK projects (refer to Chapter 5 Displaying, Documenting & Printing for details on displaying and printing your LINK projects). For information on ConfigEd’s Setup and Monitor (SAM) features, refer to Chapter 6 SAM Functions while a quick reference for all of ConfigEd’s features appears in Appendix B Quick Reference. THE SSD_LINK DATABASE The ConfigEd software package includes the SSD_LINK database which contains all the files required to build LINK configurations. It occupies about 15 megabytes of hard disk space on your computer and must be accessible by the ConfigEd program for all of its features to work properly. As the number of function blocks and LINK module types grow, more disk space will be required. While running, ConfigEd continuously accesses the database and reports any file errors to the Scratch Pad. Refer to Appendix A of the LINK Overview Manual (HA350678) for a description of the file structure of the SSD_LINK database. ORGANIZING YOUR WORK As an example of project grouping, consider a printing facility which has three separate presses, each having a series of motor controllers, operator stations, tension transducers, and winders. A separate LINK system controls each press while a unique LINK project (in this case, Web 1, Web 2, Web 3) contains all the software configurations associated with the LINK motor control system. For each LINK module or drive within the system, one software configuration exists which contains the necessary function blocks to control the printing process. To further organize the work, all projects relating to particular department within the plant are grouped under the category Printing (as opposed to other plant operations, such as Laminating, Slitting or Binding). Figure 4.1 shows the hierarchical breakdown of this printing plant’s LINK projects. Figure 4.1 - Organization Breakdown of LINK System in a Printing Plant Configuration Editor Software Manual 4 - 1 4 A LINK project is a logical grouping of configurations for one coordinated system controlling a production line (e.g., a group of LINK drives supplied by Eurotherm which control the motors of a printing press). Within any LINK project, you may create configurations for any of the modules supported by ConfigEd (i.e., AC drives, DC drives, operator stations, processor modules, etc.). Categories, in turn, are used to keep all related LINK projects in some logical grouping. Chapter 4 ConfigEd Functions Typically, one ConfigEd project is assigned to each separate LINK network while each configuration in that project is installed into only one LINK module on that network. However, grouping of the configurations for a LINK network may vary depending on whether you are using only first generation LINK hardware, only LINK2 hardware, or a mixture of the two. Refer to the LINK Overview Manual (HA350678) for planning considerations for a LINK system. THE CONFIGED MAIN MENU BAR When you begin a new ConfigEd session, the ConfigEd workspace fills your entire screen. The main menu bar is located at the top of the screen and the ConfigEd Scratch Pad appears at the bottom. Each main menu heading contains commands associated with one aspect of designing configurations for a LINK project. Clicking on a main menu heading with your mouse opens a list of sub-menus which are commands/selections associated with the main menu picked. Figure 4.2 highlights the functions associated with each main menu heading. Create, delete, open, close & select configurations within currently selected project; set page display & print settings. 4 Cut, copy & paste edit functions; change configuration network address & network topology within a single configuration. Select & manage projects; compact, update, duplicate, document & print projects. Select function blocks to place in a configuration. Install configurations; access SAM functions; start, halt & poll information from a LINK device; change the address of a LINK device Change configuration sheet; add annotation text & drawing elements; add, delete & modify configuration forms. Open or update CE module list; switch between open windows on screen Change text font Change text style. Function block data sheet information, project and ssd_link database revision levels and release notes. ConfigEd Scratch Pad. Figure 4.2 - ConfigEd Main Menu Bar 4 - 2 Configuration Editor Software Manual Chapter 4 ConfigEd Functions THE SCRATCH PAD The Scratch Pad appears on screen during every ConfigEd session. As previously mentioned, it responds to the same commands as any other window and provides a written record of most actions you perform during your ConfigEd session, such as: • Loading, saving, installing, and deleting configurations. • Reporting any errors between your database and the LINK network. • Recording all SAM commands, including Get and Set actions. When you close the program for the first time, ConfigEd automatically saves the contents of the Scratch Pad to a file called CONFIGED.TEX. This TEX file is saved to the as specified by the ConfigEd icon (typically C:\SSD_LINK\TOOLS\TOOLS\WIN3). At the close of each subsequent ConfigEd session, the contents of the current Scratch Pad is appended to this existing file. If for some reason the TEX file does not exist, ConfigEd will create a new one and save the contents of the Scratch Pad. The TEX file format is standard ASCII characters and may be edited or printed using any word processing program. In most Windows installations, the accessories NOTEPAD.EXE (smaller files) and WRITE.EXE (larger files) are available to edit/print this file. To print the CONFIGED.TEX file’s contents using Write: 1. Launch Write from the Accessories program group in Windows. 3. When the Open dialog box appears, choose All Files (*.*) for the List files of Type: selection and use the Directories: window to locate the CONFIGED.TEX file (typically in the C:\SSD_LINK\TOOLS\WIN3 directory). Once the file is visible in the File Name: window, choose the CONFIGED.TEX file by clicking once on the filename. Finally, click on the OK button. 4. A Write window will now appear asking “Do you want to convert this file to write format?”. Click on the No Conversion button. 5. To print the file’s contents, select Print from the File menu. When the Print window appears, confirm your printer’s settings and click on the OK button. After launch, ConfigEd automatically records the tools version number, current date and time, database ID, and user name in the Scratch Pad. If during commissioning or startup of a LINK system you would like to note the current date and time in the Scratch Pad, you can manually insert the current date and time at any point by selecting the Paste Time command in the Edit menu. NOTE. The title bar of Scratch Pad always displays the currently selected project’s unique serial number, category, and title. If you change projects during a session, the title bar shows only the active project. LINK Project Number Category Project In addition to the information automatically recorded in the Scratch Pad, you can add you own comments to supplement ConfigEd’s recording features. To add text, simply click in Scratch Pad where you want to add text and type at the blinking cursor. Configuration Editor Software Manual 4 - 3 4 2. Select Open from the File menu. Chapter 4 ConfigEd Functions You can also clear the visible text in Scratch Pad by clicking on the Scratch Pad window and then choosing Save from the File menu. After clearing the window, ConfigEd appends all text from the Scratch Pad to the CONFIGED.TEX file. The contents of the TEX file can be a valuable record of commissioning and troubleshooting activities; however, since it is continuously updated, the file can get relatively large consuming considerable hard disk space. Therefore, it is recommended this file periodically be moved (or deleted) from ConfigEd’s working directory (remember, if the file does not exist, it is recreated by ConfigEd). A good time to perform maintenance of this type is immediately following the commissioning or servicing of a particular LINK system where all of the file’s contents are associated with a specific project. THE PROJECT MENU The Project menu is used to manipulate the projects on your database. Selectable options in this menu include: Select, Manage, Compact, Duplicate, Update, Document, and Print. The Project-Select Command The Select menu pick is a list of the last 50 projects accessed on your computer in prior ConfigEd sessions (the list is stored in the CONFIGED.RCT file). This menu pick allows you to quickly switch between frequently accessed projects and categories. To use this feature, click on on the Select menu pick. Categories on your database will then be displayed. An additional single click on each category lists the projects most recently accessed in that category. To select a project from the list and make it active, simply click on the project title. Note, the Scratch Pad‘s title bar changes with the execution of the Select menu pick. The Project-Manage Command 4 Click the Manage menu pick to open the Project-Manage dialog box. You can use the Project-Manage features to do the following: 1. Create new categories and projects 2. Select an existing project (not in the Select pick). 3. Move projects between categories. 4. Protect project categories by designating them category as ReadOnly 5. Sort the configurations inside a project by their LINK network address. 6. Enter project data used by ConfigEd’s documentation features. NOTE. The Manage menu pick only manages projects for the LINK database installed on your computer. To manage projects between multiple computers, use the separate LINK Tool Manager (see the Manager User Manual (RG352101)). Create a New Category To create a new category, click on the New Category button in the dialog box. Type in the desired name (up to 12 characters) for the category and click OK. The new category now appears in the Destination Category column. Projects may now be moved into the new category as described later in this chapter. Click on the Done button to close the dialog box. Although you cannot directly delete a category, empty categories are automatically deleted by ConfigEd. 4 - 4 Configuration Editor Software Manual Chapter 4 ConfigEd Functions Create a New Project To create a new project, select the appropriate category from the Category box and single click the New Project button. A New Project window will appear with data entry fields for the New Project Name and Fields 1-9. The new project’s title is entered in the New Project Name field (up to 20 characters) and specific project data is entered in Field 1 through Field 9. The generic forms supplied with ConfigEd use the data in the Fields to automatically enter title block information when printing your configurations (see Chapter 5 Documenting, Printing & Displaying Configurations for details). Enter the appropriate project title and any desired field data then click on the New button to create the project. After clicking the New button, your project title will appear in the category you selected with both the category and project highlighted. Click New to close the Manage dialog box and create the project. At this point, ConfigEd assigns the project a unique 8-digit number corresponding to a sub-directory under the SSD_LINK\CONFIGS directory on your computer. All files related to the new project will be stored in this directory (see the LINK Overview Manual (HA350678) for an in-depth discussion of the LINK database directory structure). 4 NOTE. ConfigEd actually uses the 8-digit project number NOT the category and project title to access the files on your database. Therefore, it is possible to have two projects within a category with the exact same title; however, it is not recommended. 8-digit LINK Project Number. Date project was created. All of the Field data, the project’s creation date, and its unique 8-digit project number now appear in the Manage dialog box. You may modify the project title Field data by click oning the Change Project button. The Change Project window (identical to the New Project window) will appear and the data may be modified. NOTE.. Project numbers are a limited resource as each new user of ConfigEd is assigned a limited range of unique 8-digit numbers. Whenever possible, you should use the File-Delete menu pick to empty obsolete projects of all configurations and reuse the project number in lieu of creating new projects. The Project-Manage menu pick may be used to move obsolete projects to an appropriate category (e.g., Spares) until required. NOTE. Once created, a project CANNOT be deleted directly from ConfigEd. If the project is to truly be deleted, the LINK Tool Manager will allow the project to be exported to floppy diskettes with its Read/Write token making the copy on your computer Read-Only. Once in a Read-Only state, the Manager will permit you to delete the project (see the Manager User Manual (RG352101)). Configuration Editor Software Manual 4 - 5 Chapter 4 ConfigEd Functions Select a Project To select an existing project using the Project-Manage menu pick, click on the appropriate category and then click on the desired project. To select the project and close the Manage dialog box, click on the Done button. Note, the Scratch Pad ‘s title bar changes to the selected project with the execution of the Done command. Move a Project To move an existing project from one category to another using the Project-Manage menu pick, click on the project’s existing category in the Category list then click on the appropriate project title in the Project list. Now, click on the desired category under the Destination Category list on the right. If satisfied with your selections, click on the double-arrow (>>) box between Project and Destination Category boxes to move the project. When executed, the project move at the right will transfer the project junk from the Public to the Training category. 4 Cat. Read-Only To prevent modification of any projects in an entire category using the Project-Manage menu pick, click on the category to be protected and then click on the box labeled Cat. Read-Only. Each click of the mouse will toggle the state of the box. (checked is protected, blank is unprotected). For LAN installations, this lockout is private for each user and stored in the CONFIGED.RCT of their icon’s working directory. Sort by Address To sort the configurations in a project by their LINK network address using the Project-Manage menu pick, click on the project title in the Project box and then click on the box labeled Sort by Address. Each click of the mouse will toggle the state of the box. (checked is sorted by address in ascending order, blank is sorted alphabetically by configuration name). This box affects the order in which configuration names are presented in the File-Open menu pick, as well as, the order in which configurations are printed in the Project-Print menu pick. Lastly, activating the Sort by Address feature properly configures your computer to use the Index configuration under the File-New menu pick (see Chapter 5 Displaying, Documenting & Printing). Find Project If you cannot recall a project’s category and/or title, the Find Project button in the Project-Manage menu pick allows you to locate the project using either the project’s title or its unique 8-digit project number. To find a project, click on the Find Project button. When the User Input dialog box appears, type in either the exact name or unique 8-digit project number for the missing project and click on the OK button (the User Input is not case-sensitive). If the project exists on your database, its category and project title will be highlighted in the Category list and Project list, respectively. If multiple projects have the same title, the first matching title ConfigEd encounters will be selected. If you determine the highlighted project is not the missing project, simply repeat the command. 4 - 6 Configuration Editor Software Manual Chapter 4 ConfigEd Functions Change Project Info To change project information using the Project-Manage menu pick, click on the Change Project Info button in the dialog box. A Change Project window exactly like the New Project window previously described will appear with data entry fields for the Project Name and Fields 1-9. Change the project information as required, then click on the Change button to accept the data or the Cancel button to leave the project information unchanged. NOTE. It is possible to have the labels in the Change Project window for Fields 1-9 display meaningful descriptions of how the data in these boxes are actually used in your forms by creating a file called FIELDS.TXT in working directory for the ConfigEd icon (see the section on Creating Forms in Chapter 5 for more details.) The Upgrade Command Since the first generation LINK products were released, Eurotherm Drives has continued to develop newer, more powerful versions of our function blocks, as well as, create new function blocks. Accordingly, the programming code associated with these function blocks has grown on the SSD_LINK database. Since all LINK modules have a finite amount of memory, if a user built a configuration years ago which barely fit inside the module, without any protections, the same configuration may not fit with current versions of the function blocks. ConfigEd protects you from this growing project dilemma by freezing the database at the level at which it was created. When you create a new project, ConfigEd records the level of the current SSD_LINK database in the project directory. To the project, the database never looks as if it has been updated. No new are revised function blocks (or LINK module types) will be accessible from the frozen project. An upgrade will bring a project up to the current database levels making all current revisions of function blocks and LINK modules available. In effect, it is like the project was created on the day of the upgrade. 4 Caution Do not use the Upgrade command unless you are certain that you need to replace existing function blocks with a newer revision or you need access to previously unreleased function blocks. You cannot undo an Upgrade once it has been performed. NOTE. Prior to upgrading, you should export to floppy a Read-Only copy of any project with Manager. This copy will retain all the original project’s properties and, with direction from Eurotherm Drives, may be restored to your LINK database. To upgrade a project, select the project you want to upgrade from the Project-Manage menu pick’s window and then click on the Change Project Info button. When the Change Project window appears, click on the Upgrade button to upgrade the project. Prior to actually performing the upgrade, a ConfigEd confirmation window will appear providing you the last opportunity to cancel the upgrade. After upgrade, you will immediately have access to any new function blocks currently available on your database; however, obsolete function blocks will have to be replaced using the following procedure: 1. Delete the original function block. 2. Place a new copy from the Block menu. 3. Reconnect all the inputs and outputs of the function block. 4. Set all the function block’s parameters appropriately. 5. Reinstall the revised configuration into the LINK module. Obsolete function blocks in your configurations will be highlighted by a number of asterisks (*) adjacent to their name (e.g., CPW *) indicating the original function block has been replaced by another function block with a different part number (i.e., one asterisk indicates the block has been replaced once, two asterisks indicates the block has been replaced twice, etc.). Configuration Editor Software Manual 4 - 7 Chapter 4 ConfigEd Functions The Project-Duplicate... Command The Project-Duplicate... menu pick allows you to copy the currently selected project (see the Scratch Pad title bar) to a new unique 8-digit number within the same category. All configuration names in the duplicate project will match the original, but will have their revision numbers reset to .001. Also note, the duplicate project’s database level will remain at that of the original unless an Upgrade is performed. The Duplicate command can be a valuable time saver on LINK systems which are identical (or similar). NOTE. The Duplicate command is for entire projects only. To copy individual configurations, use the File-Save menu pick. To duplicate a project, click on on the Project-Duplicate... menu pick. A New Project window identical to the window displayed when creating a new project appears. A New Project window will appear with data entry fields for the New Project Name and Fields 1-9. Fill in the New Project Name and Fields 1-9, then click on on the New button. Your new project title will now be listed in both the Project-Select and Project-Manage menu picks. The duplicate project resides in the same project category as the original. Use the move feature in Project-Manage to move the duplicated project to a different category. NOTE. Do not use Project-Duplicate to back up your project. In the background, ConfigEd only recognizes projects by their unique 8-digit number see the duplicate project as a completely separate entity.. Use the export feature of Manager to make copies/backups of your work (see the Manager User Manual (RG352101)). The Project-Update... Command 4 Once you have used the SAM functions to fine tune function block and system parameters for a ConfigEd project installed in a LINK network, you can use Update to automatically revise the parameter settings in the project’s configuration files to match the real world SAM settings. This is a convenient feature, since you can often only approximate many parameter settings when you originally set them in ConfigEd and arrive at optimum values through trial and error when you performance tune the control system. This also puts field tuned parameter values into the source configuration file so that future installations will not overwrite the field tuned parameter values in the LINK network modules. NOTE. You must have access to the project’s configuration files to perform an Update on a LINK network using first generation LINK modules. This means that either: • The configuration files for the project must be resident on your PC hard drive or local network, or • You must be able to use the Extract Selected command and reconstruct the original configuration source files from the first generation LINK modules. To do this, the configuration must have been installed with the Install Source option selected under the File-Open-Open command in the File menu (see the discussion on Install Source later in this chapter). Update overwrites all the parameter values in a project’s configuration files with those of the LINK modules, even values changed during normally system processing. These include all setpoint and feedback values of function blocks and drives, regardless of data type. In effect, Update takes a snapshot of all values and parameters of all modules at the moment you execute the Update. To Update your configuration, you must first close all open configurations; ConfigEd prevents you from updating configurations unless all configurations are closed. Then click on Update in the Project menu. From the selection box that appears, select those configurations 4 - 8 Configuration Editor Software Manual Chapter 4 ConfigEd Functions you wish to update. Use the Shift-click or Ctrl-click combination to select multiple modules. Once you have selected the configurations, click the Update button. NOTE. ConfigEd cannot update modified configuration files, or those configurations to which you have made functional modifications, but have not installed. ConfigEd marks these files in the Update configuration selection box with an asterisk (*). ConfigEd then automatically refreshes or opens a CE Module List and overwrites the parameters and value settings of configuration files on your PC with those from the configurations installed within the LINK modules. The configurations update in the order in which they are arranged in the project. A status bar monitors and the Scratch Pad records the progress of your Update and any errors (such as a communications error or missing/revised configuration files). Configurations on which errors are reported are not updated. NOTE. Performing an Update does not change the modification level of a configuration since it only changes the parameter values, not the functionality of a configuration. However, an Update does change the revision level of the updated configurations (see page 4-14 for a discussion on Modification versus Revision level). Caution Executing Update adds extra communications loading on LINK network modules, particularly the one to which the PC is connected, creating a slight chance that a LINK module may halt on a L-Error processing fault (or Low-Level Error). It is therefore recommended to stop all machinery the LINK network controls before executing the Update command. The Project-Compact Command 4 Compact removes all configuration revisions of a project, except the currently installed revision and the highest (i.e. latest) revision. This saves disk space on your PC. Caution Compact deletes early configuration file revisions. Do not compact a project until you have completed installing and commissioning your LINK system and you are certain that all parameters are optimally set and no more configuration changes are required. To compact an installed and fully commissioned project, close all open configurations and select Compact from the Project menu. A dialog box first warns you that ConfigEd will delete early configuration revisions. Click Compact to proceed. A status bar reports and the Scratch Pad records the progress of the Compact. When completed, select Open History from the File menu to view the remaining file revision. Only the currently installed version and its last revision of each configuration should remain, leaving at most two files per configuration. These are the most current configurations. The Project-Document... & Project-Print... Commands These features are discussed in Chapter 5 Displaying, Documenting & Printing Configurations. Configuration Editor Software Manual 4 - 9 Chapter 4 ConfigEd Functions THE FILE MENU The File menu manages the configuration files of a ConfigEd project. NOTE. Although you may have multiple configurations from different projects open on you monitor screen, ConfigEd allows you to work on only one configuration within one project at a time. The title bar of the Scratch Pad window always indicates the active project. Use the commands in the File menu to: • Create, save and copy configurations. • Open, close, and delete current (or past) revision configurations. • Print open configurations and adjust your printout parameters. • Exit ConfigEd. The File-New... (Ctrl+N) Command This command creates a new configuration file within the ConfigEd project you have selected. The title bar of Scratch Pad indicates the currently selected ConfigEd project. To create a configuration, click New... in the File menu, or use the keyboard combination Ctrl+N, then select the type of configuration you want to create from the listing that appears. The Select New Configuration window lists all available types of first generation LINK and LINK2 modules by model number. The table also lists the date the module type was entered into the ConfigEd database. All begin with the letter L, which is the Eurotherm Drives model number designation for a LINK module. 4 NOTE. The type of configuration you create must match the first generation LINK or LINK2 module in which you will install the configuration. Generally, you cannot install a configuration designed for one type of module into another type of module. For example, if you have a three-node LINK system which includes a 590SPL DC drive, a L5207 processor module, and a L5201 analog module, you must create a L590SP configuration for the 590SPL DC drive, a L5207 configuration for the processor module, and a L5201 configuration for the analog module. NOTE. The exception to the rule are cases where new LINK modules have been released to replace older LINK hardware. For example, you can install the configuration for a first generation L5101/L5102 LINK operator station into a L5390/L5391 LINK2 operator station. The Select New Configuration window lists different versions of some configuration types (usually drive configurations). Select the version that matches the firmware of the module or drive within your LINK system. For example, select L590v2 when creating the configuration for a 590 LINK DC drive with Version 2.x firmware and L590v3 for a 590 LINK DC drive with Version 3 firmware. Once you have selected the correct configuration type for your LINK module, click the New button. ConfigEd creates the configuration then prompts you to assign the configuration an address between 1 and 3000, inclusive. This address is the node address for the module within your LINK system. NOTE. You can assign the same address to different configurations within the same project. However, each LINK module or drive within the same fiber optic network must have a unique address. 4 - 10 Configuration Editor Software Manual Chapter 4 ConfigEd Functions ConfigEd then prompts you to name the configuration. This name appears on the title bar of the configuration when opened in ConfigEd. It also serves as the MS-DOS file name for the configuration, which is stored under the 8-digit project subdirectory in SSD_LINK/CONFIGS directory on you hard disk. For a discussion on the complete file structure of the ConfigEd database, refer to the LINK Overview Manual. NOTE. As restricted by the MS-DOS, configuration names are limited to 8-character file names. The 3character MS-DOS file extension is reserved for revision numbers (001 through 999). The File-Open (Ctrl+O) Command Use File-Open to open the latest revision of a configuration within a project. When you choose File-Open, highlight the configuration file from the menu that appears and click on it to open it. Picking the Open... selection at the top of the box allows you to set display and installation options for each individual configuration. NOTE. A check mark (Ö) indicates that the configuration is not write-protected (in the Read-Only status), as set through the File-Open-Open command. The File-Open-Open Command 4 If you choose the second Open command at the top of the File-Open selection box (or File-Open-Open) a second selection box appears which gives you more control options for your configurations. You can open configurations from the same list File-Open offers (the latest revision of the project’s configuration files) but you can also individually change a configuration’s Read-Only status, designate a file’s source information be installed into the LINK module when loading, and select a graphical format. To open a configuration from the File-Open-Open dialog box, highlight the configuration, then click Select. An asterisk (*) next to the file name in the File-Open-Open selection box indicates that the configuration functionality has been modified since last installed. Configuration Read-Only Mode The File-Open-Open dialog box gives you the option to designate a configuration as Read-Only protecting it from inadvertent or accidental modification. This selection only provides limited protection as any user may change the Read-Only designation (assuming they have Guest Rights to the project). Those configurations you designate as read/ write (or not Read-Only) are marked with a check (Ö) in the File-Open command list. Graphical Mode This selection determines how your computer displays configurations on your screen. Checking the box sets the display to a graphical format; unchecking the box sets the display to the earlier text-based format of ConfigEd. NOTE. Graphical mode is recommended for all projects created with ConfigEd Versions 3.x and higher. Install Source Checking the Install Source box prior to installing configurations will cause ConfigEd to load information into the LINK module which will enable the software tool to extract the configuration from the module’s memory (i.e., without the project files on your computer). In order to use the Extract Selected function on first generation Configuration Editor Software Manual 4 - 11 Chapter 4 ConfigEd Functions LINK modules, the option must be enabled. For LINK2 modules, ConfigEd installs the configuration’s source file information regardless of the status of this box. NOTE. The source file information for a configuration consumes processor memory and limits the amount of free memory usually reserved for configuration data in first generation LINK modules. To avoid running out of configuration memory, it is recommended to enable the Install Source option only when installing small sized configurations into first generation LINK modules. Configuration Description Fields The File-Open-Open dialog box also gives you access to separate data entry fields for each configuration within a project. These fields provide standard information about the configuration that often appears on engineering drawings such as the configuration name, the type of module, as well as, the project designer. The data from these fields can be included in your forms (see the sections on Forms and Automatic Data Entry in Chapter 5). To enter or change configuration description information, highlight the configuration in the list, then click Fields. When the Fields dialog box appears, scroll through the different fields using the mouse or the Tab key. Enter the required information, then click the Change button. Click on Cancel button, if you decide not to make any changes. 4 The default names for these data entry fields are Field 1 through Field 6. You may change the names of these fields to more relevant names by creating a FIELDS.TXT file in ConfigEd’s working directory using a Windows text editor such as NOTEPAD.EXE. Prior to using the fields, it is a good idea to determine a standard format for this information to allow you to enter the information for each configuration consistently (e.g., assign Field 1 to the configuration name, Field 2 to the LINK module type, etc.). NOTE. The FIELDS.TXT file also contains the names for the descriptive fields found in the Change Project Info dialog in the Manage-Project menu pick. The File-Open History... Command ConfigEd sequentially saves each configuration revision to a new file whenever a save is executed. This occurs regardless of whether you save manually using the Save (Ctrl+S) command in the File menu or whether ConfigEd performs the save automatically (e.g., during either the execution of an install command or when you close the configuration window). When you select File-Open History..., a dialog box listing all of the saved revisions of each configuration in the active project appears. From this list, you may open an earlier revision of a configuration. The suffix number appended to the configuration file name indicates the revision level. The highest revision number corresponds to the latest revision and matches the revision level of the configuration listed in the in the File-Open dialog box. You can set the number of revisions ConfigEd will save under Revisions (#)... in the Command menu. ConfigEd allows you to open only one revision of a configuration at a time. When you open a configuration, the Scratch Pad indicates the revision level which was opened. NOTE. A file revision differs from a file modification. The distinction is discussed in the Modification Level vs. Revision Level portion of the File-Save section. 4 - 12 Configuration Editor Software Manual Chapter 4 ConfigEd Functions The File-Open Selected Command (F2) The Open Selected command opens the configuration file for the LINK module selected in the CE Module List. Since this is usually the same revision of the configuration you installed in the module, it is a quick, convenient way of opening a configuration for making modifications while commissioning a LINK system. NOTE. You must have the LINK project and the LINK module’s configuration files on your database in order to use Open Selected. To use Open Selected, open or update the CE Module List and select the LINK module whose configuration file you want open. Then, click on Open Selected in the File menu (or press the function key F2). In some cases, the modification level of the configuration file downloaded into a LINK module may not match the latest modification level of the configuration file within the LINK project on your database. This often happens when you make a functional modification to a configuration and close it, thus saving it, before downloading the modified file into the LINK module. When this file mismatch occurs, a dialog box asks you which revision of the configuration you wish to open: the modification in the module, or the latest modification on your database. ConfigEd allows the user to select the appropriate revision. Caution Be careful when modifying earlier revisions of configurations as ConfigEd skips all used revision numbers when saving. If you open earlier revisions and make any changes, any work done in intermediate revisions be lost. 4 The File-Extract Selected Command Use the Extract Selected command to reconstruct the original configuration file from the configuration installed in a LINK module. Unlike the Open Selected command, you do not need the original project and configuration files on your hard disk to reconstruct the file. However, the configuration must have been installed with the Install Source option selected in the File-Open-Open dialog box (done by default for LINK2 modules). This command is often used when you need to make modifications to a LINK configuration which are outside the parameter change capability allowed by the SAM features, such as adding function blocks to a configuration, or sending/receiving signals to/from other modules on the LINK network. After extracting, you can use ConfigEd to modify and reinstall the reconstructed configuration file, just as with the original configuration file. Using Extract Selected is similar to using Open Selected: select the LINK module whose configuration file you want to reconstruct from the CE Module List and click Extract Selected from the File menu. If the module does not contain source information, ConfigEd reverts to performing an Open Selected on the LINK module assuming the project and configuration files reside on you database. If the project does not exist on your database, ConfigEd cannot reconstruct the original files and will generate the error message noted below. Caution Once you have used Extract Selected and then modified and reinstalled the configuration(s), it is still recommended you transfer a copy of the reconstructed and revised configuration file(s) to the hub managing the LINK project. Otherwise, you can risk losing configuration data since the hub does not have the modified configuration file(s) as stored in the LINK module(s). Configuration Editor Software Manual 4 - 13 Chapter 4 ConfigEd Functions The File-Close Command (Ctrl+W) The Close command closes the active configuration window. Prior to closing the window, ConfigEd saves any changes to the configuration to a new revision number on your database. The File-Save Command (Ctrl+S) If there are any changes to a configuration, the Save command immediately writes the active configuration window to your database. Configuration changes may be functional in nature (e.g., adding/deleting LINK input/output slots, function blocks, or connections) or merely appearance related (e.g., rearranging function blocks, adding/deleting text, or adding/deleting drawing elements). ConfigEd automatically saves modified configurations in the following situations: • Upon exit, using the Exit command in the File menu. • On closing the configuration, using the File menu Close command (Ctrl+W). • On installing the configuration, using any of the install options in the Command menu. Caution ConfigEd has no autosave feature. It is recommended to periodically save while you are designing configurations to avoid losing data in case of a power failure. Modification Level vs. Revision Level 4 ConfigEd keeps track of both the quantities and types of change. Changes that alter the appearance of a configuration, in any way, are revision changes. Revision changes involve any of the following: • Moving functions blocks and connections. • Drawing or removing shapes using the Draw menu. • Placing or deleting annotation text using the Text tool. • Changing function block parameter values manually through ConfigEd. • Updating function block parameters via the Update command. • Adding/deleting function blocks or function block connections. • Adding/deleting LINK input and outputs. Any and all changes made to a configuration since a previous revision (either automatic or through the File-Save command) causes ConfigEd to save the configuration in a new file on the next save. For each file save, the configuration’s 3-digit MS-DOS file extension is incremented indicating the configuration’s revision level. You can set the number of configuration file revisions ConfigEd keeps through the Revisions (#)... in the Command menu. Modification changes are concerned with functional changes within a LINK configuration. ConfigEd increases the modification level of a configuration on the next save (if you make functional changes) not when just the appearance of the configuration is changed. Functional changes to configurations include: • Adding and deleting function blocks or function block connections. • Adding and deleting LINK input and outputs. 4 - 14 Configuration Editor Software Manual Chapter 4 ConfigEd Functions The modification level of a configuration is stored in each configuration file revision. This means that two revision levels of a configuration are functionally identical if they have the same modification number. NOTE. Making a functional change to a configuration increments its modification level while creating a new revision file. Executing a save after adding or deleting annotation text and drawing objects, executing an Update or moving function blocks and connections also creates a new revision file, but leaves its modification level unchanged. ConfigEd uses the modification number to perform operations between the source configuration and the configuration installed in a LINK module. In general, any operation that uses both the source configuration and the configuration installed in a LINK module requires both to have the same modification number to prevent data corruption. The two features most affected by the modification issue are the SAM and the Update functions. If you create an index using the File New menu pick (see Chapter 5), the index lists both the revision and the modification level of each configuration in a project. Additionally, when you open a configuration, the Scratch Pad indicates both the revision and modification level. You can use the Get Info command in the Command menu to find out the modification level of a configuration previously installed into a LINK module. Saving Scratch Pad Text 4 You can also use the Save command to save the text within the Scratch Pad. To save the text, make the Scratch Pad window active by clicking on it with your mouse, then execute a Save. This appends the CONFIGED.TEX file with all information currently displayed in the Scratch Pad window and clears the window. After the save, the Scratch Pad. window will continue to record commands/actions during the current ConfigEd session. Configuration Editor Software Manual 4 - 15 Chapter 4 ConfigEd Functions The File-Save As Command The Save As command is used to copy a configuration from one project to another, or to make a copy of a configuration within the same project. NOTE. Use the Duplicate... command in the Project menu to copy entire projects. Use Duplicate in the Edit menu to copy individual function blocks within a configuration. Open the configuration you wish to copy, then click on Save As in the File menu. A dialog box will appear asking you for the new configuration name and the category and project in which you want to save it. If you are saving the copy of a configuration to a new project or category, you must have first created the new project or category through the Manage dialog under the Project menu. Give your configuration a name and then select the project and category in which you want to save it. Then click OK. 4 NOTE. The Save As command copies all aspects of a configuration, including its address. If you copy a configuration into the same project (a feature typically used when configuring a similar section for a LINK system controlling many drive sections) remember to change the address of the new configuration using the Net Address... function in the Edit menu before installing. The File-Delete Command To delete a configuration, select Delete from the File menu, highlight the configurations you wish to delete from the list in the dialog box that appears. ConfigEd will warn you that a delete will permanently remove all revisions of that configuration. Click Delete to erase all revisions of that configuration from your PC’s hard disk. Caution You should delete configurations if they become obsolete or if you wish to make major changes and begin a new configuration from scratch. 4 - 16 Configuration Editor Software Manual Chapter 4 ConfigEd Functions The File-Page Setup..., File-Print Scale, and File-Print... Commands These commands are covered in Chapter 5 Displaying, Documenting & Printing Configurations. The File-Exit Command The Exit command ends your current ConfigEd session. All open configurations that you have altered since you began the ConfigEd session are closed and saved on exiting and the Scratch Pad text is appended to the CONFIGED.TEX file in the ConfigEd icon’s working directory. 4 Caution Do not turn power off to your PC until ConfigEd has completely closed and you have returned to the Windows Program Manager. Turning the power-off while ConfigEd is closing could cause an irrecoverable loss of data. Configuration Editor Software Manual 4 - 17 Chapter 4 ConfigEd Functions THE EDIT MENU The commands in the ConfigEd Edit menu pertains only configuration files and the Scratch Pad. Those commands that apply to configurations are only active when a configuration window is open and active. Similarly, those commands relevant to the Scratch Pad are active only when the Scratch Pad is active. Use commands in the Edit menu to: • Duplicate and move function blocks. • Change the address and topology of a configuration. • Select and time-stamp information in the Scratch Pad. • Create SAM test points. The Edit-Cut, Edit-Copy, Edit-Paste & Edit-Clear Commands Use these Edit menu commands to duplicate or move a single function block or a group of function blocks. The commands operate identically to the Cut, Copy, and Paste of many Windows software applications. Highlight the item you wish to copy (or move) and click on Copy (or Cut). If you wish to move or copy a group of items, hold down the Shift key and click and drag the mouse cursor over an area that includes all the items. Or, select multiple items individually by highlighting them while holding down the Shift key. 4 Copy writes a duplicate of the element(s) into the Windows clipboard buffer. Cut removes the selected item(s) and writes it to the same buffer. Prior to executing a Cut command, a ConfigEd dialog box warns that you are deleting the selected elements. Use the Paste command to retrieve items from the clipboard. An outline of the elements to be pasted is attached to your cursor allowing you to place the blocks appropriately. To drop the blocks in the configuration, click on white space within the configuration window’s borders. NOTE. You can also move groups of items by selecting them and dragging them to a new location directly with the mouse (see Chapter 6). You can use Copy/Cut and Paste to move a group of function blocks with connections (or text) to another sheet of the same configuration (for details on sheet selection, see the discussion on the Sheet commands in Chapter 6 Displaying, Documenting & Printing section). Or, you may use these commands to move an group of function blocks with connections to other configurations of the same project (or a different project). NOTE. Only function blocks supported by the module for which they are destined will be pasted when performing the Cut or Copy command (e.g., the Display Handler is only supported by LINK Operator Stations and is peculiar for each type of operator station (i.e., L5101, L5102, L5390, or L5391) while the System Control block is unique for every LINK module). ConfigEd increments the suffix number of duplicated items, just as with the Duplicate command (see below). Rename duplicated items by double clicking on the item while holding down the Ctrl key. Caution The Cut/Copy buffer handles elements from only one action at a time. Be careful not to overwrite elements stored in the buffer from a prior action when initiating a Cut/Copy . The Clear command deletes all selected function blocks, annotation text, and drawing entities. It mimics the functions of the Delete and Backspace keys for a group of items. 4 - 18 Configuration Editor Software Manual Chapter 4 ConfigEd Functions The Edit-Select All and Edit-Paste Time Commands These commands are associated with the Scratch Pad. Select All selects the entire contents of the Scratch Pad. Use this command in conjunction with the Backspace key to delete the contents of the Scratch Pad (see Scratch Pad below). The Paste Time command records the current date and time in the Scratch Pad window. This command is useful to record actions when troubleshooting a LINK system. The Edit-Net Address(##)... Command Net Address... allows you change the address of the active configuration. Its current address, usually assigned to the configuration when it was created, is shown in the parentheses. To reassign a configuration’s address, click on Net Address(##)... in the Edit menu When the User Input dialog box appears, type in the new address and click on the OK button. NOTE. The range of permissible LINK addresses is currently restricted to the range from 1 to 3000, inclusive. 4 Current Network Node Address of Selected Configuration The Edit-Net Topology Command You can change the network topology of a configuration by selecting the Net Topology command in the Edit menu and click oning on the desired network topology (either Simple, Tapped, Redundant, or Auxiliary Tapped). The currently selected topology of the configuration is marked with a check mark (Ö) while the default setting is a Simple topology. For an explanation of LINK network topologies, refer to the LINK Overview Manual. Configuration Editor Software Manual 4 - 19 Chapter 4 ConfigEd Functions The Duplicate (Ctrl+D) Function Block Command The Duplicate command copies selected function blocks and LINK inputs/outputs within a configuration. This feature only copies individual function blocks or LINK inputs/outputs within the same configuration and not to/from other configurations. The Duplicate command will not copy annotation text or drawing shapes. NOTE. To duplicate entire configurations, use the Save As command in the File menu. To duplicate entire projects, use the Duplicate... command in the Manage menu. 4 To use Duplicate, first highlight the original function block or LINK input/output within your configuration, then click on on Duplicate in the Edit menu. When duplicated, the highlighted item should change to a reverse video image on your monitor and be attached to your cursor. If you select Duplicate before selecting a function block, ConfigEd generates an error dialog box. An outline of the duplicate item will follow your cursor around the screen until you click on your mouse at the location where you would like to place the item. If the selected item was a function block, ConfigEd gives the new function block a name identical to the block’s original name, except for adding a suffix number. The suffix number increments for each duplicated function block. You can rename the block by using the Ctrl double-click feature of ConfigEd. You can duplicate a function block quickly by highlighting the item simply hitting the Ctrl and D keys simultaneously. The Edit-Test Point Command This command is related to the SAM features of ConfigEd. Refer to Chapter 6 SAM Functions. 4 - 20 Configuration Editor Software Manual Chapter 4 ConfigEd Functions THE BLOCK MENU You can access the LINK software function blocks in the SSD_LINK database through the Block menu. Function blocks are pre-configured software elements used for designing custom configurations for your LINK control application. Once you place the function blocks you need in your configuration, you can change the blocks’ parameter values and connect them to other function blocks within the same configuration or to function blocks in other network locations. Placing Function Blocks The Block menu lists the SSD_LINK database categories used to store the function blocks. A distinct category exists for each type of function block. Among the function blocks categories are: Logic and Logic Gate (which store all logic-type function blocks), Ordinal (which store all ordinal data-type function blocks), SignalP (which stores all value data-type function blocks), and OpStn (which stores all LINK operator station blocks). NOTE. The Help menu lists a data sheet for each function block. Refer to it for a functional description, technical information, and data types required for the particular LINK function block. You can also quickly access the on-line data sheet for a function block by holding down the Shift key before selecting it from the Block menu. 4 To place a function block into your configuration, select it with you mouse from the category listed in the Block menu. Once selected, an outline of the function block will be attached to your cursor. Click on the mouse in the area where you wish to place the block. The picture to the right shows the placement of a two input OR gate (Logic Gate/OR-2). Renaming Function Blocks ConfigEd gives the block a standard, default name. You can rename the block by double-clicking on the block while holding down the Ctrl key. The dialog box that appears shows the original name and prompts you for a new name. Deleting Function Blocks To delete a function block from your configuration, simply highlight the function block, and then press the Backspace or the Delete key (or click on Clear from the Edit menu). Configuration Editor Software Manual 4 - 21 Chapter 4 ConfigEd Functions Configuring LINK Inputs and LINK Outputs To configure a LINK input, click on the LINK Input selection at the top of the Block menu. An outline of LINK input slot appears and follows your mouse cursor. Click in your configuration in the area you wish to place the input. ConfigEd automatically assigns the input slot a number, beginning at one. The slot numbers increment for each new input slot. To change the slot number or to add annotation text, double click on the slot after placing it. A dialog box appears asking you to define the input’s slot number, source address, and description. NOTE. You must assign a unique slot number between 1 and 4095, inclusive. Duplicates are not allowed within a configuration; however, you may use the same slots numbers in another configuration within the same project. Descriptions and source addresses are optional. The LINK output from the source configuration sending the signal defines the receiving LINK input source address. ConfigEd automatically fills in the source address when you execute the Project-Document... or Project-Print... commands with the Save Sources option toggled on (see Chapter 5). 4 Caution ConfigEd automatically saves your configuration whenever you close it or exit ConfigEd. It will not save inputs unless they are connected to function blocks or LINK outputs within the configuration. Do not close or save your drawing until you have made at least one connection for each LINK input; otherwise, you will have to recreate these inputs after reopening the file. To configure a LINK output, open the Block menu and select LINK Output and click the area within your configuration window where you wish to place the output. Fill in the information in the dialog box that appears. ConfigEd automatically assigns a destination address and slot number, beginning at one. To change the destination address, slot number, or description, double-click on the LINK output. NOTE. You must assign the output slot a destination slot number in the range 1 to 4095 (inclusive) and an address in the range 1 to 3000 (inclusive). Descriptions are optional. WARNING! Assigning LINK outputs to non-existent slots in valid destination addresses will cause problems if those slots are subsequently defined by changes to your LINK system. Additionally, assigning LINK outputs to slots in nonexistent destination addresses will cause unnecessary network traffic (Address Matches) and may cause the destination module to halt processing and enter the LError state. WARNING! ConfigEd allows you to assign the same slot and address to different LINK outputs. This acts as a “wired-or” at the destination LINK module slot, and can cause the LINK module to behave in unexpected ways. Although this may be desirable in certain circumstances, be sure you understand fully the implications of assigning duplicate slots and addresses. 4 - 22 Configuration Editor Software Manual Chapter 4 ConfigEd Functions Once you have created the LINK input or outputs you need, connect them to the function block inputs and outputs you wish to send messages to or from other LINK modules over the LINK fiber optic network. Source addresses for LINK inputs are shown on the left of the input. Input slots numbers are shown on the right. For LINK outputs, destination addresses are shown on the left of the output and destination slot numbers are shown on the right, as indicated in the graphic to the right. Notice that LINK outputs and function block inputs have left handed connection points. You will also notice that LINK inputs and function block outputs have right handed connection points. This suggests a general left to right data flow within configuration drawings. It is therefore recommended to align LINK inputs on the left side of configuration drawings and LINK outputs on the right. This makes your configuration drawings easy to read and gives them a neat, professional appearance. Normal & Priority Inputs Once you have placed LINK inputs in a configuration, you can set how the LINK module will handle the incoming message using the Normal/ Priority settings located in the LINK input’s dialog box. Double-click on the LINK input to open its dialog box. A module processes a Normal LINK inputs at the same priority as other module processing- first in, first out. Priority LINK inputs are processed immediately upon receipt, jumping ahead of previously scheduled module processing already in the LINK module’s event processing queue. 4 NOTE. Leave the majority of LINK inputs set to Normal, the default setting, and use Priority only for time-critical parameters (e.g., feedback trigger inputs for winder blocks or when control processing is distributed between two or more LINK modules, but must act as a single function block). Refer to the LINK Overview Manual for additional details concerning Normal and Priority inputs. Working With DC LINK Drive The configurations for 570 LINK, 590 LINK and 590SP LINK DC drives are created and configured in much the same way as other modules in a LINK system. You create a LINK DC drive configuration just as you would for any other LINK module: by executing the New command from the File menu, selecting the type of LINK DC drive configuration and giving it a name and an address (Drive Dem, a L590v3 — or 590 version 3 software LINK drive with an address of 999, in our example here). However, there are a few important differences in working with DC drive configurations: 1. All DC drive configuration function blocks are predefined and fixed — you cannot delete or modify existing DC drive function blocks. 2. You cannot add function blocks to a DC drive configuration. When a LINK DC drive configuration window is active, ConfigEd disables all function block categories in the Block menu, except LINK Input and LINK Output. 3. All the input slots of each DC drive configuration function block are prearranged, so configuring inputs slots is unnecessary. 4. LINK DC drives do not have a RTNX serial communications port. Consequently, you cannot directly communicate to a LINK DC drive with your PC using ConfigEd. You must communicate to a module with a RTNX port that is connected to the same LINK fiber optic network as the DC drive, then select the LINK DC drive from the CE Module List. 5. All DC drive configurations span more than one sheet. If you cannot see a function block on your monitor, use the Sheet commands at the top of the Draw menu to page through the configuration and locate the function block. (Refer to Chapter 5 Displaying, Documenting & Printing for instruction on the Sheet commands.) Configuration Editor Software Manual 4 - 23 Chapter 4 ConfigEd Functions Configuring DC LINK Drive Outputs To configure drive outputs for DC LINK drives (L570, L590 or L590SP), open a LINK drive configuration you have created, select LINK Output from the Block menu and move it to the right of the drive function block which contains the output you wish to transmit to another LINK module in your LINK project. As with configuring any other LINK output, a dialog box then appears prompting you for the destination Address and Slot. The same slot and address range restrictions apply and the description field is optional. Once you fill in the information, click OK to place the LINK output slot. 4 You must now connect the DC drive function block output to the LINK output slot, just as you would with any other configuration. (In the screen shot above, the Health Flag output of the LINK 590SP drive configuration DriveDem is being transmitted to slot one of a LINK module whose address is one.) Once you make this connection, a dialog box appears prompting you to designate the connection type — Fast, Medium, Slow, or Special. This sets the speed of the output signal over the LINK fiber optic network. You should send most drive output signals at a medium or slow speed. Reserve the Fast setting for critical signals, such as Health Flag and Composite Program Stop. Sending too many signals at a fast rate to the same destination address can overload the processor event queue of the destination LINK module. This can cause the LINK module to crash, or stop processing. Caution The Special setting is used to identify messages that need to be sent at extremely high speeds, generally between DC drives. Do not use the Special setting without consulting Eurotherm Drives. The speed settings for Fast, Medium, Slow and Special are set in the Parameters function block of the DC drive configuration. To change these rates, locate the function block (you may need to page to other sheets within the drive configuration) and double click on it. The Parameters function block dialog box gives you access to sub-menus controlling various aspects of the drive’s performance. The Update Rates category contains the speed settings for Fast, Medium and Slow. The units for these settings are in ticks, a unit of processing time related to how frequently the drive’s microprocessor executes its current control loop. This varies from model to model and depends on the processor’s computation loading. Refer to the appropriate drive manual for more information on drive processing speed and the LINK Overview Manual. NOTE. It is recommended to leave the Update Rates settings at their default values. 4 - 24 Configuration Editor Software Manual Chapter 4 ConfigEd Functions Working With L620 Vector LINK Drives The L620 Vector LINK drive has features which make configuration and design with the drive different than its DC LINK drive counterpart. First, the L620 Vector LINK drive has more available memory than the DC LINK drives. This allows you to place function blocks for processing the drive start/stop logic and speed and current inputs and outputs directly in the drive configuration rather than elsewhere in the ConfigEd project in which the drive operates. When you first create and open a L620 Vector LINK drive, notice that the first configuration sheet is empty and that the drive function blocks initially exist on sheets two and three. This is done to reserve the first sheet for function blocks related to processing the drive’s input and output signals. NOTE. At the very least, the L620 Vector LINK drive — and, in general, all LINK drives — should have a Drive Start Logic block (located in the Logic Block category of the Block menu) to properly control the drive’s start/stop sequencing. Second, the L620 has digital and analog input and output terminals as well as LINK capability. This allows you to control the drive externally by applying voltage signals to the input terminals, or to configure the drive with ConfigEd and control it through the LINK fiber optic network. NOTE. To keep system design consistent, it is recommended to always control the L620 Vector LINK drive through the LINK network if you are using the drive in a project with other LINK modules You create a L620 Vector LINK drive as you would any other new configuration: by executing New from the File menu and selecting L620 from the list of LINK modules that appears in the pop-up window list, then assigning it a name and node address. Unlike DC LINK drives, L620 Vector LINK drives do not have preassigned LINK inputs. To configure an input, you must place an LINK input in the L620 configuration and connect it to the desired input function block. Use the sheet feature to connect the input to the drive input block if you placed the LINK input on the first sheet of the configuration drawing. L620 LINK Vector drive outputs are configured in much the same way as DC LINK drive outputs: place a LINK output in the L620 configuration and connect the desired drive output to the LINK output. Once you make this connection, a dialog box appears prompting you to specify the update rate, in milliseconds. Enter the update rate as an integer, using the recommended settings listed below: Recommended Analog Outputs Update Rate 30 mS Recommended Digital Outputs Update Rate 200 mS Configuration Editor Software Manual 4 - 25 4 Configuring L620 Vector LINK Drive Inputs & Outputs Chapter 4 ConfigEd Functions THE COMMAND MENU The ConfigEd Command menu allows you to: • • • • • • Install a configuration. Halt, restart and poll information from a LINK module. Gain access to the ConfigEd SAM functions. Set the communication settings between your PC and a LINK module. Change the number of revisions ConfigEd automatically saves. Change the address of LINK modules. Except for Revisions (#)... and Comms, all these commands require communication between your PC and the LINK network. Before you install a configuration into a first generation LINK or LINK2 module, you must first open a CE Module List. Refer to Appendix A, Communications and the section Opening a CE Module List in this chapter. WARNING! Do not install a configuration to a LINK network module unless all equipment controlled by the network is in a stopped and safe condition. Configuration errors may cause an unexpected or dangerous system response. Have a qualified engineer check or test all configurations before installing them and putting the LINK network into service. 4 The Command-Install at Selected Command (Ctrl+G) This command installs the configuration you have selected in ConfigEd (the active window) into the LINK module you have highlighted in the CE Module List. The new address of the configuration file you install overwrites the existing address of the LINK network module. NOTE. ConfigEd does not allow you to download the configuration designed for one type of LINK module into a different type of LINK module. In general, the LINK hardware and configuration type must be compatible. (However, you can install the configuration for one type of LINK module into a newer model LINK module designed to replaced discontinued hardware.) To use Install at Selected, you must first open a CE Module List. If none is currently open, run either Update Partial or Update Full to open a CE Module List window, then select the destination LINK module from the CE Module List. Make sure the configuration you are installing is open and that it is the active window, then choose Install at Selected from the Command menu. A status dialog monitors the progress of the installation. The upper left corner of the status dialog shows the elements being installed as they are loaded. A bar chart graphically represents the progress of ConfigEd as it loads the various blocks and other elements of the configuration into the module. All ConfigEd status dialog boxes include an Abort button. Click Abort to cancel an action and return to the previous running status any time during the execution of that action. NOTE. Pressing Abort during installation may result in a “no configuration” status for the module. When this occurs, a No Config message appears in the Scratch Pad and you will need to reinstall the configuration or install a different configuration if the original configuration again fails to install. 4 - 26 Configuration Editor Software Manual Chapter 4 ConfigEd Functions The Scratch Pad records all actions you perform with ConfigEd and confirms the installation of the configuration in the LINK network module you have selected. NOTE. When designing a configuration, keep in mind the of amount of module memory the configuration requires. For first generation LINK modules, it is recommended to reserve at least two free pages of memory. This memory overhead may be necessary for installing larger revision configurations in the future or to accommodate an increase in function block size in case you upgrade the project with the Upgrade function at a later date. ConfigEd will generate the warning message to the right in case the configuration size exceeds the minimum two page memory reserve. To check the amount of configuration space available in a LINK module, highlight the module in the CE Module List and select Get Info from the Command menu. The Scratch Pad will report the amount of free space remaining in the module. The Command-Install at Address Command (Ctrl+T) You can install the currently selected configuration (active window) at a matching LINK network module address by choosing Install at Address from the Command menu. The LINK network module type must be compatible with the configuration module type, unless you are installing a configuration into a module designed to replace discontinued LINK hardware. Install at Address attempts to install your selected configuration (the active configuration window on your screen) to the LINK module on the network having a matching node address. 4 Install at Address is convenient when you want to quickly install revised or replacement configurations to LINK modules containing the same network address in an established network. You do not need to first open the CE Module List — ConfigEd automatically generates a new list if it is initially closed. If the selected configuration does not have a matching network address, ConfigEd will ask you to specify where to install the configuration. If this occurs, either: • Use Install At Selected (see above) to install the configuration. • Open or select a configuration with an address that is present on the ring and try executing Install At Address again. • Change the address of the active configuration using Net Address in the Edit menu. • Change the address of the LINK module to match the configuration files address using the Readdress... command (see below). The Command-Install Changes Command (F3) A third way of installing configurations is by using Install Changes. This automatically polls the network and performs an Install at Address for all LINK network modules whose configurations have been revised, but not yet installed in the currently selected project. Configurations that are revised but not yet installed are marked with an asterisk (*) in the File-Open-Open dialog box. NOTE. You must first close all open configuration windows before using Install Changes. Configuration Editor Software Manual 4 - 27 Chapter 4 ConfigEd Functions When using Install Changes, ConfigEd recognizes which LINK network modules it needs to install a changed configuration to by its address only, not its ConfigEd project number. Caution Because ConfigEd allows configuration addresses to be the same from project to project, you can potentially download the wrong configurations to a network using Install Changes, which can have catastrophic results. Be certain you have the correct project selected before using Install Changes. The program generates the message shown at the right warning you to double check the LINK project before proceeding. If you are using this feature to install configurations for a project into its LINK network modules for the first time, use the Readdress... command (see below) to correctly preset all node address in the network before using Install Changes. Used together, these features can cut down on the installation time for a LINK project, especially for large LINK networks. The Command-Halt, Command-Restart, and Command-Get Info Commands These commands operate on any LINK module you select from an open CE Module List. 4 The Command-Halt Command Halt stops the LINK module you select from running its configuration. Executing Halt switches the LINK module from the “run” or OK state to the “halted” state. The way other LINK modules will react to a halted module on the same network depends on their setting of Restart on reconfiguration in the System Control block. If Restart on reconfiguration is enabled (the default setting), the LINK module reacts by switching from the OK state to the Peer Halted state; if it is disabled, the module ignores the event. Caution Any LINK module in the Halted or Peer Halted state cannot run its installed configuration and, consequently, ceases to control any drives or equipment connect to it. The Command-Restart Command Use the Restart command to request a restart of a LINK module in the halted state. The module may have entered the halted state due to a processing fault or because of a previous halt command. To restart a LINK module, first select it in CE Module List, then click on Restart in the Command menu. NOTE. You must restart only the LINK module in the halted state to bring a halted LINK network back on line and processing data over its fiber optic network. The network returns to its “run” or OK state if all other peer halted LINK modules are healthy. Executing Restart on a peer halted LINK module will not restart LINK network processing; the LINK module will remain peer halted until the original halted LINK module any other modules on the network in the halted state are restarted. When you restart a LINK module, persistent parameters within your configurations return to their saved values, sending an initializing signal to other modules on the LINK network. This can change the state of LINK operations and function blocks which, consequently, can cause unexpected motor motion and alter the state of LINK system outputs. As a caution, ConfigEd prompts you to confirm the restart whenever you execute the Restart command on a halted module. WARNING! Unexpected motion and injury could result when restarting LINK modules. Make certain no possibility of damage or injury can result before confirming a Restart command. Be certain that you interlock critical signals such the start input to the drive configurations with physical, external operator controls. 4 - 28 Configuration Editor Software Manual Chapter 4 ConfigEd Functions The Command-Get Info Command Use Get Info to acquire detailed information about a LINK module on a LINK network. The command is useful in troubleshooting (see Chapter 8 Troubleshooting and Section 8 of the LINK Overview Manual). To use Get Info, highlight the LINK module from the CE Module List, then click Get Info in the Command menu. The Scratch Pad then lists information about the module. The two screen shots below shows the module information reported to the Scratch Pad after executing Get Info on a first generation LINK module (shown below left) and a LINK2 module (shown below right). The list below the screen shots explains this information. Project: Gives the LINK project number, its category and project name to which the configuration is associated. 8-digit LINK Project Number Category Project 99758686:Training/ConfigEd Test Configuration: The name of the configuration currently installed in the LINK module. Type: The type of LINK module — for example, processor, Analog I/O, Digital I/O or operator station, and whether it is a LINK or LINK2 module — as well as its microprocessor type (for example, the LINK processor module has a type MTID 13 microprocessor; the LINK2 operator station has a type MTID 2305). Modification: The modification level of the installed configuration. The modification number increments each time a configuration is functionally changed (see Modification Level vs. Revision Level under the section on The Save Command in this chapter). Perm. Address: The permanent network address assigned to the LINK module (996 for the LINK processor, 3 for the LINK2 operator station). Working Address: The current network address of the module. Normally, it matches the permanent address. They will differ only when you install two or more configurations with the same address into LINK modules connected in the same LINK network. When this occurs, ConfigEd assigns a temporary address to the first module whose permanent address duplicates a permanent address already encountered on the network during a CE Module List update. This allows you to open full module list and communicate to all LINK modules on the LINK network even though the network contains duplicate addresses. Configuration Editor Software Manual 4 - 29 4 Serial Number: This number is assigned to each LINK module during manufacturing. The serial number shown in Scratch Pad should match the number on the module label (for example, 9145-US-C-0022 for a first generation LINK L5207 processor module). Chapter 4 ConfigEd Functions Persistents used: (LINK2 modules only.) Indicates the amount of persistent memory space the installed configuration uses, as well as the number of persistents used in the configuration. Storage used: Indicates the amount of the LINK module’s processor memory space the installed configuration file uses. In the above examples, the configuration TTTpro uses 60% (17 pages) of memory space; the LINK2 operator station uses 13.4% (103 pages). If you later increase the size of TTTpro by adding additional function blocks, 40% of the module’s memory space for the LINK processor is free to accommodate the larger configuration. 86.6% of the LINK2 operator station’s memory is free for configuration storage. NOTE. It is recommended to leave at least 2 pages of spare memory for LINK modules to accommodate future configuration modifications or upgraded function blocks. Status: The operating condition of the module (OK) on the LINK network. The most common status codes are listed in the section Get Info Status Messages in Chapter 7 Troubleshooting. Each module status state corresponds to the LED blink codes on first generation LINK modules and to the seven segment LED character display on the back of LINK2 modules. Refer to the LINK Overview Manual for more information on the LED blink and seven segment status codes. Executing Get Info on a LINK2 module that is in a running state (OK, Net warning or Net fail) generates two extra lines of dynamic information in the Scratch Pad. This information is described as follows: CPU used: Recent indicates to amount of CPU activity, or how busy the microprocessor was, during the last 2.5 seconds of operation. Peak refers to the peak amount of CPU activity since the previous Get Info execution. 4 Heap used: Shows how much heap, or static RAM (SRAM), the module’s CPU is using. Static refers to the amount of SRAM the CPU uses to hold the installed configuration and Peak refers to the amount of SRAM used since the module last entered the OK state and began executing the installed configuration. These four figures give the project designer a general sense as to whether the installed configuration is overloading the module. If any of these four percentages exceeds 95%, you should redesign the configuration to reduce its size and 4 - 30 Configuration Editor Software Manual Chapter 4 ConfigEd Functions perhaps its execution load. However, because system operation is dynamic, values below 95% do not ensure that a module will not crash with an out of heap error. The Command-SAM Functions A sub-menu with all the Setup and Monitor (SAM) functions are located under this menu item. The functions are only active when you connect your PC to a LINK network and after you have generated a CE Module List. The SAM functions are covered separately in Chapter 6 SAM Functions. The Command-Comms... Function You set the communications settings between your PC and a LINK network or between your PC and a telephone modem through this menu selection. The settings in this menu and communications between your PC and LINK networks in general are discussed in Appendix A Communications. The Command-Revisions (#)... Command Any time ConfigEd executes a save, it creates a new revision file for any configuration you have functionally modified or whose appearance you have altered. This allows you to recall early revisions of the same configuration (see File-Open History above). Revisions(#)... sets the quantity of revisions of a configuration ConfigEd saves in from the current to the oldest. The larger the number, the more current the revision. Current number of revisions 4 To change the number of revisions ConfigEd saves, go to the Command menu and select Revisions (#).... A dialog box will ask you to set the desired number of revisions. Enter a number and click OK. The parentheses shows current set number of revisions. The default number is three. If you save more than the set number of revisions, the oldest existing revisions are deleted. For instance, if you set your number of revisions for TTTpro to three and then open, modify and close the configuration four times, the Applications that appears when you click on Open History... will make only the last three revisions available. Configuration Editor Software Manual 4 - 31 Chapter 4 ConfigEd Functions NOTE. The exception to this rule of saved revisions is a configuration that has been installed in a module. The latest configuration that has been installed will remain in the File-Open History menu list, even if more than the set number of revisions are subsequently saved. The Command-Readdress... Command The Readdress feature allows you to change the permanent address of modules on a LINK network. To use this feature, first open or refresh the CE Module List, then click on the LINK module whose address you wish to change. Click Readdress in the in the Command menu. A User Input pop-up box prompts you for the module’s new address. Enter the new address (between 1 and 3000, inclusive) then click OK. The selected LINK module is now assigned to the new address. 4 If a CE Module List is open, it will immediately update the node address. Use Readdress when preparing to install the configurations of a project to LINK network modules in a new network, or to new modules added to an existing LINK network. In both these situations, the new modules have some other configuration and address installed in them, usually a default test configuration and test address. 4 - 32 Configuration Editor Software Manual Chapter 4 ConfigEd Functions When used with the Install Changes command, you can use Readdress to quickly download all configurations for an entire project into a LINK network. First, wire up the LINK modules in your network, then use Readdress to change the addresses of the new modules to match those in your project. Then use Install Changes to automatically download all project configurations. THE WINDOW MENU The Window menu is divided into four parts, each dealing with a specific aspect of windows used by ConfigEd. • The four commands in the top section of the menu are concerned solely with • • • opening or updating the CE Module List The Connections command in the second section opens a window which lists all existing connections within the active configuration, including inter-sheet connections. SAM Test Points is related to the SAM functions within ConfigEd (refer to Chapter 6 SAM Functions). It opens a window which list all SAM Test Points for the current configuration. Commands in the third section of this menu allow you to quickly switch between open windows in the ConfigEd program The bottom section lists the windows currently open in ConfigEd. The checked (ü) box indicates the active window NOTE. Holding down the Shift key while selecting a window from the bottom section of this menu re-sizes its default size and location. This is useful when the window does not display properly when you first open it. You will need to successfully open a CE Module List to communicate with ConfigEd to any first generation LINK or LINK2 module. Valid communication between your PC and a LINK module through a the CE Module List is required to perform any of the following functions: • • • • • Installing configurations. Using the SAM features. Using the Halt, Restart and Get Info commands. Updating configurations using the Update command. Changing the node address of a LINK module using the Readdress... command. NOTE. ConfigEd functions on LINK2 modules are very restricted if you access the LINK2 module through a CE Module List generated through a first generation LINK RTNX. To gain full ConfigEd functionality for LINK2 modules, including installing configurations and all available SAM features, it is recommended to open the CE Module List through a LINK2 RTNX connection. To open a CE Module List, you must first establish a valid communications setup between your PC serial port and the LINK module. Refer to Appendix A Communications for information on setting up communications to a LINK network. Configuration Editor Software Manual 4 - 33 4 Opening a CE Module List Chapter 4 ConfigEd Functions NOTE. You must connect the serial communications port on your computer to a module within a functional LINK network. You cannot open a complete CE Module List for a LINK network whose fiber optic ring is either broken or improperly connected . The LINK network module to which you connect your PC through its RS232 port also must be powered up. To open the CE Module List, open the Window menu and click on either Update Partial or Update Full. ConfigEd quickly scans the LINK network and generates a CE Module List that displays all LINK modules on the network. Executing either command updates the list if it has been previously generated. The Scratch Pad reports all communication activity between your PC and the LINK network. If you cannot generate a module list using either command, refer to Chapter 8 Troubleshooting and the troubleshooting section in the LINK Overview Manual. NOTE. Keep in mind that opening a CE Module List polls the network only once and displays the results in the CE Module List window. You may have to periodically update the CE Module List to check whether the status of a LINK module has changed while you are commissioning or troubleshooting a LINK system. Duplicate & Temporary Addresses 4 Each type of first generation LINK and LINK2 module is shipped pre-configured with a test configuration which has a specific address. This address differs for each type of module. Since most LINK networks use several of the same types of LINK modules, they can have duplicate addresses when power is initially applied. This creates a communications initialization problem, since a LINK network cannot successfully transmit and receive data over its fiber optic ring unless each node address is unique. To circumvent this problem, the software within the LINK modules immediately resets to zero the address of those modules it encounters that have a duplicate address when initializing fiber optic communications at power up. It then identifies the modules on the ring by its unique serial number, allowing you to open a CE Module List. When you open the list, ConfigEd assigns a temporary address to those modules it encounters with an address of zero. Temporary addresses range from 3001 to 4095. These modules revert to the Halted state and do not run their configurations, although they can still transmit message packets around the fiber optic ring. Until you download a new configuration with a unique, permanent address (within the range of 1 to 3000), the module retains this temporary address and uses it as its working address. The CE Module List indicates that a working address is temporary by bracketing it in parentheses. After downloading a configuration to the module, the permanent address replaces the module’s temporary address as the working address. ConfigEd then refreshes the CE Module List which displays the permanent configuration address — or the address you last assigned to the configuration file before the download — without the parentheses. Device Type Status Working Address (permanent) Working Address (permanent or temporary) Configuration name LINK1 or LINK2 device 4 - 34 Configuration Editor Software Manual Chapter 4 ConfigEd Functions The Window-Update Partial Command When you execute Update Partial, ConfigEd scans the ring and lists the modules connected on the LINK network in the direction of data flow around the fiber optic ring. A status dialog box indicates the progress of the update and allows you to abort before it completes and opens the CE Module List window. Once the update is complete, each line in the CE Module List window corresponds to a LINK module, or node on the LINK network. Nodes are displayed in the order they appear on the network, beginning at the point where the serial connection is made and proceeding around the fiber optic ring in the sequence in which the fiber optic cable physically connects them together. The CE Module List gives all information about the first LINK module on the LINK network, or the module connected to your PC through its RTNX RS232 port. This information includes: the node’s working address, its configuration name, the type of LINK module and it status. For the remaining modules on the network, the CE Module List reports only the module’s working address, whether the module is a first generation LINK or LINK2 module and its status. NOTE. Because this command provides a low level update for quickly opening the CE Module List, executing an Update Partial cannot determine whether the working address of a node other than the first is permanent or temporary. ConfigEd therefore assumes that the working address of these nodes are temporary and encloses them in parentheses. Update Partial provides a quick update of the LINK network, since it only fully polls the first module on the network for all its identification information. It is useful for large LINK networks having many network nodes. Use this update method if you are comfortable navigating through your LINK network through ConfigEd by address rather than by configuration name. 4 Once the CE Module List is opened and updated, the first node — the one connected to your PC — is automatically highlighted. Select other modules or drives by either highlighting them with the mouse pointer or by scrolling through the list using the arrow keys. Status Working Address (permanent) Configuration name Device Type The Window-Update Full Command Executing the Update Full command generates a CE Module List that displays all information — its working node address, the configuration name, the module type and operating status — for all nodes in a LINK network. Working addresses displayed in parentheses are temporary; those not enclosed in parentheses are permanent. If you execute an Update Full after an Update Partial, ConfigEd polls the LINK network and, for each node on the network, fills in the configuration name and changes the module version (LINK or LINK2 module) to module type (processor, op station, drive etc.). Working addresses that are temporary remain enclosed in parentheses; the parentheses are dropped from permanent addresses. Configuration Editor Software Manual 4 - 35 Chapter 4 ConfigEd Functions The Window-Auto Update Mode You can set ConfigEd to automatically update the CE Module List at the end of a configuration installation. ConfigEd updates the list according to the option selected in the Auto Update Mode sub-menu: Full (the default setting) gives a complete module list update, Partial gives a quick update and None disables the auto update feature altogether. NOTE. Because parameter changes to a LINK module frequently affect its performance and therefore the module’s status, it is recommended to leave the Auto Update Mode setting to Full or Partial. A Partial setting is preferable to quicken the update time, especially when working with large LINK networks. The Window-Module List Command 4 If a CE Module List has been created using either the Update Partial or Update Full commands, the Module List command activates the window and moves it to the front of your screen. Performing this command does not refresh the CE Module List. You can refresh the list using a partial or full update. 4 - 36 Configuration Editor Software Manual Chapter 5 Displaying, Documenting & Printing Chapter 5 DISPLAYING, DOCUMENTING & PRINTING DISPLAYING CONFIGURATIONS ConfigEd offers many features for enhancing your screen display and for documenting and printing your configurations. The screen display features provide an easy, quick way of moving about your configuration drawing and make configuration design a simple process. The documentation and printing features give your configuration printouts a neat, professional appearance which simplifies troubleshooting and makes them easy to work with. Most of the functions used for displaying and documenting configurations are under the Draw and Edit menus. Printing functions and features are under the File and Project menus. Display Options Screen Zooms & The Scale Function The Scale function in the Draw menu adjusts the scale of the active configuration window to preset “screen zooms”. A scale of 1.00 sizes all text within the configuration to a 6 point font. Zooming in or out magnifying or reduces the drawing and changes the font size linearly: a scale of 2.00 changes the font to 12 point and a scale of 0.50 changes the font to 3 point. The variable menu pick allows you to customize the scaling of the window to within the limits specified in the pop-up window. You can also change magnification with the “+” and “-” keys. These keys are located on the upper right of the keypad portion and to the right of the numbered key of standard PC keyboards. Each execution scales the configuration display by ±1.33 of the current setting. Press a numbered key to zoom to a specific preset scaling. The table in Figure 6.1 lists the preset scaling factor that corresponds to each number. The table also shows keystrokes which are convenient for moving to different areas of your screen display without changing the scaling. Hitting these keys have the same affect as adjusting the horizontal and vertical slide bars to the right and at the bottom of your display window. Result Keystroke 0 Scales to 10pt. font (1.67x drawing) Home Sets origin of view to upper left corner 1 Scales to 11pt. font (1.83x drawing) Page Up Moves view of drawing up by 7/8 of current size 2 Scales to 12pt. font (2.00x drawing) Page Down Moves view of drawing down by 7/8 of current size 3 Scales to 3pt. font (0.50x drawing); Up arrow Nudges view of drawing up Homes drawing to upper left corner Down arrow Nudges view of drawing down Scales to 4pt. font (0.67x drawing); Left arrow Nudges view of drawing to the left 4 Result Homes drawing to upper left corner Right arrow Nudges view of drawing to the right 5 Scales to 5pt. font (0.83x drawing) Shift Page Up Moves view of drawing to previous sheet 6 Scales to 6pt. font (1.00x drawing) Shift Page Down Moves view of drawing to next sheet 7 Scales to 7pt. font (1.17x drawing) Backspace 8 Scales to 8pt. font (1.33x drawing) 9 Scales to 9pt. font (1.50x drawing) + Increases scaling by factor of 1.33 - Decreases scaling by factor of 1.33 5 Keystroke Deletes currently-selected item Figure 5.1 - Screen Scaling & Display Keystrokes Configuration Editor Software Manual 5 - 1 Chapter 5 Displaying, Documenting & Printing To zoom in on a specific area of a drawing, click and drag the mouse over the area that you wish to magnify then release the mouse button. ConfigEd scales the configuration display to the scale which best fits your selected area. This technique does not operate on shapes or annotation text created using the drawing tools in ConfigEd’s Draw menu. To zoom in on a drawing object or text, you must include a portion of a function block within your selected zoom area. NOTE. Changing the scale of a drawing using the Scale function in the Draw menu or the “+” and “” keys only changes the appearance of the configuration on your screen, not the scaling when you print out the configuration. Zoom area 5 Before zoom After zoom 5 - 2 Configuration Editor Software Manual Chapter 5 Displaying, Documenting & Printing Moving Function Blocks and Drawing Elements You can move functions blocks or drawing elements within a configuration by selecting the item with your mouse, holding down the mouse button and dragging the item to a new location. When you select and move a block or element, an outline of the entity follows your cursor around the screen. Let go of the mouse button to place the entity in its new location. You can also select and move groups of objects, a convenient feature for arranging elements within large configurations. To move a group of objects, hold down the Shift key and the mouse button and drag your mouse to create a selection area. A dashed border marks the selected area. When you let go of the mouse and Shift buttons, ConfigEd highlights all entities— including block-to-block connections and drawing elements— that fall into the selected area or cross the area’s border. Click the mouse on any highlighted function block, hold down the mouse button, drag the group to a new location in the configuration and release the mouse button to place the group. All elements within or crossing the selected area are moved, including connection lines, text and drawing elements. NOTE. You can also use the copy buffer and the Cut, Copy and Paste commands in the Edit menu to move and copy function blocks and LINK inputs and outputs (see Chapter 4). Arranging Elements Within a Configuration 5 To keep your configuration drawings neat, keep in mind the general direction of data flow when designing configurations. Note that input connection points are on the left and output connection points are on the right of all function blocks, giving the control process a general left to right data flow. The LINK inputs and outputs also reinforce this convention: connection points for LINK inputs are on the right— a natural location for connections to function block input. LINK output connections are left positioned— making them convenient for connections from function block outputs. For clarity and neatness, use the Align function (described below) to keep all LINK inputs in an even column on the left side and all LINK outputs in a column on the right side of your drawing page. LINK2 modules have a large storage capacity— up to 10 drive sections can be stored in a L5391 or L5300 processor module. Therefore, for clarity, limit all function blocks and software configurations associated with one drive section to one sheet or two sheets using the Sheet feature (see below). It is also a good idea to organize the sections in sequence. Configuration Editor Software Manual 5 - 3 Chapter 5 Displaying, Documenting & Printing The Align Function The graphical interface feature of ConfigEd allows you to easily align function blocks and elements within your configuration drawing. To align a series of function blocks either vertically or horizontally, highlight a function block or element, then select Align from the Draw menu, or press Ctrl+A. This specifies the position of the selected function block as a reference for aligning other function blocks. Any function block you place near the reference element automatically snaps itself into either vertical or horizontal alignment with the reference element. This applies to newly created blocks, duplicated blocks or existing elements that are placed within the alignment “sense” range of the reference element. ConfigEd determines whether the most appropriate alignment is in the vertical or horizontal plane and aligns the element accordingly. The Align feature remains active until you cancel it by clicking on an empty section of the drawing (so that no function block is selected) and pressing Ctrl+A. You can also toggle the feature off while clicking Align in the Draw menu when no function block or LINK input or output in the configuration is highlighted. NOTE. The alignment spacing and “sensing” distances are fixed and nonconfigurable. The Sheet Feature When placing function blocks in your configuration, you can spread your configuration over several sheets if you run out of space. The sheet commands are located in the top section of the Draw menu. These commands allow you to change the view of your drawing to the next sheet, the previous sheet or to a specific sheet. Up to 126 sheets per configuration are permitted. The Sheet features are described below: • Prev Sheet - switches the page view to the previous sheet. • Next Sheet - switches the page view to the next sheet. • Sheet (x of y)... - switches page view to the specified sheet. The letter x designates the current sheet; y designates the last sheet in the configuration that contains a function block or graphical drawing element. 5 To move function blocks to other sheets, click and drag the function block or group of function blocks to the Draw menu, then select the sheet on which you wish to place the blocks from Sheet. When ConfigEd changes the screen view to the selected sheet, hold down the mouse button and drag and drop the entities to the area you wish to place them. NOTE. Moving a block or LINK input or outputs connected to another entities to another sheet is unsupported. You must use the Cut and Paste commands in the Edit menu (see Chapter 4). Otherwise, first break all connections, move or group move the function blocks to the desired sheet, then use inter-sheet connections (see below) to reconnect the blocks. You can also use the Edit menu commands Cut and Paste in conjunction with the Sheet command to move function blocks from sheet to sheet. 5 - 4 Configuration Editor Software Manual Chapter 5 Displaying, Documenting & Printing Inter-Sheet Connections ConfigEd allows you to make connections from blocks on one sheet of a configuration to blocks on another sheet of the same configuration. This is useful if your configuration covers more than one sheet. To use this feature, first place the function blocks you want to connect on any two different sheets of the same configuration. Begin drawing the connection normally from the output terminal of the function block on one sheet, then move the mouse pointer to the Draw menu and select Next Sheet. When the screen displays the sheet you choose, a dashed line indicating the connection will follow your mouse pointer. Connect the dashed line/connection to an input terminal on your second function block. When the connection is complete, the dashed line changes to a solid arrowhead line with text identifying the sheet number of the connection source (SHT 1). The sheet containing the starting point of the connection will have a corresponding arrowhead line and text indicating the sheet number of the destination point of the connection (SHT 2). Change the inter-sheet connection text by double-clicking on the arrowhead or the descriptive text. This brings up a dialog box for you to enter your text. The new information appears on both sheets. The Connections list in the Window menu lists all existing connections within the active configuration, including inter-sheet connections. Split Connections Split connections function like inter-sheet connections, except that they connect function blocks existing on the same configuration drawing sheet. They include labels identifying their source and destination and keep complex configurations from being cluttered with cross-connecting lines. Changing connections to split-connections does not add or delete the connection— only the on-screen appearance is modified. 5 NOTE. You can convert ordinary block-to-block connections on the same configuration drawing sheet into split connection in read-only configurations, since the connection itself remains unchanged. To draw a split connection, double-click an existing connection or click on the connection to select it, then press the Enter key. A dialog box appears prompting you to name the connection. Enter a name and click OK. If you leave the split connection unnamed, ConfigEd assigns a name. Configuration Editor Software Manual 5 - 5 Chapter 5 Displaying, Documenting & Printing The connection splits and the assigned or default name appears on the source and destination end of the connection. You can change the connection name by double-clicking either the source or destination arrow end of the connection. Check the Connections list in the Window menu to view all existing connections within an active configuration, including split connections. DOCUMENTING CONFIGURATIONS & PROJECTS ConfigEd provides many features for documenting individual configurations and entire projects. Thoroughly documenting ConfigEd projects allows end users to relate the software representation in a LINK control system to the actual motors and machinery. A fully documented project— complete with an index and annotations, where needed— is also essential for commissioning and troubleshooting LINK systems. To this end, ConfigEd provides the following documentation tools: • the drawing and text functions in the Draw menu, which are used for annotating configuration drawings. Use these features to incorporate calibration data, set up information and truth tables into configuration drawings. • the Project Document... and Project Print... commands, which create a cross reference of connections between configurations. • the SAM Document Module and Update commands, which record on line parameter settings and values. • an indexing feature, which can automatically generate an index giving users a convenient way of locating a particular configuration in a large ConfigEd project. • a means of creating forms for each of your configurations. Incorporating forms into your configurations gives your LINK configuration drawings a neat, professional look. Annotating Drawings 5 The drawing and text functions— the tools used to annotate drawings— are located in the second and third sections of Draw menu. ConfigEd handles drawing elements and annotation text differently from LINK inputs, outputs and function blocks. Although they are part of a configuration drawing, they alter the appearance of the configuration only, and do not affect the functionality or operation of the configuration. Annotation & Drawing Tools NOTE. You can add annotation text and drawing objects to configurations without changing the modification level of a configuration. You can even insert text or drawing shapes into a read-only configuration without removing the readonly restriction. For quick access, a specific function key (F4 through F8) corresponds to each of the five drawing tools in the Draw menu. NOTE. Pressing the Ctrl key after using any drawing tool causes ConfigEd to revert control to the last immediate drawing action you performed— whether it be text, line, arrow or shapes. The Backspace and Delete keys removes selected text or shapes from your configuration drawing. 5 - 6 Configuration Editor Software Manual Chapter 5 Displaying, Documenting & Printing The Text & Drawing Tools Text (F4) To create and place annotation text in your configuration drawing, click on Text in the Draw menu. Your mouse cursor will then change to a text marker common to most Windows word processing applications. Click the cursor in the area where you wish to place your text. The cursor will change again to a flashing marker ( | ). Type in your desired text. To change the appearance of the type, click on the text with the mouse pointer. Selected text is marked by a dashed box around the type. Select a different font size and type from the Font and Style menus in the menu bar (see Text Attributes below). To edit text you have previously placed, select the text block with your mouse, highlight the text and type in the new text. Rectangle (F8) To draw a rectangle, select Rectangle from the Draw menu. Your mouse cursor will then change to a cross hair symbol (X) showing that it is now a drawing tool. Move the crosshairs to the area where you wish to place the top left point of your rectangle, push and hold down the mouse button and dragdraw your rectangle. The dotted outline formed shows the outline of the rectangle. Stretch the outline to the desired size, then release the mouse button to place the rectangle. Holding down the Shift key while drawing the rectangle constrains its shape to equilateral sides. Use this feature to quickly draw squares. Oval (F7) The feature adds ovals or circles to your drawing and operates like the Rectangle tool. Select Oval from the Draw menu and click the crosshair in the area of the drawing that you wish to place the oval. As you hold down the mouse button and drag the mouse, a dotted outline shows the size of the oval. The midpoints of the top and bottom edges indicate the top and bottom points of the oval, and the sides of the outline indicate the oval’s sides. Size the oval as desired and release the mouse button to place it. The oval appears only after you release the mouse button. 5 To draw a circle, use the Oval tool while holding down the Shift key. Line (F6) The Line command allows you to draw straight lines anywhere in your drawing. Use this feature to create form outlines and text boxes and to add highlighting to drawings. When you select Line from the Draw menu, your mouse pointer turns into crosshairs (X). Place the crosshairs where you want to begin your line, press and hold the mouse key down, and drag a line to the desired end point. Release the mouse key when to complete the line. To draw a series of connected lines, hold down the Ctrl key when you click the mouse the second time. A new line will begin where the first one finished, which you can then drag to a new end point with the mouse. Arrow (F5) The Arrow command works identically to Line except that an arrowhead (è) appends to the endpoint of each line. You can draw multiple, connected arrows by holding down the <CTRL> key when you click the endpoint of the first arrow you create. Configuration Editor Software Manual 5 - 7 Chapter 5 Displaying, Documenting & Printing Moving & Re-sizing Drawing Elements You can move any of the drawing items above by highlighting the item then clicking and dragging it to a new location with the mouse. For rectangles, ovals, lines and arrows, the outline shows the boundaries of the drawing element. NOTE. The group move feature (holding down the Shift key while selecting items with your mouse, then moving them as a group) applies only to function blocks and LINK inputs and outputs, not to drawing shapes and annotation text. To re-size a drawing shape, highlight the element and click and drag on the corner or the element’s outline. Change an arrow or line’s length by clicking and dragging the beginning or end of the line or arrow. Move to Front & Move to Back These commands overlay drawing text, lines, arrows and shapes. Executing a Move to Front or a Move to Back moves the selected text or drawing shape to above or below all drawing and text elements within the configuration drawing. NOTE. These features apply to drawing shapes, lines, arrows and text only, not to function blocks. 5 You can use these features to highlight drawing shapes: copy the original shape using the Copy command in the Edit menu, use the Paste command to place the duplicate slightly offset from the original, then place the duplicate behind its original using Move to Back. Use Pattern and Fill to darken the block color and give the original a “shadowed” appearance. Draw & size Rectangle; Change Fill to Solid; Copy then Paste Original Select a Shading of Duplicate with Pattern; then Send to Back Creating a "Shadowed" Box 5 - 8 Configuration Editor Software Manual Chapter 5 Displaying, Documenting & Printing Drawing Attribute Functions ConfigEd includes features you can use to enhance the lines, arrows and shapes you have drawn in your configuration. These features are Color, Fill, Pattern and Width in the Draw menu. NOTE. The drawing attribute features apply to the drawing elements only, not to function blocks you have placed in your configuration. You cannot re-size or modify ConfigEd function blocks as to color, fill or line width. To apply these commands to an existing drawing element, first select the object with the mouse pointer. Color The Color command specifies the display outline color for rectangles and ovals and the display color for lines, arrows and text you have added to your drawing. To change the color outline of an object or text, either select a line, arrow, shape or text you have placed in your drawing, then select the new color from the Color menu. The default setting is Black. Fill Fill applies only to ovals and rectangle elements in your configuration drawing. Use this feature to color the contents of a drawing shape as a solid block of color. The default Fill setting is White. 5 NOTE. You must first change an object’s Pattern attribute to Solid to fill it with a color or a pattern. Pattern Use Pattern to fill a drawing shape with a textured fill pattern. Eight selections are available, including Hollow and Solid. Hollow, the default, changes the shape to its outline and Solid fills the shape with the color selected from the Color menu selection. Configuration Editor Software Manual 5 - 9 Chapter 5 Displaying, Documenting & Printing Width The Width command specifies the thickness of lines created with the Arrow and Line commands and the outlines of shapes created using the Oval and Rectangle commands. These widths range from 0.5 to 16.0 points, where one point equals 1/72 of an inch (.014”or 0.55 mm). The default line width is 0.5 points. NOTE. The Width command does not apply to text or to function block outlines. Black White The Black White command in the Draw menu is used to change the display of your configuration from color to black and white mode. This is useful when viewing a drawing on a black and white monitor that was created on a color monitor. It is also useful when printing a configuration with color drawing elements on a black and white printer. 5 NOTE. Black White differs from the Black & White option that appears in dialog box associated with Project Print.... (See Project Print... below.) The Black White command under Draw affects the way the configuration is displayed on the screen and how it is printed. Its setting is also saved when the configuration is saved. The Black & White option in the Project Print... dialog only effects how the configurations are printed. Its setting is not saved when you save the configuration. 5 - 10 Configuration Editor Software Manual Chapter 5 Displaying, Documenting & Printing Text Attribute Functions Font & Style Menus The pull down menus Font and Style change the monitor screen appearance of text in ConfigEd. The number of font selections available in the Font menu depends on the active window open on your monitor. If a configuration window is active, only four font selections are available, as shown in the figure to the right. These four fonts are part of the ConfigEd database and only apply to annotation text you have added to your configuration using the Text function. To change the appearance of annotation text in configuration windows, mark the text with your mouse cursor, then make your selection from the Font and Style menus. You can also change the appearance of text in any dynamic window in ConfigEd. A dynamic ConfigEd window is any window which displays data that changes due to LINK network processing. The Scratch Pad, CE Monitor List, SAM Monitor List and any SAM monitor window are considered dynamic windows since they display information which changes as the LINK control network processes data. You can select fonts for dynamic ConfigEd windows from the entire list of fonts installed on your Windows system. The number of fonts available for dynamic ConfigEd windows depends on the number you have loaded on your PC. Consult your Windows manual for information on installing fonts. Available only to annotation text within configuration windows To alter text within dynamic windows, click on a dynamic window (such as Scratch Pad) to make it active and make your selection from the menus. The font and style you select changes all the text within all dynamic windows— you cannot change the font and style for dynamic windows independently. ConfigEd retains the font and style settings for use in your next ConfigEd session. The Style menu offers a list of text sizes in point size from 3 to 72 point and allows you to underline, italicize text and set text in boldface. 5 NOTE. The appearance of text within ConfigEd software blocks appearing in configuration windows is fixed and cannot be changed through these menus. Available to dynamic ConfigEd windows NOTE. The default text font and style settings are 14 point, non-boldfaced, non-italicized and nonunderlined Helvetica font, which is easily viewed on most laptop and PC monitors. This type selection and setting matches the function block text typeface. A sans serif typeface, such as Helvetica which is clear and easy to read, is recommended. Changing your text to a larger font size is particularly useful when monitoring dynamically changing values on the SAM Monitor List from a distance while tuning or troubleshooting a LINK system. The printed text size and font may differ from the font and style you select using these menus. Refer to Printing Configurations below to change the printing font selection. Configuration Editor Software Manual 5 - 11 Chapter 5 Displaying, Documenting & Printing Forms ConfigEd provides you with the capability to place forms— such as outline borders and index tables— in your configuration drawings. A drawing form presents your configurations in a uniform, professional format while providing important standardized and unique documentation information— such as company name, project title and drawing number. This information is useful for identifying and servicing your LINK application. You can insert a standard form stored within the ssd_link database. You can also modify a standard form to create a custom form or build a custom form from scratch. Regardless of how you acquire forms, form files become part of each configuration file once you have inserted them into configuration drawings. This means that another user can still view the forms so long as the user has access to the projects configuration files. The standard ConfigEd forms are stored as .frm files on your hard disk under ssd_link\tools\win3. ConfigEd allows you to place multiple forms in each project. This is very useful for displaying information from the same project in different configurations. This is also a convenient feature for automatic data entry (see below). NOTE. Like all other graphical images in ConfigEd, the form you insert into a configuration drawing must reside within the gray border that appears on your computer screen in order to be printed. This applies to the standard available forms that are part of ConfigEd and forms that you create. The forms functions within ConfigEd are located in the last section of the Draw menu. Inserting and Removing Forms To insert a form, click Insert Forms in the Draw menu and choose the form you want from the roll-down list that appears. Three standard forms are available: · · · 5 · generic6 - a border form to frame your configuration drawings titleb6 - a key code form, used for automatically inserting documentation information into the fields of border forms (see Automatic Data Entry below) index_6 - a single column table used to tabulate index information for index configurations only (see Creating an Index below). index1_6 - a double column table used to tabulate index information for index configurations only (see Creating an Index below). NOTE. The four forms listed above are standard to the ConfigEd software package. If you are granted a LINK Manager account through a LINK Manager Hub, the Hub may include extra forms when it grants you user rights. You can insert or remove a standard form or a form that you have created on any sheet of a configuration drawing. Border and key code forms appear on all sheets so long as the Show Forms option is toggled on. Index forms appear on the first sheet of a configuration drawing only, again if the Show Forms option is toggled on. Because ConfigEd prints exactly what your screen monitor displays, the Show Forms setting also applies to printed configurations. Show Forms must be toggled ON for the form to appear on print outs. ConfigEd does not allow you to specify different forms for different sheets in a multiple-sheet configuration. NOTE. All standard forms in ConfigEd assume a landscape (horizontal) page orientation and are designed to fit an 8½” x 11” page size. Set the Page Setup orientation to landscape and Print Scale to 1.00x to match the screen print area to the form size. If you wish to have ConfigEd automatically enter data on your form (see Automatic Data Entry below), insert both the key code form titleb6 as well as the border form generic6. The key codes positions on this form line up with the correct fields positions on the border form for automatically entering documentation information about your configuration into the fields of the border form generic6. 5 - 12 Configuration Editor Software Manual Chapter 5 Displaying, Documenting & Printing Once you have inserted a form into your configuration drawing, the Remove Forms menu option becomes active. Clicking this option displays a roll-down list of the forms inserted in your configuration drawing. Clicking on the form name from this list removes the form from your configuration drawing. Creating Forms Modifying an Existing Form You can create a custom border form by modifying a standard form and saving it under a new name, or you can design an original form. Modifying an existing form is easier, since the forms available in ConfigEd already have field blocks drawn to accommodate drawing, project, application and engineering approval information. To modify a standard border form into a custom form, open or click on the open configuration in which you wish to create your form and insert the standard border form you wish to modify on any sheet in your configuration. Create the new form file by executing the Save Form command. This saves the form on your hard disk under the directory ssd_link\tools\win3. The dialog box that appears asks you to name the new form. This form name will then appear in the roll-down list under the Insert Forms option and will be available for insertion into all configurations. Caution If you modify a standard form into a custom form, it is recommended to create your new form file immediately after inserting the standard form into your configuration drawing to avoid overwriting and permanently altering the original standard form. 5 Next, switch the screen view to Sheet 0 using the Sheet commands at the top of the Draw menu. A dialog box asks you whether you wish to edit your inserted forms. Click on Edit to enter Sheet 0. NOTE. Sheet 0 is reserved for global graphic images only: any graphical images you place on Sheet 0 appear on all subsequent sheets of that configuration. Sheet 0 should not contain any function blocks. You can edit forms only on this sheet. Once you have entered Sheet 0, use the drawing and text tools (see above) to modify the standard drawing to suit your documentation requirements. Configuration Editor Software Manual 5 - 13 Chapter 5 Displaying, Documenting & Printing Creating a New Form To create a form from scratch, open or click to the open configuration in which you wish to create the form, then switch the screen view to Sheet 0. Use the drawing tools in the Draw menu— particularly the Rectangle, Line and Text commands— to create your form. In Sheet 0, the gray border around your page— indicating the printable area of your screen— is the only visible element. Make sure you are in a view scale that allows you to see the gray borders at the bottom and right side of your window. If the gray border is not visible, go to the Draw Scale menu and select a different magnification size. Or, hit the - and + keys to quickly change the drawing view. Set the page orientation under Page Setup in the File menu so that the form’s orientation aligns with your desired drawing orientation. 5 The first element to add when creating a form is the border surrounding your configuration drawing. This border the orients the edges of your drawing and defines the space available for placing configuration elements. While you can create the border using the Rectangle tool, it is more practical to use the Line tool, since it is easier to perform editing on lines rather than on rectangle shapes. When creating the border, hold down the Ctrl key while using the Line function (F6) to draw a successive series of connected lines to form your border. A new line will begin where the first one finished, which you can then drag with the mouse to define the next corner. Make the border close to— but not extending over— the grayline defined print area to ensure as much graphical information lies within the configuration print area as possible. Form border using the Line tool Print area border Use the Width feature to change the border thickness, if desired. Use the Rectangle command to add information blocks to your drawing and the Text command to add in company names and standard information headings. Change the text appearance using the selections under the Style and Font menus. Once you have created your form, either by modifying a standard form or creating one from scratch, save the form using the Save Forms command. Click Save only if you a certain you have typed in the correct file name. The form you have created will then appear in the pull down menu under the Insert Forms menu and you can install it into any configuration. 5 - 14 Configuration Editor Software Manual Chapter 5 Displaying, Documenting & Printing Automatic Data Entry Configuration 0 You can have ConfigEd automatically insert information that you specify in your configuration into designated fields on your forms. To do this, switch to Sheet 0 and use the Text command to key in codes on your form that tell ConfigEd to import specific configuration documentation information. This information can include the configuration name, project name and the number of sheets in the configuration. Figure 5.2 describes the key codes. The upper-case letter codes in the left hand column refer to the current or selected configuration in which you have entered the form. The # symbol following lower-case letter code in the right hand column refers to the nth configuration in the current project starting at 0, as enumerated from top to bottom in the File Open Open dialog box under the File menu. This is emphasized in the figure to the right. These codes can be used for index forms. Configuration 7 NOTE. All the upper-case letter codes and lower-case letter codes ^c* and ^p* are normally used for creating a title sheet. Many codes, such as those for revision and modification number, will not provide accurate information unless the project has been processed first using the Project Print or Project Document commands. Many of these codes refer to the information you entered in Fields under the File Open Open dialog box and the Change Project Info dialog box under the Project Manage menu selection (see Chapter 4). At a minimum, your form should include: 5 • the project name (code ^P) • the configuration name (code ^C). • the number of sheets in the drawing (code ^N). • the current sheet number (code ^S). The standard form titleb6 available in the Insert Forms roll-down menu already most of the information codes you will need to create a title block form. Note that if you insert the border form generic6 and the key code form titleb6, the key codes in titleb6 line up with the information field boxes in the border form generic6. As a general rule, the border drawing should contain the field heading information. As an example, the figures below show the lower portion of sheet 0 and sheet 1 for the configuration 5207-30 in the project ConfigEd Test. The forms generic6 and titleb6 are inserted into the configuration. The File Open Open and Change Project dialog windows are shown at the right for the configuration and its project to give you an idea on how information is automatically placed using the generic forms. sheet 0 of configuration 5207-30 sheet 1 of configuration 5207-30 Configuration Editor Software Manual 5 - 15 Chapter 5 Displaying, Documenting & Printing Code ^A Configuration or Project Information Network address of current configuration. Code ^a# Configuration or Project Information Network address of nth configuration # ^C Name of current configuration. ^c* Descriptive information entered for the current configuration in Fields under the File Open Open window. The asterisk (*) specifies the field number (Field 1 through Field 6). This code is identical to ^F*. ^D Date of current configurations last modification. ^d# Last modification number of nth configuration # ^F* Descriptive information entered for the current configuration in Fields under the File Open Open window (see Chapter 4). The asterisk (*) specifies the field number (Field 1 through Field 6). ^f# Field 1 in Fields under the File Open Open window of nth configuration # ^G* Descriptive information of project where current configuration resides. This information is entered in the fields appearing in the Change Project Info under the Project Manage menu selection. The asterisk (*) specifies the field number (Field 1 through Field 9). ^g# Field 2 in Fields under the File Open Open window of nth configuration # ^H Project category holding the LINK project where current configuration resides. ^h# Field 3 in Fields under the File Open Open window of nth configuration # ^I Eight digit LINK project number where current configuration resides. Displayed in the Scratch Pad title bar. ^i# Field 4 in Fields under the File Open Open window of nth configuration # ^j# Field 5 in Fields under the File Open Open window of nth configuration # ^k# Field 6 in Fields under the File Open Open window of nth configuration # Configuration or Project Information Code Configuration or Project Information ^M Last modification number of current configuration. ^m# Configuration modification number of nth configuration # ^N Number of sheets in current configuration. ^n# Configuration name of nth configuration # ^P Project name where current configuration resides. ^p* Descriptive information of project where current configuration resides. This information is entered in the fields appearing in the Change Project Info under the Project Manage menu selection. The asterisk (*) specifies the field number (Field 1 through Field 9). This code is identical to ^F*. ^R Revision number of current configuration. ^r# Revision number of nth configuration # ^S Sheet number of current configuration. ^s# Sheet number of nth configuration # ^T Topology of current configuration. ^t# Topology of nth configuration # ^X Topology of current configuration (single letter) T=Tapped, R = Redundant, S = Simple, A = Auxiliary Tapped ^x# Topology of nth configuration # (single letter) T=Tapped, R = Redundant, S = Simple, A = Auxiliary Tapped 5 Code Figure 5.2 - Format Codes for Automatic Data Entry NOTE. The ^ symbol refers to the caret key (shift+6) not the Ctrl key. 5 - 16 Configuration Editor Software Manual Chapter 5 Displaying, Documenting & Printing Creating an Index ConfigEd has an automatic indexing feature that produces a list of a project’s configurations, their descriptions and the sheet on which each configuration appears in the project drawing print out. To create a project index, you should first sort the configurations within the project by address. To do this, select the project you wish to index from the Project Manage menu and toggle Sort by Address option ON. Once this feature is toggled on, the configurations in that project appear in ascending address order in the File Open and File Open Open configuration lists. The configurations are otherwise sorted alphabetically by configuration name. Next, close the Project Manage window by clicking the Done button and click New in the File menu. Select Index, then name the index file and click OK when the dialog box appears. ConfigEd automatically places the form index_6 in this configuration, indexes all the configurations that belong to the project and assigns the index configuration the address -1. NOTE. Although an index configuration can accept configuration data, the software of first generation LINK and LINK2 devices will not accept an index configuration file. The index configuration is reserved for documentation only. Do not place function blocks or configure signals to and from an index configuration. 5 The form ConfigEd places, index_6, is a two-by-two list. If you want to reduce the configuration index to a one up list, use the form commands in the Draw menu to remove the form and then insert the form index1_6. If not all of your configurations appear in the list, return to the Project Manage dialog box and make sure Sort by Address is toggled on. The index sheet that ConfigEd creates lists the following information for each configuration in the project: network address (ADR), configuration name (CONFIG), revision number (REV), modification number (MOD), description (DESCRIPTION), and sheet number (SHEET). ConfigEd updates the index automatically whenever you add or delete configurations to you project or when you change configuration information. The DESCRIPTION field fills in the information entered in Field 1 (configuration title) of Fields, which appears in the dialog box when you execute the File Open Open command. NOTE. The MOD and SHEET fields show correct values only after the index configuration is printed using the Project Print... function. The defaults values in these fields may not be correct on your monitor screen and on print outs created with the File Print... command. It is recommended that you insert the same border and key code forms to the index file as you placed in all other configurations. Configuration Editor Software Manual 5 - 17 Chapter 5 Displaying, Documenting & Printing The Document... Command Document... creates an ASCII text file on your PC hard disk which records all connections and parameter values of any selected configuration files in a LINK project. The file is called xxxxxxxx.doc, where xxxxxxxx indicates the project number, and is located under the project number under the ConfigEd root directory ssd_link\configs. You can print out the file or review and edit it with a standard word processing application— such as Word for Windows — or text editing application. It is useful as a permanent record for troubleshooting. The Document... command operates only on the last saved configuration file and may not reflect the configuration downloaded in a LINK drive or module. A configuration file saved on your hard disk may not be the actual configuration installed. Look for the asterisk (*) in the Document pop-up window indicating that a configuration has been changed and saved, but not installed. In addition, SAM changes to a module will make an installed configuration differ from the disk stored configuration files. NOTE. Be sure to Update the configurations before executing Document... to make certain you record all SAM parameter settings in your text file. To Document... a project, you must first close all configurations within the project. You do not need to open the CE Module List to execute Document..., since ConfigEd builds the text file directly from the configuration files stored on disk. Select Document... from the Manage menu, then highlight the configurations you wish to document from the Document Project selection window that appears. Use the Ctrl-click or the Shift-click combination to quickly mark several configurations. Scratch Pad will report the progress or any errors in building the file. NOTE. Document... differs from the SAM function Document Module (see Chapter 6). Document... creates a text file of the configuration, whereas Document Module writes the SAM accessible parameter settings and dynamically changing parameter values of a working module to the ConfigEd Scratch Pad. Date configuration was created. Save Sources & Clear Unused 5 These two features in the Document... command automatically cross reference LINK outputs to LINK inputs and reconcile LINK output destination addresses with LINK input source addresses. • Save Sources - This command fills in blank source addresses and replaces incorrect source addresses in LINK input slots. If you leave this option toggled on when you execute the Document... command, ConfigEd automatically scans the selected configurations and supplies source addresses for LINK inputs you left blank or entered incorrectly. • Clear Unused - This command changes the source field of LINK inputs to a dash if they are not referenced as a destination address by a LINK output in another configuration in the project. Both of these features can help you find mismatched LINK inputs and outputs. After documenting a project with these options selected, the configuration drawing will show the true source address values of LINK inputs the next time it is displayed on screen. NOTE. It is recommended to execute the Document... command only after you have fully completed the design of all configurations in your project, and after you have performed an Update on all installed configurations in the project. 5 - 18 Configuration Editor Software Manual Chapter 5 Displaying, Documenting & Printing PRINTING The horizontal and vertical gray borders within configuration window bound the print area on your screen monitor. Your printer will print whatever lies within the borders as it appears on you screen monitor and will not print any graphics or any portions of graphics lying outside the borders. Use the Print Scale and the Page Setup features in the File menu to adjust the print output on your screen. Print Scale & Page Setup Print Scale adjusts the gray border to scale the configuration drawing to fit your printer sheet size. The scaling point is referenced to the upper left corner of the drawing. Adjusting Print Scale changes the size of your print area, not the size of any graphics on your screen. For example, changing Print Scale to 2.00 x doubles the size of the elements within the print area when they are printed but reduces the print area to a quarter of its original size. The Page Setup command opens a dialog box called Print Setup which contains your printer setting parameters. Default Printer and Specific Printer settings determine your print driver selection. The selection Default Printer is set through the Printer settings under the Control Panel icon for Windows. Normally, you should leave the Print Scale set to its default setting of 1.00x and the page orientation set to landscape. This scales and orients the ConfigEd drawing to match the default forms that ship with ConfigEd. It also is the correct scale for standard 8½”x11” printer paper. NOTE. Print Scale does not scale any forms in your configuration drawings. The File Print... (Ctrl+P) Command File Print prints only the active configuration on your monitor screen. Use this option when you want a quick print out of a configuration you are currently modifying. Executing this command prints the entire configuration your have selected, not just the current sheet view. Configuration Editor Software Manual 5 - 19 5 You can route the printing of your configuration to another printer through the Specific Printer print driver selection. The printer driver you select determines the Paper Size, Paper Source and Options selections. Chapter 5 Displaying, Documenting & Printing The Project Print... Command Use Project Print... to print a complete set of configuration drawings for a project, including the project’s index. To Print... an entire project, you must first close all configurations within the project. From the Project menu, select Print.... A dialog box appears prompting you to select the configuration(s) you want to print. You can select an individual configuration, a group or all the configurations in that project. Use the mouse to select the configurations. Hold down the Control key to select multiple individual items, or hold down the Shift key to select a list of items. Once you have selected the configurations to print, click Print.... The Project Print... dialog box contains three options: • Black & White - This option changes color images to black and white when printed. Many printers cannot print in color and automatically change color attributes to grayscale. This can degrade the printed appearance of a configuration drawing. To avoid the printer grayscale conversion, check this option to convert all color graphics you placed in your configurations to black and white. NOTE. This option differs from the Black White drawing attribute selection in the Draw menu. The Black & White setting under Project Print... changes color graphics to black and white only when they are printed. The Black White setting under Draw applies both to the screen and printed appearance color graphics drawn in your configurations. 5 • Save Sources - This command fills in blank source addresses and replaces incorrect source addresses in LINK input slots. If you leave this option toggled on when you execute the Project Print... command, ConfigEd automatically scans the selected configurations and supplies source addresses for LINK inputs you left blank or entered incorrectly. • Clear Unused - This command changes the source field of LINK inputs to a dash if they are not referenced as a destination address by a LINK output in another configuration in the project. Both the Save Sources and Clear Unused operate identically to the same options offered under the Document... command and can save valuable troubleshooting time spent tracking down mismatched or mis-addressed LINK inputs and outputs. It is recommended to always print a project with these options selected. 5 - 20 Configuration Editor Software Manual Chapter 6 SAM Functions Chapter 6 SAM FUNCTIONS The SAM (Setup And Monitor) functions of ConfigEd allow you to do the following: 1. 2. 3. make on-line changes and monitor system parameters of LINK control systems during commissioning and troubleshooting backup and restore installed configuration files document the parameter values of a LINK control system NOTE. You cannot use the SAM functions to make configuration changes to the configuration file installed in a LINK device. To do this, you must have access to the original configuration file installed in the LINK device, modify it using other ConfigEd features, and then reinstall the file. If you do not have access to the original configuration file, you may be able to reconstruct it using the Extract function (refer to Chapter 4). SAM was previously offered as a separate software package. ConfigEd 5.0 now incorporates all of the original SAM functionality and includes additional features. ACCESSING THE SAM FUNCTIONS The SAM functions are located in the Command menu. Click on SAM and a pull-down menu appears showing all SAM related functions. To use the SAM functions you must open a CE Module List and communicate through your PC’s RS232 serial connection with a LINK module that is connected to a functioning LINK network. The SAM functions are inaccessible until you successfully open a CE Module List. Refer to Opening a CE Module List in The Window Menu section of Chapter 4 if you are unsure how to do this. Refer to Appendix A for information about setting up the communications between your PC and the LINK network. Execute either Update Full or Update Partial from the Window menu to open the CE Module List or to update the list if it is already open. The Scratch Pad will display a series of error and diagnostic messages if the communications settings under Comms in the Command menu are set incorrectly. If you cannot generate or update the CE Module List, refer to the Comms Problems section of Chapter 7 Troubleshooting. Each line in CE Module List corresponds to a node on the LINK network. Nodes are displayed in the order they appear on the network, beginning at the point where the serial connection is made and proceeding around the fiber optic ring in the sequence in which the fiber optic network physically connects them. Configuration Editor Software Manual 6 - 1 6 NOTE. The CE Module List does not dynamically update. If the LINK network stops processing due to an event outside of ConfigEd — for instance, a module has failed, changed state or the LINK fiber optic network has been severed— the CE Module List will not reflect the change until you again update it. Chapter 6 SAM Functions OPENING GRAPHICAL SAM WINDOWS Once the CE Module List is opened and updated, the first node (the one connected to your PC) is automatically highlighted. Select other modules or drives by either highlighting them with the mouse pointer or by scrolling through the list using the arrow keys. To open a SAM window, double click on the LINK device node with your mouse or press Enter after highlighting the device in the list to open its SAM window. An Open Selected status bar displays the progress of opening a SAM window. Double-click to open Graphical SAM window of 5207-30 Notice that the graphical SAM window of the configuration file installed in a LINK device looks the same as its configuration file window; only the title bar distinguishes it from its configuration window. The function blocks in both are oriented and laid out identical to the revision of the installed configuration. Graphical SAM window of 5207-30 Configuation window of 5207-30 Notice also that the parameters for most function blocks in the SAM window appear adjacent to the inputs of the function blocks, just as they do in the configuration’s ConfigEd window. Upon opening the SAM window for a LINK module, these parameters show the values contained in the configuration file. With new LINK2 modules, the SAM window displays the values contained in the modules, not the configuration. 6 When you initially open the SAM window immediately after installing its configuration file, these parameters show the value to which you last set them in ConfigEd before installing the configuration. If you open the SAM window of a LINK node subsequent to making SAM parameter changes in a previous SAM session, these parameters reflect the values to which you set them in your last SAM session. 6 - 2 Configuration Editor Software Manual Chapter 6 SAM Functions MONITORING AND SETTING PARAMETERS There are three ways to monitor and change LINK parameters in SAM: 1. 2. 3. Monitoring and setting them discretely using the predefined SAM Get and Set operation for various parameters in each configuration function block Monitoring and setting them continuously using the Chart, Monitor List and Pot functions Changing and reading the parameters directly in the graphical SAM display window of the installed configuration Opening SAM Get & Set Parameter Windows To monitor or set a SAM parameter, double-click in the SAM parameter window on the function block containing the parameter you wish to monitor or set. You can also highlight the function block in the SAM window and press Enter. A window appears listing all the available SAM Get and Set operations associated with that function block. This window is called the SAM parameter list window, and a list exists for every installed function block. The title bar gives the name assigned to the function block when it was placed in the configuration and also gives its type. Double-click to open SAM parameter list of MUL.1 All Get functions associated with that function block are listed and alphabetically sorted first; all Set parameters are listed and alphabetically sorted last. 6 NOTE. Not all function block parameters have an assigned SAM Get or Set operation. The function block’s data sheet in the Help menu lists whether each function block input, output and parameter variable is available as a Get or Set SAM parameter. Configuration Editor Software Manual 6 - 3 Chapter 6 SAM Functions Monitoring Parameters The Get Operation To monitor a parameter, highlight and double-click its Get operation in its SAM parameter list window. You can also select a Get operation using the arrow keys and pressing the Enter key. ConfigEd then polls the LINK device for the Get parameter you have selected and displays its value in the Scratch Pad. The Scratch Pad displays the value of the parameter only once for each Get execution. Although most function block parameters have an associated Get and Set operation, the function blocks and parameters listed below do not: · · LINK inputs and outputs most inputs to Signal P (signal processing) ConfigEd blocks However, you can still monitor the parameter by: 1. 2. monitoring the signal source or destination block connected to the function block input or LINK input, or output. placing a Persistent block or Value Sampler in the signal path between the signal source or destination and the block input or LINK input or output, then reinstalling the configuration. You can then can monitor the Persistent block or Value Sampler output— and thereby the block input — in SAM. Double-clicking or pressing Enter on any Get operation... ...displays its current value only once in the Scratch Pad. NOTE. If you place a Value Sampler in line with a block input or LINK input or output for monitoring purposes, be certain to set its sample rate faster than the update time of the signal to avoid inadvertently slowing down the signal. The Monitor List You can also continuously monitor a SAM Get parameter. To do this, either highlight the Get operation in a SAM parameter window and press Shift + Enter, or hold down the Shift key while double-clicking on the Get operation. This opens a new window called Monitor List. ConfigEd samples the selected parameter and reports its value in the Monitor List window. This is useful during commissioning when you need to dynamically monitor a parameter value such as speed or tension feedback. The Scratch Pad also displays the first sampled value. 6 Shift+double-click or Shift+enter on this Get operation displays its value .... ...continuously in the Monitor List.... ...and only once in the Scratch Pad. 6 - 4 Configuration Editor Software Manual Chapter 6 SAM Functions You can add or delete parameters from the Monitor List as needed. To add a parameter, hold down the Shift key while double-clicking on the parameter you wish to add. To delete a parameter from Monitor List, select the parameter in the window and press the Backspace key. When you delete the last parameter displayed in the window, the window automatically closes. ConfigEd samples a single parameter in the list each 0.1 second. If there are more than one parameter in the list, ConfigEd samples them consecutively and updates them in the order they appear in the list, from top to bottom. Therefore, the more parameters you add to the list, the longer the update time for each parameter. SAM continues updating the parameters in the Monitor List until you either close it, break communication with the LINK network by closing the CE Monitor List window, delete all the items in Monitor List, switch to another program, or quit ConfigEd altogether. You may perform other SAM functions, such as Set operations, while continuously monitoring parameters; Monitor List continues updating in the background. The Chart Function You can display graphically the value of a parameter as it changes by using the SAM Chart function. First highlight the Get parameter, then selecting Chart from the Command SAM sub-menu. ConfigEd then prompts you to specify an update rate, in seconds. Enter the update rate (the default is 0.1 seconds) and click on OK. configEd will open a new window and chart the parameter. 6 NOTE. It is possible to designate an update rate that is faster than the transmission rate of the RS232 connection. In this case, the update rate will be limited by the speed of the serial communications between the computer and the LINK module. Configuration Editor Software Manual 6 - 5 Chapter 6 SAM Functions Setting Parameters The Set Operation & the Read-Only Mode You can modify parameter values by double-clicking on the desired Set operation in the SAM parameter window. If the Read-Only option in the Command SAM sub-menu is checked, all Set functions are disabled and you can only monitor, or Get SAM parameters. Toggle Read-Only on and off by clicking the mouse on the Read-Only option When Read-Only is active, the SAM Set parameters appear in italics in the SAM parameter window. The program defaults to the Read-Only mode when you begin a new ConfigEd session. A warning window will inform you whether the Read-Only option is enabled. The SAM Read-Only option applies to all open SAM parameter windows. These parameters are Read-only protected If Read-Only is disabled and you double-click on a Set parameter in the SAM parameter window, a pop-up dialog box will prompt you to enter or select a new parameter value. Make your change and click on OK. ConfigEd downloads the change over the RS232 connection to the module and the Scratch Pad reports the new setting. You can also directly set parameter values in a SAM window. Move the cursor over the parameter until cross-hair appears. Hold the <CTRL> key down and doubleclick. This opens an Enter Data window to enter the new parameter value. Read-only protection toggled off Double-click on a Set operation.... ConfigEd generates an error message if you attempt to enter a value beyond its predefined range. 6 ... to open its dialog box and change its value. 6 - 6 You must enter a value within its accepted range. Configuration Editor Software Manual Chapter 6 SAM Functions Verify Mode In order to prevent accidental modifications of configuration parameter values, SAM functions have a Verify mode, as indicated by a check mark in the Command menu opposite Verify. If Verify mode is on, ConfigEd asks you to confirm every attempted Set operation before changing a parameter value. This confirmation window does not appear when Verify is disabled. Toggle the Verify mode on or off by clicking on Verify under the Command SAM sub-menu. When you begin a ConfigEd session, it is initially disabled. The Pot Function You can also change parameters continuously by using the Pot function in the SAM menu. This feature in useful when tuning a parameter, such as the speed calibration of a LINK drive, during commissioning. To use the Pot function, remove the Read-only restriction in the SAM sub-menu and highlight the Set operation for the parameter you wish to change from its SAM parameter list. Then select Pot in the SAM sub-menu. A window prompts you for the parameter setting rate. Set this setting to change the update speed of the potentiometer, in seconds, or leave the setting at its default rate of 0.1 seconds. After you click Ok, a potentiometer graphic appears which looks similar to the graphic for the Pot function block used in configurations designed for L5102 (LINK1) or L539x (LINK2) operator stations. Click on the fast buttons (<< and >>) to change the parameter value in 1% increments. For finer adjustment, click the slow buttons (< and >). This changes the parameter value in 0.1% increments. The Scratch Pad records all changes you make to the parameter value. NOTE. You can use the Pot function only for Value parameter Set operations (Signal P type function blocks). You can not use it for Ordinal or Logic type Set operations. Double-click on the upper left bar in the Pot window heading to close the window. 6 Increments & decrements value by 1.0% Increments & decrements value by 0.1% Configuration Editor Software Manual 6 - 7 Chapter 6 SAM Functions Monitoring & Setting Parameters Through the Graphical SAM Window For many function blocks, you can graphically read a newly updated parameter value directly in the graphical SAM window without Double-click on the having to open the function block’s crosshair-marked SAM list and execute a Get or Set parameter to update operation. To monitor a parameter its value graphically... graphically, bring your mouse cursor ... and to display the near the parameter you wish to updated value in the graphically monitor. The cursor Scratch Pad. changes to crosshairs (X) when you approach the vicinity of the parameter, indicating that you can update its value graphically. Click the crosshairs on the parameter to update its value in the graphical SAM window. The Scratch Pad also records the change. NOTE. You can set or monitor the parameter graphically only if your mouse cursor changes to a crosshairs symbol (X) as you drag the cursor over the parameter. You can also open the Monitor List through the graphical SAM window and dynamically update all block parameters that have an associated Get operation. To do this, hold down the <SHIFT> key while clicking on the crosshair-marked parameter. The parameter appears in a monitor window having the same title as the function block. (This window, in fact, is the Monitor List window, only with a different name in the title bar.) You can add to the list as many of the block's parameters that have an associated Get operation, or add parameters from other function blocks. Shift+double-click on these crosshairmarked parameters ... ... to dynmaically display their values in this (Monitor List) window... 6 ... and to diplay their intial values in the Scratch Pad. ConfigEd samples a parameter every 0.1 second and dynamically updates each parameter in the list. This is useful when you need to compare different parameters while you are troubleshooting a problem. To change a parameter value graphically, bring your mouse cursor near the parameter you wish to change. If the cursor changes to crosshairs (X), telling you that you can change its value graphically, click the crosshairs on the parameter while holding down the <CTRL> key. This calls up a window which will allow you to change the parameter value. (This window is identical to the dialog box that appears when you perform a Set operation.) The value changes in the graphical SAM window and the Scratch Pad records the change. 6 - 8 Configuration Editor Software Manual Chapter 6 SAM Functions Ctrl+double-click on this crosshair-marked parameter... ...to bring up this dialog window. Enter in new parameter value. ConfigEd graphically updates parameter to new value ... ...and displays the new parameter value in the Scratch Pad. Graphical SAM windows also display the output of most function blocks. These outputs update on screen as their inputs are changed, which makes the SAM graphical display window a convenient troubleshooting feature, allowing you to track independently the effect of signal changes. You can also use this feature to test a configuration design before putting a LINK system into service. NOTE. Keep in mind that the graphical SAM window does not dynamically update its displayed parameters values to new settings. The parameter only updates to a new value when you perform a graphical Get (or double-click on the parameter), or after you perform a Get operation in the block’s SAM parameter list window. Similarly, block outputs do not automatically update on screen, even though they may have actually changed in value due to the changing of a block input parameter value. 6 For example, if the 2-input OR gate shown in the screen shot below initially has a False value for both its inputs, setting Input 1 to True will not change the value displayed on screen, even though its output has actually changed from False to True. You must graphically Get the parameter (click on it) to update its value in the graphical SAM window. Setting this parameter to a different state... Configuration Editor Software Manual ...does not update these parameter values on screen until you graphically Get (double-click) them. 6 - 9 Chapter 6 SAM Functions SAM TEST POINTS SAM Test Points is a ConfigEd feature for creating a unique set of SAM accessible Get and Set operations. You can access them just as any other SAM Get or Set operation; however because they are installed with the configuration file into the LINK device, you do not need to have the original configuration files resident on your PC to monitor or change a SAM test point. You should create SAM test points for a configuration in the following two situations: 1. if you are certain that the user commissioning and servicing the LINK system has an early version of ConfigEd (version 4.0 or lower) or the independent SAM software package, and the user does not have access to the original LINK project configuration files. These files are required to use the independent SAM software package or the SAM features incorporated in ConfigEd version 4.0 and 5.0. NOTE. Creating SAM test points for ConfigEd version 5.0 is usually unnecessary. Because you can recreate the original project configuration files using the Extract function (see Chapter 4), you can still change and monitor parameter values using the normal SAM features. 2. if you want to create a separate subset of SAM Get and Set points with unique names Creating SAM Test Points To create a SAM Test Point, first select and open a configuration from the File menu and highlight the function block containing the parameter of which you wish to assign a test point. Select Test Point from the Edit menu, or type Ctrl+E. A list of available test points for that function block only appears in a Test Point dialog box. Select a test point by highlighting it. The default name appears in the field at the bottom of the box. You can keep the default name or rename the test point then click Add to add the test point to the list of test points for that configuration. Click Cancel or Ok after you have added any or all test points you need for that function block. 6 Selecting Test Point for this highlighted function block... ...opens a dialog box displaying all avialable Get and Set operations for that function block. New assigned name for test point Get Multiplier. NOTE. The available SAM Get or Set parameters are predefined for each function block— you can only create a SAM Test Point from the parameters available in a function block’s Test Point dialog box. (For instance, you cannot create a Get SAM Test Point for the input to a Multiplier function block.) 6 - 10 Configuration Editor Software Manual Chapter 6 SAM Functions You can create a set of SAM Test Points for each configuration you design. However, be aware that creating and installing SAM Test Points consumes memory space within LINK devices usually reserved for function blocks and connections. NOTE. ConfigEd prevents you from installing a configuration file that is larger than the available storage space in a LINK device. Adding too many SAM Test Points can swell a configuration file beyond the available memory capacity of LINK devices, especially first generation LINK modules. You can view the entire list of test points you have created for a configuration by opening the SAM Test Points window under the Window menu. Remove any test from the list by highlighting it and pressing the Delete key. A pop-up window prompts you to confirm the delete. Get and Set operations. Assigned Test Point names. Setting and Monitoring SAM Test Points Like any other SAM function, you must open a CE Module List and communicate with a LINK device to set or monitor its SAM test point values. To display the LINK device’s installed SAM test points, highlight the device in the CE Module List and double click the mouse while holding down the Shift key. Or, you can select the module and press Shift + Enter. All test points configured for that module will appear in a window with the menu bar of the form: configuration Test Pts. (project name) 6 You may set, get, chart or monitor any configured test points, just as with any parameter in a SAM parameter window list. However, unlike normal SAM Get or Set parameters, you do not need to have the module’s configuration files on your PC hard drive to access its test points. Shift+Enter or Shift+double-click on this LINK node... ...opens a list displaying all avialable test points installed in that LINK device. Configuration Editor Software Manual 6 - 11 Chapter 6 SAM Functions BACKING UP After you have made final parameter value changes to the configuration installed in a LINK device using the Get or Pot functions, you can record these final values in a backup file. This is done through the SAM Backup function. Backup uploads the memory of the LINK module or drive into a separate file on your PC hard disk. ConfigEd immediately creates a backup file for each configuration as you install it into a LINK device and stores the file as [configuration name].BKU in the 8-digit LINK project directory associated with that configuration. ConfigEd overwrites the file each time you install the configuration, and each time you execute the Backup command. If your PC contains the project and configuration files for the LINK system on which you are working, ConfigEd will store .BKU files there. If not, ConfigEd will create on your PC hard drive a directory with an 8-digit name that matches the 8-digit LINK project number associated with the configuration file installed in the LINK device on which you are executing a backup. ConfigEd also creates a Public category and stores the directory holding the .BKU files there. NOTE. The .BKU file of a LINK device is used to record final parameter changes in case of a LINK device failure. You should back up a LINK device only after you are certain you have completed all final parameter changes necessary for commissioning and troubleshooting the LINK control system. The Backup function differs from the Update function (see Chapter 4). The Update function updates all parameter values in the original configuration file with the current on-line values at the instant the you execute Update. These parameter values may have been changed through a SAM Get action or through normal LINK network control processing, such as control process changes in motor speed feedback or tension feedback. Backup records these same settings and values in a separate file, but does not refresh the parameter settings of the original configuration file installed in the LINK device. NOTE. You should never use the Backup function with ConfigEd version 5.0. A new feature, the Extract command, allows you to recreate the original project configuration files directly from the modules. If you must create a backup file, be sure the end user will never have access to the original project configuration files. To Backup a drive or module, first select the LINK device node you want to back up from the CE Module List and then select Backup from the Command SAM sub-menu. The Scratch Pad provides a record of the backup procedure. 6 If you have made changes to parameter values in more than one LINK device in your control network, you can use the Backup All command to create or overwrite backup files for all LINK devices on the network. A pop-up window shows the progress of the back up. The Scratch Pad makes a record of the backup and reports whether any errors were detected. 6 - 12 Configuration Editor Software Manual Chapter 6 SAM Functions RESTORING Restore downloads the .BKU file for the configuration installed into the LINK device you highlight in the CE Module List. Because the .BKU file should hold the final SAM parameter changes made to an installed configuration, you should use Restore to install a configuration into a spare used to replace a defective LINK device. To execute a Restore, first select from the CE Module List the LINK device to which you wish to restore a configuration, then select Restore from the Command SAM sub-menu. A dialog window prompts you to select the backup file from a category and project. Select the appropriate .BKU file, then click on Restore to replace the module’s current configuration with the backup file. NOTE. If you have access to the LINK devices’ configuration files, it is recommended to use Update and Install rather than Backup and Restore to keep your software files up to date. Use Backup and Restore, only if you are using earlier versions of ConfigEd (version 4.0 or lower) and if you are certain the end user will not have access to the original configuration files for the project installed in the LINK network. SAM DOCUMENT MODULE COMMAND This SAM feature creates a text file listing the values of all SAM access points at the moment the module is documented. It effectively takes a snapshot of all SAM accessible software block parameter settings, inputs and outputs values. It is useful in troubleshooting programming problems and recording final system tuning adjustments. You can access this text file— called [configuration name].DOC, located in the working directory for ConfigEd (usually c:\ssd_link\tools\win3)— through most word processor applications, text editing and text viewing utilities. You can view the file immediately in the Scratch Pad. The software will perform a Document Module only if the configuration files are resident on your PC; if your PC does not have access to the configuration files, Document Module will capture only SAM test points installed in the LINK device, if any. 6 NOTE. The SAM Document Module feature differs from the ConfigEd function Document... located under the Project pull down menu. Document Module operates on configurations installed in on-line LINK devices and captures only parameters values available as SAM Get or Set operations. Document... records all parameters settings of all function blocks within the off-line configuration file, as well as signal connection information. Although Document... is more comprehensive, it does not capture the immediate values of dynamically changing parameters, such as Speed Feedback or Tension Feedback. To document a module, go to the Command SAM sub-menu and select Document Module. The Scratch Pad displays the values of all the SAM available parameters in all the function blocks of the selected module. Configuration Editor Software Manual 6 - 13 6 Chapter 6 SAM Functions 6 - 14 Configuration Editor Software Manual Chapter 7 Troubleshooting Chapter 7 TROUBLESHOOTING Many problems you may encounter when using ConfigEd involve either communications errors with LINK devices, or difficulty in accessing configuration files. Other problems are caused by configuration design errors, which can cause modules to fail (crash), meaning that the device halts executing its installed configuration. RS232 serial communications and file access problems are covered in this chapter. Refer to Section 8 of the ConfigEd Overview Manual to troubleshoot problems related to a crashed module, or to problems related to overall LINK network fiber optic communication. PC SERIAL PORT COMMUNICATIONS PROBLEMS The most common problem involving serial communications is attempting to communicate at a baud rate exceeding the capability of your PC. Many PCs have difficulty communicating at 57600 baud or even 19200 baud through their serial port. If you are experiencing difficulties transmitting information or commands from your computer to your installed modules, try lowering the baud rate under Comms in the Command menu (see Appendix A). If the problem persists, consider upgrading your PC's serial port driver. Eurotherm Drives offers an Enhanced Windows Communications Kit which can eliminate the delays caused by the low speed of the standard Windows™ serial port driver. Another common communications error is specifying a comms port that is already being used by another peripheral device connected to your PC, such as a mouse. If this problem occurs, check the settings in your currently selected communications profile in the Comms menu and make certain your selected profile is using the correct port. When you open a CE Module List, the Scratch Pad reports the success or failure you may have in your request to open the list. And, each time you update the list, install a configuration or perform any other function in the Command and Window menus, the Scratch Pad records the result of your attempt to communicate with the LINK network through the serial connection. The table below lists the error message which the Scratch Pad displays if you cannot open a CE Module List or otherwise have trouble communicating with the LINK network. The table also suggests ways to solve the problem. ...try the following: Accessing module list ... Cannot establish network connection. Cannot refresh immediate module info. Cannot complete exploration. 1. check for faulty serial cable or unconnected serial cable 2. check supply power to LINK module No valid echo received baud rate set too fast; try a lower baud rate Module not responding as expected... 1. baud rate set too fast; try a lower baud rate 2. module may be crashed; restart module error code -10 check comms port selection for currently selected comms profile 7 If the Scratch Pad displays this message... Configuration Editor Product Manual 7-1 Chapter 7 Troubleshooting ERROR DIALOGS ConfigEd displays a variety of error messages if it has trouble accessing a configuration file or if it cannot not perform a requested operation. Other error dialogs warn you to be aware that executing a requested operation, under certain circumstances, could cause the LINK system to control machinery in a hazardous manner. Some of the common error dialogs you may encounter are explained below. Can’t Access Configuration This dialog box appears when multiple users accessing the same ConfigEd project database on a local area network (LAN) computer system attempt to open the same configuration file at the same time. ConfigEd restricts project data file access in this instance because ConfigEd projects are single user tasked— only one user can access a configuration file at any given time. Guest Rights This dialog indicates that you do not have guest rights, or write access ability, to the selected project and therefore are restricted to a read only version of the project. ConfigEd grants only one user the right to modify any project at any one time. This right is called the “write token”. If you feel that you need to make configuration modifications to a project, coordinate with the Hub administrating the project for write token access. Consult the LINK Manager Manual for further information. NOTE. If you do not have the write token for a project, you can still use ConfigEd's SAM features to monitor and change parameters through Set or Get operations. Read-Only ConfigEd have several levels of read-only and therefore several read-only dialog boxes. This dialog box indicates that the category in which the project resides has been designated Read-only through the Project Manage dialog. To make configuration modifications, toggle off the Read-only box in Project Manage. This dialog box indicates that the configuration has been designated as Read-only through the File Open Open dialog. Toggle the Read-only box off for that configuration in the File Open Open dialog box to make configuration modifications. 7 This dialog box appears when you are in a Read-only configuration and try to change the position of an element or the information in an element’s description box. 7-2 Configuration Editor Product Manual Chapter 7 Troubleshooting Can’t Change Text This dialog box appears when you try to specify the values of an element’s description improperly. It commonly occurs when configuring text information for a display handler or button band placed in an operator station configuration. This error message prevents you from specifying incorrectly formatted information for these elements. Not Enough Memory All LINK and LINK2 devices have a finite amount of memory reserved to store configurations. If the configuration you are installing into a module exceeds this amount, ConfigEd aborts the installation the dialog box to the right appears. You cannot install the configuration until you reduce its size to the number of pages mentioned in the dialog box (in the above example, eight). To free up software space, you must condense the configuration design through tighter written logic or shift function blocks and signal processing to other configurations within the project. In many cases, especially with projects that use LINK modules exclusively, it may be simpler to add another LINK module and create a new configuration for it. You can then move the excess configuration design there rather than distribute it to already existing configurations. NOTE. For LINK devices, leave at least two free pages of memory in the module to accommodate future configuration changes or ssd_link function block changes which may occur when you perform an Upgrade. Error #6405: Could not access configuration This error occurs when you: 1. Try to open the SAM graphical window of a configuration installed in a LINK device, and 2. You do not have access to the original source configuration files for that project, and 3. The configuration has been installed without the Save Source option checked in the File Open Open window. When this error occurs, you can only access SAM Test Points (if any were designed into the installed configuration). Contact your Hub administrator to gain access to the project's source configuration files. DISPLAY PROBLEMS To resolve this conflict, use the File Open History or File Open Open commands to select and view the configuration. These commands trigger a default viewing size for the equipment currently in use. If you already have the configuration open, hold down the shift key and re-select that configuration from the Window menu. This redraws the window to within the size of the display of the machine currently being used. Configuration Editor Product Manual 7-3 7 You can occasionally have problems properly displaying configurations for a project originally designed on another computer. For example, you may have designed configurations for a project on a PC equipped with a large monitor and later open the same configuration files using ConfigEd running on a small laptop computer. The display size difference between the two machines can cause the laptop to distort the display, or can prevent the laptop from displaying the configurations entirely. Chapter 7 Troubleshooting GET INFO STATUS MESSAGES These messages appear in the Scratch Pad under Status when you execute the Get Info command on a LINK device. Checking Network The module is ready to start but is unable to send a message to itself around the fiber optic network to ensure that the ring is complete. Check for unconnected modules, loose connections, broken or damaged fiber optic cable and non-powered modules. Duplicate Address The module has discovered a duplicate address number on the network and stopped running its installed configuration. If a LINK network has two or more nodes with the same address, it cannot run. Correct the problem by re-configuring one of the modules and assigning it a unique address. Halted The module has been halted by a ConfigEd tool and not restarted. For example, when you install a configuration, the target module or drive may revert automatically to the halted state. Once you have determined why the module or drive has stopped, select Restart from the Command menu to restart. L Error The module has detected a low-level internal error and has stopped executing its installed configuration. This error code often accompanies an Out of Heap message in the Scratch Pad and occurs when data messages overloads the module’s microprocessor. The module attempts to process the high data overhead by storing the excess input events in memory. Eventually, the module runs out of memory and crashes. (L error also will appear in the CE Module List next to crashed module when you update the list.) The first step in correcting this error is to isolate the problem. If nothing has been re-configured recently, create an L5203log configuration, install it into an L5203 serial module, and connect the module to your LINK network. Connect a printer to the module, repeat the activity that generated the error message and check the printout for the cause of the problem. If a configuration has been changed recently, try installing a previous configuration that works and making configuration revisions in small steps to isolate the cause of the error. Once you feel that you have resolved the problem, use the Restart command in the Command menu to restart the device. No Config The module is unable to run because it has no configuration. Install a configuration. OK The module is running it installed configuration with no errors. Peer Halted The module is ready to start but is waiting for other modules on the network to be ready. The LINK network will not run until all modules are ready. Check for other LINK devices in the that may be Halted or in an error state. Self-Test Failure The module failed its start up self-test due to an error in a memory component and has stopped. Replace the malfunctioning module and retry. LED & SEVEN-SEGMENT STATUS DISPLAY CODES All LINK modules have a status LED and all LINK2 devices have a single character, seven-segment LED status display. Each LED blink sequence and LED display code indicates the operating status, or operating state, of the LINK device. Refer to the LINK Overview Manual for a complete listing of all status LED blink sequences and LED codes. THE HELP MENU & FUNCTION BLOCK INFORMATION 7 The Help menu provides general information on the currently active ConfigEd project and gives you application information about each function block available in the LINK data base under the Block menu. 7-4 Configuration Editor Product Manual Chapter 7 Troubleshooting Click on About ConfigEd... or type F1 to open the ConfigEd database information window. This window gives you information on the revision of the platform, library, instruction and class directories of the currently installed ssd_link database and the database for the currently selected project (ConfigEd Test in the screen shot shown at the right). Whether they match depends on whether the ssd_link database has changed and whether you have upgraded the project's database (refer to the Upgrade Command in Chapter 4 for information on upgrading project databases). NOTE. You must use Manager to upgrade your ssd_link database. Refer to the Manager Manual and contact your Hub administrator for ssd_link database upgrades. 7 To get information on a function block, select Data Sheets from the Help menu then select the function block from the category list that appears. The categories match those listed in the Block menu. You can also quickly open Configuration Editor Product Manual 7-5 7 Chapter 7 Troubleshooting 7-6 Configuration Editor Product Manual Appendix A Communications A Appendix A COMMUNICATIONS COMMUNICATING WITH LINK NETWORKS You can communicate with a Windows compatible PC running ConfigEd to first generation LINK or LINK2 devices connected in a LINK network either directly through the PC's RS232 serial communications port, or remotely through a modem. Once you have established communications between the PC and a LINK control network, you should have access to all devices in the LINK network through the CE Module List. NOTE. All first generation LINK I/O modules and operator stations and all LINK2 devices and AC LINK drives have a built-in RTNX serial port socket, similar to a telephone handset jack, for PC and PC/ modem communications. These ports, however, are unavailable on LINK Gateway modules and DC LINK drives. You therefore must access these devices through a CE Module List generated through a RTNX equipped device. DIRECT COMMUNICATIONS HARDWARE SETUP You can communicate directly to a LINK network with a Windows compatible PC running ConfigEd. Communications is established over a serial RS232 protocol hookup between a PC serial port, usually located on the back panel of your PC, and the RTNX port of a LINK device. NOTE. ConfigEd functions on LINK2 devices are very restricted if you access the LINK2 device through a first generation LINK module. To gain full ConfigEd functionality for LINK2 devices, including installing configurations and all available SAM features, you must connect to a LINK2 RTNX port. Make this connection using the three meter RJ11 connector cable (LA350475U003) and the DE-9 to RJ11 adaptor (LA350481), included with your ConfigEd package. The adaptor converts the cable from an RJ11 connection to a female DE-9, making it compatible with the standard male, 9-pin serial port (PORT1 or PORT2) connection on your PC. Connect the smaller end of the RJ11 cable directly to the RTNX connection of a LINK device and the larger end to the adaptor. Most PCs have at least two 9-pin serial ports and use PORT 1 for its mouse connection leaving PORT2 for serial communications with an external device. Connect the DE-9 end of the adaptor to either PORT1 or PORT2 or your PC, whichever is available. The adaptor and the connection set up are shown below. DE-9 to RJ11 Connector RJ11 to Large End of 3 m Serial Cable DE-9 to PC Serial Port 3 Meter Serial Cable RTNX Connector MODULE MODULE DRIVE LINK NETWORK MODULE DRIVE MODULE Figure A.1 - DE-9 to RJ11 Adaptor & Direct PC to LINK Network Communications Set Up Configuration Editor Software Manual App A - 1 A Appendix A Communications Caution Only use the connection cable and adaptor included with your ConfigEd package. Using any other cable or connector can damage your PC and the LINK device or otherwise degrade performance. Using any other cable or connector will void the Eurotherm Drives warranty. Once you have correctly set up the PC to LINK network RS232 connection, refer to Communications Settings below to specify your port and baud rate setting. MODEM COMMUNICATIONS HARDWARE SETUP You can communicate with a LINK network over a telephone line using a modem and a Windows™ compatible PC running ConfigEd. This allows you to use all ConfigEd features— including installing configurations and setting and monitoring parameters using the SAM tools— on LINK devices in a LINK network from a remote location. You will require a modem at either end of the phone line. NOTE. If the remote LINK network does not contain LINK2 devices— it consists entirely of drives and LINK modules— you must use the Eurotherm Drives L5214 Modem Package at the remote LINK network end of your modem communications setup. The L5214 is a complete modem package consisting of a high speed 28,800 baud modem and a first generation LINK serial module which communicates between the package's modem and the LINK network. The serial module automatically downloads the correct initialization command string to the modem and simplifies the setup. It is not recommended to use the L5214 to for modem communication with LINK networks containing LINK2 devices. In such cases where the remote LINK network contains a mixture of drives, LINK and LINK2 devices or all drives and LINK2 devices, connect a different remote modem kit directly to the RTNX port of a LINK2 device. An example of a modem communications set up using the L5214 and a network with only LINK modules and drives at the remote end is shown in Figure A.2. Figure A.3 shows the set up with a remote modem connected to a hybrid network, or a network with drives, LINK and LINK2 devices. L5214 MODEM MODULE (LINK1) LINK AUX TAP CONNECTION TELEPHONE LINES MODULE MODULE DRIVE (LINK1) REMOTE LINK NETWORK (DRIVES & LINK1 MODULES ONLY) MODEM Hardware Handshaking Cable (LINK1) DRIVE MODULE (LINK1) MODULE (LINK1) HOME LOCATION REMOTE LOCATION Figure A.2 - Modem Communications Set Up for LINK Interface App A - 2 Configuration Editor Software Manual A Appendix A Communications MODEM TELEPHONE LINES MODULE MODULE DRIVE (LINK2) HYBRID LINK NETWORK (LINK1 & LINK2 DEVICES & DRIVES) RTNX Connection MODEM Hardware Handshaking Cable HOME LOCATION (LINK1) DRIVE MODULE (LINK1) MODULE (LINK2) REMOTE LOCATION Figure A.3 - Modem Communications Set Up for LINK2 Interface Consult the documentation that ships with your modem manual for setting up and connecting the modem at the home location. You should use a hardware "handshaking" communications cable between the your PC and the modem at the home location. The cable should have a DE-9 female connector at one end for the PC interface an another pin connector (usually a DB-25) at the other. Most modem kits include such a cable. For LINK remote networks, consult the L5214 manual for connection information and hardware set up. For LINK2 or hybrid remote LINK networks (those containing LINK and LINK2 devices), refer to the manual for the remote modem for connection and set up information. Note that as with LINK modules, the RTNX port of LINK2 devices accommodates a standard RJ11 phone jack connector. Configuration Editor Software Manual App A - 3 A Appendix A Communications COMMUNICATIONS SETTINGS The communications settings for home modem communications are located in the Comms... sub-menu under ConfigEd's Command menu. NOTE. You can only access the Comms.. menu when the CE Module List is closed. You can choose and set independently four communication scenarios, or profiles, through this menu. Click once on Profile 1 through Profile 4 to select a scenario. A check mark (ü) indicates the currently selected communications profile. Communications mode. To change the settings of any the four profiles, double-click on Settings... This opens the Link Comms Settings dialog window. To select the profile you wish to change, click on the arrow next to the upper left field of the window and select the profile from the pull-down list. Select the port for a profile by clicking on the arrow next to the field marked Port: and highlighting the desired port. The column of three selection buttons allows you to select the type of communications between your PC and the LINK network for that profile. There are three selections available for each profile select: Port communications speed. 1. Direct for direct communications (PC serial port to LINK RTNX port) 2. Slow Modem if you are using a 2400 baud modems at both ends 3. Fast Modem if you are using a 9600 baud or faster modem at both ends NOTE. Due to incompatibilities between slow (2400 baud V.22bis) modems and modern faster modems, you must use the same modem protocol at both ends. Once you have selected the type of communications, select your baud rate for the port. You can set up each profile independently. This allows you to specify a unique PC communications baud rate or modem string for each profile. For instance, if you use your ConfigEd loaded PC mainly in your office to configure and test LINK systems , but occasionally use the same PC to remotely monitor or tune field installed LINK systems, you can set up Profile 1 for direct communications and Profile 2 for modem access. ConfigEd retains these settings and the profile you have selected for use in your next ConfigEd session. Baud Rate Settings: Direct Communications Four standard baud rates are available. Set the baud rate for the highest rate your PC can support. The default for each profile is 57600 baud. However, some IBM-compatible machines using 386 processors may experience comms errors at 57600 baud and even 19200 baud when using the standard Windows driver. PCs using 486 or better processors should handle the faster baud rates. Eurotherm Drives offers an Enhanced Windows Communications Kit (Eurotherm Drives part number LA351199), which includes a high speed serial card, to replace the standard Windows driver and improve performance. Baud Rate Settings: Modem Communications The Slow or Fast Modem selection and their baud rate settings depend on the type of modem you are using at your home location. Select the appropriate baud rate as follows if you have selected: 1. Slow Modem, recommended for 2400 baud (or V.22bis) modem communications, the baud rate is locked at 2400 baud. 2. Fast Modem, recommended for 28,800 baud (V.32bis) or V.28bis or V.34 modems, select the fastest baud rate the PC can handle. The field disallows baud rates settings below 9600. If the Scratch Pad keeps reporting communications errors, lower the baud rate for that profile. App A - 4 Configuration Editor Software Manual Appendix A Communications A Modem Command String Settings Selecting Slow or Fast Modem displays the modem commands, or Modem Settings, you need to specify for your home location modem. The default modem strings, which are the same for the fast and slow modem selections, are compatible with most available modems. Consult your modem user manual for the appropriate initialization string for each command field. The command fields are explained below. ATTENTION: +++ Attention command string. INITIALIZATION: AT H &F E DIAL: AT DT Standard modem command prefix indicating attention. Hang-up if busy or no answer. Factory default setting for hardware handshaking. Turn off the local echo when in command mode. D = dial, T = dial using tones. [NOTE. If you are not using tone dialing, delete the second T. Enter the remote phone number in this field after the DT setting. Include all numbers necessary for dialing (e.g., "9" for and outside line, "1" for long distance or *70 to disable a "call waiting" interrupt feature).] 'YES' RESPONSE: OK 'NO' RESPONSE: NO, BUSY, ERROR CONNECT: CONNECT The final three fields enable ConfigEd to interpret the modem commands. Once you have correctly set the modem settings for that profile, click OK to confirm. ConfigEd saves the settings and uses them for all projects. Click Cancel to retrieve your last confirmed settings. The initialization strings for other modems are listed in the table below. MODEM INITIALIZATION STRINGS Model Initialization String US Robotics Sportster 14.4 (Internal) (for use with Fast Modem selection only) AT H &F1 E &K M1 Xircom Credit Car/Ethernet CEM-10 (for use with Fast Modem selection only) AT H &F E0 &K3 W2 Configuration Editor Software Manual App A - 5 A Appendix A Communications App A - 6 Configuration Editor Software Manual Appendix B Quick Reference Appendix B QUICK REFERENCE CONFIGED MENU REFERENCE File Menu New Begins the process of drawing a new configuration by prompting the user to choose a type of configuration. B Open Opens a selected source configuration and, by the use of the File Open Open string, allows the user to specify configuration description fields, assign Read-Only protection, and display a source configuration in either graphical or text format. Open History Opens a selected revision of a source configuration. Open Selected Opens the source configuration installed in the LINK device selected in a CE Module List window. Extract Selected Rebuilds the source configuration file from the configuration installed in the LINK device selected in a CE Module List window. Source configuration file must have been installed in the LINK device with the Save Source option selected in the File Open Open window. Close Closes the currently active source configuration. Save Saves the currently active source configuration. Save As Saves the currently active source configuration by a name and to a destination specified by the user. Delete Deletes the currently open and active source configuration. Page Setup Opens a standard printer setup dialog box. Select your printer driver, page orientation and print paper size through this window. Print Scale Allows the user to designate the size of the printed version of the currently open and active configuration. Print Prints the currently open and active configuration. Exit Closes the open configurations and quits the ConfigEd program. Edit Menu Undo Unsupported. Cut, Copy, Paste Allows the user to transfer, duplicate and retrieve function blocks or groups of function blocks to a memory buffer for placement elsewhere in a configuration, or for placement in another configuration. Clear Removes contents of Scratch Pad. Select All Selects all text in the Scratch Pad when it is the active window.. Paste Time Pastes the current time to the Scratch Pad. Net Address Allows the user to designate the network address of the currentlyselected configuration. Net Topology Allows the user to designate the network topology of the configuration. Duplicate Duplicates a selected function block or LINK input or output. Non-applicable to annotation text or drawing elements. Test Point Selects a function block for adding a test point for monitoring with SAM functions. Configuration Editor Software Manual App B - 1 Appendix B Quick Reference Project Menu Select Permits user to select a particular project. B Manage... Permits user to designate a new project or new category, Upgrade a project, change project description information, assign Read-Only status to a project, sort configurations within a project by network address, and move projects from one category to another. Duplicate... Duplicates the currently selected project and places the duplicate in the original's project category. Compact Allows user to remove all configurations in a project, except the last revision and the last-installed versions of each configuration. Update SAM parameter changes are generally done to fine tune a system during test or commissioning. After the parameters are tuned to their final operating values, this function updates the parameter values in the module’s configuration files to match the changes made with SAM. Document... Creates an ASCII text file <project number>.doc containing all configuration information of all configuration files within a project. Print... Prints all configurations within a project and automatically assigns correct addresses to inputs. Block Menu Presents a listing of all available function blocks, categorized by function. Command Menu Install at Address Installs the active configuration into the module with the matching network address. Install at Selected Installs the active configuration into the module selected in the module list. Install Changes Installs revised configurations into modules to which configurations have previously been installed. Restart Restarts a selected halted module. Halt Halts a selected module. Get Info Prints to the Scratch Pad technical information about a selected module. SAM Allows access to SAM functions. Comms Allows user to select comms port and baud setting, as well as modem use for remote equipment. Modem Brings up modem dialog in which settings for modem initialization and use are made. Revisions [3] Allows the user to specify the number of configuration revisions saved. Readdress Allows the user to check module configurations to determine which ones need to be replaced by newer configurations. Most often used to replace default shipping configurations with user-specific ones. App B - 2 Configuration Editor Software Manual Appendix B Quick Reference SAM Sub-menu Backup Creates backup file of configuration installed in the LINK device highlighted in the CE Module List. Backup All Creates backup files of all configurations installed in all LINK devices in CE Module List. Chart Graphically displays a SAM Get operation. B Document Module Creates an ASCII text file documenting all SAM Get operations of the LINK device highlighted in the CE Module List. Pot Allows you to continuously change a SAM Set operation. Restore Downloads a backup file to a LINK device selected in the CE Module List. Read-only Restricts you from changing SAM Set operations. Verify Prompts you to confirm independently each SAM Set operation change. Draw Menu Previous Sheet Moves to the previous sheet in a multi-sheet configuration. Next Sheet Moves to the next sheet in a multi-sheet configuration. Sheet [ ] Moves to the specified sheet. Align Allows user to align function blocks. Color Allows user to assign colors to elements. Fill Allows user to fill drawn objects with colors or patterns. Move to Back Moves selected item to bottom layer of drawing. Move to Front Moves selected item to top layer of drawing. Pattern Allows selection of fill or line pattern. Scale Allows selection of viewing scale for configuration. Width Allows selection of line width. Arrow Selects arrow drawing tool. Line Selects line drawing tool. Oval Selects oval drawing tool. Rectangle Selects rectangle drawing tool. Text Selects text insertion tool. Black & White Selects black and white viewing and printing of configuration. Insert Form Allows insertion of selected form. Remove Form Allows removal of selected form. Save Form Saves user-drawn form. Show Form Displays selected forms in configuration drawings. Configuration Editor Software Manual App B - 3 Appendix B Quick Reference Window Menu Module List Makes the CE Module List the front most, active window. Update Partial Conducts a partial update of the network modules. Update Full Conducts a full update of the network modules. B Auto Update Mode Allows selection of method followed by ConfigEd when it updates the module list automatically. Connections Presents in text form a list of all connections in the currently open configuration. SAM Test Points Opens test point window in which are displayed the SAM test points for a selected configuration. Parent Brings the parent, or higher level, window to the front. Child Brings the child, or lower level, window to the front. Sibling Brings the sibling, or equal level, window to the front. Monitor Allows the user to observe the performance of a selected module’s test points. Scratch Pad Makes the Scratch Pad front most, active window. Font Menu Changes the font of text in ConfigEd program windows. Four fonts are available for annotation text added to configuration drawings. For the display of text within the Scratch Pad, the CE Module List and any other dynamic ConfigEd or SAM windows, you can select from the list of fonts installed on your PC. Fonts avialable to text in dynamic ConfigEd windows. Fonts avialable for annotation text. App B - 4 Configuration Editor Software Manual Appendix B Quick Reference Style Menu Allows the selection of type style (Bold, Italic, Underline) as well as type size for text displayed in dynamic ConfigEd windows such as Scratch Pad, as well as for annotation text added to configuration drawings. Help Menu B About ConfigEd Gives the ConfigEd software version, assigned user identification number and name, the database revision level for the selected configuration and the your current revision level of ConfigEd's ssd_link software tools installed on your PC. General Gives contact information if you need customer service to help resolve a ConfigEd or LINK system problem. Data Sheets Gives information on all the function blocks within ConfigEd's Block menu. KEYBOARD DISPLAY COMMANDS A variety of keyboard commands are available to manipulate the display size and placement of your configuration drawing on you monitor screen. Keystroke Result Keystroke Result 0 Scales to 10pt. font (1.67x drawing) Home Sets origin of view to upper left corner 1 Scales to 11pt. font (1.83x drawing) Page Up Moves view of drawing up by 7/8 of current size 2 Scales to 12pt. font (2.00x drawing) Page Down Moves view of drawing down by 7/8 of current size 3 Scales to 3pt. font (0.50x drawing); Up arrow Nudges view of drawing up Homes drawing to upper left corner Down arrow Nudges view of drawing down 4 Scales to 4pt. font (0.67x drawing); Left arrow Nudges view of drawing to the left Homes drawing to upper left corner Right arrow Nudges view of drawing to the right 5 Scales to 5pt. font (0.83x drawing) Shift Page Up Moves view of drawing to previous sheet 6 Scales to 6pt. font (1.00x drawing) Shift Page Down Moves view of drawing to next sheet 7 Scales to 7pt. font (1.17x drawing) Backspace Deletes currently-selected item 8 Scales to 8pt. font (1.33x drawing) 9 Scales to 9pt. font (1.50x drawing) + Increases scaling by factor of 1.33 - Decreases scaling by factor of 1.33 Configuration Editor Software Manual App B - 5 B Appendix B Quick Reference App B - 6 Configuration Editor Software Manual Appendix C Designing a Project - a Tutorial Appendix C DESIGNING A PROJECT A TUTORIAL This chapter instructs a beginner on how to build a simple LINK demonstration project step-by-step. The result is a functional configuration for a game of Tic Tac Toe played on a first generation L5101, L5102 or LINK2 operator station (model L5391). By creating this demonstration configuration, you should become familiar with the ConfigEd tools without risking equipment damage or injury to personnel. The project consists of two configurations, one for a LINK operator station to display the Tic Tac Toe game board and first generation LINK processor module (L5207) to hold the game’s control configuration. The configurations you will create using this tutorial are actually recreations of the two existing configurations under the project TIC TAC TOE in the Public category. The tutorial in this chapter provides a cursory introduction to using basic functions— such as creating projects and configurations, configuring a LINK project and installing LINK configurations into LINK network devices— to give the user a feel for how to use the product. All the software functions and features of ConfigEd are discussed more fully in Chapters 4, 5 and 6. GETTING TO WORK If you have followed the setup instructions in Chapter 3, you will have already selected the id.dat file and set your communications parameters. From the Windows™ 3.1 Program Manager, double-click on the ConfigEd icon in the Link Tools window to launch the program. If you are running the Windows 95™ operating system, click the Start icon on the menu bar at the bottom of your screen and click on the Link Tools selection in the rolldown menu. Click on the ConfigEd selection. To begin, you must first create a new configuration management structure of Project and Category for the configurations you will design. Each LINK project is a set of software configurations designed to control one LINK control network. Generally, each LINK configuration is dedicated for one LINK network device whose node address matches the configuration file address. A category is a grouping of one or more projects that are related in some way. Refer to Organizing Your Work in Chapter 4 ConfigEd Functions for a description of ConfigEd’s category/project hierarchy. To create a category and project, go to the Project menu and select Manage. A dialog box will appear with lists for Category, Project, and Destination Category. In this dialog box, you can create new categories and projects, move projects from one category to another, enter or change project information, or use the Find Project feature to locate a particular project. Configuration Editor Software Manual App C - 1 C NOTE. For reference, the finished configurations you will build is shown in Figure C.2 and C.3 at the end of this appendix. Appendix C Designing a Project - a Tutorial NOTE. The Manage function under the Project menu allows you to handle projects and configurations for one ConfigEd user account only. To administrate projects between multiple accounts, use the separate software application Manager (see Chapter 7). Click on New Category, give it an appropriate name (for example, Training) and click OK. Training will now appear in both the Category and Destination Category columns. C Whenever you add new projects to your database, you must first put them in the appropriate category. To do this, highlight the category where you want your new project to reside. Any project you created will immediately reside in the highlighted category. (For our exercise, highlight the only category now available, Training.) Next, click on New Project and give it a name (for example, ConfigEd Test). A dialog box then presents a series of nine description field boxes in which you can enter additional data to help identify and describe your project. NOTE. These fields correspond to the ^F# codes described in the section Automatic Data Entry (see Chapter 5 Displaying, Documenting & Printing) and is used for creating forms. The fields are marked for standard information which often appears on most engineering documentation. In the field marked System title, enter Games. Enter Testing in the field marked S.O. Number and click the New button. ConfigEd Test will now appear in the Project column in the Manage window. You have now set up a system which organizes your projects by category. If Read-only is toggled on in the Project Manage dialog box, click on the box to remove this restriction. This allows you to create new configurations. Click on the Done button to close the Project Manage window. After creating a project, you can then design configurations within that project. Select a project by choosing it from the Project Select menu tree once it has been created. NOTE. The title bar of Scratch Pad always shows the name of the current project. When you open or change projects, or if several ConfigEd projects windows are open on your screen, the title bar of the Scratch Pad indicates the active window, or the current project selected. Any ConfigEd function you perform affects that project only. App C - 2 Configuration Editor Software Manual Appendix C Designing a Project - a Tutorial CREATING & SAVING CONFIGURATIONS Creating a New Configuration Once you have created a project, the next step is to create new configurations for the LINK network devices in your project. You can then place function blocks within them and make connections between configurations to design a control scheme for your LINK network. NOTE. ConfigEd saves your drawing automatically whenever you close the drawing or exit the program. The program, however, does not automatically save while you are working. It is therefore good practice to save your configuration periodically to prevent the loss of work in case of an unexpected power loss. Save your configuration manually by going to the File menu and selecting Save or using the keyboard shortcut Ctrl+S. C To begin, you must first create all the configurations your LINK network requires. Select New from the File menu. A dialog box will provide a list of the base modules in the LINK database included in your ConfigEd package. This list includes all first generation LINK and LINK2 devices. Select L5101 (Operator Station) and click on the New button. Note that as you select a LINK device in the list, a brief description of it appears in the dialog box. A second dialog box will appear asking you to designate the network address (node number on the LINK network) for the configuration you are creating. For our example, enter 997 for the address, and click on the OK button. Once you enter an address, the files needed to configure the module are loaded and, as the graphical image appears on screen, you are prompted to name the module. NOTE. Configuration names must be legitimate 8-character DOS file names with no extension. It is best to keep a consistent naming convention for your configurations. The Eurotherm Drives convention is to specify the type of module first, followed by a dash and the address of the configuration (e.g., 5101-997). For this training example, we have named the operator station TTTgame. Type in that name and click OK. Configuration Editor Software Manual App C - 3 Appendix C Designing a Project - a Tutorial Configuration Display On screen, you will now see a graphical representation of a System Control block and a Display Handler block. The System Control block provides system and network management functions. Display Handler associates function blocks in the operator station configuration with actual bands used on the touch screen display. There must be a unique function block associated with each of the six bands available (annunciators, meters, etc.). NOTE. For more information on System Control, Display Handler and all other function blocks, click on the Help selection on the menu bar. C There are a variety of ConfigEd controls available to change the way configurations are displayed on your screen. To enlarge the ConfigEd window to fill your monitor screen, click on the screen "sizing" box in the upper right corner of the window. Clicking again on the box will return the window to its previous size. screen "sizing" box "paper" edge Notice the gray outline frame near the bottom and right side of your ConfigEd window (if the gray outline is not visible, scroll down or to the right until it appears). This outline marks the “paper” edge or the limits of your configuration drawing. When you print your configurations, leave an extra margin inside the paper outline. Items that touch or extend beyond the paper outline will not be printed. You can reorient the paper to a "landscape" sizing through the Page Setup command in the File menu. ConfigEd has internally set “screen zooms” which enlarge or reduce the view inside an active configuration window. You can switch to these preset screen zooms using the number keypad at the right or with the number keys at the top of a standard PC keyboard. Each number zooms the view to a different preset scale. The + or - keys, increments or decrements the view to the next preset zoom. The arrow keys and the Page Up and Page Down keys moves the App C - 4 Configuration Editor Software Manual Appendix C Designing a Project - a Tutorial entire selected window on the screen without zooming. Other commands switch the display to the next or previous configuration page. You can also zoom in and out of a configuration window using the Scale function in the Draw menu or enlarge an area of a drawing by holding down the mouse button and dragging over the an area you want to enlarge. NOTE. Refer to the table 5.1 in Chapter 5 for a full list of all the ConfigEd keyboard display commands. To enlarge the area of a drawing, hold down the mouse button and drag the mouse over the area of the drawing you want to enlarge. A dashed-line box will enclose the area. When you release the mouse key, the area you have selected will fill the window. Adding & Naming Function Blocks NOTE. Study the function block data sheets before placing the function blocks in a configuration. The data sheets, located in the Help menu, provide in-depth information on the blocks and data on the block’s parameters. First, use the mouse pointer to move the System Control and the Display Handler to the bottom of your drawing. To move an element, place the mouse pointer on the element to be moved, then press the mouse key and hold it down while you drag the element to its new location. (An outline of the element appears while you are moving it.) Release the mouse button when you have placed it where you want it. Next, go to the Block menu, click on the OpStn sub-menu and select Annunciator. An outline of annunciator function block will follow your mouse pointer around the screen. Move the pointer to where you want to place the annunciator (for this example, center it just below the top edge of your drawing area) and click the mouse key. ConfigEd places the software element and assigns it a default name. You can rename the software element by double-clicking on the block while holding down the Ctrl key and typing in the new name in the dialog box that appears. Rename the block Status and click OK. Configuration Editor Software Manual App C - 5 C Now you will begin adding function blocks and elements to your configuration to represent the software required to configure your Tic Tac Toe game. Screen snapshots in the manual show your progress to the final drawing, shown at the end of the appendix. Appendix C Designing a Project - a Tutorial Double-clicking on a function block opens its parameter window. For example, double-clicking on the annunciator Status opens a parameter window showing New Legend, Legend 1 and connections for its Non-Inverted Output and Inverted Output. NOTE. Since all connections with ConfigEd 5.0 are made graphically on screen, these fields are for information only. You can not set connections in this window. C Open the Status annunciator, click on Legend 1 and type Your Turn, Press to Reset. Then, double-click on New Legend. This creates an additional legend field that is now highlighted. Type in TIC-TAC-TOE...I Win, Press to Reset. Double-click again on New Legend and type Tie Game, Press to Reset. Close the parameter window. Your monitor screen should now display the annunciator with legend 1 (Your Turn, Press to Reset) shown. Next, you will add a series of push buttons that will let you “play” interactive games of Tic Tac Toe with the processor. Buttons must be used in sets of four because the function block used to display them (Button Band) holds four buttons. For this configuration, you will need four button bands since nine are required to play the game. The first three buttons in each band will hold the X's and O's required to play Tic Tac Toe; the remaining button will display text and will have no switching capability. To create a button, go to the Opstn sub-menu in Draw and select Button. Place the first button below and left of the annunciator. For clarity, we will lay the configuration out in the same manner the display will appear on the operator station screen. This will be the top left button, so rename the block TL. Duplicating Function Blocks To create the additional buttons, you can either repeatedly return to OpStn under the Block menu and select Button, or you can duplicate the block with a keyboard shortcut. To duplicate the block, select the button by placing the mouse pointer on it and clicking once; the button reverses its display image to white on black. Press the Ctrl and D keys simultaneously, or select Duplicate from the Edit menu. ConfigEd creates a duplicate button and assigns a default name which is identical to the original default name, except for a suffix number which increments for each duplicate created. Drag the duplicate block to another location on your screen and click the mouse button to place it in your configuration. App C - 6 Configuration Editor Software Manual Appendix C Designing a Project - a Tutorial Rename this second button TM (top middle), place it to the right of the first button, then create two additional buttons and name them TR (top right) and TT (top text). Arrange the button below the Status annunciator. Your drawing should appear as below. C Double-click on the first button (TL) to open its parameter window. This button will be the starting point for the game. Double-click on the Legend 1 field and type an X, the close the window. This will be the game’s first move and will display X in the top left button. Double-click on the TM button. Because it contains no information at the start of a game, leave Legend 1 blank by pressing the space bar once. Double-click on New to create additional legends. For the first, type X and for the second, type O. This supplies the three displays for the buttons: blank at the start of a game, and either X or O as the player selects each button. Repeat these actions for the TR button. The TT button will display the word TIC. Open the parameter window of that button, double-click on Legend 1 and type TIC. The button will now display the word TIC at the beginning of the game and, since you will not enter any additional legends, the L5101 will display that message throughout the game. Repeat your actions to create a second row of buttons. Make your duplicate buttons from either the TM or TR buttons using the Ctrl+D key combination. This way, you will not have to type in the X and O legends— they will be duplicated along with the button. Name your next three buttons ML (middle left), MM (middle), and MR (middle right). For the MT button, duplicate the TT button, double-click on Legend 1 and change it to TAC. Now, create a third row of buttons in the same manner. Name them BL (bottom left), BM (bottom middle), BR (bottom right), and BT (bottom text). Change the legend in the BT button to TOE. When finished, arrange your buttons on screen, as shown in the screen shot on the next page. Configuration Editor Software Manual App C - 7 C Appendix C Designing a Project - a Tutorial Button Bands A L5101, L5102 or L5391 operator station will display push buttons only if the push-button entities are specified in an operator station button band function block. This function block organizes them on screen and displays them in the order you specify. Go to the Block OpStn menu and select Button Band. Place the first one near the bottom of your configuration and name it Top. Duplicate it and name the second one Middle. Duplicate it once again and name it Bottom. Position the button bands in a single row across the screen. You must specify the physical order of appearance of the pushbuttons in order to line them up correctly on the operator station screen. Double-click on the top button band to bring up its parameter window. Double-click on the Button 1 line to bring up a list of all the push buttons in your configuration. Since this is the top button band, we will be placing the push buttons labeled Top Left, Top Middle, and so on. For Button 1, select TL; for Button 2, TM; for Button 3, TR; and for Button 4, TT. Close the window and verify that you have entered the data correctly. Repeat the process for the other two button bands. When finished, your button bands should look like this: Adding Meters You now need to add two ordinal meters to your configuration, one to record the total number of games played and another to log the number of games won. To create the Total Games meter, go to Block OpStn and select Ordinal Meter. Place it in your drawing, centered under the bottom row of buttons (BL, BM, BR, and BT), and name it Total. App C - 8 Configuration Editor Software Manual Appendix C Designing a Project - a Tutorial Next, add an ordinal meter to log the number of games won by the processor. You can either return to the OpStn in the Block menu and repeat the process used for the Total Games ordinal meter, or you can simply duplicate the meter already present in your drawing. Use the Ctrl+D key sequence to duplicate the previous meter. A new ordinal meter, identical to the first will appear adjacent to your mouse pointer. Place it in your drawing and name it Won. Notice that the settings of your second meter are identical to the first— the duplicate feature also duplicates a software function block’s attributes as well as the function block. You must change these to reflect the new meter’s functions. Double-click on Won to open its window. It will display the settings you entered for Total. Since you only need to change the legend, click on it and change it to Games I Won. Close the window and check your work. Your ordinal meters should appear as in the screen shot below. Adding & Connecting Inputs & Outputs Now you will add inputs and outputs and connect them to and from the function blocks in your configuration. These LINK inputs and outputs will send and receive data to and from the L5207 processor which will hold the control configuration for the Tic Tac Toe game. Connections to these inputs and outputs are analogous to wires in a hardwired system: the address is the device to which the “wire” is connected; the slot is the “terminal” on the device. Inside the device, the input and output slots connect to and from function blocks. When creating inputs, you must define only the incoming slots numbers. Naming the source address is optional and is used only to document the source signal. The number on the left end of an input slot is the source address; the receiving slot number of the configuration is on the right. For an output slot, the number on the left end is the destination address and its destination slot number is on the right. For now, you will name only the incoming slot. Configuration Editor Software Manual App C - 9 C Double-click on the meter to bring up its window. For the Legend, type Total Games and leave Format at its default setting of #####. Set Display Max and High Redline values to 20 and close the window. Appendix C Designing a Project - a Tutorial NOTE. When configurations are documented or printed (using the Document... or Print... commands in the Project menu), ConfigEd automatically fills in the source addresses of LINK input slots. For clarity and consistency, keep LINK inputs on the left side and LINK outputs on the right side of configuration drawings to maintain a left-to-right flow of data. Creating and Connecting LINK Inputs C Go to Block and select Link Input. Place the input to the left of the Status annunciator. Once you place the block, its parameter window appears. Notice that ConfigEd automatically assigns an input slot number, beginning at one. The default input slot number increments for each successive slot you create. For this example, change the input slot number to 10. You can double click on a placed LINK input (or output) and change its parameters just as with any other function block. Leave the Source blank; ConfigEd automatically fills in this field when you execute the Document... or Print... commands. You can also leave the Description box blank. Adding annotation text to inputs (or outputs) is optional. For now, leave the Normal and Priority option set to the default (Normal) selection. The Normal & Priority Inputs section of Chapter 4 ConfigEd Functions explains the meaning of these settings. Click OK, and your input will appear as the screen shot below. You will now draw connections between LINK inputs and function blocks. NOTE. You may only make connections from the output of a function block or LINK input to the input of the same function block, or to the input of another function block or LINK output. First, connect the LINK input you have just placed to the Highlight (HL) connection on the annunciator. Place the mouse pointer near the terminal line extending from the right (output) side of the input. As you cross that line, the pointer changes into cross hairs indicating that you can begin drawing the connecting line. With the cross hairs showing, click and hold down the mouse key, then drag the mouse to the left side of the annunciator. As you move away from the starting point, the cross hairs revert to a pointer and a line will extend from the start of the connection to the pointer. Once the pointer icon appears, you no longer need to hold down the mouse button. When the pointer once again turns into cross hairs near the HL input terminal of the annunciator, complete the connection by again clicking the mouse key. App C - 10 Configuration Editor Software Manual Appendix C Designing a Project - a Tutorial The LINK input to slot 10 is now connected to the Highlight terminal of the annunciator. If you accidentally draw a line to the wrong point, remove it by clicking once on the line with the mouse pointer. This changes the connection to a dashed line indicating that you have selected it. Press the Backspace or Delete key to remove it. Caution ConfigEd automatically saves your configuration whenever you close it or exit ConfigEd. ConfigEd will not save LINK inputs or outputs you have created unless they are connected to function blocks inputs within the same configuration. Do not close your drawing until you have made these connections; otherwise, you will have to recreate these inputs upon reopening the file. You can move function blocks in your drawing to straighten out and tidy up the appearance of your configuration even after they are connected. Place the mouse pointer on the object you wish to move, hold down the mouse key and drag it to its new location. When you are satisfied with its position, release the mouse key. You can also align a group of function blocks or LINK inputs or output either vertically or horizontally using the Align function in the Draw menu. Refer to Chapter 5 Displaying, Documenting & Printing for information on this feature. When you have added and connected all LINK input slots, your drawing should appear as the screen shot below. Configuration Editor Software Manual App C - 11 C Create additional LINK inputs or use the duplicate feature to add all the LINK inputs your configuration will require using the drawing at the end of this appendix as a guide. Assign these new inputs slot numbers 1 through 12, as required. Appendix C Designing a Project - a Tutorial Creating and Connecting LINK Outputs Your configuration also needs a series of nine outputs placed along the right side of the drawing. To create an output, select Link Output from the Block menu. Place this first output to the right of your annunciator. ConfigEd automatically opens the LINK output's parameter window when you place it in your configuration. It assigns it a default destination address and slot number, beginning at one, and increments the default destination slot number for each successively placed LINK output. As with LINK inputs, you can open a LINK output's parameter window and change the destination address and slot after you have placed the block. C NOTE. You must assign a destination slot and destination address for each output. ConfigEd prevents you from assigning duplicate destination slot numbers for the same destination address (a warning/ dialog box appears when this occurs). Descriptive information is optional. Click on the output and give it a destination address of 996 and set the destination slot number to one. Continue adding additional outputs as shown in the sample drawing at the end of this appendix, giving each a destination address of 996. (If you use the duplicate function, ConfigEd copies the destination address of the original LINK output and increments the default address.) Use the Align function to keep your work orderly. When all are placed, your configuration should appear as the screen shot below. App C - 12 Configuration Editor Software Manual Appendix C Designing a Project - a Tutorial Next, connect these outputs with their source elements. You will again select and draw the line connection with your mouse. Remember, you can only connect an element’s output to another element’s input, so you will have to start at the annunciator or a push button output, then draw the connection to a LINK output. As you draw connection lines from one object to another, notice that ConfigEd prevents you from placing connections over function blocks and will automatically reroute the line away from a function block. When this occurs, ConfigEd may place these connections much closer to objects than you would prefer. To rearrange the look of your configuration, you can move and adjust a line by selecting it with the mouse pointer and dragging it to a more suitable location. C After adding this second series of connections (from the function blocks to their LINK outputs), your configuration should appear as the screen shot below. Button Highlights The final set of connections are those connecting the output of a function block to an input of the same block. These connections are needed for the status annunciator and the nine Tic Tac Toe “squares” to change the display of elements in the operator station during the course of a game. You must draw these lines from the output side to the input side of an element. Go to the TL push button and click on the non-inverted output terminal to begin drawing the connection. Bring the line over the top of the push button until you can reconnect it to the HL (Highlight) terminal. Using the completed configuration drawing at the end of this appendix as a guide, create the remainder of your connections. When adding a connection to a function block input that already has a connection, ConfigEd uses a black dot to indicate its junction with the previous connection at the point at which the two diverge. This distinguishes it from intersecting Configuration Editor Software Manual App C - 13 Appendix C Designing a Project - a Tutorial connections, which merely cross and do not connect to the same input. You can move the first or second line— or its divergent point (black dot)— to tidy up the configuration. C Continue adding connections as on the sample sheet until you are finished with your drawing. Once you have finished, your configuration appear as the screen shot below. Organizing Your Display When you have finished placing items within your configuration and making the connections linking them together, you need to organize how the display will appear on the L5101 touch screen. To do this, use the Display Handler, which assigns the configuration function blocks to each of the six bands on the LINK operator station. To organize your display, double-click on the display handler to open its window. As with the button band function blocks, double-click on each text box to bring up a list of the items you can place in the bands. Select items you wish to place in the fields by doubleclicking on them. In Band 1, place Status; place Top in Band 2; Middle in Band 3; App C - 14 Configuration Editor Software Manual Appendix C Designing a Project - a Tutorial Bottom in Band 4; Total in Band 5; and Won Band 6. Close the window and observe the completed display handler block. The order in which the function blocks appear on your operator station follows the sequence— from top to bottom— in which you listed them in the Display Handler. Your configuration should now be complete. Compare it to the sample configuration at the end of this appendix. Close your configuration drawing by double clicking on the box under the word File in the upper left corner of the window. ConfigEd automatically saves the configuration on exit. Copying an Existing Configuration Now that you have completed the configuration for your Tic Tac Toe L5101 operator station, you need an L5107 processor configuration to make it work. Rather than repeat the same procedures to create the configuration, copy one from the demonstration project TIC TAC TOE into your ConfigEd Test project. This configuration is included in the Public category of the ssd_ LINK database. C Return to the Project Select menu structure, choose Public and then pick the project named TIC TAC TOE. Click Open in the File menu and select TTTp. A dialog box will warn you that ConfigEd will only open the file in read-only mode. Click Open to acknowledge the clear the dialog and open the configuration. When the file opens, you will see a completed configuration for the processor. You will need this configuration to run the Tic Tac Toe game. Return to the File menu and select Save As. This brings up a dialog box asking you the new name of the configuration and the project and category in which you wish to save it. Choose the category and project you have set up for your training activities (Training), give the processor a name (TTTpro) and click OK. This saves the configuration to your ConfigEd Test project. It also gives you read/write access to your copy of the configuration in case you need to modify it for a particular application. This is an important, time saving skill to learn— you will find it quicker and easier to reuse configurations from other projects rather than redesigning new ones from scratch, especially when configuring similar series of control sections. Configuration Editor Software Manual App C - 15 Appendix C Designing a Project - a Tutorial INSTALLING A CONFIGURATION Before you install a configuration into a first generation LINK or LINK2 device, you must establish a valid communications setup between your PC serial port and the LINK device and open a CE Module List window. Refer to Appendix A Communications for information on communicating to a LINK network. Also, you must connect your computer to a functional LINK network. The LINK network for our Tic Tac Toe game is a simple topology ring consisting of only two LINK “nodes”— a L5101 operator station and a L5207 processor module, both first generation LINK devices. Figure C.1 shows how this LINK network should be connected. +24 VDC Power +24 VDC Power User PC C RS232 Connection L5207 LINK1 Processor Fiber Optic Cable Rear of L5101 LINK1 Operator Station Figure C.1 - Two node LINK System for TIC TAC TOE WARNING! Do not install a configuration to a LINK network device unless all equipment controlled by the network is in a stopped and safe condition. Configuration errors may cause an unexpected or dangerous system response. Have a qualified engineer check or test all configurations before installing them and putting the LINK network into service. To open a CE Module List, click Update Full in the Window menu. If the communications setup between your PC and the LINK device is correct and the fiber optic LINK network between the modules is communicating properly, the CE Module List should open and appear as the screen shot below. NOTE. The "as shipped" test addresses may differ from those shown in the screen shot. App C - 16 Configuration Editor Software Manual Appendix C Designing a Project - a Tutorial The Scratch Pad records the information as you update your CE Module List and as you download configu- rations to LINK devices. It also reports any problems or failures related to generating the list and installing configurations. Installation options are located in the Command menu and are discussed in detail in Chapter 4 ConfigEd Functions. For now, use the Install at Selected option to download the two configurations. C To use the Install at Selected command, select the L5207 processor module from the CE Module List, then open the configuration TTTpro, or select it by clicking its window if it is already opened. Choose Install at Selected from the Command menu. This installs the active configuration into the LINK device you select in the CE Module List, regardless of whether the source configuration and destination module addresses match— in this instance, the configuration file TTTpro will install into the L5207 processor module. ConfigEd reassigns the original (test) address to the permanent address of 996. A status dialog logs the progress of the installation. The upper left corner of the status dialog shows the software elements as they are loaded. A bar chart shows the installation of the various blocks and other elements of the configuration into the module. All ConfigEd status dialog boxes include an Abort button. Click Abort to cancel an action and return to the previous running status any time during the execution of that action. After you have installed TTTpro, chose the L5101 operator station in the CE Module List and install TTTgame. During this installation, ConfigEd automatically checks to verify that all function blocks in the configuration are defined and that all their attributes are specified properly. If an undefined function block is found or if an attribute within a function block is improperly specified, the error message Undefined Symbol ’ in [name of function block] appears in Scratch Pad. ConfigEd will then halt the installation procedure and the LINK device will continue to operate using the currently installed configuration— or its pre-shipped configuration. To correct this error, make certain that each of the six bands in the operator station Display Handler contain a function block that exists within the configuration, then try another installation. Once you have installed the project Tic Tac Toe's operator station and processor configurations into your two-node LINK network, you can play an interactive game of Tic Tac Toe. If you have a problem with installing either configuration or with playing the game, see Installing Configurations and Interrogating a Module in Chapter 6 SAM Functions for more information. Configuration Editor Software Manual App C - 17 Appendix C Designing a Project - a Tutorial PRINTING A CONFIGURATION If you have set up your page properly, printing your configurations is simply a matter of sending the configuration files to a printer connected to your computer. You can select Print... from the File menu to print only the active configuration open on your monitor. Make sure that the configuration you want to print is the active window and that the page orientation in Page Setup under the File menu is set for landscape format. Refer to your Windows™ and printer manual for further assistance. You may want to include information about your configuration— the project’s name, the creator's name and date drawn, for example— at the bottom of your drawing. You can create a customized form to organize your information and present it in a functional, attractive format. See Chapter 5 for more information. Chapter 5 also shows you how to create and print an index of your ConfigEd project. C To print an entire project, a project index or multiple configurations within a project, use the Print... command in the Project menu. The Project Print... command automatically cross references and enters certain data from your configuration (network address, revision number, modification number, and sheet number) on the index sheet (see Chapter 5). App C - 18 Configuration Editor Software Manual Figure C.2 - Completed Configuration TIC TAC TOE\TTT C Appendix C Designing a Project - a Tutorial Configuration Editor Software Manual App C - 19 Figure C.3 - Completed Configuration TIC TAC TOE\TTTp C Appendix C Designing a Project - a Tutorial App C - 20 Configuration Editor Software Manual CONFIGURATION EDITOR SOFTWARE MANUAL Contents (Continued) Safety Chapter 1 INTRODUCTION Product Description ................................................................................................................................................................................................... 1 New Features ................................................................................................................................................................................................................. 1 Key Features ........................................................................................................................................................................................................... 1 Structure of This Manual ................................................................................................................................................................................ 1 Text Conventions ................................................................................................................................................................................................ 1 - Chapter 2 1 1 2 2 2 PACKAGE CONTENTS & HANDLING Package Contents ...................................................................................................................................................................................................... 2 - 1 Handling .................................................................................................................................................................................................................... 2 - 1 Chapter 3 INSTALLATION AND SETUP Computer Compatibility and Hardware Requirements ................................................................................................................ 3 - 1 Setting Up ConfigEd ................................................................................................................................................................................................. 3 - 2 Installing Manager ..................................................................................................................................................................................................... 3 - 4 Chapter 4 CONFIGED FUNCTIONS The ssd_LINK Database ...................................................................................................................................................................................... 4 - 1 Organizing Your Work ........................................................................................................................................................................................ 4 - 1 The ConfigEd Main Menu Bar .......................................................................................................................................................................... 4 - 2 The Scratch Pad .......................................................................................................................................................................................................... 4 - 3 The Project MENU .................................................................................................................................................................................................... 4 - 4 The Project-Select Command .................................................................................................................................................................. 4 - 4 The Project-Manage Command ............................................................................................................................................................. 4 - 4 Create a New Category .................................................................................................................................................................... 4 - 4 Create a New Project ........................................................................................................................................................................... 4 - 5 Select a Project .......................................................................................................................................................................................... 4 - 6 Move a Project ........................................................................................................................................................................................... 4 - 6 Cat. Read-Only ........................................................................................................................................................................................... 4 - 6 Sort by Address ......................................................................................................................................................................................... 4 - 6 Find Project .................................................................................................................................................................................................... 4 - 6 Change Project Info ................................................................................................................................................................................ 4 - 7 The Upgrade Command ....................................................................................................................................................................... 4 - 7 The Project-Duplicate... Command ...................................................................................................................................................... 4 - 8 The Project-Update... Command ........................................................................................................................................................... 4 - 8 The Project-Compact Command ........................................................................................................................................................... 4 - 9 The Project-Document... & Project-Print... Commands .......................................................................................................... 4 - 9 The File Menu ................................................................................................................................................................................................................ 4 - 10 The File-New... (Ctrl+N) Command ...................................................................................................................................................... 4 - 10 Configuration Editor Software Manual Cont. 1 CONFIGURATION EDITOR SOFTWARE MANUAL Contents (Continued) Chapter 4 CONFIGED FUNCTIONS (continued) The File-Open (Ctrl+O) Command ....................................................................................................................................................... 4 - 11 The File-Open-Open Command .................................................................................................................................................... 4 - 11 Configuration Read-Only Mode ................................................................................................................................................... 4 - 11 Graphical Mode ........................................................................................................................................................................................ 4 - 11 Install Source ................................................................................................................................................................................................ 4 - 11 Configuration Description Fields ................................................................................................................................................. 4 - 12 The File-Open History... Command ..................................................................................................................................................... 4 - 12 The File-Open Selected Command (F2) ........................................................................................................................................... 4 - 13 The File-Extract Selected Command .................................................................................................................................................. 4 - 13 The File-Close Command (Ctrl+W) ..................................................................................................................................................... 4 - 14 The File-Save Command (Ctrl+S) .......................................................................................................................................................... 4 - 14 Modification Level vs. Revision Level ....................................................................................................................................... 4 - 14 Saving Scratch Pad Text ..................................................................................................................................................................... 4 - 15 The File-Save As Command ...................................................................................................................................................................... 4 - 16 The File-Delete Command .......................................................................................................................................................................... 4 - 16 The File-Page Setup..., File-Print Scale, and File-Print... Commands .............................................................................. 4 - 17 The File-Exit Command ................................................................................................................................................................................. 4 - 17 The Edit Menu ............................................................................................................................................................................................................... 4 - 18 The Edit-Cut, Edit-Copy, Edit-Paste & Edit-Clear Commands ......................................................................................... 4 - 18 The Edit-Select All and Edit-Paste Time Commands ............................................................................................................... 4 - 19 The Edit-Net Address(##)... Command ............................................................................................................................................ 4 - 19 The Edit-Net Topology Command ....................................................................................................................................................... 4 - 19 The Duplicate (Ctrl+D) Function Block Command ..................................................................................................................... 4 -20 The Edit-Test Point Command .................................................................................................................................................................. 4 -20 The Block Menu ........................................................................................................................................................................................................... 4 - 21 Placing Function Blocks ........................................................................................................................................................................ 4 - 21 Renaming Function Blocks ................................................................................................................................................................... 4 - 21 Deleting Function Blocks ..................................................................................................................................................................... 4 - 21 Configuring LINK Inputs and LINK Outputs ............................................................................................................................ 4 -22 Normal & Priority Inputs ...................................................................................................................................................................... 4 -23 Working With DC LINK Drive ........................................................................................................................................................ 4 -23 Configuring DC LINK Drive Outputs .................................................................................................................................. 4 -24 Working With L620 Vector LINK Drives ............................................................................................................................... 4 -25 Configuring L620 Vector LINK Drive Inputs & Outputs ....................................................................................... 4 -25 The Command Menu ................................................................................................................................................................................................ 4 -26 The Command-Install at Selected Command (Ctrl+G) ......................................................................................................... 4 -26 The Command-Install at Address Command (Ctrl+T) ............................................................................................................ 4 -27 The Command-Install Changes Command (F3) ........................................................................................................................... 4 -27 The Command-Halt, Command-Restart, and Command-Get Info Commands .................................................... 4 -28 The Command-Halt Command ........................................................................................................................................................ 4 -28 The Command-Restart Command ................................................................................................................................................. 4 -28 The Command-Get Info Command .............................................................................................................................................. 4 -29 The Command-SAM Functions ................................................................................................................................................................ 4 - 31 The Command-Comms... Function ......................................................................................................................................................... 4 - 31 Cont. 2 Configuration Editor Software Manual CONFIGURATION EDITOR SOFTWARE MANUAL Contents (Continued) Chapter 4 CONFIGED FUNCTIONS (continued) The Command-Revisions (#)... Command ....................................................................................................................................... 4 - 31 The Command-Readdress... Command ............................................................................................................................................ 4 -32 The Window Menu .................................................................................................................................................................................................. 4 -33 Opening a CE Module List .......................................................................................................................................................................... 4 -33 Duplicate & Temporary Addresses .................................................................................................................................................... 4 -34 The Window-Update Partial Command .......................................................................................................................................... 4 -35 The Window-Update Full Command .................................................................................................................................................. 4 -35 The Window-Auto Update Mode ....................................................................................................................................................... 4 -36 The Window-Module List Command ................................................................................................................................................. 4 -36 Chapter 5 DISPLAYING, DOCUMENTING & PRINTING Displaying Configurations ................................................................................................................................................................................. 5 - 1 Display Options ................................................................................................................................................................................................. 5 - 1 Screen Zooms & The Scale Function ..................................................................................................................................... 5 - 1 Moving Function Blocks and Drawing Elements ................................................................................................................ 5 - 3 Arranging Elements Within a Configuration ................................................................................................................................ 5 - 3 The Align Function .................................................................................................................................................................................... 5 - 4 The Sheet Feature ..................................................................................................................................................................................... 5 - 4 Inter-Sheet Connections ...................................................................................................................................................................... 5 - 5 Split Connections ...................................................................................................................................................................................... 5 - 5 Documenting Configurations & Projects ................................................................................................................................................. 5 - 6 Annotating Drawings ..................................................................................................................................................................................... 5 - 6 The Text & Drawing Tools ................................................................................................................................................................. 5 - 7 Text (F4) .................................................................................................................................................................................................... 5 - 7 Rectangle (F8) ...................................................................................................................................................................................... 5 - 7 Oval (F7) ................................................................................................................................................................................................. 5 - 7 Line (F6) .................................................................................................................................................................................................... 5 - 7 Arrow (F5) .............................................................................................................................................................................................. 5 - 7 Moving & Re-sizing Drawing Elements .................................................................................................................................... 5 - 8 Move to Front & Move to Back ............................................................................................................................................. 5 - 8 Drawing Attribute Functions ............................................................................................................................................................ 5 - 9 Color .......................................................................................................................................................................................................... 5 - 9 Fill ................................................................................................................................................................................................................. 5 - 9 Pattern ....................................................................................................................................................................................................... 5 - 9 Width ......................................................................................................................................................................................................... 5 - 10 Black White .......................................................................................................................................................................................... 5 - 10 Text Attribute Functions ...................................................................................................................................................................... 5 - 11 Font & Style Menus .......................................................................................................................................................................... 5 - 11 Forms .......................................................................................................................................................................................................................... 5 - 12 Inserting and Removing Forms ......................................................................................................................................................... 5 - 12 Creating Forms ........................................................................................................................................................................................... 5 - 13 Modifying an Existing Form ...................................................................................................................................................... 5 - 13 Creating a New Form .................................................................................................................................................................... 5 - 14 Configuration Editor Software Manual Cont. 3 CONFIGURATION EDITOR SOFTWARE MANUAL Contents (Continued) Chapter 5 DISPLAYING, DOCUMENTING & PRINTING (continued) Automatic Data Entry ............................................................................................................................................................................ 5 - 15 Creating an Index ............................................................................................................................................................................................. 5 - 17 The Document... Command ........................................................................................................................................................................ 5 - 18 Save Sources & Clear Unused ........................................................................................................................................................ 5 - 18 Printing ............................................................................................................................................................................................................................... 5 - 19 Print Scale & Page Setup ............................................................................................................................................................................. 5 - 19 The File Print... (Ctrl+P) Command ......................................................................................................................................................... 5 - 19 The Project Print... Command ................................................................................................................................................................... 5 -20 Chapter 6 SAM FUNCTIONS Accessing The SAM Functions ........................................................................................................................................................................ 6 - 1 Opening Graphical SAM Windows .......................................................................................................................................................... 6 - 2 Monitoring and Setting Parameters ............................................................................................................................................................ 6 - 3 Opening SAM Get & Set Parameter Windows ........................................................................................................................ 6 - 3 Monitoring Parameters ................................................................................................................................................................................. 6 - 4 The Get Operation ................................................................................................................................................................................. 6 - 4 The Monitor List ......................................................................................................................................................................................... 6 - 4 The Chart Function ................................................................................................................................................................................... 6 - 5 Setting Parameters .......................................................................................................................................................................................... 6 - 6 The Set Operation & the Read-Only Mode ......................................................................................................................... 6 - 6 Verify Mode ................................................................................................................................................................................................. 6 - 7 The Pot Function ......................................................................................................................................................................................... 6 - 7 Monitoring & Setting Parameters Through the Graphical SAM Window ............................................................ 6 - 8 SAM Test Points ......................................................................................................................................................................................................... 6 - 10 Creating SAM Test Points .......................................................................................................................................................................... 6 - 10 Setting and Monitoring SAM Test Points ........................................................................................................................................ 6 - 11 Backing Up ...................................................................................................................................................................................................................... 6 - 12 Restoring .......................................................................................................................................................................................................................... 6 - 13 SAM Document Module Command ............................................................................................................................................................. 6 - 13 Chapter 7 TROUBLESHOOTING PC Serial Port Communications Problems .............................................................................................................................................. 7 Error Dialogs ................................................................................................................................................................................................................. 7 Display Problems ....................................................................................................................................................................................................... 7 Get Info Status Messages .................................................................................................................................................................................. 7 LED & Seven-Segment Status Display Codes ...................................................................................................................................... 7 The Help Menu & Function Block Information ...................................................................................................................................... 7 - Cont. 4 1 2 3 4 4 4 Configuration Editor Software Manual CONFIGURATION EDITOR SOFTWARE MANUAL Contents (Continued) Appendix A COMMUNICATIONS Communicating with LINK Networks ............................................................................................................................................. App A Direct Communications Hardware Setup ................................................................................................................................... App A Modem Communications Hardware Setup ............................................................................................................................... App A Communications Settings ........................................................................................................................................................................ App A Baud Rate Settings: Direct Communications .................................................................................................................... App A Baud Rate Settings: Modem Communications ................................................................................................................ App A Modem Command String Settings ........................................................................................................................................... App A - 1 1 2 4 4 4 5 Appendix B QUICK REFERENCE ConfigEd Menu Reference ....................................................................................................................................................................... App B File Menu ....................................................................................................................................................................................................... App B Edit Menu ...................................................................................................................................................................................................... App B Project Menu .............................................................................................................................................................................................. App B Block Menu .................................................................................................................................................................................................. App B Command Menu ...................................................................................................................................................................................... App B SAM Sub-menu ......................................................................................................................................................................................... App B Draw Menu.................................................................................................................................................................................................. App B Window Menu ......................................................................................................................................................................................... App B Font Menu ..................................................................................................................................................................................................... App B Style Menu .................................................................................................................................................................................................. App B Help Menu .................................................................................................................................................................................................... App B Keyboard Display Commands ............................................................................................................................................................. App B - 1 1 1 2 2 2 3 3 4 4 5 5 5 Appendix C DESIGNING A PROJECT A TUTORIAL Getting to Work ............................................................................................................................................................................................ App C - 1 Creating & Saving Configurations .................................................................................................................................................. App C - 3 Creating a New Configuration .................................................................................................................................................. App C - 3 Configuration Display ....................................................................................................................................................................... App C - 4 Adding & Naming Function Blocks ........................................................................................................................................... App C - 5 Duplicating Function Blocks .......................................................................................................................................................... App C - 6 Button Bands .............................................................................................................................................................................................. App C - 8 Adding Meters ........................................................................................................................................................................................ App C - 8 Adding & Connecting Inputs & Outputs ............................................................................................................................... App C - 9 Creating and Connecting LINK Inputs .................................................................................................................................... App C - 10 Creating and Connecting LINK Outputs .............................................................................................................................. App C - 12 Button Highlights .................................................................................................................................................................................... App C - 13 Organizing Your Display ............................................................................................................................................................... App C - 14 Copying an Existing Configuration ......................................................................................................................................... App C - 15 Installing a Configuration ........................................................................................................................................................................ App C - 16 Printing a Configuration ........................................................................................................................................................................... App C - 18 Configuration Editor Software Manual Cont. 5 CONFIGURATION EDITOR SOFTWARE MANUAL Contents (Continued) Cont. 6 Configuration Editor Software Manual Notes NOTES Configuration Editor Software Manual Notes NOTES Configuration Editor Software Manual Eurotherm Drives Companies Product Sales 9225 Forsyth Park Drive Charlotte, NC 28273 Tel: (704) 588-3246 Fax: (704) 588-3249 REGIONAL SALES Carolinas 9225 Forsyth Park Drive Charlotte, NC 28273 Tel: 704-588-3246 Fax: 704-588-3249 Mid-Atlantic 849 Quince Blvd., Suite J Gaithersburg, MD 20878 Tel: 301-258-1941 Fax: 301-330-5211 Central 50 East RiverCenter Blvd. Suite 400 Covington, KY 41011 Tel: 606-292-2519 Fax: 606-292-2518 Southeast 3651 Canton Hwy, Ste 100 Marietta, GA 30066-7603 Tel: 404-924-1532 Fax: 404-924-0296 West Coast 11161 Shadyridge Drive Moorpark, CA 93021 Tel: 805-529-9074 Fax: 805-529-9076 Northeast 1644 Washington Valley Road Martinsville, NJ 08836-2005 Tel: 908-271-1504 Fax: 908-271-1053 WORLDWIDE SALES AND SERVICE Australia Eurotherm Pty., Ltd. Unit 3, 6 - 18 Bridge Road Hornsby New South Wales 2077 Tel: 011-61-2-477-7022 Fax: 011-61-2-477-7756 Denmark Eurotherm Danmark A/S Finsensvej 86 DK-2000 Frederiksberg Tel: 011-45-31-871-622 Fax: 011-45-31-872-124 Austria Eurotherm GmbH Geiereckstrasse 18/1 A-1110 Vienna Tel: 011-43-1-798-76-01 Fax: 011-43-1-798-76-05 England Eurotherm Drives Ltd. New Courtwick Lane Littlehampton West Sussex, BN17 7PD Tel: 011-44-1-903-721-311 Fax: 011-44-1-903-723-938 Belgium Eurotherm BV Herentalsebaan 71-75 B-2100 Deurne Antwerpen Tel: 011-32-3-322-3870 Fax: 011-32-3-321-7363 France Eurotherm Vitesse Variable SA 27 Avenue du Québec Z.A. de Courtaboeuf 91951 Les Ulis Cedex Tel: 011-331-6918-5151 Fax: 011-331-6918-5159 Canada Eurotherm Drives Inc. 530 Seaman Street Unit No. 3 Stoney Creek Ontario L8E 3X7 Tel: 905-664-8911 Fax: 905-664-5869 Germany Eurotherm Antriebstechnik GmbH Birkenweg 8 D-64665 Alsbach-Hähnlein Tel: 011-49-6257-3005 Fax: 011-49-6257-62094 China Eurotherm Drives, Ltd. Rm 5488 Bldg. 4 Xi Yuan Hotel Er Li Gou, Beijing Tel: 011-86-3388-5488 Fax: 011-86-3388-8954 Hong Kong Eurotherm Ltd. Unit D 18/F Gee Chang Hong Centre 65 Wong Chuk Hang Road Aberdeen Tel: 011-852-873-3826 Fax: 011-852-870-0148 Ireland Eurotherm Ireland Ltd. IDA Industrial Estate Monread Road Naas County Kildare Tel: 011-353-45-79937 Fax: 011-353-45-75123 Norway Eurotherm A/S Postboks 199 N-1412 Olso Tel: 011-47-66-803330 Fax: 011-47-66-803331 Italy Eurotherm Drives SpA Via Gran Sasso 9 20030 Lentate Sul Seveso Milano Tel: 011-39-362-557-308 Fax: 011-39-362-557-312 Scotland Eurotherm Drives Ltd. Unit 59 Stirling Enterprise Park Player Road Stirling FK7 7RP Tel: 011-44-1786-471674 Fax: 011-44-1786-451095 Japan Eurotherm (Japan) Ltd. Marushima Building 28-2 Chuo 1-Chome Nakano-ku Tokyo 164 Tel: 011-81-33-363-8324 Fax: 011-81-33-363-8320 Spain Eurotherm Espana SA Calle La Granja 74 Poligono Industrial de Alcobendas 28100 Alcobendas Madrid Tel: 011-34-1-661-6001 Fax: 011-34-1-661-9093 Korea Eurotherm Korea, Ltd. Daeju Building Suite #903 132-19 Chungdam-Dong Kangnam-Ku Seoul 135-100 Tel: 011-822-543-8507 Fax: 011-822-545-9758 Sweden Eurotherm AB Lundavägen 143 S-212 24 Malmö Tel: 011-46-40-384500 Fax: 011-46-40-384545 Netherlands Eurotherm BV Johan Frisostraat 1 2382 HJ Zoeterwoude Tel: 011-31-71-411-841 Fax: 011-31-71-414-526 Switzerland Eurotherm Produkte (Schweiz) AG Kanalstrasse 17 CH-8152 Glattbrugg Tel: 011-41-1-810-3646 Fax: 011-41-1-810-8920 Price: $25.00 U.S.