1
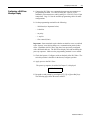
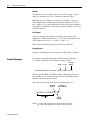
Allen-Bradley
Dataliner DL5 Slave
Displays
(Cat. No. 2706-D11JS, -D21JS)
User Manual
Important User Information
Because of the variety of uses for the products described in this publication,
those responsible for the application and use of this control equipment must
satisfy themselves that all necessary steps have been taken to assure that
each application and use meets all performance and safety requirements,
including any applicable laws, regulations, codes and standards.
The illustrations, charts, sample programs and layout examples shown in
this guide are intended solely for purposes of example. Since there are many
variables and requirements associated with any particular installation,
Allen-Bradley does not assume responsibility or liability (to include
intellectual property liability) for actual use based upon the examples shown
in this publication.
Allen-Bradley publication SGI-1.1, Safety Guidelines for the Application,
Installation and Maintenance of Solid-State Control (available from your
local Allen-Bradley office), describes some important differences between
solid-state equipment and electromechanical devices that should be taken
into consideration when applying products such as those described in this
publication.
Reproduction of the contents of this copyrighted publication, in whole or
part, without written permission of Rockwell Automation, is prohibited.
Throughout this manual we use notes to make you aware of safety
considerations:
!
ATTENTION: Identifies information about practices or
circumstances that can lead to personal injury or death,
property damage or economic loss
Attention statements help you to:
• identify a hazard
• avoid a hazard
• recognize the consequences
Important: Identifies information that is critical for successful application
and understanding of the product.
Allen-Bradley is a trademark of Rockwell Automation
Table of Contents
Using this Manual
Introduction to the DL5 Slave
Installation and Startup
Configuring the DL5 Slave
Chapter Objectives . . . . . . . . . . . . . . . . . . . . . . . . . . . . . . . . . . . .
Overview of this Manual . . . . . . . . . . . . . . . . . . . . . . . . . . . . . . .
Intended Audience . . . . . . . . . . . . . . . . . . . . . . . . . . . . . . . . . . . .
Conventions Used. . . . . . . . . . . . . . . . . . . . . . . . . . . . . . . . . . . . .
Related Publications . . . . . . . . . . . . . . . . . . . . . . . . . . . . . . . . . . .
Chapter Objectives . . . . . . . . . . . . . . . . . . . . . . . . . . . . . . . . . . . .
Description . . . . . . . . . . . . . . . . . . . . . . . . . . . . . . . . . . . . . . . . . .
Operating Modes . . . . . . . . . . . . . . . . . . . . . . . . . . . . . . . . . . . . .
DL (Dataliner) Slave Mode . . . . . . . . . . . . . . . . . . . . . . . . . .
PV (PanelView) Slave . . . . . . . . . . . . . . . . . . . . . . . . . . . . . .
Terminal Mode . . . . . . . . . . . . . . . . . . . . . . . . . . . . . . . . . . . .
Diagnostic Mode. . . . . . . . . . . . . . . . . . . . . . . . . . . . . . . . . . .
Features. . . . . . . . . . . . . . . . . . . . . . . . . . . . . . . . . . . . . . . . . . . . .
Typical Configurations . . . . . . . . . . . . . . . . . . . . . . . . . . . . . . . . .
DL40 Plus to DL5 Slave. . . . . . . . . . . . . . . . . . . . . . . . . . . . .
PanelView to DL5 Slave . . . . . . . . . . . . . . . . . . . . . . . . . . . .
Chapter Objectives . . . . . . . . . . . . . . . . . . . . . . . . . . . . . . . . . . . .
Mounting the DL5 Slave . . . . . . . . . . . . . . . . . . . . . . . . . . . . . . .
Panel Cutout Dimensions . . . . . . . . . . . . . . . . . . . . . . . . . . . . . . .
DL5 Mounting Dimensions . . . . . . . . . . . . . . . . . . . . . . . . . . . . .
Electrical Precautions . . . . . . . . . . . . . . . . . . . . . . . . . . . . . . . . . .
Input Voltage Requirements . . . . . . . . . . . . . . . . . . . . . . . . . . . . .
Hazardous Location Installations . . . . . . . . . . . . . . . . . . . . . . . . .
RS-232 Connections . . . . . . . . . . . . . . . . . . . . . . . . . . . . . . . . . . .
DL5 Slave to DL40 Plus Master RS-232 Port . . . . . . . . . . . .
DL5 Slave to PanelView RS-232 Printer Port . . . . . . . . . . . .
DL5 Slave to 1771-DB BASIC Module. . . . . . . . . . . . . . . . .
DL5 Slave to 1746-BAS BASIC Module. . . . . . . . . . . . . . . .
DL5 Slave to PLC-5 Channel 0 . . . . . . . . . . . . . . . . . . . . . . .
DL5 Slave to SLC Channel 0 . . . . . . . . . . . . . . . . . . . . . . . . .
Power Connections . . . . . . . . . . . . . . . . . . . . . . . . . . . . . . . . . . . .
Operate / Configure Switch . . . . . . . . . . . . . . . . . . . . . . . . . . . . .
Startup Sequence . . . . . . . . . . . . . . . . . . . . . . . . . . . . . . . . . . . . .
Chapter Objectives . . . . . . . . . . . . . . . . . . . . . . . . . . . . . . . . . . . .
Configuring a DL5 Slave . . . . . . . . . . . . . . . . . . . . . . . . . . . . . . .
Configuration Cables . . . . . . . . . . . . . . . . . . . . . . . . . . . . . . . . . .
Using Terminal Emulation . . . . . . . . . . . . . . . . . . . . . . . . . . . . . .
Configuring a DL5 Slave Message Display . . . . . . . . . . . . . . . . .
DL5 Configuration Menu . . . . . . . . . . . . . . . . . . . . . . . . . . . . . . .
DL5 Configuration Options . . . . . . . . . . . . . . . . . . . . . . . . . . . . .
Run Mode . . . . . . . . . . . . . . . . . . . . . . . . . . . . . . . . . . . . . . . .
Serial Address. . . . . . . . . . . . . . . . . . . . . . . . . . . . . . . . . . . . .
Baud Rate . . . . . . . . . . . . . . . . . . . . . . . . . . . . . . . . . . . . . . . .
Cursor Enable . . . . . . . . . . . . . . . . . . . . . . . . . . . . . . . . . . . . .
Auto New Line . . . . . . . . . . . . . . . . . . . . . . . . . . . . . . . . . . . .
P-1
P-1
P-2
P-2
P-2
1-1
1-1
1-2
1-2
1-2
1-2
1-2
1-3
1-4
1-4
1-4
2-1
2-1
2-2
2-2
2-3
2-3
2-4
2-4
2-5
2-5
2-6
2-6
2-7
2-7
2-8
2-8
2-9
3-1
3-1
3-1
3-2
3-3
3-4
3-5
3-5
3-5
3-5
3-5
3-5
Publication 2706-6.4
ii
Dataliner (DL) Slave Mode
PanelView (PV) Slave Mode
Terminal Mode
Diagnostic Mode
Specifications
Character Set
Index
Publication 2706-6.4
Chapter Objectives . . . . . . . . . . . . . . . . . . . . . . . . . . . . . . . . . . . .
Slave Mode Operation . . . . . . . . . . . . . . . . . . . . . . . . . . . . . . . . .
Example Messages . . . . . . . . . . . . . . . . . . . . . . . . . . . . . . . . . . . .
Display Options. . . . . . . . . . . . . . . . . . . . . . . . . . . . . . . . . . . . . . .
Clearing One or More Lines . . . . . . . . . . . . . . . . . . . . . . . . . . . . .
Chapter Objectives . . . . . . . . . . . . . . . . . . . . . . . . . . . . . . . . . . . .
PV Slave Mode . . . . . . . . . . . . . . . . . . . . . . . . . . . . . . . . . . . . . . .
PV Slave Mode Protocol. . . . . . . . . . . . . . . . . . . . . . . . . . . . . . . .
Display Options. . . . . . . . . . . . . . . . . . . . . . . . . . . . . . . . . . . . . . .
Line Display Characteristics . . . . . . . . . . . . . . . . . . . . . . . . . . . . .
Chapter Objectives . . . . . . . . . . . . . . . . . . . . . . . . . . . . . . . . . . . .
Terminal Mode Operation. . . . . . . . . . . . . . . . . . . . . . . . . . . . . . .
Terminal Mode Protocol . . . . . . . . . . . . . . . . . . . . . . . . . . . . . . . .
Chapter Objectives . . . . . . . . . . . . . . . . . . . . . . . . . . . . . . . . . . . .
Using the Diagnostic Mode. . . . . . . . . . . . . . . . . . . . . . . . . . . . . .
Display Characters . . . . . . . . . . . . . . . . . . . . . . . . . . . . . . . . . . . .
Electrical . . . . . . . . . . . . . . . . . . . . . . . . . . . . . . . . . . . . . . . . . . . .
Serial Communications . . . . . . . . . . . . . . . . . . . . . . . . . . . . . . . . .
Environmental . . . . . . . . . . . . . . . . . . . . . . . . . . . . . . . . . . . . . . . .
Mechanical . . . . . . . . . . . . . . . . . . . . . . . . . . . . . . . . . . . . . . . . . .
Certifications . . . . . . . . . . . . . . . . . . . . . . . . . . . . . . . . . . . . . . . . .
Display Characters . . . . . . . . . . . . . . . . . . . . . . . . . . . . . . . . . . . .
4-1
4-1
4-2
4-3
4-3
5-1
5-1
5-1
5-2
5-3
6-1
6-1
6-2
7-1
7-1
A-1
A-1
A-1
A-1
A-1
A-2
B-1
Preface
Using this Manual
Chapter Objectives
Overview of this Manual
Read this chapter to familiarize yourself with the rest of the Dataliner DL5
Slave Message Display manual. You will learn about:
•
contents of this manual
•
intended audience
•
conventions used
•
related publications
This manual describes how to install and use your DL5 Slave display. This
manual contains the following:
Chapter
Title
Purpose
1
Introduction to the DL5
Slave Display
Describes basic features and operating
capabilities.
2
Installation and Startup
Provides installation and wiring
instructions. The status display
sequence on powerup is described.
3
Configuring the DL5
Describes configuration of the display
using DL5 configuration software or an
ASCII terminal.
4
Dataliner (DL) Slave Mode
Describes operation of the display in the
DL Slave Mode (the display receives
message information from a DL40 Plus
master display or enhanced PanelView
terminal).
5
PanelView (PV) Slave Mode
Describes operation of the display in the
PV Slave Mode (displays data that would
normally be printed on the PanelView
printer port).
6
Terminal Mode
Describes operation of the display in the
Terminal Mode. In this mode, the slave
display receives ASCII message and
formatting data from a host device.
7
Diagnostic Mode
Describes how to use the diagnostic
mode to correct communication
problems or data formatting errors.
Appendix A
Specifications
Mechanical and electrical specifications.
Appendix B
Character Sets
ASCII character set
Publication 2706-6.4
P-2
Using this Manual
Intended Audience
Conventions Used
Related Publications
No specialized knowledge is required to configure and install the DL5 slave
display. However, we assume the following:
•
The person responsible for equipment connections is familiar with
standard wiring practices and electrical codes in your area.
•
Communication cabling is done by a person having an understanding of
basic communications terminology and cabling.
•
Panel cutouts are made using the same methods and safety practices
followed for other panel mounted equipment.
The following conventions are used in this manual.
•
The up caret, ^, may be used in place of [Ctrl] (Control key) where
space is limited.
•
Values in a hexadecimal format have the suffix “hex”.
•
Keys on your keyboard are shown in brackets. For example “press [Y]
to acknowledge message”.
•
[Enter] refers to the return key on your keyboard.
You may need to refer to the following related publications:
Publication Title
Publication 2706-6.4
Description
Publication
Number
Dataliner DL40 Plus Message
Display User Manual
Provides installation, wiring and operating
instructions for the DL40 Plus display (not
slave display). Also describes use of the
onboard message editor.
2706-6.1
DL40 Plus Off-line
Programming Software User
Manual
Describes the installation and use of the
DOS based message development
software for the DL40 Plus.
2706-6.2
BASIC Module (Catalog No.
1771-DB) User Manual
Operating instructions for the PLC-5
BASIC module.
1771-6.5.113
SLC500 BASIC Module (Catalog
No. 1746-BAS) User Manual
Operating instructions for the SLC 500
BASIC module.
1746-6.1
PLC-5 Programmable Controller
(Catalog No. 1785-LT2) Quick
Reference
PLC5 Programmable Controller reference.
1785-7.1
PanelBuilder Software
User Manual
Describes how to output messages to the
PanelView printer port for display on the
DL5 Slave.
2711-6.0
PanelBuilder 1400e
Configuration Software for
Windows User Manual
Provides useful information when using a
PanelView enhanced terminal as a master
for a DL5 Slave.
2711e-819
Chapter
1
Introduction to the DL5 Slave
Chapter Objectives
Description
This chapter describes the DL5 Slave display and summarizes its
capabilities. The following topics are included in this chapter:
•
DL5 Slave description
•
Operating modes
•
Features
•
Typical configurations
The DL5 Slave displays are available in one-line and two-line versions.
These displays are designed for panel mounting in industrial environments
and require a 12-24V DC power source.
2706-D11JS
2706-D21JS
DL5 Slave displays receive message text from a host device. The host
device may be a DL40 Plus master display, PanelView terminal,
programmable controller, or a personal computer. All messages are created
and stored in the host device.
The DL5 Slave displays appear similar to the standard DL5 one and
two-line displays except they do not have a parallel port.
Publication 2706-6.4
1-2
Introduction to the DL5 Slave
Operating Modes
The DL5 Slave has four operating modes:
•
DL Slave
•
PV Slave
•
Terminal
•
Diagnostic
DL (Dataliner) Slave Mode
Use this mode when connecting one or more DL5 slaves to a DL40 Plus
master display, PLC or SLC controller. A DL5 Slave may be connected to a
DL40 Plus using an RS-232 link (single drop only).
Multiple DL5 slave displays may be connected to an RS-485 link using an
RS-485 to RS-232 converter such as the Black Box LD-485A-MP. Each
DL5 slave may be individually addressed to display only the messages sent
to a specific address. Displays with the same address, display the same
message. Addresses 13 & 18 cannot be used.
PV (PanelView) Slave
Use this mode when connecting a single DL5 Slave to the printer port of a
standard PanelView operator terminal (PV550, 600, 900, 1000 or 1400).
The DL5 Slave displays any text that would normally be sent to a printer.
The DL5 Slave may be connected to the PanelView using the RS-232 port.
Only one display may be connected on the communication link, the DL5
slave displays cannot be addressed individually in this mode.
Terminal Mode
In this mode, the DL5 Slave can receive data from any device capable of
sending serial ASCII characters. The ASCII characters sent by the host
device control the message text, line scrolling and formatting of the
messages.
Diagnostic Mode
Use the diagnostic mode for basic setup and troubleshooting. In this mode,
the DL5 Slave displays the hex value of all the data it receives. An
indication is provided if there is a communication error.
Publication 2706-6.4
Introduction to the DL5 Slave
Features
1-3
DL5 Slave displays have these features:
14 Segment Matrix Characters
One or Two-Line Vacuum Fluorescent Display
Operate
(up)
Operates on standard
12-24V DC
1
2
SW1
DIP Switch (Operate/Configure)
Position 2 Not Used
1
Configure
(down)
2
SW1
RS-232 Port
Publication 2706-6.4
1-4
Introduction to the DL5 Slave
Typical Configurations
Here are some of the most typical applications:
DL40 Plus to DL5 Slave
DL5 Slave
SYSTEM CHECK
NORMAL
DL40 Plus (Master)
Note: You can use either the
RS-232 or the RS-485 port.
You cannot use both ports
RS-232 (point-to-point)
RS-485/RS-232
Black Box Converter
Model# LD-485A-MP
RS-232
DL5 Slave
PRESS #1 STOPPED
RS-485 (multi-drop)
RS-485/RS-232
Black Box Converter
Model# LD-485A-MP
RS-232
Host Controller or Personal Computer
Triggering Messages
DL5 Slave
PanelView to DL5 Slave
DL5 Slave
INLET VALVE
12:48 09/16/98
Printer Port
RS-232
PLC, PC, or Other Device to DL5 Slave
DL5 Slave
Alarm Reset
6:40 AM 11/17/98
RS-232 (point-to-point)
Publication 2706-6.4
PLC, Personal Computer,
or other device providing
ASCII message packets
Chapter
2
Installation and Startup
Chapter Objectives
Mounting the DL5 Slave
This chapter describes how to mount and make electrical connections to the
DL5 Slave display. The following topics are described:
•
Mounting Instructions
•
Panel Cutout Dimensions
•
Power Connections
•
Powerup Sequence
The following pages provide panel cutout dimensions and overall
dimensions for the DL5 Slave displays.
You can also mount the DL5 Slaves in a custom panel or enclosure. When a
DL5 Slave is properly installed, the faceplate of the DL5 Slave provides a
NEMA Type 12/13 and 4 enclosure rating. To install the DL5 Slave:
1. Cut and drill the appropriate mounting holes in the enclosure or panel as
shown on the following pages.
2. Remove the four mounting nuts from the mounting studs on the display.
3. Position the DL5 Slave in the panel or enclosure mounting hole.
4. Install and alternately tighten the nuts to a torque of 9in•lbs (1.02N•m).
Publication 2706-6.4
2-2
Installation and Startup
Panel Cutout Dimensions
All dimensions are in inches (millimeters)
5.75 (146.1)
5.38 (136.7)
2.25 (57.2)
Full Size Cutout Template
1.12 (28.6)
1.31 (33.3)
2.88 (73.2)
0.171 (4.3) Diameter, 4-places
DL5 Mounting Dimensions
All dimensions are in inches (millimeters)
3.12
(79.3)
Front
6.25 (158.8)
5.25 (133.4)
Top
4.31 (108.0) Max
Depending on Panel Thickness
0.22 (5.6) Max
Panel
Publication 2706-6.4
Installation and Startup
Electrical Precautions
2-3
Install the DL5 Slave display conforming to NFPA 70E, Electrical Safety
Requirements for Employee Workplaces. In addition to the NFPA general
guidelines, refer to the following:
Careful cable routing helps minimize electrical noise. Route incoming
power to the module by a separate path from the communication cables.
Do not run communications wiring and power wiring in the same
conduit!
Where communication and wire paths must cross, make their intersection
perpendicular.
Grounding helps limit the effects of noise due to electromagnetic
interference (EMI). To avoid problems caused by EMI, properly ground all
equipment and use shielded cables.
Input Voltage Requirements
Before connecting the DL5 Slave to the incoming power, verify that the
power source provides:
Voltage: 12-24 Volts DC
Current: 250 milliamperes at 12V DC (300mA inrush)
125 milliamperes at 24V DC (300mA inrush)
Fusing: External fuses should be used
Important: Power, input and output (I/O) wiring must be in accordance
with Class I, Division 2 wiring methods [Article 501-4(b) of the
National Electrical Code, NFPA70] and in accordance with the
local authority having jurisdiction.
Publication 2706-6.4
2-4
Installation and Startup
Hazardous Location
Installations
!
!
!
RS-232 Connections
ATTENTION: THIS EQUIPMENT IS SUITABLE
FOR USE IN CLASS I, DIVISION 2, GROUPS A, B,
C AND D, OR NON-HAZARDOUS LOCATIONS
ONLY.
ATTENTION: EXPLOSION HAZARD SUBSTITUTION OF COMPONENTS MAY IMPAIR
SUITABILITY FOR CLASS 1, DIVISION 2.
ATTENTION: EXPLOSION HAZARD - DO NOT
CONNECT OR DISCONNECT EQUIPMENT
UNLESS POWER HAS BEEN SWITCHED OFF OR
THE AREA IS KNOWN TO BE NON-HAZARDOUS.
Use the RS-232 port to connect the DL5 Slave to:
•
DL40 Plus Master
•
PanelView Printer Port
•
1771 or 1746-DB BASIC Module
•
RS-485/RS-232 Black Box Converter (Model# LD-485A-MD)
•
PLC-5 Channel 0
•
SLC Channel 0
•
Personal Computer (RS-232 serial port)
The following figure shows the location and terminal definitions for the
RS-232 port.
1
DL5 Slave
Publication 2706-6.4
3
2
6
Pin #
1
2
3
4
5
6
7
8
9
7
4
8
5
9
Function
No Connection
TXD
RXD
No Connection
Signal Common
DSR
RTS
CTS
No Connection
Installation and Startup
2-5
DL5 Slave to DL40 Plus Master RS-232 Port
Connect a single DL5 slave to a DL40 Plus master as shown below. You
can also use the DTAM Plus programming cable (Catalog No. 2707-NC2)
with a male-female pin adapter.
DL40 Plus Master
TXD
RXD
Signal Ground
DL5 Slave
2 TXD
3 RXD
5 Signal Ground
2
3
5
DL5 Slave to PanelView RS-232 Printer Port
Connect the DL5 Slave to a PanelView RS-232 printer port as shown
below. The PanelView sends messages to the DL5 Slave using its print
messages function. You can also use the DTAM Plus programming cable
(Catalog No. 2707-NC2) with a male-female pin adapter.
PanelView 900 Shown
DL5 Slave
TXD
RXD
Signal Ground
2 TXD
3 RXD
5 Signal Ground
2
3
5
DL5 to RS-485 Port
Use an RS-485 to RS-232 converter such as the Black Box LD485A-MP to
connect the DL5 to a RS-485 network.
RS-485 Port
Term 6
CH-B 5
CH-A 4
Comm 3
Shield 2
Shield
E-Ground 1
Black Box
LD485A-MP
RXB
RXA
TXB
TXA
2
3
7
DL5 Slave
TXD
RXD
2
3
5
RS-485 Out- RS-232 In
Publication 2706-6.4
2-6
Installation and Startup
DL5 Slave to 1771-DB BASIC Module
BASIC Module
RS-232 Peripheral Port
Shield
TXD
RXD
Signal Ground
RTS
CTS
DSR
DTR
1
2
3
7
4
5
6
20
DL5 Slave
RS-232 Port
2 TXD (RS-232 Out)
3 RXD (RS-232 In)
5 Signal Ground
DL5 Slave to 1746-BAS BASIC Module
BASIC Module
RS-232 PRT1 Port
Shield
RXD
TXD
COM
DTR
CTS
DSR
DTR
Publication 2706-6.4
1
2
3
4
5
6
7
8
DL5 Slave
RS-232 Port
No Connection
2 TXD (RS-232 Out)
3 RXD (RS-232 In)
5 Signal Ground
Installation and Startup
2-7
DL5 Slave to PLC-5 Channel 0
Connect the DL5 Slave to a PLC-5 Channel 0 port as shown below. You
can also use programming cable (Catalog No. 2706-NC12).
PLC-5 Channel 0
25 Pin D Shell Connector
DCD 8
RXD 3
TXD 2
DTR 20
Common 7
DSR 6
RTS 4
CTS 5
Chassis Ground 1
DL5 Slave
RS-232 Port
Shield
1
2
3
4
5
6
7
8
9
No Connection
TXD
RXD
No Connection
Signal Common
DSR
RTS
CTS
No Connection
DL5 Slave to SLC Channel 0
Connect the DL5 Slave to an SLC Channel 0 port as shown below. You can
also use programming cable (Catalog No. 2706-NC13).
SLC Channel 0
9-Pin Connector
DCD
RXD
TXD
DTR
Common
DSR
RTS
CTS
DL5 Slave
RS-232 Port
1
2
3
4
5
6
7
8
Shield
1
2
3
4
5
6
7
8
9
No Connection
TXD
RXD
No Connection
Signal Common
DSR
RTS
CTS
No Connection
Publication 2706-6.4
2-8
Installation and Startup
Power Connections
Before making power connections, make sure that the power is turned off.
The DL5 Slave requires 12-24Volts DC, 250-125 mA (300mA inrush).
TB2
1
Common
!
Operate / Configure Switch
2
12-24V DC
ATTENTION: Improper wiring of the power
connections may result in damage to the DL5 Slave.
The DL5 Slave does not contain any fuses. We
recommend that you use external fusing to prevent
damage to the DL5 slave or power supply.
The Operate / Configure switch (position 1) is located on the back of the
DL5 Slave. The switch in position 2 is not used.
1
2
Operate
(Up)
SW1
1
Configure
(Down)
2
SW1
For normal operation, the switch (position 1) should be in the up (on)
position. Setting the switch in the down (off) position causes the DL5 to
enter the configuration mode.
Publication 2706-6.4
Installation and Startup
Startup Sequence
2-9
When power is applied to the DL5 Slave a powerup sequence of displays
are shown. The first display on powerup is the sign-on banner identifying
the hardware and firmware:
DL5 SLAVE 2L
V1.00
04/02/99
Following the sign-on banner, all of the display pixels are turned on for 2
seconds followed by a series of informational messages indicating the
current DIP switch settings. Each display lasts for about four seconds.
DL SLAVE MODE
PV SLAVE MODE
TERMINAL MODE
DIAGNOSTIC MODE
DL SLAVE MODE
0 to 127
Addresses 13 & 18 are not valid
SERIAL ADDRESS: XXX
9600 BAUD N-8-1
9600
1200
300
Note: Only displayed for DL Slave mode
Parity / Data Bits / Stop Bits
N-8-1
CURSOR ENABLED
CURSOR DISABLED
CURSOR ENABLED
AUTO LINE ENABLED
Note: Only displayed for PV Slave
or Terminal modes
AUTO LINE ENABLED
AUTO LINE DISABLED
After the status messages are displayed, the DL5 Slave clears the display
and enters the selected run mode. Note: if the Operate / configure switch is
in the Configure position (position 1, down), the DL5 Slave displays:
MODE = (Current Operating Mode)
Publication 2706-6.4
2-10
Installation and Startup
Publication 2706-6.4
Chapter
3
Configuring the DL5 Slave
Chapter Objectives
This chapter describes how to configure the DL5 display using an ASCII
programming terminal or personal computer running a terminal emulation
program such as HyperTerminal (Windows 95 or 98).
Configuring a DL5 Slave
You can configure a DL5 Slave with:
• an ASCII (dumb) terminal connected to the DL5 Slave RS-232 port
• a personal computer connected to the DL5 Slave RS-232 port and
running a terminal emulation program.
Configuration Cables
The following cables are available for configuring the DL5 Slave.
Cable:
Use With:
2706-NC12
Personal computers with 25-pin female com port
connector. DEC VT52, VT100, or VT101 terminals.
Allen-Bradley RAC 6000 industrial computers.
2706-NC13
Personal computers with 9-pin female com port
connector (IBM AT and compatible). Allen-Bradley RAC
6000 industrial computers.
2706-NC14
Allen-Bradley RAC 6000 industrial computers (PC/XT).
2706-NC15
Allen-Bradley Industrial Terminals T1 through T4 (25-pin
male connector)
2707-NC2
DL40 master or PanelView RS-232 printer port (requires
male-female pin adapter).
Publication 2706-6.4
3-2
Configuring the DL5 Slave
Using Terminal Emulation
If you don’t have an ASCII programming terminal, you can use your
computer with a terminal emulation program such as HyperTerminal. The
following example shows HyperTerminal, other terminal programs will be
similar.
5. Locate the HyperTerminal or other program on your computer. Often
the terminal emulation programs can be found on the Start>Accessories
menu.
6. Setup the terminal emulation program. You will need to specify the
port connected to the DL5 Slave and specify a baud rate, parity (none),
data bits (8) and stop bits (1). Make sure the baud rate is set to match
the DL5 Slave. If you are not sure of the DL5 slave baud rate, cycle the
power. The communication settings are displayed in the startup
sequence. To use HyperTerminal, go to the File menu and click on New
Connection.
Publication 2706-6.4
Configuring the DL5 Slave
Configuring a DL5 Slave
Message Display
3-3
1. Connect the DL5 Slave to a communication port on your computer or
programming terminal. Use cable (Catalog No. 2706-NC13) for
standard 9-pin connections or cable (catalog No. 2706-NC12) for 25-pin
connections. Page 3-1 lists the available programming cables for other
configurations.
2. Set the programming terminal for the following:
– 9600 baud (see Important below)
– 8 data bits
– no parity
– 1 stop bit
– flow control (None)
Important: Some terminals require that the terminal be reset (or switched
to the ‘Operate’ state) before changes to a communication protocol takes
affect. In addition, the DL5 Slave may have been previously configured
with a different baud rate. The DL5 Slave displays its baud rate during the
power-up sequence. Make sure the programming terminal is set to match.
3. Check the Operate / Configure switch on the back of the DL5 Slave. The
switch in position 1 should be in the down (Configure) position.
4. Apply power to the DL5 Slave.
The power-up sequence, described in Chapter 2, is displayed.
MODE= DL SLAVE
5. Respond to each prompt by pressing the [Y], [N] or [Space Bar] keys.
The following page shows the menu structure.
Publication 2706-6.4
3-4
Configuring the DL5 Slave
DL5 Configuration Menu
Start of Menu
MODE= DL SLAVE
[Enter]
[Space Bar]
MODE= PV SLAVE
[Enter]
[Space Bar]
MODE= TERMINAL
BAUD= 9600
[Enter]
Press [SpaceBar] to
scroll through baud rates
[Space Bar]
MODE= DIAGNOSTIC
[Enter]
BAUD= 9600
Press [SpaceBar] to
scroll through baud rates
Enter 3-digit address
and press [Enter]
[Enter]
BAUD= 9600
[Space Bar]
ADDRESS= XXX
ENABLE CURSOR? Y
Press [SpaceBar] to
scroll through baud rates
Press [Y] or [N] then
press [Enter]
ENABLE CURSOR? Y
AUTO NEW LINE? Y
Press [Y] or [N] then
press [Enter]
AUTO NEW LINE? Y
BAUD= 9600
Press [SpaceBar] to
scroll through baud rates
MODE= DL SLAVE
Press [Y] or [N] then
press [Enter]
MODE= PV SLAVE
Press [Y] or [N] then
press [Enter]
MODE= TERMINAL
Important: Make sure you return the Operate / Configure switch (position
1) to the up (Operate) position after configuring the DL5 slave.
Publication 2706-6.4
Configuring the DL5 Slave
DL5 Configuration Options
3-5
The following items can be selected or entered from the configuration
menu:
Run Mode
Use the [SpaceBar] to select from the following run modes:
•
•
•
•
DL Slave Mode
PV Slave Mode
Terminal Mode
Diagnostic Mode
Serial Address
Enter a 3-digit address from 000 to 127 (013 & 018 are invalid). The
address is entered as a decimal value. The serial address only applies to the
DL Slave mode.
Baud Rate
Use the [SpaceBar] to select one of the following baud rates:
• 9600
• 1200
• 300
Cursor Enable
Only available in Terminal and PV Slave modes. Press [Y] or [N] and then
[Enter].
When enabled, the DL5 slave starts up with the cursor visible. When
disabled, the DL5 slave starts with the cursor hidden.
Auto New Line
Only available in Terminal and PV Slave modes. Press [Y] or [N] and then
[Enter].
When enabled, a line feed (LF) occurs after each carriage return (CR). This
allows the DL5 Slave to work with host devices that do not send a CR-LF
combination.
Publication 2706-6.4
3-6
Configuring the DL5 Slave
Publication 2706-6.4
Chapter
4
Dataliner (DL) Slave Mode
Chapter Objectives
Slave Mode Operation
This chapter describes the operation of the DL5 Slave in DL Slave Mode
and contains the following topics:
•
Slave mode description
•
Slave mode protocol
•
Example messages
•
Display options
•
Clearing one or more lines
DL Slave Mode is selected through the configuration menu as described in
Chapter 3. Dataliner (DL) Slave mode allows one or more DL5 Slaves to
display different messages while connected to a single master device such
as a DL40 Plus master display.
Important: If you are using a DL40 Plus as the master, configure its
communication port for DL Slaves (refer to the DL40 Plus user manual,
Publication 2706-6.1). This configures the DL40 master to send message
data in the DL Slave format.
In DL Slave Mode, the DL5 Slave accepts messages in the format:
16 Characters
to Display
Address
Line Number
Carriage Return
16 Characters to Display
Send the message text characters to be displayed. ASCII characters 32 to
126 (20hex to 7Ehex) are supported. Any valid ASCII character, upper or
lower case can be sent however, lowercase letters are displayed as
uppercase. All control characters within the message text field, except
[Ctrl][F] and [Ctrl][R], are ignored. If fewer than 16 characters are sent, the
remaining character positions are filled with spaces. Appendix B shows
the DL5 Slave character set.
Publication 2706-6.4
4-2
Dataliner (DL) Slave Mode
Address
The address of the slave display that will receive the message. This is a
single byte character from 1 to 127 decimal (01 through 7F hex).
Note: Do not use 13 (0Dhex) or 18 (12hex) as an address. These are
reserved and the DL5 automatically converts these addresses to 127 (7F
hex). Address 127 is a global address that accepts all messages regardless
of the address. In addition, any message sent with an address of 127 is sent
to all slave displays.
Line Number
A one byte character specifying the line number the message is to be
displayed on. Valid line numbers are 1, 2, or 50 decimal (not ASCII). The
ASCII characters are Ctrl-A = 1, Ctrl-B = 2, and 2 = 50
Note: 50 decimal as the line number specifies clear both lines.
Carriage Return
Message is terminated by a carriage return, Ctrl-M (decimal 13, 0Dhex).
Example Messages
For example, a print statement using a BASIC module (Catalog No.
1771-DB or 1746-BAS) with a DL5 Slave display would be:
Slave 1 Line 1
Carriage
Return
100 PRINT#”BLOWER 1 STOPPED”, CHR(1), CHR(1), CHR(13)
The message BLOWER 1 STOPPED would be displayed on line one of
slave number one. To send the message fields, the print CHR (decimal
character equivalent) function is used.
To send the same message from any PC terminal program, use:
Slave #1
(01hex)
Carriage
Return (0Dhex)
BLOWER 1 STOPPED^A^A^M
ASCII Text
Line #1
(01hex)
Where: ^A is the [Ctrl] and [A] keys pressed at the same time.
^M is the [Ctrl] and [M] keys pressed at the same time.
Publication 2706-6.4
Dataliner (DL) Slave Mode
Display Options
4-3
Use the following control codes in the message text for flash and reset
functions. Any other control codes are ignored.
[Ctrl][F]
Control-F (06 hex) is the flash code. Send this code when you want all the
characters on the line to flash. The [Ctrl][F] code can appear anywhere in
the text portion of the message. You can turn flash on and off multiple
times in a message. At the start of each new line of message text, the flash
option is turned off. The [Ctrl][F] code is not included in the 16 character
limit of the display protocol.
[Ctrl][R]
Control-R (12 hex) is the reset command. When a [Ctrl][R] is received by
the DL5, all data for the current line is discarded. For example, if 10
characters are received by the DL5 Slave and then a [Ctrl][R] is sent, the 10
characters and the [Ctrl][R] are discarded. After using the reset command,
you can start a new message. [Ctrl][R] resets the flash status to
non-flashing.
Clearing One or More Lines
To clear one or more lines on a DL5 Slave, use:
Slave
Address
Line
Number
Carriage
Return
The following table lists the line number byte required for clearing any or
all lines of the display.
Use this Byte for Line Number:
To Clear:
ASCII
Equivalent Value
Line 1
[Ctrl][A]
1 decimal (1 hex)
Line 2
[Ctrl][B]
2 decimal (2 hex)
All Lines
2
50 decimal (32 hex)
Publication 2706-6.4
4-4
Dataliner (DL) Slave Mode
Publication 2706-6.4
Chapter
5
PanelView (PV) Slave Mode
Chapter Objectives
This chapter describes the operation of the DL5 Slave in the PV Mode. The
following topics are described:
• PV Slave Mode description
• PV Mode protocol
• Display options
PV Slave Mode
Use the PanelView (PV) Slave Mode to send the DL5 Slave messages from
a PanelView operator terminal. The DL5 Slave acts like a printer attached to
the PanelView communication port. Any messages printed by the
PanelView are displayed on the DL5 Slave.
Note: In PV Mode, only one DL5 Slave display can be connected to the
PanelView communication port (RS-232).
PV Slave Mode is configured as described in Chapter 3. For information on
setting up a PanelView to print messages, refer to the PanelBuilder
Software user manual (Publication 2711-6.0).
PV Slave Mode Protocol
Messages to the DL5 Slave in PV mode consist of the following:
Message Text (Up to 128 Characters)
Carriage
Return
Only ASCII characters 32 to 126 (20hex to 7Ehex) are displayed. ASCII
characters 0 through 31 (1F hex) are non-displayable control characters.
Text is displayed from left to right. When the end of the current line is
reached, the cursor moves to the start of the line below. If the cursor is on
the last line, all the lines are shifted up one line (top line is lost). Some
control characters can be used to alter the display of messages and
movement of the cursor (refer to display options, next section).
Publication 2706-6.4
5-2
PanelView (PV) Slave Mode
Display Options
Use the following control codes to control the appearance of messages
displayed in PV Mode.
[Ctrl][F]
(06 hex)
Flash command. Send the [Ctrl][F] command when you want the display
characters to flash. Following the first flash code, all the characters on the
display will flash. If a second [Ctrl][F] is received, the display stops
flashing. At the start of each new line of message text, the flash option is
turned off.
[Ctrl][J]
(0A hex)
Line Feed command. Send a [Ctrl][J] command to move the cursor down to
the next lower line. If the cursor is on the last line, it remains on the last line
and all of the lines are shifted up (leaving the last line blank).
Note: The cursor is not moved until the next displayable character is
received. This allows the current text to be displayed for the longest period
of time before being shifted or cleared.
[Ctrl][L]
(0C hex)
Form feed command. Sending a [Ctrl][L] command clears the display and
moves the cursor to the upper left corner of the display. Flash mode is set to
non-flashing.
[Ctrl][M]
(0D hex)
Carriage return command. Sending the [Ctrl][M] command terminates the
current message line, sets the flash mode to non-flashing, and moves the
cursor to the beginning of the current line.
If Auto New Line is enabled (see Chapter 2), the cursor is also moved down
to the start of the next line. If the cursor is on the last line, all of the lines are
shifted up (leaving the last line blank).
Note: The cursor is not moved until the next displayable character is
received. This allows the current text to be displayed for the longest period
of time before being shifted or cleared.
Publication 2706-6.4
PanelView (PV) Slave Mode
Line Display Characteristics
5-3
The PanelView Slave mode has two special display characteristics that
make messages easier to read:
Line to Line Delay
After each individual line is displayed, there is a one second pause before
the next line is displayed. This delay provides time for each line to be read.
Cursor Movement Command Delay
Line wrap, carriage return, line feed and form feed operations are not
executed immediately. These commands are buffered and executed only
when the next displayable character (or identical cursor movement) is
received. This allows the current text to be displayed for the longest period
of time before being shifted or cleared.
Publication 2706-6.4
5-4
PanelView (PV) Slave Mode
Publication 2706-6.4
Chapter
6
Terminal Mode
Chapter Objectives
Terminal Mode Operation
This chapter describes the operation of the DL5 Slave in Terminal Mode
and contains the following topics:
•
Terminal mode operation
•
Protocol
Terminal mode allows more control over messages than the basic Slave
Mode setting. In terminal mode, you can control:
•
Cursor position
•
Line scrolling
•
Character-by-character display options
However, this mode also requires that you control the positioning and
formatting of each message. Terminal Mode is configured as described in
Chapter 3.
Publication 2706-6.4
6-2
Terminal Mode
Terminal Mode Protocol
Message text and control codes are sent serially to the DL5 Slave in
terminal mode. The following control codes are used:
Cursor Up (Ctrl-K )
(0B hex)
Positions the cursor directly above the current cursor position. If the cursor
is on the first line, the cursor is moved to the last line on the display. On one
line displays, the cursor does not move.
Cursor Down (Ctrl-V)
(16 hex)
Positions the cursor directly below the current cursor position. If the cursor
is on the last line, the cursor is moved to the first line on the display. On one
line displays, the cursor does not move.
Cursor Left (Ctrl-H)
(08 hex)
Moves the cursor one position to the left of the current cursor position. If
the cursor is at the leftmost position on a line, the cursor is moved to the
rightmost position on the line above. If the cursor is at the leftmost position
of the first line, the cursor is moved to the rightmost position of the last line.
Cursor Right (Ctrl-L)
(0C hex)
Moves the cursor one position to the right of the current cursor position. If
the cursor is at the rightmost position on a line, the cursor is moved to the
leftmost position on the next lower line. If the cursor is at the rightmost
position of the last line, the cursor is moved to the leftmost position of the
first line.
Cursor Return (Ctrl-M)
(0D hex)
Moves the cursor to the leftmost position on the current line.
Line Feed (Ctrl-J)
(0A hex)
Moves the cursor directly below the current position. If the cursor is on the
last line, the cursor stays in its position and every line is moved up one line
(leaving the first line blank).
Reverse Line Feed (Esc and then J )
(1B, 4A hex)
Moves the cursor directly above the current position. If the cursor is on the
first line, the cursor stays in its position and every line is moved down one
line (leaving the last line blank).
Cursor Home (Ctrl-T)
(14 hex)
Moves the cursor to the leftmost position on the first line of the display.
Clear Screen (Esc and then *)
(1B, 2A hex)
Clears the display and moves the cursor to the leftmost position on the first
line of the display.
New Line (Ctrl-_)
(1F hex)
Moves the cursor to the beginning of the line below. If the cursor is on the
last line, every line is moved up one line (leaving the last line blank).
Publication 2706-6.4
Terminal Mode
6-3
Delete Line (Esc and then R)
(1B, 52 hex)
Clears the current line. The cursor remains at its current position.
Insert Line (Esc and then E)
(1B, 45 hex)
Moves the current line and all lines below it down one line (text on bottom
line is lost). Then clears the current line. The cursor remains at its current
position.
Set Cursor Position (Esc,=,<row>,<column>) (1B, 3D <r><c> hex)
Moves the cursor to the specified row and column. Refer to the following
table. If you exceed the parameters listed in the table, the cursor position
defaults to the greatest row or column number.
Column
1
2
3
4
5
6
7
8
9
10
11
12
13
14
15
16
Row
1
2
ASCII
SP
!
“
#
$
%
&
‘
(
)
*
+
,
_
.
/
Decimal
32
33
34
35
36
37
38
39
40
41
42
43
44
45
46
47
Hex
20
21
22
23
24
25
26
27
28
29
2A
2B
2C
2D
2E
2F
For example, the following ASCII character sequence places the cursor in
Row 2, Column 9 of a two line display: ESC= !(
Set Cursor Invisible (ESC . 0)
Makes the cursor invisible.
(1B, 2E, 30 hex)
Set Cursor Visible (ESC . 1)
Makes the cursor visible.
(1B, 2E, 31 hex)
Set Flashing Mode (ESC G 2)
(1B, 47, 32 hex)
Enables flashing text mode. After receiving this command, every character
on the display flashes until disabled with a Clear Flashing Mode command.
Clear Flashing Mode (ESC G 0)
Disables flashing text mode.
(1B, 47, 30 hex)
Display Status (ESC h)
(1B, 68 hex)
Temporarily displays the configuration status of the display. This is the
same configuration text displayed on powerup without product version text
and pixel test. After displaying the status information, the screen is cleared
with the cursor in the leftmost position on the first line.
Publication 2706-6.4
6-4
Terminal Mode
Publication 2706-6.4
Chapter
7
Diagnostic Mode
Chapter Objectives
This chapter describes the operation of the DL5 Slave in the Diagnostic
Mode. Use the diagnostic mode to verify communications with a host
device. Diagnostic mode displays the exact data being sent by a host
device. Use the diagnostic mode as a temporary installation and
troubleshooting aid.
Set the DL5 Slave for diagnostic mode as described in Chapter 3.
Using the Diagnostic Mode
In diagnostic mode, every byte received on the RS-232 port is displayed in a
hexadecimal format on line 1 of the display. The bytes shift from right to
left as each new byte is received. The byte on the right is always the last
byte received. For example:
Slave 5, Line 1, Carriage Return
05 01 0D<
The value of every byte is displayed including control characters.
Characters are displayed as fast as they are received (no buffer). This
usually means that only the last 5 bytes of a long message are viewable.
Data Errors
If the DL5 Slave and host device are not set to the same serial port settings,
a reception error can occur. Data cannot be displayed if an error occurs.
Instead the DL5 Slave displays an error symbol ‘XX’. The error symbol
indicates serial data was transfered but resulted in an error..
Serial Port Error
05 XX 0D<
Publication 2706-6.4
7-2
Diagnostic Mode
Publication 2706-6.4
Appendix
A
Specifications
Display Characters
Character Height
One line display
Two line display
5.31 mm (0.209 inch)
5.94 mm (0.234 inch)
Character Set
Alphanumeric
Upper Case Only
Characters per Display Line
16
Viewing Distance - Approximate
3 meters (10 feet)
Character Type
Vacuum fluorescent, 14 segment characters.
Filtered to blue/green color.
Input Voltage
12-24V DC
Input Current
250 - 125 mA, 300 mA inrush
Electrical Interface
RS-232 (EIA-/TIA-232-E)
Baud Rate
300, 1200, 9600
Data Format
8 data bits, no parity, 1 stop bit
Temperature Range - Operating
0° to 50°C (+32° to 122°F)
Temperature Range - Storage
-40° to 85°C (-40° to 185°F)
Humidity
5% to 95% (non-condensing)
Enclosure Type
UL listed for NEMA Type 12, 13, 4 (indoor use
only) when panel mounted in a suitable
enclosure of equivalent rating.
Electrical
Serial Communications
Environmental
Mechanical
Weight - Approximate
Catalog No. 2706-D11JS, -D21JS
1.5 lbs. (0.68 kg)
Publication 2706-6.4
A-2
Specifications
Certifications
Listings
UL listed for UL-508 Industrial Control
Equipment Class I, Groups A, B, C, and D
Division 2, Hazardous Locations
Listed for Canadian Safety Standards
Class 1, Division 2, Groups A, B, C, D
Hazardous Location
Publication 2706-6.4
Appendix
B
Character Set
Publication 2706-6.4
B-2
Character Set
Publication 2706-6.4
Index
A
address
serial 3-5
contents
overview P-1
conventions P-2
applications
PanelView to DL5 slave 1-4
PLC, PC, other device to DL5 slave 1-4
cursor enable 3-5
audience P-2
D
B
baud rate 3-5
C
cables
configuration 3-1
carriage return
DL slave mode 4-2
PanelView slave mode 5-2
characters
display 1-3
clear lines 4-3
communications
baud rate 3-5
data errors 7-1
specifications A-1
configuration
communication settings 3-2, 3-3
menu 3-4
configurations
typical 1-3
configure/operate switch 1-3, 2-8
configuring
cutout
dimensions 2-2
data errors 7-1
description
DL5 1-1
DL5 slaves 1-1
diagnostic mode 1-2
data errors 7-1
displaying received data 7-1
DIP switch
operate/configure 1-3, 2-8
display
startup sequence 2-9
display characters 1-3
display options
DL slave mode 4-3
DL slave mode 1-2
BASIC example 4-2
carriage return 4-2
clearing one or more lines 4-3
display characters 4-1
display options 4-3
example 4-2
example messages 4-2
flash code 4-3
line number 4-2
reset command 4-3
DL5 3-1
connections
DL5 slave to 1746 BASIC module 2-6
DL5 slave to 1771 BASIC module 2-6
DL5 slave to DL40 master 1-4, 2-5
DL5 slave to PanelView printer port 2-5
DL5 slave to PLC-5 2-7
DL5 slave to SLC 2-7
electrical precautions 2-3
input power 2-3
PanelView to DL5 slave 1-4
PLC, PC, other device to DL5 slave 1-4
power 1-3
RS-232 2-4
typical 1-4
E
electrical
DL5 slave to 1746 BASIC module 2-6
DL5 slave to 1771 BASIC module 2-6
DL5 slave to DL40 master 2-5
DL5 slave to PanelView printer port 2-5
DL5 slave to PLC-5 2-7
power connections 2-3, 2-8
electrical precautions 2-3
enclosure
rating A-1
EU
directives A-1
Publication 2706-6.4
I-ii
Index
F
features
DL5 slave 1-2
flash code 4-3, 5-2
form feed
PanelView slave mode 5-2
H
hazardous locations
installing 2-4
humidity A-1
I
installation
cutouts 2-2
electrical precautions 2-3
hazardous locations 2-4
L
line feed 5-2
line number
DL slave mode 4-2
lines
clearing 4-3
M
O
offline programming software 3-1
operate/configure switch 1-3, 2-8
operating mode 1-2
operating modes 1-2
P
panel
cutout dimensions 2-2
PanelView slave mode
carriage return 5-2
cursor movement delay 5-3
display options 5-2
flash code 5-2
form feed 5-2
line feed 5-2
line to line delay 5-3
power
connections 2-8
connector 1-3
protocol
slave mode 5-1
terminal mode 6-2
publications
related P-2
PV slave mode 1-2
menu
configuration 3-4
messages
DL slave mode example 4-2
mode
diagnostic 1-2
diagnostic mode 3-5
DL slave 1-2, 3-5
operating 1-2
PV slave 1-2, 3-5
run 3-5
terminal 1-2
terminal mode 3-5
mounting
hazardous locations 2-4
N
NEMA
rating A-1
Publication 2706-6.4
R
reset command 4-3
RS-232
connector 2-4
to 1746 BASIC module 2-6
to 1771 BASIC module 2-6
to PanelView printer port 2-5
to PLC-5 2-7
to SLC 2-7
run mode 3-5
S
shock A-1
startup sequence 2-9
switch
configure/operate 1-3
Index
I-iii
T
temperature
operating ranges A-1
terminal mode 1-2
clear screen 6-2
cursor down 6-2
cursor home 6-2
cursor left 6-2
cursor return 6-2
cursor right 6-2
cursor up 6-2
de-energize relay 6-3
delete line 6-3
display status 6-3
flashing mode 6-3
insert line 6-3
line feed 6-2
new line 6-2
reverse line feed 6-2
set cursor invisible 6-3
set cursor position 6-3
set cursor visible 6-3
terminal emulation 3-2
U
UL
listing A-1
V
vibration A-1
voltage
input requirements 2-3
Publication 2706-6.4
I-iv
Index
Publication 2706-6.4
Back Cover
Publication 2706-6.4 - August, 1999
41061-126-01(A)
© (1999) Rockwell International Corporation. Printed in the U.S.A.