1
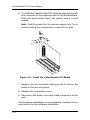
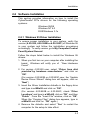
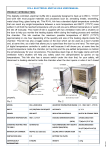
Installation
Chapter 2
Installation
This chapter will guide you through the installation of your
CyberParallel PCI. There are no jumpers or switches to set
for this PCI Plug-n-Play board.
2-1 Hardware Installation
General instructions for installing the board are given since
the design of computer chassis varies. Refer to your
computer’s reference manual for information on removing
the computer cover.
1. Turn OFF the power to your computer and any other
connected peripheral devices.
2. Unplug the power cord from the back of the computer.
3. Remove the computer’s cover by removing its mounting
screws and sliding off the cover.
4. Select an available 32-bit PCI slot for the board.
5. Remove the slot bracket by unscrewing the holding screw
and sliding it out. Save this screw for securing the board
after it's installed.
Figure 2-1. Remove the Slot Bracket
2-1
CyberParallel PCI User's Manual
6. To install the CyberParallel PCI, carefully align the board’s
bus connector to the expansion slot on the motherboard.
Push the board down firmly, but gently, until it is well
seated.
Note Hold the board by its external edges only. Try to
avoid touching the components, connectors or pins.
Figure 2-2. Install the CyberParallel PCI Board
7. Replace the slot bracket's holding screw to secure the
board to the rear slot panel.
8. Replace the computer's cover.
9. Reconnect the power cord and make connection to the
port.
The hardware installation is now complete. Continue to the
next section for the software installation.
2-2
Installation
2-2 Software Installation
This section provides information on how to install the
CyberParallel PCI's drivers for the following operating
systems:
Windows 95/98
Windows NT 4.0
DOS/Windows 3.1x
2-2.1 Windows 95 Driver Installation
To ensure proper installation in your system, verify the
version (4.00.950, 4.00.950B or 4.00.950C) of Windows 95
in your system and follow the installation procedures
accordingly. To verify version, go to My Computer/Control
Panel/System/General
Follow the steps listed below to install the Windows 95
drivers:
1. When you first turn on your computer after installing the
board, Windows will notify you of “New Hardware
Found”.
2. For version 4.00.950 user, select “Driver from disk
provided by hardware manufacturer” and click on
“OK”.
(For version 4.00.950B or 4.00.950C user, the “Update
Device Driver Wizard” dialog box will appear, click on
“Next”)
3. Insert the Driver Installation diskette in the floppy drive
and type in a:\Win95 and click on “OK”.
(For version 4.00.950B or 4.00.950C, check “Other
Locations” and type in a:\Win95, click on “OK”, and then
“Finish”. From the "Insert File" window, click on “OK”.
When the “Copying Files” dialog box appears, type in
a:\Win95 and click on “OK” again.)
4. Remove the diskette and select “Yes” to restart the
computer for the setup to take effect.
2-3
CyberParallel PCI User's Manual
2-2.2 Windows 98 Driver Installation
Follow the steps listed below to install the Windows 98
drivers:
1. At the Add New Hardware Wizard windows, click on
“Next”.
2. Select the option “Search for the best driver for your
devices (Recommend)”, and click on “Next”.
3. Select the option “Specify the location”, and type in
a:\Win98 then click on “Next”.
4. Click “Next” and then “Finish” respectively.
5. Remove the diskette, then select “Yes” to restart the
computer for the setup to take effect.
To verify successful installation in Windows 95/98:
1. From the main desktop, click on My Computer, then
double-click on Control Panel, System, and Device
Manager.
2. Double-click on either Ports (COM & LPT) or SIIG Cyber
PCI device options. SIIG CyberParallel PCI Board should
be displayed when successfully installed. The port is
ready to connect new device.
2-4
Installation
2-2.3 Windows NT 4.0 Driver Installation
Follow the steps listed below to install the Windows NT 4.0
drivers:
1
Go to Start and Run.
2. Insert the Driver Installation diskette in the floppy drive
and type in: A:\NT4\setup, then click on “OK”.
3. The “Welcome” window will appear. Click on “Next”.
4. From the “Choose Destination Location” window, click
on “Next”.
5. From the next “Setup Complete” window, select “Yes, I
want to restart my computer now” and click on “Finish”.
6. Remove the diskette and restart the computer for the
setup to take effect.
To verify successful installation in Windows NT 4.0:
1. Go to Start / Setting / Control Panel, double-click on
SIIG Cyber PCI 20X device icon.
2. A new LPT number will be assigned for the parallel port
when successfully installed. The board is ready to
connect a printer.
Note If you plan to connect a parallel device other
than a printer to the port, such as zip drive, scanner
etc, please follow the next section to change the I/O
address for the port to support the device.
2-5
CyberParallel PCI User's Manual
To change the I/O address in Windows NT 4.0:
1. Go to Start / Setting / Control Panel, double-click on
Cyber PCI IO device icon.
2. Highlight the LPT address and click on Setting.
3. Select or type in an I/O address supported by the device
you would like to configure and click on OK. Make sure
the selected I/O address does not conflict with other
device in your system.
4. Select Restart Now for the new setup to take effect.
2-2.4 DOS/Windows 3.1x Driver Installation
Follow the steps listed below to install the drivers for DOS/
Windows 3.1x:
1. Insert Driver Installation diskette in the floppy drive and
from the C:\> prompt, type in: copy a:\dos\*.* and press
<Enter>.
2. Type in: edit autoexec.bat and press <Enter>.
3. Add C:\CB20XPC.exe at the bottom of the autoexec.bat
file.
4. Go to File, save the changes and exit.
5. Remove the diskette and restart the system for the new
setup to take effect.
2-6