Download Operation Manual
Transcript
Coagulation Analyzer Operation Manual CA-04C PLEASE READ THIS MANUAL CAREFULLY BEFORE OPERATION 3, Hagavish st. Israel 58817 Tel: 972 3 5595252, Fax: 972 3 5594529 [email protected] MRC.VER.01-5.14 Coagulation Analyzer User’s Manual How to use this manual Thank you very much for being the user of CA-04C Coagulation Analyzer. Before operate .this instrument, please read this manual carefully This user’s manual is for the CA-04C Coagulation Analyzer from MRC company. including the contents of instrument installation, daily operation, maintenance, etc The functions of insrtruments with difference versions or configurations may be different. Please reserve all packing materials for storage, transportation and return to fctory for maitenance. If any problems come into existence, please contact the distributors Meanings of markers Warnings: It indicates that if no attention is paid to this marker with misoperation of this instrument, the casualties and severe injuries of the using personnel or severe property loss might be caused. Note: It indicates that if no attention is paid to this marker with misoperation of this instrument, it will be caused that the using personnel are injured, the output results are influenced or the loss is applied to the properties. Points for attention for diagnosis Cautions: This product is a clinical inspection instrument used for inspection. The clinical diagnosis based on the test results shall be implemented by the doctor according to the clinical symptoms, combining other inspection results. 1 Coagulation Analyzer User’s Manual Main graphics used on the instrument Symbols on the instrument This symbol means that the labeled item is hot while the instrument is in use. Don’t touch the labeled item as you could be scalded. The symbol is labeled on the lamp support of optic system. This means that the labeled item could lead to personal injury and/or damage to the analyzer. The symbol is labeled beside the power outlet and some external interface. The symbols for “SERIAL NUMBER”, The serial number shall be after or below the symbol, adjacent to it. The symbol means the product is in vitro diagnostic medical device. The symbol indicates the manufacturer and its address, after which are shown its name and address. The symbol indicates EU representatives of the manufacturer and their addresses, after which are shown their names and addresses. The symbol indicates biological pollution, marked in the part where the instrument contacts the clinical reagent. The symbol appears in black side and yellow background. Symbols on the sales packaging The symbol means that the environment of instruments must be dampproof in the course of transport, and instrument must be kept in a dry environment. This means that instrument should handle with care in the course of transportation, so as not to damage it. The symbol means the instrument packaged should not be upended at any time The symbol means that the level piled up can't exceed 8 layers, as not to damage instrument. The symbol indicates temperature range of the analyzers during storage and transportation. 2 Coagulation Analyzer User’s Manual Safety Precautions and Potential Hazards General Before you start installing and working with the analyzer, you should read the safety precautions and regulations shown in this chapter. Operator Qualification Please note that the operation with Coagulation analyser should be carried out only by the doctor or clinical inspector who has undergone necessary training provided by the sales agent. Service Technician Qualification To install, maintain and repair the instrument, a service technician has to be trained on the instrument by the manufacturer or their representative. A service technician is also expected to be familiar with the normal operation of the instrument as described in the User’s manual and the special operations as described in the service manual. Electrical To use analyser safely, pay attention to the following items: To prevent the risk of electrical shock and/or damage to the instrument Operator should not open the cover of the instrument. Only authorized personnel, for example, service technicians, may open the instrument to perform maintenance or repair. Touching the main board when the power is on may cause severe injury or death. Any problem, please ask for helps from your supplier. Mechanical There is no risk presented by the mechanical parts of the instrument when the instrument is closed. If the covers of the instruments are removed, mechanical parts could cause personal injury or the instrument may be damaged if the following advice is not being considered: DO NOT put your fingers/hands into the pathway or any part while the analyzer is in operation. DO NOT attempt mechanical repair unless the instrument is not in operation or OFF. Chemical The operator is responsible for taking all necessary precautions against hazards associated with the use of clinical laboratory chemicals. Specific recommendations for each reagent used with the analyzer are normally found on the manufacturer’s package inserts or the on the product information sheets for each chemical. Wipe up any reagent spillage on the instrument immediately. Biohazardous Materials As with all vitro diagnostic equipment, patient samples that are assayed on this system, as well as all waste from the waste container, should be treated as the potentially biohasardous. All materials and mechanical components associated with the sampling and waste system 3 Coagulation Analyzer User’s Manual should be handled according to your facility’s biohazard procedure. Use the personal protective equipment recommended by your facility when handling any of these components. Detailed recommendations: - Samples Treat all samples as potentially biohazardous and infectious. If any sample is spit on the instrument, utilize the correct personal protective equipment (PPE- gloves, lab coat, etc...), wipe it up immediately and clean the contaminated with a disinfectant. - Waste solutions and solid wastes Avoid direct contact with waste solution and/or solid waste. Both should be handled as potentially biohazardous. Dispose of waste solution and/or solid waste according to the relevant governmental regulations. Consult the reagent manufacturer for information on the concentrations of heavy metals and other toxic constituents in each reagent. - Biohazardous parts Avoid direct contact with the cup used to contain reagent or patient’s sample. Treat these areas as potentially biohazardous and /or infectious - Reagents Avoid direct body-contact with reagents. Direct body-contact may result in irritation or damage to your skin. Refer to the manufacturer’s reagent kit box and package inserts, or product information sheets for specific instructions. Additional Precautions - Flammables Avoid using dangerous flammable material around the instrument. - Accuracy/Precision of the Measured Results For proper use of the instrument, measure control samples and monitor the instrument during the operation. An incorrectly measured result may lead to an error in diagnosis, thereby posing a danger to the patient. Treat all reagents according to the manufacturer’s recommendations. Refer to the reagent kit box and package inserts, or product information sheets for specific instructions. - Application The instrument is designed for clinical coagulation test analysis using water-soluble samples and reagents. Please note that other types of analysis may not be applicable to the instrument. - Operation and Maintenance 4 Coagulation Analyzer User’s Manual During operation and maintenance of the instrument, proceed according to the instructors and do not touch any parts of the instrument other than those specified. Never leave a Reagents/sample mixture in the cup for longer than necessary. Always clean the cup after a batch of measurement and keep the cup cleanliness when not in use. Avoid touching the mechanism, such as the sipper mechanism inside the instrument, while the instrument is operating. This may cause operation stop or damage the instrument. Attention! Cautions Read the following content carefully before using this equipment. Turn off the power if there is smoke or abnormal smell. There should be no blood or reagent splashed on the equipment and any metal or liquid should not enter the inside of the equipment Please first have plastic glove and then maintenance or repair, wash hand each time after maintenance or repair, so as not be infected by virus. Never let the hand or any part of the body touch the blood or reagent, if the blood specimen is touched by mistake, please clean and get the advice of doctor in time. Used tube or other waste material should be placed according the regulation of medical waste material disposal. (Infected by blood, it can cause infection of pathogen) Regulation of medical law: never change or reinstall the medical instrument. 5 Coagulation Analyzer User’s Manual CONTENTS How to use this manual ...................................................................... 1 Main graphics used on the instrument ................................................ 2 Safety Precautions and Potential Hazards ......................................... 3 1. Instrument Installation .................................................................... 8 1.1 Unpacking ....................................................................................................... 8 1.2 Environment requirement ............................................................................... 8 1.3 Power requirement ......................................................................................... 8 1.4 Begin to install the instrument ......................................................................... 9 1.4.1 Connect the instrument with power .............................................................................. 9 1.4.2 Connect with the external printer .................................................................................. 9 2. Introduction .................................................................................. 10 2.1 Product characters........................................................................................ 10 2.2 Parts of the instruments ................................................................................ 10 2.2.1 Front view ................................................................................................................... 10 2.2.2 Backsight .....................................................................................................................11 2.3 Technical parameters ..................................................................................... 11 3. Input Tools and Operation ............................................................ 12 3.1 Touch screen and pen .................................................................................. 12 3.2 Digital soft key board .................................................................................... 13 3.3 Character soft key board .............................................................................. 13 4. Power on the Instrument .............................................................. 15 4.1 Power on steps ............................................................................................. 15 4.2 Main menu .................................................................................................... 15 5. Parameter Setting ........................................................................ 17 5.1 Coagulation point testing method (percentage testing method) .................... 17 5.2 Change the parameters of tests .................................................................... 18 5.3 Calibration .................................................................................................... 18 5.3.1 Activity percentage ...................................................................................................... 19 5.3.2 Quantity confirming ..................................................................................................... 19 5.3.3 Check the standard curve ........................................................................................... 19 5.4 DFIB setting .................................................................................................. 20 5.5 Control .......................................................................................................... 20 5.5.1 Control parameters setting ......................................................................................... 20 5.5.2 QC result ..................................................................................................................... 21 6 Coagulation Analyzer User’s Manual 6. Sample Testing............................................................................. 22 6.1 Select the tests combination ......................................................................... 22 6.2 Select test mode of the channel.................................................................... 23 6.2.1 Select sample testing.................................................................................................. 23 6.2.2 Select control testing .................................................................................................. 23 6.2.3 Select standard testing ............................................................................................... 24 6.2.4 Start testing ................................................................................................................. 24 6.3 Adding the reagent........................................................................................ 25 6.4 Blood coagulation testing .............................................................................. 26 6.5 Saving the testing result ............................................................................... 26 7. Synthetized Report....................................................................... 27 7.1 Printing according to patient ......................................................................... 27 7.1.1 Patient table ................................................................................................................ 27 7.1.2 Basic Operation .......................................................................................................... 27 7.1.3 Change the patient information .................................................................................. 28 7.1.4 Review the report ........................................................................................................ 28 7.1.5 Cancel the patient record............................................................................................ 28 7.1.6 Report printing ............................................................................................................ 28 7.2 Print according to the items .......................................................................... 29 7.3 Send data to serial port ................................................................................. 29 8. System Setup ............................................................................... 30 9. Message Management ................................................................. 32 10. System Log ................................................................................ 34 11. Shutting Down the System ......................................................... 35 12. Instrument Maintenance ............................................................. 36 12.1 General ....................................................................................................... 36 12.2 Clean the instrument ................................................................................... 36 12.3 Changing the parts of the instrument .......................................................... 36 12.4 Simple Troubleshutting ............................................................................... 36 Appendix I: Guideline for Adding the Sample ................................... 38 Appendix II: Special Instruction of Program Parameter Setting ........ 40 7 Coagulation Analyzer User’s Manual 1. Instrument Installation 1.1 Unpacking Unpack the packing and remove all the material used for transportation, take care of the packing box and wrapper, so as you can find them if you want to re-pack the instrument. 1) Take the instrument out of the box. 2) Take away the wrapper and take the instrument out of the plastic bag. 3) Check and confirm the content of the packing box as followed: Coagulation Analyzer’s main system User’s manual Packing list Maintenance guarantee order of sale agency Accessories: power cable, print signal cable, RS-232 serial cable, pen, fuse standby. Note! If any parts damaged or lost, please contact with the sale agency. 1.2 Environment requirement Your work location should be one place without sunshine straightly. The worktable chosen should be smooth and have enough places for coagulation analyzer. The worktable should not shake very much. (Such as there is a centrifugal machine on the worktable.) Note! Environmental requirements Ambient temperature (operating): 10℃-30 ℃ Relative humidity:≤70% Transport and Storage Environment: Temperature: -10℃~40℃ Humidity: ≤80% Atmospheric Pressure: 86kPa~106kPa Make sure that the instrument work normally; the instrument should not be placed in the location as followed: Where the changing of temperature is extremity; Where it is too hot or too cold; Where there is too much dust Where it is near the equipment that can produce the magnetic field. 1.3 Power requirement a.c.110V~220V 50/60Hz 80VA 8 Coagulation Analyzer User’s Manual Note! Alternative power should be earthed very well (the earth voltage should be no more than 5 V). Alternative power should be stable. It is forbidden that the power source is shared with the equipment with large power. When you want to pull out the power line, what you hold should be the plug itself not the power cable. If you found smoke, bad smell and strange noise in the instrument, please turn off the power immediately and contact with the sale agency. 1.4 Begin to install the instrument 1.4.1 Connect the instrument with power 1) 2) Insert one end of the power line into the power socket of the instrument Insert the other end of the power line into the alternative current socket. 1.4.2 Connect with the external printer 1) 2) 3) 4) 5) Confirm that the instrument and the printer have been shut down. Connect one end of the signal cable with the parallel interface socket of the printer. Lock the socket with steel buckle. Connect the other end of the printing signal cable with the parallel interface socket of the instrument. Connect the printer with the power by the power supply cable. 9 Coagulation Analyzer User’s Manual 2. Introduction 2.1 Product characters 1) 2) 3) 4) 5) 6) 7) 8) The Coagulation Analyzer is a netlized blood analyzing and inspecting instrument. It can be used to diagnose the disease of bleeding and thrombus, also used in the clinic diagnosing such as inspecting and curative effect watching the disease of thrombus dissolving and blood coagulating treatment. Large screen with English interface, using the input method such as screen touching and pen for the user to finish the input operation. There are 16 programmable inspection items inside it. It can save lots of history data; the most can save 1000 patient records and 10000 test records. Various synthesized English report output; it also supports many brands of external printer. Strong network capability: it can be connected with the computers of the hospital, the quality monitoring center and the client service center network. Connected with the blood coagulation lab management system, it can finish the data analyzing and managing work on other computers on the net. Management assistant function: there are section office database, doctor database and system log database. 2.2 Parts of the instruments 2.2.1 Front view ① Power light: when the instrument turns on, the light is on. ②Touch screen: show programme interface, using the pen can finish each kind of operation by touching the screen. ③ Blood coagulating preheating plate: preheat the reaction cup and reagent. 10 Coagulation Analyzer User’s Manual ④ Blood coagulating checking channel: four checking channels. ⑤ Bracket for sample holder: it is used to support the pipette and prevent the reaction cup shaking when sample is added. 2.2.2 Backsight 8 ○ ⑦ ⑦ ⑥ ③ 8 ① 9 ○ LINE PRINTER PO WER O N/O FF ④ ⑤ ② RS232 ACINPUT ①②③ ④ ⑤ ⑥ ① Power switch: turn on or turn off the power. ② Power socket: to connect the alternative current power cable. ③ Fuse: if the power switch is on and there is no power on the machine, check the fuse. ④ LINE: network connector, used to dial up the long distance net communication. ⑤ RS-232: serial communication connector used to connect the external prnter or PC for communication. ⑥ USB: usb connector, used to connect the printer and external mouse. ⑦ SD card: SD card connector. ⑧ Knob for adjusting contrast: It is used to adjust the contrast ratio of LCD. ⑨ Pipette connector: connect with the pipette and receive the signal of reaction starting. 2.3 Technical parameters Weight: 6.5kg Dimension: 410mm(L)×320mm(W)×150mm(H) Power: a.c110V~220V, 50/60Hz Fuse: T3.15AL250V, Ф 5×20 Operating environment: temperature: 10℃-30℃;relative humidity≤70% Storing environment: -10℃-40℃; relative humidity≤80% Light source 470nm laser LED CPU: Embeded RISC processor Saving capability 1000 patient records and 10000 test records Interface: RS-232 two-ward communication connector, USB connector, network connector, pipette connector Display 5.7″LCD (320x240 distinguish ratio, 256 grey degree) Input method: Touch screen, pen and external mouse (optional) 11 Coagulation Analyzer User’s Manual 3. Input Tools and Operation 3.1 Touch screen and pen The basic input tools, the user can operate on the screen by pen, the basic operation methods have 3 kinds: 1) Click: using the pen click the screen and then lift. All the press button, table choice and input casing are click operation. 2) Double click: click twice continuously and the time between these two clicks should be no more than 0.5 second. For Coagulation Analyzer, the double click is used to complete special function in special situation. To modify the table content in standard concentration table. Select the table content quickly in the items choosing window. In relative chapter please find the description in detail. 3) Dragging: pen touch the screen and not lift, move to the object location on the screen and then lift. The dragging is used to move the relative window on the screen. When dragging the heading strip to the object location, the window will move together. Attention! Cautions Please use the special pen to operate, never use sharp or hard material (such as metal and glass) touching the screen, so as to prevent damaging. When the user uses the pen on the screen, the pointer will also move together. If the deviation between the clicking location and the pointer showing location is very large, so you should re-calibrate the touching screen, the operation in detail refer to the chapter “System Setup”. On the other hand, the earthing of the alternating current should be well; otherwise the sensitivity of the touching screen will be affected. Note! You can choose the external mouse for Coagulation Analyzer, the system supports to the mouse clicking, double clicking and dragging with left key, does not support the function of right key. 12 Coagulation Analyzer User’s Manual 3.2 Digital soft key board This input window can be used to input the integer (such as age), decimal fraction (such as absorbency) and digital character string (such as telephone number). The input content include the number making up of “0”-“9”and “.”,“-”. When the input operation is finish then push the OK key or push the Back key to cancel. Modify the input content: stand for backspace key, it can delete one letter frontal. Pushing the Clear key can delete all the content already input. There is input content or limited scope in the heading strip of the window. If the content user inputting is out of the limited scope, the system will notice the user or some keys that used for inputting the illegal content will be invalidation. The method that the system limits the user is as follow: If the number inputted is beyond the upper limit and the lower limit, if the lower limit is not negative, pushing the “-” is useless. When input integer, the “.” is useless. When input the digital character string, pushing “.” and“-” is useless. 3.3 Character soft key board This input window is used for inputting words and letter model character string. Click the keyboard icon on the right, then the soft keyboard is open and the user can input characters. Please note that the clicking of soft keyboard should not be too fast, otherwise the system 13 Coagulation Analyzer User’s Manual may have no answer and lead to inputting mistake. Maybe you will find that the windows and the input strip will cover shelter each other. The windows above both have inputting strip, so the user can dragging it freely on the screen, the The operation of all the keys on the soft key board is same as the operation of PC key board, the key is used to delete letters; the key CAP and Shift are used to change the letter from normal to capital. 14 Coagulation Analyzer User’s Manual 4. Power on the Instrument 4.1 Power on steps Power on the instrument, power switch is at the rear of system after about 10 seconds, the system enters initialization, and the status of initialization is shown in the window: If there is any problem in the process of initialization, the system will show you the mistake message. The user can check the machine refer to the chapter “Instrument Maintenance” in this manual. If the problem cannot be solved, please contact with the distributor. Note! If the instrument is connected with printer, please first turn on the instrument and then turn on the printer power. If the sequence is wrong, it can cause problems in the instrument self-checking or the printer cannot print normally. 4.2 Main menu When the machine is on, then enter the main menu and start “Test” The main menu will lead you to perform all functions of the analyzer, click the related icon to perform related operation. Click the icon on the top left corner of the main menu window; you can see the message about version and copyright of the system. 15 Coagulation Analyzer User’s Manual Click the Back key to go to main menu again. 16 Coagulation Analyzer User’s Manual 5. Parameter Setting Click the Setting key to enter the test setting window. All the 16 tests of the analyzer are already fixed in the software, which can be selected in the downward menu of “Test”. When you exit setting, all the modified parameters will be saved automatically. 5.1 Coagulation point testing method (percentage testing method) The test method of the coagulation time is the percentage testing method. Before the sample start to coagulate, the scatter light intensity is 0%; when the coagulation is finished, the scatter light intensity is 100%. From the coagulation curve, you can get coagulation time which is when the scatter intensity reachs the scheduled percentage. (See the figure, the scheduled percentage is defined as 50%, the user can adjust the percentage of each coagulation point for each test according to the situation. The smaller the percentage is, the shorter the time is.) The scatter light intensity 100% The changing scatter light 50% of 0% t Time 17 Coagulation Analyzer User’s Manual 5.2 Change the parameters of tests Select the test you want to perform from the test blank, and then you can change the parameter. The normally used testing parameters for each item are showing below, the actual test should be carried out according to the reagent instruction. Tests Sample volume(ul) PT APTT TT 50 50 50 FIB (Clauss) Reagent volume (ul) 100 50 50 100 Warm-up time2 (s) 0 300 0 Remark CaCl2 50ul as PT the sample should be diluted to 1:10, if the test result is out of linearity then change the ratio to 1:5 or 1:20 according to the related need Idem as APTT Idem 50 F2,F5,F7,F10 F8,F9,F11, F12 Warm-up time 1(S) 300 180 300 480 0 The confirmation of normal reference value: test 20 normal samples and calculate the average time value (in seconds). The longest testing time: that means the longest time of coagulation reaction, if beyond this time the coagulation reaction is still not finished, in that case, we treat it as overtime. ISI value: input according to the reagent instruction. Percentage of coagulation point: percentage of coagulation point means the percentage that coagulation point reaction takes in the whole blood coagulation process, adjust this percentage in each test is useful to ensure the result closed to the real value. Calculate FIB: With the PT testing result, you can calculate the FIB result of the sample, the user can choose if they want this calculation or not. 5.3 Calibration The result’s units for each test are shown in the following table: Items PT APTT TT FIB F2 F5 F7 F8 F9 F10 F11 F12 Heparin APC-R Time (s) ★ ★ ★ ★ ★ ★ ★ ★ ★ ★ ★ ★ ★ ★ Ratio ★ ★ ★ INR ★ Activity% ★ Ration ★ ★ ★ ★ ★ ★ ★ ★ ★ ★ ★ ★ 18 Coagulation Analyzer User’s Manual Protein S Protein C ★ ★ ★ ★ In the test setting window, click the Calibrate or %activity key (these two keys are disabled for the test, which has no need to do calibrating), then enter the calibration setting window. The test needs to do calibrating permit to setup 2-6 standards, please select the standard number first, then input the concentration (or %activity) of standard sample and time value in sequence. 5.3.1 Activity percentage Take the PT for example Activity% 100 50 25 12.5 Dilution ratio 1:2 1:4 1:8 Standard plasma (ul) 200 200 100 50 normal saline(ul) 200 300 350 5.3.2 Quantity confirming Take FIB for example (suppose the standard concentration of FIB is 250mg/dl) FIB concentration (mg/dl) 500 250 125 62.5 Dilution ratio Standard plasma (ul) IBS(ul) 1:5 1:10 1:20 1:40 200 100 50 25 800 900 950 975 5.3.3 Check the standard curve Click the Curve key, then you can see the standard curve, you can print the standard curve with “print” key. 19 Coagulation Analyzer User’s Manual 5.4 DFIB setting When setting PT program, please select “DFIB” with “√”. Click the DFIB key to enter the DFIB parameters window. (Refer to Appendix II) 5.5 Control 5.5.1 Control parameters setting In the test setting window, click the Control key, then enter the control setting window. There level controls can be set for every test, and each has the value of lower limit (LL), upper limit (UL) and batch no. Input the parameters and then click the Save key to save the 20 Coagulation Analyzer User’s Manual information. 5.5.2 QC result In the Control parameters setting window, click the Curve or List key to enter the following window. Click the Clear key to delete all QC result of the test. Click the Print key to print QC result of the test. 21 Coagulation Analyzer User’s Manual 6. Sample Testing In the main menu, click the Test key. Normally the machine should warm-up for 15-30 minutes after power on, if the temperature does not reach the predetermined range(36.5-37.5℃),then the waiting window will be always show. We strongly recommend you perform the test after the warm-up is finished. 6.1 Select the tests combination Coagulation Analyzer has defined 8 groups of frequently used testing combination. The user can modify this combination. When you want to modify, select one combination and then click Edit key, then you can select the test one by one in the window. If the testing combination the user needed is not included in the table, click the Other key to define the new combination in the test this time. Once the user select the testing combination, click the OK key to perform the test. 22 Coagulation Analyzer User’s Manual 6.2 Select test mode of the channel Click the sample number setting column of each channel, then enter the window to select test mode. 6.2.1 Select sample testing Select “Sample” and click OK Input the sample number manually: the user click the sample number setting column of each channel, then input the sample number in the pop up window. The sample number range of the Coagulation Analyzer is from 1 to 999.If the channel is not used, there is no need to input sample number. Note! In the same day, the same patient should be only identified by the same sample number. The sample number of different patient should be different. If the sample sequence number is not input, the test result will not be saved. 6.2.2 Select control testing Select “Sample” and click OK, then you can select the control level in following window. 23 Coagulation Analyzer User’s Manual Select the control level and then click OK. 6.2.3 Select standard testing If user needs to calibrate the test, select “Sample” and click OK, then you can select the standard to test. Select the standard and then click OK. 6.2.4 Start testing When user has selected the test mode for the channel, there will be hint information in setting column of each channel. 24 
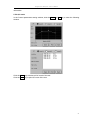
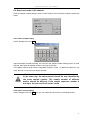
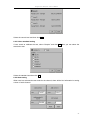
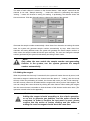
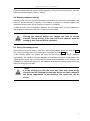
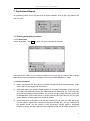
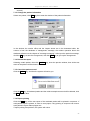
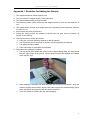
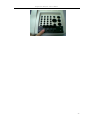
Coagulation Analyzer User’s Manual The state of each channel is shown on the channel button; “Add sample” means that this channel is not used, “Sample warming… ” means the channel is preheating the sample, “testing…” means the channel is acting for reading. In preheating, the channel shows the time count down. Click the channel button to change the status of the channel. Generate the sample number automatically: when these four channels are testing the same tests, the system will generate sample number automatically by step, when these four channels are testing different tests, the system will generate the same sample number. In other cases, the sample number should be input manually. The user can change the sample number generated by the system automatically according to their needs. Note! Only when the user enable the sample number auto-generating function in the system, can the system generate the sample number automatically. 6.3 Adding the reagent When the preheat time has only 5 seconds left, the system will notice the user by sound, until the reactive reagent is added and the channel enter the status of “ testing”, then the sound will stop. When the preheating is finished, the channel will notice you that “Finish warming”. And the currently channel to be added with the reagent will notice you that “Add reagent”; the user can change the current channel by clicking the other channel. When adding the reagent into the current channel, remember to click the button of this channel at the same time. (The operation in detail refers to the appendix). Note! Adding the reagent should according to the criteria operation, so as not to generate gas bubbles, and the action should be consistent. In order to confirm the test result is exact, please confirm that the action of button clicking and the action of adding the reactive reagent should be at the same time. 25 Coagulation Analyzer User’s Manual When the system gets the signal of button pressing, it will notice the user by sound, start the testing; the channel display notice is “testing”. 6.4 Blood coagulation testing Normally when the test is finished, the system will calculate the test result automatically, and show as “second-ratio-INR-%-quantity”. If the testing is overtime or mistake happens, the instrument will notice the user by “testing is overtime” or “ERROR”. In different testing the item quantity is different. For PT testing result, you can predetermine that whether to calculate the FIB value or not in the items setup. Note! Clicking the channel button can change the state of current channel. During testing, if the user clicks one channel, then the testing in this channel will be canceled. 6.5 Saving the testing result After these four channels testing, if the same items testing will be carried out, click the reset key, if no more testing or the item combination is changed, click the Back key. In the situation above, the system will save the test result into the history database automatically. The capability of history database of Coagulation Analyzer is 1000 patient and 10000 samples. When the new record will be inserted into the database, if the content of the database has reached the upper limit, the database will delete the earliest record to offer the space for saving the new data. Note! If in the testing you click the reset key, then only result of the channel that has finished its work can be saved, other channel if the blood coagulation is not finished, the result will not be saved. 26 Coagulation Analyzer User’s Manual 7. Synthetized Report In synthetized report, there are two kinds of report methods, such as print “By patient” and print “By test”. 7.1 Printing according to patient 7.1.1 Patient table Select “By patient”, click OK key, then you get the window as followed: According to the needs, you can select the patient in the same day (the most is 999) or all the patients (the most saved patient message in the history patient database is 1000). 7.1.2 Basic Operation 1) 2) 3) Select one patient: click the patient in the table, the patient will be shown stricking. At the same time only one patient can be selected. Mark multi-patient: the system support printing or canceling multi-patient record, the user can mark multi-patient by clicking, the marked patient is marked by “@”. If the user want to cancel the marking of certain patient, only to click the “@” symbol, then the symbol will be disappeared. On the other hand, by clicking the first list in the title bar you can mark all the patients, clicking again then cancel all markers. Patient sequence in the table: in the title bar, clicking any list (such as date) except the first list (marker list) and the second list (sequence number list), you can composite all the patient record, the first clicking is sort ascending, clicking again is downward sequence, if there are many patients, the compositing time will be longer (maybe tens of 27 Coagulation Analyzer User’s Manual second). 7.1.3 Change the patient information Select one patient, click Edit key then enter the window of the patient information: In the window, the section office and the inspect doctor are in the downward table, the content is from the database of management message, the relative operation about this database reference to the chapter of “message managing”. After input the patient’s message, click the OK key to save the changement, click the Back key to give up the changement. 7.1.4 Review the report Selecting certain patient, then click Preview key, enter the preview window, then all the test result of the patient will be shown in a table. 7.1.5 Cancel the patient record Click the Delete key, and then the system will notice you: Click the Yes key, all marketed patient and the relative sample test result will be deleted, click the No key then abort. 7.1.6 Report printing Click the Print key, all the test report of the marketed patient will be printed in sequence. If multi-patient report is printed, in order to save paper, using printing in sequence can ensure each patient’s report without pages lost. If report printing has problem, the system will notice: 28 Coagulation Analyzer User’s Manual 7.2 Print according to the items Select “By test”, pointed out the date and items, click the OK key, and then start printing. Note! Before printing, please check the connection between the printer and the instrument is right, and turn on the printer. 7.3 Send data to serial port Click the Serial trans. key, and then enter the window of serial port transferring: Sending history records to the serial port: select “History records” from the list box and click “today” or “all” to select the date time range of records, and then click the Send key. Sending QC result to the serial port: select “QC result” and click the Send key, then all QC result will be sent to the serial port. 29 Coagulation Analyzer User’s Manual 8. System Setup In the main menu, click the Sys. Setting to enter the system setup window. 1) 2) 3) Hospital Name: the user can fill it in the blank. Date and time: setup the standard time according to the actual situation. Input illegal date or time is of no effect. Printer option: Coagulation Analyzer supports printers: Epson ME 1+, PCL series, HP LaserJet P1007, and SPRT-RM thermal printer. The user can select the printer according to actual setup. Note! Printers might be changed. Please reference to printer list of system setting. If the printer option is disaccord with the actual setup, the system cannot output the result normally. 4) 5) 6) Sound effect switch: Coagulation Analyzer support multimedia sound notice in the operation, such as turning on, turning off, key clicking, warning and modem connecting. Using the sound effect switch can turn on or turn off the sound of key clicking and turning on or off the machine. Automatically create the sample sequence number: in the sample testing the user can specify whether to automatically create the sample sequence number or not according to the actual situation. When it is automatically creating, the system will create one sample sequence number for each channel according to the record each day. (When the selected items of the four channels are the same or different, this function is of effective, the user can change the sample sequence number the system created.) Temperature calibrating: the user should calibrate the temperature sensor in some time (one month advised), the operation in detail is as follow: Wait for the thermometer reading reach to 37℃,(that is the preheating process) Put one colorimetric cup on the sample preheating location, add some distilled water and put the thermometer (which is calibrated) into the cup. 30 Coagulation Analyzer User’s Manual Wait for the thermometer reading is stable (this will cost several minutes). Input the thermometer reading and finish the temperature calibrating. 7) Touch screen calibrating: the touching screen and pen is the mainly input method for Coagulation Analyzer, the touching screen of Coagulation Analyzer is using the resistance circuit, if the environment situation (such as temperature) is changed very much, the touching screen will have a little excursion (that means the location the user clicking does not match the pointer on the screen), so this will affect the input validity, so the screen should be calibrated again. Click the Touch panel key and enter the calibrating window. According to the notice on the screen, using the pen pressing the center of the cross for about one second and then lift, the cross will move to next position automatically (if the pen is not lifted, after two second the cross will automatically move), if the cross does not move, again pressing. Note! If after too many times the cross does not move from the beginning to the end, that means there is some problem in the circuit, please contact with the sale agency, Calibrating the screen need 5 locations, which are center, up left, down left, down right and up right in sequence. The user should follow the movement of the cross and repeat the action for 5 times. Now the user only needs to touch any part of the screen, the system will save the new calibrated result, and back to the system setup window. 31 Coagulation Analyzer User’s Manual 9. Message Management In the main menu click the Information key to enter the message management window. Now Coagulation Analyzer has established three databases interrelated with the in hospital doctor, section office and disease diagnosis, the user can add or delete the record in the database. The capability of each database is 100 records. The synthesize report need to input the section office, doctor, and diagnosis message, directly read from the relative data base, decrease the repeated input. Basic operation: first select the database you want to visit (doctor, section office or diagnosis); the following is based on the operation in the doctor data base (the other data base operation is the same). 1) Add one item: press Add key and then input the doctor’s name in the window: Click OK key to add the name of the doctor into the table. If the doctor’s name exists, the system will show you warning message. If the data base capability has reached the upper limit, the system will notice you “the number of doctors is full”. 32 Coagulation Analyzer User’s Manual 2) Delete one item: select one item in the doctor table, click Delete key: Click the Yes to delete the record and click the No key to cancel the operation. 33 Coagulation Analyzer User’s Manual 10. System Log In the main menu click the Log to check the history record of the instrument. Each record in the system log includes date, time type, and affair description. The affairs Coagulation Analyzer recorded included: turning on or off the machine, the type include normal, mistake, and warning. All these record is automatically recorded in the operating of the instrument. The largest number of the record in the system log data base is 2500, arranged in the order of time (the newer is at the front position), if the record number reach the upper limit, the oldest will be deleted. Clicking the Clear can delete all the record in the log. 34 Coagulation Analyzer User’s Manual 11. Shutting Down the System In the main menu click the Power off key, the system will show the confirm window: Click the Yes key to turn off the machine, click the No key and back to the main menu. Note! If the instrument is working and the power is lost or turn off the machine directly not according to the turn off program, all the test result and parameter changing will not be saved. The turning off program is just to save the user’s data into the Flash ROM, the whole process will cost about one minute. Attention! Cautions In the process of turning off the machine, you should pay strong attention to keep the power. If the power is lost in this process or turn off the power switch directly, this can damage the user’s data, and cause the instrument cannot work normally. The data saving is completed; the system will notice you to turn off the power. Now you can turn off the power switch. Note! When the power is turned off, please not turn it on immediately, if you want to turn it on again, please wait for more than 30 seconds. 35 Coagulation Analyzer User’s Manual 12. Instrument Maintenance 12.1 General Coagulation Analyzer is one rigid analyzing instrument, in order to keep it in a good condition, you must do the normally maintenance work everyday. The maintenance work of Coagulation Analyzer is very simple, but should be careful. 12.2 Clean the instrument Keep the working environment clean. Clean the surface of the instrument can use the neutral cleanser and wet cloth. Clean LCD can use soft cloth. Note! Never let any solvent, grease or corrosive material touch the instrument. 12.3 Changing the parts of the instrument Changing the fuse 1) Turn off the power switch. Safety fuse is installed in the fuse box in the back of the instrument and near the power switch, open the box and change the same size fuse. The fuse size: T3.15AL250V Note! Must use the fuse above 2) Close the fuse box and turn on the machine. 12.4 Simple Troubleshutting Trouble Cause Solutions The instrument can not be turned on The power is abnormal Check the instrument has power or not Check the power connector is loose or not Check the fuse Check the voltage Turn off the machine and wait for more than 30 seconds and then turn it on. The time between turn it off and turn it on is too short The sharing RAM self-checking mistake The time between turn it off and turn it on is too short The printer first has power Turn off the machine and wait for more than 30 seconds and then turn it on. Turn on the machine and then turn on the printer 36 Coagulation Analyzer User’s Manual The cable connection is not good. Turn off the machine, remove the cover of the machine, and check the cable connection in the front/back of the machine is good or not. You can pull it out and then plug in again, wait for 30 seconds and turn on the machine Light channel mistake The parts of the light rout are damaged or out of the lifetime. Turn off the machine and turn it on, if the same mistake, please contact with the sale agency to change the parts or maintenance Fail to open the COM The outside used is Turn it off and remove the outside mouse, and then turn it on The printer can not be turned on normally The power of the printer has problem Check the power connector is loose or not Check the ON/OFF button mouse The printer can not print Check the setup of the printer type. Turn on the main system first and then turn on the printer Check the printer cable is connected well or not The color is fade, the whole printing quality is low Change the ink box; clean the end of the printer. (The detail refer to the user’s manual) The paper (The detail refer to the user’s manual) printer nipping Other printer trouble (The detail refer to the user’s manual) Note! During the usage, if the user meet the trouble cannot be solved, or the trouble repeated, please contact with the sale agency. 37 Coagulation Analyzer User’s Manual Appendix I: Guideline for Adding the Sample 1、 The reagent should be mixed together even. 2、 The Fib and APTT reagent should not be preheated. 3、 The plasma bottle should not be preheated. 4、 The dissolving of the quality control and the reagent should be even and be stable for 10 min. 5、 The marker on the surface of the bottle show the Fib standard value should be diluted at the ratio of 1:10. 6、 Must confirm the exact preheat time. 7、 During the action process, the darken lid should never be open and the reaction cup should not be shaking. 8、 The requirement for adding the plasma a、 Using the converse absorbing method to add the sample. b、 The top should pull on the fringe of reaction cup during adding the samples. c、 The speed should be stable. d、 There should be no gas bubble at the bottom. 9、 Requirement for adding the reagent: a、 The top should abut against the groove of the sample-adding table, the step should lock the upper fringe of the groove, and the bottom should abut against the sidewall of the reaction cup. b、 When adding the samples, left hand first press the touching screen button, when the position of right hand is stable, raise the left hand to spring the sample adding signal, at the same time the right hand add the sample smoothly. c、 Cover the darken lid quickly after the sample adding. 38 Coagulation Analyzer User’s Manual 39 Coagulation Analyzer User’s Manual Appendix II: Special Instruction of Program Parameter Setting Percentage of coagulation point: Percentage of coagulation point means the percentage that coagulation point reaction takes in the whole blood coagulation process, adjust this percentage in each test is useful to ensure the result closed to the real value. The adjusting method is to do the program testing with the control blood plasma and reagent. To adjust the percentage of the coagulation point according to the testing result until the adjusting result up to the reference center value in the range of the reagent instruction. Using this method, we can calibrate the setting of the percentage of coagulation point when we do the different testing with different reagent. The range of adjusting percentage of coagulation point is from 5% to 80%. Modification expressions: If the testing result is not up to the real value after adjusting the percentage of coagulation point, we can modify the testing result with the modification expressions of the program setting. To modify the testing time, the expression is that: Time after modification= testing time*k + b (unit: second) We suggest the user not to modify the default of the modification in the program setting. DFIB parameter setting: When setting PT program, please select “DFIB”. Click the DFIB key to enter the DFIB parameters window. Derived Factor: While doing PT test; we can calculate the FIB consistence of the relative sample according to the coagulation time. The value of FIB with the calculation of PT test is marked “DFIB”. The setting method of DFIB is that the users modify Derived Factor K and B according to the real testing result.For example, take two level calibration blood, the FIB value of which are separate C1 and C2 (mg/dl), then test the PT results of two calibration blood, and then we get the coagulation time of PT: T1 and T2 (second). Now, we can calculate the Derived Factor K and B like this: K=(C1-C2)/(T1-T2), B=C1-K*T1. Using this method, we can set the DFIB parameter modification in package with calibration blood plasma that use to test PT reagent. 40 Coagulation Analyzer User’s Manual Normal range: set the reference range of DFIB. When we print the report, we can judge the DFIB result which is in the reference range or not, and give the relevant tip. Printing report: the DFIB result can be printed out in two forms that is printing by patient and printing by program. Attention: The manufacturer have been set the parameter of program with Pacific Ocean calibration blood plasma (commonly use in China) and reagent that to test PT (included DFIB), TT, APTT etc. 41