1
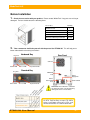
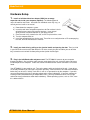
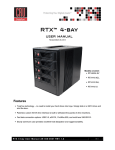
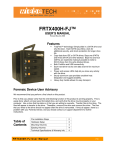
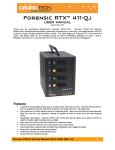
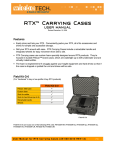
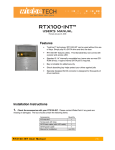
Revised January 24, 2008 Features TrayFree™ technology! RTX400-NJ can be used without the use of trays. Simply slip in a SATA drive and shut the door. Each bay features a lock for added security and shock-protection for longer drive life. • RTX400H-NJ now comes with all-metal bays and 2 LEDs for power and access. • Fast Infiniband™ host connection • Each SATA hard drive has its own data channel for maximum speed Its attractive design takes up little desktop space, occupying a tiny footprint for so much storage capability (up to 4 Terabytes) Sturdy aluminum case provides excellent heat dissipation and rugged durability Heavy-duty handle allowing for easy transport • • • • Table of Contents Before Installation Contents of the box Identifying the parts of the product Hardware Setup Usage with Macs Usage with Windows computers Warnings and Notices Technical Specifications RTX400-NJ User Manual 2 2 2 3 4 4 4 5 -1- WiebeTech LLC Before Installation 1. Check the accessories with your product. Please contact WiebeTech if any parts are missing or damaged. The box should contain the following items: Accessories Quantity RTX400-NJ unit 1 Infiniband cable 1 Power cord 1 Packet of screws and keys Manual and Warranty Information 1 (on CD) 2. Take a moment to familiarize yourself with the parts of the RTX400-NJ. This will help you to better understand the remaining instructions. Key lock Hardened Bay Rear Panel 8cm Fan Power LED Key lock Power LED Access LED Ejection handle Standard Bay InfiniBand Port Access LED Ejection handle Power Connection Port Power Supply Fan Power Switch WARNING: Do not block the ventilation fan during operation. Overheating may damage the device or hard drives. All RTX TrayFree Bays accept 1TB SATA drives, have power and access LEDs, and connect to the host via a SATA connection. RTX400-NJ User Manual -2- WiebeTech LLC Hardware Setup 1. Install an Infiniband host bus adapter (HBA) into an empty expansion slot inside your computer (optional). The following general steps will work for most cards. Instructions for individual cards may vary, so consult your host card’s user manual. a) Power down the computer system. b) Insert the card into a compatible expansion slot. Do not force it, but it will take firm pressure to fully seat the interface. It may help to gently rock the card back and forth as you apply pressure. c) Once the card is fully seated in the slot, secure it in place with a screw. d) Turn the computer back on. e) Install the appropriate drivers for the card. These files are usually found on a CD accompanying the card, or on the manufacturer’s website. 2. Install your hard drive by pulling on the ejection handle and opening the door. Then just slide in your SATA drive and shut the door behind it. For extra security for your hard drive you can lock the bay, but make sure to unlock it before pulling on the ejection handle again. 3. Plug in the InfiniBand cable and power cord. The RTX400-NJ connects to your computer through InfiniBand. One end of the cable connects to the back of the unit. Insert the other end into an Infiniband port on the computer. Cables that convert InfiniBand to four eSATA connectors can also be found. Your RTX400-NJ is now ready to use! Turn on the power switch on the back of the unit. If your drives are already formatted, you can begin using them right away. New hard drives will need to be formatted before they can be used. Initially, each drive is seen as a separate drive by the computer. If you wish, you may format each drive into a separate volume and use them individually. If you have software for creating a RAID (Redundant Array of Independent Disks), you may combine the drives into a single volume for faster performance and/or data redundancy. Some operating systems, such as OS X, have this software built in. RTX400-NJ User Manual -3- WiebeTech LLC Usage with Macintosh computers Mounting and Ejecting Volumes When you connect the unit to the Mac for the first time and turn on the power, you’ll probably see a message saying that the disk is unreadable. This is because you must format the volume before using it. The easiest way to do this is to use Mac OS X’s Disk Utility. If you plan to use the unit on both Macs and PCs, select “MS DOS File System” as the format type. If you only plan to use the unit on Macs, then select “Mac OS Extended”. After the volume is formatted, an icon representing the drive volume will appear (“mount”) on the desktop. You can now use the volume just like an internal hard drive. Eject the volume before powering down the unit by dragging the volume’s icon to the trash bin, or by selecting the volume then pressing Command-E. Shutting down the unit without first ejecting the volume can result in data loss. Booting to the RTX400-NJ Your ability to boot to the RTX400-NJ depends upon whether or not the eSATA host to which it is connected supports this feature. Many eSATA hosts do not support booting Usage with Windows computers Formatting Volumes Before you can use your RTX400-NJ, you must first format the drives into a volume. Use Disk Management, which you can find by right-clicking on My Computer then selecting Manage. Select NTFS for the format type. If you wish to format FAT-32 for cross-platform compatibility, you will need to use a third-party utility to do so. Windows XP will not create FAT-32 volumes larger than 32GB. After the volume is formatted, an icon representing the drive volume will appear in My Computer. You can now use the volume just like an internal hard drive. Ejecting Volumes Unlike external storage devices that connect via FireWire or USB, eSATA devices cannot usually be ejected. It is possible to disable the device using Device Manager. Whether or not you choose to disable the device in this way, always make sure the drives are not being accessed before shutting off theRTX400-NJ. If the unit is turned off in the middle of a data input/output process, data loss may result. Warnings and Notices • • The RTX400-NJ supports drives of various specifications and different capacities. However, we recommend using drives of the same brand and type for optimal performance. If drives of different capacities are used, the unit will consider both drives to have the same capacity as the smaller drive. Use only hard drives that are in perfect condition. Avoid using drives that have ever developed bad sectors during previous usage. This could lead to possible device failure or loss of data. RTX400-NJ User Manual -4- WiebeTech LLC Technical Specifications Product name/code: RTX400-NJ and RTX400H-NJ Host Interfaces: InfiniBand Data Interface Speeds: 3.0GHz (up to 300MB/s) Drive Types Supported: 3.5-inch SATA1 or SATA2 hard drives TrayFree™ Technology: Yes Shock Absorbing Bays: Yes Power LED: Yes Access LED: Operating Temperature: Yes Windows XP, Vista Mac OS X 10.2.6 or later Linux distributions using Kernel version 2.4 or above (USB only) 50 – 85° Fahrenheit (10 – 30° Celsius) Operating Humidity: 5% to 95%, noncondensing Power Switch: Cooling Fan: 2 position: On / Off Input: 100-240VAC Output: 200 Watts 8cm Ball Bearing Fan Safety Certification: CE/FCC External Material: Aluminum alloy case 14.25 sans drives 20.25 with drives (177mm W x 270mm D x 231mm H) 1-year limited warranty. See warranty statement for details and limitations. WiebeTech offers free phone support for 90 days after purchase (1-866-7448722). After 90 days, email support is available at [email protected]. Operating System Requirements: Power Supply: Shipping Weights: Dimensions: Warranty: RTX400-NJ and TrayFree are trademarks of WiebeTech LLC. Other marks are the property of their respective owners. © 2008 WiebeTech LLC. All rights reserved. FCC Compliance Statement: “This device complies with Part 15 of the FCC rules. Operation is subject to the following two conditions: (1) This device may not cause harmful interference, and (2) this device must accept any interference received, including interference that may cause undesired operation.” Tested to comply with FCC standards FOR HOME OR OFFICE USE In the event that you experience Radio Frequency Interference, you should take the following steps to resolve the problem: 1) Ensure that your unit is plugged into a grounded electrical outlet. 2) Use a data cable with RFI reducing ferrites on each end. 3) Use a power supply with an RFI reducing ferrite approximately 5 inches from the DC plug. If you have any questions or problems, please contact [email protected] for technical support. If you are interested in purchasing more WiebeTech products, check our website or contact [email protected]. We appreciate being able to serve you! RTX400-NJ User Manual -5-