1
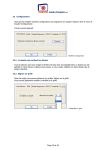
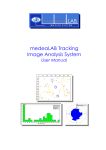
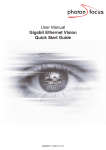
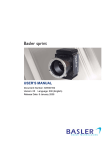
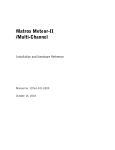
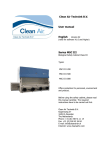
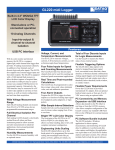
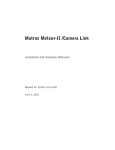
APPLICATION NOTE Setting up a Basler sprint Color Camera With a Matrox Solios Frame Grabber Document Number: AW001205 Version: 03 Language: 000 (English) Release Date: 12 February 2013 INTERNAL USE ONLY Setting up a Basler sprint Color Camera With a Matrox Solios Frame Grabber AW00120503000 Table of Contents Purpose of this Document.............................................................................................................................. 2 Prerequisites ................................................................................................................................................... 3 Hardware ..................................................................................................................................................................... 3 Software....................................................................................................................................................................... 4 Tools and Materials ...................................................................................................................................................... 5 Standard Color Chart ................................................................................................................................................ 5 Tools for Displaying Color Values ............................................................................................................................. 5 Additional Information on the Matrox Intellicam Tool ..................................................................................................... 6 Image Acquisition With the Matrox Intellicam Tool ..................................................................................................... 7 Additional Information on the Matrox Configuration Tool ............................................................................................... 8 Additional Information on the CTT+ .............................................................................................................................. 9 Specifics .................................................................................................................................................................... 10 How to Adjust the Camera (Gamma, White Balance, Color Settings) ...................................................... 11 List of Color Settings for Different Light Sources ......................................................................................................... 15 Short Overview of ‘Sequences of Steps’ ..................................................................................................... 16 Revision History ............................................................................................................................................ 18 Purpose of this Document This document describes • • what you should observe when setting up a Basler sprint color camera in combination with a Matrox Solios frame grabber. For information on Matrox frame grabber types, see below. And how to realize the gamma correction, white balance and color adjustment settings in the Basler sprint camera. For detailed information on the RGB color space and hue and saturation adjustment, see the Basler sprint User’s Manual AW000699xx which is available on the Basler website. Information on the Matrox frame grabbers Depending on the data traffic (speed) and depending on the used bus system of your PC the following Matrox frame grabbers were used at the Basler fab. Others frame grabber types are also possible, but are not scope of this document. Please see the “Compatible Products” pages in the support section on our website). • • Solios eCL - 85 MHz PCle™ Camera Link Solios6MCL/E - 66 MHz PCI- X®/PCIe™ Camera Link . Copyright 2013 by Basler AG Page 2 of 18 Basler sprint Color Cameras Setting up a Basler sprint Color Camera With a Matrox Solios Frame Grabber AW00120503000 Prerequisites Hardware Make sure that you have • … installed the corresponding Matrox frame grabber in your PC. 1. Make sure that the frame grabber has enough memory so that it can save enough camera lines. Evaluate the required memory. This depends on the selected line acquisition mode (RGB line acquisition mode, Raw line acquisition mode or Enhanced Raw line acquisition mode) and on the selected camera model. You can set the frame grabber to the correct mode via MILConfig > Non page Memory. If you require a higher storage demand (e.g. for color images in RGB mode), set the storage value to 200 – 256 MB. If you do not adapt the value, there can be error messages. For detailed information on interfacing cameras to Matrox Imaging hardware, go to http://www.matrox.com/imaging/en/support/cameras/ . • Frame grabber type A: Solios eCL (85 MHz) with PCIe™ Bus and CL (Camera Link): This frame grabber runs in full mode (-F). You do not have to adapt any settings, as the frame grabber is able to cope with all settings realized in the sprint camera (i.e. no matter what mode you select in the camera). • Frame grabber type B: ® ™ Solios6MCL/E (66 MHz) with PCI-X /PCIe Bus and CL (Camera Link): This frame grabber can run in different modes (Base or Medium). Therefore you have to make sure that the camera mode and the frame grabber mode are adapted to each other. 1. Make sure that the correct frame grabber mode is set in the MIL Config tool (select > Programs > Matrox Imaging > Tools > MILConfig. Figure 1: How to Start MIL Config Tool 2. If you modify this setting, make sure that you power-cycle the PC afterwards. • … installed, powered up and configured the Basler sprint color camera and realized the basic camera settings following the Basler sprint color user’s manual. To obtain best performance from color models of the camera, use of a dielectric IR cut filter is recommended. The filter should transmit in a range from 400 nm to 650 nm, and it should cut off from 650... 680 nm to at least 1100 nm. Figure 2: Camera Spectral Response You can check the frame rate of your camera model on the Basler website. In order to communicate with the corresponding camera, the camera must • • be connected to the frame grabber via the emulated serial interface and be selected. Copyright 2013 by Basler AG Page 3 of 18 Basler sprint Color Cameras Setting up a Basler sprint Color Camera With a Matrox Solios Frame Grabber AW00120503000 Software Make sure that you have installed • … the Matrox MIL (Matrox Imaging Library) processing pack on your PC. The image capture is realized by the Matrox Imaging Library (MIL). A “Lite” version is sufficient for your tasks. This includes the MIL Configuration tool for configuring the frame grabber and the MIL Intellicam tool for displaying the images. • … the Basler CCT+ tool for configuring the Basler sprint camera parameters. You realize the camera settings in the CCT+. You can download a free version on the Basler website (Camera Configuration Tool) – here the newest version is available. • … the corresponding *.dcf files. These are configuration files required by the frame grabber and can be set via the MIL processing pack (MIL Configuration). The *.cfg file contains settings representing the camera video data output mode, the camera link clock speed and the line acquisition mode. Figure 3 shows a parameter example as they are displayed in the Basler CCT+ tool. The parameter in the CCT+ tool and the *.dcf file must correspond to each other. Figure 3: Configuration Data You have the following possibilities: You can • • • … set the parameters in the default *.dcf file (via New command) or … load an existing *.dcf file already containing the basic settings for the corresponding mode. Ideally, there are three different *.dcf files for the different modes (RGB…, Raw… and Raw Enhanced … mode). Or … use existing data configuration sets: In the following download section on the Matrox website (Download) there are data configuration files (*.dcf) for camera models that are supported. If you cannot find the required *.dcf file, use an existing file as sample and adapt the settings. Note The MIL9 processing pack compared to the MIL8 processing pack offers more useful features (e.g. you can zoom with MIL9 but not with MIL8). We recommend using the MIL9 processing pack. • … the firmware for the Basler sprint camera. You can check the version of your camera in the CCT+. We recommend to upload the newest firmware version on your camera, so that certain functions are available (e.g. <Gain Green 2> and <RAW Line B first> should be available). If you want a newer version, please contact Basler Technical Support. Copyright 2013 by Basler AG Page 4 of 18 Basler sprint Color Cameras Setting up a Basler sprint Color Camera With a Matrox Solios Frame Grabber AW00120503000 Tools and Materials Standard Color Chart Used as a reference for adjusting the white balance /gamma and the basic colors. We recommend including a standard color chart within your camera’s field of view. This will make it much easier to know when the colors are properly adjusted. One widely used chart is the ColorChecker® chart (also known as the Macbeth chart). If you order a color checker chart, the target values for red, green and blue will be indicated on the chart for each color field (ColorChecker®). Figure 4: ColorChecker® Chart Tools for Displaying Color Values Make sure that a tool is installed on your computer that helps you to identify the color value of any pixel in an image and to compare it to the original. The tool should be able to display the colors as RGB values and as HSB/HSV values. Example tool: Just Color Picker (Just Color Picker free version), or an alternative program is the pkColorPicker. Figure 6: pk Color Picker User Interface Figure 5: Just Color Picker User Interface Copyright 2013 by Basler AG Page 5 of 18 Basler sprint Color Cameras Setting up a Basler sprint Color Camera With a Matrox Solios Frame Grabber AW00120503000 Additional Information on the Matrox Intellicam Tool For displaying the camera images you require the Matrox application Intellicam which is part of the MIL software package. Figure 7 shows you the symbol bar of Intellicam. (1) Figure 7: Symbol Bar in “Intellicam” Tool; (1) = ‘Bayer’ Button The Bayer button (1) in Figure 7 opens the Configure Bayer Settings dialog box (see Figure 8). The indicated Bayer pattern corresponds to the first two pixels that are transmitted. For information on the Bayer filter used in your camera model, see the technical specifications table in the Basler sprint user’s manual. As an alternative you can check the Bayer pattern effect by displaying single-colored test images in the CCT+. The MIL 9 processing pack has an additional Enabled option button (compared to the MIL8 version). Therefore, for MIL9 versions you do not need to distinguish between Safe grab and Safer Bayer Grab. Figure 8: Configure Bayer Settings Depending on the line acquisition mode (RGB, Raw or Raw Enhanced line acquisition mode) and on the preprocessing (debayering) (e.g. converting Raw data into color data) the following Matrox settings can vary: • • • Use of the Bayer pattern Tap configuration Standard RGB or monochrome Figure 9: Camera Configuration Data Option The MIL software can convert monochrome Raw image information into color information. This is required for real-time applications. If the images are to be processed and calculated in subsequent steps, the monochrome values of the images must be used for the transfer. Raw Enhanced image information always has to be captured in monochrome. Copyright 2013 by Basler AG Page 6 of 18 Basler sprint Color Cameras Setting up a Basler sprint Color Camera With a Matrox Solios Frame Grabber AW00120503000 Image Acquisition With the Matrox Intellicam Tool You have two possibilities to capture images: • • You can use the icons in the symbol bar (see Figure 10) or You activate the commands in the Digitizer menu (e.g. Single Grab or Continuous Safe Grab) (see Figure 11) For image capture For zooming Figure 10: Icons for Image Acquisition in the Intellicam Symbol Bar Figure 11: Digitizer Menu It is important that the camera settings are adapted to the frame grabber settings. If this is the case, and you use the icons with the additional (S), the Solios frame grabber will work faultlessly: • • If you activate a button with a camera icon, single images are taken. If you activate a button with a film camera icon, images are taken continuously. MIL9 offers useful zooming functions (see Figure 10). Note on status line in MIL In the MIL status line the following useful information is displayed (see marked section in Figure 12): Example: (1136, 687) indicates the mouse position in the image = 0xFE, E7, B5 indicates the color values for red, green and blue in hexadecimal notation Restriction: These values are only displayed, if the image capture is stopped. Figure 12: Status Line in MIL If you want the MIL Intellicam software to realize Bayer functions: • • With MIL8: via Bayer Grab Instructions With MIL9: via Safe Grab Instructions The corresponding icons are displayed in Figure 13 Figure 13: Icons for Bayer Grab Copyright 2013 by Basler AG Page 7 of 18 Basler sprint Color Cameras Setting up a Basler sprint Color Camera With a Matrox Solios Frame Grabber AW00120503000 Additional Information on the Matrox Configuration Tool The connection from the camera to the frame grabber hardware is realized via configuration parameters. These configuration parameters are stored in a *.dcf files. (1) *.dcf files can be created, loaded and saved. Figure 14: ‘Load’ and ‘Save’ Command Buttons for *.dcf Files Via File > Open you can load a *.dcf file. The following screenshots show you settings valid for RGB, Raw and Raw Enhanced mode in the MIL configuration tool. You do not need to change them in the MIL processing pack software. They are set in the CCT+. 1. Check the Pixel clock frequency parameter. Depending on the frame grabber type this parameter limits the data speed. In some cases a restriction is required. 2. Check the Image Size Y parameter because it is important for the frame rate. The Image Size Y parameter represents the number of lines per image. It is restricted by the memory space (acquisition error) and influences the image generation. During the set-up, when you take live images, set this parameter to 200 (lines). Figure 15: Configuration Settings in MIL Note • • The Image Size X parameter is the line width per tap. For a 4k camera configured with 2 taps this parameter is 2048. If the value of the pixel clock frequency is is divided, the line width is automatically adapted. Additional information Even if the configuration software allows to control the camera via the video signal of the frame grabber, we recommend to use the CCT+ software for programming/configuring the camera’s acquisition, because it is more comfortable. 1. On the Grab Mode tab: Make sure that the Line scan mode frame grabber parameter is set to Free Run. Figure 16: ‘Grab Mode’ Tab in MIL You realize the configuring of the video signal parameters (line and exposure time) directly in the camera (via CCT+). Copyright 2013 by Basler AG Page 8 of 18 Basler sprint Color Cameras Setting up a Basler sprint Color Camera With a Matrox Solios Frame Grabber AW00120503000 Additional Information on the CTT+ You can either configure and adjust the frame grabber first and then the camera settings or vice versa. But make sure that both settings are adapted to each other. For the CCT+ tool the configuring mainly consists of setting the camera output mode and the image capture. CL Base Communication via camera link with one cable. CL Medium Communication via camera link with two cables. For each tap a parallel transmission is realized. This is done via the MIL Config tool, in the frame grabber configuration *.dcf file. RGB Color is the standard video signal. Depending on your requirements, you can set the following line acquisition modes: RGB or Raw or Raw Enhanced acquisition mode transferred by several tap configurations. The video signal RGB Color is set by default. For each tap a parallel transmission is realized. The amount depends on the frame grabber mode set via the MIL Config tool, and in the frame grabber configuration *.dcf file. You must set the mode type in the CCT+. The number of taps, if required, the clock speed and the video signal standard from RGB color to monochrome must be set in the MIL Config tool and saved in the *.cfg file accordingly. 1. Make sure that the parameters in the CCT+ and the *.cfg file correspond to/are adapted to each other. If the basic settings of the frame grabber and camera have been realized and the settings are adapted to each, an uncorrected image can be displayed. Figure 18: Output Mode Parameters Set in the CCT+ (Example 1) Figure 19: Output Mode Parameters Set in the CCT+ (Example 2) Figure 17: Information in the CCT+ Information on line acquisition mode ‘Raw – Line x First’ This parameter determines the transport direction. In older firmware versions the ‘Raw – Line B First’ acquisition mode is not available, only the ‘Raw – Line A First’. The easiest way to realize an image capture, if the camera is in the free-run, programmable. You do not need to realize special settings for this in the frame grabber; they are ignored. The video timing values are set in the camera (Line Period [µs], Exposure Time [µs]). Copyright 2013 by Basler AG Figure 20: Exposure Parameters in CCT+ Page 9 of 18 Basler sprint Color Cameras Setting up a Basler sprint Color Camera With a Matrox Solios Frame Grabber AW00120503000 Specifics If you select the RGB signal standard, the direction of transport is not important, because all color information is processed by the camera. If you use raw signals, you must observe the direction of transport / the sequence of the two sensor lines of the camera. • • If you use the default settings, realize the settings as indicated in Figure 21. If the direction of transport is different, or the camera is mounted in another way, you can adapt the line acquisition mode settings accordingly (e.g. … Line B first) Note If the Camera link medium cable is connected at the upper side of the camera side (see Figure 21), pixel 0 is at the left side (see Figure 21). Figure 21: Default Settings (Camera Position and Transport Direction) Copyright 2013 by Basler AG Page 10 of 18 Basler sprint Color Cameras Setting up a Basler sprint Color Camera With a Matrox Solios Frame Grabber AW00120503000 How to Adjust the Camera (Gamma, White Balance, Color Settings) NOTE The color enhancement feature is available for the following cameras: all Basler sprint 2k and 4k color cameras and, in case of the 8k cameras, the feature is available for the spL8196-50kc. The following description is also part of the Basler sprint color User’s Manual. NOTE Please see on the Basler website for the newest version of this section in the Basler sprint color User’s Manual. On the initial wake-up after delivery, the Basler sprint color camera loads the factory configuration set into the work set. The color enhancement feature is deactivated in the factory configuration set. This factory set contains neutral values concerning color settings. Depending on what you want to achieve by adapting the color adjustment settings, you have the following possibilities: • • (A) If a high color accuracy is important to you, i.e. you want the camera to capture an object and you want the monitor to display the colors of an object as seen under a standard light source (i.e. the exact numerical values of the object’s pixels), make sure that you use a standard color chart within your camera’s field of view when you adjust the color enhancements. (B) If you want to rely on your visual impression, i.e. you want to achieve that the monitor you use displays the colors of the captured object as you perceive them, you require a high-end, calibrated monitor. • Use a high-end, calibrated monitor for displaying your acquired images. • Use a standard color chart within your camera’s field of view when you adjust the color enhancements. NOTE You can only obtain good color enhancements with a well-adjusted monitor (e.g. brightness etc.). 1. Make sure that you use an IR cut filter on the camera lens. The filter should transmit in a range from 400 nm to 650 nm, and it should cut off from 650...680 nm to at least 1100 nm (e.g. B + W 486 filter). 2. Arrange your camera so that it is viewing a scene similar to what it will view during actual operation. 3. Make sure that the lighting for the scene is as close as possible to the actual lighting you will be using during normal operation. 4. Set the exposure time and gain so that you are acquiring good quality images. It is important to make sure that the images are not over-exposed. Over exposure can have a significant negative effect on the fidelity of the color in the acquired images. 5. Carry out DSNU (Dark Signal Non Uniformity) and PRNU (Photo Response Non Uniformity) shading correction: a. Close the lens of the camera (with a cap). b. In CCT+: a) Set Exposure : Exposure Time Control Mode <Free-run, programmable> b) In the DSNU & PRNU Shading Correction group: Select Generate DSNU Values. If the generation is successful, Last Shading Generation Failed is <0>. c. Remove the cap from the camera lens. Copyright 2013 by Basler AG Page 11 of 18 Basler sprint Color Cameras Setting up a Basler sprint Color Camera With a Matrox Solios Frame Grabber AW00120503000 d. Capture an image of a homogeneous surface (just below the saturation in the object plane); e.g. white sheet of paper. a. In CCT+: In the DSNU & PRNU Shading Correction group: Select Generate PRNU Values with DSNU Values. If the generation is successful, Last Shading Generation Failed is <0>. The values are internally saved. If the procedure is successful, ‘Last Shading generation Failed’ is 0. The shading values will be saved automatically in the user shading values file. Make sure the shading mode is selected. 6. Depending on your light source, set the corresponding Offset [DN] and color-specific gain parameters for white balance in the [Gain & Offset] section. a. Capture images of the gray fields of the color checker. The brightest (white field) should be in the focus area of the camera and it should not be saturated. Preferably you should start with a gain value of 1 for the ‘strongest’ color, because this means lower values and less noise. b. Check whether the white balance in the image is correct, i.e. if the values of the colors red, green and blue inside a segment (preferably the brightest) are the same. Figure 22: Checking White Balance Via the white balance parameters you adapt the three color channels of the camera (red, green and blue) to the light source in such a way that you obtain a basic gray value. c. Set the gain value of the color with the highest gain value as low as possible. Thus you obtain the lowest noise. • If the white balance is correct, proceed with step 8. • If the white balance is not correct, see the following step. 7. If the white balance is not correct, adjust the corresponding color gain parameter in the [Gain & Offset] section. Note The following figures show white balance examples of a gray value line displayed in ColorChecker® . Figure 23: Image with Basic Camera Settings Figure 24: Same Settings + Use of IR Cut Filter In Figure 24 you can see the reduction of the red spectral components. This is why the IR cut filter must be mounted before setting the white balance parameters. Copyright 2013 by Basler AG Page 12 of 18 Basler sprint Color Cameras Setting up a Basler sprint Color Camera With a Matrox Solios Frame Grabber AW00120503000 In Figure 25 you can see the influence of a completed white balance. The global gain makes sure that the brightest field is below the saturation. The gain of the single colors were changed in such a way that red, green and blue in the image have equal values. Figure 25: Image with White Balance Influence 8. Adjust the gamma correction parameters: a. Set the gamma parameter: Info The standard value for gamma in sRGB is 0.42. An incorrect gamma value means that the saturation of the colors will change with the brightness. Figure 26: Setting the Gamma Value Gamma = 1 means no adaptation. Only set gamma to 1, if image evaluations later on include this step or if you want to obtain a higher contrast (the higher contrast can only be obtained by simultaneously loosing details in the dark areas of the image) and you do not need any color adaptations. If you use another color space, set the gamma value to the corresponding value. When gamma is set correctly, there should be a smooth transition from the lightest to the darkest gray scale targets on your color chart (see example in Figure 26). 9. Save the current settings that will reflect the status before color adjustment as a user set. This user set will include the results from white balance and gamma correction. Depending on your light source, set the corresponding color enhancement parameters in the [Color Adjustment] section. The table in the “ 10. List of Color Settings for Different Light Sources” section (on page 15) shows you the values for different light sources. 11. Take again an image of the white and gray fields of the color checker (see example Figure 22 ). The displayed image on the monitor should look like the image in Figure 22. If the displayed image does not correspond to the captured line, check whether the monitor is correctly adjusted. 12. Capture images of the blue, green, red, yellow, magenta and cyan line of the color checker (see example in Figure 27). 13. Check whether the colors are correct. • If the colors are correctly displayed, the color enhancement is complete. Go to step 14. • If the colors are not correctly set, proceed with the next step. Figure 27: Checking the Colors Copyright 2013 by Basler AG Page 13 of 18 Basler sprint Color Cameras Setting up a Basler sprint Color Camera With a Matrox Solios Frame Grabber a. Depending on what color is not correctly displayed, adjust the corresponding color enhancement parameters in the [Color Adjustment] section (see Figure 28). b. Set the viewing tool (e.g. Just Color Picker) to HSB/HSV mode. c. Capture a new image of the ColorChecker®. d. Compare the values of the captured image to the reference image on your PC. e. Adjust the primary and secondary colors as close as possible to the values of the reference image by adjusting the corresponding saturation and hue color parameter. • See parameters for the different light sources in Table 1 on page 15 and • Hue and saturation adjustment are explained in the Basler sprint User’s manual. AW00120503000 Figure 28: Color Adjustment Default Parameters in CCT+ Neighboring colors will influence each other, e.g. changes for yellow may also slightly change red and green. 15. Save the settings (i.e. with the modified color enhancement parameters) to a separate user set. If not saved in a special user set, the settings made for color adjustment will be lost when the camera is reset or switched off and back on. Additional Information Each of the six primary and secondary colors is separately adjusted in the HSB color space. Only similar colors as red and magenta are influencing each other. The example parameter at the right side were evaluated with the following illumination: Fluorescence tube Osram Lumilux L58W/865 cold white, 6500K and gamma = 0.45 The following HSB target values of the ColorChecker® are to be obtained (see Figure 29): Figure 29: ColorChecker® RGBYMC Target Values Copyright 2013 by Basler AG Page 14 of 18 Basler sprint Color Cameras Setting up a Basler sprint Color Camera With a Matrox Solios Frame Grabber AW00120503000 List of Color Settings for Different Light Sources Table 1: Color Settings for Different Light Sources Parameter Name in CCT+ Values Without Correction Tungsten 2800 K Daylight 5000 K Daylight 6500 K Color Adjustment Enable 0 1 1 1 Saturation Red 64 91 69 70 Hue Red 0 8 15 13 Saturation Yellow 64 139 104 104 Hue Yellow 0 18 -4 -4 Saturation Green 64 203 152 147 Hue Green 0 127 69 54 Saturation Cyan 64 91 89 91 Hue Cyan 0 115 46 42 Saturation Blue 64 105 89 91 Hue Blue 0 - 24 - 26 -27 Saturation Magenta 64 115 125 117 Hue Magenta 0 127 127 127 0 1 1 1.0344 3.5 2.1669 1.1499 1 ... Gain Blue [dB] 6 6.2717 1.8924 1.513 Offset [DN] 0 0 0 0 Gamma 1 0.416667 0.416667 0.416667 1 1 1 1 [Color Adjustment] [Gain & Offset] ... Gain Red [dB] ... Gain Green [dB] * [Lookup Table] Lookup Table Enable (i.e. Gamma Enable) * By default Gain Green 2 is disabled. If enabled, the gain value would be as the Gain Green value. LED light source As the variety of light emitting diodes is very large, e.g. varying temperature and color ranges etc., no values for an LED light source are indicated in this table. If you want to use an LED, we recommend to check the color and temperature values for the selected LED type and take the values of a light source that is close to the LED color temperature. This can be a starting point for your color enhancement. Copyright 2013 by Basler AG Page 15 of 18 Basler sprint Color Cameras Setting up a Basler sprint Color Camera With a Matrox Solios Frame Grabber AW00120503000 Short Overview of ‘Sequences of Steps’ Example Sprint spL4096-kc IR cut filter ILLU Optics Configuration Adjustment DSNU PRNU Copyright 2013 by Basler AG If you want to eliminate the influence of spectral components outside the visible light, you have to mount an IR (infrared) cut filter before you start to configure the camera. The 489 filter type transmits in a range from 380 nm to 690 nm, and cuts off from 690 nm on. Example: Filter type 489 Select an illumination that has a color temperature as high as possible. Example: cold white with about 6500K. It can be that a higher percentage of red in cold white cannot be compensated sufficiently. In addition, select an illumination that is so strong that you can set a low gain of the camera. This reduces the noise and makes the adjustment easier. The optical components can be freely selected. They should meet the desired resolution requirements. With larger focal lengths you obtain a more balanced result over the camera line, also concerning the color fidelity. Example: 80/4.0 with a resolution of 45 µm. All configuration steps in the example were realized with RGB signals, without Bayer mode. Optionally, you can also use RAW signals converted in Bayer mode, even with higher data width. The direction of transport is important for the configuration result, i.e. which line (line A or line B) is processed and read out first (and what line of the object is seen by the camera first). The example shows a camera that was mounted in a way that the direction of transport corresponds to the default setting in the camera. Optionally you can select < Line B first > in the camera configuration. If the focus of the camera is very well adjusted, this influences in a very positive way the depending items/settings, especially the edge effects. If the illumination allows it (noise), you can slightly open the aperture. Only if there are edges that are positioned perpendicular to the direction of transport, adjust the position of the camera (camera line). 1. Close the lens of the camera (with a cap). 2. In CCT+: a) Set Exposure : Exposure Time Control Mode <Free-run, programmable> b) In the DSNU & PRNU Shading Correction group: Select Generate DSNU Values. If the generation is successful, Last Shading Generation Failed is <0>. 3. Remove the cap from the camera lens. 4. Capture an image of a homogeneous surface (just below the saturation in the object plane); e.g. white sheet of paper. 5. In CCT+: In the DSNU & PRNU Shading Correction group: Select Generate PRNU Values with DSNU Values. If the generation is successful, Last Shading Generation Failed is <0>. 6. The values are internally saved. If the procedure is successful, ‘Last Shading generation Failed’ is 0. Page 16 of 18 Basler sprint Color Cameras Setting up a Basler sprint Color Camera With a Matrox Solios Frame Grabber White Balance GAMMA Color AW00120503000 The ColorChecker® is in the object level. All components of the RGB signal (red, green and blue) in the unsaturated (illumination, gain near the reference value), brightest field of the gray value fields should reach a target value of 242 (the field marked with a red rectangle. The green gain is slightly modified (G = 242); the red gain is set to R = 242, and the blue one to B = 242. You obtain gray values in the chart where R = G = B. The ColorChecker® is in the object level. The gamma value iss et to 0.42. For most applications this should already work. The target ist hat the six gray value field must reach the reference values. In our example it was necessary to lower the offset of the camera to 5. The ColorChecker® is in the object level. The color adjustment feature in the sprint camera lets you adjust hue and saturation for the primary colors (RGB) and the secondary colors (YMC). The most effecient way to display a live image is to use the MIL software. Either the reference image of the Colo Checker can be opened as a sample for the ColorPicker or you know the reference values (because you saved them). Adapt the values of the single colors until you obtain a satisfactory result. The parameters correspond tot he HSB color space. You can set the ColorPicker to the HSB color space. Neighboring colors will influence each other, e.g. changes for yellow may also slightly change red and green. This is why several adaptation steps are necessary. Image Capture Copyright 2013 by Basler AG Page 17 of 18 Basler sprint Color Cameras Setting up a Basler sprint Color Camera With a Matrox Solios Frame Grabber AW00120503000 Revision History Document number Date Change AW00120501000 -- AW00120502000 Jan 14, 2013 AW00120503000 Feb 12, 2013 • First preliminary version only exists in German. First version (02 version in document number, because the English version differs from the original German version no. 01). Entered note that “How to Adjust the Camera (Gamma, White Balance, Color Settings)” section is also present in the Basler sprint color user’s manual and that it will be there in the newest version. Users should check in the sprint user’s manual whether there is a newer/updated version of this section. • Inserted link to Matrox website on page 3. • Inserted information on what color camera models have the color enhancement feature available on page 11. • Inserted information on color enhancement description in Basler sprint color user’s manual on page 11. Basler AG Germany, Headquarters Tel. +49 4102 463 500 Fax +49 4102 463 599 USA Tel. +1 610 280 0171 Fax +1 610 280 7608 Asia Tel. +65 6425 0472 Fax +65 6425 0473 [email protected] [email protected] [email protected] www.baslerweb.com