1
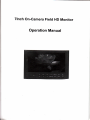
Tlnch On-Camera Field HD Monitor
Operation Manual
k
Dear usenB:
Thank you for purchasing our Oncamera Field HD llonito. Kit
This 7" Pro HD ironitor is dBigned to be used as an extemal video
diEplay, alliling you to step back from the camera whilo still being able
to ftame and capture the action withoul having to look lhrcugh the
cameras built-in viedinder. Thi3 monitor is light rcight low power
coBumption and low cGt make it idoal to use with any Pro Vidso
Camera, DSLR, DV and HD Mdeo C.merr. With HDltl, Component
Composita Vidoo and Audio lnput, Video Output, and optional HDilll
Ouhut
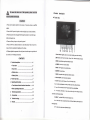
Product Advanced Features:
1024*6fi)pixels, max 1920x1080 pixels
P€kitrg Filter(Focus Asirt)
Crnon 5D Mark II Camem Mode(Full Scretr Di6play' NO delay)
16:9 or 4r3 Aspet Ratlo Setting
ChekFleld (Rcd, Cretr, BIue, Mono, color)
Utrdcr Ss! Modq
Center M.rker, Scretr Markeru(807o,E5yo,Xo/o'93o/o 96'/0).
Brightn6s, ContMt, Huc, Srtumtion rtrd Color Temp€mtore AdiNtmetrt
Support differnt kltrds of Batteriq (Sotry F970, Catron E6, Plosonic D28S,
Sotry V-mounl, Panasnic Atrlon)
Etgh Cotrtrut & Dtzzy-preof monltor with soo shrdq to @ clerly uder
sutrshitrc
jL
G4flt
To ep*rrr the rcsr u*+l'iiF*td1i&{fiet*,*i,fuiirffit)#E
drixiiisl;itiilffitgl.{*ff ,Btlisi.
1.
a
Product description
Front view
CAUTION
l. Plese
use the adapter attached
itr the acc€ssory if necessary, pleae use qualified
adapts.
2, Plqse do NOT expose this product to dircct sulight, heat, or hwid conditions3, Please
kep awoy from stong light *'hite using this product to ensre tbe image
efect and long-tem
w.
4. Plese avoid heary impact oi drop onto the
5. Ple6e do NOT
clean
$ft
us chmical
cloth to maintain the bdghtness ofthe surfrce.
6. Without adjustable component in the
by
grcud.
rclutions to clem this product. Please wipe with a
yowlf,
to avoid
dmge
wit, ple@
do not take apffi or repair the
eit
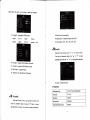
1.
the prcducr.
Pows lndicator Light Lighl turns
red when siandby, green whon working
2. BlWr Switch on/ofi Check Field (R6d, Greon.
Blue. Mon@hrmatic and Cotor)
3.
HDill: High definition signal input slection buflon
4.
CA|IERA: Canon
5. YPbpr:
6.
SD
IlCamera Mode
ypbpr signal input setec{ion
button
iIARKER: Screen Marker
7. VIOEO: Composite video signal input
selection button
8. COLOR
1
.
Menu operating
TEMp Color tffipeEture sebction
9,
4;rr6i9t Us
0_
> j Functis @nfirmation or value up while using menu
setting func{ions
11. Focus: Ctick
11
to switch betw@n 4:3 and .16:9 aspect
ratio
to switch ON/ OFF peaking Fitter(FocusAssist)Mode
12. {1 5g6ct;6. @nfimation or value doM while
using menu setting fuhctions,
and Switch ory'ofi Center Markor
13.
lrENU,
14.
l:
To activate OSD
(on-sc.en di6ptay) menu
Meou item value up adjustment button. No
Menu State to cycle adjust the s
level brightnes
15. V: Menu item value down adjustment
bution
,6. Oi Earphone
Ja6k
17. Display Screen
o
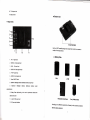
a Bottom view
Back view'
Use the %20 Thread Mounting hole to
attach the monitor to a €mera or
varEry oi mounting devies.
I
o
1- YlN, Ysigf,alinpd
2. VIDEO-IN'
3. PbJN.
4.
Video signal input
Pb signal input
VIDEO-OUT: Vid@ signal ouhut
5. PrlN:Prsignalinput
6.
7
.
8.
S.
AUDIO-IN: Audio signal input
P(rer ON/OFF Switch
Baftery Plate:
F970
HDMI-IN: HDMI(High Definition Multiredia tnterface) signalinput
HDMI-OUT HDMI(High Defnition Multimedia lnterface) signat
output(OptonaU
10. Battery Plate slot(A@rding lo the usffi' requirerent$ sd@tion)-s
:
attached instruction
11. 4{io XLR DC porer inpui
Panasonie Anton Baue,
Sony V-Mount
12. DC power input interfa@
According to the different requirements
of battery for the customers, attached
different batteries plate slot.
NEGATIVE. Otherwise wilt damage the product. (see atiached
image)
a. Sony F970 battery slot for battery of Panasonic DV:
F9701F960 F950 T930 F770 "t750 F730 F570 F550 F530 0M91D OM91
C)-
QMgOD QMgO OM71D OM71 QMTOD QMTO QM51D QM51 FM71 FMTO
*
srial
Please use the adapter attached in the acessories. lf
necessry to use
other specifications adapter, please note to provide the qualified
adapterwhich
power supply shoutd be not t6s than 1OW (DC6V-24V)
b. Canon LP-E6 battery slot for batlery of Canon DV:
Canon LP-06
c. Panasonic D28 battery slot for battery of Panasonic DV:
D55 5545 D54SE O40 D35 D33 D32 D28 D25 D22 serial
d. Sony V-mount €mera battery Platie
2.
o. Panasonic Anton Bauer battery Plate
fEY
Picture: Three types of bafreries cotreapondlng to the upper
thre slots
€se
€n
Another option
power
of
soure is using batteries. The product back
including battery slot is available for three typ€s of batteries.
Custohers
choose different battery slots according to their needs.
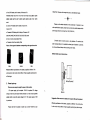
Battery install way
G
below plcture
LP-E6
Remrk:
working
i
Different specmcafions of the battery, €pability is difierent. The
tire
for the monitorwill be different. Higher €pability (working time)
will be longer
Battery(htional)
2. Powerinputway
Thoro are som6 ways to $upply the power of the
ffi
mnitor.
1.The porer supply by the adapter. 12Vl1.0A is optional DC voltage
chaoger, insert DC power input interface direc{y. lt can be
adapter which cunent with output voltage DC
6-15V
ch@sd
lhnitor
qualified
ouQut capacity >10W
by dstomeB
Sugg€tion: Bettgr remove th6 battory for long-tom NO use this product.
Diffsrcnt
Pl€se note that the polarity of
pmr
input is inner POSITIVE, outer
specilications of the battery, Gpabitity is difierent. The
working time
for the monitor wilt be different. Higher capabitity (working
fime) wiil be tonger
lvlthout d6ign charplng clrcult for the monltor, pleaae removo
tio
3.Operating instructions
Datlory to the battBry chargs tor ch.ryo.
a
Panol sholicul buton frnction operation!
mMI'_
il
jl
supplied ftom camera.
,
l,
h
a
F
** 't mpusisial +
wm J *raion L
3. This product also 6an be by 4-Pin XLD interface to use tho power
HDMI {HD SieBl)
Sigral
YPbPr/C@porent
VIDEO Signal
Coltr
ewbtnage@lor,
Mmhmmsldim
0
Cmu
f
l-
bl@k
Ca@5DIC@Me
-
inage firl disphy,
NodEtay, Node&m
-
in ths worklng
8trlo- 857o, fPl0,
93%, 95Vo, ofi
-S()@
ShoItwt brtton
s@
Nobl6rk
ureR
Op€ratlng inrkuc0on (When op6r.tlng, th6 morltor should ba pow6r on
ed whiE
lffioctuome (R/C/B)
st &)
Pating For Bett{
Focu6!
wlda @lor app€aring;,
Ihe edgs of M whffi
a
Mm
Peaking
Fih6r
-
lhe
-
piffi
is
inf@N
6500K
@LOREMP
c4lof
T@FMreseleotid
7500K
9300K
-
us
(*ting
4!3,/i6:9
-
AQelRdio
sesbe
l-
I
@)
4:3
16:9
6Ld
fttu
fiEctid
smd
il
-
{-
by
Bdghtae$
8djust
Vollre adjN
6
brfloD
oCem Mrkm
Vollffiadjffibffiu
l0
lml brighhss
-
slEtuutbubn
vol@do@
-
O, Menu operating inatructions
Berore setting lhe menu functions, please make sure the device E
connected correctly. Power switch(lower right corner of the unit) dial to ON
position. The monitor enter into working staie. please dial to OFF position
when ned lo close the unit. Afier enter into working state, press the,,mode,
button on the unit, a@ording to the input video signal to Bwitch',HDMl. ypbpr,
VIDEO" (under NO menu state, using the shortcut button on the panel to
X
Saturation: To adjust color concentration
X
Color temperature: Enter into Gftcolorlmenu, press
unit to confirm, press
press
"
<'or"
f
'l'o/'v'
"<"or'tion
the
to select the fom of color temperature, then
on the unit io confirm, then use " l"or"
v" lo seleci
color
temperature such as: 93OO K, 7500K' 6500K or USER.(the monitor leave the
factory defalts 6500K)
operate). Press "lGNt " button on the unit, then enter into OSD menu operation.
Operate'l'"ol'V"on the uniilo select or adjust the needed options. E(color);
E(menu); E(tunction); Elsounay; After select options, press .<"or ron
th€ unit to confirm, then using A "or'V'to select or adjust the value of Analog
Dat8. Afier confirm the needed adjusl parameteE, using,<,or>,to adjust. lf
need to exit OSD menu, repress
'ilEl{ll'
button.
When select "USER",
. il
use
(color)
Enter into "Color" OSD, press' <"o/.
"<'or"f
color of picture meets
tbufton to
ue 'l"orv"
to select color
R' G' B'
lo adjust the value of Analog Data, to make sure
then
the
ned
contirm, then enter to
adjust the color parameters, use 'l."of,!7',to select adjustment item, then
use"
<"or,
X
adjust the parameters.
Brightness: To ediust the image,s brightness.
X Contrasl
To adjust the brightest and darkeEt ratio of the image, please
note the sense of picture when adjust, proportion too large or small, will make
the picture lose the color of showy.
XTint: On NTSC Video mode, the image color tint difference is adjustable
by tint.
.E
(osD)
Ater select "OSD" function, press "<"or", button to confirm,
then enter into parameters adjust. Using'A"ot"V" bufton to *lec{
l2
optional items, then using ,,<,,or"X button to adjust the parameters.
X
Language: LanguagesforOsD as below
English ifi{S+A ttatians
Deutsch Espafrot *#+t
Fransis
Pyce
X
Reset: Backtooriginalsetting.
x
Display Ratio, To change the display ratio 16:9/4:3.
X
ScreenMarker: (80o/o' 85o/o. 900/o' 93%' 95olo)
o E[(souna]
Afier select "menu" function,
prss " < "
or " >
"
Use
"A"
or
Then enter into parameteF adiust.
adjustable options, then use "
X
H Position, To adjust the OSD position in horizontal
X
V Position: To ad.iust the OSD position in vertical.
X
OSD Timeout: To adjustthe ctock.
X
Transparent: To adjust the level of transparent.
'(
" or " > "
button to @n irm
"v"
to *lect
adjust specific parametere
X Volume: To adiust the volume
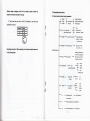
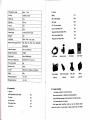
4, Parameter:s
.
Ell (Function)
After select',function,,, pEss
.<"of
enler into parameteE adjust. Using
adjustable items, then
using,'<'o/X
,
button to confrm, then
"ol"V,, button
to
setecl
button to adiuatthe parameters.
Display panel size
TFT LCD T.oinch 1843200 Pixels
Panel type
TFT LCD
Resolution
1
Max resolulion
'192Ox144O
Horizontal frequency range
30-60kHz
024*600
Field fEqGncy range
60Hz
Dot Pitch
0.05(\4 x 0-15 (H)
Battery
lpc
Display ratio
16:9
BNC to RCA adapter
6p6
Brightnes
25O cdln"
BNC
Contrasi
7O0:1
DC 12V power adapter
-
2.
75Hz
1oms
Canon LP-EO battery Plate
75'fi 511/R),7o'rs. (u/D)
Panasonic D28 series battery Plate
lpcs
LED
Sony V-mount battery Plate
1p6
Panesonic Anton Bauer Plale
lpcs
lnput Signal
HDMI, YPbPr, Video,Audio
HDMI & YPbPr Support Format
480i, 480p. 576i. 576p. 720p. 1080i(50,60).
PAL-4.43: NTSC-3.58
Speaker output power
>1W/80
Signal output
Video, HDMI(optional)
lnput power voltage range
DC6-24V(XLR DC Connetion)
Power mnsumption
<6w
Standby current
<50mA
Unit size
I
Weight
4699
Working temperature
-20-55C
Slorage temperature
-30-6sc
88.s(L)mm X 1 34(W)mm x 42.5(H)mm
t
t
t5-
#
3
HDMI
*
*
€ble
Power adapter
shoe mounl
Acccssories
I
Sun shado
b &
BNC to RCA
adapter
(optional)
(optional)
t
User manual
,
BNC cable
Battery
(optional)
(optional)
6, Trouble shooting
1. Srtandard
s
pcs
Response time
Video color system
i
1
Viewing Angle
1080P(50/60)
I
6p6
€ble
1pc
Backlight
5.
Optiooal
1. Only black and white or monochrome pic{urc.
HDMI cable(HDMI to Mini HDMI)
1pc
Pleas check saturation- brightness
Sun shade
lpc
confirm B/w button whether in black and white or monehrome state'
Hol sh@ mount
F970 baftery Plate
1p6
1p6
User manual
1
pcs
2. NO picture afrer
&
mntrast adiustment'
Put on the Power
connecting, make sure use the standard adapter
pwer
supply by baitery, please check the battery
lf
the
monitor
conneot
Check signsl
cble
whether fully charged.
3. The image 610r distorlion or abnormal, eg. lack some color.
Pleas check signal €ble whether
damage or l@se will
€use
connec-t conectly or not. The cable
poor tftlnsfer, then above malfunction will
happen.
Chsk "@lof'
function menu "@lor tempeEture' adjustment, whether
adiustmont misconducl under the "us6r" state
4. lf there exists an abnomal phenomenon, plaase try to enter into OSD
menu
slect 't@f' to reset.
r Remark:
lf there are still other prcblems, please mntact with our related deals.
lf there are changes without prior notice.
'