1
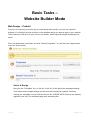
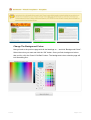
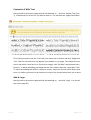
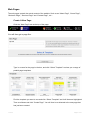
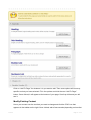
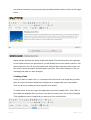
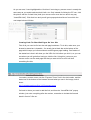
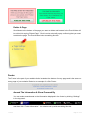
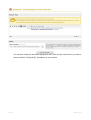
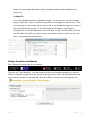
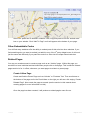
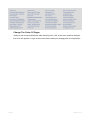
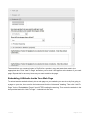
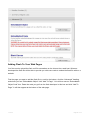
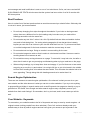
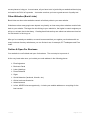
USER MANUAL
Tel: 01775 670180 - Fax: 01775 670160
Email: [email protected]
www.DriveByWebsites.com
Revision
Published
1.01.00
30th March 2011
Latest Version Available
http://drivebywebsites.com/downloads/direct-user-manual.pdf
Company Details
Drive By Websites is a trading name of Vantage Businesses Ltd
Registration: 056 574 27
v1.01.00
VAT: (GB) 887 5955 43
Page 1 of 34
TABLE OF CONTENTS
Introduction ......................................................................................................................... 4
User Modes.......................................................................................................................... 4
What are User Modes? ................................................................................................................ 4
Updates Only ............................................................................................................................... 4
Site Builder ................................................................................................................................... 4
Basic Tasks – Website Builder Mode ............................................................................... 5
Web Design – Prebuilt.................................................................................................................. 5
Select A Design ........................................................................................................................ 5
Change The Background Colour .............................................................................................. 6
Customise It With Text ............................................................................................................. 7
Add A Logo .............................................................................................................................. 7
Web Pages .................................................................................................................................. 9
Create A New Page .................................................................................................................. 9
Move Content Around............................................................................................................. 10
Add Additional Content Using Templates ............................................................................... 10
Modify Existing Content .......................................................................................................... 11
Creating Links ........................................................................................................................ 12
Creating Links To Other Web Pages On Your Site ............................................................. 13
Creating Links To Other Websites (Not Your Own)............................................................. 14
Creating Links That Open In A New Window ...................................................................... 14
Creating Picture Links......................................................................................................... 14
Removing Links .................................................................................................................. 14
Add/Replace/Resize An Image ............................................................................................... 15
Tweak Page Settings.............................................................................................................. 16
Publish/Unpublish A Page ...................................................................................................... 16
Delete A Page ........................................................................................................................ 17
Footer......................................................................................................................................... 17
Amend The Information & Show Powered By ......................................................................... 17
Intermediate Tasks – Website Builder Mode ................................................................. 19
Standalone Web Pages .............................................................................................................. 19
Creation Of ............................................................................................................................. 19
Managing ............................................................................................................................... 19
Linking To............................................................................................................................... 20
Google Analytics Installation ...................................................................................................... 20
v1.01.00
Page 2 of 34
Adding 3rd Party Widgets To Pages ............................................................................................ 21
YouTube Videos ..................................................................................................................... 21
Google Maps .......................................................................................................................... 22
Other Embeddable Codes .......................................................................................................... 23
Related Pages............................................................................................................................ 23
Create A New Page ................................................................................................................ 23
Change The Order Of Pages .................................................................................................. 24
Advanced Tasks – Website Builder Mode ..................................................................... 25
Creating An E-Commerce Website (Using PayPal) .................................................................... 25
Embedding A Website Inside Your Web Page............................................................................ 27
Adding Flash To Your Web Pages ............................................................................................. 28
Advice ................................................................................................................................ 29
Why Should I Even Bother With A Website? .............................................................................. 29
Domain Name Registration ........................................................................................................ 29
Domain Name Selection ............................................................................................................. 30
Hosting ....................................................................................................................................... 30
Best Practices ............................................................................................................................ 31
Search Engine Optimisation ....................................................................................................... 31
Your Website - Keywords ....................................................................................................... 31
Other Websites (Back Links) .................................................................................................. 32
OnLine & Open For Business ..................................................................................................... 32
Miscellaneous ................................................................................................................... 33
Useful Links................................................................................................................................ 33
Picking A Colour Scheme ....................................................................................................... 33
Online Colour Picking ............................................................................................................. 33
Free Stock Photos & Images .................................................................................................. 33
Premium Stock Photos & Images ........................................................................................... 33
Email Forwarders ....................................................................................................................... 33
Contact....................................................................................................................................... 34
Disclaimer .................................................................................................................................. 34
v1.01.00
Page 3 of 34
Introduction
This User Manual is the complete guide to creating professionally designed websites. It’s been
written to assist people looking to either build their own website or need some assistance in respect
of updating their website utilising our award winning system. It’s perfect for beginners and the more
experienced web developer.
User Modes
What are User Modes?
User Modes are the means by which the system is made relevant to your website development
experience. You can switch between user modes at any time by clicking the new user mode in the
top left of the screen. The image below shows you what you should be looking for.
Updates Only
This mode is perfect if all you want to do is update your existing website and pay for invoices. For
this reason, “Creating New Pages”, The User Dashboard” and “Configuring The Web Design”, etc
are all hidden from you, as the user, in this mode.
Site Builder
Site Builder is for our clients looking to build their own website. Included in this mode are many
more features such as creating “Related Pages”, “Custom Templates”, “Designs”, “Standalone
Pages” and much more…
v1.01.00
Page 4 of 34
Basic Tasks –
Website Builder Mode
Web Design – Prebuilt
If you’re in a rush and you need to get your web design done quickly, you can use a prebuilt
template. You literally just point and click on the template design you want to apply to your website.
Then customise it with up to 3 lines of text in the header, add a logo and change the background
colour.
From your dashboard, scroll down and click “Prebuilt Templates”. You will then see a page similar
to the one shown below:
Select A Design
Now click the “Templates” link, or click the “Let’s Go” to the right of the templates heading.
Then select which template design you like and it will instantly be installed. Just keep
clicking new templates until you find the one you like. PLEASE NOTE that they are instantly
applied to your site! The templates page looks something like:
v1.01.00
Page 5 of 34
Change The Background Colour
Now go back to the previous page with all the headings on… and click “Background Colour”.
Select the colour you want and click the “OK” button. Once you find a background colour
that you like, click the “Save & Go Back” button. The background colour selection page will
look something like:
v1.01.00
Page 6 of 34
Customise It With Text
Now go back to the previous page with all the headings on… and click “Header Text (Line
1)” or whichever line of text it is you want to work on. You will then see a page like follows:
First of all you need to click the “Text” tab, enter some text in the box and click “Apply New
Text”. Wait for a second and it will appear in the header of your page. Then adjust the size,
colour and select a new font for it. Once you’re happy, click “Go Back” and then add more
lines etc. To delete a heading just delete the text in the textbox and click “Apply New Text”.
To move the heading just click on it with your mouse, hold down the left mouse button and
move it to where you want it to be positioned. Let go of the mouse button when you’re done.
Add A Logo
Now go back to the previous page with all the headings on… and click “Logo”. You should
then see a page like:
v1.01.00
Page 7 of 34
Click “Manage Images” and you will then get something like so:
Then click “Upload”… browse for the image (logo) you want to add to your site and click
“Upload”. Then once it’s done you should get a message. Click OK, then close the upload
box (click the X or click cancel). Now click on the thumbnail of your logo.
The page should reload, click the logo again and it will appear in your header. Then drag
and drop it to position it in the header area.
v1.01.00
Page 8 of 34
Web Pages
The web pages contain the actual content of the website. Such as an “About Page”, “Home Page”,
“Welcome Page”, “Services Page” and “Contact Page”, etc…
Create A New Page
Click the “New Page” text at the top of the page:
You will then get a page like:
Type in a name for the page in the box, and click “Select Template” to show you a range of
prebuilt page templates.
Find the template you want to use and click “Select Template” and it will become highlighted.
Then scroll down and click “Create Page”. You will then be re-directed to the new page that
has just been created.
v1.01.00
Page 9 of 34
Move Content Around
To move content around on a page simply hover your mouse over what it is you want to
move and the section of the page you are going to move becomes highlighted. A little
toolbar will also popup. Move your cursor over the “Move” icon and hold your left mouse
button down. Drag the mouse up or down the page to re-position it and let go of the mouse
button when you are happy with the new position. The picture below shows a box being
moved.
Add Additional Content Using Templates
Let’s say you want to add another paragraph of text or a list to the page. Scroll down to the
bottom of the page until you see what looks like that shown in the image below:
v1.01.00
Page 10 of 34
Click on “Add To Page” for whatever it is you want to add. Then some options will come up
specific to what you have selected. Fill in the options and click the new “Add To Page”
button. Once clicked, it will appear at the bottom of your page. Scroll up a little and you will
see it.
Modify Existing Content
Hover your mouse over the text that you want to change and click the “Edit” icon that
appears in the toolbar on the right. Once clicked, wait a few seconds (depending on how fast
v1.01.00
Page 11 of 34
your internet connection is) and you will get something similar to what is shown in the image
below.
Notice that the edit tools are similar to Microsoft Word? That’s because they are supposed
to look similar so there is a good chance you will already know how to edit the content. Just
select some text, click “B” and it becomes bold! Easy as that! Hold the mouse cursor over
the icons for a few seconds to see what each one will do. Click “Save Changes” once you
are happy with what you have changed.
Creating Links
If ever you want to create a link i.e. if someone clicks some text or an image and you want
them to be sent to another website like Google.com or a page within your own website.
Then you do so by creating a link (or hyperlink to be exact).
To create a link, all you do is go to the page where you want to add the link. Click “Edit” in
the toolbar that appears when you hover over what you want to turn into a link on the page.
Then highlight the text or image that you want to turn into a link like this:
v1.01.00
Page 12 of 34
As you can see, I have highlighted the “click here” text using my mouse cursor in exactly the
same way as you would make text bold, italic, etc. Only instead of clicking the “B” icon, click
the picture with the 3 chain links (hold your mouse cursor over the icon and it may say
“Insert/Edit Link”). Click that icon and you will get a popup window like so from which the
next steps below will follow.
Creating Links To Other Web Pages On Your Site
First of all you need to find out the web page’s address. To do this, make sure your
browser’s status bar is viewable - it’s usually just a blank bar at the bottom of the
page which keeps you informed about such things as page loading. One feature of
the status bar is that it will show you the URL of a link before you click it, so you can
see where you will go before having to click the link. Using this, just move your
mouse cursor over the web page link that you want to link to and it will look
something like this:
I moved my mouse cursor over the “Payment Terms” link in the site header, and the
status bar in the bottom of the browser showed what you see in the image, write it
down:
http://rentasiteresellers.office/1107/payment-terms
Go back to where you want to add the link, and from the “Insert/Edit Link” popup
window, just enter everything after the number, remember to include the forward
slash in front of it like so:
v1.01.00
Page 13 of 34
Click “Insert” and save the changes to the page once you are finished making any
further modifications.
Creating Links To Other Websites (Not Your Own)
From the “Insert/Edit Link” popup window click in the box next to “Link URL” and type
in the website address you want to go to such as:
http://google.com/ or http://amazon.co.uk/product/12/cool
and click “Insert”. Then click “Save Changes” once you have finished adding links to
that section of the page.
Creating Links That Open In A New Window
From the “Insert/Edit Link” popup window you will see a heading that says “Target”
with a drop down box next to it. Simply select “Open In New Window (_blank)” from
within the drop down box. Then click “Save Changes” once you have finished
modifying that section of the page.
Creating Picture Links
Exactly the same procedure for turning text into a link, except this time just click on
the image you wish to make into a link instead of highlighting some text. The process
is then the same as making text into a link from then on.
Removing Links
Click the link, and then click the icon next to the link’s icon. The icon will look like 2
chain links broken apart. Click that, and the link will be removed. Another way that
might work depending on which web browser you are using is just by right clicking
your mouse on the link, and then select “unlink” from the drop down menu.
v1.01.00
Page 14 of 34
Add/Replace/Resize An Image
After carrying out the step above “Modify Existing Content” to the point where you load up
the editor, then click where you want the image to go, for example, at the start of a
paragraph of text. Then move your mouse cursor along the top row of icons until you see
one that looks like a picture with a + sign on it. If you leave your mouse cursor on the icon
for a second or two it may come up with some text saying “Insert Image”. Click the icon and
you should get something similar to this:
This is where all your images are stored. You can create folders to store/group images in.
We recommend that you create one folder for each web page, for instance, if you are adding
images to a Services’ Page, create a folder called “Services” and click the folder to insert
images in it. When you want to upload an image to your website, click upload and follow the
on screen instructions. You will then return to the image manager screen, click the thumbnail
version of the image that’s automatically produced and it will be inserted into your page.
To re-size an existing image, click on the image you want to re-size. By clicking on the
image, little white boxes will appear around it like so:
v1.01.00
Page 15 of 34
Now hold your left mouse button down on one of the little boxes that have appeared and
drag your mouse to resize the image. The boxes in the corners will prevent the image from
becoming distorted as you re-size it.
To change an image, click on it as if you were going to re-size it, then click the “Insert
Image” icon as you did earlier, select the new image, and it will replace it. Re-size the new
image as required.
Tweak Page Settings
Scroll down to the bottom of the page you want to tweak, and click “Page Settings” located
in the Post-It-Note on the right and you will get something like this appear:
Make the changes to the page and click “Save Page Settings” once you are done.
Publish/Unpublish A Page
Scroll down the page you want to publish or unpublish until you see one of the little boxes in
the pictures below and click the relevant button:
v1.01.00
Page 16 of 34
Delete A Page
Scroll down to the bottom of the page you want to delete and located in the Post-It-Note will
be a blue link saying “Delete Page”. Click it and an alert will popup confirming that you want
to delete the page. The Post-It-Note looks something like this:
Footer
The Footer is the part of your website that’s located at the bottom of every page and is the same on
every page of your website. Below is an example of a Site Footer:
Amend The Information & Show Powered By
You can make amendments to the information displayed in the footer by clicking “Settings”
in the top panel:
and then click “Footer Information”. You should end up with something like this:
v1.01.00
Page 17 of 34
You can then modify the text that’s displayed in the Footer and you can select if you want to
show or hide the “Powered By” information on your website.
v1.01.00
Page 18 of 34
Intermediate Tasks –
Website Builder Mode
Standalone Web Pages
The only way in which Standalone Pages differ from regular web pages is that Standalone
Pages are not automatically linked in i.e. there is no page link produced in the Header
Section of the page for you. Instead, you need to link to it manually such as by adding a link
to it from another web page, telling people about the link or adding a link to it in the Site
Footer. Example uses of Standalone Pages are Terms & Conditions and Privacy Policies
both of which are often not wanted in the main navigational area of the website.
Creation Of
On your dashboard, click “Standalone Pages” and you should have something like this on
your screen:
Click “Create New Page”… create the page then as normal.
Managing
To get back to the Standalone Page’s screen at a later date you can do so by going to your
dashboard and clicking “Standalone Pages”. From here you can create more Standalone
v1.01.00
Page 19 of 34
Pages. All your existing Standalone Pages, sorted by published and unpublished, are
stored here.
Linking To
Go to your dashboard and click “Standalone Pages”. You will then see a column heading
saying “Public URL”. Copy or write down the public url of the page you want to link to. Then
go to the page on your website that you want to link to the Standalone Page from. Create a
link as normal (see the section on “Tasks for Beginner User Mode -> Web Pages ->
Creating Links” in this User Manual for more information on this) This time when you enter
the URL enter in the URL you copied or wrote down earlier and click “insert” once you are
done, it should look something like this:
Google Analytics Installation
Click “Settings” in the top right of your website:
Then click on “Traffic Analytics”. You then need to get your http://analytics.google.com / account,
finish the registration pages and at the end you will be given some code. Copy and paste the code
into the box we provide you with and click “Save & Go Back”. It should look something like this:
v1.01.00
Page 20 of 34
Adding 3rd Party Widgets To Pages
Do you have an account on another website and wish that you could include some of that content
on your own website? Maybe add a video from youtube or a feed from Twitter? This is how you
do it! Go to the page on your site that you wish to add the content to and scroll to the bottom. You
then need to click on “3rd Party Widgets” and you will see a list of websites come up, something like
below:
YouTube Videos
Click the “Add To Page” button on the Videos section. You will then see a box appear with
the heading “Embed Code”. All you have to do now is go to youtube.com and find the video
you want to use on your website. Then click the Embed link… you should end up with
something like this:
v1.01.00
Page 21 of 34
Notice the highlighted code… starting with “<object… “ - copy it and paste it into the embed
code box on your website. Click “Add To Page” and it will appear at the bottom of your page.
Google Maps
Click the “Add To Page” button on the Maps section. You will then see a box appear with the
heading “Embed Code”. All you have to do now is go to maps.google.co.uk and find the
location you want to show on the map. Then click the “Link” link… you should end up with
something like this:
v1.01.00
Page 22 of 34
Select the “paste html to embed in website” code, copy and paste it into the “embed code”
box on your website. Click “Add To Page” and it will appear at the bottom of your page.
Other Embeddable Codes
You will find many websites offer the ability to embed parts of their site into other websites. If you
find something else you want to embed, just add it to any of the 3rd party widget boxes. It will work
just the same and efficiently if you paste the code for a video into the maps embed code box.
Related Pages
You may on occasions want to create a page such as an “Articles” page. Within this page you
would like to have individual articles listed when people click on that page. This is what the related
pages section is for. In effect, whenever you want pages to relate to a parent page.
Create A New Page
Create and find the Parent Page such as “Articles” or “Products” first. Then scroll down to
the bottom of the page and in the Post-It-Note on the right you will see a link saying “Create
Related Page”. Now create the page as normal (see the section in this manual about
creating pages for more information on this).
Once the page has been created, it will produce a related page’s menu like so:
v1.01.00
Page 23 of 34
Change The Order Of Pages
Hold your left mouse button down while hovering over a link in the menu and then drag the
link to its new position. Let go of the mouse button when you’re happy with its new position.
v1.01.00
Page 24 of 34
Advanced Tasks –
Website Builder Mode
Creating An E-Commerce Website (Using PayPal)
This section is if you want to accept payments online via your website. This is how you do this - via
a PayPal account - which we assume has previously been registered. If not, please register an
account.
Login to your PayPal account and go to the merchant services page. From there you are looking for
something like “Create Buy Now Buttons”, “Sell Single Items” or “Accept Donations”. This website
changes all the time but you should be able to find it, just click on a few links until you end up with a
page like this:
v1.01.00
Page 25 of 34
Choose the button type such as “Buy Now” for a single product with no shopping cart, “Shopping
Cart” or for an “Add To Cart” button, and so on… click the button type that suits your requirements
and fill in the rest of the form. Click “Create Button”. When you are done, you will be given some
code. This is the code you need to copy and paste into the relevant places on your website.
Go to the web page on your website where you want to add the button to. Scroll to the bottom of the
page and click “Products”. You should then get something that looks similar to this:
Click “Add To Page” on the layout you like the look of and you will have some settings appear.
Select what you feel suits you best and then click “E-Commerce Buttons (PayPal)” to produce 4
boxes like this:
v1.01.00
Page 26 of 34
Then each time you create a button in PayPal for a product, copy and paste that code in the
appropriate box. Click “Add To Page” and when you’re done it will appear at the bottom of your web
page. Repeat this for as many items as you want to add to the page.
Embedding A Website Inside Your Web Page
To embed another website directly into a web page on your website you can do so by first going to
a page on your site, then scroll to the bottom and click the “Advanced” heading. Then click “Add To
Page” for the “Embeddable IFrame” item AFTER reading the warning. Then enter the website in the
box provided and click “Add To Page”. It should look like this:
v1.01.00
Page 27 of 34
Adding Flash To Your Web Pages
You first need to upload the flash .swf file somewhere on the internet via a web host. Whoever
developed the flash file will be able to provide you with some code to embed the flash file with on a
website.
Find the page you want to add the flash file to, scroll to the bottom, click the “Advanced” heading,
and where you see “Embeddable Object” click “Add To Page”. You will then see an “Embeddable
Object Code” box. Paste the code you got from the flash developer in this box and click “Add To
Page”. It will then appear at the bottom of the web page.
v1.01.00
Page 28 of 34
Advice
Why Should I Even Bother With A Website?
It’s expected – every business has a website nowadays. A website inspires confidence and adds
credibility to your business. How many times have you Googled a business to find out what its all
about and how many times have you contacted an alternative supplier just because your original
choice of business didn’t have a website or their website wasn’t up to scratch?
A website is a powerful marketing tool because you are creating an easy way for people that you
meet or people that see your advertisements to get more information about you and your business
which is, of course, open 24/7.
You should treat your website like an employee – the qualities you should be looking for:
Ø Friendly and informative
Ø Professional at all times
Ø Able to communicate clearly and concisely
Ø Interesting and entertaining
Ø Smartly attired
Your website should be working hard on your behalf and getting results. Very often, this is just not
the case and business owners are disappointed and look on their website as a waste of time and
money. This need not be the case because by taking on board some of the free advice offered
within this section of the User Manual your website could well become “employee of the year”.
Domain Name Registration
A domain name must be registered with a domain registrar before your website can go live. Once
your domain is registered, no one else can use that domain name. However, because the internet
is worldwide, you need to get your domain name registered NOW before someone else does.
It’s entirely your choice which company you choose to register your domain name with. We would
recommend godaddy.com because we think you will find that they are very reasonable in respect of
the price. But, it is entirely your choice.
.
v1.01.00
Page 29 of 34
Domain Name Selection
The first step to commissioning a website is to purchase your domain name. Your domain name is
basically the name of your website, for instance: www.yourbusiness.com or
www.yourbusiness.co.uk
With all the different domain names you can register as well as extensions, numbers, hyphens,
etc… which do you chose?
If you stick to these guidelines, you should be fine in most cases:
•
Choose a name that reflects the very nature of your business.
•
Shorter the domain name, the better. This helps to prevent typos and it will also fit easily on
a business card, etc
•
Stay clear from hyphens – people forget to type them!
•
Register .co.uk for local UK based businesses, .com for international. We do, however,
recommend you register both, if possible, and promote just the .co.uk domain. This helps in
respect of competition because if your clients or potential clients type in .com by mistake
then they will be automatically transferred to the .co.uk website. Stay clear from other
domain name extensions such as .org, .net, .fm, etc. Many people wouldn’t even associate
them as a website address!
•
Keep numbers out of the domain name or words that have multiple spellings such as 2, two,
to, too… if possible.
•
Put your most vital keywords in the domain name - but not too many! Remember, the
shorter the domain name the better. Usually you want to get the same domain name as your
company’s name. That way when people search for your company name, your website
comes up.
Hosting
Hosting is something that you will never have to worry about because clients’ websites created
utilising our system are securely hosted by us. By using a specifically chosen third party hosting
provider we guarantee to provide you, as a valued client, with a fast, secure and reliable
performance at all times. The service setup has been designed specifically to accommodate clients
demanding the highest quality network performance.
At the time of writing this, for the past six months we have been running “Pingdom.com” on our site,
and we have received 100% uptime. The way this works is a 3rd party website carries out 5 minute
checks automatically to make sure that it’s online. Should any of our clients’ websites go offline a
v1.01.00
Page 30 of 34
text message and email notification is sent to one of our technicians. So far, we have received NO
SUCH EMAILS OR TEXTS which means that the system has been online for a full 6 months with
NO interruptions
Best Practices
Here is a short list of the best practices that we would recommend you should follow. Obviously this
is not set in stone, just recommended.
•
Do not keep changing font styles throughout the website. If you insist on having several
styles, then use a different font for the headings only but make sure you make all the
headings around the site the same font.
•
Do not make any text “blue” unless it is a link. By default links are blue and website visitors
are used to links being blue. So seeing whole paragraphs of text that are blue instantly
implies you can click it as visitors to your site will think that it’s a link. Try to leave text black
on a white background for the best contrast to make the content easy to read.
•
Do not make text too large. Doing so results in more scrolling for the user.
•
Do not make images too wide so that it results in a horizontal scroll bar. Users are used to
scrolling down but not across as well.
•
Do not add too many moving elements on a page. To start with, it may look nice, but after a
short time it tends to get very annoying and distracting when trying to read text on the page.
•
When writing headings, try to keep them short and snappy. If you find that one or two words
are going on a new line, try and reduce it to a single full line or put a line break in the middle
to force the 2 heading lines to be about the same width. This will make the website look a lot
more appealing. Though doing this with headings sounds a lot easier than it is!
Search Engine Optimisation
There are two elements to search engine optimisation. One element is what you can do on your
own website and the other element is what you can do on other websites. If you try to do anything
to purposefully get higher in search results such as stuff keywords into pages too heavily or pay to
get listed on “link farms” then Google and other search engines may completely remove your
website from their result listings! So remember, don’t try too hard, and in most cases you will do
well.
Your Website - Keywords
To summarise, your website needs to be full of keywords and easy to scan by search engines - all
original content (nothing copied from other websites). First of all, we have already made your
website easy to scan by search engines and we have given you access to put keywords in the
v1.01.00
Page 31 of 34
correct places to help you. In most cases, all you have to do is just build your website without trying
too hard to stuff it full of keywords. Just make sure that you have a good amount of quality text.
Other Websites (Back Links)
Back Links are when other websites contain a link that points to your own website.
Websites such as www.google.com depend very heavily on how many other websites contain links
back to your website. The larger the site linking to your website is, the higher in search engines you
will go or, at least, that is the theory. Creating back links as they are called can take some time but
it’s well worth it in the long run.
After you’ve created your website, we would recommend that you register your business with as
many business directory websites as you can find such as, for example, BT Tradespace and Free
Index.
OnLine & Open For Business
Your website is now finished and open for business. The next step is to promote it.
At the very least make sure you include your web address in the following places
Ø Email signature
Ø Business Cards
Ø Letter Headings
Ø Press Releases
Ø Signs
Ø Social Networks (facebook, linkedin, etc.)
Ø Online business directories
Ø Advertisements
Ø In fact, NEVER miss an opportunity – include your website address on everything for the
best results!
v1.01.00
Page 32 of 34
Miscellaneous
Useful Links
Picking A Colour Scheme
You can pick colour schemes which tell you the hex code for that specific colour scheme
by visiting http://www.colorschemer.com/online.html
Online Colour Picking
Should you need to pick a specific colour, you can do so here. By visiting this site you will
find the hex code to match the exact colour you’ve chosen. The hex code is located next to
the # at the top of the page.
http://www.colorpicker.com/
Free Stock Photos & Images
More often than not you will want some nice images to use in the template design of a
website or throughout the pages of a site. This is where “stock images” come in handy
because you can choose the one you want, often out of a 1000’s!
http://www.sxc.hu/
Premium Stock Photos & Images
More often than not you will want some nice images to use in the template design of your
website or throughout the pages of your site. This is where “stock images” comes in handy
because you can choose the one you want, often out of a 1000’s!
http://www.istockphoto.com/
http://www.fotolia.com/
http://www.shutterstock.com/
Email Forwarders
From past experience we do not offer actual email inboxes. This is because they cause more
trouble than they are worth in respect of clients contacting us about forgotten passwords, not getting
emails because their inbox is full, and so on. To combat this, we simply set up a forwarder to your
existing email inbox. The inbox can be an existing email address such as [email protected],
[email protected], [email protected], etc… this is where the emails are actually “stored” and read.
What we then do, is setup an email forwarder such as [email protected] to instantly forward
v1.01.00
Page 33 of 34
any email sent to that address on to [email protected], etc. We can setup up to 10 forwarders per
domain name. If you don’t already have an email address or you want a business one we highly
recommend you register an account at www.gmail.com
To help demonstrate how forwarders work visually, please see the diagram below.
A client sends an email to:
[email protected]
A forwarder is setup so any
email sent to:
[email protected]
instantly gets forwarded to:
[email protected]
You log into your
[email protected]
account to read the
email and respond
Utilising this method means that we have no extra passwords to remember, we can use your choice
of email inbox (hotmail, gmail, yahoo, etc). We are in charge of looking after your emails. You can
have multiple addresses that all go to either one or more Inboxes. For example:
[email protected] & [email protected] both go to [email protected]. To setup or modify
forwarders, please email us at [email protected] and quote your username and the
last 3 characters of your password.
Contact
Please feel free to contact us for support or advice in respect of your website development or
updates
Website:
http://drivebywebsites.com/
Phone:
01775 670180
Email Address:
[email protected]
Post:
Drive By Websites, Bank House Farm, Spalding, Lincolnshire, PE11 3JH
Disclaimer
This User Manual is for guidance purposes only and we cannot be held liable or responsible for any
loss or damages caused by anything that’s contained within this document.
v1.01.00
Page 34 of 34


![Audio Extremes Entertainment [Graffiti Spray User Manual]](http://vs1.manualzilla.com/store/data/005858722_1-74e7fc11dae975c9529a69c83302f350-150x150.png)