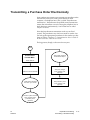
Download Purchasing and Receiving Manual
Transcript
H•A•R•D•G•O•O•D•S Purchasing and Receiving Manual Created by Learning Products Development Copyright © 1989, 1992, 1993 Triad Systems Corporation Hardgoods Division 3055 Triad Drive Livermore, CA 94550-9559 All Rights Reserved. No part of this documentation may be reproduced in any form, or by any means without written permission from Triad Systems Corporation. Printed in the United States of America. WARNING This equipment generates, uses and can radiate radio frequency energy. If not installed and used in accordance with the instruction manual, it may cause interference to radio communications. It has been tested and found to comply with the limits for a Class A computing device pursuant to Subpart J of Part 15 of the FCC rules, which are designed to provide reasonable protection against such interference when operated in a commercial environment. Operation of this equipment in a residential area is likely to cause interference, in which case the user, at his own expense, must take whatever measures may be required to correct the interference. Publication No. 1075125 Revision No. 4508 Contents Using This Manual In This Section About Purchasing and Receiving Who Should Read This Manual About This Manual What This Manual Does Not Contain Conventions Used in This Manual Other Ways to Learn About Purchasing and Receiving Where to Get Help 1-1 1-1 1-2 1-2 1-3 1-3 1-5 1-5 Introduction To Purchasing and Receiving How Replenishment Ordering Works Deciding What to Order Ordering It Receiving It How the Order Point System Works Deciding What to Order Ordering It Receiving It If Your Triad System is New Questions You May Have Setting Up or Changing Your Purchasing System 2-1 2-1 2-1 2-1 2-1 2-1 2-2 2-2 2-2 2-3 2-7 iii Replenishment Ordering About Replenishment Ordering— The Big Picture Deciding What to Order and Creating a Purchase Order Creating a Purchase Order Based on Sales Creating a Purchase Order Manually Adding the Header Information Adding Special Instructions Adding Line Item Detail Printing a Checking Copy Changing a Purchase Order Changing Header Information Changing Special Instructions Changing Line Item Detail Resequencing a Purchase Order Deleting a Purchase Order Submitting the Purchase Order to the Vendor Printing a Purchase Order Transmitting a Purchase Order Electronically Printing and Purging a Purchase Order Finding Out What's on Order Receiving Merchandise into Stock 3-1 3-2 3-3 3-9 3-10 3-11 3-12 3-14 3-15 3-15 3-17 3-17 3-22 3-23 3-25 3-25 3-27 3-28 3-30 3-31 Order Point Purchasing About Order Point Purchasing— Two Big Pictures If You Know What Vendor You'll Order From If You Don't Know Who You'll Order From iv 4-1 4-2 4-3 Order Point Purchasing (cont'd) Order Points Setting Order Points—Classic Inventory Calculating Order Points—Advanced Inventory Reviewing the Order Point Report The Art and Science of Weighting Sales Periods Protecting Items from Order Point Calculation Deciding What to Order and Creating a Purchase Order What to Order How Many to Order Where to Go From Here When You Know What Vendor You'll Order From When You Don't Know Who You'll Order From Creating a Purchase Order Manually, or a Future Order Generating Purchase Orders From Special Orders Questions You May Have Loading Report GPO in your End-of-Day Queue Generating Purchase Orders for Specific Special Orders Understanding the Generated Purchase Order Report Changing a Purchase Order Changing Header Information Changing Special Instructions Changing Line Item Detail Resequencing a Purchase Order Submitting the Purchase Order to the Vendor Printing a Purchase Order Transmitting a Purchase Order Electronically 4-4 4-5 4-6 4-13 4-14 4-15 4-17 4-17 4-17 4-19 4-20 4-29 4-35 4-43 4-43 4-45 4-46 4-48 4-49 4-49 4-51 4-51 4-56 4-58 4-58 4-61 v Order Point Purchasing (cont'd) Finding Out What's On Order 4-63 What's Currently On Order? 4-63 Has This SKU Been Ordered? 4-65 What's On This Purchase Order? 4-68 What's On Order With This Vendor? 4-73 Receiving 4-77 Receiving Merchandise into Stock 4-77 Receiving Merchandise for Which There is No Purchase Order 4-88 Printing and Checking the Receiving Report 4-92 Finalizing Receipt of Your Merchandise 4-97 Cancelling and Purging a Purchase Order 4-100 Vendors Primary Vendors, Secondary Vendors, Manufacturing Vendors Designating Vendor Type Adding a New Vendor Printing a List of Your Vendors Checking on Your Vendors' Performance Method A Method B Deleting a Vendor SKU Numbers, Alternate Part Numbers, Manufacturer's Part Numbers, Vendor Stock Numbers Entering an Alternate Part Number Deleting an Alternate Part Number Printing Your Alternate Part Numbers or Manufacturer's Part Numbers vi 5-1 5-1 5-2 5-5 5-6 5-6 5-7 5-9 5-10 5-11 5-12 5-13 Displaying History Displaying Item Sales History Displaying Item Purchase History Displaying Item Purchase History for a Specific SKU Displaying Item Purchase History for a Specific Vendor Displaying Item Purchase History for a Specific Vendor and SKU Displaying Item Purchase Information 6-1 6-2 6-2 6-3 6-4 6-5 Appendixes Appendix A: Printing Price Labels Appendix B: Printing Bin/Shelf Labels Appendix C: Calculations Index A-1 B-1 C-1 I-1 vii Using This Manual In This Section 1-1 About Purchasing and Receiving 1-1 Who Should Read This Manual 1-2 About This Manual 1-2 Tabbed Sections 1-2 What This Manual Does Not Contain 1-3 Conventions Used in This Manual 1-3 Other Ways to Learn About Purchasing and Receiving 1-5 Where to Get Help 1-5 i Using This Manual In This Section This section introduces this manual, describing, in general terms, the purchasing and receiving system. This section also describes: • who should read this manual • what information is not included in this manual • • • • • how this manual is structured what conventions are used throughout any related publications other resources you could use to learn more about the purchasing and receiving system who to call for help About Purchasing and Receiving There are three main tasks involved in purchasing and receiving merchandise for your store. You have to: 1. Decide what to order 3. Receive it 2. Order it The Triad system offers two Purchasing/Receiving systems. They handle these three main tasks in slightly different ways. The two Purchasing/Receiving systems are: • • Replenishment Ordering (available with Replenishment Inventory ) Order Point (available with Classic and Advanced Inventory) You can't use the two systems in conjunction with each other; they are mutually exclusive. 12 1030072 Using This Manual About Purchasing and Receiving 1-1 The owner of your store purchased either the Replenishment Ordering or Order Point Purchasing/Receiving system. Make sure you know which one you have. This manual covers both of the Purchasing/Receiving systems. Neither of these Purchasing/Receiving systems is connected to an accounts payable system. You must handle invoices for merchandise just as you handle any other invoice. If you use Triad Accounts Payable, please see your Accounts Payable manual. Who Should Read This Manual This manual is written for anyone who is responsible for ordering inventory and for receiving the merchandise into stock. It is assumed that you are familiar with the basic operation of the Triad system and know whether your store uses Replenishment Ordering or Order Point Ordering. About This Manual This manual includes all the procedures for both Purchasing/ Receiving systems. Be sure you're using the right section! It might be a good idea to staple together all the pages in the section you don't use, so that no one will accidentally try to use the wrong procedures. In most cases, you couldn't do any harm to your system, but it would be frustrating, because the procedures that work for one system don't work for the other. Tabbed Sections The tabbed sections included in this manual are as follows: USING THIS MANUAL — describes the manual, structure, and conventions that will help you find the information you need. INTRODUCTION TO PURCHASING AND RECEIVING — explains the differences between the two purchasing/receiving systems and how to set up or change your purchasing system. 1-2 Using This Manual About This Manual 12 1030072 REPLENISHMENT ORDERING— explains how to create purchase orders, submit them to your vendor, then receive the merchandise into stock. Changing and deleting purchase orders are also covered. ORDER POINT PURCHASING— describes how to set order points, create, change, and delete purchase orders; submit orders to your vendor; determine what's on order; and receive merchandise into stock. VENDORS — explains how to add and delete vendors, and how to monitor their performance. APPENDIXES— describes how to print price, bin, and shelf labels; and how the Triad system calculates order points. Finally, at the back of the manual is an index to help you find information based on a topic. What This Manual Does Not Contain This manual does not contain the procedures for electronically transmitting a purchase order to a wholesaler. (This information can be found in Talking Computers—A Communications User's Guide or in Triad True Value User’s Guide.) Conventions Used in This Manual You will notice several style conventions in this manual that have been designed to make the information more accessible. They are described below: Convention Tasks 12 1030072 Description Tasks you perform are presented in a twocolumn format. The left-hand column contains the step or specific action you complete. The right-hand column presents additional explanation about the step, such as messages, and warnings. It also contains additional information about that specific step in the procedure. Using This Manual Conventions 1-3 Convention Description Entries Actual entries you type at the terminal keyboard are shown in bold face (for example, type IMU ). You may type your entries in either upper- or lowercase letters unless you are at the Main Menu. Then you must type your entries in all uppercase letters. Keys Messages The keys you press to perform a function at the terminal appear with initial caps, bold face, within delimiters (for example, <Enter>). The messages and prompts you receive from the system are presented in special type. For example: THIS TRANSACTION HAS BEEN CHANGED Footer At the bottom of every page is a footer. Use these as guides when looking up information. Look at the bottom of this page to see an illustration of a footer. • • • • References On the top line is the name of this section— Using This Manual. Underneath the section name is the topic name—Conventions. Next to the topic name is the page number—1-4. On the opposite side of the page is the software release level, date, and manual model number—7.2/1089/H5266 Throughout the manual you are referred to different manuals, sections within the same manual, or page numbers within the same section. Here are the conventions for each part of a reference: • Manual names are initial caps, italic. • Procedures are initial caps within quotation marks. • Tabbed sections are initial caps followed by a comma. For example, please see the Manager's POS Manual, the tabbed section Security and Control, "Checking the Cash Drawer." 1-4 Using This Manual Conventions 12 1030072 Convention Magnifying Glass Description When you see a magnifying glass, you will find additional information about a procedure, a particular part of procedure, or a specific entry. This information can help you better understand the inner-workings of your Triad system. Ways to Learn About Purchasing and Receiving There are several ways to learn how to use this powerful program: • • Customer education class. Your Customer Education Representative teaches a four-hour course that will teach you to use the Triad system purchasing and receiving system. This manual. Just about everything you'll need to know about purchasing and receiving is in this manual. Always check here first if you have a question or problem. The Table of Contents or the Index can direct you to the answer. Where to Get Help If you encounter a problem that you can not solve with the use of this manual, you can call the Advice Line or you local CER for help. You should call the Advice Line about any error messages, and call your CER for advice about implementing store-specific procedures on the Triad system. 12 1030072 Using This Manual Learning/Getting Help 1-5 Introduction To Purchasing and Receiving How Replenishment Ordering Works Deciding What to Order Ordering It Receiving It 2-1 2-1 2-1 2-1 How the Order Point System Works 2 - 1 Deciding What to Order Ordering It Receiving It 2-1 2-2 2-2 If Your Triad System is New 2-2 Questions You May Have 2-3 Setting Up or Changing Your Purchasing System 2-7 i Introduction To Purchasing and Receiving How Replenishment Ordering Works Deciding What to Order The Triad system tracks the quantity sold of each item since your last order, and prints this information for you. You'll probably wish to replenish your stock of most items—that is, order about as many as you have sold. The Triad system does not keep track of how many you still have on hand. Ordering It Receiving It You can create the purchase order in the Triad system, and you may be able to transmit the purchase order to your vendor's computer via telephone lines. You can print a copy of the purchase order for your files. When the merchandise arrives, you can check the shipment against your printed copy of the purchase order. You do not track the quantity received in the Triad system. How the Order Point System Works Deciding What to Order The Triad system tracks not only the sales history of each item, but also how many you still have on hand. As sales history accumulates and evolves over time, you can use the Triad system to calculate optimum stocking levels for all items based on demand, lead time and cost. 7.2/1089/H5277 Introduction How Replenishment Ordering Works 2-1 The Triad system recommends purchase quantities based on those stocking levels and on the quantities you have on hand. It also takes into account whether you are ordering from a distributor, warehouse or manufacturer, and any special restrictions a vendor may impose. Ordering It Receiving It You can create and store the purchase order in the Triad system, and you may be able to transmit the purchase order to your vendor's computer via telephone lines. When the merchandise arrives, you receive it against the purchase order stored in the Triad system, and automatically update the stock and price information in your inventory records. If Your Triad System is New You'll probably begin with the Replenishment Ordering system. Later, you may move up to the Order Point system. At that time, the people at your store will spend some weeks entering the quantity-on-hand for each item into your inventory file. During that transition period, when quantity-on-hand information is on file for some but not all of your inventory records, you must use a modified version of the Order Point system. But if you are going directly onto the Order Point system, the people at your store will spend several weeks as soon as the Triad system is installed entering the quantity-on-hand for each item into your inventory file. So for a time, some of your inventory records will have quantity-on-hand information and some won't. Also, since your Triad system is new, you'll have no sales history for calculating optimum stocking levels. During this loading period, you must use a modified version of the Order Point system. The audiotutorial titled Inventory Loading tells you how. 2-2 Introduction 7.2/1089/H527 Ho Questions You May Have What if I want to order a new item that I don't already stock? First you'll assign the new item an SKU number and add it to your inventory file. You should also give it an Order Point of at least two. Now you can create any kind of purchase order for this item. If, when you calculate Order Points (using Report ROP), you exclude items recently added to your inventory, the Order Point you entered manually will stay with the item for awhile, until the item has established its own sales history. How can I order an item that doesn't have an SKU number? You can order such items manually. Since you don't have a computer record of such items, the Triad system can't suggest when to order them. If you use Replenishment Ordering, please see the tabbed section Replenishment Ordering, "Creating a Purchase Order Manually." If you use Order Point purchasing, please see the tabbed section Order Point Purchasing, "Creating a Purchase Order Manually, or a Future Order." You should describe the item on the manual purchase order well enough to identify the item to the vendor. What if I try to create a PO when there's already another PO in file for that same vendor? No problem. You can have as many purchase orders in the Triad system as necessary for any given vendor. What's a future order? If you use the Order Point system, you may occasionally wish to make special purchases of merchandise which will arrive sometime in the future—say a month or more away. You will create "future orders" for such purchases. The merchandise on future orders will not arrive in time to fill your immediate stocking needs. The Triad system recognizes this, and does not count the quantities expected on future orders until the future order is imminent. You shouldn't leave obsolete purchase orders in the Triad system, though, because they waste space. For a more detailed explanation, please see "Setting Up or Changing Your Purchasing System," page 2-7. To create a future order, please see "Creating a Purchase Order Manually, or a Future Order." 7.2/1089/H5277 Introduction Questions You May Have 2-3 If you use Replenishment Ordering, there is no need to distinguish between immediate orders and orders that are expected in the future. We have a multistore system. Can I consolidate ordering for all stores? Yes. When you create your purchase order using Report RSO, you can set the Store field to C for consolidated. For any item stocked in more than one store, the Triad system will automatically: • calculate the individual order quantity for each store • round the total order quantity by Order Multiple or Standard Pack • • find the total of the individual order quantities for all stores adjust the individual store quantities, if necessary, to take up the slack of the Order Multiple or Standard Pack After the Triad system has determined the correct quantities, and after you have made any manual changes you want (using Function MPO), there are a few additional steps you'll take: • • • We have a multistore system. Can I order individually for each store? Resequence the purchase order, using Function POR. If you're ordering by SKU number, you'll resequence by SKU. If you're ordering by manufacturer's part number, you'll resequence first by SKU and then by manufacturer's part number. Print the purchase order once showing the order quantities consolidated for all stores (you'll order from this copy). Print the purchase order a second time showing each individual store's order quantities. This copy is just for your own information. Yes. When you create your purchase order using Report RSO, type the number for the store for which you want to order in the Store field. The Triad system will not consider any other stores. Can I transfer inventory from one store to another? Yes. You can use Function IST, Inter-Store Transfer. Please see your Transfers User's Manual. How do I discontinue an item and make sure the Triad system doesn't order it again? If you use the Order Point system, display the item on IMU Screen C. At Discontinued, type Y and press <Change>. This item will no longer appear on any Suggested Order (RSO) reports. You could still order it manually, however. 2-4 Introduction Questions You May Have 7.2/1089/H527 If you use Replenishment Ordering, simply sell out your stock. Then, when none is being sold, the Triad system will not suggest ordering any. Since it is not selling, the Triad system does not suggest re-ordering it. Again, you could still order it manually if you wish. How do I set order points for Tally 2 items, and how do I order them? You set order points for your Tally 2 items the same way you set them for all your other items—just run Report ROP. The procedure is called "Calculating Order Points," in the tabbed section Order Point Purchasing. There is no need to exclude the Tally 2 header SKUs or the Tally 2 component SKUs. They can all have their own order points, based upon their own sales history. When you come to actually ordering, though, it's a different story. We suggest you exclude Tally 2 component SKUs from your purchase orders, and include just the Tally 2 header SKUs. Here's why: when you order commodity items such as lumber, you probably don't know exactly what quantities of what lengths will be shipped to you. You just order your 10,000 board feet of Douglas Fir 2x4s, for example. If you look in the Qty on Order field for the header SKU, you'll see the quantity you've ordered. There will be no quantities on order for the component SKUs—because you didn't order by component. Later, when your shipment arrives, you'll know exactly what quantities of what lengths you are receiving. During the receiving process, you can receive against your Tally 2 component SKUs, even though you ordered under the Tally 2 header SKU. When you finalize your receipts, the Qty on Hand will be updated for each component SKU. Later, when you run the RTL report, the Qty on Hand for the header SKU will be updated, too. You'll find the detailed procedures for purchasing and receiving Tally 2 items in section 3 of this manual. Can I use both Replenishment Ordering and the Order Point system? No. These two systems are mutually exclusive. You can use only one or the other. Can I print a list of all backordered items? Yes, if you use Order Point Purchasing. Please see Finding Out What's On Order, section 3. If you use Replenishment Ordering, you cannot use the Triad system to find out what's been backordered. How do I set order points for kit items, and how do I order 7.2/1089/H5277 Kit SKUs are automatically excluded from the Order Point Report (ROP). So you'll never calculate an order point for any Introduction Questions You May Have 2-5 SKU that is a kit. (All the components of a kit—that aren't kits themselves—are included on the ROP and always have their own order points.) them? Since kit SKUs don't have order points, they never appear on Suggested Order Reports (RSO) either. When you receive items that are components of kits, not only is the quantity-on-hand updated for the item itself, but the quantity available for any kits of which the item is a component is also updated. You can see the available quantity in Function MKR. Sometimes you'll post cost or price changes during receiving. Those price changes affect the individual item's inventory record, but if the item is part of a kit, the cost and price of the kit are not automatically updated. Please see your Kits manual for details. 2-6 Introduction Questions You May Have 7.2/1089/H527 Setting Up or Changing Your Purchasing System It's very easy to set up your purchasing/receiving system, and just as easy to make changes later. Here's the procedure. Multistore users only: You'll use this procedure to set up a purchasing/receiving system for each store. You can set them up to work the same, or differently from each other. You don't have to be physically in the store you're setting up—any terminal will work. You don't have to set them all up at the same time. 1 At any menu, type MPC and press <Enter>. Multistore users only: You will go through this procedure once for each store. Check the number at Store. If you want to set up a different store: • • • 2 At Assign PO Numbers Automatically, type Y or N, and press <Enter>. press <Home> at Store, type the number of the store you want to set up or change press <Display> We suggest you type Y. Then the Triad system will automatically assign sequential purchase order numbers to each purchase order as they are created. You'll still be able to type in your own number, though, anytime that's necessary. Allowing the Triad system to assign numbers automatically provides an audit trail, and reduces the possibility of accidentally assigning the same number to several purchase orders. If you type N, you will have to assign a number to each purchase order you create. 7.2/1089/H5277 Introduction Setting Up/Changing Your Purchasing System 2-7 3 If you typed N in the previous field, skip to step 4. If you typed Y, type the number you want the Triad system to start with at Next PO Number to Assign. Then press <Enter>. 4 Leave the Y at Print Store Name on PO and press <Enter>. 5 Single Store Users: leave PO Bill to Store ID blank. Press <Enter>. 6 Replenishment Inventory users: skip to step 8. Classic and Advanced Inventory users: At # Days Before Future PO Quantity Becomes Current, type the normal lead time in days for your primary vendor. Then press <Enter>. Your purchase order numbers can be up to five digits long—but we recommend you keep them short. Multistore users only: You may wish different stores to use different series of purchase order numbers. Use a different starting number (or a different number of digits) for each store. Answer N here only if you use purchase order forms that are already printed with your name and address. These forms are not generally available. Multistore users only: If your vendors should invoice this store for purchase orders generated at this store, leave PO Bill To Store ID blank. If your vendors should invoice another store for purchase orders generated at this store, type that other store's number. Then press <Enter>. You may occasionally wish to make special purchases of merchandise which will arrive sometime in the future—say a month or more away. You will create "future orders" for such purchases. Future orders are especially useful for your market purchases. Remember, if you use the Order Point purchasing system, the Triad system suggests new order quantities based on quantityon-order plus quantity-on-hand. But the Triad system does not count quantities on future orders as part of quantity-on-order. That's so the merchandise you've ordered for future delivery doesn't upset your Triad system's suggestions about what you need to order now. Eventually, of course, the delivery date for those future orders draws near. When the expected delivery date is within the number of days you enter here, the Triad system begins adding the quantity on the future order to the quantity that's currently on order. How many days should you type at # Days Before Future PO Quantity Becomes Current ? It should probably be about 14 to 21 days, depending on how quickly your usual vendors deliver. 2-8 Introduction 7.2/1089/H527 Se For example, if you type 14 here, the Triad system considers orders due within the next 14 days as current, and counts them as part of quantity-on-order. 7 At Use Landed Cost in Receiving, enter one of the option codes shown in the table to the right. The available options are described in the following table. Option N Do not use landed cost. X Calculate landed cost based on item weight. Recalculate retail prices and (-) type matrix prices. W Y Z 8 Press <Change>. Description Calculate landed cost based on item weight. Do not recalculate retail prices and (-) type matrix prices. Calculate landed cost based on units. Recalculate retail prices and (-) type matrix prices. Calculate landed cost based on units. Do not recalculate retail prices and (-) type matrix prices. As soon as your inventory items and vendors are loaded for this store, you can begin using your purchasing/receiving system. (If you are using the Order Point system, your quantities-on-hand and order points must be loaded, too. ) Check with your Triad representative before you begin using your purchasing/receiving system. Single store users only: You are done. Multistore users only: Press <Home>. Type the number of the next store you want to change or set up. Press <Display>. Return to step 2 and repeat this procedure for each store you want to set up or change. You can set them up the same or differently from each other. 7.2/1089/H5277 Introduction Setting Up/Changing Your Purchasing System 2-9 Replenishment Ordering About Replenishment Ordering— The Big Picture 3-1 Deciding What to Order and Creating a Purchase Order 3-2 Creating a Purchase Order Based on Sales Reading Your Restocking Order Report Creating a Purchase Order Manually Adding the Header Information Adding Special Instructions Adding Line Item Detail Printing a Checking Copy Changing a Purchase Order Changing Header Information Changing Special Instructions Changing Line Item Detail Changing a Line Item Deleting a Line Item Adding a Line Item 3-3 3-6 3-9 3-10 3-11 3-12 3-14 3-15 3-15 3-17 3-17 3-18 3-19 3-20 i Resequencing a Purchase Order 3-22 Deleting a Purchase Order 3-23 Submitting the Purchase Order to the Vendor 3-25 Printing a Purchase Order 3-25 Transmitting a Purchase Order Electronically 3-27 Printing and Purging a Purchase Order 3-28 Finding Out What's on Order 3-30 Receiving Merchandise into Stock 3 - 3 1 ii Replenishment Ordering About Replenishment Ordering—The Big Picture Replenishment Ordering is the simplest of the two Purchasing/Receiving systems available on your Triad system. In the Replenishment Ordering system, you simply replenish your stock of items that have sold since your last order. The Triad system keeps track of how many you have sold, but not of how many you still have on hand. The basic assumption is that you'll probably want to re-order about as many as you have sold. Here's how it works: Start Function BTC Sell an item at POS Item's To Date field in Function IMU Screen H is updated Function ROF OR Send PO to vendor electronically Print PO and submit to vendor Report RLA Report ROR Print Restocking Order Worksheet Print price labels (optional) Report RBL Walk your shelves to check quantity-on-hand Print bin/shelf labels (optional) Mark changes on workstheet Report ROF Function MPO Print final copy of PO and purge from file Edit first-draft PO created by Report ROR 12 1030072 Replenishment Ordering The Big Picture 3-1 Deciding What to Order and Creating a Purchase Order There are a couple of ways to decide what to order. And depending on how you choose what to order, there are a couple of ways to create your purchase order in the Triad system. Most of the time, you'll create purchase orders based on sales (see page 3-3). With this method, the Triad system suggests what to order. When you are ready to order from a particular vendor, you'll print a Restocking Order Worksheet Report (ROR), using Option F. This report: • • • prints a worksheet, listing the items from this vendor that have sold since your last order, and how many. creates a first-draft purchase order in the Triad system's purchasing file. Each item that printed on the worksheet is also on the purchase order. resets to zero the To Date field in Function IMU for each item on the worksheet. Occasionally, you'll want to create a purchase order manually (see page 3-9). With this method, you tell the Triad system what you want to order. You'd do this if you've made a decision about what to order independent of your sales history. You might want to: • take advantage of special buys or vendor promotions • fill a customer's special order requirements • • • stock up for a seasonal surge you know is coming order new items from a new vendor order items from a dealer market Keep in mind, though, that when you create a purchase order manually, the Triad system does not reset the To Date field to zero for the items you order. So the Triad system might select those items for another purchase order based on sales, too. There are two ways to deal with this problem: • • 3-2 Replenishment Ordering What to Order You could reset the To Date field to zero yourself, for the items you order manually. You could keep a close eye on your automatic purchase orders and make sure you don't over-order items you've already ordered manually. 7.2/1089/H5277 Creating a Purchase Order Based on Sales 1 At any menu, type ROR and press <Enter>. Before you begin this procedure, you must: • decide what vendor to order from • know whether this vendor is the primary vendor, secondary vendor, or manufacturing vendor for the kind of inventory items you'll be ordering (if you're not sure, please see Vendors, section 5) • know the vendor's code (if you're not sure, please see Vendors, section 5) The initiation screen displays for the Restocking Order Report (ROR). You could change the printer where this report will print by typing another number at Printer. Multistore users only: You can create Restocking Orders for only one store at a time. Check the Store field. If that's not the store you want to order for, press <Home> and type the correct number. Then press <Enter>. 2 At Vendor Type, type the code for the kind of vendor you are ordering from. Press <Enter>. 3 At Vendor, type the code for the vendor you want to order from, and press <Enter>. 4 If you are ordering from a Primary or Secondary vendor, leave the O at Order Package. If you are ordering from the Manufacturer, type S. Then press <Enter>. 7.2/1089/H5277 Is the vendor you're ordering from the primary vendor, secondary vendor, or manufacturing vendor for the items you're ordering? This is the code you use to identify this vendor. You assigned it to the vendor in the Vendor Code field of Function MVR. When you order from a Primary or Secondary vendor, you'll usually order in multiples of the vendor's order package quantity. You've entered that quantity in each item's inventory record at Order Multiple. When you order from the manufacturer, you'll usually order in multiples of the manufacturer's standard package. You've entered that quantity in each item's inventory record, too, at Standard Pack. Replenishment Ordering What to Order 3-3 The Triad system will suggest ordering as many as you have sold, rounded up to the next nearest order package quantity or standard pack quantity for each item. If you want to ignore your vendor's order multiple or standard pack guidelines, type 1. 5 At Options, type FS and press <Enter>. Option F creates a purchase order in the Purchasing File. Later, after you've reviewed the stock you still have on hand, you 'll be able to revise this purchase order to reflect any special needs. Option S prints the Order Point and Maximum Stock Level for each item as well. If you haven't entered this information in your inventory file, you don't need to use Option S. 6 At Order Level, leave the 1 and press <Enter>. This means every item that has sold at least one since your last order will print on the worksheet. If you want to print only those items that have sold at least three, say, type 3 instead. If you want to print every item, regardless of whether it has sold, type 0 (zero). 7 If you are ordering for just certain locations, SKUs, departments or classes, fill in the ranges that interest you in the From and To fields. 8 Press <Run>. 3-4 Replenishment Ordering What to Order If you want to include or exclude items with certain User Codes, you could fill in the Codes and Exclusion fields too. (Please see the Guide to Your Triad System for an explanation of how User Codes work.) If the screen says ENTER TERMS, it means the record for this vendor (in Function MVR) does not include any information about the payment terms offered by this vendor. Type a brief description of the payment terms for this purchase order. If you really have no idea, just type 1, so as not to leave the field blank. Then press <Enter>. 7.2/1089/H5277 9 When the screen asks you, type your initials. There's room for only two initials. If you have the same initials as someone else who also creates purchase orders, the two of you should agree on who will use what initials. The Triad system keeps track of who's creating purchase orders. As the worksheet prints, the Triad system is doing two other important things as well: 1. 2. 10 Check your stock of each item on the worksheet. Cross out items you don't want to order. Change quantities to be ordered, if necessary. Write in any additional items and quantities you want to order. Creating a Purchase Order for the items that print, in the quantities that print. Resetting the To Date field (in IMU, screen H) to zero for the items that print. You should check your actual shelf stock for each item on this worksheet. Be sure to check any stock room areas where additional stock may be stored. Use the sales history information to find trends. You should pay more attention to Units/Wk (or, if seasonal, to Units/12 mo) than to Snce Ord, because Snce Ord can be misleading. Please see "Reading Your Restocking Order Report," below, for a complete explanation. Be sure to check your shelves for empty spots, too, even if the item that belongs there didn't print on your worksheet. If an item has not sold since your last order to this vendor, it does not print on this worksheet—but maybe it hasn't sold because you don't have any to sell. 11 If you wrote no changes on your worksheet, go to "Submitting the Purchase Order to the Vendor," page 3-25. If you wrote any changes or additions at all, go to "Changing A Purchase Order," page 3-15. 7.2/1089/H5277 You'll almost always need to make a few changes. You might need to add a few items, delete a few items, or change some order quantities. Replenishment Ordering What to Order 3-5 Reading Your Restocking Order Report First of all, some questions you may have about your Restocking Order Report (ROR). What items print on my ROR? An item prints on the ROR only if all of the following are true: 1. 2. 3. 4. You purchase it from the primary, secondary or manufacturing vendor you specified on the ROR screen. It falls within the From and To range you specified on the ROR screen. There is a positive number in its To Date field on IMU Screen H. The number in the To Date field is as big or bigger than the number you entered at Order Level on the ROR screen. How does a positive number get into an item's To Date field? Every time you sell this item at POS, the To Date number is automatically increased by the quantity you sold. If someone returns this item, the To Date number is automatically decreased. So the Triad system tracks each item's sales activity in the To Date field. What else happens when I print an ROR? Two things happen to every item that prints on the ROR : 1. 2. Are any other fields in the IMU record updated? 3-6 Replenishment Ordering What to Order It is placed on a Purchase Order in your Purchasing File. The number of the Purchase Order prints at the bottom of your ROR at P. O. NUMBER. The To Date field on IMU Screen H is reset to zero. Even if you decide not to order an item now and delete it from your Purchase Order, its To Date field remains at zero. So the To Date field does not tell you how many of this item you have sold since you last purchased this item. Instead, it tells you how many you have sold of this item since the last time it printed on an ROR worksheet. No. When you use the Replenishment Ordering system, the Triad system does not update On Order, New Order Quantity, or any other fields in the IMU record. 7.2/1089/H5277 What quantity of each item does the Triad system put on the Purchase Order? You can see the quantity on the worksheet under Ord Qty. How does the Triad system arrive at this quantity? First the Triad system checks the quantity in the To Date field. (On the ROR worksheet, the To Date figure is called Snce Ord.) Then the Triad system checks what you put in the Order Package field in step 4, above. If you typed 1, to indicate that the Triad system should ignore the vendor's order package standards, then the Triad system simply orders the To Date (or Snce Ord) quantity. But if you left the O, or typed M, then the Triad system rounds up the order quantity to the nearest whole Order Multiple or Standard Pack for this item. For example, suppose the To Date figure for Item 12345 is 10. That means you have sold ten of them since your last order. Let's say you're ordering Item 12345 from Prime Vendors, and their Order multiple on this item 6. At Order Package on the ROR screen, let's say you left the O, to indicate the Triad system should take order multiples into account when creating the Purchase Order. So how many of Item 12345 does the Triad system place on order? You would need to order ten simply to replenish your stock, but the Triad system then rounds up the ten to the nearest whole order multiple. So the Triad system places 12 of Item 12345 on order. 7.2/1089/H5277 Replenishment Ordering What to Order 3-7 Now let's take a look at an ROR worksheet: Notice that items without location codes print first. All other items print in order by location code. This makes it easier for you to check your shelf stock for every item. The figure under Snce Ord is the same as the figure that had accumulated in this item's To Date field on Function IMU Screen H. The quantity the Triad system suggests you order is under Ord Qty. It's been rounded up by this vendor's order multiple or standard package (unless you typed 1 at Order Package, in step 4). If you used Option S, the Triad system prints each item's Order Point from IMU as MIN, and each item's Maximum Stock Level from IMU as MAX. Of course, if those fields are blank in IMU, they're blank here, too. And they do not affect the quantity the Triad system suggests ordering. The Cost figure is per purchasing unit of measure, not the extended cost. 3-8 Replenishment Ordering What to Order 7.2/1089/H5277 Creating a Purchase Order Manually Function MPO, Screen H Add header information Occasionally you may wish to create a Purchase Order manually—that is, based on your own assessment of what you want to order, rather than on the sales history accumulated in the Triad system. You would probably create manual purchase orders to: • prepare for a seasonal surge that you know is coming • fill your customers' Special Order requirements • Function MPO, Screen I Add special instructions (optional) • • • Function MPO, Screen D Add line item detail information Report ROF Print checking copy of purchase order take advantage of special buys or vendor promotions order brand new items from a brand new vendor order items you don't ordinarily stock, or that don't have SKU numbers place market orders The diagram on the left shows the general procedure used to create a purchase order manually. The procedure is explained step-by-step below. Keep in mind, though, that when you create a purchase order manually, the To Date field for the items you order is not reset to zero. So the Triad system might select those items for another purchase order based on sales, too. You could: • • reset the To Date field to zero yourself, for the items you order manually. or keep a close eye on your sales-based purchase orders and make sure you don't over-order items you've already ordered manually. Before you begin this procedure you must decide what vendor to order from, and you'll need to know the vendor's code (if you're not sure, please see Vendors, section 5). 7.2/1089/H5277 Replenishment Ordering Manually Creating a PO 3-9 Adding the Header Information 1 At any menu, type MPO and press <Enter>. This is the header screen of the Modify Purchase Order function. You will use this screen to enter the kind of information that belongs at the "head" of a Purchase Order. Multistore users only: Check the Store field. If that's not the store you want to create this purchase order for: • press <Back-Tab> • then press <Enter> • 2 If your system does not assign purchase order numbers , type the number you will use to identify this purchase order at P.O. Number. If your system assigns purchase order numbers, leave P.O. Number blank. Then press <Tab>. 3 At Vendor, type the code for the vendor you're ordering from. 4 Tab down to Buyers Initials and type your initials. 3 - 10 Replenishment Ordering Manually Creating a PO type the correct store number If the question Assign PO Numbers Automatically in Function MPC is answered Y, you don't have to type a purchase order number; the Triad system will assign one in a moment. This is the code you use to identify this vendor. You assigned it to the vendor in the Vendor Code field of Function MVR. There's room for only two initials. If you have the same initials as someone else who also creates purchase orders, the two of you should agree on who will use what initials. The Triad system keeps track of who's creating purchase orders. 7.2/1089/H5277 5 Press <Add>. 6 Type in any information you wish to add or change. Then press <Change>. If you did not assign a number, the Triad system assigns one. All the default information for this vendor displays. The Order Type field indicates what type of PO this is. Order Type Description C blank Credit PO Regular PO The Date Due is determined by the usual lead time for this vendor. You could change it if you wish. If you want this order shipped to an address other than your store address, type it at Special Ship To. The information at Date Due, Terms, Ship Via, FOB Point, Codes, Backorder, and Reference # is all from the MVR record for this vendor. If you want, though, you can type over any field that the cursor will move to. 7 If you do not want to add any other special instructions or comments to this purchase order, skip to "Adding Line Item Detail." If you do want to add other special instructions or comments, continue here with "Adding Special Instructions." Adding Special Instructions 1 Press <Home>. At Screen, type I, and press <Enter>. 7.2/1089/H5277 This is the Special Instructions screen. Any comments you type here will print on the Purchase Order. They cannot be transmitted electronically, though, so if you'll be transmitting this purchase order to your vendor bisynchronously, don't bother with any special instructions for the vendor. Skip to "Adding Line Item Detail." Replenishment Ordering Manually Creating a PO 3 - 11 2 Press <Tab>. Type anything you want. Press <Enter> at the end of each line to move to the next line. 3 Press <Change> to add the special instructions to the purchase order. Adding Line Item Detail 1 Press <Home>. At Screen, type D and press <Enter>. Then press <Tab>. 2 At Item Number, type the SKU of the item you want to place on order. 3 Press <Tab>. At (Stk) QOO or at (Pur) QOO, type the quantity of this item you want to order. 3 - 12 Replenishment Ordering Manually Creating a PO This is the Detail screen. On this screen you add line items to the Purchase Order. You will fill in information such as SKU and order quantity for each line item you add to the Purchase Order. If this item is a special order for a particular customer, press <Enter> twice and type the customer's name at Mfg #/Spcl. If this item doesn't have an SKU number, but you do know the number the vendor uses to identify the item, press <Enter> twice and type that number at Mfg #/Spcl. If you don't know any number for it, press <Next Line> and type a good description of it at Description. The more accurate your description, the easier it will be for the vendor to figure out what you want. (This description cannot be transmitted electronically, however.) You can enter up to two decimal places. The units of measure for this item aren't displayed, so you may have to guess the correct quantity. If you really have no idea, just type any number. You can correct it in a moment, after the units of measure display. 7.2/1089/H5277 4 Press <Add>. Now the item description, unit cost, extended price and units of measure display. If the units of measure are not what you expected, you can: • • • type a new number in either of the QOO fields and press <Clear Field> then press <Clear Field> in the other QOO field then press <Change> If the screen says QUANTITY ON ORDER MUST BE A MULTIPLE OF x OR UNIT OF MEASURES THE SAME, it means the order quantity you entered is not a multiple of this vendor's order multiple or standard pack. (This warning appears only if the purchasing unit of measure for this item is different from its stocking unit of measure.) You should: • • type a quantity that is a multiple of the number in the screen message; then press <Add> if you want to ignore the vendor's order multiple/standard pack requirements, type over one of the units of measure to make them both the same; then press <Add>. For example, suppose the stocking unit of measure is EA and the purchasing unit of measure is BX. Suppose you want to buy 4 each, even though the vendor's order multiple is 8 each, which is a whole box. The screen will say QUANTITY ON ORDER MUST BE A MULTIPLE OF 8 OR UNIT OF MEASURES THE SAME. So you could change (Stk) QOO to 8—but then you would get 8, when you only want 4. Or you could type EA over the BX at (Pur) U/M, and leave your order quantity 4. Then you'd get 4 each. 5 Press <Clear>. Return to step 2 and repeat for each item you want to place on the order. 7.2/1089/H5277 You can place up to 10,000 items on a purchase order. Replenishment Ordering Manually Creating a PO 3 - 13 Printing a Checking Copy 1 When the purchase order is complete, press <End>, type ROF at the menu and press <Enter>. Now you will print a copy of the purchase order and check it for accuracy. If you want to use a different printer, type its number at Printer. Multistore users only: If you created this purchase order for a store other than the one shown at Store, press <Home>, type the correct number at Store, and press <Enter>. 2 At P.O. #, type the number of the purchase order you just created. 3 At Options, type any options you want except F. Then press <Run>. If any of the items on the purchase order have an alternate part number, use Option A to print the alternate part number. If this purchase order is to a secondary vendor, use Option V. If this purchase order is to the manufacturing vendor, or if you entered anything in the Mfg # /Spcl field, use Option M to print the manufacturer's part number. You can't use Options M and V together. You can't use Options A and I together. Any other combination is fine. Don't use Option F! You're not ready to finalize and delete this purchase order yet! 4 Look at the purchase order and mark any mistakes you find. Are corrections needed? Yes No 3 - 14 Replenishment Ordering Manually Creating a PO Then go to… Changing a Purchase Order, page 3-15 Submitting the Purchase Order to the Vendor, page 3-25 7.2/1089/H5277 Changing a Purchase Order Function MPO, Screen H Change header information Function MPO, Screen I Once you have created a purchase order, whether manually through Function MPO or automatically through Report ROR, you can change it as necessary. You can add line items to it, delete line items from it, or change order quantities of line items on it. You can add special comments or shipping instructions. The diagram on the left shows that the procedures for changing a purchase order are very similar to those for manually creating the purchase order. The procedure is explained stepby-step below. Change special instructions (optional) Function MPO, Screen D Change line item detail information Changing Header Information 1 At any menu, type MPO and press <Enter>. There are three screens of information for each purchase order in Function MPO. You will use these screens to make any necessary changes. This is the Header screen; it contains the kind of information that would print at the head, or top, of a purchase order. 2 At P.O. Number, type the number of the purchase order you want to change, and press <Display>. If you created this purchase order through Report ROR, the purchase order the Triad system assigned printed at the bottom of the worksheet. If you created this purchase order manually, you assigned a number, or the Triad system assigned a number. If you printed a 7.2/1089/H5277 Replenishment Ordering Changing a PO 3 - 15 copy of the purchase order after you created it, the number printed at the top of the purchase order. To display in turn all the purchase orders in your purchasing file, press <Next Item>. When the correct purchase order is displayed, go to the next step. 3 Fill in or type over any fields on this screen you want to change. Then press <Change>. Take a good look at the Total Cost. You can't change the cost by typing over this field—in fact, the cursor won't go to it. You can only change the cost of the purchase order by changing what's on the purchase order. The Date Due is determined by the usual lead time for this vendor. You could change it, but that does not change the actual due dates for any of the items that are already on this Purchase Order. It just affects any items you add to the Purchase Order. If you want this order shipped to an address other than your store address, type it at Special Ship To. The information at Date Due, Terms, Ship Via, FOB Point, Codes, Backorder, and Reference # is all from the MVR record for this vendor. If you want, though, you can change any field that the cursor will move to. You can fill in Total Freight and Other Charges if you want, but you don't have to. 4 If you do not want to add or change any other special instructions or comments on this purchase order, skip to "Changing Line Item Detail," page 3-17. If you do want to add or change other special instructions or comments, continue here with "Changing Special Instructions." 3 - 16 Replenishment Ordering Changing a PO 7.2/1089/H5277 Changing Special Instructions 1 Press <Home>. At Screen, type I, and press <Enter>. This is the special instructions screen. Any comments you type here will print on the Purchase Order. They cannot be transmitted electronically, though, so if you'll be transmitting this purchase order to your vendor bisynchronously, don't bother with any special instructions here. Skip to "Changing Line Item Detail." 2 Press <Tab>. Type anything you want. Press <Enter> at the end of each line to move to the next line. 3 Press <Change> to add the special instructions to the purchase order. Changing Line Item Detail 1 Press <Home>, type D and press <Enter>. 7.2/1089/H5277 This is the Detail screen. It contains the detailed information on each line item on this purchase order. For each line item on the purchase order, there is a complete screen of information. The first line item is displayed. Replenishment Ordering Changing a PO 3 - 17 2 Use the table at the right to determine which step to proceed to. To do this… Go to… Delete a line item Step 7 Continue with procedure, after making all your changes Step 13 Change a line item Add a line item Changing a Line Item (steps 3 - 6) Step 3 Step 10 3 In the parentheses preceding Item Number, type X and press <Enter>. 4 At Item Number, type the SKU number of the item you want to change, and press <Next Item>. If the item you want to change doesn't have an SKU number, but has a Manufacturer's Part Number (or if you typed a customer's name at the Mfg #/Spcl field), press <Clear>, then press <Enter>. In the parentheses before Mfg #/Spcl, type X. Press <Enter>. Type the manufacturer's part number (or the name). Then press <Next Item>. The item displays—but it may be on a different purchase order than the one you want to work on. Check the P.O. Number field at the top of the screen. Is this the correct purchase order? If not, keep pressing <Next Item> until the item displays—on the correct purchase order. If you know what the item's line number is, you could also display the item by typing its line number at Line Number, pressing <Clear Field> and then pressing <Display>. If you created this purchase order manually, the line items are numbered in the order you added them to the purchase order. But if you created this purchase order through Report ROR, the line items are not necessarily numbered in the order they printed on your ROR worksheet. 5 Fill in or type over any fields on this screen you want to change. Press <Clear Field> if necessary. Then press <Change>. 3 - 18 Replenishment Ordering Changing a PO To change the quantity on order: 1. Tab down to one of the QOO fields. (Stk) QOO is the quantity on order in stocking units of measure. (Pur) QOO is the quantity on order in purchasing units of measure. The actual units of measure display at the far right. 7.2/1089/H5277 2. 3. 4. Type the new quantity in either of the QOO fields. Press <Clear Field>. Move the cursor to the other QOO field, and press <Clear Field> again. Then press <Change>. The Unit Cost for this item comes from the IMU record. If you know it is not the correct cost for this vendor, you could change it. Changing the Unit Cost here, though, does not change the cost on file for this item in the IMU record! You could change the due date for this item by typing a new date at Date Due, but there's no need to do this. It affects nothing in your system. 6 Go back to step 2. Deleting a Line Item (steps 7 - 9) 7 In the parentheses preceding Item Number, type X and press <Enter>. 8 At Item Number, type the SKU number of the item you want to cancel, and press <Next Item>. If the item you want to cancel doesn't have an SKU number, but has a Manufacturer's Part Number (or if you typed a customer's name at the Mfg #/Spcl field), press <Clear>, then press <Enter>. In the parentheses before Mfg #/Spcl, type X. Press <Enter>. Type the manufacturer's part number (or the name). Then press <Next Item>. The item displays—but it may be on a different purchase order than the one you want to work on. Check the P.O. Number field at the top of the screen. Is this the correct purchase order? If not, keep pressing <Next Item> until the item displays—on the correct purchase order. If you know what the item's line number is, you could also display the item by typing its line number at Line Number, pressing <Clear Field> and then pressing <Display>. If you created this purchase order manually, the line items are numbered in the order you added them to the purchase order. 7.2/1089/H5277 Replenishment Ordering Changing a PO 3 - 19 But if you created this purchase order through Report ROR, the line items are not necessarily numbered in the order they printed on your ROR worksheet. 9 Press <Delete> twice. Then go back to step 2. Adding a Line Item (steps 10 - 12) 10 Press <Clear>. At Item Number, type the SKU of the item you want to place on order. 11 Press <Tab>. At (Stk) QOO or at (Pur) QOO, type the quantity of this item you want to order. 12 Press <Add>. Then go back to step 2. If this item is a special order for a particular customer, press <Enter> twice and type the customer's name at Mfg #/Spcl. If this item doesn't have an SKU number, but you do know the number the vendor uses to identify the item, press <Enter> twice and type that number at Mfg #/Spcl. If you don't know any number for it, press NEXT LINE and type a good description of it at Description. The more accurate your description, the easier it will be for the vendor to figure out what you want. (This description cannot be transmitted electronically, however.) The units of measure for this item aren't displayed, so you may have to guess the correct quantity. If you really have no idea, just type any number. You can correct it in a moment, after the units of measure display. Now the item description, unit cost, extended price and units of measure display. If the units of measure are not what you expected, you can • • • type a new number in either of the QOO fields and press <Clear Field> then press <Clear Field> in the other QOO field then press <Change> If the screen says QUANTITY ON ORDER MUST BE A MULTIPLE OF x OR UNIT OF MEASURES THE SAME, it means the order quantity you entered is not a multiple of this vendor's order multiple or standard pack. (This warning appears only if the purchasing 3 - 20 Replenishment Ordering Changing a PO 7.2/1089/H5277 unit of measure for this item is different from its stocking unit of measure.) You should: • • type a quantity that is a multiple of the number in the screen message; then press <Add> if you want to ignore the vendor's order multiple/standard pack requirements, type over one of the units of measure to make them both the same; then press <Add> For example, suppose the stocking unit of measure is EA and the purchasing unit of measure is BX. Suppose you want to buy 4 each, even though the vendor's order multiple is 8 each, which is a whole box. The screen will say QUANTITY ON ORDER MUST BE A MULTIPLE OF 8 OR UNIT OF MEASURES THE SAME. So you could change (Stk) QOO to 8—but then you would get 8, when you only want 4. Or you could type EA over the BX at (Pur) U/M, and leave your order quantity 4. Then you would get 4 each. 13 When you have made all the necessary changes to this purchase order, you are ready to submit it to your vendor. Please go on to "Submitting the Purchase Order to the Vendor," page 3-25. 7.2/1089/H5277 Replenishment Ordering Changing a PO 3 - 21 Resequencing a Purchase Order You may find that the line items on your purchase orders are in a sequence that is not particularly easy to use. If you want, you can use this procedure to resequence the line items on any purchase order, either by SKU number or by manufacturer's part number. This procedure actually reassigns line numbers to the line items on the purchase order. 1 At any menu, type POR and press <Enter>. 2 At P.O. Number, type the number of the purchase order you want to resequence, and press <Enter>. 3 At Sequence, type S or M. 4 Press <Change>. To resequence in order by… Type Manufacturer's part number M SKU number S When the resequencing is complete, the screen tells you so. If you already printed a file copy of this purchase order, you should now print another one, because the line numbers associated with the various line items have changed. Please see "Printing a Purchase Order," page 3-25. 3 - 22 Replenishment Ordering Resequencing a PO 7.2/1089/H5277 Deleting a Purchase Order Occasionally you may need to delete a purchase order that you created in your Triad system—just get rid of it. If you created this purchase order using Report ROR, the Triad system zeroed the To Date fields for each item it placed on the purchase order. And when you delete the purchase order, using this procedure, the To Date fields will remain at zero. So if you want to create another purchase order (to another vendor, for example), you can't start over again using Report ROR—because there are no longer any figures in the To Date fields for the ROR report to work from. If you want to create another purchase order for these items, you'll have to do it manually "from scratch." To do that, please see "Creating a Purchase Order Manually," page 3-9, after you have completed this procedure. CAUTION Don't delete purchase orders by displaying them on the MPO Header screen and pressing <Delete>! If you did that, the purchase order's status would change to X, which means cancelled—but the purchase order would remain in your Triad system and you would have no way of purging it. Always use Report ROF procedure below for cancelling and purging purchase orders. 1 At any menu, type ROF and press <Enter>. 2 Identify the purchase order you want to delete by typing its number at P.O. #, or by typing the vendor's code at Vendor. 7.2/1089/H5277 If you want, change the number of the printer you want to use at Printer. You should have no more than one purchase order for any given vendor in file at a time, so the vendor's code would satisfactorily identify the purchase order you want to delete. Replenishment Ordering Deleting a PO 3 - 23 3 At Options, type F. Then press <Run>. You don't need to use any other options. As the purchase order prints, it is deleted from your Triad system at the same time. There is no further record of it. If this purchase order was created using Report ROR, and if you want to create another purchase order for these items, you'll have to do it manually. You can't start over again using Report ROR because the To Date fields for these items were re-set to zero the first time you ran Report ROR to create this purchase order. Please see "Creating a Purchase Order Manually," page 3-9. Refer to this printed copy of the deleted purchase order when you re-create your new purchase order from scratch. 3 - 24 Replenishment Ordering Deleting a PO 7.2/1089/H5277 Submitting the Purchase Order to the Vendor You place your order with some vendors by telephone—you just call them up and tell them what you want. Other vendors send by a sales representative to get your order. In those two cases, you would probably want to print out a copy of the purchase order to work from. The procedure for doing this is under Printing a Purchase Order, this page. And some other vendors may permit you to transmit your purchase order electronically from your Triad system directly to their computer, via telephone lines. This is called "bisynchronous transmission." Bisynchronous means that information can travel along the telephone line in both directions. Transmission means you are sending and/or receiving information. The "big picture" for doing this is under "Transmitting a Purchase Order Electronically," page 3-27. The detailed procedure is in Talking Computers: A Communications User's Guide or in the Triad True Value User’s Guide. Printing a Purchase Order 1 At any menu, type ROF and press <Enter>. 2 Identify the purchase order you want to print by typing its number at P.O. #, or by typing the vendor's code at Vendor. 3 At Options, type any options you want to use, except F. Then press <Run>. If you want, change the number of the printer you want to use at Printer. You should have no more than one purchase order for any given vendor in file at a time, so the vendor's code would satisfactorily identify the purchase order you want. Don't use Option F because it purges the purchase order from your purchasing file at the same time as it prints—and you're not ready to do that yet. If any of the items on the purchase order have an alternate part number, you should use Option A. 12 1030072 Replenishment Ordering Submitting the PO to the Vendor 3 - 25 If this purchase order is to a secondary vendor, you should print the vendor's stock number—use Option V. If this purchase order is to the manufacturing vendor, you should print the manufacturer's part number—use Option M. You can't use Options M and V together. You can't use Options A and I together. Any other combination is fine. 4 Give this purchase order to your vendor, or refer to it when you telephone your vendor. 5 If you want to print price labels or bin/shelf labels, do so now. Please see Appendix A or Appendix B. If you want to print price labels for the items you've ordered, you have to do it before purging this purchase order—and that's the next step. 6 Now go on to "Printing and Purging the Purchase Order," page 3-28. 3 - 26 Replenishment Ordering Submitting the PO to the Vendor 12 1030072 Transmitting a Purchase Order Electronically Some vendors may permit you to transmit your purchase orders electronically from your Triad system directly to their computer, via telephone lines. This is called "bisynchronous transmission." Bisynchronous (buy-SINK-ronus) transmission means that information can travel along the telephone line in both directions simultaneously. You'll often hear it called "bisync" for short. How does bisynchronous transmission work on your Triad system? The procedures vary a bit from vendor to vendor. You can look up the appropriate procedures for the vendors you buy from in Talking Computers: A Communications User's Guide or in the Triad True Value User’s Guide. The big picture, though, is the same for everyone: Start Function ROR Function MPO Triad system prints the Transmission Report Create final PO Function BTC Select PO for transmission Report RPC Add price changes to the Inventory File (optional) Report RUP Triad system transmits the PO to your vendor Add promotion prices to the Inventory File (optional) Vendor's system transmits price changes and/or promotion prices (optional) 12 1030072 Replenishment Ordering Transmitting a PO Electronically 3 - 27 Printing and Purging a Purchase Order After you've submitted the purchase order to your vendor, you should print a copy of it for your own reference, and purge it from the Triad system's memory. You shouldn't leave purchase orders in the Triad system after you place the order because they take up file space. You can print a file copy and purge all in one step. Here's how: 1 At any menu, type ROF and press <Enter>. If you want to use a different printer, type its number at Printer. Multistore users only: If the purchase order you want to print was created for another store, press <Home> and type the correct number at Store. 2 Identify the purchase order you want to print and purge by typing its number at P.O. #, or by typing the vendor's code at Vendor. You should have no more than one purchase order for any given vendor in file at a time, so the vendor's code would satisfactorily identify the purchase order you want. 3 At Options, type F, and any other options you want to use. Then press <Run>. Option A I M V 3 - 28 Replenishment Ordering Printing/Purging the PO Use it if… Any items on the PO have an alternate part number Don't combine it with… Option I You ordered from a vendor SKU numbering scheme you adopted or You want your SKU numbers to print for your reference Option A You want to print the vendor's stock number Option M You want to print the manufacturer's part number Option V 7.2/1089/H5277 4 After the purchase order has printed correctly, type Y. Save this purchase order where you'll be able to find it when the merchandise arrives. 7.2/1089/H5277 You can no longer look up the purchase order or change the purchase order on the MPO screen; it is no longer in the Triad system's memory. Your printed copy is now your only record of what you ordered. Replenishment Ordering Printing/Purging the PO 3 - 29 Finding Out What's on Order If you use Replenishment Ordering, there's only one way to find out what's on order: look at the purchase orders you printed and saved when you did the procedure called "Printing and Purging the Purchase Order," page 3-28. The Triad system does not keep any record of what you have ordered. There may be a figure in the Qty on Order field in each item's IMU record, but it is not intended to be used with Replenishment Ordering. The Qty on Order field does not give reliable information if you use the Replenishment Ordering system. The New Order Quantity field is not significant for you, either. In the Order Point system, the Quantity on Hand and Qty on Order fields are significant. If and when you move up to the Order Point system, you will go through a conversion process to reset those fields. 3 - 30 Replenishment Ordering What's On Order? 7.2/1089/H5277 Receiving Merchandise into Stock When you use Replenishment Ordering, your receiving procedure is just the same as it always has been. That is, it's a manual procedure. You don't use the Triad system. Here's a recap of what you'll need to do: 1 Compare the packing list to what actually arrived. Make sure you received full count of everything the vendor will invoice you for. Resolve any discrepancies with your vendor. 2 Compare the packing list to what you ordered. Refer to your file copy of the purchase order that you printed when you did the procedure for "Printing and Purging the Purchase Order," page 3-28. Arrange to return to the vendor any items you do not wish to accept. Check for any price changes. If any prices or costs have changed, you should immediately change them in your inventory records. To change prices or costs, please see your Pricing manual. 3 Make a note to re-order any items that were not shipped and not backordered. 4 Put price labels on merchandise, shelves and bins. Stock sales floor. 7.2/1089/H5277 Please see the procedure for "Creating a Purchase Order Manually," page 3-9. If you printed price labels at the time you created the purchase order, you should have filed them with your copy of the purchase order. Replenishment Ordering Receiving Merchandise 3 - 31 Order Point Purchasing About Order Point Purchasing— Two Big Pictures 4-1 If You Know What Vendor You'll Order From If You Don't Know Who You'll Order From Order Points Setting Order Points—Classic Inventory Deciding What the Order Point Should Be Setting the Order Points Calculating Order Points—Advanced Inventory ROP, Screen 1 ROP, Screen 2 ROP, Screen 3 Reviewing the Order Point Report The Art and Science of Weighting Sales Periods Protecting Items from Order Point Calculation Deciding What to Order and Creating a Purchase Order What to Order How Many to Order Who You're Ordering From Min-Max vs. Straight Order Point New Order Quantity Where to Go From Here 4-2 4-3 4-4 4-5 4-5 4-6 4-6 4-6 4-10 4-12 4-13 4-14 4-15 4-17 4-17 4-17 4-18 4-18 4-19 4-19 i Deciding What to Order and Creating a Purchase Order (cont'd) When You Know What Vendor You'll Order From Adding Header Information Checking the Suggested Order Report Reading Your Suggested Order Report When You Don't Know Who You'll Order From Reading Your Suggested Order Report Creating a Purchase Order Manually, or a Future Order Adding the Header Information Adding Special Instructions Adding Line Item Detail Printing a Checking Copy Generating Purchase Orders From Special Orders Questions You May Have Loading Report GPO in your End-ofDay Queue Generating Purchase Orders for Specific Special Orders Understanding the Generated Purchase Order Report Changing a Purchase Order Changing Header Information Changing Special Instructions Changing Line Item Detail Changing a Line Item Deleting a Line Item Adding a Line Item ii 4-20 4-25 4-26 4-27 4-29 4-34 4-35 4-36 4-38 4-38 4-40 4-43 4-43 4-45 4-46 4-48 4-49 4-49 4-51 4-51 4-52 4-53 4-54 Resequencing a Purchase Order 4-56 Submitting the Purchase Order to the Vendor 4-58 Printing a Purchase Order 4-58 Transmitting a Purchase Order Electronically 4-61 Finding Out What's On Order 4-63 What's Currently On Order? Has This SKU Been Ordered? Looking in Function IMU Looking in Function MPO Printing a Report Showing What Purchase Orders an Item's On What's On This Purchase Order? Looking up a Purchase Order In Function MPO Printing a Purchase Order in Report Format Printing a Purchase Order in Purchase Order Format What's On Order With This Vendor? Looking it up in Function MPO Printing it out Using Report RPP Receiving Receiving Merchandise into Stock Electronic Receipt Posting A or E? How to Receive Using Receiving Method A Using Receiving Method E 4-63 4-65 4-65 4-66 4-67 4-68 4-68 4-69 4-70 4-73 4-73 4-74 4-77 4-77 4-77 4-79 4-81 4-83 iii Receiving (cont'd) Receiving Tally 2 Items or Items Not On the PO Distributing Freight or Other Charges Receiving Merchandise for Which There is No Purchase Order Creating the Purchase Order Receiving the Merchandise Printing and Checking the Receiving Report Printing the Report Checking the Report Correcting Receiving Mistakes Finalizing Receipt of Your Merchandise 4-85 4-86 4-88 4-88 4-89 4-92 4-92 4-94 4-95 4-97 Cancelling and Purging a Purchase Order 4-100 iv Order Point Purchasing About Order Point Purchasing—Two Big Pictures Order Point Purchasing is the more sophisticated of the two Purchasing/Receiving systems available on your Triad system. In Order Point Purchasing, the Triad system tracks the quantity sold of each item and how many you still have on hand. As sales history accumulates and changes over time, you can use the Triad system to calculate optimum stock levels. The optimum stocking levels are based on demand, lead time and cost. When the time comes to order, the Triad system compares each item's quantity-on-hand to its optimum stock level and recommends purchase quantities accordingly. The procedure varies slightly, depending on whether you know what vendor you will order from, or whether you prefer to shop around for best prices before placing your order. When you're buying lumber or other commodity items, for example, you may wish to shop around before deciding where to buy. The diagrams on the next pages give a big picture of each procedure. (The large numbered arrows in the diagrams direct multisystem users to the Multisystem Detour chapter. Single system users can ignore them.) 12 1030072 Order Point Purchasing Two Big Pictures 4-1 If You Know What Vendor You'll Order From: Start Sell an item at POS Item's To Date & QOH fields in Function IMU Screen H are updated Report RP Receive merchandise into stock Report ROP Function FIL OR (with Function DEF & Report RFL) Calculate order points weekly Set order points Report RRP Print a checking copy of the receiving report Report RLA Report RSO (Option F) Print price labels (optional) Print suggested order report Report RBL Function MPO Print bin/shelf labels (optional) Edit first-draft PO created by Report RSO Function BTC Function RPO Report RRP (Option F) OR Send PO to vendor electronically 4-2 Order Point Purchasing Two Big Pictures Print PO and submit to vendor Finalize receipt of merchandise 12 1030072 If You Don't Know Who You'll Order From: Start Start Sell an item at POS Item's To Date & QOH fields in Function IMU Screen H are updated Report ROP Function FIL OR Calculate order points weekly (with Function DEF & Report RFL) Report RP Receive merchandise into stock Report RRP Print a checking copy of the receiving report Set order points Report RLA Report RSO Print price labels, (optional) Print suggested order report Report RBL Function MPO Print bin/shelf labels, (optional) Create a purchase order for each vendor you are ordering from Function RPO Report RRP (Option F) Print purchase order (optional) 12 1030072 Finalize receipt of merchandise Order Point Purchasing Two Big Pictures 4-3 Order Points How many of any given item should you keep on hand? This is an extremely important question, with a strong effect on the overall profitability of your store. Your Triad system can help you make these decisions. The procedure you use to set or calculate order points depends on which Inventory package you have. Classic Inventory users have to manually set their order points; Advanced Inventory users can have the Triad system automatically calculate their order points. Both procedures are included in this section. First of all, what is an order point? It's the optimum stocking level for an item. When an item's quantity-on-hand falls below its order point, the Triad system suggests you order more. Every item has its own order point— it's in the Order Point field on IMU, screen S. For example, if the order point is four for item 12345, 20-foot retracting measuring tapes, the Triad system suggests ordering more when your quantity-on-hand falls to three. (Actually, it's a little more complex than that—but let's save the details for "Deciding What to Order and Creating a Purchase Order," page 4-17.) How do I decide what each item's order point should be? The Triad system can help you make these decisions, using different criteria for different kinds of items. • • • • For high-cost items, you may wish to keep just one or two on hand, regardless of other factors. If you're cutting back or expanding inventory in general, you may wish to increase or decrease order points by a set percentage above or below your current order points. If it is important to you to maintain a reputation for breadth of inventory, you may choose always to have on hand at least a minimum quantity of even unpopular items. For most items, you should set order points according to how fast the item moves and how long it takes to get in a new order. What if you want to set the order point for certain items yourself, and prevent the Triad system from recalculating them? In that case, you'd "protect" them. Please see "Protecting Items from Order Point Calculation," page 4-15. For most items, though, your order points will be based on the item's sales history. Of course, the Triad system is a first-rate 4-4 Order Point Purchasing What To Order 12 1030072 collector of information about each item's sales history, so it's the perfect tool for suggesting order points. Exactly how does the Triad system calculate such order points? For an explanation of the calculations the Triad system uses, please see Appendix C: Order Point Calculations. Each item's sales history continues to change over time, so you should recalculate or set order points frequently—perhaps as often as weekly, before ordering from your primary vendor. Fortunately, it's quick and easy to do. Setting Order Points—Classic Inventory With Classic Inventory, you must decide what you want the order point for each SKU to be and manually load it into the Triad system. Deciding What the Order Point Should Be 1 At any menu, type IMU and press <Enter>. 2 Press <Home>, type H, then press <Enter>. 3 Type the SKU number that you want to set the order point for and press <Display>. The History Screen appears. Review the sales history fields (especially Cur Pd, Per 2, Per 12 and Per 13). Based on the sales history of the item, decide what you want the order point to be and make a note of it. 4 Repeat step 3 for each SKU you are interested in. 12 1030072 Order Point Purchasing What To Order 4-5 5 When you have determined the order points for all the SKUs, press <End>. Setting the Order Points Calculating Order Points—Advanced Inventory The Flexible Load File (FIL) can be used to quickly enter the order points into the system. However, there is more to the procedure than just entering the information in Function FIL. Please see the Inventory Item Information Manual, tabbed section Loading Inventory, for the procedure for changing inventory information quickly. You can add the ROP report to a queue to run the night before you do your ordering. ROP, Screen 1 1 At any menu, type ROP and press <Enter>. This is the first screen of the Order Point Report. It has three initiation screens. If you want to use a different printer, type its number at Printer. Multistore users only: Check the Store field. If you want to calculate order points for another store, press <Home> and type the other store's number. Then press <Enter>. If you want to calculate order points for every store, press <Home> and press <Clear Field>. There's no such thing as "consolidating" order points for all stores. Order points are always store-specific. That is, each item has its own order point in each store where it's stocked. 2 At Printing Seq, type the number for the printing sequence you want to use. Then press <Enter>. 4-6 Order Point Purchasing What To Order If you want to define your own printing sequence, type 5. Then see the procedures in the Reports Manual. 12 1030072 3 At Options, type FC and any other options you want to use. Then press <Enter>. Option A C E Description Print All Items Use this option if you want to print every item within the range you'll specify below. Every item (except those with a Y in their ROP Protect field) will print on the report, even those whose order point did not change. Allow Changes of OPs of 0 or 1 This option allows the ROP report to increase order points of zero or one, if an item's sales history warrants an increase. It's a good idea to use Option C so that if an item starts to move, your order point can move up right along with it, and you don't get left behind. If you don't use Option C, any item with an order point of zero or one is protected from change—that is, the ROP report won't change it, no matter what its sales history warrants. Exclude Expanded Promo Sales History. You can use this option only if: 1. 2. F M Z 12 1030072 you've answered Y to the Count Promo Sales field and the Keep Promo History field in IMU for every item you'll be calculating order points for, and you don't want to count those promotion sales when calculating order points. If you use this option, the Triad system will count only your regular sales history, not your promotion sales, and will therefore calculate lower order points. If you don't use this option, the Triad system will count your promotion sales as part of your regular sales history, and therefore will calculate higher order points. Finalize Order Point Changes Updates your inventory records with the new order points. Clear Maximum Stock Level Field The Maximum Stock Level field for each item within the range you'll specify below will be reset to zero. Not recommended as part of this procedure. Include Protected Order Points The Triad system will calculate and print order points for the items whose ROP Protect field ( in Function IMU) says Y—but it won't change those protected order points in the IMU record. It simply lists them on the report with a pound sign (#) so you can identify them. Good idea, if you want to see Order Point Purchasing What To Order 4-7 what you're protecting those items from. (If you decide to un-protect an item, you would have to change its ROP Protect field to N, and then run this report again.) 4 At Minimum New OP, type 1, 2 or 3. Then press <Enter>. 5 Type Y or N at Subtotals to indicate whether you want to see subtotals at the end of each group in the printing sequence you chose. Then press <Enter>. 6 If you don't use a Min-Max system, leave the A at Max Stk Level. If any items are on a Min-Max system, you could type A, B or C. Then press <Enter>. If you typed zero, you might accidentally discontinue items just by failing ever to re-order them again. The Triad system won't let you type a number greater than 3. Ignore Subtotals if you are using Printing Sequence 5. When you designed your printing sequence, you also specified what subtotals you want to see. If you don't use Min-Max, ignore this field. If you do use Min-Max, this field governs how the Maximum Stock Level field in Function IMU will be affected for items whose minimum (Order Point) changes. Option A 4-8 Order Point Purchasing What To Order Description Example Adjust maximum level by the same percentage as the order point is changed. Suppose an item's order point is 10 and its maximum stock level is 20. If the order point increases by 20% (to 12), then the maximum stock level would also increase by 20% (to 24). 12 1030072 Option 7 If you have recently added inventory items whose sales history is not yet long enough for calculating reliable order points, type a cutoff date at Exclude records added after. We suggest you type a date at least three months ago. 8 Fill in the From and To fields at the bottom of the screen to include all the items for which you want to calculate order points. You'll probably run this report for a particular vendor. 12 1030072 Description Example B Adjust maximum level by the same number of units as the order point is changed. Suppose an item's order point is 10 and its maximum stock level is 20. If the order point increases by 2 (to 12), then the maximum stock level would also increase by 2 (to 22). C Do not change maximum stock level Suppose an item's order point is 10 and its maximum stock level is 20. If the order point increases to 12, then the maximum stock level would remain unchanged at 20. Type the cutoff date in MM/DD/YY format. For example, if you type 02/14/89, no order points will be calculated for any items added to your inventory after February 14, 1989. Usually, three to six months of sales history give you a reliable base on which to calculate order points. Seasonal items, of course, require a longer sales history. When you add an item to the inventory file, you also add an order point for it. If you fill in a date on this screen that's about six months back, the order point you assigned will remain in the item's record for about six months. By that time, the item will have accumulated a sales history sufficient for calculating an order point, and you won't need to exclude it anymore. If you can't include them all in one report run, you can repeat this procedure as many times as necessary. You may want to limit this report run to just one location in the store, or items in just one department. Order Point Purchasing What To Order 4-9 9 If you want to include or exclude items with certain User Codes, Popularity Codes, Order Indicators, Promotional codes or Seasonal Codes, fill in the Codes and Exclusion fields at the bottom right corner of the screen. 10 For example, if you want to recalculate order points for just your "A" movers (most popular items), you would type A at Popularity. Please see the tabbed section Introduction to Reporting in the Reports Manual for a complete explanation of how to use the Codes and Exclusions fields. Press <Run>. Nothing prints yet. Instead, the second ROP screen appears. ROP, Screen 2 Why Three Methods? • • • For high-cost items such as expensive appliances, you may wish to keep just one or two on hand, regardless of other factors. Use Method 1, beginning with step 1. If you're cutting back or expanding inventory in general, you may wish to increase or decrease order points by a set percentage above or below your current order points. Use Method 2, beginning with step 2. For most items, you should set order points according to how fast the item moves and how long it takes to get in a new order. Use Method 3, beginning with step 3. If you would like to know exactly how the Triad system calculates order points based on each item's sales history, please see Appendix D: Order Point Calculation. You can use Methods 1 and 3 at the same same. Method 2 must be used by itself. 1 If there are any high-cost items you don't want to stock many of, type the cost in the first blank at Method 1, and press <Enter>. In the second blank, type the order point you want to set for those items and press <Enter> again. If this is the only kind of calculation you want to make, skip to step 6. If there are no such items, just press <Enter> twice, leaving the two blanks empty. 4 - 10 Order Point Purchasing What To Order For example, if you want to set the order point to 1 for all items that cost $100 or more (instead of letting the Triad system calculate an order point based on sales figures), you would type 100 in the first blank and 1 in the second blank. 12 1030072 2 If you want to calculate order points based on sales history, skip to step 3. If instead you simply want to increase or decrease order points to a certain percentage of your current order points, type the percent in the blank at Method 2. Then press <Run>. 3 How many weeks of supply do you want to have on the shelf? Type the number at Weeks of Supply on Shelf, and press <Enter>. 4 How long does it take to receive ordered merchandise from your vendor? Type the number of weeks at Lead Time Weeks, and press <Enter>. 5 If you like to keep a safety margin, too, type the number of weeks of safety supply at Safety Stock Weeks. For example, if you want to reduce your current order points by 5 percent, type 95. If you want to increase your current order points by 5 percent, type 105. You can't go on to Method 3 if you're using Method 2. When you press <Run>, the Triad system begins recalculating your order points. Please skip to "Reviewing the Order Point Report," page 4-13. You can use decimal places if you want. If you want to keep two and a half weeks' supply on hand, you could type 2.5. You can use decimal places if you want. If your vendor delivers in ten days, for example, you could type 1.5 for one and a half weeks. You can use decimal places if you want. If you want to keep ten days' safety stock on hand to cover shipping delays, for example, you could type 1.5. How Many Total Weeks? For a weekly warehouse order, you should probably use from 3 to 6 total weeks of supply. Toward the end of a season you may wish to decrease the weeks of supply to lower your inventory costs. If you are ordering from a manufacturer who comes by for an order only once a quarter, use a higher total—perhaps 12 to 15 weeks. You may wish to calculate order points separately for different kinds of merchandise. For example, in winter you may wish to use a 3-week total supply for most items. Plumbing items, however, are popular during cold weather, so you may wish to calculate order points separately for the Plumbing Supplies department, using 5 to 6 total weeks of supply. 12 1030072 Order Point Purchasing What To Order 4 - 11 6 Press <Run>. The third ROP screen appears. This screen appears only if you are using Method 3. ROP, Screen 3 1 How many weeks into the current period are you? Type the number of weeks, including decimal point, under Wk at Current Pd and press <Clear Field> . If today is February 14, for example, you're two weeks into the current period, so you would type 2. The Triad system knows how many weeks are in each of the previous periods because your fiscal year is recorded in Function MDT. The correct number of weeks displays next to each period. Period 2 was last period; period 3 was the period before, and so on. If your fiscal year has 12 periods, then period 13 represents this period last year. If you want to use period 13's sales history in this order point calculation, then under Wk at Period 13, type the total number of weeks in this month. (If your fiscal year has 13 periods, then this period last year is not shown on this screen.) 2 How much weight do you want to give to each of these periods in calculating your average sales per week? Type the percent of total weight to be accorded to each period. For example, if you want sales figures over the last four months to be weighted all equally, under Weight you would type 25 at Current Per, at Period 2, at Period 3 and at Period 4. The weights don't have to add up to 100. Their sum can be more or less than 100. Assigning weights is an art and a science, where your experience and expertise are of great importance. Please see The Art and Science of Weighting Sales Periods, on page 4-14, for a complete explanation. 3 Press <Run>. 4 - 12 Order Point Purchasing What To Order Finally, your Order Point Report prints. At the same time, order points are being recalculated according to the guidelines you entered. 12 1030072 Reviewing the Order Point Report 1 Look at the Order Point Report. Share it with department heads or other store managers or buyers, if necessary. If you want to change any of these new order points, you could: • • do this procedure again for the same range of items, using different options, weeks of supply, or weights. You can do this as many times as you want. You're never stuck with any order points. change any individual order points you want. Display the item on IMU screen S, type a new number at Order Point, and press <Change>. 2 When you have confidence in your order points, you are ready to order. Please go on to "Deciding What to Order and Creating a Purchase Order," page 4-17. 12 1030072 Order Point Purchasing What To Order 4 - 13 The Art and Science of Weighting Sales Periods The greater the weight you give any sales period, the more it counts in determining your order points. There's no "right" or "wrong" weighting scheme. Let your experience be your guide in discovering what works best for you. Suppose this is May and you are calculating order points for some seasonal items—barbecues, for example. If your fiscal year has 12 periods (so that period 13 represents May last year), you might want to weight the periods like this: • period 13 (May last year) at 20%, • period 11 (July last year) at 20%, • • period 12 (June last year) at 40%, and the current period (this May) at 20% This would tell the Triad system to consider last summer's sales of these items, and the trend so far this summer. Suppose this is September, and you are re-calculating order points for those same seasonal barbecues. You might want to weight the periods like this: • period 13 (September last year) at 20% • period 11 (November last year) at 20%, • • period 12 (October last year) at 40%, and the current period (this September) at 20% This would tell the Triad system to consider last fall's sales of these items, and the trend so far this fall. Now suppose you believe your sales have recently signaled the beginning of a significant upward trend so you would like to raise all your order points by 5%. You could do this by weighting the current period at 45%, period 2 at 30%, and period 3 at 30%. That's a total of 105% and the "extra" 5% will be reflected in the new order points. A similar decrease in the order points could be accomplished by making the weights total less than 100%. Weighting sales periods is the heart of order point calculation. You can calculate order points that reflect the most recent consumer demand and sales trends—and historical demand, all at the same time. Using these order points can help shift your inventory investment from slower-selling items to faster-selling items. 4 - 14 Order Point Purchasing What To Order 12 1030072 Protecting Items from Order Point Calculation 1 At any menu, type IMU and press <Enter>. There may be some items in your inventory whose order points you want to set yourself, instead of letting the Triad system do it. Here's how to set an order point manually, and prevent the Triad system from changing it: Multistore users only: You can change store-specific information in only one store at a time. Order point and order point protection are storespecific. • • 2 At SKU, type the number of the item whose order point you want to set, and press <Display>. 3 Move the cursor down to Order Point and type the point at which you want the Triad system to suggest re-order. If there was a number there already, press <Clear Field>. Press <Home>, then <Enter>. At Chg Type, type S. Multistore users only: If the number of the store where you want to protect this item is not displayed at STORE in the store specific area of the screen, type the store number over the number already there and press <Display>. When your quantity-on-hand falls below this number, the Triad system will suggest you re-order. 4 Press <Change>. 5 Press <Home>, type C and press <Enter>. 12 1030072 Order Point Purchasing What To Order 4 - 15 6 Move the cursor to ROP Protect. Type Y. Press <Change>. Ordinarily the Triad system recalculates order points when you run the Order Point Report (ROP) during the procedure "Order Points," page 4-4. But now the Triad system will not recalculate the order point for this item. The order point for this item is protected from the Order Point Report's calculations, until you change the ROP Protect field to N again. 4 - 16 Order Point Purchasing What To Order 12 1030072 Deciding What to Order and Creating a Purchase Order What to Order For each item in the range you indicate, your Triad system adds up your current quantity-on-hand, quantity-on-order and any part of the Future Order quantity that's due in shortly. Then it subtracts Committed Quantity and Customer Backorder quantity. If the sum of all these is less than the item's Order Point, the Triad system suggests you order more. For example, if Quantity on Hand 3 Qty On Order 4 Committed Qty 2 Future Order Cust Backorder Order Point 1 1 8 the Triad system figures: (3 + 4 + 1)- (2 + 1) = 5. That's less than the Order Point (8), so the Triad system suggests you order more. Incidentally, there is an option you can use when creating a purchase order to tell the Triad system not to consider the committed quantity. There's another option that tells the Triad system not to consider the quantity-on-order. How Many to Order That depends on: • who you're ordering from • whether this item has a New Order Quantity • 12 1030072 whether this item is on a Min-Max system or a straight order point system Order Point Purchasing What To Order 4 - 17 Who You're Ordering From The Triad system rounds up suggested order quantities to the next nearest multiple of the vendor's package. So if you're ordering from a primary vendor, the Triad system suggests that you order in multiples of the vendor's order package quantity. During the inventory loading process, you entered that quantity in each item's inventory record at Order Multiple. In the example above, if the order multiple is 4, the Triad system will suggest you buy 4. When you order from the manufacturer, the Triad system suggests that you order in multiples of the manufacturer's standard package. During the inventory loading process, you entered that quantity in each item's inventory record, too, at Standard Pack. In the example above, if the standard pack is 8, the Triad system will suggest you buy 8. When you order from the secondary vendor, you must indicate which vendor's order package quantity you want to use: • • • Min-Max vs. Straight Order Point If you use the Primary Vendor print sequence (sequence 2) or Order Calculation Option V, the Triad system suggests that you order in multiples of the order multiple. If you use the Manufacturer print sequence (sequence 3) or Order Calculation Option M, the Triad system suggests that you order in multiples of the standard pack. If you do not use print sequence 2 or 3, and do not use Order Calculation Option V or M, the Triad system does not round up any order quantities. If there is a number in an item's Maximum Stock Level field, the item is on a Min-Max ordering system. When your quantityon-hand falls below the order point, the Triad system suggests you order enough to put you back up to the maximum stock level—rounded up to the next appropriate order package quantity. If there is no number at Maximum Stock Level, this item is on a straight order point system. When your quantity-on-hand falls below the order point, the Triad system suggests you order enough to put you back up to the order point—rounded up to the next appropriate order package quantity. 4 - 18 Order Point Purchasing What To Order 12 1030072 There's no problem with mixing these; some of your items may be on Min-Max, and some may be on straight order point. The Triad system can handle them both at once. New Order Quantity Where to Go From Here If there is a number in an item's New Order Quantity field, the Triad system just suggests you order that quantity—rounded up, if necessary, to the next appropriate order package quantity. There could be a number at New Order Quantity if you typed a number there, or if you ran Report RSO with Option E. Clearly, your order points play an essential part in determining the items and quantities you will order. To make sure the order points you're using are as accurate and current as possible, you should recalculate them frequently—perhaps even weekly. Please see "Order Points," page 4-4. When you have confidence in your order points, you're ready to order. If you know which vendor you want to order from, please see "When You Know What Vendor You'll Order From," page 4-20. If you want to shop around before you decide who to buy from (you're buying lumber, for example), you need a shopping list to work from. Please see "When You Don't Know Who You'll Order From" on page 4-29. 12 1030072 Order Point Purchasing What To Order 4 - 19 When You Know What Vendor You'll Order From You should have confidence in your order points before you begin this procedure. If you haven't calculated order points within the last week, please see "Order Points," page 4-4. Then come back here. Use this procedure if you know which vendor you want to order from. You will print a report that suggests purchase quantities. At the same time, a first-draft purchase order for this vendor will be created in your Triad system. Later you can edit the purchase order as necessary. If you don't know yet what vendor you'll decide to order from, please see instead "When You Don't Know Who You'll Order From," page 4-29. Before you begin this procedure: • you must decide what vendor to order from • you'll need to know whether this vendor is the primary vendor, secondary vendor, or manufacturing vendor for the kind of inventory items you'll be ordering (if you're not sure, please see Vendors, section 5) • 1 At any menu, type RSO and press <Enter>. you'll need to know the vendor's code (if you're not sure, please see Vendors, section 5) This is the initiation screen for the suggested order report. You will use it to print suggested order quantities and create a firstdraft purchase order at the same time. If you want to use a different printer, type its number at Printer. Multistore users only: You can create an order for one store at a time—or you can create a consolidated order for all stores. Check the Store field. If you want to order for a different store: • press <Home> • press <Enter> • 4 - 20 Order Point Purchasing What To Order type that store's number over the number at Store 12 1030072 If you want to consolidate your order for all stores: • press <Home> • press <Enter> • type C over the number at Store In consolidated orders, the Triad system automatically: • • • calculates an order quantity for each store and adds them all together then it rounds the total order quantity to the nearest order multiple or standard pack if necessary, it then adjusts the individual store quantities to take up the slack of the order multiple or standard pack rounding Although the Triad system adds together the individual store quantities for purposes of consolidation, it still keeps track of how many are on order at each individual store. 2 At Printing Sequence, type the number for the sequence you want to see these items listed in. Then press <Enter>. If you are ordering from a vendor whose SKU numbering scheme you adopted, use printing sequence 7. If you are ordering from the secondary vendor, and: • • • you want to round up order quantities by the order multiple, use printing sequence 2 you want to round up order quantites by the standard pack, use printing sequence 3 you don't want to round up order quantities, use any other printing sequence, not sequence 2 or 3 If you are ordering from the manufacturer, use printing sequence 8. If you want to define your own printing sequence, type 5. Then see the procedures in the Reports Manual. 3 At Order Calc Options, type the codes to indicate what kind of calculations you want the Triad system to use. Then press <Enter>. 12 1030072 If you are ordering from your primary vendor, use Option V. If you are ordering from the manufacturer, use Option M. Order Point Purchasing What To Order 4 - 21 If you are ordering from the secondary vendor, and: • you want to round up order quantities by the order multiple, use Option V • you want to round up order quantites by the standard pack, use Option M • you don't want to round up order quantities, don't use Option V or M Please see the table below, for complete details on each of these options. Option A B G M 4 - 22 Order Point Purchasing What To Order Description Use Average Cost The average cost of items prints on the suggested order, instead of replacement cost or manufacturer's cost. Don't use this option if you want the replacement cost or manufacturer's cost to print. Use Negative QOH in Order Calculation Some items may show a quantity-on-hand less than zero. (If QOH is less than zero, it's usually because merchandise was placed on the floor and sold before it was properly received in the Triad system; or because your last physical count was inaccurate.) Ordinarily, the Triad system treats negative quantities on hand as though they were zero. However, if you want the Triad system to increase the suggested order by the negative quantity-onhand, use this option. The effect is that the Triad system will suggest ordering more. Don't use Comm Qty in Order Calculation Some items may be committed for future delivery on Orders or Special Orders. Ordinarily, the Triad system subtracts the committed quantity from quantity-on-hand. If you use this option, though, the Triad system doesn't subtract your committed quantity from quantity-on-hand. The effect is that the Triad system will suggest ordering less. Use Manufacturer Information Fields If you want the Triad system to use Standard Package quantities and manufacturer's cost, use this option. Don't use this option if you selected Printing Sequence 2. 12 1030072 Option Q V 4 Leave Selection Options blank, and press <Enter>. 5 At Other Options, type F and any other options you want to use. Then press <Enter>. Description Don't Use QOO in Order Calculation Some items may already be on order with this or another vendor. Ordinarily, the Triad system adds the quantity-on-order to quantity-on-hand. If you use this option, though, the Triad system doesn't add the quantity-on-order to quantity-on-hand. The effect is that the Triad system will suggest ordering more. Use Primary Vendor Information Fields If you want the Triad system to use Order Multiple quantities and replacement cost, use this option. Don't use this option if you selected Printing Sequence 3. If you leave Selection Options blank, then any item that meets the order criteria explained above will print on the report, and will be placed on the first-draft purchase order. You should use Option F so that a first-draft purchase order will be created in your purchasing file at the same time the Suggested Order Report prints. Later you can change that firstdraft purchase order to your heart's content—or even delete it, if you want to start over again. We recommend that you do not use Option W. If this purchase order is for a secondary vendor, use Option C. Options D, J, N, and T are the standard options that just control how the report looks. The other options are explained in detail below. Option E I 12 1030072 Description Set New Order field You can't use this option here. (It can't be used with Options F or W). It puts each item's suggested order quantity into its New Order Quantity field in IMU Screen S. Check if Item Overstocked in Other Stores (Multistore users only) If you use this option, the Triad system checks to see if each item is overstocked in another store. If Order Point Purchasing What To Order 4 - 23 Option U Description it is, it will be flagged—you'll see how many are overstocked in each store. The item still prints on the report, though, and it's still placed on the firstdraft purchase order. Items on min-max are considered "overstocked" if the QOH is more than the Max Stock Level. Items on straight order point are considered "overstocked" if the QOH is more than the Order Point. Update Date of Last Physical Inventory If you will actually count and update the quantityon-hand for every item that prints on this order, you could use this option. This option will put today's date in the Last Phys Inv field on Function IMU screen S, for each item on the order. If you use Select Option P (Select All Items) at the same time, then every item in the range you will specify later in the From and To fields will print on the suggested order report, and will have its Last Phys Inv date updated—even if the suggested order quantity is zero. So don't use Options U and P together unless you are actually doing a physical inventory of every item on the order, regardless of its suggested order quantity. 6 If you are using Printing Sequence 5, ignore Subtotals. If you are using any other printing sequence, though, type Y or N to indicate whether you want to see subtotals at the end of each group in the printing sequence you chose. Then press <Enter>. 7 Type the vendor's code in From and To for Primary Vendor, Manufacturer or Secondary Vendor. You could also restrict the range by filling in any of the other From and To fields. 4 - 24 Order Point Purchasing What To Order If you want more than one copy, type the quantity you want at Copies. Press <Enter>. If you are ordering for only particular departments, classes, locations or SKU numbers, fill in the appropriate From and To fields. 12 1030072 8 If you want to include or exclude items with certain User Codes, Popularity Codes, Order Indicators, Promotional codes or Seasonal Codes, fill in the Codes and Exclusion fields at the bottom right corner of the screen. Contractor Package Users: If there are any Tally 2 items in the range you are ordering, be sure to exclude either the Tally 2 component SKUs or the Tally 2 header SKUs (parent SKUs), using the Ord Indicator field under Codes and Exclusion. If you don't exclude either the headers or the components, you might accidentally double-order those items. We recommend you exclude the component SKUs. To exclude Tally 2 component SKUs: Ord Indicator: Codes C Exclusion Y Or to exclude Tally 2 header SKUs: Ord Indicator: 9 Press <Run>. Codes T Exclusion Y Another screen appears. On this screen you can enter "header" information for the purchase order you're creating. Header information prints at the head of a purchase order. The information displayed here is from this vendor's record (Function MVR). Adding Header Information 1 If your system does not assign purchase order numbers, type the number you will use to identify this purchase order at P.O. Number. If your system assigns purchase order numbers, leave P.O. Number blank. 2 Type in any information you wish to add or change. 12 1030072 Leave Order Type blank. The Date Due is determined by the usual lead time for this vendor. You could change it if you wish. Order Point Purchasing What To Order 4 - 25 If you want this order shipped to an address other than your store address, type it at Special Ship To. The information at Date Due, Terms, Ship Via, FOB Point, Codes, Backorder, and Reference # is all from the MVR record for this vendor. If you want, though, you can change any field that the cursor will move to. 3 Tab down to Buyers Initials at the bottom of the screen, and type your initials. 4 Press <Run>. There's room for only two initials. If you have the same initials as someone else who also creates purchase orders, the two of you should agree on who will use what initials. The Triad system keeps track of who's creating purchase orders. At the same time as the Suggested Order Report prints: • • a first-draft purchase order is created. The items and quantities on it are the items and quantities that print on your RSO report. the Qty On Order field (Function IMU, Screen S) is updated for each of these items to show the quantity placed on order. Checking the Suggested Order Report 1 Check the Suggested Order Report. Write any changes on it that you want to make. You may wish to split up the report and distribute it among various department heads, product line managers, or other store managers. Cross out items you don't want to order. Change quantities to be ordered, if necessary. Write in any additional items and quantities you want to order. If you used Option U, be sure to check your actual quantities on hand and, if necessary, correct any quantities in the inventory file. 4 - 26 Order Point Purchasing What To Order 12 1030072 Reading Your Suggested Order Report Notice that most of the special codes are defined for you at the bottom of the pre-page. CUR FOQ is the quantity on future orders that is now considered current (and is therefore considered in addition to the current quantity-onorder). FUT FOQ is the quantity on future orders that is still considered future (and therefore not considered in addition to the current quantityon-order). NOQ means "new order quantity." The COST is in stocking units of measure. If you're using Option A, it's the average cost. If you're not using Option A, it's replacement cost, if these items are being ordered from their primary or secondary vendor. Or it's manufacturer's cost, if these items are being ordered from their manufacturing vendor. The RETAIL is in pricing units of measure. 12 1030072 Order Point Purchasing What To Order 4 - 27 2 Use the table below to determine which procedure to do next. Is This A Consolidated PO? No Yes 4 - 28 Order Point Purchasing What To Order Did You Mark Changes on the RSO? Yes No Yes No Then Go To… Changing a Purchase Order, page 4-49 Submitting the Purchase Order to the Vendor, page 4-58 Changing a Purchase Order, page 4-49 Resequencing a Purchase Order, page 4-56 12 1030072 When You Don't Know Who You'll Order From You should have confidence in your order points before you begin this procedure. If you haven't calculated order points within the last week, please see "Order Points," page 4-4. Then come back here. If you want to shop around before you decide whom to buy from (you're buying lumber, for example), you need a shopping list to work from. This procedure prints a list of what you need to order. If you already know what vendor you'll order from, please see instead "When You Know What Vendor You'll Order From," page 4-20. 1 At any menu, type RSO and press <Enter>. This is the initiation screen for the suggested order report. You will use it to print suggested order quantities. If you want to use a different printer, type its number at Printer. Multistore users only: You can print a suggested order for one store at a time—or you can print a consolidated suggested order for all stores. Check the Store field. If you want to print a suggested order for a different store: • press <Home> • press <Enter> • type that store's number over the number at Store If you want to print a consolidated suggested order for all stores: • press <Home> • press <Enter> • type C over the number at Store In consolidated orders, the Triad system automatically: • 12 1030072 calculates an order quantity for each store and adds them all together Order Point Purchasing What To Order 4 - 29 • • then it rounds the total order quantity to the nearest order multiple or standard pack if necessary, it then adjusts the individual store quantities to take up the slack of the order multiple or standard pack rounding Although the Triad system adds together the individual store quantities for purposes of consolidation, it still keeps track of how many are on order at each individual store. 2 At Printing Sequence, type the number for the sequence you want to see these items listed in. Then press <Enter>. 3 At Order Calc Options, type the codes to indicate what kind of calculations you want the Triad system to use. Then press <Enter>. You probably won't use sequences 2 or 3. If you want to define your own printing sequence, type 5. Then see the procedures in the Reports Manual. If you are buying lumber or any other commodity whose price fluctuates, you will probably wish to use Option A. Please see the table below for complete details on each of these options. Option A B 4 - 30 Order Point Purchasing What To Order Description Use Average Cost The average cost of items prints on the suggested order, instead of replacement cost or manufacturer's cost. Don't use this option if you want the replacement cost or manufacturer's cost to print. Use Negative QOH in Order Calculation Some items may show a quantity-on-hand less than zero. (If QOH is less than zero, it's usually because merchandise was placed on the floor and sold before it was properly received in the Triad system; or because your last physical count was inaccurate.) Ordinarily, the Triad system treats negative quantities on hand as though they were zero. However, if you want the Triad system to increase the suggested order by the negative quantity-onhand, use this option. The effect is that the Triad system will suggest ordering more. 12 1030072 Option G M Q V 4 Leave Selection Options blank, and press <Enter>. 5 Single-store users: You can leave Other Options blank. Multistore users only: Type I. Then press <Enter>. Description Don't use Comm Qty in Order Calculation Some items may be committed for future delivery on Orders or Special Orders. Ordinarily, the Triad system subtracts the committed quantity from quantity-on-hand. If you use this option, though, the Triad system doesn't subtract your committed quantity from quantity-on-hand. The effect is that the Triad system will suggest ordering less. Use Manufacturer Information Fields If you want the Triad system to use Standard Package quantities and manufacturer's cost, use this option. Don't use this option if you selected Printing Sequence 2. Don't Use QOO in Order Calculation Some items may already be on order with this or another vendor. Ordinarily, the Triad system adds the quantity-on-order to quantity-on-hand. If you use this option, though, the Triad system doesn't add the quantity-on-order to quantity-on-hand. The effect is that the Triad system will suggest ordering more. Use Primary Vendor Information Fields If you want the Triad system to use Order Multiple quantities and replacement cost, use this option. Don't use this option if you selected Printing Sequence 3. If you leave Selection Options blank, then any item that meets the order criteria explained above will print on the report. The available list of options displays. There are several you may wish to use under some circumstances: Options D, J, N, and T are the standard options that just control how the report looks. Don't use options F or W. We recommend against using options E or U here. Multistore users only: You could use option I. If you use this option, the Triad system checks to see if each item is overstocked in another 12 1030072 Order Point Purchasing What To Order 4 - 31 store. If it is, it will be flagged with an asterisk—you'll see how many are overstocked in each store. The item still prints on the report, though. 6 If you are using Printing Sequence 5, ignore Subtotals. If you are using any other printing sequence, though, type Y or N to indicate whether you want to see subtotals at the end of each group in the printing sequence you chose. Then press <Enter>. 7 Type the range of items you are interested in ordering at the From and To fields. 8 If you want to include or exclude items with certain User Codes, Popularity Codes, Order Indicators, Promotional codes or Seasonal Codes, fill in the Codes and Exclusion fields at the bottom right corner of the screen. If you want more than one copy, type the quantity you want at Copies. Press <Enter>. If you are ordering for only particular departments, classes, locations or SKU numbers, fill in the appropriate From and To fields. Contractor Package Users: If there are any Tally 2 items in the range you are ordering, be sure to exclude either the Tally 2 component SKUs or the Tally 2 header SKUs (parent SKUs), using the Ord Indicator field under Codes and Exclusion. If you don't exclude either the headers or the components, you might accidentally double-order those items. We recommend that you exclude the component SKUs. To exclude Tally 2 component SKUs: Ord Indicator: Codes C Exclusion Y Or to exclude Tally 2 header SKUs: Ord Indicator: 9 Press <Run>. 4 - 32 Order Point Purchasing What To Order Codes T Exclusion Y Nothing is changed, updated or created when you run this report. You're simply printing a shopping list. 12 1030072 10 Check the Suggested Order Report. Decide which items you want to order, and whom you want to order them from. You may wish to split up the report and distribute it among various department heads, product line managers, or other store managers. Cross out items you don't want to order. Change quantities to be ordered, if necessary. Write in any additional items and quantities you want to order. 11 When you have decided which items and quantities to order from which vendor(s), go on to "Creating a Purchase Order Manually," page 4-35. 12 1030072 Order Point Purchasing What To Order 4 - 33 Reading Your Suggested Order Report Notice that most of the special codes are defined for you at the bottom of the pre-page. CUR FOQ is the quantity on future orders that is now considered current (and is therefore considered in addition to the current quantity-onorder). FUT FOQ is the quantity on future orders that is still considered future (and therefore not considered in addition to the current quantityon-order). NOQ means "new order quantity." The COST is in stocking units of measure. If you're using Option A, it's the average cost. If you're not using Option A, it's replacement cost, if these items are being ordered from their primary or secondary vendor. Or it's manufacturer's cost, if these items are being ordered from their manufacturing vendor. The RETAIL is in pricing units of measure. 4 - 34 Order Point Purchasing What To Order 12 1030072 Creating a Purchase Order Manually, or a Future Order Function MPO, Screen H Add header information Occasionally you may wish to create a purchase order manually. You would create a purchase order manually to: • • • • • • Function MPO, Screen I Add special instructions (optional) Function MPO, Screen D Add line item detail information Report RPO Print checking copy of purchase order place an order after shopping around for a best price on commodity items such as lumber prepare for a seasonal surge that you know is coming take advantage of special buys or vendor promotions fill your customers' Special Order requirements order brand new items from a brand new vendor order items you don't ordinarily stock, or that don't have SKU numbers Or you may wish to create a future order. A future order is a special purchase of merchandise for delivery sometime in the future—say a month or more away. You place a future order to take advantage of a special buying opportunity. Future orders are not intended to fill your immediate stocking needs. Remember, the Triad system does not count quantities on future orders as part of quantity-on-order. That's so the merchandise you've ordered for future delivery doesn't upset your Triad systems suggestions about what you need to order now. Eventually, of course, the delivery date for those future orders draws near. When the expected delivery date is within a certain number of days, the Triad system considers the quantity on the future order as well as your current quantity-on-order. Within how many days? You made that decision when you set up your purchasing system using Function MPC. It should be about the same as the normal leadtime for delivery from your usual vendors. The diagram on the left shows the general procedure used to create a purchase order manually. The procedure is explained step-by-step below. Before you begin this procedure: • you must decide what vendor to order from • you'll need to know whether this vendor is the primary vendor, secondary vendor, or manufacturing vendor for the inventory items you'll be ordering (if you're not sure, please see Vendors, section 5) • 12 1030072 you'll need to know the vendor's code (if you're not sure, please see Vendors, section 5) Order Point Purchasing What To Order 4 - 35 Adding the Header Information 1 At any menu, type MPO and press <Enter>. This is the header screen of the Modify Purchase Order function. You will use this screen to enter the information that prints at the "head" of a Purchase Order. Multistore users only: Check the Store field. If that's not the store you want to create this purchase order for: • press <Back Tab> • press <Enter> • type the correct store number The header must be for a particular store, not for all stores. You can place line items for any store on the purchase order, however, regardless of which store number is on the header. 2 If your system does not assign purchase order numbers, type the number you will use to identify this purchase order at P.O. Number. If your system assigns purchase order numbers, leave P.O. Number blank. Then press <Tab>. 3 At Vendor, type the code for the vendor you're ordering from. 4 If this is a future order, type the date you expect to receive it at Date Due, and type F at Order Type. 4 - 36 Order Point Purchasing What To Order This is the code you use to identify this vendor. You assigned it to the vendor in the Vendor Code field of Function MVR. Type the date in MMDDYY format. The cursor moves across the slashes by itself. 12 1030072 5 Tab down to Buyers Initials and type your initials. 6 Press <Add>. 7 Type in any information you wish to add or change. Then press <Change>. There's room for only two initials. If you have the same initials as someone else who also creates purchase orders, the two of you should agree on who will use what initials. The Triad system keeps track of who's creating purchase orders. If you did not assign a number, the Triad system assigns one. All the default information for this vendor displays. The table below explains the options available for the Order Type field. Option Description B Blanket purchase order D Defective purchase order C F S blank Credit purchase order Future purchase order Special purchase order Regular purchase order The Date Due is determined by the usual lead time for this vendor. You could change it if you wish. If you want this order shipped to an address other than your store address, type it at Special Ship To. The information at Date Due, Terms, Ship Via, FOB Point, Codes, Backorder, and Reference # is all from the MVR record for this vendor. If you want, though, you can change any field that the cursor will move to. 8 If you do not want to add any other special instructions or comments to this purchase order, skip to "Adding Line Item Detail," page 4-38. If you do want to add other special instructions or comments, continue here with "Adding 12 1030072 Order Point Purchasing What To Order 4 - 37 Special Instructions." Adding Special Instructions 1 Press <Home>. At Screen, type I, and press <Enter>. This is the Special Instructions screen. Any comments you type here will print on the purchase order. They cannot be transmitted electronically, though, so if you'll be transmitting this purchase order to your vendor bisynchronously, you could use this space instead for special instructions to the person who will receive the order. 2 Press <Tab>. Type anything you want. Press <Enter> at the end of each line to move to the next line. 3 Press <Change>. Adding Line Item Detail 1 Press <Home>, type D and press <Enter>. Then press <Tab>. This is the Detail screen. On this screen, you add line items to the purchase order. You will fill in a screenful of information for each line item you add to the purchase order. At Item Number, type the SKU of the item you want to place on order. If this item is a special order for a particular customer, press <Enter> twice and type the customer's name at Mfg #/Spcl. 2 4 - 38 Order Point Purchasing What To Order If this item doesn't have an SKU number, but you do know the number the vendor uses to identify the item, press <Enter> twice and type that number at Mfg #/Spcl. If you don't know any number for it, press <[> and type a good description of it at Description. The more accurate your description, the easier it will be for the vendor to figure out what you want. (This description cannot be transmitted electronically, however.) 12 1030072 Multistore users only: If this particular item is for a different store than is shown at Store, press <Home> and then <Enter>. At Store, type the number of the store for which you're ordering this item. If you are ordering the same item for more than one store, and if you might want to consolidate the order quantities later when you print the purchase order, try to order that item for one store after another, without ordering any other items in between. For example, if you're ordering SKU 123 in Store 1, Store 2, and Store 3, add it in Store 1. Right away add it in Store 2, and then in Store 3. Don't go on to SKU 124 for any store until you've finished ordering SKU 123 for each store. 3 Press <Tab>. At (Stk) QOO or at (Pur) QOO, type the quantity of this item you want to order. 4 Press <Add>. The units of measure for this item aren't displayed, so you may have to guess the correct quantity. If you really have no idea, just type any number. You can correct it in a moment, after the units of measure display. Now the item description, unit cost, extended price and units of measure display. If the units of measure are not what you expected, you can • • • type a new number in either of the QOO fields and press <Clear Field> then press <Clear Field> in the other QOO field then press <Change> If the screen says QUANTITY ON ORDER MUST BE A MULTIPLE OF x OR UNIT OF MEASURES THE SAME, it means the order quantity you entered is not a multiple of this vendor's order multiple or standard pack. (This warning appears only if the purchasing unit of measure for this item is different from its stocking unit of measure.) You should: • • type a quantity that is a multiple of the number in the screen message. Then press <Add>. or, if you want to ignore the vendor's order multiple/standard pack requirements, type over one of the units of measure to make them both the same. Then press <Add>. For example, suppose the stocking unit of measure is EA and the purchasing unit of measure is BX. Suppose you want to buy 4 12 1030072 Order Point Purchasing What To Order 4 - 39 each, even though the vendor's order multiple is 8 each, which is a whole box. The screen will say QUANTITY ON ORDER MUST BE A MULTIPLE OF 8 OR UNIT OF MEASURES THE SAME. So you could change (Stk) QOO to 8—but then you would get 8, when you only want 4. Or you could type EA over the BX at (Pur) U/M, and leave your order quantity 4. Then you would get 4 each. 5 Press <Clear>. Return to step 2 and repeat for each item you want to place on the order. You can place up to 10,000 items on a purchase order. Printing a Checking Copy 1 When the purchase order is complete, press <End>, type RPO at the menu and press <Enter>. Now you will print a copy of the purchase order and check it for accuracy. If you want to use a different printer, type its number at Printer. Multistore users only: Check the PO's for Store and Items for Store fields. Remember, you could have created a purchase order for one store that includes line items for various other stores. If the number at PO's for Store is not the same as the store number on this purchase order's header screen, press <Home> and type the correct store number at PO's for Store. If all the line items on this purchase order are for just one store, type that store's number at Items for Store. Line items for just that store will print. If this purchase order includes line items for more than one store, press <Clear Field> at Items for Store. Line items for all stores will print. 2 At Options, type any options you want. If any of the items on the purchase order have an alternate part number, use Option A. If this purchase order is to a secondary vendor, use Option V. 4 - 40 Order Point Purchasing What To Order 12 1030072 If this purchase order is to the manufacturing vendor, or if you entered anything in the Mfg # /Spcl field, use Option M. You can't use Options M and V together. You can't use Options A and I together. Any other combination is fine. Multistore users only: If this purchase order includes the same line items on order for more than one store, you could use Option C. If you ordered those line items one after another, without ordering any other items in between, the Triad system will add all the order quantities together and print just one total order quantity instead of printing a line for each store. If instead you want to see the order quantities for each store, don't use Option C. 3 At P.O. Number From, type the number of the purchase order you just created. Type the same number at P.O. Number To. 4 Press <Run>. 5 Look at the purchase order and mark any mistakes you find. If you need to make corrections, go to "Changing a Purchase Order," page 4-49. If you don't need to make any corrections, go to "Submitting the Purchase Order to the Vendor," page 4-58. Multistore users only: If you want to consolidate this purchase order, you should resequence it before you submit it to your vendor, so the Triad system can consolidate order quantities properly: • If you don't need to make any corrections, go now to "Resequencing a Purchase Order," page 4-56. Afterwards, go on to "Submitting the Purchase Order to the Vendor," page 4-58. • If you do need to make corrections, go now to "Changing a Purchase Order," page 4-49. You'll resequence it later, after making your changes. If you don't want to consolidate this purchase order, you don't have to resequence it. 12 1030072 Order Point Purchasing What To Order 4 - 41 Generating Purchase Orders From Special Orders Report GPO (Generating Purchase Orders from Special Orders) automatically creates purchase orders from special orders entered at POS. The purchase orders that generate from Report GPO have a F (Final) status. The ideal time to run Report GPO is with your end-of-day reports, because it will generate purchase orders for every special order entered during the day. If you cannot wait until the next day for a purchase order, you can run GPO for a specific special order or a range of special orders any time during the day. Questions You May Have Here are some questions and answers about Report GPO. Why would I want to use Report GPO? You can save a lot of time by using Report GPO. The Triad system will copy the line items from the POS Posting Screen of a special order to a purchase order for appropriate vendors. What if I need to change a special order that has a generated purchase order from Report GPO? You have two options for changing special orders after generating purchase orders. You can: • • Is the Purchase Order Header Screen (Function MPO) filled in by the system? delete and purge the purchase order, change the special order, and run Report GPO with Option A for that purchase order number, special order number, and vendor or manually enter the changes on the special order and the purchase order Yes. Check the Modify Purchase Order Constants Screen (Function MPC) and make sure the Assign PO Numbers Automatically? field is Y (Yes). The clerk's initials are required in Function MPO and will be entered by you when you run Report GPO. If you don't want to assign purchase order numbers automatically, then you can manually enter the purchase order number in Report GPO. 4 - 42 Order Point Purchasing What To Order 12 1030072 How are purchase orders generated when I run Report GPO? Here is an illustration of the way purchase orders are generated from special orders: Special Order Item 1 2 3 Vendor P P P Purchase Order Vendor: P Item: 1 2 3 Purchase Order Special Order Vendor: M Item: 2 Item 1 2 3 Vendor P M P Purchase Order Vendor: P Item: 1 3 Can I consolidate generated purchase orders for a vendor? Yes. You can use Function BPO (Combine Purchase Order) to combine purchase orders for a vendor. How can I tell whether a purchase order has been generated for a special order? On the POS Header Screen there is a field called Special Order Codes. These codes are user-defined. The system will enter a G in the fourth position meaning this special order has had purchase orders generated. You could also print Report RPP (Purchasing Master File Print). You need to run this report with Option G entering the specific special order number in the new Special Order # From and To fields on the report initiation screen. Can I generate purchase orders for orders? 12 1030072 No. Report GPO is designed specifically for special orders, because these items are not normally stocked in your inventory. When you enter orders, you are ordering items you normally stock in inventory. Order Point Purchasing What To Order 4 - 43 Loading Report GPO in your Endof-Day Queue You can incorporate Report GPO into your daily procedures to make sure that you always generate purchase orders for all special orders in the system. NOTE: 1 Add Report GPO to your end-ofday queue. If the Assign PO Numbers Automatically? field is N (No) in Function MPC, then you cannot add Report GPO to your end-of-day queue. If you don't know how to load a report into your queue, please see the Guide to Your Triad System for more information. Here's what needs to be filled in on the report initiation screen: • At Clerk Initials, enter your initials. • Leave the following fields blank: • At Date Created, enter 999999 to tell the system to always use the system date. - Options - From/To Special Order # - P.O. # From/To Vendor CAUTION If you forget to run end-of-day reports, then you will need to change the From/To Date Created fields from 9s to the day you missed. It is important that you change this field; otherwise, special orders will be processed for the wrong date. To avoid this situation, remember to run your end-of-day reports every evening. 2 Run end-of-day and shutdown as usual. 4 - 44 Order Point Purchasing What To Order 12 1030072 Generating Purchase Orders for Specific Special Orders 1 At any menu, type GPO and press <Enter>. 2 At Printer, press <Enter> to accept the default printer. 3 At Clerk Initials, type your initials and press <Enter>. If you can't wait until the next day for a purchase order, you can run Report GPO for a specific order or a range of special orders. You don't have to worry about generating these purchase orders in your EOD report. Purchase orders will not be generated again for the special orders specified manually. The GPO (Generate Purchase Order from Orders) Screen appears. If you want, you can enter a different printer number. Any employee with the security clearance to use Function MPO can run Report GPO. You must enter your initials in this field, because the system requires initials in the Header Screen of Function MPO. 4 At Options, type the options you want and press <Enter>. Here are the available options: Option P 12 1030072 Description Pickup Pattern # If you code the Tally* field in Function IMU (Codes Screen) for pattern SKUs, then you can use this option to include the pattern number entered at POS on the generated purchase order. The first line in the Description field from the POS Posting Screen will be added to the Mfg/Spcl field in Function MPO. Order Point Purchasing What To Order 4 - 45 Option A Create PO for Sp. Orders Previously Processed by GPO If you changed a special order or accidentally deleted a purchase order, you can use this option to regenerate purchase orders for all the details. You must specify a purchase order number, special order number, and vendor when you use this option. NOTE: 5 At P.O. #, type the purchase order number you want to assign to this special order and press <Enter>. Description Check the fourth position of Special Order Codes in the POS Header Screen—a G means that this special order has been processed through GPO. Normally you would leave this field blank, because the Triad system automatically assigns the purchase order number. EXCEPTION If the purchase order: • was generated from Report GPO • was deleted and purged through Report RPP and you must enter the deleted purchase order number in the P.O. # field. Make sure the following fields match the special order: • • the From/To Special Order selection fields the From/To Vendor selection fields 6 At From/To fields, enter the special order numbers, vendor codes, or dates created to limit what special orders are processed. 4 - 46 Order Point Purchasing What To Order 12 1030072 7 At Special Order, you can exclude specific special orders if you enter user-defined codes in the POS Header Screen. The Special Order Codes field on the POS Header Screen allows you to group special orders in whatever categories you want. If you enter Y in one of the code positions, then those special orders coded in that position will not be generated purchase orders. For example: • • In the POS Header Screen, the Special Order Code field is _ _ B_ In Report GPO, the Special Order field is NNYN Purchase orders will not be generated for special order codes with B in the third position. 8 Press <Run> to process special orders and generate purchase orders. Understanding the Generated Purchase Order Report The Generated Purchase Order Report will print. See the next section for more information about this report. The report that prints from running Report GPO is called the Generated Purchase Order Report. You should check it every day to monitor special order activity at your store. Report GPO lists the following information when a purchase order is created: • special order number processed • vendor name • • purchase order number assigned number of details added from the special order Posting Screen If a purchase order has been generated by Report GPO, then you will see this message: SPECIAL ORDER # 999999 VENDOR COT: P.O HAS BEEN GENERATED When you see this message, you can print Report RPP for the special order number to see the generated purchase order. This report is not a purchase order. You would print, FAX, or transmit orders according to your usual procedures. 12 1030072 Order Point Purchasing What To Order 4 - 47 Changing a Purchase Order Function MPO, Screen H Change header information Function MPO, Screen I Once you have created a purchase order, whether manually through Function MPO or automatically through Report RSO, you can change it as necessary. You can add line items to it, delete line items from it, or change order quantities of line items on it. You can add special comments or shipping instructions. The diagram on the left shows that the procedures for changing a purchase order are very similar to those for manually creating the purchase order. The procedure is explained stepby-step below. Change special instructions (optional) Function MPO, Screen D Change line item detail information Changing Header Information 1 At any menu, type MPO and press <Enter>. There are three screens of information for each purchase order in Function MPO. You will use these screens to make any necessary changes. This is the Header screen; it contains information that prints at the head of a purchase order. Multistore users only: Check the Store field. If the purchase order you want to display was created for another store, press <Back Tab> and type that store's number at Store. 12 1030072 Order Point Purchasing Changing a PO 4 - 49 2 At P.O. Number, type the number of the purchase order you want to change, and press <Display>. If you created this purchase order through Report RSO, the purchase order number the Triad system assigned printed at the bottom of the Suggested Order Report. If you created this purchase order manually, you assigned a number, or the Triad system assigned a number. If you printed a copy of the purchase order after you created it, the number printed at the top of the purchase order. To display in turn all the purchase orders in your purchasing file, press <Next Item>. If you want to display in turn all the purchase orders in file for this vendor, type an X in the parentheses in front of Vendor. Then type the vendor code at Vendor, and press <Next Item>. 3 Fill in or type over any fields on this screen you want to change. Then press <Change>. Take a good look at the Total Cost. You can't change the cost by typing over this field—in fact, the cursor won't go to it. You can only change the cost of the purchase order by changing what's on the purchase order. Leave Order Type blank. The Date Due is determined by the usual lead time for this vendor. You could change it, but that does not change the actual due dates for any of the items that are already on this purchase order. It just affects any items you add to the purchase order. If you want this order shipped to an address other than your store address, type it at Special Ship To. The information at Date Due, Terms, Ship Via, FOB Point, Codes, Backorder, and Reference # is all from the MVR record for this vendor. If you want, though, you can change any field that the cursor will move to. You can fill in Total Freight and Other Charges if you want, but you don't have to. 4 If you do not want to add or change any other special instructions or comments on this purchase order, skip to "Changing Line Item Detail," page 4-51. If you do want to add or change other special instructions or comments, continue here with "Changing Special Instructions." 4 - 50 Order Point Purchasing Changing a PO 12 1030072 Changing Special Instructions 1 Press <Home>. At Screen, type I, and press <Enter>. This is the special instructions screen. Any comments you type here will print on the Purchase Order. They cannot be transmitted electronically, though, so if you'll be transmitting this purchase order to your vendor bisynchronously, you could use this space instead for special instructions to the person who will receive the order. 2 Press <Tab>. Type anything you want. Press <Enter> at the end of each line to move to the next line. 3 Press <Change>. Changing Line Item Detail 1 Press <Home>, type D and press <Enter>. 2 Use the table at the right to determine which step to proceed to. This is the Detail screen. It contains the detailed information on each line item on this purchase order. For each line item on the purchase order, there is a complete screen of information. The first line item is displayed. To do this… Go to… Delete a line item Step 7 Continue with procedure, after making all your changes Step 13 Change a line item Add a line item 12 1030072 Step 3 Step 10 Order Point Purchasing Changing a PO 4 - 51 Changing a Line Item (steps 3 - 6) 3 To change a line item on the purchase order: In the parentheses preceding Item Number, type X and press <Enter>. 4 At Item Number, type the SKU number of the item you want to change, and press <Next Item>. If the item you want to change doesn't have an SKU number, but has a Manufacturer's Part Number (or if you typed a customer's name at the Mfg #/Spcl field), press <Clear>, then press <Enter>. In the parentheses before Mfg #/Spcl, type X. Press <Enter>. Type the manufacturer's part number (or the name). Then press <Next Item>. The item displays—but it may be on a different purchase order than the one you want to work on. Check the P.O. Number field at the top of the screen. Is this the correct purchase order? If not, keep pressing <Next Item> until the item displays—on the correct purchase order. If you know what the item's line number is, you could also display the item by typing its line number at Line Number, pressing <Clear Field> and then pressing <Display>. If you created this purchase order manually, the line items are numbered in the order you added them to the purchase order. But if you created this purchase order through Report RSO, the line items are not necessarily numbered in the order they printed on your Suggested Order Report. 5 Fill in or type over any fields on this screen you want to change. Press <Clear Field> if necessary. Then press <Change>. To change the quantity-on-order: 1. 2. 3. 4. 4 - 52 Order Point Purchasing Changing a PO Tab down to one of the QOO fields. (Stk) QOO is the quantity-on-order in stocking units of measure. (Pur) QOO is the quantity-on-order in purchasing units of measure. The actual units of measure display at the far right. Type the new quantity in either of the QOO fields. Press <Clear Field>. Move the cursor to the other QOO field, and press <Clear Field> again. Then press <Change>. 12 1030072 The Unit Cost for this item comes from the IMU record. If you know it is not the correct cost for this vendor, you could change it. Changing the Unit Cost here, though, does not change the cost on file for this item in its IMU record! You could change the due date for this item by typing a new date at Date Due, but there's no need to do this. It affects nothing in your system. 6 Go back to step 2. Deleting a Line Item (steps 7 - 9) 7 In the parentheses preceding Item Number, type X and press <Enter>. 8 At Item Number, type the SKU number of the item you want to cancel, and press <Next Item>. If the item you want to cancel doesn't have an SKU number, but has a Manufacturer's Part Number (or if you typed a customer's name at the Mfg #/Spcl field), press <Clear>, then press <Enter>. In the parentheses before Mfg #/Spcl, type X. Press <Enter>. Type the manufacturer's part number (or the name). Then press <Next Item>. The item displays—but it may be on a different purchase order than the one you want to work on. Check the P.O. Number field at the top of the screen. Is this the correct purchase order? If not, keep pressing <Next Item> until the item displays—on the correct purchase order. If you know what the item's line number is, you could also display the item by typing its line number at Line Number, pressing <Clear Field> and then pressing <Display>. If you created this purchase order manually, the line items are numbered in the order you added them to the purchase order. But if you created this purchase order through Report RSO, the line items are not necessarily numbered in the order they printed on your Suggested Order Report. 12 1030072 Order Point Purchasing Changing a PO 4 - 53 9 Press <Delete> twice. Then go back to step 2. Adding a Line Item (steps 10 - 12) 10 Press <Clear>. At Item Number, type the SKU of the item you want to place on order. 11 Press <Tab>. At (Stk) QOO or at (Pur) QOO, type the quantity of this item you want to order. 4 - 54 Order Point Purchasing Changing a PO If this item is a special order for a particular customer, press <Enter> twice and type the customer's name at Mfg #/Spcl. If this item doesn't have an SKU number, but you do know the number the vendor uses to identify the item, press <Enter> twice and type that number at Mfg #/Spcl. If you don't know any number for it, press <[> and type a good description of it at Description. The more accurate your description, the easier it will be for the vendor to figure out what you want. (This description cannot be transmitted electronically, however.) The units of measure for this item aren't displayed, so you may have to guess the correct quantity. If you really have no idea, just type any number. You can correct it in a moment, after the units of measure display. 12 1030072 12 Press <Add>. Then go back to step 2. Now the item description, unit cost, extended price and units of measure display. If the units of measure are not what you expected, you can • • • type a new number in either of the QOO fields and press <Clear Field> then press <Clear Field> in the other QOO field then press <Change> If the screen says QUANTITY ON ORDER MUST BE A MULTIPLE OF x OR UNIT OF MEASURES THE SAME, it means the order quantity you entered is not a multiple of this vendor's order multiple or standard pack. (This warning appears only if the purchasing unit of measure for this item is different from its stocking unit of measure.) You should: • • type a quantity that is a multiple of the number in the screen message; then press <Add> or, if you want to ignore the vendor's order multiple/standard pack requirements, type over one of the units of measure to make them both the same; then press <Add> For example, suppose the stocking unit of measure is EA and the purchasing unit of measure is BX. Suppose you want to buy 4 each, even though the vendor's order multiple is 8 each, which is a whole box. The screen will say QUANTITY ON ORDER MUST BE A MULTIPLE OF 8 OR UNIT OF MEASURES THE SAME. So you could change (Stk) QOO to 8—but then you would get 8, when you only want 4. Or you could type EA over the BX at (Pur) U/M, and leave your order quantity 4. Then you would get 4 each. 13 When you have made all the necessary changes to this purchase order, you are ready to submit it to your vendor. Please go on to "Submitting the Purchase Order to the Vendor," page 4-58. Multistore users only: If you want to consolidate this purchase order, you should resequence it before you submit it to your vendor, so the Triad system can consolidate order quantities properly. Go now to "Resequencing a Purchase Order," page 4-56. Afterwards, go on to "Submitting the Purchase Order to the Vendor," page 4-58. If you don't want to consolidate this purchase order, you don't have to resequence it. 12 1030072 Order Point Purchasing Changing a PO 4 - 55 Resequencing a Purchase Order You can use this procedure to resequence the line items on any purchase order, either by SKU number or by manufacturer's part number. This procedure actually re-assigns line numbers to the line items on the purchase order. Resequencing is an essential step for multistore users when creating consolidated purchase orders. But anyone could resequence a purchase order any time, just for the sake of convenience when looking up ordered items. 1 At any menu, type POR and press <Enter>. 2 At P.O. Number, type the number of the purchase order you want to resequence, and press <Enter>. 3 Use the table at the right to determine what to enter in the Sequence field. Multistore users only: If this purchase order is to be consolidated, you must first resequence in SKU order. Type S. Option M S 4 - 56 Order Point Purchasing Resequencing a PO Description Resequence in manufacturer part number sequence Resequence in SKU sequence 12 1030072 4 Press <Change>. When the resequencing is complete, the screen tells you so. Multistore users only: If this purchase order is to be consolidated, and you want to consolidate by manufacturer's part number (not SKU number), you must now: • move the cursor back up to Sequence • press <Change> • type M (To make consolidation work properly for items you're ordering by manufacturer's part number, you must first resequence by SKU, and then by manufacturer's part number. Strange but true.) 5 Print a new copy of this purchase order, showing the new line numbers. Please see "Printing a Purchase Order in Report Format," page 4-69, or "Printing a Purchase Order in Purchase Order Format," page 4-70. Multistore users only: If this purchase order is to be consolidated, you might want to print two copies: one showing consolidated order quantities, and one showing each individual store's order quantity. 12 1030072 Order Point Purchasing Resequencing a PO 4 - 57 Submitting the Purchase Order to the Vendor You place your order with some vendors by telephone—you just call them up and tell them what you want. Other vendors send by a sales representative to get your order. In those two cases, you would probably want to print out a copy of the purchase order to work from. The procedure for doing this is under "Printing a Purchase Order," below. And some other vendors may permit you to transmit your purchase order electronically from your Triad system directly to their computer, via telephone lines. This is called "bisynchronous transmission." Bisynchronous transmission just means that information can travel along the telephone line in both directions simultaneously. The "big picture" for doing this is under "Transmitting a Purchase Order Electronically," page 4-61. The detailed procedure is in Talking Computers—A Communications User's Guide. or in the Triad True Value User’s Guide. Printing a Purchase Order Purchase orders print on plain paper. There's no special form to use, and you don't have to reset your printer. You can use this procedure to print a purchase order only before you receive any of the items on the purchase order. Once you have begun receiving against this purchase order, the only way to print it is in a report format (please see "Printing a Purchase Order in Report Format," page 4-69). 1 At any menu, type RPO and press <Enter>. If you want to use a different printer, type its number at Printer. Multistore users only: Check the PO's for Store field. If the purchase order you want to print is not for this store, press <Home> and type the correct store number. If the purchase order is for all stores, press <Clear Field>. Then check Items for Store. If you want to print only the items that are on order for a particular store, type that store's number. If this is a consolidated order, or if you want to print items for all stores, press <Clear Field>. 4 - 58 Order Point Purchasing Submitting a PO to a Vendor 12 1030072 2 At Printing Seq, type the code for the sequence you want to use, and press <Enter>. 3 At Options, type the code for any options you want to use. These options determine what prints on the purchase order. Then press <Enter>. If any of the items on the purchase order have an alternate part number, you should use Option A. This option prints each item's alternate part number, if it has one; otherwise it prints the item's SKU number. (You can't use Option I at the same time.) If you are ordering from a vendor whose SKU numbering scheme you adopted, or if you want your SKU numbers to print for your own reference, use Option I. (You can't use Option A at the same time.) If you are ordering from the manufacturer, you might wish to print the manufacturer's part number—use Option M. (You can't use Option V at the same time.) If you are ordering from a secondary vendor, you might wish to print the vendor's stock number—use Option V. (You can't use Option M at the same time.) If this vendor has a weight minimum, you might wish to print extended weight—use Option W. If this vendor has a dollar minimum, you might wish to print costs—use Option Z. Options J and T are the standard options that simply govern how the page looks. Multistore users only: If this is a consolidated purchase order, use Option C to print the vendor's copy. Then you could repeat this procedure to print a file copy for yourself without Option C (so you can see the quantity-on-order for each store). 4 If you wish to print a copy for yourself as well as for your vendor, type 2 at Copies, and press <Enter>. 12 1030072 Order Point Purchasing Submitting a PO to a Vendor 4 - 59 5 In the From and To fields at the bottom of the screen, type the PO number(s) and/or vendor code(s) you're interested in. Then press <Run>. 4 - 60 Order Point Purchasing Submitting a PO to a Vendor You can give the purchase order to your vendor or mail it. Or you can refer to it when you telephone your vendor. Keep a copy for yourself, too. You'll refer to it when the time comes to receive the merchandise you've ordered. 12 1030072 Transmitting a Purchase Order Electronically Some vendors may permit you to transmit your purchase orders electronically from your Triad system directly to their computer, via telephone lines. This is called "bisynchronous transmission." Bisynchronous (buy-SINK-ronus) transmission means that information can travel along the telephone line in both directions simultaneously. You'll often hear it called "bisync" for short. How does bisynchronous transmission work on your Triad system? The procedures vary a bit from vendor to vendor. You can look up the appropriate procedures for the vendors you buy from in Talking Computers—A Communications User's Guide or in the Triad True Value User’s Guide. The big picture, though, is the same for everyone: Start Function RSO Function MPO Create final PO Triad system prints the Transmission Report Function BTC Select PO for transmission Report RPC Add price changes to the Inventory File (optional) Triad system transmits the PO to your vendor Report RUP Add promotion prices to the Inventory File (optional) Vendor's system transmits price changes and/or promotion prices (optional) 12 1030072 Order Point Purchasing What's On Order? 4 - 61 Finding Out What's On Order You may need to know: • what's currently on order • what's on a particular purchase order • • whether a particular item has been ordered what's on order with a particular vendor This section tells you how to find out. What's Currently On Order? This procedure prints a complete list of everything that's currently on order, or on a future order. Even items with a negative quantity-on-order print on the list. There are a few things this list won't tell you. You won't be able to tell: • what purchase order the items are on • the total dollar amount of the items on order • what vendor they're on order with If you need to know this information, please see instead "Printing a Report Showing What Purchase Order an Item's On," page 4-67. 1 At any menu, type RIS and press <Enter>. If you want to use a different printer, type its number at Printer. Multistore users only: Check the Store field. • • If you want to print the items on order in just one store, press <Home> and type that store's number at Store. If you want to print the items on order in all stores, press <Home> and type C at Store. 2 At Report Type(s), type D and press <Enter>. 12 1030072 Order Point Purchasing What's On Order? 4 - 63 3 At Printing Seq, type the code for the printing sequence you want to use and press <Enter>. 4 Leave Options blank and press <Enter>. You could use the standard options D, J, N or T if you want. These are the options that govern how the report looks. But don't use any of the other options. 5 At Subtotals, indicate whether you want subtotals to print. At Copies, type over the 1 if you want more than one copy. 6 At Flex Rep Name, leave the OO, and press <Enter>. 7 If you want to restrict this report to a range of any of the From and To fields, fill them in. OO stands for On Order. You could restrict the report to items that have a particular vendor code at Prime Vend, for example. The items that print, though, are not necessarily on a purchase order to that vendor. They could be on a purchase order to their secondary vendor or manufacturing vendor. 8 If you want include or exclude any items by User code, Popularity Code, Order Indicator, Promotional or Seasonal Code, fill in the Codes and Exclusion fields at the bottom right corner of the screen. 9 Press <Run>. 4 - 64 Order Point Purchasing What's On Order? 12 1030072 Has This SKU Been Ordered? You can find out whether an item has been ordered by looking on-screen, or by printing a report. When looking on-screen, there are two places you could look: • • in the item's inventory record—using Function IMU. in the Purchasing File—using Function MPO. If you want to know what vendor an item's on order with, or what PO number it's on, look in the Purchasing File, not the item record. Or you can print a report that shows what purchase order(s) the item's on. Looking in Function IMU 1 At any menu, type IMU and press <Enter>. 2 At SKU, type the SKU number of the item you want to look up, and press <Display>. 3 Check the Qty On Order field. If there is a number, that is the quantity-on-order. If there is no number, this item is not currently on order. 12 1030072 Multistore users only: Quantity-on-order is store-specific information. Check the Store field in the Store Specific part of the screen. If you want to check the quantity-on-order in another store, type that store's number at Store, and press <Display>. You might also wish to check the Future Order field. If there is a number there, this item is on a future order. Future orders are not due in immediately. Instead, they are due in some time in the future. How far in the future? That's determined by you when you set up your purchasing system. Please see the tabbed section Introduction, "Setting Up or Changing Your Purchasing System." Order Point Purchasing What's On Order? 4 - 65 Looking in Function MPO 1 At any menu, type MPO and press <Enter>. The header screen for Modify Purchase Order displays. 2 Press <Home>, type D, and press <Display>. 3 Press <Tab> and then <Back Tab>. At the parentheses preceding Item Number, type X. Then press <Enter>. 4 At Item Number, type the SKU number of the item you're interested in. Then press <Next Item>. If some other item displays, it means the item you're looking for is not on order on any purchase order in your purchasing file. If the item displays, it is on order. The purchase order it's on appears at the top of the screen at P.O. Number, and the quantity-on-order displays at the middle of the screen at (Stk) QOO and (Pur) QOO. The item may be on more than one purchase order at a time. Continue pressing <Next Item> to see all the purchase orders this item is on. Multistore users only: If the item is on order in more than one store, it will automatically display for the other stores, too. You do not have to change the Store field at the top of the screen. 4 - 66 Order Point Purchasing What's On Order? 12 1030072 Printing a Report Showing What Purchase Orders an Item's On 1 At any menu, type RPP and press <Enter>. Whenever you use this procedure, all cancelled purchase orders will automatically be printed and purged from your purchasing file. That's nothing to be alarmed about. If you want to use a different printer, type its number at Printer. Multistore users only: Check the PO's for Store field. If you want to see the item on purchase orders for another store, press <Home> and type the correct store number. If you want to see the item on purchase orders for all stores, press <Clear Field>. Then check the Items for Store field. If you want to print only the items that are on order for a particular store, type that store's number. If you want to print items for all stores, press <Clear Field>. 2 At Printing Seq, type 3 and press <Enter>. 3 At Options, type the code for any options you want to use, and press <Enter>. 4 Leave P.O. Status blank, and press <Enter>. 5 Move down to Item Number at the bottom of the screen and type the SKU number of the item you're interested in. Then press <Run>. 12 1030072 Order Point Purchasing What's On Order? 4 - 67 What's On This Purchase Order? You can find out what items are on a purchase order by • • looking up the purchase order on-screen, in Function MPO printing it out on paper If some items on a purchase order have been received, they are no longer on the purchase order. Only the backordered items remain. There are two ways to print a purchase order. If you have not yet received into stock any of the items on the purchase order, you can print it in purchase order format; please see "Printing a Purchase Order in Purchase Order Format," page 4-70 If you have received any of the items, you can only use report format; please see "Printing a Purchase Order in Report Format," page 4-69. Looking up a Purchase Order In Function MPO 1 At any menu, type MPO and press <Enter>. 2 At P.O. Number, type the number of the purchase order you're interested in, and press <Display>. If you're not sure of the number, you can press <Next Item> to display them all in sequence by purchase order number. Or press <Enter> and type an X in the parentheses preceding Vendor. Then press <Next Item> to display them all in sequence by vendor number. When the correct purchase order displays, go on to step 3. Multistore users only: You don't need to change the Store field. 3 Press <Home>, type D and press <Display>. 4 - 68 Order Point Purchasing What's On Order? The detail screen displays, with information about the first line item on this purchase order. 12 1030072 4 Press <Next Item>, and continue pressing <Next Item> to view all the line items on this purchase order. They display in sequence by line number. Printing a Purchase Order in Report Format 1 At any menu, type RPP and press <Enter>. When the screen says NO MORE DETAIL LINES FOR THIS PO, and Line Number says 9999, you have reached the end of the purchase order. You can press <Prev Item> to back up if you want. Whenever you use this procedure, all cancelled purchase orders will automatically be printed and purged from your purchasing file. That's nothing to be alarmed about. If you want, change the number of the printer you want to use at Printer. Multistore users only: Check the PO's for Store field. • • If you want to print purchase orders for all stores, press <Clear Field>. If you want to print purchase orders for a particular store, type its number at PO's for Store. Then check Items for Store: • • If you want to print all the items on a purchase order, regardless of what store they're on order for, press <Clear Field>. If you want to print only those items that are on order for a particular store, type its number at Items for Store. 2 At Printing Seq, leave the 1 and press <Enter>. 3 At Options, type the code for any options you want to use, and press <Enter>. 12 1030072 Order Point Purchasing What's On Order? 4 - 69 4 Leave P.O. Status blank, and press <Enter>. 5 Move down to P.O. Number From and type the number of the purchase order you're interested in. Then press <Enter>. 6 At P. O. Number To, type the same number. Then press <Run>. Printing a Purchase Order in Purchase Order Format You can print a purchase order in purchase order format only if you have not yet received into stock any of the items on it. How can you find out whether you have received any of the items on it? • At any menu, type MPO and press <Enter>. • Look at the P.O. Status field at the upper right of the screen. If it says F or T, you can use this procedure. If any other letter is there, this procedure will not work. Instead, please see "Printing a Purchase Order in Report Format," page 4-69. • 1 At any menu, type RPO and press <Enter>. At P.O. Number, type the number of the purchase order and press <Display>. If you want, change the number of the printer you want to use at Printer. Multistore users only: Check the PO's for Store field. • • 4 - 70 Order Point Purchasing What's On Order? If you want to print purchase orders for all stores, press <Clear Field>. If you want to print purchase orders for a particular store, type its number at PO's for Store. 12 1030072 Then check Items for Store: • • If this is a consolidated purchase order, or if you want to print all the items on a purchase order, regardless of what store they're on order for, press <Clear Field>. If you want to print only those items that are on order for a particular store, type its number at Items for Store. 2 At Printing Seq, type the code for the sequence you want to use, and press <Enter>. 3 At Options, type the code for any options you want to use. Then press <Enter>. If you are ordering from a vendor whose SKU numbering scheme you adopted, or if you want your SKU numbers to print for your own reference, use Option I. If you are ordering from the manufacturer, you might wish to print the manufacturer's part number—use Option M. (You can't use Option V at the same time.) If you are ordering from a secondary vendor, you might wish to print the vendor's stock number—use Option V. (You can't use Option M at the same time.) If any of the items on the purchase order have an alternate part number, you should use Option A. If this vendor has a weight minimum, you might wish to print extended weight—use Option W. If this vendor has a dollar minimum, you might wish to print costs—use Option Z. If you don't want the line number and store number to print on the purchase order, use Option L. Options J and T are the standard options that simply govern how the page looks. Multistore users only: If this purchase order includes items from several stores, and if you want to consolidate (print the items together that are on order in more than one store,) use Option C. Otherwise, all the items and order quantities for the first store will print, then all items and quantities for the next 12 1030072 Order Point Purchasing What's On Order? 4 - 71 store, and so on. You might want to print this purchase order twice: once with Option C (to see consolidated quantities), and once without (to see quantity-on-order at each store). 4 In the From and To fields at the bottom of the screen, type the PO numbers and/or vendor codes you're interested in. Then press <Run>. 4 - 72 Order Point Purchasing What's On Order? If nothing prints except the prepage, it means that you have already received into stock at least one of the items from this purchase order. If you want to print the purchase order, you'll have to print it in report format; please see "Printing a Purchase Order in Report Format," page 4-69. 12 1030072 What's On Order With This Vendor? You can find out what any given vendor owes you by looking it up on-screen, or by printing out a report. Looking it up in Function MPO 1 At any menu, type MPO and press <Enter>. 2 Press <Enter>. At the parentheses preceding Vendor, type X. Press <Enter>. 3 At Vendor, type this vendor's code. Then press <Next Item>. 4 Press <Home>, type D and press <Display>. 5 To see other line items on this purchase order for this vendor, continue pressing <Next Item>. The first line item on the first purchase order for this vendor displays. The line items display in sequence by line item number. When the screen says NO MORE DETAIL LINES FOR THIS P.O., you have seen all the items on this purchase order. However, there may be other items on order on other purchase orders to this vendor. If you want to go on to the next purchase order for this vendor, press <Home>, type H and press <Display>. Then press <Next Item>. The next purchase order for this vendor 12 1030072 Order Point Purchasing What's On Order? 4 - 73 displays. To see the line items on this purchase order, repeat steps 4 and 5 as desired. Printing it out Using Report RPP 1 At any menu, type RPP and press <Enter>. Whenever you use this procedure, all cancelled purchase orders will automatically be printed and purged from your purchasing file. That's nothing to be alarmed about. If you want, change the number of the printer you want to use at Printer. Multistore users only: Check the PO's for Store field. • • If you want to print purchase orders for all stores, press <Clear Field>. If you want to print purchase orders for a particular store, type its number at PO's for Store. Then check the Items for Store field. • • 2 At Printing Seq, type 2 or 3 and press <Enter>. Option 2 3 If you want to print all the items on a purchase order, regardless of what store they're on order for, press <Clear Field>. If you want to print only those items that are on order for a particular store, type its number at Items for Store. Description By vendor (in order by PO number) By item number (in order by due date) 3 At Options, type the code for any options you want to use, and press <Enter>. 4 Leave P.O. Status blank, and press <Enter>. 4 - 74 Order Point Purchasing What's On Order? 12 1030072 5 Move down to Vendor From and To, and type the codes for the range of vendors you're interested in. Then press <Run>. 12 1030072 If you want to print items on order with only one vendor, type that vendor's code at both From and To. Order Point Purchasing What's On Order? 4 - 75 Receiving Receiving Merchandise into Stock Electronic Receipt Posting Receiving merchandise into stock is a very important procedure. The accuracy of your receiving affects your inventory records, your costs and prices, and your vendor records. Follow the procedure below very carefully. Be sure you understand what you are doing, and why. If you have questions, check with your Triad representative. Certain vendors may be able to electroncially send invoice information to your Triad system over the telephone lines. The Triad system uses the information to reconcile the invoice to the purchase order. This replaces receipt posting (using Function RP) in the following procedure. The greatest benefit of using electronic receipt posting is time savings; you don’t have to spend time manually posting the items you receive against the purchase order. Before using electronic receipt posting you should thoroughly understand the “manual” procedure explained below so that you can understand which portions of the procedure the Triad system is doing electronically for you. For complete procedures for using electronic receipt posting see Talking Computers—A Communications User’s Guide or Triad True Value User’s Guide. 1 When merchandise arrives from a vendor, compare the vendor's packing list to what actually arrived. 2 Get a copy of the purchase order on which this merchandise was ordered. 12 1030072 Verify that you received a full count of everything the vendor will invoice you for, and that everything arrived in good condition. If there are discrepancies (for example, you received a short shipment, or some merchandise is damaged), resolve the matter with the vendor or carrier. You must receive merchandise against a particular purchase order. If you don't have a copy of the purchase order, you can print one. Please see "Printing a Purchase Order," page 4-58. Order Point Purchasing Receiving 4 - 77 If no purchase order was ever created for this merchandise, you should first get authorization to receive this merchandise. Then you need to create a purchase order to receive this merchandise against. Please see "Receiving Merchandise for Which There is No Purchase Order," page 4-87. 3 Compare the purchase order to what actually arrived. On the purchase order, write down any differences. Mark items that arrived (or, if almost everything arrived, mark the items that did not arrive—whichever is easier.) Write down items that arrived but were not ordered. Mark any changes of cost or price. Write down any differences in quantity. It's important to make a complete comparison, and to note the differences accurately. Contractor Package Users: If there are any Tally 2 items in this shipment, make a note of the quantities received of the various lengths. You ordered under the header SKU because you didn't know what lengths and quantities would be shipped to you. But now you know what you've got, so you'll receive against the appropriate component SKUs. For example, you may have ordered 10000 bf of Douglas Fir 2x4s, using the tally header SKU. When the shipment arrives, you find you've received 4000 bf of 2x4x8s, 4000 bf of 2x4x10s, and so on. Write down the quantities received of each component SKU. 4 At any menu, type RP and press <Enter>. 5 At P.O. Number, type the number of the purchase order on which these items were ordered. Then press <Display>. This is the Receipt Posting screen. The two highlighted lines are headings for the blank lines below. Multistore users only: Check the Store field. The number displayed is the number of the store for which this purchase order was created. The purchase order could include items for other stores, though. The items for the various stores may be consolidated as a single line item, with a single total order quantity (the Triad system knows how many of the total order quantity are for each store). Or there may be a separate line item for each store. You can receive for just one store at a time, or you can receive for all stores at once. To receive for just one store at a time, press <Home> and type the number of the store you are receiving for. 4 - 78 Order Point Purchasing Receiving 12 1030072 To receive for all stores at once, press <Home> and press <Clear Field>. When the Store field is blank, you are receiving for all stores. Make a mental note of whether you're receiving for one store or for all stores—you'll need to know again later, when you finalize the receipt of this merchandise. 6 Use the table at the right to determine how to fill in the How Received field. Then press <Save/Order>. Option A E Use this option if… Most of the items on the PO arrived exactly as ordered. Most of the items on the PO did not arrive exactly as ordered. Notice that P.O. Status changes to R, to indicate that receipt is under way. The Triad system already knows exactly what's on order, in what quantities, and the cost and price for each item. When you receive, you have to advise the Triad system of any changes to what it already knows. You marked those changes on your copy of the purchase order in step 3, above. Now you have to decide on the most efficient way to advise the Triad system of these changes. A or E? How to Receive If most of the items on the purchase order arrived, in the correct quantity and at the correct cost, it would be quickest to post just the few exceptions. So you would type A here, and list on the lines below just the items that did not arrive exactly as ordered. The Triad system will take note of the exceptions you post, and will assume that everything else on the order was received exactly as ordered. On the other hand, if most of the items on the purchase order did not arrive, it would be quickest to post just the few that did arrive. So you would type E here, and list on the lines below just the items that did arrive. The Triad system will receive the exceptions you post, and will assume that everything else on the order was not received at all. If the numbers are about even, or if you're not sure, type A. You will post the items that did not arrive exactly as ordered. 12 1030072 Order Point Purchasing Receiving 4 - 79 If you realize later on in this procedure that the other way of receiving will be simpler for the merchandise you have yet to receive, you can change How Received. Changing the How Received field doesn't affect the lines you have already posted, but only the lines you post subsequently. You should understand that the How Received field never affects the items you display and post on this screen--the items you display and post are always received exactly as you post them. The How Received field tells the Triad system what to assume about all the line items you don't display: If A, the Triad system assumes you received them just as ordered. If E, the Triad system assumes you did not receive them at all. Multistore users only: If you are receiving for one store at a time, you can set the How Received field differently for each store, if you want. 7 Check the Backorder field. If this vendor is backordering any items not shipped, Backorder should say Y. If the vendor is cancelling any items not shipped, Backorder should say N. 8 Use the table at the right to determine which step to continue with. 4 - 80 Order Point Purchasing Receiving If Backorder says N, the Triad system will simply cancel any items you don't receive on this purchase order. If Backorder says Y, this purchase order will be kept in your purchasing file, and you will be able to receive against it again later. What if the Backorder field is wrong? You can't change it on this screen. If you need to change it, display the Header screen for this purchase order in Function MPO. Type Y or N in the Backorder field on the MPO screen. Press <Change>. Then come back to this point in this procedure. If How Received is … A E Continue with Using Receiving Method A Using Receiving Method E 12 1030072 Using Receiving Method A 1 For any item that did not arrive at the price or in the quantity ordered, type its SKU under Item Number. Repeat for the first five items that did not arrive exactly as ordered. Then press <Display>. 2 For each item, type the quantity you are receiving under Recv. The first five line items that did not arrive exactly as ordered display. You can enter up to two decimal places. The Triad system will assume you received zero quantity unless you type another quantity under Recv. If you are rejecting any of this item (if some arrived damaged, for example, and you will ship them back to the vendor), type the quantity you are receiving and keeping under Recv. Then press <Enter> and type the quantity you are rejecting under Reject. If you want, you can use the one-digit blank field to the right of Reject to type a code indicating why you're rejecting the merchandise. It's up to you to devise the code and track what it means. The code has no effect on the receiving process. Contractor package users: If any of the items on the screen are Tally 2 headers, you must reject the header quantity. Later you will add instead the SKUs that denote the various component lengths. For the header SKU, type the entire order quantity under Reject. When you get to "Receiving Tally 2 Items," you will receive the component SKUs instead. 3 For each item, if the vendor is charging you a different cost than the cost displayed, type the cost the vendor is charging you under Cost-Stk or Cost-Pur. 12 1030072 If you want the Triad system to recalculate the retail price for this item according to the new cost and your desired gross profit percent, move the cursor under Retail and press <Clear Field>. Zeroes appear there now, but when you post this line in a few moments, a new retail price will be calculated. Order Point Purchasing Receiving 4 - 81 4 When the correct quantity and cost information is displayed for each item on this screen, press <Save/Order>. 5 Press <Clear>. Return to step 1 and repeat, until you have posted all price changes and items that did not arrive exactly as ordered. The screen tells you how many detail lines have been posted. If you notice a mistake after you have pressed <Save/Order>, just type over the mistake. When everything is correct, press <Save/Order> again. If you post any line items more than once, the Triad system remembers only the most recent posting. You can make corrections as many times as necessary. For every item that you display on this screen, you must enter the actual quantity you are receiving. If you display an item on this screen and do not enter a received quantity, the Triad system will read the blank under Recv as zero, and will assume you are receiving zero. For every item on this purchase order that you don't display on this screen, the Triad system will assume you have received full count, at the cost on file in the inventory record. 6 When you have posted all such exceptions, use the table below to determine which procedure to do next. Was everything you're receiving on the PO? Yes Do you use landed cost?* Yes No No * 4 - 82 —— Then continue with this procedure Distributing Freight and Other Charges, page 4-85 Printing and Checking the Receiving Report, page 4-91 Receiving Tally 2 Items or Items Not On the PO, page 4-84 Use Landed Cost in Receiving in Function MPC is answered Y. Order Point Purchasing Receiving 12 1030072 Using Receiving Method E 1 For any item that did arrive, type its SKU under Item Number. Repeat for the first five items that arrived. Then press <Display>. 2 For each item, type the quantity you are receiving under Recv. The first five line items that arrived display. You can enter up to two decimal places. The Triad system will assume you received zero quantity unless you type another quantity under Recv. If you are rejecting any of this item (if some arrived damaged, for example, and you will ship them back to the vendor), type the quantity you are receiving and keeping under Recv. Then press <Enter> and type the quantity you are rejecting under Reject. If you want, you can use the one-digit blank field to the right of Reject to type a code indicating why you're rejecting the merchandise. It's up to you to devise the code and track what it means. The code has no effect on the receiving process. Contractor package users: If any of the items on the screen are Tally 2 headers, you must reject the header quantity. Later you will add instead the SKUs that denote the various component lengths. For the header SKU, type the entire order quantity under Reject. When you get to "Receiving Tally 2 Items," you will receive the component SKUs instead. 3 If the vendor is charging you a different cost than the cost displayed, type the cost the vendor is charging you under Cost-Stk or Cost-Pur. 12 1030072 If you want the Triad system to recalculate the retail price for this item according to the new cost and your desired gross profit percent, move the cursor under Retail and press <Clear Field>. Zeroes appear there now, but when you post this line in a few moments, a new retail price will be calculated. Order Point Purchasing Receiving 4 - 83 4 When the correct quantity and cost information is displayed for each item on this screen, press <Save/Order>. 5 Press <Clear>. Return to step 1 and repeat, until you have posted every item you are receiving. Then use the table below to determine which procedure to do next. The screen tells you how many detail lines have been posted. If you notice a mistake after you have pressed <Save/Order>, just type over the mistake. When everything is correct, press <Save/Order> again. If you post any line items more than once, the Triad system remembers only the most recent posting. You can make corrections as many times as necessary. For every item that you display on this screen, you must enter the actual quantity you are receiving. If you display an item on this screen and do not enter a received quantity, the Triad system will read the blank under Recv as zero, and will assume you are receiving zero. For every item that you don't display on this screen, the Triad system will assume you are receiving zero. Was everything you're receiving on the PO? Yes Do you use landed cost?* Yes No No * 4 - 84 —— Then continue with this procedure Distributing Freight and Other Charges, page 4-85 Printing and Checking the Receiving Report, page 4-91 Receiving Tally 2 Items or Items Not On the PO, page 4-84 Use Landed Cost in Receiving in Function MPC is answered Y. Order Point Purchasing Receiving 12 1030072 
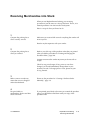
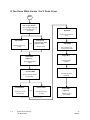
Receiving Tally 2 Items or Items Not On the PO 1 Press <Clear>. A vendor may occasionally ship substitute items. Those must be received properly and added to the inventory, too. Contractor Package Users: If this shipment includes any Tally 2 component items, you must add them to the purchase order using this procedure. In a previous step, you made a note of the quantities you received of each component length. In another step, you also rejected the Tally 2 header SKUs that were on the original order. Now you are ready to add the component SKUs to this order, and receive the correct quantity of each one. For example, suppose you ordered 10000 bf of Douglas Fir 2x4s, using the tally header SKU. When the shipment arrived you find you've received 4000 bf of 2x4x8s, 4000 bf of 2x4x10s, and so on. You rejected the tally header SKU. Now you're ready to receive the component SKUs. 2 Under Item Number, type the item's SKU number. If the item does not have an SKU number, you can identify it temporarily by typing a description under Description. If you identify it only by description, you should add it as a new item to your inventory record. Please see the Inventory Loading manual. Contractor Package Users: Type the SKU number of the first tally component SKU you are receiving—the SKU for the Douglas Fir 2x4x8s, for example. 3 Under Recv, type the quantity you are receiving. 12 1030072 You can enter up to two decimal places. Order Point Purchasing Receiving 4 - 85 4 If this item has a new cost, or if the item is not already in your inventory file, type its cost under Cost-Stk. 5 Repeat steps 2 through 4 for up to five items. 6 Press <Add>. Then press <Clear>. Repeat steps 1 through 5 until you have added all items you are receiving that were not on the purchase order. 7 Use the table at the right to determine which procedure to do next. The quantity-on-order in the inventory file is not affected for these items, but later, when you finalize receipt of this merchandise, the quantity-on-hand will be updated accordingly. Do you use landed cost?* Yes No * Then continue with this procedure Distributing Freight or Other Charges, page 4-85 Printing and Checking the Receiving Report, page 4-91 Use Landed Cost in Receiving in Function MCT is answered Y. Distributing Freight or Other Charges 1 Press <End>. At the menu, type MPO and press <Enter>. 2 At P.O. Number, type the number of the purchase order you are receiving against, and press <Display>. 4 - 86 Order Point Purchasing Receiving 12 1030072 3 At Total Freight or Other Charges, type the amounts that should be distributed across the items you have received. Then press <Change>. 4 Go on to "Printing and Checking the Receiving Report," page 4-91. 12 1030072 Order Point Purchasing Receiving 4 - 87 Receiving Merchandise for Which There is No Purchase Order Occasionally someone may order merchandise verbally from a vendor, and forget to create a purchase order in the Triad system. You should make sure this doesn't happen often, because if the Triad system doesn't know someone has ordered an item, it may well suggest purchasing additional quantities, and you will be overstocked. (If a vendor just shipped some additional items besides what you ordered on a purchase order, please see instead "Receiving Merchandise Into Stock," page 4-77.) If someone does forget to create a purchase order, though, here's how to receive such merchandise. Creating the Purchase Order 1 Compare the packing list to what actually arrived. 2 At any menu, type MPO and press <Enter>. Verify that you received a full count of everything the vendor will invoice you for, and that everything arrived in good condition. If there are discrepancies (you received a short shipment, or some merchandise is damaged), resolve the matter with the vendor or carrier. If your system does not assign purchase order numbers, type a number at P.O. Number. Multistore users only: Check the Store field. If that's not the store you want to create this purchase order for: • press <Back Tab> • press <Enter> • type the correct store number The header must be for a particular store, not for all stores. You can receive line items for any store on this purchase order, however, regardless of which store number is on the header. 4 - 88 Order Point Purchasing Receiving 12 1030072 3 At Vendor, type the code for the vendor who shipped you this merchandise, and press <Tab>. 4 If you use landed cost in receiving, type the amounts to be prorated at Freight or Other Charges. 5 At Buyers Initials, type your initials, or the initials of the person who ordered this merchandise. Then press <Add>. If you want, type a note at Special Ship To to indicate that this purchase order was created after you received the merchandise. Leave Order Type blank. If Use Landed Cost in Receiving in Function MCT is answered Y, the Triad system automatically prorates the cost of freight and other charges across all the items on the purchase order. The Triad system can do the calculation automatically, but you must enter the cost of freight and other charges. If you did not enter a purchase order number, the Triad system assigns a number now. The purchase order header is created. Now you may receive against this purchase order, even though it has no detail lines. Receiving the Merchandise 1 Press <End>. At the menu, type RP and press <Enter>. 2 At P.O. Number, type the number of the purchase order you just created, and press <Display>. This is the Receipt Posting screen. The two highlighted lines are headings for the blank lines below. Multistore users only: Check the Store field. The number displayed is the number of the store for which you created this purchase order header. You can receive items for other stores, too, if you want, but only for one store at a time. If you want to receive for a different store than the one displayed, press <Home> and type the number of the store you are receiving for. Don't press <Clear Field>. Since there are no detail lines on this purchase order, the Triad system wouldn't know how to distribute the items you are receiving if the Store field were blank. 12 1030072 Order Point Purchasing Receiving 4 - 89 3 At How Received, type E. Press <Save>. The screen tells you the purchase order has been posted. Notice that the F at P.O. Status changed to R, to indicate that receipt is in progress. 4 Press <Tab>. 5 Under Item Number, type the item's SKU number. 6 Under Recv, type the quantity you are receiving. If the item does not have an SKU number, you can identify it temporarily by typing a description under Description. If you identify it only by description, you should add it as a new item to your inventory record. Please see the Inventory Item Information Manual. You can enter up to two decimal places. 7 If this item has a new cost, or if the item is not already in your inventory file, type its cost under Cost-Stk. 8 Repeat steps 5 through 7 for up to five items. 9 Press <Add>. Then press <Clear>. Repeat steps 5 through 9 until you have added all items you are receiving. If you notice a mistake before you press <Add>, just type over the mistake. When everything on the screen is correct, press <Add>. If you notice a mistake after you press <Add>, type over the mistake. When everything on the screen is correct, press <Save/Order>. If you post any line items more than once, the Triad system remembers only the most recent posting. You can 4 - 90 Order Point Purchasing Receiving 12 1030072 make corrections using the <Save/Order> key as many times as necessary. 10 Go on to "Printing and Checking the Receiving Report," page 4-91. 12 1030072 Order Point Purchasing Receiving 4 - 91 Printing and Checking the Receiving Report After you use Function RP (Receipt Posting) to indicate what you are receiving into stock, print a receiving report to check your entries. This procedure also explains how to check the receiving report and correct any mistakes you might have made. Printing the Report 1 At any menu, type RRP and press <Enter>. If you want to use another printer, type its number at Printer. Multistore users only: Check PO's for Store . • • • If the purchase order you received against was created for a particular store, press <Home> and type the number of that store. If you don't know which store the purchase order was created for press <Clear Field> at PO's for Store. If the purchase order was consolidated, press <Clear Field> at PO's for Store. Then check Items for Store. • • If you received items for just one store, type its number at Items for Store. If you received items for all stores, press <Clear Field> at Items for Store. 2 At Printing Seq, type the number for the printing sequence you want to use. Press <Enter>. 3 At Print Options, type the codes for any options you want to use. Then press <Enter>. 4 - 92 Order Point Purchasing Receiving See the Reports Manual for information about specific options. 12 1030072 4 Leave Updt Options blank. Don't use Option F. Then press <Enter>. 5 Use the table at the right to determine how to fill in the Updt Prices field. Then press <Enter>. Don't use Option F yet. You need to check the receipts you posted before you finalize them. Enter this at Updt Prices CGMR blank D If you … Changed any costs or prices on the items you received Did not change any costs or prices on the items you received Do not want to update replacement cost with landed cost P Notes: Want to update the retail price on the PO based on the landed cost Comments See Note 1 See Note 2 See Note 3 1. If you don't use the price matrix (that is, if you don't have Advanced Inventory), don't use option M. If you use your own variable pricing scheme, don’t use option G. It will change your desired gross profit percent. 2. The Use Landed Cost in Receiving field in Function MPC must be Y for this option to work. 3. To use this option, both of the following must be true. • The Use Landed Cost in Receiving field in Function MPC is Y. • The Updt Options field in Report RRP cannot include D. The costs and prices in your Inventory File will not actually change, because you're not running this report with Option F. But you will get a complete list of any changes that will be made later when you finalize receipts by running this report again with Option F. 6 At Subtotals, indicate whether you want subtotals to print. 12 1030072 Order Point Purchasing Receiving 4 - 93 7 At Copies, type over the 1 if you want more than one copy. 7 At P.O. Number From and To, type the number of the purchase order you're receiving against and press <Enter>. 8 Press <Run>. Checking the Report 1 Check the report. Mark any mistakes. Notice that the abbreviations used on the receiving report are defined for you at the bottom of the pre-page. Pay particular attention to the figure under B-REC (being received). It's on the second line. This is the quantity you have posted for receipt now. (The figure above it, T-REC, or total received, may be different. It is the total quantity received on this purchase order, if you've received against this purchase order before.) For now, the B-REC figure is what you should check. If your costs or prices changed, the old figures are on the top line for each item, and the new figures are on the bottom line. If you use landed cost in receiving, the new figures reflect your landed cost. Check the total cost or total items received against the vendor's packing list. If they match, you can be pretty sure you posted everything correctly. If they don't match, check the individual line items to find the discrepancy. 4 - 94 Order Point Purchasing Receiving 12 1030072 2 Use the table at the right to determine which procedure to do next. Did you find any mistakes on the Receiving Report? Yes No Continue with this procedure Correcting Receiving Mistakes, page 4-94 Finalizing Receipt of Your Merchandise, page 4-95 Correcting Receiving Mistakes 1 At any menu, type RP and press <Enter>. 2 At P.O. Number, type the number of this purchase order and press <Display>. 3 Under Item Number, type the SKU number of the first item you want to change, and press <Display>. 4 Type over any field(s) you want to change. Press <Clear Field> if necessary. When everything is correct, press <Save/Order>. It doesn't matter whether there's an A or an E at How Received. You don't need to change it. If this is an item without an SKU number, type its manufacturer's part number under Mfg #/Specl, or its line number under Line, and press <Display>. The screen says it has posted one detail line. You can make corrections as many times as you need to, using the <Save/Order> key. The latest correction for a line item always supersedes any previous corrections. 5 Press <Clear>, and repeat steps 3 - 5 for each line item you need to change. 12 1030072 Order Point Purchasing Receiving 4 - 95 6 When you have corrected all the line items, press <End> and return to "Printing the Report." Repeat this entire procedure for printing, checking and correcting what you have received. 4 - 96 Order Point Purchasing Receiving You can continue making corrections to the receipts you have posted until you finalize your receipts (next step). It is very important to post all quantities, costs and prices perfectly accurately, because they will be posted to your inventory file when you do the procedure for "Finalizing Receipt of your Merchandise," page 4-95. 12 1030072 Finalizing Receipt of Your Merchandise Once you post the merchandise you received (using Function RP) and check for accuracy (using Report RRP), you're ready to finalize the receipt of the items you posted. This is the last step in the receiving process. When you finalize, you're updating your inventory records. You'll use Report RRP, Option F, to finalize. As you run Report RRP, Option F, the system updates the Quantity on Hand , Quantity-on-Order and Average Cost figures in Function IMU for each item you're receiving. If you changed retail or other costs, you'll use options to update them as well. The system also updates the Received, Fill Pct and Last Rec fields on the History screen of the vendor's record (Function MVR). 1 If you want to print price labels for the merchandise you've received, do so now. 2 At any menu, type RRP and press <Enter>. To print price labels, please see Appendix A: Printing Price Labels, or Appendix B: Printing Bin/Shelf Labels. You can print price labels only before you finalize your receipts. If you need to print price labels for the items you just received, do so before you go on to the next step. If you want to use another printer, type its number at Printer. Multistore users only: Fill in the PO's for Store and Items for Store fields exactly as you did when you ran the receiving report in "Printing and Checking the Receiving Report," page 4-91. Here's what we told you then: Check PO's for Store . • • • 12 1030072 If the purchase order you received against was created for a particular store, press <Home> and type the number of that store. If you don't know which store the purchase order was created for press <Clear Field> at PO's for Store. If the purchase order was consolidated, press <Clear Field> at PO's for Store. Order Point Purchasing Receiving 4 - 97 Then check Items for Store. • • If you received items for just one store, type its number at Items for Store. If you received items for all stores, press <Clear Field> at Items for Store. 3 At Printing Seq, type the number for the printing sequence you want to use. Press <Enter>. 4 At Print Options, type any options you want. Then press <Enter>. See the Reports Manual for information about specific print options. 5 At Updt Options, type F. Then press <Enter>. 6 Use the table at the right to determine how to fill in the Updt Prices field. Then press <Enter>. See the Reports Manual for information about specific update options. Enter this at Updt Prices CGMR blank D P Notes: If you … Changed any costs or prices on the items you received Did not change any costs or prices on the items you received Do not want to update replacement cost with landed cost Want to update the retail price on the PO based on the landed cost Comments See Note 1 See Note 2 See Note 3 1. If you don't use the price matrix (that is, if you don't have Advanced Inventory), don't use option M. 4 - 98 Order Point Purchasing Receiving 12 1030072 If you use your own variable pricing scheme, don’t use option G. It will change your desired gross profit percent. 2. The Use Landed Cost in Receiving field in Function MPC must be Y for this option to work. 3. To use this option, both of the following must be true. • The Use Landed Cost in Receiving field in Function MPC is Y. • The Updt Options field in Report RRP cannot include D. This time, the system will change the costs and prices in your Inventory File. 7 At Subtotals, indicate whether you want subtotals to print. At Copies, type over the 1 if you want more than one copy. 8 At P.O. Number From, type the number of the purchase order you're receiving against. Press <Enter> and type the same number at P.O. Number To. 9 Press <Run>. The receiving report prints. At the same time, the system fianlizes the quantity-on-hand and quantity-on-order figures for the items you received. If you changed any costs or prices, it updates the costs and prices for those items. This is the end of the receiving cycle. If Backorder is N for this purchase order, it is now automatically purged from your Purchasing File, along with any items on it that your vendor did not ship (and did not backorder). If Backorder is Y for this purchase order, it is still stored in your Purchasing File, and you can receive against it again when the backordered merchandise arrives from your vendor. If you want to print a list of what's still backordered on this purchase order, please see "What's On This Purchase Order," page 4-68. 12 1030072 Order Point Purchasing Receiving 4 - 99 Cancelling and Purging a Purchase Order Ordinarily, purchase orders don't need to be cancelled or purged. In most cases, your vendor ships you at least some of the merchandise you ordered. • • If the vendor shipped everything on your purchase order, the purchase order is automatically purged from your purchasing file as soon as you have finalized receipt of the merchandise. If the vendor shipped only part of your order, the Triad system checks the Backorder field (in Function MPO) to see whether the remaining items are backordered. If Backorder is N, the purchase order is automatically purged as soon as you have finalized receipt of the merchandise that did arrive. But if Backorder is Y, the Triad system keeps the purchase order on file until you have received all the backordered merchandise—or until you cancel the purchase order, using this procedure. Of course, there are a number of other reasons you might wish to cancel a purchase order: • you found a better source for some items, or • it's smarter financially for you to wait a few days before ordering, or • • the vendor can't ship soon enough, or you made a mistake and want to start over again. This procedure tells you how to cancel and purge an entire purchase order. If you need to cancel just some of the line items on a purchase order, please see instead "Changing a Purchase Order," page 4-49. 1 At any menu, type MPO and press <Enter>. 4 - 100 Order Point Purchasing Cancelling/Purging a Purchase Order 12 1030072 2 At P.O. Number, type the number of the purchase order you want to cancel. Then press <Display>. 3 Press <Delete> twice. The Header information for this purchase order displays. Check the P.O. Status field. If it says T, F or P, you can delete this purchase order. If it says R, though, this purchase order has a status of "receipt in progress." That means some items on this purchase order have been posted as received, but you have not yet finalized receipt of the merchandise. Please see "Finalizing Receipt of Your Merchandise," page 4-95. Afterwards you can come back to this procedure and cancel the purchase order and the items that remain unreceived on it. The screen tells you the purchase order has been cancelled. If it was previously status F or P, P.O. Status changes to X, which means cancelled. It's still in the purchasing file, though, and you can still display it. It remains in the purchasing file until the next time you print Report RPP (no matter what ranges or options you use). If you do not use Report RPP frequently (say, at least weekly) in the regular course of your receiving operations, you should go on to step 4 now. The Quantity on Order field for each item on this purchase order has now been updated to reflect the fact that this order has been cancelled. 4 If you don't expect to print Report RPP before the next time you order, press <End>. At the menu, type RPP and press <Enter>. 5 At P.O. Status, type X. Then press <Run>. No matter what Options or P.O. Status you use, Report RPP automatically prints and purges all purchase orders that were cancelled since the last time you ran Report RPP. Status X saves paper by printing only the purchase orders you have cancelled. You don't need to keep this report. Check it to make sure you cancelled only what you intended to cancel. Then you can throw it away. 12 1030072 Order Point Purchasing 4 - 101 Cancelling/Purging a Purchase Order Vendors Primary Vendors, Secondary Vendors, Manufacturing Vendors 5-1 Designating Vendor Type 5-1 Adding a New Vendor 5-2 Printing a List of Your Vendors 5-5 Checking on Your Vendors' Performance 5-6 Method A Method B Deleting a Vendor 5-6 5-7 5-9 SKU Numbers, Alternate Part Numbers, Manufacturer's Part Numbers, Vendor Stock Numbers 5 - 1 0 Entering an Alternate Part Number Deleting an Alternate Part Number Printing Your Alternate Part Numbers or Manufacturer's Part Numbers 5-11 5-12 5-13 i Vendors Primary Vendors, Secondary Vendors, Manufacturing Vendors You may buy some items from any of several sources. • • • Your usual source for an item is the Primary Vendor for that item. You may also have a backup source, called the Secondary Vendor for that item. If you also buy direct from the manufacturer, the manufacturer is called the Manufacturing Vendor for that item. Any given vendor could be your Primary Vendor on some items and at the same time, the Secondary Vendor or Manufacturing vendor on other items—or vice versa. Designating Vendor Type You can designate the primary, secondary and manufacturing vendors for each item on the Stocking (S) Screen of Function IMU. Before a vendor can be used in Function IMU it must be setup in the system, using Function MVR. See "Adding a New Vendor" for the procedure to use to add a vendor. 7.2/1089/H5277 Vendors Primary, Secondary, Manufacturing 5-1 Adding a New Vendor 1 At any menu, type MVR and press <Enter>. Many of the fields on this screen are optional, or have to do with Accounts Payable rather than purchasing. This procedure just tells you how to set up vendors so you can place purchase orders with them. If you are interested in setting up a vendor record for Accounts Payable purposes, please see the Accounts Payable manual. Multistore users only: Check the Store field. If you want to add this vendor in a different store, type its number at Store. If you want to add this vendor in all stores, press <Clear Field> at Store. 2 At Vendor Code, type a name or number you will use to identify this vendor. You can use letters or numbers, or a combination. There's room for up to five characters, but it will save keystrokes if you keep vendor codes down to three or four digits. If you don't have too many vendors, it's probably simplest to use letter codes to identify them. For example, Black & Decker may be coded as BD. The Triad system won't let you assign the same code to more than one vendor. 3 Type the vendor's Name, Address, City, State, Zip Code, and Phone number in the appropriate fields. Press <Enter> to move between fields. 4 At Assigned Customer #, type the number this vendor uses to identify you. 5-2 Vendors Adding a Vendor This information will print on the purchase orders you create for this vendor (as well as on checks issued by the Triad system Accounts Payable program). If you don't know, or if this vendor hasn't assigned you a number, you can leave this blank. If you do fill in a number here, it will print on the purchase orders you create for this vendor. 7.2/1089/H5277 5 At Lead Time, type the number of days it takes for this vendor's shipments to reach you. 6 At Backorder, leave the N if this vendor does not backorder merchandise they don't have on hand. Type Y if they do backorder merchandise and ship it when it becomes available. 7 At Ship Via, type the shipping instructions you want to print on purchase orders to this vendor. 8 At Terms, type a brief description of your payment arrangements with this vendor. This is important because it will determine the due dates for any purchase orders you create for this vendor. This is important because it determines whether you will be able to receive merchandise against a particular purchase order more than once. If the vendor does not backorder, the Triad system will automatically cancel a purchase order as soon as you have received any items the vendor did ship. If the vendor does backorder, though, the Triad system will continue to store the purchase order with the unshipped items until the vendor does ship you the backordered merchandise. You can change these shipping instructions for any purchase order, as needed. The terms you type here will appear on purchase orders you create for this vendor. You can change them for any purchase order, as needed. You could leave Terms blank, but then you'll have to enter terms separately each time you create a purchase order for this vendor. 9 If a certain minimum dollar amount, weight, purchase order line amount, or number of units qualifies you for some concession on the vendor's part, type the amount in the appropriate Minimum field, and the concession in the field just to its right. 7.2/1089/H5277 For example, if this vendor pays freight on any order exceeding $400, you would type 400 at Minimum Dollars, and FF for free freight in the blanks to the right. It's up to you to remember what FF means. You can use any kind of code you like. Then if you create a purchase order that doesn't meet one of these minimums, the Triad system will let you know. Vendors Adding a Vendor 5-3 10 Press <Add>. 5-4 Vendors Adding a Vendor The screen tells you the record has been added. Now you can create purchase orders for this vendor. 7.2/1089/H5277 Printing a List of Your Vendors This procedure prints a list of all the information that's been entered on the first screen of each vendor 's record (Function MVR). It also prints each vendor's "fill percent." That's the percentage you've received of the units you've ordered from this vendor to date. Incidentally, the fill percent for any vendor who supplies you Tally 2 items will not be accurate. That's because you order Tally 2 items by the header, and receive them by the component. Consequently, it looks as though the vendors who ship you Tally 2 items aren't shipping what you ordered— although that's not the case. If you want to see in more detail how well a vendor is performing for you, please see "Checking on Your Vendors' Performance," page 5-6. 1 At any menu, type RVE and press <Enter>. 2 Use the table at the right to determine how to fill in the Options field. If you want to use a different printer, type its number at Printer. Multistore users only: Check the Store field. If you want to print a list of the vendors for a different store, type its number at Store. If you want to print a list of vendors for all stores, press <Clear Field> at Store. Option N J blank Description Print in alphabetic order by vendor name. Don't print prepage Print in alphabetic order by vendor code. 3 If you want to restrict the list to a certain range of vendors, type their codes at From and To Vendor, or their names at From and To Name. Press <Run>. 7.2/1089/H5277 Vendors Printing a Vendor List 5-5 Checking on Your Vendors' Performance There are two ways to review each vendor's performance history and the value of your purchases. Use Method A if: • • you would like to compare several vendors at once, and you're interested in just the current quarter's history. Use Method B if: • • you are checking on just a few vendors, and you want to see history over a long period (through last year). Method A 1 At any menu, type IQR and press <Enter>. This is the Item Quick Reference screen. Multistore users only: Check the number at Store. • • 2 At Use File, type V. 3 At Vendor, type the vendor code for the vendor you want to start with. 5-6 Vendors Checking Vemdor Performance If you want to view vendors for another store, press <Home> and type that store's number. If you want to view vendors for all stores, press <Home> and type C at Store. This selects the Vendor File. If you want to see them all, type 1. 7.2/1089/H5277 4 Press <Next Item>. The first 12 vendors appear on the screen, starting with the vendor whose code you specified. The figures at the right come from each vendor's record (Function MVR, screen H). To the right, under Purchases, you see the dollar value so far this quarter of purchases from each vendor whose Type (MVR) is W or blank. Under # of Buys, you see how many purchase orders you have created to each vendor so far this quarter. Under Drop Ship, you see the the dollar value so far this quarter of purchases from each vendor whose Type (MVR) is M. 5 To see the next 12 vendors, press <Next Item>. Repeat as necessary. Method B 1 At any menu, type MVR and press <Enter>. Multistore users only: Check the Store field. If you want to check on a vendor in a different store, type its number at Store. If the vendor is in all stores, it doesn't matter what's at Store. 2 Press <Home>. Type H and press <Display>. 3 At Vendor Code, type the code of the vendor you're interested in, and press <Display>. Look at the Purchasing History information at the bottom of the screen. For the current quarter, last quarter, year to date and last year, you'll see your purchases from this vendor in dollars (that's the first number) and in number of buys (that's the second number). These figures are updated during the receiving procedure (when you run Report RRP with Option F.) The Discount History (if any) has to do with Accounts Payable. 7.2/1089/H5277 Vendors Checking Vendor Performance 5-7 On the last line of the screen you see the figures that make up this vendor's "fill percent." The higher the fill percent, of course, the better this vendor is doing at filling your orders. Contractor package users: The fill percent for any vendor who supplies you Tally 2 items is not accurate. That's because you order Tally 2 items by the header (10,000 bf of Douglas Fir 2x4s, for example), and receive them by the component (4,000 bf of 2x4x8s, 4,000 bf of 2x4x10s, etc.). Consequently, it looks as though the vendors who ship you Tally 2 items aren't shipping what you ordered—although that's not the case. The dollar amount purchasing history figures are all correct, however. 4 To see other history records for other vendors, press <Next Item> or <Prev Item>. 5-8 Vendors Checking Vemdor Performance 7.2/1089/H5277 Deleting a Vendor If a vendor goes out of business, or if you stop buying from a vendor, you'll want to delete the vendor from your files. Before you delete a vendor, you should: • • Make sure any invoices you owe the vendor have been paid (you won't be able to use Triad system Accounts Payable to issue a check to this vendor after you delete this vendor). Check with the person who handles your Accounts Payable. Make sure you have changed the inventory record for each item you used to buy from this vendor to show who your new source is. Please see the Inventory Item Information Manual. Then go on to this procedure: 1 At any menu, type MVR and press <Enter>. Multistore users only: Check the Store field. If you want to delete this vendor in a different store, type its number at Store. If you want to delete this vendor in all stores, you'll have to do it one store at a time. You can't leave the Store field blank to delete the vendor in all stores at once. 2 At Vendor Code, type the code of the vendor you want to delete, and press <Display>. 3 Press <Delete> twice. 7.2/1089/H5277 This vendor is deleted from this store. You will not be able to display it again, or pay any invoices to this vendor (using Triad system Accounts Payable). Vendors Deleting a Vendor 5-9 SKU Numbers, Alternate Part Numbers, Manufacturer's Part Numbers, Vendor Stock Numbers You identify each item in your inventory by an SKU number, or item number. That number may be the same as the number your primary vendor uses to identify that item. And it may be the same as the number your secondary vendor uses to identify that item. And it may even be the same as the number the manufacturing vendor uses to identify that item. Then again, they may all use different numbers. How do you keep track of which numbers refer to which items? And when you transmit purchase orders to your vendors, how are are vendors to know what items you're ordering? • • • 5 - 10 Vendors Alternate Part Numbers If your SKU number is different from your primary vendor's number, enter the vendor's number as an alternate part number. When you transmit purchase orders to this vendor, the Triad system will transmit the vendor's number. Please see "Entering an Alternate Part Number," page 5-11. If your SKU number is different from your secondary vendor's number, enter the vendor's number as an alternate part number. Please see "Entering an Alternate Part Number," page 5-11. When you transmit purchase orders to this vendor, the Triad system will transmit the vendor's number. If you wish, you may also type the vendor's number at Vendor Stock Number on IMU screen S, and press <Change>—but this is not essential. If your SKU number is different from the manufacturing vendor's number, type the vendor's number at Manufacturer Part # on IMU screen S, and press <Change>. This is necessary if you want clerks to be able to use the manufacturer's part number for looking up items at Point-ofSale. You do not need to enter an alternate part number, though, because you will not transmit purchase orders electronically to any manufacturers. 7.2/1089/H5277 Entering an Alternate Part Number If your primary vendor or secondary vendor wouldn't recognize your SKU number, you should enter the vendors' numbers as Alternate Part Numbers, using Function MAP. When you transmit purchase orders to these vendors, the Triad system will automatically translate your SKU numbers into the correct vendor's number. Any item can have several alternate part numbers, one for each vendor who uses a different number to identify the item. 1 At any menu, type MAP and press <Enter>. 2 Under Alternate Part #, type the number the vendor uses to refer to this item. Press <Enter>. 3 Under SKU, type the number you use to refer to this item. Press <Enter>. 4 Under Vendor, type the code for the vendor whose number you are entering. 5 Press <Add>. The alternate part number is added, and the description of this item displays. At the same time, if this is the first alternate part number for this item, the Has Alt Part # field changes to Y on IMU Screen C for this item. 7.2/1089/H5277 Vendors Alternate Part Numbers 5 - 11 6 Press <Clear>. Repeat as necessary. You may add as many alternate part numbers as necessary for any SKU. Deleting an Alternate Part Number 1 At any menu, type MAP and press <Enter>. 2 Under Alternate Part #, type the number you want to delete. 3 Press <Display>. 4 Press <Delete> twice. 5 - 12 Vendors Alternate Part Numbers If there is a chance that another vendor uses this same number to refer to this item or to any other item, press <Enter> twice and type the vendor whose number you want to delete under Vendor. The SKU associated with this alternate part number and vendor displays. If this was the only alternate part number associated with this SKU, the Has Alt Part # field changes back to N on this item's IMU screen C at the same time. 7.2/1089/H5277 Printing Your Alternate Part Numbers or Manufacturer's Part Numbers 1 At any menu, type RAP and press <Enter>. If you want to use another printer, type its number at Printer. Multi-store users: Check the Store field. If you want to print part numbers for another store, press <Home> and type the correct number. Then press <Enter>. If you want to print part numbers for all stores, press <Home> and press <Clear Field>. 2 Use the table at the right to determine how to fill in the Options field. Then press <Enter>. Option Description D Print double spaced M Print only manufacturers part numbers J blank Don't print prepage Print only alternate part numbers You can't get a list of manufacturer's part numbers and alternate part numbers combined. 3 If you are interested in just a certain range of SKUs, vendors or manufacturer's part numbers, fill in the From and To fields. Use the Mfg Part # From and To fields only if you are using Option M to print a list of manufacturer's part numbers. 4 Press <Run>. 7.2/1089/H5277 Vendors Alternate Part Numbers 5 - 13 Displaying History Displaying Item Sales History 6-1 Displaying Item Purchase History 6-2 Displaying Item Purchase History for a Specific SKU Displaying Item Purchase History for a Specific Vendor Displaying Item Purchase History for a Specific Vendor and SKU 6-2 6-3 6-4 Displaying Item Purchase Information6-5 i Displaying History Displaying Item Sales History Use the following procedure to display item sales history. 1 From any Function MPO screen press <Disc>. Then press <Home>. 2 At View, type A. Press <Enter>. 3 Leave the Store field blank to display history for all stores or Type the store number or letter to display sales history for a specific store. 4 If you displayed a SKU on the Detail Screen, the system fills in the SKU field with that SKU. Press <Display> to display sales history for this SKU. or At SKU, type the SKU and press <Display>. 14 1075125 The Sales History Window displays. The Store field determines how the <Next> key works. If the Store field is A number or letter Blank Pressing the <Next> key displays The next SKU in the Inventory File for that store. The next SKU in the Inventory File regardless of which store the SKU is in. To display a different SKU, press <Clear>. Then type the SKU and press <Display>. For each store you specified, the system displays: • monthly unit sales for the past 13 months • total unit sales for the past 13 months • committed quantity (COMQTY) • quantity-on-hand (QOH) • • quantity-on-order (QOO) future order quantity (FOQ) Displaying History Displaying Item Sales History 6-1 The system also displays the information listed above for all stores. Look at the bottom of the window to see the function keys available to you. Displaying Item Purchase History You can display item purchase history for the following. • a specific SKU • a specific vendor and SKU • Displaying Item Purchase History for a Specific SKU a specific vendor Use the following procedure to display item purchase history for a specific SKU. 1 From any Function MPO screen press <Disc>. Then press <Home>. 2 At View, type H. Press <Enter>. 3 The Item Purchase History Window displays. Move the cursor to the Store field and press <Clear Field> to display history for all stores. The Store field defaults to the number or letter in the Function MPO Store field. Type the store number or letter to display purchase history for a specific store. A number or letter or 6-2 Displaying History Displaying Item Purchase History The Store field determines how the <Next> key works. If the Store field is Blank Pressing the <Next> key displays The next SKU in the Inventory File for that store. The next SKU in the Inventory File regardless of which store the SKU is in. 14 1075125 4 If you displayed a SKU on the Detail Screen, the system fills in the SKU field with that SKU. Press <Display> to display sales history for this SKU. or At SKU, tpe the SKU and press <Display>. To display a different SKU, press <Clear>. Then type the SKU and press <Display>. The system displays the following. • receipt date • vendor • • • • • purchase order number quantity ordered quantity received unit cost reference Look at the bottom of the window to see the function keys available to you. Displaying Item Purchase History for a Specific Vendor Use the following procedure to display item purchase history for a specific vendor. 1 From any Function MPO screen press <Disc>. Then press <Home>. 2 At View, type H. Press <Enter>. 3 At Vendor, type the vendor code. Press <Display>. 14 1075125 The Item Purchase History Window displays. The purchase history for that vendor displays. Displaying History Displaying Item Purchase Information 6-3 Displaying Item Purchase History for a Specific Vendor and SKU Use the following procedure to display item purchase history for a specific vendor and SKU. 1 From any Function MPO screen press <Disc>. Then press <Home>. 2 At View, type H. Press <Enter>. The Item Purchase History Window displays. 3 At SKU, type the SKU. Press <Enter>. 4 At Vendor, type the vendor code. Press <Display>. 6-4 Displaying History Displaying Item Purchase History The purchase history for that vendor and SKU displays. 14 1075125 Displaying Item Purchase Information Use the following procedure to display item purchase information. 1 From any Function MPO screen press <Disc>. 2 The Item Purchase Information Window displays. Move the cursor to the Store field and press <Clear Field> to display purchase information for all stores. The Store field defaults to the number or letter in the Function MPO Store field. Type the store number or letter to display purchase information for a specific store. A number or letter or 3 If you displayed a SKU on the Detail Screen, the system fills in the SKU field with that SKU. Press <Display> to display sales history for this SKU. or At SKU, type the SKU and press <Display>. The Store field determines how the <Next> key works. If the Store field is Pressing the <Next> key displays The next SKU in the Inventory File for that store. Blank The next SKU in the Inventory File regardless of which store the SKU is in. To display a different SKU, press <Clear>. Then type the SKU and press <Display>. The system displays the following: • purchase order due date • vendor • unit cost • • • purchase order number quantity-on-order unit of measure • reference • purchase order type • • buyer’s initials purchase order status Look at the bottom of the window to see the function keys available to you. 14 1075125 Displaying History Displaying Item Purchase Information 6-5 Appendix A: Printing Price Labels Setting Up the Printer for Labels 1 At any menu, type MPS and press <Enter>. 2 At Printer Number, type the number of the printer you wish to use. Then press <Display>. 3 At Form Used in Printer, type LAB1. Then press <Change>. You should make sure no one else needs to use the printer while you are printing labels. After you change Form Used in Printer to LAB1, no one can print reports on the printer. When you finish printing the labels and change the Form Used in Printer back to blank, other employees can use the printer again. The message RECORD HAS BEEN CHANGED appears at the bottom of the screen. 4 At the printer which will print the labels, take out the report paper and put in the label forms. 12/1030072 Printing Price Labels A-1 Printing the Labels See the Reports Manual for complete information about each field. 1 At any menu, type RLA and press <Enter>. Multistore users only: You can print labels for one or all stores. If the Store field entry is… Then this prints… A store’s number labels for only the store specified Blank labels for all stores, store by store C labels for all stores, consolidated by item 2 At Printer Number, the printer number you specified in MPS should be displayed. If it isn't there, type the printer number over what's there. 3 At File to Use, specify which file the Triad system should use to find prices. A list of the files the Triad system can use to print labels appears on the right side of the screen. If you specify a file other than I, the screen changes. See "Which File Should the Triad System Use to Print Price Labels," page A-8 for more information. 4 At Labels to Use, indicate large or small labels, and press <Enter>. A-2 Printing Price Labels Earlier, you loaded either large or small labels in the printer. Depending on which type is in the printer, you should specify large or small at Labels to Use. The Triad system needs to know whether large or small labels are loaded into the printer so it can make adjustments in the printing. 12/1030072 5 At Number of Labels, specify how many labels the Triad system should print for each item. Then press <Enter>. 6 At Price to Print, type the appropriate letter to specify which price should print on the labels. Press <Enter>. 7 At Printing Seq, specify how you want the labels to print. 8 At Name to Print, specify what name should print on the labels. 9 At Test Rows, specify the number of rows you want for alignment purposes. 10 At Line 3 Contents, specify what should print on the third line of the labels. Press <Enter>. A list of the choices appears on the right side of the screen. The list is different, depending on what file you specified at File to Use. You can decide how many labels for each item the Triad system prints. You can specify a number (l-999). Or, depending on what file you specified at File to Use, you can tell the Triad system to use the file for appropriate quantities. Choose what price prints from the list which appears on the right side of your screen Choose the printing sequences from the list which appears on the right side of the screen. If you want the store name displayed at Name to Print, press <Enter>. If you want another name to print on the labels, type the name you want over the store name already there. Then press <Clear Field>. Before the Triad system begins to print, it will print rows of dummy labels. That way, you can align the forms accurately. Then the Triad system will print the price labels you require correctly. You can choose how many rows of dummy labels you want to print. Test Rows defaults to 3. The SKU number prints on the second line of the label. For items with SKU numbers which fit on the second line of the price label, you can specify what information prints on the third line of the price labels. There are two reasons why the SKU won't fit on the second line of the label. First, there may be too many numbers or letters for the SKU to fit on the second line. Or, at SKU Characters on Line 2 field, you might specify that only a certain number of 12/1030072 Printing Price Labels A-3 letters or numbers should print on the second line. In either case, the SKU number will continue on the third line of the price label. 11 At UPC Coded Items, specify whether you want labels for all items, or only for items with or without UPCs. 12 At SKU Characters on Line 2, specify how many characters of the SKU number should print on the second line of the label. Choose from the list which appears on the right side of the screen. The number of characters that can print on the second line depends on the label size. Label size Large Small 13 At Tear Strip Contents, specify what you want to print on the tear strip of the labels. Maximum characters 9 7 This field appears only if File to Use is P. Code Tear Strip Contents Blank Small labels—Mfg Part Number, Department, SKU, Description I Invoice/line number Large labels—SKU, Mfg Part Number, Description 14 Type the range in the appropriate From and To fields. 15 Press <Run>. As the test rows print, align the labels in the printer. A-4 Printing Price Labels The From and To fields at the bottom of the screen will vary, depending on which file the Triad system is using to print price labels. When aligning, adjust the paper horizontally first. There are two Form Align buttons on your printer; one has an arrow pointing up and the other has an arrow pointing down. These buttons move the labels up or down in the printer. It takes seven clicks to move the paper up or down one line. After the labels have printed, make a mark on the printer where they ended. That will make your next alignment easier. 12/1030072 Resetting the Printer for Reports 1 As soon as the labels have finished printing, change back to report paper, or to the type of paper you'll use next. 2 At any menu, type MPS. Press <Enter>. 3 If necessary, at Printer, change the number to the printer you'll use next. To do this: • • 4 At Form Used in Printer, type the code for the type of paper you just installed in the printer. If you installed report paper, press <Clear Field>. Type the number of the printer you wish to use next, over what's already there. Press <Display>. A list of the forms you can use in the printer appears on the right side of your screen. 5 Press <Change>. 12/1030072 Printing Price Labels A-5 Which File Should the Triad System Use to Print Price Labels? Imagine that the Triad system keeps records for items in its file cabinet. To determine what price should print on the price labels, the Triad system can use the Inventory File, the Purchasing/Receiving File or the Price Change File. You need to decide which file folder the Triad system should use. Inventory File Imagine you just purchased the Triad system. You've loaded all the items in your first department. You want to print the price labels before you begin Point of Sale. The Triad system would use the Inventory File to find the correct prices for all the items in the department you just loaded. Another time the Triad system should use the Inventory File is when some price labels already on items are damaged, and you want to print new labels. Or imagine that you want to print labels for the items you just put on promotion. The Triad system would use the Inventory File to find the correct prices to print on the price labels. Purchasing/Receiving File Imagine you created a purchase order for some seasonal items. You want to print price labels for these items. The Triad system has a copy of the PO in its Purchasing/Receiving File. So it can find the PO in the Purchasing/Receiving File and print the labels required for the items on that PO. Imagine you just changed prices when you posted items in Function RP. You want to print price labels before you finalize receipts (print Report RRP, Option F). The price changes are now filed in the Purchasing/Receiving File. So the Triad system can find the most current prices in the Purchasing/Receiving File and print the correct prices on the price labels. Price Change File Imagine you've used Function IPC or RPC to add new prices to the Price Change File. These price changes won't take effect until next Wednesday, so you haven't printed Report RPC, Option F yet. But you want to print price labels now—before the new prices take effect. The Triad system can find the new prices in the Price Change File to print on the price labels. A-6 Printing Price Labels 12/1030072 Appendix B: Printing Bin/Shelf Labels Setting Up the Printer for Labels 1 At the main menu, type MPS, and press <Enter>. 2 At Printer Number, type the number of the printer you want to use to print the labels, and press <Display>. 3 At Form Used In Printer, type BINL, and press <Change>. You should make sure no one else needs to use the printer while you are printing labels. After you change Form Used in Printer to BINL, no one can print reports on the printer. When you finish printing the labels and change the Form Used in Printer back to blank, other employees can use the printer again. The message RECORD HAS BEEN CHANGED appears at the bottom of the screen. 4 At the appropriate printer, take out the report paper and put in the label forms. 5 Change the printer to 8 lines per inch. 12/1030072 Printing Bin/Shelf Labels B-1 Printing the Labels 1 At the main menu, type RBL, and press <Enter>. Multistore users only You can print labels for one or all stores. If the Store field entry is… Then this prints… A store’s number labels for only the store specified Blank labels for all stores, store by store C labels for all stores, consolidated by item 2 At Printer, type in the printer number you specified in MPS. 3 At Copies, type the number of copies you want and press <Enter>. 4 At File to Use, specify which file the Triad system should use to find prices. A list of the files the Triad system can use to print labels appears on the right side of the screen. If you specified a file other than I, the screen changes. See "Which File Should the Triad System Use to Print Price Labels," page B-6 for more information. 5 At Label to Use, type the code for the label you are using and press <Enter>. B-2 Printing Bin/Shelf Labels Choose the code from the list that appears on the right side of the screen. 12/1030072 6 At Test Rows, type in the number of rows required for alignment, then press <Enter>. 7 At Number of Labels, type the quantity of labels the Triad should print for each item, and press <Enter>. 8 At Price to Print, specify which price should print on the labels, if any. 9 At Printing Seq, specify in what order the labels should print. 10 Type the range in the appropriate From and To fields. Then press <Run>. 11 As the test rows print, align the labels in the printer. 12/1030072 Before the Triad system begins to print, it will print rows of dummy labels. You can use these dummy rows to align the forms. You can choose the number of rows you want to use for alignment purposes. Then the Triad system will print the price labels you require correctly. You can type any quantity, or select any of the choices displayed. Different choices display, depending on which file you specified at File to Use. Choose what price prints from the list which appears on the right side of the screen. Choose the printing sequence from the list which appears on the right side of the screen. The From and To fields at the bottom of the screen will vary, depending on which file the Triad system is using to print bin labels. When aligning, adjust the paper horizontally first. There are two Form Align buttons on your printer; one has an arrow pointing up and the other has an arrow pointing down. These buttons move the labels up or down in the printer. It takes seven clicks to move the paper up or down one line. After the labels have printed, make a mark on the printer where they ended. That will make your next alignment easier. Printing Bin/Shelf Labels B-3 Resetting the Printer for Reports 1 When the labels have finished printing, put regular paper back in the printer and change the printer back to 6 lines per inch. 2 At the main menu, type MPS, and press <Enter>. 3 At Printer Number, type the number of the printer you were using and press <Display>. 4 At Form Used in Printer, press <Clear Field>. When Form Used in Printer is blank, the printer is set up for printing reports on plain paper. If you installed some other type of form in the printer, type its code. The codes appear on the right side of your screen. 5 Press <Change>. B-4 Printing Bin/Shelf Labels 12/1030072 Which File Should the Triad System Use to Print Bin Labels? Imagine that the Triad system keeps records for items in its file cabinet. To determine what price should print on the bin labels, the Triad system can use the Inventory File, the Purchasing/Receiving File or the Price Change File. You need to decide which file folder the Triad system should use. Inventory File Imagine you just purchased the Triad system. You've loaded all the items in your first department. You want to print the bin labels before you begin Point of Sale. The Triad system would use the Inventory File to find the correct prices for all the items in the department you just loaded. Another time the Triad system should use the Inventory File is when some bin labels are damaged, and you want to print new ones. Or imagine that you want to bin labels for the items you just put on promotion. The Triad system would use the Inventory File to find the correct prices to print on the bin labels. Purchasing/Receiving File Imagine you created a purchase order for some seasonal items. You want to print bin labels for these items. The Triad system has a copy of the PO in its Purchasing/Receiving File. So it can find the PO in the Purchasing/Receiving File and print the labels required for the items on that PO. Imagine you just changed prices when you posted items in Function RP. You want to print bin labels before you finalize receipts (print Report RRP, Option F). The price changes are now filed in the Purchasing/Receiving File. So the Triad system can find the most current prices in the Purchasing/Receiving File and print the correct prices on the bin labels. Price Change File Imagine you've used Function IPC or RPC to add new prices to the Price Change File. These price changes won't take effect until next Wednesday, so you haven't printed Report RPC, Option F yet. But you want to print price labels now—before the new prices take effect. The Triad system can find the new prices in the Price Change File to print on the price labels. 12/1030072 Printing Bin/Shelf Labels B-5 Appendix C: Calculations This appendix explains how the Triad system calculates order points using Method 3, the Weeks of Supply method. Calculating Order Points To calculate order points using Method 3, the Weeks of Supply method, the Triad system counts the total units sold in each sales period you have weighted, and divides that by the number of weeks in that period. Then it multiples this figure by the percentage of weight placed on that period to get the weighted quantity sold per week. The weighted quantities are added together to get total weighted average. This quantity is multipled by the desired number of weeks of supply to arrive at the order point for that item. Here's an example: Suppose the total number of weeks of supply you have entered on ROP Screen 2 is 4: Method 3: Weeks of Supply on Shelf Lead Time Weeks Safety Stock Weeks 2 1 1 Total # of Weeks Supply = 4 Suppose you are halfway through the current month, and have weighted the periods on ROP Screen 3 like this: Current Pd: 2 Wt% 25 Period 2: 4.28 25 Period 12: 4.28 15 Period 3: Period 13: 12 1030072 Wk 4.42 4.42 25 10 Calculations C- 1 Suppose you are calculating an order point for SKU 1123, and its sales history is as follows: Current Pd: Units Sold 6 Period 2: 10 Period 12: 9 Period 3: 9 Period 13: 8 Here's how the Triad system calculates the order point for SKU 1123: 1 Divides the quantity sold during each sales period by the number of weeks in the period, to find quantity sold per week. quantity sold per week: Current Pd: Period 2: Period 3: Period 12: Period 13: 2 Multiplies each quantity by the appropriate weight percentage to find weighted quantity sold per week. 10 ∏ 4.28 = 2.336 9 ∏ 4.42 = 2.036 9 ∏4.28 = 2.102 8 ∏ 4.42 = 1.809 Current Pd 3.000 x .25 = .750 Period 3: 2.036 x .25 = .509 Period 2: Period 13: Calculations = 3.000 weighted quantity sold per week: Period 12: C- 2 6 ∏ 2 2.336 x .25 = .584 2.102 x .15 = .315 1.809 x .10 = .181 12 1030072 3 Adds all weighted quantities to find weighted average units per week. .750 .584 .509 + 4 Multiplies weighted average units per week by desired total weeks of supply to find order point. 12 1030072 .315 .181 2.339 2.339 x 4 = 9.356 The Triad system rounds up 9.356 to 10. The order point for SKU 1123 is 10. Calculations C- 3 Index A Alternate part number Deleting 5-11 Entering 5-12 Printing list of 5-13 When to use 5-10 B Backordered items printing list of 2-5 Bin labels How many to print B-3 Which file to use B-6 Printing B-1 to B-7 Bisynchronous communication 3-27, 4-61 C Cancelling a PO 4-98 to 4-99 Changing a purchase order Adding line items 3-20, 4-54 Changing line items 3-18, 4-52 Deleting line items 3-19, 4-53 Header information 3-15, 4-49 to 4-51 Special instructions 3-16, 4-51 Consolidated ordering 4-20, 4-29 Correcting receiving errors 4-94 Creating POs based on sales 3-3 to 3-5 Creating POs manually Adding header information 3-10 to 3-11, 4-36 to 4-38 Adding special instructions 3-11, 4-38 Adding line item detail 3-12 to 3-13, 4-38 to 4-40 D Displaying Purchase history 6-2 to 6-4 Purchase information 6-5 Sales history 6-1 Distributing charges 4-85 E Electronically sending POs 3-27, 4-61 F Future order Creating 4-35 to 4-42 Defined 2-3 G GPO Loading in end-of-day queue 4-45 Reviewing report 4-48 H History purchase, displaying 6-2 to 6-4 sales, displaying 6-1 I, J IMU Checking if a SKU has been ordered 4-65 Protecting item from order point calculation 4-14 IQR 5-6 Deleting a PO 3-23 Discontinued items 2-4 14 1075125 Index I-1 K O Kit items Ordering 2-6 Setting order points for 2-6 Order multiples 4-18, 4-21 Order point (Advanced Inventory) Calculating 4-6 to 4-12 Defined 1-1 Protecting from change 4-15 Order point (Classic Inventory) Determining 4-5 Setting 4-6 Order point purchasing Big picture of 4-2, 4-3 How it works 2-1 Order point report 4-13 Order Worksheet See Restocking Order Worksheet L Labels See Bin labels See Price labels See Shelf labels Landed cost 4-82, 4-83 Setting up to use 2-9 M, N Manufacturer's part number Printing list of 5-13 When to use 5-10 MAP Entering altenate part number 5-11 Deleting alternate part number 5-12 Min-Max ordering defined 4-18 MPC Setting up purchasing system 2-7 MPO Checking if a SKU has been ordered 4-65 Screen D 3-12, 3-17, 4-38 to 4-40, 4-51 to 4-55 Screen H 3-9 to 3-11, 3-15, 4-36 to 4-38, 4-49 to 4-51 Screen I 3-11, 3-17, 4-38, 4-51 What's on specific PO 4-68 What's ordered from specific vendor 4-73 MPS A-1, A-7, B-1, B-5 Multistore system Consolidated ordering 2-4 Ordering for indiviual stores 2-4 MVR Adding a vendor 5-2 Checking vendor performance 5-7 Deleting a vendor 5-9 I-2 Index P, Q POR 3-22, 4-56 Price labels How many to print A-3 Which file to use A-8 Printing A-1 to A-8 Printing Bin labels B-1 to B-7 POs in PO format 4-40, 4-58, 4-70 POs in report format 4-69 Price labels A-1 to A-8 Receiving report 4-91 Shelf labels B-1 to B-7 Vendor list 5-5 Purchase history, displaying 6-2 to 6-4 Purchase information, displaying 6-5 Purchase order Cancelling 4-98 to 4-99 Changing See Changing a purchase order Creating based on sales 3-3 to 3-5 Creating manually See Creating POs manually Deleting 3-23 Printing See Printing Purging 3-28, 4-98 to 4-99 14 1075125 R S RAP 5-13 RBL B-2 Receipt Posting screen 4-77 Receiving merchandise Correcting errors 4-94 Finalizing receipt 4-95 Items not on PO 4-87 Rejecting items 4-81, 82 Replenishment Ordering 3-31 Tally 2 items 4-84, 4-85 Using method A 4-80 to 4-81 Using method E 4-82 to 4-83 Resequencing 3-22, 4-55 Replenishment Ordering Big picture of 3-1 How it works 2-1 Restocking Order Worksheet Printing 3-3 Questions about 3-6 Reviewing 3-6 to 3-8 Sample 3-8 RIS 4-63 RLA A-2 ROF Deleting a PO 3-23 Printing 3-14, 3-25 Purging a PO 3-28 ROP Screen 1 4-6 Screen 2 4-10 Screen 3 4-12 ROR 3-3 RPO Print in PO format 4-40, 4-58, 4-70 RP 4-78 Correcting receiving errors 4-94 RPP Printing PO in report format 4-70 Purging POs 4-98 Seeing what's on order with specific vendor 4-74 Seeing which PO a SKU is on 4-67 RRP Finalizing merchandise receipt 4-95 Printing 4-91 RSO 4-19, 4-28 RVE 5-5 Sales history, displaying 6-1 Sales periods See Weighting sales periods Shelf labels How many to print B-3 Which file to use B-6 Printing B-1 to B-7 Special order creating PO from 4-43 to 4-48 Standard package 4-18, 4-21 Submitting PO to vendor 3-26, 4-57 Suggested Order report Reviewing 4-27, 4-34 Running 4-20 to 4-26, 4-29 to 4-33 14 1075125 T, U Tally 2 items Ordering 2-5, 4-24, 4-31 Receiving 4-84 Setting order point for 2-5 Total weeks of supply determining 4-11 Transferring inventory 2-4 Transmitting POs See Bisynchronous communication V Vendor Adding 5-2 to 5-4 Checking performance of 5-6 to 5-8 Deleting 5-9 Printing list of 5-5 Vendor type designating 5-1 W, X, Y, Z Weighting sales periods 4-13 Index I-3 Document Change Request Form YOUR NAME __________________________________________ CUSTOMER#________________ BUSINESS NAME ______________________________________________________________ BUSINESS ADDRESS ______________________________________________________________ ________________________________________ BUSINESS TELEPHONE ( )________________________________ * * ZIP________________ DATE _____________ * SOFTWARE LEVEL _____________________________ FULL NAME OF MANUAL SECTION __________________________________________________ ______________________________________________________________________________________ PAGE NUMBER(S) ___________________________________________________________________ DESCRIPTION OF PROBLEM _________________________________________________________ ______________________________________________________________________________________ ______________________________________________________________________________________ ______________________________________________________________________________________ ______________________________________________________________________________________ ______________________________________________________________________________________ SUGGESTIONS FOR IMPROVEMENTS ________________________________________________ ______________________________________________________________________________________ ______________________________________________________________________________________ ______________________________________________________________________________________ ______________________________________________________________________________________ GENERAL COMMENT ON THE MANUAL _____________________________________________ ______________________________________________________________________________________ ______________________________________________________________________________________ Triad’s intention in acquiring the suggestions set forth in this Change Request Form (“Suggestions”) is for evaluation. Triad assumes no obligation with respect to the suggestions and retains all right, title, and interest to any ideas, concepts, expressions, know-how and/or techniques related to the suggestions. NO POSTAGE NECESSARY IF MAILED IN THE UNITED STATES BUSINESS REPLY CARD FIRST CLASS PERMIT NO. 1156 LIVERMORE, CA POSTAGE WILL BE PAID BY ADDRESSEE TRIAD SYSTEMS CORPORATION 3055 Triad Drive Livermore, CA 94550-9862 Attn: Learning Products Development