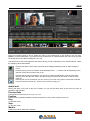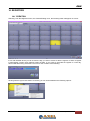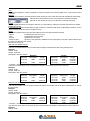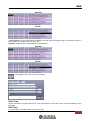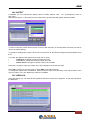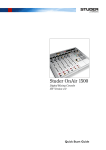
1
ENG DIGIWARE User Guide Software for playlists creation (Rev 3.0 EN) | DIGIWARE 1 ENG CONTENT 1 DIGIWARE .................................................................................................................................................................. 4 1.1 GENERAL INFO ....................................................................................................................................................... 4 1.1.1 General hints .....................................................................................................................................................................4 2 TABLES ...................................................................................................................................................................... 6 2.1 GENERAL HINTS ..................................................................................................................................................... 6 2.2 VIEWS ................................................................................................................................................................... 6 2.3 SEARCH ................................................................................................................................................................ 8 3 USERS ........................................................................................................................................................................ 9 4 BROADCASTINGS..................................................................................................................................................... 9 5 SET BROADCASTINGS ........................................................................................................................................... 11 6 CATEGORIES (Only for Radio and Music TV) ...................................................................................................... 12 7 CLOCKS ................................................................................................................................................................... 14 7.1 TIME SIGNAL ........................................................................................................................................................ 17 7.2 ADVERTISING ....................................................................................................................................................... 17 7.3 COMMENT ........................................................................................................................................................... 17 7.4 EXTERNAL COMMAND ........................................................................................................................................... 17 7.5 AUDIO FILE .......................................................................................................................................................... 18 7.6 SONGS ................................................................................................................................................................ 18 7.7 TELEVISION ......................................................................................................................................................... 19 7.8 PLAYLIST ............................................................................................................................................................. 19 8 PRE-SCHEDULE ...................................................................................................................................................... 20 9 TYPOLOGY DETAILS .............................................................................................................................................. 23 10 ORIGIN ................................................................................................................................................................. 24 11 TV (Only for Digiware TV and music TV) ........................................................................................................... 25 11.1 CLIP ................................................................................................................................................................... 25 11.1.1 Tape Data....................................................................................................................................................................27 11.1.2 DIGI REC....................................................................................................................................................................33 11.1.3 DIGI EDIT ..................................................................................................................................................................34 11.2 PROGRAMS ......................................................................................................................................................... 36 11.3 SERIES ............................................................................................................................................................... 39 11.4 CLIP EPISODES .................................................................................................................................................... 42 11.5 AGENDA .............................................................................................................................................................. 43 11.6 FILLERS .............................................................................................................................................................. 44 11.7 EMERGENCIES ..................................................................................................................................................... 45 11.8 KEYBOARD .......................................................................................................................................................... 46 11.9 CHECK FILE ......................................................................................................................................................... 47 11.10 REC LIST ............................................................................................................................................................. 48 11.11 CATEGORIES ....................................................................................................................................................... 49 11.12 NATIONALITY ....................................................................................................................................................... 50 11.13 CLIP TYPE ........................................................................................................................................................... 50 11.14 SOURCE COLOR ................................................................................................................................................... 50 12 PLAYLIST ............................................................................................................................................................. 51 12.1 CREATION ........................................................................................................................................................... 51 12.2 EDITING .............................................................................................................................................................. 53 12.3 GRAPHS .............................................................................................................................................................. 55 13 STATISTICS ......................................................................................................................................................... 56 14 REGISTERS.......................................................................................................................................................... 58 14.1 CREATION ........................................................................................................................................................... 58 14.2 RADIO REGISTERS ................................................................................................................................................ 59 14.2.1 Profiles ........................................................................................................................................................................59 14.2.2 Macro ..........................................................................................................................................................................60 14.3 EDITING .............................................................................................................................................................. 66 15 UTILITY................................................................................................................................................................. 75 15.1 SETUP ................................................................................................................................................................ 75 15.1.1 Archives.......................................................................................................................................................................75 15.1.2 Settings ........................................................................................................................................................................75 15.1.3 Export/Import ..............................................................................................................................................................79 15.1.4 Backup.........................................................................................................................................................................80 15.1.5 Player ..........................................................................................................................................................................81 15.1.6 Print ............................................................................................................................................................................81 15.1.7 Registers ......................................................................................................................................................................82 15.2 SETUP MONITOR................................................................................................................................................... 83 15.3 IMAGES ............................................................................................................................................................... 83 15.4 ASPECT............................................................................................................................................................... 84 15.5 VIEW LOG ............................................................................................................................................................ 84 15.6 RECONCILIATION .................................................................................................................................................. 85 | DIGIWARE 2 ENG 15.7 REBUILD PASSAGES .............................................................................................................................................. 85 15.8 DELETE PASSAGES ............................................................................................................................................... 85 15.9 DELETE SENT SCHEDULE ....................................................................................................................................... 85 15.10 RESTORE ALERTS ................................................................................................................................................. 85 15.11 MAINTEINANCE..................................................................................................................................................... 85 15.12 REPAIR ............................................................................................................................................................... 86 15.13 INFORMATION....................................................................................................................................................... 86 15.14 DOWNLOAD UPDATES ........................................................................................................................................... 86 15.15 EXIT ................................................................................................................................................................... 86 16 FINAL CONSIDERATION AND AXEL TECHNOLOGY CONTACT ..................................................................... 87 | DIGIWARE 3 ENG 1 DIGIWARE 1.1 1.1.1 GENERAL INFO General hints In all the windows, the following buttons always assume the same meaning: OK (F10): Confirms the operation UNDO (ESC): Undo the operation and return to the main window. EXIT (ESC): Exit from the current window. DELETE (F5): Perform the deletion. INSERTION (F2): Perform the insertion. PRINT (F6): Run the printout. COPY (F11) Make a copy of the selected element. RECORD (F12): Allows the recording or playing/visualization of audio and video files. SEARCH: Allows to search the information in a more detailed way by visualizing a search window. The boxes in which you enter data are called FIELDS and can belong to the following types NUMERICAL: In these fields, you can enter only numeric values, the insertion of letters or symbols are not allowed. Example: the CODE fields ALPHANUMERIC: the these fields you can enter numbers, letters and symbols. Example: the field DESCRIPTION. LIST: These fields are proposing a set of data from which to choose. Some of them are updatable because they are derived from the tables that can be changed by the user, others do not. | DIGIWARE 4 ENG CHECKBOX : They are fields that don’t allow data entry, but fields that have value as YES or NO, that is, being selected or not. If you want a particular day, a particular time or any item proposed to be active (selected), just click with the left mouse button and you will see a check on the white square. At the bottom of the main window it displays some information about free space on the disks used by the application (it is recommended not to go below 50,000,000), date, time, memory occupied (in percent) and the name of the station. Always at the bottom of the window it displays on the right side: delay or advance of the schedule, scheduled time, start time, end time, and file name of what is currently airing. | DIGIWARE 5 ENG 2 TABLES 2.1 GENERAL HINTS In all tables, the allowed operations are the following: Insert a new element on the table by using the INSERT key the item “Insert” from the menu that will appear. edit an item in the table by double clicking on it or pressing ENTER after selecting it. delete the item where you are placed from the table using the DELETE and choosing the item “Delete” from the menu that will appear. print the list using the PRINT key escape from the current window using the ESC key confirm the modification/insertion of an item using the OK key cancel the modification/insertion of an item using the UNDO key 2.2 or by right clicking and choosing or by right clicking . . . . VIEWS It is possible to customize the display of the following tables: Clocks, Pre-Schedule, TV (Clip, Programs, Series, Clip Episodes, Agenda, Fillers, Emergencies, Keyboard, Rec List). Below, in the form of tables indicated, it will appear the following field: <Default View> is the standard display and can not be changed. To create a new view, make the changes to the form and click the button to the left: if you are entering the first new view it will open directly the mask for entering the name associated with the new view. Type the name and press OK, Esc to cancel the operation. | TABLES 6 ENG If you have already entered the new views, after making the changes, pressing the button brings up a menu from which to choose whether to Create a new view or Modify the current. When the program starts, for forms in which you can customize views, it will always display the last view assigned. You can also hide the columns of a table. To do this simply press the right mouse button on the upper left corner, choose the item you need from the right side of the screen and move it to the left side, Hide by clicking on the arrow to the center and vice versa when you'll want to re-appear in the table. | TABLES 7 ENG 2.3 SEARCH To search for an item in a list, simply sort the list by clicking on the column header that needs to be sorted, the selected heading will appear in red lettering, and start typing the desired item. This will find the first item in the list that begins with the characters entered. NB: Inside a playlist, to change the sort order of the columns, you must use the Order menu below. Sorting by clicking on the column header has been disabled in this window. If you want to search for an item that is not the beginning of the text, but on the inside you can make a second type of search, which is valid only in the following lists: Programs, Clip, Clocks. Press the F7 key, always after ordering the list, type the characters that are to be searched and press F7; each time you press this key, the cursor will move to the next line that contains the typed characters, once they run out, it will position on the last line of the list. | TABLES 8 ENG 3 USERS This table allows you to define which users can access the program, with its password and the operations they can perform. User Alphanumeric compulsory (max 30 characters). Enter the name for the user that you want to create. Password - Confirm Password Alphanumeric compulsory (max 30 characters). Field to enter the password. Operation List of operations that you can perform in Digiware. With a double click on the desired function you will enable Insert etc.). or disable all of the options (Display, Print, View F9 Press F9 or double-click in the cell to make allow the user to see, or not, the selected operation. Print F6 Press F6 or double click in the cell to allow the user to print or not the selected section. Ins. F2 Press F2 or double click in the cell to allow the user to insert or not new data inside the selected section. Mod. F4 Press F4 or double click in the cell to allow the user to modify or not the data that belong to the selected section. Del. F5 Press F5 or double click in the cell to allow the user to delete or not the data that belong to the selected section. Broadcasters list Select the station where the user can work. If no choice is not made, the user can work in all. 4 BROADCASTINGS Digiware allows you to manage multiple stations. To do this simply insert into this table the names, or descriptions, of the stations that you intend to use; you can also associate an image that will appear on the home page of the software. | USERS 9 ENG Code Automatically assigned by the software. Description Alphanumeric compulsory (max 40 characters). Description or name to identify the station. Common Clips In event of TV station, if selected, when you update the parameters of the clips that belong to the selected broadcaster, it will also update the parameters of the clips on <All broadcasters>. | BROADCASTINGS 10 ENG 5 SET BROADCASTINGS To start working on individual stations you must select Set Broadcasting from the Tables menu and indicate the station with which you want to work. Leaving the selection on All broadcasters you will be able to change only the tables Typology Details and Origin. For TV stations, by selecting All broadcasters you can also create a database of clips that are common to all stations managed in the same Digiware. Once you have selected the station press the OK button to confirm the selection. A faster way to set it is to press the right mouse button on the main menu, and select from the menu that will appear in the desired station. | SET BROADCASTINGS 11 ENG 6 CATEGORIES (Only for Radio and Music TV) With the Categories table, you can define the kinds of membership of the songs. Press F2 to enter a new Category, double-click the line you want to edit it and press F5 to delete it; or press the right mouse button and choose from the menu Insert or Delete. The fields where it is possible to insert are the following: Category Alphanumeric compulsory (max 20 characters). Select one of the categories in the songs archive. Note: If in the songs archive (internal Digiware for TV music, from Djpro for the radio) there is not at least one song having the desired category, you can’t create your own category in Digiware. Description Alphanumeric compulsory (max 40 characters). Category description. All the songs If selected, the Category field is "*" all the songs of the archive will be included. Audio Number Summary field, it can not be changed by the user. Shows the amount of songs that belong to the selected category. Priority Numeric (max. 4 digits). It is the priority assigned to the category. The value will be used during the creation of the schedule to determine the order of insertion of the categories. When creating the daily schedule, Digiware starts the insertion of the songs from the Categories that have the lowest priority. Frequency List from which to choose the frequency of transmission of the songs belonging to the category you are entering. You can choose between Daily, Weekly, Monthly and Customized (where the user can set the number of days of the frequency). % Numeric (max. 3 digits). Percentage of songs, in this category, to be used in the generation of the schedule. This parameter is used in the case of songs that seem to recur too often in the schedule: The number of songs to choose from is reduced to the percentage indicated including only the songs aired for the longest time. Execute Controls If selected, the program performs checks on delays, repetitions, the frequency and percentage of use of the songs. Repetitions Numeric (max. 4 digits). | CATEGORIES (Only for Radio and Music TV) 12 ENG Indicates the maximum number of times the same song or the same author may be repeated in one day. Today’s delay Numeric in HH.MM format This is the minimum delay to be applied to the author or song between two successive outputs on the same day. Example: If the Today’s Delay parameter for the song is set with the value 02:00 (2 hours) and the song was scheduled at 10:00 am, the next step will not be scheduled before 12.00. Previous Passages Numeric (max. 3 digits). This is the number of previous releases that the system considers to verify compliance with the set parameters. Previous Delay Numeric in HH.MM format It's like the Today’s Delay field but working on the Previous days. Example: If the Previous Delay parameter of the song has been set with the value 02:00 (2 hours) and the song was schedule the last time (for example the day before) at 10:00 am, the next step will be scheduled before 08.00 or after 12.00. Previous Days Number of previous days to consider, from the date of creation of the schedule, to perform the check on delays and verify compliance with the set parameters. Policies Select from the list, the Policies to be associated with the Gender. The data in the list are those included in the table of policies. Day Part Select from the list, the Day Part to be associated with the genre. The data in the list are those included in the table of Day Part. Previous Days Number of previous days to consider, from the date of creation of the schedule, to perform the check on the Day Part (if 0 it will be taken from Table Day Part). Color Pressing the Color button it is possible to associate to each category a background color and a font color. Image It is the image that will be displayed in the Daily Playlist, in the tabular display. To assign double-click inside the box, it will open a window that will allow you to search for the image file you want to insert. | CATEGORIES (Only for Radio and Music TV) 13 ENG 7 CLOCKS The mask for the management of the Clocks is divided into three parts, Top, Bottom and Side (right). At the Top of the mask shows a list of all the Clocks. To insert a new item press F2, to edit an existing item double click with the left mouse button and to delete an existing item press the Delete key (F5). With the right button of your mouse you can choose Insert, Delete and Copy content. The fields to be set are different for Digiware Radio (or music TV) and Digiware TV. Digiware TV view: | CLOCKS 14 ENG Digiware radio view: The fields to be filled are the following: Description Alphanumeric compulsory (max 40 characters). Enter the name for the clock. Length Numeric in HH:MM:SS format It is the length of the clock. Color By pressing this key it is possible to associate to each clock a background color (BackColor) and a different font (ForeColor). Image You can assign a picture to each clock. To do this, click 2 times inside the gray box and select the desired image. Journal Description Alphanumeric optional (max 40 characters). Enter the name you want to appear in print to be sent to the newspapers. Notes Any details that we want to appear in the prints Policies Policies (settable in Tables policies) to be applied to the clock. At the Bottom of the mask there is the detail of the sequence of information that will be included for the generation of the playlist. To insert the detail rows within a clock you need to select the typology: the available data are accessible through the right side of the mask "INSERTION". To change the sequence of the lines that make up the clock simply drag the clock that you want to move the point at which it is to be inserted. Clicking with the right mouse button on one line you can delete or copy it. To refresh the duration or the description of the fixed rows, for example jingles, included in the clocks, press F8. To temporarily hide the entry window, press the button Above, in the form of Insert/Edit (right part of the screen), you will find several buttons that allow you to choose the type of data that will be inserted. | CLOCKS 15 ENG To enter the item you want, select it, and press F10 or ENTER. To cancel, press ESC To record (only for TV clips), F12. Some fields are common to all of the choices: Link (L.) If selected, it means that the selected line is linked to the previous one; this means that if the first element will not be transmitted, it will not be even the second. Erasable (C.) If enabled, it means that the selected row may be canceled in the event of delay. Breakable (I.) If enabled means that, in case of delay, the selected row will be interrupted to recover the time; This will be done by cutting the program or song only from the Outro point to the End. Exact Time (E.T.) If enabled, it means that the locked item will be transmitted at the exact time of the block set, cutting what is on the air at that time and erasing all previous events not yet transmitted. The parameters Minimum Hour and Maximum Hour, in case of Exact Time, must be equal. (Function can only be used by radio stations with broadcast system Djpro). Length Numerical in HH.MM.SS,DD format. It is the theoretical duration of the program Minimum Hour – Maximum Hour Numerical in HH.MM:SS format It is the time lapse in which the program or the time signal, etc., absolutely must start.. End Time If selected, when editing the playlist, setting an item block time, this time will be considered as the end time of the transmission, and not starting time. The specific fields of each option are different depending on whether you're scheduling: - A TV - A music TV - A radio TV options: Music TV options: Radio options: | CLOCKS 16 ENG TIME SIGNAL 7.1 Clicking on this button it will insert a time signal inside the clock. Description Alphanumeric compulsory (max. 40 digits). Description assigned to the time signal ADVERTISING 7.2 Clicking on this button it will insert a an advertising break inside the clock. Hour List from which to choose the hour (00 to 24) and minutes (00 to 59). It is time of the advertising break that will be inserted. For example, if we set 10:15, although actually the advertising will be broadcasted starting at 10:20, the commercials broadcasted will be those scheduled in the advertising break of 10:15. If you select the time but not the minutes, for example 10:MM it means that the on air will insert the first cluster set at 10, for example, 10:15. If you select the items HH and MM means that within a clock, for example, from 15:00 to 16:00, it will insert advertising breaks scheduled within that time lapse, and it will choose the clusters closer to the time when the will be broadcasted. 7.3 COMMENT Clicking this button it is possible to insert in the band, a comment line for internal use. The comment line will be displayed in the playout playlist to communicate or remember something to the director. Description Alphanumeric compulsory (max. 40 digits). 7.4 EXTERNAL COMMAND By clicking this button, you can enter an external command in the clock, which is a command to and from the outside, such as a satellite connection. Description Alphanumeric compulsory (max. 40 digits). Description associated with the external command. Delay Predefined list (from 00 to 60) Code A List where to choose the command type (eg. Automatic Onair, End satellite receiving, Automatic Advertising, Start, Stop) customised for every station. Code B List where to choose the command type (eg. End, Start External Receiving) customised for every station. | CLOCKS 17 ENG 7.5 AUDIO FILE By pressing this button, you can insert an audio file that is not present in the database Djpro (only for Digiware Radio). Description Alphanumeric compulsory (max. 40 digits). Description associated to the file. Voice over If selected, the audio file will be treated as a voice over. When the voice over is selected, some parameters appear to define the type of voice over you want to schedule. File Path to of file you want to schedule. 7.6 SONGS By pressing this button, you can insert songs for the radio scheduling or a music TV. When selected, it displays the list of songs in your music database. To add a song, select the title and and double click on it or press F10. By audio If you select this field, you can schedule songs by category. The list of available categories is taken from Tables categories. Speed From – Speed To (or BPM from – BPM to) It is possible to restrict scheduling only to the songs within a specified range of BPM. The BPM are those set in the form of the song (clip Digiware schedule for music TV or Djpro song schedule for the radio). Year From – Year To It is possible to restrict scheduling only to the songs within a specified range of years. The year is the one set in the form of the song (clip Digiware schedule for music TV or Djpro song schedule for the radio). Length From – Length To It is possible to restrict scheduling only to the songs within a specified range of lengths (only for Digiware radio). Multiple Selection If selected, during the search of the tracks corresponding to the parameters it will consider even those audio which have a shorter duration than the one indicated in Length From and Length To, but if added they meet the criteria. Audio Number Number of songs that meet all the criteria. Nationality You can narrow your scheduling only to national or foreign songs. Period You can narrow your scheduling only to the tracks that belong to a specific Period (settable in Tables Groups Periods). User fields You can create custom fields (in Djpro for radio stations) to be used later for specific schduling, for example in the music categories (eg category Rock and subcategories Punk, Heavy Metal, and so on). Start Type – End Type You can choose to schedule songs with a beginning or an end from very slow to very fast, to create an audio stream without sudden changes in speed in the transition between a song and the next. (Only for Digiware Radio. Parameters Start Type and End Type must be set in the schedules of the songs in Djpro) Introduction Field visible only if on Setup -> Settings is enabled the parameter “Consider spoken songs”. If selected, it will be enabled the broadcast of the introduction of the song previously recorded. (only for Digiware Radio. Paths of the introduction audio files must be configured in the schedules of songs in Djpro) Context Field visible only if on Setup -> Settings is enabled the parameter “Consider spoken songs”. If selected, it will be enabled the broadcast of the context of the song previously recorded. (only for Digiware Radio. Paths of the context audio files must be configured in the schedules of songs in Djpro) | CLOCKS 18 ENG Final Field visible only if on Setup -> Settings is enabled the parameter “Consider spoken songs”. If selected, it will be enabled the broadcast of the final of the song previously recorded. (only for Digiware Radio. Paths of the final audio files must be configured in the schedules of songs in Djpro). These parameters are not changeable if in the Song table was not selected the field Execute Controls. 7.7 TELEVISION By pressing this button, you can enter Programs, Clips or Series for television scheduling. With drop-down lists can also filter the programs and clips that are displayed in the lower part, by category and media location. Optional If you select this field, the item that you are going to insert and the former will be considered optional, it will be an external software that will decide the transmission. It could be the case of clips voted by the public: you will include in the scheduling all the clips but the playout will broadcast only the winner clip. 7.8 PLAYLIST By pressing this button, you can insert parts of schedules already aired. With the drop-down list you can filter the broadcaster. By entering your date of interest in the lower part of the screen you will see the schedule from which you can select the programs to be introduced in the clock. | CLOCKS 19 ENG 8 PRE-SCHEDULE The mask for the management of schedules is divided into three parts: in the upper left is the list of existing schedules, the center is the daily details of the schedule chosen, on the right is placed the list of available clocks. Superior list To add a new schedule, press the F2 key: it will appear a form where you can enter the name or description of the new schedule. Pressing the Count key it will display, for the selected day, the rows of the schedule with the related quantity. To delete a schedule, press the F5 key. Press F6 to print: Table, list of the bands that compose the pre schedule day by day. | PRE-SCHEDULE 20 ENG Image, print of the image that you usually see in the screen. Graphic, scheme of the bands that compose the pre schedule.. Band Table, list of the bands and all their contents. Newspapers, print the weekly schedule to be sent to the newspapers. Right list This list shows all the existing Clocks; you can insert in the schedule by drag-drop, ie choosing the clock that you want and dragging it to the schedule. Central list On the left, vertically, are listed 24 hours of the day, down to the bottom of this bar you find details the of the time where it is positioned at the moment the mouse cursor. To enlarge, reduce or customize the playlist view. To move the selected clock forward or backwards of 1 minute. To cancel or repeat the operation. to change the view type and get the details of the selected day. Clicking with the right mouse button on any day of the week you can do the following: Delete the schedule set for that day, copy the entire day. To change the daily schedule, click with the right mouse button on the desired column. You can perform the following tasks: Delete: Delete the clock; Edit: opens the mask for the management of the clock (with double click) to change the structure of the clock; Change newspaper: To change the name of the program to be sent to the newspapers; Link: to tie the clock to the previous one; it will show * before che clock name; Block: the inserted element is blocked, as minimum and maximum time set on the clocks. Copy: Copy the band Paste: To paste the copied clock on the selected point. Paste the same time: to paste the copied clock in the same hour where is the original one. When you move or copy a band on an already busy schedule, the following message appears. | PRE-SCHEDULE 21 ENG You can insert the item before or after the band already present, or exactly at the selected time. Leaving the mask with the ESC key, if you have made changes to the schedule of one or more days, you will be prompted for confirmation of data storage for each day changed. | PRE-SCHEDULE 22 ENG 9 TYPOLOGY DETAILS Insert in this table the genres which will be used to classify programs during the creation of registries. Code Numerical compulsory (up to 5 numbers) given automatically by the program. Color By pressing this key it is possible to associate to every kind a background color (BackColor) and a different font color (ForeColor). Description Alphanumeric compulsory (max 64 characters). Description or name to identify the genre (eg Advertising, Information, Documentary, ... etc..). Code Detail Alphanumeric (max 10 characters). Code associated with the Detail, awarded by the Ministry of Communications. Typology Alphanumeric (max 64 characters). Enter the description that will appear on the registers. If you do not select any item, it will indicate on the registers the main description. Code Typology Alphanumeric (max 10 characters). Code associated with the Typology, awarded by the Ministry of Communications. Type Select the typology of the genre that you are entering. You can choose between Information, Advertising, System’s Failure. Length Numeric in the format HH:MM:SS Indicate the duration to be considered as advertising. Percentage Percentage of advertising to be calculated inside the the effective duration of the program. Break If selected, the element belonging to this category will not be included in the registers, and its duration will be added to the previous item. End Day If selected, calculates the duration of advertising only at the end of the day and not per hour. Local Information Check the box if it is local information Telepromotions / Telesales Check the box if it is Telepromotions or Telesales. | TYPOLOGY DETAILS 23 ENG 10 ORIGIN The table allows you to manage a list of suppliers or different sources of the clips that will be included in the playlist (eg, home production, Self-produced, etc..). To insert a new source press the F2 key or the right mouse button, select "Insert" from the menu that appears. It shows the list composed by the fields: Code Numerical mandatory given automatically (progressive), but changeable. It does not allow you to enter multiple times the same value (up to 5 numbers). Description Alphanumeric mandatory (max. 40 characters). Description or name to identify the source (eg. Self-produced, etc..). Self-produced Select the field if the source is "Self-produced." Tax Code Alphanumeric (max. 16 characters). Tax Code of the production house Independent Select the field if it is an independent production company | ORIGIN 24 ENG 11 TV (Only for Digiware TV and music TV) 11.1 CLIP This table allows the control of the Clip: their registration and cataloging them. To insert a new clip, press the F2 key, or use the right mouse button and choose Insert from the menu. To edit the clips already entered double click on the clip you want, or select it and press Enter. The data relating to the clips, on the page 1, are the following: Code Required value given automatically progressive. Clip Name Alphanumeric mandatory (max. 50 characters) This is a description of the clip and automatically suggests "CLIP <nn>" but you can change it. Category List from which to choose the Category of membership of the Clip. The data in the list are those included in the Categories table, and if the chosen category is associated with an image, it is also used for the clip you are editing, in case this has not already set up an image. On-Air Description Alphanumeric optional (max. 50 characters) It is the description that will appear on the director screen, when the clip will be aired. Journal Description Alphanumeric optional (max. 50 characters) It is the description of the clip for newspapers. Clip Type List to choose the type of clips (eg Spot). | TV (Only for Digiware TV and music TV) 25 ENG Register Description Alphanumeric optional (max. 50 characters) It is the description that will be printed in the register for this clip. Registers Typology Detail This field is mandatory. List to choose the Typology that will be associated to this clip, when creating the Registers. The data of the list are the ones in the Typology Details table. Origin Optional field. List from which to select the origin of the clip (eg, self-produced). The data in the list are those included in the Origin table. Archive Select the field where the clip is to be considered archived. Nationality List from which to choose the nationality of the production of the movie. The data in the list are those included in the Nationality table. Production Year Indicate the year of production of the movie in 4-digit format. Exclude Hours Indicate the time zones in which the clip can not be transmitted (HH: MM) Notes Free field for entering notes. Page 2 with Type Export, selected in Setup, equal to DigiTV: Font To insert the source from which the clip will be assimilated press the button to the right of the field, you will see the drop-down menu from which to select. | TV (Only for Digiware TV and music TV) 26 ENG Media Type Given automatically after choosing the source. Last change date Indicates the date and time of last modification made on the clips. The data are updated automatically and can not be modified by the user. Media Location Assigned automatically ON-LINE: the clip is present and accessible. OFF-LINE: the clip is present, but is not accessible; for example when there is a computer on the network that at that time is off. NO MEDIA: the clip does not exist. MarkIn Automatic, given after the marking of the clip, it is the point where starts the part of the movie that must be broadcasted. Numeric in format HH:MM:SS.FF MarkOut Automatic, given after the marking of the clip, it is the point where ends the part of the movie that must be broadcasted. Numeric in format HH:MM:SS.FF Length Automatic, given after the marking of the clip, it is the actual length of the movie that will be broadcasted. Numeric in format HH:MM:SS.DD Intro Automatic, given after editing the clip, it is the point at which ends the part of the movie that you can interrupt. Numeric in format HH:MM:SS.FF OutTro Automatic, given after editing the clip, it is the point at which starts the part of the movie that you can interrupt. Numeric in format HH:MM:SS.FF Marked Automatic, given after the marking of clips. If selected, it means that the movie has been Marked, that have been set Markin and MarkOut. If the clip is not marked it can not be broadcasted. Teorical Data Rate Indicates the theoretical quality to which you want to record the clip and it can not be changed. Real Data Rate Indicates the actual quality at which the clip is recorded and it can not be changed. 11.1.1 Tape Data Support Name Name of the tape or subject. T.C. In Automatic Numeric in format HH:MM:SS.FF T.C. Out Automatic but it can be changed. Numeric in format HH:MM:SS.FF Length Automatic Numeric in format HH:MM:SS.DD T.C. Intro Automatic Numeric in format HH:MM:SS.FF | TV (Only for Digiware TV and music TV) 27 ENG T.C. Outtro Automatic Numeric in format HH:MM:SS.FF Page 2 with Type Export, selected in Setup, equal to TX: Source Select from the list the type of source from which the clip will be assimilated (VTR, HDR, LINE). Last change date Indicates the date and time of last change made on the clips. The data are updated automatically and can not be modified by the user. Media Location Assigned automatically ON-LINE: the clip is present and accessible. OFF-LINE: the clip is present, but is not accessible; for example when there is a computer on the network that at that time is off. NO MEDIA: the clip does not exist. MarkIn Automatic, given after the marking of the clip, it is the point where starts the part of the movie that must be broadcasted. Numeric in format HH:MM:SS.FF MarkOut Automatic, given after the marking of the clip, it is the point where ends the part of the movie that must be broadcasted. | TV (Only for Digiware TV and music TV) 28 ENG Numeric in format HH:MM:SS.FF Length Automatic, given after the marking of the clip, it is the actual length of the movie that will be broadcasted. Numeric in format HH:MM:SS.DD OutTro Automatic, given after editing the clip, it is the point at which starts the part of the movie that you can interrupt. Numeric in format HH:MM:SS.FF Page 3, only visible if the type selected in the Export Setup is DigiTV: Skipable If enabled means that the clip you are entering may be canceled in the event of delay of time. Interruptable If enabled means that, in case there are any delay, the clip that is being inserted will be interrupted to recover the time; This will be done by cutting, as needed, only from the Outro point to the End. Delete List from which to choose: NO: The clip should not be deleted Remove Media: after it was used the clip can be deleted Archive Media: after it was used in the clip will be moved to the archive. Start Type List to choose the type of start to be given to the clip: AUTOMATIC, in this way the start of the clip will be automatic; MANUAL, during the broadcast, the director will wait for the user to manually start the clip; START GPI (2), during the broadcast, the director will wait in for a input contact associated with the selected number Time Out Enter the maximum time (HH:MM) beyond which the clip must be broadcasted even in the absence of the signal. Stop Type | TV (Only for Digiware TV and music TV) 29 ENG List to choose the type of stop to give to the clip: AUTOMATIC, in this way the stop of the clip will be automatic; MANUAL, during the broadcast, the director will wait for the user to manually stop the clip; START GPI (2), during the broadcast, the director will wait for a input contact associated with the number chosen to stop the clip. Time Out Enter the maximum time (HH: MM) beyond which the broadcast of the clip should be stopped even in the absence of the signal. Input Macro You can select from the list the operations that must be performed at the beginning of the clip, for example, the start of a particular graphic or an external command. Output Macro Like the previous field but applied to the end of the clip. Page 3, only visible if the type selected in the Export Setup is TX: Skipable If enabled means that the clip you are entering may be canceled in the event of delay of time. Interruptable If enabled means that, in case there are any delay, the clip that is being inserted will be interrupted to recover the time; This will be done by cutting, as needed, only from the Outro point to the End. Automatic Stop If selected, the clip will not wait for a manual command to finish, but it will do so automatically. Crawl Clip Name If selected, the name of the clip will flow superimposed throughout the duration of the same. Page Heading | TV (Only for Digiware TV and music TV) 30 ENG List (00 to 99) from which to select the header page which should be broadcasted. Clock Superimposure List (01 to 99) from which to select the type of clock that will be broadcasted during the clip. Video Macro Crosses Select the set of intersections to be used for video output. GPI Control Indicate that the contacts will be activated with the transmission of the clip. Crawl Text Start Enter the text you want to appear at the beginning of the transmission of the clip. Iteractions Select from the list (1 to 20) the number of times that the text will scroll. Seconds from Start Numeric in HH:MM:SS format Enter the time that elapses from the beginning of the clip, to start scrolling the text. Crawl Text End Enter the text you want to appear at the end of the transmission of the clip. Iteractions Select from the list (1 to 20) the number of times that the text will scroll. Seconds to end Numerical in format HH:MM:SS Insert the time from the end of the clip to start the text scroll. Start page List (from 01 to 99) where to select the header page that will be broadcasted in the beginning of the clip. Seconds from Start Numeric in HH:MM:SS format Insert the time that must go by from the clip start, to make the selected page appear. Length Numerical in format HH:MM:SS Enter for how long the page will be broadcasted. End page List (from 01 to 99) where to select the header page that will be broadcasted at the end of the clip. Seconds to end Numerical in format HH:MM:SS Insert the time from the clip end tolet the selected page appear. Length Numerical in format HH:MM:SS Enter for how long the page will be broadcasted. Audio File If during the clip you have to broadcast an audio file, enter in this field the exact path where this file is. Length Numerical in format HH:MM:SS Enter the lenght of audio files. | TV (Only for Digiware TV and music TV) 31 ENG Page 4, shown only if the Export Type selected in the Setup is DIGITV: Logo Double click and select the logo (the graphic) that wll be broadcasted for all the length of the clip. Graphics Double click and select the graphics that must be broadcasted during the clip but not for its whole length. From start/From end Choose the reference for the graphic broadcast. For example after 10” from the start or 15” to the end. Seconds Numerical in format HH:MM:SS Enter the exact moment when the graphic must start. Length Numerical (max. 6 digits) Enter for how many seconds the graphic will be broadcasted. Command Enter the command line to be executed. | TV (Only for Digiware TV and music TV) 32 ENG Recorder By pressing the F12 key, to register or modify the clip, the mask that will be shown will be the following one: . 11.1.2 DIGI REC Pressing the DIGI REC key, will appear the tool for recording clip: | TV (Only for Digiware TV and music TV) 33 ENG Macro Clicking on this button it will open the possible sources to be selected to capture the clip. Record (F5) It is the key to start recording. Stop (F2) Press to stop recording. New recording (ALT+F5) Allows you to restart the recording, it automatically creates a "sub-clip." Delete With this button you can delete the physical file. You are prompted to confirm your selection. Import Allows you to import a movie previously computerized. Parameters The parameters appear on the left side by default except: Profile, where you can select by clicking on the right side of the string format for airing, example DV PAL Maximum duration, where you can write in the format HH:MM:SS the maximum recording time 11.1.3 DIGI EDIT When you finish to record or import your movie, by clicking on the DIGI EDIT button you have the opportunity to mark the clip, that is to determine from which point to which point can be broadcasted and what audio level; | TV (Only for Digiware TV and music TV) 34 ENG During the opening phase it will be loaded the video to be marked and on the window in the top right, picture, you will be assigned a .jpg image that will characterize our VIDEO besides the name at the top that will be the same name that we assigned to the clip. The sequences of the movie appear at the bottom where you can, depending on the selected button, obtain the following views and features: Pressing the button Show / hide waveform will be displayed different levels of audio during the movie Pressing the key Zoom commands can be displayed with +, -, to marks and All depending on the selection of the various parts of the movie Pressing the key Mark commands I can choose to position myself where I want to begin airing with the cursor and give the mark in and then moing to the point where I want to end, click the mark out. Pressing the convert commands you can convert your movie or any part of it previously selected, from one format to another eg. .avi file I can convert to .mpeg, etc ... Audio level Moving the slider on the left to the top or bottom you can set the audio level of the movie as close as possible to the standard. Preview Ratio Indicates the format of the movie eg. 4:3 or 16:9. Position Expressed in HH:MM:SS,FRAME indicates the position in which I find myself in the movie. Play To start the movie. Stop To stop the movie. Mark In Position from which starts the broadcast. | TV (Only for Digiware TV and music TV) 35 ENG Intro Position, prior to which, in case of delay of the schedule and having selected the Interruptible option our movie will be cut. Mark Out Position after which the broadcast ends. Outro Position, after which, in case of delay of the schedule and having selected the Interruptible option our movie will be cut. +or- 1 and 10 sec. Moves the cursor position of the given time. +or-1 frame Moves the position of the cursor in the indicated time (25 frames = 1 second) Go to Mark In Place the cursor on the mark in. Go to Start Place the cursor at the beginning of the movie. Go to End Place the cursor at the end of the movie Go to Mark Out Place the cursor on the mark out. On the right side of the screen you will find all information relating to our film in order to check the proper preparation for the broadcast. 11.2 PROGRAMS This table allows the management of Programs: each program can contain one or more clips. You can create the program empty and then, using the F12 key, run the DIGIBroadcast recorder to record the various clips. You can also create an empty clip in which to insert only the general data and then record it later. To insert a new program, press F2, to edit an existing program double-click with the mouse on the desired line, to delete an existing program press F5. | TV (Only for Digiware TV and music TV) 36 ENG View the list composed by the fields: Code Numerical required given automatically (progressive), but changeable. It doesn’t allow you to insert the same value (10 numbers maximum) more than one time. Length Numeric in the format HH:MM:SS.DD Given automatically after recording or inserting the clips. Category List where to choose the category membership of the program. List data are the ones inerted in the Category table. Description Alphanumeric required (50 characters maximum) Description of the program. On air Description Alphanumeric optional (50 characters maximum) It is the description that will appear on the screen, to the direction, when the program will be on air. Journal Description Alphanumeric optional (50 characters maximum). It is the description of the program in the journal communications. Clip type List where to choose the Clip type (eg. Spot). Register Description Alphanumeric optional (50 characters maximum). It is the description that will be printed in the register in correpondence to the program. Media Location Given automatically ON-LINE: the clip is present and accessible. OFF-LINE: the clip is present, but not accessible; for example when it is on a computer of the net that is turned off at the moment. NO MEDIA: the clip doesn’t exist. Origin | TV (Only for Digiware TV and music TV) 37 ENG Required field. List where to select the origin of the program (eg. Selfproduct). Data on the list are the ones inserted in Origin table. Registers typology details Required field. List where to choose the Typology that will be associated to this program, during the Registers creation phase. List data are the ones inserted in the Typology Details table. Nationality List where to choose the nationality of production of the film. List data are the ones inserted in the Nationality table. Production year Enter the year of production of the film in 4 numbers format. Note Free field for notes insertion. Exclude hours Enter the time slots when the program can’t be broadcast (HH:MM) On the right of these fields there is a grey square; double click on it to insert an image to be associated to the program. Archive Select this field if the program is to be considered as archived. Last change date Digiware enters automatically the date of the last modify of the program. Clicking this button, the selected clip will be associated to the program, but not duplicated. To insert a new clip click on F2; to modify clips already inserted double click on the desired clip or select it and press enter; to record a clip click on F12; to copy an existing clip press F11. The mask for the modification or the recording of a clip is the same already explained in the Clip section | TV (Only for Digiware TV and music TV) 38 ENG 11.3 SERIES This section of the software allows you to organize the broadcasting of TV series, giving the choice to choose the rotation type, the number of episodes and onair dates. Page 1 of 2: Code The code is given automatically by the software and it is not changeable. Length Numerical in HH:MM:SS,DD format, calculated by Digiware on the basis of the length of the inserted clips. Category List where to choose the category membership of the series. Data on the list are the ones inserted in Category table. Description Alphanumeric required (50 characters maximum). Description of the series. On air description Alphanumeric optional (50 characters maximum) It is the description that will appear on screen, to the direction, when the series will be broadcasted. Journal description Alphanumeric optional (50 characters maximum). It is the description of the series in the paper communications. Clip type List where to choose the Clip type (eg. Spot). Register description Alphanumeric optional (50 characters maximum). It is the description that will be printed in the register in correspondance to the series. Origin List where to select the origin of the program (eg. Selfproduct). Data on the list are the ones inserted in Origin table. | TV (Only for Digiware TV and music TV) 39 ENG Register typology details List where to choose the Typology that will be associated to this program, during the Registers creation phase. List data are the ones inserted in the Typology Details table. Nationality List where to choose the nationality of production of the film. List data are the ones inserted in the Nationality table. Production year Enter the year of production of the film in 4 numbers format. Exclude hour Enter the time slots when the series can’t be broadcast (HH:MM). Note Free field for notes insertion. Page 2 of 2: Rotation By selecting this option you can open the drop down menu and clicking on the black arrow will appear: Manual With this rotation type it is possible to manage a series that has neither fixed date nor a required broadcast order. The episodes must be inserted manually on the playlist, and it is not possible to manage them from pre schedule and it doesn’t make any control on the number of the last episode broadcasted. Progressive With the progressive rotation I can manage the series even from the pre schedule: Digiware will check the number of the last episode broadcasted and insert in the playlist the following one. Cyclical The cyclical rotation, once the broadcast of all the episodes scheduled ended, let Digiware start again from the first one in a cyclical way. Inserting manually the series in the playlist, the software will control the number of the last episode broadcasted and insert the following one. Random | TV (Only for Digiware TV and music TV) 40 ENG Inserting a series with Random rotation in pre schedule, Digiware will not follow any logical order in the choose on the episodes to broadcast, but it will broadcast in a random way. Issue date Choosing this rotation type, the created episodes are not identified by a number, but only by the broadcast date; this date is automatically generated after the insertion of the time interval and the days valid for the broadcast. Start date: enter the start date of the series broadcast. End date: enter the end date of the series broadcast. Days of the week: select the days of the week when the series will be broadcast. Rotation Date With this rotation type every episode will be broadcasted in the assigned day but only since the wanted hour; until then Digiware will broadcast the previous episode. To work in this way is useful when a clip can be broadcasted as a replica, until when the new recording will be available. Hour: enter the hour when it is possible to start broadcasting the series of the day. Start date: enter the start date of the series broadcast. End date: enter the end date of the series broadcast. Days of the week: select the days of the week when the series will be broadcast. From episode – To episode Numerical (4 numbers maximum) Insert the number of the first (From) and the last (To) episode of the series. Digiware will automatically number all the episodes contained in the interval. Exclude days Clicking on this option it will open the calendar referred to the period chosen and you can go to exclude the days on which the series should not go on the air (eg. For a football game at the stop of the season) in this way clip of that episode will not even be created. Recalculate episodes Click the button to let the software calculate the number of episodes and broadcast date according to the assigned rotation type. Don’t send Making double click on the field will appear the following symbol broadcasted. , that means that this episode will not be Episode Shows the episode number. Description Alphanumeric (50 characters maximum). It enters the description already assigned to the series, but double clicking on it it is possible to modify it for every single episode. Length Shows the duration of the clip that can not be changed at this point. Media Location It shows the clip state: if the film is present or not. Clip details In the lower box there are all the details about the selected clip. With double click you can open the schedule of each clip and modify its data. Archive Select the box to store the series. Last change date It shows, automatically, the date of the last change made on the series. To insert a new Clip, click on the F2 button; to modify clips that have been already inserted, click with the right key of the mouse on the desired clip and select the item “Complete Modify”; to record a Clip, click on F12. | TV (Only for Digiware TV and music TV) 41 ENG 11.4 CLIP EPISODES In this section of our menu you will find all the clips that we have created in the SERIES. From this position it is easy to free discs memory of different computer from the video clips that we know will no longer be broadcasted. In fact, clicking with the right mouse button on the clip in question will appear the item "delete the physical file" and repeating the operation will appear the item "Store" to store the clip. You can delete a file and store even a large number of data, just clicking and holding down the shift key on the keyboard in the gray area on the left of the screen at the first clip of interest and then, while holding down the shift always on the gray part of last clip of interest. If the clips are not in a row will do the same thing by holding down the ctrl key and selecting clips that interest us always in the gray on the left side of the screen. At this point, clicking on the selection, on a clip containing the video (in the case of the empty clip you can only store), with the right mouse button and selecting delete physical file our software will begin to empty the clip selected one by one. The same operation can be repeated to store the episode clips. | TV (Only for Digiware TV and music TV) 42 ENG 11.5 AGENDA With this option I get the chance to go in the schedules to include those one-off events that I do not want to lose sight of, but that does not repeat at regular intervals (eg. live for a special event, an advance or postpone sport match, etc ...) In this section, our screen is presented in three parts. On the left side of the screen we have the calendars from which we can select the day in which you want to enter the program. At the center we have the week containing the selected day with 24 hours of broadcast. On the right we have the screen in which, by clicking with the right mouse button, we can choose the clip, the clip episode, the program or series to be scheduled. To enter the clip on the day and time you want, we can directly use the drag and drop positioning it at the desired point (the point will now appear in the lower left corner in the middle and move according to the position of our mouse), or we can use as always double-click on the clip in question or the Enter key. In each of the three cases a new window will appear: Where to check and if necessary change the time of airing and the duration of the broadcasting. Both data are in HH:MM:SS. Press F10 to confirm or ESC to quit. | TV (Only for Digiware TV and music TV) 43 ENG 11.6 FILLERS This table allows you to define the Fillers (Buffer) used by DIGIBroadcast. In the list on the right of the screen, composed by Programs and Clips (click on the desired button), select one or more lines and drag them on the left list. To select many consecutive lines, select the first, click on the square on the left of the Code, press the Shift key of the keyboard and select the last desired line. To select many lines not consecutive, select them, in the same way shown above, keeping pressed the Ctrl key of the keyboard. It does not allow you to insert the same Clip or Program twice. To send the fillers to DIGIBroadcast click the Export button (F3). Pressing the right key of the mouse on the left list will appear a choice menu of the possible operations. | TV (Only for Digiware TV and music TV) 44 ENG 11.7 EMERGENCIES This table allows you the definition of those programs and those clips that will be used in an emergency. In the list on the right of the screen, composed by Programs or Clip (click on the interested button), select one or more lines and drag them on the left list. To select many consecutive lines select the first, click with the left key of the mouse on the square on the left of the Code, press the Shift key of the keyboard and select the last interested line. To select many lines not consecutive, select them, in the same way shown above, keeping pressed the Ctrl key of the keyboard. It does not allow you to insert the same Clip or Program twice. To send the emergencies to DIGIBroadcast click the Export button (F3). To delete Clips od Programs inserted as Emergencies, select them and press the key F5 or press the right key of the mouse and select Delete. | TV (Only for Digiware TV and music TV) 45 ENG 11.8 KEYBOARD This table allows you the definition of the 20 keyboards available with DIGIBroadcast. Select the keyboard you want to create or modify, from the list up on the left; if no list has been set yet, it will show only numbers (from 1 to 20). Once you selected the keyboard, in the line below it will be possible to assign or modify its name. In the right side of the mask you will find the complete list of the existing clips, with Code and Description. To associate a Clip to a key you must select the desired key (left side of the mask from 1 to 16), one or more Clip to associate (in the right side) and drag them to the left, in the list under the keyboard. To select more consecutive Clips select the first, click with left button of the mouse on the square on the left of the code, press the Shift key on the keyboard and select the last desired clip. To select more Clips not consecutive, select them, in the same way shown above, keeping pressed the Ctrl key of the keyboard. To send the keyboards to DIGIBroadcast click on Export (F3). Right clicking with the mouse on the Clip list on the left, a choice menu of the possible operations will appear. | TV (Only for Digiware TV and music TV) 46 ENG 11.9 CHECK FILE This table allows you the deletion of those video files that do not have associated clips, or those clips that have never been broadcast after a certain date. In the list there are the files that are not associated to any clip (empty Code field) or the clips never broadcast after the Start Date. To select the clip for the deletion of the physical file, double click on the related line or select it and press enter. To select many consecutive lines select the first, click on the square on the left of the Code, press the Shift key of the keyboard and select the last interested line. To select many non-consecutive lines, select them, in the same way shown above, keeping the Ctrl key of the keyboard pressed. To delete clips or programs inserted as Emergencies, select them and press the F5 button, it will delete all the files with the green check off on the Del column. | TV (Only for Digiware TV and music TV) 47 ENG 11.10 REC LIST In this section, I have the opportunity to schedule the recordings of programs to be carried out during the day and send them to the playout To insert a new program to be recorded in the program list press the key (F2). It will show a list of our programs. Positioning ourselves on the program concerned and double-clicking, F10 or enter, we are going to include in our list of recording the new item. At this point by positioning the new entry and double-clicking or enter it will open the following window: Here we have the chance to assign to our registration the parameters that interest us: period, beginning hour in size HH:MM:SS, tv station and recording days. When finished the insertion, click on the button (F10) to save. By clicking on the columns at the top we can order our table depending on the column of interest code, Description, Date, Start Time. To send the list to recordings to DIGIBroadcast press the Export button (F3). For the printout (F6). | TV (Only for Digiware TV and music TV) 48 ENG 11.11 CATEGORIES This table allows you to define gendres that will be assigned to Programs or TV Clip. To insert a new category press the key F2, double-click the line you want to edit it and press F5 to delete it; or press the right mouse button and choose from the menu Insert or Delete. The fields that can be entered are: Description Alphanumeric required (40 characters maximum). Description of the category. Colors Clicking this button it is possible to associate to every category a BackColor and a different font (ForeColor). Image It is possible to associate an image to every category. F10 to confirm or ESC to cancel | TV (Only for Digiware TV and music TV) 49 ENG 11.12 NATIONALITY The table allows you to manage a list of the production nationalities of clip and programs. To insert a new nationality press the key F2 or, clicking the right key of the mouse, select “insert” from the menu. Code Numerical required given automatically (progressive), but changeable. It does not allow you to insert more than one time the same value (5 numbers maximum). Description Alphanumeric required (40 characters maximum). Description or name to identify the nationality. Europe Select the field if the Nation is european. Necessary to allow you the printing of the statistic data of the broadcasting activity form (table Q1). 11.13 CLIP TYPE The table allows you to manage the different clip typologies that you can find inside a schedule (eg. Advertising, Promo, Telepromotions, etc.). Shows the list composed by the fields: Code Numerical required given automatically (progressive), but changeable. It doesn’t allow you to insert more than one time the same value (5 numbers maximum). Description Alphanumeric required (40 characters maximum). Description of the clip type. Register Description Alphanumeric (40 characters maximum). Description associated during the creation of the registers. Advertising If selected, the clips associated to this category will be considered advertising. 11.14 SOURCE COLOR With this table you can assign to our sources, by positioning the source and clicking with the right mouse button, a background color (BackColor) and a text color (ForeColor). | TV (Only for Digiware TV and music TV) 50 ENG 12 PLAYLIST 12.1 CREATION By selecting Creation / Editing from the PlayList menu, the following window will appear on screen: It is a real calendar where you can choose the day of which you want to create or modify the schedule. When a schedule is created, a green tick appears under the date, and on the top right the time that has not yet been programmed is shown in blue. If you want to generate the schedule on a day not scheduled yet, click on F2 after selecting it, or double-click with the mouse on it. Clicking with the right mouse button on a day where the schedule has already been generated, you can choose among a number of options: Creation, Delete, Modify week, Modify day, Partial Modification. The mask for the creation is the following: Schedule List to choose the type of schedule (created in the Pre-Schedule table) to be created. From - To Numeric in HH:MM format Specify the time interval of the schedule that you want to create (modify it only if you intend to create a portion of the day instead of 24 hours). Of (From - To) Numeric, mandatory, in DD/MM/YY format Specify the day for which you want to create the schedule. If you double click with the mouse on a day to enter the schedule, or you clicked on F2 after selecting it, these fields are not editable because they contain the date of the selected day. Press OK to confirm, or ESC to cancel. | PLAYLIST 51 ENG Export: sends the schedule to the OnAir playout. Sinchronize: sinchronizes the schedule with the broadcasted playlist. Update Parameters: updates all the parameters of the items composing the schedule. Data send to RAM-COMM: updates any changes made on the advertising (only for Digiware TV). View Broadcasted: shows the broadcasted playlist (available only after the synchronization has been executed on the day). You can execute the same commands by clicking with the righ mouse button on the day: Create and Sinchronize will be the options for a day not yet generated, while for an existing schedule the options are: | PLAYLIST 52 ENG 12.2 EDITING When editing a schedule, the window will be as follows: On the left you can see the daily schedule, while on the right you find the mask for inserting or editing the schedule lines. On the top left you see the number of errors in the schedule and the time remaining to fill 24 hours. The fields displayed on the form are as follows: Media Location (only for Digiware TV) ON LINE (green dot) in case of on air shows or material for the current broadcasting. NO MEDIA (red dot) missing airing material. Imm. (only for Digiware TV) .jpg image that features the clip Start - End Estimated start time and ending time for the broadcasting of the scheduled line. Length Length of the scheduled line in HH:MM:SS.DD format, and its graphical representation. Blocked It displays Minimum Hour and Maximum Hour, if they have been entered. If the field is empty and you double click on it, the values of the Start – End field of the scheduled item will be automatically entered. M - Missing If the item inserted in the schedule line is missing, you will see this picture L - Linked If the schedule line is linked to the previous one, this picture will appear C - Deletable If the schedule line is deletable, this picture will appear | PLAYLIST 53 ENG I - Interruptible If the schedule line is interruptible, this picture will appear I/C/F - Introduction – Context – Final (only for Digiware radio) They can be selected if the type of the inserted line is Songs. If in the clocks the song has been scheduled with the check mark on one of these columns, the song will be associated to the related audio of Introduction, Context or Final that have been set in Djpro’s song database. Description It is the description of the scheduled item that can be a Newscast, commercial cluster, teleshopping,… etc. Line Type Description of the scheduled item (e.g.: Advertising, Song, Clip… etc. Category Category of the scheduled item (e.g.: Special, Teleshopping, Sport, News,… etc. Code It is the code of the scheduled item. MarkIn - MarkOut It indicates, in HH:MM:SS.DD format, the Mark In and Mark Out points of the scheduled item. Intro - Outtro It indicates, in HH:MM:SS.DD format, the Intro and Outtro points of the scheduled item. Fade In – Fade Out It indicates, in HH:MM:SS.DD format, the Fade In and Fade Out points of the scheduled item. Clock It displays the start time and the end time of the clock of the scheduled line, as it is set in the pre-schedule. File It displays the path where the file of the scheduled item is saved. U This field is marked if the user made any changes in the daily schedule on the item itself. Real Date It shows the date and time of the actual broadcasting of the scheduled line. Graphics – G (only for Digiware TV) A check mark appears in this field if a command or a graphic has been inserted into the clip’s form (page 4 of the form). E. T. - External Command A check mark appears in this field if in the clip’s form a macro (for the TV) or an External Command (for the radio) has been inserted. Pressing the right mouse button on the lines that make up the schedule, you can do the following operations (on each element): | PLAYLIST 54 ENG 12.3 GRAPHS You can get the graphs that represent the presence in the scheduling of a song, a clip, an episode or a program. Days Number You can set the number of previous days that you want to view. Show Empty Days If it is selected, even the days when the program has not been aired will be displayed. From – To Enter the start date and end date (DD/MM/YY) in these fields to search in a defined period. Show Number of Passages If it is selected, the number of passages is shown in place of the dots. Click on F6 to obtain obtain two types of printing: Graph, which is the exact pattern we see in figure with the marked passage or number of passages; Tabular, with day of the week, date and exact broadcast time expressed in HH:MM:SS | PLAYLIST 55 ENG 13 STATISTICS Passages It shows, for the period and time indicated, the broadcasted songs, clips, episodes and programs together with the related amount. Enter the Start Date and End Date of the period, the Start Time and End Time, choose if you want to perform the search by songs or audio categories (for the radio); by Clips, episodes or programs (for the TV) and click on OK (F10) to start the search. Passages by Date It shows the passages, for every song, clip, episode or program, for the period and time entered, showing the date and time for each of them. | STATISTICS 56 ENG Last Passage Enter the period, the song category or the clip category, the episodes or programs of which you want to know the last broadcasted passage. For Digiware TV, by ticking the “All Networks” voice, you will have the total scheduling of the networks, while unticking this parameter you will get only the data related to the network you are working on. In Digiware TV, selecting the clip you want with the right click of the mouse, you can delete the related file of the program and/or archive it. If you want to delete or archive more than one file, select them by holding the shift key (consecutive files) or the ctrl key (non consecutive files). | STATISTICS 57 ENG 14 REGISTERS 14.1 CREATION Selecting, from the Registers menu, the Creation/Editing voice, the following mask will appear on screen: It is a real calendar where you can choose the day you want to create or edit the register of. When a register is genereated, a green check appears under the date. If you wanto to generate the register of a new day, Click on F2 after having selected it. The form for the creation is the following: Clicking with the right mouse button on the day you can choose between the following options: | REGISTERS 58 ENG From - To Numeric, mandatory, in DD/MM/YY format. Set the period for which you want to create the register. Real / Programmed Choose if the register must be generated according to what has been really broadasted by the playout (Real) or what has been scheduled by Digiware. Click on OK to confirm, ESC to cancel. NB: to create a REAL type register, you must SYNCHRONIZE the schedule first. Synchronize: to manually align the generated register to the data contained in the log file created by the playout. 14.2 RADIO REGISTERS In the case of radio registers (or for the music TVs), where the schedule events in a day are many and would generate registers of many pages, it is necessary to configure some macros that provide the basic rules for the creation of the registers in order to group the sequential events of the same type in one row (e.g.: “music programs”). For the music TVs, you have to enable the creation of the “radio” type registers from Utility – Setup – Settings, ticking the “TV: Use radio registers” voice. Click on the related button to access the registers setup and configure the rules. 14.2.1 Profiles The term "profile" refers to a collection of settings, called macros, which are used by Digiware for the creation of registers. In the Macro section, explained below, you can set several criteria to develop the registers with, and in every profile you can associate a different macro to each day of the week. During the actual creation of the registrer you will be able to choose which scheme (profile) to follow. Description Alphanumeric mandatory (max. 40 characters) Insert the description or the name for the profile. Days of the week Choose the macro to be applied from the list for each day of the week. pressing this button, you can copy, in the selected profile, the settings of a profile already entered. | REGISTERS 59 ENG 14.2.2 Macro You can think of macros as a set of instructions which, when set, will be performed by the program during the creation of the registers. In the upper left is the list of macros already entered. The value automatically presented, and not editable, is 000 <Default>: 000 is the associated number and <Default> is the description. To add new macro, select a number from the list and enter a description. Description Alphanumeric mandatory (max. 20 characters). Insert the name for the macro. pressing this button, you can copy, in the selected macro, the configuration of a macro already inserted. Test Date Numeric in DD/MM/YY format. Enter a past date to have some sample values available while filling the setup. 14.2.2.1 Categories To add a new category, double-click with the mouse on the line that you want to update; To delete a line, select it with the right mouse button and choose Delete. Description Alphanumeric mandatory (max. 64 characters) Origin Choose from the list the origin associated with the category you are entering. The data in the list are those included in the Origin table. | REGISTERS 60 ENG Typology Detail Choose from the list the type associated with the category you are entering. The data in the list are those included in the Typology Details table. % Information Set the percentage of time that must be considered as information for the category. Local Inf. Indicate whether the percentage of time that must be considered as information within the category is to be considered as Local. Include - Exclude To enter new selection criteria, double-click with the mouse on the empty lines of the column you want (Description, Author or File). The lines in the playout log will be classified into different categories according to the parameters inserted here; the lines, for being included or excluded, must begin or contain in their description, or author, or in the file name, the string entered in this field. Example: by setting in “Test” category: Include, Start with, Description “JINGLE”, all those log lines that will have a description that begins with "JINGLE" will be treated as "Test" category. Inserting the same settings in Exclude, all the log lines except those with the description that begins with "JINGLE" will be part of the "Test" category. You can set multiple parameters simultaneously, in both Include and Exclude. pressing this button, a form will open that will allow you to choose description, author or file to insert, from the list of those already in use. 14.2.2.2 PreProcessor Before the actual creation of the registers, the software analyzes the file produced by the playout and deletes, insert or modifiy the lines by following the directions given in this section of the setup. Delete Lines Any rows that will comply with the conditions set in the following fields will be deleted. START TIME – END TIME You can limit the deletion of lines to a narrow time range, indicating the start time and end time. Leaving the range from 00:00:00 to 24:00:00, the full day will be considered. DESCRIPTION – AUTHOR - FILE Alphanumeric (max 64 characters). Insert the Description and/or the Author and/or the File which will identify the lines that, starting with (Start with) or containing (Internal) these terms, must be deleted. Insert Lines New schedule lines will be inserted, or the existing ones will be modified, using the data entered in the following fields. START TIME Numeric in HH:MM:SS format. Set the time where you want to insert the line. TYPE Set the type of insertion that needs to be done: | REGISTERS 61 ENG - Before the new description is inserted in the line above the one found. Example Start Time = 11:00 Description = SPOT BEFORE AFTER Begin End Description Begin End Description 10:46 10:54 BNR 10:46 10:54 SPOT 10:54 11:02 CNR 10:54 11:02 CNR - After the new description is inserted in the next line to the one found. Example Start Time = 11:00 Description = SPOT BEFORE AFTER Begin End Description Begin End Description 10:54 11:02 CNR 10:54 11:02 CNR 11:02 11:06 DNR 11:02 11:06 SPOT - Forced the line found is limited to the inserted time and the remaining length is assigned to the new description entered. Example Start Time = 11:00 Description = SPOT BEFORE AFTER Begin End Description Begin End Description 10:54 11:02 CNR 10:54 11:00 CNR 11:00 11:02 SPOT DESCRIPTION – AUTHOR - FILE Alphanumeric (max 64 characters). A line will be insertedT with the description, the author and the file entered in these fields. Search Lines (Edit) DESCRIPTION Double click with the mouse on a line, in the left panel, to enter a description that must be found and changed. You can search by name of the Author, by Description or by File name, and if the parameter must be internal to the description or at its begin. DESCRIPTION Double click with the mouse on a line, in the right panel, to enter a description that will replace or modify the searched one. | REGISTERS 62 ENG Hour Selecting this parmater, it will be possible to indicate a specific time interval (Start Time - End Time) in which to search. Minutes Selecting this parmater, the search will be done each hour in the same time interval indicated in these fields Minutes from: the minute (in every hour) at which it will start searching. Minutes to: the minute (in every hour) at which it will stop searching. Length Set, in HH:MM:SS format, the length of the item you are entering. If Where is Forced, this field is not visible. Advertising Cluster If selected, the software is told that this type of search is combined with lines of advertising schedule, so the reference time will be the one set by Ram-Comm. Where Indicate the position where the item that replaces the one found should be inserted: - Before inserted before the one found - After inserted after the one found - Forced replaces the one found - Divide to Half the item to be replaced is divided into two equal parts: one part is placed before and the other one after the item found. METHOD OF INSERTION Remove from different items - If Where = Before The item is inserted before the one found and its length is subtracted to that of the previous item. Example Search: CNR Length: 00:00:40 Description new item: SPOT BEFORE AFTER Start time Description Length Start time Description Length 01:00:00 BNR 00:02:00 01:00:00 BNR 00:01:20 01:01:20 SPOT 00:00:40 01:02:00 CNR 00:03:00 01:02:00 CNR 00:03:00 - If Where = After The item is inserted after the one found and its length is subtracted to that of the next item. Example Search: CNR Length: 00:00:40 Description new item: SPOT BEFORE AFTER Start time Description Length Start time Descrizione Length 01:02:00 CNR 00:02:00 01:02:00 CNR 00:02:00 01:04:00 SPOT 00:00:40 01:04:00 DNR 00:03:00 01:04:40 DNR 00:02:20 Remove from found item - If Where = Before The new item starts at the same point where the found one started and its length is subtracted from that of the item found. Example Search: CNR Length: 00:00:40 Description new item: SPOT BEFORE AFTER Start time Description Length Start time Description Length 01:00:00 BNR 00:02:00 01:00:00 BNR 00:02:00 01:02:00 CNR 00:03:00 01:02:00 SPOT 00:00:40 01:02:40 CNR 00:02:20 - If Where = After The new item ends at the same point as of the one found and its length is subtracted from that of this last. Example Search: CNR | REGISTERS 63 ENG Length: 00:00:40 Description new item: SPOT Start time 01:02:00 BEFORE Description CNR Length 00:02:00 Start time 01:02:00 01:03:20 01:04:00 AFTER Description CNR SPOT DNR Length 00:01:20 00:00:40 00:03:00 01:04:00 DNR 00:03:00 Force length The length must be lower than or equal to the one of the item found. - If Where = Before The item found is assigned the entered length and the remaining time is assigned to the new description. First is the new line, and then the original. Example Search: CNR Length: 00:00:40 Description new item: SPOT BEFORE AFTER Start time Description Length Start time Description Length 01:02:00 CNR 00:02:00 01:02:00 SPOT 00:01:20 01:03:20 CNR 00:00:40 - If Where = After The found item is assigned the entered length and the remaining time is assigned to the new description. First is the original line and then the new one. Example Search: CNR Length: 00:00:40 Description new item: SPOT BEFORE AFTER Start time Description Length Start time Description Length 01:02:00 CNR 00:02:00 01:02:00 CNR 00:00:40 01:02:40 SPOT 00:01:20 DESCRIPTION Alphanumeric (max 64 characters). Enter the description that will replace the searched one (e.g.: SPOT). AUTHOR - FILE Alphanumeric (max 64 characters). Indicate the author and the files that will be associated with the newly inserted line. To sort the lines in the desired order, click with the right mouse button on the selected line, choose the SELECT item from the menu that appears, position on the line where you want to move the item, press again the right mouse button and select INSERT and answer YES to the question "paste element?". 14.2.2.3 Containers | REGISTERS 64 ENG Category Check, in the list below, the category or categories that need to be replaced and select from the list at the top the new description that will be inserted in their place. Start Indicate the item that will determine the begin of the container. Hour: exact hour Forced Hour: waits for the event on the air to finish and then starts Description: when the inserted description is found Author: when the inserted author is found File: when the inserted file is found Begin from next By selecting this option the beginning of the container will be set to the start time of the next event to the one found. End Indicate the item that will determine the end of the container. Hour: exact hour Forced Hour: ends when the next one begins Description: when the inserted description is found Author: when the inserted author is found File: when the inserted file is found End at previous Selecting this option, the end of the container will be set to the ending time of the previous event to the one found. | REGISTERS 65 ENG 14.3 EDITING When editing the daily register the mask will be as follows: At the top you will see the lines that make up the register with the following information: start time and end time, length, description, origin, Typology, percentage of information and notes. In the central part, the same view is given only to the lines of advertising, that can not be changed. Clicking with the right mouse button on a line you can Delete it, Divide it, resulting in two lines with the same length equal to half of the original one, or Copy it. To modify a line, double-click with the mouse on the desired one: it will be possible to change all the fields except the start time and end time. To delete a line, select it, press the right mouse button and choose Delete; but first of all you need to set in the During deletion field the fill type that must be done to occupy the space left by the item removed. | REGISTERS 66 ENG During deletion - Extend first: the length of the deleted line will be added to the length of the first line of the register. Example: delete the line E’TG REGIONE 19.20 REPLICA BEFORE AFTER - Extend previous: the length of the deleted line will be added to the length of the previous line. Example: delete the line E’TG REGIONE 19.20 REPLICA BEFORE AFTER - Extend following: the length of the deleted line will be added to the length of the next line. Example: delete the line E’TG REGIONE 19.20 REPLICA BEFORE AFTER - Extend last: the length of the deleted line will be added to the length of the last line of the register. Example: delete the line E’TG REGIONE 19.20 REPLICA | REGISTERS 67 ENG BEFORE AFTER - NO Lengthen: the lines that folllow the deleted one will keep the original length, will therefore remain a hole (equal to the length) at the end of the day. Example: delete the line E’TG REGIONE 19.20 REPLICA BEFORE AFTER Press [F2] to insert a new line in the register. Start Time The time entered in the field "End Time" of the selected line in the main screen is set automatically in this parameter. End Time It is automatically calculated after entering the length. | REGISTERS 68 ENG Length Numeric in HH:MM:SS formato. Insert the length that you want to assign to the line. Description Alfanumeric mandatory (max. 64 characters). Enter the description of the line that is being inserted or select the clips. button and choose from the available Origin Select from the list the source to associate with the line. Typology Detail Select from the list the typology to which the line belongs. % Set the percentage to be considered as information. Local Inf. Set the percentage of information to be considered as local. Start Container If it is selected, it means that the item you are inserting marks the beginning of a container. End Container If it is selected, it means that the item you are inserting marks the end of a container. Notes When the log is created automatically, the number of broadcasted commercials, if it is advertising, or the minutes of information are indicated in this field according to the percentage set. Press OK to confirm the insertion. Higher length or Insertion When you insert a new schedule line, or when you increase the length of an existing line, you must indicate in this field the type of "recovery" that has to be done on the time added. - Remove from the first one: The new line is inserted after the selected one and its length is subtracted from the one of the first line of the log. Example: select the line SOLO CALCIO ANTEPRIMA REPLICA insert E’TG REGIONE 19.20 REPLICA Length = 00:13:12 BEFORE AFTER - Remove from the previous one: The new line is inserted after the selected one and its length is subtracted from the one of the previous line. Example: select the line SOLO CALCIO ANTEPRIMA REPLICA insert E’TG REGIONE 19.20 REPLICA Length = 00:13:12 | REGISTERS 69 ENG BEFORE AFTER - Remove from the following one: The new line is inserted after the selected one and its length is subtracted from the one of the following line. Example: select the line SOLO CALCIO ANTEPRIMA REPLICA insert E’TG REGIONE 19.20 REPLICA Length = 00:13:12 BEFORE AFTER - Remove from the last one: The new line is inserted after the selected one and its length is subtracted from the one of the last line. Example: select the line SOLO CALCIO ANTEPRIMA REPLICA insert E’TG REGIONE 19.20 REPLICA Length = 00:13:12 BEFORE | REGISTERS 70 ENG AFTER - Don’t Remove: The new line is inserted after the selected one and no length will be changed. Example: select the line SOLO CALCIO ANTEPRIMA REPLICA insert E’TG REGIONE 19.20 REPLICA Length = 00:13:12 BEFORE AFTER Lower length When you modify the length of a line, if the new value is lower than the original one, you must indicate in this field how to use the time difference between the new and the original length. - Add to the first one: the new length is modified and the remaining time is added to the first line of the log. Example: Length E’TG REGIONE 19.20 REPLICA = 00:03:12 BEFORE AFTER - Add to the previous one: the new length is modified and the remaining time is added to the line before the modified one. Example: Length E’TG REGIONE 19.20 REPLICA = 00:03:12 | REGISTERS 71 ENG BEFORE AFTER - Add to the following one: the new length is modified and the remaining time is added to the line after the modified one. Example: Length E’TG REGIONE 19.20 REPLICA = 00:03:12 BEFORE AFTER - Add to the last one: the new length is modified and the remaining time is added to the last line of the log. Example: Length E’TG REGIONE 19.20 REPLICA = 00:03:12 BEFORE AFTER | REGISTERS 72 ENG - NO Add: the new length is modified and the remaining time is not added to any line of the log. Example: Length E’TG REGIONE 19.20 REPLICA = 00:03:12 BEFORE AFTER At the bottom of the mask the different types present in the log are displayed, with the related percentages of presence in the day that you are editing. When you select a type, on the right side of the mask you will see the detail, hour by hour, of the percentage of presence by highlighting, in bold style, the exceeding points for information and advertisement. | REGISTERS 73 ENG % Vertical If selected, the detail of the percentages will be displayed vertically. Press this button to display the same information, but in graphical form. The overall situation is shown on the left, and the detail on the right, hour by hour, of the chosen section. % Start Time / End Time Numeric in HH:MM:SS format. Enter the time interval for which you want to display the percentages. Programs gross Information By selecting this option, in the percentages calculation the containers will be considered with the information included. To see the list of programs actually broadcasted. SIAE Webradio - WebTV- SCF – OnAir Webradio - WebTv In these logs, you can view and print your programs by full year or first, second, third and fourth quarters, by category. You can also select multiple types simultaneously. | REGISTERS 74 ENG 15 UTILITY 15.1 SETUP 15.1.1 Archives Direction Data Path Mandatory Directory where you can find the video archives or Djpro archives. Advertising Type Indicate the type of advertising that will be inserted. RAM-COMM DATA SEND (if you use the Ram Comm software for the advertising schedule) Path for Ram-Comm Archives Mandatory Path where the files used for advertising are stored (if you use the Ram Comm software for the advertising schedule). Advertising Data Send path Mandatory Path where the software for the advertising management sends the data for the broadcast. Extension of Advertising Data Send Mandatory Extension of the files used for the advertising Ram-Comm Schedules Editing Command (for TV) Specify the path where Ram-Comm’s executable and the INI files are located. Song Manager Command (for Radio) Specify the command string for running the program for the Songs management (Song Manager). E.g.. “M:\RADIO\BIN\WINDOWS\CANZONI.EXE M:\RADIO\BIN\WINDOWS\ ADMIN”. Certification Specify the path where the files for the advertising certification written by the playout are located. 15.1.2 Settings | UTILITY 75 ENG Enable Log Field to be changed only after asking the Technical Assistance. Common to all broadcasters. Read Length By Archive If it is selected, the length of the file will be controlled from the archive. Keep Erasable If it is selected, the scheduling lines set as Erasable will still be kept in the palimpsest even if with a length set to zero. In this way, if a program lasted less than expected, the Erasable would be transmitted to cover the gap created. Erasable – do not overrun If selected, when a program is set as Erasable and is overriding two rows, it will be deleted. Enable audio associated to songs (only for the radio) If selected, also the voiceover files eventually linked to the scheduled songs will be inserted in the palimpsest. 3 fields (Introduction, Context, Final) will be added in the insertion of policies and clocks. ADVERTISING: Block start If selected, the start time of the advertising is locked. ADVERTISING: Block end If selected, the end time of the advertising is locked. | UTILITY 76 ENG ADVERTISING: Automatic insertion The program automatically inserts advertisements; references are however those set out in the advertising schedule, but the exact time is not taken, rather the point that the program considers most appropriate near the time indicated. ADVERTISING: Always Present If selected, Digiware considers the advertising as always present, even in the case where the file of the advertising schedule does not exist, by setting a zero length. SPOT: Accept Link If selected, the commercial break is always linked. DATA TRANSMISSION Automatic If selected, each time the schedule is modified, the data is automatically sent to the on-air workstation. AUTOMATIC SYNC: Ask for confirmation If selected, when from the creation/editing window of the schedule you try to get into a past day or in the current one, a message appears asking if to perform the synchronization of that specific day. VOICE OVER: Read Length By Archive (only for radio) If selected, the file length of the voice overs will be controlled from the archive. NEWS-BULLETINS: Read Length By Archive (only for radio) If selected, the file length of the Newscasts will be controlled from the archive. EDIT PLAYLIST: Enable AUTOSAVE If selected, when editing the schedule, the program automatically saves your changes every 5 actions or at least every 40 seconds. DATA TRANSMISSION : Always Update parameters If selected, when sending data, the software will automatically update the parameters of the items included in the schedule. DATA TRANSMISSION: Update parameters with confirmation If selected, when sending data, the software, before updating the parameters of the items included in the schedule, asks the user for confirmation. TV: Optional origin If the field is selected, the insertion of the origin in the Clip form becomes optional. TV: Optional Tipology’s Details If the field is selected, the insertion of the Tipology Details into the Clip form becomes optional. SYNC: Merge with advertising If selected, Digiware reads the advertising from the file written by Ram-Comm with data send. SYNC: Min. System failure in comment If the field is selected, in the display of broadcast items, the rows of the system failure will be written as a comment if of a length lower than the value entered in the following Min.System Failure field. TV: Production Year optional If the field is selected, in the Clip form, the Production Year field will not be mandatory. Write LOG missing songs It creates a log file with a list of missing songs (highlighted in red in the schedule). Exclude Mask songs (only for radio) If the field is selected, the songs with the MASKED attribute (it is set in Djpro) will not be considered among those that can be inserted in the schedule. Exclude Mask audio (only for radio) If the field is selected, the audio with the MASKED attribute (it is set in Djpro) will not be considered among those that can be inserted in the schedule. SONGS: Check excluded days (only for radio) If the field is selected, Digiware will verify the days exclusion set in Djpro before scheduling the songs. Schedule Correction - ignore 24h overrun If during a manual insertion in the schedule you exceed 24 hours, a warning message is displayed. Update Supports: Delete Support Name (only for TV) If a support (file) has been removed, Digiware removes the reference to that support in the Clip form too. Recalculate Hour points always Locked During the creation of the schedule, it sets all the commercial clusters as locked items. | UTILITY 77 ENG EDIT PLAYLIST: Real Intro It checks the validity of the INTRO parameter for the clips. If this is lower than the MARK IN value, it is set to 0. Align tables of broadcasters All additions, modifications or deletions in Politics, Pre-Schedules, Daypart, Groups (author, song etc.). Musical Categories or Clocks, are run on all broadcasters. TV: Set <All broadcasting> In the clip tables, by default it shows the ones that are common to all broadcasters. SONGS: Interruptible with OuTro = 0 (only for radio) If enabled, the songs with Outro (settable in Djpro) = 0, can be scheduled as interruptible and be interrupted at any point of the audio in case of delay of a locked item. PLAYLIST: Don’t visualize conflicts ( only for radio or musicTV) If enabled, during the manual insertion of a song, warnings of potential conflicts will not be displayed (song already inserted or author already entered). PLAYLIST: Do not import modified hours If enabled, when you import from an external program on an existing schedule, it will not overwrite previously modified clocks. TV: Don’t connect RecList (only for TV) If enabled, it prevents to monitor the status of the recording list (Digimedia reclist). Save changes to previous schedule Allows you to change the schedules prior to the current day. TV: Import/Export Clip If enabled, allows the import/export of clips and schedules from external softwares. VOICE OVER: Update Length opening Playlist (only for radio) At the opening of the schedule the length of the voice overs is updated automatically (without the need to use the F8 Update Parameters function). Hide Mask songs If the field is selected, the songs with the MASKED attribute (settable in Djpro) will not appear among the ones that can be inserted in the schedule. TV: Music Enables the features necessary for the schedule of a music TV. Specifically, it enables the menu for the insertion of songs in clocks and schedules, and adds the scheduling data (eg, category, year, mood, etc. ..) to the clip form. Move Lock Hour if missing If there are any items that have a locked hour and that will not be broadcast because missing, it moves the locked hour on the first previous item belonging to the same clock. This is because the missing items are not sent to the on-air and it would not know that the item had to be locked. TV: Spot color from clip If you select this field, the clip will appear in the schedule with the same color. Multi Thread Allows you to run multiple instances of Digiware. TV: Interruptable with OutTro = 0 If selected, in the case of interruptible items the transmission will be interrupted even if no value has been assigned to the outtro. Enable Stretch Audio (only for radio) If selected, it allows the audio stretch of jingles to conform to the BPM of the previous or following song. TV: Use radio registers If selected, it allows you to create logs by using rules as for the radio (see REGISTERS section of this manual). CAMPOFILE: Vecchio ordine Used for backward compatibility with very old Djpro databases in the management of Introduction, Context and Final fields. TV: Lock time of first playlist element If enabled, the first item of the day is automatically set as locked. | UTILITY 78 ENG 15.1.3 Export/Import Export Type Set the type of data Export: DJ-PRO for the Radio DIGITV, TX and VIPER for the TV If the selected Export type is DJ-PRO the following fields will be displayed: Data Send Path Mandatory It is the path where Digiware will send the schedule to be broadcast. Voice Over path Mandatory. Set the path where the Voice Over files are saved. Extension Mandatory. Set the extension of the files to be imported. Force Min. Hour If enabled, it sets as interruptible with outtro=0.1 seconds all the items that are not interruptible yet. Force all erasable If enabled, it sets as erasable all the items in the schedule. Subtract Seconds It can be set only if FORCE MIN. HOUR is enabled. It sets [minimum hour] = [scheduled time] – [N seconds]. If the result of the calculation is before 00:00, it will be set at 00:00 Add Seconds It can be set only if FORCE MIN. HOUR is enabled. It sets [maximum hour] = [scheduled time] + [N seconds]. If the result of the calculation is after 24:00, it will be set at 24:00 If the selected Export type is DIGITV or VIPER the following fields will be displayed: Clip Type for Spot Set the genre that Digiware will use to detect the commercials Channel (only with DIGITV) Select the playout channel. Set the number of exported channels Backup Channel | UTILITY 79 ENG Set the number of the backup channel Television Path Mandatory. Set the path where Digiware will search for the files to be imported. Clip Images path Mandatory. Set the path where Digiware will search for the image files to be imported. Icons path Mandatory. Set the path where Digiware will search for the icons. VIPER path Set the path where the clip files are stored. 15.1.4 Backup Program Set the path where the .exe file of the backup program is. Parameters Set the parameters that must be passed to the program. Backup Folder Set in which folder to save the backup files. | UTILITY 80 ENG 15.1.5 Player General and Local File Name Set the path where the .exe file of the program that you want to use for the audio listening is. Parameters Set the parameters that must be passed to the program. Title Set the name of the program. 15.1.6 Print Heading If selected, the heading will be inserted in the prints. Preview If selected, a preview will be always displayed before starting the print. Image If you want to insert an image in the print headings, double click into the box and choose the desired file. | UTILITY 81 ENG Pre-Playlist Graphic Print Max. characters for line Set the maximum number of characters that can be printed for each line. Range (minutes) Set the desired time range for the graph display. With Colors If the field is selected, the graphic printing of the Pre-schedule will be executed in colors. 15.1.7 Registers Registers Type Default: the register type set is the standard one for DIGIWARE’s users. Max. Advertising 1h. Numeric in HH:MM:SS format Set, for each hour, the maximum time to be devoted to advertising. Day Numeric in HH:MM:SS format Set the maximum time to be devoted to advertising in the whole day. Additional Numeric in HH:MM:SS format Set the maximum time that you can devote to non-tabular advertising (e.g.: telesales). Advertising Recovery Numeric (NNN,nn% format) Set the percentage of advertising that you can recover in the previous or next hour in case of excess (2%). Print Advertising in the 60 minutes If this parameter is selected, in the registers print for the advertising there will not be a line for each cluster, but a line for each clock (e.g. from 07:00 to 8:00). Information Start Time / End Time Set the time range at which the percentage of information will refer. Min. Day Limit Numeric in HH:MM:SS format. Set the minimum time to be devoted to the information in the whole day. Local Information Numeric in HH:MM:SS format. Set the minimum daily time to be devoted to the local information. Programs gross information | UTILITY 82 ENG If selected, in Registers->Creation/Editing the percentages will be displayed by default to gross of information. 15.2 SETUP MONITOR This section of the Setup gives you the ability to set a data display on two monitors. Video Card Select the video card type and the arrangement of the monitors. Press OK to save the changes done. 15.3 IMAGES In this section, you can change the icons that appear in Digiware. On the left you can see the list of the available items and on the right you can see the images associated to them. To change the icons, simply double-click on the desired image and choose the new icon by the mask that appears. | UTILITY 83 ENG 15.4 ASPECT In Digiware you can customize the display colors of masks, buttons, cells,… etc., by assigning a name to each style. Selecting the Aspect -> New voice from the Utility menu, the mask that will appear will be as follows: To insert a new style. select New in the list on the top left and insert, in the Style field, the name you want to use for the saved settings. To modify an existing style, select it in the list on the top left, do the desired changes and press F10 to save them. To modify the aspect of the graphic items, right click on them: BackColor to change the item’s background color Forecolor to change the character’s style and color Border Color to change the border color for the windows Each time a change is made, the aspect of the item changes to show the new style. Press OK to confirm the choices made, or press ESC to exit without saving. To change the aspect of the visualization, select the Aspect voice from the Utility menu and the name of the style you want to use. The default style cannot be modified. 15.5 VIEW LOG Using this feature you can check all the operations that were carried out in Digiware, on the day indicated in the Date field. | UTILITY 84 ENG 15.6 RECONCILIATION Function available with the parameters set for television. The reconciliation updates the status of the video files, indicating whether they are present or not, and if a file exists, but not the related tab, Digiware creates it. 15.7 REBUILD PASSAGES This utility allows you to rebuild all the passages needed for the displaying of the graphs. simply indicate the period (Start Date – End Date) you want to rebuild the passages of. 15.8 DELETE PASSAGES This utility allows you to delete all the passages necessary to display the graphs for the period indicated. 15.9 DELETE SENT SCHEDULE With this function you can delete the past schedules, thus freeing up space on your hard disk. Insert the period you want to delete (Start Date – End Date) and press F10. We recommend that you do this only after you have created the Register of the transmissions. 15.10 RESTORE ALERTS Select this voice if you want to restore the alert messages. 15.11 MAINTEINANCE This function permanently erases the data that are no longer used by Digiware. We recommend to periodically use this function after making backup copies (once a week). | UTILITY 85 ENG 15.12 REPAIR This feature allows you to repair damaged archives. Simply select one or more archives that you want to repair, and select F10. If you select the Rebuild MDB parameter, Digiware will try to recover all the possible data, also in the case in which it was complete; otherwise the software will try to correct the archive and retrieve everything, and in case it was not possible it will not recover anything. 15.13 INFORMATION It displays information about the software version. 15.14 DOWNLOAD UPDATES To use to download updates sent by Axel Technology. 15.15 EXIT Exits the program. | UTILITY 86 ENG 16 FINAL CONSIDERATION AND AXEL TECHNOLOGY CONTACT ________________________________________________________________________________________________ ________________________________________________________________________________________________ ________________________________________________________________________________________________ ________________________________________________________________________________________________ ________________________________________________________________________________________________ ________________________________________________________________________________________________ ________________________________________________________________________________________________ ________________________________________________________________________________________________ ________________________________________________________________________________________________ ________________________________________________________________________________________________ ________________________________________________________________________________________________ ________________________________________________________________________________________________ ________________________________________________________________________________________________ ________________________________________________________________________________________________ ________________________________________________________________________________________________ ________________________________________________________________________________________________ ________________________________________________________________________________________________ ________________________________________________________________________________________________ ________________________________________________________________________________________________ ________________________________________________________________________________________________ ________________________________________________________________________________________________ ________________________________________________________________________________________________ ________________________________________________________________________________________________ ________________________________________________________________________________________________ ________________________________________________________________________________________________ ________________________________________________________________________________________________ ________________________________________________________________________________________________ ________________________________________________________________________________________________ ________________________________________________________________________________________________ ________________________________________________________________________________________________ ________________________________________________________________________________________________ ________________________________________________________________________________________________ ________________________________________________________________________________________________ ________________________________________________________________________________________________ ________________________________________________________________________________________________ ________________________________________________________________________________________________ ________________________________________________________________________________________________ ________________________________________________________________________________________________ Main Office BOLOGNA: Via Caduti Di Sabbiuno 6/F 40011 Anzola Emilia - Bologna - Italy Tel. +39 051 736555 - Fax. +39 051 736170 For Technical information or support [email protected] For General information and Sales dept [email protected] www.axeltechnology.com | FINAL CONSIDERATION AND AXEL TECHNOLOGY CONTACT 87