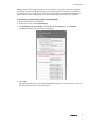
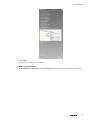
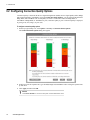
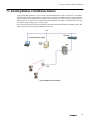
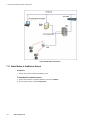
1
OneWireless
Wireless Device Manager User's Guide
OWDOC-X254-en-220A
October 2013
Release 220
Document
Release
Issue
Date
OWDOC-X254-en-220A
220
0
October 2013
Disclaimer
This document contains Honeywell proprietary information. Information contained herein is to be used solely
for the purpose submitted, and no part of this document or its contents shall be reproduced, published, or
disclosed to a third party without the express permission of Honeywell International Sàrl.
While this information is presented in good faith and believed to be accurate, Honeywell disclaims the implied
warranties of merchantability and fitness for a purpose and makes no express warranties except as may be stated
in its written agreement with and for its customer.
In no event is Honeywell liable to anyone for any direct, special, or consequential damages. The information
and specifications in this document are subject to change without notice.
Copyright 2013 - Honeywell International Sàrl
2
www.honeywell.com
Contents
1 About this guide ..................................................................................................................................... 7
2 Terms and definitions ............................................................................................................................ 9
3 Introduction ........................................................................................................................................... 11
3.1 Overview of Wireless Device Manager ............................................................................................................ 12
3.2 About OneWireless user interface .................................................................................................................... 16
3.3 Overview of OneWireless Network setup ........................................................................................................ 17
4 Getting started with WDM .................................................................................................................... 19
4.1
4.2
4.3
4.4
4.5
4.6
4.7
Mounting a WDM ............................................................................................................................................. 20
Connecting the WDM and the other OneWireless components ....................................................................... 23
Establishing communication between OneWireless Network and Experion system ....................................... 24
Configuring network properties on the computer ............................................................................................. 25
Logging on to OneWireless user interface ....................................................................................................... 26
Configuring WDM using the First Time Configuration Wizard ...................................................................... 27
Understanding the OneWireless user interface ................................................................................................. 33
4.7.1 Ribbon bar ......................................................................................................................................... 33
4.7.2 Selection Panel ................................................................................................................................... 36
4.7.3 Understand the device icons .............................................................................................................. 39
4.7.4 Property Panel .................................................................................................................................... 43
4.7.5 Status bar ........................................................................................................................................... 46
4.8 About map view ................................................................................................................................................ 47
5 Configuration ........................................................................................................................................ 53
5.1 Configuring a Provisioning Device handheld ................................................................................................... 54
5.1.1 Install synchronization software on the computer ............................................................................. 54
5.1.2 Install Microsoft .NET Compact Framework 3.5 on the Provisioning Device handheld .................. 54
5.1.3 Install Provisioning Device Application on the Provisioning Device handheld ............................... 56
5.1.4 Generate and transfer the provisioning keys to the Provisioning Device handheld .......................... 57
5.1.5 Remove Provisioning Device handheld ............................................................................................. 58
5.2 Loading the Device Description file ................................................................................................................. 59
5.3 Provisioning the OneWireless Network components ....................................................................................... 60
5.3.1 Provision the devices using Provisioning Device handheld .............................................................. 60
5.3.2 Provision the devices using over-the-air provisioning method ......................................................... 60
5.4 Configuring the WDM ...................................................................................................................................... 65
5.4.1 Configure default routing policy ....................................................................................................... 65
5.4.2 Configure key rotation period ............................................................................................................ 66
5.4.3 Configure channel blacklisting .......................................................................................................... 66
5.5 Configuring the WDM redundancy .................................................................................................................. 68
5.5.1 Configure the WDM redundancy from the First Time Configuration Wizard .................................. 69
5.5.2 Configure the WDM redundancy from the WDM Properties Panel ................................................. 70
5.6 Monitoring the WDM redundancy status ......................................................................................................... 73
5.6.1 Monitor the redundancy status from the WDM Property Panel ........................................................ 73
5.6.2 Perform redundancy-specific operations ........................................................................................... 75
5.7 Configuring device communication redundancy .............................................................................................. 78
5.7.1 Property Panel- device communication redundancy ......................................................................... 78
5.7.2 Report ................................................................................................................................................ 78
3
CONTENTS
5.8 Configuring field devices .................................................................................................................................
5.8.1 Configure field device properties ......................................................................................................
5.8.2 Configuring routing assignment ........................................................................................................
5.8.3 Configure publication rate .................................................................................................................
5.8.4 Calibrate field devices .......................................................................................................................
5.9 Configuring field device channels ....................................................................................................................
5.9.1 Configure Mode and Scale ................................................................................................................
5.9.2 Add channels to publication groups ..................................................................................................
5.9.3 Configure channel instantiation .........................................................................................................
5.9.4 Remove channels from publication groups .......................................................................................
5.9.5 Delete (uninstantiate) channels ..........................................................................................................
5.10 Adding notes for devices ................................................................................................................................
80
80
80
81
82
85
85
85
86
89
90
91
6 Operations ............................................................................................................................................ 93
6.1 Setting up the monitoring area .......................................................................................................................... 94
6.1.1 Configure site maps ........................................................................................................................... 94
6.1.2 Position the devices on the map ......................................................................................................... 96
6.1.3 Change the default map for a device ................................................................................................. 96
6.1.4 Remove the device from the map ...................................................................................................... 97
6.2 Configuring Connection Quality Options ......................................................................................................... 98
6.3 Verifying connectivity using maps ................................................................................................................... 99
6.4 Configuring alerts for Honeywell field devices .............................................................................................. 101
6.5 Monitoring the network and the devices ........................................................................................................ 102
6.6 Alarm and event management ........................................................................................................................ 104
6.6.1 Understand alarms and events ......................................................................................................... 104
6.6.2 Monitor alarms and events ............................................................................................................... 116
6.7 Viewing time synchronization parameters ...................................................................................................... 118
6.8 Viewing license agreement files ..................................................................................................................... 119
7 Activate process control interfaces ................................................................................................. 121
7.1 Establishing connection between WDM and external interfaces ................................................................... 122
7.1.1 Serial interface connection .............................................................................................................. 122
7.2 Activating HART in OneWireless Network ................................................................................................... 126
7.2.1 Configure HART serial interface ..................................................................................................... 126
7.2.2 Configure HART Ethernet/UDP interface ....................................................................................... 128
7.2.3 Configure HART/IP interface .......................................................................................................... 129
7.2.4 Monitor performance of HART interface ........................................................................................ 130
7.2.5 Monitor field devices from an asset management system ............................................................... 131
7.3 Activating Modbus in OneWireless Network ................................................................................................. 133
7.3.1 Enable Modbus in OneWireless Network ........................................................................................ 134
7.3.2 Configure the parameters in the Modbus tables .............................................................................. 140
7.4 Activating OPC in OneWireless Network ...................................................................................................... 142
7.4.1 Enable OPC interface ...................................................................................................................... 142
7.4.2 Configure OPC UA client system .................................................................................................... 143
7.4.3 Configure OPC DA client system .................................................................................................... 148
7.4.4 Monitor OPC interface statistics ...................................................................................................... 155
7.5 About integrating OneWireless Network with Experion using the CDA interface ........................................ 157
7.6 Activating GCI interface on the WDM .......................................................................................................... 159
7.7 Activate ENRAF Ethernet UDP interface on the OneWireless user interface ............................................... 160
7.7.1 Configure ENRAF serial interface .................................................................................................. 160
7.7.2 Monitor performance of ENRAF interface ...................................................................................... 161
8 Administration .................................................................................................................................... 163
8.1 Administering users ........................................................................................................................................ 164
8.1.1 About users and user roles ............................................................................................................... 164
8.1.2 Create user accounts ........................................................................................................................ 165
4
www.honeywell.com
CONTENTS
8.2
8.3
8.4
8.5
8.1.3 Edit user account .............................................................................................................................. 166
8.1.4 Delete user account .......................................................................................................................... 166
8.1.5 Change password ............................................................................................................................. 167
8.1.6 Reset password ................................................................................................................................ 167
8.1.7 Change user role .............................................................................................................................. 167
8.1.8 Manage user roles ............................................................................................................................ 168
Downloading support software ....................................................................................................................... 169
Upgrading device firmware ............................................................................................................................ 170
8.3.1 Upgrading the WDM firmware ....................................................................................................... 170
8.3.2 Upgrading the FDAP/access point firmware ................................................................................... 171
8.3.3 Upgrading the field device firmware ............................................................................................... 172
Configuring system configuration backup ...................................................................................................... 174
8.4.1 About system configuration backup ................................................................................................ 174
8.4.2 Configure manual backup ................................................................................................................ 174
8.4.3 Configure automatic backup ............................................................................................................ 174
Restoring the system configuration from a backup ........................................................................................ 176
9 Troubleshooting and maintenance ................................................................................................... 179
9.1
9.2
9.3
9.4
9.5
9.6
9.7
9.8
Replacing devices ........................................................................................................................................... 180
Removing devices ........................................................................................................................................... 182
Resetting/removing WDM .............................................................................................................................. 183
Restarting devices ........................................................................................................................................... 184
About NTP status ............................................................................................................................................ 186
Generating reports .......................................................................................................................................... 188
Exporting and saving system logs .................................................................................................................. 193
Reporting anomalies ....................................................................................................................................... 194
10 Notices .............................................................................................................................................. 195
10.1 Documentation feedback .............................................................................................................................. 196
10.2 How to report a security vulnerability .......................................................................................................... 197
5
CONTENTS
6
www.honeywell.com
1 About this guide
This document describes the procedures to provision, configure, operate, and monitor an ISA100 Wireless
field device network using the Wireless Device Manager.
Intended audience
This guide is intended for people who are responsible for planning, configuring, administering, and operating
the OneWireless Network.
Prerequisite skills
It is assumed that you are familiar with the operation of OneWireless Network.
How to use this guide
This guide provides guidance on:
•
•
•
•
•
•
WDM overview
WDM installation
WDM configuration
WDM operations
WDM administration
WDM troubleshooting and maintenance
Required Honeywell documentation
The following documents and sources contain additional information required for deploying OneWireless
Network. It is recommended to have these documents readily available for reference.
Document
Document ID
Description
OneWireless Release Notes
OWDOC-X252-en-220A
This document provides information
about the new functions and features in
OneWireless.
OneWireless Network Planning and
Installation Guide
OWDOC-X253-en-220A
This document provides information
about planning, designing, and setting
up OneWireless Network using WDM,
FDAPs, and field devices.
OWDOC-X255-en-220A
This document provides information
about configuring OneWirelesss
network using Cisco 1552S Access
Point
OneWireless Field Device Access Point OWDOC-X256-en-220A
(FDAP) User’s Guide
This document describes the
procedures to install, configure, and
operate Field Device Access Point
(FDAP).
OneWireless Wireless LAN Controller
Configuration Guide
7
1 ABOUT THIS GUIDE
Document
Document ID
Description
OneWireless Parameter Reference
Dictionary
OWDOC-X260-en-220A
This document provides information
about the parameters associated with
the OneWireless devices.
OneWireless Migration User’s Guide
OWDOC-X258-en-220A
This document assists you in
understanding, planning, and
performing the migration of the
OneWireless Network.
You can download Honeywell documentation from http://www.honeywellprocess.com website.
8
www.honeywell.com
2 Terms and definitions
Terms
Definition
WDM
Wireless Device Manager (WDM) is a device that manages the ISA100.11a wireless
field device network and all the ISA100.11a components connected to the OneWireless
network.
FDAP
Field Device Access Point (FDAP) is a wireless infrastructure node that acts as an
ISA100.11a access point and a mesh node member. FDAP can only communicate
through ISA100.11a.
Field device
A general term for process sensor (input) or process actuator (output) device.
Provisioning Device handheld
Includes Personal Digital Assistant (PDA), mobile PCs and so on.
DD files
Device Description files
DSSS
Direct Sequence Spread Spectrum
FDN
Field Device Network
PCN
Process Control Network
HART
Highway Addressable Remote Transducer
RSSI
Receive Signal Strength Index
RSQI
Receive Signal Quality Index
TxFailRatio
Transmit Fail Ratio
GCI
Gateway General Client Interface
9
2 TERMS AND DEFINITIONS
10
www.honeywell.com
3 Introduction
Related topics
“Overview of Wireless Device Manager” on page 12
“About OneWireless user interface” on page 16
“Overview of OneWireless Network setup” on page 17
11
3 INTRODUCTION
3.1 Overview of Wireless Device Manager
What is Wireless Device Manager?
The Wireless Device Manager (WDM) allows you to design, commission, configure, and monitor an ISA100
wireless network and associated ISA100 wireless field devices from a centralized location. The WDM acts as a
network gateway enabling third-party applications to communicate with ISA100 wireless field devices.
Functions of WDM
The WDM performs the following roles and functions within the ISA100 network.
Table 1: WDM roles and functions
Role
Functions
Gateway
•
•
Acts as the communication interface for the ISA100 wireless field devices.
Provides wireless field device data cache for the OneWireless user interface and the
external control systems.
•
Allows communication between wired HART devices with OneWireless Adapter and the
asset management system.
System Manager
•
•
•
•
Manages the ISA100 wireless field device network and the devices.
Establishes communication between the devices.
Performs policy-based control of the network runtime configuration.
Monitors and reports the communication configuration, performance, and operational
status.
Security Manager
•
It provides security keys to the Provisioning Device handhelds that are used for issuing
security keys to the field devices.
Authenticates the provisioning data with which a field device tries to join the network.
Initiates key rotation for the field devices.
Maintains session key for each device in the network.
•
•
•
12
www.honeywell.com
3 INTRODUCTION
Hardware description of WDM
Figure 1: WDMS hardware
13
3 INTRODUCTION
Figure 2: WDMX hardware
Table 2: Description of WDM ports
Port name
Description
Field Device Network (FDN) port Used for connecting the WDM with FDAPs/Access points.
Attention
The FDN port is also known as the “FIN – Field Instrument Network” port in
some WDMs.
Process Control Network (PCN)
port
Used for connecting the monitoring clients and external controllers.
Attention
The WDM contains an embedded firewall that restricts the data routing between the two network ports.
COM ports
Used for connecting to devices such as modems, terminals and various peripherals.
•
•
USB ports
Used for connecting USB flash drives. In addition, USB ports are used for connecting
the PDA or provisioning device.
•
•
14
www.honeywell.com
WDMS — Has three serial ports, two of which can be used as standard RS232
ports and the third port can be used as an RS485 port
WDMX — Has two serial ports, one of which can be used as standard RS232 port
and the other can be used as an RS485 port.
WDMS — Has three USB ports
WDMX — Has four USB ports
3 INTRODUCTION
Port name
Description
On/Off switch
WDMS — Power plug
WDMX — Switch to on/off the WDM
RDN (redundancy) port
WDMS — Does not support redundancy.
WDMX — Supports redundancy, implements redundant private path over RDN port,
which is connected to the partner WDM through a crossover cable.
For more information about the technical specifications of the WDM models, refer to the specifications
document available at Honeywell Process Solutions website.
15
3 INTRODUCTION
3.2 About OneWireless user interface
The WDM provides an HTTP/Silverlight-based user interface for configuring and monitoring all the devices
connected to the ISA100 Wireless field device network. To start managing the ISA100 Wireless
field device network, you first need to configure the WDM. When you access the OneWireless user
interface for the first time, the WDM needs to be configured using the First Time Configuration Wizard. After
that, you can use the user interface for provisioning, commissioning, configuring, monitoring, and
decommissioning of the Field Device Access Points (FDAP), Access Points, and field devices.
In addition, the user interface can be used for performing the following tasks.
•
•
•
•
Network maintenance
Security configuration
Device configuration and maintenance
Operator activities
The following are some of the benefits of OneWireless user interface.
•
•
•
•
•
•
•
•
16
Requires only the installation of a browser plug-in, Silverlight
Is simple and easy to use
Reduces commissioning time
Reduces security threats with secured HTTPS-based user interface
Provides simultaneous access to WDM using multiple logon sessions
Supports device diagnostics summary display and related reports capability
Supports effective node failure diagnosis
Simplifies integration of the wireless field devices with process control interfaces
www.honeywell.com
3 INTRODUCTION
3.3 Overview of OneWireless Network setup
Set up the OneWireless Network in the following sequence.
1.
2.
3.
4.
Install and configure the WDM.
Power up and provision all the Access Points/FDAP access points.
Power up and provision all the FDAP routers.
Power up and provision all the field devices.
17
3 INTRODUCTION
18
www.honeywell.com
4 Getting started with WDM
Related topics
“Mounting a WDM” on page 20
“Connecting the WDM and the other OneWireless components” on page 23
“Establishing communication between OneWireless Network and Experion system” on page 24
“Configuring network properties on the computer” on page 25
“Logging on to OneWireless user interface” on page 26
“Configuring WDM using the First Time Configuration Wizard” on page 27
“Understanding the OneWireless user interface” on page 33
“About map view” on page 47
19
4 GETTING STARTED WITH WDM
4.1 Mounting a WDM
Mounting a WDM on DIN-Rail
1
Screw the provided DIN-Rail Kit onto the rear side of the WDM as illustrated in the following figure.
2
Hang the WDM onto the DIN-Rail with an angle of inclination about 30 degrees.
3
Lower the WDM straight down to slide over the Rail smoothly.
Attention
To remove the WDM from the Rail, push down on the top of the WDM, and then pull the bottom of the WDM
away from the Rail to disengage smoothly.
Mounting a WDM on a flat surface
1
20
Screw the provided Wall Mounting Kit onto the rear side of the WDM as illustrated in the following figure.
www.honeywell.com
4 GETTING STARTED WITH WDM
2
Mount the WDM on the wall using the 2 pairs of mounting holes.
Figure 3: Front view of the WDM
21
4 GETTING STARTED WITH WDM
Figure 4: Rear view of the WDM
Figure 5: Top view of the WDM
22
www.honeywell.com
4 GETTING STARTED WITH WDM
4.2 Connecting the WDM and the other OneWireless components
Prerequisites
•
•
•
•
•
Ensure that you provide the maximum power requirement of 48 W (10 ~ 36 VDC).
Ensure that you have an FDN Ethernet switch when connecting multiple FDAPs/Access Points to the WDM.
Ensure that you have Ethernet cables required for connecting the devices.
Ensure that you have redundancy Ethernet cable for connecting the devices.
Identify the location for mounting the devices.
Establish physical connection between WDM and Cisco 1552S Access Point
1
Connect the Ethernet cable from the Ethernet port on the Cisco 1552S Access Point (AP) to the non-trunk
port on the Cisco switch.
2
Connect the Ethernet cable from the FDN port on the WDM to the non-trunk port on the Cisco Switch.
For more information about installing a Cisco 1552S AP, refer to the respective Cisco user documentation.
Establish physical connection between WDM and FDAP
•
Connect the Ethernet cable from the FDAP to the FDN port on the WDM.
OR
If you are using multiple FDAPs, you can use an Ethernet switch to connect the FDAPs to the WDM.
For more information about installing and setting up the FDAP, refer to the Field Device Access Point User’s
Guide.
Attention
The WDM has the capability to act as the DHCP Server for the Field Device Network. However, if you are
configuring an external DHCP Server for the network, ensure you connect the DHCP Server to the switch during
this stage.
Establish physical connection between WDM and a computer
1
Connect the WDM power cable to a DC power supply.
2
Connect the Ethernet cable from the computer’s network port to the PCN port on the WDM or to a switch
connected to the PCN port.
Power up the components
•
After establishing connection with the WDM, power up the WDM, the FDAPs, and the Access Points.
Attention
When powering up the WDM, if a duplicate IP address is configured on either the PCN port or the FDN port, the
WDM startup operation ends and no IP address is assigned. To recover, you must resolve the duplicate IP address
from the network .
23
4 GETTING STARTED WITH WDM
4.3 Establishing communication between OneWireless Network and
Experion system
To establish communication between OneWireless Network and Experion system, connect an Ethernet cable
from the PCN port of the WDM to the top-level yellow Level–2 switch port on the Experion network. If you
have a secondary WDM, connect an Ethernet cable from the PCN port of the secondary WDM to the top-level
green Level-2 switch port on the Experion network.
Attention
Ensure that the Experion Level–2 switch port where the WDM is connected, is set to auto speed, auto duplex.
Ensure that the Experion Level–2 switch port where the WDM is connected, has spanning-tree portfast enabled.
24
www.honeywell.com
4 GETTING STARTED WITH WDM
4.4 Configuring network properties on the computer
Before migrating, you must configure the network properties on your computer to use a different IP subnet. This
is because you cannot use the default FDN ip address of WDM (192.168.0.1) for migration.
Prerequisites
•
A desktop or a laptop computer for accessing the OneWireless user interface.
Attention
The steps in the following procedure are specific to Microsoft Windows XP operating system.
To configure network properties on the computer
1
Perform one of the following steps to open the Network Connections dialog box.
•
Choose Start > Settings > Network Connections.
Or
•
Choose Start > Control Panel > Network Connections.
2
Right-click the network port connected to the WDM and click Properties.
3
On the General tab, select Internet Protocol (TCP/IP) check box, and then click Properties.
Attention
Note down the current settings in Internet Protocol (TCP/IP) Properties so that, if necessary, you can return to
their original values.
4
Configure the IP address and the Subnet Mask as 192.168.0.x and 255.255.255.0 respectively.
Attention
Do not configure the computer with the default IP address of the WDM, 192.168.0.1.
5
Click OK to close the Internet Protocol (TCP/IP) Properties dialog box.
6
On the General tab, click Configure.
7
Click the Advanced tab and then in the Property list, click Link Speed & Duplex.
8
In the Value list, click Auto Detect and then click OK.
9
Click OK and close all the open dialog boxes.
CAUTION
You must turn on a single WDM at a time, at the default address because the second WDM removes itself
from the network if its duplicate address is detected. The removed WDM does not recover unless powercycled.
25
4 GETTING STARTED WITH WDM
4.5 Logging on to OneWireless user interface
Prerequisites
•
•
•
One of the following recommended Web browsers must be installed on the computer.
– Microsoft Internet Explorer 7.0 or higher
– Firefox 3.6 or higher
– Google Chrome 12.0 or higher
Honeywell recommends a browser resolution of 1280 X 1024. Any resolution is supported but it may be
necessary to navigate scrollbars or adjust zoom levels to view the entire interface.
Microsoft Silverlight 5 plug-in is required on the computer used for accessing the user interface. If the
computer has a prior version or it is not installed, then you are prompted to install or update the software
when you attempt to connect to the WDM. Honeywell is an authorized distributor of the Silverlight software
and a copy is maintained on the WDM for installs and upgrades; no internet or external connection is
required.
Attention
Silverlight is backwards compatible. You can still run prior applications based on earlier versions of Silverlight. To
save some initialization time during the first use on a new computer and if the computer has internet access, you
can pre-install the Silverlight 5 runtime environment at any time using the following link: http://
www.microsoft.com/getsilverlight/Get-Started/Install/Default.aspx.
Perform the following steps to log on to the OneWireless user interface.
To log on to OneWireless user interface
1
Open the Web browser and type the URL for the WDM in the address bar.
If you are logging on to the user interface for the first time from the PCN side of the network, use the default
address, https://192.168.1.1 for logging on to the user interface. If you have connected to FDN side of the
network, you must use the ip address 192.168.0.1.
2
If a security warning appears, confirm or allow the security exception.
3
In the User ID and Password fields, type the user name and password, and then click Login.
Attention
The default User ID and Password configured for the WDM are as follows:
User ID: administrator
Password: password
Note that the Password is case-sensitive.
26
www.honeywell.com
4 GETTING STARTED WITH WDM
4.6 Configuring WDM using the First Time Configuration Wizard
After installing the WDM, you need to configure the WDM to enable it to function in the OneWireless
Network. The First Time Configuration Wizard guides you through the initial configuration of the WDM.
The First Time Configuration Wizard appears ONLY when you log on to the OneWireless user interface for
the first time or after the WDM is deleted (returning to factory defaults).
Considerations
The following are some of the network configuration rules that you must follow while configuring the network
properties.
•
•
•
•
FDN and PCN must be on separate subnets.
FDN IP address must be outside the FDAP IP address range.
FDN subnet mask must include FDN IP address and FDAP IP address range.
Default PCN gateway must be on the same subnet as PCN.
Attention
If you are performing a migration, skip this section and proceed with the tasks available in the OneWireless Migration
User’s Guide.
To configure WDM using the First Time Configuration Wizard
1
Log on to the OneWireless user interface using the default User ID and Password.
The First Time Configuration Wizard appears.
2
On the Welcome page of the First Time Configuration Wizard, click Next.
3
On the Wireless Device Manager Configuration page, click Configure New Wireless Device Manager
and click Next.
27
4 GETTING STARTED WITH WDM
4
On the Wireless Device Manager Settings page, type the WDM Tag Name and the Description.
The Tag Name is the unique name that is used to identify the WDM. It can be up to 16 characters long and
must begin with an alphabetic character. Do not use special characters in the Tag Name; underscore is the
only acceptable character. After completing the initial configuration, you cannot change the WDM name.
The Description can be up to 255 characters long.
5
If you need to configure redundant WDM, then under Redundancy Configuration, configure the
following:
Select Enable redundancy for this Wireless Device Manager check box.
b Click the Redundancy Role, as required. You can select either Primary or Secondary option depending
on the redundancy role.
c In the Partner PCN IP Address box, type the PCN IP address of the partner WDM.
a
Attention
If an incorrect partner PCN IP address is configured, WDM does not synchronize. The incorrect PCN IP
address can be reconfigured on WDM Property Panel.
28
www.honeywell.com
4 GETTING STARTED WITH WDM
Tip
When redundancy is enabled, the primary WDM is assigned physical ID A and the secondary WDM is
assigned physical ID B. The physical IDs are displayed in the UI during normal operation. Tagging the
physical hardware with matching labels makes it easy to distinguish the WDMs later.
6
Click Next.
The Location Settings page appears.
Attention
If you have selected the Redundancy Role as Secondary in the Wireless Device Manager Settings page, then
the Location Settings page options are disabled.
7
Under Location, select the Country Code.
The country code is used to define any location-specific settings within the OneWireless Network. For
example, radio frequency options are location dependent and vary depending on the country code setting.
After completing the first time configuration, you cannot modify the Country Code.
8
Under ISA 100 Network ID, type the Network ID.
The ISA100 Network ID is the unique identifier for the network. It must contain a value between 2 (default)
and 65535. After completing the first time configuration, you cannot change the Network ID.
9
Click Next.
The Network Settings page appears.
10 Under Field Device Network (FDN), configure the network settings for the wireless field device network as
follows.
•
Field Device Network IP Address: These settings are used to configure the wireless field device
network Ethernet connection for the WDM. This is used for communication with FDAP.
Attention
–
–
•
The IP address must be unique on the network, even if a redundant WDM pair is being configured.
After completing the initial configuration, you cannot change the Field Device Network IP Address
specified in the First Time Configuration Wizard.
Subnet Mask: A subnet mask identifies the bits of an IP address that are reserved for the network
address. For example, if the IP address of a particular node is 192.168.2.3 with a subnet mask of
255.255.255.0, the subnet mask indicates that the first 24 bits of the address represent the network
address. The last 8 bits can be used for individual node addresses on that network.
29
4 GETTING STARTED WITH WDM
•
Assign Addresses to Field Device Access Points (Enable DHCP Server): Select this check box to
enable the WDM to act as the DHCP Server. Ensure you do not select the check box if the network has
another DHCP Server. It is recommended to enable the WDM to act as the DHCP Server.
•
Field Device Access Point IP Address: This option is enabled only if you have selected the Enable
DHCP Server check box. Accept the default range or configure the IP address range according to the
network settings in the plant network. The WDM that acts as the DHCP Server assigns IP addresses
based on the range specified. Ensure that the IP addresses of the Access Points are not within the DHCP
address range.
If you do not enable DHCP Server during the first time configuration, it is possible to enable this at a
later stage using the Property Panel.
Attention
DHCP server configuration option is disabled on a secondary WDM.
11 Under Process Control Network (PCN), configure the process control network settings as follows.
•
Process Control Network IP Address: The process control network settings are used to configure the
process control network Ethernet connections for the WDM. This is used for communication with
monitoring applications and external controllers.
Attention
The IP address must be unique on the network, even if redundant WDM pair is being configured.
•
Subnet Mask
•
Default gateway: Used to access the subnets outside the PCN subnet. This is an optional configuration
option.
12 Click Next.
The Network Time page appears.
Attention
The network time settings configuration is disabled on the secondary WDM. Upon synchronization, the secondary
WDM syncs time from primary over the FDN interface.
30
www.honeywell.com
4 GETTING STARTED WITH WDM
Attention
Network time settings configuration is disabled on the secondary WDM. Upon synchronization, the secondary
WDM syncs time from primary over the FDN interface.
13 Click Use NTPServer or Use System Time, as required.
You can use either the NTP server or system time to configure the network time of the OneWireless
Network.
Attention
•
•
By default, the network time is configured as the system time.
Consider the following while configuring an external NTP server.
–
–
–
–
NTP server should be on the PCN or FDN.
NTP server IP address must be within FDN or PCN subnet unless a default gateway has been configured
on the PCN subnet and the NTP server is accessible through the default gateway.
NTP server IP address should not overlap with the FDN and PCN IP addresses.
NTP server IP address should not overlap with FDAP IP address range, if DHCP Server is enabled.
14 If you are selecting NTP server, enter the NTP Server IP Address and click Next.
The Administrator Information page appears.
15 Type the user name and password in the Administrator Name, New Password, and Confirm Password
fields.
•
•
The default user name configured for the WDM is administrator. You can change the default user name
in the First Time Configuration Wizard, if required. However, you cannot change the user name after
completing the initial configuration.
The password must contain at least one character and can contain up to 32 characters. It should not start
or end with a space and must not contain single quote (‘).
Attention
When setting up a redundant WDM pair, it is recommended that the same default user name and password are
configured on primary and secondary WDM. This is because when the primary and secondary WDMs
synchronize, the secondary WDM's user account information is overwritten by the user accounts configured in the
primary. Providing identical configuration on both WDMs, avoids confusion related to login credentials when the
WDMs synchronize.
31
4 GETTING STARTED WITH WDM
16 Click Next.
The Configuration Summary page appears which displays the summary of all the configuration
information specified in the First Time Configuration Wizard. An incorrect entry is indicated by a
warning icon. Hovering the mouse over the icon displays a tooltip with the information about the incorrect
entry.
17 Verify the WDM settings, correct errors if any, and then click Finish.
If there are any errors in the configuration information that you have provided, then the system does not
allow you to click Finish.
18 On the Browser Redirect dialog box, click OK.
The wizard redirects the Web browser to the revised process control network IP address.
Attention
32
•
If you are configuring the WDM to use the same process control network IP address, then the wizard redirects
the Web browser.
•
If you have configured the WDM using a different PCN IP subnet than the computer, then you need to
reconfigure the network settings of the computer to access the user interface using the IP address on the new
subnet.
www.honeywell.com
4 GETTING STARTED WITH WDM
4.7 Understanding the OneWireless user interface
After configuring the WDM using the First Time Configuration Wizard, the following OneWireless user
interface displays.
Figure 6: OneWireless user interface
OneWireless user interface comprises of the following main elements.
•
•
•
•
•
Ribbon bar — Consists of the Monitoring tab, Alarms/Events tab and the Reports tab. It consists of
groupings of user interface controls for controlling display elements and accessing various functions for
monitoring and maintaining the OneWireless Network. These user interface controls are contextual and are
enabled based on user role and devices/channels selected in the Selection Panel or the Map view.
Map view – Provides a visual representation of the OneWireless Network.
Selection Panel – Displays a list of all the devices that are configured in the OneWireless Network.
Property Panel – Contains configuration properties of all the devices configured in the OneWireless
Network.
Status bar – Provides an overview of the network status by displaying the number of online devices, active
alarms, WDM redundancy status, and the progress of any maintenance operation.
The following sections explain each element of the user interface in detail.
4.7.1 Ribbon bar
Figure 7: Ribbon bar
The ribbon bar in the user interface contains the following tabs and icons.
33
4 GETTING STARTED WITH WDM
Table 3: Ribbon bar elements
Tab/icon
Description
Display group
Monitoring tab displays the topological view of the OneWireless Network.
Use the Monitoring tab to add, configure, and commission wireless field devices
and monitor the devices in a topological view. The topological view of the network
is known as the map view. For more information about the map view, refer to the
section, “About map view” on page 47.
Attention
The Monitoring tab is disabled on the secondary WDM.
The Alarms & Events tab displays the alarms and system events generated by the
wireless field devices in a tabular format. An alarm is generated whenever an
abnormal condition occurs. An event is any significant change in the system, and
includes alarms and operator actions. The Alarms & Events tab contains the
following sub elements.
•
The Active Alarms tab: Lists the devices, device diagnostic alarms and their
respective location, source, start time, priority, and description.
•
The Alarms/Events History tab: Provides a tabular view of the events. It is
possible to export the alarm log and the event log for a particular period.
Reports tab displays device performance and connectivity reports.
Use the Reports tab to generate and view predefined reports that are used to
maintain and optimize the network and the field devices.
The following are the reports that can be generated:
•
•
•
•
•
•
Battery Life
Device Health Overview
Device Summary
Device History
Connection Summary
Connection History
Filtering group
The Filter option in the ribbon bar allows you to customize the device list by
filtering the devices. By default, all the devices appear in the device list. You can
filter by Device Type, Device Status, Vendor, Model, Power Source, Alarm Priority,
Hop Level, and Maps.
Attention
When you set a filter, various system views are altered. For example, the map
highlights only the devices for which the filter option is applied. All the
filtered out devices appear as blurred in the map.
Filter includes an option to filter by Map. This includes the Unplaced map so
any device that has not been placed on a map can easily be detected. Note that
since a device can be placed on more than one map, it can appear in the set of
filtered devices for different maps.
Provisioning group
34
www.honeywell.com
4 GETTING STARTED WITH WDM
Tab/icon
Description
•
•
•
Accept: Accepts devices that can be provisioned using over-the-air provisioning
method.
Reject: Rejects devices that are attempting to join the network using over-the-air
provisioning method.
Delete: Removes a provisioned device from the network. Removing a device
from the network clears the provisioning data and restores the device to factory
default state. It can also be used to remove a rejected unprovisioned device from
the user interface in case you have mistakenly rejected a device earlier.
Removing a rejected device enables the device to rejoin as an unprovisioned
device. You can then accept the unprovisioned device to join the network.
Note the following points while deleting a device from the network.
–
–
Deleting a joined device removes the provisioning data and the configuration
data from the device and the WDM. Also, the device restores to factory
default state.
Deleting an offline device removes the provisioning data and the
configuration data of the device only from the WDM. The provisioning data
and the configuration data needs to be manually cleared from the device
using the PDA.
Only the Delete option is available on the secondary WDM.
Channel group
•
•
Activate: Activates all the channels of the selected field device. Clicking the
Activate transitions the field device channel state from OOS to the currently
configured Normal mode.
Inactivate: Inactivates all the channels of the selected field device. Clicking the
Inactivate button transitions the field device channel state from AUTO to OOS.
Attention
This group is disabled on the secondary WDM.
Maintenance group
•
•
•
Templates: Uploads the vendor supplied DD file to the WDM.
Replace: Displays the help information for performing the replace operation.
Point Picker: Enables you to browse parameters on all devices and then drag
and drop parameter into MODBUS coil or register configuration.
Attention
This group is disabled on the secondary WDM.
Upgrade group
•
•
Application: Initiates firmware upgrade operation for the WDM and the
application firmware of the field devices.
Radio: Initiates firmware upgrade operation for the access points and the radio
firmware of the field devices.
System group
35
4 GETTING STARTED WITH WDM
Tab/icon
Description
•
•
•
•
•
Manage Users: Opens the Manage Users dialog box that contains the options to
add, delete, or edit new user accounts.
Change Password: Enables you to change the current user’s password.
Export System Log: Exports and saves the system logs that record information
about events in the application instances.
Manage Roles: Opens the Manage Roles dialog box that enables you to modify
the configured user-permitted operations.
Software: Enables you to download software provided on WDM.
Attention
Only the Export System Log option is available on the secondary WDM.
Displays the user who has currently logged on to the OneWireless user interface.
Click the icon to log out of the OneWireless user interface.
Invoke the context-sensitive help. Note that this functionality is currently not
supported.
4.7.2 Selection Panel
The Selection Panel in the OneWireless user interface provides a list of all the devices configured in the
OneWireless Network. It is docked to the left of the user interface window and is horizontally expandable and
collapsible. It also provides an option to view the extended view of the Selection Panel known as the extended
Selection Panel. The extended Selection Panel displays the device information in a tabular format.
The default view of the Selection Panel displays all the devices arranged in the order - WDM, FDAPs, Access
Points, and field devices. You can configure multiple locations for organizing the devices. The following
illustrations depict the default view of the Selection Panel.
36
www.honeywell.com
4 GETTING STARTED WITH WDM
Figure 8: Selection Panel
The following table describes the different elements/icons available in the Selection Panel.
Table 4: Selection Panel elements
Element
Function
Click to expand the Selection Panel.
Click to collapse the Selection Panel.
Click to view the extended Selection Panel. It provides information about the
properties of the devices such as device type, status, vendor, model, serial number,
and so on.
Click to collapse the extended Selection Panel.
37
4 GETTING STARTED WITH WDM
Element
Function
Click to collapse the devices in the Selection Panel.
Click to expand the devices in the Selection Panel.
Figure 9: Extended Selection Panel
The Show Radio Identification check box allows you to view the radio related details about the field devices.
The following illustration depicts the extended Selection Panel with Show Radio Identification check box
selected.
38
www.honeywell.com
4 GETTING STARTED WITH WDM
Figure 10: Extended Selection Panel with radio details of the devices
4.7.3 Understand the device icons
The Selection Panel, map view, and the Property Panel display various device icons for representing the
network components. The following table summarizes the appearance of the device icons and their
corresponding description/state.
Table 5: Device state icons
If the device icon is…
Then it represents…
WDM
Redundant WDM
External interfaces
By default, the external interfaces appear within the WDM icon.
39
4 GETTING STARTED WITH WDM
If the device icon is…
Then it represents…
FDAP router
Access Point or FDAP access point
Offline FDAP access point
Offline FDAP router
Over-the-air provisioning icons
Access point with OTAP enabled
FDAP router with OTAP enabled
Access point in unprovisioned state
FDAP router in unprovisioned state
Field device in unprovisioned state
Access point in joining/provisioning state
FDAP router in joining/provisioning state
40
www.honeywell.com
4 GETTING STARTED WITH WDM
If the device icon is…
Then it represents…
Field device in joining/provisioning state
Access point in rejected state
FDAP router in rejected state
Field device in rejected state
Field device icons
Routing field device (field device with routing capability)
Routing field device with an active alarm
Field device that has joined the network
Field device in offline state
Field device in joining/provisioning state
Channel icons
41
4 GETTING STARTED WITH WDM
If the device icon is…
Then it represents…
Channel in Auto/MAN mode
Channel in inactive/OOS mode
Channel becomes grey when the data is being fetched from the device. For a
digital output channel, grey indicates the MAN mode, where you can
manually set the output value.
Offline channel
WDM redundancy icons
Primary view
Primary is Unknown (default Secondary).
Primary is Offline (default Secondary).
Primary is Joining (default Secondary).
Primary is Joined, redundancy sync state (secondary) is NoPartner or
Unknown (default Secondary).
Primary is Joined, Partner is visible over private path but not syncd. Partner
may be incompatible.
Primary is Joined, Initial sync is in progress.
42
www.honeywell.com
4 GETTING STARTED WITH WDM
If the device icon is…
Then it represents…
Primary is Joined, WDMs are synchronized.
Secondary view
Secondary is Unknown (default Primary).
Secondary is Offline (default Primary).
Secondary is Joining (default Primary).
Secondary is Joined, Redundancy sync state NoPartner or unknown (default
Secondary).
Secondary is Joined, Partner is visible over private path but not syncd. Partner
may be incompatible.
Secondary is Joined, Initial sync is in progress.
Secondary is Joined, WDMs are synchronized.
4.7.4 Property Panel
The Property Panel in the OneWireless user interface provides configuration properties of all the devices
configured in the OneWireless Network. The Property Panel is docked to the right of the user interface window
and is horizontally expandable and collapsible.
The Property Panel allows you to perform configuration tasks pertaining to WDM, FDAPs, Access Points, and
field devices and their channels. It also allows monitoring the configuration attributes of the devices such as PV,
communication links, signal quality, and so on.
Selecting the required device in the Selection Panel, automatically displays all the configuration parameters of
the devices that are accessible from the Property Panel. These configuration parameters are grouped into
accordion panels that can be individually expanded or collapsed.
43
4 GETTING STARTED WITH WDM
44
www.honeywell.com
4 GETTING STARTED WITH WDM
Attention
On the secondary WDM UI, some accordion panels like System Manager, Configuration, Date and Time,
Provisioning, Provisioning Devices, and Notes are not displayed. For example, refer to the following figure.
Figure 11: WDM Property Panel
The following table describes the different elements/icons available in the Property Panel.
Table 6: Property Panel elements
Element
Function
Click to expand the Property Panel.
Click to collapse the Property Panel.
Apply icon. Click to save any configuration changes applied. This icon is enabled only
if you have made any changes in the user interface.
Reset icon. Click to reset any unsaved changes made to the devices through the
Property Panel. This icon is enabled only if you have made any changes in the user
interface.
45
4 GETTING STARTED WITH WDM
Element
Function
Alarms panel allows to view the alarm details (Priority, Start Time, and Description)
for any device selected in the Selection Panel.
4.7.5 Status bar
The status bar that is located at the bottom of the user interface window displays messages that indicate the
overall status of the network. These status messages are grouped into different panes in the status bar.
Table 7: Status bar panes
Pane
Description
Number of online devices.
Displays all the active alarms. Click the Alarms box to open the
Active Alarms table in the Alarm/Events tab.
Device replacement status is displayed when you have initiated a
device replacement operation. Since the status bar displays the
progress, you can close the Device Replacement dialog box to
allow the replacement operation to run in the background. Click this
box to open the Device Replacement dialog box.
Firmware upgrade status is displayed when you have initiated a
firmware upgrade of any device. Since the status bar displays the
progress, you can close the Firmware Upgrade dialog box to allow
the operation to run in the background. Click this box to open the
Firmware Upgrade dialog box.
Method status is displayed when you have initiated a scripted
operation, such as calibration or diagnostics on a field device.
Methods are defined in the DD file of a field device. Click the box
to open the Method dialog box.
Displays the redundancy role and sync status.
46
www.honeywell.com
4 GETTING STARTED WITH WDM
4.8 About map view
Use the map view to create a visual topology map of the network. The devices can be arranged in a map view
according to the plant network topology. The map view allows you to create a real plant topology by dragging
and dropping the devices from the device list in the Selection Panel. Arrange the devices on the map according
to the plant setup and set the map visibility and overlays such as connection strength and publishing rate. For
more information about creating a map view, refer to the section “Setting up the monitoring area” on page 94.
Figure 12: Map view
The following are the map navigation controls that are available in the map view.
Table 8: Map navigation controls
Map navigation control
Description
Pan control is used to move the map in the up,
down, left, and right directions. You can also pan
the map by clicking and dragging on the map view.
47
4 GETTING STARTED WITH WDM
Map navigation control
Description
Zoom control is used to zoom in or zoom out the
map view. You can also use the scroll button on the
mouse, to zoom in or zoom out the map view.
WDM allows you to configure multiple maps to
reflect the real plant topology. By default, the
Default Map appears.
On the top-right of Map view, click the map list and
select the required map to be displayed.
Options: On the top-right of Map view, click the
Options list. The following are the options:
•
•
•
Map
View
Overlay
Map: On the top-right of Map view, click Options
> Maps to view map options, the following are the
map options.
•
•
Manage Maps: Enables you to Add, Edit, and
Delete maps.
Remove Devices: Enables you to remove the
selected devices from the current map.
View: On the top-right of Map view, click Options
> View to view the View options. The View option
provides options for controlling the map displayed.
The following are the View options:
•
•
•
•
•
•
48
www.honeywell.com
Show Map: Select the Show Map check box to
display the map image.
Map Opacity: Move the slider to adjust the
opacity of the map. Move the slider left to
increase the visibility (fade in) of the map and
move the slider right to decrease the visibility
(fade out) of the map.
Show Grid: Select the Show Grid check box to
display grid overlay on the map.
Lock Map: Select the Lock Map check box to
lock the map, locking of the map prevents
moving of devices.
Collapse All: Click the Collapse All option to
collapse all expanded devices on the map.
Expand All: Click the Expand All option to
expand all collapsed devices on the map.
4 GETTING STARTED WITH WDM
Map navigation control
Description
Overlay: On the top-right of Map view, click
Options > Overlay to view the Overlay options.
The Overlay options provides options for
controlling connections displayed.
The following are the Overlay options:
•
•
•
•
•
Display No Connections
Display All Connections
Display Routing Connections
Display Time Synchronization Connections
Connection Status Options
Attention
Depending on the Overlay option selected,
the other options available are displayed.
Click the Display No Connections option for not
displaying any connections on the map.
Click the Display All Connections option for
displaying all connection details on the maps. The
following are the options:
•
•
•
•
•
Show Inactive Connections: Select the Show
Inactive Connections check box to display
inactive connections.
No Display of Data: Click No Display of Data
for not displaying the data.
Display RSQI: Click Display RSQI to display
RSQI.
Display RSSI: Click Display RSSI to display
RSSI.
Display Tx Fail Ratio: Click Display Tx Fail
Ratio to display Tx Fail Ratio.
49
4 GETTING STARTED WITH WDM
Map navigation control
Description
Click the Display Routing Connections option for
displaying all routing connection details on the
maps. The following are the options:
•
Show Secondary Connections: Select the Show
Secondary Connections check box to display
secondary connections.
•
No Display of Data: Click No Display of Data
for not displaying the data.
Display RSQI: Click Display RSQI to display
RSQI.
Display RSSI: Click Display RSSI to display
RSSI.
Display Tx Fail Ratio: Click Display Tx Fail
Ratio to display Tx Fail Ratio.
Display Routing Level: Click Display Routing
Level to display routing level.
•
•
•
•
Click the Display Time Synchronization
Connections option for displaying all clock
connection details on the maps. The following are
the options:
•
•
•
•
•
•
•
•
Show Secondary Connections: Select the Show
Secondary Connections check box to display
secondary connections.
No Display of Data: Click No Display of Data
for not displaying the data.
Display RSQI: Click Display RSQI to display
RSQI.
Display RSSI: Click Display RSSI to display
RSSI.
Display Tx Fail Ratio: Click Display Tx Fail
Ratio to display Tx Fail Ratio.
Display Clock Sigma: Click Display Clock
Sigma to display clock sigma. Clock sigma
represents the standard deviation of clock
corrections with respect to a node and a
neighbor in units of micro seconds.
Display Time Master Address: Click Display
Time Master Address to display time master
address. The Time Master Address is the
network address of the time master access
point.
Display Time Distribution Level: Click Display
Time Distribution Level to display time
distribution level. The Time Distribution Level
is the distance to the time master.
For more information about connectivity option
ranges, refer to “Verifying connectivity using
maps” on page 99.
50
www.honeywell.com
4 GETTING STARTED WITH WDM
Map navigation control
Description
Connection Status Options enables you to define
the quality thresholds for link quality. On the topright of Map view, click Options > Overlay >
Connection Status Options.
For more information about Connection Quality
Options, refer to “Configuring Connection Quality
Options” on page 98.
The device icons in the map view contain the following indicators using which you can analyze the battery
level, the publishing rate, and the bandwidth usage of devices.
Table 9: Field device performance indicators
Device performance indicators
Description
Displays the battery level as low, medium, high, or unknown.
Displays the publishing rate at which the PV data is published.
Displays the bandwidth usage of the devices. This attribute is used to
determine the communication resource usage of field devices. It is
computed based on the percentage of active neighbors and the
percentage of links allocated. When the bandwidth usage becomes
100%, the device will no longer be able to handle additional
communication requests.
51
4 GETTING STARTED WITH WDM
52
www.honeywell.com
5 Configuration
Related topics
“Configuring a Provisioning Device handheld” on page 54
“Loading the Device Description file” on page 59
“Provisioning the OneWireless Network components” on page 60
“Configuring the WDM” on page 65
“Configuring the WDM redundancy” on page 68
“Monitoring the WDM redundancy status” on page 73
“Configuring device communication redundancy” on page 78
“Configuring field devices” on page 80
“Configuring field device channels” on page 85
“Adding notes for devices” on page 91
53
5 CONFIGURATION
5.1 Configuring a Provisioning Device handheld
OneWireless Network uses Provisioning Device handheld for authenticating the devices in the network. This
section describes the tasks that must be performed to configure a Provisioning Device handheld.
This section is not applicable if you are provisioning the devices in the network using over-the-air provisioning
method. For more information about over-the-air provisioning, refer to the section “Provision the devices using
over-the-air provisioning method” on page 60.
Related topics
“Install synchronization software on the computer” on page 54
“Install Microsoft .NET Compact Framework 3.5 on the Provisioning Device handheld” on page 54
“Install Provisioning Device Application on the Provisioning Device handheld” on page 56
“Generate and transfer the provisioning keys to the Provisioning Device handheld” on page 57
“Remove Provisioning Device handheld” on page 58
5.1.1 Install synchronization software on the computer
You must install synchronization software such as Microsoft ActiveSync or Windows Mobile Device Center on
the computer. Microsoft ActiveSync is compatible only with Windows XP or earlier. If you are using a
Windows 7 or Windows Vista system, download and install Windows Mobile Device Center.
To install synchronization software on the computer
1
Using the following link, download the Microsoft ActiveSync 4.5 setup file (setup.msi) and save it to the
computer.
http://www.microsoft.com/downloads/en/details.aspx?familyId=9E641C34-6F7F-404D-A04BDC09F8141141&hash=ZXcqOkIz1vPfw73vwJQbLTHV8Xwio8UMvRuVGUr1w8v5qUjfU8QzIwuUfUo4
uwyiyTbYehsyK3L1OUi7TYCd6g%3d%3d
For Windows Mobile Device Center, use the following link.
http://www.microsoft.com/downloads/en/details.aspx?FamilyId=46F72DF1-E46A-4A5FA791-09F07AAA1914&displaylang=en
2
Browse to the hard disk drive location where the setup file is saved.
3
Run the setup file and follow the on-screen instructions to complete the installation.
5.1.2 Install Microsoft .NET Compact Framework 3.5 on the Provisioning Device handheld
To install Microsoft .NET Compact Framework 3.5 on the Provisioning Device handheld
1
54
On the ribbon bar, in the System group, click Software.
The Support Software dialog box appears.
www.honeywell.com
5 CONFIGURATION
2
From the Select Software list, select the MS .NET Compact Framework v3.5 software.
3
Click Save To to save the software to the computer.
A confirmation message Do you want to save the NETCFSetupv35? appears.
4
Click OK.
The Save As dialog box appears.
5
Browse to a location on the hard drive to save the MS .NET Compact Framework v3.5 software.
•
By default, the file name appears as NETCFSetupv35, if you want to change the file name, then type the
File name.
6
Click Save.
7
Connect the Provisioning Device handheld’s docking station to a USB port on the computer.
8
Place the Provisioning Device handheld on the docking station.
9
Switch on the Provisioning Device handheld.
10 The computer detects the Provisioning Device handheld and the Synchronization Setup Wizard dialog box
appears.
11 Click Cancel to continue.
It is not necessary to complete the synchronization setup before installing the Provisioning Device
Application.
The Microsoft ActiveSync dialog box appears with the status as connected.
12 On the computer, browse to the location where Microsoft .NET Compact Framework 3.5 setup file is saved.
13 Run the setup file on the computer and follow the on-screen instructions to complete the installation.
The Provisioning Device handheld displays the progress of the installation.
55
5 CONFIGURATION
Attention
If Microsoft .NET Compact Framework 3.5 is already installed on the computer, in order to reinstall, you must
remove it using Add/Remove Programs.
5.1.3 Install Provisioning Device Application on the Provisioning Device handheld
Prerequisites
•
•
Ensure that you have logged on to the OneWireless user interface.
Ensure that the Provisioning Device handheld is connected to the computer and the connection status
appears as green in ActiveSync on the computer.
To install Provisioning Device Application on the Provisioning Device handheld
1
On the ribbon bar, in the System group, click Software.
The Support Software dialog box appears.
2
From the Select Software list, select the Provisioning Device Application software.
3
Click Save To to save the software to the computer.
A confirmation message Do you want to save the ProvDevInstaller? appears.
4
Click OK.
The Save As dialog box appears.
5
Browse to a location on the hard drive to save the Provisioning Device Application.
•
By default, the file name appears as ProvDevInstaller, if you want to change the file name, then type the
File name.
6
Click Save.
The Provisioning Device Application is saved on the hard disk drive with a .cab extension. An example for
the file name is ProvDevInstaller.cab.
7
Browse to the location on the hard disk drive where you have saved the *.cab cabinet file and copy the file.
8
Open My Computer and double-click Mobile Device to open My Documents folder on the Provisioning
Device handheld.
9
Paste the *.cab file on My Documents folder of the Provisioning Device handheld. Note that you can save
the Provisioning Device Application in any directory location on the handheld.
You can now remove the Provisioning Device handheld from the computer.
10 On the Provisioning Device handheld, tap Start > File Explorer and browse to My Documents.
11 Tap the *.cab cabinet file.
The message *.cab was successfully installed on your device appears.
12 To use the Provisioning Device Application, tap Start > Programs > Provisioning Device.
Before running the Provisioning Device Application, ensure you perform the following steps.
•
Disable Receive all incoming beams option
•
1. Tap Start > Settings.
2. On the Connections tab, tap Beam.
3. Clear the Receive all incoming beams check box.
4. Tap Ok.
Enable RNDIS Sync Mode on devices using Windows Mobile 5.x
1. Tap Start > Settings.
2. On the Connections tab, tap ActiveSync Mode.
3. Under USB ActiveSync Interface, select RNDIS Sync Mode.
56
www.honeywell.com
5 CONFIGURATION
•
4. When the device prompts for soft reset, tap OK.
Enable advanced network functionality on devices using Windows Mobile 6.x
1. Tap Start > Settings > Connections > USB to PC.
2. Select Enable advanced network functionality.
3. Tap OK.
5.1.4 Generate and transfer the provisioning keys to the Provisioning Device handheld
Prerequisites
•
•
Ensure that the Provisioning Device Application is installed on the Provisioning Device handheld.
Ensure that the Provisioning Device Application is running on the Provisioning Device handheld.
To generate and transfer the provisioning keys to the Provisioning Device handheld
1
Connect the Provisioning Device handheld’s docking station to the USB port on the WDM.
2
In the OneWireless user interface, select the WDM on the Selection Panel.
3
On the Property Panel, expand Provisioning.
4
Click Transfer to PDA and type the following information under Settings.
•
•
•
Name: Unique name used to identify the Provisioning Device handheld.
Number of Keys: The number of provisioning keys to be transferred to the Provisioning Device
handheld. These keys are deployed to FDAPs, Access Points, and field devices through the IR port.
Maximum number of keys that can be transferred at a time is 100.
Expiration (days): The expiration period for the provisioning keys in the Provisioning Device handheld.
The maximum expiration period is 31 days. To calculate the expiration period correctly, ensure that the
PDA time is manually synchronized with the system time.
Attention
If the Provisioning Device handheld is already configured with the provisioning keys from another OneWireless
Network or from the same network, the provisioning data from the earlier configuration is displayed on the
Provisioning panel. To transfer the new keys, rewrite the values in the fields with the new values.
5
Click Transfer Settings.
The security keys are transferred from the WDM to the Provisioning Device handheld.
57
5 CONFIGURATION
6
On the Provisioning Device handheld, tap Start > Programs > Provisioning Device.
The Provisioning Device screen appears.
7
Verify Network ID, No. of keys, and Expiry that appears on the Provisioning Device handheld.
5.1.5 Remove Provisioning Device handheld
To remove Provisioning Device handheld
58
1
On the Selection Panel, select the WDM.
2
On the Property Panel, expand Provisioning Devices.
3
Select the check box for the Provisioning Device handheld to be removed.
4
Click Delete Selected Devices.
Deleting a Provisioning Device handheld, makes the security keys on the handheld device invalid. However,
keys that have already been used to provision a device are still valid provided those devices has already
joined the network at least once after provisioning.
www.honeywell.com
5 CONFIGURATION
5.2 Loading the Device Description file
A Device Description (DD) file is usually a zip file that is available on the disk supplied in the Honeywell
Process Solutions website. It contains information about the device type, commands that are supported by the
device, and other device-specific data. A DD file for a particular field device is used to describe the device and
to interpret messages and the device status.
Attention
•
•
DD files loaded prior to migrating the WDM to R220 are discarded to resolve the R2xx to R220 migration
anomaly. Note that this is a one time behavior that is not repeated after migration to future releases.
To ensure consistency in the channel names, load the DD files before the device joins the network.
To load the Device Description file
1
On the ribbon bar, in the Maintenance group, click Templates.
The Load DD File dialog box appears.
2
Click Load DD File.
3
Browse to the directory location of the DD file.
4
Select the DD file and click Open.
The DD file is uploaded to the WDM and an upload success message appears.
5
Click Close to close the Load DD File dialog box.
6
Repeat steps to load the DD files for all the device types.
59
5 CONFIGURATION
5.3 Provisioning the OneWireless Network components
Related topics
“Provision the devices using Provisioning Device handheld” on page 60
“Provision the devices using over-the-air provisioning method” on page 60
5.3.1 Provision the devices using Provisioning Device handheld
FDAPs/Access Point/field devices must be securely provisioned before adding them to the OneWireless
Network. Provisioning involves the process of downloading the security keys from the WDM to the
Provisioning Device handheld and then transferring them to the FDAPs, Access Point, or field devices through
their Infrared (IR) ports. In addition, from OneWireless R210 release onwards, over the air provisioning is
supported. This allows the devices to join the secure OneWireless Network and establish communication with
other devices and the WDM.
Prerequisites
•
•
•
Ensure that the FDAP/Access Point/field device is powered on.
Provisioning Device Application must be installed on the Provisioning Device handheld.
Provisioning Device handheld must be configured with valid keys from the WDM.
To provision an FDAP/Access Point/field device using Provisioning Device handheld
1
On the Provisioning Device handheld, tap Start > Provisioning Device.
The Provisioning Device screen appears.
2
Tap Provisioning.
The Provisioning screen appears.
3
Hold the Provisioning Device handheld in line with the IR port of the FDAP/Access Point/field device and
tap Provision a Device.
The Device provisioned successfully message appears.
4
Tap Ok.
The device joins the network and appears in the Selection Panel with a default name assigned by the WDM.
Attention
If the FDAP/Access Point/field device is already provisioned, a message displays on the Provisioning Device
handheld screen, prompting to reset the device to default and try again. To restore the device settings:
1. Hold the Provisioning Device handheld in line with the IR port of the device to be provisioned.
2. Tap Reset to defaults on the Provisioning Device handheld.
5
Repeat the procedure to add the other FDAPs/Access Point/field devices to the network.
5.3.2 Provision the devices using over-the-air provisioning method
Devices in the OneWireless Network can be provisioned using over-the-air provisioning method. WDM
provisions the access points and the access points that are enabled to function as provisioning devices can
provision the field devices/line-powered FDAPs. Provisioning role can be enabled in Honeywell FDAPs when
acting as a back bone router or line-powered field router. To enable over-the-air provisioning capability, you
must enable this feature in the user interface.
Any access point that is in the factory default state, when connected to the OneWireless Network can join the
network as an unprovisioned device. In this state, the WDM contains only the basic details about the device
such as the Tag Name, EUI64, and Radio Revision. Also, there is no active data communication between the
60
www.honeywell.com
5 CONFIGURATION
WDM and the device in the unprovisioned state. You can accept or reject an unprovisioned device using the
user interface. If accepted, the WDM sends the provisioning data to the device and the device transitions to
provisioning state. A device with the new security data sends join request to the WDM. This is similar to the
join request received by the WDM when a device is provisioned using a Provisioning Device handheld.
To provision the access points using over-the-air provisioning method
1
On the Selection Panel, select the WDM.
2
On the Property Panel, expand System Manager.
3
Under ISA100 Network Provisioning, in the Over the Air Provisioning group, select Enabled.
The WDM is enabled for over-the-air provisioning support.
4
Click Apply.
The unprovisioned access points start appearing in the Selection Panel. You can filter the device list to view
only the unprovisioned access points in the network.
61
5 CONFIGURATION
5
On the ribbon bar, in the Filter group, click Device Status > Un-Provisioned.
6
Expand the extended Selection Panel to view the available device parameters.
7
Select the required access point in the Selection Panel or the map view and then click Accept on the ribbon
bar.
Attention
•
•
You can select multiple access points using the Selection Panel or the map view. Use SHIFT+click to select
multiple items in a successive list. Use CTRL+click to select multiple items not in succession.
It is recommended that you select and accept only 10 devices at a time.
The Accept Over the Air Devices dialog box appears. The dialog box displays all the unprovisioned access
points that you have selected for enabling over-the-air provisioning.
8
Click Accept.
The Progress column displays the status as In Progress, Provisioning, and then Completed when
complete. Do not close the dialog box when over-the-air provisioning is initiated for devices.
9
Click Close.
The Accept Over the Air Devices dialog box closes.
To provision line-powered FDAP routers/ field devices using over-the-air provisioning method
62
1
On the Selection Panel, select the access point.
2
On the Property Panel, expand Device Management.
3
Under Over The Air Provisioning, click Enable for 60 Minutes.
www.honeywell.com
5 CONFIGURATION
The access point functions as a provisioning device for 60 minutes. The unprovisioned field devices and the
line-powered FDAP routers that are in the factory default state start appearing in the Selection Panel. Note
that if you do not accept or reject the devices within 60 minutes, the devices automatically disappear from
the user interface.
4
To filter the device list:
On the ribbon bar, in the Filter group, click Device Status > Un-Provisioned.
The unprovisioned devices appear in the Selection Panel. The extended Selection Panel enables you to view
the available device parameters.
The device establishes a communication link with the access point after it attains the unprovisioned state.
This link persists even if the device is not provisioned using the connected access point. If the device needs
to be provisioned using a different access point, reject the device and then delete it from the user interface,
so that the device can rejoin through a different access point for provisioning.
5
Select the required line-powered FDAP router/ field device in the Selection Panel or the map view and then
click Accept on the ribbon bar.
Attention
•
•
You can select multiple access points using the Selection Panel or the map view. Use SHIFT+click to select
multiple items in a successive list. Use CTRL+click to select multiple items not in succession.
It is recommended that you select and accept only 10 devices at a time.
The Accept Over the Air Devices dialog box appears. The dialog box displays all the unprovisioned
devices that you have selected for enabling over-the-air provisioning.
63
5 CONFIGURATION
Attention
To reject a device from joining the network using over-the-air provisioning method.
1. Select the required device and click Reject in the ribbon bar.
The Reject Over the Air Devices dialog box displays.
2. Click Reject.
The Progress column displays the status as In Progress, and then Completed, when complete.
3. Click Close.
The Reject Over the Air Devices dialog box closes.
6
Click Accept.
The Progress column displays the status as In Progress, Provisioning, and then Completed, when
complete. Do not close the dialog box when over-the-air provisioning is initiated for devices.
7
Click Close.
The Accept Over the Air Devices dialog box closes.
All the line-powered FDAP routers and the field devices that you have selected for over-the-air provisioning
are provisioned.
Attention
Repeat the procedure to enable over-the-air provisioning capability in line-powered FDAP routers. This enables
the line-powered FDAP routers to provision distant nodes in the network.
64
www.honeywell.com
5 CONFIGURATION
5.4 Configuring the WDM
Related topics
“Configure default routing policy” on page 65
“Configure key rotation period” on page 66
“Configure channel blacklisting” on page 66
5.4.1 Configure default routing policy
The default routing policy defines the routing behavior of a field device that is capable of operating as a router
as well as an I/O device, after it joins the network.
Considerations
The default routing policy is not applicable for the following devices.
•
•
•
Devices capable of operating as access points (Access Points and FDAPs when connected to the backbone
network).
Devices capable of operating only as routers (FDAPs when not wired to the backbone network).
Devices capable of operating only as I/O devices.
To configure default routing policy
1
On the Selection Panel, select the WDM.
2
On the Property Panel, expand System Manager.
3
Under ISA100 Network Topology, select Default Routing Policy, as appropriate.
The following are the routing policy options available.
•
•
•
Routing Enabled — Enables all the routing field devices to function as a router and an I/O device.
Routing Enabled, Line Powered Only — Enables all the line-powered routing field devices to function
as a router and an I/O device. In this case, the battery powered routing field devices function only as I/O
devices.
Routing Disabled — Disables the ability of the routing field devices to function as routers. The field
devices with routing capability can function only as I/O devices.
4
Type the Maximum Route Depth, as appropriate.
The Maximum Route Depth parameter specifies the maximum number of hops. Hops are defined as the
number of routing devices through which the data must pass to reach its destination. By default, this
parameter is set to four.
5
Type the Link Quality Threshold, as appropriate.
65
5 CONFIGURATION
This corresponds to the RSQI value between the devices. The link between the devices is established only if
RSQI is equal to or greater than the Link Quality Threshold limit. By default, Link Quality Threshold is
set to 127.
CAUTION
Honeywell recommends that you set the Link Quality Threshold as 127. To set the Link Quality Threshold
to any other value other than 127, you must contact a Honeywell technical support representative for
assistance.
The Link Quality Threshold does not apply if the device has only one primary link.
6
Select one of the following Default Join Policy options, as required.
The Default Join Policy specifies the system-wide join policy for the routing devices (FDAP routers and
routing field devices). The system – wide join policy can be overridden by the join policy of the device.
By default, the join policy for the devices is configured as Join Enabled.
•
•
7
Join Enabled — Enables the devices to join the network through FDAP routers and routing field
devices.
Join Enabled, Line Powered Only — Enables the devices to join the network only through FDAP
routers.
Click Apply.
The configured routing policy is applicable only for devices that are joining the network for the first time.
5.4.2 Configure key rotation period
To configure key rotation period
1
On the Selection Panel, select the WDM.
2
On the Property Panel, expand System Manager.
3
Under ISA100 Network Security, select the Key Rotation Period.
The following are the options available for configuring the key rotation period.
•
•
•
•
•
4
8 Hours
1 Day
1 Week
1 Month
Infinite – The default setting, which implies that key rotation is disabled.
Click Apply.
5.4.3 Configure channel blacklisting
The data communication in the OneWireless Network takes place through 15 channels of the wireless frequency
spectrum. Each channel is of 5 MHz bandwidth, and with a center frequency starting from 2405 MHz to 2475
MHz. Of the 15 channels, three channels of frequency 2425 MHz, 2450 MHz, and 2475 MHz, are fixed and are
not user configurable. The remaining 12 channels are user configurable and by default are available for data
communication. You can determine and configure the channels that would be available for communication in
the network. The method of removing the channels that can cause interference in the data communication is
referred to as channel blacklisting.
In a plant scenario, there can be various wireless devices communicating in specific channels, which may cause
interference. In such situations, you can configure channel blacklisting to avoid interference and have reliable
data communication network.
66
www.honeywell.com
5 CONFIGURATION
To configure channel blacklisting
1
On the Selection Panel, select the WDM.
2
On the Property Panel, expand System Manager.
The fixed channels appear under ISA100 Fixed Channels and the user configurable channels appear under
ISA100 Configurable Channels.
3
Select the check boxes for the channels, as required.
4
Click Apply.
It takes approximately 90 seconds for the changes to reflect.
67
5 CONFIGURATION
5.5 Configuring the WDM redundancy
A OneWireless redundant system consists of two identical WDMs, one acts as a primary and the other acts as a
secondary (redundant backup). In a redundant system, the secondary is actively linked to the primary (running),
so that it can take control whenever the primary fails or is shut down. The primary and the secondary WDMs
are connected to each other through the RDN Ethernet port.
Attention
Redundancy is supported only on the WDMX hardware (with three Ethernet ports).
The following are the redundancy features:
•
•
•
•
Provides an uninterrupted view to the ISA100 wireless network in the event of a hardware or a software
failure.
Synchronize process data, alarms and events, ISA100 network databases, and WDM configuration in real
time.
Enables transparent switchover with no loss of view to the ISA100 network across all external interfaces.
Enables you to implement the network topology with no single point of failure, including the network
switches. The following figure describes a dual switch network topology without a single point of failure.
Figure 13: Redundant Network Topology with FDAP
68
www.honeywell.com
5 CONFIGURATION
Figure 14: Redundant Network Topology with Access Point
Attention
–
Cisco Catalyst 2960 Series 8 port switches and Cisco Catalyst 2960G Series 24 port switches are the supported
FDN switches. For more information, refer to the Cisco Catalyst 2960 Series documents.
–
For information about the Cisco Access Point configuration, refer to the OneWireless Wireless LAN
Controller Configuration Guide.
You can use a single PCN/single FDN switch or a dual PCN/dual FDN switches. Single switches are used for
simple networks, less expensive, possible single point of failure. Dual switches are used for more robust
networks, which are more expensive, but do not contain single point of failure.
–
In case you plan to set up a redundant WDM, ensure the following:
1.
2.
3.
4.
CISCO switch port, where the WDM is connected, is configured to operate in access mode.
Spanning-tree portfast feature is enabled.
Speed is set to auto.
Port is in full duplex mode.
For an example of the CISCO switch configuration for WDM port, refer to the OneWireless Migration User's
Guide.
5.5.1 Configure the WDM redundancy from the First Time Configuration Wizard
You can configure the WDM redundancy from the First Time Configuration Wizard (FTCW). For more
information, refer to the section “Configuring WDM using the First Time Configuration Wizard” on page 27.
69
5 CONFIGURATION
5.5.2 Configure the WDM redundancy from the WDM Properties Panel
Redundancy configuration may be enabled, disabled, or modified on-process from the WDM Properties Panel.
Changes performed to redundancy configuration from the WDM Properties Panel only apply to that WDM, and
are not automatically cascaded to the redundant partner. For example, if redundancy is disabled on a primary
WDM, the redundant partner remains in secondary role.
Enable redundancy from the WDM Properties Panel
To enable redundancy on a primary WDM
1. On the Property Panel, expand Redundancy.
2. Select the Redundancy Enabled check box.
3. In the Partner's PCN IP address, type the partner's PCN IP address.
When the WDM redundancy is enabled, there is no need to specify a redundancy role since it is automatically
set to primary. A non-redundant WDM may not be converted into a secondary on-process. To convert a nonredundant WDM into secondary WDM, reset it to defaults, and then configure it as a secondary WDM from the
FTCW.
Disable redundancy from the WDM Properties Panel
The WDM redundancy can only be disabled from the WDM Properties Panel, if the WDM is in the primary role
and synchronization is disabled. Secondary WDM may not be converted into non-redundant on-process.
To disable redundancy on a primary WDM
1. On the Property Panel, expand Redundancy.
70
www.honeywell.com
5 CONFIGURATION
2. Clear the Redundancy Enabled check box.
Attention
To disable redundancy on a secondary WDM, reset it to defaults and then configure as non-redundant from FTCW.
Modify partner PCN IP address
On a redundant WDM (primary or secondary), the partner’s PCN IP address may be modified on-process if
synchronization is disabled.
Redundancy commands
Refer to the section “Perform redundancy-specific operations” on page 75.
Primary view
The Primary WDM is used for monitoring the ISA100 Wireless field device network and the devices, initiating
all the commands, and viewing alarms and events. Primary WDM monitors and reports the communication
configuration, performance, and operational status. The external interfaces such as MODBUS, HART, OPC,
GCI, and ENRAF are only available on the primary WDM. CDA interface is available on both the primary and
secondary WDMs.
Secondary view
The secondary WDM has limited functionality and is used for monitoring redundancy parameters, initiating
redundancy commands, and viewing the secondary WDM alarms and events. The access points, field devices,
or external interfaces are not displayed on the secondary WDM. CDA external interface is not displayed on the
secondary WDM. However, secondary WDM can be accessed from Experion through CDA interface.
The following are not available in the Properties Panel of the secondary WDM.
•
•
•
System Manager
Configuration
Date and Time
71
5 CONFIGURATION
•
•
•
Provisioning
Provisioning Devices
Notes
The external interfaces are only available on the primary WDM (except CDA). External clients cannot connect
to the secondary WDM using Modbus, HART, OPC, GCI, and ENRAF. The CDA interface is available on both
the primary and the secondary WDMs. The external clients are reconnected to the old secondary/new primary
immediately after switchover, using the primary WDM configuration. Redundancy status parameters and
commands are available when integrated with Experion R410 and later.
72
www.honeywell.com
5 CONFIGURATION
5.6 Monitoring the WDM redundancy status
The redundancy status is displayed on the Status Bar, Property Panel, Selection Panel, and Reports of the
OneWireless User Interface.
Status Bar
The Status Bar contains the overall redundancy status as text.
Selection Panel
The WDM icon on the Selection Panel changes depending on the redundancy role. For information regarding
the different WDM icons, refer to “Understand the device icons” on page 39.
5.6.1 Monitor the redundancy status from the WDM Property Panel
To monitoring the redundancy status from the WDM Property Panel
1
On the Selection Panel, select WDM.
2
On the Property Panel, expand Redundancy.
3
Under Summary, verify the Redundancy Role, Synchronization State, Initial Sync Progress, Inhibit
Sync Reason, and Redundancy Physical ID.
4
Under Status, verify Hardware Supported, Partner Creds Syncd, Redun Controllability, Redun
Compatibility, and Auto Sync State, Pending Critical Data, and Pending Non-Critical Data.
73
5 CONFIGURATION
The following table describes the attributes displayed in the Redundancy tab of the WDM Property Panel.
Attributes
Description
Summary
Redundancy Role
Indicates the current redundancy role - primary, secondary, or non-redundant.
Synchronization State
Indicates level of module synchronization with redundancy partner as follows: Partner Visible, Initial Sync Progress, Synchronized, No Partner, Incompatible.
•
•
•
•
•
Partner Visible: Communication is established over the RDN private path, but the
WDMs are not yet synchronized.
Initial Sync Progress: Initial sync is in progress.
Initial sync is complete and WDMs are in sync maintenance state.
No communication over RDN private path.
Redundant partner is not compatible for synchronization.
Initial Sync Progress (%)
Indicates the percentage of initial-sync completion. This is set to zero when initial
sync is not in progress and it is set to 100 when initial sync is complete.
Inhibit Sync Reason
Indicates the current reason why initial sync is inhibited.
Redundancy Physical ID
Used to identify the physical hardware module.
The Redundancy Physical ID attribute is used for identifying the physical hardware
module. By default, when a WDM is configured in a primary role, the value of its
attribute is set to A. When a WDM configured in a secondary role the value of its
attribute is set to B. These values are attached to the physical hardware and not the
redundancy role. In other words, starting from a redundant synchronized WDM pair,
where the WDM with a physical ID A is primary and the WDM with a physical ID B
is secondary, if a switchover occurs, the WDM physical ID B will be in primary role
and the WDM with physical ID A will reboot into secondary role. If the phsyical
hardware is so labeled, it is possible to identify the WDM currently in Primary role.
Status group
Hardware Supported
Indicates whether redundancy is supported on current hardware. WDM redundancy is
not supported on WDMS hardware.
Partner Creds Syncd
Indicates whether WDMs have synchronized at least once. On a lonely secondary, the
become primary command is disabled if this check box is not selected.
Redun Controllability
Describes the module’s ability to control relative to its redundant partner. For
example, on an unsynchronized redundant WDM pair, if the primary's FDN or PCN
cable is disconnected, but the secondary's FDN and PCN cables are connected, then
the secondary has better control ability than the primary. And the primary WDM's
control ability is worse than the secondary. Note that on such a redundant WDM pair,
if synchronization is enabled, then the WDMs synchronize and immediately
switchover since the secondary's control ability is better than that of the primary.
Switchover can be initiated from primary or secondary WDM. The following
conditions result in switchover:
•
•
•
•
74
FDN or PCN Ethernet cable is disconnect on the primary WDM.
Loss of power on the primary WDM.
Software failure on the primary WDM.
Hardware failure on the primary WDM.
Redun Compatibility
Indicates whether redundant partner modules are compatible and if not compatible,
provides a reason. Initial synchronization is disabled on an incompatible WDM pair.
Auto Sync State
Indicates whether auto synchronization is enabled or disabled. When disabled, you
must explicitly issue the Enable Synchronization command to reset any persistent
fault condition and (re)attempt initial synchronization.
www.honeywell.com
5 CONFIGURATION
5
Attributes
Description
Pending Critical Data
Number of critical sync data bytes yet to be sent to partner. This value is usually 0.
An increase may be observed during initial synchronization, which rapidly reduces to
0.
Pending Non-critical data
Number of non-critical synchronization data bytes yet to be sent to the partner. This
value may increase to a large value during initial synchronization, and gradually
reduce to zero.
Last Sync Time
Time when the WDM completed initial synchronization.
Last Loss of Sync Time
Time when the WDM last lost synchronization.
Statistics
The attributes in this group indicate whether redundant WDMs are communicating
over the RDN private path. A steadily increasing Tx count indicates that data is
successfully being transmitted to partner. A steadily increasing Rx count indicates
that data is successfully being received from the partner.
On the Property Panel, expand Redundancy History to view the history details. The Redundancy
History tab displays the 16 most recent redundancy events along with a reason why the event occurred. For
example, in the figure provided below, the role change state is reported with reason
InitiateSwitchoverCommand indicating that a role change occurred at 2 PM on 9/17/2013 due to userinitiated switchover command.
5.6.2 Perform redundancy-specific operations
Enable Synchronization
The Enable Synchronization option enables auto synchronization and is used for initial synchronization. The
maximum initial synchronization time is 180 seconds.
75
5 CONFIGURATION
The following conditions result in loss of synchronization:
•
•
•
•
•
•
•
Disable Synchronization command initiated from primary or secondary WDM.
FDN or PCN Ethernet cable disconnected on the secondary WDM.
RDN Ethernet cable disconnected.
Loss of power on the secondary WDM.
Software failure on the secondary WDM
Hardware failure on secondary WDM.
Redundancy data communication failure (checksum, and so on).
Attention
Redundancy command buttons are disabled if they do not apply to the current redundancy state. For example, ‘Enable
Synchronization’ is disabled when synchronized.
To enable synchronization
•
On the Property Panel, expand Redundancy, and then click Enable Synchronization.
Disable Synchronization
The Disable Synchronization option disables auto synchronization and used for drop synchronization.
To disable synchronization
•
On the Property Panel, expand Redundancy, and then click Disable Synchronization.
Initiate Switchover
The Initiate Switchover option enables immediate switchover of synchronized WDM pair. The switchover
time is 15 seconds.
Switchover can be initiated from the primary or the secondary WDM. The following conditions result in
switchover:
•
•
•
•
FDN or PCN Ethernet cable is disconnect on the primary WDM.
Loss of power on the primary WDM.
Software failure on the primary WDM.
Hardware failure on the primary WDM.
To initiate switchover
•
On the Property Panel, expand Redundancy, and then click Initiate Switchover.
Convert a lonely unsynchronized secondary into a primary
The Become Primary option converts a lonely unsynchronized secondary into a primary. The secondary WDM
must have synchronized at least once with the primary WDM for this command to be enabled. This is indicated
by the Partner Credentials Syncd check box in the Status group.
76
www.honeywell.com
5 CONFIGURATION
Attention
Since the secondary is not synchronized with the primary when this command is executed, it may have stale
configuration data. You must manually check and re-configure devices and other settings as appropriate. The
following data is preserved in the secondary WDM since the last sync drop event:
•
•
•
•
•
•
•
•
•
•
•
Primary WDM name.
Primary WDM FDN IP address.
Primary WDM PCN IP address.
Primary WDM external NTP server configuration.
Primary WDM DHCP server configuration.
DHCP leases given out by primary WDM.
Security keys already used by devices to join the network.
Country code.
Subnet ID.
TAI offset.
User accounts, their roles, and permissions.
To convert a lonely unsynchronized secondary into a primary
•
On the Property Panel, expand Redundancy, and then click Become Primary.
Toggle Physical ID
The Toggle Physical ID option to toggle physical ID from B to A or A to B.
When the redundant WDMs are communicating over the private path, the physical IDs of both the WDMs is
toggled, regardless of whether the command was sent to the primary or the secondary WDM. If redundant
WDMs are not communicating over the private path, only the WDM to which the command was sent is
affected.
Tip
When redundancy is enabled, the primary WDM is assigned physical ID A and the secondary WDM is assigned
physical ID B. The physical IDs are displayed in the UI during normal operation. Tagging the physical hardware
with matching labels makes it easy to distinguish the WDMs later.
To toggle the physical ID
•
On the Property Panel, expand Redundancy, and then click Toggle Physical ID.
77
5 CONFIGURATION
5.7 Configuring device communication redundancy
The OneWireless user interface displays the communication redundancy state of each device. A communication
redundancy ratio statistic is provided to identify devices with frequent non-redundant connectivity over time,
even if the device currently has redundant connectivity. In addition, devices may optionally alarm if a nonredundant connection is detected.
5.7.1 Property Panel- device communication redundancy
The Property Panel displays the communication redundancy information.
•
•
•
Communication Redundancy State identifies if a device is having connectivity issues.
Communication Redundancy Ratio provides ratio of redundant connectivity versus non-redundant
connectivity, used to identify if a device is having connectivity issues over time
Communication Redundancy Alarm alerts if a device loses redundant connectivity, alarm may be disabled.
5.7.2 Report
The report now displays the communication redundancy information. For example, Connection Summary
report.
78
www.honeywell.com
5 CONFIGURATION
For more information, refer to “Generating reports” on page 188.
79
5 CONFIGURATION
5.8 Configuring field devices
Related topics
“Configure field device properties” on page 80
“Configuring routing assignment” on page 80
“Configure publication rate” on page 81
“Calibrate field devices” on page 82
5.8.1 Configure field device properties
To configure tag name and description
1
On the Selection Panel, select the field device.
2
On the Property Panel, expand Field Device Summary.
3
Type the required Tag Name.
Attention
You can change the Tag Name by double-clicking the field device name in the Selection Panel.
4
Type the required Description.
5
Click Apply.
5.8.2 Configuring routing assignment
After joining the network for the first time, a field device capable of operating as a router and an I/O device
initializes its routing assignment based on the current default routing policy. It is possible to override the default
routing policy by configuring routing assignment for field devices. Configuring device routing assignment
results in restarting the device with a new role.
Considerations
•
Device routing assignment can be configured only for devices that are capable of operating as routers and
I/O devices.
To configure routing assignment
1
On the Selection Panel, select the field device.
2
On the Property Panel, expand Device Management.
3
Select Routing Assignment, as appropriate.
The following are the Routing Assignment options available.
•
•
•
Routing Disabled — Disables the ability of a routing field device to function as a router. The field
device can function only as an I/O device.
Routing Enabled — Enables the routing field device to function as a router and an I/O device. The
default join policy configured is Follow System Manager Policy.
Not Applicable
– Does not apply to devices that are capable of operating as access points.
– Does not apply to devices that are only capable of operating as routers.
4
80
Select one of the following Join Assignment options, as required.
www.honeywell.com
5 CONFIGURATION
The Join Assignment overrides the system manager join policy. This is applicable only for routing field
devices.
•
•
•
Join Disabled — Disables device-join through this device.
Join Enabled — Enables device-join through this device.
Follow System Manager Policy — Enables the device to follow the system manager join policy.
Device-join through this device depends on the configured system manager join policy.
The Join Status is a read-only parameter that indicates the resultant join state for all the devices.
•
•
•
5
Access Points, FDAP access points, and FDAP routers have the Join Assignment permanently set to
Join Enabled.
Non-routing field devices have the Join Assignment permanently set to Join Disabled.
Routing field devices have the default Join Assignment set to Follow System Manager Policy.
Click Apply.
5.8.3 Configure publication rate
The publication data for input and output field devices can be configured using the Input Publication and Output
Publication panels in the Property Panel. Depending on the device type, a field device can have an Input
Publication panel or an Output Publication panel. This is determined by the DD file for the field device.
The Input/Output Publication panel contains the following configuration options.
•
Contract Status — A contract is a communication resource (bandwidth) allocation between two devices on
the ISA100 network. The following are the status values that are displayed depending on the status of the
contract.
–
–
–
–
•
•
•
•
Not Configured - No contract established due to incorrect configuration of the device.
Activating - Contract establishment is in progress.
Active- Contract is active.
Active, Negotiated Down - If a device requests a contract for periodic publications at a fast rate (such as
1 second) and if the communication resources are not available, the contract is negotiated down to a
slower publication period (such as 5 seconds).
– Terminating - Contract termination is in progress.
– Failed - Contract establishment is failed.
– Inactive - Contract is inactive.
Rate – The rate at which a field device publishes data.
Stale Limit – Defines the maximum number of stale input values that can be received before the input status
is set to Bad. It is recommended that for 1 second publication period, the stale limit should be set to 15
seconds. For all other publication periods (5 seconds, 10 seconds, 30 seconds, and 1 minute), the stale limit
should be set to 5.
Destination – Destination of publication for output devices .
Channel – The list of channels for which the publication configuration applies.
Attention
When a device joins the network, the WDM automatically configures its publication period as 30 seconds.
To configure publication rate and stale limit
1
On the Selection Panel, select the field device.
2
On the Property Panel, expand Input Publication or Output Publication.
81
5 CONFIGURATION
3
In the Rate field, select the publication rate, as appropriate.
4
In the Stale Limit field, select the stale limit, as appropriate.
5
Click Apply.
5.8.4 Calibrate field devices
Calibration can be initiated either by manually setting the calibration parameters such as Cal Cmd, Cal Point
High, Cal Point Low, and Cal Unit in the Calibration panel or by using the Invoke Method button. Invoke
Method initiates the method manager, which guides you through the calibration process. All the field devices
might not necessarily have the ability to calibrate. This is defined in the vendor supplied DD file.
To calibrate field device using Invoke Method
82
1
On the Selection Panel, select the field device channel.
2
On the ribbon bar, in the Channel group, click Inactivate.
Ensure you inactivate the channels before starting calibration. You cannot perform calibration when the
channel is online.
3
Click Apply.
4
In the Property Panel, expand Calibration.
www.honeywell.com
5 CONFIGURATION
5
Click Invoke Method to open the method dialog box.
6
Click Next and follow the instructions on-screen to complete calibration.
To cancel the calibration process at any stage of method execution, click Abort.
You can close the method dialog box while the method execution is in progress. To open the method dialog
box again, click the method pane in the status bar.
Once complete, a message appears indicating that the calibration process completed successfully.
7
On the ribbon bar, in the Channel group, click Activate.
8
Click Apply.
•
•
You can run only one method at a time for a field device using the current login session.
If you close the Web browser while a method is running and logon as another user, you can start another
method on the same device only after few minutes.
To calibrate field device by setting the calibration parameters
1
On the Selection Panel, select the field device channel.
83
5 CONFIGURATION
2
On the ribbon bar, in the Channel group, click Inactivate.
Ensure you inactivate the channels before starting calibration. You cannot perform calibration when the
channel is online.
3
Click Apply.
4
In the Property Panel, expand Calibration.
5
Set the following calibration parameters:
•
•
•
•
6
84
Cal Cmd – The options available are None, Cal Lower (to calibrate device with lower calibration limit),
Cal Upper (to calibrate device with higher calibration limit), Cal Restore (to restore calibration setting),
and Cal Clear (to clear calibration setting).
Cal Point High
Cal Point Low
Cal Unit
Click Apply.
7
On the ribbon bar, in the Channel group, click Activate.
8
Click Apply.
www.honeywell.com
5 CONFIGURATION
5.9 Configuring field device channels
Related topics
“Configure Mode and Scale” on page 85
“Add channels to publication groups” on page 85
“Configure channel instantiation” on page 86
“Remove channels from publication groups” on page 89
“Delete (uninstantiate) channels” on page 90
5.9.1 Configure Mode and Scale
To configure Scale
1
On the Selection Panel, select the field device channel.
2
On the Property Panel, expand Process Variable to view the following read-only parameters in the
OneWireless user interface.
•
•
•
3
EU at 100%: Specifies the high range PV value in Engineering Units.
EU at 0%: Specifies the low range PV value in Engineering Units.
Units Index: Specifies the unit of the measurement value. The value varies according to the sensor type
selected for a channel.For example, in a temperature device, when the sensor type changes to a
thermocouple (TC-J) or mV-50 range, the transducer block sets the Units Index to °C or mV.
Click Apply.
Attention
After applying the changes, the newly configured values appear under the Scale panel.
To configure Mode
1
On the Property Panel, expand Mode.
2
In the Target list, select the mode as required.
The mode types available are Normal, OOS, and Auto. If the device type is Digital Output (DO), an
additional mode Man is also available in the Target list.
3
Click Apply.
5.9.2 Add channels to publication groups
Perform the following steps to enable/disable the PV publication capability of field devices.
To add channels to publication groups
1
On the Selection Panel, select the field device channel.
2
On the Property Panel, expand Input Publication or Output Publication panel.
3
In the Channel drop-down list, select the channels for which data publication needs to be enabled.
85
5 CONFIGURATION
Attention
To disable data publication, select None in the Channel list.
4
Click Apply.
5.9.3 Configure channel instantiation
OneWireless Network supports block instantiation for field device channels. You can add, remove, and
reconfigure channels on supported field devices. An individual channel can be configured for one of the several
roles, such as an analog temperature input, an analog current input, or a discrete input.
You can instantiate channels, only for supported field devices from Honeywell.
•
•
•
XYR 6000 Multi AI DI
XYR 6000 Multi AI DI DO
XYR 6000 Temp DI
You can add, remove, and reconfigure channels on a supported field device using the user interface.
To inactivate the channel
1
On the Selection Panel, select the field device channel.
2
Do one of the following:
3
•
On the ribbon bar, in the Channel group, click Inactivate.
•
On the Property Panel, expand Mode and then in the Target list, click OOS.
Click Apply.
The channel icon appears as blue indicating the inactive mode.
To remove channel from publication group
86
1
On the Selection Panel, select the field device.
2
On the Property Panel, expand Input Publication.
3
For the channel to be removed from the publication group, click None in the Channel drop-down list.
www.honeywell.com
5 CONFIGURATION
4
Click Apply.
Wait for a few seconds to save the changes.
To delete (uninstantiate) channel
1
Expand Channel Configuration and click Unassigned in the drop-down list for the channel to be deleted.
87
5 CONFIGURATION
2
Click Apply.
The channel disappears from the map view and the Selection Panel.
To instantiate channel
1
88
Expand Channel Configuration and click the respective instantiable object type for the channel to be
instantiated.
In the following example illustration, the temperature DI field device has three instantiable channels. Each
channel can be instantiated as an analog input channel or a binary input channel.
www.honeywell.com
5 CONFIGURATION
2
Click Apply.
To add channel to publication group
1
On the Property Panel, expand Input Publication panel.
2
In the Channel drop-down list, click the channel for which data publication needs to be enabled.
3
Click Apply.
To activate the channel
1
On the Selection Panel, select the field device channel.
2
Do one of the following:
3
•
On the ribbon bar, in the Channel group, click Activate.
•
On the Property Panel, expand Mode and then in the Target list, click Auto.
Click Apply.
The channel icon appears as green indicating active mode.
5.9.4 Remove channels from publication groups
To remove channels from publication groups
1
On the Selection Panel, select the field device channel.
2
On the Property Panel, expand Input Publication.
3
For the channel to be deleted from the publication group, click None in the Channel drop-down list.
89
5 CONFIGURATION
4
Click Apply.
5.9.5 Delete (uninstantiate) channels
Prerequisites
•
•
Ensure that the channel is set to OOS mode.
Ensure that the channel is not configured for publication in any of the Input/Output Publication groups. If
configured, remove the channel from the Publication group.
To delete channels
90
1
On the Selection Panel, select the field device channel.
2
On the Property Panel, expand Channel Configuration.
The Channel Configuration panel displays a list of instantiated channels.
3
Select the channel to delete and select Unassigned in the corresponding drop-down list.
4
Click Apply.
www.honeywell.com
5 CONFIGURATION
5.10 Adding notes for devices
You can add device notes for WDM, FDAPs, Access Points, or field devices. These notes can be used as a
logbook for the device.
Perform the following steps to add notes for any configured device. Note that the notes added for devices are
saved on the WDM and not on the device.
To add notes
1
On the Selection Panel, select the required device.
2
On the Property Panel, expand Notes.
3
Click the Add note icon.
A text box appears.
4
Type the note and click Apply.
Attention
•
•
All users can view all the notes added by other users.
To delete any note added, click delete icon adjacent to the note.
•
– Users with User role can delete only notes added by them.
– Users with Administrator role can delete other user’s notes.
Notes are not restored during a replace operation.
To edit a note already added, double-click on the note that you want to edit, make the necessary changes,
and then click Apply.
91
5 CONFIGURATION
92
www.honeywell.com
6 Operations
Related topics
“Setting up the monitoring area” on page 94
“Configuring Connection Quality Options” on page 98
“Verifying connectivity using maps” on page 99
“Configuring alerts for Honeywell field devices” on page 101
“Monitoring the network and the devices” on page 102
“Alarm and event management” on page 104
“Viewing time synchronization parameters” on page 118
“Viewing license agreement files” on page 119
93
6 OPERATIONS
6.1 Setting up the monitoring area
About site-specific monitoring
The OneWireless user interface enables you to create multiple maps for setting up site-specific monitoring
areas. After the initial configuration, WDM creates a default map. Based on the plant topology, you can create
multiple site maps and place the devices under these maps. This enables site specific monitoring of the devices
that are placed in different locations of a plant. In addition, a site map of that particular location can be uploaded
to the map. You can position the devices on the site map in such a way that it reflects the real plant topology.
You can create a map of entire plant and maps of smaller areas, each containing the same devices. The FDAPs
and devices can be placed on multiple maps.
Figure 15: Site-specific monitoring
6.1.1 Configure site maps
To configure site maps
94
1
Click the Monitoring tab to view the map view.
2
On the top-right of Map view, click Options > Maps > Manage Maps.
The Manage Maps dialog box appears.
www.honeywell.com
6 OPERATIONS
3
Click Add.
4
Under Map Configuration, in the Map Name box, type the name of the map.
5
In the Description box, type the description for the map.
6
Click Load Image.
The Open dialog box appears.
7
Browse to the location where the site map is saved, and then select the site map.
Attention
The site map must be a .jpg file of any size.
8
Click Open to upload the site map.
In the Manage Maps dialog box, under Image Size the image appears.
Attention
•
•
By default, the map display is hidden. To display the map, on the top-right of the map view, click
Options>View > Show Map.
To increase or decrease map visibility, click Options > View > Map Opacity > fade in /fade out.
For more information about map controls, refer to the section, “About map view” on page 47.
9
Click Save.
Attention
In the Manage Maps dialog box, click Delete to remove any previously loaded site map. In the Manage Maps
dialog box, click Edit to edit the site map details.
95
6 OPERATIONS
6.1.2 Position the devices on the map
After uploading the site map for a particular location, you can position the devices on the map to reflect the
physical design and structure of your plant. The devices do not appear on the map view, by default.
To position the devices on the map
1
On the Selection Panel, select the device to be positioned on the map.
2
Drag the device and drop it on the required location on the map.
3
Repeat steps 1 and 2 to place the other devices.
4
On the top-right of Map view, click Options > View.
5
Select Lock Map check box to the lock the map.
You must lock the map to prevent device locations from being accidentally modified.
6.1.3 Change the default map for a device
From the Property Panel, you can only change the default map for an FDAP or a field device. This has no effect
on the actual current placement of a device on any map. The default map is only used for display purposes in
reporting alarms, reports, and so on. You cannot change any physical placement of a device from the property
panel. In fact, only maps on which the device is currently placed appears in the drop down for default map.
To change the default map for a device
96
1
On the Selection Panel, select the required device.
2
On the Property Panel, expand the Device Summary.
3
From the Default Map list, select the required map on which the device must be placed.
www.honeywell.com
6 OPERATIONS
Attention
The Default Map list displays all the maps on which the device is placed.
6.1.4 Remove the device from the map
To remove the device from the map
1
Click the Monitoring tab to view the map view.
2
From the Selection Panel or map view, select the device.
3
On the top-right of Map view, click Options > Maps > Remove Devices.
The Remove Devices From Map dialog box appears.
4
Click Remove to remove the selected devices from the current map.
97
6 OPERATIONS
6.2 Configuring Connection Quality Options
Connection quality is based on the Receive Signal Strength Index (RSSI), Receive Signal Quality Index (RSQI),
and Transmit Fail Ratio (TxFailRatio). Using the Connection Status Options, you can configure thresholds for
RSQI, RSSI, and TxFailRatio. The overall quality of an active connection is based on RSQI, RSSI, or
TxFailRatio. If RSQI, RSSI, or TxFailRatio is poor, connection quality is poor. Connection quality is displayed
as good (green), fair (orange), or poor (red).
To configure connection quality options
1
On the top-right of Map view, click Options > Overlay > Connection Status Options.
The Connection Status Options dialog box appears.
2
In the boxes near the separator bars, type the RSSI, RSQI, and TxFailRatio values or drag the separator bars
up and down.
3
Click Apply, and then click OK.
Attention
Click Restore Defaults to restore the Honeywell recommended default values.
98
www.honeywell.com
6 OPERATIONS
6.3 Verifying connectivity using maps
Perform the following steps, to verify mesh connectivity and device connectivity.
To verify mesh connectivity and device connectivity
1
Click the Monitoring tab to view the map view.
2
Visually inspect network topology map and connectivity.
3
Navigate to the device in the topology map and check the link signal quality and connectivity.
The RSSI range is displayed in the format -xx/-yy dBm, where –xx and -yy represent the link strength of the
devices connected to each other. When the difference between –xx and –yy is less than 5, the lowest of the
two values is displayed.
The RSSI range is displayed in the format xx/yy, where xx and yy represent the link quality index of the
devices connected to each other. When the difference between xx and yy is less than 10, the highest of the
two values is displayed.
For example, in the following illustration, the value -56 represents RSSI of the device (MNBBR_163) and
the value -46 represents the RSSI of the device (MNBBR_72).
4
Verify device communication statistics information such as RSQI, RSSI, and TxFailRatio.
A green line between the devices in the map view indicates strong signal quality, whereas a red line indicates
weak signal quality. A solid line between the devices represents an active connection between the devices
and a dotted line represents an inactive connection.
The connection quality details are displayed as tool tip when you hover the mouse over the connection.
Option
Description
RSQI range
235 to 255: Excellent
180 to 235: Good
150 to 180: Fair
0 to 150: Poor
RSSI range
-75 to -25: Good
-85 to -75: Fair
-100 to -85: Poor
TxFailRatio
0 to 20: Good
20 to 50: Fair
50 to 100: Poor
You can modify connection quality ranges.
99
6 OPERATIONS
Attention
While configuring the network, ensure that the lowest RSQI on each active link is greater than 180 and the lowest
RSSI on each active link is greater than -80 dbm. An active link with RSQI/RSSI values higher than the specified
values protects the signals when the signal strength/quality degrades due to transient environmental conditions.
100
www.honeywell.com
6 OPERATIONS
6.4 Configuring alerts for Honeywell field devices
You can configure to enable or disable the following alerts for Honeywell field devices if the DD files for the
devices are loaded to the WDM.
•
•
•
•
Maintenance Required alerts: Generated to indicate low battery or low external power condition.
Out of Specification Status alerts: Generated for calibration errors, thermocouple condition warning, or
indeterminate discrete input state.
Failure Status alerts: Generated for fault conditions such as input failure, output failure, or electronic
failure.
Function Check Status: Generated for conditions such as device channel out of service.
To configure alerts for field devices
1
On the Selection Panel, select the field device.
2
On the Property Panel, expand Device Vendor Parameters.
3
For the type of alert to be configured, perform one of the following.
•
•
4
Set the Alert Priority.
The Alert Priority can contain the following values.
•
•
•
•
•
5
To enable alert generation, clear the Alert Disable check box.
To disable alert generation, select the Alert Disable check box.
0-2: Journal (only events are reported)
3-5: Low
6-8: Medium
9-11: High
2-15: Urgent
Click Apply.
101
6 OPERATIONS
6.5 Monitoring the network and the devices
You can monitor the performance of the network and the devices that have joined the network. All the devices
that have joined the network are accessible from the Selection Panel. The extended Selection Panel allows you
to view the details about the devices in the network.
Figure 16: Monitoring the network using extended Selection Panel
The following tables explain the device and the channel attributes that are available in the extended Selection
Panel.
Table 10: Device attributes in the extended Selection Panel
Device attribute
Description
Tag Name
Name of the device.
Type
Device type, which can contain the following values.
•
•
•
•
•
Status
Device Manager for WDM
Access Point for FDAP and Access Points
Routing for FDAP routers
Device, Routing for field devices
Device for non-routing field devices
Device status.
The status can be Offline, Joining, or Joined.
Vendor
102
www.honeywell.com
Device vendor name.
6 OPERATIONS
Device attribute
Description
Model
Device model.
For example, XYR 6000 HLAI is the device model for Honeywell HLAI devices.
Revision
Device sensor firmware revision number.
To view the radio firmware revision, select the Show Radio Identification check box.
Serial
Serial number of the device.
IP6 Address
IPv6 address of the device.
Power Source
Power source of the device, which can contain the following values.
•
•
Line for line powered FDAPs or WDM.
High, Low, or Medium for battery powered field devices.
Tag Name
Channel name.
Channel
Channel number.
Mode
Device channel mode, which contains the values AUTO, OOS, or MAN.
Value
Process Value.
Status
PV status.
You can view the PV trend in the Values and Trends panel of the channel’s Property Panel.
103
6 OPERATIONS
6.6 Alarm and event management
Related topics
“Understand alarms and events” on page 104
“Monitor alarms and events” on page 116
6.6.1 Understand alarms and events
The following table provides a summary of the various alarms and events generated by the OneWireless devices
and the recommended corrective action to handle the alarms and events.
104
Source
Alarm/Event
notification
Possible cause
Consequences Recommended
corrective
action
WDM
Bad Join Key
FDAP or field
device is
attempting to
join the network
with an invalid
key.
WDM rejects
the join
request by the
FDAP or the
field device.
Locate the
N/A
devices and
reprovision the
devices with
valid join keys.
None
N/A
WDM
Expired Join
Key
FDAP or field
device is
attempting to
join the network
with an expired
key.
WDM rejects
the join
request by the
FDAP or the
field device.
Locate the
N/A
devices and
reprovision the
devices with
valid join keys.
None
N/A
WDM
Key
Authentication
Failed
FDAP or field
device security
confirmation
failed due to an
invalid master
key.
WDM rejects
the join
request by the
FDAP or the
field device.
None
N/A
None
N/A
WDM
Offline
FDAP or field
None
device is offline.
None
N/A
EUI64 of N/A
the device
WDM
Joining
FDAP or field
None
device is joining
the network.
None
N/A
EUI64 of N/A
the device
WDM
Joined
FDAP or field
None
device has
joined the
ISA100 Wireless
network.
None
N/A
EUI64 of N/A
the device
www.honeywell.com
Response
time
Parameter/ Default
Reported value
value
6 OPERATIONS
Source
Alarm/Event
notification
Possible cause
Consequences Recommended
corrective
action
WDM
Not
Synchronized
Redundancy
enabled, but
sync not yet
enabled or
completed. Error
occurred during
communication
between
redundant
WDMs over the
RDN private
path. Sync is
disabled.
WDM
redundancy is
not available
and primary
WDM failure
results in loss
of view and/or
control.
WDM
Switchover
Switchover can WDM role
be initiated from change.
primary or
secondary
WDM. The
following
conditions result
in switchover:
•
•
•
•
FDN or
PCN
Ethernet
cable is
disconnect
on the
primary
WDM.
Loss of
power on the
primary
WDM.
Software
failure on
the primary
WDM.
Hardware
failure on
the primary
WDM.
Response
time
Parameter/ Default
Reported value
value
Enable sync if N/A
disabled.
Reconnect
RDN private
path
communication
cable. If
redundancy is
no longer
required,
disable
redundancy.
N/A
N/A
If switchover
N/A
occured due to
FDN and/or
PCN cable
disconnect on
original
primary, verify
connections.
Reason for
switchover is
available in the
redundancy
history section
in the
redundancy tab
in the WDM
Properties
Panel. Take
appropriate
corrective
action to restore
WDM
redundancy
based on this
reason. In case
of hardware or
software
failiure in the
original
primary,
contact
customer
support.
N/A
N/A
WDM
Redundant
Partner Visible
on Redundant
Link
Redundant
None
WDM sync state
changes to
partner visible.
None
N/A
N/A
N/A
WDM
Redundancy
Sync In
Progress
Redundant
None
WDM sync state
changes to sync
in progress.
None
N/A
N/A
N/A
105
6 OPERATIONS
106
Source
Alarm/Event
notification
Possible cause
Response
time
Parameter/ Default
Reported value
value
WDM
Redundancy
Sync
Maintenance
Redundant
None
WDM sync state
changes to sync
maintenance.
None
N/A
N/A
N/A
WDM
Redundant
During role
Non-Redundant determination,
the WDM
configuration is
changed from
non-redundant
to redundant.
None
None
N/A
N/A
N/A
WDM
Redundant No
Partner
Sync state
changes to no
partner when
WDM is
configured as
redundant.
None
None
N/A
N/A
N/A
WDM
Redundant
Incompatible
Partner
Redundant
None
WDM sync state
changes to
incompatible
partner.
None
N/A
N/A
N/A
WDM
Sync Hardware Redundant
Restart WDM. Re-enable
Failure
WDM serial port
redundancy,
initialization
restart WDM
fails.
N/A
N/A
N/A
WDM
Redundant
Physical ID A
Redundant
None
WDM physical
ID changes to A
due to startup/
change.
None
N/A
N/A
N/A
WDM
Redundant
Physical ID B
Redundant
WDM physical
ID changes to B
due to startup/
change.
None
None
N/A
N/A
N/A
WDM
Redundant
Partner not
visible on PCN
Primary or
secondary
WDM
communicating
with compatible
partner and
partner is not
visible across
PCN.
Sync is
inhibited
Ensure that
N/A
primary and
secondary are
connected to
the PCN
network. Verify
PCN switch
connections.
N/A
N/A
WDM
Redundant
Partner not
visible on FDN
Primary or
secondary
WDM
communicating
with compatible
partner and
partner is not
visible across
FDN
Sync is
inhibited
Ensure that
N/A
primary and
secondary are
connected to
the FDN
network. Verify
FDN switch
connections.
N/A
N/A
www.honeywell.com
Consequences Recommended
corrective
action
6 OPERATIONS
Source
Alarm/Event
notification
Possible cause
Consequences Recommended
corrective
action
FDAP, field
device
Non-redundant Access point or
communication field device has
non-redundant
connection to
the ISA100
Wireless
network.
FDAP, field
device
Power Status
Changed
The power status Loss of power Replace the
of FDAP or field to the field
field device
device is
device
battery
changed.
Immediate
POWER_ N/A
SUPPLY_
STATUS
FDAP, field
device
Device
Restarted
FDAP or field
device radio is
restarted.
N/A
RESTART 0
_COUNT
Single point
of failure for
device
communicatio
n in ISA100
Wireless
network.
None
Response
time
Add an access N/A
point, FDAP
router, or
battery
powered router
near the source
device to
enable
redundant
communication
. If the network
is designed for
non-redundant
communication
, you can
disable the
alarm on the
Properties
Panel.
None
Parameter/ Default
Reported value
value
N/A
N/A
107
6 OPERATIONS
Source
Alarm/Event
notification
Possible cause
Consequences Recommended
corrective
action
FDAP, field
device
Clock Drift
•
Loss of
•
communicatio
n with the
field device
and the
associated
channels.
•
FDAP clock
has drifted
200 Ms or
greater from
the WDM
clock.
FDAP
corrects its
clock
automaticall
y over a
period of
time. If the
difference
between the
FDAP clock
and the
WDM clock
is too high,
the FDAP
may drop
from the
network.
•
•
108
www.honeywell.com
Response
time
This issue
N/A
may be
caused by
delays
encountere
d when
installing a
wireless
system with
a third
party Wi-Fi
(TCP/IP)
mesh
network.
Connect the
WDM and
at least one
FDAP
directly to
the same
Ethernet
switch.
This allows
the WDM
and
Ethernetconnected
FDAPs to
synchronize
clocks over
Ethernet.
Position
additional
FDAPs in
such a way
that an
ISA100
Wireless
mesh
network is
formed
between the
nodes.
Additional
FDAPs can
synchronize
the clocks
over the
ISA100
Wireless
mesh
network.
Parameter/ Default
Reported value
value
None
N/A
6 OPERATIONS
Source
Alarm/Event
notification
Possible cause
Response
time
Parameter/ Default
Reported value
value
FDAP, field
device
Illegal Use of
Port
FDAP received None
a message
(TPDU packet)
over the ISA100
Wireless
network on an
unexpected port.
Remove
uncertified or
incompatible
ISA100
Wireless
devices from
the ISA100
Wireless
network.
N/A
16-bit TL
port
number
N/A
FDAP, field
device
TPDU
Received on
Unregistered
Port
FDAP received None
a message
(TPDU packet)
over the ISA100
Wireless
network on an
unexpected port.
Remove
uncertified or
incompatible
ISA100
Wireless
devices from
the ISA100
Wireless
network.
N/A
TPDU
N/A
FDAP, field
device
TPDU Does
Not Match
Security
Policies
•
Remove
uncertified or
incompatible
ISA100
Wireless
devices from
the ISA100
Wireless
network.
N/A
TPDU
N/A
•
Consequences Recommended
corrective
action
FDAP
None
received a
message
(TPDU
packet) that
does not
match the
current
security
policy.
Unavailabilit
y of session
key or
configuratio
n of an
unsupported
security
algorithm, or
configuratio
n of an
unsupported
security
mode.
109
6 OPERATIONS
110
Source
Alarm/Event
notification
Possible cause
Consequences Recommended
corrective
action
FDAP, field
device
DL
Connectivity
Failure in data
transmission
between ISA100
Wireless
devices, at 90%
packet failure
rate or greater.
FDAP may have
a poor
communication
link with another
ISA100 Wireless
device on the
ISA100 Wireless
network.
Loss of
•
communicatio
n with the
field device
and the
associated
channels.
•
•
Response
time
Reposition N/A
the device
or the
antenna to
minimize
interference
.
Reposition
the antenna
if the
directional
antenna is
installed.
Remove
any strong
interference
sources
near the
ISA100
Wireless
device or
reposition
the ISA100
Wireless
device to
limit
interference
.
Parameter/ Default
Reported value
value
Neighbor
Diag
N/A
FDAP, field
device
Neighbor
Discovery
Discovery of a
None
new neighbor
near the FDAP
or the field
device in the
ISA100 Wireless
network.
None
N/A
DLMO_C N/A
ANDIDA
TES
FDAP, field
device
Alarm
Recovery Start
Initiation of
alarms recovery
for FDAP or
field device
radio.
None
None
N/A
None
N/A
FDAP, field
device
Alarm
Recovery End
Completion of
alarms recovery
for FDAP or
field device
radio.
None
None
N/A
None
N/A
www.honeywell.com
6 OPERATIONS
Source
Alarm/Event
notification
Possible cause
Consequences Recommended
corrective
action
FDAP, field
device
MPDU Failure
Rate Exceeded
•
Occurrence
of FDAP or
field device
security
authenticatio
n failure for
five packets
per minute
or greater, at
the data link
layer.
Loss of
communicatio
n with the
field device
and the
associated
channels.
•
A poor link
or strong
interference
due to
frequent
packet
security
failures.
•
Occurrence
of FDAP or
field device
security
authenticatio
n failure for
five packets
within five
minutes at
the transport
layer.
Invalid or
mismatched
session key
in the
ISA100
Wireless
device.
FDAP, field
device
TPDU Failure
Rate Exceeded
•
Response
time
Remove any
N/A
strong
interference
sources near the
ISA100
Wireless device
or reposition
the ISA100
device to limit
interference.
Loss of
None
communicatio
n with the
field device
and the
associated
channels.
N/A
Parameter/ Default
Reported value
value
Number
N/A
of failures
Number
N/A
of failures
111
6 OPERATIONS
Source
Alarm/Event
notification
Possible cause
Consequences Recommended
corrective
action
FDAP, field
device
Key Update
Rate Failure
Exceeded
•
Loss of
•
communicatio
n with the
field device
and the
associated
channels.
•
•
112
Session key
update
failure in the
FDAP or
field device.
Weak
connection
between the
ISA100
Wireless
devices or
communicati
on failure
with the
WDM.
•
Response
time
Reposition N/A
the device
or the
antenna to
minimize
interference
.
Reposition
the antenna
if a
directional
antenna is
installed.
Remove
any strong
interference
sources
near the
ISA100
Wireless
device or
reposition
the ISA100
Wireless
device to
limit
interference
.
Parameter/ Default
Reported value
value
Number
N/A
of failures
FDAP, field
device
Dropped PDU
Failure in data
None
transmission
(PDU) by FDAP
or field device
due to an out-ofmemory error
(or another
reason as
reported within
the alert).
None
N/A
Reason
for the
drop
FDAP, field
device
Malformed
APDU
Received
FDAP or field
None
device received
a message
(APDU) with an
incorrect length,
invalid read/
write/execute/
publish service,
or invalid
parameters for
the specified
service.
None
N/A
Device
N/A
address
generating
Malforme
d APDU’s
www.honeywell.com
N/A
6 OPERATIONS
Source
Alarm/Event
notification
Possible cause
Consequences Recommended
corrective
action
Field device
Device Offline
Field device is
offline.
Loss of
•
communicatio
n with the
field device
and the
associated
channels.
•
Response
time
Verify that Immediate
there is no
loss of
communica
tion
between the
WDM and
the field
device,
specifically
loss of
power or
connectivit
y to the
FDAPs.
Physically
check the
field
device.
Replace
failed
battery or
failed
hardware,
as
appropriate.
Parameter/ Default
Reported value
value
EUI64 of N/A
the device
Field device
Begin Alert
Recovery
Initiation of
alarms recovery
of field device
sensor radio.
None
None
N/A
None
N/A
Field device
End Alert
Recovery
Completion of
alarms recovery
of field device
sensor radio.
None
None
N/A
None
N/A
Field device
Device Restart
Field device
sensor is
restarted.
None
None
N/A
RESTART 0
_COUNT
113
6 OPERATIONS
Source
Alarm/Event
notification
Possible cause
Consequences Recommended
corrective
action
Field device
Maintenance
Alert
Critically low
battery power or
external power
is detected by
the field device
sensor.
Loss of
•
communicatio
n with the
•
field device
and the
associated
channels.
Response
time
Replace the •
batteries.
Check the
external
power 24V
supply and
wiring.
•
Field device
Out of
Specification
Alert
Invalid or
unreadable
calibration data.
Field device
Failure Status
Alert
•
•
114
www.honeywell.com
Channel may
report
incorrect PV
value.
An
•
electronics
failure,
including
NVM fault,
RAM fault,
program
memory
fault, or A/D •
failure is
detected by
the field
device
sensor.
Cold
junction
failure.
DIAG_ST 0
ATUS,
DIAG_ST
ATUS_D
ETAIL
For
externa
lly
powere
d
devices
,
immedi
ate
action
is
require
d.
Immediate
DIAG_ST 0
ATUS,
DIAG_ST
ATUS_D
ETAIL
Restart the Immediate
field device
radio and
sensor. If
condition
persists,
replace the
sensor
module.
Check the
connectors
on the
terminal
board and
sensor
module.
Replace the
terminal
board.
DIAG_ST 0
ATUS,
DIAG_ST
ATUS_D
ETAIL
Perform user
calibration.
Loss of
•
communic
ation with
the field
device and
the
associated
channels.
Channel
reports
•
incorrect
PV value.
For
battery
powere
d
devices
,
replace
the
batterie
s
within
two to
four
weeks
after
initial
alert.
Parameter/ Default
Reported value
value
6 OPERATIONS
Source
Alarm/Event
notification
Possible cause
Consequences Recommended
corrective
action
Response
time
Parameter/ Default
Reported value
value
Field device
AI Channel
OutOfService
Field device AI
channel is outof-service.
None
None
N/A
MODE.A
CTUAL
Field device
AI Channel
Sensor Over
Temperature
The meter body
exceeded the
maximum
temperature as
defined by the
meter body
characterization
data.
Channel may
report
incorrect PV
value.
Determine
cause of
excessive
temperature.
Immediate
DIAG_ST 0
ATUS,
DIAG_ST
ATUS_D
ETAIL
Field device
AI Channel
OutOfService
Field device DI
channel is outof-service.
None
None
N/A
MODE.A
CTUAL
Field device
AI Channel
Input Failure
Cold junction
failure.
Channel
reports
incorrect PV
value.
•
•
Check
Immediate
connectors
on the
terminal
board and
the sensor
module.
Replace the
terminal
board.
OOS
OOS
DIAG_ST 0
ATUS,
DIAG_ST
ATUS_D
ETAIL
Field device
AI Channel
OutOfService
Field device DO None
channel is outof-service.
None
N/A
MODE.A
CTUAL
Field device
AI Channel
Fault Alert
Number of
•
consecutively
missed data
publication
exceeds the stale
count limit. The
configured
•
output value is
not received by
the output
channel on the
field device.
Determine the
cause of
missing the
published data
or verify the
stale count
limit.
Immediate
DIAG_ST 0
ATUS,
DIAG_ST
ATUS_D
ETAIL
Output
channel
may shed
to fault
state
value.
Changes
to the
configured
output
value
would
reflect on
the output
channel.
OOS
In addition to the alarms and events listed in the above table, the following user-initiated events are also
recorded in the events history.
Table 11: User actions logged in the Alarms/Events History tab
Login/logout
DHCP server
configuration change
Device replacement
Perform manual WDM
backup
115
6 OPERATIONS
Failed login attempt
PCN IP address change
Firmware upgrade
operation when initiated,
completed, aborted, or
failed.
Publication period change
Create/delete user account
PCN subnet mask change
DD load
Publication stale limit
change
Password change
PCN default gateway
change
Device deletion
PD deletion
User role change
Disable/enable external
NTP server
Channel instantiation
Security key transfer to the
PD for field devices/
infrastructure devices
FDN subnet mask change
External NTP server
change
Channel deletion
Channel activation/
inactivation
Enable/disable publication
channel
Enable/disable automatic
backup
Channel rename
Attribute write (data may be
truncated. Maximum
reported size = 308.
Maximum old size = 256)
Enable/disable DHCP server
Automatic backup
configuration change
Method initiation
Method completion/
abortion (data may be
truncated; maximum size =
114)
Add/remove role permission
Set system time
Accept/reject over-the-air
provisioning
Restore WDM from backup
Failure in restoring WDM from Configure a new WDM
backup
Reset WDM to factory
defaults
Restart WDM
FDN IP address changed
Redundancy enabled/
disabled
Redundant partner PCN IP
changed
Write protect/unprotect
6.6.2 Monitor alarms and events
The Alarm/Events tab in the user interface allows you to monitor the alarms and events triggered by the
devices. The Active Alarms tab displays the category, description, priority, default map, source, reported value,
and time. The Alarms/Event History tab provides a tabular view of the events, displays event class, event
category, priority, event start time, event source, location, and description. You can also export the alarm log and
event log for a particular period.
Whenever a new alarm is triggered, a pop-up window appears in the user interface displaying the details of the
alarm such as source, time, description, and priority. When multiple alarms are reported at the same time, the
pop-up displays the message “You have multiple new alarms”. Hovering the mouse over the window changes
the appearance of the text displayed to that of a hyperlink. Click on the link to open the alarm display.
To monitor alarms and events
116
1
Click the Alarm/Events tab.
The Alarm/Events page displays.
2
Click the Active Alarms tab.
The Active Alarms page displays details about the active alarms.
3
To view the alarm details, click on any alarm and expand Alarm Detail at the bottom of the pane.
The Alarm Detail pane displays details such as Start Time, Source, Default Map, Reported Value,
Category, and Description, for any selected device.
4
Click the Alarms/Events History tab.
The Alarms/Events History page displays details about all the alarms (active and inactive) and events.
www.honeywell.com
6 OPERATIONS
When an alarm is reported, the Event Class column displays a red alarm symbol. When the alarm returns to
normal, the alarm symbol changes to black.
The following are the events that are reported in the Alarms/Events History.
•
•
•
•
Communications Diagnostic: Reported for events such as device offline, device joining, device online,
alarm recovery start, alarm recovery end, and so on.
Device Diagnostic: Reported for events such as device restart, alarm recovery start, and alarm recovery
end.
Security: Reported for security-based events.
User actions: Reported for user actions that are captured as events. For a list of user actions that are
captured as events, refer to “Table 11: User actions logged in the Alarms/Events History tab” on
page 115.
The Alarms/Events History page is not updated automatically. Click Refresh to manually update the
Alarms/Events History page.
5
To export an alarm or event log
a
b
Click Export Alarm Log or Export Event Log.
On the Export Logs dialog box, click the export option using which the log needs to be exported. The
following are the available export options.
•
•
•
c
Entire log
From last hours: Specify the number of hours for which the log needs to be exported.
From time period: Specify the From Date and To Date to export the log for that particular time
period. Note that this is different from the time when an event is detected which is reported in the
Event Start Time column in the Alarms/Events History page.
Click Export.
The alarm or event log is exported in the .csv format.
117
6 OPERATIONS
6.7 Viewing time synchronization parameters
ISA100 time synchronization parameters provide the details of the network clock master which distributes time
to all the nodes within the time synchronization cluster.
To view the time synchronization parameters
1
On the Selection Panel, select an access point/field device.
2
On the Property Panel, expand Field Device Summary/Access Point Summary.
3
Under ISA100 Time Synchronization, review the following time synchronization parameters.
•
Time Master Tag Name: The tag name of the device acting as the clock master in the time
synchronization cluster.
•
Time Master Address: The short address of the clock master.
•
Time Distribution Level: The clock hop level in which the device is present.
A time master device (access point) is always at a Time Distribution level of 0. A device that joins
directly to this master will always be at level 1 and the devices joining through the level 1 devices will be
at level 2 and so on. Other access points in the network, synchronize its time from the clock master
directly or indirectly through other access points. Hence they can be at time distribution level of 1, 2, or
so on.
118
www.honeywell.com
6 OPERATIONS
6.8 Viewing license agreement files
Honeywell End User License Agreement (EULA) and third-party licenses are available at the following
locations.
•
•
Honeywell EULA: https://<WDM IP Address>/licenses/Third_Party_Licenses.txt
Third-party licenses: https://<WDM IP Address>/licenses/Honeywell_End_User_License_Agreement.txt
119
6 OPERATIONS
120
www.honeywell.com
7 Activate process control interfaces
Related topics
“Establishing connection between WDM and external interfaces” on page 122
“Activating HART in OneWireless Network” on page 126
“Activating Modbus in OneWireless Network” on page 133
“Activating OPC in OneWireless Network” on page 142
“About integrating OneWireless Network with Experion using the CDA interface” on page 157
“Activating GCI interface on the WDM” on page 159
“Activate ENRAF Ethernet UDP interface on the OneWireless user interface” on page 160
121
7 ACTIVATE PROCESS CONTROL INTERFACES
7.1 Establishing connection between WDM and external interfaces
Perform the following step to connect OPC, Modbus, SmartRadar FlexLine (ENRAF), and HART interfaces to
the PCN port of the WDM.
To connect OPC, Modbus, SmartRadar FlexLine (ENRAF), and HART interfaces to the PCN port or the COM1/COM2
of the WDM
Connect the external interface client to the PCN port of WDM.
You can use a switch if you have multiple interfaces to connect to the WDM.
•
7.1.1 Serial interface connection
For serial interface connection, connect a serial cable from the interface client to the serial port on the WDM.
RS-232
For RS-232, select the serial port on which the serial cable is connected as COM1.
Figure 17: RS-232
Table 12: RS-232 pin connection
Pin number
Signal Name
1
DCD
2
RXD
3
TXD
4
DTR
5
GND
6
DSR
7
RTS
8
CTS
9
RI
For R220, the RS-232 – Half Duplex is supported.
122
www.honeywell.com
7 ACTIVATE PROCESS CONTROL INTERFACES
Figure 18: RS-232– Half Duplex
RS-485
The Modbus, HART, and SmartRadar FlexLine (ENRAF) interfaces supports RS-485. For RS-485, select the
serial port on which the serial cable is connected as COM2.
Install the Lantronix DeviceInstaller software on the HART client machine using the documentation and media
packaged with the device. For more information, refer to “Install and configure the Lantronix device” on
page 128.
123
7 ACTIVATE PROCESS CONTROL INTERFACES
Figure 19: Serial pin out diagram — RS-485
Table 13: RS-485 pin connection
Pin number
Signal Name
1
DATA−
2
DATA+
3
NC
4
NC
5
GND
6
NC
7
NC
8
NC
9
NC
For R220, the RS-485 – Half Duplex is supported.
124
www.honeywell.com
7 ACTIVATE PROCESS CONTROL INTERFACES
Figure 20: RS-485 – Half Duplex
125
7 ACTIVATE PROCESS CONTROL INTERFACES
7.2 Activating HART in OneWireless Network
The ISA100 Wireless field devices maintain a database of process configuration, identification, and diagnostic
information in memory. WDM allows accessing this information from asset management systems, such as Field
Device Manager (FDM), through a HART interface. This enables monitoring the ISA100 Wireless field devices
like any other HART device. OneWireless Network uses serial communication interface to support data
transmission between the asset management systems and the WDM.
It also uses Ethernet/UDP interface for data transmission. Ethernet/UDP communication allows users to tunnel
serial communication to Ethernet. Serial communication can be tunneled to Ethernet by using a Lantronix
device or serial-to-Ethernet/UDP driver on the asset management system.
7.2.1 Configure HART serial interface
Prerequisites
Ensure the following:
•
•
The asset management system is connected to the process control network.
The asset management system is connected to the WDM using a serial cable.
To access the field device data from the asset management system, you need to configure the HART interface
from the OneWireless user interface.
To configure HART serial interface
126
1
On the Selection Panel, expand the WDM icon and select HART.
2
On the Property Panel, expand Configuration panel.
3
In the Interface list, click Serial Interface.
www.honeywell.com
7 ACTIVATE PROCESS CONTROL INTERFACES
4
Configure the following under Serial Interface Options.
•
Serial Port: Select the serial port on which the serial cable is connected. For RS-232, select the serial
port as COM1. For RS-485, select the serial port as COM2.
•
Baud Rate: Configure 9600 as the baud rate for HART serial interface.
•
Parity: Configure the parity as Odd.
5
In the Serial Polling Address box, type the required polling address value. This represents the polling
address of the emulated HART MUX on the HART interface.
6
Click Apply.
7
Expand Vendor and Model Table.
The Vendor and Model Table is used to configure mapping between ISA100 Wireless vendor and model
strings with HART manufacturer ID and device type bytes. This mapping is required for native ISA100
Wireless devices functioning as HART devices. The HART protocol uses a manufacturer ID byte and device
type byte when identifying a device. This table is used to configure a lookup table that maps the ISA100
Wireless vendor and model strings with HART manufacturer ID and the device type bytes. The Vendor and
Model Table contains the following columns.
•
•
•
•
Vendor String: The ISA100 Wireless vendor string of the native ISA100 Wireless device.
Model String: The ISA100 Wireless model string of the native ISA100 Wireless device.
Manufacturer ID: The HART manufacturer ID byte used to represent the native ISA100 Wireless
device.
Device Type: The HART device type byte used to represent the native ISA100 Wireless device.
127
7 ACTIVATE PROCESS CONTROL INTERFACES
Attention
The Vendor and Model Table is pre-configured for Honeywell field devices. No configuration is required if your
device vendor and model is pre-configured. Native HART devices connected using the OneWireless Adapter do
not use the Vendor and Model Table.
7.2.2 Configure HART Ethernet/UDP interface
You can configure HART Ethernet/UDP interface by using a Lantronix device or a serial-to-Ethernet/UDP
driver. Following are the high-level tasks to be performed for configuring the HART Ethernet/UDP interface
using a Lantronix device.
•
•
•
•
•
Install and configure the Lantronix device.
Assign an IP address to the Lantronix device.
Install the Standard Serial Tunnel firmware on the Lantronix device.
Configure the Standard Serial Tunnel firmware settings on the Lantronix device.
Activate HART Ethernet/UDP interface on the OneWireless user interface.
7.2.2.1 Install and configure the Lantronix device
Install the Lantronix DeviceInstaller software on the HART client machine using the documentation and media
packaged with the device. After installing the DeviceInstaller software, perform the following tasks to configure
it.
•
•
•
Assign an IP address to the Lantronix device.
Install Standard Serial Tunnel firmware on the Lantronix device.
Configure the Standard Serial Tunnel firmware settings on the Lantronix device.
7.2.2.2 Assign IP address to the Lantronix device
Perform the following steps to assign or reassign an IP address to the Lantronix device.
To assign or reassign an IP address to the Lantronix device
1
From the Start menu, open Lantronix DeviceInstaller.
2
Click Device > Assign IP Address.
3
When prompted for device identification, enter the MAC address of the Lantronix device and click Next.
The MAC address is located on a sticker on the side of the device.
4
When prompted for the assignment method, choose Assign a specific IP address to assign a static IP
address to the Lantronix device and click Next.
5
Enter the IP address, subnet mask, and default gateway for the Lantronix device and click Next.
6
Click Assign.
The device now uses the new IP address and has network access.
7.2.2.3 Install Standard Serial Tunnel firmware on the Lantronix device
The Xpress-DR-IAP Device Server supports different protocols using different firmware images installed on the
device. Perform the following procedure to install the Standard Serial Tunnel firmware on the device.
To install the Standard Serial Tunnel firmware on the Lantronix device
128
1
From the Start menu, open Lantronix DeviceInstaller.
2
In the Lantronix Devices tree on the left pane, select the Lantronix Xpress-DR-IAP device name.
www.honeywell.com
7 ACTIVATE PROCESS CONTROL INTERFACES
3
Do one of the following:
•
On the menu bar, click Device > Upgrade.
•
Click the Upgrade icon on the toolbar.
4
To select the firmware files, click Create a custom installation option and click Next.
5
Browse and select the firmware file available for Standard Serial Tunnel protocol and click Next.
6
If there are no additional firmware files to install, select No other files to install option and click Next.
7
If you want to save this installation for a later use, select Save Installation.
8
To start firmware upgrade, click Next.
7.2.2.4 Configure Standard Serial Tunnel settings on the Lantronix device
Configure Standard Serial Tunnel firmware to enable it to properly tunnel HART messages from the RS-232
serial port to the Ethernet port of the WDM.
To configure Standard Serial Tunnel settings on the Lantronix device
1
From the Start menu, open Lantronix DeviceInstaller.
2
In the Lantronix Devices tree on the left pane, select the Lantronix Xpress-DR-IAP device name.
3
On the Telnet Configuration tab, click Connect.
4
When prompted, press Enter to go to the setup mode.
5
On the Main menu, press 1 on the keyboard to configure channel 1 and set the configuration parameters as
follows:
•
Baud Rate = 9600
•
I/F Mode = 5C
•
Flow = 00
•
Port Number = 34568
•
Connect Mode = CC
•
Datagram Mode = 01
•
Remote IP Address = IP Address of the WDM
•
Remote Port = 55599
•
Packet Control = 00
•
Send Character 1 = 00
•
Send Character 2 = 00
6
Click Save.
7
Press 9 on the keyboard, to save and exit the Lantronix main menu.
7.2.3 Configure HART/IP interface
To configure HART serial interface
1
On the Selection Panel, expand the WDM icon and select HART.
2
On the Property Panel, expand Configuration panel.
3
In the Interface list, click HART/IP Interface.
129
7 ACTIVATE PROCESS CONTROL INTERFACES
4
Configure the following under Serial Interface Options.
•
Serial Port: Select the serial port on which the serial cable is connected. For RS-232, select the serial
port as COM1. For RS-485, select the serial port as COM2.
•
Baud Rate: Configure 9600 as the baud rate for HART serial interface.
•
Parity: Configure the parity as Odd.
5
In the Serial Polling Address box, type the required polling address value. This represents the polling
address of the emulated HART MUX on the HART interface.
6
Click Apply.
7.2.4 Monitor performance of HART interface
To monitor performance of HART interface
130
1
On the Selection Panel, select the HART interface.
2
On the Property Panel, expand Statistics.
www.honeywell.com
7 ACTIVATE PROCESS CONTROL INTERFACES
3
Verify the following attributes to monitor the performance of the HART interface.
• Message Rate: Number of messages processed by the interface, per second.
• Message Rate Max: Maximum number of messages processed by the interface, per second.
• Reset Statistics: Resets all HART interface statistics.
7.2.5 Monitor field devices from an asset management system
FDM supports ISA100 wireless device templates using ISA100 DD files. FDM communicates with ISA100
wireless devices using GCI interface. FDM communicates with OWA/HART devices using HART/IP interface.
The following procedure describes the steps to access the field devices using FDM. The steps in this procedure
provide only an overview of the tasks that you need to perform. For detailed information on the tasks that you
need to perform using FDM, refer to the FDM user documentation.
To access the field devices using FDM
1
Log on to the FDM server and configure the following using FDM Server Management Tool.
1. Configure RS-485 HART Multiplexer for enabling communication between HART client and the
ISA100 Wireless field devices.
2. Configure the Network Interface Name and Remote Communication Interface Server Name.
3. Configure the following network specific parameters.
•
•
•
COM Port: COM port on the WDM to which the serial cable is connected.
BAUD Rate: 9600
Start Poll Address and End Poll Address: 0 to 127
2
Start the FDM server using the FDM Server Management Tool.
3
Log on to the FDM Client and scan for the field devices.
Once the FDM Client scans the devices, the WDM and the devices appear on the FDM Client as displayed
in the following illustration.
131
7 ACTIVATE PROCESS CONTROL INTERFACES
4
132
For accessing the field device parameters, add HART DD files for the field devices.
After accessing the parameters, the HART Client displays the device details as follows.
www.honeywell.com
7 ACTIVATE PROCESS CONTROL INTERFACES
7.3 Activating Modbus in OneWireless Network
Using any Modbus application, you can read any standard measurement or status of field devices. The WDM
functions as the Modbus server and allow clients to access point data. The Modbus interface within the WDM
supports Modbus TCP and Modbus RTU. Modbus interface supports coils, discrete inputs, holding registers, or
input registers. It can associate only standard measurement and status of field device within the network with a
coil, discrete input, holding register, or input register.
The coil and discrete input are used for digital input and output SIGNALS/VALUES. The holding register and
input register are used for analog input SIGNALS/VALUES.
Figure 21: Modbus TCP communication
133
7 ACTIVATE PROCESS CONTROL INTERFACES
Figure 22: Modbus RTU communication
7.3.1 Enable Modbus in OneWireless Network
Prerequisites
•
Ensure that you have installed the Modbus client.
To enable Modbus in OneWireless Network
134
1
On the Selection Panel, expand the WDM icon and select Modbus.
2
On the Property Panel, expand Configuration.
www.honeywell.com
7 ACTIVATE PROCESS CONTROL INTERFACES
3
Under Interface, in the Interface list, click the required option.
The following are the interface options available.
•
•
4
Modbus TCP Interface
Modbus RTU Interface
Configure one of the following depending on the Modbus interface option that you have selected.
•
If you have selected Modbus TCP Interface, configure the following under Modbus TCP Options.
•
– TCP Port: The TCP port number used for the configuring the Modbus TCP interface.
If you have selected Modbus RTU Interface, configure the following under Modbus RTU Options.
– Serial Port: The serial port used for the Modbus RTU interface. The available options are COM1 and
COM2. For RS-232, select the serial port as COM1. For RS-485, select the serial port as COM2.
– Baud Rate: The baud rate used for the Modbus RTU serial port.
– Parity: The parity used for the Modbus RTU serial port.
– Serial Address: The serial address used for the Modbus RTU serial port. The serial address may be
referred to as the unit ID in your MODBUS client.
5
Under Byte Order, in the Byte Order list, click the byte order for 32-bit holding register and input register
values.
You should select a byte order that matches the expected byte order of the Modbus client. Options include
Big Endian, Big Endian Byte Swapped, Little Endian, and Little Endian Byte Swapped.
6
Under Unconfigured Register Response, click Read Response and Write Response.
If you select the Read Response as “Zero,” for unmapped registers the Modbus client displays zero. If you
select Read Response as “Illegal Exception,” then the server sends an exception response and returns no
values.
7
Configure the following under Read Register Error Response.
135
7 ACTIVATE PROCESS CONTROL INTERFACES
•
Float Error Response
•
Float Error Value
•
Integer Error Response
•
Integer Error Response Value
If you have selected the Float Error Response as NAN and if the floating PV is not available, then the
client displays “NAN.”
If you have selected the Float Error Response as Float Error value and input any value in the Float Error
Value, it displays the float error value in the client when the floating PV is not available in the client.
If you select the Integer Error Response as Zero and if the integer PV is not available, then the client
displays “Zero.”
If you have selected the Integer Error Response as Integer Error value and input any value in Integer
Error Response Value, it displays the integer error value in the client when the Integer PV is not available
in the client.
8
Using the Coil Table, Discrete Input Table, Holding Register Table, and Input Register Table panels,
you can configure standard measurement like PV or status of field devices.
•
Coil Table and Discrete Input Table: These two registers are used to configure the input/output and the
status of the Boolean modules as well as the status of the analog devices.
•
Holding Register Table and Input Register Table: These two registers are used to configure the input
of the analog modules and Diag status of the device.
In the example illustration, ID_106.CH01_AITEMP_TemperatureDI_AIO_BL.PV.STATUS indicates
that the coil register is configured to read the PV status.
For a Analog input module, you must configure the PV and PV Status as follows:
– PV - TAGNAME.CHANNELNAME.PV (For example,
ID_106.CH01_AITEMP_TemperatureDI_AIO_BL.PV.VALUE)
After configuring PV in Modbus registers in the user interface, the PV data starts appearing in the
Modbus client. The PV value for a device received at the client is in decimal or hexadecimal format
and is displayed in two adjacent registers in the Modbus client.
– If the PV value received is in the hexadecimal format, you need to convert the data in to a float
value to read the PV value as displayed in the user interface.
– If the PV value received is in the decimal format, you need to convert the data in to hexadecimal
and then to a float value to read the PV value as displayed in the user interface.
136
www.honeywell.com
7 ACTIVATE PROCESS CONTROL INTERFACES
– PV STATUS - TAGNAME.CHANNELNAME.PV_B.STATUS (For example,
ID_106.CH01_AITEMP_TemperatureDI_AIO_BL.PV.STATUS)
Note the following while configuring a Boolean module.
– For a Boolean input module, you must configure the PV and PV Status as follows:
– PV - TAGNAME.CHANNELNAME.PV_B (For example, ID_106.CH02_BI.PV_B)
– PV STATUS - TAGNAME.CHANNELNAME.PV_B.STATUS (For example,
ID_106.CH02_BI.PV_B.STATUS)
– For a Boolean output module, you must configure the PV and PV Status as follows:
– PV - TAGNAME.CHANNELNAME.OP_B (For example, ID_106.CH02_BI.OP_B)
– PV STATUS - TAGNAME.CHANNELNAME.OP_B.STATUS (For example,
ID_106.CH02_BI.OP_B.STATUS)
Similarly, you can configure the device status as TAGNAME.DIAG_STATUS (For example,
ID_106.DIAG_STATUS) for the field devices.
After configuring DIAG_STATUS in Modbus registers in the user interface, the DIAG_STATUS data
starts appearing in the Modbus client. The DIAG_STATUS data received at the client is in decimal or
hexadecimal format and is displayed in two adjacent registers in the Modbus client.
– If the data received is in the hexadecimal format, you need to convert the data in to binary format and
then map each bit of the binary data to diag_status bits.
– If the data received is in the decimal format, you need to convert the data in to binary format and then
map each bit of the binary data to diag_status bits.
Use the following table as a reference to map the binary data received in the Modbus client.
Table 14: DIAG_STATUS for all XYR 6000 field device types
Diagnostic status detail
Bits
Diagnostic status detail
Bits
FAILURE_STATUS
BIT31
WCI_RESERVED_15
BIT15
FUNCTION_CHECK_STATUS
BIT30
WCI_RESERVED_14
BIT14
OUT_OF_SPEC_STATUS
BIT29
WCI_RESERVED_13
BIT13
MAINTENANCE_REQD
BIT28
WCI_RESERVED_12
BIT12
FAULT_IN_ELECTRONICS
BIT27
WCI_RESERVED_11
BIT11
FAULT_IN_SENSOR_ACTUATOR BIT26
WCI_RESERVED_10
BIT10
INSTALLATION_CALIBRATION_ BIT25
PROBLEM
WCI_RESERVED_9
BIT9
OUT_OF_SERVICE
BIT24
WCI_RESERVED_8
BIT8
OUTSIDE_SENSOR_LIMITS
BIT23
DATABASE_ERROR
BIT7
ENVIRON_CONDITIONS_OUT_O BIT22
F_SPEC
RADIO_IPC_ERROR
BIT6
FAULT_PREDICTED
HEAP_ERROR
BIT5
BIT21
POWER_CRITICALLY_LOW
BIT20
DEVICE_FIRMWARE_MISMATCH
BIT4
POWER_LOW
BIT19
WATCHDOG_ERROR
BIT3
SOFTWARE_UPDATE_INCOMPL
ETE
BIT18
OUTPUT_AT_FAILSAFE
BIT2
SIMULATION_ACTIVE
BIT17
FW_DOWNLOAD_ERROR
BIT1
WCI_RESERVED_16
BIT16
DETAIL_INFO_AVAILABLE
BIT0
You can read device vendor parameters (DEVICE_TAG.DIAG_STATUS_DETAIL_1) from Modbus client.
For example, configure UIOD_06_1FLR.DIAG_STATUS_DETAIL_1 under Holding Register.
137
7 ACTIVATE PROCESS CONTROL INTERFACES
Use the following table as a reference to interpret the data received in the Modbus client.
Table 15: DIAG_STATUS_DETAIL_1 for XYR 6000 temperature/Temp DI/Multi DI/HLAI devices
Diagnostic status detail
Bits
Diagnostic status detail
Bits
DEV_ST_ELEC_FAIL
BIT0
DEV_ST_NVM_FAULT
BIT18
DEV_ST_INPUT_FAIL
BIT2
DEV_ST_AD_FAULT
BIT19
DEV_ST_LOW_BAT
BIT4
DEV_ST_INPUT_FAIL1
BIT21
DEV_ST_STACK_ERR
BIT5
DEV_ST_INPUT_FAIL2
BIT22
DEV_ST_CONF_ERR
BIT6
DEV_ST_INPUT_FAIL3
BIT23
DEV_ST_CAL_ERR
BIT7
DEV_ST_SUSP_IP1
BIT24
DEV_ST_RADIO_ERR
BIT8
DEV_ST_SUSP_IP2
BIT25
DEV_ST_WDT_ERR
BIT11
DEV_ST_SUSP_IP3
BIT26
DEV_ST_LOW_EXT_PWR
BIT12
DEV_ST_CAL_ERR1
BIT27
DEV_ST_FAILSTATE
BIT13
DEV_ST_CAL_ERR2
BIT28
DEV_ST_ROM_FAULT
BIT16ba
DEV_ST_CAL_ERR3
DEV_ST_RAM_FAULT
BIT17
Table 16: DIAG_STATUS_DETAIL_1 for XYR 6000 corrosion devices
Diagnostic status detail
Bits
Diagnostic status detail
Bits
DEV_ST_ELEC_FAIL
BIT0
DEV_ST_RAM_FAULT
BIT17
DEV_ST_INPUT_FAIL
BIT2
DEV_ST_NVM_FAULT
BIT18
DEV_ST_LOW_BAT
BIT4
DEV_ST_AD_FAULT
BIT19
DEV_ST_STACK_ERR
BIT5
DEV_ST_SHORT_PROBE
BIT20
DEV_ST_CONF_ERR
BIT6
DEV_ST_OPEN_PROBE
BIT21
DEV_ST_CAL_ERR1
BIT7
DEV_ST_EXCESS_CAL
BIT24
DEV_ST_RADIO_ERR
BIT8
DEV_ST_HDM_NOT_PO
BIT25
DEV_ST_HEAP_ERR
BIT9
DEV_ST_ASM_RESPONSE
BIT26
DEV_ST_IPC_ERR
BIT10
DEV_ST_DAC_ERROR
BIT27
DEV_ST_WDT_ERR
BIT11
DEV_ST_CAL_CLEAR
BIT28
DEV_ST_LOW_EXT_PWR
BIT12
DEV_ST_CJ_FAULT
BIT31
DEV_ST_ROM_FAULT
BIT16
Table 17: DIAG_STATUS_DETAIL_1 for XYR 6000 pressure devices
138
Diagnostic status detail
Bits
Diagnostic status detail
Bits
DEV_ST_ELEC_FAIL
BIT0
DEV_ST_ROM_FAULT
BIT16
DEV_ST_INPUT_FAIL
BIT2
DEV_ST_RAM_FAULT
BIT17
DEV_ST_LOW_BAT
BIT4
DEV_ST_NVM_FAULT
BIT18
DEV_ST_EXT_PWR
BIT5
DEV_ST_AD_FAULT
BIT19
DEV_ST_CONF_ERR
BIT6
DEV_ST_CHAR_FAULT
BIT20
DEV_ST_CAL_ERR
BIT7
DEV_ST_MB_OVT
BIT24
DEV_ST_RADIO_ERR
BIT8
DEV_ST_MB_OVL
BIT25
DEV_ST_HEAP_ERR
BIT9
DEV_ST_EXCESS_ZERO
BIT26
www.honeywell.com
7 ACTIVATE PROCESS CONTROL INTERFACES
Diagnostic status detail
Bits
Diagnostic status detail
Bits
DEV_ST_IPC_ERR
BIT10
DEV_ST_EXCESS_SPAN
BIT27
DEV_ST_WDT_ERR
BIT11
DEV_ST_EXCESS_CAL
BIT28
DEV_ST_LOW_EXT_PWR
BIT12
DEV_ST_CAL_CLEARED
BIT29
DEV_ST_STACK_ERR
BIT15
Table 18: DIAG_STATUS_DETAIL_1 for XYR 6000 Multi AI DI/Multi AI DI DO devices
Diagnostic status detail
Bits
Diagnostic status detail
Bits
DEV_ST_ELEC_FAIL
BIT0
DEV_ST_RAM_FAULT
BIT17
DEV_ST_INPUT_FAIL
BIT2
DEV_ST_NVM_FAULT
BIT18
DEV_ST_LOW_BAT
BIT4
DEV_ST_AD_FAULT
BIT19
DEV_ST_STACK_ERR
BIT5
DEV_ST_INPUT_FAIL1
BIT21
DEV_ST_CONF_ERR
BIT6
DEV_ST_INPUT_FAIL2
BIT22
DEV_ST_CAL_ERR
BIT7
DEV_ST_INPUT_FAIL3
BIT23
DEV_ST_RADIO_ERR
BIT8
DEV_ST_SUSP_IP1
BIT24
DEV_ST_HEAP_ERR
BIT9
DEV_ST_SUSP_IP2
BIT25
DEV_ST_IPC_ERR
BIT10
DEV_ST_SUSP_IP3
BIT26
DEV_ST_WDT_ERR
BIT11
DEV_ST_CAL_ERR1
BIT27
DEV_ST_LOW_EXT_PWR
BIT12
DEV_ST_CAL_ERR2
BIT28
DEV_ST_FAILSTATE
BIT13
DEV_ST_CAL_ERR3
BIT29
DEV_ST_ROM_FAULT
BIT16
DEV_ST_CJ_FAULT
BIT31
Table 19: DIAG_STATUS_DETAIL_1 for OWA devices
9
Diagnostic status detail
Bits
Diagnostic status detail
Bits
DEV_ST_ELEC_FAIL
BIT0
DEV_ST_FAILSTATE
BIT13
DEV_ST_INPUT_FAIL
BIT2
DEV_ST_ROM_FAULT
BIT16
DEV_ST_LOW_VOLT
BIT3
DEV_ST_RAM_FAULT
BIT17
DEV_ST_LOW_BAT
BIT4
DEV_ST_NVM_FAULT
BIT18
DEV_ST_STACK_ERR
BIT5
DEV_ST_AD_FAULT
BIT19
DEV_ST_CONF_ERR
BIT6
HART_LOOP_ERROR
BIT20
DEV_ST_CAL_ERR
BIT7
NO_HART_DEV
BIT21
DEV_ST_RADIO_ERR
BIT8
HART_DEV_MAINT_REQ
BIT22
DEV_ST_HEAP_ERR
BIT9
HART_DEV_VAR_ALERT
BIT23
DEV_ST_DEV_FW_ERR
BIT10
HART_DEV_BURST_MODE
BIT24
DEV_ST_WDT_ERR
BIT11
DEV_ST_CAL_ERR1
BIT27
DEV_ST_LOW_EXT_PWR
BIT12
Expand Statistics panel, to monitor the performance of the Modbus interface. Following are parameters
available in the Statistics panel.
•
Under Modbus RTU Interface and Modbus TCP Interface
– Message Count: Total number of messages processed by the interface. The count should increase
with every message sent by a Modbus client. If the count is not incrementing, it indicates that the
Modbus interface on the WDM is not receiving messages from the client.
139
7 ACTIVATE PROCESS CONTROL INTERFACES
•
– Message Rate: Number of messages processed by the interface per second.
– Message Rate Max: Maximum number of messages processed by the interface per second.
– CRC Error Count: Total number of CRC errors recorded by the Modbus RTU interface. The count
should increase if any CRC errors are detected when receiving a message sent by the Modbus RTU
client.
– CRC Error Rate: Number of CRC errors recorded by the Modbus RTU interface per second.
– CRC Error Rate Max: Maximum number of CRC errors recorded by the Modbus RTU interface per
second.
Under Coils, Discrete Inputs, Holding Registers, Input Registers, and Exceptions,
–
–
–
–
Read: Total number of read messages processed by the interface.
Write: Total number of write messages processed by the interface.
Exception: Total number of exceptions, such as invalid request messages.
Timeout: Total number of timeouts.
7.3.2 Configure the parameters in the Modbus tables
Point Picker enables you to browse parameters on all devices and then configure the parameters in the Modbus
tables. You can drag and drop the information into the appropriate table. You can drag from the actual text next
to the Attribute label, or dragged from the list of Select Attribute. You can drag and drop parameter into the
Modbus coil or register configuration or copy and paste the parameter into the Modbus coil or register
configuration.
To configure the parameters in the Modbus tables
140
1
On the ribbon bar, in the Maintenance group, click Point Picker.
The Point Picker dialog box appears.
2
From the Select Device/Channel list, select the required Device or Channel.
Under Select Attribute list, the corresponding attributes appears.
3
From the Select Attribute list, select the required attribute.
4
Click Copy.
5
On the Selection Panel, expand the WDM icon and select Modbus.
6
In the Coil Table, Discrete Input Table, Holding Register Table, or Input Register Table, drag and drop the
parameter in to the Attribute column or select the Attribute column, and then press Control V (Ctrl +V).
www.honeywell.com
7 ACTIVATE PROCESS CONTROL INTERFACES
Attention
The entire set of attributes can be pasted from Excel. Also, you can copy and paste it to Excel. This helps you to
save all the attributes in the Excel sheet.
7
Click Apply.
Attention
In the Property Panel, hover the mouse over a parameter, then a tooltip appears with the details about the attribute.
Also, this information is displayed in the Point Picker when an attribute is selected.
141
7 ACTIVATE PROCESS CONTROL INTERFACES
7.4 Activating OPC in OneWireless Network
WDM hosts an OPC Unified Architecture (UA) server, which provides open system communication to ISA100
Wireless data (current, historical and alarm/event data). OPC UA provides a Service Oriented Architecture
(SOA) for industrial applications.
For the OPC based applications that only support DCOM/COM based OPC (DA), WDM offers an OPC Proxy.
OPC Proxy when installed on the client machine enables communication between a DCOM/COM-based OPC
client and the WDM.
Several OPC clients are used to connect to the WDM which hosts an OPC server. Honeywell uses Unified
AutomationUAExpert as the sample client for configuring OPC UA and OPC Validator as the sample client for
configuring OPC DA. The procedures to configure an OPC client (for OPC UA and OPC DA) in this document
are based on Unified Automation UAExpert and OPC Validator.
7.4.1 Enable OPC interface
To enable OPC interface
142
1
On the Selection Panel, expand the WDM icon and select OPC.
2
On the Property Panel, expand Configuration panel.
3
In the Interface list, click Enabled.
4
Click Apply.
www.honeywell.com
7 ACTIVATE PROCESS CONTROL INTERFACES
7.4.2 Configure OPC UA client system
Figure 23: OPC Interface
Prerequisites
•
Install Microsoft .NET Framework 3.5 SP1 and OPC UAExpert Client in the client system.
To configure OPC UA client system
1
On the desktop of the client system, double-click Unified Automation UAExpert icon.
The Unified Automation UAExpert window appears.
143
7 ACTIVATE PROCESS CONTROL INTERFACES
144
2
On the Server menu, click Add to add the OPC server to be connected to the client.
The Add Server dialog box appears.
3
Type the Configuration Name.
www.honeywell.com
7 ACTIVATE PROCESS CONTROL INTERFACES
4
Click the Discovery tab to view all the available servers. There is only one OPC UA server available for a
WDM, and its port number is 4840.
5
Click the Advanced tab and then type the IP address of the WDM and the port number in the Endpoint url
field.
The OPC server IP address with port number is opc.tcp://WDM IP address:4840. For example, if the WDM
IP address is 192.168.1.1, then type, opc.tcp://192.168.1.1:4840.
6
Under Security Settings, ensure that Security Policy and Message Security Mode are selected as None.
There is only one OPC UA server available for a WDM, but with multiple security modes. Multiple levels of
security are allowed in configuring the OPC UA connection to the server.
7
Under Authentication Settings, click Anonymous.
8
Select Connect Automatically check box.
145
7 ACTIVATE PROCESS CONTROL INTERFACES
9
Click OK and the server automatically connects.
The OPC server appears as connected under Projects > Servers.
10 Under Projects, expand Project > Server and select the added server.
146
www.honeywell.com
7 ACTIVATE PROCESS CONTROL INTERFACES
11 To monitor the PV value of any field device,
1. In the Address Space pane, under Root expand Objects > Transmitter > Transmitter Channel.
2. Click PV.
The selected PV attributes appear in the Attribute Window pane.
147
7 ACTIVATE PROCESS CONTROL INTERFACES
12 Drag any parameter from the Address Space pane to the Default DA View to increase the load of the
network.
The OPC Statistics pane in the OneWireless user interface displays the following information about the
loaded parameters.
•
•
Subscription Rate: Current rate of OPC subscriptions/attributes/data points that the WDM provides
every second. This must be less than or equal to 500 attributes per second.
Subscription Rate Max: Maximum rate of OPC subscriptions/attributes/data points that the WDM
provides in a second since OPC statistics reset due to WDM reboot. This can have a higher value
because while launching the OPC client, the data rate might increase considerably.
7.4.3 Configure OPC DA client system
You can setup OPC proxies on a client machine so that an OPC DA client (a non-UA client) can connect to the
OPC UA server on the WDM. The proxy files are available on the WDM.
148
www.honeywell.com
7 ACTIVATE PROCESS CONTROL INTERFACES
Figure 24: OPC client with OPC DA
Prerequisites
•
•
Connect the OPC DA client system to a switch or to a system connected to the PCN
Install the OPC Validator Client in the client system.
Install OPC proxies
1
On the ribbon bar, in the System group, click Software.
The Support Software dialog box appears.
2
From the Select Software list, select the OPC UA Proxy software.
3
Click Save To to save the software to the computer.
A confirmation message Do you want to save the OpcProxySetup? appears.
4
Click OK.
The Save As dialog box appears.
5
Browse to a location on the hard drive to save the OPC UA Proxy software.
•
By default, the file name appears as OpcProxySetup, if you want to change the file name, then type the
File name.
6
Click Save.
7
Double-click OPC UA Proxy.exe.
8
If a security warning appears, confirm or allow the security exception to proceed.
9
Click Run.
The InstallShield wizard appears.
149
7 ACTIVATE PROCESS CONTROL INTERFACES
10 Click Next to proceed with the installation.
The License Agreement page appears.
11 Click I accept the terms in the license agreement and click Next.
The Customer Information page appears.
12 Enter the User Name and Organization and click Next.
The Setup Type page appears.
13 Click Complete and then click Next.
The Ready to Install the Program page appears.
14 Click Install and click Next to proceed with the installation.
The OPC Gateway Server Host IP Address page appears.
15 Type the OPC Gateway Server Host IP Address (WDM’s IP Address) and click Next.
The OPC Gateway Server tcp Port page appears.
16 Type the TCP Port Value as 4840 and then click Next.
The InstallShield Wizard Completed page appears.
17 Click Finish to load the OPC proxies.
Access WDM using OPC DA
1
150
On the desktop of the client system, double-click OPC Validator icon.
The OPC Validator window appears.
www.honeywell.com
7 ACTIVATE PROCESS CONTROL INTERFACES
2
Choose Servers > Connect to Server (Listing).
The OPC Server List dialog box appears.
151
7 ACTIVATE PROCESS CONTROL INTERFACES
152
3
Double-click OPC DataAccess Servers Version 2.0 and select OpcDa.OneWirelessGW.ComServer from
the list, and then click Connect Server….
4
Once the server is connected, click Close.
The OPC Server List dialog box closes.
5
In the OPC Validator window, select OpcDa.OneWirelessGW.ComServer.
6
Click Data > Browse Server Address Space, and then click Browse Server Address Space All.
The Address Space appears on the lower pane.
7
In the upper pane, right-click OpcDa.OneWirelessGW.ComServer, and then click Add Private Group.
The Add Private Group dialog box appears.
www.honeywell.com
7 ACTIVATE PROCESS CONTROL INTERFACES
8
Type the Group Name, and then click OK.
9
From the lower pane of the OPC Validator window, select the OneWireless Network, and then a device.
10 To add all the parameters of a device, right-click the device and click Add All Items and SubItems to
Group_OW.
153
7 ACTIVATE PROCESS CONTROL INTERFACES
To add individual parameters for a device, expand the device, right-click the parameter, and then click Add
Item to Group_OW.
11 In the upper pane, expand Group_OW to view the items in your group.
12 Click Tags – All to view all the tags.
13 Navigate to the desired value. Identify the OPC item that represents the desired value.
154
www.honeywell.com
7 ACTIVATE PROCESS CONTROL INTERFACES
Perform the following steps to edit parameters from OPC DA client. Note that you can only edit the
parameters whose access rights are displayed as RW in the Rights column of the OPC Validator.
•
•
In the OPC DA client, click the Tags — All tab.
Right-click the parameter that you have added, and then click Async> Write Item.
•
The Write Async Item Value dialog box appears.
In the Raw field, type the required value.
•
You can only edit the mode for all the device types and the output value of the Multi AI DI DO devices.
Click OK.
7.4.4 Monitor OPC interface statistics
To monitor OPC interface statistics
1
On the Selection Panel, expand the WDM icon and select OPC.
2
On the Property Panel, expand Statistics.
You can view the OPC interface messages totals and OPC interface message rates.
155
7 ACTIVATE PROCESS CONTROL INTERFACES
3
156
Click Reset Statistics to reset all the OPC interface statistics.
www.honeywell.com
7 ACTIVATE PROCESS CONTROL INTERFACES
7.5 About integrating OneWireless Network with Experion using the CDA
interface
OneWireless Network can be integrated with Experion PKS system using the CDA interface available on the
WDM. To establish communication between the Experion system and the OneWireless Network, you must
connect the WDM to the Experion network. For more information about connecting WDM with the Experion
system, refer to the section “Establishing communication between OneWireless Network and Experion system”
on page 24.
After connecting the WDM to the Experion network, you need to configure the OneWireless Network
components such as WDM and field devices using the Control Builder. For more information about configuring
the OneWireless Network components using Control Builder, refer to the Experion PKS OneWireless
Integration User’s Guide.
After the communication between the Experion system and the OneWireless Network is established, the CDA
parameters on the OneWireless user interface provides you information about the WDM state, CDA statistics,
and the peer connections of the WDM. Following are the CDA parameters that are available on the user
interface.
Selection Panel element
Parameters and their description
Configuration
•
•
WDM State parameter indicates the WDM state in an Experion
system. This parameter displays the state as Online, when the WDM
is loaded in an Experion system.
WDM Command parameter on the CDA interface consists of the
following commands.
–
–
Statistics
None
Clear CDA Database: This command is used to clear the CDA
interface database from a running WDM. You must clear the CDA
interface database when moving the WDM from one Experion
PKS system to another. If you do not clear the CDA interface
database, you may get an "invalid EEC" error when attempting to
load the WDM on a different Experion PKS system.
Displays the CDA statistics used for maintenance and performance
monitoring of the WDM. For the specifications for peer responder rate
and display responder rate, refer to the Technical Specifications document
available at the Honeywell Process Solutions website.
157
7 ACTIVATE PROCESS CONTROL INTERFACES
Selection Panel element
Parameters and their description
Connections
Displays the number of peer and display connections between the WDM
and the controller CEEs. It also displays the details about incoming and
outgoing connections between the different CEEs.
For more information about the CDA parameters, refer to the OneWireless Parameter Reference Dictionary.
158
www.honeywell.com
7 ACTIVATE PROCESS CONTROL INTERFACES
7.6 Activating GCI interface on the WDM
The Gateway General Client Interface (GCI) is an external interface that is used with GCI-based client
applications residing external to the WDM. GCI is a protocol that is used with client applications that
communicate with the wireless field devices using ISA100 Wireless standard.
To activate GCI interface on the WDM
1
On the Selection Panel, expand the WDM icon and select GCI.
2
On the Property Panel, expand Configuration panel.
3
In the Interface list, click TCP Interface.
4
Under Ethernet/TCP Interface Options, in the TCP Port field, specify the default port number 4901.
5
Click Apply.
6
Expand Statistics to monitor performance of GCI interface.
7
Verify the following attributes to monitor the performance of the GCI interface.
8
•
Message Rate: Number of messages processed by the interface, per second.
•
Message Rate Max: Maximum number of messages processed by the interface, per second.
Click Reset Statistics to reset all the GCI interface statistics.
159
7 ACTIVATE PROCESS CONTROL INTERFACES
7.7 Activate ENRAF Ethernet UDP interface on the OneWireless user
interface
OneWireless supports integration between WDM, SmartRadar FlexLine field devices, and Enraf applications
(CIU Prime hardware, Engauge software). For more information, refer to the ISA100 SmartRadar FlexLine
User's Guide.
To activate ENRAF Ethernet/UDP interface on the OneWireless user interface
1
On the Selection Panel, expand the WDM icon and select ENRAF.
2
On the Property Panel, expand Configuration panel.
3
In the Interface list, click Ethernet/UDP Interface.
4
Under the Ethernet/UDP Interface Options, the UDP port number of the port on which the WDM is
connected is displayed.
5
Click Apply.
7.7.1 Configure ENRAF serial interface
To access the field device data, you need to configure the Enraf interface from the OneWireless user interface.
Prerequisites
Ensure the following:
•
•
•
•
•
160
The SmartRadar FlexLine field devices are connected to the WDM using a serial cable.
The SmartRadar FlexLine field devices are joined in the ISA100 Wireless network.
The GPU address and the FlexConn address configured for a SmartRadar FlexLine field device should be
unique for each device in the network.
For more information regarding the GPU address and the FlexConn address, refer to the section “Configure
SmartRadar FlexLine field device interface”.
If RS-232 serial communication is required, then connect the RS-232 serial cable between the COM1 port of
the WDM and the client .
If RS-485 serial communication is required, then connect the RS-485 serial cable between the COM2 port of
the WDM and the client .
www.honeywell.com
7 ACTIVATE PROCESS CONTROL INTERFACES
To configure ENRAF serial interface
1
On the Selection Panel, expand the WDM icon and select ENRAF.
2
On the Property Panel, expand Configuration panel.
3
In the Interface list, click Serial Interface.
4
Configure the following under Serial Interface Options.
5
•
Serial Port: Select the serial port on which the serial cable is connected. The available options are
COM1 and COM2.
•
Baud Rate: Select 19200 as the baud rate for ENRAF serial interface.
•
Parity: This is a read-only parameter and displays the value as None.
Click Apply.
7.7.2 Monitor performance of ENRAF interface
To monitor performance of ENRAF interface
1
On the Selection Panel, select the ENRAF interface.
2
On the Property Panel, expand Statistics.
161
7 ACTIVATE PROCESS CONTROL INTERFACES
3
4
162
Verify the following attributes to monitor the performance of the ENRAF interface.
•
Message Rate: Number of messages processed by the interface, per second.
•
Message Rate Max: Maximum number of messages processed by the interface, per second.
Click Reset Statistics to reset all the ENRAF interface statistics.
www.honeywell.com
8 Administration
Related topics
“Administering users” on page 164
“Downloading support software” on page 169
“Upgrading device firmware” on page 170
“Configuring system configuration backup” on page 174
“Restoring the system configuration from a backup” on page 176
163
8 ADMINISTRATION
8.1 Administering users
Related topics
“About users and user roles” on page 164
“Create user accounts” on page 165
“Edit user account” on page 166
“Delete user account” on page 166
“Change password” on page 167
“Reset password” on page 167
“Change user role” on page 167
“Manage user roles” on page 168
8.1.1 About users and user roles
The WDM enables you to define user-specific settings by creating user accounts with the required user roles.
The following are the user roles defined by the WDM.
•
•
•
Administrator – Authorized to manage the user accounts. Users with user role as administrator can add,
delete, or modify user accounts, change existing user’s role, change password for the existing users, upgrade
firmware, and provision the infrastructure nodes. Only a user logged on with Administrator role has the
ability to provision and upgrade a WDM.
View Only – Authorized only to read/view the device parameters and export the system logs, alarm and
event logs, and the reports.
Instrument Tech – Authorized to configure operating mode for the field device channels and provision only
the field devices. This role also has privileges to enable/disable write protection for the field devices.
By default, the WDM is configured with an administrator account. You can create multiple user accounts and
assign the user role, as required. Users with Administrator role can create new users, delete users, change
existing user’s role, and reset password for the existing users.
The following table summarizes the default role-based access privileges enforced by the WDM for performing
different operations. Note that a user logged on with Administrator role can override the default privileges,
except for the operations that are grayed out in the following table.
164
www.honeywell.com
8 ADMINISTRATION
Table 20: Default role-based access privileges
Attention
The Provision WDM function also enables you to configure the redundant related parameters.
8.1.2 Create user accounts
To create user accounts
1
On the ribbon bar, in the System group, click Manage Users.
The Manage Users dialog box appears.
2
Click Add.
3
In the Account Configuration pane, in the User Name, Password, and Confirm Password boxes, type the
user name and password, respectively.
4
In the Select User Role list, click the user role as appropriate.
165
8 ADMINISTRATION
5
Click Save.
6
Click Close to close the Manage Users dialog box.
8.1.3 Edit user account
To edit user account
1
On the ribbon bar, in the System group, click Manage Users.
The Manage Users dialog box appears.
2
From the list of users on the Users pane, select the user account to edit and click Edit.
3
Edit the required account details, and then click Save.
8.1.4 Delete user account
Attention
Note that you cannot delete the default user account (administrator) configured by the WDM.
To delete user account
166
1
On the ribbon bar, in the System group, click Manage Users.
The Manage Users dialog box appears.
2
From the list of users on the Users pane, select the user account to delete, and then click Delete.
3
Click OK in the confirmation dialog box.
4
Close the Manage Users dialog box.
If you have logged on simultaneously using the user account that you want to delete, you will be
automatically logged off.
www.honeywell.com
8 ADMINISTRATION
8.1.5 Change password
To change your own password
1
On the ribbon bar, in the System group, click Change Password.
The Change User Password dialog box appears.
2
In the Current Password box, type the current password and in the New Password and Confirm Password
boxes, type the new password.
3
Click OK.
The message Password has been successfully changed appears.
4
Click Cancel to close the Change User Password dialog box.
5
Restart the Web browser and log on to the user interface using the new password.
8.1.6 Reset password
If you are logged on to the user interface with administrative privileges, you can reset the password of any user.
For example, using an administrator account it is possible to reset the password for a user who has forgotten the
password.
To reset the password of any user
1
On the ribbon bar, in the System group, click Manage Users.
The Manage Users dialog box appears.
2
From the list of users on the Users pane, select the user account for which you need to reset the password
and click Edit.
3
Under Account Configuration, in the Password and Confirm Password boxes, type the new password.
4
Click Save.
5
Close the Manage Users dialog box.
8.1.7 Change user role
Attention
Note that you cannot change the user role for the default user account (administrator) configured by the WDM.
To change user role
1
On the ribbon bar, in the System group, click Manage Users.
The Manage Users dialog box appears.
2
From the list of users on the Users pane, select the user account for which the user role needs to be changed.
3
In the Account Configuration pane, in the Select User Rolelist, click the appropriate user role.
4
Click Save.
The user account modifies with the new user role. If you have logged on using the user account whose role
is modified, you will be automatically logged off. You have to log on to the system again.
5
Close the Manage Users dialog box.
167
8 ADMINISTRATION
8.1.8 Manage user roles
To manage user roles
168
1
On the ribbon bar, in the System group, click Manage Roles.
2
Select the required check boxes for the permitted operations for the user roles, as appropriate.
For more information about the default role-based access privileges, refer to the “Table 20: Default rolebased access privileges”. Note that a user logged on with Administrator role can override the default
privileges, except for the operations that are grayed out in the table available in the section “About users and
user roles” on page 164.
3
Click Save.
The user roles are modified to perform the operations that are configured.
www.honeywell.com
8 ADMINISTRATION
8.2 Downloading support software
The Software option enables you to download software provided on the WDM.
To download support software
1
On the ribbon bar, in the System group, click Software.
The Support Software dialog box appears.
2
From the Select Software list, select the required software to be downloaded. The following software can be
downloaded.
•
Provisioning Device Application: The Provisioning Device Application is a Windows Mobile PDA
application that allows you to transfer network configuration and security keys from your WDM to your
access points and field devices.
•
MS .NET Compact Framework v3.5: The Microsoft .NET Compact Framework is a system library
required to run the Provisioning Device Application on your Windows Mobile PDA.
•
OPC UA Proxy: The OPC-UA Proxy is used to connect OPC-DA clients to the OPC-UA server running
on your WDM.
•
Multinode Mesh Firmware, WNMS (Extended Temperature): Multinode Mesh Firmware is provided
for WNMX (standard temperature) Multinodes and WNMS (extended temperature) Multinodes. This
firmware replaces any mesh firmware from previous releases.
•
Multinode Mesh Firmware, WNMX (Standard Temperature): Multinode Mesh Firmware is provided
for WNMX (standard temperature) Multinodes and WNMS (extended temperature) Multinodes. This
firmware replaces any mesh firmware from previous releases.
•
OneWireless R120 Migration Firmware: Migration Firmware can be used for migrating OneWireless
R120 Multinode or field device to the current release of OneWireless.
3
Click Save To to save the software to the computer.
A confirmation message appears.
4
Click OK.
The Save As dialog box appears.
5
Browse to a location on the hard drive to save the software.
6
If require, type the File name, and then click Save.
169
8 ADMINISTRATION
8.3 Upgrading device firmware
The FDAPs and field devices have radio firmware that can be upgraded. Some field devices may have a
separate application firmware, which handles the functioning of the sensor in the device. This can also be
upgraded over the wireless network. For more information about upgrading the firmware of field devices, refer
to the field device vendor’s documentation. Honeywell field devices usually have separate firmware files for
radio firmware and application firmware. FDAPs have only radio firmware.
Considerations
Following are some of the considerations for upgrading the device firmware.
•
•
•
•
You can upgrade only the application firmware or radio firmware of a device at a time.
You can upgrade only the firmware of five devices simultaneously.
Starting the radio firmware upgrade operation of lower hop and upper hop devices simultaneously, results in
the failure of upgrade operation of the lower hop device. When the devices are in different hops, it is
recommended to perform the upgrade of only one device at a time.
Upgrading the radio firmware of a device, which routes communication between other devices, results in
communication failure as well as firmware upgrade failure.
Related topics
“Upgrading the WDM firmware” on page 170
“Upgrading the FDAP/access point firmware” on page 171
“Upgrading the field device firmware” on page 172
8.3.1 Upgrading the WDM firmware
Download the latest WDM firmware file from the Honeywell Process Solutions website.
Attention
Sync must be disabled on a redundant WDM to allow WDM upgrade. If WDM upgrade is initiated on a WDM when
sync is enabled an error is displayed. You must disabled the sync from WDM PP and again re-initiate the WDM
upgrade.
CAUTION
•
Upgrading the WDM firmware makes the WDM offline for some time. During this operation, all the devices
drop and join the network again.
•
Once initiated, you cannot abort the firmware upgrade operation.
The WDM must not be turned on while the upgrade is in progress.
•
The steps for upgrading the WDM from R202 to R210 and then from R210 to R220 are common.
Prerequisites
Ensure that the speed/duplex setting for the network adapter of the computer is set to Auto.
To upgrade the WDM firmware
170
1
On the Selection Panel, select the WDM.
2
On the ribbon bar, in the Upgrade group, click Application.
The WDM Update dialog box appears.
www.honeywell.com
8 ADMINISTRATION
3
Click Browse to navigate to the directory location of the firmware file and click Open. The WDM firmware
file has a .tar.gz extension.
The WDM Update dialog box displays the upload status. Once complete, the Firmware File box displays
the uploaded firmware file.
4
Click Update.
The firmware upgrade starts and once complete, the user interface displays a message indicating the result of
firmware upgrade operation.
Attention
At times, the update may take longer than expected and the result of the upgrade may not be displayed. Instead, a
“Page not available” error may appear. In such cases, wait for a minute and then redirect the browser to “https://
<ipaddress>/restartzfs.html” for viewing the result. Do not remove or reboot the WDM during the upgrade
process.
After the WDM upgrade from R210 to R220 is complete, the WDM reboots automatically.
5
Close and restart the web browser.
6
Log on to the user interface again.
7
Verify the upgraded version of the WDM firmware as follows:
1. On the Selection Panel, select the WDM.
2. On the Property Panel, expand Device Manager Summary.
3. Under Identification, verify the Revision.
8.3.2 Upgrading the FDAP/access point firmware
Download the latest FDAP/access point firmware files from the Honeywell Process Solutions website.
To upgrade the FDAP/access point firmware
1
On the Selection Panel, select the FDAP/access point.
You can select multiple devices using the Selection Panel or the map view. Use SHIFT+click to select
multiple items in a successive list. Use CTRL+click to select multiple items not in succession.
171
8 ADMINISTRATION
2
On the ribbon bar, in the Upgrade group, click Radio.
The Radio Firmware Upgrade dialog box appears.
3
In the Available Firmware Files list, select the required firmware upgrade file.
By default, the firmware upgrade file appears in the list. If the file is not available in the list, perform the
following steps to open the firmware file.
Click Add to browse to the directory location of the firmware upgrade file.
b Click Open.
a
4
Click Upgrade.
The Firmware Upgrade Status dialog box appears. The Progress column displays the progress of the
upgrade.
Attention
•
•
5
To abort any firmware upgrade operation, click the Abort Upgrade icon adjacent to the upgrade status.
To remove the devices for which the firmware upgrade has been completed, click the Clear Upgrade icon
adjacent to the upgrade status.
Close the Firmware Upgrade Status dialog box.
8.3.3 Upgrading the field device firmware
The devices at the farthest hop level must be upgraded first.
To upgrade the SmartRadar FlexLine field device firmware
1
On the Selection Panel of the OneWireless user interface, select the field device.
You can select multiple devices of the same type using the Selection Panel or the map view. Use SHIFT
+click to select multiple items in a successive list. Use CTRL+click to select multiple items not in
succession.
Attention
It is recommended that you select and accept only three devices at a time.
2
172
On the ribbon bar, in the Upgrade group, click one of the following icons, as required.
www.honeywell.com
8 ADMINISTRATION
•
Application: To upgrade the application firmware of the selected field device.
Attention
To initiate the firmware upgrade of the HCI-1WL (CAN-1WL) board using the Application firmware, the SD
card must be inserted in the HCI-1WL (CAN-1WL) board. Also, the SD card should not be write protected.
•
Radio: To upgrade the radio firmware of the selected field device.
The Radio/Application Firmware Upgrade dialog box appears.
3
Depending on the firmware type, the available upgrade files appear by default. Select the required file from
the list of upgrade files.
If the file is not available in the list, perform the following steps.
Click Add to browse to the directory location of the firmware upgrade file.
b Click Open.
a
4
Click Upgrade.
The Radio/Application Firmware Upgrade dialog box appears.
The Firmware Upgrade Status dialog box displaying the status of the upgrade appears. Closing the dialog
box allows the upgrade operation to run in the background. The upgrade status is displayed in the status bar.
Click the firmware upgrade status box to open the dialog box again. If multiple users are simultaneously
upgrading different device firmware, all the users can view the progress of all the device upgrades.
While upgrading the application firmware of a field device, the LCD display of the field device displays the
firmware upgrade status. The status is displayed until the upgrade operation completes or aborts.
Once the upgrade is complete, the status column displays the status as complete. If firmware upgrade fails
for a device, you can abort the upgrade and start again. To abort firmware upgrade for individual devices,
click the abort button next to the status indicator.
5
Close the Firmware Upgrade Status dialog box.
173
8 ADMINISTRATION
8.4 Configuring system configuration backup
Related topics
“About system configuration backup” on page 174
“Configure manual backup” on page 174
“Configure automatic backup” on page 174
8.4.1 About system configuration backup
OneWireless user interface enables you to configure system backup on a FAT32 formatted USB drive connected
to one of the USB slots in the WDM. The backup file created can be used to restore the system configuration to
a new WDM, or a WDM that has been reset to factory defaults. System configuration can be backed up
manually or WDM can be configured to automatically backup system configuration whenever a configuration
change is detected. All system configuration data is included in the backup file created.
In automatic system configuration backup, a USB flash drive should be connected to the WDM at all times. If
automatic backup is enabled and the USB flash drive is disconnected from the WDM, automatic backup stops
and resumes when a flash drive is connected to the same slot on the WDM. If the disk space on the backup drive
is insufficient, you can replace the disk with a new one without any backup configuration changes.
WDM state, ISA100 network state, WDM configuration changes, user actions, external interface configuration
changes, and device topology changes are monitored every five minutes to initiate an automatic system backup,
when enabled.
8.4.2 Configure manual backup
The Manual Backup option enables you to back up the system configuration manually. This option is disabled
when automatic backup is enabled.
To configure manual backup
1
Connect a FAT32 formatted USB flash drive to any one of the USB slots on the WDM.
You can create a backup only using a USB flash drive.
2
On the Selection Panel, select the WDM.
3
On the Property Panel, expand Backup Settings.
4
Under Automatic Backup, clear the Enable Automatic Backup check box.
Under Manual Backup, the Destination drop-down list displays the USB slot to which the flash drive is
connected.
5
Click Backup Now.
The Backup Status dialog box displays the following information about the last successful backup.
•
•
•
•
Name: Name of the backup file.
Size: Size of the backup file.
Date: Date and time of last backup.
Description: The mode of backup configured (automatic or manual) and the USB drive/slot number
where the backup file was created. It also displays any errors that occurred during a backup.
8.4.3 Configure automatic backup
You can configure automatic system configuration backup to back up the system configuration automatically.
174
www.honeywell.com
8 ADMINISTRATION
To configure automatic backup
1
Connect a FAT32 formatted USB flash drive to any one of the USB slots on the WDM.
2
On the Selection Panel, select the WDM.
3
On the Property Panel, expand Backup Settings.
4
Under Automatic Backup, select the Enable Automatic Backup check box.
The Destination drop-down list displays the USB slot in which the USB flash drive is connected.
The Status displays the current automatic backup status. Following are the different status values that are
displayed.
•
•
•
•
•
•
•
Idle when automatic backup is not in progress.
In Progress when automatic backup is in progress.
Error when an automatic backup fails.
No Device when the backup device is not available on the destination USB slot even though backup is
enabled.
Device Access Error when an error is encountered while accessing the backup device on the destination
USB slot.
Device Disk Space Low when the disk space is low on the backup device.
Auto Backup Not Configured when automatic backup is disabled.
The Backup Status displays the following details about the last successful backup.
•
•
•
•
Name: Name of the backup file.
Size: Size of the backup file.
Date: Date and time of last backup.
Description: The mode of backup configured (automatic or manual) and the USB drive/slot number
where the backup file was created. It also displays any errors that occurred during a backup.
175
8 ADMINISTRATION
8.5 Restoring the system configuration from a backup
System configuration from a previously created backup file can be used to reconfigure a WDM that has been
reset to factory defaults using the First Time Configuration Wizard. Restoring WDM configuration from a
backup file configures the WDM with the same list of devices/channels. It also restores other system
configuration on the WDM when the backup file was created.
Attention
After restoring the system configuration, the default administrator password resets to the default password,
“password.” All other users’ password remains unchanged.
To restore the system configuration from a backup
176
1
Log on to the OneWireless user interface using the default user name and password. For more information,
refer to the section “Logging on to OneWireless user interface” on page 26.
The First Time Configuration Wizard appears.
2
On the Welcome page of the First Time Configuration Wizard, click Next.
3
On the Wireless Device Manager Configuration page, click Restore Wireless Device Manager from a
Previous Backup, and then click Next.
The Restore WDM from Backup page appears.
4
Connect the USB flash drive containing the backup file to one of the USB slots on the WDM.
5
Click Refresh to view a list of backup files available on the USB flash drive.
6
Select the required backup file from the list of available backups, and then click View Details to view the IP
addresses and redundancy information.
www.honeywell.com
8 ADMINISTRATION
Attention
•
•
The network address of the WDM when a backup is performed is displayed at the bottom of the page. After
completing the restore, you can access the WDM using this IP address.
Reconfigure the network settings of the computer to access the user interface using the IP address displayed on
the Restore WDM from Backup page.
7
Click Restore.
8
Click OK on the Browser Redirect dialog box.
The system configuration restores, and the Login page appears. The WDM restarts after the restore
operation. It might take a minute to complete the restart and the login page to appear.
9
Type the default User ID and Password or use the logon credentials configured at the time when the backup
file was created.
177
8 ADMINISTRATION
178
www.honeywell.com
9 Troubleshooting and maintenance
Related topics
“Replacing devices” on page 180
“Removing devices” on page 182
“Resetting/removing WDM” on page 183
“Restarting devices” on page 184
“About NTP status” on page 186
The NTP Status panel in the WDM Properties Panel displays a number of NTP process attributes, which
are mostly useful for debugging purposes.
“Generating reports” on page 188
“Exporting and saving system logs” on page 193
“Reporting anomalies” on page 194
179
9 TROUBLESHOOTING AND MAINTENANCE
9.1 Replacing devices
You can replace a failed FDAP, Access Point, or a field device with a new device. Replace operation restores all
the configuration information to the new device. This includes the position of the device on the map, device
name, channel names, publication, configuration, and so on. Note that device notes from a failed device are not
restored to the new device.
Considerations
•
•
•
•
•
•
A failed device can be replaced with a new device, only if the new device specification is identical to the
failed one.
Device role should be identical for the devices that are undergoing replacement operation. That is, a field
device can be replaced only with a field device and a routing field device can be replaced only with a routing
field device.
Device to be replaced should not be part of another replacement operation.
For FDAP and field device, the radio vendor and radio model of the failed device and the new device should
be identical.
For field devices, the application vendor and application model of the failed device and the new device
should be identical.
For field devices, the number of channels and the channel types of failed device and the new device should
be identical.
Prerequisites
•
•
•
•
•
Ensure that the failed device is offline and that it is not deleted.
Ensure that the new device’s tag name, type, radio vendor, and radio model is read by the WDM.
Ensure that methods are not running for any of the channels of the new field device.
Ensure that new device's firmware is not undergoing any upgrade operation.
Ensure that new device's channels have been read by the WDM.
To replace devices
1
Provision the new device to allow it to join the network.
For more information, refer to the section “Provision the devices using Provisioning Device handheld” on
page 60.
2
Perform one of the following:
•
For replacing a field device with instantiable channels, verify that the new device’s instantiable channels
are identical to that of the failed device.
•
If not, perform channel instantiation to make the channel configuration identical to the failed device.
For more information, refer to the section “Configure channel instantiation” on page 86.
3
To replace a field device, set the channel to OOS mode as follows:
a
b
c
180
On the Selection Panel, select the field device channel.
On the Property Panel, expand Mode.
In the Target list, click OOS and then click Apply.
The channel icon appears as blue indicating the OOS mode.
4
On the Selection Panel, select the newly added device.
5
Drag the new device icon and drop it on the failed device on the map.
The Device Replacement dialog box appears.
6
Click Replace failed device <device name> with <new device name>.
7
Click OK.
www.honeywell.com
9 TROUBLESHOOTING AND MAINTENANCE
The Device Replacement Status dialog box appears indicating the progress of replace operation. The status
bar also displays the status. If you close the Device Replacement Status dialog box, click the Device
replacement in progress pane in the status bar to open the dialog box.
8
After the device replace operation is complete, the Device Replacement Status dialog box displays the
result.
Attention
If a device replace operation completes with errors, it implies that one or more attributes of the device is not
restored successfully. In this case, manually inspect the device and channel configuration from the Property Panel,
and correct any incorrectly configured attribute.
9
Click Clear List to clear the list of device replace operations.
181
9 TROUBLESHOOTING AND MAINTENANCE
9.2 Removing devices
You can remove a failed device from the network. A device that is removed can rejoin the network only if it is
assigned a new provisioning key.
Considerations
•
•
Removing an online device resets the device configuration to factory defaults. This results in the loss of
provisioning data from the device.
Removing an offline device makes the security information of the device invalid, but retains the
provisioning data in the device. Though the device retains the provisioning data, it should be authenticated
again to allow it to join the network.
To remove a device
182
1
On the Selection Panel, select the devices that you want to delete.
If you are deleting an online device, change the channel mode to OOS for all the channels.
2
On the ribbon bar, in the Provisioning group, click Delete.
The Delete Devices dialog box appears.
3
Click Delete.
On completion, the Progress column in the Delete Devices dialog box displays the status as complete.
4
Click Close.
www.honeywell.com
9 TROUBLESHOOTING AND MAINTENANCE
9.3 Resetting/removing WDM
Like any other device, you can reset/remove a WDM using the Delete Selected Device icon on the Property
Panel. Resetting or removing WDM is possible only if WDM sync is disabled. Resetting the WDM removes all
the system and configuration data and resets the WDM to factory defaults.
CAUTION
This operation results in significant changes in the system configuration. Honeywell recommends you to perform
this operation only when there is a definite requirement.
To delete/reset a WDM
1
On the Selection Panel, select the WDM.
2
On the ribbon bar, in the Provisioning group, click Delete.
The Delete Devices dialog box appears.
3
Click Delete.
On completion, the Progress column in the Delete Devices dialog box displays the status as complete.
4
Click Close.
This resets/removes the WDM.
5
Use default FDN or PCN IP address to access WDM after the WDM is reset to defaults.
6
Restart the Web browser to run the First Time Configuration Wizard.
You can either configure the WDM using the First Time Configuration Wizard or restore the system
configuration using the latest available backup. If you are configuring the WDM using the First Time
Configuration Wizard, you need to transfer new provisioning keys to the Provisioning Device handheld
and provision all the devices in the network.
183
9 TROUBLESHOOTING AND MAINTENANCE
9.4 Restarting devices
To restart a WDM
1
On the Selection Panel, select the WDM.
2
On the Property Panel, expand Device Management.
3
Click Reset WDM.
The WDM restarts.
To restart FDAP/Access Point/field device
184
1
On the Selection Panel, select the device to be restarted.
2
On the Property Panel, expand Device Management.
www.honeywell.com
9 TROUBLESHOOTING AND MAINTENANCE
3
4
In the Join Command list, select one of the following options.
•
None
•
Warm Restart — preserves static and constant attributes data.
•
Restart as Provisioned — corresponds to the provisioned state of the device in which the device only
retains the data received during its provisioning.
Click Apply.
185
9 TROUBLESHOOTING AND MAINTENANCE
9.5 About NTP status
The NTP Status panel in the WDM Properties Panel displays a number of NTP process attributes, which are
mostly useful for debugging purposes.
To view the NTP status display
1. On the Selection Panel, select WDM.
2. On the Property Panel, expand NTP Status.
NTP server unreachable
When the NTP server is not responding to NTP communication from the WDM, the WDM raises the NTP
server not reachable alarm. In the NTP Status panel, under Flash error status section, the Peer Unreachable
appears in blue color and indicates as ON, and under Peer association status section, the Host Reachable
appears in grey color and indicates as OFF. Depending on the internal state of the NTP process, it takes 8.5
minutes or more to detect that the server is not reachable.
NTP server reachable
The NTP server unreachable alarm returns to normal when the server is reachable again. In the NTP Status
panel , under Flash error status section, the Peer Unreachable appears in grey color and indicates as OFF, and
under Peer association status section, the Host Reachable appears in blue color and indicates as ON.
Depending on the internal state of the NTP process, it takes 8.5 minutes or more to detect that the server is not
reachable.
186
www.honeywell.com
9 TROUBLESHOOTING AND MAINTENANCE
Peer rejected
The NTP process determines the time quality of the server over several communication packets based on
various time and frequency measurements. Based on these measurements, the NTP process may reject a server
but still continue to communicate with it and perform the time measurements. Until the server’s time quality
improves, the NTP process keeps the server marked as rejected. In the NTP Status panel, under Peer status
section, the Peer Selection status is set to Reject. When a server is in rejected state, the NTP process does not
try to sync time from the server.
Peer selected
The NTP process may reject a server for several reasons. For example, the server itself may not yet have
synchronized to the root time server. While the server is rejected, the NTP process keeps performing the time
and frequency measurements with the data received from the server. When the reference time quality improves,
the NTP process selects the server as a system peer and starts synchronizing time with the server. In the NTP
Status panel, under Peer status section, the Peer Selection status is set to SysPeer.
Mean offset
The NTP process monitors time from a server selected as a system peer and calculates how much correction
should be made to the system time. In the NTP Status panel, the Mean offset indicates the additional remaining
correction to the system clock. A positive value indicates that the system clock is behind the reference clock. As
the NTP process slowly corrects the system time, the system clock slowly approaches the reference clock and
the mean offset reduces.
Time synchronization
In the NTP Status panel, under the System status section, the Mean frequency offset field indicates the periodic
correction applied to the system clock. Positive values make the clock go faster while negative values slow it
down. When the NTP process starts synchronizing with a server, depending on how far the two clocks are, it
may set the frequency offset to the maximum value (+/-500 ppm). This is unusually high for a good clock and is
an intermediate value. ISA100 network devices correct their clocks at a maximum rate of 60 ppm. If the
WDM’s clock is corrected at a higher rate, the ISA100 network devices may further apart in time, resulting in
devices reporting a clock drift alarm. The WDM generates an NTP frequency error alarm when the frequency
offset is > 60 ppm. As the WDM’s system time converges and the offset reduces, the frequency offset gradually
reduces to a more realistic value. The NTP frequency error alarm returns to normal when the frequency offset
reduces to below 30 ppm. The NTP process adjusts the clock in small steps so that the time-scale is effectively
continuous and without discontinuities. This makes clock correction slow. In a system with a redundant or
backup WDM, the backup WDM uses the primary WDM as its time server. If the primary WDM is configured
to use an external NTP server, it may take some time for the primary WDM to synchronize with the NTP server
and then the secondary WDM will synchronize, after some more time, with the primary WDM’s time.
187
9 TROUBLESHOOTING AND MAINTENANCE
9.6 Generating reports
The OneWireless user interface enables you to generate and view various reports about connectivity, device
health, and battery life of the devices in a network.
You can generate and view the following reports:
188
•
Battery Life: This report lists all devices that require battery replacement and lists the devices with battery
level less than 50%.
•
Device Health Overview: This report lists all the devices with wireless network disconnection and alarms.
www.honeywell.com
9 TROUBLESHOOTING AND MAINTENANCE
•
Device Summary: This report provides a summary of each of the device that is configured in the network.
The report does not display the details of the devices that are filtered out using the Filter option in the
ribbon bar.
•
Device History: This report lists all the device status changes. For example, status change from online to
offline device, routing to time synchronization, non-redundant connection to redundant connection.
189
9 TROUBLESHOOTING AND MAINTENANCE
190
•
Connection Summary: This report provides a summary of current status of device connections in the
network, redundancy state, and lists all connections with a poor or unacceptable signal strength and quality.
The RSQI value when less than 128 results in poor or unacceptable signal quality.
•
Connection History: This report lists all the history of connection changes. For example, change of RSQI,
RSSI, transmit fail ratio.
www.honeywell.com
9 TROUBLESHOOTING AND MAINTENANCE
To view, print, and save the report
1
Click Reports in the ribbon bar.
2
In the left pane, click Reports and then click the required report.
3
Click Run Report.
The Data Preview pane displays the report.
The following is a sample illustration of the Connection Summary report.
4
To print the report, click Print Report.
5
To save the report in .csv format, click Export As and save the report to your system.
191
9 TROUBLESHOOTING AND MAINTENANCE
•
192
Select the Include column headers in exported file check box to include the column headers in the
exported file format.
www.honeywell.com
9 TROUBLESHOOTING AND MAINTENANCE
9.7 Exporting and saving system logs
OneWireless user interface enables you to export and save the system logs that record information about events
in the application instances. Export System Log option in the ribbon bar, exports and saves the system log in
a .tar.gz (compressed archive) format in the system for future reference. The system logs are primarily used for
debugging by Honeywell Technical Assistance Center (TAC).
Attention
For WDMS configured as redundant, export the system logs from both WDMs when reporting an anomaly or
requesting clarification.
To export and save system logs
1
On the ribbon bar, click Export System Log.
The Export System Log dialog box appears.
2
Click OK.
The Save As dialog box appears.
3
Save the log file.
The system log files are saved in *.tar.gz format.
The Export System Log in Progress message appears. After the system log is saved, Export System Log
completed successfully message appears indicating that system log has been saved successfully.
4
Click OK.
193
9 TROUBLESHOOTING AND MAINTENANCE
9.8 Reporting anomalies
If you encounter any errors in the OneWireless Network that you cannot resolve, you need to contact TAC. The
following are required while contacting TAC for assistance.
•
•
•
Export and collect system logs. For information on exporting system logs, refer to the section “Exporting
and saving system logs” on page 193.
Take a system configuration back up. For information on taking a backup, refer to the section “Configuring
system configuration backup” on page 174.
Contact TAC and provide the following.
–
–
–
–
194
System logs from both WDMs if configured for WDM redundancy.
The system configuration backup, if required
Affected device tag name and the exact description of the anomaly
Time when the anomaly occurred
www.honeywell.com
10 Notices
Other trademarks
Microsoft and SQL Server are either registered trademarks or trademarks of Microsoft Corporation in the
United States and/or other countries.
Trademarks that appear in this document are used only to the benefit of the trademark owner, with no intention
of trademark infringement.
Third-party licenses
This product may contain or be derived from materials, including software, of third parties. The third party
materials may be subject to licenses, notices, restrictions and obligations imposed by the licensor. The licenses,
notices, restrictions and obligations, if any, may be found in the materials accompanying the product, in the
documents or files accompanying such third party materials, in a file named third_party_licenses on the media
containing the product, or at http://www.honeywell.com/ps/thirdpartylicenses.
195
10 NOTICES
10.1 Documentation feedback
You can find the most up-to-date documents on the Honeywell Process Solutions website at:
http://www.honeywellprocess.com/
If you have comments about Honeywell Process Solutions documentation, send your feedback to:
[email protected]
Use this email address to provide feedback, or to report errors and omissions in the documentation. For
immediate help with a technical problem, contact your local support center.
196
www.honeywell.com
10 NOTICES
10.2 How to report a security vulnerability
For the purpose of submission, a security vulnerability is defined as a software defect or weakness that can be
exploited to reduce the operational or security capabilities of the software.
Honeywell investigates all reports of security vulnerabilities affecting Honeywell products and services.
To report a potential security vulnerability against any Honeywell product, please follow the instructions at:
https://honeywell.com/pages/vulnerabilityreporting.aspx
Submit the requested information to Honeywell using one of the following methods:
•
Send an email to [email protected].
•
or
Contact your local Honeywell Technical Assistance Center (TAC) or support center listed in the “Support
and other contacts” section of this document.
197
10 NOTICES
198
www.honeywell.com