1
Setting the Time
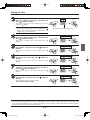
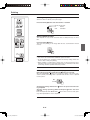
Press the + button or the − button, select 20
(the first 2 digits of the year), and press the
Print
button to finalize.
There will be a change to the “last 2 digits of the year” setting mode (
display).
Note
• The factory default setting is 20. Pressing the Print
button in this condition will result in a change to the “last
2 digits of the year” setting mode.
Print
Time Setting
The dot will flash while making settings.
Press the + button or the − button, select 06
(the last 2 digits of the year), and press the
Print
button to finalize.
There will be a change to the “month” setting mode (
display).
Print
Time Setting
Press the + button or the − button, select 11
(the month), and press the Print
button to
finalize.
There will be a change to the “day” setting mode (
display).
Print
Time Setting
Press the + button or the − button, select 08
(the day), and press the Print
button to
finalize.
There will be a change to the “hour” setting mode (
display).
Print
Time Setting
Press the + button or the − button, select 14
(the hour of the 24-hour display), and press
the Print
button to finalize.
There will be a change to the “minute” setting mode (
display).
Print
Time Setting
Press the + button or the − button, select 16
(the minutes), and press the Print
button to
finalize.
The display will change to being lit steadily.
This completes the time setting.
Print
Time Setting
Note
• The factory default print timestamp is set to “enable (print).” If you do not wish to print the timestamp, use the setup utility
in the supplied CD-ROM and set to “disable (do not print).” See the separate volume Captureboard Software Operation
Manual for information about the installation method.
E-15
C-11_man_E.indd E-15
07.7.30 6:04:53 PM