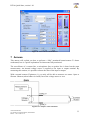
1
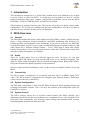
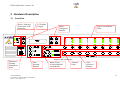
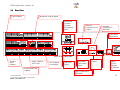
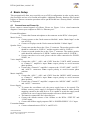
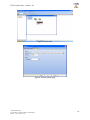
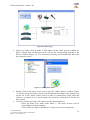
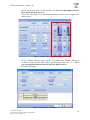
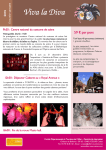
DIVA8M
QUICK START
Version 1.1
Ateïs International
Ch. du Dévent, 1024 Ecublens, Switzerland.
Phone : +41 21 881 25 10
DIVA Quick Start, version 1.0.1
1
INTRODUCTION ....................................................................................................................................... 3
2
DIVA OVERVIEW ..................................................................................................................................... 3
2.1
2.2
2.3
2.4
2.5
3
HARDWARE DESCRIPTION .................................................................................................................. 4
3.1
3.2
4
GENERAL .............................................................................................................................................. 3
AUDIO................................................................................................................................................... 3
CONNECTIVITY ..................................................................................................................................... 3
SYSTEM CONFIGURATION ..................................................................................................................... 3
SYSTEM CONTROL ................................................................................................................................ 3
FRONT VIEW ......................................................................................................................................... 4
REAR VIEW ........................................................................................................................................... 5
BASIC SETUP ............................................................................................................................................. 6
4.1
4.2
4.3
4.3.1
4.3.2
4.3.3
4.3.4
4.3.5
4.3.6
4.4
4.4.1
4.4.2
4.4.3
4.4.4
CONNECTIONS AND POWER UP ............................................................................................................. 6
SOFTWARE START UP ........................................................................................................................... 8
DIVA CONFIGURATION ........................................................................................................................ 8
Event Philosophy ........................................................................................................................... 11
Music ............................................................................................................................................. 11
Messages ....................................................................................................................................... 14
Fireman Microphone..................................................................................................................... 16
GPIOs............................................................................................................................................ 18
Surveillance Monitoring ................................................................................................................ 20
FRONT PANEL CONTROL AND SOFTWARE REAL-TIME MONITORING .................................................... 22
Music ............................................................................................................................................. 22
Messages ....................................................................................................................................... 23
Fireman Microphone..................................................................................................................... 23
Amplifier........................................................................................................................................ 23
5
COMPILING AND STORING FILES .................................................................................................... 25
6
ADVANCED SETUP ................................................................................................................................ 25
6.1
6.2
6.3
6.4
6.5
6.5.1
6.5.2
7
CONNECTIONS .................................................................................................................................... 25
ADDING A LINE/MIC SOURCE ............................................................................................................. 27
ADDING A PSS .................................................................................................................................... 28
USING EVENT SEQUENCES .................................................................................................................. 30
FRONT PANEL CONTROL AND SOFTWARE REAL-TIME MONITORING .................................................... 32
Microphone ................................................................................................................................... 32
PSS ................................................................................................................................................ 32
ANNEXE .................................................................................................................................................... 33
Ateïs International
Ch. du Dévent, 1024 Ecublens, Switzerland.
Phone : +41 21 881 25 10
2
DIVA Quick Start, version 1.0.1
1 Introduction
This document is designed to be a “Quick Start” manual and is only intended to give a rapid
overview of how to start with DIVA. To obtain more precise details on “how to” and for
further information about more complex configuration possibilities, please read the DIVA
HELPDOC or DIVA USER MANUAL available on our website.
This document is separated into two parts. The first one will lead you to obtain a quick usable
configuration. The second part, starting from the basic configuration, will show you how to
add more devices and more feature to your configuration.
2 DIVA Overview
2.1 General
The DIVA8M module unit houses: audio digital processing (DSP), a matrix, a digital message
player, a fully monitored fireman microphone, amplifiers monitoring with switchover to
backup amplifier and loudspeaker lines monitoring. It can process and route one PSSxxDT
security microphone console or up to eight cascaded PSM paging microphones and two 0 dB
audio inputs into 2 different channels (Music + Voice). Each input is fitted with volume
controls and equalizers. The two audio inputs feature contact and VOX activation (ideal when
using the cordless microphone, for example)
2.2 Audio
There are 5 audio inputs. Two are 0 dB line inputs for tuner, cd player, etc. One gain
adjustable MIC/LINE inputs for using a third 0 dB source or an external microphone. One
input for PSS or PSM microphone and one fireman microphone input. Built in DIVA8M, a
front panel fireman microphone input that is fully monitored.
There are eight monitored loudspeaker zones (A+B) feed by two amplifier channel Voice and
Music.
2.3 Connectivity
The DIVA master is designed to be networked with slave DIVA on RS485 using CAT5
cables. The DIVA master is connected to the computer upon Ethernet protocol. Third party
control can be achieved via the RS232.
2.4 System Configuration
The DIVA8M configuration is done with the DIVA Windows® based graphical design and
operating environment software. This is an all in one software with configurable option for
each DIVA’s features.
2.5 System Control
The DIVA software allows user to real-time control features like PEQs, filtering, level
adjustment. But DIVA has also been defined to be a standalone device once configured. The
front panel offers controls like, zone selection, music routing, zone attenuator knob, message
launching buttons and different indicators LED.
Ateïs International
Ch. du Dévent, 1024 Ecublens, Switzerland.
Phone : +41 21 881 25 10
3
DIVA Quick Start, version 1.0.1
3 Hardware Description
3.1
Front View
Power, Fault and
Evacuation LED
Indicators
LCD Menu
Display
Menu
Navigation
Buttons
Zone Event Indicator
LEDs
Figure 1: DIVA front Panel
Monitored
Fireman
Microphone
Input
Start
Message
Buttons
Ateïs International
Ch. du Dévent, 1024 Ecublens, Switzerland.
Phone : +41 21 881 25 10
Music Source
Selection Buttons
and Indicators
Attenuar
Knob
Zone
Selection
Buttons
4
DIVA Quick Start, version 1.0.1
3.2
Rear View
Monitored Logical Inputs
Logical Inputs
Monitored
External
Fireman
Microphone
Input
Ethernet
Connector for PC
Control
Network
Connector to
DIVA8S
Front Panel
Deportation
Figure 2: DIVA Rear Panel
Speaker
Zone
Outputs
Audio Channel
100V Link
Logical and Fault
Outputs
Ateïs International
Ch. du Dévent, 1024 Ecublens, Switzerland.
Phone : +41 21 881 25 10
I/O Channels
to Amplifier
OdB Line
Inputs
Adjustable
Gain Audio
Input
Third Party
Control
Main
Power
Supply
Connector
RJ45 Connector to
PSS/PSM
5
DIVA Quick Start, version 1.0.1
4 Basic Setup
This paragraph will allow user to quickly set up a DIVA configuration in order to play music,
play messages and use of a fireman microphone. Additional Security functions like external
triggers to start an evacuation procedure and to put DIVA8M into “Security Mode” will also
be implanted.
4.1 Connections and Power Up
Please connect external apparels as follows. Please see Figure 3 for a visual connection
diagram. Connect your computer to DIVA’s “Ethernet port”.
Fireman Microphone:
• Connect the fireman microphone to the connector on the DIVA’s front panel.
Music Sources:
• Connect a tuner on the Cinch connector labelled 1 under “Music Input” on the
rear of DIVA.
• Connect a CD player on the Cinch connector labelled 2 “Music Input”.
Speaker Lines:
• Connect one speaker line to the “Zone 1” connector. The speaker positive cable
should be connected to “LINEA+” and the negative cable to “LINEA-“.
• Connect a second speaker line to the “Zone 1” connector. The speaker positive
cable should be connected to “LINEB+” and the negative cable to “LINEB-“.
• If more zones have to be used, please redo the same connection for ZONE2,
ZONE3, etc…
Voice Amplifier:
• Connect the “AIN+”, “AIN-“ and “GND” from the “VOICE AMP” connector
to “Channel 1” amplifier’s input. Note: respect polarity to avoid inversion
phase problem.
• Connect the “Channel 1” amplifier’s output to the “VOICE AMP” “AOUT+”
and “AOUT-“ connectors. Note: respect polarity to avoid inversion phase
problem.
Music Amplifier:
• Connect the “AIN+”, “AIN-“ and “GND” from the “MUSIC AMP” connector
to “Channel 1” amplifier’s input. Note: respect polarity to avoid inversion
phase problem.
• Connect the “Channel 2” amplifier’s output to the “MUSIC AMP” “AOUT+”
and “AOUT-” connectors.
Power Supply:
• To ensure the surveillance role, the power supply have to be secured. The
SONaes security power supply is designed to charge batteries while directly
supplying current to the main devices. It is capable to switch the supply mode
to batteries in case of supply blackout and to activate a default contact.
• The batteries connections aren’t describe here.
• Connect the default contact of the SONaes to the DIVA “EXFLTS” and
“COM” inputs.
• Connect the SONaes supply output to DIVA “POWER SUPPLY 1.5A” input.
Evacuation Button:
• Connect a button between EVAC1+ and EVAC1-.
Ateïs International
Ch. du Dévent, 1024 Ecublens, Switzerland.
Phone : +41 21 881 25 10
6
DIVA Quick Start, version 1.0.1
Ateïs International
Ch. du Dévent, 1024 Ecublens, Switzerland.
Phone : +41 21 881 25 10
Figure 3: Basic Setup Connection
7
DIVA Quick Start, version 1.0.1
4.2 Software Start Up
First of all, please install the DIVA which could be found on the Ateis-International website.
After double-clicking the DIVA Setup
complete the installation.
, please follow the next few step to
Figure 4: DIVA InstallSchield Wizard start page
After the installation process complete, launch DIVA software from the Start menu or the
desktop shortcut automatically installed.
4.3 DIVA Configuration
The first steps to DIVA’s configuration, is to set up network parameters and to test
communication.
Figure 5: DIVA Software front page
Ateïs International
Ch. du Dévent, 1024 Ecublens, Switzerland.
Phone : +41 21 881 25 10
8
DIVA Quick Start, version 1.0.1
•
The start page is represented on Figure 5. A first thing to do is to start a new project by
clicking on or by going trough the menu file. This will launch a new window named
“System” displayed on Figure 7.
•
If this is the first installation, please update the DIVA software to the latest version
available on our website. In the DIVA software click on the menu “tools-> update”. In
the update window (Figure 6), verify that the path specified is the one corresponding
to the last version software, if not click open and choose the right one. Then click on
the update button.
•
DIVA software will ask for password. For default users have been set into DIVA:
User1: ATEIS1 Password: ATEIS1 User level: 1
User2: ATEIS2 Password: ATEIS2 User level: 3
User3: ATEIS3 Password: ATEIS3 User level: 3
User4: ATEIS4 Password: ATEIS4 User level: 4
Figure 6: Update form
•
Next step is to set the network option. Simply click F12 or menu “Tools->Options”. A
new pop window will appear directly on the network options page (Figure 8). Please
check that the network card is one to be used.
•
The devices connected to the TCP/IP network have to be detected. Click on the menu
“Tools->Device Search”. In the new window, click on device “Start Search” button to
check if the Network is correctly set up. A list of all networked devices is displayed. If
your Master DIVA is not detected, please check cables and verify the IP address
assignment.
•
Select the Master DIVA you want to work on and then click “Auto Connect”. After
connection, you will be able to see the IP address of the master on the system window.
Ateïs International
Ch. du Dévent, 1024 Ecublens, Switzerland.
Phone : +41 21 881 25 10
9
DIVA Quick Start, version 1.0.1
Figure 7: New System
Figure 8: Network options page
Ateïs International
Ch. du Dévent, 1024 Ecublens, Switzerland.
Phone : +41 21 881 25 10
10
DIVA Quick Start, version 1.0.1
Figure 9: Device Search page
4.3.1 Event Philosophy
For a better understanding of how the DIVA works, a quick “Events” explanation is needed.
Event can be compare to an action. Each action or event can be started by a multiple of
different ways: external trigger, modulation detection, etc. Those events are hierarchically
organised by priority levels set for each one of them. You also can set permanent event like
playing music.
4.3.2 Music
Now the DIVA connections are configured. The following step is how to set the system for
using audio external sources, like tuner, cd player, computer, etc., and assigned them to zone.
•
In the main system page (Figure 7), double click the DIVA Icon after having rename
DIVA apparels according to your wishes, here DIVA1 (default is “master1”). A
“DIVA1” pop window is displayed (Figure 10).
Ateïs International
Ch. du Dévent, 1024 Ecublens, Switzerland.
Phone : +41 21 881 25 10
11
DIVA Quick Start, version 1.0.1
Figure 10: Master page
•
In the tree folder, click on audio. It will display all the audio sources available for
DIVA. Simply drag and drop the music icon on the corresponding drawing in the
DIVA1 window (Figure 11). The connection picturing will automatically show that
the connection exists.
Figure 11: Adding music source
•
•
Double Click on the music source icon to open the “Music Source” window (Figure
12). Before going any further, please keep in mind that this chapter only intends to set
up the use of two audio sources and to be able to control them (front panel and
software, see chapter 4.4.1). On the figure, the part that is red framed is for the real
time control.
In order to achieve your aim, you need to specify some parameters:
- Select the Route Key mode under Music 1. The music sources will be
controllable from the front panel.
- Click on Edit, for Music1 and Music2, in order to set event’s parameters.
Ateïs International
Ch. du Dévent, 1024 Ecublens, Switzerland.
Phone : +41 21 881 25 10
12
DIVA Quick Start, version 1.0.1
-
Define the priority from 0 to 20, default is 20. Note: 0 is the highest priority.
Here music has been set to 13.
The event “Play Music” is created automatically as soon as you configure your
music source.
Figure 12: Music Source window
-
-
In the “Advance Setting” page, tick the “Pre-define Zone Enable”. Then you
are able to define the zone where music will be played, here zone 1, 2, 3. Note:
you cannot define different zone for the two music sources.
Click the OK button
Figure 13: Play Music Event window
Ateïs International
Ch. du Dévent, 1024 Ecublens, Switzerland.
Phone : +41 21 881 25 10
13
DIVA Quick Start, version 1.0.1
-
Configure your default source. Choice is between music source 1 and 2 (here
1).
Your system is now configured to play music from the music source 1 and 2. Please save your
project before going to next step and close the “Music Source” window.
Note: At this time, you won’t be able to hear music before compiling your file and store
it into DIVA. Compiling and Storing are discussed in chapter 0.
4.3.3 Messages
This chapter will explain how to set up messages (like alarm, evacuation, test, etc.) and how
to use them.
The messages are administered with the so-called “Messages Manager”. To add messages to
message library, just save your messages in .wav format (16bit, 16kHz) into the “message lib”
folder under the “Programe Files” ->Ateis ->ATEIS DIVA folder.
To access the messages manager, please follow the next steps.
•
Click on the menu “view” -> “Message”. The message page will display (Figure 14).
Figure 14: Message Window
•
•
•
Click on the “MSG Manager” button. A new “Message Library” window appears.
In the Library (Figure 15), all the messages in the library files are display. Simply tick
the one you want, here all, to import into DIVA and click the “Add to DIVA” button.
You will automatically return to Message page.
Once you are back in the message window, you can select the messages to store in
DIVA and specify if there are security messages or not. Simply tick the right cases,
Ateïs International
Ch. du Dévent, 1024 Ecublens, Switzerland.
Phone : +41 21 881 25 10
14
DIVA Quick Start, version 1.0.1
and then push the “Store” button. For this example, all of them are selected and
security has been desired for “AlarmDE” and “EvacuationEng”.
Figure 15: Message Manager Library page
•
•
Close the message page and go back on the “DIVA1” page.
Click, under DIVA icon, the “Front Panel Setup” (Figure 16). You need to assign an
event to the message buttons of the front panel (Evac, Alert and Test). For each
button, make a new event and then edit the events (example on Figure 17).
Figure 16: “Front Panel Setup” window
•
In dedicated area of “Play Message Event” window (Figure 17), change the name,
choose a priority and tick if it’s a security message or not. Under “Message”
emplacement, choose with the drop-down menu the right message for the event. You
Ateïs International
Ch. du Dévent, 1024 Ecublens, Switzerland.
Phone : +41 21 881 25 10
15
DIVA Quick Start, version 1.0.1
•
•
•
can also define the “Play Mode” option: repeat for ever or repeat for a definable
number of time. Please choose between the “cancel all” or “Coexist” options. “Cancel
All” consist of cancelling all the messages or events, with a lower priority, that
are currently playing in the selected zone. “Coexist” permit to momentarily
disable the current message or event and to retrieve it as soon as the one with a
higher priority has finished.
Last thing to do is to define the zone where this message will be played. Here for the
evacuation message, every zone are selected.
Repeat this section for the two more buttons (Alert and Test).
Close the “Front Panel Setup” window.
Figure 17: “Message Event” edit page
4.3.4 Fireman Microphone
The Fireman microphone is a special monitored microphone. It means that at any time, the
connection and the status of the microphone are measured and analyse. If any faults are
detected, the front panel “Faults” led will illuminate.
In order to set up the use of the fireman microphone, please do as follow.
•
•
In the DIVA1 window, drag and drop the fireman microphone icon from the tree
folder.
Double click the Fireman Microphone Icon. The “Fireman Microphone” window will
open (Figure 18).
Ateïs International
Ch. du Dévent, 1024 Ecublens, Switzerland.
Phone : +41 21 881 25 10
16
DIVA Quick Start, version 1.0.1
•
•
Figure 18: Fireman Microphone window
As for music, the event corresponding to the fireman microphone is automatically
created. Click “Edit”. A new pop-up window opens (Figure 19).
You need now to set the priority of the fireman microphone, by default it is set to 0,
and tick security (as his main purpose is to deliver security warning).
Figure 19: Paging Event window
•
•
Then, under “Conflict”, choose “Cancel All” or “Coexist according to your needs.
Tick “Pre-define Zone Enable” in order to define where the fireman microphone will
play. Choose zone according to your needs. Then click “OK”.
Ateïs International
Ch. du Dévent, 1024 Ecublens, Switzerland.
Phone : +41 21 881 25 10
17
DIVA Quick Start, version 1.0.1
•
•
In the Fireman Microphone window, select the behaviour of the microphone under
“Paging Mode”. You can choose between “Push To Talk” or “Lock To Talk”, it
respectively means that you can talk only while pushing the microphone button or talk
after pushing once the microphone button (stop talking by pushing a second time the
microphone button).
Close the “Fireman Microphone” window.
4.3.5 GPIOs
The two next paragraphs EXFLT and INPUT discuss about, respectively, how to use GPIOs
to have the SONaes default contact working and to add a external contactor to trigger an
evacuation action.
To access the GPIOs page, click under menu “View -> GPIO”.
Figure 20: GPIO window
4.3.5.1 EXFLT:
Before going any further, the principle of security in the event have to be discussed. In case of
power shutdown, the all DIVA system is designed to run under 24V battery. The DIVA is
made for energy saving and will only keep security event alive. All the non-security event
will be disable. The activation of an external fault input will force DIVA into security mode.
•
•
In the GPIO window (Figure 20), click the External Faults Inputs tab (Figure 21).
Tick the security square. Note: You don’t have to define an event in order to
activate the external fault inputs. Ticking Security will induce DIVA to know in
case this contact is activated that there is a major issue and will automatically go
in power safe mode. So that only security event could be activated.
Ateïs International
Ch. du Dévent, 1024 Ecublens, Switzerland.
Phone : +41 21 881 25 10
18
DIVA Quick Start, version 1.0.1
Figure 21: External Fault Inputs page
4.3.5.2 EVAC:
Evacuation inputs can be monitored input. It means that the line is under surveillance. In this
example, we will activate the evacuation message by calling the “Evac” event. Note: see
annexe to know how to perform a monitored evacuation button/line.
In the GPIO window, please click on the “Evacuation Inputs” tab, see Figure 22.
Figure 22:GPIO’s Evacuation Inputs tab
•
•
Under Channel 1, tick the “Latch Mode” square selector. “Latch mode” defines the
way the contact or button will work. In “Latch Mode”, you will have to close/open the
contact once for launching the event, and reclose/reopen it to stop the event. In “NonLatch Mode” the contact need to be closed/opened all the time the event has to be
activated.
Click on the “Start” under “Event Setting” for channel 1. You will enter in the “Event
Selection” page, see Figure 23.
Ateïs International
Ch. du Dévent, 1024 Ecublens, Switzerland.
Phone : +41 21 881 25 10
19
DIVA Quick Start, version 1.0.1
Figure 23: Evacuation Inputs Event Selection page
•
•
•
•
•
At the left of the page, you will see all the existing event. Select the “Evac” event and
click on insert.
Click “OK”
On the GPIO page, “Evacuation Inputs” tab, you will find under “Monitor Mode” a
drop-down menu which allow you to choose between 2 modes: Voltage UGA and
Contact. Note: “Voltage UGA” mode means that the contact is activated by an
external voltage source. “Contact” mode used internal voltage source that is
forced to 0 V when the input is shorten (closed contact).
Thick the “Monitored” square selector to apply a full surveillance to your contact.
Note: “Monitored” have to be used with additional 4k7 resistors at the end of the
line. The monitored input permit to determine if there is a short-circuit, an open
line, a closed contact or an open contact.
Close the GPIO window.
4.3.6 Surveillance Monitoring
As said before, DIVA is EN 60849 and EN54-1 compliant. It means that the monitoring of
event, message and speakers line are totally secure.
To access the monitoring window, go on the DIVA1 window and click the “Monitoring”
button under the DIVA icon.
Ateïs International
Ch. du Dévent, 1024 Ecublens, Switzerland.
Phone : +41 21 881 25 10
20
DIVA Quick Start, version 1.0.1
Figure 24: Monitoring Window
•
•
•
•
•
•
In the “Monitoring” window (Figure 24), you can see the machine and tone generator
display. It informs which DIVA you are currently monitoring. Note: all DIVA in
your Network are real time surveillance monitored.
The “Monitoring” window is divided into three distinct parts: “Zone Monitoring”,
“Voice Amp”, “Music Amp” (corresponding to the three tabs).
“Zone Monitoring”:
- As mentioned before, one speaker zone is separated in two, A and B. On for
security (Voice) and one for Music (Music). The Voice channel has the priority
regarding Music channel in case of power supply defect. In case of default on the
Voice Channel, the voice source is automatically routed on the Music channel.
- Click on the “Get All Reference” button. It will start storing the actual
measurement for each zone.
- In the “Zone Monitoring” page, you can specify the tolerance of the faults
detection. It means that as long as the real time measurement is within the
reference +/- the tolerance, the monitored speaker lines are considered as non
faulty.
“Voice Amp”:
- The voice amp tab is illustrated on Figure 25.
- Simply click on get the reference and choose a tolerance.
“Music Amp”: to get the reference impedance measurement and to start monitoring
this amp channel, simply reproduce the “Voice Amp” procedure.
Close the monitoring window.
Ateïs International
Ch. du Dévent, 1024 Ecublens, Switzerland.
Phone : +41 21 881 25 10
21
DIVA Quick Start, version 1.0.1
Figure 25: Voice Amp Monitoring Window
4.4 Front Panel Control and software real-time monitoring
As soon as your configuration will be compiled and stored into DIVA (see chapter 5), you
will be able to control DIVA from the front panel or with the software. To use software
controls, you have to connect to the network using the connect button
or menu “operations
-> connect”.
4.4.1 Music
•
•
From the front Pannel:
- The Music controls are red highlighted on Figure 26.
- Using “Select” button allows toggle between Source 1, Source 2 and none. With
our configuration, the defaults status will be source 1 routed to zone 1, 3, 4 and 6.
Despite that you can re-route music source 1 and 2 at your will.
- For changing zone routing, push the “Route” button, select the zone with
appropriate button and then push the “Route” button to validate the routing.
- Each zone has an attenuator knob. It means that you can adjust level of each zone
independently. Note: Attenuator will only have effect on the music source with
the highest priority, the reason of that is the use of the voice amplifier for
music. Attenuator are disabled for voice amplifer.
- The “All Call” button allows user to instantaneously select all the zones.
Figure 26: Music control on the DIVA front panel
From Software:
- To access the music control page, simply click on the music icon in the DIVA1
window. Be sure to be connected to DIVA. If not, use the connect button .
Ateïs International
Ch. du Dévent, 1024 Ecublens, Switzerland.
Phone : +41 21 881 25 10
22
DIVA Quick Start, version 1.0.1
-
At the right of the “Music Source” window, different indicators are display: source
volume, signal (presence of a signal), and level overflow.
The controls are mute button for source 1 and source 2 as well as input level.
Additional features for using music source, like filtering and equalization are discussed in the
DIVA HELPDOC or in the DIVA USER MANUAL manual.
4.4.2 Messages
The messages’ controls are limited to the front panel (Highlighted on Figure 27).
To run a message, simply click on the button of the desired message. The message will be
played in the pre-defined zone. WARNING: Evacuation and alarm should be used only in
case of emergency. Please use the test message in order to put your installation to the
test.
If no pre-defined zone were configured, just select the zone on the front panel and then click
on the message button. In accordance to priority, the message, for example TEST, won’t play
in zone where there is already an event with a higher priority
Figure 27: Front Panel Messages Buttons
4.4.3 Fireman Microphone
The use of the fireman microphone is really easy. In this case, just push once the fireman
microphone button to start talking. Re-push the button to stop talking.
You can adjust the fireman microphone level by going to the microphone menu. The controls
are red framed on Figure 28. Use the menu button, the ones with arrows, to select the
“Fireman Microphone menu”. Then click on + or – to adjust the microphone level.
Figure 28: Fireman Front panel controls
4.4.4 Amplifier
In the DIVA1 window, double click on the amplifier icon, voice amplifier for this example.
Doing so will open the “Voice Amp” widow, Figure 29.
The Red frame shows the monitoring controls (Level) and indicators (Volume and Level
Overflow). The orange frame shows the equalisation section.
Ateïs International
Ch. du Dévent, 1024 Ecublens, Switzerland.
Phone : +41 21 881 25 10
23
DIVA Quick Start, version 1.0.1
•
•
•
•
Adjust Level to your desires.
The DIVA software allows user to set up to 7 EQ. Those EQs are controlled by 3
parameters: Gain, Quality factor in Bandwidth per octave and centre frequency.
By clicking the “Graphic Button”, a window displaying graphically the EQ settings
will show up.
A Peaking EQ overflow indicator is visible at the right upper corner.
Figure 29: Voice Amplifier Monitoring and Equalisation
Ateïs International
Ch. du Dévent, 1024 Ecublens, Switzerland.
Phone : +41 21 881 25 10
24
DIVA Quick Start, version 1.0.1
5 Compiling and storing files
Once you have configured your installation, you need to upload it in DIVA. Follow the few
next steps to achieve this aim.
The compile process is here to determine if there are errors in your DIVA and all his
peripherals set up. Storing is for uploading your setup into DIVA.
•
To compile, click on
•
•
•
To store your setup, click on
or under menu “Operations -> Store” or even F9.
During the store process, you will be asked to either connect to DIVA. Choose “Yes”.
You also will be prompt to enable audio. Choose “Yes”.
or under menu “Operation -> Compile” or even F9.
6 Advanced Setup
The advance setup paragraph will introduce to you some of the additional devices one can use
and how to manage multiple event actions. Keep in mind that this paragraph does not intent to
list all the connection possibilities.
6.1 Connections
In this quick start manual, we will add two more devices (microphone and PSS) to our “Basic
Setup” configuration. See Figure 30 for a visual connection diagram.
Follow the few next step:
•
•
Connect the microphone with a standard 3 pins XLR cable to the “MIC/LINE”
connector on the rear of DIVA. Note: The input level can be adjusted with the gain
screw beside the connector.
Connect the PSSDT with a CAT5 cable to the “PSS/PSM” input on the rear panel.
Ateïs International
Ch. du Dévent, 1024 Ecublens, Switzerland.
Phone : +41 21 881 25 10
25
DIVA Quick Start, version 1.0.1
Ateïs International
Ch. du Dévent, 1024 Ecublens, Switzerland.
Phone : +41 21 881 25 10
Figure 30: Advanced Setup connection diagramm
26
DIVA Quick Start, version 1.0.1
6.2 Adding a Line/Mic Source
In the DIVA master window, DIVA1, simply drop the microphone from the audio source
menu on the right icon.
•
•
•
•
•
•
•
•
•
Double click on the microphone icon. The “MIC/LINE” window will open (Figure
31).
By default, the “Modulation Detection” is activated. If not please select it.
Click on Edit button.
Set the priority to ten.
Under “Conflict”, activate “Coexist”.
Tick “Pre-Chime Enable” and select the “Chime 3 notes” message in the drop-down
menu. Note: the pre-chime option allows user to have a notification message
before the user can speak into the microphone.
Tick “Pre-define Zone Enable” and select the zone 1 and 3.
Click OK.
Adjust the “Threshold” level to -12 dB and the “Counter” to 3000 ms. Note: the time
defined by the counter is the inactivity time after which the microphone will go
off line.
Figure 31: MIC/LINE window
•
Close the MIC/LINE window.
Ateïs International
Ch. du Dévent, 1024 Ecublens, Switzerland.
Phone : +41 21 881 25 10
27
DIVA Quick Start, version 1.0.1
Figure 32: Microphone advanced setting page
6.3 Adding a PSS
The PSSDT microphone series is a fully monitored paging microphone with programmable
function and a selection touch screen. For more information upon the PSSDT microphone,
visit the Ateis International website ( http://www.ateis-international.com ).
In this quick start, the PSS microphone touch screen will be programmed to control only what
is relied to music.
•
•
•
•
•
•
•
•
Drop the PSS in the “Audio Source” folder to the right icon on the DIVA1 master
page.
Double click the icon. The PSS window will open (Figure 33).
Select 15 for the priority.
Click on the “Key” tab ().
For the First Key, write “Zone 1” in the blank square. This will be the Key 1’s name
on the PSS screen.
In the drop-down menu, select “Zone Selection”. The “Zone Selection” window will
open (Figure 35). Select the zone 1 and click “OK”.
Repeat the same process for the 4 first keys, zone 1, zone 2, zone 3 and zone 4.
Under the Fifth key, write “Route” and select Route in the drop-down menu. Note:
Route key act like the button route on the DIVA’s front panel. You have to use
this button to confirm the zone selection.
Ateïs International
Ch. du Dévent, 1024 Ecublens, Switzerland.
Phone : +41 21 881 25 10
28
DIVA Quick Start, version 1.0.1
Figure 33: PSS Window
•
•
Name Key 6 “Music1 Level +” and select “Music Level +” in the menu. Choose
Music1 for level control.
Name Key 7 “Music1 Level –” and select “Music Level –” in the menu. Choose
Music1 for level control.
Ateïs International
Ch. du Dévent, 1024 Ecublens, Switzerland.
Phone : +41 21 881 25 10
29
DIVA Quick Start, version 1.0.1
Figure 34: PSS Key Tab
Figure 35: PSS Zone Selection window
Now the key of the PSS are defined. Close the PSS window, compile your project and store it
into DIVA. The PSS will receive his configuration at each start up of DIVA.
6.4 Using Event sequences
The short description of the event in chapter 4.3.1 needs some further explanations.
You can define multiple events by accessing the event window (menu “View -> Event”). In
this window, all the existing event are listed. You can add/delete events.
Before adding a new event, choose in the “Event Type” drop-down menu the desire event’s
type. Click on the new event then “Edit” to be able to set up parameters for this new event.
You can declare event with the same action, like playing a message (even playing the same
message). You just have to give them different names.
The event can be cascaded. An explanation diagram is visible on Figure 36.
Ateïs International
Ch. du Dévent, 1024 Ecublens, Switzerland.
Phone : +41 21 881 25 10
30
DIVA Quick Start, version 1.0.1
Figure 36: Cascading Event Diagram
An action like closing a contact could induce to start an event. But the first event, as soon as it
will be finished or stopped could launch an other event. The second event could activate the
start of a third event, and so on.
In each event edit page, there is a next event drop down menu, see Figure 37. In this menu
you will be able to choose between all the existing events.
Figure 37: Next event drop-down menu
Events could also be looped. The diagram on Figure 38 visually explains it.
Figure 38: Looping Event Diagram
According to the looping event diagram, when selecting next event for “Event 2”, choose
“Event 1”. As soon as you select a event that is before in the chain, a new “Circular Times”
Ateïs International
Ch. du Dévent, 1024 Ecublens, Switzerland.
Phone : +41 21 881 25 10
31
DIVA Quick Start, version 1.0.1
selector is visible just beside the next event drop-down menu (see Figure 39). This selector
permits to define how many time the events’ loop will be repeat.
This is a quick way to loop different language evacuation messages for example.
Figure 39: Event Circular Times selector
More details information could be found about the way to use events in the DIVA USER
MANUAL.
6.5 Front Panel Control and software real-time monitoring
The MIC/LINE input as well as the PSS have no front panel controls. There are only software
controls. In this section only one part of them will be explain. On both the microphone and
the PSS, PEQ and Filtering can be applied. On the MIC/LINE input, a compressor/limiter can
be set.
6.5.1 Microphone
At the right of the “MIC/LINE” page, there is one level controls, a volume and a level
overflow indicator. See red framed on Figure 40.
You can adjust the microphone level with the slide bar.
Figure 40: MIC/LINE control and Indicator
6.5.2 PSS
The PSS window offers two controls, one for the integrated microphone gain and one for the
PSS’s speaker gain, as well as three indicators, volume, microphone level overflow and
speaker overflow. See red frame on Figure 41.
Ateïs International
Ch. du Dévent, 1024 Ecublens, Switzerland.
Phone : +41 21 881 25 10
32
DIVA Quick Start, version 1.0.1
Figure 41: PSS Controls and Indicators
7 Annexe
This annexe will explain you how to perform a “fully” monitored button/contact. To better
understand, here is a quick explanation of what means fully monitored.
The surveillance of a contact line, a microphone line or speaker line is based on the same
measurement. An internal voltage source is applied to the input or output terminal. By
measuring this tension, it is possible to know the state of the input or output.
With a normal contact (FigAnnexe 1), you only will be able to measure two states: Open or
Shorten. Shorten (when contact is closed) forces the voltage source to zero.
FigAnnexe 1:Simple Contact Schematic
Ateïs International
Ch. du Dévent, 1024 Ecublens, Switzerland.
Phone : +41 21 881 25 10
33
DIVA Quick Start, version 1.0.1
In this case, the measurement unit can only detect 0V (closed) or 4.4 V (opened). In order To
have different state measurement like open line and short-circuit we need to add a resistor
network to the end of the line, see FigAnnexe 2.
FigAnnexe 2: Fully Monitored Contact Schematic
Using the resistor Network, the measurement unit can detect 4 different states: 1.3 V, 2 V, 2.7
V and 4.4 V. The 4 states correspond respectively to Shortcut, Closed Contact, Opened
contact and Absent (open line).
According to the FigAnnexe 2, you have a fully monitored line responding to the security
norms.
Ateïs International
Ch. du Dévent, 1024 Ecublens, Switzerland.
Phone : +41 21 881 25 10
34