1
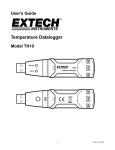
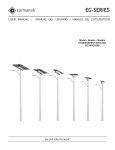
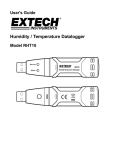
HOSELINK™
Digital Tap Timer with Flow Meter
User Manual
Item Code: 5808
1
1. QUICKSTART GUIDE
Your new HOSELINK Digital Tap Timer is easy to set up and use. After installing a 9V battery (see p.4), press
and hold the ‘Menu’ Button A for 3 seconds to enter the setup mode. The timer cycles through each option
on the screen every time you press Button A. Simply use the up and down buttons (Button B and Button C)
to adjust each setting and press the O.K. button to confirm and move on to the next option. It is important to
know the timer measures the volume of water rather than length of watering time.
You can use the tap without removing the timer whenever the timer is not in use by pressing the ‘On’ or ‘Off’
button to start or stop water flow.
Step
Setting
Description
1
Day of the week
Set today’s day
2
Time
Using 24 hour clock, set the time now
3
Start
Time you want watering to commence
4
LIT
How many litres you want to be watered
5
Mist Cycle
Most users will select 100%
6
Cycle Time
Frequency – how often water is released. 1 Day is most commonly
used. See Table 1 (P.7) for more info.
7
Watering Days
Put a raindrop next to each day you want watering to occur
8
Prog. ON/OFF
Turns the system on or off
Step
Setting
Description
1
Resetting the Tap Timer To start from scratch, press and hold ‘Menu’ Button A for 3 seconds
to enter the setup mode again.
We recommend you choose a simple watering cycle the first time and move on to more complex settings
thereafter, if required. Below are some simple set-up options for example.
Suggested
Option
Settings to Select
Description
1
Set today’s day and time, 6.00am,
20L, 100%, 1 Day, ♠Mo, ♠We, ♠Sa,
On
Waters 20L of water of 6am, once a day on Mondays,
Wednesdays and Saturdays.
2
Set today’s day and time, 6.00am,
40L, 100%, 12 HR, ♠Mo, ♠Th, On
Waters 40L of water at 6am and 6pm (twice a day) on
Mondays and Thursdays
3
Set today’s day and time, 7.00am,
30L, 100%, 2 Days, ♠Mo, ♠Tu, ♠We,
♠Th, ♠Fr, ♠Sa, ♠Su, On
Waters 30L of water at 7am every second day. To
cycle every 2nd, 3rd, etc. day you must have a raindrop
next to every day or the timer will not operate.
For more detailed instructions, read on.
2
2. Installing the Battery for the first time:
(a) Pull the digital face away from the Tap Timer body. It is normal to meet some resistance. See Figure
1 below.
(b) Place the battery behind the digital screen as seen in figure 2.
Figure 1
Figure 2
(c) Once battery is installed put the digital screen and body back together.
3. BUTTONS on the CONTROL PANEL:
BUTTON A
BUTTON B
BUTTON C
Figure 3
Button A - Menu/O.K.: This button is used for setting the Time and program schedule. It is also used for
changing selection of setting and to confirm program set up.
Button BOn: Increase digital value/Selecting the raindrop icon on the day(s) of the week that
watering is required.
Button COff: Decrease digital value/Removing the raindrop icon from the day(s) of week that
watering is not required.
4. The Digital Display
TIME:
Current Time (indicated on top right corner)
START TIME:
Next watering time
LIT:
Volume of watering (0.1~999.9 Lit)
:
Manual watering time (10 Lit)
MIST CYCLE:
Divides the allocated amount of water (LIT) and disperses in intervals to allow for
distributed watering. The digital values range is (10%, 20%, 30%, 40%, 50%, 60%, 70%, 80%,
90%, 100%).
CYCLE TIME:
How frequently the Tap Timer is activated to dispense water. For example if the CYCLE
TIME is set at 12 Hours it will dispense water twice daily. See Table 1 above.
3
:
The drop icon Indicates the days of week watering will happen. If a day of week does not
have the Drop icon next to it watering will not happen that day.
Prog. ON:
Prog. OFF:
When ON is displayed the set schedule will be run.
When OFF is displayed the set schedule will NOT be run.
FEATURES :
*MIN. operating water pressure : 0.5 bars
*MAX. operating water pressure : 8 bars
5. Setting the Time and Schedule of Tap Timer:
When the battery is installed, the screen will display days of week from Monday (MO) to Sunday (SU), TIME,
START, LIT (LIT Stands for litre. This is how much water will be dispensed) MIST CYCLE and CYCLE TIME. See
Figure 4 below.
Figure 4
Setting up for the first time
(a) Set Day of Week (the day it is today):
Press and hold Button A – (Menu/O.K.) until the cursor under MO (Monday) starts to flash (About 3
seconds). When the cursor under MO (Monday) starts to flash the device is in Setup mode. Use Button
B or C to scroll to the correct day of the week. This lets the Tap Timer know what day of the week it is.
(b) Set TIME (the time it is now):
Once the Day of the week is set Press Button A – (Menu/O.K.) again to set the time. When the Hour
setting on the clock is flashing use Button B or C to set the hour setting (in 24 hour time). Press Button
A – (Menu/O.K.) again to set the minute time. When the minutes are flashing use Button B or C to set
minutes. Once time is set press Button A – (Menu/O.K.) to set the START time schedule.
(c) Set START time Schedule (when watering will commence):
When the Hour is flashing use Button B or C to set the Hour time. Press Button A – (Menu/O.K.) to set
the minutes. When minutes are flashing use Button B or C to set the minutes.
(d) Set LIT (LIT Stands for litre “Water Flow Volume”. This is how much water will be dispensed through the
Tap timer)
Press Button A – (Menu/O.K.) to set the “Water Flow Volume” LIT. When LIT is flashing use the Button
B or C to set the “Water Flow Volume” in litres. The digital values range is from 0.1~999.9 Litres.
(e) Set the MIST CYCLE: (Most common use is 100%)
To set MIST CYCLE Press Button A – (Menu/O.K.) so MIST CYCLE is flashing. Use Button B or C to set the
4
Button B or C %. Digital range is: 10% to 100%.
MIST CYCLE will set how quickly the water is dispensed. For example if the MIST CYCLE is set at 100% all
the water will be released in one hit. If MIST CYCLE is set at 20% the water will be released in five
portions.
Example:
If given Water Flow Volume = 10 Lit and MIST CYCLE = 20%.
The tap timer waters for 2 Lit, then stops for 10 minutes,
then repeats the number of watering until 100% is reached. = 100% ÷ 20% = 5 times
(f) Set the CYCLE TIME
To set CYCLE TIME press Button A – (Menu/O.K.). When CYCLE TIME is flashing use Button B or C to set
the CYCLE TIME required. (Most common use is 1 Day)
The CYCLE TIME setting is how frequently the timer is activated and water is released. The digital values
range is from 1HR, 2HR, 3HR, 4HR, 6HR, 8HR, 12HR, 1 DAY, 2 DAYS, 3 DAYS, 4 DAYS, 5 DAYS, 6 DAYS and7
DAYS.
Example:
If START time is 19:30 on Tuesday and Water Flow Volume = 10 Lit and MIST CYCLE = 100% and
CYCLE TIME is 4 Hours:
The Tap Timer will water for 10 Litres at 19:30 on Tuesday, Then 4 hours later at 23:30 will water again
for 10 litres
(g) Set the WATERING DAYS (Monday to Sunday)
To set the WATERING DAYS press Button A –(Menu/O.K.). The Drop icon
next to MO (Monday) will
begin to flash. Use Button B to select the days for watering. Use Button C to remove the Drop icon
and so there is no watering on that day.
WATERING DAYS (Monday to Sunday) allows the user to selects the days of the week to water.
Example:
Watering can take place every Monday, Friday and Sunday of the week. See Figure 5 below and note
the Drop icon
next to MO, FR and SU.
Figure 5
(h) Set the Prog. ON/OFF:
Press Button A – (Menu/O.K.) to set the schedule ON or OFF. When flashing press Button B or C to turn
ON or OFF.
(i) To finish Setup press Button A – (Menu/O.K.) for the last time. The screen will flash and the setup is
5
complete. If changes to setup are required re-do steps (a) to (i).
6. Other Useful Features
(d) Manual Override ON
To run the manual override and turn the tap ON press Button B (ON)
This feature allows the user to easily override the schedule and turn the tap ON. When ON the
following icon will flash on the screen.
(e) Manual Override OFF
To run the manual override and turn the tap OFF press Button C (OFF)
This feature allows the user to easily override the schedule and turn the tap OFF if required.
(f) Low Battery Alert
At the bottom center of the digital screen, the following icon
will continually flash when the
battery is running low. The battery must be replaced at this point. See section 2 for instructions.
(g) The Tap Timer has a lid to protect the screen from the elements. To protect the screen keep the lid
shut whenever possible.
7. Replacing the Battery
(h) Before changing the battery press Button C to shut off the water flow. Have the replacement 9 volt
battery ready.
(i)
Pull the front face off the timer. The battery is stored behind the digital screen. See Figure 6 and 7 on
the next page. (HOSELINK recommends the use of an alkaline battery).
Figure 6
Figure 7
(j) When the 9 volt battery is removed the settings on the Tap Timer will be stored for about 30
seconds. If the new battery is replaced quickly the Tap Timer will not need to be reconfigured. See
Figure 5 above.
(k) Once the battery is replaced fit the screen back onto the Tap timer body. The timer will then
continue to work.
8. Things to Remember
(a) Please keep your Tap ON after the watering schedule is set up.
(b) Programmed watering schedule will be overridden by pressing Button B (ON) or Button C (OFF).
(c) When the programmed watering schedule is interrupted, any unfinished cycle will be cancelled
6
automatically.
(d) When the watering schedule is being executed, schedules cannot be changed.
(e) When watering more than 1 time a day refer to Table 1 on the following page:
Number of watering times
1
2
3
4
6
8
12
CYCLE TIME to be set
1 DAY
12 HR
8 HR
6 HR
4 HR
3 HR
2 HR
24
1 HR
Table 1
9. Setup Example:
Watering one time a day CYCLE TIME: 1 Day (24 hrs)
If:
Day of Week:
TIME
START
Water Flow Volume
MO, TU, WE, TH, FI, SA and SU
6:00
7:00
10 Lit
MIST CYCLE
30 %
CYCLE TIME
1 DAY
Watering will begin at 7:00
Duration of watering time will be executed as:
Waters 3 Lit, stop for 10min
Waters 3 Lit, stop for 10min
Waters 3 Lit, stop for 10min
Waters 1 Lit, then stop
The next START TIME will be renewed as 7:00 (7:00 + 24hrs) on the following day. So, CYCLE TIME is: 1 DAY.
This means watering will occur one time a day.
10. WARNINGS :
◎ Water temperature should not exceed 40℃
◎
◎
◎
◎
◎
DO NOT leave the instrument exposed to very low temperatures (snow and frost)
DO NOT use the instrument indoors.
Always replace the battery before you leave for a long period
Never use the instrument without its filter (The Filter/Washer is included with the Tap Timer)
Check periodically that the Filter is placed correctly and is clean.
7