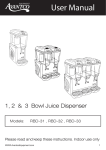
1
www.tunturi.com
UPRIGHT BIKE PRO
USER MANUAL
Contents
Welcome ............................................. 2
Safety instructions ............................. 3
Assembly ............................................ 4
Step 1 ................................................. 4
Step 2 ................................................... 5
Step 3 ................................................... 6
Step 4 ................................................... 7
User interface...................................... 8
Jogwheel and button settings ............... 8
USB port ............................................... 8
Start up screen ..................................... 9
Programs ............................................. 9
Quick start ............................................ 9
End your workout................................ 10
Target heart rate ................................. 10
Manual .................................................11
Watt Constant ..................................... 12
T-Ride ................................................. 13
Preset programs ................................. 14
Own Trainings..................................... 15
Fitness test ......................................... 16
T-Road ................................................ 18
User settings ..................................... 19
User log .............................................. 19
User settings....................................... 19
Edit User ............................................. 20
Change user ....................................... 21
Create user ......................................... 21
Heart rate training............................. 21
Owner ’s manual
•
P L AT I N U M P R O
Exercising ......................................... 22
2
Maintenance ...................................... 23
Troubleshooting .................................. 23
Moving and storage ............................ 23
Specifications ................................... 24
User interface ..................................... 24
Equipment .......................................... 24
Spare parts list.................................... 25
Exploded view .................................... 27
Welcome to the world of Tunturi
exercising!
Your choice shows that you really
want to invest in your well being and
condition; it also shows you really value
high quality, safe and motivating product
as your training partner. Whatever your
goal in training, we are certain this is
the training equipment to get you there.
You’ll find information about using your
exercise equipment and what makes for
efficient training at Tunturi’s website at
www.tunturi.com
Owner ’s manual
Safety Instructions
Read this guide through carefully
before assembling, using or servicing
your fitness equipment. Please keep
the guide somewhere safe; it will
provide you now and in the future with
the information you need to use and
maintain your equipment. Always follow
these instructions with care.
Note about your health
• Before you start any training, consult a
physician to check your state of health.
• If you experience nausea, dizziness
or other abnormal symptoms while
exercising, stop your workout at once
and consult a physician.
• To avoid muscular pain and strain,
begin each workout by warming up and
end it by cooling down (slow pedaling
at low resistance). Don’t forget to
stretch at the end of the workout.
Note about the exercise environment
• The equipment is not to be used
outdoors.
• Place the equipment on a firm, level
surface. Place the equipment on a
protective base to avoid any damages
to the floor beneath the equipment.
• Make sure that the exercising
environment has adequate ventilation.
To avoid catching cold, do not exercise
in a draughty place.
• In training, the equipment tolerates
an environment measuring +10°C to
+35°C. The equipment can be stored in
temperatures ranging between -15°C
and +40°C. Air humidity in the training
or storage environment must never
exceed 90%.
Note about the equipment
• If children are allowed to use the
equipment, they should be supervised
and taught to use the equipment
properly, keeping in mind the child’s
physical and mental development and
their personality.
•
P L AT I N U M P R O
GB
• Before you start using the equipment,
make sure that it functions correctly
in every way. Do not use faulty
equipment.
• Press the keys with the tip of the
finger; your nails may damage the key
membrane.
• Never lean on the interface.
• Never remove the side covers. Do not
step on the frame casing.
• Only one person may use the
equipment at a time.
• Hold the handlebar for support when
getting on or off the equipment.
• Wear appropriate clothing and shoes
when exercising.
• Protect the meter from sunlight and
always dry the surface of the meter if
there are any drops of sweat on it.
• Further information on warranty terms
can be found in the warranty booklet
included with the product.
• Please note that the warranty does
not cover damage due to shipping
or negligence of adjustment or
maintenance instructions described in
this manual.
• The equipment must not be used by
persons weighing over 150 kg.
• Do not attempt any servicing or
adjustments other than those described
in this guide. Everything else must
be left to someone familiar with the
maintenance of electromechanical
equipment and authorized under the
laws of the country in question to carry
out maintenance and repair work.
• Never drop or insert any object into any
openings.
• Do not use outdoors.
• Do not use excessive pressure
on console control keys. They are
precision set to properly function with
little finger pressure. Pushing harder
is not going to make the unit go faster
or slower. If you feel the buttons are
not functioning properly with normal
pressure, contact your dealer.
SAVE THIS INSTRUCTION MANUAL
3
Assembly
Step 1:
Rear support tube assembly
Owner ’s manual
•
P L AT I N U M P R O
Install the rear support tube (5) onto the
main frame (1) with four 3/8” x 2” Hex
head bolts (50) and four 3/8” x 25mm
Flat Washers (71).
4
Owner ’s manual
•
P L AT I N U M P R O
GB
Step 2:
g tube assembly
y
Front pright
1. Unravell the Computer Cable (29)
and snake
ake it through the Upright tube
Cover (38) and the Upright tube (2)
until the
e cable connector comes out
the top opening of the upright tube.
Slide the
he plastic cover (38) onto the
upright tube, ensuring the correct
orientation
tion of the cover.
2. Install the
he Upright tube (2) onto the
Main Frame
rame (1) with seven 5/16” x
5/8” Hex
ex Head bolts (51), six 5/16”
x 18mm
m Flat Washers (72) on the
side screws
rews and one 5/16” x 19mm
Curved Washer (99) on the front
screw.
5
Step 3:
Handlebar
Owner ’s manual
•
P L AT I N U M P R O
1. Run the two hand pulse wires (26)
into the hole in the handle bar
mounting
g plate and out through the
hole in the
e console plate.
2. Install the
e Handle Bar (3) onto the
Upright tube
ube (2) with two 5/16” x
5/8” Hex Head bolts (51), two 5/16”
x 18mm Flat Washers (72) and two
5/16” Splitit Washers (103) being
careful not
ot to pinch the hand pulse
wires.
6
Owner ’s manual
Step 4:
Console, Seat, Pedals
And Main Housing Covers
Assembly
1. Insert the Computer Cable (29) and
two Hand pulse cables (26) into
the connectors in the back of the
Console (34). Install the Console (34)
onto the Upright tube at the bottom
with two M5x12mm Phillips Head
Screws (58).Then fasten the Console
(34) with the Fixing Plate (12) onto
the Upright tube on the top with two
M5x12mm Phillips Head Screws (58).
2. Install the Front Foot Cover ((40)) and
the Rear Foot Cover
ver (41) onto the
Main Frame (1) with
th four M5x12mm
Phillips Head Screws
ews (58).
3. Install the Pedals (45 L, 46R)
onto the Crank arms
ms (16L, 16R).
Remember that the
e left pedal has a
reverse thread and
d will be screwed
into the crank in the
he opposite rotation
from normal threads.
ds.
•
P L AT I N U M P R O
GB
There is an “L” stamped into the end
of the threaded post of the left pedal
and an “R” in the right. Make sure to
tighten the pedals as much as you
possibly can. It may be necessary
to re-tighten the pedals if you feel a
thumping during pedaling the bike. A
noise or feeling such as a thumping
or clicking is usually caused by the
pedals being too loose.
4. Install the Seat slide tube (7) onto the
track on top of the seat tube with the
seat post facing forward. Install the
seat (19) onto the seat post.
5. Install the Bottle Holder (116) onto
the Upright tube with two M5x12mm
Phillips Head Screws (58).
7
User interface
Jogwheel and Button settings
B
Horizontal
•
Vertical
•
D
C
•
•
•
A Back/ Stop button:
•
•
Move back to previous window
Stop the active training
B Main menu:
It will go back to main menu of quick
start if press main menu button
During training: pause if press this button
Owner ’s manual
8
•
•
•
Sport mode confirmation
Option confirmation under User/Setting
mode
Confirmation of working item on setting
screen
Setting value confirmation
Screen switching between bpm ↔ Nm or
bpm ↔ W during workout
Screen switching between bpm ↔ m or
bpm ↔ ft during T-Ride™
Screen switching between Video ↔
Profile during T-Road
Switching to next tutoring mode during
T-Trainer™
USB Port
D Jogwheel:
The user interface is equiped with
1 Usb port.
This USB port can be used for service
purpose only.
Turn functions:
Note! format should not be NTFS
•
•
•
•
P L AT I N U M P R O
C User:
Press this button to enter User/Setting
mode screen
This button is of no use during workout
Turning clockwise to shift up;
counterclockwise to shift down
Press functions:
•
•
A
Turning clockwise to choose option
rightward; counterclockwise for leftward
•
•
•
Choose workout mode in main menu
User/setting mode option selection
Choose working item on the setting
screen
Increase or decrease the setting value
Adjusting target value (high/low) during
workout
Shift up or down during T-Ride™ or
T-Road workout
Owner ’s manual
Start up screen
•
P L AT I N U M P R O
GB
Programs
When user interface startup it will show
loading screen as shown below.
Quick start
•
•
Turn the jogwheel and select
“Quick start“
Press the jogwheel to confirm and
enter the workout screen quickly
Workout screen
After a few seconds this scree will
change into Data reading in progress
screen. Shown below.
The X axis denote time in minutes
betwen 0~30. It is updated once every
15 minnutes during workout
•
After loading the aplication the user
interface will be show main menu
screen.
•
•
•
•
During workout, press the jogwheel
button to switch the Y-axis between
Nm↔ bpm.
Turning jogwheel during workout will
increase/ decrease the resistance level
in NM
The bar chart denotes torque value Nm.
Rotate the jogwheel to adjust the Nm
value.
The white dot line shows current
position, which moves rightward as
workout time increases. The workout
screen could show 5-hour data at most.
The orange curve shows the user’s
actual heart rate, which varies as the
heart rate frequency goes up and down.
trainer is now ready to start your workout
programming of just select quick start
and begin.
9
GB
End your workout
The workout end screen pops up when
Back/stop or Main menu is pressed or
when the white dot line reaches the
target value.
Workout
screen
Wo
W
ork
rkout
ou
o
ut end
end sc
en
s
creen
reen
re
en
Target heart rate
•
•
Turn the jogwheel and select
“Target HR“
Press the jogwheel to confirm and enter
the Setting screen (1)
Setting screen (1)
Continue:
Choose ”Continue” to return to workout
screen
Exit:
•
Choose “Exit” to exit to last session
screen.
•
•
Save&Exit:
•
Choose “Save&Exit” and enter a file
name at the bottom of the screen: use
the jogwheel to select A~Z or 0~9, save
all workout data and name the file for a
new workout mode.
Turn the jogwheel to adjust target heart
rate value.
(the percentage varies with bpm value)
Press the jogwheel to confirm and enter
the Setting screen (2)
Setting screen (2)
Display the workout data in Last session
screen.
Workout data screen
Owner ’s manual
•
P L AT I N U M P R O
•
•
10
•
•
•
Press the jogwheel button to return to
main menu.
Turn jogwheel to select item
Press the jogwheel button for
confirmation and continue the range
setting at the right.
Turn jogwheel to change setting ranges
Press the jogwheel button to confirm and
enter the Workout screen.
Owner ’s manual
•
P L AT I N U M P R O
GB
Workout screen
Manual
•
•
Turn the jogwheel and select
“Manual”
press the jogwheel to confirm and
enter the Setting screen (1).
Setting screen (1)
The X-axis unit is shown according to
the selection of Energy/Time/Distance in
Set screen:
Energy Unit:
kcal
Time Unit:
min
Distance Unit:
km in metric
mile in Imperial
•
•
•
•
•
•
•
•
During workout, press the jogwheel
button to switch the Y-axis between
W↔ bpm
Turning the jogwheel will increase/
decrease the Target HR level in Bpm
The bar chart denotes target heart rate
value bpm. Rotate the jogwheel to adjust
the target heart rate value.
The white dot line shows current
position, which moves rightward as
calorie /time/distance increases.
The orange curve shows the user’s
actual heart rate, which varies as the
heart rate frequency goes up and down.
The blue curve shows the actual Watt
value.
Console programming: Assist the user to
achieve the target according to its target
heart rate input during workout. When
actual heart rate is higher than target
value, the system would decrease Watt
value; while increases Watt value when
actual heart rate is below target value.
A message of “No Heart Rate” is shown
if the user’s heart rate is not detected
during workout.
To stop your workout see:
“End your workout”
•
•
•
•
Turn jogwheel to select item
Press the jogwheel button for
confirmation and continue the range
setting at the right.
Turn jogwheel to change setting ranges
Press the jogwheel button to confirm and
enter the Workout screen.
Workout screen
The X-axis unit is shown according to
the selection of Energy/Time/Distance in
Set screen.
Energy Unit:
kcal
Time Unit:
min
Distance Unit:
km in metric
mile in Imperial
•
During workout, press the jogwheel
button to switch the Y-axis between
Nm↔ bpm
11
GB
•
•
•
•
Turning jogwheel during workout will
increase/ decrease the resistance level
in NM
The bar chart denotes torque Nm value.
Rotate the jogwheel to adjust the Nm
value.
The white dot line shows current
position, which moves rightward as
calorie /time/distance increases.
The orange curve shows the user’s
actual heart rate, which varies as the
heart rate frequency goes up and down
•
•
•
•
Turn jogwheel to select item
Press the jogwheel button for
confirmation and continue the range
setting at the right.
Turn jogwheel to change setting ranges
Press the jogwheel button to confirm and
enter the Workout screen
Workout screen
To stop your workout see:
“End your workout”
Watt Constant
•
•
Turn the jogwheel and select
“Watt Constant”
press the jogwheel to confirm and enter
the Setting screen (1).
Setting screen (1)
The X-axis unit is shown according to
the selection of Energy/Time/Distance in
Set screen.
Energy Unit:
kcal
Time Unit:
min
Distance Unit:
km in metric
mile in Imperial
•
During workout, press the jogwheel
button to switch the Y-axis between
Nm↔ bpm
•
Turning jogwheel during workout will
increase/ decrease the resistace level in
Watt.
•
•
Owner ’s manual
•
P L AT I N U M P R O
•
12
•
Turn the jogwheel to adjust target Watt
value.
Press the jogwheel to confirm and enter
the Setting screen (2)
Setting screen (2)
•
•
The bar chart denotes the Watt value.
Rotate the jogwheel to adjust the
Watt value
The white dot line shows current
position, which moves rightward as
calorie /time/distance increases
The orange curve shows the user’s
actual heart rate, which varies as the
heart rate frequency goes up and
down
Console programming: Assist the
user to achieve the target according
to its target Watt value input during
workout. When actual Watt value
> target value, the system would
decrease Watt value; while increases
Watt value when actual Watt rate <
target value.
To stop your workout see:
“End your workout”
Owner ’s manual
•
P L AT I N U M P R O
GB
Workout screen
T-Ride
•
•
Turn the jogwheel and select
“T-ride”
press the jogwheel to confirm and
enter the Setting screen (1).
Setting screen (1)
The X-axis is shown as distance unit, km
in metric and mile in Imperial
•
•
•
•
Turn the jogwheel to select between:
Top and Down - Trail - Easy Ride Marathon - Short Loop
Press the jogwheel to confirm and
enter the Setting screen (2)
Setting screen (2)
•
•
•
•
During workout, press the jogwheel
button to switch the Y-axis between
m↔ bpm in metric, ft↔bpm in
imperial
The white dot line shows current
position, which moves rightward as
distance increases
The orange curve shows the user’s
actual heart rate, which varies as the
heart rate frequency goes up and
down
In the right of the screen is the gear shift
from 1~8, use the jogwheel button to
switch. (tension level related)
The white icon + 0°in the left buttom
of the screen shows the incline level
and it varies with the Profile incline
level change.
The Last Session screen shows
workout data. Press the jogwheel
button to return to Main menu
To stop your workout see:
“End your workout”
•
•
Set up the Startup point of Workout:
rotate the jogwheel button to adjust
the left white dot line, press the
jogwheel button for confirmation.
Set up the Ending point of Workout:
rotate the jogwheel button to adjust
the right white dot line, press the
jogwheel button for confirmation then
enter the Workout screen.
13
GB
Workout screen ( Watt Control )
Preset Programs
•
•
Turn the jogwheel and select
“Preset Programs”
press the jogwheel to confirm and
enter the Setting screen (1).
Setting screen (1)
The X-axis unit is shown according to
the selection of Time/Distance in Set
screen:
Time Unit:
min
Distance Unit:
km in metric
mile in Imperial
•
•
•
Turn the jogwheel to select between:
Watt control: Rolling Hills - Hill
Climb - Cross Country - Stamina Power Interval items and,
Heart Rate Control: Fatburner1 Fatburner2 - Cardio Strength Cardio Climb - Cardio Interval
Press the jogwheel to confirm and
enter the Setting screen (2)
•
Setting screen (2)
•
•
•
•
Owner ’s manual
•
P L AT I N U M P R O
•
14
•
•
•
•
Turn jogwheel to select item
Press the jogwheel button for
confirmation and continue the range
setting at the right.
Turn jogwheel to change setting
ranges
Press the jogwheel button to confirm
and enter the Workout screen
During workout, press the jogwheel
button to switch the Y-axis between
W↔ bpm
Turn jogwheel to T-scale the program
profile in %.
The bar chart denotes the default
target Watt value of the Profile.
Rotate the jogwheel to adjust the
percentage of Profile Watt value in
the right of the white dot line
The white dot line shows current
position, which moves rightward as
time/distance increases
The orange curve shows the user’s
actual heart rate, which varies as the
heart rate frequency goes up and
down
Console Programming is the same as
Watt Constant mode
Owner ’s manual
•
P L AT I N U M P R O
GB
NOTE
Workout (Heart Rate Control)
When no saved trainings are
found below window will appear.
The X-axis unit is shown according to
the selection of Time/Distance in Set
screen:
Time Unit:
min
Distance Unit:
km in metric
mile in Imperial
•
•
Setting screen (1)
•
•
•
•
•
•
During workout, press the jogwheel
button to switch the Y-axis between
W↔ bpm
Turn jogwheel to T-scale the program
profile in %.
The bar chart denotes the default
target Watt value of the Profile.
Rotate the jogwheel to adjust the
percentage of Profile Watt value in
the right of the white dot line
The white dot line shows current
position, which moves rightward as
time/distance increases
The orange curve shows the user’s
actual heart rate, which varies as the
heart rate frequency goes up and
down
The blue curve shows the actual Watt
value
Console Programming is the same as
Target HR mode
Press jogwheel to go back to main
menu
Setting Screen (1) is for user’s saved
itemsand training records.
They are shown in the right and left
screen.
• Turn jogwheel to select item
• Press the jogwheel button to confirm
and to open selection window.
Selection window
•
To stop your workout see:
“End your workout”
Own Trainings
•
•
Turn the jogwheel and select
“Preset Programs”
press the jogwheel to confirm and
enter the Setting screen (1).
•
Turn the jogwheel and select item
15
GB
•
•
•
•
•
•
•
•
Choose “Replay”
Press jogwheel button to confirm.
Enter workout screen and continue
the previous training
Choose “Edit”
Press jogwheel to confirm
Enter and edit the range setting
Press jogwheel button to confirm and
to enter workout screen
Choose “Delete”
Turn jogwheel to select item
Press the jogwheel button to confirm
and to open selection window.
Choose Yes to delete selected file,
choose no not delete selected file.
Press joghweel button to confirm.
Workout screen:
Workout screen is depending on the
trianings mode you are in.
NOTE
User interface needs the user’s data to
process Fitness test, if not any user data
availeble Fitness test cannot start up.
Below message will pop up.
•
Press jogwheel to go back to main
menu
Setting screen (1)
Nm manual mode
It’s the same as Manual mode
Watt Constant Mode
Its’ the same as Preset programs Watt
Mode
Target HR Mode
It’s the same as Preset programs Heart
Rate Mode
•
•
Turn jogwheel to select item
(Inactive / Active / Athlethic mode)
Press the jogwheel button to confirm
and to open setting screen (2)
Setting screen (2)
Fitness test
Owner ’s manual
•
P L AT I N U M P R O
•
16
•
Turn the jogwheel and select
“Fitness test”
press the jogwheel to confirm and
enter the Setting screen (1).
•
Turn jogwheel set up user’s target
heart rate within Vo2 Max value.
(the range is between 68~220bpm.)
default: 85% of Max HR and shows
user’s Max HR (bpm) and weight (kg)
Owner ’s manual
•
Press the jogwheel button to confirm
and to open information window
Information window
•
P L AT I N U M P R O
GB
”No Heart Rate detected”if:
• It doesn’t detect the user’s heart rate
Press Back/stop or Main menu button to
leave the workout screen
“Target HR reached! Stop test or
Continue”
• User has achieves the target.
• press the jogwheel button to end the
test and show workout data screen
Workout data screen
•
Press the jogwheel button to confirm
and to open Workout screen.
Workout screen
•
Press jogwheel to go to VO2 Max
test result screen
VO2 Max test result screen
•
•
•
•
•
•
The X-axis unit is min
The Y-axis unit is bpm
The bar chart denotes the Watt value
of the Profile.
The white dot line shows current
position, which moves rightward as
time increases, the workout time is 5hour at most then the workout screen
leaves
The orange curve shows the user’s
actual heart rate, which varies as the
heart rate frequency goes up and
down
The horizontal red dot line shows the
user’s target hear rate value
•
Press jogwheel to go back to main
menu
To stop your workout see:
“End your workout”
The screen shows
”Test Failed ! if:
• the workout time is too short
• RPM value is too low
• HR target is not reached
• HR is less than 110bpm
17
GB
VO2 Max test result table.
There are 3 selectable tracks availeble.
Knowing: Tuscany Sandy Road/ Tuscany
Scenrey Road/ Tuscany Country Road.
•
•
Turn the jogwheel and select your
training track
press the jogwheel to confirm and
enter the workout video screen.
Press the jogwheel during workout to
switch between Video and Profile screen
•
•
Owner ’s manual
•
P L AT I N U M P R O
•
18
T-Road
•
Turn the jogwheel and select
“T-Trainer”
press the jogwheel to confirm and
enter the Setting screen (1).
•
Setting screen (1)
The X-axis is shown as distance unit,
km in metric and mile in Imperial
The Y-axis unit is m in metric and ft in
Imperial
Press the Jogwheel during workout
to switch between Video ↔ Profile
screen
In profile screen:
• The white dot line shows current
position, which moves rightward as
workout time increases.
• The orange curve shows the user’s
actual heart rate, which varies as the
heart rate frequency goes up and
down
In video screen:
•
In the right of the screen is the gear
shift from 1~8, use the jogwheel
button to switch. (tension level
Owner ’s manual
•
•
related)
The white icon + 0°in the left buttom
of the screen shows the incline level
and it varies with the Profile incline
level change.
Press Back/stop, Main menu or the
white dot line reaches the target
value can leave the workout screen
To stop your workout see:
“End your workout”
User settings
Press “User/Settings” button to enter
the User/Settings main menu.
•
•
•
P L AT I N U M P R O
GB
User Setting
By selecting the “User Setting” you can:
• Adjust the brightness (Defalut=50%)
• Check the total mileages of the
machine.
• Check the total used time fo the
machine.
• Check the default firmware and
software version of Console
• Change language
• Select button beep sound on(yes) or
off (NO)
User setting window.
Use the jogwheel to select one of the
six availeble items.
Press the jogwheel button for
confirmation to enter the selected
item setting screen
User Log
By selecting the “User Log” you can:
view the training data of the selected
user.
You can view either the last training
session data or a summary of all the
user’s sessions.
How to modify settings
• Turn jogwheel to select changable
item.
• Press jogwheel to open selected item
in right side of the screen for edit..
• Turn jogweel to change valeu of
selected.
• Press joghweel to confirrm change.
• Turn jogwheel to select next item, or
use Back/ Stop button to go back to
setting menu.
Exit the training data by pressing
BACK/STOP.
19
GB
Owner ’s manual
•
P L AT I N U M P R O
Edit User
20
By selecting the Edit User you can:
Edit:
User name:
• Turn jogwheel and select “Name”
• Press jogwheel to open “Name”edit.
• Turn jogwheel to select letter
• Press jogwheel to confirm
• Turn jogwheel to select next letter
• When name is edit correctly than
select “√” to confirm name and go
back to Edit user Menu
Units, Display
• Turn jogwheel and select “Units”
• Press jogwheel to open “Units” edit
• Turn jogwheel to select
Metric: show units in km/kph/Kcal
Imperial: show units in mile/mph/kcal
• Press jogwheel to confirm and go
back to Edit user Menu
Display
• Turn jogwheel and select “Display”
• Press jogwheel to open “Display” edit
• Turn jogwheel to select
Count up: preset time/ distance will
be counting up
Count Down: preset time/ distance
will be counting down.
• Press jogwheel to confirm and go
back to Edit user Menu
Gender
• Turn jogwheel and select “Gender”
• Press jogwheel to open “Gender” edit
• Turn jogwheel to select Male/ Female
• Press jogwheel to confirm and go
back to Edit user Menu
Age
• Turn jogwheel and select “Age”
• Press jogwheel to open “Age” edit
• Turn jogwheel to change age
• Press jogwheel to confirm and go
back to Edit user Menu
Heigth
• Turn jogwheel and select “Heigth”
• Press jogwheel to open “Heigth” edit
• Turn jogwheel to change Heigth
In cm when units in Metric
In ft/inch when units in Imperial.
• Press jogwheel to confirm and go
back to Edit user Menu
Weight
• Turn jogwheel and select “Weight”
• Press jogwheel to open “Weight” edit
• Turn jogwheel to change Weight
In kg when units in Metric
In lb when units in Imperial.
• Press jogwheel to confirm and go
back to Edit user Menu
Max HR
• Turn jogwheel and select “Max HR”
• Press jogwheel to open “Max HR”
edit
• Turn jogwheel to change default max
HR preset as:
when selected Male
: 220-age
when selected female : 226-age
• Press jogwheel to confirm and go
back to Edit user Menu
Delete User
By selecting the “Delete User” you can:
Delete a user and all its data.
• Turn jogwheel and select the user
you want to delete
• Press jogwheel to delete the selected
user and go back to setting menu.
User will be deleted without futher
prompting
Owner ’s manual
Change User
By selecting the “Change User” you can:
Select an other pre set user profile.
• Turn jogwheel and select the user
you want to activate
• Press jogwheel to confirm the
selected user and go back to setting
menu.
• Selected user is shown in upper right
corner of window.
•
P L AT I N U M P R O
GB
rate (MHR) for someone of your age. To
determine the effective heart rate range
for specific goals you simply calculate
a percentage your MHR. Your Heart
rate training zone is 50% to 90% of your
maximum heart rate. 60% of your MHR
is the zone that burns fat while 70% is
for strengthening the cardio vascular
system. This 60% to 70% is the zone to
stay in for maximum benefit.
Create User
By selecting the “Create User” you can
set up a new user profile. Maximum of 8
users can be installed.
See Edit user on how to create user.
For someone who is 40 years old their
target heart rate zone is calculated:
Heart Rate Training
A word about Heart Rate:
The old motto, “no pain, no gain”, is a
myth that has been overpowered by the
benefits of exercising
comfortably. A great deal of this success
has been
promoted by the use of heart rate
monitors. With the proper use of a heart
rate monitor, many people find that their
usual choice of exercise intensity was
either too high or too low and exercise is
much more enjoyable by
maintaining their heart rate in the desired
benefit range.
To determine the benefit range in
which you wish to train, you must first
determine your Maximum Heart Rate.
This can be accomplished by using the
following formula: 220 minus your age.
This will give you the Maximum heart
220 – 40 = 180 (maximum heart rate)
180 x .6 = 108 beats per minute (60% of
maximum)
180 X .7 = 126 beats per minute (70% of
maximum)
So for a 40 year old the training zone
would be 108 to 126 beats per minute.
How to wear your wireless chest
strap transmitter:
•
•
•
Attach the transmitter to the elastic
strap using the locking parts.
Adjust the strap as tightly as possible
as long as the strap is not too tight to
remain comfortable.
Position the transmitter with the logo
centered in the middle of your body
facing away from your chest (some
people must position the transmitter
slightly left of center). Attach the final
end of the elastic strap by inserting
21
GB
•
•
•
the round end and, using the locking
parts, secure the transmitter and
strap around your chest.
Position the transmitter immediately
below the pectoral muscles.
Sweat is the best conductor to
measure very minute heart beat
electrical signals. However, plain
water can also be used to pre-wet
the electrodes (2 black square areas
on the reverse side of the belt and
either side of transmitter). It’s also
recommended that you wear the
transmitter strap a few minutes
before your work out. Some users,
because of body chemistry, have
a more difficult time in achieving
a strong, steady signal at the
beginning. After “warming up”, this
problem lessens. As noted, wearing
clothing over the transmitter/strap
doesn’t affect performance.
Your workout must be within range distance between transmitter/receiver
- to achieve a strong steady signal.
The length of range may vary some
what but generally stay close enough
to the console to maintain good,
strong, reliable readings. Wearing
the transmitter immediately against
bare skin assures you of proper
operation. If you wish, you may wear
the transmitter over a shirt. To do so,
moisten the areas of the shirt that the
electrodes will rest upon.
Owner ’s manual
•
P L AT I N U M P R O
NOTE!
22
The transmitter is automatically activated
when it detects activity from the user’s
heart. Additionally, it automatically
deactivates when it does not receive any
activity. Although the transmitter is water
resistant, moisture can have the effect
of creating false signals, so you should
take precautions to completely dry the
transmitter after use to prolong battery
life (estimated transmitter battery life
is 2500 hours). If your chest strap has
a replaceable battery the replacement
battery is Panasonic CR2032.
Caution!
Do not use this trainer for Target Heart
Rate unless a steady, solid Actual Heart
Rate value is being displayed. High,
wild, random numbers being displayed
indicate a problem.
1. Areas to look at for interference,
which may cause erratic heart rate:
2. Microwave ovens, TVs, small appliances, etc.Fluorescent lights.
3. Some household security systems.
4. Perimeter fence for a pet.
5. Some people have problems with the
transmitter picking up a signal from
their skin. If you have problems try
wearing the transmitter upside down.
Normally the transmitter will be oriented so the logo is right side up.
6. The antenna that picks up your heart
rate is very sensitive. If there is an
outside noise source, turning the
whole machine 90 degrees may
de-tune the interference.
7. If you continue to experience problems contact your dealer.
Exercising
Working out with this device is excellent
aerobic exercise, the principle being that
the exercise should be suitably light,
but of long duration. Aerobic exercise
is based on improving the body’s
maximum oxygen upteke, which in turn
improves endurance and fitness. The
ability of the body to burn fat as a fuel is
directly dependent on its oxygen-uptake
capacity. Aerobic exercise should be
above all pleasant. You should work up a
light sweat but you should not get out of
breath during the workout.
You should exercise at least three times
a week, 30 minutes at a time, to reach
a basic fitness level Maintaining this
level requires a few exercise sessions
each week. Once the basic condition
has been reached, it is easily improved,
simply by increasing the number of
exercise sessions.
•
Troubleshooting
Owner ’s manual
You should start slowly at a low pedalling
speed and low resistance, because for
an overweight person strenuous exercise
may subject the heart and circulatory
system to excessive strain. As fitness
improves, resistance and pedalling
speed can be increased gradually.
Maintenance
The equipment requires very little
maintenance. Check, however, from
time-to-time that all screws and nuts are
tight.
•
•
After exercising, clean the equipment
with a soft, absorbent cloth.
Do not use solvents.
Never remove the equipment’s protective
casing.
The electromagnetic brake forms a
magnetic field that
may damage the mechanism of a watch,
or the magnetic identification strip on a
credit or cash card, should they come
into immediate contact with the magnets.
Never attempt to detach or remove the
electromagnetic brake!
The electromagnetic brake is based on
electromagnetic resistance; resistance
level is electronically measured and
shown as watt reading on the display.
Due to the measurement system, your
Tunturi ergometer need not be recalibrated when assembled, serviced
and used according to this Owner’s
Manual.
P L AT I N U M P R O
GB
Despite continuous quality control,
defects and malfunctions caused by
individual components may occur
in the equipment. In most cases it’s
unnecessary to take the whole device
in for repair, as it’s usually sufficient
to replace the defective part. If the
equipment does not function properly
during use, contact your Tunturi dealer
immediately. Always give the model and
serial number of your equipment. Please
state also the nature of the problem,
conditions of use and purchase date.
If you require spare parts, always
give the model, serial number of your
equipment and the spare part number
for the part you need. The spare part list
is at the back of this manual. Use only
spare parts mentioned in the spare part
list.
Moving and storage
Please follow these instructions when
carrying and moving the equipment
about, because lifting it incorrectly may
strain your back or risk other accidents:
For transportation or moving of the
device, two grown-ups are needed.
Remain standing in front of the device
on each side and take a sturdy grip at
the handles. Lift the rear of the device
so as to lift the front of the device on the
wheels. Move the device and carefully
put it down to its new place. To prevent
the equipment malfunctioning, store in
a dry place with as little temperature
variation as possible and protected from
dust.
NOTE
Transport the equipment with caution
over uneven surfaces, for example over
a step. The equipment should never be
23
GB
transported upstairs using the wheels
over the steps, instead it must be
carried. We recommend that you use a
protective base when transporting the
equipment.
Specifications
User Interface
Graphic window in training mode:
Y-axis: Watt, bpm, Nm
X-axis: km, min, kcal
Factory defaults:
Some values should be in default setting
when shown (not zero) for first time in
session.
Owner ’s manual
•
P L AT I N U M P R O
Time: .......................................30:00 min
Distance:.....................................10.0 km
Energy: .................................. 200 kcal
HR: ............... 75 % of Max HR of user
Effort: ............................................ 100 W
Units: .............................................Metric
Target display: ......................... Count Up
Speed: ........................................... kph
Gender......................................... Male
Age: ...........................................40 years
Height: ..................................... 175 cm
Weight: ....................................... 75 kg
Max HR................................. 180 bpm
24
Range:
Energy range .......... 50~2000 kcal (±50)
Time range ......... 10~180 minutes (±10)
Distance range ............ 3~100 kms (± 1)
Target HR Range .......80~220 bpm (± 1)
Target effort Range ... 20W ~ 350W (± 1)
Age ............................. 10~99 years (± 1)
Height
Metric Units ................ 110~210 cm (±1)
Imperial units ...... 3’7”~6’10” ft/inch(± 1)
Weight
Metric Units .................. 30~220 kg (± 1)
Imperial units ................. 66~330 lb(± 1)
Max HR.....................- 80~220 bpm (± 1)
Equipment
Length...........................................108cm
Width .............................................55 cm
Height .........................................136 cm
Weight ...........................................52 kg
This product meets the requirements
of the EU’s EMC Directives on
electromagnetic compatibility (89/336/
EEC) and electrical equipment designed
for use within certain voltage limits
(73/23/EEC). This product therefore
carries the CE label.
This product meets EN precision and
safety standards (Class SA, EN-957,
parts 1 and 9).
Due to our continuous policy of product
development, Tunturi reserves the right
to change specifications without notice.
Owner ’s manual
•
P L AT I N U M P R O
GB
Spare parts list
Buble
1
2
3
5
6
7
9
11
12
13
14
15
16L
16R
17
18
19
20
21
22
23
24
25
26
29
30
31
34
34~6
34~7
35
36
37
38
39
40
41
42
43
45
46
Description
Main frame
Console mast
Handle bar
Rear stabilizer
Seat slider
Sliding seat mount
Idler wheel Assy.
Crank axle
Fixing cover plate
Chain cover bracket
Drive belt
Drive pulley (Ø330)
Crank arm (LH)
Crank arm (RH)
Bearing (6004)
Bearing (6203)
Seat
Induction brake
Power control board
Magnet (speed pick-up)
Sensor w/cable (350mm)
Handgrip foam
Handgrip foam
Handpulse W/Cable Assy.
Computer cable (1900mm)
Wire brake coil harness
DC wire (250mm)
Console Assy.
Console top cover
Console bottom cover
Ø35 × 10m/m_Rubber foot
Chain cover (LH)
Chain cover (RH)
Console mast cover
Seat post cover
Front stabilizer cover
Rear stabilizer cover
Handgrip side cap (upper)
Handgrip side cap (lower)
Pedal (LH)
Pedal (RH)
Qty
1
1
1
1
1
1
1
1
1
1
1
1
1
1
2
2
1
1
1
8
1
2
2
2
1
1
1
1
1
1
4
1
1
1
1
1
1
2
2
1
1
47
49
50
51
52
53
54
55
56
58
59
62
65
66
67
69
70
71
72
73
75
76
77
79
80
82
83
85
86
93
96
97
99
100
102
103
104
105
106
106~1
106~2
107
Transportation wheel (Ø54)
Button head plug
Hex head bolt (3/8”×2”)
Hex head bolt (5/16”×58”)
Tapping screw (5×19)
Button head socket bolt
Hex head bolt (14”×3/4”)
J bolt (M8×170)
Phillips head screw (M6×15)
Phillips head screw (M5×12)
Flat head socket bolt (3/8”×2”)
Tapping screw (Ø3×20)
Tapping screw (Ø3×10)
C Ring (Ø17)
C Ring (Ø20)
Flat washer (1/4”×13×1T)
Flat washer (3/8”×19×1.5T)
Flat washer (3/8”×25×2T)
Flat washer (5/16”×18×1.5T)
Flat washer (Ø17×23.5×1T)
Hex blind nut (M5)
Split washer (Ø14”)
Nyloc nut (M8×7T)
Nyloc nut (14”×8T)
Nyloc nut (516”×6T)
Nut (38”×7T)
M10 × 1.25m/m_nut
Round disk
Quick release lever
Phillips head screw driver
Crank arm end cap
Phillips head screw (M5×12)
Curved washer
Wrench (12/14)
Flat washer (5/16×16×1.0T)
Split washer (5/16”×1.5T)
Power adaptor
Handle bar cover
Seat height Adjustment knob
Knob nut (22×M16×M22×37)
Phillips head screw (M4×5L)
Slider sleeve
2
4
4
9
2
2
8
1
3
10
4
4
4
1
2
7
4
4
9
1
6
7
1
4
4
8
2
2
1
1
2
13
1
1
2
2
1
1
1
1
2
1
25
GB
Owner ’s manual
•
P L AT I N U M P R O
114
116
117
118
120
121
122
123
132
133
135
26
Slide spacer
Drink bottle holder
Wrench (13/15)
Hex head bolt (5/16”×2-14”)
Connecting cap
Flat washer (5/16”×20×3.0T)
Sleeve
Power cord
Phillips head screw (M3×10)
Attaching plate
Isolation column
1
1
1
2
1
3
1
1
4
1
4
Owner ’s manual
•
P L AT I N U M P R O
GB
Exploded view
27
Owner ’s manual
•
P L AT I N U M P R O
Notes
28
Owner ’s manual
•
P L AT I N U M P R O
GB
Notes
29
www.tu n tu r i.com
TUNTURI FITNESS B.V.
P.O. BOX 60001
1320 AA
THE NETHERLANDS
www.tunturi.com
Version 20140509