1
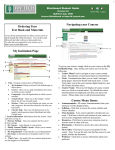
Blackboard Instructor Quick Guide
Version 8.0
Updated May, 2008
Access Blackboard at http://dl.ivytech.edu
My Institution Page
Navigating Your Course
1
5
2
4
1
7
3
2
4
3
6
1. Tabs– Navigate common areas of Blackboard.
• My Institution– brings you back to the page shown above.
• Courses– takes you to a page and displays all courses in
which you are enrolled.
• Community– Lists all organizations in which you are enrolled.
• Virtual Library– Takes you to the college’s virtual library
for all your research needs.
• Scholar– Takes you to the Scholar site where you can add,
categorize, and socialize about the web sites you find useful.
• Click for Help– Here you will find answers to frequently
asked questions about Blackboard and other College tools.
2. System information- Information about the system.
Read each time you log on.
3. Browser Settings- Test your computer for the correct
browser settings.
4. My Courses– The list of courses you are teaching or
otherwise enrolled.
5. Modify Content/ Modify Layout- Allows you to customize your My Institution Page.
6. What’s New– Shows you items that are new in your
courses. If you find that the information is the same as
before, then click the refresh button at the bottom of the
What’s New area.
7. My Organizations– Links directly to Organizations in
which you are enrolled in.
Customizing the My Institution Page
To customize the My Institution page click the Modify Content button (number 5 above) and select the modules you
want to be displayed on your page. When you’ve finished
making changes, scroll to the bottom of the page and click
Submit. Click OK on the receipt page.
To customize the layout of the My Institution Page, click the
Modify Layout button, make the changes then click submit.
To access a course, click on the course on the My Institution
Page. Once inside your course you will see the following.
1. Course Menu-Used to navigate to your course content
items.
2. Tools– Communication takes you to e-mail, messages,
group pages, discussion boards and much more. Course
Tools takes you to the users manual, digital drop box, and
My Grades and many more.
3. Control Panel– Click here to manage your course.
Note: This is the most important button for an Instructor.
4. Course Frame– This area will display all course content
once you click on a menu button. By default the course
announcements are displayed each time you enter your
course. Please make sure to read all announcements.
Course Menu Items:
The following is the required set of Course Menu items for all
Ivy Tech Community College courses. Buttons should be
placed in this order.
• Announcements– All course Announcements you create
will be displayed here. Quick Tip: Tell students to click the
View All link each time they go to the course so they are
sure they see all announcements.
• Syllabus– Students click here to access the course syllabus
you have provided for them.
• Class Sessions– Your course typically is broken into sessions. Students click here to access each session of your
course.
• Resources– Students click here to access any resources
you want to share with your students.
• Discussions– Students click here to access the course discussion boards.
• My Grades– Students use this button to access their individual grades for the course.
• Professor– Students click here to access information you
provide about yourself.
Creating & Posting Course Content
To access the tools which allow you to create and
post course content, you will use either the Control
Panel or the Edit View in your course.
•
•
The Control Panel
•
•
•
The Control Panel is only accessible to Instructors & System
Administrators. The Control Panel allows you access to all
areas of your course and provides tools that allow you to
create and add content items. In this section we will review
the various ways you can add content items to your course.
You can also add content items by clicking the Edit View
link in any course content area.
To add a new content item, click the name of the content
area where you want to add that item. Content areas are
listed in the first box on the top left of the Control Panel.
Content Types
After you select a content area, you will see the Add Content
toolbar (shown above) at the top of the screen. There are
five content types which should show on this bar along with
the “Select” drop down list which allows you to select other
content types to add to your course.
• Item—An item is a single piece of information in your
course. Items can have attachments added to them.
• Folder—A folder is used to hold a collection of items
(or other content types) grouped around a common subject or time period. We recommend creating, under
Class Sessions, one folder per class session and placing
all information for that session inside the folder.
• External Link—External links are links to websites
outside of Blackboard. You will need to complete web
address for the External Link. If the link is in your
Scholar account, you can also add it using the drop
down box on the left and selecting Scholar Bookmark.
• Course Link—A course link allows you to create a direct link between one area of the course and another.
• Test— Create a Blackboard graded test or quiz using
the test button. Blackboard can handle a wide variety of
question types, many of which can be graded by the system and automatically entered in the Grade Center.
From the drop down menu you can also select from the following:
• Learning Unit—Create a “presentation” which students
view in a specific order. May include any number of
other content types like quizzes, assignments, etc.
Assignment—Assignments allow you to provide students a place to upload documents they have created
with other software programs. You can then grade these
items and return them to students with feedback.
SafeAssignment—A SafeAssignment is a special kind
of assignment which is checked against several databases to assist you in identifying work which may not be
properly referenced. See the Instructor Guide to
SafeAssign on the Click for Help tab for more information on using this tool.
Scholar Stream/Scholar Bookmark—Allows you to
add content from your Scholar account directly into
Blackboard.
Blog—Add a blog (for a student, group of students, or
yourself) to a course content area.
Wiki—Add a wiki (for a student, group of students, the
class, or yourself) to a course content area.
Creating Content
The Visual Text Box Editor (VTBE)
Blackboard uses a Visual Text Box Editor which lets you
see your content as it will appear to the user. The VTBE
allows you to add and format text using a number of common format options such as bold, italics, color, center justification, bullets and numbering, tables, and hyperlinks. A
math notation editor is also available for entering equations
and mathematical symbols. You can also add file attachments, images, movies, sounds, and flash content using the
buttons provided.
Attachments
You can also create content in other programs such as Microsoft Word or PowerPoint and add these items, either as
separate attachments or within the VTBE. It’s important to
remember that students do not all have access to the same
software products so whenever possible, save documents in
rich text format (RTF) or as PDF files. A free viewer for
PowerPoint files is available from the Click for Help tab.
Tests & Quizzes
Tests and Quizzes can be created directly in Blackboard or
offline using Respondus. For more information about Respondus or to download, go to the Click for Help tab.
Interactive Learning Games
Studymate can be used to create Interactive Learning Games
such as crossword puzzles, flashcards, multiple choice and
true/false games and jeopardy style challenge game. To
learn more about Studymate, go to the Click for Help tab.
Communicating with Students
Announcements
Announcements are displayed on the main course page.
You can create announcements from the Control Panel.
Sending an E-mail Message
Email messages are sent through Blackboard and received in
your and your student’s Ivy Tech email accounts. You and
your students can check your email through Campus
Connect or as directed on your campus.
1. On the Course Page, click the Communications button
under the Course Menu.
2. Click the Send E-mail button
3. Do One of the following:
To send an e-mail message select either All Users, All
Groups, or All Student Users.
To send an e-mail message to a specific user or groups
select Select Users or Select Groups and select the
users or groups you want to send the message to.
4. Enter a subject for the message in the Subject box.
5. Enter your message in the Message box.
6. Optional: to send an attachment, click attach file, click
browse, locate file and click Open.
7. Click the Submit button to send the message.
8. Click OK.
Sending a Message
Messages is Blackboard’s internal messaging system.
Messages sent with this system are sent and received
directly in Blackboard.
1. On the Course Page, click the Communications button
under the main Course Menu.
2. Click on Messages.
3. Click the New Message button.
4. Click the To button.
5. Select the recipient in the Select Recipient box, and
click the Add Recipient button (right arrow). Repeat
for all users you want to send a Message to.
6. Repeat steps 4 and 5 for anyone you want to CC or Bcc
on the message.
7. Enter a subject in the Subject box.
8. Enter your message in the Body box.
9. Optional: to send an attachment, click the Browse
button, locate the file and click open.
10. Click Submit button.
Reading a Message
1. On the Course Page, click the Communications button
under the main Course Menu.
2. Click on Messages.
3. Click the Inbox button.
4. Click on the subject name to open the message.
5. Optional: Click the Reply, Reply All, or Forward button.
Select recipients, enter message, and click Submit.
6. Click the OK button when you are finished reading the
message.
Note: In the inbox, you will see an envelope icon which is
closed or open. Closed means you have not viewed the
message and open means you have viewed the message.
Creating a Discussion Board Forum
Forums are used for you and students to have conversations
with one another. A new forum is generally created for each
major topic. Threads are the individual messages within
each forum.
1. On the Course page, click on the Discussions menu
item. (You can also click the Communications button
under the main Course Menu and click Discussion
Boards or click Discussion Board in the Tools area of
the Control Panel).
2. Click the Add Forum button at the top of the page.
3. Enter a name for the forum as well as the description of
the forum.
4. Set Availability options.
5. Set Forum Settings.
6. Scroll down and click Submit.
Changing Settings
To change forum settings after the forum is created, click the
Modify button to the right of the forum title.
Managing Forum Users
You can assign students different roles in a forum if you
wish to give them management responsibilities for a
particular forum. If you make no changes here, all students
have participant role by default.
Creating a Discussion Thread
1. Click the Add New Thread button.
2. Enter a subject in the Subject box.
3. Enter the thread text in the Message box.
4. Optional: To add an attachment, click Browse, locate
and select the file you want to attach, and click the Open
button.
5. Click Submit when done.
Replying to a Thread
1. Click the Reply button to reply to a thread.
2. Enter text in the Message box
3. Click Submit.
Grading a Forum
If you attached points possible to a the Forum when you
created it, you will be able to grade the forum directly in the
Discussion Forum.
1. Click the Grade Forum Button on the Main Forum
View.
2. On the Grade Forum Users screen, click the Grade
button to the right of the student you wish to grade.
3. On this screen, you can review the student’s work. To
post the grade, enter a grade in the Grade box at the top
of the screen and click Submit.
4. Click Ok at the bottom of the screen.
5. Repeat these steps for each student you wish to grade.
Pronto
Pronto is an instant messaging tool you can use to instantly
connect with students. Pronto requires separate registration.
Access Pronto from the Communication link on the course
menu.
Assessing Student Work and
Communicating about Assessment
Results
Viewing the Grade Center
The Grade Center is the central point where you can view all
work submitted by students through Blackboard. (If students
send assignments to you via email these will not be viewable
from the Grade Center, but you can still record grades in the
Grade Center and provide Feedback to students.)
The Grade Center is accessed from the Assessment area of
the Control Panel.
Using the Grade Center
To learn more about the Grade Center see the Getting Started
with the Grade Center file on the Click for Help tab.
Feedback to Students
Using the Feedback options in the Grade Center is the most
secure way to provide information to students about their
progress on individual assignments.
Grading work in the Grade Center
Any item that is in the Grade Center with an exclamation
mark needs attention from the instructor before the grade is
posted for the student. To view the assignment information,
click the arrow at the right side of the grade box and select
Grade Details. From this page you can view all information
about this assignment for the student. Now click View
Attempt to grade the student’s attempt.
Downloading Your Grade Center
It’s a good idea to download your grade center once per week
in case anything is accidentally changed or deleted at a later
date. To download your grades, click the Manage button and
then click Download Grades. A number of download
options are available so select the most appropriate methods
for your needs.
How often should assessment results be posted
Students need regular and frequent feedback on their progress
in your course. It’s important that you post grades in your
course within no more than ten days after the assignment is
completed. If you can not meet that deadline for some
reason, be sure to communicate this to students.
Assessing Wikis
For more information on assessing wiki’s see the Click for
Help tab.
Course Management Checklist
Prior to the Course Start
• Load all of your content for the semester into
Blackboard. If you are teaching a statewide course,
ensure that you have the most recent version of the
course by contacting your distance learning/
instructional technology department or following
instructions they provide to you on accessing these
courses. Do not copy statewide courses from one
semester to another. If you are teaching a nonstatewide course you may copy course content from
one semester to the next and simply edit the new
version.
• Post a welcome announcement to your students. It’s a
good idea to also send this announcement out as an
email and/or via messages to students.
• It’s a good idea to export your course once it is set up.
You can do using the Export Course option on the
Course Options section of the course panel. You will
get an email as soon as the Export is done. Once you
get this email, download a copy of this Export File to
your local computer or network drive.
• Once your course is ready, you can make it available
early to students if you’d like. This feature is available
from the Settings link of the Course Options section of
the Control Panel. If you do not make your course
available early, it will automatically become available
on the first day of the term.
Weekly During Your Course
Communicate regularly with students through
announcements, the discussion forum, email/messages,
and any other communication methods you have made
available in your course. College policy requires that
you respond to emails/messages from students within
48 hours excluding weekends.
• Update grades and provide feedback to students on
their progress in the course.
• Download a copy of your grade center each week and
maintain on your local hard drive or secure network
drive.
•
As Needed During Your Course
• Add any additional clarifying content to the course site
to enhance and answer questions that students are
providing to you.
• Complete any College required attendance and progress
reporting. If you have questions about these processes,
contact your supervisor for more information.
At the End of Your Course
Post final grades in Web4Faculty as directed.
Provide any necessary documentation to your
supervisor as required.
• Export a copy of your course.
• Archive your course.
• Download and save the final version of your Grade
Center.
•
•
Getting Help
Tools Available to You
Your Distance Education/Instructional Technology
Department
The Distance Education/Instructional Technology
departments on each campus run a variety of training
sessions during the year. These training sessions are a great
way to learn new skills on the College’s various
instructional technology tools.
The College has a number of tools available for your use in
using technology in instruction. More information about
these tools is available from the Click for Help tab in
Blackboard. New tools are added regularly so please check
back for the most updated copy of this document as well as
access to additional tools and information on the tools.
• Respondus—used to create tests, quizzes, and surveys
offline. Can also be used to create printed tests. In
addition, Respondus files can be used with Studymate.
• Studymate—used to create interactive learning objects
such as flash cards, crossword puzzles, challenge
games, etc. These files can be posted not only to
Blackboard but also to web pages and other sites.
• Respondus LockDown Browser—this tool is available
to lock down a student’s computer while they are
taking an exam requiring lockdown browser. You can
set this requirement directly in the Test creation canvas
in Blackboard, Students can download LockDown
Browser from the Click for Help tab or the Hot Links
area on the My Institution page.
• Pronto—Pronto is the College’s instant messaging
software. Pronto allows for individual communication
as well as small group chats and voice conversations if
both users have microphones available on their
computers.
• Teams LX—This is the Wiki tool that can be accessed
from within Blackboard.
• Journals LX—This is the Blog tool that can be
accessed from within Blackboard.
• SafeAssign—SafeAssign is the College’s plagiarism
detection software which can be used with an
assignment in your course.
• Scholar—Scholar is a social bookmarking service that
you can access from within Blackboard and from
within your course to add new bookmarks and Scholar
streams.
• Virtual Library—The College’s Virtual Library has
research tools available to meet many of the needs for
your courses.
• Media Server—You can create and deliver podcasts
right from Ivy Tech’s own Media Server. The Media
Server is available through Campus Connect.
Click for Help tab
The Click for Help tab is a great place to check for answers
to frequently asked questions, manuals and quick start
guides related to the various products and tools available,
as well as downloads for software that is available to
College employees.
Using the Online Manuals
If a student has questions on how to use any feature in
Blackboard, you can take a look at the Manual located in
your course.
1. In the Course page, click the Tools button under the
Main Course Menu.
2. Click the User Manual button.
3. Click a Book Icon in the Contents area to expand a
topic and view all its subjects.
4. To search for Help information, enter the text you want
to search for in the Search box and press Enter on
your keyboard.
5. Click on a topic to view Help text for the topic.
6. When you finished, click the red X at the top right of
your screen to close the manual window.
A separate manual is available for Faculty from the Control
Panel. To access this manual, click Manual from the
Control Panel.
If your question isn't accessed in one of these areas, submit
a helpdesk ticket. This can be done online 24 hours a day at
the web site below or you can call to get assistance during
the hours listed here.
Helpdesk Information for Ivy Tech
Helpdesk hours (Indianapolis time)
Tuesday-Thursday 7a.m.-10 p.m.
Friday 7 a.m.-12a.m.
Saturday-Monday 24 Hour availability
Helpdesk requests received after hours will be processed
the next business day.
Contact the Helpdesk
Toll Free Telephone: 1-877-IVY-TECH (1-877-489-8324)
Email:[email protected]
Online helpdesk request form
https://helpdesk.ivytech.edu/createissue.php
Coming Soon
Media Server—Add video objects to your course right
from the Media Server. This will be available in late
Summer 2008.
• Waypoint– Build customizable rubrics and assess
student work directly in these rubrics. This tool is
coming Fall 2008.
•
Watch the Click for Help Tab for the Center for
Instructional Technology’s schedule of Webinars and other
training activities!