Download User Manual - FTP Directory Listing
Transcript
Business Central Wireless Manager Application User Manual September 2015 202-11548-02 350 East Plumeria Drive San Jose, CA 95134 USA Business Central Wireless Manager Application Support Thank you for purchasing this NETGEAR product. You can visit www.netgear.com/support to register your product, get help, access the latest downloads and user manuals, and join our community. We recommend that you use only official NETGEAR support resources. Trademarks © NETGEAR, Inc., NETGEAR and the NETGEAR Logo are trademarks of NETGEAR, Inc. Any non-NETGEAR trademarks are used for reference purposes only. Revision History Publication Part Number Publish Date Comments 202-11548-02 September 2015 Documented minor feature refinements 202-11548-01 June 2015 Initial publication 2 Contents Chapter 1 Introduction to the Business Central Wireless Manager Business Central Wireless Manager Application Concepts . . . . . . . . . . . . . . . . . . 9 System Architecture Concepts . . . . . . . . . . . . . . . . . . . . . . . . . . . . . . . . . . . . . . . 9 Key Functions. . . . . . . . . . . . . . . . . . . . . . . . . . . . . . . . . . . . . . . . . . . . . . . . . . . . . . . 11 Provisioning Functions . . . . . . . . . . . . . . . . . . . . . . . . . . . . . . . . . . . . . . . . . . . . . 11 Configuring and Managing Functions . . . . . . . . . . . . . . . . . . . . . . . . . . . . . . . . 11 Monitoring Functions . . . . . . . . . . . . . . . . . . . . . . . . . . . . . . . . . . . . . . . . . . . . . . 13 Account Management Functions . . . . . . . . . . . . . . . . . . . . . . . . . . . . . . . . . . . . 13 Wizards for Ease of Configuration . . . . . . . . . . . . . . . . . . . . . . . . . . . . . . . . . . . . . 13 Application Roles . . . . . . . . . . . . . . . . . . . . . . . . . . . . . . . . . . . . . . . . . . . . . . . . . . . . 14 Plan a Location with WiFi Networks and Hotspots . . . . . . . . . . . . . . . . . . . . . . . . 15 Determine the Location Requirements . . . . . . . . . . . . . . . . . . . . . . . . . . . . . . . 15 Determine the Management VLAN . . . . . . . . . . . . . . . . . . . . . . . . . . . . . . . . . . 16 Plan the Client Authentication and Data Encryption . . . . . . . . . . . . . . . . . . . . 16 Plan the Hotspots with Free and Paid-For Access . . . . . . . . . . . . . . . . . . . . . . 17 Plan the Usage Policies. . . . . . . . . . . . . . . . . . . . . . . . . . . . . . . . . . . . . . . . . . . . . 17 Plan the User Groups for Cloud AAA Hotspots . . . . . . . . . . . . . . . . . . . . . . . . 17 Other Planning Considerations . . . . . . . . . . . . . . . . . . . . . . . . . . . . . . . . . . . . . . 18 Compatible NETGEAR Wireless Access Points . . . . . . . . . . . . . . . . . . . . . . . . . . . . 19 Definitions of Access Point Terms. . . . . . . . . . . . . . . . . . . . . . . . . . . . . . . . . . . . . . 20 Chapter 2 Get Started With Cloud Management Strategies for the Initial Configuration. . . . . . . . . . . . . . . . . . . . . . . . . . . . . . . . . . Use the Get Started Wizard to Set Up a Location and WiFi Network . . . . . . . . Set Up a Basic Location. . . . . . . . . . . . . . . . . . . . . . . . . . . . . . . . . . . . . . . . . . . . . . . Set Up a Complex Location . . . . . . . . . . . . . . . . . . . . . . . . . . . . . . . . . . . . . . . . . . . Chapter 3 23 23 29 33 Manage Locations, Buildings, and Floors Add a New Location . . . . . . . . . . . . . . . . . . . . . . . . . . . . . . . . . . . . . . . . . . . . . . . . . Copy the Configuration of One Location and Overwrite the Configuration of Another Location . . . . . . . . . . . . . . . . . . . . . . . . . . . . . . . . . Change the Basic Settings for a Location Profile . . . . . . . . . . . . . . . . . . . . . . . . . Remove a Location . . . . . . . . . . . . . . . . . . . . . . . . . . . . . . . . . . . . . . . . . . . . . . . . . . Manage Buildings and Floors for a Location . . . . . . . . . . . . . . . . . . . . . . . . . . . . . Add a Building and Floor to a Location. . . . . . . . . . . . . . . . . . . . . . . . . . . . . . . . Add a Floor to a Building . . . . . . . . . . . . . . . . . . . . . . . . . . . . . . . . . . . . . . . . . . . Add an Access Point to a Floor . . . . . . . . . . . . . . . . . . . . . . . . . . . . . . . . . . . . . . Manage the Settings for an Access Point on a Floor . . . . . . . . . . . . . . . . . . . . Change the Name and Dimensions of a Floor. . . . . . . . . . . . . . . . . . . . . . . . . . 3 41 42 44 44 45 45 46 47 49 51 Business Central Wireless Manager Application Remove a Floor from a Building . . . . . . . . . . . . . . . . . . . . . . . . . . . . . . . . . . . . . Change the Name for a Building . . . . . . . . . . . . . . . . . . . . . . . . . . . . . . . . . . . . . Remove a Building from a Location . . . . . . . . . . . . . . . . . . . . . . . . . . . . . . . . . . Manage WiFi and Global Settings for a Location . . . . . . . . . . . . . . . . . . . . . . . . . Manage the WiFi Radio or Radios for a Location . . . . . . . . . . . . . . . . . . . . . . . Manage Load Balancing for Access Points at a Location. . . . . . . . . . . . . . . . . Manage RF Assignment and Output Power for a Location. . . . . . . . . . . . . . . Assign User Groups to Buildings at a Location . . . . . . . . . . . . . . . . . . . . . . . . . Change the Password for Access Points Assigned to a Location . . . . . . . . . . Select a RADIUS Server for a Location . . . . . . . . . . . . . . . . . . . . . . . . . . . . . . . Select a MAC Access Control List for a Location . . . . . . . . . . . . . . . . . . . . . . . Manage Wireless Quality of Service for a Location. . . . . . . . . . . . . . . . . . . . . Chapter 4 Manage WiFi Networks at a Location Add a New WiFi Network to a Location . . . . . . . . . . . . . . . . . . . . . . . . . . . . . . . . . Manage the WiFi Settings for a Network. . . . . . . . . . . . . . . . . . . . . . . . . . . . . . . . Change the WiFi Network Name, Authentication, or Encryption . . . . . . . . . Change SSID Broadcast and Client Separation . . . . . . . . . . . . . . . . . . . . . . . . . Change the WiFi Network VLAN Settings . . . . . . . . . . . . . . . . . . . . . . . . . . . . . Change the WiFi Network Radio Band . . . . . . . . . . . . . . . . . . . . . . . . . . . . . . . . Change the WiFi Network into a Captive Portal by Assigning a Captive Portal Profile . . . . . . . . . . . . . . . . . . . . . . . . . . . . . . . . . . . . . . . . . . . . . . Disable or Reenable a WiFi Network at a Location . . . . . . . . . . . . . . . . . . . . . . . . Remove a WiFi Network from a Location . . . . . . . . . . . . . . . . . . . . . . . . . . . . . . . Chapter 5 67 68 68 72 74 75 76 77 78 Manage Access Points at a Location Add an Access Point and Assign It to a Building and Floor. . . . . . . . . . . . . . . . . . Add an Access Point Without Assigning It to a Location . . . . . . . . . . . . . . . . . . . Assign an Access Point to a Location . . . . . . . . . . . . . . . . . . . . . . . . . . . . . . . . . . . Manage Access Point Settings. . . . . . . . . . . . . . . . . . . . . . . . . . . . . . . . . . . . . . . . . Change the Access Point Name . . . . . . . . . . . . . . . . . . . . . . . . . . . . . . . . . . . . . Configure a Static IP Address for an Access Point . . . . . . . . . . . . . . . . . . . . . . Specify the Management VLAN Settings for an Access Point . . . . . . . . . . . . Manage the Access Point Antenna Settings . . . . . . . . . . . . . . . . . . . . . . . . . . . Configure a Static Channel for an Access Point . . . . . . . . . . . . . . . . . . . . . . . . Configure Static Output Power for an Access Point . . . . . . . . . . . . . . . . . . . . Manage the Syslog Settings for an Access Point . . . . . . . . . . . . . . . . . . . . . . . Reboot an Access Point. . . . . . . . . . . . . . . . . . . . . . . . . . . . . . . . . . . . . . . . . . . . . . . Remove an Access Point from Your Account. . . . . . . . . . . . . . . . . . . . . . . . . . . . . Add Multiple Access Points Simultaneously. . . . . . . . . . . . . . . . . . . . . . . . . . . . . . View or Change the Password for Unassigned Access Points. . . . . . . . . . . . . . . Chapter 6 51 52 53 54 54 57 58 61 62 63 64 64 80 82 84 85 85 86 88 89 90 91 92 93 93 94 99 Manage Radio On/Off Schedules and RADIUS Server Profiles Manage Radio On/Off Schedules . . . . . . . . . . . . . . . . . . . . . . . . . . . . . . . . . . . . . 102 Add a Radio On/Off Schedule. . . . . . . . . . . . . . . . . . . . . . . . . . . . . . . . . . . . . . 102 Change, Disable, or Enable a Radio On/Off Schedule . . . . . . . . . . . . . . . . . . 103 4 Business Central Wireless Manager Application Remove Radio On/Off Schedules. . . . . . . . . . . . . . . . . . . . . . . . . . . . . . . . . . . 104 Manage RADIUS Server Profiles . . . . . . . . . . . . . . . . . . . . . . . . . . . . . . . . . . . . . . 104 Add a RADIUS Server Profile with an Optional Accounting Server . . . . . . . 105 Change a RADIUS Server Profile. . . . . . . . . . . . . . . . . . . . . . . . . . . . . . . . . . . . 106 Remove a RADIUS Server Profile . . . . . . . . . . . . . . . . . . . . . . . . . . . . . . . . . . . 107 Chapter 7 Manage Captive Portal Profiles, Usage Plans, and User Access Manage Captive Portal Profiles . . . . . . . . . . . . . . . . . . . . . . . . . . . . . . . . . . . . . . . 109 Add a Basic Captive Portal Profile for Free Access or Access Through Cloud AAA . . . . . . . . . . . . . . . . . . . . . . . . . . . . . . . . . . . . . . . . . . . . . . 111 Add an Advanced Captive Portal Profile for Free Access or Access Through Cloud AAA . . . . . . . . . . . . . . . . . . . . . . . . . . . . . . . . . . . . . . . . 114 Add a Basic Captive Portal Profile for Access Through Vouchers . . . . . . . . 117 Add an Advanced Captive Portal Profile for Access Through Vouchers . . . 122 Change a Captive Portal Profile . . . . . . . . . . . . . . . . . . . . . . . . . . . . . . . . . . . . 125 Remove a Captive Portal Profile . . . . . . . . . . . . . . . . . . . . . . . . . . . . . . . . . . . . 126 Manage Usage Plans . . . . . . . . . . . . . . . . . . . . . . . . . . . . . . . . . . . . . . . . . . . . . . . . 127 Add a Usage Plan. . . . . . . . . . . . . . . . . . . . . . . . . . . . . . . . . . . . . . . . . . . . . . . . . 128 Change a Usage Plan . . . . . . . . . . . . . . . . . . . . . . . . . . . . . . . . . . . . . . . . . . . . . 129 Remove a Usage Plan . . . . . . . . . . . . . . . . . . . . . . . . . . . . . . . . . . . . . . . . . . . . . 130 Manage Hotspot User Accounts for Cloud AAA Hotspots . . . . . . . . . . . . . . . . 131 View the Hotspot User Database and Add a New Hotspot User Account . 131 Change an Existing Hotspot User Account . . . . . . . . . . . . . . . . . . . . . . . . . . . 133 Remove a Hotspot User Account . . . . . . . . . . . . . . . . . . . . . . . . . . . . . . . . . . . 134 Manage User Groups for Cloud AAA Hotspots . . . . . . . . . . . . . . . . . . . . . . . . . . 135 Add a User Group . . . . . . . . . . . . . . . . . . . . . . . . . . . . . . . . . . . . . . . . . . . . . . . . 135 Add a New Hotspot User Account to a User Group . . . . . . . . . . . . . . . . . . . . 137 Add an Existing Hotspot User Accounts to a User Group . . . . . . . . . . . . . . . 138 Change a Hotspot User Account in a User Group. . . . . . . . . . . . . . . . . . . . . . 140 Remove One or More Hotspot User Account from a User Group . . . . . . . . 141 Change the Group Name or Usage Plan for a User Group . . . . . . . . . . . . . . 142 Remove a User Group. . . . . . . . . . . . . . . . . . . . . . . . . . . . . . . . . . . . . . . . . . . . . 142 Manage MAC ACLs . . . . . . . . . . . . . . . . . . . . . . . . . . . . . . . . . . . . . . . . . . . . . . . . . 143 Set Up a MAC ACL by Adding MAC Addresses Manually . . . . . . . . . . . . . . . 143 Set Up a MAC ACL by Importing a File with MAC Addresses . . . . . . . . . . . . 145 Change a MAC ACL. . . . . . . . . . . . . . . . . . . . . . . . . . . . . . . . . . . . . . . . . . . . . . . 148 Remove a MAC ACL . . . . . . . . . . . . . . . . . . . . . . . . . . . . . . . . . . . . . . . . . . . . . . 148 Chapter 8 Manage Hotspots for Locations Hotspot Overview . . . . . . . . . . . . . . . . . . . . . . . . . . . . . . . . . . . . . . . . . . . . . . . . . . 151 Hotspot Options . . . . . . . . . . . . . . . . . . . . . . . . . . . . . . . . . . . . . . . . . . . . . . . . . 152 Roadmap for Providing and Acquiring Hotspot Access with a Voucher and for Monitoring Hotspot Usage . . . . . . . . . . . . . . . . . . . . . . . . 153 Add a Basic Hotspot for Free Access . . . . . . . . . . . . . . . . . . . . . . . . . . . . . . . . . . 154 Add an Advanced Hotspot for Free Access . . . . . . . . . . . . . . . . . . . . . . . . . . . . . 159 Add a Basic Hotspot for Access Through a Voucher. . . . . . . . . . . . . . . . . . . . . . 164 Add an Advanced Hotspot for Access Through a Voucher . . . . . . . . . . . . . . . . 172 5 Business Central Wireless Manager Application Change a Hotspot . . . . . . . . . . . . . . . . . . . . . . . . . . . . . . . . . . . . . . . . . . . . . . . . . . 178 Remove a Hotspot . . . . . . . . . . . . . . . . . . . . . . . . . . . . . . . . . . . . . . . . . . . . . . . . . . 178 Chapter 9 Manage Vouchers With a Hotspot Clerk User Account Accept an Invitation and Sign Up for and Activate a Hotspot Clerk Account. 180 Sell and Generate a Voucher . . . . . . . . . . . . . . . . . . . . . . . . . . . . . . . . . . . . . . . . . 181 View the Status of Vouchers for a Hotspot, Reprint a Voucher, or Delete Vouchers . . . . . . . . . . . . . . . . . . . . . . . . . . . . . . . . . . . . . . . . . 184 Chapter 10 Monitor Your Account, Locations, Networks, and Access Points Account Level: Monitor the Cloud for Your Account . . . . . . . . . . . . . . . . . . . . . 188 View the Summary of Statistics for Your Account. . . . . . . . . . . . . . . . . . . . . 188 View Access Point Details for Your Account . . . . . . . . . . . . . . . . . . . . . . . . . . 190 View Hotspot Usage for Your Account . . . . . . . . . . . . . . . . . . . . . . . . . . . . . . 191 Search the Hotspot Database for Your Account. . . . . . . . . . . . . . . . . . . . . . . 194 Location Level: View the Summary of Statistics for a Location . . . . . . . . . . . . 196 Location Level: Monitor the Health of a Location . . . . . . . . . . . . . . . . . . . . . . . 198 View the Health Summary for a Location . . . . . . . . . . . . . . . . . . . . . . . . . . . . 198 View Access Point Details for a Location. . . . . . . . . . . . . . . . . . . . . . . . . . . . . 199 View the Command Log for a Location . . . . . . . . . . . . . . . . . . . . . . . . . . . . . . 201 Location Level: Monitor the Usage at a Location . . . . . . . . . . . . . . . . . . . . . . . . 204 View the Usage Summary for a Location . . . . . . . . . . . . . . . . . . . . . . . . . . . . 204 View Client Details for a Location . . . . . . . . . . . . . . . . . . . . . . . . . . . . . . . . . . 206 View Hotspot Usage at a Location . . . . . . . . . . . . . . . . . . . . . . . . . . . . . . . . . . 208 Search the Hotspot Database for a Location . . . . . . . . . . . . . . . . . . . . . . . . . 211 Location Level: Monitor the Security at a Location . . . . . . . . . . . . . . . . . . . . . . 213 View the Security Summary for a Location . . . . . . . . . . . . . . . . . . . . . . . . . . 214 View the Neighbor Details for a Location and Mark Neighbor Access Points . . . . . . . . . . . . . . . . . . . . . . . . . . . . . . . . . . . . . . . . . . . . . . . . . . . . 215 WiFi Network Level: Monitor a WiFi Network. . . . . . . . . . . . . . . . . . . . . . . . . . . 217 View the Summary of Statistics for a WiFi Network . . . . . . . . . . . . . . . . . . . 217 View the Clients That Are Connected to a WiFi Network . . . . . . . . . . . . . . . 219 View Hotspot Usage for a WiFi Network. . . . . . . . . . . . . . . . . . . . . . . . . . . . . 220 Search the Hotspot Database for a WiFi Network . . . . . . . . . . . . . . . . . . . . . 223 Access Point Level: Monitor an Access Point. . . . . . . . . . . . . . . . . . . . . . . . . . . . 225 View the Summary of Statistics for an Access Point . . . . . . . . . . . . . . . . . . . 226 View the Clients That Are Connected to an Access Point . . . . . . . . . . . . . . . 228 View Details and Statistics for an Access Point . . . . . . . . . . . . . . . . . . . . . . . 230 Chapter 11 View and Manage Alarms and Events Alarm and Event Concepts and Examples . . . . . . . . . . . . . . . . . . . . . . . . . . . . . . 233 Account Level: View and Manage Alarms and Events for Your Account . . . . . 234 View and Manage Active Alarms for Your Account . . . . . . . . . . . . . . . . . . . . 234 View the Cleared Alarms for Your Account. . . . . . . . . . . . . . . . . . . . . . . . . . . 236 View the Event Log for Your Account . . . . . . . . . . . . . . . . . . . . . . . . . . . . . . . 238 6 Business Central Wireless Manager Application Location Level: View and Manage Alarms and Events for a Location . . . . . . . 240 View and Manage Active Alarms for a Location. . . . . . . . . . . . . . . . . . . . . . . 240 View the Cleared Alarms for a Location . . . . . . . . . . . . . . . . . . . . . . . . . . . . . 242 View the Event Log for a Location . . . . . . . . . . . . . . . . . . . . . . . . . . . . . . . . . . 244 WiFi Network Level: View the Event Log for a WiFi Network. . . . . . . . . . . . . . 246 Access Point Level: View and Manage Alarms and Events for an Access Point . . . . . . . . . . . . . . . . . . . . . . . . . . . . . . . . . . . . . . . . . . . . . . . . . 248 View and Manage Active Alarms for an Access Point . . . . . . . . . . . . . . . . . . 248 View the Cleared Alarms for an Access Point . . . . . . . . . . . . . . . . . . . . . . . . . 251 View the Event Log for an Access Point . . . . . . . . . . . . . . . . . . . . . . . . . . . . . 253 Chapter 12 Manage Maintenance, Firmware, Application Users, and Accounts Manage the Cloud Configuration File . . . . . . . . . . . . . . . . . . . . . . . . . . . . . . . . . . 257 Back Up the Cloud Configuration File . . . . . . . . . . . . . . . . . . . . . . . . . . . . . . . 257 Restore the Cloud Configuration File . . . . . . . . . . . . . . . . . . . . . . . . . . . . . . . . 258 Remove a Cloud Configuration Backup File . . . . . . . . . . . . . . . . . . . . . . . . . . 260 Manage the Access Point Firmware Through the Application. . . . . . . . . . . . . . 261 Schedule Firmware Upgrades for Cloud-Managed Access Points . . . . . . . . 261 Immediately Upgrade Firmware for Cloud-Managed Access Points . . . . . . 262 Automate Firmware Upgrades for Cloud-Managed Access Points . . . . . . . 264 Manage the Application Users . . . . . . . . . . . . . . . . . . . . . . . . . . . . . . . . . . . . . . . . 264 Invite Others to Become Admin, Read Only, or Hotspot Clerk Application Users . . . . . . . . . . . . . . . . . . . . . . . . . . . . . . . . . . . . . . . . . . . . . . . . 265 Accept an Invitation and Set Up a User Account . . . . . . . . . . . . . . . . . . . . . . 266 Change the Role of an Application User . . . . . . . . . . . . . . . . . . . . . . . . . . . . . 267 Change the User Profile, Password, or Time Zone for Your User Account . 267 Change the Basic Application Account Settings . . . . . . . . . . . . . . . . . . . . . . . . . 269 View Application Notifications. . . . . . . . . . . . . . . . . . . . . . . . . . . . . . . . . . . . . . . . 270 Chapter 13 Manage Application Licenses and Tokens About the Trial Period . . . . . . . . . . . . . . . . . . . . . . . . . . . . . . . . . . . . . . . . . . . . . . . 273 View the Trial Expiration Date During the Trial Period . . . . . . . . . . . . . . . . . 273 What Happens at the End of the Free Trial Period? . . . . . . . . . . . . . . . . . . . . 273 License Concepts . . . . . . . . . . . . . . . . . . . . . . . . . . . . . . . . . . . . . . . . . . . . . . . . . . . 274 Add a License to a Trial Subscription . . . . . . . . . . . . . . . . . . . . . . . . . . . . . . . . . . 275 View Licenses or Add a License to an Account with a Paid-For Subscription. 276 Appendix A Cloud-Managed Access Points View the Access Point Cloud State in the Application . . . . . . . . . . . . . . . . . . . . 279 View the Cloud Connection and Activity Status on a Cloud-Enabled Access Point . . . . . . . . . . . . . . . . . . . . . . . . . . . . . . . . . . . . . . . . . 280 Convert an Access Point from Cloud-Enabled Mode to Standalone Mode. . . . . . . . . . . . . . . . . . . . . . . . . . . . . . . . . . . . . . . . . . . . . . . . . . . 282 Appendix B Technical Specifications 7 1. Introduction to the Business Central Wireless Manager 1 This chapter provides an introduction to the NETGEAR Business Central Wireless Manager (BCWM) application. For information about preparing your access points for cloud management and subscribing to the BCWM application, see the NETGEAR Business Central Wireless Manager Quick Start Guide, which you can download from downloadcenter.netgear.com. This chapter includes the following sections: • Business Central Wireless Manager Application Concepts • Key Functions • Wizards for Ease of Configuration • Application Roles • Plan a Location with WiFi Networks and Hotspots • Compatible NETGEAR Wireless Access Points • Definitions of Access Point Terms Note: For more information about the topics covered in this manual, visit the support website at support.netgear.com. Note: This manual uses the following conventions: - WiFi and wireless are exchangeable terms. - A WiFi network provides access without a captive portal. - A hotspot is a WiFi network that provides free or paid-for access through a captive portal. Note: The BCWM application supports the desktop versions of the following browsers: - Microsoft Internet Explorer 10 or later - Mozilla Firefox 15 or later - Google Chrome 15 or later - Apple Safari 5 or later 8 Business Central Wireless Manager Application Business Central Wireless Manager Application Concepts The NETGEAR Business Central Wireless Manager (BCWM) application is a cloud management application that you can access from any computer to centrally manage cloud-enabled NETGEAR access points. Using the BCWM application, you can add, configure, and monitor WiFi networks in the cloud. The BCWM cloud management solution is intended primarily for small and medium-sized businesses and organizations, for example, retail and hospitality businesses and healthcare organizations. In this manual, the BCWM application is referred to as the application. This manual is intended primarily for cloud network administrators but also contains useful information for hotspot clerks (see Chapter 9, Manage Vouchers With a Hotspot Clerk User Account). System Architecture Concepts The application lets you manage multiple WiFi networks and NETGEAR WiFi access points (APs) over a secure connection using Secure Sockets Layer (SSL). You can add existing and new APs to the application, which is based on AP licensing. You assign both networks and access points to a location. You can set up multiple locations, each with its own networks and access points, and manage them from the application. By default, an account with a free trial subscription or paid-for subscription can support up to 4,000 access points. Service Location Concepts Service locations, in this manual referred to simply as locations, are physical addresses where WiFi networks and access points are installed. In the application, these locations are logical locations and can span multiple Layer 2 or Layer 3 network segments. When you set up a location with one or more networks and assign access points to that location, the application automatically assigns the networks to the pool of access points for that location. That is, you do not assign a network to an access point. The application assigns the network automatically to one or more access points, depending on the number of networks and the number of access points at the location. When you set up a location, the application automatically creates a default building and floor for the location. You can add multiple buildings and floors to the location. In the application, these buildings and floors are logical groupings, and, although they can, they do not need to correspond to physical locations or network segments. You assign an access point to a building or to a specific floor in a building. You can add multiple locations, for example, for branches and remote offices, which can be in different time zones. The application integrates Google Maps to display the locations. For each location, you can monitor its health, usage, and security, as well as its WiFi networks, building, floors, and access points. Introduction to the Business Central Wireless Manager 9 Business Central Wireless Manager Application The following diagram shows the location-based hierarchy of the application. NETGEAR cloud server Cloud management account Cloud Location: Coffee shop 2 Access points 3 WiFi networks: - SSID-clients - SSID-staff - SSID-corporate Location: Hotel 6 Access points 4 WiFi networks: - SSID-guests - SSID-VIPs - SSID-staff - SSID-management Location: Dental office 1 Access point 2 WiFi networks: - SSID-doctor - SSID-patients Figure 1. Locations with their access points and WiFi networks Automatic Network Provisioning Concepts With standalone access points, you add a WiFi network to an access point. With the application, the entire provisioning process is location based. You add a WiFi network to a location and you add an access point to a floor in a building at a location. By default, each location that you set up includes a default building (Building 1) and default floor (Floor 1). If you do not specify buildings and floors, all access points that you add for a location are automatically assigned to Floor 1 in Building 1. Floors can help you to organize your access points, whereas buildings can also provide some access controls in certain captive portal configurations. All networks configured at a location are automatically applied to all access points at that location. Typically, a single access point can support eight networks per radio. If an access point supports only a single radio, the application configures the networks only on that radio. Offline provisioning is possible. You can set up locations and WiFi networks while access points are offline. Then, add access points and assign them to locations, allowing the networks to go online. Introduction to the Business Central Wireless Manager 10 Business Central Wireless Manager Application Global Configuration Concepts The application lets you set up global configurations (referred to as shared settings) for radio on/off schedules, captive portal profiles, RADIUS server profiles, usage plans, user groups, hotspot users, and MAC ACLs. You can assign these to any location. Key Functions The application provides key functions such as provisioning, configuring, managing, and monitoring. Provisioning Functions Provisioning lets you add locations, WiFi networks, and APs. Typically, you add a location, set up a WiFi network, and add APs to the location. However, you can also start by adding APs, add locations and WiFi networks, and assign the APs to the locations. For configuration strategies and procedures, see Chapter 2, Get Started With Cloud Management. Configuring and Managing Functions You can configure and manage features for each location, each WiFi network, and each access point. Shared settings are features that you can set up and then assign at any location. Location Functions For each location, you can configure and manage multiple features. For detailed configuration procedures, see Chapter 3, Manage Locations, Buildings, and Floors, except where otherwise indicated in the following list. You can configure and manage the following features: • Manage buildings and floors for the location. • Add WiFi networks for the location. For detailed configuration procedures, see Chapter 4, Manage WiFi Networks at a Location. • Add access points for the location. For detailed configuration procedures, see Chapter 5, Manage Access Points at a Location. • Add hotspots with free access or paid access for the location. For detailed configuration procedures, see Chapter 8, Manage Hotspots for Locations. • Configure and manage global WiFi, access point, and security settings for the location, including the following components: - WiFi radios - Load balancing for access points by model - Radio on/off schedule - Automatic radio frequency (RF) assignment, channel allocation, and output (Tx) power Introduction to the Business Central Wireless Manager 11 Business Central Wireless Manager Application - Building access control (for hotspot users who are authenticated through cloud AAA) - Access point credentials (that is, setting a global password for accessing the web management interfaces of cloud-managed access points) - RADIUS server - MAC access control list - WiFi QoS, including WMM and WMM Powersave. WiFi Network Functions For each WiFi network that you set up at a location, you can configure and manage multiple features. For detailed configuration procedures, see Chapter 4, Manage WiFi Networks at a Location, except where otherwise indicated in the following list. You can configure and manage the following features: • Select network authentication, data encryption, and MAC ACL enforcement for the WiFi network. • Set security, including broadcast of the network name (SSID) and client separation for the WiFi network. • Specify the VLAN for the WiFi network. • Select the radio (for dual-band access points) for the WiFi network. • Enable and select a captive portal for free access, cloud AAA access, or voucher access. • Add hotspots with free access or voucher access. For detailed configuration procedures, see Chapter 8, Manage Hotspots for Locations. • Sell and generate vouchers (available only to users with a hotspot clerk user account). For detailed configuration procedures, see Chapter 9, Manage Vouchers With a Hotspot Clerk User Account. Access Point Functions For each access point that you assign to a location, you can configure and manage multiple features. For detailed configuration procedures, see Chapter 5, Manage Access Points at a Location. You can configure and manage the following features: • Manage the profile, including assignment or reassignment of the location, building, and floor for the access point. • Manage the DHCP server, static IP addresses, and VLANs for the access point. • Manage advanced settings such as the antenna assignment, static channels, static output (Tx) power, and syslog server settings for the access point. Introduction to the Business Central Wireless Manager 12 Business Central Wireless Manager Application Shared Setting Functions You can configure and manage the following features (shared settings) independently of a location and then assign them to any location. For detailed configuration procedures, see Chapter 6, Manage Radio On/Off Schedules and RADIUS Server Profiles, and Chapter 7, Manage Captive Portal Profiles, Usage Plans, and User Access. You can configure and manage the following features: • Set up radio on/off schedules. • Set up captive portal profiles. • Set up RADIUS server profiles. • Define usage plans. • Specify user groups. • Specify hotspot users. • Set up MAC ACLs. Monitoring Functions Monitoring lets you display WiFi network and access point health, WiFi network and access point usage, WiFi network location maps, alarms and alarm trends, statistics for networks, access points, traffic, clients, and neighboring access points with the option to mark access points as known and unknown. For detailed configuration procedures, see Chapter 10, Monitor Your Account, Locations, Networks, and Access Points, and Chapter 11, View and Manage Alarms and Events. Account Management Functions Account management lets you manage licenses, add and invite application users, schedule access point firmware updates or run updates immediately, and back up and restore application settings. For detailed configuration procedures, see Chapter 12, Manage Maintenance, Firmware, Application Users, and Accounts, and Chapter 13, Manage Application Licenses and Tokens. Wizards for Ease of Configuration The application provides the following wizards for ease of configuration: • Get Started wizard. Before you can configure the application, you must use the Get Started wizard to set up at least one location and WiFi network. For more information, see Use the Get Started Wizard to Set Up a Location and WiFi Network on page 23. • Location wizard. Lets you add a location and, as options, lets you add a WiFi network and an access point to the location. For more information, see Set Up a Basic Location on page 29. • WiFi network wizard. Lets you configure the network authentication and data encryption for a WiFi network, assign the WiFi network to one or more radios, and add the WiFi Introduction to the Business Central Wireless Manager 13 Business Central Wireless Manager Application network to a location. For more information, see Add a New WiFi Network to a Location on page 67. • Access Point wizard. Lets you add an access point and, as an option, lets you assign the access point to a location. For more information, see Add an Access Point and Assign It to a Building and Floor on page 80. • Wizard to add multiple access points. Lets you upload a file with access points (that is, serial numbers and names), edit and confirm the access points, and, if you run the application with a permanent license, apply licenses to the access points. For more information, see Add Multiple Access Points Simultaneously on page 94. • Captive portal wizard. Lets you add and customize a captive portal profile. For more information, see Manage Captive Portal Profiles on page 109. • Hotspot wizard. Lets you add a hotspot, set a usage plan, edit the splash page, and set access limits. For more information, see Chapter 8, Manage Hotspots for Locations. • Wizard to import MAC addresses. Lets you upload a file with MAC addresses and import the addresses into a MAC ACL. For more information, see Set Up a MAC ACL by Importing a File with MAC Addresses on page 145. Application Roles The application supports the following roles for users who can log in to the application. These users are different from WiFi users and hotspot users who can connect to a network that is part of the cloud but who cannot log in to the application. • Owner. A user who signed up for the application account and owns the account. An owner can perform any action, including setting up and removing accounts for admin users, hotspots clerks, and read-only users. • Admin. A user who can perform administration-related functions. An admin user is authorized to perform all application functions, including setting up and removing accounts for admin users, hotspots clerks, and read-only users. • Hotspot clerk. A user who can sell and print vouchers and monitor their use for hotspots. • Read only. A user who can only monitor and view BCWM functions. This manual is primarily intended for cloud network administrators (admin users) but also contains useful information for hotspot clerks (see Chapter 9, Manage Vouchers With a Hotspot Clerk User Account). Introduction to the Business Central Wireless Manager 14 Business Central Wireless Manager Application Plan a Location with WiFi Networks and Hotspots Before you set up a location with one or more large WiFi networks, plan accordingly and perform a site survey so that you can determine how many access points the location requires. Plan the types of network authentication and data encryption for WiFi access, the nature of hotspots, whether you need usage plans, and which user groups you must set up. The following sections describe planning concepts: • Determine the Location Requirements • Determine the Management VLAN • Plan the Client Authentication and Data Encryption • Plan the Hotspots with Free and Paid-For Access • Plan the Usage Policies • Plan the User Groups for Cloud AAA Hotspots • Other Planning Considerations Determine the Location Requirements For each location, before you set up the location, configure the WiFi networks, and assign the access points, determine its requirements: • Number of users that must be able to receive WiFi service over managed networks • Type of security and encryption for the managed networks • Number of users that must be able to receive WiFi service over a WiFi network or hotspot • Type of security, encryption, paid access, and free access for the WiFi network or hotspot • Number of access points required to provide seamless coverage for all WiFi networks and hotspots through all buildings and floors of the location • Number of licenses required to cover all access points at the location • 802.11 frequency bands and channels that are optimal for WiFi usage For each large location that you plan to set up, NETGEAR recommends that you perform a site survey: • To determine the current RF behavior and detect both 802.11 and non-802.11 noise, run a spectrum analysis of the channels of the site. • To determine the maximum throughput that is achievable on the client, run an access point-to-client connectivity test. • Identify potential RF obstructions and interference sources. • Determine areas where denser coverage might be required because of heavier usage. Introduction to the Business Central Wireless Manager 15 Business Central Wireless Manager Application Determine the Management VLAN To enable all access points at a location to connect over the Internet to the cloud, make sure that the management VLAN is set up correctly at the location and that all access points at the location use the same management VLAN. Plan the Client Authentication and Data Encryption A WiFi user must authenticate to the WiFi network to be able to access WiFi resources. A WiFi network can supports several types of security methods, including those methods that require a RADIUS authentication server. The encryption option that is available depends on the authentication method that you selected. The following table lists the authentication and corresponding encryption methods that you configure through the application. Table 1. Authentication and encryption options Authentication Method Type of Authentication Encryption Options Authentication Server Open System None None None WEP Open System 64-bit, 128-bit, or 152-bit WEP None None for authentication, but you must add a network key (passphrase) for encryption WEP Shared Key Network key (passphrase) 64-bit, 128-bit, or 152-bit WEP None Legacy 802.1x RADIUS None RADIUS server WPA-PSK Network key (passphrase) TKIP or TKIP+AES None WPA2-PSK Network key (passphrase) AES or TKIP+AES None WPA-PSK and WPA2-PSK Network key (passphrase) TKIP+AES None WPA with RADIUS RADIUS TKIP or TKIP+AES RADIUS server WPA2 with RADIUS RADIUS AES or TKIP+AES RADIUS server TKIP+AES RADIUS server WPA and WPA2 with RADIUS RADIUS Introduction to the Business Central Wireless Manager 16 Business Central Wireless Manager Application Plan the Hotspots with Free and Paid-For Access Plan the hotspots that you want to offer at a location. Hotspots can offer free access, paid-for access that is administered through cloud AAA, paid-for access with vouchers, and paid-for access with vouchers with additional limited free access. The application supports the following authentication and payment methods for hotspots: • Click-through. No authentication and no email address is required to click through to a free hotspot. • Click-through with email. No authentication is required but an email address is required to click through to a free hotspot. • Cloud AAA. User name and password are required to sign in to a paid-for hotspot. For each user, you must set up a hotspot user account with a user name and password in a user group. You grant that user group access to the paid-for hotspot. • Vouchers. Voucher number is required to sign in to a paid-for hotspot. In addition to paid-for access, you can also offer additional limited free access with the voucher. Note: Although a less common approach, you could also use the voucher option to generate user names and passwords for guest use in an office environment or as a lightweight alternative to RADIUS authentication and authorization. Plan the Usage Policies Determine if the location requires usage plans, which are also referred to as policy plans. A usage plan lets you combine an access time limit, hours during which access is permitted, and the maximum number of concurrently allowed connections in one plan. You can include all or a selection of these restrictions in a single usage plan and assign the plan to a captive portal, hotspot, voucher, user group, and hotspot user account. Plan the User Groups for Cloud AAA Hotspots Determine if the location requires specific user groups for hotspot users who access hotspots1 through cloud AAA authentication. If it does, you must set up one or more user groups and add hotspot user accounts to these user groups. To restrict access, you can assign these user groups to buildings at the location (each user group can be assigned to one building). You can associate usage plans with a user group, with individual hotspot user accounts, or with both. 1. You cannot directly set up a hotspot with cloud AAA authentication, but you can do so indirectly by assigning a captive portal that uses cloud AAA authentication to a WiFi network. Introduction to the Business Central Wireless Manager 17 Business Central Wireless Manager Application Other Planning Considerations The application functions with the following concepts: • A WiFi network broadcasts in an entire location, not in an individual building or on a floor only. • An access point is assigned to a floor in a building at a location but carries all WiFi networks that broadcast at that location. • All access points at a location function with the same WiFi and global settings for that location (see Manage WiFi and Global Settings for a Location on page 54). If you disable the broadcast of a WiFi network, the WiFi network stops broadcasting at the entire location. That is, you cannot stop a WiFi network from broadcasting in a particular building only or on a particular floor only. It’s either on or off for the entire location. However, you can circumvent these limitations by setting up more than one location. Consider the following example: In a single building (for example, a high-rise, multifloor tower) you want to use the application to manage the WiFi networks and hotspots through the cloud. The configuration of companies in the building varies: Some companies occupy an entire floor, some companies share a floor, and some companies occupy more than one floor. Each floor requires at least one access point and each company requires at least one WiFi network, but some floors require more access points and some companies require more WiFi networks. All companies are connected to the Internet through the same high-speed broadband WAN connection. The following three scenarios cover configuration options for the building: • For a company that occupies a single floor, you can do the following: 1. Set up one location for the company. 2. Add all access points that the company requires to the location. 3. Add all WiFi networks that the company requires to the location. You can set up a maximum of 16 WiFi networks for the location. • For a company that occupies several floors, you can do the following: 1. Set up one location for the company. 2. Add the number of floors that the company occupies to the location. 3. Add all access points that the company requires to the location. If the company is spread out over floors that are not adjacent, you must set up at least one access point per floor. 4. Add all WiFi networks that the company requires to the location. If the company is spread out over floors that are not adjacent, you must set up at least one WiFi network per floor. You can set up a maximum of 16 WiFi networks for each floor of the location. Introduction to the Business Central Wireless Manager 18 Business Central Wireless Manager Application • For companies that share a single floor, you can do the following: 1. Set up one location for the floor. 2. Add a sufficient number of access points to the location so that the WiFi requirements for all companies on the floor are covered. 3. For each company on the floor, add one or more WiFi networks to the location. You can set up a maximum of 16 WiFi networks for the location. Compatible NETGEAR Wireless Access Points Before the application can manage an access point, the access point must run the required firmware version that is cloud enabled. This release supports the following NETGEAR wireless access points running cloud-enabled firmware version 3.0.0.7 or later: • WNAP210v2 ProSAFE Wireless-N Access Point • WNAP320 ProSAFE Wireless-N Access Point • WNDAP350 ProSAFE Dual Band Wireless-N Access Point • WNDAP360 ProSAFE Dual Band Wireless-N Access Point • WNDAP660 ProSAFE Dual Band Wireless-N Access Point The following table lists the minimum required standalone firmware version that an access point must run in order for you to be able to upgrade the access point to the required cloud-enabled firmware version. \ Table 2. Software requirements for upgrade to the cloud-enabled firmware version Access Point Model Minimum Required Required Cloud-Enabled Standalone Firmware Firmware WNAP210v2 ProSAFE Wireless-N Access Point v2.1.4.8 v3.0.0.7 or later WNAP320 ProSAFE Wireless-N Access Point v2.1.6 v3.0.0.7 or later WNDAP350 ProSAFE Dual Band Wireless-N Access Point v2.1.9 v3.0.0.7 or later WNDAP360 ProSAFE Dual Band Wireless-N Access Point V2.1.12 v3.0.0.7 or later WNDAP660 ProSAFE Dual Band Wireless-N Access Point V2.0.5 v3.0.0.7 or later If your access point runs a standalone firmware version that is earlier than the minimum required standalone firmware version, you first must upgrade the access point to the minimum required standalone firmware version before you can upgrade the access point to the required cloud-enabled firmware version. Introduction to the Business Central Wireless Manager 19 Business Central Wireless Manager Application CAUTION: If you do not first upgrade to the minimum required standalone firmware version but attempt to upgrade directly to the required cloud-enabled firmware version, you might be locked out of the access point. In that situation, you must log in to the access point over an SSH connection with the user name admin and the password that is configured for the access point and issue the restore-factory-default command to reset the access point to factory default settings. If your access point runs the minimum required standalone firmware version, you must load the required cloud-enabled firmware version onto the access point. Using the web management interface of the access point, upgrade the access point to the cloud-enabled firmware version, and reset the access point to factory default settings. For more information about preparing your access points for cloud management, see the NETGEAR Business Central Wireless Manager Quick Start Guide, which you can download from downloadcenter.netgear.com. Once you perform the one-time cloud-enabled firmware upgrade for the access point, the application can centrally manage future firmware upgrades for the cloud-managed access point. Note: For more information about cloud-managed access points, see Chapter 5, Manage Access Points at a Location and Appendix A, Cloud-Managed Access Points. Definitions of Access Point Terms This manual uses the following definitions of access point (AP) terms: • Cloud-managed AP. NETGEAR AP that is installed at a location and is controlled by the application. • Unmanaged AP. An AP that is not controlled by the application. The following APs fall into this category: • - NETGEAR AP that is known - NETGEAR AP that is unknown - Third-party AP that is known - Third-party AP that is unknown - NETGEAR or third-party rogue AP Known AP. An AP that is not a cloud-managed AP and that an admin user classified as a known AP. Introduction to the Business Central Wireless Manager 20 Business Central Wireless Manager Application • Rogue AP. An illegitimate AP that is not a cloud-managed AP and that is broadcasting an SSID that is identical to the SSID of a cloud-managed AP, and that an admin user could mark as a known AP. This type of rogue AP is also referred to as an evil twin. • Unknown AP. An unknown AP that is not a cloud-managed AP, that is within the radio range of and discovered by a cloud-managed AP, and that an admin user could mark as a known AP. • Static AP. An AP that is configured with a static channel and a static output power. • Auto AP. An AP that is configured for automatic radio frequency (auto RF) assignment and automatic output power assignment. Introduction to the Business Central Wireless Manager 21 2. Get Started With Cloud Management 2 Before you can manage WiFi networks in the cloud, you must set up one or more locations, add one or more WiFi networks to each location, and add and assign access points to each location. This chapter includes the following sections: • Strategies for the Initial Configuration • Use the Get Started Wizard to Set Up a Location and WiFi Network • Set Up a Basic Location • Set Up a Complex Location Note: For information about preparing your access points and subscribing to the BCWM application, see the NETGEAR Business Central Wireless Manager Quick Start Guide, which you can download from downloadcenter.netgear.com. 22 Business Central Wireless Manager Application Strategies for the Initial Configuration The first step in setting up a location with WiFi networks is to define the location. By default, each location includes a default building (Building 1) and default floor (Floor 1). However, under one location, you can set up multiple buildings, each with multiple floors. You assign access points and WiFi networks independently of each other. Because you assign an access point to a floor in a building of a location but you assign a WiFi network to a location only (that is, not to a floor or a building), you can first set up access points and then WiFi networks, or the other way around. The application assigns WiFi networks automatically to cloud-managed access points. Use one or more of the following strategies for initial configuration of the application: • Set up a simple location. For information about setting up a simple location with a default building and floor, a WiFi network, and an access point, see the following sections: - Use the Get Started Wizard to Set Up a Location and WiFi Network on page 23. Before you can configure the application, you must use the Get Started wizard to set up at least one location and WiFi network. - Set Up a Basic Location on page 29. Use this procedure after you use the Get Started wizard and the wizard is no longer available to you. • Set up a complex location. For information about setting up a complex location with custom buildings and floors, multiple WiFi networks, and multiple access points, see Set Up a Complex Location on page 33. • Add access points in bulk. For information about adding multiple access points simultaneously (that is, in bulk), see Add Multiple Access Points Simultaneously on page 94. You can add these access points before you set up locations or after you do so. Once you set up locations, you can assign each access point to a floor in a building of a location. After you set up at least one location and add one or more WiFi networks and access points, you can configure all features that are described in this manual. Use the Get Started Wizard to Set Up a Location and WiFi Network Before you can configure the application, you must use the Get Started wizard to set up at least one location and WiFi network. Setting up an access point during the Get Started wizard process is optional because you can also do that later. If you prefer, you can add multiple access points to the application inventory before you initiate the Get Started wizard. For information about adding multiple access points to the application inventory, see Add Multiple Access Points Simultaneously on page 94. If you already set up a location and WiFi network, the Get Started wizard no longer displays. Instead, see Set Up a Basic Location on page 29. Get Started With Cloud Management 23 Business Central Wireless Manager Application To add a new location, network, and access point for the first time using the Get Started wizard: 1. Open a browser on your computer. 2. In the address bar, enter https://wireless.netgear.com. The application login page displays. 3. Enter the email address and password for your BCWM account and click the LOG IN button. Except for adding access points to the application inventory and making changes to your account, no configuration options other than initiating the Get Started wizard are available to you. You must set up a location before you can configure and monitor networks and access points. 4. Click the GET STARTED button. The Get Started page displays. This page provides information only. 5. Click the START button. 6. Specify a location name, complete the location address fields, select a time zone, and set the location-specific password for the access points that you can assign to the location. Get Started With Cloud Management 24 Business Central Wireless Manager Application Note: Entering correct address information allows the location to be displayed on Google Maps. Note: The password that you must set in this step is the password that you need when you want to access the web management interface of an individual cloud-managed access point or to access a cloud-managed access point over an SSH connection. 7. Click the NEXT button. 8. Configure the network settings: a. In the Network Name field, enter a WiFi network name (SSID). b. From the Wireless Network on menu, select the WiFi band or bands. You can select both bands to be active but such a configuration affects only dual-band access points. c. From the Network Authentication menu, select the type of authentication. If you need advanced authentication, select one of the available options from the Network Authentication menu and complete the procedure. Then, configure the advanced authentication (see Change the WiFi Network Name, Authentication, or Encryption on page 68). d. From the Data Encryption menu, select the type of encryption. e. In the Network Key field, enter a network key. You can enter up to 63 alphanumeric and special characters. 9. Click the NEXT button. Get Started With Cloud Management 25 Business Central Wireless Manager Application 10. Decide whether you want to add and assign one or more access points at this time: • Do not add an access point. If you do not want to add an access point at this time, do the following: a. Click the Skip Assignment button. b. Continue with Step 11. Note: You can always add access points at a later time (see Chapter 5, Manage Access Points at a Location). • Add and assign one or more new access points. To add and assign one or more new access points (that are not yet in the application inventory), do the following: a. In the Name field, enter a name for the access point. b. Scroll down to the Serial Number field and enter the precise serial number for the access point. Note: Without entering the correct serial number, you cannot add the access point to the network. c. Click the ASSIGN button. The access point is moved to the Assigned Access Points table. d. To add another access point, repeat Step a through Step c. • Assign one or more access points that are already in the application inventory. To assign one or more access points that are already in the application inventory, do the following: a. In the Access Points In Inventory table, select the check boxes for the access points that you want to assign, or select the check box in the table header to assign all access points. Get Started With Cloud Management 26 Business Central Wireless Manager Application b. Click the ASSIGN button. The access points are moved to the Assigned Access Points table. 11. Click the FINISH button. On the left, the LOCATIONS tree displays, highlighting the location that you just added and showing the Wireless Networks heading and Access Points heading. On the main page, the Location Profile section is expanded and displays the details of the location. 12. To verify the configuration of the WiFi network and access point (if you added any), do the following: a. In the LOCATIONS tree, click the Wireless Networks heading. The buildings that you just added display. The WiFi network that you just added displays. b. In the LOCATIONS tree, click the name of the WiFi network. On the main page, the Network Name and Authentication section expands. c. To view other details about the network, on the main page, click another section heading (for example, Security). Get Started With Cloud Management 27 Business Central Wireless Manager Application For information about how to change the network settings, see Manage the WiFi Settings for a Network on page 68. d. In the LOCATIONS tree, click the Access Points heading. Building 1 displays. The application automatically added this default building when you set up the location. e. In the LOCATIONS tree, click Building 1. Floor 1 displays. The application automatically added this default floor when you set up the location. f. In the LOCATIONS tree, click Floor 1. The access points that you just added display. g. To verify that a newly added access point is connected to the cloud, in the LOCATIONS tree, click the name of the access point. The Access Point Profile section displays information about the access point. If the access point is connected to the Internet, after you add the access point to the application, the application detects the access point, reconfigures it, and restarts it. This process takes time and the State field might display Waiting for connection for several minutes. After the process finishes, the State field displays Connected, and you can manage the access point in the cloud. Get Started With Cloud Management 28 Business Central Wireless Manager Application Note: Be aware that if the access point connects to the application for the first time, it might take between 5 and 10 minutes before the State field displays Connected. During this period, the application might need to push the latest firmware to the access point, automatically reboot the access point, push the configuration to the access point, and automatically reboot the access point again. h. To view other details about the access point, on the main page, click another section heading (for example, IP Setting). For information about how to change the access point settings, see Manage Access Point Settings on page 85. i. To verify that another newly added access point is connected to the cloud, repeat Step g and Step h. Set Up a Basic Location The following procedure describes how you can set up a basic location, add a single WiFi network, and add a single access point after the Get Started wizard is no longer available to you. To set up a basic location, add a WiFi network, and add an access point: 1. Open a browser on your computer. 2. In the address bar, enter https://wireless.netgear.com. The application login page displays. 3. Enter the email address and password for your BCWM account and click the LOG IN button. The Home page displays. 4. Select Configuration. 5. From the Choose Action menu, select Add Location. Get Started With Cloud Management 29 Business Central Wireless Manager Application 6. Specify a location name, complete the location address fields, select a time zone, and set the location-specific password for the access points that you can assign to the location. Note: Entering correct address information allows the location to be displayed on Google Maps. Note: The password that you must set in this step is the password that you need when you want to access the web management interface of an individual cloud-managed access point or to access a cloud-managed access point over an SSH connection. 7. Click the ADD THIS LOCATION button. The application confirms the addition. 8. Click the Add Wireless Network link. Get Started With Cloud Management 30 Business Central Wireless Manager Application 9. Configure the network settings: a. In the Network Name field, enter a WiFi network name (SSID). b. From the Wireless Network on menu, select the WiFi band or bands. For dual-band access points, you can select both bands to be active. c. From the Network Authentication menu, select the type of authentication. If you need advanced authentication, select one of the available options from the Network Authentication menu and complete the procedure. Then, configure the advanced authentication (see Change the WiFi Network Name, Authentication, or Encryption on page 68). d. From the Data Encryption menu, select the type of encryption. e. In the Network Key field, enter a network key. You can enter up to 63 alphanumeric and special characters. 10. Click the ADD THIS WIRELESS NETWORK button. The application confirms the addition. 11. Click the Add Access Point link. 12. In the Name field, enter a name for the access point. 13. In the Serial Number field, enter the precise serial number for the access point. Note: Without entering the correct serial number, you cannot add the access point to the network. 14. Click the ADD THIS ACCESS POINT button. The Location Profile page displays, showing information about the new location. 15. To verify the configuration of the new location with its new WiFi network and access point, do the following: a. In the LOCATIONS tree on the left, click the location that you just added. The Wireless Networks and Access Points headings display. b. Click the Wireless Networks heading. The WiFi network that you just added displays. c. In the LOCATIONS tree, click the name of the WiFi network. On the main page, the Network Name and Authentication section expands. Get Started With Cloud Management 31 Business Central Wireless Manager Application d. To view other details about the network, on the main page, click another section heading (for example, Security). For information about how to change the network settings, see Manage the WiFi Settings for a Network on page 68. e. In the LOCATIONS tree, click the Access Points heading. Building 1 displays. The application automatically added this default building when you set up the location. f. In the LOCATIONS tree, click Building 1. Floor 1 displays. The application automatically added this default floor when you set up the location. g. In the LOCATIONS tree, click Floor 1. The access point that you just added displays. h. In the LOCATIONS tree, click the name of the access point. On the main page, the Access Point Profile section expands. i. Verify that the access point is connected to the cloud. If the access point is connected to the Internet, after you add the access point to the application, the application detects the access point, reconfigures it, and restarts it. This process takes time and the State field might display Waiting for connection for several minutes. After the process finishes, the State field displays Connected, and you can manage the access point in the cloud. Get Started With Cloud Management 32 Business Central Wireless Manager Application Note: Be aware that if the access point connects to the application for the first time, it might take between 5 and 10 minutes before the State field displays Connected. During this period, the application might need to push the latest firmware to the access point, automatically reboot the access point, push the configuration to the access point, and automatically reboot the access point again. j. To view other details about the access point, on the main page, click another section heading (for example, IP Setting). For information about how to change the access point settings, see Manage Access Point Settings on page 85. Set Up a Complex Location The following procedure describes how you can set up a complex location with a building, multiple floors, and multiple access points and add multiple WiFi networks. (Adding access points is optional. You can also do this later.) The procedure to set up a complex location consists of the following main steps that are described in detail later in this section: 1. Set up a location. 2. Add a building to the location. 3. Add floors to the building. While you add floors, you can also add access points, or you can add access points later. 4. Add WiFi networks to the location. Tip: Before you set up a complex location, see Plan a Location with WiFi Networks and Hotspots on page 15. To set up a complex location with a building, multiple floors, and multiple access points and add multiple WiFi networks: 1. Open a browser on your computer. 2. In the address bar, enter https://wireless.netgear.com. The application login page displays. 3. Enter the email address and password for your BCWM account and click the LOG IN button. The Home page displays. 4. Select Configuration. Get Started With Cloud Management 33 Business Central Wireless Manager Application 5. From the Choose Action menu, select Add Location. 6. Specify a location name, complete the location address fields, select a time zone, and set the location-specific password for the access points that you can assign to the location. Note: Entering correct address information allows the location to be displayed on Google Maps. Note: The password that you must set in this step is the password that you need when you want to access the web management interface of an individual cloud-managed access point or to access a cloud-managed access point over an SSH connection. 7. Click the ADD THIS LOCATION button. The application confirms the addition. 8. Click the CLOSE button. The Location Profile page displays, showing information about the new location. 9. From the Choose Action menu, select Add Building. The Building wizard starts. Get Started With Cloud Management 34 Business Central Wireless Manager Application 10. Specify a building name. 11. Click the ADD THIS BUILDING button. The application confirms the addition. 12. Click the Add Floor link. 13. Specify a floor name, the floor length in feet, and the floor width in feet. 14. From the In Building menu, select the building to which you want to add the floor. If no other building exist for the location, leave the In Building menu as is. 15. Click the ADD THIS FLOOR button. The application confirms the addition. 16. Decide whether you want to add an access point at this time: • Do not add an access point. If you do not want to add an access point at this time, do the following: a. Click the Close button. b. Repeat Step 9 through Step 15 until you add all floors that you need for the building. c. Follow Step 17, skip Step 18, and continue with Step 18. Note: You can always add an access point at a later time (see Chapter 5, Manage Access Points at a Location). • Add an access point. To add an access point, do the following: a. Click the Add Access Point link. Get Started With Cloud Management 35 Business Central Wireless Manager Application b. In the Name field, enter a name for the access point. c. In the Serial Number field, enter the precise serial number for the access point. Note: Without entering the correct serial number, you cannot add the access point to the network. d. Click the ADD THIS ACCESS POINT button. The Location Profile page displays, showing information about the new location. e. Repeat Step 9 through Step 16 until you add all floors and access points that you need for the building. 17. To verify the configuration of the new location with its buildings, floors, and access points, do the following: a. In the LOCATIONS tree on the left, click the location that you just added. The Wireless Networks and Access Points headings display. Note: In this procedure, you did not yet set up any WiFi networks for the building, so none display under the Wireless Network heading. b. In the LOCATIONS tree, click the Access Points heading. The buildings that you just added display. c. In the LOCATIONS tree, click the name of a building that you added. The floors that you just added to the building display. d. In the LOCATIONS tree, click the name of a floor that you added. If you added an access point to the floor, the access point displays. e. (If you added an access point) In the LOCATIONS tree, click the name of the access point. On the main page, the Access Point Profile section expands. f. (If you added an access point) Verify that the access point is connected to the cloud. Get Started With Cloud Management 36 Business Central Wireless Manager Application If the access point is connected to the Internet, after you add the access point to the application, the application detects the access point, reconfigures it, and restarts it. This process takes time and the State field might display Waiting for connection for several minutes. After the process finishes, the State field displays Connected, and you can manage the access point in the cloud. Note: Be aware that if the access point connects to the application for the first time, it might take between 5 and 10 minutes before the State field displays Connected. During this period, the application might need to push the latest firmware to the access point, automatically reboot the access point, push the configuration to the access point, and automatically reboot the access point again. g. (If you added an access point) To view other details about the access point, on the main page, click another section heading (for example, IP Setting). For information about how to change the access point settings, see Manage Access Point Settings on page 85. h. Repeat Step d through Step g for each floor and access point that you added. 18. In the LOCATIONS tree, click the location. The Location Profile page displays. 19. From the Choose Action menu, select Add Wireless Network. Get Started With Cloud Management 37 Business Central Wireless Manager Application 20. Configure the network settings: a. In the Network Name field, enter a WiFi network name (SSID). b. From the Wireless Network on menu, select the WiFi band or bands. For dual-band access points, you can select both bands to be active. c. From the Network Authentication menu, select the type of authentication. If you need advanced authentication, select one of the available options from the Network Authentication menu and complete the procedure. Then, configure the advanced authentication (see Change the WiFi Network Name, Authentication, or Encryption on page 68). d. From the Data Encryption menu, select the type of encryption. e. In the Network Key field, enter a network key. You can enter up to 63 alphanumeric and special characters. 21. Click the ADD THIS WIRELESS NETWORK button. 22. To add more networks to the location, repeat Step 18 through Step 21. 23. To verify the configuration of the new WiFi networks, do the following: a. In the LOCATIONS tree, click the location that you just added. The Wireless Networks and Access Points headings display. b. Click the Wireless Networks heading. The WiFi network or networks that you just added display. c. In the LOCATIONS tree, click the name of a WiFi network. On the main page, the Network Name and Authentication section expands. d. To view other details about the WiFi network, on the main page, click another section heading (for example, Security). Get Started With Cloud Management 38 Business Central Wireless Manager Application For information about how to change the WiFi network settings, see Manage the WiFi Settings for a Network on page 68. e. If you are able to access the location with a WiFi device, verify that the WiFi network propagated to the location by using the WiFi device to detect the WiFi network. f. Repeat Step c through Step e for each floor and access point that you added. Note: If you must set up more than one building at the location, repeat the entire procedure for each building. Get Started With Cloud Management 39 3. Manage Locations, Buildings, and Floors 3 Locations form the key building blocks of your cloud network. You can set up new and manage existing locations, manage buildings and floors at a location, manage WiFi and global settings for a location, and manage hotspots for a location. This chapter includes the following sections: • Add a New Location • Copy the Configuration of One Location and Overwrite the Configuration of Another Location • Change the Basic Settings for a Location Profile • Remove a Location • Manage Buildings and Floors for a Location • Manage WiFi and Global Settings for a Location Note: For information about managing hotspots for locations, see Chapter 8, Manage Hotspots for Locations. 40 Business Central Wireless Manager Application Add a New Location You can add a location only, that is, one without a WiFi network, access point, and default building and floor. For information about setting up a location with those components, see Set Up a Basic Location on page 29. To add a new location: 1. Open a browser on your computer. 2. In the address bar, enter https://wireless.netgear.com. The application login page displays. 3. Enter the email address and password for your BCWM account and click the LOG IN button. The Home page displays. 4. Select Configuration. 5. From the Choose Action menu, select Add Location. 6. Specify a location name, complete the location address fields, select a time zone, and set the location-specific password for the access points that you can assign to the location. Manage Locations, Buildings, and Floors 41 Business Central Wireless Manager Application Note: Entering correct address information allows the location to be displayed on Google Maps. Note: The password that you must set in this step is the password that you need when you want to access the web management interface of an individual cloud-managed access point or to access a cloud-managed access point over an SSH connection. 7. Click the ADD THIS LOCATION button. The application confirms the addition. 8. Click the CLOSE button. The new location displays in the LOCATIONS tree on the left. Copy the Configuration of One Location and Overwrite the Configuration of Another Location For ease of configuration, you can copy an existing location, in the process select which components are included, and create or overwrite those components for an existing location. For example, if you want to set up a new location that is based on an existing location with all or part of its configuration, configure a simple location profile without WiFi networks and access points, select and copy the components of the existing location, and overwrite the simple location profile. To copy the configuration of one location and overwrite the configuration of another location: 1. Open a browser on your computer. 2. In the address bar, enter https://wireless.netgear.com. The application login page displays. 3. Enter the email address and password for your BCWM account and click the LOG IN button. The Home page displays. 4. Select Configuration. The All Locations page displays. 5. To first set up a new simple location that you then can overwrite with the configuration of an existing location, do the following: a. From the Choose Action menu, select Add Location. The Add Location page displays. b. Specify a location name, complete the location address fields, and select a time zone. Manage Locations, Buildings, and Floors 42 Business Central Wireless Manager Application c. Click the ADD THIS LOCATION button. The application confirms the addition. d. Click the CLOSE button. The new location displays in the LOCATIONS tree. 6. In the LOCATIONS tree, click the name of the source location that you want to copy. The Location Profile page displays. 7. From the Choose Action menu, select Copy Config. 8. Select the check boxes for the components of the source location that you want to copy and overwrite or create for the destination location. In addition to the location configuration, you can also copy and overwrite or create the WiFi networks for the destination location. 9. In the Destination table, select the check box for the destination location. You can select more than one check box. 10. Click the COPY CONFIG button. The source configuration overwrites the destination configuration. The Location Profile page displays the source configuration. 11. To verify the destination location, in the LOCATIONS tree, click the name of the destination location. The Location Profile page displays the destination location. Manage Locations, Buildings, and Floors 43 Business Central Wireless Manager Application Change the Basic Settings for a Location Profile You can change the basic settings (that is, the location name and address) for a location profile. You cannot change the country and time zone for an existing location profile. For information about changing other location settings, see Manage WiFi and Global Settings for a Location on page 54. To change the location name and address of a location profile: 1. Open a browser on your computer. 2. In the address bar, enter https://wireless.netgear.com. The application login page displays. 3. Enter the email address and password for your BCWM account and click the LOG IN button. The Home page displays. 4. Select Configuration. The All Locations page displays. 5. In the LOCATIONS tree on the left, click the location. The Location Profile page displays. 6. Change the location name, location address, or both. 7. Click the APPLY button. The changes are saved. Remove a Location You can remove a location with all its settings and WiFi networks from your account. To remove a location from your account: 1. Open a browser on your computer. 2. In the address bar, enter https://wireless.netgear.com. The application login page displays. 3. Enter the email address and password for your BCWM account and click the LOG IN button. The Home page displays. 4. Select Configuration. The All Locations page displays. 5. In the LOCATIONS tree on the left, click the location. The Location Profile page displays. Manage Locations, Buildings, and Floors 44 Business Central Wireless Manager Application 6. From the Choose Action menu, select Delete This Location. A confirmation pop-up window displays. 7. Click the YES button. The location is removed from your account. Manage Buildings and Floors for a Location By default, each location that you add includes a default building (Building 1) and default floor (Floor 1). However, under one location, you can set up multiple buildings, each with multiple floors. The following sections describe how you can manage buildings and floors for a location: • Add a Building and Floor to a Location • Add a Floor to a Building • Add an Access Point to a Floor • Manage the Settings for an Access Point on a Floor • Change the Name and Dimensions of a Floor • Remove a Floor from a Building • Change the Name for a Building • Remove a Building from a Location Add a Building and Floor to a Location In addition to the default building and floor, you can add multiple buildings, each with multiple floors, to a location. For information about changing and customizing the default building and floor, see the following sections: • Change the Name for a Building on page 52 • Change the Name and Dimensions of a Floor on page 51 To add a building and floor to a location: 1. Open a browser on your computer. 2. In the address bar, enter https://wireless.netgear.com. The application login page displays. 3. Enter the email address and password for your BCWM account and click the LOG IN button. The Home page displays. Manage Locations, Buildings, and Floors 45 Business Central Wireless Manager Application 4. Select Configuration. The All Locations page displays. 5. In the LOCATIONS tree on the left, click the location. The Location Profile page displays. 6. From the Choose Action menu, select Add Building. The Add Building page displays. 7. Specify a name for the building. 8. Click the ADD THIS BUILDING button. The application confirms the addition. 9. Click the Add Floor link. 10. Specify a floor name, the floor length in feet, and the floor width in feet. 11. From the In Building menu, select the building to which you want to add the floor. 12. Click the ADD THIS FLOOR button. The application confirms the addition. 13. Click the CLOSE button. The Location Profile page displays again. 14. In the LOCATION tree, click the Access Points heading that displays under the location for which you just added a building and floor. The buildings at the location display, including the building that you just added. 15. In the LOCATION tree, click the building to which you added the floor. The floors in the building display, including the floor that you just added. Add a Floor to a Building You can add multiple floors to a building. To add a floor to a building at a location: 1. Open a browser on your computer. 2. In the address bar, enter https://wireless.netgear.com. The application login page displays. Manage Locations, Buildings, and Floors 46 Business Central Wireless Manager Application 3. Enter the email address and password for your BCWM account and click the LOG IN button. The Home page displays. 4. Select Configuration. The All Locations page displays. 5. In the LOCATIONS tree on the left, click the location. The Location Profile page displays. 6. In the LOCATIONS tree, click the Access Points heading. The buildings at the location display. 7. In the LOCATIONS tree, click the name of the building to which you want to add a floor. 8. From the Choose Action menu, select Add Floor. 9. Specify a floor name, the floor length in feet, and the floor width in feet. Leave the selection from the In Building menu as is. (You already selected the building in Step 7.) 10. Click the ADD THIS FLOOR button. The application confirms the addition. 11. Click the CLOSE button. In the LOCATION tree, the floor that you just added shows under the building. Add an Access Point to a Floor The application provides various ways in which you can add an access point. One way is to add an access point to a floor directly. For other ways to add an access point, see the following sections: • Add an Access Point and Assign It to a Building and Floor on page 80 • Add an Access Point Without Assigning It to a Location on page 82 • Add Multiple Access Points Simultaneously on page 94 Manage Locations, Buildings, and Floors 47 Business Central Wireless Manager Application To add an access point to a floor: 1. Open a browser on your computer. 2. In the address bar, enter https://wireless.netgear.com. The application login page displays. 3. Enter the email address and password for your BCWM account and click the LOG IN button. The Home page displays. 4. Select Configuration. The All Locations page displays. 5. In the LOCATIONS tree on the left, click a location. The Location Profile page displays. 6. In the LOCATIONS tree, click the Access Points heading. The buildings at the location display. 7. In the LOCATIONS tree, click the building that contains the floor to which you want to add an access point. 8. From the Choose Action menu, select Add Access Point. 9. In the Name field, enter a name for the access point. 10. In the Serial Number field, enter the precise serial number for the access point. Note: Without entering the correct serial number, you cannot add the access point to the network. 11. Click the ADD THIS ACCESS POINT button. On the main page, the Access Point Profile section displays information about the new access point. Manage Locations, Buildings, and Floors 48 Business Central Wireless Manager Application If the access point is connected to the Internet, after you add the access point to the application, the application detects the access point, reconfigures it, and restarts it. This process takes time and the State field might display Waiting for connection for several minutes. After the process finishes, the State field displays Connected, and you can manage the access point in the cloud. Note: Be aware that if the access point connects to the application for the first time, it might take between 5 and 10 minutes before the State field displays Connected. During this period, the application might need to push the latest firmware to the access point, automatically reboot the access point, push the configuration to the access point, and automatically reboot the access point again. 12. To view other details about the access point, on the main page, click another section heading (for example, IP Setting). For information about how to change the access point settings, see Manage the Settings for an Access Point on a Floor on page 49. Manage the Settings for an Access Point on a Floor When you change the settings for an access point on a floor, the settings apply only to that specific access point. To manage the settings for an access point on a floor: 1. Open a browser on your computer. 2. In the address bar, enter https://wireless.netgear.com. The application login page displays. Manage Locations, Buildings, and Floors 49 Business Central Wireless Manager Application 3. Enter the email address and password for your BCWM account and click the LOG IN button. The Home page displays. 4. Select Configuration. The All Locations page displays. 5. In the LOCATIONS tree on the left, click a location. The Location Profile page displays. 6. In the LOCATIONS tree, click the Access Points heading. The buildings at the location display. 7. In the LOCATIONS tree, click the building that contains the floor with the access point. The floors at the building display. 8. In the LOCATIONS tree, click the floor that contains the access point. The access points at the floor display. 9. Click the access point. The Access Point Profile page displays. 10. To change the access point name, in the Name field, enter a new name for the access point. 11. To configure a static IP address or the VLAN settings, scroll down and click the IP Settings heading. The IP and VLAN settings display. 12. Change the IP or VLAN settings as needed. For more information, see the following sections: • Configure a Static IP Address for an Access Point on page 86 • Specify the Management VLAN Settings for an Access Point on page 88 13. To manage the antenna settings, configure a static channel, configure static output power, or manage the syslog settings, scroll down and click the Advanced heading. The advanced settings display. 14. Change the antenna, channel, output power, or syslog settings as needed. For more information, see the following sections: • Manage the Access Point Antenna Settings on page 89 • Configure a Static Channel for an Access Point on page 90 • Configure Static Output Power for an Access Point on page 91 • Manage the Syslog Settings for an Access Point on page 92 15. Click the APPLY button. The changes are saved. The new settings are pushed immediately to the cloud-managed access point. Manage Locations, Buildings, and Floors 50 Business Central Wireless Manager Application Change the Name and Dimensions of a Floor You can change the name and dimensions of a floor. Once you assign a floor to a building, you cannot change the building assignment. However, you can remove the floor, redefine it under another building, and reassign an access point to the floor. To change the name and dimensions of a floor: 1. Open a browser on your computer. 2. In the address bar, enter https://wireless.netgear.com. The application login page displays. 3. Enter the email address and password for your BCWM account and click the LOG IN button. The Home page displays. 4. Select Configuration. The All Locations page displays. 5. In the LOCATIONS tree on the left, click a location. The Location Profile page displays. 6. In the LOCATIONS tree, click the Access Points heading. The buildings at the location display. 7. In the LOCATIONS tree, click a building. The floors at the building display. 8. Click the floor. The floor fields display. 9. Change the name, dimensions, or both. 10. Click the SAVE button. The changes are saved. Remove a Floor from a Building You can remove a floor that you no longer need. If an access point is assigned to the floor, the access point is removed from the location and returned to default settings. To remove a floor from a building: 1. Open a browser on your computer. 2. In the address bar, enter https://wireless.netgear.com. The application login page displays. Manage Locations, Buildings, and Floors 51 Business Central Wireless Manager Application 3. Enter the email address and password for your BCWM account and click the LOG IN button. The Home page displays. 4. Select Configuration. The All Locations page displays. 5. In the LOCATIONS tree on the left, click a location. The Location Profile page displays. 6. In the LOCATIONS tree, click the Access Points heading. The buildings at the location display. 7. In the LOCATIONS tree, click a building. The floors at the building display. 8. Click the floor. The floor fields display. 9. From the Choose Action menu, select Delete This Floor. A confirmation pop-up window displays. 10. Click the YES button. The floor is removed from the building. Change the Name for a Building You can change the name for a building. To change the name for a building: 1. Open a browser on your computer. 2. In the address bar, enter https://wireless.netgear.com. The application login page displays. 3. Enter the email address and password for your BCWM account and click the LOG IN button. The Home page displays. 4. Select Configuration. The All Locations page displays. 5. In the LOCATIONS tree on the left, click a location. The Location Profile page displays. 6. In the LOCATIONS tree, click the Access Points heading. The buildings at the location display. Manage Locations, Buildings, and Floors 52 Business Central Wireless Manager Application 7. Click the building. The Building Name field displays. Change the name. 8. Click the SAVE button. The changes are saved. Remove a Building from a Location You can remove a floor that you no longer need. WARNING: If access points are assigned to a floor that you remove, the access points are removed from the location and returned to their default settings. To remove a floor from a building: 1. Open a browser on your computer. 2. In the address bar, enter https://wireless.netgear.com. The application login page displays. 3. Enter the email address and password for your BCWM account and click the LOG IN button. The Home page displays. 4. Select Configuration. The All Locations page displays. 5. In the LOCATIONS tree on the left, click a location. The Location Profile page displays. 6. In the LOCATIONS tree, click the Access Points heading. The buildings at the location display. 7. Click the building. The Building Name field displays. 8. From the Choose Action menu, select Delete This Building. A confirmation pop-up window displays. 9. Click the YES button. The building is removed from the location. Manage Locations, Buildings, and Floors 53 Business Central Wireless Manager Application Manage WiFi and Global Settings for a Location The WiFi settings and global settings for a location apply to all networks and access points that you configure for that location. The following sections describe the WiFi and global settings for a location: • Manage the WiFi Radio or Radios for a Location • Manage Load Balancing for Access Points at a Location • Manage RF Assignment and Output Power for a Location • Assign User Groups to Buildings at a Location • Change the Password for Access Points Assigned to a Location • Select a RADIUS Server for a Location • Select a MAC Access Control List for a Location • Manage Wireless Quality of Service for a Location Manage the WiFi Radio or Radios for a Location All networks configured at a location are automatically applied to all access point at that location and therefore to all available radios at that location. Typically, a single access point can support eight networks per radio. If an access point supports only a single radio, the application configures the networks only on that radio. Note: You cannot disable or enable the radio for an individual WiFi network, access point, building, or floor. You can disable or enable the radio only for an entire location. Note: If a radio is in the Always OFF state or not scheduled, automatic radio frequency (auto RF) assignment does not function. For auto RF assignment to function, a radio must be either in the Always ON state or scheduled. If a radio is scheduled but off according to the schedule, auto RF assignment does run because it turns the radio on at the start of the process and turns the radio off at the completion of the process. To manage the WiFi radio or radios for a location: 1. Open a browser on your computer. 2. In the address bar, enter https://wireless.netgear.com. The application login page displays. Manage Locations, Buildings, and Floors 54 Business Central Wireless Manager Application 3. Enter the email address and password for your BCWM account and click the LOG IN button. The Home page displays. 4. Select Configuration. The All Locations page displays. 5. In the LOCATIONS tree on the left, click the location. The Location Profile page displays. 6. On the main page, click the Wireless Radio heading. The previous figure show both radios scheduled. By default, the radio or radios are in the Always ON state and the Schedule Profile menu does not display. 7. Configure the 2.4 GHz and 5 GHz settings as described in the following table. Setting Description Radio On/Off Setting 2.4GHz Radio Make a selection from the menu: • Always ON. The 2.4 GHz radio is always on. This is the default setting. • Always OFF. The 2.4 GHz radio is always off. • Scheduled. Both the 2.4 GHz radio and the 5 GHz radio turn on and off according to a schedule. The Schedule Profile menu becomes available, allowing you to select a schedule. The schedule that you select applies to both radios. 5GHz Radio Make a selection from the menu: • Always ON. The 5 GHz radio is always on. This is the default setting. • Always OFF. The 5 GHz radio is always off. • Scheduled. Both the 5 GHz radio and the 2.4 GHz radio turn on and off according to a schedule. The Schedule Profile menu becomes available, allowing you to select a schedule. The schedule that you select applies to both radios. Manage Locations, Buildings, and Floors 55 Business Central Wireless Manager Application Setting Description Schedule Profile If the selection from the 2.4GHz Radio or 5GHz Radio menu is Scheduled, select a radio schedule from the Schedule Profile menu. The schedule that you select applies to both radios. For information about setting up a schedule, see Manage Radio On/Off Schedules on page 102. 2.4GHz configuration Wireless Mode By default, the highest supported wireless mode is selected for the 2.4 GHz radio (11ng). You can select one of the following wireless modes: • 11b. Both 802.11n and 802.11g devices can connect to the access point because they are backward compatible, but they function at limited speed. • 11bg. 802.11n devices can connect to the access point because they are backward compatible, but they function at limited speed. 802.11g devices function at limited speed if 802.11a devices are also connected. • 11ng. This is the default setting. 802.11b devices cannot connect to the access point. 802.11n devices function at limited speed if 802.11g devices are also connected. A wider channel improves the performance but some legacy devices can operate only in either 20 MHz or 40 MHz. Note: Does not apply to the The default channel width setting for the 2.4 GHz radio is 20MHz. 11b and 11bg wireless To specify another channel width, select an option from the menu. modes. Channel Width 5GHz configuration Wireless Mode By default, the highest supported wireless mode is selected for the 5 GHz radio (11na). You can select one of the following wireless modes: • 11a. 802.11n devices can connect to the access point because they are backward compatible, but they function at limited speed. • 11na. This is the default setting. 802.11n devices function at limited speed if 11a devices are also connected. Channel Width A wider channel improves the performance but some legacy devices can operate only in either 20 MHz or 40 MHz. Note: Does not apply to the The default channel width setting for the 5 GHz radio is Dynamic 20/40MHz. 11a wireless mode. To specify another channel width, select an option from the menu. Manage Locations, Buildings, and Floors 56 Business Central Wireless Manager Application Setting Description Advanced Features Note: To display the advanced features for either the 2.4 GHz radio or 5 GHz radio, click the Show Advanced Features link. Beacon Interval A beacon transmission allows wireless devices to synchronize with the access point. The beacon interval determines how often synchronization occurs. By default, the beacon interval is 100 ms. To select another beacon interval, enter a number from 100 to 1000 ms in the field. DTIM interval The delivery traffic indication message (DTIM) interval, also referred to as the data beacon rate, indicates the beacon DTIM period in multiples of beacon intervals. By default, the DTIM interval is 3. To select another DTIM interval, enter a number from 1 to 255 in the field. 8. Click the APPLY button. The changes are saved. The new settings are pushed immediately to the cloud-managed access points for the location. If a cloud-managed access point for the location is not connected, the new settings are pushed when the access point reconnects to the application. Manage Load Balancing for Access Points at a Location All networks configured at a location are automatically applied to all access points at that location and therefore to all available radios at that location. Typically, a single access point can support eight networks per radio. If an access point supports only a single radio, the application configures the networks only on that radio. By default, each access point supports the maximum number of clients that it is capable of. When you balance the client load over different types of access points at a location, take considerations such as the following into account: • The total number of access points at the location • The types of access points at the location • The buildings and floors on which the access points are installed • The number of expected clients at each building and floor • The number of expected clients for each access point To manage load balancing for access points at a location: 1. Open a browser on your computer. 2. In the address bar, enter https://wireless.netgear.com. The application login page displays. 3. Enter the email address and password for your BCWM account and click the LOG IN button. The Home page displays. Manage Locations, Buildings, and Floors 57 Business Central Wireless Manager Application 4. Select Configuration. The All Locations page displays. 5. In the LOCATIONS tree on the left, click the location. The Location Profile page displays. 6. Click the Load Balancing heading. By default, for each supported type of access point and the band or bands that it supports, the maximum number of supported clients is allowed. 7. To change the number of allowed clients for the access points that are assigned to the location, enter other values in the fields. Note: Ignore the types of access points that are not in use at the location. 8. Click the APPLY button. The changes are saved. The new settings are pushed immediately to the cloud-managed access points for the location. If a cloud-managed access point for the location is not connected, the new settings are pushed when the access point reconnects to the application. Manage RF Assignment and Output Power for a Location For all cloud-managed access points at a location, you can schedule automatic radio frequency (auto RF) assignment, run RF assignment manually, and select which channels participate in RF assignment. The capability to select channels for RF assignment at the location level affects only which channels participate in RF assignment, whether RF assignment runs automatically or you run RF assignment manually. However, on an individual cloud-managed access point, you can configure a static channel (see Configure a Static Channel for an Access Point on page 90). For all cloud-managed access points at a location, you can also schedule automatic output (Tx) power adjustment for each radio band, run Tx power level adjustment manually, and set the maximum power level for Tx power adjustment. Manage Locations, Buildings, and Floors 58 Business Central Wireless Manager Application The capability to select the maximum power level at the location level affects only the Tx power adjustment. However, for an individual cloud-managed access point, you can configure static output power (see Configure Static Output Power for an Access Point on page 91). The static channel and static output power that you configure on an individual cloud-managed access point override the RF assignment and automatic Tx power adjustment from the location setting. By default, auto RF assignment and automatic Tx power adjustment are enabled and run every day at 12:00 a.m. Note: If a radio is in the Always OFF state or not scheduled, automatic radio frequency (auto RF) assignment does not function. For auto RF assignment to function, a radio must be either in the Always ON state or scheduled. If a radio is scheduled but off according to the schedule, auto RF assignment does run because it turns the radio on at the start of the process and turns the radio off at the completion of the process. To manage RF assignment and output power for a location: 1. Open a browser on your computer. 2. In the address bar, enter https://wireless.netgear.com. The application login page displays. 3. Enter the email address and password for your BCWM account and click the LOG IN button. The Home page displays. 4. Select Configuration. The All Locations page displays. 5. In the LOCATIONS tree on the left, click the location. The Location Profile page displays. 6. On the main page, click the Auto RF heading. Manage Locations, Buildings, and Floors 59 Business Central Wireless Manager Application 7. To run the auto RF assignment and automatic Tx power adjustment immediately for both WiFi bands, do the following: a. Make sure that both Auto Channel On radio buttons are selected and that the 2.4 GHz Auto Tx Power On and 5 GHz Auto Tx Power On radio buttons are selected. b. Click the RUN NOW button. 8. To reschedule auto RF assignment and automatic Tx power adjustment, do the following: a. In the Schedule Channel and/or Power section, from the menu, select the time at which the auto RF assignment and automatic Tx power adjustment must run. By default, these processes run every day at 12:00 a.m. b. If you do not want to run these processes every day, clear the check boxes for the days on which you do not want these processes to run. 9. To select which channels can participate in RF assignment, do the following for the 2.4 GHz band, 5 GHz band, or both bands: a. Click the Valid Corporate Channels link. The page adjusts and displays the enabled channels. The page displays only channels that are legally allowed in the country that is configured for the location. b. To enable channels to participate in RF assignment, select the associated check boxes, or select the All check box to enable all channels to participate. c. To prevent channels from participating in RF assignment, clear the associated check boxes. 10. To disable auto RF assignment entirely, in the Channel Allocation section for the 2.4 GHz band, 5 GHz band, or both bands, click the Auto Channel Off radio button. Manage Locations, Buildings, and Floors 60 Business Central Wireless Manager Application 11. To configure the default output power manually, in the Tx power settings section, move the 2.4 GHz Default TX Power slider, 5 GHz Default TX Power slider, or both sliders to the desired output power level. You can set the Tx power level to 1 (full power, which is the default setting), 1/2, 1/4, 1/8, or 0 (which effectively shuts down Tx power on a radio band). 12. To disable automatic Tx power adjustment entirely, in the Tx power settings section, select the 2.4 GHz Auto Tx Power Off radio button, 5 GHz Auto Tx Power Off radio button, or both radio buttons. 13. Click the APPLY button. The changes are saved. The new settings are pushed immediately to the cloud-managed access points for the location. If a cloud-managed access point for the location is not connected, the new settings are pushed when the access point reconnects to the application. Assign User Groups to Buildings at a Location For a hotspot that uses cloud AAA authorization1, you can assign user groups to buildings at a location so that you can specify which user groups are allowed WiFi access in a building and which users are denied WiFi access in a building. This feature is useful only if a location includes multiple buildings and you set up user groups (see Add a User Group on page 135). To assign a user group for hotspot users to a building at a location: 1. Open a browser on your computer. 2. In the address bar, enter https://wireless.netgear.com. The application login page displays. 3. Enter the email address and password for your BCWM account and click the LOG IN button. The Home page displays. 4. Select Configuration. The All Locations page displays. 5. In the LOCATIONS tree on the left, click the location. The Location Profile page displays. 6. On the main page, click the Building Access Controls heading. The Building Access Controls section displays. By default, the Disable radio button is selected. 7. Select the Enable radio button. 1. You cannot directly set up a hotspot with cloud AAA authentication, but you can do so indirectly by assigning a captive portal that uses cloud AAA authentication to a WiFi network. Manage Locations, Buildings, and Floors 61 Business Central Wireless Manager Application 8. In the Building column, select a building. If you did not yet specify the building controls, all existing user groups display in the Allow column. 9. To deny WiFi access to a user group in the building, select the user group and click the right arrow. The user group displays in the Deny column. 10. To allow WiFi access to a user group in the building, select the user group and click the left arrow. The user group displays in the Allow column. 11. To configure user groups for another building at the same location, repeat Step 8 through Step 10. 12. Click the APPLY button. The changes are saved. Change the Password for Access Points Assigned to a Location You can change the password for the access points that are assigned to the same location. This is the password that you need when you want to access the web management interface of an individual cloud-managed access point or to access a cloud-managed access point over an SSH connection. To change the password for access points that are assigned to a location: 1. Open a browser on your computer. 2. In the address bar, enter https://wireless.netgear.com. The application login page displays. 3. Enter the email address and password for your BCWM account and click the LOG IN button. The Home page displays. Manage Locations, Buildings, and Floors 62 Business Central Wireless Manager Application 4. Select Configuration. The All Locations page displays. 5. In the LOCATIONS tree on the left, click the location. The Location Profile page displays. 6. On the main page, click the AP Local Management heading. The AP Local Management section expands. 7. To display the current password, select the Show Characters check box. 8. Enter a new secure password. The new password applies to all access points that are assigned to the location. 9. Click the APPLY button. The changes are saved. The new settings are pushed immediately to the cloud-managed access points for the location. If a cloud-managed access point for the location is not connected, the new settings are pushed when the access point reconnects to the application. Select a RADIUS Server for a Location For you to be able to select a RADIUS server for a location, you first must set up a shared RADIUS server profile (see Manage RADIUS Server Profiles on page 104). After you select a RADIUS server profile for a location, you can assign that profile for network authentication with RADIUS (see Change the WiFi Network Name, Authentication, or Encryption on page 68). To select a RADIUS server for a location: 1. Open a browser on your computer. 2. In the address bar, enter https://wireless.netgear.com. The application login page displays. 3. Enter the email address and password for your BCWM account and click the LOG IN button. The Home page displays. 4. Select Configuration. The All Locations page displays. 5. In the LOCATIONS tree on the left, click the location. The Location Profile page displays. 6. On the main page, click the Radius Server heading. The Radius Server section expands. Manage Locations, Buildings, and Floors 63 Business Central Wireless Manager Application 7. From the Radius Profile menu, select a RADIUS server profile. 8. Click the APPLY button. The changes are saved. Select a MAC Access Control List for a Location For you to be able to select a MAC access control list (ACL) for a location, you first must set up a shared MAC ACL (see Manage MAC ACLs on page 143). After you select a MAC ACL for a location, you can assign that MAC ACL for additional security (see Change the WiFi Network Name, Authentication, or Encryption on page 68). To select a MAC ACL for a location: 1. Open a browser on your computer. 2. In the address bar, enter https://wireless.netgear.com. The application login page displays. 3. Enter the email address and password for your BCWM account and click the LOG IN button. The Home page displays. 4. Select Configuration. The All Locations page displays. 5. In the LOCATIONS tree on the left, click the location. The Location Profile page displays. 6. On the main page, click the MAC-ACL heading. The MAC-ACL section expands. 7. From the Profile for Local MAC-ACL menu, select a MAC ACL. 8. Click the APPLY button. The changes are saved. Manage Wireless Quality of Service for a Location Wi-Fi Multimedia (WMM) is a subset of the 802.11e standard. WMM allows wireless traffic to receive different priorities, depending on the type of data. Time-dependent information, such as video or audio, receives a higher priority than normal traffic. For WMM to function correctly, wireless clients also must support WMM. WMM supports Quality of Service (QoS) control for upstream traffic flowing from a wireless device to an access point and for downstream traffic flowing from the access point to a wireless device. Manage Locations, Buildings, and Floors 64 Business Central Wireless Manager Application WMM defines the following four queues in decreasing order of priority: • Voice. The highest priority queue with minimum delay, which makes it ideal for applications like VoIP and streaming media. • Video. The second highest priority queue with low delay is given to this queue. Video applications are routed to this queue. • Best Effort. The medium priority queue with medium delay is given to this queue. Most standard IP applications use this queue. • Background. Low priority queue with high throughput. Applications, such as FTP, that are not time-sensitive but require high throughput can use this queue. The WMM Powersave feature saves power for battery-powered equipment by increasing the efficiency and flexibility of data transmission. By default, the Wi-Fi Multimedia (WMM) and WMM Powersave features are enabled for a location. To manage the wireless QoS for a location: 1. Open a browser on your computer. 2. In the address bar, enter https://wireless.netgear.com. The application login page displays. 3. Enter the email address and password for your BCWM account and click the LOG IN button. The Home page displays. 4. Select Configuration. The All Locations page displays. 5. In the LOCATIONS tree on the left, click the location. The Location Profile page displays. 6. On the main page, click the QoS heading. The QoS section expands. 7. Configure the wireless QoS settings: • Wi-Fi Multimedia (WMM). By default, the Enable radio button is selected and WMM is enabled. To disable WMM, select the Disable radio button. • WMM Powersave. By default, the Enable radio button is selected and WMM Powersave is enabled. To disable WMM Powersave, select the Disable radio button. 8. Click the APPLY button. The changes are saved. The new settings are pushed immediately to the cloud-managed access points for the location. If a cloud-managed access point for the location is not connected, the new settings are pushed when the access point reconnects to the application. Manage Locations, Buildings, and Floors 65 4. Manage WiFi Networks at a Location 4 You assign WiFi networks to a location. Therefore, you first must set up a location and then you can add networks to that location. For each network, you can manage the WiFi settings such as network authentication, data encryption, SSID broadcast, client separation, VLANs, and radio bands. This chapter includes the following sections: • Add a New WiFi Network to a Location • Manage the WiFi Settings for a Network • Disable or Reenable a WiFi Network at a Location • Remove a WiFi Network from a Location Note: In addition to the configuration options that are described in this chapter, you can add a hotspot to the pool of WiFi networks at a location. For information about managing hotspots, see Chapter 8, Manage Hotspots for Locations, which describes how you can add a hotspot directly to a location instead of to the pool of WiFi networks at a location. The procedures to set up a hotspot for these scenarios are almost identical: The only difference is the menu from which you initiate the hotspot wizard. 66 Business Central Wireless Manager Application Add a New WiFi Network to a Location You can add a WiFi network to a location only, not to an individual building or floor. For information about how you can circumvent these limitations, see Other Planning Considerations on page 18. To add a new WiFi network to a location: 1. Open a browser on your computer. 2. In the address bar, enter https://wireless.netgear.com. The application login page displays. 3. Enter the email address and password for your BCWM account and click the LOG IN button. The Home page displays. 4. Select Configuration. The All Locations page displays. 5. In the LOCATIONS tree on the left, click the location. The Location Profile page displays. 6. From the Choose Action menu, select Add Wireless Network. 7. Configure the network settings: a. In the Network Name field, enter a WiFi network name (SSID). b. From the Wireless Network on menu, select the WiFi band or bands. For dual-band access points, you can select both bands to be active. c. From the Network Authentication menu, select the type of authentication. If you need advanced authentication, select one of the available options from the Network Authentication menu and complete the procedure. Then, configure the Manage WiFi Networks at a Location 67 Business Central Wireless Manager Application advanced authentication (see Change the WiFi Network Name, Authentication, or Encryption on page 68). d. From the Data Encryption menu, select the type of encryption. e. In the Network Key field, enter a network key. You can enter up to 63 alphanumeric and special characters. 8. Click the ADD THIS WIRELESS NETWORK button. The Network Name and Authentication section displays, showing the settings for the new WiFi network. Manage the WiFi Settings for a Network The WiFi settings for a network apply only to one specific network at a location. The following sections describe the WiFi settings for a network at a location: • Change the WiFi Network Name, Authentication, or Encryption • Change SSID Broadcast and Client Separation • Change the WiFi Network VLAN Settings • Change the WiFi Network Radio Band • Change the WiFi Network into a Captive Portal by Assigning a Captive Portal Profile Change the WiFi Network Name, Authentication, or Encryption By default, the network authentication is mixed WPA/WPA2-PS and the data encryption is TKIP+AES. These default settings apply to any network that you set up at a location. Before you change the network authentication, you might need to take the following actions: • Set up a RADIUS configuration. If you want to change the default network authentication to a type of authentication with RADIUS, first do the following: 1. Set up a RADIUS server profile (see Add a RADIUS Server Profile with an Optional Accounting Server on page 105). • 2. Select the RADIUS server profile for the location at which the network is configured (see Select a RADIUS Server for a Location on page 63). Set up a MAC ACL configuration. If you want to configure MAC ACL enforcement as an additional authentication method to allow only devices whose MAC address is on a local or external ACL to access the network, first do the following: 1. Set up a MAC ACL (see Set Up a MAC ACL by Adding MAC Addresses Manually on page 143). 2. Select the MAC ACL for the location at which the network is configured (see Select a MAC Access Control List for a Location on page 64). Manage WiFi Networks at a Location 68 Business Central Wireless Manager Application To change the name (SSID), authentication, or encryption for a WiFi network: 1. Open a browser on your computer. 2. In the address bar, enter https://wireless.netgear.com. The application login page displays. 3. Enter the email address and password for your BCWM account and click the LOG IN button. The Home page displays. 4. Select Configuration. The All Locations page displays. 5. In the LOCATIONS tree on the left, click the location at which the network is configured. The Location Profile page displays. In the LOCATIONS tree, the Wireless Networks and Access Points headings display under the selected location. 6. In the LOCATIONS tree, click the Wireless Networks heading. The networks and hotspots that you configured at the location display. 7. Click the network. 8. To change the WiFi network name (SSID), enter a new name in the Network Name field. 9. Make a selection from the Network Authentication menu and configure the associated settings as described in the following table. Note: The content of the page changes if you make another selection from the Network Authentication menu. Manage WiFi Networks at a Location 69 Business Central Wireless Manager Application Settings Description WPA/WPA2-PSK This type of authentication is the default selection and can authenticate devices that support either WPA or WPA2. Data Encryption The selection from the menu is fixed at TKIP+AES. Network Key Enter a network key. You can enter up to 63 alphanumeric and special characters. The default network key is sharedsecret. Note: To show the characters in the Network Key field, select the Show Characters check box. Open System An entirely open system does not provide network authentication, does not provide data encryption, and is not secured. As an option, an open system can provide WEP data encryption but does not use the WEP network key to provide network authentication. Data Encryption Select one of the following options from the menu: • None. Data encryption is not supported. This is the default setting. • 64 bit WEP. Uses a 10-digit hexadecimal key. • 128 bit WEP. Uses a 26-digit hexadecimal key. • 152 bit WEP. Uses a 32-digit hexadecimal key. Network Key If you select a WEP option, enter a network key. You can enter up to 63 alphanumeric and special characters. The default network key is sharedsecret. Note: To show the characters in the Network Key field, select the Show Characters check box. Key 1 through Key 4 If you select a WEP option, do the following: 1. Click the GENERATE KEYS button. The application generates four keys. 2. As an option, change individual keys manually. 3. Select the Key 1, Key 2, Key 3, or Key 4 radio button. The selected key contains the string that is required to access the WiFi network. Shared Key Shared Key authentication uses a WEP key for network authentication and encryption. Data Encryption Select one of the following options from the menu: • 64 bit WEP. Uses a 10-digit hexadecimal key. • 128 bit WEP. Uses a 26-digit hexadecimal key. • 152 bit WEP. Uses a 32-digit hexadecimal key. Manage WiFi Networks at a Location 70 Business Central Wireless Manager Application Settings Description Network Key Enter a network key. You can enter up to 63 alphanumeric and special characters. The default network key is sharedsecret. Note: To show the characters in the Network Key field, select the Show Characters check box. Key 1 through Key 4 Do the following: 1. Click the GENERATE KEYS button. 2. Select the Key 1, Key 2, Key 3, or Key 4 radio button. The selected key contains the string that is required to access the WiFi network. Legacy 802.1x Authentication occurs through the RADIUS server that you selected for the location at which the network is configured (see Select a RADIUS Server for a Location on page 63). Data Encryption The selection from the menu is fixed at None. WPA with Radius Authentication occurs through the RADIUS server that you selected for the location at which the network is configured. Data Encryption Select one of the following options from the menu: • TKIP. Supports Temporal Key Integrity Protocol (TKIP) only. This is the default selection. • TKIP+AES. Supports both TKIP and Advanced Encryption Standard (AES). WPA2 with Radius Authentication occurs through the RADIUS server that you selected for the location at which the network is configured (see Select a RADIUS Server for a Location on page 63). Data Encryption Select one of the following options from the menu: • AES. Supports Advanced Encryption Standard (AES) only. This is the default selection. • TKIP+AES. Supports both TKIP and Advanced Encryption Standard (AES). WPA & WPA2 with Radius Authentication occurs through the RADIUS server that you selected for the location at which the network is configured (see Select a RADIUS Server for a Location on page 63). Data Encryption The selection from the menu is fixed at TKIP+AES. WPA-PSK This type of legacy authentication can authenticate only devices that support WPA. Data Encryption Select one of the following options from the menu: • TKIP. Supports Temporal Key Integrity Protocol (TKIP) only. This is the default selection. • TKIP+AES. Supports both TKIP and Advanced Encryption Standard (AES). Manage WiFi Networks at a Location 71 Business Central Wireless Manager Application Settings Description Network Key Enter a network key. You can enter up to 63 alphanumeric and special characters. The default network key is sharedsecret. Note: To show the characters in the Network Key field, select the Show Characters check box. WPA2-PSK This type of authentication can authenticate only devices that support WPA2. Data Encryption Select one of the following options from the menu: • AES. Supports Advanced Encryption Standard (AES) only. This is the default selection. • TKIP+AES. Supports both TKIP and Advanced Encryption Standard (AES). Network Key Enter a network key. You can enter up to 63 alphanumeric and special characters. The default network key is sharedsecret. Note: To show the characters in the Network Key field, select the Show Characters check box. 10. To enable MAC ACL security, select one of the following options from the MAC-ACL Enforcement menu: • Local. The MAC address of any device that wants to connect to the network must be on the MAC ACL that you selected for the location at which the network is configured. • External (Radius). The MAC address of any device that wants to connect to the network must be on the RADIUS server that you selected for the location at which the network is configured. By default MAC ACL security is disabled. 11. Click the APPLY button. The changes are saved. The new settings are pushed immediately to the cloud-managed access points for the location. If a cloud-managed access point for the location is not connected, the new settings are pushed when the access point reconnects to the application. Change SSID Broadcast and Client Separation By default, the SSID for a network is broadcast and client separation is disabled, allowing clients on the same network or hotspot to communicate with each other. To change the SSID broadcast and client separation for a WiFi network: 1. Open a browser on your computer. 2. In the address bar, enter https://wireless.netgear.com. The application login page displays. Manage WiFi Networks at a Location 72 Business Central Wireless Manager Application 3. Enter the email address and password for your BCWM account and click the LOG IN button. The Home page displays. 4. Select Configuration. The All Locations page displays. 5. In the LOCATIONS tree on the left, click the location at which the network is configured. The Location Profile page displays. In the LOCATIONS tree, the Wireless Networks and Access Points headings display under the selected location. 6. In the LOCATIONS tree, click the Wireless Networks heading. The networks and hotspots that you configured at the location display. 7. Click the network. On the main page, the Network Name and Authentication section displays. 8. Click the Security heading. The Security section displays. 9. Next to Broadcast Network Name (SSID), select one the following radio buttons: • Yes. The SSID is broadcast. This is the default setting. • No. The SSID is not broadcast. A user must know the SSID to be able to connect to the network. 10. Next to Client Security Separation, select one the following radio buttons: • Enable. Client separation is enabled. Clients on the same network or hotspot cannot communicate with each other. • Disable. Client separation is disabled. Clients on the same network or hotspot can communicate with each other. This is the default setting. Note: The client security separation setting of a captive portal policy takes precedence over the client security separation setting for the WiFi network. 11. Click the APPLY button. The changes are saved. The new settings are pushed immediately to the cloud-managed access points for the location. If a cloud-managed access point for the location is not connected, the new settings are pushed when the access point reconnects to the application. Manage WiFi Networks at a Location 73 Business Central Wireless Manager Application Change the WiFi Network VLAN Settings By default, all clients that access a WiFi network are assigned to VLAN 1. You can change the VLAN ID. For information about specifying the management VLAN for an access point, see Specify the Management VLAN Settings for an Access Point on page 88. To change the VLAN ID for a WiFi network: 1. Open a browser on your computer. 2. In the address bar, enter https://wireless.netgear.com. The application login page displays. 3. Enter the email address and password for your BCWM account and click the LOG IN button. The Home page displays. 4. Select Configuration. The All Locations page displays. 5. In the LOCATIONS tree on the left, click the location at which the network is configured. The Location Profile page displays. In the LOCATIONS tree, the Wireless Networks and Access Points headings display under the selected location. 6. In the LOCATIONS tree, click the Wireless Networks heading. The networks and hotspots that you configured at the location display. 7. Click the network. On the main page, the Network Name and Authentication section displays. 8. Click the VLAN setting heading. The VLAN setting section displays. 9. Enter a VLAN ID in the VLAN field. By default, the VLAN ID is 1. 10. Click the APPLY button. The changes are saved. The new settings are pushed immediately to the cloud-managed access points for the location. If a cloud-managed access point for the location is not connected, the new settings are pushed when the access point reconnects to the application. Manage WiFi Networks at a Location 74 Business Central Wireless Manager Application Change the WiFi Network Radio Band You can change the radio band or bands that you assigned to the WiFi network when you set it up. To change the radio band for a WiFi network: 1. Open a browser on your computer. 2. In the address bar, enter https://wireless.netgear.com. The application login page displays. 3. Enter the email address and password for your BCWM account and click the LOG IN button. The Home page displays. 4. Select Configuration. The All Locations page displays. 5. In the LOCATIONS tree on the left, click the location at which the network is configured. The Location Profile page displays. In the LOCATIONS tree, the Wireless Networks and Access Points headings display under the selected location. 6. In the LOCATIONS tree, click the Wireless Networks heading. The networks and hotspots that you configured at the location display. 7. Click the network. On the main page, the Network Name and Authentication section displays. 8. Click the Radio heading. The Radio section displays. 9. From the Enable Wireless Network menu, select one of the following options: • 2.4GHz and 5GHz. The network broadcasts on both the 2.4 GHz band and the 5 GHz band. Depending on the WiFi capability of the access points that are assigned to the location, this is the default setting. • 2.4GHz. The network broadcasts on the 2.4 GHz band only. • 5GHz. The network broadcasts on the 5 GHz band only. 10. Click the APPLY button. The changes are saved. The new settings are pushed immediately to the cloud-managed access points for the location. If a cloud-managed access point for the location is not connected, the new settings are pushed when the access point reconnects to the application. Manage WiFi Networks at a Location 75 Business Central Wireless Manager Application Change the WiFi Network into a Captive Portal by Assigning a Captive Portal Profile After you set up a WiFi network, you can change it into a captive portal. Although you can build an entirely new captive portal for the WiFi network, the easiest approach is to assign an existing captive portal profile to the network. For information about how to set up a captive portal profile, see Manage Captive Portal Profiles on page 109. To assign a captive portal to a WiFi network: 1. Open a browser on your computer. 2. In the address bar, enter https://wireless.netgear.com. The application login page displays. 3. Enter the email address and password for your BCWM account and click the LOG IN button. The Home page displays. 4. Select Configuration. The All Locations page displays. 5. In the LOCATIONS tree on the left, click the location at which the network is configured. The Location Profile page displays. In the LOCATIONS tree, the Wireless Networks and Access Points headings display under the selected location. 6. In the LOCATIONS tree, click the Wireless Networks heading. The networks and hotspots that you configured at the location display. 7. Click the network. On the main page, the Network Name and Authentication section displays. 8. Click the Captive Portal heading. The Captive Portal section displays. 9. From the Captive Portal menu, select one of the following authentication options: • Click Through. No authentication is required to click through. • Click Through With Email. An email address is required to click through. • Vouchers. A voucher is required to access the network. • Cloud AAA. A user name and password are required to sign in. If you select Cloud AAA from the Captive Portal menu, select one or more user groups that are allowed access to the network: a. In the Denied Groups column, select a group and click the right arrow. The user group displays in the Allowed Groups column. b. To allow more groups access to the network, repeat the previous step. Manage WiFi Networks at a Location 76 Business Central Wireless Manager Application c. To move a group back to the Denied Groups column, select the group and click the left arrow. Note: Your selection from the Captive Portal menu determines which captive portal profiles are listed in the Captive Portal Profile menu. 10. From the Captive Portal Profile menu, select an associated profile. If the type of profile that you want to assign is not listed, you can set up a new captive portal profile. For more information, see the following sections: • Add a Basic Captive Portal Profile for Free Access or Access Through Cloud AAA on page 111 • Add an Advanced Captive Portal Profile for Free Access or Access Through Cloud AAA on page 114 • Add a Basic Captive Portal Profile for Access Through Vouchers on page 117 • Add an Advanced Captive Portal Profile for Access Through Vouchers on page 122 11. Click the APPLY button. The changes are saved. The new settings are pushed immediately to the cloud-managed access points for the location. If a cloud-managed access point for the location is not connected, the new settings are pushed when the access point reconnects to the application. Disable or Reenable a WiFi Network at a Location When you set up a WiFi network, it is enabled by default. You can temporarily disable a WiFi network at a location and reenable it later. To disable or reenable a WiFi network at a location: 1. Open a browser on your computer. 2. In the address bar, enter https://wireless.netgear.com. The application login page displays. 3. Enter the email address and password for your BCWM account and click the LOG IN button. The Home page displays. 4. Select Configuration. The All Locations page displays. 5. In the LOCATIONS tree on the left, click the location at which the network is configured. The Location Profile page displays. In the LOCATIONS tree, the Wireless Networks and Access Points headings display under the selected location. 6. In the LOCATIONS tree, click the Wireless Networks heading. The networks and hotspots that you configured at the location display. Manage WiFi Networks at a Location 77 Business Central Wireless Manager Application 7. Click the network. On the main page, the Network Name and Authentication section displays. 8. Take one of the following actions: • To disable the WiFi network, select the Disable radio button. • To reenable the WiFi network, select the Enable radio button. 9. Click the APPLY button. The changes are saved. The new settings are pushed immediately to the cloud-managed access points for the location. If a cloud-managed access point for the location is not connected, the new settings are pushed when the access point reconnects to the application. Remove a WiFi Network from a Location You can remove a WiFi network that you no longer need. To remove a WiFi network from a location: 1. Open a browser on your computer. 2. In the address bar, enter https://wireless.netgear.com. The application login page displays. 3. Enter the email address and password for your BCWM account and click the LOG IN button. The Home page displays. 4. Select Configuration. The All Locations page displays. 5. In the LOCATIONS tree on the left, click the location at which the network is configured. The Location Profile page displays. In the LOCATIONS tree, the Wireless Networks and Access Points headings display under the selected location. 6. In the LOCATIONS tree, click the Wireless Networks heading. The networks and hotspots that you configured at the location display. 7. Click the network. On the main page, the Network Name and Authentication section displays. 8. From the Choose Action menu, select Delete This Network. A confirmation pop-up window displays. 9. Click the YES button. The WiFi network is removed from the location. The new settings are pushed immediately to the cloud-managed access points for the location. If a cloud-managed access point for the location is not connected, the new settings are pushed when the access point reconnects to the application. Manage WiFi Networks at a Location 78 5. Manage Access Points at a Location 5 You assign access points to a location. Therefore, you first must set up a location and then you can assign access points to that location. For each access point, you can manage the settings such as the IP address, VLANs, antenna, static channel, and static output power. This chapter includes the following sections: • Add an Access Point and Assign It to a Building and Floor • Add an Access Point Without Assigning It to a Location • Assign an Access Point to a Location • Manage Access Point Settings • Reboot an Access Point • Remove an Access Point from Your Account • Add Multiple Access Points Simultaneously • View or Change the Password for Unassigned Access Points Note: For information about access point modes, see Appendix A, Cloud-Managed Access Points. 79 Business Central Wireless Manager Application Add an Access Point and Assign It to a Building and Floor Before you add the access point to a location, make sure that your access point runs the required firmware (see Compatible NETGEAR Wireless Access Points on page 19), that you reset it to factory defaults, and that you power cycle it. To add an access point and assign it to a building and floor: 1. Open a browser on your computer. 2. In the address bar, enter https://wireless.netgear.com. The application login page displays. 3. Enter the email address and password for your BCWM account and click the LOG IN button. The Home page displays. 4. Select Inventory. If you already added access points, the access point configurations display. By default, the configurations are sorted by access point name. Note: If you did not yet add any access points, the ADD ACCESS POINT button displays. This button serves the same function as the Add Access Point selection from the Choose Action menu (see the next step). 5. From the Choose Action menu, select Add Access Point. 6. In the Name field, enter a name for the access point. 7. In the Serial Number field, enter the precise serial number for the access point. Note: Without entering the correct serial number, you cannot add the access point to the network. 8. Click the ADD THIS ACCESS POINT button. The application confirms the addition. 9. Click the Assign Access Point link. Manage Access Points at a Location 80 Business Central Wireless Manager Application 10. From the Location menu, select a location. 11. From the Building menu, select a building for the location. If you did not add a building to the location, the menu lists Building1 as the default setting. 12. From the Floor menu, select a floor for the building. If you did not add a floor to the building, the menu lists Floor 1 as the default setting. 13. Click the ASSIGN ACCESS POINT button. The changes are saved. On the main page, the Access Point Profile section displays information about the new access point. If the access point is connected to the Internet, after you add the access point to the application, the application detects the access point, reconfigures it, and restarts it. This process takes time and the State field might display Waiting for connection for several minutes. After the process finishes, the State field displays Connected, and you can manage the access point in the cloud. Manage Access Points at a Location 81 Business Central Wireless Manager Application Note: Be aware that if the access point connects to the application for the first time, it might take between 5 and 10 minutes before the State field displays Connected. During this period, the application might need to push the latest firmware to the access point, automatically reboot the access point, push the configuration to the access point, and automatically reboot the access point again. 14. To view other details about the access point, on the main page, click another section heading (for example, IP Setting). For information about how to change the access point settings, see Manage Access Point Settings on page 85. Add an Access Point Without Assigning It to a Location Before you add the access point to the application, make sure that your access point runs the required firmware (see Compatible NETGEAR Wireless Access Points on page 19), that you reset it to factory defaults, and that you power cycle it. To add an access point to the application without assigning it to a location: 1. Open a browser on your computer. 2. In the address bar, enter https://wireless.netgear.com. The application login page displays. 3. Enter the email address and password for your BCWM account and click the LOG IN button. The Home page displays. 4. Select Inventory. All access point configurations display. By default, the configurations are sorted by access point name. Note: If you did not yet add any access points, the ADD ACCESS POINT button displays. This button serves the same function as the Add Access Point selection from the Choose Action menu (see the next step). 5. From the Choose Action menu, select Add Access Point. 6. In the Name field, enter a name for the access point. 7. In the Serial Number field, enter the precise serial number for the access point. Manage Access Points at a Location 82 Business Central Wireless Manager Application Note: Without entering the correct serial number, you cannot add the access point to the network. 8. Click the ADD THIS ACCESS POINT button. The application confirms the addition. 9. Click the CLOSE button. On the main page, the Access Point Profile section displays information about the new access point. If the access point is connected to the Internet, after you add the access point to the application, the application detects the access point, reconfigures it, and restarts it. This process takes time and the State field might display Waiting for connection for several minutes. After the process finishes, the State field displays Connected, and you can manage the access point in the cloud. Note: Be aware that if the access point connects to the application for the first time, it might take between 5 and 10 minutes before the State field displays Connected. During this period, the application might need to push the latest firmware to the access point, automatically reboot the access point, push the configuration to the access point, and automatically reboot the access point again. Because you did not yet assign the access point to a location, the Location menu displays Unassigned. As a security measure, the application automatically assigns a password to the unassigned access points (see View or Change the Password for Unassigned Access Points on page 99). 10. To view other details about the access point, on the main page, click another section heading (for example, IP Setting). For information about how to change the access point settings, see Manage Access Point Settings on page 85. Manage Access Points at a Location 83 Business Central Wireless Manager Application Assign an Access Point to a Location You can assign an unassigned access point to a building and floor of a location or change an already assigned access point to a different building and floor of a location. To assign an access point or change the assignment of an access point: 1. Open a browser on your computer. 2. In the address bar, enter https://wireless.netgear.com. The application login page displays. 3. Enter the email address and password for your BCWM account and click the LOG IN button. The Home page displays. 4. Select Inventory. All access point configurations display. By default, the configurations are sorted by access point name. 5. To narrow the access points that display, take one or more of the following steps: a. To view only unassigned access points, in the INVENTORY tree on the left, click Unassigned. b. To view only access points that are assigned to one location, in the INVENTORY tree, click the location and, as an option, narrow the access points that display at the location by selecting a building and a floor. c. If many access points are assigned to the application, use the icons ( ) below the Choose Action menu on the main page to search for an access point, to group access points together according to an attribute, or to display more information. 6. On the main page, click an access point configuration. The Access Point Profile section displays information about the access point. Manage Access Points at a Location 84 Business Central Wireless Manager Application 7. From the Location menu, select a location. The Building menu and Floor menu become available. 8. From the Building menu, select a building for the location. If you did not add a building to the location, the menu lists Building1 as the default setting. 9. From the Floor menu, select a floor for the building. If you did not add a floor to the building, the menu lists Floor 1 as the default setting. Click the APPLY button. If you assign or change a location, a confirmation pop-up window displays. This page does not display when you change only a building or floor for the same location. 10. Click the YES button. The changes are saved. Note: When you assign the access point to a location, the password for the access point changes from the password for unassigned access points to the location-specific password that you specified when you added the location. Manage Access Point Settings The settings for an access point apply only to one specific access point at a location. The following sections describe the settings for an access point at a location: • Change the Access Point Name • Configure a Static IP Address for an Access Point • Specify the Management VLAN Settings for an Access Point • Manage the Access Point Antenna Settings • Configure a Static Channel for an Access Point • Configure Static Output Power for an Access Point • Manage the Syslog Settings for an Access Point Change the Access Point Name You do not need to use the NETGEAR default name for an access point and can change the name to a custom name. Note: As part of an access point profile, besides the access point name, the only other settings that you can change are the location, building, and floor to which the access point is assigned. For more information, see Assign an Access Point to a Location on page 84. Manage Access Points at a Location 85 Business Central Wireless Manager Application To change the name of an access point: 1. Open a browser on your computer. 2. In the address bar, enter https://wireless.netgear.com. The application login page displays. 3. Enter the email address and password for your BCWM account and click the LOG IN button. The Home page displays. 4. Select Inventory. All access point configurations display. By default, the configurations are sorted by access point name. 5. To narrow the access points that display, do the following: a. To view only access points that are assigned to one location, in the INVENTORY tree on the left, click the location and, as an option, narrow the access points that display at the location by selecting a building and a floor. ) below b. If many access points are assigned to the application, use the icons ( the Choose Action menu on the main page to search for an access point, to group access points together according to an attribute, or to display more information. 6. On the main page, click an access point configuration. The Access Point Profile section displays information about the access point. 7. In the Name field, enter a new name for the access point. 8. Click the APPLY button. The changes are saved. The new settings are pushed immediately to the cloud-managed access point. Configure a Static IP Address for an Access Point By default, cloud-managed access points receive their IP addresses through a DHCP server. However, you can configure a static IP address for an access point. To configure a static IP address for an access point: 1. Open a browser on your computer. 2. In the address bar, enter https://wireless.netgear.com. The application login page displays. 3. Enter the email address and password for your BCWM account and click the LOG IN button. The Home page displays. 4. Select Inventory. All access point configurations display. By default, the configurations are sorted by access point name. Manage Access Points at a Location 86 Business Central Wireless Manager Application 5. To narrow the access points that display, do the following: a. To view only access points that are assigned to one location, in the INVENTORY tree on the left, click the location and, as an option, narrow the access points that display at the location by selecting a building and a floor. b. If many access points are assigned to the application, use the icons ( ) below the Choose Action menu on the main page to search for an access point, to group access points together according to an attribute, or to display more information. 6. On the main page, click an access point configuration. The Access Point Profile section displays information about the access point. 7. Scroll down and click the IP Settings heading. The IP and VLAN settings display. 8. From the IP Setting menu, select Static. 9. Enter the IP address, network mask, default gateway, and primary and secondary DNS servers. 10. To force the static IP address configuration onto the access point, even if the access point cannot connect to the Internet with the static configuration, clear the Use safe apply check box. By default, the application tests the static IP address configuration. If the access point cannot connect to the Internet with the static configuration, the application automatically rolls back to the previous configuration with which the access point was able to connect to the Internet and raises an alarm. In such a situation, you are directed to specify if you want to keep the old IP address configuration or try the new static configuration again. Even if the access point cannot connect to the Internet with the new static configuration, you can force the application to accept the new static configuration. 11. Click the APPLY button. The changes are saved. The new settings are pushed immediately to the cloud-managed access point. Manage Access Points at a Location 87 Business Central Wireless Manager Application Specify the Management VLAN Settings for an Access Point The VLAN settings for an access point determine the access point’s management VLAN. For information about the VLAN that is assigned to clients when they access a WiFi network, see Change the WiFi Network VLAN Settings on page 74. To specify the management VLAN settings for an access point: 1. Open a browser on your computer. 2. In the address bar, enter https://wireless.netgear.com. The application login page displays. 3. Enter the email address and password for your BCWM account and click the LOG IN button. The Home page displays. 4. Select Inventory. All access point configurations display. By default, the configurations are sorted by access point name. 5. To narrow the access points that display, do the following: a. To view only access points that are assigned to one location, in the INVENTORY tree on the left, click the location and, as an option, narrow the access points that display at the location by selecting a building and a floor. ) below b. If many access points are assigned to the application, use the icons ( the Choose Action menu on the main page to search for an access point, to group access points together according to an attribute, or to display more information. 6. On the main page, click an access point configuration. The Access Point Profile section displays information about the access point. 7. Scroll down and click the IP Settings heading. The IP and VLAN settings display. 8. To configure the VLAN settings for a static IP address settings, from the IP Setting menu, select Static. 9. To change the management VLAN, in the Management VLAN field, enter a new VLAN ID. By default, the management VLAN ID is 1. 10. To change or disable the untagged VLAN, in the Untagged VLAN field, enter a new VLAN ID or clear the Untagged VLAN check box. By default, the untagged VLAN is enabled with VLAN ID 1. By default, the application tests the new VLAN configuration. If the access point cannot connect to the Internet with the new VLAN configuration, the application automatically rolls back to the previous configuration with which the access point was able to connect to the Internet and raises an alarm. In such a situation, you are directed to specify if you want to keep the old VLAN configuration or try the new VLAN settings again. Even if the access Manage Access Points at a Location 88 Business Central Wireless Manager Application point cannot connect to the Internet with the new VLAN configuration, you can force the application to accept the new VLAN configuration. 11. Click the APPLY button. The changes are saved. The new settings are pushed immediately to the cloud-managed access point. Manage the Access Point Antenna Settings Some access points can support one or more optional external antennas. For such an access point, you can switch the antenna settings from internal antennas to external antennas. To switch the antenna settings for an access point to external antennas: 1. Open a browser on your computer. 2. In the address bar, enter https://wireless.netgear.com. The application login page displays. 3. Enter the email address and password for your BCWM account and click the LOG IN button. The Home page displays. 4. Select Inventory. All access point configurations display. By default, the configurations are sorted by access point name. 5. To narrow the access points that display, do the following: a. To view only access points that are assigned to one location, in the INVENTORY tree on the left, click the location and, as an option, narrow the access points that display at the location by selecting a building and a floor. ) below b. If many access points are assigned to the application, use the icons ( the Choose Action menu on the main page to search for an access point, to group access points together according to an attribute, or to display more information. 6. On the main page, click an access point configuration. The Access Point Profile section displays information about the access point. 7. Scroll down and click the Advanced heading. The advanced settings displays. 8. From the Antenna menu, select External. The default setting is Internal. 9. Click the APPLY button. The changes are saved. The new settings are pushed immediately to the cloud-managed access point. Manage Access Points at a Location 89 Business Central Wireless Manager Application Configure a Static Channel for an Access Point By default, cloud-managed access points autoconfigure their channels (that is, the channel setting is Auto). However, for each WiFi band that the access point supports, you can configure a static channel. To configure a static channel for an access point: 1. Open a browser on your computer. 2. In the address bar, enter https://wireless.netgear.com. The application login page displays. 3. Enter the email address and password for your BCWM account and click the LOG IN button. The Home page displays. 4. Select Inventory. All access point configurations display. By default, the configurations are sorted by access point name. 5. To narrow the access points that display, do the following: a. To view only access points that are assigned to one location, in the INVENTORY tree on the left, click the location and, as an option, narrow the access points that display at the location by selecting a building and a floor. ) below b. If many access points are assigned to the application, use the icons ( the Choose Action menu on the main page to search for an access point, to group access points together according to an attribute, or to display more information. 6. On the main page, click an access point configuration. The Access Point Profile section displays information about the access point. 7. Scroll down and click the Advanced heading. The advanced settings displays. 8. In the Static Channel section, configure a static channel for the 2.4 GHz band, 5 GHz band, or both: • 2.4 GHz band. Select the 2.4GHz check box, and from the menu that becomes available, select a channel. • 5 GHz band. Select the 5GHz check box, and from the menu that becomes available, select a channel. 9. Click the APPLY button. The changes are saved. The new settings are pushed immediately to the cloud-managed access point. Manage Access Points at a Location 90 Business Central Wireless Manager Application Configure Static Output Power for an Access Point By default, the transmission output for an access point is set to maximum power. However, you can configure a lower output power for each WiFi band that the access point supports. To configure static output power for an access point: 1. Open a browser on your computer. 2. In the address bar, enter https://wireless.netgear.com. The application login page displays. 3. Enter the email address and password for your BCWM account and click the LOG IN button. The Home page displays. 4. Select Inventory. All access point configurations display. By default, the configurations are sorted by access point name. 5. To narrow the access points that display, do the following: a. To view only access points that are assigned to one location, in the INVENTORY tree on the left, click the location and, as an option, narrow the access points that display at the location by selecting a building and a floor. ) below b. If many access points are assigned to the application, use the icons ( the Choose Action menu on the main page to search for an access point, to group access points together according to an attribute, or to display more information. 6. On the main page, click an access point configuration. The Access Point Profile section displays information about the access point. 7. Scroll down and click the Advanced heading. The advanced settings displays. 8. In the Static Tx Power section, configure the transmission output for the 2.4 GHz radio, 5 GHz radio, or both: • 2.4 GHz band. Select the 2.4GHz check box, and from the menu that becomes available, select Half, Quarter, Eight, or Minimum. By default, the setting for the 2.4 GHz band is Full. • 5 GHz band. Select the 5GHz check box, and from the menu that becomes available, select Half, Quarter, Eight, or Minimum. By default, the setting for the 5 GHz band is Full. 9. Click the APPLY button. The changes are saved. The new settings are pushed immediately to the cloud-managed access point. Manage Access Points at a Location 91 Business Central Wireless Manager Application Manage the Syslog Settings for an Access Point If your network includes a syslog server, you can configure an access point to send its logs to the server. To manage the syslog settings for an access point: 1. Open a browser on your computer. 2. In the address bar, enter https://wireless.netgear.com. The application login page displays. 3. Enter the email address and password for your BCWM account and click the LOG IN button. The Home page displays. 4. Select Inventory. All access point configurations display. By default, the configurations are sorted by access point name. 5. To narrow the access points that display, do the following: a. To view only access points that are assigned to one location, in the INVENTORY tree on the left, click the location and, as an option, narrow the access points that display at the location by selecting a building and a floor. ) below b. If many access points are assigned to the application, use the icons ( the Choose Action menu on the main page to search for an access point, to group access points together according to an attribute, or to display more information. 6. On the main page, click an access point configuration. The Access Point Profile section displays information about the access point. 7. Scroll down and click the Advanced heading. The advanced settings displays. 8. In the Syslog Settings section, configure the syslog server: a. Select the Enable Syslog check box. The Server IP Address and Port Number fields become available. b. Enter the IP address of the syslog server. c. Enter the port number through which the application can reach the syslog server. The default port number is 514. 9. Click the APPLY button. The changes are saved. The new settings are pushed immediately to the cloud-managed access point. Manage Access Points at a Location 92 Business Central Wireless Manager Application Reboot an Access Point You can reboot an individual access point. To reboot an access point: 1. Open a browser on your computer. 2. In the address bar, enter https://wireless.netgear.com. The application login page displays. 3. Enter the email address and password for your BCWM account and click the LOG IN button. The Home page displays. 4. Select Inventory. All access point configurations display. By default, the configurations are sorted by access point name. 5. To narrow the access points that display, do the following: a. To view only access points that are assigned to one location, in the INVENTORY tree on the left, click the location and, as an option, narrow the access points that display at the location by selecting a building and a floor. ) below b. If many access points are assigned to the application, use the icons ( the Choose Action menu on the main page to search for an access point, to group access points together according to an attribute, or to display more information. 6. On the main page, click the access point configuration. The Access Point Profile section displays information about the access point. 7. From the Choose Action menu, select Reboot This Access Point. The access point reboots. (The application does not provide a confirmation.) It might take several minutes before the access point comes back up and reconnects to the application. Remove an Access Point from Your Account You can remove an access point from your account, irrespective of whether the access point is assigned or unassigned. If you only want to reassign an access point, you do not need to remove it from its location. For information about reassigning an access point from one location, building, or floor to another, see Assign an Access Point to a Location on page 84. Manage Access Points at a Location 93 Business Central Wireless Manager Application To remove an access point from your account: 1. Open a browser on your computer. 2. In the address bar, enter https://wireless.netgear.com. The application login page displays. 3. Enter the email address and password for your BCWM account and click the LOG IN button. The Home page displays. 4. Select Inventory. All access point configurations display. By default, the configurations are sorted by access point name. 5. To narrow the access points that display, do the following: a. To view only access points that are assigned to one location, in the INVENTORY tree on the left, click the location and, as an option, narrow the access points that display at the location by selecting a building and a floor. ) below b. If many access points are assigned to the application, use the icons ( the Choose Action menu on the main page to search for an access point, to group access points together according to an attribute, or to display more information. 6. On the main page, click the access point configuration. The Access Point Profile section displays information about the access point. 7. From the Choose Action menu, select Delete this Access Point. A confirmation pop-up window displays. 8. Click the YES button. The access point is removed and returns to factory default settings. For information about returning an access point to standalone mode, see Convert an Access Point from Cloud-Enabled Mode to Standalone Mode on page 282. Add Multiple Access Points Simultaneously You can add multiple access points to the application. Before you can add multiple access points to the application simultaneously, you must add the serial numbers and names to a table in a .csv file. In the table, add the serial numbers in the leftmost column and add the names in the column immediately to the right of it. The table can contain a header but does not need to. The following figure shows an example of a table with a header. Tip: You can download a template from the application. You use this template to set up your list of serial numbers and names. For more information, see the following procedure. Manage Access Points at a Location 94 Business Central Wireless Manager Application Figure 2. Table with serial number and names of access points CAUTION: Do not open the .csv file with serial numbers and names in Excel. Excel might automatically reformat the serial numbers in scientific notation. Make sure that the column with serial numbers in the .csv file does not contain any type of formatting. To download a template and add multiple access points to the application: 1. Open a browser on your computer. 2. In the address bar, enter https://wireless.netgear.com. The application login page displays. 3. Enter the email address and password for your BCWM account and click the LOG IN button. The Home page displays. 4. Select Inventory. If you already added access points, the access point configurations display. By default, the configurations are sorted by access point name. Note: If you did not yet add any access points, the ADD ACCESS POINT button displays. This button serves the same function as the Add Access Point selection from the Choose Action menu (see the next step). 5. From the Choose Action menu, select Add Multiple APs. The Access Point wizard starts. Manage Access Points at a Location 95 Business Central Wireless Manager Application 6. To download a template, click the Download a CSV file template and follow the directions of your browser to save the file to your computer. 7. If you did not set up your list of serial numbers and names, do so now. When you are ready, continue with the next step. 8. If the table of your .csv file with access points includes a header, select the My table has header check box. 9. Click the Browse button. 10. Navigate to and select the .csv file. The name of the .csv file displays in the Browse to CSV field. 11. If the .csv file does not include a header, clear the My table has header check box. 12. Click the UPLOAD button. Manage Access Points at a Location 96 Business Central Wireless Manager Application 13. If the application detects an access point that is already registered or if you entered an erroneous serial number, correct the serial number on the page or click the associated X icon to remove the name and serial number from the list. 14. Click the CONFIRM button. 15. If you work with a trial license, go to Step 16. If you work with a permanent license, do the following: a. Make sure that you own sufficient licenses to support the new access points. The following figure shows the licensing information in a situation in which you do not own sufficient licenses to support the new access point. b. If you do not own sufficient licenses, do one of the following: • Add the access points anyway (see Step 16). The application lets you add the access points, but you cannot manage them with the application until you add a license with a sufficient number of tokens. Each Manage Access Points at a Location 97 Business Central Wireless Manager Application token provides one access point with one month of cloud usage. For more information, see View Licenses or Add a License to an Account with a Paid-For Subscription on page 276. • Remove some access points from the list by clicking the associated X icons. • Cancel the operation by clicking the CANCEL button. 16. Click the ADD button. A pop-up window displays, confirming the addition. 17. Click the OK button. The configurations for the access points that you just added display. 18. To verify that an access point is connected to the cloud and, as an option, assign the access point to a location, do the following: a. To view only unassigned access points, including the access points that you just added through the .csv file, in the INVENTORY tree on the left, click Unassigned. b. If many access points are assigned to the application, use the icons ( ) below the Choose Action menu on the main page to search for an access point, to group access points together according to an attribute, or to display more information. c. On the main page, click an access point configuration. The Access Point Profile section displays information about the access point. If the access point is connected to the Internet, after you add the access point to the application, the application detects the access point, reconfigures it, and restarts it. This process takes time and the State field might display Waiting for connection for several minutes. After the process finishes, the State field displays Connected, and you can manage the access point in the cloud. Manage Access Points at a Location 98 Business Central Wireless Manager Application Note: Be aware that if the access point connects to the application for the first time, it might take between 5 and 10 minutes before the State field displays Connected. During this period, the application might need to push the latest firmware to the access point, automatically reboot the access point, push the configuration to the access point, and automatically reboot the access point again. Note: You can either assign the access points now (see Step d through Step h) or do this later (see Assign an Access Point to a Location on page 84). d. From the Location menu, select a location. The Building menu and Floor menu become available. e. From the Building menu, select a building for the location. If you did not add a building to the location, the menu lists Building1 as the default setting. f. From the Floor menu, select a floor for the building. If you did not add a floor to the building, the menu lists Floor 1 as the default setting. g. Click the APPLY button. A confirmation pop-up window displays. h. Click the YES button. The changes are saved. 19. To verify if another access point is connected to the cloud and, as an option, assign the access point to a location, repeat Step 18. View or Change the Password for Unassigned Access Points If you add access points to the application but do not assign them to locations, as a security measure, the application automatically assigns a password to the unassigned access points. This is the password that you need when you want to access the web management interface of an individual cloud-managed access point or to access a cloud-managed access point over an SSH connection. The password applies to all unassigned access points. You can view this password and change it. Note: When you assign an access point to a location, the password for the access point changes from the password for unassigned access points to the location-specific password that you specified when you added the location. Manage Access Points at a Location 99 Business Central Wireless Manager Application To view or change the password for unassigned access points: 1. Open a browser on your computer. 2. In the address bar, enter https://wireless.netgear.com. The application login page displays. 3. Enter the email address and password for your BCWM account and click the LOG IN button. The Home page displays. 4. Select Account. The My Account page displays. 5. In the ACCOUNT tree on the left, select Settings > Account Setting. The Account Setting page displays. 6. To view the password, select the Show Characters check box. 7. To change the password, do the following: a. In the Unassigned AP Local Password field, enter a new secure password. b. Click the SAVE button. The changes are saved. The new password is pushed immediately to the cloud-managed but unassigned access points. Manage Access Points at a Location 100 6. Manage Radio On/Off Schedules and RADIUS Server Profiles 6 Radio on/off schedules and RADIUS servers are part of the shared settings, which you can assign to any location or network, depending on the nature of the setting. After you set up a radio on/off schedule, you can assign the schedule to any location. Similarly, after you configure a RADIUS server profile, you can assign the profile to any location. Then you can assign the associated RADIUS server to any network at that location. This chapter includes the following sections: • Manage Radio On/Off Schedules • Manage RADIUS Server Profiles 101 Business Central Wireless Manager Application Manage Radio On/Off Schedules A radio on/off schedule lets you specify when a WiFi radio must be turned off and back on again. For example, you can set up a schedule that lets you turn off WiFi radios at night and during weekends. Once you set up and enable a schedule, you can apply it to one or more locations (you do not apply schedules to WiFi networks or access points). For information about applying a radio on/off schedule to a location, see Manage the WiFi Radio or Radios for a Location on page 54. Add a Radio On/Off Schedule You can add multiple radio on/off schedules. To add a radio on/off schedule: 1. Open a browser on your computer. 2. In the address bar, enter https://wireless.netgear.com. The application login page displays. 3. Enter the email address and password for your BCWM account and click the LOG IN button. The Home page displays. 4. Select Configuration. The All Locations page displays. 5. From the Choose Action menu, select Add Radio Schedule. 6. Configure the settings as described in the following table. Setting Description Schedule Name Enter a name that lets you easily identify the schedule. Schedule Radio On/Off Select the On radio button. You cannot configure the schedule while the Off radio button is selected and the schedule is disabled. Note: After you add the schedule, you can turn it off. Schedule On Select the check boxes for the days on which the schedule must be effective. Manage Radio On/Off Schedules and RADIUS Server Profiles 102 Business Central Wireless Manager Application Setting Description Radio On time Enter the time or use the arrow keys on your keyboard to specify the time on which the schedule turns on. To specify AM or PM, you must use the arrow keys. Radio OFF time Enter the time or use the arrow keys on your keyboard to specify the time on which the schedule turns off. To specify AM or PM, you must use the arrow keys. 7. Click the ADD THIS RADIO ON/OFF button. The Radio On/Off Schedules page displays. The new schedule is listed in the table. Change, Disable, or Enable a Radio On/Off Schedule You can change, disable, or enable a radio on/off schedule. The change affects all locations for which the schedule is in effect. To change, disable, or enable a radio on/off schedule: 1. Open a browser on your computer. 2. In the address bar, enter https://wireless.netgear.com. The application login page displays. 3. Enter the email address and password for your BCWM account and click the LOG IN button. The Home page displays. 4. Select Configuration. The All Locations page displays. 5. In the SHARED SETTINGS menu in the lower left, select Radio On/Off Schedules. The Radio On/Off Schedules page displays. 6. Select the check box for the radio on/off schedule. 7. Click the EDIT SELECTED button. The EDIT SELECTED SCHEDULE pop-up window displays. 8. Change the settings, disable the schedule, or enable the schedule. For more information about the settings, see Add a Radio On/Off Schedule on page 102. Note: You cannot configure the schedule while the Off radio button is selected. 9. Click the SAVE button. The changes are saved. Manage Radio On/Off Schedules and RADIUS Server Profiles 103 Business Central Wireless Manager Application Remove Radio On/Off Schedules You can remove one or more radio on/off schedules that you no longer need. To remove radio on/off schedules: 1. Open a browser on your computer. 2. In the address bar, enter https://wireless.netgear.com. The application login page displays. 3. Enter the email address and password for your BCWM account and click the LOG IN button. The Home page displays. 4. Select Configuration. The All Locations page displays. 5. In the SHARED SETTINGS menu in the lower left, select Radio On/Off Schedules. The Radio On/Off Schedules page displays. 6. Select the check boxes for the radio on/off schedules. 7. Click the DELETE SELECTED button. A confirmation pop-up window displays. 8. Click the YES button. The schedules are removed. Manage RADIUS Server Profiles After you configure a RADIUS server profile, you first must apply the profile to a location. Then, for any network at that location, you can apply the RADIUS server profile to one of the following network authentication methods: • WPA & WPA2 with RADIUS • WPA2 with RADIUS • WPA with RADIUS • Legacy 802.1x You can use one RADIUS server profile simultaneously for multiple locations and networks. However, all networks at one location share the same RADIUS server. For information about applying a RADIUS server profile to a location, see Select a RADIUS Server for a Location on page 63. For information about applying a RADIUS server profile to a network authentication method, see Change the WiFi Network Name, Authentication, or Encryption on page 68. Manage Radio On/Off Schedules and RADIUS Server Profiles 104 Business Central Wireless Manager Application Add a RADIUS Server Profile with an Optional Accounting Server If one or more RADIUS servers are available in your network, you can set up a RADIUS server profile that can include up to two authentication servers and up to two accounting servers. You can set up multiple RADIUS server profiles. To add a RADIUS server profile: 1. Open a browser on your computer. 2. In the address bar, enter https://wireless.netgear.com. The application login page displays. 3. Enter the email address and password for your BCWM account and click the LOG IN button. The Home page displays. 4. Select Configuration. The All Locations page displays. 5. From the Choose Action menu, select Add Radius Server Profile. 6. Configure the settings as described in the following table. Setting Description Profile Name Enter a name that lets you easily identify the RADIUS server. Primary Authentication Server IP Address Enter the IP address of the primary RADIUS server. Port Number Enter the port number through which the application must reach the primary RADIUS server. Manage Radio On/Off Schedules and RADIUS Server Profiles 105 Business Central Wireless Manager Application Setting Description Shared Secret Enter the password that provides the application access to the primary RADIUS server. Secondary Authentication Server IP Address Enter the IP address of the secondary RADIUS server. Port Number Enter the port number through which the application must reach the secondary RADIUS server. Shared Secret Enter the password that provides the application access to the secondary RADIUS server. Authentication Setting Reauthentication Time Enter the period in seconds after which a user must be reauthenticated. The default period is 3600 seconds (1 hour). Enter 0 to disable reauthentication. Update global key every To allow the global key update, select the Update global key every check box and enter the period in seconds after which the global key must be updated. The default period is 1800 seconds (30 minutes). 7. Click the ADD THIS RADIUS PROFILE button. The application confirms the addition. 8. To add an accounting server to the profile, click the Add Accounting Server link and do the following: a. For the primary and secondary accounting servers, specify the IP address, port number, and shared secret. b. Click the ADD THIS ACCOUNTING SERVER button. The Radius Server Profile page displays the new profile. Change a RADIUS Server Profile You can change a RADIUS server profile. The change affects all locations for which the RADIUS server profile is in effect. You cannot disable a RADIUS server profile. To change a RADIUS server profile: 1. Open a browser on your computer. 2. In the address bar, enter https://wireless.netgear.com. The application login page displays. 3. Enter the email address and password for your BCWM account and click the LOG IN button. The Home page displays. 4. Select Configuration. The All Locations page displays. Manage Radio On/Off Schedules and RADIUS Server Profiles 106 Business Central Wireless Manager Application 5. In the SHARED SETTINGS menu in the lower left, select Radius Server Profiles. The All Radius Server Profiles page displays. 6. Click the profile. The Radius Server Profile page displays. 7. Change the authentication settings as needed. For more information, see Add a RADIUS Server Profile with an Optional Accounting Server on page 105. 8. To change the accounting settings, do the following: a. At the bottom, click the Accounting Server heading. The accounting server fields display. b. Change the accounting settings as needed. 9. Click the SAVE button. The changes are saved. Remove a RADIUS Server Profile You can remove a RADIUS server profile that you no longer need. To remove a RADIUS server profile: 1. Open a browser on your computer. 2. In the address bar, enter https://wireless.netgear.com. The application login page displays. 3. Enter the email address and password for your BCWM account and click the LOG IN button. The Home page displays. 4. Select Configuration. The All Locations page displays. 5. In the SHARED SETTINGS menu in the lower left, select Radius Server Profiles. The All Radius Server Profiles page displays. 6. Click the RADIUS server profile. The Radius Server Profile page displays. 7. From the Choose Action menu, select Delete This Radius Server. A confirmation pop-up window displays. 8. Click the YES button. The RADIUS server profile is removed. Manage Radio On/Off Schedules and RADIUS Server Profiles 107 7. Manage Captive Portal Profiles, Usage Plans, and User Access 7 Captive portal profiles, user groups, hotspot user accounts, and MAC ACLs are part of the shared settings, which you can assign to any location or network, depending on the nature of the setting. Usage plans are also part of the shared settings. At any location, you can assign a usage plan to a captive portal profile, hotspot, user group, or user account. This chapter includes the following sections: • Manage Captive Portal Profiles • Manage Usage Plans • Manage Hotspot User Accounts for Cloud AAA Hotspots • Manage User Groups for Cloud AAA Hotspots • Manage MAC ACLs 108 Business Central Wireless Manager Application Manage Captive Portal Profiles A captive portal blocks clients from accessing the network until they are verified. You can require users to agree to user terms and you can direct user to a specific website. You can offer free access or access that is paid or through vouchers. The application provides four methods of entry for a captive portal: click-through, click-through with email, cloud AAA authentication, and voucher authentication. You can set up two types of captive portal profiles, each of which can offer free or paid access: • • Basic captive portal profile. A basic captive portal profile lets you use the default splash page image or upload a custom image, align the image, and customize the header, text, and end-user license agreement (EULA). You can assign click through, click through using an email address, cloud AAA authentication, or voucher authentication through two types of basic captive portal profiles: - Free access. A basic captive portal profile that provides free access by requiring users to click through or click through using an email address. - Paid access. A basic captive portal profile that provides paid access through cloud AAA authentication or voucher authentication. Advanced captive portal profile. An advanced captive portal profile lets you customize and restyle the splash page by uploading a splash page file (the application supports CSS page styling), including customized advanced login messages and a custom EULA. You can assign click-through, click-through with email, cloud AAA authentication, or voucher authentication trough two types of advanced captive portal profiles: - Free access. An advanced hotspot that provides free access by requiring users to click through or click through using an email address. - Paid access. An advanced hotspot that provides paid access through cloud AAA authentication or voucher authentication. A captive portal profile is a shared setting that you can assign to a free or paid-for hotspot for a location or network (see Chapter 8, Manage Hotspots for Locations). You can also change a corporate network into a captive portal (see Change the WiFi Network into a Captive Portal by Assigning a Captive Portal Profile on page 76) or set up a new captive portal for a corporate network. The following table describes the options that are available to you when you set up a captive portal profile. Table 3. Captive portal options Feature Captive Portal Free Access Captive Portal Paid Access Authentication • • • • Redirect users Redirecting to a website is an option. Redirecting to a website is an option. Click-through Click-through with email Cloud AAA authentication Voucher Manage Captive Portal Profiles, Usage Plans, and User Access 109 Business Central Wireless Manager Application Table 3. Captive portal options (continued) Feature Captive Portal Free Access Captive Portal Paid Access Voucher definition Not applicable • • • Usage plan You can select an existing usage plan for free access. • • Set the unit cost per hour. Offer optional free access in addition to paid access. Authenticate optional free access: - Click-through - Click-through with email You can select an existing usage plan for paid access. If you offer optional free access with a voucher, you can select a second usage plan for free access. Splash page Basic You can set the following options: • Image for the page • Alignment of the image • Header for the page • Text for the page • EULA text, and whether the EULA displays You can set the following options: • Image for the page • Alignment of the image • Header for the page • Text for the page • EULA text and whether the EULA displays Advanced You can customize and restyle the splash page by uploading a splash page file (page styling with CSS is supported). Customization includes the following options: • Login message • Login error message • Login success message • EULA You can customize and restyle the splash page by uploading a splash page file (page styling with CSS is supported). Customization includes the following options: • Login message • Login error message • Login success message • EULA The following sections describe how you can set up and manage captive portal profiles: • Add a Basic Captive Portal Profile for Free Access or Access Through Cloud AAA • Add an Advanced Captive Portal Profile for Free Access or Access Through Cloud AAA • Add a Basic Captive Portal Profile for Access Through Vouchers • Add an Advanced Captive Portal Profile for Access Through Vouchers • Change a Captive Portal Profile • Remove a Captive Portal Profile Manage Captive Portal Profiles, Usage Plans, and User Access 110 Business Central Wireless Manager Application Add a Basic Captive Portal Profile for Free Access or Access Through Cloud AAA A basic captive portal profile for free access or access through cloud AAA lets you use the default splash page image or upload a custom image, align the image, and customize the header, text, and end-user license agreement (EULA). For a basic captive portal profile, you cannot customize or restyle the splash page. You can assign click-through, click-through with email, or cloud AAA authentication. For information about adding an advanced captive portal profile for free access or access through cloud AAA, see Add an Advanced Captive Portal Profile for Free Access or Access Through Cloud AAA on page 114. To add a basic captive portal profile for free access or access through cloud AAA: 1. Open a browser on your computer. 2. In the address bar, enter https://wireless.netgear.com. The application login page displays. 3. Enter the email address and password for your BCWM account and click the LOG IN button. The Home page displays. 4. Select Configuration. The All Locations page displays. 5. From the Choose Action menu, select Add Captive Portal Profile. Manage Captive Portal Profiles, Usage Plans, and User Access 111 Business Central Wireless Manager Application 6. Configure the settings as described in the following table. Setting Description Profile Name Enter a name that lets you easily identify the captive portal. Authentication From the menu, select one of the following options: • Click Through. No authentication is required to click through. • Click Through With Email. Email address is required to click through. • Cloud AAA. User name and password are required to sign in. Note: For information about the Vouchers option, see Add a Basic Captive Portal Profile for Access Through Vouchers on page 117. Usage Plan From the menu, select a usage plan. By default, the selection from the menu is No Policy. For information about setting up a usage plan, which is also referred to as a policy plan, see Add a Usage Plan on page 128. Redirect users to a Select this check box to direct the user to a website after login. specified website after login In the field that displays, enter the website, beginning with http://. 7. Click the NEXT button. 8. Make sure that the Basic radio button is selected. This radio button is selected by default. Manage Captive Portal Profiles, Usage Plans, and User Access 112 Business Central Wireless Manager Application 9. Customize the settings as described in the following table. Setting Description Image In relation to the splash page that welcomes the users, you can perform the following tasks: • By default, the right radio button is selected and the image on the splash page is aligned at the right side. You can select the center or left radio button. • To customize the image on the splash page, click the UPLOAD button, navigate to an image, and upload it to the application. Header By default, the header text is Welcome! You can customize this text. Text The default text and components that display on the splash page depend on the type of authentication. For all these types of captive portals, you can customize the text but not the fields and button. To preview this splash page, click the PREVIEW button. • Click Through. The splash page shows the default text Please click Continue for free Internet access (or your customized text) and the Continue button that the user must click. • Click Through With Email. The splash page shows the default text Please enter a valid email address for Internet access (or your customized text), a field in which the user must enter an email address, and the Continue button that the user must click. • Cloud AAA. The splash page shows the default text Please enter a valid account for Internet access (or your customized text), a field in which the user must enter an account name, another field in which the user must enter a password, and the Sign In button that the user must click. Note: For information about the Vouchers option, see Add a Basic Captive Portal Profile for Access Through Vouchers on page 117. EULA By default, the On radio button is selected and the user can click the Terms and Conditions link on the splash page to view the default EULA. You can change the text of the EULA. You can select the Off radio button, in which case the EULA is not accessible to the user on the splash page. 10. To preview the splash page, click the PREVIEW button. 11. To change your customization of the splash page and start again, click the RESET button. 12. To add the captive portal profile, click the ADD WITH BASIC MODE button. The Captive Portal Profile page displays the profile. Note: For information about how to assign a captive portal profile to a hotspot for a location or WiFi network, see Chapter 8, Manage Hotspots for Locations. Manage Captive Portal Profiles, Usage Plans, and User Access 113 Business Central Wireless Manager Application Add an Advanced Captive Portal Profile for Free Access or Access Through Cloud AAA An advanced captive portal profile for free access or access through cloud AAA lets you customize and restyle a splash page file (the application supports CSS page styling), including customized advanced login messages and a custom end-user license agreement (EULA). You can assign click-through, click-through with email, or cloud AAA authentication. Note: The default splash page for an advanced captive portal profile is responsive to tablet and smartphone displays. For information about adding a basic captive portal profile for free access or access through cloud AAA, see Add a Basic Captive Portal Profile for Free Access or Access Through Cloud AAA on page 111. To add an advanced captive portal profile for free access or access through cloud AAA: 1. Open a browser on your computer. 2. In the address bar, enter https://wireless.netgear.com. The application login page displays. 3. Enter the email address and password for your BCWM account and click the LOG IN button. The Home page displays. 4. Select Configuration. The All Locations page displays. 5. From the Choose Action menu, select Add Captive Portal Profile. The Captive Portal wizard starts. Manage Captive Portal Profiles, Usage Plans, and User Access 114 Business Central Wireless Manager Application 6. Configure the settings as described in the following table. Setting Description Profile Name Enter a name that lets you easily identify the captive portal. Authentication From the menu, select one of the following options: • Click Through. No authentication required is to click through. • Click Through With Email. Email address is required to click through. • Cloud AAA. User name and password are required to sign in. Note: For information about the Vouchers option, see Add an Advanced Captive Portal Profile for Access Through Vouchers on page 122. Usage Plan From the menu, select a usage plan. By default, the selection from the menu is No Policy. For information about setting up a usage plan, which is also referred to as a policy plan, see Add a Usage Plan on page 128. Redirect users to a Select this check box to direct the user to a website after login. specified website after login In the field that displays, enter the website, beginning with http://. 7. Click the NEXT button. The basic customization page displays. 8. Click the Advanced button. Manage Captive Portal Profiles, Usage Plans, and User Access 115 Business Central Wireless Manager Application 9. To download NETGEAR templates, that is, default templates that are used for basic captive portal profiles, click the DOWNLOAD TEMPLATES button and follow the directions of your browser to save the .zip file to a location on your computer. You can alter these default templates or use the default templates as examples to create your own templates. You must keep indicators that relate to elements such as style, input, and email in the source file. Otherwise, the template will not function. The name of the .zip file depends on the type of authentication that you are using for the captive portal: • Click Through. cp_template_click_through.zip • Click Through With Email. cp_template_click_through_email.zip • Cloud AAA. cp_template_aaa.zip After you set up a custom template, you can upload it to the application, making sure that you do not change the .zip file name for the type of authentication that you are using for the captive portal. Note: For information about the Vouchers option, see Add an Advanced Captive Portal Profile for Access Through Vouchers on page 122. 10. To upload a custom template or CSS file to the application, click the UPLOAD FILE button and follow the directions of your browser. If you upload a CSS file, the name of the file is stated in the CSS section. 11. To view a custom login message, custom error message, custom success message, or custom EULA, click the associated PREVIEW button in the HTML section. 12. To add the captive portal profile, click the ADD WITH ADVANCED MODE button. The Captive Portal Profile page displays the profile. Manage Captive Portal Profiles, Usage Plans, and User Access 116 Business Central Wireless Manager Application Note: For information about how to assign a captive portal profile to a hotspot for a location or WiFi network, see Chapter 8, Manage Hotspots for Locations. Add a Basic Captive Portal Profile for Access Through Vouchers A basic captive portal profile for voucher access lets you use the default splash page image or upload a custom image, align the image, and customize the header, text, and end-user license agreement (EULA). For a basic captive portal profile, you cannot customize or restyle the splash page. In addition to access that is paid for with a voucher, you can also provide limited free access. For information about adding an advanced captive portal profile for voucher access, see Add an Advanced Captive Portal Profile for Access Through Vouchers on page 122. To add a basic captive portal profile for voucher access: 1. Open a browser on your computer. 2. In the address bar, enter https://wireless.netgear.com. The application login page displays. 3. Enter the email address and password for your BCWM account and click the LOG IN button. The Home page displays. 4. Select Configuration. The All Locations page displays. 5. From the Choose Action menu, select Add Captive Portal Profile. The Captive Portal wizard starts. Manage Captive Portal Profiles, Usage Plans, and User Access 117 Business Central Wireless Manager Application 6. From the Authentication menu, select Vouchers. Note: For information about the Click Through, Click Through With Email, and Cloud AAA options, see Add a Basic Captive Portal Profile for Free Access or Access Through Cloud AAA on page 111. Manage Captive Portal Profiles, Usage Plans, and User Access 118 Business Central Wireless Manager Application 7. Configure the settings as described in the following table. Setting Description Profile Name Enter a name that lets you easily identify the captive portal. Redirect users to a Select this check box to direct the user to a website after login. specified website after login In the field that displays, enter the website, beginning with http://. Voucher Access Settings Voucher Plan Name Enter a name that lets you easily identify the voucher plan. Usage Limits (Optional) From the menu, select a usage plan for the voucher. By default, the selection from the menu is No Policy. For information about setting up a usage plan, which is also referred to as a policy plan, see Add a Usage Plan on page 128. Voucher Unit Cost Enter an amount in US$. The selections from the menus are fixed at connected and Hour. The amount that you enter is the cost per hour of connection. Optional Free Access By default, a voucher does not offer free WiFi access and the selection from the menu is No Optional Access. To offer a limited period of free WiFi access with a voucher (that is, in addition to the period purchased with the voucher), select one of the following options: • Click Through. No authentication is required to click through. • Click Through With Email. Email address is required to click through. Note: If you offer free WiFi access with a voucher, you must select a usage plan. Without a usage plan, you cannot offer free WiFi access with a voucher. If you select Click Through or Click Through With Email from the Optional Free Access menu, the Usage Plan menu displays. From the Usage Plan menu, select a usage plan for free WiFi access. For information about setting up a usage plan, which is also referred to as a policy plan, see Add a Usage Plan on page 128. Usage Plan 8. Click the NEXT button. Manage Captive Portal Profiles, Usage Plans, and User Access 119 Business Central Wireless Manager Application 9. Make sure that the Basic radio button is selected. This radio button is selected by default. 10. Customize the settings as described in the following table. Setting Description Image In relation to the splash page that welcomes the users, you can perform the following tasks: • By default, the right radio button is selected and the image on the splash page is aligned at the right side. You can select the center or left radio button. • To customize the image on the splash page, click the UPLOAD button, navigate to an image, and upload it to the application. Header By default, the header text is Welcome! You can customize this text. Manage Captive Portal Profiles, Usage Plans, and User Access 120 Business Central Wireless Manager Application Setting Description Text If you do not offer free access with the voucher, the default text that displays on the splash page is To access Internet, please enter your purchased voucher ID. You can customize this text. If you do offer free access with the voucher, the default text that displays on the splash page is To access Internet, please enter your purchased voucher ID or continue with limited free access. You can also customize this text. To preview the splash page, click the PREVIEW button. The fields and buttons that the splash page displays depend on whether you offer free access with the voucher. You cannot customize these fields or buttons. • No Optional Access. The splash page shows the default text (or your customized text), a field in which the user must enter the voucher number, and the Submit button that the user must click to obtain paid access. • Click Through. The splash page shows the default text (or your customized text), a field in which the user must enter the voucher number, and the Submit button that the user must click to obtain paid access. In addition, the splash page shows the Continue button that the user must click to obtain a limited period of free access. • Click Through With Email. The splash page shows the default text (or your customized text), a field in which the user must enter the voucher number, and the Submit button that the user must click to obtain paid access. In addition, the splash page shows a field in which the user must enter an email address and the Continue button that the user must click to obtain a limited period of free access. EULA By default, the On radio button is selected and the user can click the Terms and Conditions link on the splash page to view the default EULA. You can change the text of the EULA. You can select the Off radio button, in which case the EULA is not accessible to the user on the splash page. 11. To preview the splash page, click the PREVIEW button in the upper right of the Image section. 12. To change your customization of the splash page and start again, click the RESET button. 13. To add the captive portal profile, click the ADD WITH BASIC MODE button. The Captive Portal Profile page displays the profile. Note: For information about how to assign a captive portal profile to a hotspot for a location or WiFi network, see Chapter 8, Manage Hotspots for Locations. Manage Captive Portal Profiles, Usage Plans, and User Access 121 Business Central Wireless Manager Application Add an Advanced Captive Portal Profile for Access Through Vouchers An advanced captive portal profile for voucher access lets you customize and restyle the splash page by uploading a splash page file (the application supports CSS page styling), including customized advanced login messages and a custom end-user license agreement (EULA). In addition to access that is paid for with a voucher, you can also provide limited free access. Note: The default splash page for an advanced captive portal profile is responsive to tablet and smartphone displays. For information about adding a basic captive portal profile for free access, see Add a Basic Captive Portal Profile for Access Through Vouchers on page 117. To add an advanced captive portal profile for voucher access: 1. Open a browser on your computer. 2. In the address bar, enter https://wireless.netgear.com. The application login page displays. 3. Enter the email address and password for your BCWM account and click the LOG IN button. The Home page displays. 4. Select Configuration. The All Locations page displays. 5. From the Choose Action menu, select Add Captive Portal Profile. The Captive Portal wizard starts. Manage Captive Portal Profiles, Usage Plans, and User Access 122 Business Central Wireless Manager Application 6. From the Authentication menu, select Vouchers. Note: For information about the Click Through, Click Through With Email, and Cloud AAA options, see Add a Basic Captive Portal Profile for Free Access or Access Through Cloud AAA on page 111. 7. Configure the settings as described in the following table. Setting Description Profile Name Enter a name that lets you easily identify the captive portal. Redirect users to a Select this check box to direct the user to a website after login. specified website after login In the field that displays, enter the website, beginning with http://. Voucher Access Settings Voucher Plan Name Enter a name that lets you easily identify the voucher plan. Usage Limits (Optional) From the menu, select a usage plan. By default, the selection from the menu is No Policy. For information about setting up a usage plan, which is also referred to as a policy plan, see Add a Usage Plan on page 128. Voucher Unit Cost Enter an amount in US$. The selections from the menus are fixed at connected and Hour. The amount that you enter is the cost per hour of connection. Manage Captive Portal Profiles, Usage Plans, and User Access 123 Business Central Wireless Manager Application Setting Description Optional Free Access By default, a voucher does not offer free WiFi access and the selection from the menu is No Optional Access. To offer a limited period of free WiFi access with a voucher (that is, in addition to the period purchased with the voucher), select one of the following options: • Click Through. No authentication is required to click through. • Click Through With Email. Email address is required to click through. Note: If you offer free WiFi access with a voucher, you must select a usage plan. Without a usage plan, you cannot offer free WiFi access with a voucher. Usage Plan If you select Click Through or Click Through With Email from the Optional Free Access menu, the Usage Plan menu displays. From the Usage Plan menu, select a usage plan for free WiFi access. For information about setting up a usage plan, which is also referred to as a policy plan, see Add a Usage Plan on page 128. 8. Click the NEXT button. The basic customization page displays. 9. Click the Advanced button. 10. To download NETGEAR templates, that is, default templates that are used for basic captive portal profiles, click the DOWNLOAD TEMPLATES button and follow the directions of your browser to save the .zip file to a location on your computer. You can alter these default templates or use the default templates as examples to create your own templates. You must keep indicators that relate to elements such as style, input, and email in the source file. Otherwise, the template will not function. Manage Captive Portal Profiles, Usage Plans, and User Access 124 Business Central Wireless Manager Application The name of the .zip file for voucher use depends on whether or not you offer optional free access with a voucher: • No free access with voucher. cp_template_voucher_no_free_access.zip • Optional free access with voucher. cp_template_voucher_free_access.zip After you set up a custom template, you can upload it to the application, making sure that you do not change the .zip file name for the type of access that you are using for the captive portal. 11. To upload a custom template or CSS file to the application, click the UPLOAD FILE button and follow the directions of your browser. If you upload a CSS file, the name of the file is stated in the CSS section. 12. To view a custom login message, custom error message, custom success message, or custom EULA, click the associated PREVIEW button in the HTML section. 13. To add the captive portal profile, click the ADD WITH ADVANCED MODE button. The Captive Portal Profile page displays the profile. Note: For information about how to assign a captive portal profile to a hotspot for a location or WiFi network, see Chapter 8, Manage Hotspots for Locations. Change a Captive Portal Profile You can change a captive portal profile, including the profile name, authentication method, voucher plan name, usage plan settings, and splash page settings. To change a captive portal profile: 1. Open a browser on your computer. 2. In the address bar, enter https://wireless.netgear.com. The application login page displays. 3. Enter the email address and password for your BCWM account and click the LOG IN button. The Home page displays. 4. Select Configuration. The All Locations page displays. 5. In the SHARED SETTINGS menu in the lower left, select Captive Portal Profiles. The Captive Portal Profiles page lists all captive portal profiles. 6. Select the captive portal profile. Manage Captive Portal Profiles, Usage Plans, and User Access 125 Business Central Wireless Manager Application The nature of the page that displays depends on whether the captive portal profile is for free access, cloud AAA access, or voucher access. The following figure show a page for a captive portal profile with voucher access. 7. Change the profile settings and, if applicable, voucher settings as needed. For more information about these settings, see one of the following sections: • Profile for free access. See the table on page 112. • Profile for voucher access. See the table on page 119. 8. Click the CUSTOMIZE button. 9. Change the splash page settings as needed. For more information about these settings, see one of the following sections: • Profile for free access with basic splash page. See the table on page 113. • Profile for free access with advanced splash page. See the steps on page 116. • Profile for voucher access with basic splash page. See the table on page 120. • Profile for voucher access with advanced splash page. See the steps on page 124. 10. Click the SAVE button. The changes are saved. Remove a Captive Portal Profile You can remove a captive portal profile or hotspot that you no longer need. If the captive portal profile is in use, you cannot remove it. In such a situation, you must find the location and network or hotspot to which the captive portal profile is assigned and disassociate the captive portal profile from the network or hotspot. Once it is disassociated, you can remove the captive portal profile. Manage Captive Portal Profiles, Usage Plans, and User Access 126 Business Central Wireless Manager Application To remove a captive portal profile: 1. Open a browser on your computer. 2. In the address bar, enter https://wireless.netgear.com. The application login page displays. 3. Enter the email address and password for your BCWM account and click the LOG IN button. The Home page displays. 4. Select Configuration. The All Locations page displays. 5. In the SHARED SETTINGS menu in the lower left, select Captive Portal Profiles. The Captive Portal Profiles page lists all captive portal profiles. 6. Select the captive portal profile. 7. From the Choose Action menu, select Delete This Captive Portal. The pop-up window that displays depends on whether or not the captive portal profile is in use. 8. Take one of the following actions: • If the captive portal profile is not in use, the Confirmation pop-up window displays. Do the following: Click the OK button. The captive portal profile is removed. • If the captive portal profile is in use, the Captive Portal Profile In Use pop-up window displays. Do the following: a. Click the OK button. The pop-up window closes. b. Find the location and network or hotspot to which the captive portal profile is assigned. c. Disassociate the captive portal profile from the network or hotspot. d. Repeat this procedure to remove the captive portal profile. Manage Usage Plans A usage plan, which is also referred to as a policy plan, lets you combine a time limit and a maximum number of allowed concurrent connections (per user or voucher) in one plan. You can include one or both of these restrictions in a single plan. The time limit lets you set a maximum number of hours per day, week, month, or year and the permitted access hours during a 24-hour period. Manage Captive Portal Profiles, Usage Plans, and User Access 127 Business Central Wireless Manager Application You can assign a usage plan to one or more of the following components: • Captive portal profile (See Manage Captive Portal Profiles on page 109.) • Hotspot (See Chapter 8, Manage Hotspots for Locations.) • User group (See Add a User Group on page 135.) • Hotspot user account (See View the Hotspot User Database and Add a New Hotspot User Account on page 131 and Add a New Hotspot User Account to a User Group on page 137.) The following sections describe how you can set up and manage usage plans: • Add a Usage Plan • Change a Usage Plan • Remove a Usage Plan Add a Usage Plan Before you add a usage plan, consider how you are going to use it. You can assign a usage plan to a captive portal profile, hotspot, user group, or user account. To add a usage plan: 1. Open a browser on your computer. 2. In the address bar, enter https://wireless.netgear.com. The application login page displays. 3. Enter the email address and password for your BCWM account and click the LOG IN button. The Home page displays. 4. Select Configuration. The All Locations page displays. 5. From the Choose Action menu, select Add Usage Plan. 6. In the Usage Policy Name field, enter a name that lets you easily identify the usage plan. 7. To configure time limits, click the Time Limit heading. Manage Captive Portal Profiles, Usage Plans, and User Access 128 Business Central Wireless Manager Application 8. Specify the following settings: • Limit access to. Use the field and menu to specify the maximum period of allowed access. By default, the period of access is not limited. • Permitted access hours. Use the fields and menus to specify the hours during which access is allowed. By default, access is not limited to specific hours. 9. To configure the maximum number of concurrent connections, click the Devices heading. 10. In the Allow field, enter the number of concurrent Internet connections that are allowed for one user or one voucher. By default, no limit is set. 11. Click the ADD THIS USAGE PLAN button. The Usage Plan page displays the basic features for the usage plan. Change a Usage Plan You can change a usage plan, including the maximum period of allowed access, the hours during which access is allowed, and the number of concurrent Internet connections that are allowed. To change a usage plan: 1. Open a browser on your computer. 2. In the address bar, enter https://wireless.netgear.com. The application login page displays. 3. Enter the email address and password for your BCWM account and click the LOG IN button. The Home page displays. 4. Select Configuration. The All Locations page displays. 5. In the SHARED SETTINGS menu in the lower left, select Usage Plan. The All Usage Plans page lists all usage plans. 6. Select the usage plan. The Usage Plan page displays. 7. Change the settings as needed. For more information about the settings, see Add a Usage Plan on page 128. Manage Captive Portal Profiles, Usage Plans, and User Access 129 Business Central Wireless Manager Application 8. Click the SAVE button. The changes are saved. Remove a Usage Plan You can remove a usage plan that you no longer need. If the usage plan is in use, you cannot remove it. In such a situation, you must find the captive portals, hotspots, user groups, and user accounts to which the usage plan is assigned and disassociate the usage plan from that component. (A usage plan can be assigned to more than one component.) Once it is disassociated, you can remove the usage plan. To remove a usage plan: 1. Open a browser on your computer. 2. In the address bar, enter https://wireless.netgear.com. The application login page displays. 3. Enter the email address and password for your BCWM account and click the LOG IN button. The Home page displays. 4. Select Configuration. The All Locations page displays. 5. In the SHARED SETTINGS menu in the lower left, select Usage Plan. The All Usage Plans page lists all usage plans. 6. Select the usage plan. 7. From the Choose Action menu, select Delete This Usage Plan. The pop-up window that displays depends on whether or not the usage plan is in use. 8. Take one of the following actions: • If the usage plan is not in use, the Confirmation pop-up window displays. Do the following: Click the OK button. The usage plan is removed. • If the usage plan is in use, the Usage Plan In Use pop-up window displays. Do the following: a. Click the OK button. The pop-up window closes. b. Find the captive portals, hotspots, user groups, and user accounts to which the usage plan is assigned. c. Disassociate the usage plan from the components to which is it assigned. d. Repeat this procedure to remove the usage plan. Manage Captive Portal Profiles, Usage Plans, and User Access 130 Business Central Wireless Manager Application Manage Hotspot User Accounts for Cloud AAA Hotspots A hotspot user is a user who accesses a WiFi network that provides free or paid-for access through a captive portal. A hotspot user account is intended for long-term use, for example, for a known and recurring visitor to an office floor. Users who access a WiFi network that provides access without a captive portal are regular WiFi users and do not require hotspot user accounts. Hotspot users are not related to vouchers. Users who access a hotspot that provides voucher access and users who access a free hotspot do not require hotspot user accounts. (In normal situations, the network authentication for such types of hotspots is Open System without data encryption.) IMPORTANT: The only type of hotspot user for which you must set up a hotspot user account is the user who accesses a hotspot through cloud AAA. You can add a new hotspot user account directly to the hotspot users database. If the hotspot user account is not member of a user group, the hotspot user cannot access the cloud AAA hotspot. However, at any time, you can add an existing hotspot user account to a user group (see Add an Existing Hotspot User Accounts to a User Group on page 138). Adding a usage plan for the hotspot user account is optional. Instead of adding a new hotspot user account directly to the hotspot user database, you can add a new user hotspot account to a user group (see Add a New Hotspot User Account to a User Group on page 137). In that case, the hotspot user account is also automatically added to the hotspot user database. The following sections describe how you can set up and manage hotspot user accounts: • View the Hotspot User Database and Add a New Hotspot User Account • Change an Existing Hotspot User Account • Remove a Hotspot User Account View the Hotspot User Database and Add a New Hotspot User Account You can add a new hotspot user account directly to the hotspot users database. If you want to assign the hotspot user account to a hotspot user group, first add the user group (see Add a User Group on page 135). If you want to assign a usage plan to a hotspot user account (which is optional), first add the usage plan (see Add a Usage Plan on page 128). Note: By default, the hotspot user database includes User 1, the default hotspot user account, which is assigned to Group 1, the default user group. Manage Captive Portal Profiles, Usage Plans, and User Access 131 Business Central Wireless Manager Application To view the hotspot user database and add a new hotspot user account: 1. Open a browser on your computer. 2. In the address bar, enter https://wireless.netgear.com. The application login page displays. 3. Enter the email address and password for your BCWM account and click the LOG IN button. The Home page displays. 4. Select Configuration. The All Locations page displays. 5. In the SHARED SETTINGS menu in the lower left, scroll down and select Hotspot Users. The previous figure shows all hotspot users. However, if you did not yet add any hotspot user accounts, the Hotspot Users page show only User 1 in Group 1, the default user in the default user group. 6. Click the ADD USER button. Manage Captive Portal Profiles, Usage Plans, and User Access 132 Business Central Wireless Manager Application 7. Configure the settings as described in the following table. Setting Description Username Enter a user for the hotspot user. This is the name that the hotspot user must enter on the splash page as part of the authentication process to gain network access. Full Name As an option, enter the full name of the hotspot user. Password Enter a password for the hotspot user. A password must contain at least eight characters. This is the password that the hotspot user must enter on the splash page as part of the authentication process to gain network access. Usage Plan As an option, from the menu, select a usage plan or leave the default No Policy selection. For information about setting up a usage plan, which is also referred to as a policy plan, see Add a Usage Plan on page 128. User Group As an option, from the menu, select a user group or leave the default No Group selection. Note: You can add the hotspot user to a user group later (see Add an Existing Hotspot User Accounts to a User Group on page 138). 8. Click the ADD button. The User Account page displays, showing the new hotspot user account in the table. Change an Existing Hotspot User Account You can change the settings for a hotspot user account. Note: If the hotspot user account was set up automatically when you created a user account in a user group, the changes that you make to the hotspot user account also apply to the associated entry in the user group. To change the settings for a hotspot user account: 1. Open a browser on your computer. 2. In the address bar, enter https://wireless.netgear.com. The application login page displays. 3. Enter the email address and password for your BCWM account and click the LOG IN button. The Home page displays. 4. Select Configuration. The All Locations page displays. Manage Captive Portal Profiles, Usage Plans, and User Access 133 Business Central Wireless Manager Application 5. In the SHARED SETTINGS menu in the lower left, scroll down and select Hotspot Users. The Hotspot Users page displays. 6. Select the check box for the user account. 7. Click the EDIT SELECTED button. The EDIT SELECTED USER pop-up window displays. 8. Change the settings as needed. For more information about the settings, see View the Hotspot User Database and Add a New Hotspot User Account on page 131. 9. Click the SAVE button. The changes are saved. Remove a Hotspot User Account You can remove one or more hotspot user accounts that you no longer need. Note: If the hotspot user account was set up automatically when you created a user account in a user group, removing the hotspot user account from the hotspot user database also removes the user account from the user group. To remove hotspot user accounts: 1. Open a browser on your computer. 2. In the address bar, enter https://wireless.netgear.com. The application login page displays. 3. Enter the email address and password for your BCWM account and click the LOG IN button. The Home page displays. 4. Select Configuration. The All Locations page displays. 5. In the SHARED SETTINGS menu in the lower left, scroll down and select Hotspot Users. The Hotspot Users page displays. 6. Select the check boxes for the user accounts. 7. Click the DELETE SELECTED button. A confirmation pop-up window displays. 8. Click the YES button. The user accounts are removed. Manage Captive Portal Profiles, Usage Plans, and User Access 134 Business Central Wireless Manager Application Manage User Groups for Cloud AAA Hotspots A user group contains hotspot user account for users who can access a hotspot through cloud AAA. For example, a hotel could host regular guests, premium guests, VIP guests, and so on. You could create a user group for each type of guest, attach a different usage plan to each user group, and add individual hotspot user accounts to each group. This approach is much easier and more efficient than setting up a usage plan for each individual user account. You can assign a user group to one or more of the following components: • Buildings at a location (See Assign User Groups to Buildings at a Location on page 61.) • Captive portal with cloud AAA authentication for a network (See Change the WiFi Network into a Captive Portal by Assigning a Captive Portal Profile on page 76.) The following sections describe how you can set up and manage user groups: • Add a User Group • Add a New Hotspot User Account to a User Group • Add an Existing Hotspot User Accounts to a User Group • Change a Hotspot User Account in a User Group • Remove One or More Hotspot User Account from a User Group • Change the Group Name or Usage Plan for a User Group • Remove a User Group Add a User Group If you want to assign a usage plan to a user group, first add the usage plan (see Add a Usage Plan on page 128). Note: By default, the application includes Group 1, the default user group to which User 1, the default hotspot user account, is assigned. To add a user group and, as an option, add existing hotspot user accounts to the new user group: 1. Open a browser on your computer. 2. In the address bar, enter https://wireless.netgear.com. The application login page displays. 3. Enter the email address and password for your BCWM account and click the LOG IN button. The Home page displays. Manage Captive Portal Profiles, Usage Plans, and User Access 135 Business Central Wireless Manager Application 4. Select Configuration. The All Locations page displays. 5. From the Choose Action menu, select Add User Group. 6. Configure the new user group: • Group Name. Enter a name for the new user group. • Policy Plan. As an option, from the menu, select a usage plan, or leave the default No Policy selection. For information about usage plans, see Add a Usage Plan on page 128. 7. Click the ADD THIS USER GROUP button. The application confirms the addition of the user group. 8. Take one of the following actions: • Complete the procedure by clicking the CLOSE button. The User Group page displays information about the new user group. • Add existing hotspot user accounts to the new user group by continuing with the following step. 9. To add existing hotspot user accounts to the new user group, click the Add User link. The Users Not In Group column displays user names for existing hotspot user accounts that do not yet belong to a user group. Note: All other user accounts must be assigned to a user group when you create the user account, so they do not display in the Users Not In Group column. 10. Move hotspot user accounts to the new user group: a. In the Users Not In Group column, select a user name and click the right arrow. The user name displays in the Users in Group column. Manage Captive Portal Profiles, Usage Plans, and User Access 136 Business Central Wireless Manager Application b. To move more user accounts to the group, repeat the previous step. c. To move a user account back to the Users Not In Group column, select the user name and click the left arrow. 11. Click the ADD THIS USER button. The changes are saved. The User Group page displays information about the new user group and shows the hotspot user accounts in the table. Add a New Hotspot User Account to a User Group If you want to assign a usage plan to a hotspot user account, first add the usage plan (see Add a Usage Plan on page 128). To add a new user hotspot account to a user group: 1. Open a browser on your computer. 2. In the address bar, enter https://wireless.netgear.com. The application login page displays. 3. Enter the email address and password for your BCWM account and click the LOG IN button. The Home page displays. 4. Select Configuration. The All Locations page displays. 5. From the SHARED SETTINGS menu in the lower left, scroll down and select User Groups. The All User Groups page displays. 6. Click the user group. 7. Click the ADD NEW USER button. Manage Captive Portal Profiles, Usage Plans, and User Access 137 Business Central Wireless Manager Application 8. Configure the settings as described in the following table. Setting Description Username Enter a user for the hotspot user. This is the name that the hotspot user must enter on the splash page as part of the authentication process to gain network access. Full Name As an option, enter the full name of the hotspot user. Password Enter a password for the hotspot user. A password must contain at least eight characters. This is the password that the hotspot user must enter on the splash page as part of the authentication process to gain network access. Usage Plan As an option, from the menu, select a usage plan or leave the default No Policy selection. Note: The user group and individual user accounts can be assigned different usage plans. The usage plan for an individual user account overrides the usage plan for the user group. User Group This is a nonconfigurable field that displays the name of the user group. 9. Click the ADD button. The new user account is added to the user group. Add an Existing Hotspot User Accounts to a User Group If you added hotspot user accounts directly to the hotspot user database without assigning them to a user group, use the following procedure to add the hotspot user accounts to a user group. If you want to add different hotspot user accounts to different user groups, repeat the procedure for each user group. To add existing hotspot user accounts to a user group: 1. Open a browser on your computer. 2. In the address bar, enter https://wireless.netgear.com. The application login page displays. 3. Enter the email address and password for your BCWM account and click the LOG IN button. The Home page displays. Manage Captive Portal Profiles, Usage Plans, and User Access 138 Business Central Wireless Manager Application 4. Select Configuration. The All Locations page displays. 5. From the SHARED SETTINGS menu in the lower left, select User Groups. The All User Groups page displays. 6. Click the user group. 7. Click the ADD EXISTING USERS button. 8. Move the hotspot user accounts to the group: a. In the Users Not In Group column, select a user name and click the right arrow. The user name displays in the Users in Group column. b. To move more user accounts to the group, repeat the previous step. c. To move a user account back to the Users Not In Group column, select the user name and click the left arrow. 9. Click the SAVE button. The existing hotspot user accounts are added to the user group. Manage Captive Portal Profiles, Usage Plans, and User Access 139 Business Central Wireless Manager Application Change a Hotspot User Account in a User Group You can change the settings for a hotspot user account. You must know to which user group the hotspot user account is assigned. Note: Changes to the hotspot user account in the user group also affect the hotspot user account in the hotspot user database. Tip: If you are not sure to which user group the hotspot user account is assigned, locate the hotspot user account in the hotspot user database (see View the Hotspot User Database and Add a New Hotspot User Account on page 131). If you change a hotspot user account in the hotspot user database, you can also assign the hotspot user account to another user group. For more information, see Change an Existing Hotspot User Account on page 133. To change the settings for a hotspot user account in a user group: 1. Open a browser on your computer. 2. In the address bar, enter https://wireless.netgear.com. The application login page displays. 3. Enter the email address and password for your BCWM account and click the LOG IN button. The Home page displays. 4. Select Configuration. The All Locations page displays. 5. From the SHARED SETTINGS menu in the lower left, select User Groups. The All User Groups page displays. 6. Click the user group. The User Group page displays. 7. Select the check box for the user account. 8. Click the EDIT SELECTED button. The EDIT SELECTED USER pop-up window displays. 9. Change the settings as needed. For more information about the settings, see Add a New Hotspot User Account to a User Group on page 137. 10. Click the SAVE button. The changes are saved. Manage Captive Portal Profiles, Usage Plans, and User Access 140 Business Central Wireless Manager Application Remove One or More Hotspot User Account from a User Group You can remove one or more hotspot user accounts that you no longer need. You must know to which user group the hotspot user accounts are assigned. Note: Hotspot user accounts that you remove from a user group are not automatically removed from the hotspot user database. For information about removing a hotspot user account from the hotspot user database, see Remove a Hotspot User Account on page 134. Tip: If you are not sure to which user group the hotspot user account is assigned, locate the hotspot user account in the hotspot user database (see View the Hotspot User Database and Add a New Hotspot User Account on page 131). To remove hotspot user accounts from a user group: 1. Open a browser on your computer. 2. In the address bar, enter https://wireless.netgear.com. The application login page displays. 3. Enter the email address and password for your BCWM account and click the LOG IN button. The Home page displays. 4. Select Configuration. The All Locations page displays. 5. From the SHARED SETTINGS menu in the lower left, select User Groups. The All User Groups page displays. 6. Click the user group. The User Group page displays. 7. Select the check boxes for the user accounts. 8. Click the DELETE SELECTED button. A confirmation pop-up window displays. 9. Click the YES button. The hotspot user accounts are removed from the user group but not from the hotspot user database. Manage Captive Portal Profiles, Usage Plans, and User Access 141 Business Central Wireless Manager Application Change the Group Name or Usage Plan for a User Group You can change the group name or usage plan for a user group. To change the group name and usage plan for a user group: 1. Open a browser on your computer. 2. In the address bar, enter https://wireless.netgear.com. The application login page displays. 3. Enter the email address and password for your BCWM account and click the LOG IN button. The Home page displays. 4. Select Configuration. The All Locations page displays. 5. In the SHARED SETTINGS menu in the lower left, select User Groups. The All User Groups page displays. 6. Click the user group. The User Group page displays. 7. Change the name and usage plan as needed. For more information, see Add a Usage Plan on page 128. 8. Click the SAVE button. The changes are saved. Remove a User Group You can remove a user group that you no longer need. If you do so, the hotspot user accounts that were assigned to the user group remain in the hotspot user database but are no longer assigned to a user group. To remove a user group: 1. Open a browser on your computer. 2. In the address bar, enter https://wireless.netgear.com. The application login page displays. 3. Enter the email address and password for your BCWM account and click the LOG IN button. The Home page displays. 4. Select Configuration. The All Locations page displays. Manage Captive Portal Profiles, Usage Plans, and User Access 142 Business Central Wireless Manager Application 5. In the SHARED SETTINGS menu in the lower left, select User Groups. The All User Groups page displays. 6. Click the user group. The User Group page displays. 7. From the Choose Action menu, select Delete This User Group. A confirmation pop-up window displays. 8. Click the YES button. The user group is removed. Manage MAC ACLs Another way to control user access is to set up one or more MAC access control lists (ACLs). You can either allow or deny access to a network at the location to which you apply the MAC ACL. Note: NETGEAR recommends that you do not rely only on MAC ACLs to control user access. After you set up a MAC ACL, you must apply the MAC ACL to a location (see Select a MAC Access Control List for a Location on page 64) and configure network authentication with the MAC ACL for a WiFi network at the location (see Change the WiFi Network Name, Authentication, or Encryption on page 68). The following sections describe how you can set up and manage MAC ACLs: • Set Up a MAC ACL by Adding MAC Addresses Manually • Set Up a MAC ACL by Importing a File with MAC Addresses • Change a MAC ACL • Remove a MAC ACL Set Up a MAC ACL by Adding MAC Addresses Manually You can add MAC addresses manually either by typing the MAC addresses or by moving MAC addresses that the application detects to the MAC ACL. You can add up to 250 MAC addresses to a MAC ACL. To set up a MAC ACL manually: 1. Open a browser on your computer. 2. In the address bar, enter https://wireless.netgear.com. The application login page displays. Manage Captive Portal Profiles, Usage Plans, and User Access 143 Business Central Wireless Manager Application 3. Enter the email address and password for your BCWM account and click the LOG IN button. The Home page displays. 4. Select Configuration. The All Locations page displays. 5. From the Choose Action menu, select Add MAC-ACL. 6. In the MAC ACL Name field, enter a name that lets you easily identify the MAC ACL. 7. Next to Treat List As, select a radio button: • Allow. WiFi devices with MAC addresses on the MAC ACL are allowed access. • Deny. WiFi devices with MAC addresses on the MAC ACL are denied access. This is the default setting. 8. Compose the MAC ACL by adding MAC addresses manually, by adding MAC addresses that the application detected, or by a combination of both methods: • Manual method. Enter MAC addresses manually in the MAC ACL: a. In the MAC Address field, enter a valid MAC address. b. Click the ADD button. The MAC address displays in the MAC ACL table. c. To add more MAC addresses, repeat Step a and Step b. d. To remove a MAC address from the list, select its check box and click the REMOVE button. • Detection method. Move all or selected MAC addresses that are detected by the application to the MAC ACL: a. From the Show available clients at menu, select a location, or leave the default selection All Locations, which shows all WiFi clients at all locations. b. Either select the check box in the Available Wireless Clients table header or select check boxes for individual MAC addresses. Manage Captive Portal Profiles, Usage Plans, and User Access 144 Business Central Wireless Manager Application c. Click the ADD button (the button with the left arrow). The selected MAC addresses display in the MAC ACL table. d. To remove a MAC address from the list, select its check box and click the REMOVE button. Note: For information about importing a list of MAC addresses, see Set Up a MAC ACL by Importing a File with MAC Addresses on page 145. 9. At the right bottom, click the ADD THIS MAC-ACL button. The changes are saved. The MAC ACL Control Lists page displays information about the new MAC ACL. The MAC ACL does not go into effect until you do the following: a. Apply the MAC ACL to a location (see Select a MAC Access Control List for a Location on page 64). b. Configure network authentication with the MAC ACL for a WiFi network at the location (see Change the WiFi Network Name, Authentication, or Encryption on page 68). Set Up a MAC ACL by Importing a File with MAC Addresses To set up a MAC ACL by importing MAC addresses, you must add the MAC addresses to a table in a .csv file. You can add up to 250 MAC addresses to the table. In the table, add each MAC address on a single row in the leftmost column. The MAC addresses must be in the standard xx:xx:xx:xx:xx:xx format. Do not include a table header. Tip: You can download a template from the application. You use this template to set up your list of MAC addresses. For more information, see the following procedure. CAUTION: Do not open the .csv file with MAC addresses in Excel. Excel might automatically reformat the MAC addresses in scientific notation. Make sure that the column with MAC addresses in the .csv file does not contain any type of formatting. To download a template and set up a MAC ACL by importing a file with MAC addresses: 1. Open a browser on your computer. 2. In the address bar, enter https://wireless.netgear.com. The application login page displays. 3. Enter the email address and password for your BCWM account and click the LOG IN button. The Home page displays. Manage Captive Portal Profiles, Usage Plans, and User Access 145 Business Central Wireless Manager Application 4. Select Configuration. The All Locations page displays. 5. From the Choose Action menu, select Add MAC-ACL. 6. To download a template, click the Download a CSV file template link and follow the directions of your browser to save the file to your computer. 7. If you did not set up your list of MAC addresses, do so now. When you are ready, continue with the next step. 8. In the MAC ACL Name field, enter a name that lets you easily identify the MAC ACL. 9. Next to Treat List As, select a radio button: • Allow. WiFi devices with MAC addresses on the MAC ACL are allowed access. • Deny. WiFi devices with MAC addresses on the MAC ACL are denied access. This is the default setting. 10. In the lower left, click the CHOOSE FILE button. 11. Follow the directions of your browser to locate and select the .csv file with MAC addresses. After you select the file, the MERGE and REPLACE buttons display. 12. Click either the MERGE or REPLACE button: • MERGE. Allows you to keep the existing MAC addresses on the MAC ACL and adds the imported MAC addresses to the ACL. • REPLACE. Removes the existing MAC addresses from the MAC ACL and adds the imported MAC addresses to the MAC ACL. Manage Captive Portal Profiles, Usage Plans, and User Access 146 Business Central Wireless Manager Application 13. If the application detects a MAC address with errors, correct the MAC address on the page or click the associated X icon to remove the MAC address from the list. 14. Depending on whether you selected the MERGE button or REPLACE button in Step 12, click the MERGE MACs TO ACL button (see the previous figure) or REPLACE ACL WITH MACs button. 15. At the right bottom, click the ADD THIS MAC-ACL button. The changes are saved. The MAC ACL Control Lists page displays information about the new MAC ACL. The MAC ACL does not go into effect until you do the following: a. Apply the MAC ACL to a location (see Select a MAC Access Control List for a Location on page 64). b. Configure network authentication with the MAC ACL for a WiFi network at the location (see Change the WiFi Network Name, Authentication, or Encryption on page 68). Manage Captive Portal Profiles, Usage Plans, and User Access 147 Business Central Wireless Manager Application Change a MAC ACL You can change the name of a MAC ACL, add MAC addresses to an ACL, remove MAC addresses from an ACL, and switch an ACL that allows access to an ACL that denies access, or the other way around. A MAC ACL can contain up to 250 MAC addresses. To change a MAC ACL: 1. Open a browser on your computer. 2. In the address bar, enter https://wireless.netgear.com. The application login page displays. 3. Enter the email address and password for your BCWM account and click the LOG IN button. The Home page displays. 4. Select Configuration. The All Locations page displays. 5. In the SHARED SETTINGS menu in the lower left, scroll down and select MAC ACLs. The MAC Access Control Lists page displays. 6. Click the MAC ACL. The settings for the MAC ACL display. 7. Change the settings as needed. For more information about the settings, see Set Up a MAC ACL by Adding MAC Addresses Manually on page 143 and Set Up a MAC ACL by Importing a File with MAC Addresses on page 145). 8. Click the APPLY button. The changes are saved. Remove a MAC ACL You can remove a MAC ACL that you no longer need. To remove a MAC ACL: 1. Open a browser on your computer. 2. In the address bar, enter https://wireless.netgear.com. The application login page displays. 3. Enter the email address and password for your BCWM account and click the LOG IN button. The Home page displays. 4. Select Configuration. The All Locations page displays. Manage Captive Portal Profiles, Usage Plans, and User Access 148 Business Central Wireless Manager Application 5. In the SHARED SETTINGS menu in the lower left, scroll down and select MAC ACLs. The MAC Access Control Lists page displays. 6. Click the MAC ACL. The settings for the MAC ACL display. 7. From the Choose Action menu, select Delete This MAC ACL. A confirmation pop-up window displays. 8. Click the YES button. The MAC ACL is removed. Manage Captive Portal Profiles, Usage Plans, and User Access 149 8. Manage Hotspots for Locations 8 A hotspot is a WiFi network that provides access through a captive portal. You assign a hotspot to a location. A hotspot can offer free access, access that is paid for with a voucher, or a combination of both. A hotspot can also offer access that is paid for in another form (for example, added onto the total of a bill) and administered through cloud AAA.1 When you set up a hotspot, you can select a captive portal and a usage plan. Therefore, first set up the captive portals (see Manage Captive Portal Profiles on page 109) and usage plans (see Manage Usage Plans on page 127) that you might need for the hotspot. This chapter includes the following sections: • Hotspot Overview • Add a Basic Hotspot for Free Access • Add an Advanced Hotspot for Free Access • Add a Basic Hotspot for Access Through a Voucher • Add an Advanced Hotspot for Access Through a Voucher • Change a Hotspot • Remove a Hotspot For information about hotspot users, see Manage Hotspot User Accounts for Cloud AAA Hotspots on page 131. For information about (hotspot) user groups, see Manage User Groups for Cloud AAA Hotspots on page 135. 1. You cannot directly set up a hotspot with cloud AAA authentication, but you can do so indirectly by assigning a captive portal that uses cloud AAA authentication to a WiFi network. 150 Business Central Wireless Manager Application Hotspot Overview You can add a hotspot directly to a location or to the pool of WiFi networks at a location. The procedures to set up a hotspot for these scenarios are almost identical: The only difference is the menu from which you initiate the hotspot wizard. This chapter describes how to add a hotspot directly to a location. The application provides three methods of user access and authentication for a hotspot: click-through, click-through with email, and voucher authentication. Note: You cannot directly set up a hotspot with cloud AAA authentication through the hotspot wizard, but you can do so indirectly by assigning a captive portal that uses cloud AAA authentication to a WiFi network. That means that if you want to set up a hotspot with cloud AAA authentication, you must configure the hotspot through the captive portal menus. For more information, see Add a Basic Captive Portal Profile for Free Access or Access Through Cloud AAA on page 111 and Add an Advanced Captive Portal Profile for Free Access or Access Through Cloud AAA on page 114. You can set up two types of hotspots, each of which can offer free or paid access: • • Basic hotspot. A basic hotspot lets you use the default splash page image or upload a custom image, align the image, and customize the header, text, and end-user license agreement (EULA). You can assign click through, click through using an email address, or voucher authentication through two types of basic hotspots: - Free access. A basic hotspot that provides free access by requiring users to click through or click through using an email address. - Paid access. A basic hotspot that provides paid access through voucher authentication. Advanced hotspot. An advanced hotspot lets you customize and restyle the splash page by uploading a splash page file (the application supports CSS page styling), including customized advanced login messages and a custom EULA. You can assign click-through, click-through with email, or voucher authentication through two types of advanced hotspots: - Free access. An advanced hotspot that provides free access by requiring users to click through or click through using an email address. - Paid access. An advanced hotspot that provides paid access through voucher authentication. You can base a hotspot on an existing captive portal profile (see Manage Captive Portal Profiles on page 109) and usage plan (see Manage Usage Plans on page 127) or you can build an entirely new hotspot. Manage Hotspots for Locations 151 Business Central Wireless Manager Application If you use the hotspot wizards that are described in this chapter, you can offer free access or access that is paid for through vouchers, with or without an additional limited period of free access. Hotspot Options The following table describes the many options that are available to you when you set up a hotspot for a location. Table 4. Hotspot options Feature Hotspot Free Access Hotspot Voucher Access New captive portal • • Click-through Click-through with email Voucher Copy from existing captive portal • • Click-through Click-through with email Voucher Use existing captive portal • • Click-through Click-through with email Voucher Authentication Redirect users Redirecting to a website is an option. Redirecting to a website is an option. Voucher definition Not applicable • • • Set the unit cost per hour. Offer optional free access in addition to paid access. Authenticate optional free access: - Click-through - Click-through with email Splash page Basic You can set the following options: • Image for the page • Alignment of the image • Header for the page • Text for the page • EULA text, and whether the EULA displays You can set the following options: • Image for the page • Alignment of the image • Header for the page • Text for the page • EULA text and whether the EULA displays Advanced You can customize and restyle the splash page by uploading a splash page file (page styling with CSS is supported). Customization includes the following options: • Login message • Login error message • Login success message • EULA You can customize and restyle the splash page by uploading a splash page file (page styling with CSS is supported). Customization includes the following options: • Login message • Login error message • Login success message • EULA Manage Hotspots for Locations 152 Business Central Wireless Manager Application Table 4. Hotspot options (continued) Feature Hotspot Free Access Hotspot Voucher Access Usage plan New usage plan Copy from existing usage plan Use existing usage plan You can set the following options: • Maximum number of total free access hours during a period. • Hours during which free access is allowed. You can set the following options: • Maximum number of total paid access hours during a period. • Hours during which paid access is allowed. • Number of concurrent Internet connections that are allowed with one voucher. You can set the following options: • Maximum number of total free access hours during a period. • Hours during which free access is allowed. Usage plan for optional free access Not applicable New usage plan Copy from existing usage plan Use existing usage plan Roadmap for Providing and Acquiring Hotspot Access with a Voucher and for Monitoring Hotspot Usage The following high-level steps are involved in providing hotspot access with a voucher, acquiring hotspot access with a voucher, and monitoring the voucher status, hotspot users, and hotspot usage: 1. An admin user sets up a basic or advanced hotspot for voucher access. For more information, see Add an Advanced Hotspot for Free Access on page 159 or Add an Advanced Hotspot for Access Through a Voucher on page 172. 2. In the unusual situation that the hotspot for voucher access does not provide Open System network authentication without data encryption, an admin user sets up a user account in the hotspot user database for each hotspot user. For more information, see View the Hotspot User Database and Add a New Hotspot User Account on page 131. 3. An admin user invites someone to set up a hotspot clerk account so that he or she can sell and generate vouchers. For more information, see Invite Others to Become Admin, Read Only, or Hotspot Clerk Application Users on page 265. 4. The invitee sets up a hotspot clerk account. For more information, see Accept an Invitation and Sign Up for and Activate a Hotspot Clerk Account on page 180. 5. The hotspot clerk sells and generates a voucher for a customer or guest. For more information, see Sell and Generate a Voucher on page 181. 6. The customer or guest accesses the splash page and enters the voucher number. 7. The hotspot clerk monitors the voucher status. Manage Hotspots for Locations 153 Business Central Wireless Manager Application For more information, see View the Status of Vouchers for a Hotspot, Reprint a Voucher, or Delete Vouchers on page 184. 8. The admin monitors the hotspot users and usage. For more information, see the following sections: • View Hotspot Usage for Your Account on page 191 • Search the Hotspot Database for Your Account on page 194 • WiFi Network Level: View the Event Log for a WiFi Network on page 246 Add a Basic Hotspot for Free Access You set up a hotspot by adding it to a location. A basic hotspot with free access lets you use the default splash page image or upload a custom image, align the image, and customize the header, text, and end-user license agreement (EULA). For a basic hotspot, you cannot customize or restyle the splash page. By default, a hotspot for free access is an entirely open system (that is, without network authentication and data encryption). You can assign click-through without any authentication or click-through with email authentication. For information about setting up an advanced hotspot with free access, see Add an Advanced Hotspot for Free Access on page 159. To add a basic hotspot with free WiFi access to a location: 1. Open a browser on your computer. 2. In the address bar, enter https://wireless.netgear.com. The application login page displays. 3. Enter the email address and password for your BCWM account and click the LOG IN button. The Home page displays. Note: You can click the Add Hotspot link on the Home page, in which case the hotspot wizard functions slightly differently from the way it is described in this procedure and includes an extra page that lets you select a location. 4. Select Configuration. The All Locations page displays. 5. In the LOCATIONS tree on the left, click the location. The Location Profile page displays. In the LOCATIONS tree, the Wireless Networks and Access Points headings display under the selected location. 6. From the Choose Action menu, select Add Hotspot (Free). Manage Hotspots for Locations 154 Business Central Wireless Manager Application 7. Specify the following settings: • Hotspot Name. Enter the name that must serve as the SSID for the hotspot. • Wireless Network on. From the menu, select the WiFi band or bands on which the hotspot must be accessible. 8. Click the NEXT button. 9. Select a radio button to specify which type of captive portal must be used for the hotspot. You can create a new captive portal for the hotspot, copy and customize an existing captive portal, or use an existing captive portal. Manage Hotspots for Locations 155 Business Central Wireless Manager Application 10. Configure the settings as described in the following table. Setting Description Create New Captive Portal Profile Enter a name that lets you easily identify the captive portal for the hotspot. Authentication From the menu, select one of the following options: • Click Through. No authentication is required is to click through. • Click Through With Email. Email address is required to click through. Redirect users to a Select this check box to direct the user to a website after login. specified website after login In the field that displays, enter the website, beginning with http://. Copy From Existing Based on From the menu, select the shared captive portal on which you want to base the captive portal for the hotspot. Captive Portal Profile Enter a name that lets you easily identify the captive portal for the hotspot. Authentication From the menu, select one of the following options: • Click Through. No authentication is required to click through. • Click Through With Email. Email address is required to click through. Redirect users to a Select this check box to direct the user to a website after login. specified website after login In the field that displays, enter the website, beginning with http://. Use Existing Use From the menu, select the shared captive portal that you want to use as the captive portal for the hotspot. 11. Take one of the following actions: • If you selected the Use Existing radio button, go to Step 20. • If you selected the Create New or Copy From Existing radio button, click the NEXT button. Manage Hotspots for Locations 156 Business Central Wireless Manager Application 12. Make sure that the Basic radio button is selected. This radio button is selected by default. 13. Customize the settings as described in the following table. Setting Description Image In relation to the splash page that welcomes the users, you can perform the following tasks: • By default, the right radio button is selected and the image on the splash page is aligned at the right side. You can select the center or left radio button. • To customize the image on the splash page, click the UPLOAD button, navigate to an image, and upload it to the application. Header By default, the header text is Welcome! You can customize this text. Text The default text and components that display on the splash page depend on the type of authentication. For all these types of captive portals, you can customize the text but not the fields and button. To preview this splash page, click the PREVIEW button. • Click Through. The splash page shows the default text Please click Continue for free Internet access (or your customized text) and the Continue button that the user must click. • Click Through With Email. The splash page shows the default text Please enter a valid email address for Internet access (or your customized text), a field in which the user must enter an email address, and the Continue button that the user must click. Manage Hotspots for Locations 157 Business Central Wireless Manager Application Setting Description EULA By default, the On radio button is selected and the user can click the Terms and Conditions link on the splash page to view the default EULA. You can change the text of the EULA. You can select the Off radio button, in which case the EULA is not accessible to the user on the splash page. 14. To preview the splash page, click the PREVIEW button in the upper right of the Image section. 15. To change your customization of the splash page and start again, click the RESET button. 16. Click the NEXT button. The page adjusts and provides you with the options to set usage limits. If you do not want to set usage limits, leave the No radio button selected, which is the default setting, and go to Step 20. 17. To set usage limits, select the Yes radio button. 18. Select a radio button to specify how you want to set up the usage limits for the hotspot. You can create a new usage plan, copy and customize an existing usage plan, or use an existing usage plan. Manage Hotspots for Locations 158 Business Central Wireless Manager Application 19. Configure the settings as described in the following table. Setting Description Create New Policy Name Enter a name that lets you easily identify the usage plan. Limit access to Use the field and menus to specify the maximum period of allowed access. By default, the period of access is not limited. Permitted access hours Use the fields and menus to specify the hours during which access is allowed. By default, access is not limited to specific hours. Copy From Existing Based on From the menu, select the existing shared usage plan on which you want to base the hotspot usage plan. Policy Name Enter a name that lets you easily identify the usage plan. Limit access to Use the field and menus to specify the maximum period of allowed access. By default, the period of access is not limited. Permitted access hours Use the fields and menus to specify the hours during which access is allowed. By default, access is not limited to specific hours. Use Existing Use From the menu, select the existing shared usage plan that you want to use as the hotspot usage plan. 20. Click the ADD THIS HOTSPOT button. The Network Name and Authentication section displays, showing the settings for the new hotspot. By default, the network authentication is configured as an open system and the hotspot does not provide data encryption. For information about how to change the network authentication, data encryption, and other network settings for the hotspot, see Manage the WiFi Settings for a Network on page 68. Add an Advanced Hotspot for Free Access You set up a hotspot by adding it to a location. An advanced hotspot with free access lets you customize and restyle the splash page by uploading a splash page file (the application supports CSS page styling), including customized advanced login messages and a custom end-user license agreement (EULA). Note: The default splash page for an advanced hotspot is responsive to tablet and smartphone displays. Manage Hotspots for Locations 159 Business Central Wireless Manager Application By default, a hotspot for free access is an entirely open system (that is, without network authentication and data encryption). You can assign click-through without any authentication or click-through with email authentication. For information about setting up a basic hotspot with free access, see Add a Basic Hotspot for Free Access on page 154. To add a basic hotspot with free WiFi access to a location or individual WiFi network: 1. Open a browser on your computer. 2. In the address bar, enter https://wireless.netgear.com. The application login page displays. 3. Enter the email address and password for your BCWM account and click the LOG IN button. The Home page displays. Note: You can click the Add Hotspot link on the Home page, in which case the hotspot wizard functions slightly differently from the way it is described in this procedure and includes an extra page that lets you select a location. 4. Select Configuration. The All Locations page displays. 5. In the LOCATIONS tree on the left, click the location. The Location Profile page displays. In the LOCATIONS tree, the Wireless Networks and Access Points headings display under the selected location. 6. From the Choose Action menu, select Add Hotspot (Free). 7. Specify the following settings: • Hotspot Name. Enter the name that must serve as the SSID for the hotspot. Manage Hotspots for Locations 160 Business Central Wireless Manager Application • Wireless Network on. From the menu, select the WiFi band or bands on which the hotspot must be accessible. 8. Click the NEXT button. 9. Select a radio button to specify which type of captive portal must be used for the hotspot. You can create a new captive portal, copy and customize an existing captive portal, or use an existing captive portal. 10. Configure the settings as described in the following table. Setting Description Create New Captive Portal Profile Enter a name that lets you easily identify the captive portal for the hotspot. Authentication From the menu, select one of the following options: • Click Through. No authentication is required to click through. • Click Through With Email. Email address is required to click through. Redirect users to a Select this check box to direct the user to a website after login. specified website after login In the field that displays, enter the website, beginning with http://. Copy From Existing Based on From the menu, select the shared captive portal on which you want to base the captive portal for the hotspot. Captive Portal Profile Enter a name that lets you easily identify the captive portal for the hotspot. Authentication From the menu, select one of the following options: • Click Through. No authentication is required to click through. • Click Through With Email. Email address is required to click through. Manage Hotspots for Locations 161 Business Central Wireless Manager Application Setting Description Redirect users to a Select this check box to direct the user to a website after login. specified website after login In the field that displays, enter the website, beginning with http://. Use Existing Use From the menu, select the shared captive portal that you want to use as the captive portal for the hotspot. 11. Take one of the following actions: • If you selected the Use Existing radio button, go to Step 20. • If you selected the Create New or Copy From Existing radio button, click the NEXT button. The page that lets you edit the splash page displays. 12. Click the Advanced radio button. 13. To download NETGEAR templates, that is, default templates that are used for basic hotspots, click the DOWNLOAD TEMPLATES button and follow the directions of your browser to save the .zip file to a location on your computer. You can alter these default templates or use the default templates as examples to create your own templates. You must keep indicators that relate to elements such as style, input, and email in the source file. Otherwise, the template will not function. The name of the .zip file depends on the type of authentication that you are using for the hotspot: • Click Through. cp_template_click_through.zip • Click Through With Email. cp_template_click_through_email.zip Manage Hotspots for Locations 162 Business Central Wireless Manager Application After you set up a custom template, you can upload it to the application, making sure that you do not change the .zip file name for the type of authentication that you are using for the hotspot. 14. To upload a custom template or CSS file to the application, click the UPLOAD FILE button and follow the directions of your browser. If you upload a CSS file, the name of the file is stated in the CSS section. 15. To view a custom login message, custom error message, custom success message, or custom EULA, click the associated PREVIEW button in the HTML section. 16. Click the NEXT button. The page adjusts and provides you with the options to set usage limits. If you do not want to set usage limits, leave the No radio button selected, which is the default setting, and go to Step 20. 17. To set usage limits, select the Yes radio button. 18. Select a radio button to specify how you want to set up the usage limits for the hotspot. You can create a new usage plan, copy and customize an existing usage plan, or use an existing usage plan. 19. Configure the settings as described in the following table. Setting Description Create New Policy Name Enter a name that lets you easily identify the usage plan. Limit access to Use the field and menus to specify the maximum period of allowed access. By default, the period of access is not limited. Manage Hotspots for Locations 163 Business Central Wireless Manager Application Setting Description Permitted access hours Use the fields and menus to specify the hours during which access is allowed. By default, access is not limited to specific hours. Copy From Existing Based on From the menu, select the existing shared usage plan on which you want to base the hotspot usage plan. Policy Name Enter a name that lets you easily identify the usage plan. Limit access to Use the field and menus to specify the maximum period of allowed access. By default, the period of access is not limited. Permitted access hours Use the fields and menus to specify the hours during which access is allowed. By default, access is not limited to specific hours. Use Existing Use From the menu, select the existing shared usage plan that you want to use as the hotspot usage plan. 20. Click the ADD THIS HOTSPOT button. The Network Name and Authentication section displays, showing the settings for the new hotspot. By default, the network authentication is configured as an open system and the hotspot does not provide data encryption. For information about how to change the network authentication, data encryption, and other network settings for the hotspot, see Manage the WiFi Settings for a Network on page 68. Add a Basic Hotspot for Access Through a Voucher You set up a hotspot by adding it to a location. A basic hotspot with voucher access lets you use the default splash page image or upload a custom image, align the image, and customize the header, text, and end-user license agreement (EULA). For a basic hotspot, you cannot customize or restyle the splash page. A voucher is used for authentication. For information about setting up an advanced hotspot with voucher access, see Add an Advanced Hotspot for Access Through a Voucher on page 172. When you set up a basic hotspot with paid voucher access, you can also select to provide limited free access in addition to the paid access. For example, you could provide free access for the first hour and then require paid access for any additional hours. Manage Hotspots for Locations 164 Business Central Wireless Manager Application To add a basic hotspot with voucher and optional limited free WiFi access to a location or individual WiFi network: 1. Open a browser on your computer. 2. In the address bar, enter https://wireless.netgear.com. The application login page displays. 3. Enter the email address and password for your BCWM account and click the LOG IN button. The Home page displays. Note: You can click the Add Hotspot link on the Home page, in which case the hotspot wizard functions slightly differently from the way it is described in this procedure and includes an extra page that lets you select a location. 4. Select Configuration. The All Locations page displays. 5. In the LOCATIONS tree on the left, click the location. The Location Profile page displays. In the LOCATIONS tree, the Wireless Networks and Access Points headings display under the selected location. 6. From the Choose Action menu, select Add Hotspot (Voucher). 7. Specify the following settings: • Hotspot Name. Enter the name that must serve as the SSID for the hotspot. • Wireless Network on. From the menu, select the WiFi band or bands on which the hotspot must be accessible. 8. Click the NEXT button. Manage Hotspots for Locations 165 Business Central Wireless Manager Application 9. Select a radio button to specify which type of captive portal must be used for the hotspot. You can create a new captive portal, copy and customize an existing captive portal, or use an existing captive portal. 10. Configure the settings as described in the following table. Setting Description Create New Captive Portal Profile Enter a name that lets you easily identify the captive portal for the hotspot. Authentication The selection from the menu is fixed at Vouchers. Redirect users to a Select this check box to direct the user to a website after login. specified website after login In the field that displays, enter the website, beginning with http://. Voucher Plan Name Enter a name that lets you easily identify the voucher plan. Voucher Unit Cost Enter an amount in US$. The selections from the menus are fixed at connected and Hour. The amount that you enter is the cost per hour of connection. Optional Free Access By default, a voucher does not offer free WiFi access and the selection from the menu is No Optional Access. To offer a limited period of free WiFi access with a voucher (that is, in addition to the period purchased with the voucher), select one of the following options: • Click Through. No authentication is required to click through. • Click Through With Email. Email address is required to click through. Note: If you offer free WiFi access with a voucher, you must select a usage plan, which you can do later in this procedure. Without a usage plan, you cannot offer free WiFi access with a voucher. Manage Hotspots for Locations 166 Business Central Wireless Manager Application Setting Description Copy From Existing Based on From the menu, select the shared captive portal on which you want to base the hotspot captive portal. Captive Portal Profile Enter a name that lets you easily identify the captive portal for the hotspot. Authentication The selection from the menu is fixed at Vouchers. Redirect users to a Select this check box to direct the user to a website after login. specified website after login In the field that displays, enter the website, beginning with http://. Voucher Plan Name Enter a name that lets you easily identify the voucher plan. Voucher Unit Cost Enter an amount in US$. The selections from the menus are fixed at connected and Hour. The amount that you enter is the cost per hour of connection. Optional Free Access By default, a voucher does not offer free WiFi access and the selection from the menu is No Optional Access. To offer a limited period of free WiFi access with a voucher (that is, in addition to the period purchased with the voucher), select one of the following options: • Click Through. No authentication is required to click through. • Click Through With Email. Email address is required to click through. Note: If you offer free WiFi access with a voucher, you must select a usage plan, which you can do later in this procedure. Without a usage plan, you cannot offer free WiFi access with a voucher. Use Existing Use From the menu, select the shared captive portal that you want to use as the captive portal for the hotspot. 11. Click the NEXT button. Manage Hotspots for Locations 167 Business Central Wireless Manager Application The previous figure shows a configuration in which free access is offered (see the options in Step 10) and in which you can set usage limits for both voucher access and free access. Multiple combinations are possible. Note: If you do not assign a usage plan to the hotspot, Internet access for a voucher user is terminated automatically after 48 hours of usage. 12. Take one of the actions that are described in the following table. Action Details Voucher limits No free access Set usage limits for voucher access. You did not select free access in Step 10. 1. Select the Yes radio button. 2. Go to Step 13. 3. In the Voucher Plan section, specify the usage plans for voucher access. Voucher limits Free access with limits Set usage limits for voucher access. You selected free access in Step 10 and must set usage limits for free access. 1. Select the Yes radio button. 2. Go to Step 13. 3. In the Voucher Plan section, specify the usage plan for voucher access. 4. In the Usage Limits for Free Access section, specify the usage plan for free access. No voucher limits Free access with limits Do not set usage limits for voucher access. You selected free access in Step 10 and must set usage limits for free access. 1. Leave the No radio button selected, which is the default setting. 2. Go to Step 13. 3. In the Usage Limits for Free Access section, specify the usage plan for free access. No voucher limits No free access Do not set usage limits for voucher access. You did not select free access in Step 10. 1. Leave the No radio button selected, which is the default setting. 2. Go to Step 20. 13. Select a radio button to specify how you want to set up the usage plan or plans for the hotspot. For the voucher usage limit plan and the free access usage limit plan independently, you can create a new usage plan, copy and customize an existing usage plan, or use an existing usage plan. Manage Hotspots for Locations 168 Business Central Wireless Manager Application 14. Configure the settings for voucher access, free access, or both as described in the following table. Setting Description Create New Usage Plan Name Enter a name that lets you easily identify the usage plan for the hotspot. Limit access to Use the field and menus to specify the maximum period of allowed access. By default, the period of access is not limited. Permitted access hours Use the fields and menus to specify the hours during which access is allowed. By default, access is not limited to specific hours. Allow Enter the number of concurrent Internet connections that are allowed for one voucher. By default, no limit is set. Copy From Existing Based on From the menu, select the shared usage plan on which you want to base the usage plan for the hotspot. Usage Plan Name Enter a name that lets you easily identify the usage plan for the hotspot. Limit access to Use the field and menus to specify the maximum period of allowed access. By default, the period of access is not limited. Permitted access hours Use the fields and menus to specify the hours during which access is allowed. By default, access is not limited to specific hours. Allow Enter the number of concurrent Internet connections that are allowed for one voucher. By default, no limit is set. Use Existing Use From the menu, select the shared usage plan that you want to use as the usage plan for the hotspot. 15. Take one of the following actions: • If you selected the Use Existing radio button, go to Step 20. • If you selected the Create New or Copy From Existing radio button, click the NEXT button. Manage Hotspots for Locations 169 Business Central Wireless Manager Application 16. Make sure that the Basic radio button is selected. This radio button is selected by default. 17. Customize the settings as described in the following table. Setting Description Image In relation to the splash page that welcomes the users, you can perform the following tasks: • By default, the right radio button is selected and the image on the splash page is aligned at the right side. You can select the center or left radio button. • To customize the image on the splash page, click the UPLOAD button, navigate to an image, and upload it to the application. Header By default, the header text is Welcome! You can customize this text. Manage Hotspots for Locations 170 Business Central Wireless Manager Application Setting Description Text If you do not offer a period of free access with the voucher, the default text that displays on the splash page is To access Internet, please enter your purchased voucher ID. You can customize this text. If you do offer a period of free access with the voucher, the default text that displays on the splash page is To access Internet, please enter your purchased voucher ID or continue with limited free access. You can also customize this text. To preview the splash page, click the PREVIEW button. The fields and buttons that the splash page displays depend on whether you offer a period of free access with the voucher. You cannot customize these fields or buttons. • No Optional Access. The splash page shows the default text (or your customized text), a field in which the user must enter the voucher number, and the Submit button that the user must click to obtain paid access. • Click Through. The splash page shows the default text (or your customized text), a field in which the user must enter the voucher number, and the Submit button that the user must click to obtain paid access. In addition, the splash page shows the Continue button that the user must click to obtain a period of free access. • Click Through With Email. The splash page shows the default text (or your customized text), a field in which the user must enter the voucher number, and the Submit button that the user must click to obtain paid access. In addition, the splash page shows a field in which the user must enter an email address and the Continue button that the user must click to obtain a period of free access. EULA By default, the On radio button is selected and the user can click the Terms and Conditions link on the splash page to view the default EULA. You can change the text of the EULA. You can select the Off radio button, in which case the EULA is not accessible to the user on the splash page. 18. To preview the splash page, click the PREVIEW button in the upper right of the Image section. 19. To change your customization of the splash page and start again, click the RESET button. 20. Click the ADD THIS HOTSPOT button. The Network Name and Authentication section displays, showing the settings for the new hotspot. By default, the network authentication is configured as an open system and the hotspot does not provide data encryption. For information about how to change the network authentication, data encryption, and other network settings for the hotspot, see Manage the WiFi Settings for a Network on page 68. Manage Hotspots for Locations 171 Business Central Wireless Manager Application Add an Advanced Hotspot for Access Through a Voucher You set up a hotspot by adding it to a location. An advanced hotspot with voucher access lets you customize and restyle the splash page by uploading a splash page file (the application supports CSS page styling), including customized advanced login messages and a custom end-user license agreement (EULA). A voucher is used for authentication. Note: The default splash page for an advanced hotspot is responsive to tablet and smartphone displays. For information about setting up a basic hotspot with voucher access, see Add a Basic Hotspot for Access Through a Voucher on page 164. When you set up an advanced hotspot with paid voucher access, you can also select to provide limited free access in addition to the paid access. For example, you could provide free access for the first hour and then require paid access for any additional hours. To add an advanced hotspot with voucher and optional limited free WiFi access to a location or individual WiFi network: 1. Open a browser on your computer. 2. In the address bar, enter https://wireless.netgear.com. The application login page displays. 3. Enter the email address and password for your BCWM account and click the LOG IN button. The Home page displays. Note: You can click the Add Hotspot link on the Home page, in which case the hotspot wizard functions slightly differently from the way it is described in this procedure and includes an extra page that lets you select a location. 4. Select Configuration. The All Locations page displays. 5. In the LOCATIONS tree on the left, click the location. The Location Profile page displays. In the LOCATIONS tree, the Wireless Networks and Access Points headings display under the selected location. 6. From the Choose Action menu, select Add Hotspot (Voucher). Manage Hotspots for Locations 172 Business Central Wireless Manager Application 7. Specify the following settings: • Hotspot Name. Enter the name that must serve as the SSID for the hotspot. • Wireless Network on. From the menu, select the WiFi band or bands on which the hotspot must be accessible. 8. Click the NEXT button. 9. Select a radio button to specify which type of captive portal must be used for the hotspot. You can create a new captive portal, copy and customize an existing captive portal, or use an existing captive portal. Manage Hotspots for Locations 173 Business Central Wireless Manager Application 10. Configure the settings as described in the following table. Setting Description Create New Captive Portal Profile Enter a name that lets you easily identify the captive portal for the hotspot. Authentication The selection from the menu is fixed at Vouchers. Redirect users to a Select this check box to direct the user to a website after login. specified website after login In the field that displays, enter the website, beginning with http://. Voucher Plan Name Enter a name that lets you easily identify the voucher plan. Voucher Unit Cost Enter an amount in US$. The selections from the menus are fixed at connected and Hour. The amount that you enter is the cost per hour of connection. Optional Free Access By default, a voucher does not offer free WiFi access and the selection from the menu is No Optional Access. To offer a limited period of free WiFi access with a voucher (that is, in addition to the period purchased with the voucher), select one of the following options: • Click Through. No authentication is required to click through. • Click Through With Email. Email address is required to click through. Note: If you offer free WiFi access with a voucher, you must select a usage plan, which you can do later in this procedure. Without a usage plan, you cannot offer free WiFi access with a voucher. Copy From Existing Based on From the menu, select the shared captive portal on which you want to base the hotspot captive portal. Captive Portal Profile Enter a name that lets you easily identify the captive portal for the hotspot. Authentication The selection from the menu is fixed at Vouchers. Redirect users to a Select this check box to direct the user to a website after login. specified website after login In the field that displays, enter the website, beginning with http://. Voucher Plan Name Enter a name that lets you easily identify the voucher plan. Voucher Unit Cost Enter an amount in US$. The selections from the menus are fixed at connected and Hour. The amount that you enter is the cost per hour of connection. Optional Free Access By default, a voucher does not offer free WiFi access and the selection from the menu is No Optional Access. To offer a limited period of free WiFi access with a voucher (that is, in addition to the period purchased with the voucher), select one of the following options: • Click Through. No authentication is required to click through. • Click Through With Email. Email address is required to click through. Note: If you offer free WiFi access with a voucher, you must select a usage plan, which you can do later in this procedure. Without a usage plan, you cannot offer free WiFi access with a voucher. Manage Hotspots for Locations 174 Business Central Wireless Manager Application Setting Description Use Existing Use From the menu, select the shared captive portal that you want to use as the captive portal for the hotspot. 11. Click the NEXT button. The previous figure shows a configuration in which free access is offered (see the options in Step 10) and in which you can set usage limits for both voucher access and free access. Multiple combinations are possible. Note: If you do not assign a usage plan to the hotspot, Internet access for a voucher user is terminated automatically after 48 hours of usage. 12. Take one of the actions that are described in the following table. Action Details Voucher limits No free access Set usage limits for voucher access. You did not select free access in Step 10. 1. Select the Yes radio button. 2. Go to Step 13. 3. In the Voucher Plan section, specify the usage plans for voucher access. Manage Hotspots for Locations 175 Business Central Wireless Manager Application Action Details Voucher limits Free access with limits Set usage limits for voucher access. You selected free access in Step 10 and must set usage limits for free access. 1. Select the Yes radio button. 2. Go to Step 13. 3. In the Voucher Plan section, specify the usage plan for voucher access. 4. In the Usage Limits for Free Access section, specify the usage plan for free access. No voucher limits Free access with limits Do not set usage limits for voucher access. You selected free access in Step 10 and must set usage limits for free access. 1. Leave the No radio button selected, which is the default setting. 2. Go to Step 13. 3. In the Usage Limits for Free Access section, specify the usage plan for free access. No voucher limits No free access Do not set usage limits for voucher access. You did not select free access in Step 10. 1. Leave the No radio button selected, which is the default setting. 2. Go to Step 20. 13. Select a radio button to specify how you want to set up the usage plan or plans for the hotspot. For the voucher usage limit plan and the free access usage limit plan independently, you can create a new usage plan, copy and customize an existing usage plan, or use an existing usage plan. 14. Configure the settings for voucher access, free access, or both as described in the following table. Setting Description Create New Usage Plan Name Enter a name that lets you easily identify the usage plan for the hotspot. Limit access to Use the field and menus to specify the maximum period of allowed access. By default, the period of access is not limited. Permitted access hours Use the fields and menus to specify the hours during which access is allowed. By default, access is not limited to specific hours. Allow Enter the number of concurrent Internet connections that are allowed for one voucher. By default, no limit is set. Copy From Existing Based on From the menu, select the shared usage plan on which you want to base the usage plan for the hotspot. Manage Hotspots for Locations 176 Business Central Wireless Manager Application Setting Description Usage Plan Name Enter a name that lets you easily identify the usage plan for the hotspot. Limit access to Use the field and menus to specify the maximum period of allowed access. By default, the period of access is not limited. Permitted access hours Use the fields and menus to specify the hours during which access is allowed. By default, access is not limited to specific hours. Allow Enter the number of concurrent Internet connections that are allowed for one voucher. By default, no limit is set. Use Existing Use From the menu, select the shared usage plan that you want to use as the usage plan for the hotspot. 15. Take one of the following actions: • If you selected the Use Existing radio button, go to Step 20. • If you selected the Create New or Copy From Existing radio button, click the NEXT button. The page that lets you edit the splash page displays. 16. Click the Advanced radio button. 17. To download NETGEAR templates, that is, default templates that are used for basic hotspots, click the DOWNLOAD TEMPLATES button and follow the directions of your browser to save the .zip file to a location on your computer. You can alter these default templates or use the default templates as examples to create your own templates. You must keep indicators that relate to elements such as style, input, and email in the source file. Otherwise, the template will not function. Manage Hotspots for Locations 177 Business Central Wireless Manager Application The name of the .zip file for voucher use depends on whether or not you offer optional free access with a voucher: • No free access with voucher. cp_template_no_free_access.zip • Optional free access with voucher. cp_template_free_access.zip After you set up a custom template, you can upload it to the application, making sure that you do not change the .zip file name for the type of access that you are using for the hotspot. 18. To upload a custom template or CSS file to the application, click the UPLOAD FILE button and follow the directions of your browser. If you upload a CSS file, the name of the file is stated in the CSS section. 19. To view a custom login message, custom error message, custom success message, or custom EULA, click the associated PREVIEW button in the HTML section. 20. Click the ADD THIS HOTSPOT button. The Network Name and Authentication section displays, showing the settings for the new hotspot. By default, the network authentication is configured as an open system and the hotspot does not provide data encryption. For information about how to change the network authentication, data encryption, and other network settings for the hotspot, see Manage the WiFi Settings for a Network on page 68. Change a Hotspot A hotspot is a WiFi network that provides access through a captive portal. For information about changing the WiFi network setting for the hotspot, see Manage the WiFi Settings for a Network on page 68. For information about changing the captive portal profile that the hotspot uses, see Change a Captive Portal Profile on page 125. Remove a Hotspot A hotspot is a WiFi network that provides access through a captive portal. For information about removing the WiFi network that includes the hotspot, see Remove a WiFi Network from a Location on page 78. For information about removing the captive portal profile that the hotspot uses, see Remove a Captive Portal Profile on page 126. You first must disassociate the captive portal profile from the hotspot before you can remove the captive portal profile. Manage Hotspots for Locations 178 9. Manage Vouchers With a Hotspot Clerk User Account 9 If you are assigned a hotspot clerk user account, you can sell and generate vouchers and view the status of vouchers. This chapter includes the following sections: • Accept an Invitation and Sign Up for and Activate a Hotspot Clerk Account • Sell and Generate a Voucher • View the Status of Vouchers for a Hotspot, Reprint a Voucher, or Delete Vouchers Note: To manage vouchers, you must sign in with a hotspot clerk user account. You cannot manage vouchers with an admin or read only user account. However, only an admin user can send an invitation to someone to set up a hotspot clerk user account (see Invite Others to Become Admin, Read Only, or Hotspot Clerk Application Users on page 265). 179 Business Central Wireless Manager Application Accept an Invitation and Sign Up for and Activate a Hotspot Clerk Account The owner of the application and an admin user of the application can send invitations to invite others to become hotspot clerk users. If you receive such an invitation, before you can access the application, you must accept the invitation, sign up for an user account, and activate the user account. To accept an invitation, sign up for a hotspot clerk user account, and activate the user account: 1. Open the Invitation Letter email and click the here link. Note: The entire sentence is Click here to accept the invitation and create your user profile. The User Sign Up page displays. 2. Under the name of the inviter and your email address, specify and confirm a password. Your password must consists of at least six characters and must contain at least one uppercase letter [A–Z], at least one lowercase letter [a–z], and at least one number [0–9]. The following symbols are allowed in your password: !@#$%^&*() 3. Save your password and store it in a safe place. 4. In the INFOMATION section, enter your personal information. 5. To view the terms and conditions, do the following: a. Click the Terms and Conditions link. A pop-up window displays the terms and conditions. b. Click the I AGREE button. The pop-up window closes. 6. Click the Sign Up button. A message on the page informs you if the sign-up is successful. If the sign-up is successful, you receive a confirmation email. 7. Open the NETGEAR Account Confirmation email and click the here link. Note: The entire sentence is Click here to activate your account and log in. The New Account Activation page displays. 8. Enter your password. 9. Click the ACTIVATE button. The application login page displays. Manage Vouchers With a Hotspot Clerk User Account 180 
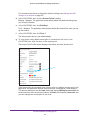
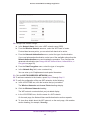
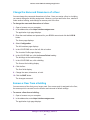
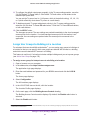
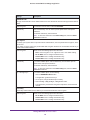
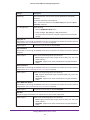
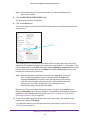
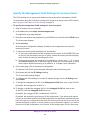
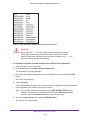
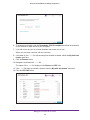
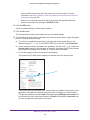
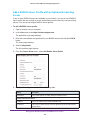
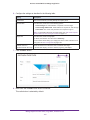
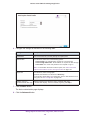
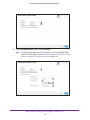
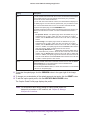
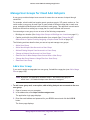
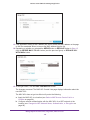
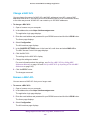
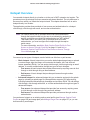
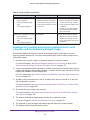
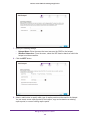
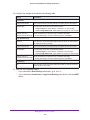
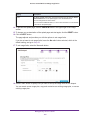
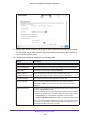
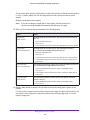
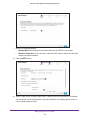
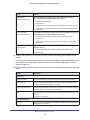
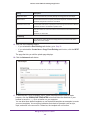
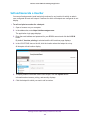
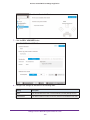
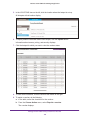
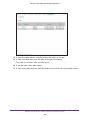
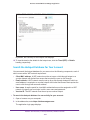
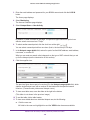
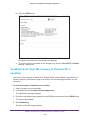
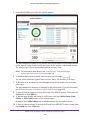
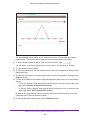
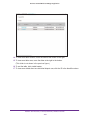
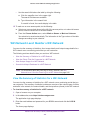
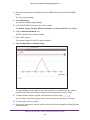
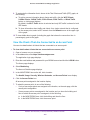
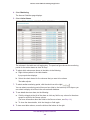
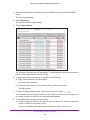
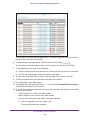
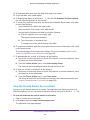
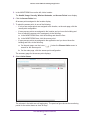
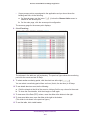
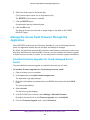
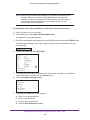
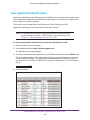
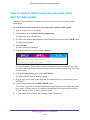
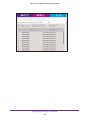
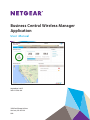
Business Central Wireless Manager Application Sell and Generate a Voucher You can sell and generate (email and print) vouchers for any location for which an admin user configured at least one hotspot. Locations for which no hotspots are configured do not display. To sell and print a voucher for a hotspot: 1. Open a browser on your computer. 2. In the address bar, enter https://wireless.netgear.com. The application login page displays. 3. Enter the email address and password for your BCWM account and click the LOG IN button. By default, Voucher printing is selected and the All Locations page displays. 4. In the LOCATIONS tree on the left, click the location where the hotspot is set up. All hotspots at that location display. 5. To display detailed information about each hotspot, click the Expand all link. Information about access, pricing, and security displays. 6. Click the hotspot for which you want to sell a voucher. Manage Vouchers With a Hotspot Clerk User Account 181 Business Central Wireless Manager Application 7. Click the SELL VOUCHER button. 8. Configure the settings as described in the following table. Setting Description Name Enter the full name of the user or a name that lets you easily identify the user. Email Address To be able to email the voucher to the user, enter the email address of the user. Manage Vouchers With a Hotspot Clerk User Account 182 Business Central Wireless Manager Application Setting Description Voucher plan Only the first voucher plan is available. Note: In a future release of the application, an admin user might be able to configure alternate voucher plans, after which the hotspot clerk would be able to select such a plan for use in a voucher. Forced Expiration By default, the voucher does not expire and the NO button is selected. To let the voucher expire (for example at the expected checkout time of a hotel guest), do the following: 1. Select the YES button. 2. From the menu, select the expiration time 3. From the calendar that opens when you click the date field, select the expiration date. 9. In the gray bar the bottom, specify the number of hours for each voucher and the number of vouchers: • From the connected hour counter, select the number of hours that the voucher must include. Note: As a hotspot clerk, you cannot change the hourly price. Only a user with an admin user account can changed the hourly price. • From the each counter, select the number of vouchers that you are selling. 10. Click the GENERATE button. The voucher or vouchers are generated. The following figures show samples of vouchers. Figure 3. Single voucher with expiration Manage Vouchers With a Hotspot Clerk User Account 183 Business Central Wireless Manager Application Figure 4. Voucher without expiration for multiple customers View the Status of Vouchers for a Hotspot, Reprint a Voucher, or Delete Vouchers The status of a voucher indicates whether a voucher is active or expired, how much of the voucher is consumed, and when the voucher expires. In addition, you can view details about the voucher and voucher holder, reprint a voucher, or delete one or more vouchers. To view the status of vouchers for a hotspot, reprint a voucher, or delete one or more vouchers: 1. Open a browser on your computer. 2. In the address bar, enter https://wireless.netgear.com. The application login page displays. 3. Enter the email address and password for your BCWM account and click the LOG IN button. By default, Voucher printing is selected and the All Locations page displays. 4. Select Voucher status. Manage Vouchers With a Hotspot Clerk User Account 184 Business Central Wireless Manager Application 5. In the LOCATIONS tree on the left, click the location where the hotspot is set up. All hotspots at that location display. 6. To display detailed information about each hotspot, click the Expand all link. Information about access, pricing, and security displays. 7. Click the hotspot for which you want to view the voucher status. 8. To view more information, move the slider at the bottom to the right. 9. To reprint a voucher, do the following: a. In the table, select the check box for the voucher. b. From the Choose Action menu, select Reprint a voucher. The voucher displays. Manage Vouchers With a Hotspot Clerk User Account 185 Business Central Wireless Manager Application 10. To delete one or more vouchers, do the following: a. In the table, select the check boxes for the vouchers. b. From the Choose Action menu, select Delete voucher. The vouchers are removed from the table. 11. To delete all vouchers, do the following: a. Select the check box in the in the table header. b. From the Choose Action menu, select Delete voucher. All vouchers are removed from the table. Manage Vouchers With a Hotspot Clerk User Account 186 10. Monitor Your Account, Locations, Networks, and Access Points 10 You can view summary and detailed information about your cloud account and the locations, WiFi networks, and access points that are configured, including real-time and historical information, performance statistics, and traffic usage. This chapter includes the following sections: • Account Level: Monitor the Cloud for Your Account • Location Level: View the Summary of Statistics for a Location • Location Level: Monitor the Health of a Location • Location Level: Monitor the Usage at a Location • Location Level: Monitor the Security at a Location • WiFi Network Level: Monitor a WiFi Network • Access Point Level: Monitor an Access Point Note: Depending on the number of statistics, the amount of data, the length of the monitoring period, and your Internet connection, it might take from several seconds to several minutes for some monitoring pages to be updated. Note: The tables that you can display in the application can show a maximum of 200 entries. However, for most tables, you can download the entire table with all entries (even if more than 200 entries exist) as an Excel or .csv file. 187 Business Central Wireless Manager Application Account Level: Monitor the Cloud for Your Account You can monitor your cloud account by various criteria and you can customize the monitoring period for which the statistics and data display. The following sections describe how you can monitor the cloud for your account: • View the Summary of Statistics for Your Account • View Access Point Details for Your Account • View Hotspot Usage for Your Account • Search the Hotspot Database for Your Account Note: For information about active alarms, cleared alarms, and the event log for your account, see Account Level: View and Manage Alarms and Events for Your Account on page 234. View the Summary of Statistics for Your Account You can view a summary of statistics for network health, trend of alarms, top statistics for several categories, and license usage for your account over a monitoring period that you can customize. To view the summary of statistics for your account: 1. Open a browser on your computer. 2. In the address bar, enter https://wireless.netgear.com. The application login page displays. 3. Enter the email address and password for your BCWM account and click the LOG IN button. The Home page displays. 4. Select Monitoring. Monitor Your Account, Locations, Networks, and Access Points 188 Business Central Wireless Manager Application By default, Summary is selected and the page displays the network health, trend of alarms, top statistics for several categories, and license usage. The previous figure shows the monitoring period as Last 7 Days. 5. To select another monitoring period, click the clock icon at the right ( ). You can select a monitoring period from one hour (that is, the last hour) to 30 days. 6. To view details, point to a graph. 7. To drill down to a page that provides more information, click an SSID in the Top 3 Wireless Networks section or click a location in the Top 3 Wireless Networks section or Top 3 Locations section. For more information about the pages to which you can drill down, see the following sections: • Drill down to a location. See Location Level: View the Summary of Statistics for a Location on page 196. • Drill down to an SSID. See WiFi Network Level: Monitor a WiFi Network on page 217. Monitor Your Account, Locations, Networks, and Access Points 189 Business Central Wireless Manager Application View Access Point Details for Your Account You can view details about cloud-managed access points for your account over a monitoring period that you can customize. The details include the health status, alarm state, location, building, floor, channels, output power, number of clients, and more. You can download the entire access points table as an Excel or .csv file. To view access point details for your account and download the access points table: 1. Open a browser on your computer. 2. In the address bar, enter https://wireless.netgear.com. The application login page displays. 3. Enter the email address and password for your BCWM account and click the LOG IN button. The Home page displays. 4. Select Monitoring. The Account Statistics page displays. 5. Select AP Details. The previous figure shows the monitoring period for the MANAGED ACCESS POINTS table as Last 7 Days. The columns in the table are self-explanatory. 6. To select another monitoring period, click the clock icon at the right ( Monitor Your Account, Locations, Networks, and Access Points 190 ). Business Central Wireless Manager Application You can select a monitoring period from one hour (that is, the last hour) to 30 days. For this table, you can also select Right Now to display only the clients that are currently connected. 7. To view more table columns, move the slider at the bottom to the right. 8. To view more table rows, move the slider at the right to the bottom. 9. To sort the table, click a table header. 10. To download the access points table as an Excel or .csv file, click the Download Full Details link and follow the directions of your browser. 11. To search for a particular component and narrow the information that is shown in the table, do one of the following: • Type information in a field in the table header. • Make a selection from a menu in the table header. View Hotspot Usage for Your Account You can view hotspot usage from all types of captive portals for your account over a monitoring period that you can customize. To view hotspot usage for your account: 1. Open a browser on your computer. 2. In the address bar, enter https://wireless.netgear.com. The application login page displays. 3. Enter the email address and password for your BCWM account and click the LOG IN button. The Home page displays. 4. Select Monitoring. The Account Statistics page displays. 5. Select Hotspot Users > Hotspot Usage. Monitor Your Account, Locations, Networks, and Access Points 191 Business Central Wireless Manager Application The page displays trend graphs for the connected time for both paid and free captive portal access. The previous figure shows the monitoring period as Last 7 Days. 6. To select another monitoring period, click the clock icon at the right ( ). You can select a monitoring period from one hour (that is, the last hour) to 30 days. 7. To view details, point to a graph. 8. To view only paid access, remove the free access trend from the graph by clicking the blue Free button once. 9. To view only free access, remove the paid access trend from the graph by clicking the red Paid button once. 10. To view other aspects of the hotspot usage and adjust the graph, take one of the following actions: • To view the number of paid devices versus free devices, from the menu on the upper right, select Number of Devices Paid vs Free. • To view the traffic in bytes of paid devices versus free devices, from the menu on the upper right, select Traffic (bytes) Paid vs Free. By default, the graph show the connected time of devices with paid access versus the connected time of devices with free access. 11. To view details about hotspot users, click the Details heading. Monitor Your Account, Locations, Networks, and Access Points 192 Business Central Wireless Manager Application 12. To view more table columns, move the slider at the bottom to the right. 13. To view more table rows, move the slider at the right to the bottom. (This slider is not shown in the previous figure.) 14. To sort the table, click a table header. 15. To view more details about one individual hotspot user, click the ID in the Identifier column. Monitor Your Account, Locations, Networks, and Access Points 193 Business Central Wireless Manager Application By default, the summary for the hotspot user displays. 16. To view the trend or the details for the hotspot user, click the Trend (PDT) or Details heading, respectively. Search the Hotspot Database for Your Account You can search the hotspot database for your account on the following components, each of which comes with a WiFi network requirement: • Client MAC address. A WiFi network must be set up as a click-through hotspot or a voucher hotspot with limited free access that requires the user to click through. • Email address. A WiFi network must be set up as a click-through hotspot for which an email address is required or a voucher hotspot with limited free access that requires the user to click through with an email address. • User name. A captive portal for cloud AAA authentication must be assigned to a WiFi network. A hotspot user must sign in with a user name and password. • Voucher ID. The WiFi network must be set up as voucher hotspot. To search the hotspot database for user activity for your account: 1. Open a browser on your computer. 2. In the address bar, enter https://wireless.netgear.com. The application login page displays. Monitor Your Account, Locations, Networks, and Access Points 194 Business Central Wireless Manager Application 3. Enter the email address and password for your BCWM account and click the LOG IN button. The Home page displays. 4. Select Monitoring. The Account Statistics page displays. 5. Select Hotspot Users > User Activity. By default, no data is shown on the page. The previous figure shows the period over which a search occurs as Last 7 Days. 6. To select another search period, click the clock icon at the right ( ). You can select a search period from one hour (that is, the last hour) to 30 days. 7. In the Hotspot usage details field, enter all or part of a client MAC address, email address, user name, or voucher ID. What you can enter as search criteria depends on the type of WiFi network that you set up for the hotspot (see the introduction of this section). 8. Click the magnifier icon. The previous figure shows part of a voucher ID in the Hotspot usage details field, which yields a single hotspot user with a voucher ID that starts with the specified search criterium. (A search could yield several hotspot users.) 9. To view more table rows, move the slider at the right to the bottom. (This slider is not shown in the previous image.) 10. To sort the table, click a table header. 11. To view more details about one individual hotspot user, do the following: a. Click the user row. All fields in the user row highlight blue and the VIEW button becomes available. Monitor Your Account, Locations, Networks, and Access Points 195 Business Central Wireless Manager Application b. Click the VIEW button. By default, the summary for the hotspot user displays. c. To view the trend or the details for the hotspot user, click the Trend (PDT) or Details heading, respectively. Location Level: View the Summary of Statistics for a Location You can view the summary of statistics for network health, trend of alarms, top statistics for several categories, and license usage for a location over a monitoring period that you can customize. To view the summary of statistics for a location: 1. Open a browser on your computer. 2. In the address bar, enter https://wireless.netgear.com. The application login page displays. 3. Enter the email address and password for your BCWM account and click the LOG IN button. The Home page displays. 4. Select Monitoring. The Account Statistics page displays. Monitor Your Account, Locations, Networks, and Access Points 196 Business Central Wireless Manager Application 5. In the MONITORING tree on the left, click the location. The page displays the health for the network and its associated cloud-managed access points, network usage, trend of traffic and clients for the network, and network security. The previous figure shows the monitoring period as Last 7 Days. Note: For information about alarms, see Location Level: View and Manage Alarms and Events for a Location on page 240. 6. To select another monitoring period, click the clock icon at the right ( ). You can select a monitoring period from one hour (that is, the last hour) to 30 days. 7. To drill down to an access point in the Managed Access Points section, click an access point name. The page displays the summary of statistics for the access point. For more information, see View the Summary of Statistics for an Access Point on page 226. 8. To view the network usage for a single WiFi band in the USAGE section, select either the 2.4 GHz link or the 5 GHz link. 9. To add the trend of traffic and clients for a WiFi band, click the 2.4GHz Clients, 5GHz Clients, or 5GHz Traffic button, or click several buttons. By default, the 2.4GHz Traffic button is selected and only 2.4 GHz traffic is shown. 10. To view the network security for a single WiFi band in the SECURITY section, select either the 2.4 GHz link or the 5 GHz link. Monitor Your Account, Locations, Networks, and Access Points 197 Business Central Wireless Manager Application Location Level: Monitor the Health of a Location You can monitor the health of a location by various criteria and you can customize the monitoring period for which the statistics and data display. The following sections describe how you can monitor the health at a location: • View the Health Summary for a Location • View Access Point Details for a Location • View the Command Log for a Location Note: For information about active alarms, cleared alarms, and the event log for a location, see Location Level: View and Manage Alarms and Events for a Location on page 240. View the Health Summary for a Location You can view the health summary for a location, including the trend of alarms and information about access points by alarm and connection time over a monitoring period that you can customize. To view the health summary for a location: 1. Open a browser on your computer. 2. In the address bar, enter https://wireless.netgear.com. The application login page displays. 3. Enter the email address and password for your BCWM account and click the LOG IN button. The Home page displays. 4. Select Monitoring. The Account Statistics page displays. 5. In the MONITORING tree on the left, click a location. The Health, Usage, Security, Wireless Networks, and Access Points icons display. 6. In the MONITORING tree, click the Health icon. Monitor Your Account, Locations, Networks, and Access Points 198 Business Central Wireless Manager Application The page displays the trend of alarms and information about access points by alarm and connection time. The page also displays the location on a map. The previous figure shows the monitoring period as Last 7 Days. 7. To select another monitoring period, click the clock icon at the right ( ). You can select a monitoring period from one hour (that is, the last hour) to 30 days. 8. To view details, point to the graph or an access point name. 9. To drill down to an access point, click an access point name. The page displays the summary of statistics for the access point. For more information, see View the Summary of Statistics for an Access Point on page 226. View Access Point Details for a Location You can view details about cloud-managed access points for a location over a monitoring period that you can customize. The details include the health status, alarm state, location, building, floor, channels, output power, number of clients, and more. You can download the entire access points table as an Excel or .csv file. Monitor Your Account, Locations, Networks, and Access Points 199 Business Central Wireless Manager Application To view access point details for a location and download the access points table: 1. Open a browser on your computer. 2. In the address bar, enter https://wireless.netgear.com. The application login page displays. 3. Enter the email address and password for your BCWM account and click the LOG IN button. The Home page displays. 4. Select Monitoring. The Account Statistics page displays. 5. In the MONITORING tree on the left, click a location. The Health, Usage, Security, Wireless Networks, and Access Points icons display. 6. In the MONITORING tree, click the Health icon. The health summary page for the location displays. 7. Select AP Details. The previous figure shows the monitoring period for the MANAGED ACCESS POINTS table as Last 7 Days. The columns in the table are self-explanatory. Monitor Your Account, Locations, Networks, and Access Points 200 Business Central Wireless Manager Application 8. To select which columns are shown in the table, do the following: a. To the right of the Name column, right-click anywhere in the table header. A pop-up window displays. b. Select the check boxes for the columns that you want to be shown. The table adjusts. 9. To select another monitoring period, click the clock icon at the right ( ). You can select a monitoring period from one hour (that is, the last hour) to 30 days. For this table, you can also select Right Now to display only the clients that are currently connected. 10. To view more table columns, move the slider at the bottom to the right. 11. To view more table rows, move the slider at the right to the bottom. 12. To sort the table, click a table header. 13. To download the access points table as an Excel or .csv file, click the Download Full Details link and follow the directions of your browser. 14. To search for a particular component and narrow the information that is shown in the table, do one of the following: • Type information in a field in the table header. • Make a selection from a menu in the table header. View the Command Log for a Location You can view the log of commands that are pending or in progress for access points at the location. The command log also includes the commands that were successful, failed, or aborted for access points at the location. The command log is generated for a monitoring period that you can customize. You can download the entire command log as an Excel or .csv file. To view the command log for a location and download it: 1. Open a browser on your computer. 2. In the address bar, enter https://wireless.netgear.com. The application login page displays. 3. Enter the email address and password for your BCWM account and click the LOG IN button. The Home page displays. 4. Select Monitoring. The Account Statistics page displays. 5. In the MONITORING tree on the left, click a location. The Health, Usage, Security, Wireless Networks, and Access Points icons display. Monitor Your Account, Locations, Networks, and Access Points 201 Business Central Wireless Manager Application 6. In the MONITORING tree, click the Health icon. The health summary page for the location displays. 7. Select Command Log. The previous figure shows the monitoring period for the command log as Last 7 Days. The information in the Title column lists the command name. The information in the Error Category column lists the type of error. The other columns in the table are self-explanatory. 8. To select which columns are shown in the table, do the following: a. Right-click anywhere in the table header. A pop-up window displays. b. Select the check boxes for the columns that you want to be shown. The table adjusts. 9. To select another monitoring period, click the clock icon at the right ( ). You can select a monitoring period from one hour (that is, the last hour) to seven days. (For most monitoring pages, you can select a monitoring period longer than seven days but not for this table.) For this table, you can also select Future to display only the commands that are pending. 10. To view more table columns, move the slider at the bottom to the right. 11. To view more table rows, move the slider at the right to the bottom. Monitor Your Account, Locations, Networks, and Access Points 202 Business Central Wireless Manager Application 12. To sort the table, click a table header. 13. To download the command log as an Excel or .csv file, click the Download Full Command Log link and follow the directions of your browser. 14. To search for a particular component and narrow the information that is shown in the table, do one of the following: • Type information in a field in the table header. • Make a selection from a menu in the table header. • Use the search field above the table by doing the following: a. Click the magnifier icon in the upper right. The search field becomes available. b. Type information in the search field. If a match is found, the results display in the table. 15. To view details about a command, click the command name in the Title column. 16. To copy the information on the page so that you can save the information in a file or email, do the following: a. Click the COPY TO CLIPBOARD button. b. Save the information as needed. c. Click the OK button. The pop-up window closes and the Command Log page displays. Monitor Your Account, Locations, Networks, and Access Points 203 Business Central Wireless Manager Application Location Level: Monitor the Usage at a Location You can view the usage summary, client usage details, and hotspot usage details for a location over a monitoring period that you can customize. The following sections describe how you can monitor the usage at a location: • View the Usage Summary for a Location • View Client Details for a Location • View Hotspot Usage at a Location • Search the Hotspot Database for a Location View the Usage Summary for a Location You can view the usage summary for a location over a monitoring period that you can customize. The usage summary includes an overview of the various types of clients and traffic for all networks or a specific network at the location, the top talkers (clients) for all networks at the location, and the top access points for all networks at the location. To view the usage summary for a location: 1. Open a browser on your computer. 2. In the address bar, enter https://wireless.netgear.com. The application login page displays. 3. Enter the email address and password for your BCWM account and click the LOG IN button. The Home page displays. 4. Select Monitoring. The Account Statistics page displays. 5. In the MONITORING tree on the left, click a location. The Health, Usage, Security, Wireless Networks, and Access Points icons display. 6. Click the Usage icon. Monitor Your Account, Locations, Networks, and Access Points 204 Business Central Wireless Manager Application The page displays a graph for the total number of clients and amount of traffic at the location, a table with the top talkers (clients) at the location, and a graph for the top access points at the location. The previous figure shows the monitoring period as Last 7 Days and the information in the upper graph for the WiFi traffic for all networks at the location. 7. To select another monitoring period, click the clock icon at the right ( ). You can select a monitoring period from one hour (that is, the last hour) to 30 days. 8. To customize the information that is shown in the upper graph, do the following: a. To add or remove information about clients and traffic, click the Wi-Fi Clients, 2.4GHz Clients, 2.4GHz Traffic, 5GHz Clients, 5GHz Traffic, or Wired Traffic button, or click several buttons. By default, the Wi-Fi Traffic button is selected and only WiFi traffic is shown for both WiFi bands. b. To show information about traffic and clients for a single network at the location, select a WiFi network from the menu at the upper right of the graph. c. To view details, point to the graph. Monitor Your Account, Locations, Networks, and Access Points 205 Business Central Wireless Manager Application 9. To view details about top talkers, do the following: a. Click a MAC address in the CLIENTS table. The CLIENT PROFILE pop-up window displays. The information that is shown is self-explanatory. b. To close the pop-up window, click the x in the upper right. 10. To view details about the top access points, point to the lower graph. View Client Details for a Location You can view details about all clients that are connected to networks at a location and download the clients table as an Excel or .csv file. To view details about clients that are or were connected to networks at a location and download the clients table: 1. Open a browser on your computer. 2. In the address bar, enter https://wireless.netgear.com. The application login page displays. 3. Enter the email address and password for your BCWM account and click the LOG IN button. The Home page displays. 4. Select Monitoring. The Account Statistics page displays. 5. In the MONITORING tree on the left, click a location. The Health, Usage, Security, Wireless Networks, and Access Points icons display. 6. Click the Usage icon. The usage summary page for the location displays. 7. Select Client Details. Monitor Your Account, Locations, Networks, and Access Points 206 Business Central Wireless Manager Application . The page displays information about all WiFi clients that are or were connected to networks at the location. The columns in the table are self-explanatory. The previous figure shows the monitoring period as Last 7 Days. 8. To select which columns are shown in the table, do the following: a. To the right of the MAC Address column, right-click anywhere in the table header. A pop-up window displays. b. Select the check boxes for the columns that you want to be shown. The table adjusts. 9. To select another monitoring period, click the clock icon at the right ( ). You can select a monitoring period from one hour (that is, the last hour) to 30 days. For this table, you can also select Right Now to display only the clients that are currently connected. 10. To view more table columns, move the slider at the bottom to the right. 11. To view more table rows, move the slider at the right to the bottom. 12. To sort the table, click a table header. 13. To download the access points table as an Excel or .csv file, click the Download Full Details link and follow the directions of your browser. Monitor Your Account, Locations, Networks, and Access Points 207 Business Central Wireless Manager Application 14. To search for a particular component and narrow the information that is shown in the table, do one of the following: • Type information in a field in the table header. • Make a selection from a menu in the table header. • Use the search field above the table by doing the following: a. Click the magnifier icon in the upper right. The search field becomes available. b. Type information in the search field. c. Click the magnifier icon again. If a match is found, the results display in the table. View Hotspot Usage at a Location You can view hotspot usage from all types of captive portals at a location over a monitoring period that you can customize. To view hotspot usage at a location: 1. Open a browser on your computer. 2. In the address bar, enter https://wireless.netgear.com. The application login page displays. 3. Enter the email address and password for your BCWM account and click the LOG IN button. The Home page displays. 4. Select Monitoring. The Account Statistics page displays. 5. In the MONITORING tree on the left, click a location. The Health, Usage, Security, Wireless Networks, and Access Points icons display. 6. Click the Usage icon. The usage summary page for the location displays. 7. Select Hotspot Users > Hotspot Usage. Monitor Your Account, Locations, Networks, and Access Points 208 Business Central Wireless Manager Application The page displays trend graphs for the connected time for both paid and free captive portal access. The previous figure shows the monitoring period as Last 7 Days. 8. To select another monitoring period, click the clock icon at the right ( ). You can select a monitoring period from one hour (that is, the last hour) to 30 days. 9. To view details, point to a graph. 10. To view only paid access, remove the free access trend from the graph by clicking the blue Free button once. 11. To view only free access, remove the paid access trend from the graph by clicking the red Paid button once. 12. To view other aspects of the hotspot usage and adjust the graph, take one of the following actions: • To view the number of paid devices versus free devices, from the menu on the upper right, select Number of Devices Paid vs Free. • To view the traffic in bytes of paid devices versus free devices, from the menu on the upper right, select Traffic (bytes) Paid vs Free. By default, the graph show the connected time of devices with paid access versus the connected time of devices with free access. 13. To view details about hotspot users, click the Details heading. Monitor Your Account, Locations, Networks, and Access Points 209 Business Central Wireless Manager Application 14. To view more table columns, move the slider at the bottom to the right. 15. To view more table rows, move the slider at the right to the bottom. (This slider is not shown in the previous figure.) 16. To sort the table, click a table header. 17. To view more details about one individual hotspot user, click the ID in the Identifier column. Monitor Your Account, Locations, Networks, and Access Points 210 Business Central Wireless Manager Application By default, the summary for the hotspot user displays. 18. To view the trend or the details for the hotspot user, click the Trend (PDT) or Details heading, respectively. Search the Hotspot Database for a Location You can search the hotspot database for a location on the following components, each of which comes with a WiFi network requirement: • Client MAC address. A WiFi network must be set up as a click-through hotspot or a voucher hotspot with limited free access that requires the user to click through. • Email address. A WiFi network must be set up as a click-through hotspot for which an email address is required or a voucher hotspot with limited free access that requires the user to click through with an email address. • User name. A captive portal for cloud AAA authentication must be assigned to a WiFi network. A hotspot user must sign in with a user name and password. • Voucher ID. The WiFi network must be set up as voucher hotspot. To search the hotspot database for user activity at a location: 1. Open a browser on your computer. 2. In the address bar, enter https://wireless.netgear.com. The application login page displays. Monitor Your Account, Locations, Networks, and Access Points 211 Business Central Wireless Manager Application 3. Enter the email address and password for your BCWM account and click the LOG IN button. The Home page displays. 4. Select Monitoring. The Account Statistics page displays. 5. In the MONITORING tree on the left, click a location. The Health, Usage, Security, Wireless Networks, and Access Points icons display. 6. Click the Usage icon. The usage summary page for the location displays. 7. Select Hotspot Users > User Activity. By default, no data is shown on the page. The previous figure shows the period over which a search occurs as Last 7 Days. 8. To select another search period, click the clock icon at the right ( ). You can select a search period from one hour (that is, the last hour) to 30 days. 9. In the Hotspot usage details field, enter all or part of a client MAC address, email address, user name, or voucher ID. What you can enter as search criteria depends on the type of WiFi network that you set up for the hotspot (see the introduction of this section). 10. Click the magnifier icon. The previous figure shows part of a voucher ID in the Hotspot usage details field, which yields a single hotspot user with a voucher ID that starts with the specified search criterium. (A search could yield several hotspot users.) 11. To view more table rows, move the slider at the right to the bottom. (This slider is not shown in the previous image.) Monitor Your Account, Locations, Networks, and Access Points 212 Business Central Wireless Manager Application 12. To sort the table, click a table header. 13. To view more details about one individual hotspot user, do the following: a. Click the user row. All fields in the user row highlight blue and the VIEW button becomes available. b. Click the VIEW button. By default, the summary for the hotspot user displays. c. To view the trend or the details for the hotspot user, click the Trend (PDT) or Details heading, respectively. Location Level: Monitor the Security at a Location You can view the security summary and neighbor details for a location over a monitoring period that you can customize. The following sections describe how you can monitor the security at a location: • View the Security Summary for a Location • View the Neighbor Details for a Location and Mark Neighbor Access Points Monitor Your Account, Locations, Networks, and Access Points 213 Business Central Wireless Manager Application View the Security Summary for a Location You can view the security summary for a location over a monitoring period that you can customize. The usage summary includes an overview of neighboring and rogue access points for the location. To view the security summary for a location: 1. Open a browser on your computer. 2. In the address bar, enter https://wireless.netgear.com. The application login page displays. 3. Enter the email address and password for your BCWM account and click the LOG IN button. The Home page displays. 4. Select Monitoring. The Account Statistics page displays. 5. In the MONITORING tree on the left, click a location. The Health, Usage, Security, Wireless Networks, and Access Points icons display. 6. Click the Security icon. Monitor Your Account, Locations, Networks, and Access Points 214 Business Central Wireless Manager Application The page displays a graph for the total number of neighboring access points at the location and states the total number of neighboring and rogue access points at the location. In addition, the page displays the MAC addresses of any rogue access points and the names of the access points with a high number neighbors. If no rogue access points are detected, none are reported on the page. The previous figure shows the monitoring period as Last 7 Days. 7. To select another monitoring period, click the clock icon at the right ( ). You can select a monitoring period from one hour (that is, the last hour) to 30 days. 8. To view details, point to a graph. View the Neighbor Details for a Location and Mark Neighbor Access Points You can view the details about neighbor access points at a location over a monitoring period that you can customize. Neighbor access points are access points that are not cloud managed. You can mark unknown and rogue access points as known access points and you can mark known and rogue access points as unknown access points. You can download the entire neighbor access points table as an Excel or .csv file. To view details about neighbor access points at a location, download the neighbor access points table, and mark access points as known or unknown: 1. Open a browser on your computer. 2. In the address bar, enter https://wireless.netgear.com. The application login page displays. 3. Enter the email address and password for your BCWM account and click the LOG IN button. The Home page displays. 4. Select Monitoring. The Account Statistics page displays. 5. In the MONITORING tree on the left, click a location. The Health, Usage, Security, Wireless Networks, and Access Points icons display. 6. Click the Security icon. The security summary page for the location displays. 7. Select Neighbor Details. Monitor Your Account, Locations, Networks, and Access Points 215 Business Central Wireless Manager Application The columns in the NEIGHBOR ACCESS POINT table are self-explanatory. The previous figure shows the monitoring period for the command log as Last 7 Days. 8. To select which columns are shown in the table, do the following: a. To the right of the MAC Address column, right-click anywhere in the table header. A pop-up window displays. b. Select the check boxes for the columns that you want to be shown. The table adjusts. 9. To select another monitoring period, click the clock icon at the right ( ). You can select a monitoring period from one hour (that is, the last hour) to 30 days. 10. To view more table columns, move the slider at the bottom to the right. 11. To view more table rows, move the slider at the right to the bottom. 12. To sort the table, click a table header. 13. To download the neighbor access points table as an Excel or .csv file, click the Download Full Details link and follow the directions of your browser. 14. To search for a particular component and narrow the information that is shown in the table, do one of the following: • Type information in a field in the table header. • Make a selection from a menu in the table header. Monitor Your Account, Locations, Networks, and Access Points 216 Business Central Wireless Manager Application • Use the search field above the table by doing the following: a. Click the magnifier icon in the upper right. The search field becomes available. b. Type information in the search field. If a match is found, the results display in the table. 15. To mark one or more access points, do the following: a. Select one or more check boxes to the left of the access points, or to select all access points, select the check box in the table header. b. From the Choose Action menu, select Mark as Known or Mark as Unknown. Your selection is saved automatically. The information in the Type column of the table changes according to your selection. WiFi Network Level: Monitor a WiFi Network You can view the summary of statistics, client usage details, and hotspot usage details for a WiFi network over a monitoring period that you can customize. The following sections describe how you monitor a WiFi network: • View the Summary of Statistics for a WiFi Network • View the Clients That Are Connected to a WiFi Network • View Hotspot Usage for a WiFi Network • Search the Hotspot Database for a WiFi Network Note: For information about the event log for a WiFi network, see WiFi Network Level: View the Event Log for a WiFi Network on page 246. View the Summary of Statistics for a WiFi Network You can view the summary of statistics for a WiFi network over a monitoring period that you can customize. The summary of statistics includes an overview of the various types of clients and traffic in the network, the network health, and the top talkers (clients) in the WiFi network. To view the summary of statistics for a WiFi network: 1. Open a browser on your computer. 2. In the address bar, enter https://wireless.netgear.com. The application login page displays. 3. Enter the email address and password for your BCWM account and click the LOG IN button. The Home page displays. Monitor Your Account, Locations, Networks, and Access Points 217 Business Central Wireless Manager Application 4. Select Monitoring. The Account Statistics page displays. 5. In the MONITORING tree on the left, click a location. The Health, Usage, Security, Wireless Networks, and Access Points icons display. 6. Click the Wireless Networks icon. All WiFi networks at the location display. 7. Click a WiFi network. The page displays a graph for the total number of clients and amount of traffic in the WiFi network, a graph that shows the health of the access points on which the WiFi network is configured, and information about the top talkers (clients) in the WiFi network with their MAC addresses and data consumption. The previous figure shows the monitoring period as Last 7 Days and the information in the upper graph for all WiFi traffic. 8. To select another monitoring period, click the clock icon at the right ( ). You can select a monitoring period from one hour (that is, the last hour) to 30 days. Monitor Your Account, Locations, Networks, and Access Points 218 Business Central Wireless Manager Application 9. To add or remove information about clients and traffic, click the Wi-Fi Clients, 2.4GHz Clients, 2.4GHz Traffic, 5GHz Clients, or 5GHz Traffic button, or click several buttons. By default, the Wi-Fi Traffic button is selected and only WiFi traffic is shown for both WiFi bands. 10. To view details, point to the graph. View the Clients That Are Connected to a WiFi Network You can view details about all clients that are connected to a WiFi network. To view details about clients that are connected to a WiFi network: 1. Open a browser on your computer. 2. In the address bar, enter https://wireless.netgear.com. The application login page displays. 3. Enter the email address and password for your BCWM account and click the LOG IN button. The Home page displays. 4. Select Monitoring. The Account Statistics page displays. 5. In the MONITORING tree on the left, click a location. The Health, Usage, Security, Wireless Networks, and Access Points icons display. 6. Click the Wireless Networks icon. All WiFi networks at the location display. 7. Click a WiFi network. The summary page for the WiFi network displays. 8. Select Clients. Monitor Your Account, Locations, Networks, and Access Points 219 Business Central Wireless Manager Application . The page displays a table with the clients that are currently connected to the WiFi network. The columns in the table are self-explanatory. 9. To select which columns are shown in the table, do the following: a. To the right of the MAC Address column, right-click anywhere in the table header. A pop-up window displays. b. Select the check boxes for the columns that you want to be shown. The table adjusts. 10. To view more table columns, move the slider at the bottom to the right. 11. To view more table rows, move the slider at the right to the bottom. 12. To sort the table, click a table header. View Hotspot Usage for a WiFi Network You can view hotspot usage from all types of captive portals in a WiFi network over a monitoring period that you can customize. To view hotspot usage in a WiFi network: 1. Open a browser on your computer. 2. In the address bar, enter https://wireless.netgear.com. The application login page displays. Monitor Your Account, Locations, Networks, and Access Points 220 Business Central Wireless Manager Application 3. Enter the email address and password for your BCWM account and click the LOG IN button. The Home page displays. 4. Select Monitoring. The Account Statistics page displays. 5. In the MONITORING tree on the left, click a location. The Health, Usage, Security, Wireless Networks, and Access Points icons display. 6. Click the Wireless Networks icon. All WiFi networks at the location display. 7. Click a WiFi network. The summary page for the WiFi network displays. 8. Select Hotspot Users > Hotspot Usage. The page displays trend graphs for the connected time for both paid and free captive portal access. The previous figure shows the monitoring period as Last 7 Days. 9. To select another monitoring period, click the clock icon at the right ( ). You can select a monitoring period from one hour (that is, the last hour) to 30 days. 10. To view details, point to a graph. 11. To view only paid access, remove the free access trend from the graph by clicking the blue Free button once. Monitor Your Account, Locations, Networks, and Access Points 221 Business Central Wireless Manager Application 12. To view only free access, remove the paid access trend from the graph by clicking the red Paid button once. 13. To view other aspects of the hotspot usage and adjust the graph, take one of the following actions: • To view the number of paid devices versus free devices, from the menu on the upper right, select Number of Devices Paid vs Free. • To view the traffic in bytes of paid devices versus free devices, from the menu on the upper right, select Traffic (bytes) Paid vs Free. By default, the graph show the connected time of devices with paid access versus the connected time of devices with free access. 14. To view details about hotspot users, click the Details heading. 15. To view more table columns, move the slider at the bottom to the right. 16. To view more table rows, move the slider at the right to the bottom. (This slider is not shown in the previous figure.) 17. To sort the table, click a table header. 18. To view more details about one individual hotspot user, click the ID in the Identifier column. Monitor Your Account, Locations, Networks, and Access Points 222 Business Central Wireless Manager Application By default, the summary for the hotspot user displays. 19. To view the trend or the details for the hotspot user, click the Trend (PDT) or Details heading, respectively. Search the Hotspot Database for a WiFi Network You can search the hotspot database for a WiFi network on the following components, each of which comes with a WiFi network requirement: • Client MAC address. A WiFi network must be set up as a click-through hotspot or a voucher hotspot with limited free access that requires the user to click through. • Email address. A WiFi network must be set up as a click-through hotspot for which an email address is required or a voucher hotspot with limited free access that requires the user to click through with an email address. • User name. A captive portal for cloud AAA authentication must be assigned to a WiFi network. A hotspot user must sign in with a user name and password. • Voucher ID. The WiFi network must be set up as voucher hotspot. To search the hotspot database for user activity in a WiFi network: 1. Open a browser on your computer. 2. In the address bar, enter https://wireless.netgear.com. The application login page displays. Monitor Your Account, Locations, Networks, and Access Points 223 Business Central Wireless Manager Application 3. Enter the email address and password for your BCWM account and click the LOG IN button. The Home page displays. 4. Select Monitoring. The Account Statistics page displays. 5. In the MONITORING tree on the left, click a location. The Health, Usage, Security, Wireless Networks, and Access Points icons display. 6. Click the Wireless Networks icon. All WiFi networks at the location display. 7. Click a WiFi network. The summary page for the WiFi network displays. 8. Select Hotspot Users > User Activity. By default, no data is shown on the page. The previous figure shows the period over which a search occurs as Last 7 Days. 9. To select another search period, click the clock icon at the right ( ). You can select a search period from one hour (that is, the last hour) to 30 days. 10. In the Hotspot usage details field, enter all or part of a client MAC address, email address, user name, or voucher ID. What you can enter as search criteria depends on the type of WiFi network that you set up for the hotspot (see the introduction of this section). 11. Click the magnifier icon. The previous figure shows part of a voucher ID in the Hotspot usage details field, which yields a single hotspot user with a voucher ID that starts with the specified search criterium. (A search could yield several hotspot users.) Monitor Your Account, Locations, Networks, and Access Points 224 Business Central Wireless Manager Application 12. To view more table rows, move the slider at the right to the bottom. (This slider is not shown in the previous image.) 13. To sort the table, click a table header. 14. To view more details about one individual hotspot user, do the following: a. Click the user row. All fields in the user row highlight blue and the VIEW button becomes available. b. Click the VIEW button. By default, the summary for the hotspot user displays. c. To view the trend or the details for the hotspot user, click the Trend (PDT) or Details heading, respectively. Access Point Level: Monitor an Access Point The following sections describe how you monitor an access point: • View the Summary of Statistics for an Access Point • View the Clients That Are Connected to an Access Point • View Details and Statistics for an Access Point Monitor Your Account, Locations, Networks, and Access Points 225 Business Central Wireless Manager Application Note: For information about active alarms, cleared alarms, and the event log for an access point, see Access Point Level: View and Manage Alarms and Events for an Access Point on page 248. View the Summary of Statistics for an Access Point You can view the summary of statistics for an access point over a monitoring period that you can customize. The summary of statistics includes an overview of the various types of clients and traffic in the network, the network health, and the top talkers (clients) in the WiFi network. To view the summary of statistics for an access point: 1. Open a browser on your computer. 2. In the address bar, enter https://wireless.netgear.com. The application login page displays. 3. Enter the email address and password for your BCWM account and click the LOG IN button. The Home page displays. 4. Select Monitoring. The Account Statistics page displays. 5. In the MONITORING tree on the left, click a location. The Health, Usage, Security, Wireless Networks, and Access Points icons display. 6. Click the Access Points icon. All access points assigned to the location display. 7. To select the access point, do one of the following: • If only a few access points are assigned to the location, on the main page, click the access point configuration. • If many access points are assigned to the location and you know the building and floor to which the access point is assigned, do the following: a. In the MONITORING tree, click the building and then the floor. • b. In the MONITORING tree, click the access point. If many access points are assigned to the application and you do not know the building and floor, do the following: a. On the main page, use the icons ( search for the access point. ) below the Choose Action menu to b. On the main page, click the access point configuration. Monitor Your Account, Locations, Networks, and Access Points 226 Business Central Wireless Manager Application The page displays the state of the access point (CONNECTED), the number of connected clients, and the number of alarms for the access point. For more information, see the following section and appendix: • For more information about access point states, see Appendix A, Cloud-Managed Access Points. • For more information about alarms, see Access Point Level: View and Manage Alarms and Events for an Access Point on page 248. The page also displays a graph that shows the connection time in percentages, a graph for the total number of clients and amount of traffic on the WiFi networks that are configured on the access point, a graph that shows the trend of alarms for the access point, and a graph that shows the trend of blacklisted clients (none in the previous figure) on the access point. The previous figure shows the monitoring period as Last 7 Days and the information in the upper graph for all WiFi traffic. 8. To select another monitoring period, click the clock icon at the right ( ). You can select a monitoring period from one hour (that is, the last hour) to 30 days. Monitor Your Account, Locations, Networks, and Access Points 227 Business Central Wireless Manager Application 9. To customize the information that is shown in the Total Clients and Traffic (PDT) graph, do the following: a. To add or remove information about clients and traffic, click the Wi-Fi Clients, 2.4GHz Clients, 2.4GHz Traffic, 5GHz Clients, 5GHz Traffic, or Wired Traffic button, or click several buttons. By default, the Wi-Fi Traffic button is selected and only WiFi traffic is shown for both WiFi bands. b. To show information about traffic and clients for a single network that is configured on the access point, select a WiFi network from the Network menu at the upper right of the graph. 10. To view details about a graph (including the graph that shows the connection time in percentages), point to the graph. View the Clients That Are Connected to an Access Point You can view details about all clients that are connected to an access point. To view details about clients that are connected to an access point: 1. Open a browser on your computer. 2. In the address bar, enter https://wireless.netgear.com. The application login page displays. 3. Enter the email address and password for your BCWM account and click the LOG IN button. The Home page displays. 4. Select Monitoring. The Account Statistics page displays. 5. In the MONITORING tree on the left, click a location. The Health, Usage, Security, Wireless Networks, and Access Points icons display. 6. Click the Access Points icon. All access points assigned to the location display. 7. To select the access point, do one of the following: • If only a few access points are assigned to the location, on the main page, click the access point configuration. • If many access points are assigned to the location and you know the building and floor to which the access point is assigned, do the following: a. In the MONITORING tree, click the building and then the floor. b. In the MONITORING tree, click the access point. Monitor Your Account, Locations, Networks, and Access Points 228 Business Central Wireless Manager Application • If many access points are assigned to the application and you do not know the building and floor, do the following: a. On the main page, use the icons ( search for the access point. ) below the Choose Action menu to b. On the main page, click the access point configuration. The summary page for the access point displays. 8. Select Clients. . The page displays a table with the clients that are currently connected to the access point. The columns in the table are self-explanatory. 9. To select which columns are shown in the table, do the following: a. To the right of the MAC Address column, right-click anywhere in the table header. A pop-up window displays. b. Select the check boxes for the columns that you want to be shown. The table adjusts. 10. To view more table columns, move the slider at the bottom to the right. 11. To view more table rows, move the slider at the right to the bottom. 12. To sort the table, click a table header. 13. To change the refresh rate, click the 30 Sec link. By default, the refresh rate is one minute. Monitor Your Account, Locations, Networks, and Access Points 229 Business Central Wireless Manager Application View Details and Statistics for an Access Point You view details about an access points and LAN and WiFi statistics for the access point. To view details and statistics for an access point: 1. Open a browser on your computer. 2. In the address bar, enter https://wireless.netgear.com. The application login page displays. 3. Enter the email address and password for your BCWM account and click the LOG IN button. The Home page displays. 4. Select Monitoring. The Account Statistics page displays. 5. In the MONITORING tree on the left, click a location. The Health, Usage, Security, Wireless Networks, and Access Points icons display. 6. Click the Access Points icon. All access points assigned to the location display. 7. To select the access point, do one of the following: • If only a few access points are assigned to the location, on the main page, click the access point configuration. • If many access points are assigned to the location and you know the building and floor to which the access point is assigned, do the following: a. In the MONITORING tree, click the building and then the floor. • b. In the MONITORING tree, click the access point. If many access points are assigned to the application and you do not know the building and floor, do the following: a. On the main page, use the icons ( search for the access point. ) below the Choose Action menu to b. On the main page, click the access point configuration. The summary page for the access point displays. 8. Select Details. Monitor Your Account, Locations, Networks, and Access Points 230 Business Central Wireless Manager Application . The page displays details about the access point settings and LAN statistics and WiFi statistics for the access point. The details are self-explanatory. 9. To view the WIRELESS STATISTICS section, move the slider at the right to the bottom. 10. To change the refresh rate for the details in the ACCESS POINT SETTINGS section, move the switch to 30 Seconds. By default, the refresh rate is 10 minutes. Monitor Your Account, Locations, Networks, and Access Points 231 11. View and Manage Alarms and Events 11 You can view and manage current and previous alarms using various filter options. In addition, you can view and manage network event notifications. If your network includes a syslog server, you can configure an access point to send its logs to the server (see Manage the Syslog Settings for an Access Point on page 92). This chapter includes the following sections: • Alarm and Event Concepts and Examples • Account Level: View and Manage Alarms and Events for Your Account • Location Level: View and Manage Alarms and Events for a Location • WiFi Network Level: View the Event Log for a WiFi Network • Access Point Level: View and Manage Alarms and Events for an Access Point Note: The alarm and event tables that you can display in the application can show a maximum of 200 entries. However, for all alarm and event tables, you can download the entire table with all entries (even if more than 200 entries exist) as an Excel or .csv file. 232 Business Central Wireless Manager Application Alarm and Event Concepts and Examples The application provides three basic levels of alarms: • Critical . A critical alarm for a condition that could cause a service disruption and that you must address as soon as possible. • Major . A major alarm for a condition that might affect a service adversely or is cause for a security concern but that is not urgent. • Warning . An minor alarm for a condition that is not urgent. These alarms can be generated for your account, an individual location, and an individual access point. You can view and manage the current alarms, that is, acknowledge them, clear them, or do both. After you clear alarms, you can still view them in the alarm history (that is, the cleared alarms table). The application also provides four basic levels of event notifications: critical, warning, info, and debug. These event notification can be generated for your account, an individual location, an individual WiFi network, and an individual access point. These notifications remain in the event log. Note: For information about another type of notification, the application notification, see View Application Notifications on page 270. The following table lists alarms that could be raised. Table 5. Alarms Alarm Description IP or VLAN out of sync An IP address or VLAN mismatch occurred between the application and the access point. AP disconnected unexpectedly The access point lost its connection to the application. Rogue AP currently detected A cloud-managed access point detected a rogue access point. Firmware upgrade failed A firmware upgrade failed. Apply config failed The application could not apply a configuration to the access point. Out of license keys The access point could not connect to the application because no tokens are available. License key activation failed A license key was revoked during activation. AP disconnected after forced IP/VLAN change The access point lost its connection to the application after a forced IP address or VLAN change occurred. AP registration failed The application rejected the registration of the access point because no tokens are available. View and Manage Alarms and Events 233 Business Central Wireless Manager Application Table 5. Alarms (continued) Alarm Description Error while parsing command No additional description available. Error while parsing notification Error while parsing response Unexpected AutoRF output The application detected an unusual condition with a radio, channel, or access point during automatic radio frequency (auto RF) assignment. Account Level: View and Manage Alarms and Events for Your Account You can view the active alarms for your account, acknowledge the alarms, and clear the alarms. You can view the cleared alarms and event log for your account. The following sections describe how you view and manage alarms and events for your account: • View and Manage Active Alarms for Your Account • View the Cleared Alarms for Your Account • View the Event Log for Your Account View and Manage Active Alarms for Your Account You can view the active alarms for your account, acknowledge the alarms, and clear the alarms. After you clear the alarms, you can still view them in the alarm history (that is, the table with cleared alarms). Acknowledging an alarm moves the state to acknowledged. Clearing an alarm removes the alarm from the active table and adds the alarm to the cleared alarms table. If you do not acknowledge an active alarm, the alarm remains in memory unless an event occurs that clears the alarm automatically and adds the alarm to the cleared alarms table. The application can display a maximum of 200 active alarms, but you can download the entire active alarms table as an Excel or .csv file. To view, manage, and download active alarms for your account: 1. Open a browser on your computer. 2. In the address bar, enter https://wireless.netgear.com. The application login page displays. 3. Enter the email address and password for your BCWM account and click the LOG IN button. The Home page displays. View and Manage Alarms and Events 234 Business Central Wireless Manager Application 4. Select Monitoring. The Account Statistics page displays. 5. Select Active Alarms. The columns in the table are self-explanatory. The previous figure shows the monitoring period for the active alarms as Last 30 Days. 6. To select which columns are shown in the table, do the following: a. Right-click anywhere in the table header. A pop-up window displays. b. Select the check boxes for the columns that you want to be shown. The table adjusts. 7. To select another monitoring period, click the clock icon at the right ( ). You can select a monitoring period from one hour (that is, the last hour) to 30 days or you can select to display all entries in the active alarms database. 8. To see details about an alarm, do the following: a. Click the triangle at the left of the alarm or click any field in any column for the alarm except for a field in the Source column. (For more information about the fields in the Source column, see Step 14.) b. To close the alarm details, click the triangle or field again. 9. To view more table columns, move the slider at the bottom to the right. View and Manage Alarms and Events 235 Business Central Wireless Manager Application 10. To view more table rows, move the slider at the right to the bottom. 11. To sort the table, click a table header. 12. To download the alarms as an Excel or .csv file, click the Download Full Active Alarms link and follow the directions of your browser. 13. To search for a particular component and narrow the information that is shown in the table, do one of the following: • Type information in a field in the table header. • Make a selection from a menu in the table header. • Use the search field above the table by doing the following: a. Click the magnifier icon in the upper right. The search field becomes available. b. Type information in the search field. If a match is found, the results display in the table. 14. To view more information about the access point that is the source of the alarm, click a field in the Source column. The summary page for the access point displays. For more information, see View the Summary of Statistics for an Access Point on page 226. 15. To acknowledge one, several, or all alarms, do the following: a. Select one or more check boxes to the left of the alarms, or to select all alarms, select the check box in the table header. b. From the Choose Action menu, select Acknowledge Alarm. The entries in the Acknowledged column change from No to Yes. 16. To clear one, several, or all alarms, do the following: a. Select one or more check boxes to the left of the alarms, or to select all alarms, select the check box in the table header. b. From the Choose Action menu, select Clear Alarm. The entries are removed from the table and moved to the cleared alarms table (see View the Cleared Alarms for Your Account on page 236). View the Cleared Alarms for Your Account You can view the cleared alarms for your account. The application can display a maximum of 200 cleared alarms, but you can download the entire alarms history as an Excel or .csv file. To view and download the cleared alarms for your account: 1. Open a browser on your computer. 2. In the address bar, enter https://wireless.netgear.com. The application login page displays. View and Manage Alarms and Events 236 Business Central Wireless Manager Application 3. Enter the email address and password for your BCWM account and click the LOG IN button. The Home page displays. 4. Select Monitoring. The Account Statistics page displays. 5. Select Cleared Alarms. The columns in the table are self-explanatory. The previous figure shows the monitoring period for the cleared alarms as Last 30 Days. 6. To select which columns are shown in the table, do the following: a. Right-click anywhere in the table header. A pop-up window displays. b. Select the check boxes for the columns that you want to be shown. The table adjusts. 7. To select another monitoring period, click the clock icon at the right ( ). You can select a monitoring period from one hour (that is, the last hour) to 30 days or you can select to display all entries in the cleared alarms database. 8. To see details about an alarm, do the following: a. Click the triangle at the left of the alarm or click any field in any column for the alarm except for a field in the Source column. (For more information about the fields in the Source column, see Step 14.) View and Manage Alarms and Events 237 Business Central Wireless Manager Application b. To close the alarm details, click the triangle or field again. 9. To view more table columns, move the slider at the bottom to the right. 10. To view more table rows, move the slider at the right to the bottom. 11. To sort the table, click a table header. 12. To download the alarms as an Excel or .csv file, click the Download Full Cleared Alarms link and follow the directions of your browser. 13. To search for a particular component and narrow the information that is shown in the table, do one of the following: • Type information in a field in the table header. • Make a selection from a menu in the table header. • Use the search field above the table by doing the following: a. Click the magnifier icon in the upper right. The search field becomes available. b. Type information in the search field. If a match is found, the results display in the table. 14. To view more information about the access point that is the source of the alarm, click a field in the Source column. The summary page for the access point displays. For more information, see View the Summary of Statistics for an Access Point on page 226. View the Event Log for Your Account You can view the event log for your account. The application can display a maximum of 200 events, but you can download the entire event log as an Excel or .csv file. A downloaded log includes debug-level events that are not displayed onscreen. Except for debug events, events are automatically cleared after 30 days. Debug events are automatically cleared after 7 days. To view and download the event log for your account: 1. Open a browser on your computer. 2. In the address bar, enter https://wireless.netgear.com. The application login page displays. 3. Enter the email address and password for your BCWM account and click the LOG IN button. The Home page displays. 4. Select Monitoring. The Account Statistics page displays. 5. Select Event Log. View and Manage Alarms and Events 238 Business Central Wireless Manager Application The columns in the table are self-explanatory. The previous figure shows the monitoring period for the events as Last 30 Days. 6. To select another monitoring period, click the clock icon at the right ( ). You can select a monitoring period from one hour (that is, the last hour) to 30 days. 7. To see details about an event, do the following: a. Click the triangle at the left of the event or click any field in any column for the event. b. To close the event details, click the triangle or field again. 8. To view more of the Date (PDT) column, move the slider at the bottom to the right. 9. To view more table rows, move the slider at the right to the bottom. 10. To sort the table, click a table header. 11. To download the event log as an Excel or .csv file, click the Download Full Event Log link and follow the directions of your browser. 12. To search for a particular component and narrow the information that is shown in the table, do one of the following: • Type information in a field in the table header. • Make a selection from a menu in the table header. • Use the search field above the table by doing the following: a. Click the magnifier icon in the upper right. The search field becomes available. View and Manage Alarms and Events 239 Business Central Wireless Manager Application b. Type information in the search field. If a match is found, the results display in the table. Location Level: View and Manage Alarms and Events for a Location You can view the active alarms for a location, acknowledge the alarms, and clear the alarms. You can also view the cleared alarms and event log for a location. The following sections describe how you view and manage alarms and events for a location: • View and Manage Active Alarms for a Location • View the Cleared Alarms for a Location • View the Event Log for a Location View and Manage Active Alarms for a Location You can view the active alarms for a location, acknowledge the alarms, and clear the alarms. After you clear the alarms, you can still view them in the alarm history (that is, the table with cleared alarms). Acknowledging an alarm moves the state to acknowledged. Clearing an alarm removes the alarm from the active table and adds the alarm to the cleared alarms table. If you do not acknowledge an active alarm, the alarm remains in memory unless an event occurs that clears the alarm automatically and adds the alarm to the cleared alarms table. The application can display a maximum of 200 active alarms, but you can download the entire active alarms table as an Excel or .csv file. To view, manage, and download active alarms for a location: 1. Open a browser on your computer. 2. In the address bar, enter https://wireless.netgear.com. The application login page displays. 3. Enter the email address and password for your BCWM account and click the LOG IN button. The Home page displays. 4. Select Monitoring. The Account Statistics page displays. 5. In the MONITORING tree on the left, click a location. The Health, Usage, Security, Wireless Networks, and Access Points icons display. View and Manage Alarms and Events 240 Business Central Wireless Manager Application 6. In the MONITORING tree, click the Health icon. The health summary page for the location displays. 7. Select Active Alarms. The columns in the table are self-explanatory. The previous figure shows the monitoring period for the active alarms as Last 30 Days. 8. To select which columns are shown in the table, do the following: a. Right-click anywhere in the table header. A pop-up window displays. b. Select the check boxes for the columns that you want to be shown. The table adjusts. 9. To select another monitoring period, click the clock icon at the right ( ). You can select a monitoring period from one hour (that is, the last hour) to 30 days or you can select to display all entries in the active alarms database. 10. To see details about an alarm, do the following: a. Click the triangle at the left of the alarm or click any field in any column for the alarm except for field in the Source column. (For more information about the fields in the Source column, see Step 16.) b. To close the alarm details, click the triangle or field again. 11. To view more table columns, move the slider at the bottom to the right. View and Manage Alarms and Events 241 Business Central Wireless Manager Application 12. To view more table rows, move the slider at the right to the bottom. 13. To sort the table, click a table header. 14. To download the alarms as an Excel or .csv file, click the Download Full Active Alarms link and follow the directions of your browser. 15. To search for a particular component and narrow the information that is shown in the table, do one of the following: • Type information in a field in the table header. • Make a selection from a menu in the table header. • Use the search field above the table by doing the following: a. Click the magnifier icon in the upper right. The search field becomes available. b. Type information in the search field. If a match is found, the results display in the table. 16. To view more information about the access point that is the source of the alarm, click a field in the Source column. The summary page for the access point displays. For more information, see View the Summary of Statistics for an Access Point on page 226. 17. To acknowledge one, several, or all alarms, do the following: a. Select one or more check boxes to the left of the alarms, or to select all alarms, select the check box in the table header. b. From the Choose Action menu, select Acknowledge Alarm. The entries in the Acknowledged column change from No to Yes. 18. To clear one, several, or all alarms, do the following: a. Select one or more check boxes to the left of the alarms, or to select all alarms, select the check box in the table header. b. From the Choose Action menu, select Clear Alarm. The entries are removed from the table and moved to the cleared alarms table (see View the Cleared Alarms for a Location on page 242). View the Cleared Alarms for a Location You can view the cleared alarms for a location. The application can display a maximum of 200 cleared alarms, but you can download the entire alarms history as an Excel or .csv file. To view and download the cleared alarms for a location: 1. Open a browser on your computer. 2. In the address bar, enter https://wireless.netgear.com. The application login page displays. View and Manage Alarms and Events 242 Business Central Wireless Manager Application 3. Enter the email address and password for your BCWM account and click the LOG IN button. The Home page displays. 4. Select Monitoring. The Account Statistics page displays. 5. In the MONITORING tree on the left, click a location. The Health, Usage, Security, Wireless Networks, and Access Points icons display. 6. In the MONITORING tree, click the Health icon. The health summary page for the location displays. 7. Select Cleared Alarms. The columns in the table are self-explanatory. The previous figure shows the monitoring period for the cleared alarms as Last 30 Days. 8. To select which columns are shown in the table, do the following: a. Right-click anywhere in the table header. A pop-up window displays. b. Select the check boxes for the columns that you want to be shown. The table adjusts. 9. To select another monitoring period, click the clock icon at the right ( View and Manage Alarms and Events 243 ). Business Central Wireless Manager Application You can select a monitoring period from one hour (that is, the last hour) to 30 days or you can select to display all entries in the cleared alarms database. 10. To see details about an alarm, do the following: a. Click the triangle at the left of the alarm or click any field in any column for the alarm except for a field in the Source column. (For more information about the fields in the Source column, see Step 15.) b. To close the alarm details, click the triangle or field again. 11. To view more table rows, move the slider at the right to the bottom. 12. To sort the table, click a table header. 13. To download the alarms as an Excel or .csv file, click the Download Full Cleared Alarms link and follow the directions of your browser. 14. To search for a particular component and narrow the information that is shown in the table, do one of the following: • Type information in a field in the table header. • Make a selection from a menu in the table header. • Use the search field above the table by doing the following: a. Click the magnifier icon in the upper right. The search field becomes available. b. Type information in the search field. If a match is found, the results display in the table. 15. To view more information about the access point that is the source of the alarm, click a field in the Source column. The summary page for the access point displays. For more information, see View the Summary of Statistics for an Access Point on page 226. View the Event Log for a Location You can view the event log for a location. The application can display a maximum of 200 events, but you can download the entire event log as an Excel or .csv file. A downloaded log includes debug-level events that are not displayed onscreen. Except for debug events, events are automatically cleared after 30 days. Debug events are automatically cleared after 7 days. To view and download the event log for a location: 1. Open a browser on your computer. 2. In the address bar, enter https://wireless.netgear.com. The application login page displays. 3. Enter the email address and password for your BCWM account and click the LOG IN button. The Home page displays. View and Manage Alarms and Events 244 Business Central Wireless Manager Application 4. Select Monitoring. The Account Statistics page displays. 5. In the MONITORING tree on the left, click a location. The Health, Usage, Security, Wireless Networks, and Access Points icons display. 6. In the MONITORING tree, click the Health icon. The health summary page for the location displays. 7. Select Event Log. The columns in the table are self-explanatory. The previous figure shows the monitoring period for the events as Last 30 Days. 8. To select another monitoring period, click the clock icon at the right ( ). You can select a monitoring period from one hour (that is, the last hour) to 30 days. 9. To see details about an event, do the following: a. Click the triangle at the left of the event or click any field in any column for the event. b. To close the event details, click the triangle or field again. 10. To view more of the Date (PDT) column, move the slider at the bottom to the right. 11. To view more table rows, move the slider at the right to the bottom. 12. To sort the table, click a table header. 13. To download the event log as an Excel or .csv file, click the Download Full Event Log link and follow the directions of your browser. View and Manage Alarms and Events 245 Business Central Wireless Manager Application 14. To search for a particular component and narrow the information that is shown in the table, do one of the following: • Type information in a field in the table header. • Make a selection from a menu in the table header. • Use the search field above the table by doing the following: a. Click the magnifier icon in the upper right. The search field becomes available. b. Type information in the search field. If a match is found, the results display in the table. WiFi Network Level: View the Event Log for a WiFi Network You can view the event log for a WiFi network, which can include events such as the sale of vouchers for the network. The application can display a maximum of 200 events, but you can download the entire event log as an Excel or .csv file. A downloaded log includes debug-level events that are not displayed onscreen. Except for debug events, events are automatically cleared after 30 days. Debug events are automatically cleared after 7 days. Note: The application does not generate alarms for a WiFi network but can generate alarms for an access point that broadcasts the WiFi network (see View and Manage Active Alarms for an Access Point on page 248). To view and download the event log for a WiFi network: 1. Open a browser on your computer. 2. In the address bar, enter https://wireless.netgear.com. The application login page displays. 3. Enter the email address and password for your BCWM account and click the LOG IN button. The Home page displays. 4. Select Monitoring. The Account Statistics page displays. 5. In the MONITORING tree on the left, click a location. The Health, Usage, Security, Wireless Networks, and Access Points icons display. 6. Click the Wireless Networks icon. All WiFi networks at the location display. View and Manage Alarms and Events 246 Business Central Wireless Manager Application 7. Click a WiFi network. The summary page for the WiFi network displays. 8. Select Event Log. The columns in the table are self-explanatory. The previous figure shows the monitoring period for the events as Last 30 Days. 9. To select another monitoring period, click the clock icon at the right ( ). You can select a monitoring period from one hour (that is, the last hour) to 30 days. 10. To see details about an event, do the following: a. Click the triangle at the left of the event or click any field in any column for the event. b. To close the event details, click the triangle or field again. 11. To view more of the Date (PDT) column, move the slider at the bottom to the right. 12. To view more table rows, move the slider at the right to the bottom. 13. To sort the table, click a table header. 14. To download the event log as an Excel or .csv file, click the Download Full Event Log link and follow the directions of your browser. 15. To search for a particular component and narrow the information that is shown in the table, do one of the following: • Type information in a field in the table header. • Make a selection from a menu in the table header. View and Manage Alarms and Events 247 Business Central Wireless Manager Application • Use the search field above the table by doing the following: a. Click the magnifier icon in the upper right. The search field becomes available. b. Type information in the search field. If a match is found, the results display in the table. Access Point Level: View and Manage Alarms and Events for an Access Point You can view the active alarms for an access point, acknowledge the alarms, and clear the alarms. You can also view the cleared alarms and event log for an access point. The following sections describe how you view and manage alarms and events for an access point: • View and Manage Active Alarms for an Access Point • View the Cleared Alarms for an Access Point • View the Event Log for an Access Point View and Manage Active Alarms for an Access Point You can view the active alarms for an access point, acknowledge the alarms, and clear the alarms. After you clear the alarms, you can still view them in the alarm history (that is, the cleared alarms table). Acknowledging an alarm moves the state to acknowledged. Clearing an alarm removes the alarm from the active table and adds the alarm to the cleared alarms table. If you do not acknowledge an active alarm, the alarm remains in memory unless an event occurs that clears the alarm automatically and adds the alarm to the cleared alarms table. The application can display a maximum of 200 active alarms, but you can download the entire active alarms table as an Excel or .csv file. To view, manage, and download active alarms for an access point: 1. Open a browser on your computer. 2. In the address bar, enter https://wireless.netgear.com. The application login page displays. 3. Enter the email address and password for your BCWM account and click the LOG IN button. The Home page displays. 4. Select Monitoring. The Account Statistics page displays. View and Manage Alarms and Events 248 Business Central Wireless Manager Application 5. In the MONITORING tree on the left, click a location. The Health, Usage, Security, Wireless Networks, and Access Points icons display. 6. Click the Access Points icon. All access points assigned to the location display. 7. To select the access point, do one of the following: • If only a few access points are assigned to the location, on the main page, click the access point configuration. • If many access points are assigned to the location and you know the building and floor to which the access point is assigned, do the following: a. In the MONITORING tree, click the building and then the floor. • b. In the MONITORING tree, click the access point. If many access points are assigned to the application and you do not know the building and floor, do the following: a. On the main page, use the icons ( search for the access point. ) below the Choose Action menu to b. On the main page, click the access point configuration. The summary page for the access point displays. 8. Select Active Alarms. The columns in the table are self-explanatory. The previous figure shows the monitoring period for the active alarms as Last 30 Days. View and Manage Alarms and Events 249 Business Central Wireless Manager Application 9. To select which columns are shown in the table, do the following: a. Right-click anywhere in the table header. A pop-up window displays. b. Select the check boxes for the columns that you want to be shown. The table adjusts. 10. To select another monitoring period, click the clock icon at the right ( ). You can select a monitoring period from one hour (that is, the last hour) to 30 days or you can select to display all entries in the active alarms database. 11. To see details about an alarm, do the following: a. Click the triangle at the left of the alarm or click any field in any column for the alarm except for a field in the Source column. b. To close the alarm details, click the triangle or field again. 12. To view more table columns, move the slider at the bottom to the right. 13. To view more table rows, move the slider at the right to the bottom. (This slider is not shown in the previous figure.) 14. To sort the table, click a table header. 15. To download the alarms as an Excel or .csv file, click the Download Full Active Alarms link and follow the directions of your browser. 16. To search for a particular component and narrow the information that is shown in the table, do one of the following: • Type information in a field in the table header. • Make a selection from a menu in the table header. • Use the search field above the table by doing the following: a. Click the magnifier icon in the upper right. The search field becomes available. b. Type information in the search field. If a match is found, the results display in the table. 17. To acknowledge one, several, or all alarms, do the following: a. Select one or more check boxes to the left of the alarms, or to select all alarms, select the check box in the table header. b. From the Choose Action menu, select Acknowledge Alarm. The entries in the Acknowledged column change from No to Yes. 18. To clear one, several, or all alarms, do the following: a. Select one or more check boxes to the left of the alarms, or to select all alarms, select the check box in the table header. b. From the Choose Action menu, select Clear Alarm. View and Manage Alarms and Events 250 Business Central Wireless Manager Application The entries are removed from the table and moved to the cleared alarms table (see View the Cleared Alarms for an Access Point on page 251). View the Cleared Alarms for an Access Point You can view the cleared alarms for an access point. The application can display a maximum of 200 cleared alarms, but you can download the entire alarms history as an Excel or .csv file. To view and download the cleared alarms for an access point: 1. Open a browser on your computer. 2. In the address bar, enter https://wireless.netgear.com. The application login page displays. 3. Enter the email address and password for your BCWM account and click the LOG IN button. The Home page displays. 4. Select Monitoring. The Account Statistics page displays. 5. In the MONITORING tree on the left, click a location. The Health, Usage, Security, Wireless Networks, and Access Points icons display. 6. Click the Access Points icon. All access points assigned to the location display. 7. To select the access point, do one of the following: • If only a few access points are assigned to the location, on the main page, click the access point configuration. • If many access points are assigned to the location and you know the building and floor to which the access point is assigned, do the following: a. In the MONITORING tree, click the building and then the floor. • b. In the MONITORING tree, click the access point. If many access points are assigned to the application and you do not know the building and floor, do the following: a. On the main page, use the icons ( search for the access point. ) below the Choose Action menu to b. On the main page, click the access point configuration. The summary page for the access point displays. 8. Select Cleared Alarms. View and Manage Alarms and Events 251 Business Central Wireless Manager Application The columns in the table are self-explanatory. The previous figure shows the monitoring period for the cleared alarms as Last 30 Days. 9. To select which columns are shown in the table, do the following: a. Right-click anywhere in the table header. A pop-up window displays. b. Select the check boxes for the columns that you want to be shown. The table adjusts. 10. To select another monitoring period, click the clock icon at the right ( ). You can select a monitoring period from one hour (that is, the last hour) to 30 days or you can select to display all entries in the cleared alarms database. 11. To see details about an alarm, do the following: a. Click the triangle at the left of the alarm or click any field in any column for the alarm except for a field in the Source column. b. To close the alarm details, click the triangle or field again. 12. To view more table rows, move the slider at the right to the bottom. 13. To sort the table, click a table header. 14. To download the alarms as an Excel or .csv file, click the Download Full Cleared Alarms link and follow the directions of your browser. View and Manage Alarms and Events 252 Business Central Wireless Manager Application 15. To search for a particular component and narrow the information that is shown in the table, do one of the following: • Type information in a field in the table header. • Make a selection from a menu in the table header. • Use the search field above the table by doing the following: a. Click the magnifier icon in the upper right. The search field becomes available. b. Type information in the search field. If a match is found, the results display in the table. View the Event Log for an Access Point You can view the event log for an access point. The application can display a maximum of 200 events, but you can download the entire event log as an Excel or .csv file. A downloaded log includes debug-level events that are not displayed onscreen. Except for debug events, events are automatically cleared after 30 days. Debug events are automatically cleared after 7 days. To view and download the event log for an access point: 1. Open a browser on your computer. 2. In the address bar, enter https://wireless.netgear.com. The application login page displays. 3. Enter the email address and password for your BCWM account and click the LOG IN button. The Home page displays. 4. Select Monitoring. The Account Statistics page displays. 5. In the MONITORING tree on the left, click a location. The Health, Usage, Security, Wireless Networks, and Access Points icons display. 6. Click the Access Points icon. All access points assigned to the location display. 7. To select the access point, do one of the following: • If only a few access points are assigned to the location, on the main page, click the access point configuration. • If many access points are assigned to the location and you know the building and floor to which the access point is assigned, do the following: a. In the MONITORING tree, click the building and then the floor. b. In the MONITORING tree, click the access point. View and Manage Alarms and Events 253 Business Central Wireless Manager Application • If many access points are assigned to the application and you do not know the building and floor, do the following: a. On the main page, use the icons ( search for the access point. ) below the Choose Action menu to b. On the main page, click the access point configuration. The summary page for the access point displays. 8. Select Event Log. The columns in the table are self-explanatory. The previous figure shows the monitoring period for the events as Last 30 Days. 9. To select another monitoring period, click the clock icon at the right ( ). You can select a monitoring period from one hour (that is, the last hour) to 30 days. 10. To see details about an event, do the following: a. Click the triangle at the left of the event or click any field in any column for the event. b. To close the event details, click the triangle or field again. 11. To view more of the Date (PDT) column, move the slider at the bottom to the right. 12. To view more table rows, move the slider at the right to the bottom. (This slider is not shown in the previous figure.) 13. To sort the table, click a table header. View and Manage Alarms and Events 254 Business Central Wireless Manager Application 14. To download the event log as an Excel or .csv file, click the Download Full Event Log link and follow the directions of your browser. 15. To search for a particular component and narrow the information that is shown in the table, do one of the following: • Type information in a field in the table header. • Make a selection from a menu in the table header. • Use the search field above the table by doing the following: a. Click the magnifier icon in the upper right. The search field becomes available. b. Type information in the search field. If a match is found, the results display in the table. View and Manage Alarms and Events 255 12. Manage Maintenance, Firmware, Application Users, and Accounts 12 You can back up and restore the cloud configuration file and manage access point firmware upgrades, application users, and account settings. This chapter includes the following sections: • Manage the Cloud Configuration File • Manage the Access Point Firmware Through the Application • Manage the Application Users • Change the Basic Application Account Settings • View Application Notifications Note: For information about viewing or changing the password for unassigned access points, see View or Change the Password for Unassigned Access Points on page 99. 256 Business Central Wireless Manager Application Manage the Cloud Configuration File You can back up the configuration file, restore the configuration from a backup file, and remove a backup file that you no longer need. The backup file is saved on the cloud server, not on a local computer. The following sections describe how you can manage the cloud configuration file: • Back Up the Cloud Configuration File • Restore the Cloud Configuration File • Remove a Cloud Configuration Backup File Back Up the Cloud Configuration File NETGEAR recommends that you back up your cloud configuration regularly so that you can always restore your configuration from a recent backup file. To back up the configuration file: 1. Open a browser on your computer. 2. In the address bar, enter https://wireless.netgear.com. The application login page displays. 3. Enter the email address and password for your BCWM account and click the LOG IN button. The Home page displays. 4. Select Account. The My Account page displays. 5. In the ACCOUNT tree on the left, click Backup/Restore. The Saved Backups page displays. If did not yet back up the configuration file, the page does not show any backup files. 6. Click the BACKUP NOW button. 7. Enter a name for the backup file. A description is optional. Manage Maintenance, Firmware, Application Users, and Accounts 257 Business Central Wireless Manager Application 8. Click the BACKUP button. The application confirms the addition of the backup file. 9. Click the OK button. The backup file is added to the table on the SAVED BACKUPS page. Restore the Cloud Configuration File If you backed up your cloud configuration, you can restore the configuration to the one in the backup file. CAUTION: The restore process replaces your locations, WiFi networks, an shared settings to the state they were in at the time when you made the backup. Locations, WiFi networks, and shared settings that you created after you made the backup are lost when the restore process is complete. To restore the configuration file from a backup file: 1. Open a browser on your computer. 2. In the address bar, enter https://wireless.netgear.com. The application login page displays. 3. Enter the email address and password for your BCWM account and click the LOG IN button. The Home page displays. 4. Select Account. The My Account page displays. 5. In the ACCOUNT tree on the left, click Backup/Restore. Manage Maintenance, Firmware, Application Users, and Accounts 258 Business Central Wireless Manager Application 6. Select the check box for the backup file from which you want to restore the configuration. (The previous figure shows only a single backup file.) The RESTORE button becomes available. 7. Click the RESTORE button. The page lists the locations that are restored and the locations that will be removed after the restore process is completed. By default, the application creates a new backup file of the configuration before it restores the configuration to the one on the backup file that you selected in Step 6. 8. Enter a name for the new backup file. A description is optional. Manage Maintenance, Firmware, Application Users, and Accounts 259 Business Central Wireless Manager Application Note: If you do not want the application to create a new backup of the configuration before it starts the restore process, clear the check box. 9. Click the RESTORE button. A pop-up window displays the following caution and requires you to enter your password: “By clicking restore, all of your networks will go down and any connected clients will immediately lose connectivity.” 10. Enter your password. 11. Click the RESTORE button in the pop-up window. Another pop-up window displays whether the restore process is successful. 12. Click the OK button. Unless you cleared the check box in Step 8, the new backup file displays in the table on the SAVED BACKUPS page. It takes several minutes for the cloud-managed access points to come back up with the restored configuration and reconnect to the application. Remove a Cloud Configuration Backup File You can remove one or more backup files that you no longer need. To remove one or more backup files: 1. Open a browser on your computer. 2. In the address bar, enter https://wireless.netgear.com. The application login page displays. 3. Enter the email address and password for your BCWM account and click the LOG IN button. The Home page displays. 4. Select Account. The My Account page displays. 5. In the ACCOUNT tree on the left, click Backup/Restore. Manage Maintenance, Firmware, Application Users, and Accounts 260 Business Central Wireless Manager Application 6. Select the check boxes for the backup files. (The previous figure shows only a single backup file.) The DELETE button becomes available. 7. Click the DELETE button. A conformation pop-up window displays. 8. Click the YES button. The backup files are removed and no longer display in the table on the SAVED BACKUPS page. Manage the Access Point Firmware Through the Application When NETGEAR makes new cloud firmware available for your cloud-managed access points, the application detects the new firmware and displays a message. By default, the application automatically pushes the new firmware to the access points seven days after the firmware is made available. However, you can schedule the firmware upgrade at a particular time and day in a week. You can also push the firmware upgrade immediately. Schedule Firmware Upgrades for Cloud-Managed Access Points You can schedule a firmware upgrade at a particular time and day in a week. To schedule firmware upgrades for cloud-managed access points: 1. Open a browser on your computer. 2. In the address bar, enter https://wireless.netgear.com. The application login page displays. 3. Enter the email address and password for your BCWM account and click the LOG IN button. The Home page displays. 4. Select Account. The My Account page displays. 5. In the ACCOUNT tree on the left, select Settings > Schedule Firmware. By default, the selection from the Firmware Upgrade menu is Notify Me. 6. From the Firmware Upgrade menu, select Scheduled. Manage Maintenance, Firmware, Application Users, and Accounts 261 Business Central Wireless Manager Application 7. Set the schedule: • In the Schedule at field, specify the time. The local time is affected by the time zone that is set for the location. • Next to Preferred Days, select the check boxes for the days on which a firmware upgrade is allowed. 8. Click the SAVE button. The changes are saved. Immediately Upgrade Firmware for Cloud-Managed Access Points If new firmware is available for cloud-managed access points, a message similar to the following displays above the main menu bar in the web management interface of the application. You can update firmware immediately. If the application manages different access point models, you must upgrade each model separately. To immediately upgrade firmware for all cloud-managed access points of one model: 1. Open a browser on your computer. 2. In the address bar, enter https://wireless.netgear.com. The application login page displays. 3. Enter the email address and password for your BCWM account and click the LOG IN button. The Home page displays. 4. Select Account. The My Account page displays. 5. In the ACCOUNT tree on the left, select Settings > Firmware Report. 6. In the Model column of the table, click a model access point. Manage Maintenance, Firmware, Application Users, and Accounts 262 Business Central Wireless Manager Application 7. To view the firmware release notes for the selected model, click the RELEASE NOTES button. 8. To upgrade the firmware for all cloud-managed access points of the selected model, click the UPGRADE NOW button. The upgrade progress displays on the page. When the upgrade is complete, the upgrade status displays on the page. If the application manages different access point models, repeat the procedure for all access point models. Manage Maintenance, Firmware, Application Users, and Accounts 263 Business Central Wireless Manager Application Automate Firmware Upgrades for Cloud-Managed Access Points By default, the application automatically pushes the new firmware to the access points seven days after the firmware is made available. If you changed to a scheduled firmware update, you can return to an automated update. To automate firmware upgrades for cloud-managed access points: 1. Open a browser on your computer. 2. In the address bar, enter https://wireless.netgear.com. The application login page displays. 3. Enter the email address and password for your BCWM account and click the LOG IN button. The Home page displays. 4. Select Account. The My Account page displays. 5. In the ACCOUNT tree on the left, select Settings > Schedule Firmware. By default, the selection from the Firmware Upgrade menu is Notify Me. 6. From the Firmware Upgrade menu, select Notify Me. 7. Click the SAVE button. The changes are saved. If new firmware is available, a message similar to the following one displays above the main menu bar. Manage the Application Users As an admin user, you can add application users to the user pool by sending invitations to others, change the application of existing application users, and remove application users from the user pool. Invitees do not become application users until they accept the invitation, sign up for an user account, and activate the user account. Note: All user capabilities of an admin user are also included in the user capabilities of the owner, who is the user who signed up for the application account and owns the account. Manage Maintenance, Firmware, Application Users, and Accounts 264 Business Central Wireless Manager Application Invite Others to Become Admin, Read Only, or Hotspot Clerk Application Users As admin user (the owner is also an admin user) of the application, you can send invitations to invite others to become admin, read only, or hotspot clerk users. Note: As an admin user, you can set up a hotspot and define vouchers (see Add a Basic Hotspot for Access Through a Voucher on page 164). However, only someone with a hotspot clerk user account can manage vouchers (see Chapter 8, Manage Hotspots for Locations). If you log in with an admin or read only user account, you cannot sell and print vouchers and you cannot view the status of sold vouchers. To invite someone to become an admin, ready only, or hotspot clerk application user: 1. Open a browser on your computer. 2. In the address bar, enter https://wireless.netgear.com. The application login page displays. 3. Enter the email address and password for your BCWM account and click the LOG IN button. The Home page displays. 4. Select Account. The My Account page displays. 5. From the Choose Action menu, select Invite User. The Invite User page displays. 6. In the Email Address field, enter the email address of the invitee. 7. From the Role menu, select a role: • Admin. A user who can configure the application. • Read only. A user who cannot configure the application but who can view the web configuration interface. • Hotspot clerk. A user who cannot configure the application and who cannot view the web configuration interface but who can sell and print vouchers and view the status of sold vouchers. 8. Click the INVITE THIS USER button. The application sends an email message to the invitee. Manage Maintenance, Firmware, Application Users, and Accounts 265 Business Central Wireless Manager Application Accept an Invitation and Set Up a User Account The owner of the application and an admin user of the application can send invitations to invite others to set up an application user account. If you receive such an invitation, before you can access the application, you must accept the invitation, sign up for an user account, and activate the user account. Your user capabilities depend on the role that is assigned to you. To accept an invitation, sign up for a user account, and activate the user account: 1. Open the Invitation Letter email and click the here link. Note: The entire sentence is Click here to accept the invitation and create your user profile. The User Sign Up page displays. 2. Under the name of the inviter and your email address, specify and confirm a password. Your password must contain at least six characters and cannot contain the underscore (_) character. 3. Save your password and store it in a safe place. 4. In the INFOMATION section, enter your personal information. 5. To view the terms and conditions, do the following: a. Click the Terms and Conditions link. A pop-up window displays the terms and conditions. b. Click the I AGREE button. The pop-up window closes. 6. Click the Sign Up button. A message on the page informs you if the sign-up is successful. If the sign-up is successful, you receive a confirmation email. 7. Open the NETGEAR Account Confirmation email and click the here link. Note: The entire sentence is Click here to activate your account and log in. The New Account Activation page displays. 8. Enter your password. 9. Click the ACTIVATE button. The application login page displays. The options that are available to you as an application user depend on the role that is assigned to you. Manage Maintenance, Firmware, Application Users, and Accounts 266 Business Central Wireless Manager Application Change the Role of an Application User Only an admin user (the owner is also an admin user) of the application can change the role of a read only application user or hotspot clerk. To change the role of an application user: 1. Open a browser on your computer. 2. In the address bar, enter https://wireless.netgear.com. The application login page displays. 3. Enter the email address and password for your BCWM account and click the LOG IN button. The Home page displays. 4. Select Account. The My Account page displays. 5. In the ACCOUNT tree on the left, click Users. All user accounts display. By default, the accounts are sorted alphabetically. 6. If many accounts are set up for the application, to narrow the accounts that display, use ) below the Choose Action menu on the main page to search for an the icons ( account, to group accounts together according to an attribute, or to display more information. 7. On the main page, click the user account. The User Profile section displays information about the account. 8. From the Role menu, select another role: • Admin. A user who can configure the application. • Read only. A user who cannot configure the application but who can view the web configuration interface. • Hotspot clerk. A user who cannot configure the application and who cannot view the web configuration interface but who can sell and print vouchers and view the status of sold vouchers. 9. Click the SAVE button. The changes are saved. Change the User Profile, Password, or Time Zone for Your User Account You can change the user profile (first and last name, telephone number, and country), password, and time zone for your own user account but not for someone else’s account. The time zone for your user account is the time zone for time stamps that are associated with data that is separate from locations. (You cannot change the time zone for an existing location profile.) Manage Maintenance, Firmware, Application Users, and Accounts 267 Business Central Wireless Manager Application Note: After five unsuccessful login attempts, your account is blocked for five minutes. While your account is being blocked, you can reset and redefine your account password, but the account remains blocked for five minutes. After five minutes, you can attempt to log in to your account with the new password. To change the user profile, password, or time zone for your user account: 1. Open a browser on your computer. 2. In the address bar, enter https://wireless.netgear.com. The application login page displays. 3. Enter the email address and password for your BCWM account and click the LOG IN button. The Home page displays. In the upper right of the page, next to Welcome, your user name displays. 4. Point to your name and select My Profile. 5. To change your user profile, as needed, enter a first name, last name, and telephone number, and select a country from the Country menu. 6. Click the Change Password heading. 7. To change your password, do the following: a. Enter your current password. b. Enter a new password. c. Confirm the new password. d. Click the User Preference heading. Manage Maintenance, Firmware, Application Users, and Accounts 268 Business Central Wireless Manager Application 8. To change the time zone for your user account, select another time zone from the Time Zone menu. 9. To prevent the application from automatically emailing notifications, under Email Notifications, select one or more check boxes. 10. Click the SAVE button. The changes are saved. If you changed your name it does not show in the My Profile, the next that you log in to your use account Change the Basic Application Account Settings Only an admin user (the owner is also an admin user) of the application can change the basic application account settings such as the company name, country in which the company is located, and company address. To change the basic account application setting: 1. Open a browser on your computer. 2. In the address bar, enter https://wireless.netgear.com. The application login page displays. 3. Enter the email address and password for your BCWM account and click the LOG IN button. The Home page displays. 4. Select Account. The My Account page displays. 5. Change the settings as needed. 6. Click the SAVE button. The changes are saved. Manage Maintenance, Firmware, Application Users, and Accounts 269 Business Central Wireless Manager Application View Application Notifications Application notifications are a different type of notifications from network alarms and network event notifications. Application notifications indicate whether new firmware is available and events related to firmware upgrades. The severity levels for application notifications are Critical, Warning, and Info. Application notifications are automatically cleared after 30 days. Note: For information about network alarms and network event notifications for your account, a location, a WiFi network, or an access point, see Chapter 11, View and Manage Alarms and Events. To view the application notifications and mark all notifications as read: 1. Open a browser on your computer. 2. In the address bar, enter https://wireless.netgear.com. The application login page displays. 3. Enter the email address and password for your BCWM account and click the LOG IN button. The Home page displays. In the upper right of the page, next to Welcome and your user name, a mailbox displays. If the application generated application notifications and no one read them, the number of notifications is shown on the mailbox (118 in the following figure). 4. Click the mailbox. Manage Maintenance, Firmware, Application Users, and Accounts 270 Business Central Wireless Manager Application The columns in the table are self-explanatory. The previous figure shows the monitoring period for the events as Last 30 Days. 5. To select another monitoring period, click the clock icon at the right ( ). You can select a monitoring period from one hour (that is, the last hour) to 30 days. 6. To see details about an event, do the following: a. Click the triangle at the left of the event or click any field in any column for the event. b. To close the event details, click the triangle or field again. 7. To view more table rows, move the slider at the right to the bottom. 8. To sort the table, click a table header. 9. To search for a particular component and narrow the information that is shown in the table, do one of the following: • Type information in a field in the table header. • Make a selection from a menu in the table header. • Use the search field above the table by doing the following: a. Click the magnifier icon in the upper right. The search field becomes available. b. Type information in the search field. If a match is found, the results display in the table. 10. To mark all entries in the table as read, from the Choose Action menu, select Mark as Read. None of the entries in the table are highlighted and the number on the mailbox in the upper right of the page is cleared. Manage Maintenance, Firmware, Application Users, and Accounts 271 13. Manage Application Licenses and Tokens 13 You can view license information, add a license, and deregister a license. This chapter includes the following sections: • About the Trial Period • License Concepts • Add a License to a Trial Subscription • View Licenses or Add a License to an Account with a Paid-For Subscription Note: Only admin users (that is, users with a security profile that is set to Admin) can perform license management tasks. 272 Business Central Wireless Manager Application About the Trial Period The trial period starts when you set up and activate your BCWM subscription. NETGEAR does not impose any special limits to the number of locations, networks, and access points1 that you can add during the trial subscription. View the Trial Expiration Date During the Trial Period During the trial period, you can clearly see the remaining period for free evaluation. To display the remaining time of your trial period: 1. Open a browser on your computer. 2. In the address bar, enter https://wireless.netgear.com. The application login page displays. 3. Enter the email address and password for your BCWM account and click the LOG IN button. The Home page displays. 4. Select Account. The My Account page displays. 5. In the ACCOUNT tree on the left, select Licenses. The page displays the number of days that are left in the trial period and the number of managed APs. What Happens at the End of the Free Trial Period? One month before the end of the trial period, the application displays alerts about the scheduled end of the trial period and you receive weekly emails notifying you of the pending end of the trial period. Before the end of the trial period, you can purchase access point licenses to continue with the application without service interruption. That is, you can convert your account with a free trial subscription to an account with a paid-for subscription. For more information, see Add a License to a Trial Subscription on page 275. 1. By default, an account with a free trial subscription or paid-for subscription can support up to 4,000 access points. Manage Application Licenses and Tokens 273 Business Central Wireless Manager Application If you decide not to purchase access point licenses, you gradually lose access to the application and its networks: • The day after the end of the trial period, the one-week grace period starts and access to the application is limited to the Home page (Monitoring Summary) with the possibility to purchase and add access point licenses. • During the one-week grace period, the access points maintain their configuration and continue to provide WiFi access and connectivity, including guest access and authentication cloud services. • Seven days after the end of trial period, the grace period ends. Access points that are managed by the application are automatically reset to their factory default configuration but without WiFi broadcast enabled. The access points are not removed from the account. To use the access points, you must reprovision them on an account with a paid-for subscription, or reprovision them with a NETGEAR hardware-based wireless controller platform, or manually reconfigure them for standalone service. Note: During the a free trial period, you can provision an access point for a single BCWM account only. You cannot reprovision the same access point for another BCWM account, that is, you cannot set up successive accounts with trial subscriptions and keep adding the same access points to different accounts. If you do not convert a BCWM account from a trial subscription to a paid-for subscription, 30 days after the end of the grace period, the BCWM account is deleted. License Concepts A license consists of tokens. Each access point that the application manages requires one token per month. That is, each token provides one access point with one month of cloud usage. After all tokens are used up, the licence must be renewed for you to continue to use the application. For example, if your license consists of 2,000 tokens and the application manages 33 access points per month, you must renew your license after five years. Another example: If your license consists of 2,000 tokens and the application manages 80 access points per month, you must renew your license after two years and one month. Manage Application Licenses and Tokens 274 Business Central Wireless Manager Application Add a License to a Trial Subscription Ensure that your account with a trial subscription does not expire by adding a license. However, even if your account expires, NETGEAR provides a 30-day grace period during which you can add a license and convert your account to a paid-for subscription. To add a license to an account with a trial subscription: 1. Open a browser on your computer. 2. In the address bar, enter https://wireless.netgear.com. The application login page displays. 3. Enter the email address and password for your BCWM account and click the LOG IN button. The Home page displays. 4. Select Account. The My Account page displays. 5. In the ACCOUNT tree on the left, select Licenses. The number of days that are left in the trial period and the number of cloud-managed access points display. 6. Click the ADD LICENSE button. The ADD LICENSE pop-up window displays. 7. Enter or copy one or more license keys that you obtained from your local reseller or from NETGEAR. 8. In the pop-up window, click the ADD LICENSE button. The license or licenses are validated and added to the application and display, along with the number of tokens that are still available, the date that the license must be renewed, and the average number of tokens used per month. 9. To view details about a license, click the license key. The status, date added, SKU, date activated, remaining tokens, and tokens used display. Manage Application Licenses and Tokens 275 Business Central Wireless Manager Application View Licenses or Add a License to an Account with a Paid-For Subscription You can view your licenses and add one or more licenses to an account with a paid-for subscription. To view licenses or add a license to an account with a paid-for subscription: 1. Open a browser on your computer. 2. In the address bar, enter https://wireless.netgear.com. The application login page displays. 3. Enter the email address and password for your BCWM account and click the LOG IN button. The Home page displays. 4. Select Account. The My Account page displays. 5. In the ACCOUNT tree on the left, select Licenses. The licenses display, along with the number of tokens that are still available, the month and year in which the license must be renewed, and the number of tokens that are in the current month. 6. From the Choose Action menu, select Add License. The ADD LICENSE pop-up window displays. 7. Enter or copy one or more license keys that you obtained from your local reseller or from NETGEAR. 8. In the pop-up window, click the ADD LICENSE button. The license or licenses are validated and added to the application and display, along with the number of tokens that are still available, the date that the license must be renewed, and the average number of tokens used per month. 9. To view details about a license and its usage, click the license key. Manage Application Licenses and Tokens 276 Business Central Wireless Manager Application Manage Application Licenses and Tokens 277 A. Cloud-Managed Access Points A This appendix includes the following sections: • View the Access Point Cloud State in the Application • View the Cloud Connection and Activity Status on a Cloud-Enabled Access Point • Convert an Access Point from Cloud-Enabled Mode to Standalone Mode Note: For information about preparing your NETGEAR wireless access points for cloud management, see the NETGEAR Business Central Wireless Manager Quick Start Guide, which you can download from downloadcenter.netgear.com. The following sections also provide information about access points: • Compatible NETGEAR Wireless Access Points on page 19 • Definitions of Access Point Terms on page 20 278 Business Central Wireless Manager Application View the Access Point Cloud State in the Application The access point cloud state indicates the cloud-management state of the access point. To view the access point cloud state in the application: 1. Open a browser on your computer. 2. In the address bar, enter https://wireless.netgear.com. The application login page displays. 3. Enter the email address and password for your BCWM account and click the LOG IN button. The Home page displays. 4. Select Inventory. All access point configurations display. By default, the configurations are sorted by access point name. 5. To narrow the access points that display, do the following: a. To view only access points that are assigned to one location, in the INVENTORY tree on the left, click a location and, as an option, narrow the access points that display at the location by selecting a building and a floor. b. If many access points are assigned to the application, use the icons ( ) below the Choose Action menu on the main page to search for an access point, to group access points together according to an attribute, or to display more information. 6. On the main page, click the access point configuration. Cloud-Managed Access Points 279 Business Central Wireless Manager Application The application can indicate any of the following cloud states for an access point: • Waiting for connection. The access point is not yet cloud managed and is waiting for a connection to the application. • Connected. The access point is cloud managed and is connected to the application. • Disconnected. The access point was cloud managed but is disconnected from the application. • Upgrading firmware. The access point is either cloud managed or is in the process of becoming cloud managed while the application is pushing a firmware upgrade. • Rebooting after upgrading firmware. The access point is either cloud managed or in the process of becoming cloud managed and is rebooting after the application pushed a firmware upgrade. • Configuring. The access point is in the process of becoming cloud managed while the application is pushing the initial configuration to the access point. • Rebooting after configuring. The access point is in the process of becoming cloud managed and is rebooting after the application pushed the initial configuration to the access point. • Rebooting manually. The access point is cloud managed and someone is rebooting the access point manually. View the Cloud Connection and Activity Status on a Cloud-Enabled Access Point When an access point is cloud enabled, its web management interface is a restricted cloud management interface that shows the cloud connection status and cloud activity status. Note: If you already know the IP address and password of the access point that you want to access, you can skip Step 1 and Step 2 in the following procedure and start with Step 3. To view the cloud connection status and cloud activity status on a cloud-enabled access point: 1. To view the IP address of the access point in the application, do the following: a. Open a browser on your computer. b. In the address bar, enter https://wireless.netgear.com. The application login page displays. c. Enter the email address and password for your BCWM account and click the LOG IN button. The Home page displays. Cloud-Managed Access Points 280 Business Central Wireless Manager Application d. Select Inventory. All access point configurations display. By default, the configurations are sorted by access point name. e. To narrow the access points that display, do the following: • To view only access points that are assigned to one location, in the INVENTORY tree on the left, click a location and, as an option, narrow the access points that display at the location by selecting a building and a floor. • f. If many access points are assigned to the application, use the icons ( ) below the Choose Action menu on the main page to search for an access point, to group access points together according to an attribute, or to display more information. On the main page, click the access point configuration. The Access Point Profile section displays information about the access point. g. Scroll down and click the IP Settings heading. The IP address displays. Take note of the IP address, which you will need in Step 4. 2. To view the password of the access point in the application, do the following: a. Select Configuration. The All Locations page displays. b. In the LOCATIONS tree on the left, click the location to which the access point is assigned. The Location Profile page displays. c. On the main page, click the AP Local Management heading. The AP Local Management section expands. d. To display the current password, select the Show Characters check box. Take note of the password, which you will need in Step 5. 3. Open a browser on your computer. 4. In the address bar, enter the IP address of the access point. 5. Enter the user name and password. The user name is admin. The password is specific to the location to which the access point is assigned (see Step 2). 6. Click the LOGIN button. The General page displays. The web management interface is the restricted cloud management interface. Cloud-Managed Access Points 281 Business Central Wireless Manager Application When the access point is cloud enabled, the web management interface can indicate the following cloud connection status and cloud activity status for the access point: • • Cloud connection status: - Pending. The access point is not yet registered with the application and not yet cloud managed but is either waiting to be connected or in the process of being connected to the application. If you reset an access point to the factory default state, the access point restarts in the Pending state. - Activated. The access point is registered with the application and is cloud managed. Cloud activity status: - Connected. The access point is registered with the application, cloud managed, connected to the Internet, and connected to the application. - Disconnected. Although the access point is registered with the application and is cloud managed, it is disconnected from the application. This situation could occur when a cable is unplugged, the Internet connection is down, a gateway cannot be reached, a DNS name cannot be resolved, and so on. Convert an Access Point from Cloud-Enabled Mode to Standalone Mode You can convert an access point from cloud-managed mode to standalone mode. Once converted, the access point is running the same firmware version that was used for the cloud-managed mode is but now in standalone mode without a restricted web management interface. To convert an access point from cloud-managed mode to standalone mode: 1. To view the IP address of the access point in the application so that you can access the access point web management interface later, do the following: a. Open a browser on your computer. b. In the address bar, enter https://wireless.netgear.com. The application login page displays. c. Enter the email address and password for your BCWM account and click the LOG IN button. The Home page displays. d. Select Inventory. All access point configurations display. By default, the configurations are sorted by access point name. Cloud-Managed Access Points 282 Business Central Wireless Manager Application e. To narrow the access points that display, do the following: • To view only access points that are assigned to one location, in the INVENTORY tree on the left, click a location and, as an option, narrow the access points that display at the location by selecting a building and a floor. • f. If many access points are assigned to the application, use the icons ( ) below the Choose Action menu on the main page to search for an access point, to group access points together according to an attribute, or to display more information. On the main page, click the access point configuration. The Access Point Profile section displays information about the access point. g. Scroll down and click the IP Settings heading. The IP address displays. Take note of the IP address, which you will need in Step 5. 2. From the Choose Action menu, select Delete this Access Point. A confirmation pop-up window displays. 3. Click the YES button. The access point is removed from the application and returns to factory default settings. 4. Open another browser on your computer. 5. In the address bar, enter the IP address of the access point. In the unlikely situation that the access point is no longer connected to a DHCP server or is accessible only over its default IP address, do the following: a. Change the IP address of your computer to an IP address in the 192.168.0.x subnet, which is the subnet in which the access point’s default IP address is located. For example, change the computer’s IP address to 192.168.0.210. b. Connect your computer to the access point with an Ethernet cable. c. In the address bar of the browser, enter the default IP address of the access point: • WNAP210v2. 192.168.0.236 • WNAP320. 192.168.0.100 • WNDAP350. 192.168.0.237 • WNDAP360. 192.168.0.100 • WNDAP660. 192.168.0.100 A login window opens. 6. Enter the user name and password. The user name is admin. The default password is password. 7. Click the LOGIN button. Either the General page displays or, depending on the firmware version that is loaded onto the access point, the Change Password page displays, in which case you must specify a new password. Cloud-Managed Access Points 283 Business Central Wireless Manager Application 8. (Only if the Change Password page displays) To specify a new password, do the following: a. In the Current Password field, enter password, which is the default password. b. In the New Password and Repeat New Password fields, specify the new password. c. Click the APPLY button. A login window opens. d. Enter the user name and new password. The user name is admin. The new password is the one you just specified. e. Click the LOGIN button. The General page displays. 9. In the Cloud Settings section, next to Cloud Enabled, select the No radio button. 10. Click the APPLY button. Your settings are saved. You can now configure the access point as a standalone access point. Cloud-Managed Access Points 284 B. Technical Specifications B The following table lists the technical specifications of the application. Table 6. Technical specifications Item Specification System architecture and supported devices WiFi management as a service: Cloud hosted with an embedded agent on NETGEAR cloud-managed access points For information about the supported access point and required firmware versions, see Compatible NETGEAR Wireless Access Points on page 19. Browser support (HTTP and HTTPS) The desktop versions of the following browsers: • Microsoft Internet Explorer 10 or later • Mozilla Firefox 15 or later • Google Chrome 15 or later • Apple Safari 5 or later OS support Any OS with one of the supported browsers Management interface support Desktop web management interface Language support English 285