1
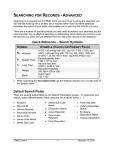
LOG ON AND NAVIGATION The logon procedure and navigation tools allow you to access the system using your personal UserID and password, and navigate through its screens using the TAB key, or the mouse Quick Reference – Log On and Navigation LOG ON To access CRMS, go to the Start Menu and select Ministry Connections, there you will see the CRMS 8.0.1 NEW icon, when you select it you will be taken to the CRMS website [intranet] choose Production from the CRMS 8.0.1 sites at the top of the page. If you are prompted for your ID and password before reaching the CRMS signon screen, you will need to enter your username as IDIR\username and use your IDIR password to access this website. CRMS Sign-On FIELD DEFINITION UserId Password Environment Usually first initial and Last name Initially same as UserID but can be changed The database in which you work. Will be autoselected EXAMPLE Kcampbell superman CRMS_PROD SYMBOL USE Allows you to select from a drop down list Allow you to enter data in this field or select from a list Opens the editor function (Drop Down Button) … (List of Values Button) >> (Double Arrows) ° (Degree Symbol) |< or >| EXAMPLE OPR Code Primary numbers Description Field Indicates a mandatory field Primary # field Allows you to move to the beginning (|<) or end (>|) of a File List Screen list NAVIGATION Use the TAB key or the mouse to move through the CRMS screens CRMS Level I -1- February 10. 2010 CREATING A RECORD There are 7 mandatory fields that must be filled in for each record: Confidentiality Code o Assigned Access—the new record will only be able to be viewed by individuals within the organizational unit who have assigned access privileges Unit Only— IS THE DEFAULT -- the new record will be available only to the selected organizational unit All Units—the new record will be available to all organizational units Schedule Number o Primary Number o Secondary Number o OPR Code o Indicates whether or not you are the Office of Primary Responsibility File Location o Only required if different from the default for the Org Unit Opened Date o Entered in the form yyyy-mm-dd Quick Reference – Creating a Record STEP 1. 2. 3. 4. 5. 6. 7. 8. 9. 10. 11. 12. 13. ACTION From the main menu, select Record Maintenance At the prompt to have the records ordered, select Yes if you want the records to display sorted in numeric order, or select No to display in random order Select New Select Confidentiality Code Enter or Select the Schedule number Enter Primary number Enter Secondary number Enter Series Code and Series Sub Code (if needed) Select OPR or NOPR Enter Location (if other than default) Enter the Opened Date (or TAB to enter today’s date) Enter the Closed Date (if applicable – only necessary for SO files) Select Save For more information about Creating Records, consult the User Manual located on the CRMS website CRMS Level I -2- February 10. 2010 CLASSIFYING RECORDS WITH THE MANUAL FUNCTION The Manual Function can be used to find the correct classification for your records. Quick Reference – Manual Classification STEP 1. 2. 3. 4. 5. 6. 7. 8. 9. 10. CRMS Level I ACTION From the Records Maintenance Screen, select New to create a new record. Insert curser into Primary Number Field Select Manual Enter up to 3 separate keywords to define search criteria Select Find From the Classification list, select the code you believe to be correct, and click on Details to view more information about the classification Select Primary to display the description of this primary classification, scope notes, see also references and default retention schedule Select Secondary to display the list of secondaries associated with this primary classification Continue selecting primary or secondary details on each classification until you reach the selection you are seeking, or, clear the search criteria and set new criteria When you have decided on a classification from the list select the button to the left and your new record will be populated with schedule, primary and secondary completed for you. -3- February 10. 2010 CREATING A VOLUME As you continue to add material to a file, it may eventually become too thick to manage and you may need to fill another, or several file folders. In CRMS each of the individual folders that make up the complete file is called a volume. Quick Reference – Adding Volumes STEP 1. 2. 3. 4. 5. 6. 7. ACTION From the Main Menu, select Record Maintenance At the prompt to have the records ordered, select Yes if you want the records to display sorted in numeric order, or select No to display in random order Locate the record to which you wish to add a volume (Using Search) Select Volume Select the next available line Enter the Opened Date (in the format YYYY-MM-DD) Select Save CREATING AN ENCLOSURE Sometimes information is contained in a media such as videotapes or CDs or bound books. They most often do not fit within a file volume or need to be stored separately. In this case we create enclosures Quick Reference – Adding Enclosures STEP 1. 2. 3. 4. 5. 6. 7. 8. 9. 10. ACTION From the Main Menu, select Record Maintenance At the prompt to have the records ordered, select Yes if you want the records to display sorted in numeric order, or select No to display in random order Locate the record requiring an enclosure (Using Search) Select Volume Select Enclosure Select New Enter the Media Type Number from the selection list Enter the Enclosure Location Enter the Enclosure Description Select Save CRMS Level I -4- February 10. 2010 Quick Reference – Viewing Enclosures STEP 1. 2. 3. 4. 5. 6. 7. ACTION From the Main Menu, select Record Maintenance At the prompt to have the records ordered, select Yes if you want the records to display sorted in numeric order, or select No to display in random order Locate the record that has the enclosure (Using Search) Select Volume Select the Volume with the enclosure Select Enclosure Select Next to view the first enclosure For more information about Volumes and Enclosures, consult the User Manual located on the CRMS website. CRMS Level I -5- February 10. 2010 PRINTING LABELS CRMS can automatically generate folder labels for all volumes and enclosures that you have entered. You can either print the label for an individual record or you can print labels for a group of records at once. If you wish to print labels for a group of records, you must determine what these records have in common, so that you can enter that information as the criteria in a search. Quick Reference – Printing Labels STEP 1. 2. 3. 4. 5. 6. 7. 8. 9. 10. 11. 12. 13. ACTION From the Main Menu, select Record Maintenance At the prompt to have the records ordered, select Yes if you want the records to display sorted in numeric order, or select No to display in random order Select Find Enter your search criteria to locate the correct record(s) Select Count Select Retrieve From the resulting file list, you can selectively choose one, many or all of the records listed Once the appropriate records have been selected, click on Label Select the number of copies you wish for each label (default is 1) If you don’t want the dates printed on your labels, deselect the “Include Dates” box If you have a smart label printer, select the appropriate one If you are using a laser printer, select the starting position on the label sheet Select View After previewing the labels select Print from the preview screen For more information about Printing Labels, consult the User Manual located on the CRMS website [intranet] CRMS Level I -6- February 10. 2010 PRINTING REPORTS File lists are the most commonly printed report. To print a file list, you must first determine which files you would like to include on your list. Then you will perform a search for these records. Once you have the list of records you wish to print, you can print either a standard numeric file list, a condensed numeric file list, a standard alpha file list, or a condensed alpha file list Quick Reference – Printing File Lists STEP 1. 2. 3. 4. 5. 6. 7. 8. ACTION From the Main Menu, select Record Maintenance At the prompt to have the records ordered, select Yes if you want the records to display sorted in numeric order, or select No to display in random order Select List Files to go directly to the list of all records, or select Find to set search criteria Select type of sort you want (Alpha or Numeric) Select the records you wish to include on your list, or if you want them all click on the Select All button Click on Print Select Standard, Condensed, or Descriptive Select Print from the preview screen CRMS Level I -7- February 10. 2010 SEARCHING Searching is a powerful tool in CRMS. Once you learn how to set up the searches, you will find that working with a smaller set of records rather than the whole database, increases the speed of your tasks, and enables you to see only the records you want There are a number of special symbols you may need to perform your searches, but the most important key to effective searching is determining what criteria are common to all the records you want, and yet different from the rest of the records in the database Quick Reference – Search Symbols SYMBOL EXAMPLE (VALUE FOR PRIMARY FIELD) % Wildcard > Greater Than < Less Than : Range Blank %100 = all ending with 100 (eg 100, 7100, 13100, etc) 100% = all beginning with 100 (eg 100, 1000, 1006, etc) %100% = all with 100 in them (eg 8100, 81003, etc) Records greater than >100 = 101 to end Records less than <6450 = 6449 to 100 Records in between 100:199 = 100 to 199 Exact match 100 = 100 Quick Reference – Searching STEP 1. 2. 3. 4. ACTION From the Record Maintenance Screen select Find If you don’t see the Fields you wish to search in, Click on a list of values button (...) and select the field Enter your search criteria as a single value, a range of values, or a partial value using the wildcard (%) Click on the Find button CRMS Level I -8- February 10. 2010