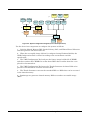
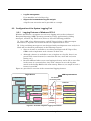
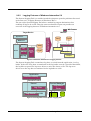
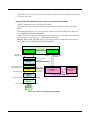
1
Microsoft® Windows® Automotive 5.0 SP2 Using Windows Automotive Preface Preface This document provides an overview of Windows Automotive 5.0 and describes how to use its tools. Chapter Description 1 Overview of Windows Automotive 5.0 2 Windows Automotive Development Environment Configuration Guide This chapter describes how to configure a development environment and use it to take advantage of the characteristics of the Windows Automotive architecture. Also covers efficient development techniques. 3 Automotive Configuration This chapter describes the sample configurations that can be used as a basis for user system development. 4 Virtual Memory (VM) Expansion Tool This chapter describes the VM Expansion Tool as a solution for the problem of insufficient processing memory. 5 CPU Time Measurement Tool This chapter describes how the CPU is used by Windows Automotive, which is essential to being able to tune the system optimally. This chapter also describes the techniques and tools used to verify how the CPU is used. 6 Memory Usage Measurement Tool To design a system which is more stable, it is important to obtain the size of memory used by modules in the system. This chapter describes the techniques and tools for understanding the characteristics of memory. 7 System Monitoring Tool This chapter describes the tool that monitors the delay time for a thread of a given priority in order to detect the program going into an infinite loop or becoming unresponsive. 8 Error Handling Tool This chapter describes the unified error management framework for the entire system, as well as the method for detecting an application exception, saving exception information, and restarting the system. 9 System Logging Tool This chapter describes the logging tool that can collect various types of data, such as application, OS, and AUI logs. 10 TFAT File System The transaction-safe FAT file system is intended for automotive devices that guard against a power cut or media removal during a write operation. This chapter describes the extended functions of the TFAT file system. 11 High-Speed Graphics Processing Framework GDI-Sub This chapter describes the standard specifications of the high-speed rendering architecture GDI-Sub, which allows access to the functions of a graphic chip that support the execution of rendering commands asynchronously with the CPU. Windows Automotive User's Manual SP2 iii Preface Chapter Description 12 Fast Cold Boot Guide This chapter discusses various methods that can contribute to faster startup, and describes how to incorporate them. 13 GWES2 (GWES for Automotive) This chapter describes GWES2, which is the operating environment for execution of GDI applications in the Automotive Device Configuration. The company and product names that appear in this document are trademarks or registered trademarks of their respective owners. Windows Automotive User's Manual SP2 iv Contents Contents Preface iii Contents v 1 Overview of Windows Automotive 5.0 .........................................1-1 1.1 Aims of Windows Automotive ........................................................................... 1-1 1.2 Features of Windows Automotive 5.0 ............................................................... 1-2 1.3 Software Architecture ........................................................................................ 1-2 2 Windows Automotive Development Environment Configuration Guide..............................................................................................2-1 2.1 3 2.1.1 Product Development Flow with Windows Automotive ....................... 2-2 2.1.2 Features of Windows Automotive 5.0 Development Environment ...... 2-6 Automotive Configuration ............................................................3-1 3.1 Overview ............................................................................................................. 3-1 3.2 Software Configuration ..................................................................................... 3-1 4 3.2.1 Automotive Device Configuration Types ............................................... 3-1 3.2.2 Build Types .............................................................................................. 3-4 Virtual Memory (VM) Expansion Tool ...........................................4-1 4.1 Overview ............................................................................................................. 4-1 4.2 Memory Map ...................................................................................................... 4-1 4.3 Tool Configuration ............................................................................................. 4-2 5 6 Overview ............................................................................................................. 2-1 CPU Time Measurement Tool .......................................................5-1 5.1 Components of the Tool ..................................................................................... 5-1 5.2 General Configuration Diagram ....................................................................... 5-1 5.3 Operating Requirements ................................................................................... 5-3 Memory Usage Measurement Tool ...............................................6-1 Using Windows Automotive 5.0 SP2 v Contents 6.1 Components of the Tool ..................................................................................... 6-1 6.2 Operating Requirements ................................................................................... 6-1 7 System Monitoring Tool ................................................................7-1 7.1 Overview ............................................................................................................. 7-1 7.2 Components of the Tool ..................................................................................... 7-2 7.3 Operating Requirements ................................................................................... 7-3 8 Error Handling Tool .......................................................................8-1 8.1 Overview ............................................................................................................. 8-1 8.2 Components of the Tool ..................................................................................... 8-2 8.3 9 8.2.1 Error Handling Service Driver ............................................................... 8-2 8.2.2 Advanced Exception Reporting (AER) ................................................... 8-2 8.2.3 Error Handling Routine in Kernel OAL ................................................ 8-2 Error Handling Tool Samples ........................................................................... 8-3 8.3.1 General Error Handling .......................................................................... 8-3 8.3.2 Exception Error Handling ...................................................................... 8-3 8.3.3 TFAT Error Handling .............................................................................. 8-3 8.3.4 System Monitoring Tool Error Handling ............................................... 8-3 System Logging Tool ....................................................................9-1 9.1 Overview ............................................................................................................. 9-1 9.2 Configuration of the System Logging Tool ....................................................... 9-2 9.3 10 9.2.1 Logging Features of Windows CE 5.0 .................................................... 9-2 9.2.2 Logging Features of Windows Automotive 5.0 ...................................... 9-3 Log Types ............................................................................................................ 9-4 9.3.1 Unformatted Data (Raw Data) Log ........................................................ 9-4 9.3.2 Formatted Data Log ................................................................................ 9-4 Transaction-Safe FAT (TFAT) File System .................................10-1 10.1 Overview ........................................................................................................... 10-1 10.2 Windows Automotive 5.0 SP2 TFAT Module ................................................. 10-1 10.3 Extended Functions of Windows Automotive TFAT ...................................... 10-1 10.3.1 Disable Commit Mode ........................................................................... 10-1 10.3.2 TFAT Error Handling ............................................................................ 10-2 Using Windows Automotive 5.0 SP2 vi Contents 11 High-Speed Graphics Processing Framework GDI-Sub .......... 11-1 11.1 Background ...................................................................................................... 11-1 11.2 Features of GDI-Sub ........................................................................................ 11-2 11.3 Compatibility of GDI-Sub Applications.......................................................... 11-3 11.4 Overall Structure of GDI-Sub ......................................................................... 11-3 12 11.4.1 GDI-Sub Drawing Client Library......................................................... 11-4 11.4.2 GDI-Sub Display Control Client Library............................................. 11-4 11.4.3 GDI-Sub Server Libraries ..................................................................... 11-4 11.4.4 Hardware Adaptation Code .................................................................. 11-4 Fast Cold Boot Guide ..................................................................12-1 12.1 Needs for Fast Cold Boot ................................................................................. 12-1 12.2 Overview of Startup Speedup Methods.......................................................... 12-1 12.3 Considerations When Selecting a Method ..................................................... 12-2 13 12.3.1 Required startup time specification ..................................................... 12-2 12.3.2 Where programs are executed and saved ............................................ 12-3 12.3.3 Other Criteria ........................................................................................ 12-3 GWES2 (GWES for Automotive) .................................................13-1 13.1 Block Diagram....................................................... Error! Bookmark not defined. Using Windows Automotive 5.0 SP2 vii 1 Overview of Windows Automotive 5.0 1.1 Aims of Windows Automotive It can be said that an automotive information system with an accompanying navigation system is one of the most advanced and complicated systems among built-in information devices. For example, an automotive information system: Contains many different elements, including graphics processing for tasks such as three-dimensional map drawing (requiring high quality and high speed), background processing for operations related to determining routes and guides, and real-time processing related to positional and traffic information. Must support various types of functions and devices such as increasingly sophisticated multi-media and information systems, in addition to the navigation system. Must satisfy requirements for automotive systems including response time, startup time, and power requirements, while also ensuring high reliability. Must feature a highly developed human-machine interface (HMI) that places minimal load on the user's attention when accessing information while driving. Requires high-quality and unique design as part of an instrument panel of an automobile. Automotive information system manufacturers must develop products that meet the above criteria within requested development periods at as low cost as possible. This presents the following challenges: Operation methods and tools for efficiently developing a system in a comparatively large-scale team are required. Efficient system tuning using useful tools. Use of general-purpose practical components and minimal reliance on custom components. Emphasis on software reusability to minimize the time and cost required for development, even if different HMIs are required for different product line-ups and markets. Flexible functionality and HMIs that satisfy the needs of the market. Windows Automotive is an integrated development package that is designed to support development by automotive information device manufacturers, as described above. Conventionally, for development based on a general-purpose operating system such as Windows CE, developers typically use either an embedded operating system-type development approach in which all applications, including the HMIs, are configured on a basic platform consisting of a kernel and other components, or an SDK-type development approach in which a PC or another application model is employed using an application platform that mimics a specific device configuration. Using Windows Automotive 5.0 SP2 1-1 With Windows Automotive, the software architecture merges the advantages of both approaches to achieve both HMI flexibility and development efficiency. Development Efficiency SDK Type Windows Automotive Built-In OS Type HMI Flexibility Figure 1-1: Development goals of Windows Automotive 1.2 Features of Windows Automotive 5.0 The Windows Automotive 5.0 development environment (the Automotive Adaptation Kit, or AAK) is configured as an add-on package based on Platform Builder 5.0. Windows Automotive 5.0 provides the following functions based on feedback from customers so far: Automotive User Interface Toolkit, AUITK, an HMI framework for automotive information systems that supports the development of high-quality, flexible HMIs High-speed rendering library, GDI-Sub, that allows developers to make maximum use of the performance of automotive graphics chips Automotive System Tools (AST) that support the stable integration of advanced, high-performance systems Development environment configuration guideline that is useful for team development A wide selection of middleware components, such as Internet Explorer and Windows Media Technology, that are required for the development of an automotive multimedia system Microsoft sample drivers and third-party driver software components for supporting the most up-to-date devices 1.3 Software Architecture With AUITK-based systems, HMIs can be defined with skin resources to support development techniques in which the application layer is developed separately from the HMI layer. Using Windows Automotive 5.0 SP2 1-2 A Windows Automotive system consists of the following layers: HMI layer Defines the screen design, screen transitions and actions for HMI input, and other data. HMI flexibility is implemented by switching the skin resources. Application layer Implements navigation, media player, Internet browser, and other functions. Also provides application functions to an HMI via controls. Middleware layer Contains middleware libraries and system services available for applications. Also provides a range of services to applications via APIs. Operating System layer Contains an operating system, device drivers, file systems, and other basic components. Also provides system services to applications and middleware components via system APIs. By completely separating the HMI layer from the application layer, software reusability is enhanced, resulting in considerable cost reduction when reconfiguring an HMI to suit a different model of vehicle, or according to the end user’s preferences. A wide selection of middleware components, sample drivers, and development tools support efficient Using Windows Automotive 5.0 SP2 1-3 Skin Authoring Tool HMI Layer AUI Skin AUI Runtime Sample Applications Custom Applications GDI-sub Graphic Library Windows Media OEM Middleware International (IME, Fonts) Internet Explorer 3rd Party Middleware Direct X Networking Speech Engine Device Drivers Sample Drivers 3rd Party Drivers OS Power Management File systems AUI GPU Dependent Renderer OS Layer development. IDE Custom Controls Compiler Sample Controls AST Application Layer Development Environment Middleware Layer Modules that can be used as is そのまま使用可能なモジュール MSサンプルをベースにカスタマイズするモジュール Modules to be customized based on MS samples 3rd Party製サンプルをベースにカスタマイズするモジュール Modules to be customized based on third-party samples OEMが開発するモジュール Modules to be developed by OEM Figure 1-2: Overview of a Windows Automotive System Using Windows Automotive 5.0 SP2 1-4 2 Windows Automotive Development Environment Configuration Guide 2.1 Overview In the development of automotive systems, various types of software modules are mutually related, so many developers work jointly on a system over a long period of time. It is therefore important to modularize more functions to minimize dependency among the software. For best results, mechanisms for improving development efficiency also need to be incorporated in the development environment itself. To expand the effectiveness of such a development system, Windows Automotive 5.0 supports the creation of a more flexible, clearly defined, and easier-to-use development environment. Windows Automotive 5.0 also uses built-in system modules that can be locally replaced, thus providing rapid increase in debug efficiency and a cohesive development environment. The goal of this document is to help you take full advantage of these and other development features in Windows Automotive 5.0. This document describes the development process with Windows Automotive 5.0, the features of an ideal development environment, and how to establish and efficiently use the capabilities of that environment. In addition, the appendix offers a sample development procedure. Using Windows Automotive 5.0 SP2 2-1 2.1.1 Product Development Flow with Windows Automotive Development with Windows Automotive can be done with or without the Automotive User Interface Toolkit (AUITK). Below, we will consider each approach. 2.1.1.1 System Development Flow without AUITK Product development without AUITK is almost the same as that for general system development, as shown in Figure 2-1.With this approach, the process begins with platform development, which consists of hardware design, OEM adaptation layer (OAL) / board support program (BSP) development, custom driver development, and operating system design determination and implementation. Subsequently, based on that platform, products are constructed through development and testing of applications including middleware. Development Step Application Development Device Bring-Up Platform Development Hardware Design Develop Custom Drivers Testing and Integration Custom Windows Automotive Catalog Items Load ROM Monitor Testing and Integration Boot Kernel on Hardware Create Boot Loader Testing and Integration Applications and Middleware OAL Development Develop and Integrate Catalog Items Testing and Integration BSP Development Feedback System Integration Integration System Test/Tuning Figure 2-1: Product development stage without AUITK Using Windows Automotive 5.0 SP2 2-2 The development step can be broadly divided into four stages: device initialization, platform development, application development, and system integration. Each stage is explained below. Device Initialization Consists of the hardware design and development, boot loader development, and OAL construction needed to create a basic BSP. The main purpose of this stage is hardware operation verification; therefore, the operating system design for the BSP is established using the bare minimum of components as Windows CE. The product used for the device initialization stage is BSP. Platform Development Consists of the development of device drivers, in addition to the establishment and testing of the operating system design for target products. Based on the BSP inherited from the device initialization stage, the platform development stage is where the components required for the operating system design of products and the Windows Automotive 5.0 configuration are selected. This is also the stage in which an initial executable image is generated, which then serves as the target product base for application development. This increases the subsequent development efficiency. Application Development Consists of the development of applications on a platform alongside middleware. Using the application development executable image inherited from the platform development stage, the build work (which is usually required for each application correction) can be omitted to support efficient development. System Integration Consists of the merging of each module created so far and tests them as products. Moreover, performance evaluation is implemented for the entire operation. The problems generated here are sent as feedback data. Using Windows Automotive 5.0 SP2 2-3 2.1.1.2 System Development Flow with AUITK The flow of product development with AUITK is as shown below: Development Step with AUI Application Development Device Bring-Up Platform Development Hardware Design Develop Custom Drivers Testing and Integration Custom Windows AUI Skin Development AUI Skin Automotive Catalog Load ROM Monitor Items Boot Kernel on Hardware Testing and Integration Create Boot Loader Testing and Integration Testing and Integration Applications OAL Development Develop and Integrate Middleware Catalog Items Custom Control Testing and Integration BSP Development Feedback System Integration Integration System Test/Tuning Figure 2-2: Product development stage with AUITK Using Windows Automotive 5.0 SP2 2-4 The development process of this approach can be broadly divided into five stages: device initialization, platform development, application development, AUI skin development, and system integration. The device initialization and platform development stages are basically the same as those in development without the AUITK. The flow of the subsequent stages makes the most of the AUITK features, as shown below. Application Development Since the AUITK integrally controls HMI of the system, applications developed using the AUITK generally have no HMI. The platform supports the development of products without HMI that include middleware, and custom controls that link AUITK to the applications. In the same way as a system without AUITK, efficient development can be performed here using the application development executable image that is inherited from the platform development stage. The application development stage generates applications and custom controls that are all contained within the skin development executable image. AUI Skin Development This stage produces an AUITK skin that is coded in XML to create the HMI portion of the system. The AUI skin can be used to design all the HMI screens of a system and control applications having no HMI through either the standard control attached to AUITK or a custom control generated in the preceding stage. An AUI skin can be easily and efficiently developed on a personal computer. The products generated in each stage are important components that make up the development environment of the next stage. The development efficiency can be improved by clarifying the products that are exchanged between steps and determining the exchange rules and usage. Using Windows Automotive 5.0 SP2 2-5 2.1.2 Features of Windows Automotive 5.0 Development Environment Windows Automotive 5.0 provides a development environment that can be used in each development stage to improve product development efficiency. The development environment is designed to build on the results of the previous stage and incorporate them into the base Windows Automotive development tool. Figure 2-3 shows the development environment for each stage and the product flow. H/W Specification Device Bring-Up OAL, Driver Development Platform Builder Hardware Tool Final Executable Image Platform Development Driver, OS Design Development BSP System Integration Platform Builder Platform Builder Application Development Executable Image Platform SDK Application Development Application, Custom Control, Middle ware Development Platform Builder AUI Skin Development Skin AUI Skin Development Development Executable Image AUISkinTool Create Images *.bmp eMbedded Visual C++ Figure 2-3: Windows Automotive development flow between stages Using Windows Automotive 5.0 SP2 2-6 Windows Automotive 5.0 provides the following development features through the efficient use of this development environment: Device Initialization The device initialization stage uses the hardware specifications and Platform Builder to develop a boot loader, OAL, and driver. The environment used for this step incorporates the hardware specifications with Platform Builder and becomes the environment used for the device initialization stage. In this development environment, BSP is generated and made available to the system integration and platform development stage. Platform Development The platform development stage consists of driver development and the operating system design for a target product by using BSP (the product of the device initialization stage) and Platform Builder. The environment in this stage incorporates Platform Builder and BSP and becomes the environment for the platform development stage. In this development environment, the application development executable image and Platform SDK are generated and are then made available to the system integration and application development stages. Application Development The application development stage uses Platform Builder to develop application programs and custom controls based on the application development executable image, the product of the platform development stage. When Platform Builder is used, the application development executable image is incorporated into the development environment. When eMbedded Visual C++ is used for development, the Platform SDK is incorporated into the development environment. In both cases, the resulting development environment generates custom control and applications that are then incorporated into the skin development executable image, and makes the resulting products available to the subsequent system integration and application development stages. AUI skin Development Based on the skin development executable image generated in the application development stage, the AUI skin development stage develops the AUI skin using AUISkinTool. The environment used in this stage incorporates AUISkinTool the skin development executable image and becomes the development environment for the AUI skin development stage. In this development environment, the AUI skin is generated and made available to the system integration stage. System Integration The system integration stage collects the products of the previous development stages and then generates and evaluates the final executable image using Platform Builder. The resulting environment becomes the development environment for the system integration stage. Using Windows Automotive 5.0 SP2 2-7 3 Automotive Configuration 3.1 Overview Windows Automotive 5.0 provides a sample configuration that can be used as the basis for user system development. The sample configuration includes components commonly used in an automotive information system. These include: AUI Runtime and AUI sample skin AUI sample control and sample application Middleware (DirectDraw, DirectShow, Windows Media technology, MSXML, COM, Internet Client Service, and others) Core components (GWES, file system, Device Manager, Kernel, and others) System tool (Automotive System Tools) In actual product development, replace the sample application, skin, driver, and BSP with product-based components. And add any required components or delete any unnecessary ones. 3.2 Software Configuration 3.2.1 Automotive Device Configuration Types The following three sample automotive device configurations are provided. Each of these samples can be configured using a wizard. For automotive device configuration, only the minimal graphics, windowing, and events subsystem (GWES) configuration is used as GWES. Basic configuration This is the basic Windows Automotive configuration, including the core components, middleware, and system tools. AUITK configuration This consists of the basic configuration plus the AUI Toolkit. AUITK+IE configuration This consists of the AUITK configuration plus a browser-related component (Internet Explorer) and GWES2-related component. Using Windows Automotive 5.0 SP2 3-1 3.2.1.1 Functions Included in Each Configuration Y: Included, S: Option set with the wizard, Blank: Not included Table 3-1: Functions Included in Each Configuration Category Function Sub-category (1) Sub-category (2) AUITK AUI runtime AUI renderer (GDISub) Basic AUI host sample AST System tuning tools AUITK+IE S S S S CPU time measurement tool Y Y Y Memory usage measurement tool Y Y Y System monitoring tool Y Y Y VM extended kernel Y Y Y System error handling Y Y Y System logging tool Y Y Y Y Y Y Advanced Exception Reporting (AER) Y Y Y Development environment component (SDKConnect) Y Y Y Application launcher Y Y Y Kernel Y Y Y File system Y Y Y Y Y Y Device manager Y Y Y GWES Y Y Y Courier New Y Y Y Tahoma Y Y Y Extended core component Core OS AUITK TFAT UDFS/CDFS Font Wingding GDISub GWES2 Y Y Y Y S Using Windows Automotive 5.0 SP2 3-2 Category Function Multimedia Audio Sub-category (1) Sub-category (2) Basic AUITK AUITK+IE Y Y Y Graphic DirectDraw Y Media Y Y Y Y Y Y MP3 Y Y Y WMA Y Y Y DirectShow DirectShow Codec WMV Y XML XML parser Y Internet Explorer Internet Explorer Y HTML parser Y Jscript Y WinInet Security Shell Sample applications Y Y Y Y Y Y Debug Shell Y Y Y Mouse Y Y Y Touch Screen (Stylus) Y Y Y S S Media player Web browser S Dummy navigation S S XML data deployment S S Multi skin S S Using Windows Automotive 5.0 SP2 3-3 3.2.2 Build Types Table 3-2: Build Types Type Description How to Set Debug This build configuration is intended to debug the entire system. The module size becomes large because the build is performed without optimization. Debug messages can be output using DEBUGMSG and RETAILMSG. From the "Build OS" menu of Platform Builder, select "Set Active Configuration" and then "Debug," or set "debug" in environment variable WINCEDEBUG. Release The module size becomes small because the build is performed with optimization. Select "Setting" from the "Platform" menu of Platform Builder. Check "EnableKITL" and "Enable Kernel Debugger" to enable debugging. Note that, because of optimization, inconsistencies with the source code line may arise from debugging. Debug messages can be output using RETAILMSG. From the "Build OS" menu of Platform Builder, select "Set Active Configuration" and then "Release," or set "retail" in environment variable WINCEDEBUG. Ship This configuration is intended for shipment from which the debugging function is removed. Debug messages are not output using DEBUGMSG or RETAILMSG. For details, refer to the Platform Builder online manual, "Creating a Custom Ship Configuration." Select "Setting" from the "Platform" menu of Platform Builder. Uncheck "EnableKITL" and "Enable Kernel Debugger." Then, check "Enable Ship Build," or set "retail" in environment variable WINCEDEBUG, or set "1" in environment variable WINCESHIP. NoDev This configuration does not include the AST development environment component (SDK Connect). Set "1" in environment variable IMGDISABLEDEVENV for the Release or Debug configuration. Using Windows Automotive 5.0 SP2 3-4 4 Virtual Memory (VM) Expansion Tool 4.1 Overview With Windows CE 5.0, one process can use a total of 64 MB of virtual memory, consisting of an individual 32-MB process area for each process and a 32-MB DLL area that is shared by the processes. With the increase in scale of programs in automotive systems, there are more high-end systems with DLLs having a total size of 32 MB or more than ever before. When the total DLL size exceeds 32 MB, the process area can be insufficient, leading to the following problems: When a process uses a large amount of virtual memory, an address conflict between the process and DLLs occurs. To avoid this issue, the address allocation for each DLL must be optimized manually. When the total size of the DLLs is 58 MB or more, a setting is required to move the overflowing DLLs to the file section. The above tasks must be performed each time the program is modified or the DLL size is changed due to a change in the compile options (such as a debug build), which increases the number of man-hours required for system configuration. To solve these problems, Windows Automotive 5.0 provides a virtual memory expansion tool (VM Expansion Tool) which enables the problem-free expansion of the DLL area from 32 to 96 MB. 4.2 Memory Map With Windows CE, the 32-bit user memory space (2 GB) is divided into 32-MB areas, each of which is called a slot. Each process uses slot 0 when executed. DLLs are placed in slot 1 and shared by the processes (DLL R/W data is stored in slot 0). When the total size of the DLLs is 32 MB or more, the overflowing DLLs are placed in slot 0 and the process space is reduced by that amount. Since the VM Expansion Tool places those DLLs that overflow from slot 0 into slot 60 or 61, DLLs of up to 96 MB (32 MB three slots) can be included in the system without using the process space. Using Windows Automotive 5.0 SP2 4-1 0x80000000 0x80000000 Resource DLL (Slot 63) 0x7E000000 Resource DLL (Slot 63) 0x7E000000 Shared Heap (Slot 62) 0x7C000000 Slot 61 Shared Memory (928MB) Slot 60 : Slot 33 0x42000000 Slot 32 Other Processes : Shared Heap (Slot 62) 0x7C000000 DLL (Slot 61) 0x78000000 Shared Memory (864MB) : Slot 33 0x42000000 Slot 32 Other Processes Slot 2 0x04000000 DLL (Slot 60) : Slot 2 0x04000000 DLL (Slot 1) 0x02000000 DLL (Slot 1) 0x02000000 Current Process (Slot 0) 0x00000000 Current Process (Slot 0) 0x00000000 DLLs over 32MB use Slot 0 Windows CE 5.0 Memory Map Windows Automotive 5.0 VM Expansion Memory Map Figure 4-1: Overview of virtual memory allocation by the VM Expansion Tool 4.3 Tool Configuration The VM Expansion Tool consists of the following four main components: VM Expansion Configuration Tool (vmeconfig.exe) Tool that runs on the development PC. This tool reads a binary image builder file (CE.BIB) and converts it so that those DLLs that overflow from slot 1 are moved to the shared space. Thunk Generator (thunkgen.exe) Tool that runs on the development PC. Use this tool to convert normal DLLs to DLLs that can be loaded into the shared space. Shared Memory DLL Loader Library (smdloader.lib) Static library linked to the Windows CE kernel. Use this library to set up the system so that DLLs can be loaded into the shared space. Windows Automotive 5.0 Kernel Libraries (nkmain.lib and nkprmain.lib) Static libraries that extend the Windows CE kernel so that DLLs can be loaded into shared memory. These libraries are used when the kernel is built. Using Windows Automotive 5.0 SP2 4-2 (1) 1. Vme.cfg Kernel OAL WA5.0 Kernel Lib Ce.bib Map file VME Config Tool 2. (2) SM DLL Loader lib. 4. (4) DLL REL DLL EXE Kernel (nk.exe) Thunk Generator (5) 5. 3. (3) Ce.bib DLL with Thunk REL with Thunk RomImage NK.BIN NK_VME .BIN (6) 6. Figure 4-2: System configuration diagram (on the development PC) Use the above four components to configure the system as follows: 1. Link the Shared Memory DLL Loader Library, OAL, and WA5.0 Kernel Libraries and then generate the kernel (nk.exe). 2. When the executable image (nk.bin) is configured using Platform Builder, the VME Configuration Tool is started according to the environment variable specification. 3. The VME Configuration Tool analyzes the binary image builder file (CE.BIB) and then rewrites the CE.BIB file so that those DLLs that overflow from slot 1 are placed in slots 60 and 61. 4. The VME Configuration Tool starts the Thunk Generator for those DLLs to be placed in slots 60 and 61 and then converts them. 5. The Thunk Generator converts the standard DLLs to DLLs that can be executed in the shared memory. 6. Romimage.exe generates shared memory DLLs as another executable image (BIN). Using Windows Automotive 5.0 SP2 4-3 5 CPU Time Measurement Tool The CPU Time Measurement Tool can list processing times and other data for threads running on the system. Using the celog data obtained from a target system that is running according to a scenario, the CPU Time Measurement Tool outputs a list of operating threads as input data. With the list of threads created by this tool, you can grasp what kind of characteristics the respective threads have, such as processing time and priority. 5.1 Components of the Tool The CPU Time Measurement Tool consists of the five components described below. CPU Time Measurement Tool (CPUTimeMeasurementTool.xls) This tool runs on a development PC. CPUTimeMeasurementTool.xls is a sample macro for creating a list of threads for data input, based on celog data. CPU Time Analysis Tool (TSWLog.exe) This tool runs on a development PC. TSWLog.exe generates an intermediate file for analyzing celog data and creating a list of threads. TSWLog.exe is used together with CPUTimeMeasurementTool.xls and is installed in the same folder. System Resource Usage Measurement DLL (ResUsage.dll) This is a dynamic link library that runs on a target device. Loading this DLL into CE Target Control as Target Control Extension enables the use of commands for creating celog data. System Resource Usage Measurement Kernel Library (KResUsage.lib) This is a static library that is added to the kernel. KResUsage.lib starts and stops the obtaining of celog data. To use KResUsage.lib, you must add a process to call a function for celog data acquisition from OEMIoControl(). System Resource Usage Measurement Driver (DResUsage.dll) This is a dynamic link library that runs on a target device to obtain celog data. DResUsage.dll generates a celog data file. 5.2 General Configuration Diagram The figure below shows the general configuration of the CPU Time Measurement Tool. Using Windows Automotive 5.0 SP2 5-1 WA device side PC side celog acquisition API (DeviceIOControl) KernelIOControl Shell process Device process Shell.exe Device.exe [1] Command input NK.BIN *.MAP Excel macro nk.exe Input ResUsage.dll DResUsage.dll KResUsage.lib (ShellExt) (ResUsage Driver) celog.dll Application process Generates Read into FlushThread [5] [3] Kernel process Writes into and analysis macro KINFO Table 出 Output celog enableflag Application thread APP.exe ON/OFF [4] 力 List of threads Saves data into [2] Shared memory celog data HDD or memory card celog data file - A WA device is one that uses Windows Automotive 5.0. Figure 5-1: CPU Time Measurement Tool general configuration [1] To obtain celog data from the CE Target Control, load the system resource usage measurement DLL (ResUsage.dll) as an extension shell by executing the loadext command on the CE Target Control, and then execute the clg command. A detailed description of the clg command is given below. [2] Executing the clg command creates a celog data file with the specified file name. If no file name has been specified, execution of the clg command creates a celog data file named \release\celog.clg. Transfer the created celog data file to the host PC by using KITL or some other method. [3] Start the CPU time measurement tool (CPUTimeMeasurmentTool.xls), and then input the celog data file transferred to the host PC, the system image generated by PlatformBuilder (NK.BIN), and the directory in which the MAP files are placed. [4] A list of average thread processing times, average startup cycles, priorities, thread names is generated. Using Windows Automotive 5.0 SP2 5-2 [5] To do a CPU time measurement from a user application, call DeviceIoControl(). This operation does not require the system resource usage measurement DLL (ResUsage.dll) to be used. After that, you can create another list of threads by executing steps [2] through [4], rather than starting from step [1]. 5.3 Operating Requirements This tool requires the following programs to operate: Microsoft Windows Automotive 5.0 SP1 Microsoft® Office Excel® 2003 * This tool requires Office Excel 2003 macros. Before starting up this tool, set the macro security level to "Medium." To do this: In Excel, from the Tools menu, select Macro | Security. Click the Security tab, set the security level to Medium, and click OK. Using Windows Automotive 5.0 SP2 5-3 6 Memory Usage Measurement Tool The Memory Usage Measurement Tool generates memory footprint charts that list the components of system images (i.e., nk.bin, nk2.bin), together with their sizes and a memory map chart that denotes how memory is used for system operation. 6.1 Components of the Tool The Memory Usage Measurement Tool consists of the five components described below. Memory Usage Analysis Tool (MemoryMeasurmentTool.xls) This tool runs on the development PC. MemoryMeasurementTool.xls is a sample macro that is used for creating a memory footprint chart, a memory map chart, and multiple summary chart by using a memory usage data file and system image (nk.bin) as input. System Resource Usage Measurement DLL (ResUsage.dll) This is a dynamic link library that runs on a target device. This DLL generates data on the actual measured memory usage for creating a memory map chart. Loading this DLL into the CE Target Control as Target Control Extension makes those commands available for measuring memory usage. System Resource Usage Measurement Kernel Library (KResUsage.lib) This is a static library that is added to the kernel. This library generates data about the actually measured memory usage when creating a memory map chart. System Resource Usage Measurement Driver (DResUsage.dll) This is a dynamic link library that runs on a target device for which the memory usage is to be measured. This driver generates a memory usage data file for creating a memory map chart. Intermediate File Creator DLL for a Memory Footprint/Memory Map (MakeMemFile.dll) This tool runs on the development PC. This DLL generates an intermediate file for creating a memory footprint chart/memory map chart from a memory usage data file and system image (nk.bin). 6.2 Operating Requirements The Memory Usage Measurement Tool requires the following programs to run: Microsoft Windows Automotive 5.0 Microsoft Office Excel 2003 * This tool requires Office Excel 2003 macros. Before starting up this tool, set the macro security level to "Medium." To do this: In Excel, from the Tools menu, select Macro | Security. Click the Security tab, set the security level to Medium, and click OK. It has not been verified that the tool can operate on any other version of Excel. Using Windows Automotive 5.0 SP2 6-1 WA device side PC side Memory usage acquisition API (DeviceIOControl) KernelIOContro Shell.exe [1] Command input NK.BIN l Shell process Device process Shell.exe Device.exe ResUsage.dll DResUsage.dll (ShellExt) Kernel process nk.exe KResUsage.lib [3] Input Input Excel macro (ResUsage Driver) Allocate Application process Application thread APP.exe [5] Memory information work area (memory usage recording data) Kernel information Written into Memory information Saves data into HDD or memory card Memory usage data file Intermediate file [4] Memory map Memory footprint [2] Multiple summary - A WA device is one that uses Windows Automotive 5.0. Figure 6-1: Memory Usage Measurement Tool general operation diagram [1] To measure memory usage from the CE Target Control, load the system resource usage measurement DLL (ResUsage.dll) as Target Control Extension by executing the loadext command for CE Target Control, and then execute the mm command. [2] Upon execution, the mm command creates a memory usage data file with the specified file name. If no file name is specified, the executed mm command creates a memory usage data file, named \release\MemMeasure.dat. [3] Start up the memory usage analysis tool (MemoryMeasurmentTool.xls), and then input the memory usage data file that has been transferred to the host PC and the system image generated by Platform Builder (nk.bin). [4] The memory usage analysis tool generates a memory map chart that includes physical memory usage and a virtual memory map; a memory footprint chart having the list of component names and sizes; and a multiple summary chart lists the contents of the summary sheet of the memory map chart. [5] To measure memory usage from a user process, call DeviceIoControl(). To measure memory usage from AER, call KernelIoControl(). This operation does not require the use of the system resource usage measurement DLL (ResUsage.dll). If desired, you can create another memory map chart, memory footprint chart, and multiple summary chart by executing steps [3] through [4], rather than starting from step [1]. Using Windows Automotive 5.0 SP2 6-2 7 System Monitoring Tool 7.1 Overview Automotive information systems have a watchdog feature as a means to detect a system failure, such as an infinite processing loop or the program becoming unresponsive, which cannot be handled by the exception or error handling mechanism. Typically, such a feature has a prepared watchdog thread run periodically at a given priority and detects a system failure if the watchdog thread is unable to operate for a certain period of time. Watchdog threads are effective in monitoring the entire system. However, to monitor a thread of a specific priority level requires creating a new watchdog thread dedicated to that target thread. The System Monitoring Tool supports an extended watchdog feature to enable easy simultaneous monitoring of threads running at different priorities. The System Monitoring Tool measures the processing delay at each priority level when a thread switch takes place in the system, and determines whether the delay exceeds the specified worst-case latency. The OEMReschedule() function is used to obtain the thread switch timing. When a thread switch takes place, the System Monitoring Tool calculates the recommended time for the timer of each priority level and sets the timer to the minimum of the calculated values. If the worst-case latency is not exceeded, no timer interrupt occurs, because a different value is set in the timer before the timer starts and causes a timer interrupt. However, if the worst-case latency is exceeded, the timer starts before a different value is set, thereby causing a timer interrupt. As a result, an interrupt service thread (IST ) for timer interrupt receives the interrupt and detects that the worst case latency has been exceeded. Detect that the specified latency is exceeded 100 (High) 120 Priority 140 (Low) 180 160 ▲ 200 [1] [2] [3] [4] [5] [6] [7] [8] [9] [10] [11] [12] Specified worst case latency Figure 7-1: System monitoring method The figure above shows that threads are running at priorities 100, 120, 140, 160, 180, and 200. In this figure, the period of time during which the thread of priority 160 cannot run is [1], [3]+[4]+[5], or [10]+[11] (indicated by red lines in the figure). If the red dotted line in the figure represents the worst case latency for the thread of priority 160, the worst case latency is exceeded over the time of [3]+[4]+[5] (▲ in the figure), thus starting the timer and causing a timer interrupt. Using Windows Automotive 5.0 SP2 7-1 7.2 Components of the Tool The System Monitoring Tool consists of the components described below. KWatchLatency_$(_TGTPLAT).lib This is a library that is created by building KWatchLatency.h, KWatchLatency.c, and WatchLatency.lib. The library is linked when kern.exe, kernkitl.exe, and kernkitlprof.exe are created. In $(_TGTPLAT), the information of the environment variable set in _TGTPLAT is used. This is created as KWatchLatency_$(_TGTPLAT).lib in the build operation and incorporated in the system image under the name of KWatchLatency.lib. Therefore, use KWatchLatency.lib as its name in a registry file (*.reg) and binary image file (*.bib). KWatchLatency.h This file declares the latency table, the parameter table for KernelIoControl(), and constants. It is included from KWatchLatency.c when KWatchLatency.lib is created. KWatchLatency.c This file defines the worst case latency for each priority level. It implements OEMReschedule(). The file internally calls I_WatchLatency(), which is a processing function in WatchLatency.lib. It is used when KWatchLatency.lib is created. If OEMReschedule() is already implemented, it is necessary to add a process that calls I_WatchLatency() within OEMReschedule(). WatchLatency.lib This library is used for creation or update of a latency table and retention of delay time in an internal table. It is linked to KWatchLatency.c when KWatchLatency.lib is created. DWatchLatency_$(_TGTPLAT).dll and source code This is an IST for the timer interrupt defined in KWatchLatency.lib. Upon receiving the timer interrupt, it calls the Error Handling Tool. In $(_TGTPLAT), the information of the environment variable set in _TGTPLAT is used. This is created as DWatchLatency_$(_TGTPLAT).dll in the build operation and incorporated in the system image under the name of DWatchLatency.dll. Therefore, use DWatchLatency.dll as its name in a registry file (*.reg) and binary image file (*.bib). DWatchLatency.reg This is a registry for setting DWatchLatency.dll. Error Handling Routine This is an error handling routine embedded in the Error Handling Tool. In this chapter, KWatchLatency_$(_TGTPLAT).lib is referred to as KWatchLatency.lib, and DWatchLatency_$(_TGTPLAT).dll to DWatchLatency.dll. Using Windows Automotive 5.0 SP2 7-2 APP Application Device.exe Error Handling Tool DWatchLatency.dll Log output Kernel KernelIoControl() Scheduler System Logging Tool Thread Switch OEMReschedule() KWatchLatency.lib Modify latencies Monitoring Timer Worst Case Latencies Interrupt Set Timer Regiter Timer ISR :WA Feature Figure 7-2: System Monitoring Tool operating diagram 7.3 Operating Requirements The System Monitoring Tool requires the following program to run: Microsoft Windows Automotive 5.0 SP2 It has not been verified that the tool can operate on any other version of the program. Using Windows Automotive 5.0 SP2 7-3 8 Error Handling Tool 8.1 Overview In an automotive system, several different software modules interact with one another. In many cases, therefore, an error in a single software module affects the operation of the entire system. This makes it necessary to handle errors on a system-wide basis. Also, depending on the system specifications and configuration, the same software module may require a different error handling action. Given these factors, the process that runs when a software module detects an error needs to be managed in a cohesive way by the system, instead of being implemented individually by each module. The Error Handling Tool is a unified system-wide framework for error management. The Error Handling Tool divides modules into three types: error detection, error analysis, and error handling. Error statuses detected by individual modules are managed centrally by a unified error management module, which requests the error handling section to handle the detected errors. Software Module A (Error Detection Section) Software Module B (Error Detection Section) Software Module C (Error Handling Section) Error Information Error Information Error Handling Request Error Management Module (Error Analysis Section) Figure 8-1: Error Handling Tool processing diagram The Error Handling Tool has the following features: It has a mechanism that allows each software component to report its status to the error management module. The error management module can analyze the statuses reported from individual components and take an action for each reported status. It has a mechanism whereby the error management module reports status changes to the application upon request. The above-mentioned analysis process and actions can be customized. Using Windows Automotive 5.0 SP2 8-1 8.2 Components of the Tool The Error Handling Tool consists of three components. 8.2.1 Error Handling Service Driver This is a module that serves as an interface between the error detection section and the application that receives error notifications. It is implemented as a driver and loaded by Device.exe at system startup. 8.2.2 Advanced Exception Reporting (AER) This is an interface module that receives application exceptions detected by the kernel. It is implemented as a kernel debugger and loaded by the kernel at system startup. 8.2.3 Error Handling Routine in Kernel OAL This is an error analysis and reset routine implemented within the kernel. It is implemented as a static library and linked statically with the kernel. Error Detection Components User Components Application Application Error Notification Request WA Components User Driver Post-error Action Code System Monitoring … Error Information TFAT Kernel AST Error Reporting API AER (Customizable) Error Handling Interface Error Notification Message … Exception Trap Interface Error Action Routines (Customizable) Error Handling Service Driver Error Analyzing Routines (Customizable) System Reset Routine (Customizable) Error Handling Routine in Kernel OAL System Logging Figure 8-2 Error Handling Tool Block Diagram Using Windows Automotive 5.0 SP2 8-2 8.3 Error Handling Tool Samples The Error Handling Tool includes samples for performing error handling using this framework. 8.3.1 General Error Handling This sample is intended for the handling of general errors. It is implemented as a sample (stub) for creating user-defined error categories. 8.3.2 Exception Error Handling This sample is intended for the handling of exceptions caused by application errors. 8.3.3 TFAT Error Handling This sample is used to accomplish system-level recovery from an error that occurs while data is being written to a disk drive using the TFAT file system. For details, refer to Section 10, "Transaction-Safe FAT (TFAT) File System," later in this document 8.3.4 System Monitoring Tool Error Handling This sample is intended for the handling of errors detected by the System Monitoring Tool. Using Windows Automotive 5.0 SP2 8-3 9 System Logging Tool Since reliability is an important feature to automotive information systems, the performance and functionality of the debug tool have a significant impact on the development process. The debugging of an automotive information system in particular involves analyzing problems with low repeatability that involve extended test drives. Because a remote debugging environment linked with Platform Builder cannot be used in the error analysis for a test drive, the common practice is to store the error log in a non-volatile storage device and use the log data to analyze the causes of recorded errors after the test. The System Logging Tool saves error logs and enables error analysis even if a remote debugging environment is not available. 9.1 Overview The System Logging Tool has the following features: Unified log output mechanism A unified log output destination is provided for the operating system log, application log, AUITK log, Advanced Exception Reporting (AER) log, and others, thus allowing all log data to be saved using the same mechanism. File storage control features Features are available to control the maximum size of a file, number of files, and file write timing. Formatted data log output Both text and binary logs can be output in the celog-compatible standard system logging format. Unformatted data log output o Raw data that does not need formatting, such as memory dump data, can be output. A log can be output from an interrupt service routine (ISR). The file write timing can be set arbitrarily. o Data is written when a preset threshold value is exceeded. o The tool can be configured to write to the file as soon as a log message is output. o The file write timing can be set arbitrarily using the AstLogFlush API. Startup log save feature If the system is reset due to a failure, the log data stored in the backup memory is saved to the relevant files at the next startup. The action to be taken in case of a buffer overflow can be selected. o Retain the latest logs while discarding the previous logs o Retain the previous logs while discarding the latest logs o Wait for the buffer to become available without discarding any logs Using Windows Automotive 5.0 SP2 9-1 Log file management Up to 999 files can be held per log. Support for formatted data log file analysis A log file text conversion tool is provided as a sample. 9.2 Configuration of the System Logging Tool 9.2.1 Logging Features of Windows CE 5.0 Windows Automotive 5.0 supports several error logging tools such as Advanced Exception Reporting (AER), operating system log (celog), application log (debug messages), and AUI log. These tools, however, have the following problems: [1] Since AER, celog, debug messages, and AUI log each have a different output destination, a separate save feature needs to be implemented for each. [2] Celog and debug messages are not designed with post-shipment error analysis in mind and are therefore problematic in the following respects: Since no feature is available to save debug messages and AUI log to files, OEMs need to implement such a feature on their own. Although a feature is available to save celog data to a log file, there is no practical file control feature (to control the file size, start and end, write timing, etc.). Because AER and other error reset logging tools may not be able to save files in the event of a system failure, they need a feature to save the log data stored in the backup RAM at the next startup. However, no sample of such a feature is provided. Figure 9-1 provides an overview of the conventional logging features. Target Device OEM Implementation Applications File transfer via memory cards Middleware Kernel Host PC OS Log Shared memory CeLogFlush .clg .clg Exception Log Shared memory CE Error Reporting binary binary Analysis by OEM .txt .txt Notepad App Log (Dbg Msg) OEM Impl. KernelTracker OAL OS Log Shared memory Serial port Serial Cable HyperTerm Auiapp Ethernet Transport AuiSkinTool Figure 9-1: Overview of System Logging Tool features Using Windows Automotive 5.0 SP2 9-2 9.2.2 Logging Features of Windows Automotive 5.0 The System Logging Tool is a module intended to improve upon the problems discussed in Section 9.2.1, "Logging Features of Windows CE 5.0." The use of the System Logging Tool offers a unified log output destination, thus enabling all logs to be saved using the same mechanism. Figure 9-2 provides an overview of the logging features of Windows Automotive 5.0. WA Feature Host PC Target Device Middleware OS Log CeLog Exception Log Log file System Logging Tool Kernel AUI Log Memory Card, Ethernet, USB, Serial port, etc Applications Log file CeLog Log Convert Tool KernelTracker AerReport.pl App Log (Dbg Msg) Notepad Figure 9-2: Windows Automotive 5.0 logging features The System Logging Tool accumulates log data, received from the application, in a log buffer. If the size of log data accumulated in the log buffer exceeds a specified threshold, the log filter requests the log saver driver to write the data to a file. The log saver driver saves the log data accumulated in the log buffer to a file. Application Interface Library KernelIoControl Kernel Log Filter Log Router Device Manager Log Saver Driver OAL Figure 9-3: Configuration of the System Logging Tool Using Windows Automotive 5.0 SP2 9-3 9.3 Log Types 9.3.1 Unformatted Data (Raw Data) Log The unformatted data type of log data is output to a file without being processed. While this is useful when saving dump data or log data that adheres to a user's proprietary format, the user needs to develop an analysis tool on his or her own. 9.3.2 Formatted Data Log The formatted data type of log data is output with the standard (celog-compatible) header information used by the logging tool appended to it. This type of log adheres to the standard format used by the logging tool and the AST-provided text conversion tool as the analysis tool. The standard format used by the logging tool standard format is described below. Table 9-1: Standard format of the logging tool OFFSET High Word 0x00 T | F | ID Length Bit 15 : Flag indicating whether a timestamp Number of bytes in the data is present or not section (multiple of 4) Bit 14 : Flag indicating whether a FILETIME is present or not Bit 13-0 : Log type ID (Celog ID) Timestamp 32-bit value based on the Celog-compatible performance counter Counting period: Approx. 60 minutes from system startup Resolution: 1 microsecond 0x04 Low Word High-order 32 bits of the data or FILETIME (with the F flag) 0x08 9.3.2.1 Text Log This type of log is similar to debug messages. Each time the log output API (AstLogMsg) is called, text data is appended at the end of log data. The text log output API writes text in Unicode. Saving this text as is results in a two-fold increase in the log size, compared to when ASCII code is used. To reduce the log size, the System Logging Tool converts text data to ASCII code when saving the log. Text log messages have the following advantages and disadvantages: Advantages Since messages are easy for humans to understand, the log can be analyzed with ease. Even if parts of log data are lost, the log can be analyzed correctly to a certain degree. There is high compatibility with debug messages (existing debug messages can be saved as the text log). Using Windows Automotive 5.0 SP2 9-4 Disadvantages The log size tends to become large (compared to the binary log). Format conversion results in some additional CPU overhead. (When 32-byte data is output, this type of log takes about two or three microseconds more than the binary log.) 9.3.2.2 Binary Log Each time the log output API (AstLogWrite) is called, binary data is appended at the end of log data, as with the text log. Binary log messages have the following advantages and disadvantage: Advantages The log size is small. The CPU load is light (message conversion is not involved). Disadvantage Because the data is difficult for humans to understand, a log analysis tool is necessary. Using Windows Automotive 5.0 SP2 9-5 10 Transaction-Safe FAT (TFAT) File System 10.1 Overview Automotive devices may not be able to complete a write operation to media due to abrupt power loss or vibration. For this reason, the file system for automotive devices must retain data even if the write operation fails to complete. If a write operation is interrupted, the Transaction-Safe (TFAT) file system helps to ensure: That the data already written will not be lost; That the file system can be restored to the state it was in before the interrupted transaction began; and That the consistency of the file system will be maintained (there must be no area made unavailable due to a lost cluster). TFAT is based on FAT32 File System Specification Version 1.03 and supports additional features to protect against write operation interruptions. 10.2 Windows Automotive 5.0 SP2 TFAT Module To meet automotive needs, Windows Automotive 5.0 SP2 provides the following improvements over the standard TFAT of Windows CE 5.0: Performance improvement through the use of the disable commit mode Improvement in error handling through interaction with the Error Handling Tool 10.3 Extended Functions of Windows Automotive TFAT 10.3.1 Disable Commit Mode In TFAT, the unit for achieving transaction guarantee is called a commit. If power loss or the removal of media occurs while data is written to a storage, the next time that storage is mounted, the data being written is discarded and the storage is restored to the state it was in when it was last committed. With the standard TFAT, the commit timing is fixed and cannot be controlled by applications. For a write-through operation, a commit is performed each time WriteFile is completed (a write operation to a file opened with the FILE_FLAG_WRITE_THROUGH attribute). In the case of a write-back operation, a commit is performed each time FlushFileBuffers or CloseHandle is completed (a write operation without FILE_FLAG_WRITE_THROUGH). Therefore, when the system writes a large number of files, each relatively small in size, the overhead for the commit process increases in comparison with the amount of data being written, potentially resulting in a substantial drop in performance. The TFAT in Windows Automotive 5.0 SP2 supports a new mode (disable commit mode) in which the commit timing can be controlled by applications, making it possible to reduce such commit overhead. Using Windows Automotive 5.0 SP2 10-1 Table 10-1 shows the commit timing in each available mode. Table 10-1: TFAT commit operation modes and commit timing Operation Mode Commit Timing Normal mode Write-through operation A commit is performed when any of the following API calls is completed: WriteFile, SetEndOfFile, CreateDirectory, RemoveDirectory, SetFileAttributes, CreateFile (new file), DeleteFile, MoveFile, DeleteAndRenameFile * CopyFile and CopyFileEx are executed by combining several of the above APIs within them, thus requiring a commit to be done more than once. Normal mode Write-back operation A commit is performed when any of the following API calls is completed: FlushFileBuffers, CloseHandle, CreateDirectory, RemoveDirectory, SetFileAttributes, CreateFile (new file), DeleteFile, MoveFile, DeleteAndRenameFile * CopyFile and CopyFileEx are executed by combining several of the above APIs within them, thus requiring a commit to be done more than once. Disable commit mode A commit is performed when the disable commit mode is ended (TfatEnableCommit is executed) or when the execution of an explicit commit (TfatCommit) is completed. The commit process is performed on a per-volume (per-partition) basis. Therefore, if one thread is committed when two or more threads are accessing the same one volume, the data written previously by the other threads will be committed as well. 10.3.2 TFAT Error Handling In automotive devices, an error may occur due to abnormal temperature, vibration, or some other factor while a command is reading from or writing to the disk. In the worst case, TFAT may lose the consistency of its file system (volume corruption) if an error occurs during the read or write of critical data. In the event of an error that may corrupt volumes, TFAT can maintain the system consistency by restoring it to the state it was in at the last commit. This, however, requires remounting the volumes. The standard TFAT in Windows CE does not have a mechanism to remount volumes in case of an error or to notify applications of the volume remount. The only way for this TFAT to remount volumes is to reset the entire system in response to an error. The TFAT in Windows Automotive 5.0 SP2 provides a mechanism whereby it performs the steps described below, [1] through [3], in conjunction with the Error Handling Tool, in order to remount volumes without resetting the system and prevent volume corruption. [1] If a disk read/write error occurs, the driver notifies TFAT of the error. [2] TFAT reports the error status to the Error Handling Tool. [3] The Error Handling Tool takes the error action appropriate for the error status Using Windows Automotive 5.0 SP2 10-2 (volume remount, notification to the application, etc.). The Error Handling Tool allows the error handling processing to be customized. Windows Automotive 5.0 SP2 offers a default TFAT error handling sample, which works as outlined below. Outline of the TFAT error handling sample When the application is initialized [1] The application starts a thread for receiving unmount/mount notification messages. [2] An unmount/mount notification request is sent to the error handling module (to obtain the handle of the message queue). [3] Within a message receive loop, the application waits for a message. How the block driver behaves if an error occurs [4] The block driver sets an error code other than ERROR_SUCCESS in SetLastError and returns FALSE for XXX_IOControl. [5] If an exception occurs inside the block driver, DeviceIoControl of DevMgr.dll sets ERROR_INVALID_PARAMETER in SetLastError and returns FALSE. Therefore, there is no need for the block driver to implement structured exception handling. How TFAT behaves if an error occurs [6] TFAT reports the error status to the error handling module (AstErrorReportStatus function call). [7] Based on the return value from the error handling module, TFAT takes one of the following actions: retry, continue, and stop. [8] If the operation is stopped, the API call that caused the error returns an error code (this error code is set by the block driver or reset by the error handling module). [9] If an unrecoverable error occurs in a volume, the write operation to that volume is disabled and subsequent writes are prohibited. The read operation remains enabled unless a read error occurs. Note, however, that if a file whose write operation has not been completed is read, the read data may be different from that to be read next time the file is mounted. Also, if a file for which a write error has occurred is read before it is remounted, invalid data may be read. [10] If any write disable error or read error occurs as mentioned above, TFAT reports the error to the error handling module. How the error handling module behaves [11] If TFAT calls the error status report function, the module determines the action to take (retry, continue, remount, or reset) based on the reported error status and returns an action code to TFAT immediately. [12] In the case of remount, the TFAT error handling thread sends a volume unmount/mount notification message to the application to execute the remount. Using Windows Automotive 5.0 SP2 10-3 [13] In the case of reset, the system reset thread calls the reset routing (in the kernel) to execute the reset. How the application behaves upon receipt of an unmount notification [14] The application closes all open file handles. [15] After receiving a remount completion message, the application opens the files again. [16] After the unmount, any access request using an open file handle fails due to an error (ERROR_INVALID_HANDLE). [17] During the remount (between unmount and mount), any file operation using the mount point in question (e.g., "\\Hard Disk") fails with ERROR_FILE_NOT_FOUND and any directory operation using the mount point in question fails with ERROR_PATH_NOT_FOUND. Application Retry request Thread 1 Win32 API (WriteFile etc) Thread 2 Error Code Notification Request Filesys Storage Manager Unmount / Mount Notification Unmount / Mount Request Filter File system function (FAT_WriteFile etc) Action Code TFAT Error Report DeviceIoControl Partition Driver DeviceIoControl TFAT Error Handling Sample Reset Request System Reset Sample Routine AST Error Handling Module Error Code Block Driver Write Command H/W Error Hardware Figure 10-1: TFAT error handling sample diagram Using Windows Automotive 5.0 SP2 10-4 11 High-Speed Graphics Processing Framework GDI-Sub This section describes what is required to develop an application using GDI-Sub. 11.1 Background In designing automotive information systems, key elements are high-speed processing performance and graphics processing capabilities such as rich UI, real-time performance, reliability, and low cost because of map drawing, menu drawing, and other graphics drawing with a high load. Conventionally, these elements were secured by directly accessing hardware via a dedicated library implementation to achieve performance and functions. With this method, however, applications come to heavily depend on the hardware configuration, and this leads to difficulty in adapting to new hardware. In addition, maintaining a proprietary graphics solution that becomes increasingly advanced and complicated over time is not cost-efficient. On the other hand, in the Windows system on a PC, the processing operations for graphics rendering can be handled through GDI. However, GDI design assumes a general-purpose system, which leads to several obstacles to satisfying automotive requirements. For example, some automotive graphics chips have a function for executing a sequence of rendering instructions (a command list) asynchronously with the CPU, but this function cannot be utilized with the GDI architecture. The GWES subsystem also exclusively manages drawing requests received from applications, such that when a large number of drawing instructions for a map or the like are issued, a bottleneck can arise due to the exclusive processing. In addition, GWES cannot support physically superimposing multiple display surfaces on top of each other, which is a method used in most automotive information systems. In Windows, DirectX is provided as a framework for graphics processing that requires such high-speed performance. However, the design of DirectX is based on the assumption that the application exclusively occupies the screen, such as a game; thus DirectX is not sufficient for automotive use where drawing applications run concurrently and a 2-D command list is used. Additionally, DirectDraw does not support two-dimensional diagrammatic drawing processes other than BitBlt. Thus, GDI and/or another self-prepared drawing process is required. GDI-Sub is a graphics processing framework designed to develop and port systems at a low cost, satisfying requirements of automotive information systems. Given these factors, GDI-Sub is recommended for use with Windows Automotive. Using Windows Automotive 5.0 SP2 11-1 Figure 11-1: GDI-sub graphics output 11.2 Features of GDI-Sub In designing GDI-Sub, portability with GDI/DirectDraw is well-considered at the application level. GDI-Sub is equipped with timing controls, command lists, and other extensions needed for automotive requirements, and its architecture is designed to follow GDI/DirectDraw as much as possible for major principles such as drawing APIs and surface management. On the other hand, from the perspective of system development, the GDI-Sub framework does not depend on the GDI/DirectDraw modules. GDI-Sub does not require the GDI/DirectDraw modules unless compatible applications which use GDI are used; thus it is possible to construct simple systems. In addition, the GDI-Sub system has a device prepared to use GDI applications in the conventional manner. A graphic accelerator in the form of a command list used on automotive systems can directly interrupt and execute commands, making the best use of the intrinsic performance of the hardware. A command generation mechanism is realized in the client library, thus issuing a mass drawing command can be handled at high speed without context-switching in client applications. This enables the drawing portion of the application entity to make a quicker response and makes convenient real-time design possible. On GDI-Sub, the end of asynchronous execution of a series of command lists and the subsequent display switching can be handled as a transaction. With the transaction, applications can asynchronously handle the sequence from the queuing for command execution to the display switching subsequent to the end of execution. In transactions, you can specify parameters such as display switching time (frame interval), display switching of surfaces, command execution priorities, and transaction cancellation. The GDI-Sub Server module handles drawing completion interrupts from the hardware and VSYNC interrupts at the ISR level as far as possible to efficiently handle successive execution and synchronous processing. As the display resolution is becoming higher due to increased hardware quality, it has become difficult to retain multiple sizes of fonts in bitmap on Asian systems using many character sets. GDI-Sub has a function to provide applications with bitmap images that the GDI-Sub drawing API can draw, referring to Windows-compatible TrueType outline fonts and bitmap fonts included in AUI skins. On a system without a graphics accelerator, command lists are interrupted by a thread of a priority different from the application (software rendering) to perform Using Windows Automotive 5.0 SP2 11-2 the drawing process. This enables a system with a graphics accelerator and a system without a graphics accelerator to take the same command list model, thus making systems more scalable to ensure application portability. GDI-Sub applications can be checked for their drawing operations on a PC with the GDI-Sub PC emulator. The PC emulator handles command execution on software, superimposing multiple surfaces, and other processing to allow checking the operation of a GDI-Sub application in an environment close to the real machine. 11.3 Compatibility of GDI-Sub Applications GDI-Sub was designed for high-speed drawing first, intending application portability and development orientation to the precise second. Therefore, this leads to the following restrictions: Limited drawing APIs For simpler GDI-Sub library implementation, only minimum required APIs for HMI and/or map drawing are used at present. To port a GDI application, you may need to replace commands or expand APIs. Hardware-dependent graphics GDI-Sub's drawing API is close to GDI, but the details of graphics actually drawn may depend on the hardware. For example, line segments to be capped are directly handled by the graphics chip implementation instead of emulation in conformity with the GWES specifications. This is because high-speed hardware drawing should take priority over complete compatibility of graphics. Manufacturer-extended APIs Graphics chip specific functions that are not defined by common APIs need to be supported by manufacturer-extended APIs. For applications with those APIs used, hardware functions can be effectively employed, but caution is needed when porting the application—even between systems that support GDI-Sub—because they are hardware-dependent. 11.4 Overall Structure of GDI-Sub GDI-Sub roughly consists of a client library linked with an application and a GDI-Sub driver module, which is loaded as a device driver into device.exe. In addition, GDI-Sub also includes an optional virtual display driver to run a GDI application within the GDI-Sub environment, as well as a software rendering module. Details of these are covered later in this document. Using Windows Automotive 5.0 SP2 11-3 Application Process Customer Module APPLICATION GDI-Sub Display Control Client Library GDI-Sub Drawing Client Library Microsoft Module Command List Chip Vendor Module Hardware GDI-Sub Driver (Device Process) GDI-Sub Server Libraries Graphic Accelerator Display Image GDI-Sub Hardware Adaptation Code LCD Display Unit Figure 11-2: GDI-sub overview diagram 11.4.1 GDI-Sub Drawing Client Library This library is mainly responsible for providing drawing-related APIs for the application and generating command lists dependent on the hardware. This is a client library linked with an application, thus it generates command lists at high speed from a large number of draw commands without requiring process switching or exclusive control to individual drawing API calls. 11.4.2 GDI-Sub Display Control Client Library This is a general-purpose library which provides APIs dedicated to display control, buffer control, and other non-drawing functions for the application. This library mainly communicates with the GDI-Sub driver in another process space to control the video memory and hardware, which are system-wide shared resources. 11.4.3 GDI-Sub Server Libraries The GDI-Sub Server is implemented as a driver DLL loaded from Device.exe. The GDI-Sub Server Library provides functions for GDI-Sub driver implementation including communication with the client library, exclusive video memory/hardware management, and timing control. 11.4.4 Hardware Adaptation Code In the Hardware Adaptation Code, hardware control codes are written for functions such as the start of command execution, display start position control, and interrupt detection. Applying GDI-Sub Server Libraries to the hardware characteristics makes it possible to take full advantage of the hardware at the minimum cost. Using Windows Automotive 5.0 SP2 11-4 12 Fast Cold Boot Guide 12.1 Needs for Fast Cold Boot One of the features of Pocket PC, Smartphone, and other systems using Windows CE is fast startup. This fast startup is implemented with suspend/resume—which puts a system in low power consumption mode—and retained with the backup power supply in normal mode when an interrupt occurs by pressing the power button. However, automotive information systems cannot use the suspend/resume method. Automotive information systems instead require fast boot up by cold boot. This leaves the following options: 1. Restrictions of backup power Suspend/resume requires DRAM backup, but some automotive information systems may be unable to back up DRAM. 2. System reboot due to a failure Automotive information systems require a mechanism in which system monitoring software detects any failure and automatically reboots the system, thus avoiding system freeze. The startup specifications required for automotive information systems cannot be satisfied by the existing Windows CE platform because on a cold boot or reboot, time is required to perform startup operations for basic system components, including dynamic module loading, thread generation, dynamic memory allocation, and driver loading. This document introduces methods, samples, and tools for accelerating a cold boot and how to incorporate them into an automotive information system design. 12.2 Overview of Startup Speedup Methods To speed up a cold boot, the Windows CE boot sequence is broken into the following five stages: [1] Copying programs from the HDD, NAND flash memory, or another storage device to DRAM (This stage is not required for a system with DRAM backup.) [2] Initializing the operating system work area [3] Initializing user data (registry) [4] Starting up the operating system and applications [5] Loading device drivers and initializing the devices For the above startup sequence, the following acceleration methods can be applied. Using Windows Automotive 5.0 SP2 12-1 Table 12-1: Applying acceleration methods Processing Acceleration Method Description Copying programs from the HDD or NAND flash memory to DRAM Multistage image loading Distribute the program copying time to reduce the initial load time. Initializing the operating system work area DRAM clear thread Distribute memory initialization to reduce the overall initialization time. Initializing user data (registry) Hive-based registry Registry management system with which the registry initialization time is reduced Starting up the operating system and applications Snapshot boot Restores the status of the operating system and applications to the state that follows their initialization to skip the fixed initialization sequence. Loading device drivers Application Launcher Distributes driver load processing to eliminate the CPU idle time. 12.3 Considerations When Selecting a Method Not all startup acceleration methods introduced in the previous section always need to be applied. Each method does not always contribute to improving system initialization speed. The acceleration of system startup is implemented by appropriately combining methods according to the required startup specifications, hardware configuration, software configuration, and other factors. For example, there is no need to apply multistage image loading to a DRAM backup or flash XIP system that is expected to have programs in the execution memory. This is because this acceleration method reduces the time required for transferring programs from the HDD or flash memory to DRAM to by distributing the startup processing and transfer processing. To select startup acceleration methods, the following points must be considered: 12.3.1 Required startup time specification Most required startup time specifications are based on the existence of multiple start points. When accelerating system initialization, the required startup time specification is the most important element. For example, start points are set for the following operations: Displaying the logo screen Playing analog audio data Displaying a UI screen Displaying a map Playing digital audio data (music server) Starting navigation guide Using Windows Automotive 5.0 SP2 12-2 12.3.2 Where programs are executed and saved In many systems, programs are executed in DRAM to speed up their execution. To execute programs in DRAM, the programs saved in non-volatile memory must be copied into DRAM. Programs are mainly saved in the following locations: DRAM backup In this system, once programs are copied in DRAM, they are retained in DRAM with the backup power supply. In this case, it is not necessary to speed up the program copying time. HDD In a system in which programs are read from the HDD, the HDD spinup time (2 to 3 seconds usually) has a more significant impact on the startup time. Normally, when programs are saved on the HDD, a copy of the programs is stored in a few MB of flash memory. Therefore, an HDD boot causes the following two stages of initialization: Startup of the boot program transferring data from the HDD and that of main programs copied from the HDD. (In some cases, programs may be copied from the HDD in several stages.) NOR flash memory For NOR flash memory, the initial program should run while programs are being copied into DRAM. By using DMA to copy the programs, the CPU can perform other processing. In addition, XIP is available for NOR flash memory, so programs whose performance requirements are not severe may be executed in the memory. NAND flash memory For NAND flash memory, multistage boot operation is performed for the boot program and main programs in DRAM in the same way as for an HDD. For NAND flash memory, the time required for starting the first read operation is shorter than that for an HDD, but transfer is performed at a speed lower than that for an HDD. Therefore, dividing and distributing the copying time is recommended. 12.3.3 Other Criteria Finally, it is necessary to consider the following criteria for evaluating the acceleration of the system startup: Startup time (satisfying the required specifications) Execution performance (performance of programs after the startup) Component cost Reliability (processing performed when the startup is disabled due to the peripheral environment, in particular, for a boot from the HDD) Backup current (for DRAM backup) Using Windows Automotive 5.0 SP2 12-3 13 GWES2 (GWES for Automotive) GWES2 is a module that needs to be added when the user wants to use an application (like Internet Explorer) that uses the GDI function. This is necessary because the Automotive environment is structured with GWES, which does not include the GDI function. 13.1 GWES2 Configuration Example The example below provides an overview of the configuration of GWES2 when Internet Explorer is installed. The components of IE are indicated by thick black boxes. Where GWES2.EXE should be added for operation of these modules is indicated by a shaded thick black box. AUI skin AUIRuntime WebCtrl Navi Ctrl WebApp Navi MS HTML URLMon SHDocvw coredll AUI Renderer Ctrl 2 App1 App2 ・・・ App Device gwes2dll Ctrl 1 .EXE coredll. GWES Kernel File sys GWES2 DDGPE I/F DDI Wrapper GDISUB Graphic Driver KB-Mouse AUI_Mouse_Event Driver Figure 13-1: Configuration example of an environment with GWES2 GWES2 is configured with the gwes2dll library linked. This library includes a wrapper function necessary for access to GWS2. * You do not need to use gwes2dll when developing an application. You can develop an application following your established procedure. Using Windows Automotive 5.0 SP2 13-1