1
USER’S MANUAL
MAY / 06
VERSION 8
FOUNDATION
P V I
E WD M I
M E
www.smar.com
Specifications and information are subject to change without notice.
Up-to-date address information is available on our website.
web: www.smar.com/contactus.asp
Table of Contets
TABLE OF CONTENTS
DATA MINING ACTIVEX ................................................................................................................................ 5
INTRODUCTION ............................................................................................................................................................5
DATA MINING ACTIVEX FEATURES ........................................................................................................................................ 5
INSERTING THE ACTIVEX INTO A DISPLAY..............................................................................................................5
DATA MINING ACTIVEX PROPERTIES .......................................................................................................................6
GENERAL ................................................................................................................................................................................... 6
CONNECTING TO AN ADO DATA SOURCE............................................................................................................................. 7
CONNECTING TO A MULTIDIMENSIONAL DATA MINING DATA SOURCE ......................................................................... 11
CONNECTING TO A ONE-DIMENSIONAL DATA MINING DATA SOURCE ........................................................................... 14
FONTS ...................................................................................................................................................................................... 17
COLUMNS ALIAS ..................................................................................................................................................................... 18
CREATING COLUMN ALIASES ............................................................................................................................................... 18
HIDING COLUMNS................................................................................................................................................................... 20
WEB ACCESS .......................................................................................................................................................................... 21
VIEWING DATA IN THE RUNTIME GRID ...................................................................................................................22
TESTING YOUR DATA TAGS .................................................................................................................................................. 22
VIEWING ONE-DIMENSIONAL ARRAYS ................................................................................................................................ 23
VIEWING MULTIDIMENSIONAL ARRAYS............................................................................................................................... 24
VIEWING COMBINED ARRAYS............................................................................................................................................... 25
REFRESHING THE DATA GRID .............................................................................................................................................. 26
DATA MINING ACTIVEX OLE AUTOMATION REFERENCES ..................................................................................26
AUTOMATION INTERFACES................................................................................................................................................... 26
CONTROL PROPERTIES......................................................................................................................................................... 27
CONTROL METHODS.............................................................................................................................................................. 31
III
Data Mining ActiveX – User’s Manual
IV
Data Mining ActiveX
DATA MINING ACTIVEX
Introduction
The Data Mining ActiveX is included in the ProcessView installation, and it can be inserted into any
container that has the capability to embed ActiveX objects, including GraphWorX, Visual Basic
forms, Microsoft Word, and Microsoft Excel.
The basic purpose of the Data Mining ActiveX is to read data from a specified data source (e.g.
Microsoft Access, Microsoft SQL Server, and ODBC databases) and display the chosen data set in
a data grid during runtime mode.
Data Mining ActiveX Features
Key features of the Data Mining ActiveX include:
•
Data Mining Grid for displaying data during runtime
•
Support for open database connections, including Microsoft Access, Microsoft SQL Server,
Microsoft Excel, Oracle, and ODBC databases.
•
TraceWorX support
•
Global aliasing support
•
Column aliasing for data items
•
Column hiding
•
Auto/manual grid refresh/updates
•
View the Data Mining ActiveX via WebHMI
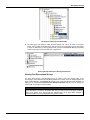
Inserting the ActiveX Into a Display
To insert the Data Mining ActiveX choose Insert Object from the Edit menu in GraphWorX, or click
the Data Mining ActiveX button on the ActiveX toolbar. The Data Mining ActiveX will appear as
shown below.
Data Mining ActiveX
5
Data Mining ActiveX – User’s Manual
Data Mining ActiveX Properties
Double-clicking the Data Mining ActiveX opens the Data Mining ActiveX Properties dialog box,
which contains the following property pages:
• General
•
Fonts
•
Columns Alias
•
Web Access
General
The General tab of the Data Mining ActiveX Properties dialog box, shown below, allows you to
connect to the desired data source.
Data Mining ActiveX Properties: General Tab
Configure the following General tab settings:
•
Title: Enter a title for the ActiveX.
•
About: Clicking the About button displays both technical support information and the About
Box, which contains registration and serial number information as well as system resource
information, such as memory and disk space available.
•
Auto Update (Used only for ADO Data Source type): Specifies the frequency (in seconds) at
which the Data Mining ActiveX updates data from the connected database.
•
Configuration File: By default, information is stored as part of the container application's
document file. You can also store information as part of a separate (.dbm) file. To save the .dbm
file, under Configuration File click Save As to open the Save Configuration Info dialog box.
Enter a name for the .dbm file in the File Name field, and then click Save.
You can also open an existing configuration file by clicking the Load button on the General tab and
browsing for the file. The ActiveX will attempt to load the configuration file. If URL Path is selected,
the ActiveX will use the specified network URL path upon loading the file.
NOTE
The ActiveX cannot be saved to a URL path. To create a URL file, save a configuration to a local
file and copy the file to the desired network location. When the URL Path option is selected, you
can also enable the Use Local Settings option, which, if checked, stores runtime changes to a
local copy of the remote configuration file. It will use this local file every time the HTML page that
hosts the Viewer is loaded inside the Web browser.
6
Data Mining ActiveX
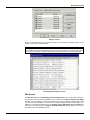
You can also select aliases to use for the configuration file. Clicking the # button and selecting
Insert Global Alias from the pop-up menu opens the Global Aliases tab of the Unified Data
Browser, as shown in the figure below. Select a global alias from the Unified Browser, which
includes all global aliases in the global alias database. This eliminates the need to manually type in
the alias name. All global aliases that are configured in the Global Alias Engine Configurator are
conveniently available to choose from inside the browser. The tree control of the Global Alias
Engine Configurator is mimicked in the tree control of the Global Alias Browser. Select a global alias
by double-clicking the alias name (e.g. "Floor" in the figure below). The alias name appears at the
top of the browser, which automatically adds the <# and #> delimiters to the alias name. Click the
OK button.
Selecting an Alias From the Global Alias Browser
•
Data Source Type: The Data Mining ActiveX allows you to connect to two types of data
sources: ADO and Data Mining. An Active Data Object (ADO) connection is a direct
connection to a data source. A data mining connection is a connection to a data source through
a preconfigured data mining tag (i.e. a data tag that was configured using the Data Mining
Configurator). To define your database connections, clicking the Connection Parameters
button. ADO and Data Mining data source connections are described in detail in the sections
below.
Connecting to an ADO Data Source
An Active Data Object (ADO) connection is a direct connection to a data source. To connect to an
ADO data source:
1. Select the ADO radio button on the General tab of the Data Mining ActiveX Properties dialog
box.
2. Click the Connection parameters button. This opens the Database Connection dialog box, as
shown below.
3. Under Data Provider, select from Microsoft Access, Microsoft SQL Server, or ODBC (Open
Data Base Connectivity), as shown in the figure below. In this example, we will select Microsoft
Access.
7
Data Mining ActiveX – User’s Manual
Connecting to a Database
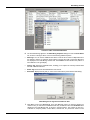
4. Click the Build Connection String button. This opens the Microsoft Data Link Properties dialog
box, as shown in the figure below. In the Connection tab specify the data source and then click
OK. In this example, we will use the Northwind.mdb Microsoft Access database, which is
included
in
the
ProcessView
installation
in
the
Program
Files\Smar\ProcessView\Examples\Database Mining Examples directory. For more information
about database mining examples, please refer to the Database Mining Configurator help
documentation.
NOTE
All data source connections are made through the Data Link Properties dialog box. The
Connection tab settings may vary depending on which data provider you selected. Click the OK
button. Click the Help button at any time to view the Microsoft Data Link help documentation.
8
Data Mining ActiveX
Specifying a Data Source
The data source reference appears in the Database Connection dialog box in the OLE DB
Connection String field, as shown below. In the Query field, you must type in a database query to
define which recordset will be read from the connected data source. In this example, we will use the
following query:
Select * From [Customers];
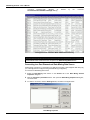
This query will read all data from the Customers table in the Northwind.mdb database. The figure
below shows this table as viewed in Microsoft Access. As you can see, it has several columns of
data (e.g. Customer ID, Company Name, Contact Name, Contact Title, etc.).
NOTE
For more information about writing database queries, please refer to the Microsoft SQL server or
Oracle help documentation
9
Data Mining ActiveX – User’s Manual
Customers Table in Northwind Database
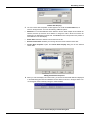
5. Click the Connect button to connect to the database. The traffic light icon changes to green
when the connection is successful, as shown in the figure below. Click OK to return to the
General tab. Then click OK again.
Database Connection
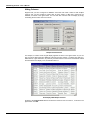
6. When you enter the display into runtime mode, you will see the data items from the Customers
table displayed in the Data Mining Grid, as shown in the figure below. The columns of data (e.g.
Customer ID, Company Name, Contact Name, Contact Title, etc.) match the columns in the
connected Northwind.mdb database.
10
Data Mining ActiveX
Table Column Displayed in Data Mining ActiveX Grid
Connecting to a Multidimensional Data Mining Data Source
A data mining connection is a connection to a data source through a preconfigured data mining tag
(i.e. a data tag that was configured using the Data Mining Configurator). To connect to a Data
Mining data source:
1. Select the Data Mining radio button on the General tab of the Data Mining ActiveX
Properties dialog box.
2. Click the Connection parameters button. This opens the Data Mining Properties dialog box,
as shown below.
3. To create a connection, click the Add Tags button, as shown in the figure below.
Data Mining Properties
4. This opens the Unified Data Browser. Select one or more data tags from the Unified Data
Browser, as shown in the figure below. In this example, we will use the following
multidimensional database mining tag:
SMAR.DatabaseOPCServer.3\AccessConnection.DataSource04.Tag4
11
Data Mining ActiveX – User’s Manual
This tag is defined in the DBOPCServerExample.mdb example data mining configuration
database, which is included in the ProcessView installation in the Program
Files\Smar\ProcessView\Examples\Database Mining Examples directory. This configuration
database connects to the Northwind.mdb Microsoft Access database. For more information about
database mining examples, configuring database access items and how to load the
DBOPCServerExample.mdb configuration database, please refer to the Database Mining
Configurator help documentation. For an example of how to use global aliasing in the Data Mining
ActiveX,
please
refer
to
the
DBOPC_GlobalAlias.gdf
file
in
the
Program
Files\Smar\ProcessView\Examples\Database Mining Examples directory in the ProcessView
installation.
Selecting a Data Tag From the Unified Data Browser
5. This example data access tag, AccessConnection.DataSource04.Tag4, is a multidimensional
array (i.e. reads data from multiple columns in the specified database table) that reads data
from the Customers table in the Northwind.mdb database. The figure below shows this table as
viewed in Microsoft Access. As you can see, it has several columns of data (e.g. Customer ID,
Company Name, Contact Name, Contact Title, etc.). Click OK.
12
Data Mining ActiveX
Customers Table in Northwind Database
6. The selected data tag appears in the Data Mining Properties dialog box under the Point Name
list, as shown in the figure below. You have the following additional options:
•
Add Tags: You can choose additional data items to add to the list. When multiple data items
are selected, click the up and down arrow buttons to change the order in which the data items
are displayed in the Data Mining ActiveX Grid. The Position number indicates the position of
each data item in the grid display.
•
Change Tag: Opens the Unified Browser, enabling you to replace the currently selected data
item with a different data item.
•
Delete Tag: Removes the selected data item from the list.
•
Show Path: Displays the full path (i.e. server name and location) of the selected data item(s).
Data Mining List of Tags Present Inside the Grid
7. Click OK to return to the General tab. Then click OK again. When you enter the display into
runtime mode, you will see the multidimensional array of data items from the Customers table
displayed in the Data Mining Grid, as shown in the figure below. The columns of data (e.g.
Customer ID, Company Name, Contact Name, Contact Title, etc.) match the columns in the
13
Data Mining ActiveX – User’s Manual
connected
Northwind.mdb
database
as
AccessConnection.DataSource04.Tag4 data tag.
defined
by
the
connected
Viewing Data Items in Runtime Mode: Multidimensional Array
NOTE
If you want to browse for data mining tags on a remote computer, go to the OPC DA tab of the
Unified Data Browser and browse to the computer in the Network Neighborhood tree.
Connecting to a One-Dimensional Data Mining Data Source
A data mining connection is a connection to a data source through a preconfigured data mining tag
(i.e. a data tag that was configured using the Data Mining Configurator).
To connect to a Data Mining data source:
1. Select the Data Mining radio button on the General tab of the Data Mining ActiveX
Properties dialog box.
2. Click the Connection parameters button. This opens the Data Mining Properties dialog box,
as shown below.
3. To create a connection, click the Add Tags button, as shown in the figure below.
Data Mining Properties
14
Data Mining ActiveX
4. This opens the Unified Data Browser. Select one or more data tags from the Unified Data
Browser, as shown in the figure below. In this example, we will use the following onedimensional database mining tag:
SMAR.DatabaseOPCServer.3\AccessConnection.DataSource02.Tag2
This tag is defined in the DBOPCServerExample.mdb example data mining configuration
database, which is included in the ProcessView installation in the Program
Files\Smar\ProcessView\Examples\Database Mining Examples directory. This configuration
database connects to the Northwind.mdb Microsoft Access database. For more information about
database mining examples, configuring database access items and how to load the
DBOPCServerExample.mdb configuration database, please refer to the Database Mining
Configurator help documentation. For an example of how to use global aliasing in the Data Mining
ActiveX,
please
refer
to
the
DBOPC_GlobalAlias.gdf
file
in
the
Program
Files\Smar\ProcessView\Examples\Database Mining Examples directory in the ProcessView
installation.
Selecting a Data Tag From the Unified Data Browser
5. This example data access tag, AccessConnection.DataSource02.Tag2, is a one-dimensional
array (i.e. reads data from a single column in the specified database table) that reads data from
the Customers table in the Northwind.mdb database. The figure below shows this table as
viewed in Microsoft Access. As you can see, it has several columns of data (e.g. Customer ID,
Company Name, Contact Name, Contact Title, etc.). This particular tag reads data only from
the ANTON rowset in the Customer ID column. Click OK.
15
Data Mining ActiveX – User’s Manual
Customers Table in Northwind Database
6. The selected data tag appears in the Data Mining Properties dialog box under the Point Name
list, as shown in the figure below. You have the following additional options:
•
Add Tags: You can choose additional data items to add to the list. When multiple data items
are selected, click the up and down arrow buttons to change the order in which the data items
are displayed in the Data Mining ActiveX Grid. The Position number indicates the position of
each data item in the Grid display.
•
Change Tag: Opens the Unified Browser, enabling you to replace the currently selected data
item with a different data item.
•
Delete Tag: Removes the selected data item from the list.
•
Show Path: Displays the full path (i.e. server name and location) of the selected data item(s).
Data Mining List of Tags Present Inside the Grid
7. Click OK to return to the General tab. Then click OK again. When you enter the display into
runtime mode, you will see the one-dimensional array of data items from the Customers table
displayed in the Data Mining Grid, as shown in the figure below. The grid displays the entire
rowset ANTON in the Customer ID column in the connected Northwind.mdb database as
defined by the connected AccessConnection.DataSource02.Tag2 data tag.
16
Data Mining ActiveX
NOTE
The array can be a horizontal array (i.e. view an entire rowset), or it can be a vertical array (i.e. it
shows the values in a column). No matter what array you want to view, in the grid it is always
shown as a column. Thus, even though the example shown in the figure below displays a
rowset, the data in the row are displayed in the grid as a column.
Viewing Data Items in Runtime Mode: One-dimensional Array
NOTE
If you want to browse for data mining tags on a remote computer, go to the OPC DA tab of the
Unified Data Browser and browse to the computer in the Network Neighborhood tree.
Fonts
The Fonts tab of the Data Mining ActiveX Properties dialog box, shown below is similar to many
fonts property screens. The Font field determines the font, and the Font Style field determines
whether the text will be Regular, Bold, Italic, or Bold Italic. The Effects section allows for
strikeout or underlining, and the Sample section shows a real-size example of the font, style, and
size you have chosen.
Data Mining ActiveX Properties: Fonts Tab
17
Data Mining ActiveX – User’s Manual
Columns Alias
The Columns Alias tab of the Data Mining ActiveX Properties dialog box, shown below, allows
you to create column names and associate each name with a column that is displayed in the Data
Mining ActiveX Grid.
Data Mining ActiveX Properties: Columns Alias Tab
Creating Column Aliases
To create a new column alias:
1. On the Columns tab, click the Add Alias button, as shown in the figure below.
Adding a Column Alias
2. This opens the Column Alias Property dialog box, as shown in the figure below. In the Alias
Name field, specify a column name. Then specify a Column Position number, which
corresponds to the position of the column where the alias will be applied in the Grid display.
Click OK.
NOTES
With column aliasing, you can define aliases for the columns that you need. Column positions do
not need to be sequential. For example, you could define two aliases: one for column position 3
and another for column position 13.
can also click the # button to select a global alias from the global alias browser.
18
Data Mining ActiveX
Column Alias Property
3. The new column alias and position number appear in the under the Column Name list, as
shown in the figure below. You have the following additional options:
•
Add Alias: You can add additional column aliases to the list. When multiple column aliases are
selected, click the up and down arrow buttons to change the order in which the columns are
displayed in the Data Mining ActiveX Grid. The Position number corresponds to the position of
each data item in the Grid display.
•
Delete Alias: Deletes the selected column alias from the list.
•
Rename Column Alias: Enables you to change the name of the selected column alias.
•
Column Alias Properties: Opens the Column Alias Property dialog box for the selected
column alias.
Editing Column Alias Properties
4. When you enter the display into runtime mode, you will see the associated data items displayed
in the Data Mining Grid with the substituted column aliases, as shown in the figure below. You
can change the column width by moving the column dividers.
Column Aliases Displayed in Data Mining Grid
19
Data Mining ActiveX – User’s Manual
Hiding Columns
Suppose that you have configured a database connection that reads a data set with multiple
columns, and you have created a column alias for each column of data that is read from the
database, as shown in the figure below. You can hide each columns from the display by simply
unchecking the check box next to the column.
Multiple Column Aliases
For example, in runtime mode the grid display appears as shown in the figure below. As you can
see, the column alias names are displayed at the top of the grid. Column 1 contains some data (e.g.
abbreviations, cryptic characters, etc.) that may not make sense to some users and therefore should
be removed from the display. Thus, we will hide Column 1.
Grid Display With Multiple Columns
Go back to the Columns Alias tab and uncheck the check box next to Column 1, as shown in the
figure below. Click OK.
20
Data Mining ActiveX
Hiding a Column
When you start runtime mode, you can see that Column 1 is now hidden, and the first column is now
Column 2, as shown in the figure below.
NOTE
You can also hide the column headers and row headers. To hide the column names in the Grid,
uncheck the Show Columns Header check box on the Columns Alias tab. To hide the row names
(or numbers) in the Grid, uncheck the Show Rows Header check box on the Columns Alias tab.
Grid Display With Hidden Columns
Web Access
The Web Access tab of the Data Mining ActiveX Properties dialog box, shown below, allows you
to access the currently connected database over the Internet via a Remote Data Service (RDS).
The RDS, which is hosted by an Internet Information Server (IIS), enables the downloading of data
from the connected database to a client over the Internet. Simply specify the URL name or IP
address of the primary IIS Web server in the Primary Internet Information Server for RDA field,
as shown in the figure below. The Remote Recordset Page Size field specifies the size of the
recordset portion in the database records.
21
Data Mining ActiveX – User’s Manual
NOTES
You also may designate a redundant IIS Web server by specifying the URL name or IP address
of the redundant IIS Web server in the Backup Internet Information Server for RDA field, as
shown in the figure below.
For more information about Remote Data Access, please refer to the AlarmWorX Remote
Database Access Manager help documentation.
The Web Access tab only applies when you are connecting via an ADO database connection. If
you are using a data mining tag, you need only supply the node name or IP address of the
server in front of the tag name.
Data Mining ActiveX Properties: Web Access Tab
Viewing Data in the Runtime Grid
Once you have established your data source connections, you are ready to view the data in the
Data Mining ActiveX Grid.
Testing Your Data Tags
Before you try to connect to data sources and view your data tags, it is highly recommended that
you verify if the tags present inside the display are well configured from the server side. To do that
you have to check the quality of your data tags using OPC DataSpy:
1. Start OPC DataSpy from the Windows Start menu by selecting Programs > ICONCS
ProcessView > OPC DataSpy.
2. In OPC DataSpy, expand the tree control and browse to your data tag. Right-click on the data
tag(s) and select Monitor from the pop-up menu, as shown in the figure below.
22
Data Mining ActiveX
Browsing for Data Tags in OPC DataSpy
3. The data tag(s) now appear in under the Data Monitor tree control, as shown in the figure
below. The tag quality is indicated in the right-hand pane. If the tag quality is good, then the tag
is ready for data mining. If the tag quality is bad, go back to the Database Mining Configurator
and check your data source and data item configurations.
Data Tag Quality Indicated in DataSpy Data Monitor
Viewing One-Dimensional Arrays
The figure below shows a one-dimensional array in runtime mode. This example (refer to the
"Connecting to a One-Dimensional Data Mining Data Source" section above for details) displays the
entire rowset ANTON in the Customer ID column in the connected Northwind.mdb database, as
defined by the connected AccessConnection.DataSource02.Tag2 data tag. You can change the
column width by moving the column dividers.
NOTE
The array can be a horizontal array (i.e. view an entire rowset), or it can be a vertical array (i.e. it
shows the values in a column). No matter what array you want to view, in the grid it is always
shown as a column. Thus, even though the example shown in the figure below displays a
rowset, the data in the row are displayed in the grid as a column.
23
Data Mining ActiveX – User’s Manual
Viewing Data Items in Runtime Mode: One-dimensional Array
Viewing Multidimensional Arrays
The figure below shows a multidimensional array in runtime mode. This example (refer to the
"Connecting to a Multidimensional Data Mining Data Source" section above for details) displays
columns of data (e.g. Customer ID, Company Name, Contact Name, Contact Title, etc.) that match
the columns in the connected Northwind.mdb database, as defined by the connected
AccessConnection.DataSource04.Tag4 data tag. You can change the column width by moving
the column dividers.
Viewing Data Items in Runtime Mode: Multidimensional Array
24
Data Mining ActiveX
Viewing Combined Arrays
It is possible to view data from a one-dimensional array and data from a multidimensional array in
the same grid display. For example, the data tags selected in the Data Mining Properties below
contain two different types of arrays: Tag2 is one-dimensional, and Tag4 is multidimensional. Tag2
will yield only one column of data in the grid display, while Tag4 will produce many columns. When
you enter the display into runtime, the data from both arrays will be displayed side-by-side in the
Data Mining ActiveX Grid.
Data-Mining Properties: Combining Data Sources
Thus, it is recommended that you use some column aliases to distinguish between the two different
sets of data. In the example configuration shown in the figure below, Column 1 represents the single
column from Tag2, and the other columns (2-6) represent the columns from Tag4.
Column Names for Combined Arrays
When you enter the display into runtime mode, you can clearly distinguish between the two sets of
data produced by each of the data tags, as shown in the figure below.
25
Data Mining ActiveX – User’s Manual
Viewing Combined Arrays in the Grid Display
Refreshing the Data Grid
The Data Mining ActiveX automatically updates data from the connected data source (ADO data
connections only) at the frequency (in seconds) you specified in the Auto Update field in the Data
Mining ActiveX General tab. To manually update the data in the Grid, right-click on the data during
runtime mode and select Refresh Grid from the pop-up menu, as shown in the figure below.
Refreshing Data in Grid
Data Mining ActiveX OLE Automation References
This reference describes the OLE Automation features available in the Data Mining ActiveX.
Automation Interfaces
The Data Mining ActiveX provides a COM interface that allows automation interfaces run from within
the ActiveX container to manipulate the Data Mining ActiveX control as it is running. The interface is
available to all programming languages that support COM, including Visual Basic (VB), Visual Basic
for Applications (VBA), and Microsoft Visual C++.
26
Data Mining ActiveX
To access the Automation interface from VB and VBA, the Data Mining ActiveX must be made
available by choosing Project > Components from the main menu in the VB or VBA development
environment and selecting Smar DBGrid in the list of available components.
Control Properties
AutoSelectRow
Type: Boolean
Description
If true, when the user clicks on a cell the whole row will be highlighted.
AutoUpdateInterval
Type: Short
Description
Sets/gets the number of seconds between automatic updates.
Available only for ADO connections.
Example
ThisDocument.DBMining1.AutoUpdateInterval=60
BackColor
Type: OLE_COLOR
Description
Sets/gets the background color of the column.
Example
Dim column As OGridColumnWrapper
Set column = ThisDisplay.DBMining1.GetColumn(1)
column.ModifyBackColor = True
column.BackColor = RGB(0, 255, 0)
The above example will change the background color for column 1 to green.
BlinkOnUpdate
Type: Boolean
Description
Sets/gets whether or not the Database Mining ActiveX will blink on update.
Example
ThisDocument.DBMining1.BlinkOnUpdate=True
BorderType
Type: String
Description
Sets/gets control's border appearance. Can be one of the following:
"0" - none
"1" - flat border
"2" - 3D border
Example
Sets 3D look for the control's border.
ThisDocument.DBMining1.BorderType="2"
ConnectionString
Type: String
Description
Sets/gets ADO connection string used by the Database Mining ActiveX control to access data.
Example
Dim strConnString as String
strConnString="Provider=Microsoft.Jet.OLEDB.4.0; _
Data Source=c:\alarms\AWXLog32.mdb; _
User ID=Admin; Password=SYSTEM"
ThisDocument.DBMining1. ConnectionString = strConnString
DataSourceType
Type: Short
Description
Sets/gets the Database Mining ActiveX connection type.
"0" - ADO
"1" – Database Mining
27
Data Mining ActiveX – User’s Manual
DBMiningTitle
Type: String
Description
Sets/gets the title shown in the window title bar of the Database Mining ActiveX control during
runtime mode.
DisplayGridTitle
Type: Boolean
Description
Sets/gets Boolean value that controls the visibility of the grid title bar.
Example
ThisDocument.DBMining1. DisplayGridTitle = TRUE
EnableAutoUpdate
Type: Boolean
Description
Enables/disables automatic updates for ADO connections.
Example
ThisDocument.DBMining1.EnableAutoUpdate=True
EnableWebAccess
Type: Boolean
Description
Enables/disables Database Mining ActiveX Web access for ADO connections.
Example
ThisDocument.DBMining1.EnableWebAccess=True
FileName
Type: BSTR
Description
Sets/gets the name of the Database Mining ActiveX configuration file.
Example
ThisDocument.DBMining1.FileName=”C:\DBMiningConfig.dbm”
Font
Type: StdFont
Description
Returns a reference to the control's default font.
Example
To set control's default font to Arial, 14 pt., use the following statements:
With ThisDocument.DBMining1.Font
.Name="Arial"
.Size=14
End With
ForeColor
Type: OLE_COLOR
Description
Sets/gets foreground (usually font) color property of the Database Mining ActiveX.
Example
ThisDocument.DBMining1. ForeColor=RGB(0,0,0)
GridBackColor
Type: OLE_COLOR
Description
Sets/gets color value used to paint the gaps between rightmost column and right edge of the grid,
last row and bottom edge of the grid, and row headers column (the 'back area' of the grid).
Example
ThisDocument.DBMining1. GridBackColor =RGB(0,127,0)
GridDefRowHeight
Type: Integer
Description
Sets/gets the default row height for data grid.
Example
ThisDocument.DBMining1. GridDefRowHeight=16
28
Data Mining ActiveX
GridHorizLinesColor and GridVertLinesColor
Type: OLE_COLOR
Description
Sets/gets color for horizontal or vertical grid lines.
Example
ThisDocument.DBMining1. GridHorizLinesColor =RGB(127,127,127)
ThisDocument.DBMining1. GridVertLinesColor = RGB(127,127,127)
GridHorizLinesStyle and GridVertLinesStyle
Type: Integer
Description
Sets/gets style for horizontal or vertical grid lines. Can be one of the following:
0 - no line
1 - solid line
2 - dot line
3 - dash line
4 - dashdot line
5 - dashdotdot line
Example
ThisDocument.DBMining1. GridHorizLinesStyle =0
ThisDocument.DBMining1. GridVertLinesStyle = 2
GridHorizLinesWidth and GridVertLinesWidth
Type: Integer
Description
Sets/gets the widths for the horizontal or vertical grid lines when corresponding grid line style
(property GridHorizLinesStyle or GridVertLinesStyle) is set to 1 - solid line. For all other line styles,
these properties must be set to 1.
Example
Sets both horizontal and vertical grid lines to solid line style, 2 pixels wide.
ThisDocument.DBMining1. GridHorizLinesStyle =1
ThisDocument.DBMining1. GridVertLinesStyle = 1
ThisDocument.DBMining1. GridHorizLinesWidth =2
ThisDocument.DBMining1. GridVertLinesWidth = 2
GridTitleBackColor
Type: OLE_COLOR
Description
Sets/gets the background color for the grid's title bar.
Example
Sets title bar background color to dark blue.
ThisDocument.DBMining1. GridTitleBackColor =GRB(0,0,127)
GridTitleTextColor
Type: OLE_COLOR
Description
Sets/gets the text color for the grid's title bar.
Example
Sets grid's title bar text color to yellow.
ThisDocument.DBMining1. GridTitleBackColor =GRB(255,255,0)
HeaderColor
Type: OLE_COLOR
Description
Sets/gets the background color for grid's column headers.
Example
Sets color of grid's column header to dark green.
ThisDocument.DBMining1. GridTitleBackColor =GRB(0,127,0)
IsConnected
Type: Boolean
Description
This is read-only property, indicating that control is connected to the server.
Example
If ThisDocument.DBMining1.IsConnected Then
``` do something here ```
End If
29
Data Mining ActiveX – User’s Manual
MaxRecords
Type: Long
Description
Sets/gets the maximum number of records that the Database Mining ActiveX will download using a
Web access RDS connection.
Example
ThisDocument.DBMining1.MaxRecords=1024
QueryText
Type: String
Description
Sets/gets the SQL statement used with an ADO connection to populate the data grid in runtime
mode.
Example
Dim strQry as String
strQry=ThisDocument.DBMining1.QueryText
MsgBox strQry
RemoteDataServer
Type: BSTR
Description
This is the Internet Information Server used with the Web access RDS connections.
Example
ThisDocument.DBMining1.RemoteDataServer = “http://localhost”
RemoteDataServerBackup
Type: BSTR
Description
This is the backup URL used with Web access RDS connections if the connection with the server
specified on RemoteDataServer property fails.
Example
ThisDocument.DBMining1.RemoteDataServerBackup = “http://localhost”
ShowColsHeader and ShowRowsHeader
Type: Boolean
Description
Show/hide the rows/columns headers.
URLPathName
Type: BSTR
Description
Sets/gets the URL path for a configuration file over the Web. Must set URLPathUsed to “True” for
this to take effect.
Example
ThisDocument.DBMining1.URLPathName=
”http://www.smar.com/dbminingcfg.dbm”
URLPathUsed
Type: Boolean
Description
Enables/disables the use of a URL path.
Example
ThisDocument.DBMining1.URLPathUsed=True
UseLocalSettings;
Type: Boolean
Description
When the URL path is enabled, it allows you to use or not to use the local settings configuration file.
Example
ThisDocument.DBMining1.UseLocalSettings=True
30
Data Mining ActiveX
Control Methods
AboutBox
Shows About dialog box.
Example
ThisDocument.DBMining1.AboutBox
Connect As Boolean
It forces the control to establish connection to database, using the information set in
ConnectionString and QueryText. If control is already connected, the current connection will be
closed and a new connection will be established. This method can be used in VBA scripts
automatically to switch the Database Mining ActiveX between different connections.
Return Value
On success, returns TRUE; if for any reason connection cannot be established, returns FALSE.
Example
Dim strConnString as String
strConnString="Provider=Microsoft.Jet.OLEDB.4.0; _
Data Source=c:\alarms\SomeOtherDatabase.mdb; _
User ID=Admin; Password=SYSTEM"
ThisDocument.DBMining1. ConnectionString = strConnString
ThisDocument.DBMining1.QueryText="Select * from [Table]"
ThisDocument.DBMining1.Connect
ThisDocument.DBMining1.Refresh
LoadConfigFile(BSTR newVal) as Boolean
It loads the configuration file specified in newVal.
Example
Dim ret As Boolean
ret = DBMining1.LoadConfigFile(“C:\My Configs\cfg.dbm”)
SaveConfigFile(BSTR newVal) as Boolean
It saves your current Database Mining ActiveX configuration to the file specified in newVal.
Example
Dim ret As Boolean
ret = DBMining1.SaveConfigFile(“C:\My Configs\cfg.dbm”)
LoadConfigURL(BSTR newVal) as Boolean
Loads the configuration file specified in the URL string newVal.
Example
Dim ret As Boolean
ret = DBMining1.LoadConfigURL(“http://localhost/cfg.dbm”)
ReplaceHost(BSTR OldHostName, BSTR NewHostName) as Long
It works over data source tags, data mining tags and path name attributes and replaces node name
substring within URL path only. Returns 0 on success and HRESULT when something fails.
Example
'similar to ReplaceTag
'VBA example, works only in configure mode
'replaces host name in whole display
Dim Status As Long
Status = ThisDisplay.ReplaceHost("Host1", "Host2")
'if Status <> 0 then there was no replacement performed or an error occurs
If Status <> 0 Then
MsgBox "No replacements"
Else
MsgBox "Tags replaced"
End If
ReplaceHostEx(BSTR OldHostNameSubstring, BSTR NewHostNameSubstring, BOOL MatchCase,
BOOL MatchWholeWord) as Long
It works over data source tags, data mining tags and path name attributes and replaces node name
substring within URL path only, and supports case-sensitivity, wildcard strings and
MatchWholeWord flag. Returns 0 on success and HRESULT when something fails.
Example
31
Data Mining ActiveX – User’s Manual
'similar to ReplaceTag
'VBA example, works only in configure mode
'replaces host name in whole display, regarding "case" and "whole words" options
Dim Status As Long
Status = ThisDisplay.ReplaceHostEx("Host1", "Host2", True, True)
'if Status <> 0 then there was no replacement performed or an error occurs
If Status <> 0 Then
MsgBox "No replacements"
Else
MsgBox "Tags replaced"
End If
SaveConfigFile(BSTR newVal) as Boolean
It saves your current Database Mining ActiveX configuration to the file specified in newVal.
Example
Dim ret As Boolean
ret = DBMining1.SaveConfigFile(“C:\My Configs\cfg.dbm”)
SetDBType(short NewDBType)
Sets the database type.
Example
DBMining1.SetDBType(1)
GetGridCellValue(long ColNum,long RowNum) as VARIANT
It takes inside the grid buffer the current cell value with column number equal to Colnum and row
number equal to RowNum.
32