1
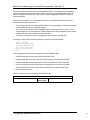
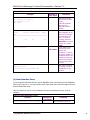
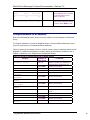
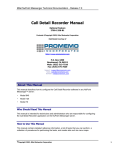
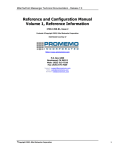
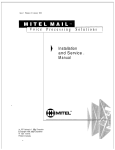
Mitel NuPoint Messenger Technical Documentation - Release 7.0
NP RapidDial Reference Manual
Optional Feature
DOCUMENT HISTORY
Revision/Issue
Date Issued
Part Number
Revision A/Issue 2
January 1998
2700-1425-01
Issue 1
November 1999
2700-1425-B1
Contents ©Copyright 2002, Mitel Networks Corporation
Distributed Courtesy of
8777 E. Via De Ventura Suite #340
Scottsdale, Arizona 85258
Main: (480) 998-9500
Fax: (480) 718-7355
http://www.legacyvoicemail.com
Support: [email protected]
Sales: [email protected]
General: [email protected]
©Copyright 2002, Mitel Networks Corporation
1
Mitel NuPoint Messenger Technical Documentation - Release 7.0
About This Manual
This manual is about NP RapidDial, an optional feature that allows users to enter an abbreviated
phone number to address mailboxes on a NuPoint Messenger™ system.
Who Should Read This Manual?
This manual is for administrators who must install and configure NP RapidDial on a NuPoint
Voice™ server.
Conventions Used in this Manual
This manual uses certain conventions to describe how to enter configuration data and to indicate
information displayed on the server console.
These conventions are described below:
Press Enter
Press the Enter key. For example, “Press Enter if the current number is
correct.” On some keyboards, this key is labeled “Return” or has a return
arrow.
Enter
Type the text shown, then press the Enter key. For example, “Enter the line
number (1-24)” means to type a number from 1 through 24, then press the
Enter key.
bold
Words or characters in bold type either indicate a value to be entered
exactly as shown or, when used to indicate a variable entry, describe the
type of value to be supplied.
Note: Unless otherwise stated, press Enter after each response.
1
Introduction
This chapter provides an introduction to NP RapidDial.
About NP RapidDial
NP RapidDial uses a table to map a subscriber group of abbreviated mailbox numbers to the
complete mailbox numbers on the NuPoint Mesenger system. For example, mailbox numbers in
a Subscriber Group might be seven digits long, but NP RapidDial allows you to use only part of
each mailbox number to make and send a message or create a distribution list. Members of a
Subscriber Group must use the complete phone number to address messages to mailboxes
©Copyright 2002, Mitel Networks Corporation
2
Mitel NuPoint Messenger Technical Documentation - Release 7.0
outside of their Subscriber Group.
Using Configuration Menus
This manual describes many operations that are performed through the NuPoint Voice Main
Menu and its submenus:
MAIN MENU
(M)
(R)
(S)
(X)
Mailbox maintenance
Report generation
System maintenance
Exit
Select a menu option by typing the character shown in parenthesis next to the menu option, or
pressing Enter to accept the current terminal setting.
Input data at any prompt by typing a value, then pressing Enter. If the value you enter is out of
range or not valid, an error message appears.
To exit from a prompt without changing the current value, press Enter.
2
Installing NP RapidDial
This chapter describes how to install the NP RapidDial Optional Feature software onto the server.
Software Requirements
The NP RapidDial software is supplied on the CD-ROM. To install NP RapidDial, do the following:
Follow the instructions in the Installation and Service Manual, chapter 3 for the appropriate
manual, to install an optional feature
Model 70
Model 120
Model 640
•
3
Configuring NP RapidDial
This section provides the information required to configure the NP RapidDial feature on a NuPoint
Messenger system.
After you install NP RapidDial, you must:
•
Determine Subscriber Groups
•
Configure a variable dialing plan for the linegroup
•
Create a Features Class of Service (FCOS) for NP RapidDial
©Copyright 2002, Mitel Networks Corporation
3
Mitel NuPoint Messenger Technical Documentation - Release 7.0
•
Create the NP RapidDial Table
•
Configure mailboxes for NP RapidDial
Determine Subscriber Groups
NP RapidDial can only be used to address messages to mailboxes within a Subscriber Group.
The NP RapidDial Table defines the groups of subscribers and lists the mailbox numbers in each
group.
The NP RapidDial Table separates mailbox numbers into two parts, the prefix and the suffix. The
prefix consists of the leading digits in the mailbox number. The suffix consists of the remaining
digits in the mailbox number and becomes the NP RapidDial address for the mailbox. For
example, the following parameters might appear in the NP RapidDial Table:
Prefix length:
Suffix length:
Prefix:
Suffix range:
5
2
23422
10-99
In this example, mailbox numbers in the Subscriber Group use seven-digit numbers that begin
with a five-digit prefix of 23422 and end with a two-digit suffix in the range of 10 through 99. With
NP RapidDial, members of this Subscriber Group can address messages to another mailbox in
this group by entering only the last two digits of the mailbox number.
Configuration Requirements for Prefixes and Suffixes
NP RapidDial mailbox numbers can include up to 11 digits. The prefix can include up to nine
digits. In the preceding example, the Subscriber Group supports 90 phone numbers.
Note: When defining a Subscriber Group, make the suffix large enough to identify all phone numbers in
the Subscriber Group.
You can add several prefixes and suffixes to a subscriber group, however ranges of suffix
numbers cannot overlap.
Configure a Variable Dialing Plan for the Line Group
In order for the NP RapidDial feature to function, you must set the line group dialing plan for
variable length mailboxes. For information on configuring the dialing plan, refer to CP 5002 in the
Reference and Configuration Manual.
With a variable length dialing plan, the voice mail system uses a timeout to determine when data
entry is complete. With NP RapidDial, the user enters as few as two digits or as many as 11
digits. Then, the user either waits for the system to time out or presses the pound (#) key to
indicate that data entry is complete.
©Copyright 2002, Mitel Networks Corporation
4
Mitel NuPoint Messenger Technical Documentation - Release 7.0
Create a Features Class of Service (FCOS) for NP RapidDial
To enable NP RapidDial, create a Features Class of Service (FCOS) that contains feature bit
265.
For information on configuring an FCOS, refer to CP 3342, CP 5004, CP 5008, and Chapter 7 on
the Features Class of Service, in the Reference and Configuration Manual.
Create the NP RapidDial Table
The NP RapidDial Table (Figure 3-1) maps each NP RapidDial number to its complete mailbox
number. This table shows the Subscriber Groups and the mailbox numbers associated with each
Subscriber Group. All mailbox users in a Subscriber Group can dial a partial mailbox number to
access another mailbox in that group. Those users must dial a complete phone number to reach
any mailbox not included in their Subscriber Group.
Figure 3-1 NP RapidDial Table
To create the NP RapidDial Table, log into the console, enter M at the Main Menu, then enter T at
the Mailbox Maintenance menu (Figure 3-2). The NP RapidDial Table Menu appears (Figure 3-3).
Figure 3-2 The Mailbox Maintenance Menu
(B)
(C)
(E)
(I)
(K)
(L)
(N)
(O)
(P)
(R)
(S)
(T)
(W)
(X)
MAILBOX MAINTENANCE
Mailbox block inquiry
Create/Modify/Delete mailboxes
Mailbox dump
Inquire about mailboxes
Copy/delete/enable mailbox greetings
List maintenance
Trace Utility Report
Trace Utility Delete
Set passcode/tutorial
Rotational mailboxes
Search for mailboxes
NP RapidDial Table Utility Maintenance
Mailbox disk speech usage
Exit
Figure 3-3 The NP RapidDial Table Menu
NP RAPIDDIAL TABLE MENU
(A) Add new record(s)
(C) Clear NP RapidDial table
(D) Delete existing record(s)
(E) Export NP RapidDial table
(I) Import NP RapidDial table
(P) Purge Subscriber Group
(R) Report all Subscriber Groups
(V) View Subscriber Group
(X) Exit
Use the NP RapidDial Table menu to access the NP RapidDial configuration menus. These menu
options are described in the following sections in the order in which they appear in the NP
RapidDial Table menu.
©Copyright 2002, Mitel Networks Corporation
5
Mitel NuPoint Messenger Technical Documentation - Release 7.0
(A) Add new record(s)
To add a new record to the NP RapidDial Table, select A from the NP RapidDial Table menu
(Figure 3-3). After you create or modify the NP RapidDial Table, save a copy of the table with the
Export NP RapidDial table menu option, described later in this section.
Table 3-1 shows you how to add a new Subscriber Group record to the NP RapidDial Table
(using Subscriber Group 10 as an example).
Table 3-1 Add New Records
Prompts
Example of
Comments
User Input
Enter Subscriber Group (1- 10
Assign a Subscriber Group ID of
1000):
10.
Subscriber Group 10 does
not exist.
Create new Subscriber
Group 10? (Y/N)
Y
Begin creating Subscriber Group
10.
Enter prefix length:
5
Sets the first five digits of the phone
number as the prefix.
Enter suffix length:
2
Sets the last two digits of the phone
number as the suffix.
Enter prefix:
12345
Sets all phone numbers in this
group to begin with 12345.
Enter suffix range (start- 10-99
end):
Sets all phone numbers to end with
a number from 10 through 99.
Enter
Enter another prefix or press Enter
to end.
Enter prefix:
Enter Subscriber Group (1- Enter
1000):
1 record(s) added.
Enter
Enter a new Subscriber Group or
press Enter to end.
A notification appears that the
group was created.
When creating a Subscriber Group, the following rules apply:
•
Mailbox numbers in Subscriber Groups can be up to 11 digits.
•
The prefix can be a maximum of nine digits.
•
The suffix is the NP RapidDial number that group members will use to access mailboxes in
their Subscriber Group.
In the example in Table 3-1, the mailbox numbers are set at seven digits with five digits in the
prefix and two digits in the suffix. All mailboxes numbers have the prefix 12345. Members of
Subscriber Group 10 can use the two-digit suffix to address messages to other mailboxes in the
group. For example, the user for mailbox 1234510 can press 99 to address a message to mailbox
©Copyright 2002, Mitel Networks Corporation
6
Mitel NuPoint Messenger Technical Documentation - Release 7.0
1234599.
(C) Clear NP RapidDial Table
To delete all data in the NP RapidDial Table, select C from the NP RapidDial Table menu (Figure
3-3). Do this only if the NP RapidDial Table is corrupt, recently entered data is not valid, or you
need to replace the table with another NP RapidDial Table. Clearing the NP RapidDial Table lets
you restore a valid, previously saved version with the Import NP RapidDial table option, described
later in this section.
Table 3-2 shows you how to clear all records from the NP RapidDial Table.
Note: Use the password “RdtUtil” for all functions that delete data from the NP RapidDial Table.
Table 3-2 Clear NP RapidDial Table
Prompts
Example of
Comments
User Input
Please enter the passcode: RdtUtil
RdtUtil is the passcode. It is case
sensitive.
Do you really want to
delete all entries in the
rapid dial table? (Y/N)
Y or N
NP RapidDial Table
cleared.
(D) Delete existing record(s)
To delete the record for a single Subscriber Group from the NP RapidDial Table, select D from
the NP RapidDial Table menu (Figure 3-3). Table 3-3 shows you how to delete a single record
from a Subscriber Group (using Subscriber Group 10 as an example).
Table 3-3 Delete Existing Records
Prompts
Example of
Comments
User Input
Enter Subscriber Group
Delete Subscriber Group 10.
10
Subscriber Group: nn
Number of record(s) : nn
Prefix length nn, Suffix
length nn
Enter prefix:
12345
Enter suffix range (start- 10-99
end):
©Copyright 2002, Mitel Networks Corporation
Sets all phone numbers in this
group to begin with 12345.
Sets all phone numbers to end with
a number from 10 through 99.
7
Mitel NuPoint Messenger Technical Documentation - Release 7.0
Prefix Suffix Range Start
Suffix Range End
nn
nn
nn
Do you want to delete
above record? (Y/N)
Y
Record deleted.
Enter Subscriber Group (11000):
Enter another Subscriber Group
number or press Enter to end.
(E) Export NP RapidDial Table
To export and save a copy of the NP RapidDial Table, select E from the NP RapidDial Table
menu (Figure 3-3). You can use the export option to back up the current NP RapidDial Table
before you modify it. Table 3-4 shows you how to export the current NP RapidDial Table. The NP
RapidDial Table is automatically saved when you back up the server, but you cannot selectively
restore the NP RapidDial Table, only.
Note: At the prompt, enter a file name. You can enter a full path and file name to store the file in any
directory on the hard disk or on a diskette. The export option uses the .rdt extension.
Table 3-4 Export NP RapidDial Table
Prompts
Example of
User Input
Enter export filename:
<filename>
Comments
Enter a name for the saved file. If
you enter the name of an existing
file, that file is overwritten and its
contents are lost. To save the file
to floppy disk, enter a full path
name in the following format:
/fd0/<path><filename>
If you do not specify a path, the file
is stored in this location:
/usr/vm/config/<filename>.rdt
Export file <filename> is
created
(I) Import NP RapidDial Table
To import an NP RapidDial Table from diskette or another directory, select I from the NP
RapidDial Table menu (Figure 3-3). When you import a file, the program searches for the
specified file in the “/usr/vm/config” directory. To import a file from a diskette or another directory,
you must include a path in the file name. Do not specify an extension. NP RapidDial automatically
appends .rdt as the extension.
©Copyright 2002, Mitel Networks Corporation
8
Mitel NuPoint Messenger Technical Documentation - Release 7.0
Only new records are imported into the NP RapidDial Table. An existing record is not affected
unless a command in the import file deletes that record in the current NP RapidDial Table. To
import a completely new table, first clear (C) the current NP RapidDial Table, then import the
replacement table.
Import files are text files. You can edit these text files in a text editor and insert the following
commands before importing the file:
•
“add” inserts a record in the NP RapidDial Table. If a record overlaps or is redundant, the add
command fails and an error message appears.
•
“del” removes a record from the NP RapidDial Table. If the record does not exist, an error
message appears. You can delete an existing record with the del command and then insert a
replacement record with a subsequent add command.
•
“end” stops the import process. It must appear at the end of the imported data.
A text file for import might include the following example commands and data:
add
add
add
del
add
end
5,622,2100
25,345,5000-6999
300,7954,100-550
4,621,3000-4999
4,621,5000-5050
This example causes the following changes in the NP RapidDial Table:
•
Creates Subscriber Group 5 with prefix 622 and suffix 2100
•
Creates Subscriber Group 25 with prefix 345 and suffixes from 5000 through 6999
•
Creates Subscriber Group 300 with prefix 7954 and suffixes from 100 through 550
•
Removes Subscriber Group 4 with prefix 621 and suffixes from 3000 through 4999
•
Creates Subscriber Group 4 with prefix 621 and suffixes from 5000 through 5050
•
Ends the import process
Table 3-5 shows you how to import an NP RapidDial Table.
Table 3-5 Import NP RapidDial Table
Prompts
Example of
User Input
©Copyright 2002, Mitel Networks Corporation
Comments
9
Mitel NuPoint Messenger Technical Documentation - Release 7.0
Enter import filename:
<file name> Enter the path and file name to
import. Do not specify the default
.rdt extension in the filename.
Records with settings that overlap
existing records in the current NP
RapidDial Table are not imported.
To import the file from diskette or
another directory, specify a full
path name in the following format:
/fd0/<path><filename>
n records added, n records
deleted, 1 failed.
If you do not specify a path, the
program searches for the file in the
default directory:
/usr/vm/config/
The number of imported records
appears as n records added. If the
import file includes redundant
records, an error message
appears. Each error increments the
“failed” counter.
(P) Purge Subscriber Group
To remove a Subscriber Group from the NP RapidDial Table, select P from the NP RapidDial
Table menu (Figure 3-3). Table 3-6 shows you how to purge a Subscriber Group (using
Subscriber Group 10 as an example).
Table 3-6 Purge Subscriber Group
Prompts
Example of
User Input
Enter Subscriber Group (1- 10
1000):
Please enter the passcode: RdtUtil
Do you really want to
Y
remove Subscriber Group
10? (Y/N)
Subscriber Group nn with
nn record(s) deleted.
Enter Subscriber Group (11000):
Comments
Purge Subscriber Group 10.
The passcode is case sensitive.
Enter a new Subscriber Group
number or press Enter to exit.
(R) Report on all Subscriber Groups
To obtain a report of the Subscriber Groups in the NP RapidDial Table, select R from the NP
RapidDial Table menu (Figure 3-3). You can view the report on the console or save it to a file.
Table 3-7 shows you how to obtain an NP RapidDial Table report.
©Copyright 2002, Mitel Networks Corporation
10
Mitel NuPoint Messenger Technical Documentation - Release 7.0
Table 3-7 Report on all Subscriber Groups
Prompts
Example of
User Input
Comments
Option C sends the
report to the console
screen.
Option F sends the
report to a file.
Option X exits this
function.
Subscriber Suffix Suffix
If you select C, a
C
Group
Prefix Range Start Range
report appears on the
End
console. This display
======================================
shows 24 lines at a
=
time. To continue
nn
nn
nn
nn
scrolling, press the
space bar or to scroll
a single line, press
Enter.
Enter filename:
If you select F, you
F
<file name> must specify a full
<path> and
<filename>. If you do
not specify a path, the
program uses the .rpt
extension to save the
report to this location:
/usr/vm/config/<filena
me>.rpt
Total of nn tables and nn records
After the file is saved,
stored to file
a message similar to
/usr/vm/config/<filename>.rpt
this appears on the
console.
DISPLAY RAPID DIAL TABLE MENU
(C) Display to console
(F) Output to file
(X) Exit
(V) View Subscriber Group
To see a specific Subscriber Group in the NP RapidDial Table, select V from the NP RapidDial
Table menu (Figure 3-3). You can view the prefix, suffix range start, and suffix range end for the
selected Subscriber Group.
Table 3-8 shows you how to view a Subscriber Group (using Subscriber Group 10 as an
example).
Table 3-8 View Subscriber Group
Prompts
Example of
User Input
Enter Subscriber Group (1-1000): 10
©Copyright 2002, Mitel Networks Corporation
Comments
View Subscriber Group 10.
11
Mitel NuPoint Messenger Technical Documentation - Release 7.0
Prefix
Suffix
Suffix
Range
Start
Range End
===============================
nn
nn
nn
The record for the Subscriber
Group appears on the console
in a format similar to that
shown on the left.
Enter Subscriber Group (1-1000)
Enter a new Subscriber Group
to view or press Enter to exit.
Configure Mailboxes for NP RapidDial
Before the NP RapidDial feature can be used, each mailbox must be assigned to a Subscriber
Group.
To configure mailboxes to use the NP RapidDial feature, reach the Mailbox Maintenance menu
(Figure 3-2) and select (C) Create/Modify/Delete Mailboxes.
Table 3-9 shows you an example of how to create or modify a group of mailboxes that will use NP
RapidDial. For additional information on creating, deleting, and configuring mailboxes, refer to
Chapter 6, Mailboxes, in the Reference and Configuration Manual.
Table 3-9 Create or Modify Mailboxes for Rapid Dialing
Prompts
Example of
Comments
User Input
Mailbox to create:
100-120
Creates or modifies 21 mailboxes
numbered from 100 through 120.
Name:
Retains current value.
Press Enter
Department code:
Retains current value.
Press Enter
Access code:
Retains current value.
Press Enter
Receptionist day
Retains current value.
Press Enter
treatment:
Receptionist day
Retains current value.
Press Enter
treatment:
Mailbox’s extension
Retains current value.
Press Enter
number:
Mailbox’s extension preRetains current value.
Press Enter
dial index:
Attendant extension
Retains current value.
Press Enter
number:
Features Class of service: 60
Specify an FCOS containing FCOS
bit 265.
Limits Class of service:
Retains current value.
Press Enter
Group Class of service:
Retains current value.
Press Enter
Network Class of service: Press Enter
Retains current value.
Restriction Class of
Retains current value.
Press Enter
service
©Copyright 2002, Mitel Networks Corporation
12
Mitel NuPoint Messenger Technical Documentation - Release 7.0
Subscriber Group (1-1000)
Enter a temporary
passcode:
Tutorial (y/n):
Enter the message speech
quality (0,18,24,32):
Enter the name and
greeting speech quality
(0,18,24,32):
Enter Internal Outcall
Index:
Enter Billed Outcall
Index:
Enter Non-Billed Outcall
Index:
Message waiting type #1:
Message waiting type #2:
Message waiting type #3:
Call placement pager
access type:
Time zone offset:
Lists with change rights:
Lists with review rights:
Mailbox 100-101 created
Mailbox to create:
#
Subscriber
Enter the Subscriber Group
Group Number number. This prompt appears only
if FCOS 265 is assigned to the
mailbox.
Retains current value.
Press Enter
Press Enter
Press Enter
Retains current value.
Retains current value.
Press Enter
Retains current value.
Press Enter
Retains current value.
Press Enter
Retains current value.
Press Enter
Retains current value.
Press Enter
Press Enter
Press Enter
Press Enter
Retains current value.
Retains current value.
Retains current value.
Retains current value.
Press Enter
Press Enter
Press Enter
Press Enter
Press Enter
exit
Retains current value.
Retains current value.
Retains current value.
Retains current value.
Retains current value.
Return to the Main Menu.
©Copyright 2002, Mitel Networks Corporation
13