1
Solstice HA 1.3 User’s Guide
SunSoft, Inc.
A Sun Microsystems, Inc. Business
2550 Garcia Avenue
Mountain View, CA 94043 USA
415 960-1300
fax 415 969-9131
Part No.: 805-0317-10
Revision A, April 1997
Copyright 1997 Sun Microsystems, Inc., 2550 Garcia Avenue, Mountain View, California 94043-1100 U.S.A. All rights reserved.
This product or document is protected by copyright and distributed under licenses restricting its use, copying, distribution, and
decompilation. No part of this product or document may be reproduced in any form by any means without prior written
authorization of Sun and its licensors, if any.
Portions of this product may be derived from the UNIX® system, licensed from Novell, Inc., and from the Berkeley 4.3 BSD
system, licensed from the University of California. UNIX is a registered trademark in the United States and other countries and is
exclusively licensed by X/Open Company Ltd. Third-party software, including font technology in this product, is protected by
copyright and licensed from Sun’s suppliers.
RESTRICTED RIGHTS: Use, duplication, or disclosure by the U.S. Government is subject to restrictions of FAR 52.22714(g)(2)(6/87) and FAR 52.227-19(6/87), or DFAR 252.227-7015(b)(6/95) and DFAR 227.7202-1(a).
Sun, Sun Microsystems, the Sun logo, Solaris, SunSoft, the SunSoft logo, SunOS, Solstice, OpenWindows, DeskSet,
SunFastEthernet, SunFDDI, SunNetManager, AnswerBook, JumpStart, OpenBoot, RSM, Solstice DiskSuite, Solstice Backup,
ONC, ONC+, NFS, and Ultra Enterprise are trademarks or registered trademarks of Sun Microsystems, Inc. in the United States
and other countries. All SPARC trademarks are used under license and are trademarks or registered trademarks of SPARC
International, Inc. in the United States and other countries. Products bearing SPARC trademarks are based upon an architecture
developed by Sun Microsystems, Inc.
The OPEN LOOK® and Sun™ Graphical User Interfaces were developed by Sun Microsystems, Inc. for its users and licensees.
Sun acknowledges the pioneering efforts of Xerox in researching and developing the concept of visual or graphical user
interfaces for the computer industry. Sun holds a non-exclusive license from Xerox to the Xerox Graphical User Interface, which
license also covers Sun’s licensees who implement OPEN LOOK GUIs and otherwise comply with Sun’s written license
agreements.
X Window System is a product of the X Consortium, Inc.
THIS PUBLICATION IS PROVIDED “AS IS” WITHOUT WARRANTY OF ANY KIND, EITHER EXPRESS OR IMPLIED,
INCLUDING, BUT NOT LIMITED TO, THE IMPLIED WARRANTIES OF MERCHANTABILITY, FITNESS FOR A
PARTICULAR PURPOSE, OR NON-INFRINGEMENT.
Please
Recycle
Contents
Preface . . . . . . . . . . . . . . . . . . . . . . . . . . . . . . . . . . . . . . . . . . . . . . . . . . .
xxi
Part 1 —Planning and Installation
1. Product Overview . . . . . . . . . . . . . . . . . . . . . . . . . . . . . . . . . . . . .
1-1
1.1 The Ultra Enterprise Cluster HA System . . . . . . . . . . . . .
1-1
1.2 Hardware Overview. . . . . . . . . . . . . . . . . . . . . . . . . . . . . . .
1-3
1.3 Software Overview. . . . . . . . . . . . . . . . . . . . . . . . . . . . . . . .
1-6
1.4 Elements of Solstice HA. . . . . . . . . . . . . . . . . . . . . . . . . . . .
1-8
1.5 Solstice DiskSuite . . . . . . . . . . . . . . . . . . . . . . . . . . . . . . . . . 1-12
1.6 System Files Associated With Solstice HA . . . . . . . . . . . . 1-15
2.
Planning Overview . . . . . . . . . . . . . . . . . . . . . . . . . . . . . . . . . . .
2-1
3. Configuration Planning . . . . . . . . . . . . . . . . . . . . . . . . . . . . . . . .
3-1
3.1 Configuration Planning Overview . . . . . . . . . . . . . . . . . . .
3-1
3.2 Configuration Rules for Improved Reliability . . . . . . . . . 3-16
3.3 Configuration Restrictions . . . . . . . . . . . . . . . . . . . . . . . . . 3-20
iii
4. Installation Planning . . . . . . . . . . . . . . . . . . . . . . . . . . . . . . . . . .
4-1
4.1 Selecting the Cluster Configuration . . . . . . . . . . . . . . . . . .
4-1
4.2 Planning the Network Connections . . . . . . . . . . . . . . . . . .
4-2
4.3 Choosing Host Names . . . . . . . . . . . . . . . . . . . . . . . . . . . . .
4-3
4.4 Updating Naming Services . . . . . . . . . . . . . . . . . . . . . . . . .
4-7
4.5 Creating the md.tab File . . . . . . . . . . . . . . . . . . . . . . . . . .
4-8
4.6 Setting Up the Hardware Configuration . . . . . . . . . . . . . . 4-14
▼ How to Set Up the Hardware Configuration . . . . . . . . 4-14
4.7 Selecting the Install Method . . . . . . . . . . . . . . . . . . . . . . . . 4-17
4.8 Setting Up and Configuring the Install Server . . . . . . . . . 4-17
▼ How to Set Up and Configure the Install Server . . . . . 4-17
iv
5. Licensing Solstice HA Software . . . . . . . . . . . . . . . . . . . . . . . . .
5-1
5.1 Licensing Overview . . . . . . . . . . . . . . . . . . . . . . . . . . . . . . .
5-2
5.2 Gathering Information for Your License . . . . . . . . . . . . . .
5-2
▼ How to Gather the Licensing Information . . . . . . . . . .
5-3
5.3 Contacting the Sun License Center. . . . . . . . . . . . . . . . . . .
5-4
5.4 Receiving Your License . . . . . . . . . . . . . . . . . . . . . . . . . . . .
5-4
5.5 Installing Your License. . . . . . . . . . . . . . . . . . . . . . . . . . . . .
5-5
▼ How to Install Your License From an Email File . . . . .
5-6
▼ How to Install Your License Using the
halicense(1M) Program . . . . . . . . . . . . . . . . . . . . . .
5-7
Solstice HA 1.3 User’s Guide—April 1997
6. Software Installation . . . . . . . . . . . . . . . . . . . . . . . . . . . . . . . . . .
6-1
6.1 Installation Guidelines. . . . . . . . . . . . . . . . . . . . . . . . . . . . .
6-2
6.2 Installation Procedures . . . . . . . . . . . . . . . . . . . . . . . . . . . .
6-5
▼ How to Install From an Install Server . . . . . . . . . . . . . .
6-5
▼ How to Install From CD-ROM. . . . . . . . . . . . . . . . . . . .
6-6
6.3 Post-Installation Procedures . . . . . . . . . . . . . . . . . . . . . . . .
6-8
▼ How to Complete the Post-Installation Procedures . .
6-8
6.4 Upgrade Procedures. . . . . . . . . . . . . . . . . . . . . . . . . . . . . . . 6-11
▼ How to Upgrade From HA 1.0 to HA 1.3 . . . . . . . . . . . 6-11
▼ How to Upgrade from HA 1.2 to HA 1.3 . . . . . . . . . . . 6-19
7. Software Configuration and Validation . . . . . . . . . . . . . . . . . .
7-1
7.1 Overview of hasetup(1M) . . . . . . . . . . . . . . . . . . . . . . . . .
7-2
7.2 Preparing to Run hasetup(1M) . . . . . . . . . . . . . . . . . . . .
7-2
▼ How to Run hasetup(1M) . . . . . . . . . . . . . . . . . . . . . .
7-3
▼ How to Set Up Disksets When md.tab Does Not
Exist. . . . . . . . . . . . . . . . . . . . . . . . . . . . . . . . . . . . . . . . . . 7-15
▼ How to Set Up a Multihost UFS File System . . . . . . . . 7-19
7.3 Post-Configuration Procedures. . . . . . . . . . . . . . . . . . . . . . 7-23
▼ How to Complete the Post-Configuration
Procedures . . . . . . . . . . . . . . . . . . . . . . . . . . . . . . . . . . . . 7-23
7.4 Verifying and Validating the Configuration . . . . . . . . . . . 7-24
7.5 Troubleshooting HA Installation and Configuration . . . . 7-27
▼ How to Install a Data Service Package Using
pkgadd(1M) . . . . . . . . . . . . . . . . . . . . . . . . . . . . . . . . . . 7-27
▼ How to Fix Problems in md.tab . . . . . . . . . . . . . . . . . . 7-28
Contents
v
Part 2 —Installing, Configuring, and Administering Data Services
8. Data Services Overview . . . . . . . . . . . . . . . . . . . . . . . . . . . . . . . .
8-1
9. Setting Up and Administering HA-NFS . . . . . . . . . . . . . . . . . .
9-1
9.1 Overview of Tasks . . . . . . . . . . . . . . . . . . . . . . . . . . . . . . . .
9-2
9.2 Setting Up Metadevices for HA-NFS . . . . . . . . . . . . . . . . .
9-2
9.3 Setting Up and Sharing HA-NFS File Systems . . . . . . . . .
9-2
▼ How to Share HA-NFS File Systems . . . . . . . . . . . . . . .
9-3
▼ How to Register and Activate HA-NFS . . . . . . . . . . . .
9-5
▼ How to Add HA-NFS to a System Already
Running Solstice HA . . . . . . . . . . . . . . . . . . . . . . . . . . . .
9-6
9.4 Administering HA-NFS . . . . . . . . . . . . . . . . . . . . . . . . . . . .
9-7
▼ How to Add an Existing UFS to a Logical Host . . . . .
9-7
▼ How to Remove a Logging UFS From a Logical
Host . . . . . . . . . . . . . . . . . . . . . . . . . . . . . . . . . . . . . . . . . .
9-8
▼ How to Add an HA-NFS File System to a Logical
Host . . . . . . . . . . . . . . . . . . . . . . . . . . . . . . . . . . . . . . . . . .
9-8
▼ How to Remove an HA-NFS File System From a
Logical Host . . . . . . . . . . . . . . . . . . . . . . . . . . . . . . . . . . .
9-9
▼ How to Change Share Options on an HA-NFS File
System. . . . . . . . . . . . . . . . . . . . . . . . . . . . . . . . . . . . . . . . 9-10
vi
Solstice HA 1.3 User’s Guide—April 1997
10. Setting Up and Administering Solstice HA-DBMS for
ORACLE7 . . . . . . . . . . . . . . . . . . . . . . . . . . . . . . . . . . . . . . . . . . . . 10-1
10.1 Overview of Tasks . . . . . . . . . . . . . . . . . . . . . . . . . . . . . . . . 10-1
10.2 Setting Up Metadevices for Solstice HA-DBMS for
ORACLE7 . . . . . . . . . . . . . . . . . . . . . . . . . . . . . . . . . . . . . . . 10-2
10.3 Setting Up Solstice HA-DBMS for ORACLE7. . . . . . . . . . 10-2
▼ How to Prepare Solstice HA Servers for Oracle
Installation . . . . . . . . . . . . . . . . . . . . . . . . . . . . . . . . . . . . 10-2
▼ How to Prepare Logical Hosts for Oracle
Databases . . . . . . . . . . . . . . . . . . . . . . . . . . . . . . . . . . . . . 10-5
▼ How to Create an Oracle Database . . . . . . . . . . . . . . . . 10-6
▼ How to Set Up Solstice HA-DBMS for ORACLE7. . . . 10-7
10.4 Verifying the Solstice HA-DBMS for ORACLE7
Installation. . . . . . . . . . . . . . . . . . . . . . . . . . . . . . . . . . . . . . . 10-15
▼ How to Verify the Solstice HA-DBMS for ORACLE7
Installation . . . . . . . . . . . . . . . . . . . . . . . . . . . . . . . . . . . . 10-15
10.5 Configuring the ORACLE SQL*Net V2 Listener . . . . . . . 10-16
▼ How to Configure the ORACLE SQL*Net V2
Listener . . . . . . . . . . . . . . . . . . . . . . . . . . . . . . . . . . . . . . . 10-16
Contents
vii
11. Setting Up and Administering Solstice HA-DBMS for
SYBASE . . . . . . . . . . . . . . . . . . . . . . . . . . . . . . . . . . . . . . . . . . . . . 11-1
11.1 Overview of Tasks . . . . . . . . . . . . . . . . . . . . . . . . . . . . . . . . 11-1
11.2 Setting Up Solstice HA-DBMS for SYBASE
Metadevices. . . . . . . . . . . . . . . . . . . . . . . . . . . . . . . . . . . . . . 11-2
11.3 Setting Up Solstice HA-DBMS for SYBASE. . . . . . . . . . . . 11-2
▼ How to Prepare Solstice HA Servers for Sybase
Installation . . . . . . . . . . . . . . . . . . . . . . . . . . . . . . . . . . . . 11-2
▼ How to Prepare Logical Hosts for Sybase SQL
Servers and Databases . . . . . . . . . . . . . . . . . . . . . . . . . . 11-4
▼ How to Create a Sybase SQL Server and Databases . . 11-5
▼ How to Set Up Solstice HA-DBMS for SYBASE . . . . . 11-6
11.4 Verifying the Solstice HA-DBMS for SYBASE
Installation. . . . . . . . . . . . . . . . . . . . . . . . . . . . . . . . . . . . . . . 11-10
▼ How to Verify the Solstice HA-DBMS for SYBASE
Installation . . . . . . . . . . . . . . . . . . . . . . . . . . . . . . . . . . . . 11-10
12. Setting Up and Administering Solstice HA-DBMS for
INFORMIX. . . . . . . . . . . . . . . . . . . . . . . . . . . . . . . . . . . . . . . . . . . 12-1
12.1 Overview of Tasks . . . . . . . . . . . . . . . . . . . . . . . . . . . . . . . . 12-1
12.2 Setting Up Metadevices for Solstice HA-DBMS for
INFORMIX . . . . . . . . . . . . . . . . . . . . . . . . . . . . . . . . . . . . . . 12-2
viii
Solstice HA 1.3 User’s Guide—April 1997
12.3 Setting Up Solstice HA-DBMS for INFORMIX . . . . . . . . . 12-2
▼ How to Prepare Solstice HA Servers for Informix
Installation . . . . . . . . . . . . . . . . . . . . . . . . . . . . . . . . . . . . 12-2
▼ How to Prepare Logical Hosts for Informix
Databases . . . . . . . . . . . . . . . . . . . . . . . . . . . . . . . . . . . . . 12-4
▼ How to Create an Informix Database . . . . . . . . . . . . . . 12-5
▼ How to Set up Solstice HA-DBMS for INFORMIX . . . 12-6
12.4 Verifying the Solstice HA-DBMS for INFORMIX
Installation. . . . . . . . . . . . . . . . . . . . . . . . . . . . . . . . . . . . . . . 12-10
▼ How to Verify the Solstice HA-DBMS for INFORMIX
Installation . . . . . . . . . . . . . . . . . . . . . . . . . . . . . . . . . . . . 12-10
13. Setting Up and Administering Solstice HA Internet Pro. . . . 13-1
13.1 Overview of Tasks . . . . . . . . . . . . . . . . . . . . . . . . . . . . . . . . 13-2
13.2 Installing Netscape Services . . . . . . . . . . . . . . . . . . . . . . . . 13-3
▼ How to Install Netscape Services . . . . . . . . . . . . . . . . . 13-3
13.3 Installing DNS. . . . . . . . . . . . . . . . . . . . . . . . . . . . . . . . . . . . 13-5
▼ How to Install DNS . . . . . . . . . . . . . . . . . . . . . . . . . . . . . 13-5
13.4 Installing Netscape News . . . . . . . . . . . . . . . . . . . . . . . . . . 13-6
▼ How to Install Netscape News . . . . . . . . . . . . . . . . . . . 13-6
13.5 Installing Netscape Web or HTTP Server . . . . . . . . . . . . . 13-11
▼ How to Install Netscape Web or HTTP Server. . . . . . . 13-11
13.6 Installing Netscape Mail . . . . . . . . . . . . . . . . . . . . . . . . . . . 13-15
▼ How to Install Netscape Mail . . . . . . . . . . . . . . . . . . . . 13-16
Contents
ix
13.7 Configuring the HA Internet Pro Data Services . . . . . . . . 13-21
▼ How to Configure HA-DNS . . . . . . . . . . . . . . . . . . . . . . 13-23
▼ How to Configure HA-NEWS for Netscape. . . . . . . . . 13-23
▼ How to Configure HA-HTTP for Netscape . . . . . . . . . 13-24
▼ How to Configure HA-MAIL for Netscape . . . . . . . . . 13-25
Part 3 —Software Administration
14. Administration Overview . . . . . . . . . . . . . . . . . . . . . . . . . . . . . . 14-1
15. Preparing for Administration . . . . . . . . . . . . . . . . . . . . . . . . . . . 15-1
15.1 Saving Device Information . . . . . . . . . . . . . . . . . . . . . . . . . 15-1
15.2 Restoring Device Information . . . . . . . . . . . . . . . . . . . . . . . 15-3
15.3 Recording the Device Configuration Information . . . . . . 15-4
15.4 Instance Names and Numbering . . . . . . . . . . . . . . . . . . . . 15-5
15.5 Logging Into the Servers as Root . . . . . . . . . . . . . . . . . . . . 15-7
16. Administering the Terminal Concentrator . . . . . . . . . . . . . . . . 16-1
16.1 Connecting to the Ultra Enterprise Cluster HA Server
Console . . . . . . . . . . . . . . . . . . . . . . . . . . . . . . . . . . . . . . . . . 16-2
▼ How to Connect to the Ultra Enterprise Cluster HA
Server Console . . . . . . . . . . . . . . . . . . . . . . . . . . . . . . . . . 16-2
16.2 Resetting Terminal Concentrator Connections . . . . . . . . . 16-4
▼ How to Reset a Terminal Concentrator Connection . . 16-4
16.3 Entering the OpenBoot PROM on an Ultra Enterprise
Cluster HA Server . . . . . . . . . . . . . . . . . . . . . . . . . . . . . . . . 16-6
▼ How to Enter the OpenBoot PROM . . . . . . . . . . . . . . . 16-6
x
Solstice HA 1.3 User’s Guide—April 1997
16.4 Troubleshooting the Terminal Concentrator . . . . . . . . . . . 16-7
▼ How to Correct a Port Configuration Access Error. . . 16-7
▼ How to Establish a Default Route . . . . . . . . . . . . . . . . . 16-9
17. General Solstice HA Maintenance . . . . . . . . . . . . . . . . . . . . . . . 17-1
17.1 Switching Over Data Services . . . . . . . . . . . . . . . . . . . . . . . 17-2
17.2 Starting the Membership Monitor . . . . . . . . . . . . . . . . . . . 17-3
17.3 Stopping the Membership Monitor . . . . . . . . . . . . . . . . . . 17-3
17.4 Forcing a Membership Reconfiguration . . . . . . . . . . . . . . 17-4
17.5 Handling Split-Brain Syndrome . . . . . . . . . . . . . . . . . . . . . 17-5
17.6 Shutting Down Ultra Enterprise Cluster HA Servers . . . 17-5
▼ How to Shut Down One Server . . . . . . . . . . . . . . . . . . . 17-6
▼ How to Shut Down an Ultra Enterprise Cluster HA
Configuration . . . . . . . . . . . . . . . . . . . . . . . . . . . . . . . . . . 17-6
▼ How to Halt an Ultra Enterprise Cluster HA Server . 17-7
17.7 Starting Servers Without Running Solstice HA . . . . . . . . 17-7
▼ How to Start Servers Without Running Solstice HA. . 17-8
17.8 Setting the OpenBoot PROM. . . . . . . . . . . . . . . . . . . . . . . . 17-8
▼ How to Set the OpenBoot PROM . . . . . . . . . . . . . . . . . 17-9
▼ How to Configure the OpenBoot PROM to Handle
Split-Brain Syndrome . . . . . . . . . . . . . . . . . . . . . . . . . . . 17-10
17.9 Maintaining the /var File System . . . . . . . . . . . . . . . . . . . 17-11
▼ How to Repair a Full /var File System . . . . . . . . . . . . 17-12
17.10 Maintaining Solstice HA Packages. . . . . . . . . . . . . . . . . . . 17-13
▼ How to Remove Solstice HA Packages. . . . . . . . . . . . . 17-13
Contents
xi
17.11 Changing the Host Name of a Server or a Logical Host . 17-13
17.12 Changing the Time in Ultra Enterprise Cluster HA
Configurations . . . . . . . . . . . . . . . . . . . . . . . . . . . . . . . . . . . 17-14
18. Administering Metadevices and Disksets . . . . . . . . . . . . . . . . 18-1
18.1 Overview of Metadevice and Diskset Administration . . 18-2
18.2 Mirroring Guidelines . . . . . . . . . . . . . . . . . . . . . . . . . . . . . . 18-3
18.3 Diskset Administration . . . . . . . . . . . . . . . . . . . . . . . . . . . . 18-3
▼ How to Add a Disk to a Diskset . . . . . . . . . . . . . . . . . . 18-4
▼ How to Remove a Disk From a Diskset . . . . . . . . . . . . 18-5
18.4 Multihost Metadevice Administration . . . . . . . . . . . . . . . 18-5
18.5 Local Metadevice Administration . . . . . . . . . . . . . . . . . . . 18-10
18.6 Destructive Metadevice Actions to Avoid . . . . . . . . . . . . . 18-10
18.7 Backing Up Multihost Data Using Solstice Backup . . . . . 18-10
19. Monitoring the Ultra Enterprise Cluster HA Servers . . . . . . . 19-1
19.1 Overview of Solstice HA Monitoring. . . . . . . . . . . . . . . . . 19-1
19.2 Monitoring the Ultra Enterprise Cluster HA Configuration
Status . . . . . . . . . . . . . . . . . . . . . . . . . . . . . . . . . . . . . . . . . . . 19-2
19.3 Monitoring the Load of the Ultra Enterprise Cluster HA
Servers . . . . . . . . . . . . . . . . . . . . . . . . . . . . . . . . . . . . . . . . . . 19-5
19.4 Monitoring Metadevices . . . . . . . . . . . . . . . . . . . . . . . . . . . 19-5
19.5 Monitoring Metadevice State Database Replicas . . . . . . . 19-7
19.6 Checking Message Files . . . . . . . . . . . . . . . . . . . . . . . . . . . . 19-9
19.7 Using Solstice SunNet Manager to Monitor Ultra
Enterprise Cluster HA Servers . . . . . . . . . . . . . . . . . . . . . . 19-9
xii
Solstice HA 1.3 User’s Guide—April 1997
20. Recovering From Power Loss . . . . . . . . . . . . . . . . . . . . . . . . . . . 20-1
20.1 Total Power Loss. . . . . . . . . . . . . . . . . . . . . . . . . . . . . . . . . . 20-2
20.2 Partial Power Loss . . . . . . . . . . . . . . . . . . . . . . . . . . . . . . . . 20-3
21. Administering HA Server and Multihost Disks . . . . . . . . . . . 21-1
21.1 Restoring a Boot Disk from Backup . . . . . . . . . . . . . . . . . . 21-2
▼ How to Restore a Boot Disk From Backup . . . . . . . . . . 21-2
21.2 Replacing a Local Non-Boot Disk. . . . . . . . . . . . . . . . . . . . 21-4
▼ How to Replace a Local Non-Boot Disk . . . . . . . . . . . . 21-4
21.3 Adding a Multihost Disk . . . . . . . . . . . . . . . . . . . . . . . . . . . 21-5
▼ How to Add a Multihost Disk . . . . . . . . . . . . . . . . . . . . 21-6
21.4 Replacing a Multihost Disk . . . . . . . . . . . . . . . . . . . . . . . . . 21-14
▼ How to Replace a Multihost Disk . . . . . . . . . . . . . . . . . 21-14
22. Administering SPARCstorage Arrays . . . . . . . . . . . . . . . . . . . . 22-1
22.1 Recovering From Power Loss . . . . . . . . . . . . . . . . . . . . . . . 22-2
▼ How to Recover from Power Loss. . . . . . . . . . . . . . . . . 22-2
22.2 Repairing a Lost SPARCstorage Array Connection . . . . . 22-4
▼ How to Repair a Lost Connection . . . . . . . . . . . . . . . . . 22-4
22.3 Adding a SPARCstorage Array. . . . . . . . . . . . . . . . . . . . . . 22-6
▼ How to Add a SPARCstorage Array . . . . . . . . . . . . . . . 22-6
Contents
xiii
22.4 Removing and Replacing SPARCstorage Array
Components . . . . . . . . . . . . . . . . . . . . . . . . . . . . . . . . . . . . . 22-7
▼ How to Take a SPARCstorage Array Tray Out of
Service . . . . . . . . . . . . . . . . . . . . . . . . . . . . . . . . . . . . . . . . 22-8
▼ How to Bring a SPARCstorage Array Tray Back Into
Service . . . . . . . . . . . . . . . . . . . . . . . . . . . . . . . . . . . . . . . . 22-10
22.5 Replacing a SPARCstorage Array Controller and
Changing the World Wide Name . . . . . . . . . . . . . . . . . . . . 22-12
▼ How to Change a SPARCstorage Array World
Wide Name. . . . . . . . . . . . . . . . . . . . . . . . . . . . . . . . . . . . 22-13
23. Administering Network Interfaces . . . . . . . . . . . . . . . . . . . . . . 23-1
23.1 Replacing Network Cables and Interfaces . . . . . . . . . . . . 23-1
▼ How to Replace a Public or Client Ethernet Cable . . . 23-2
▼ How to Replace a Private Network Cable . . . . . . . . . . 23-2
23.2 Adding a Public Network . . . . . . . . . . . . . . . . . . . . . . . . . . 23-3
▼ How to Add a Public Network Connection . . . . . . . . . 23-3
23.3 Removing a Public Network . . . . . . . . . . . . . . . . . . . . . . . . 23-6
▼ How to Remove a Public Network . . . . . . . . . . . . . . . . 23-6
24. Administering Server Components . . . . . . . . . . . . . . . . . . . . . . 24-1
24.1 System Board Replacement . . . . . . . . . . . . . . . . . . . . . . . . . 24-1
24.2 Adding Board-Level Modules . . . . . . . . . . . . . . . . . . . . . . 24-2
▼ How to Add Board-Level Modules . . . . . . . . . . . . . . . . 24-2
24.3 Replacing SBus Cards . . . . . . . . . . . . . . . . . . . . . . . . . . . . . 24-3
▼ How to Replace an SBus Card . . . . . . . . . . . . . . . . . . . . 24-4
xiv
Solstice HA 1.3 User’s Guide—April 1997
Part 4 —Technical Reference
25. Solstice HA Fault Detection . . . . . . . . . . . . . . . . . . . . . . . . . . . . 25-1
25.1 Introduction . . . . . . . . . . . . . . . . . . . . . . . . . . . . . . . . . . . . . 25-1
25.2 Fault Detection Overview . . . . . . . . . . . . . . . . . . . . . . . . . . 25-2
25.3 Network Fault Monitoring . . . . . . . . . . . . . . . . . . . . . . . . . 25-6
25.4 Data Service-Specific Fault Probes . . . . . . . . . . . . . . . . . . . 25-9
25.5 Configuration of Fault Monitoring is Not Supported . . . 25-13
Part 5 —Appendices
A. Error Messages . . . . . . . . . . . . . . . . . . . . . . . . . . . . . . . . . . . . . . . A-1
A.1 General Error Messages . . . . . . . . . . . . . . . . . . . . . . . . . . . . A-1
A.2 Membership Monitor Error Messages . . . . . . . . . . . . . . . . A-2
A.3 hacheck(1M) Command Error Messages . . . . . . . . . . . . A-6
A.4 hasetup(1M) Command Error Messages . . . . . . . . . . . . A-15
B. Man Pages . . . . . . . . . . . . . . . . . . . . . . . . . . . . . . . . . . . . . . . . . . .
B-1
B.1 Solstice HA Man Pages Quick Reference. . . . . . . . . . . . . .
B-1
B.2 Data Services Man Pages Quick Reference . . . . . . . . . . . .
B-4
C. Configuration Worksheets . . . . . . . . . . . . . . . . . . . . . . . . . . . . . .
C-1
Contents
xv
D. Dual-String Mediators . . . . . . . . . . . . . . . . . . . . . . . . . . . . . . . . . D-1
D.1 Overview . . . . . . . . . . . . . . . . . . . . . . . . . . . . . . . . . . . . . . . .
D-1
D.2 Why Mediators are Needed . . . . . . . . . . . . . . . . . . . . . . . .
D-2
D.3 What are Mediators . . . . . . . . . . . . . . . . . . . . . . . . . . . . . . .
D-3
D.4 Failures Addressed by Mediators. . . . . . . . . . . . . . . . . . . .
D-5
D.5 Administering the Mediator Host . . . . . . . . . . . . . . . . . . .
D-9
D.6 HA Administration Tasks When Using Mediators . . . . .
D-9
▼ How to Check the Status of Mediator Data . . . . . . . . .
D-9
▼ How to Fix Bad Mediator Data . . . . . . . . . . . . . . . . . . . D-10
xvi
E. Administering SPARCstorage Array NVRAM . . . . . . . . . . . .
E-1
E.1 Overview . . . . . . . . . . . . . . . . . . . . . . . . . . . . . . . . . . . . . . . .
E-1
E.2 Enabling and Disabling NVRAM . . . . . . . . . . . . . . . . . . . .
E-2
▼ How to Enable and Disable NVRAM . . . . . . . . . . . . . .
E-2
E.3 Flushing and Purging NVRAM Data . . . . . . . . . . . . . . . . .
E-4
▼ How to Flush and Purge NVRAM Data . . . . . . . . . . . .
E-5
F. Glossary . . . . . . . . . . . . . . . . . . . . . . . . . . . . . . . . . . . . . . . . . . . . .
F-1
Index . . . . . . . . . . . . . . . . . . . . . . . . . . . . . . . . . . . . . . . . . . . . . . . .
I-1
Solstice HA 1.3 User’s Guide—April 1997
Figures
Figure 1-1
Ultra Enterprise Cluster HA Hardware Configuration . . . . . .
1-4
Figure 1-2
Sample Diskset Layout With Three Multihost Disk
Expansion Units. . . . . . . . . . . . . . . . . . . . . . . . . . . . . . . . . . . . . . .
1-5
Figure 1-3
Diagram of the Solstice HA Software Elements . . . . . . . . . . . .
1-6
Figure 1-4
Diagram of the Solstice HA Layers. . . . . . . . . . . . . . . . . . . . . . .
1-8
Figure 2-1
Configuration, Installation, and Verification Steps . . . . . . . . .
2-3
Figure 3-1
Sample Diskset Allocation . . . . . . . . . . . . . . . . . . . . . . . . . . . . . .
3-9
Figure 4-1
Host Names of Logical Network Interfaces. . . . . . . . . . . . . . . .
4-5
Figure 15-1
Sample Script for Saving VTOC Information . . . . . . . . . . . . . .
15-2
Figure 15-2
Sample Script for Restoring VTOC Information. . . . . . . . . . . .
15-3
Figure 15-3
Sample Script to Copy VTOC Information From a Mirror . . .
15-4
Figure 19-1
Sample hastat(1M) Output . . . . . . . . . . . . . . . . . . . . . . . . . . .
19-2
Figure C-1
HA Configuration Worksheet . . . . . . . . . . . . . . . . . . . . . . . . . . .
C-4
Figure C-2
SPARCcluster HA Disk Setup Worksheet - Creating
md.tab . . . . . . . . . . . . . . . . . . . . . . . . . . . . . . . . . . . . . . . . . . . . . . .
C-8
xvii
xviii
Figure D-1
HA System in Steady State with Mediators . . . . . . . . . . . . . . . .
D-4
Figure D-2
Single HA Server Failure with Mediators . . . . . . . . . . . . . . . . .
D-6
Figure D-3
Single String Failure with Mediators . . . . . . . . . . . . . . . . . . . . .
D-7
Figure D-4
Multiple Failure – One Server and One String . . . . . . . . . . . . .
D-8
Solstice HA 1.3 User’s Guide—April 1997
Tables
Table 3-1
Sample Private Network Naming . . . . . . . . . . . . . . . . . . . . . . . .
3-4
Table 3-2
Determining Drives Needed for a Configuration. . . . . . . . . . .
3-8
Table 3-3
Division of Disksets. . . . . . . . . . . . . . . . . . . . . . . . . . . . . . . . . . . .
3-8
Table 4-1
Primary Network Naming . . . . . . . . . . . . . . . . . . . . . . . . . . . . . .
4-6
Table 4-2
Secondary Network Naming . . . . . . . . . . . . . . . . . . . . . . . . . . . .
4-6
Table 4-3
Multihost Disk Partitioning for Most Drives. . . . . . . . . . . . . . .
4-10
Table 4-4
Multihost Disk Partitioning for the First Drive on the
First Two Controllers . . . . . . . . . . . . . . . . . . . . . . . . . . . . . . . . . .
4-10
Table 6-1
File System Allocation . . . . . . . . . . . . . . . . . . . . . . . . . . . . . . . . .
6-3
Table 13-1
Data Service Registration Names and Syntax . . . . . . . . . . . . . . 13-21
Table 13-2
HA-DNS Configuration Parameters. . . . . . . . . . . . . . . . . . . . . . 13-23
Table 13-3
Configuration Parameters for HA-NEWS for Netscape . . . . . 13-23
Table 13-4
Configuration Parameters for HA-HTTP for Netscape . . . . . . 13-24
Table 13-5
Configuration Parameters for HA-HTTP for Netscape . . . . . . 13-25
Table 19-1
Solstice HA Monitor Agents . . . . . . . . . . . . . . . . . . . . . . . . . . . . 19-12
xix
xx
Table C-1
Root Slice Calculation Template . . . . . . . . . . . . . . . . . . . . . . . . .
C-1
Table C-2
Required Root File System Sizes and md.conf Values. . . . . .
C-2
Table C-3
Solstice HA Host Naming Worksheet . . . . . . . . . . . . . . . . . . . .
C-5
Table C-4
SPARCcluster HA Metadevice Planning Worksheet . . . . . . . .
C-6
Solstice HA 1.3 User’s Guide—April 1997
Preface
Ultra™ Enterprise™ Cluster HA is a hardware and software product that
supports specific dual-server hardware configurations. It is compatible with
the Solaris™ 2.5.1 software environment. When configured properly, the
hardware and software together provide highly available data services. Ultra
Enterprise Cluster HA depends upon the mirroring and diskset capabilities
and other functionality provided by Solstice™ DiskSuite™ 4.1, which is an
integral part of Ultra Enterprise Cluster HA.
The Solstice HA 1.3 User’s Guide documents the procedures for setting up
hardware and installing, configuring, and administering the Solstice HA 1.3
software. This book is intended to be used with hardware and software books
listed under “Related Documentation” on page xxv.
Who Should Use This Book
This book is for Sun™ representatives who are performing the initial
installation of Ultra Enterprise Cluster HA configurations and for system
administrators responsible for maintaining the system. The instructions and
discussions are complex and intended for a technically advanced audience.
The instructions in this book assume the reader has expertise with the Solstice
DiskSuite product.
System administrators with UNIX® system experience will find this book
useful when learning to administer Ultra Enterprise Cluster HA
configurations.
xxi
Note – Junior or less experienced system administrators should not attempt to
install, configure, or administer Ultra Enterprise Cluster HA configurations.
How This Book Is Organized
This document contains the following chapters and appendixes:
Part 1 – Planning and Installation
Chapter 1, “Product Overview” provides a high-level overview of Ultra
Enterprise Cluster High Availability. This chapter includes an overview of the
components that make up the HA cluster.
Chapter 2, “Planning Overview” presents a roadmap of the planning and
installation process.
Chapter 3, “Configuration Planning” discusses how to plan the Solstice HA
configuration at your site.
Chapter 4, “Installation Planning” describes the steps to take before installing
the software needed to run Solstice HA.
Chapter 5, “Licensing Solstice HA Software” describes the Solstice HA
software licensing process.
Chapter 6, “Software Installation” describes the Solstice HA software
installation process.
Chapter 7, “Software Configuration and Validation” describes the software
procedures used to configure and validate the new Solstice HA cluster
configuration.
Part 2 – Installing, Configuring, and Administering Data Services
Chapter 8, “Data Services Overview” provides an overview to the procedures
used to install, configure, and administer Solstice HA data services.
Chapter 9, “Setting Up and Administering HA-NFS” describes the
procedures necessary to install and configure HA-NFS.
xxii
Solstice HA 1.3 User’s Guide—April 1997
Chapter 10, “Setting Up and Administering Solstice HA-DBMS for
ORACLE7” describes the procedures necessary to install and configure
HA-DBMS for ORACLE7.
Chapter 11, “Setting Up and Administering Solstice HA-DBMS for SYBASE”
describes the procedures necessary to install and configure HA-DBMS for
SYBASE.
Chapter 12, “Setting Up and Administering Solstice HA-DBMS for
INFORMIX” describes the procedures necessary to install and configure
HA-DBMS for INFORMIX.
Chapter 13, “Setting Up and Administering Solstice HA Internet Pro”
describes the procedures to install and configure HA-DNS, HA-HTTP,
HA-NEWS, and HA-MAIL for Netscape.
Part 3 – Software Administration
Chapter 14, “Administration Overview” describes the Solstice HA hardware
and software environment.
Chapter 15, “Preparing for Administration” offers a high-level overview of
the functionality included with Solstice HA. The interactions among the
various parts of Solstice HA are also discussed.
Chapter 16, “Administering the Terminal Concentrator” describes the
procedures used to maintain the Solstice HA terminal concentrator.
Chapter 17, “General Solstice HA Maintenance” describes the procedures
used to maintain the Solstice HA framework.
Chapter 18, “Administering Metadevices and Disksets” describes the
procedures used to maintain the Solstice HA metadevices and disksets.
Chapter 19, “Monitoring the Ultra Enterprise Cluster HA Servers” discusses
the tools and commands used to monitor the behavior of the systems.
Chapter 20, “Recovering From Power Loss” describes the procedures used to
recover from power failures.
Chapter 21, “Administering HA Server and Multihost Disks” describes the
procedures used to restore, replace, and add disks to the HA servers and
storage arrays.
Preface
xxiii
Chapter 22, “Administering SPARCstorage Arrays” provides specific
procedures for maintaining SPARCstorage™ Arrays.
Chapter 23, “Administering Network Interfaces” describes the procedures
needed to replace, add, or remove network interfaces.
Chapter 24, “Administering Server Components” describes the procedures
needed to replace, add, or remove components from the HA servers.
Part 4 – Technical Reference
Chapter 25, “Solstice HA Fault Detection” describes the Solstice HA
membership and fault monitoring process.
Part 5 – Appendices
Appendix A, “Error Messages” explains the status, error, and log messages
displayed by Solstice HA. It also includes the error messages returned by
hasetup(1M) and hacheck(1M).
Appendix B, “Man Pages” contains a list of man pages used to administer and
maintain Solstice HA.
Appendix C, “Configuration Worksheets” provides configuration worksheets
to use when planning your Solstice HA configuration.
Appendix D, “Dual-String Mediators” describes the feature that allows you to
use Solstice HA with only two disk strings.
Appendix E, “Administering SPARCstorage Array NVRAM” describes the
administration procedures needed for enabling, disabling, flushing, and
purging NVRAM in SPARCstorage Arrays.
Appendix F, “Glossary” provides definitions of terms used throughout this
document.
Note – This book contains sample output and examples of various commands
used in the Ultra Enterprise Cluster HA environment. All of the output and
examples use the suggested host naming conventions described in Chapter 3,
“Configuration Planning.” That is, physical host names are designated as
“phys-hahostname” (e.g., “phys-hahost1”) and logical host names are
designated as the physical host name without the phys- prefix (e.g., “hahost1”).
xxiv
Solstice HA 1.3 User’s Guide—April 1997
Related Documentation
The documents listed in Table P-1 contain information that might be helpful to
the system administrator and/or service provider.
Table P-1
List of Related Documentation
Product Family
Title
Ultra 4000, 5000, and 6000
Server Series
Ultra Enterprise Cluster Service Manual
Part Number
802-6786
Ultra Enterprise Cluster Hardware Site Preparation, Planning, and
Installation Guide
802-6783
Ultra Enterprise 3000 System Installation Guide
802-6050
Ultra Enterprise 3000 System Manual
802-6051
Sun Ultra 2 Series Hardware Setup Instructions
802-5933
Sun Ultra 2 Series Installation Guide
802-5934
Sun Ultra 2 Series Service Manual
802-2561
SPARCstorage Array *Model 100 Series* Installation Manual
801-2205
SPARCstorage Array *Model 100 Series* Service Manual
801-2206
Disk Drive Installation Manual for the SPARCstorage Array Model 100
Series
801-2207
SPARCstorage Array Regulatory Compliance Manual
801-7103
SPARCstorage Array Model 200 Series Installation Manual
802-2027
SPARCstorage Array Model 200 Series Service Manual
802-2028
SPARCstorage MultiPack
SPARCstorage MultiPack User’s Guide
802-4428
Ultra 2 Server HA Cluster
Ultra 2 HA Cluster Binder Set
825-3449
Getting Started (roadmap)
802-6317
Ultra 2 Server Cluster Hardware Planning and Installation Manual
802-6314
Ultra 2 Server Cluster Hardware Service Manual
802-6316
Ultra 2 Server Cluster Hardware Product Notes
805-0721
Solstice HA 1.3 Programmer's Guide
805-0318
Ultra 3000 Server Series
Ultra 2 Server Series
SPARCstorage Array
Preface
xxv
Table P-1
Product Family
Title
Part Number
Solstice HA 1.3 Software New Product Information
805-0629
Terminal Concentrator Binder Set
825-2227
Terminal Concentrator Installation Notes
801-6127
Terminal Concentrator General Reference Guide
801-5972
Solstice DiskSuite 4.1 Document Set
851-2369
Solstice DiskSuite 4.1 User’s Guide
802-4215
Solstice DiskSuite 4.1 Reference
802-6724
Solstice DiskSuite 4.1 Installation/Product Notes
802-7196
SunVTS Diagnostic
SunVTS 2.0 User’s Guide
802-7221
Other Product Families
Fibre Channel SBus Card Installation Manual
801-6313
Fibre Channel Optical Module Installation Manual
801-6326
Name Services Administration Guide
801-6633
Name Services Configuration Guide
801-6635
NFS Administration Guide
801-6634
Oracle7 Installation Guide for Sun SPARC Solaris 2.x
802-6994
SBus Quad Ethernet Controller Manuals
801-7123
SMCC NFS Server Performance and Tuning Guide
801-7289
Solaris 2.x Handbook for SMCC Peripherals
801-5488
SPARC: Installing Solaris Software
801-6109
SunSwift SBus Adapter Installation and User’s Guide
802-6021
TCP/IP Network Administration Guide
801-6632
Terminal Concentrator
Solstice DiskSuite
xxvi
List of Related Documentation (Continued)
Solstice HA 1.3 User’s Guide—April 1997
Typographic Conventions
Table P-2 describes the typographic conventions used in this book.
Table P-2
Typographic Conventions
Typeface or
Symbol
Meaning
Example
Typewriter
The names of commands,
files, and directories;
on-screen computer output.
Edit your .login file.
Use ls -a to list all files.
machine_name% You have mail.
boldface
What you type, contrasted
with on-screen computer
output.
italic
Command-line placeholder:
replace with a real name or
value.
Book titles, new words or
terms, or words to be
emphasized.
machine_name% su
Password:
To delete a file, type rm filename.
Shell Prompts in Command Examples
Table P-3 shows the default system prompt and superuser prompt for the C
shell, Bourne shell, and Korn shell.
Table P-3
Shell Prompts
Shell
Prompt
C shell prompt
machine_name%
C shell superuser prompt
machine_name#
Bourne shell and Korn shell prompt
$
Bourne shell and Korn shell superuser prompt
#
Preface
xxvii
Getting Help
If you have problems installing or using Ultra Enterprise Cluster HA, contact
your service provider and provide the following information:
•
•
•
•
•
xxviii
Your name and electronic mail address (if available)
Your company name, address, and phone number
The model and serial numbers of your systems (factory assembled
configurations come with the same serial number for each server)
The release number of the operating system (for example, Solaris 2.5.1)
The release number of Solstice HA (for example, Solstice HA 1.3)
Solstice HA 1.3 User’s Guide—April 1997
Part 1 — Planning and Installation
1
Product Overview
This chapter provides an overview of the Ultra Enterprise Cluster HA product.
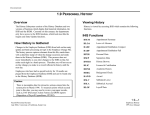
The Ultra Enterprise Cluster HA System
page 1-1
Hardware Overview
page 1-3
Software Overview
page 1-6
Elements of Solstice HA
page 1-8
Solstice DiskSuite
page 1-12
System Files Associated With Solstice HA
page 1-15
1.1 The Ultra Enterprise Cluster HA System
Ultra Enterprise Cluster HA is hardware and software that provides high
availability support and automatic data service failover for specific dual-server
hardware configurations. The configurations consist of Sun hardware running
Solaris 2.5.1, Solstice High Availability (Solstice HA), and Solstice DiskSuite
software.
The Solstice HA framework provides hardware and software failure detection,
HA system administration, and system takeover and automatic restart in the
event of a failure.
Solstice HA includes a set of highly available data services and an API that can
be used to create other highly available data services and integrate them with
the Solstice HA framework.
1-1
1
The HA configurations automatically recover from single server, disk, or
network interface failure, as well as software failure.
Ultra Enterprise Cluster HA uses Solstice DiskSuite 4.1 software to administer
multihost disks. The DiskSuite software provides mirroring, concatenation,
striping, hot spare disks, file system growing, and UNIX file system logging
capabilities.
An Ultra Enterprise Cluster HA configuration can be either symmetric or
asymmetric.
In a symmetric configuration, each system masters one of two logical hosts and
makes one or more data services available from that logical host. In the event
of a failure, the remaining system takes control of both logical hosts and
provides all the data services.
In an asymmetric configuration, there is only one logical host. All data services
run from that logical host on only one of the hosts. The second host is a hot
standby that is ready to assume control of the logical host and provide the data
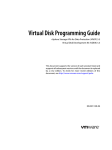
services in the event of a failure. See Figure 1-1 for a diagram of the Ultra
Enterprise Cluster HA hardware configuration.
The hardware configuration is the same regardless of the software
configuration. That is, multihost disks are connected the same way in both
symmetric and asymmetric configurations. Refer to “Type of Configuration” on
page 3-2 for more information on the two types of configurations.
The server configurations must be identical in the following ways:
•
•
•
•
•
Number and size of local disks
Number and types of connections to multihost disks
Number and types of network connections
Number and location of SBus cards
Same version of Solaris software (Solaris 2.5.1), Solstice DiskSuite, and
Solstice HA installed on each server’s local disk
There are certain limitations imposed upon the Ultra Enterprise Cluster HA
configuration. These are documented in “Configuration Restrictions” on
page 3-20.
Any machine on the network can be a client of an Ultra Enterprise Cluster HA
system without modifications to the client system or user programs.
1-2
Solstice HA 1.3 User’s Guide—April 1997
1
1.2 Hardware Overview
This section describes the elements of the Ultra Enterprise Cluster HA
hardware configuration. An example configuration is shown in Figure 1-1.
Each server in an Ultra Enterprise Cluster HA configuration has one or more
disks that are accessible only from that server. These are called local disks. They
contain the Solstice HA software environment.
Note – The servers are referred to as siblings of each other.
Disks in the configuration that are accessible from either of the servers are
called multihost disks. Multihost disks are organized into one or two disksets
during configuration. In a symmetric configuration, there are two disksets. In
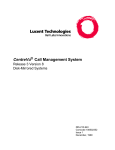
an asymmetric configuration, there is only one. The diskset(s) are stored on
multihost disk expansion units and contain the data for highly available data
services. Figure 1-2 shows an example of a symmetric configuration with three
multihost disk expansion units.
The Ultra Enterprise Cluster HA configurations tolerate the following types of
single-point failures:
•
•
•
•
•
Server operating system failure because of a crash or a panic
Data service application failure
Server hardware failure
Network interface failure
Disk media failure
The servers in the configuration communicate using two private network
connections. Ultra Enterprise Cluster HA configuration and status information
is communicated across these links. These links are redundant, requiring only
one for continued system operation.
The servers also have one or more public network connections that provide
communication to clients of the highly available services.
Product Overview
1-3
1
Additional Public Networks (optional)
Public Network
Admin
Workstation
server1
server2
Local Disk
Local Disk
c0
c0
Terminal
Concentrator
Private Networks
c1
c2
c1
SP
AR
Cs
SP
AR
Cs
tora
ge
ge
multihost disk expansion unit
Figure 1-1
1-4
SP
AR
Cs
tora
Arra
y
c3
c2
tora
Arra
y
multihost disk expansion unit
ge
Arra
y
multihost disk expansion unit
Ultra Enterprise Cluster HA Hardware Configuration
Solstice HA 1.3 User’s Guide—April 1997
c3
1
To phys-hahost1
Diskset_1
Diskset_2
To phys-hahost2
c1
c1
c2
c1t0d0
c1t2d0
c1t4d0
c2t0d0
c2t2d0
c2t4d0
c3t0d0
c3t2d0
c3t4d0
c1t0d1
c1t2d1
c1t4d1
c2t0d1
c2t2d1
c2t4d1
c3t0d1
c3t2d1
c3t4d1
c1t0d2
c1t2d2
c1t4d2
c2t0d2
c2t2d2
c2t4d2
c3t0d2
c3t2d2
c3t4d2
c1t1d2
c1t3d2
c1t5d2
c2t1d2
c2t3d2
c2t5d2
c3t1d2
c3t3d2
c3t5d2
c1t1d3
c1t3d3
c1t5d3
c2t1d3
c2t3d3
c2t5d3
c3t1d3
c3t3d3
c3t5d3
c1t1d4
c1t3d4
c1t5d4
c2t1d4
c2t3d4
c2t5d4
c3t1d4
c3t3d4
c3t5d4
c3
multihost disk expansion unit
multihost disk expansion unit
Figure 1-2
c2
c3
multihost disk expansion unit
Sample Diskset Layout With Three Multihost Disk Expansion Units
Product Overview
1-5
1
1.3 Software Overview
Solstice HA enables two servers to act as a highly available data facility.
Solstice HA is built on Solstice DiskSuite, which provides mirroring,
concatenation, stripes, hot spares, and UFS logging. The Solstice HA and
Solstice DiskSuite packages and the Solaris 2.5.1 distribution are installed on
both servers in the configuration.
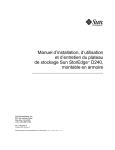
Figure 1-3 illustrates how Solstice HA fits on top of Solstice DiskSuite and
Solaris 2.5.1. These elements are discussed further in the following sections.
Solstice High Availability 1.3
Solstice DiskSuite 4.1
Solaris 2.5.1
Figure 1-3
Diagram of the Solstice HA Software Elements
The Solstice HA software has the following components:
•
•
•
•
1-6
Membership monitor
Fault monitor
Programs used by the membership monitor and fault monitor
Various administration commands
Solstice HA 1.3 User’s Guide—April 1997
1
The membership monitor, fault monitor, and associated programs allow one
server to take over processing of all HA data services from the other server
when hardware or software fails. This is accomplished by causing the server
without the failure to take over mastery of the logical host associated with the
failed server. This is referred to as a takeover.
When a takeover occurs, the server assuming control becomes the I/O master
for the failed server’s logical host and redirects the clients of the failed server
to itself. The takeover also includes actions specific to the configured data
services.
Administrators also can use the haswitch(1M) command to manually direct
one server to take over the data services for the sibling server. This is referred
to as switchover. A switchover allows administrators to take a server off line for
maintenance and to bring a previously off-line server back on line.
Solstice DiskSuite software is required for Solstice HA operations and provides
the following functionality:
•
•
•
•
•
•
•
Diskset configuration and management
Disk mirroring
Disk concatenation
Disk striping
File system growing
Hot spare pool device management
UNIX file system (UFS) logging
Product Overview
1-7
1
1.4 Elements of Solstice HA
The Solstice HA software consists of three functional layers; data services,
configuration and administration commands, and the HA framework.
Figure 1-4 illustrates the Solstice HA layers. These layers are discussed in the
following sections.
Data Services Layer
ORACLE7
NFS
SYBASE INFORMIX
Fault Monitor
Internet Pro
Command Layer
hasetup
hacheck
hafstab
haswitch hastart hastop
hastat
haload
haremove
hainstall halicense hainetconfig
Framework Layer
Membership Monitor
Figure 1-4
Fault Monitor
Diagram of the Solstice HA Layers
1.4.1 Data Services Layer
Release 1.3 of Solstice HA supports the following data services:
• Solstice HA-NFS
• Solstice HA-DBMS for ORACLE7
• Solstice HA-DBMS for INFORMIX
• Solstice HA-DBMS for SYBASE
• Solstice HA Internet Pro
Fault monitors for these data services are also provided at the data services
layer.
1-8
Solstice HA 1.3 User’s Guide—April 1997
1
1.4.2 Command Layer
Solstice HA provides utilities for configuring and administering the highly
available data facility. The utilities are described in man pages in Part 4 –
Technical Reference. The utilities include:
•
hacheck(1M) – Validates Ultra Enterprise Cluster HA configurations. This
program ensures that the configuration has been set up correctly.
•
hafstab(1M) – Provides a method of editing and distributing HA specific
dfstab(4) and vfstab(4) files to the two servers in an Ultra Enterprise
Cluster HA configuration.
•
hainstall(1M) – Installs Solstice HA. This command also sets up HA
install servers for installing Solstice HA over the network.
•
halicense(1M) – Installs a license on the two Ultra Enterprise Cluster HA
servers.
•
haload(1M) – Monitors the load on the pair of Ultra Enterprise Cluster HA
servers. Monitoring is necessary because there must be some excess capacity
between the two servers. If there is no excess capacity and a takeover
occurs, the remaining server will be unable to handle the combined
workload.
•
hareg(1M) - Control registration and activation of Solstice HA data
services.
•
•
haremove(1M) – Removes the Solstice HA software.
•
hastart(1M) – Starts Solstice HA on the individual node from which it is
executed, or, if used with the -r option, arranges for Solstice HA to start
automatically on subsequent system boots. Once hastart(1M) has been
run, Solstice HA restarts automatically on each system boot until
hastop(1M) is run.
hasetup(1M) – Provides for initial configuration of the Ultra Enterprise
Cluster HA servers. The information entered on one of the servers is
automatically updated on the other server. The hasetup utility first
attempts to discover most information about the configuration without user
input. You are asked about additional public network names, the type of
configuration (symmetric or asymmetric), the data services being used,
space for UFS logging, and placement of disks in disksets. The program then
updates the Solstice HA configuration files with the information.
Product Overview
1-9
1
•
hastat(1M) – Displays the current status of the Ultra Enterprise Cluster
HA configuration.
•
hastop(1M) – Gracefully shuts down Solstice HA on the node from which
it is executed. Solstice HA remains stopped, even across system boots, until
hastart(1M) is issued.
•
haswitch(1M) – Transfers the specified logical host(s) along with its
associated data services and IP addresses to the specified physical server.
In addition to these general Solstice HA utility commands, the following
administrative commands are supplied to administer specific data services.
•
hainetconfig(1M) – The hainetconfig(1M) command is used to
configure the HA Internet Pro data services on Solstice HA configurations.
•
hainformix(1M) – The hainformix(1M) command is used to maintain
the list of monitored databases in the Solstice HA-DBMS for INFORMIX
configuration file, hainformix_databases(4).
•
haoracle(1M) – The haoracle(1M) command is used to maintain the list
of monitored databases in the Solstice HA-DBMS for ORACLE7
configuration file, haoracle_databases(4).
•
hasybase(1M) – The hasybase(1M) command is used to maintain the list
of monitored databases in the Solstice HA-DBMS for SYBASE configuration
file, hasybase_databases(4).
You also use Solstice DiskSuite commands when performing administration
procedures on Ultra Enterprise Cluster HA configurations. The Solstice
DiskSuite man pages are included with the Solstice DiskSuite distribution.
1-10
Solstice HA 1.3 User’s Guide—April 1997
1
1.4.3 Framework Layer
The Solstice HA framework layer includes the membership monitor and the fault
monitor. The membership monitor detects which of the HA servers in the Ultra
Enterprise Cluster HA configuration is running and which of the HA servers
has failed.
The principal functions of the membership monitor are to make sure the
servers are in sync and to coordinate the configuration of the applications and
services when the configuration state changes.
The membership monitor provides the following features:
•
•
Detection of a server crash within the Ultra Enterprise Cluster HA
configuration
Removal of the failed server from the Ultra Enterprise Cluster HA
configuration using a reliable fail-fast mechanism
While the membership monitor detects total failure of a system in the Ultra
Enterprise Cluster HA configuration, the fault monitor detects failures of
individual services.
The fault monitor consists of a fault daemon and the programs used to probe
various parts of the data service. These probes are executed periodically by the
fault daemon to ensure that services are working. The types of probes include:
•
•
•
•
Probes of both the public and private networks
Probes of both the local and remote NFS service
Probes of both the local and remote Solstice HA data services
Fault probes of the Internet Pro data services
If the probe detects a service failure, the fault monitor attempts to restart the
service. However, if the fault monitor has already tried and failed to restart the
service recently (within about 30 minutes), the fault monitor probe initiates a
takeover by the sibling.
For HA-NFS service, the fault monitor checks the availability of each of the
highly available NFS-shared file systems.
Product Overview
1-11
1
Under certain circumstances the fault monitor will not initiate a takeover even
though there has been an interruption of a service. These interruptions can
include:
•
•
•
The mounted multihost NFS file systems are being checked with fsck(1M).
The NFS file system is locked using lockfs(1M).
The name service is not working. Because client HA-NFS depends on the
name service database (NIS or NIS+), the HA-NFS services are only as
reliable as the name service. The name service exists outside the Ultra
Enterprise Cluster HA configuration so you must ensure its reliability. This
can include use of an uninterruptable power supply (UPS) on the name
service servers. Refer to the service manual for your HA server for
additional information.
Note – Do not change any of the programs or files associated with the fault
monitor daemon or probe. You can, however, change some of the parameters
using Solstice HA commands. See the HA man pages for details.
1.5 Solstice DiskSuite
Solstice DiskSuite 4.1 is a software package that offers a metadisk driver and
several UNIX file system enhancements that provide improved availability.
The metadisk driver is the basic element of the Solstice DiskSuite product. This
driver is implemented as a set of loadable, pseudo device drivers. The
metadisk driver uses other physical device drivers to pass I/O requests to and
from the underlying devices.
An overview of the metadisk driver elements is presented in the following
sections. For a complete discussion, refer to the Solstice DiskSuite 4.1 User’s
Guide.
1.5.1 Metadevices
Metadevices are the basic functional unit of the metadisk driver. After you
create metadevices, you can use them like physical disk slices. These
metadevices can be made up of one or more slices. You can configure the
metadevices to use a single device, a concatenation of stripes, or a stripe of
devices.
1-12
Solstice HA 1.3 User’s Guide—April 1997
1
1.5.2 Metadevice State Database Replicas
Metadevice state database replicas provide the nonvolatile memory necessary
to keep track of configuration and status information for mirrors, submirrors,
concatenations, stripes, UFS logs, and hot spares. The replicas also keep track
of error conditions that have occurred. A majority of metadevice state database
replicas must be preserved in the event a multihost disk expansion unit fails.
The replicas are automatically placed on disks in the disksets by the
metaset(1M) command. Configurations with three or more disk strings have
replicas placed such that if one string fails, there will always be a majority of
replicas left on the other two strings. Configurations with only two disk strings
use mediators on the HA servers to ensure that enough replicas are available in
the event of a single string failure. See Appendix D, “Dual-String Mediators”
for details on mediators.
1.5.3 Disksets
A diskset is a group of disk drives that can move as a unit between HA
servers. An Ultra Enterprise Cluster HA configuration can have one or two
disksets.
Only one host can master a diskset at any point in time. There is one
metadevice state database per diskset. During installation and configuration of
Ultra Enterprise Cluster HA, the hasetup(1M) program creates metadevice
state databases on the local disks. It then repartitions the multihost disks and
populates them with metadevice state database replicas. The number and
placement of the replicas on disks in the disksets is determined automatically
by the metaset(1M) command. The metaset -b command verifies that
replicas are distributed according to the replica layout algorithm. The
command will do nothing if the replicas are distributed correctly. See the
metaset(1M) man page for more information.
1.5.4 Concatenations and Stripes
Each metadevice is either a concatenation or a stripe of slices. Concatenations
and stripes work much the way the cat(1) command is used to concatenate
two or more files together to create one larger file. When slices are
concatenated, the addressing of the component blocks is done on the
components sequentially. The file system can use the entire concatenation.
Product Overview
1-13
1
Striping is similar to concatenation except that the addressing of the
metadevice blocks is interlaced on the components, rather than addressed
sequentially. When stripes are defined, an interlace size can be specified.
1.5.5 Mirrors
All multihost data must be placed on mirrored metadevices. This is necessary
for the server to tolerate single-component failures.
To set up mirroring, you first create a metamirror. A metamirror is a special type
of metadevice made up of one or more other metadevices. Each metadevice
within a metamirror is called a submirror.
1.5.6 Hot Spares
The hot spare facility enables automatic replacement of failed submirror
components, as long as a suitable spare component is available and reserved.
Hot spares are temporary fixes, used until failed components are either
repaired or replaced. Hot spares provide further security from downtime due
to disk-related hardware failures.
1.5.7 UNIX File System Logging
UFS logging records UFS updates in a log before the updates are applied to
disk. UFS logging also speeds up reboots.
UFS logging speeds up reboots by eliminating file system checking at boot
time, because changes from unfinished system calls are discarded. A pseudo
device, called the trans device, manages the contents of the log. Log placement
on multihost disks in Ultra Enterprise Cluster HA configurations is very
important, selecting the wrong location can decrease performance.
When using UFS logs in Ultra Enterprise Cluster HA configurations, follow
these guidelines:
1-14
•
Set up one log per file system. Logs should not be shared between file
systems.
•
If you have heavy writing activity on a file system, use separate disks for
the log and master.
Solstice HA 1.3 User’s Guide—April 1997
1
•
The recommended size for a UFS log is one Mbyte per 100 Mbytes of file
system size (one percent). The maximum useful log size is 64 Mbytes.
1.6 System Files Associated With Solstice HA
Several system files are associated with Solstice HA. You can edit the
vfstab.logicalhost and dfstab.logicalhost files using hafstab(1M). You can
also edit md.tab to create your multihost disk configuration. Do not edit the
other files unless directed to in the Solstice HA documentation or by a
SunService representative.
•
/etc/opt/SUNWmd/md.tab
This file is used by the metainit and metadb commands as an optional
input file. Each metadevice must have a unique entry in the file. You can use
tabs, spaces, comments (using the pound sign (#) character), and line
continuations (using the backslash (\) character) in the file.
Note – The md.tab file is not updated automatically when the configuration is
changed. See Chapter 4, “Installation Planning” for more information about
using the md.tab file for initial configuration of Solstice DiskSuite
metadevices.
•
/etc/opt/SUNWhadf/hadf/vfstab.logicalhost
The vfstab.logicalhost files list the file systems mounted for the logical
hosts. Two instances of this file occur in a symmetric configuration—one for
each logical host. An asymmetric configuration has only one instance of this
file.
•
/etc/opt/SUNWhadf/nfs/dfstab.logicalhost
This file is present only if you are running HA-NFS. Two instances of this
file occur in a symmetric configuration—one for each logical host. An
asymmetric configuration has only one instance of this file.
•
/etc/opt/SUNWhadf/hadf/cmm_confcdb
This file contains configuration information for the membership monitor.
Among other things, it identifies the two hosts of an Ultra Enterprise
Cluster HA configuration, private network connections, and membership
monitor states and transitions.
Product Overview
1-15
1
•
/etc/opt/SUNWhadf/hadf/hadfconfig
This file contains Ultra Enterprise Cluster HA configuration information
and is read by the reconfiguration programs as part of membership
reconfiguration.
•
/etc/opt/SUNWhadf/hadf/license.dat
This file contains the license information for Solstice HA and any licensed
data services running on the system. This can be manually created or copied
from an email message from the License Center.
1.6.1 Solaris and DiskSuite System Files Updated by Solstice HA
In addition to the system files directly associated with Solstice HA, the
following system files might be updated as part of the Solstice HA installation
or configuration.
•
•
•
•
•
•
1-16
/etc/inet/hosts
The names and IP addresses of all physical and logical hosts (including the
private links) are added to this file.
/etc/inet/netmasks
This file associates IP net masks with IP network numbers.
/.rhosts
This file includes entries for the private net interfaces from the sibling host.
/etc/syslog.conf
This file is used to log Solstice HA messages to the console and
/var/adm/messages at the user7 level.
/etc/nsswitch.conf
A special version of this file is used to cause Solstice HA to search files
before querying name services.
/kernel/drv/md.conf
This file is updated to increase the nmd parameter from the default 128 to
600.
Solstice HA 1.3 User’s Guide—April 1997
Planning Overview
2
Configuring and installing Ultra Enterprise Cluster HA involves several steps.
Before you configure and install your system, take time to carefully plan the
entire configuration.
Use the steps and references shown below to help organize your plans. Note
that Appendix C, “Configuration Worksheets” includes worksheets that can
help you plan your configuration.
Follow the steps in the order shown to complete the configuration, installation,
and validation of your Ultra Enterprise Cluster HA configuration.
1. Plan the configuration.
Refer to Chapter 3, “Configuration Planning.”
2. Plan the software installation.
Prepare the HA cluster for the software installation. Refer to Chapter 4,
“Installation Planning.”
3. License the Solstice HA and data services software.
The Solstice HA framework and each data service must be licensed to run in
your configuration. Refer to Chapter 5, “Licensing Solstice HA Software.”
4. Install the software.
Install all required software (Solaris, Solstice HA, and HA data services) on
each HA server. Refer to Chapter 6, “Software Installation.”
2-1
2
5. Configure the HA cluster.
Configure the network links and multihost disks as described in Chapter 7,
“Software Configuration and Validation.”
6. Configure your data services.
This is part of the configuration process described in Step 5. The data service
installation and configuration procedures are described in Part 2 – Installing,
Configuring and Administering Data Services.
7. Verify and validate the cluster configuration.
These steps are part the final steps in the configuration process described in
Chapter 7, “Software Configuration and Validation.”
After you complete these steps, you will have a fully operational Ultra
Enterprise Cluster HA system.
2-2
Solstice HA 1.3 User’s Guide—April 1997
2
Figure 2-1
Configuration, Installation, and Verification Steps
Step 1 – Plan the Configuration
Plan the Ultra Enterprise Cluster HA configuration.
Chapter 3, “Configuration Planning”
Step 2 – Plan the Software Installation
Prepare the Ultra Enterprise Cluster HA configuration for
software installation.
Chapter 4, “Installation Planning”
Step 3 – License the Software
License the Solstice HA and data services software.
Chapter 5, “Licensing Solstice HA Software”
Step 4 – Install the Software
Install the required software on each HA server.
Chapter 6, “Software Installation”
Step 5 – Configure the Cluster
Create the Ultra Enterprise Cluster HA configuration.
Configure the private and public network interfaces and
set up the multihost disks.
Chapter 7, “Software Configuration and Validation”
Step 6 – Install and Configure the Data Services
Install and configure metadevices and logical hosts,
register and activate your data services.
Part 2, Installing, Configuring, and Administering Data Services
Step 7 – Verify and Validate the New Configuration
Verify that the Ultra Enterprise Cluster HA configuration is
set up properly and that it will provide highly available data
services.
Chapter 7, “Software Configuration and Validation”
Planning Overview
2-3
2
2-4
Solstice HA 1.3 User’s Guide—April 1997
3
Configuration Planning
This chapter discusses how to plan the configuration of Ultra Enterprise
Cluster HA.
Configuration Planning Overview
page 3-1
Configuration Rules for Improved Reliability
page 3-16
Configuration Restrictions
page 3-20
3.1 Configuration Planning Overview
Ultra Enterprise Cluster HA configuration involves planning for hardware as
well as software. The hardware planning includes making decisions about
network connections, disk space requirements, disk sizes, and the systems that
will be used. You make decisions about the type of configuration (symmetric or
asymmetric), makeup of the disksets, and file system layout.
This section gives detailed information about each step in the planning
process. The information here might not be useful in every situation. Your
site’s configuration might involve special planning. Refer to Appendix C,
“Configuration Worksheets” for worksheets to help you plan your
configuration.
Become familiar with “Configuration Rules for Improved Reliability” on
page 3-16, and “Configuration Restrictions” on page 3-20, before planning your
configuration.
3-1
3
3.1.1 Type of Configuration
Ultra Enterprise Cluster HA allows configurations to be either symmetric or
asymmetric. In the symmetric configuration, each system masters one of the
two logical hosts and makes one or more data services available from that
logical host. In the event of a failure, the remaining system takes control of
both logical hosts and provides the data service.
In an asymmetric configuration, the data service is run from only one logical
host on only one of the hosts. The second host is a hot standby that is ready to
assume control of the logical host and provide data service in the event of a
failure.
Consider these points when deciding whether to have a symmetric or
asymmetric configuration:
•
In an asymmetric configuration, one host will be idle until the other host
goes down and a failover occurs.
•
An asymmetric configuration is less likely to be overloaded after a
switchover.
•
In a symmetric configuration, both hosts are actively providing data services
until a failure of one of the systems occurs.
•
In a symmetric configuration you can experience overload of a server
following a failover. You must plan and monitor usage to prevent an
overload.
3.1.2 Network Configuration
You must have at least one public network connection to a local area network
and exactly two private network connections between the systems. Refer to
Appendix C, “Configuration Worksheets” for worksheets to help you plan
your network configuration.
By default, the two private networks are assigned the class C network numbers
204.152.64 and 204.152.65.
3-2
Solstice HA 1.3 User’s Guide—April 1997
3
3.1.2.1 Public Network Configuration
Ultra Enterprise Cluster HA uses logical network interfaces to establish a
mapping between several logical host names and a single physical network
interface. This enables one physical interface to respond to multiple logical
host names. The physical interface on the host that currently has the logical
interface configured is the one that services packets destined for that logical
host.
In a symmetric configuration, when each logical host is mastered by its
respective default master host, only one logical host name is associated with a
physical network connection. However, when a takeover occurs, two logical
host names will be associated with one physical network connection.
You must assign a unique host name for each logical host on each public
network. Two logical host names per network are required for symmetric
configurations but only one logical host name per network is required for
asymmetric configurations.
If you add another public network connection, you also must assign a unique
logical host name to that connection for each logical host. This will move to the
sibling during a switchover or takeover.
Multiple public networks can lead to many host names. Thus, it is useful to
adopt a naming convention when you assign the host names for each network.
See “Physical and Logical Host Names” on page 3-5 and “Choosing Host
Names” on page 4-3 for more information on naming.
If it has not already been done, you must also assign IP addresses and host
names for the terminal concentrator and the administration workstation.
3.1.2.2 Private Network Configuration
Ultra Enterprise Cluster HA systems require two private networks for normal
operation. Typically, these networks are implemented with point-to-point
cables between the two systems. Only Ultra Enterprise Cluster HA private
traffic appears on these networks.
Two class C network numbers (204.152.64 and 204.152.65) are reserved
for private network use by the servers. The same network numbers are
typically used by all Ultra Enterprise Cluster HA systems.
Configuration Planning
3-3
3
One way to form the host names used on these networks is to append a suffix
of -priv1 (for 204.152.64) and -priv2 (204.152.65) to the physical host
name. A sample of this is illustrated in the Table 3-1.
Table 3-1
Sample Private Network Naming
IP Address
Host Name
Network Interface
204.152.64.1
phys-hahost1-priv1
hme1
204.152.65.1
phys-hahost1-priv2
hme2
204.152.64.2
phys-hahost2-priv1
hme1
204.152.65.2
phys-hahost2-priv2
hme2
Note – Throughout this guide, the network controller interfaces hme1 and
hme2 are shown for the private links. This can vary depending on your
hardware platform and your public network configuration. The requirement is
that the two private links do not share the same controller and thus cannot be
disrupted by a single point of failure. Refer to the hardware planning and
installation guide for your HA servers for the recommended private network
controller interfaces to use in your configuration.
The hasetup(1M) utility enters these private host names in the
/etc/inet/hosts file of both of the HA servers. It also adds an entry for
each HA server’s sibling host to the /.rhosts file on both HA servers, to
allow communication between the two systems during normal HA operation.
Do not put the private host names in the host table of the network name service
(NIS, NIS+ and DNS) since no hosts other than the two HA servers should be
using these private links.
3-4
Solstice HA 1.3 User’s Guide—April 1997
3
3.1.3 Physical and Logical Host Names
You must select physical host names for the two HA servers and a logical host
name for each of the logical hosts. In an asymmetric configuration, you will
need only one logical host name per public network. Refer to Appendix C,
“Configuration Worksheets” for worksheets to help plan your host names.
Consider these points when selecting physical and logical host names:
•
You must select a logical host name for each logical host. Enter these names
when you create the configuration using hasetup(1M). A symmetric
configuration has two logical hosts; an asymmetric configuration has only
one.
Note – The primary logical host name and the diskset name must be the same.
•
You must select a primary physical host name for each server. This will be
the nodename returned by uname -n.
•
Each server must have two private host names for the Solstice HA software
to communicate across the two private network connections. The
hasetup(1M) command enters the names in the /etc/inet/hosts file,
and also creates /etc/hostname.x and /etc/hostname.y on each server
where x and y are the interfaces (hme1 and hme2, for example).
Note – You are not required to follow any particular naming convention when
setting up host names. However, if you use the following suggested naming
convention for the primary host names, hasetup(1M) will provide
appropriate defaults for your logical host names and private host names as it
sets up your configuration.
A convention for naming each primary physical host is to take the name of the
associated logical host and add the prefix phys-. For example, if your logical
hosts are “hahost1” and “hahost2,” and you select “phys-hahost1” and
“phys-hahost2” as your primary host names, hasetup(1M) will provide
default logical host names “hahost1” and “hahost2” and private host names
“phys-hahost1-priv[1,2]” and “phys-hahost2-priv[1,2]”. For an asymmetrical
configuration with a physical host name “phys-hahost1”, hasetup(1M) would
provide a default logical host name “hahost1”.
Configuration Planning
3-5
3
•
If you use additional public networks, you must create a secondary physical
host name for each server and for each of the logical hosts for each
additional network. For example, if you are setting up a symmetric
configuration with four public networks you will need to assign 20 host
names and IP addresses for the Ultra Enterprise Cluster HA configuration.
This includes two physical host names and two logical host names for each
network, and four host names and IP addresses for the private networks.
3.1.4 Planning Your Multihost Disk Requirements
Determine the amount of data that you want to move to the Ultra Enterprise
Cluster HA configuration. Double that amount to allow disk space for
mirroring. Also consider growth and hot spare capacity. Use the worksheets in
Appendix C, “Configuration Worksheets” to help plan your disk requirements.
Consider these points when planning your disk requirements:
3-6
•
Solstice HA supports two multihost disk expansion units: SPARCstorage
Arrays and SPARCstorage MultiPacks. When you are calculating the
amount of data to migrate to Ultra Enterprise Cluster HA, keep in mind the
sizes of disks available for these disk arrays. The number and sizes of disks
vary with the types and series of SPARCstorage products.
•
Under some circumstances, there might be an advantage to merging several
smaller file systems into a single larger file system. This reduces the number
of file systems to administer and might help speed up takeovers if one of the
hosts fails.
•
The size of the dump media (backup system) might influence the size of the
file systems in Ultra Enterprise Cluster HA configurations.
Solstice HA 1.3 User’s Guide—April 1997
3
3.1.4.1 Planning Your Multihost File System Hierarchy
You are required to have at least one multihost UNIX file system (UFS) per
diskset to serve as the HA administrative file system. Other files systems might
be needed depending on the data services you will be running. These file
systems must be mirrored file systems set up with UFS logging. This will affect
your metadevice configuration.
You must design a hierarchy of mount points for these file systems. These are
entered in the /etc/opt/SUNWhadf/hadf/vfstab.logicalhost file.
Solstice HA conventions require that the HA administrative file system be
created for each logical host and mounted on /logicalhost. The file system size
is a minimum of 10 Mbytes. It is used to store private directories containing
Solstice HA data service configuration information.
Consider these points when planning your multihost file system layout:
•
•
The HA administrative file system cannot be grown using growfs(1M).
•
Your application might dictate a file system hierarchy and naming
convention. Solstice HA imposes no restrictions on file system naming, as
long as names begin with /logicalhost and do not conflict with data-service
required directories such as /logicalhost/statmon for HA-NFS.
You must create mount points (file systems) to other multihost file systems
at the /logicalhost level. The /logicalhost file system is created for you by
hasetup(1M).
3.1.4.2 File System Size and Disk Layout
If you plan to use the Ultra Enterprise Cluster HA configuration for existing
data that is not mirrored, you will need twice the amount of currently used
disk space. If the data is already mirrored, the space required is approximately
equal. The DiskSuite requirement for metadevice state database replicas and
for UNIX file system (UFS) logging is about one to two percent of each of the
multihost disks.
Ideally, you should balance the load on each diskset in a symmetric Ultra
Enterprise Cluster HA configuration. This makes configuration easier and
performance comparable on each system. Balancing the load might not be
possible at every site.
Consider these points when deciding on file system size and disk layout:
Configuration Planning
3-7
3
•
Ideally, the minimum file system size is the usable size of the disk. This
makes general administration and Solstice DiskSuite administration easier
and will allow greater flexibility in meeting space requirements for users.
•
Partitioning all similar disks identically can simplify administration.
Size of Disksets
The following example helps to explain the process for determining the
number of disks to place in each diskset. It assumes that you are using three
SPARCstorage Arrays as your disk expansion units. In this example, existing
applications are running over NFS (two file systems of five Gbytes each) and
two Oracle databases (one five Gbytes and one 10 Gbytes).
Table 3-2
Determining Drives Needed for a Configuration
Use
Data
Disk Storage Needed
Drives Needed
nfs1
5 Gbytes
3x2.1 Gbyte disks * 2 (Mirror)
6
nfs2
5 Gbytes
3x2.1 Gbyte disks * 2 (Mirror)
6
oracle1
5 Gbytes
3x2.1 Gbyte disks * 2 (Mirror)
6
oracle2
10 Gbytes
5x2.1 Gbyte disks * 2 (Mirror)
10
Table 3-2 shows the calculations used to determine the number of drives
needed in the sample configuration. If you have three SPARCstorage Arrays,
you would need 28 drives which would be divided as evenly as possible
among each of the three arrays. Note that the five Gbyte file systems were
given an additional Gbyte of disk space because the number of disks needed
was rounded up.
Table 3-3
3-8
Division of Disksets
Logical host
(diskset)
Data Services
Disks
SPARCstorage
Array 1
SPARCstorage
Array 2
SPARCstorage
Array 3
hahost1
nfs1/oracle1
12
4
4
4
hahost2
nfs2/oracle2
16
5
6
5
Solstice HA 1.3 User’s Guide—April 1997
3
Initially, four disks on each SPARCstorage Array (so a total of 12 disks) are
assigned to “hahost1” and five or six disks on each (a total of 16) are assigned
to “hahost2.” In Figure 3-1, the disk allocation is illustrated. The disks are
labeled with the name of the diskset (1 for “hahost1” and 2 for “hahost2.”)
1
1
2
2
1
2
1
2
2
1
1
1
1
1
1
2
2
2
2
2
2
1
2
2
1
2
2
2
SPARCstorage Array 1
Figure 3-1
SPARCstorage Array 2
SPARCstorage Array 3
Sample Diskset Allocation
No hot spares have been assigned to either diskset. A minimum of one hot
spare per SPARCstorage Array per diskset allows one drive to be hot spared
(restoring full two-way mirroring).
3.1.4.3 Disk Space Growth
Consider growth needs when planning your move of data to the Ultra
Enterprise Cluster HA platform.
Consider these points when planning for disk space growth:
•
It will require less administration time to add disks during initial
configuration than when the system is in service.
•
Leave empty slots in the multihost disk expansion units during initial
configuration. This will allow you to add disks later.
Configuration Planning
3-9
3
•
When your site needs additional disk arrays, you might have to reconfigure
your data to prevent mirroring within a single array chassis. The easiest
way to add disk arrays without reorganizing data is to add them in pairs, if
all the existing disk array chassis are full.
3.1.4.4 Mirroring
All multihost disks must be mirrored in Ultra Enterprise Cluster HA
configurations. This enables the configuration to tolerate single-component
failures.
Consider these points when mirroring multihost disks:
•
Each submirror of a given metamirror must be in a different multihost disk
expansion unit.
•
•
With two-way mirroring, the amount of disk space needed will double.
•
Under Solstice DiskSuite, mirrors are made up of other metadevices such as
concatenations or stripes. Large configurations might contain a large
number of metadevices. For example, seven metadevices are created for
each logging UFS file system.
•
If you mirror metadevices of a different size, your mirror capacity is limited
to the size of the smallest submirror.
Three-way mirroring is supported by Solstice DiskSuite. However, only
two-way mirroring is required for Ultra Enterprise Cluster HA.
For additional information about mirroring, refer to the Solstice DiskSuite 4.1
User’s Guide.
3.1.4.5 Type and Number of Multihost Disk Expansion Units
Solstice HA supports two multihost disk expansion units: SPARCstorage
Arrays and SPARCstorage MultiPacks. You can choose either type of expansion
unit, but your configuration cannot include both types. Note also that some
administrative procedures are different depending on which type of disk
expansion unit you include in your configuration.
3-10
Solstice HA 1.3 User’s Guide—April 1997
3
Regardless of the type of multihost disk expansion unit you choose, you must
have at least two. If you have only two disk expansion units, dual-string
mediators will be configured. If you have more than two disk expansion units,
mediators will not be configured. See Appendix D, “Dual-String Mediators”
for a description of the dual-string mediator feature.
3.1.4.6 Size and Number of Disk Drives
Several sizes of disks are supported in multihost disk expansion units.
Calculate the number of drives needed by dividing the total amount of storage
required by the size of the disks in your disk array.
Consider these points when deciding which size drives to use:
•
If you use lower capacity drives, you can have more spindles, which
increases potential I/O bandwidth, assuming the disks have the same I/O
rates.
•
Using higher capacity disks means fewer devices are required in the
configuration. This can help speed up takeovers, because takeover time can
be partially dependent on the number of drives being taken over.
•
To determine the number of disks needed, divide the total disk capacity that
you have selected (including mirrors) by the disk size.
3.1.4.7 Trans Devices
Trans devices are composed of a logging device and a master device. Under
Ultra Enterprise Cluster HA, both the log and master must be mirrored.
Consider these points when planning for trans devices:
•
Because the log and master devices often perform I/O at the same time,
place them on separate drives to minimize the disk seek activity.
•
Logs should reserve one Mbyte of space for every 100 Mbytes of the trans
master device space, up to a maximum of 64 Mbytes.
Configuration Planning
3-11
3
3.1.4.8 Hot Spares
Solstice DiskSuite’s hot spare facility automatically replaces failed submirror
components, as long as a suitable spare component is available and reserved.
Hot spares are temporary fixes, allowing you to schedule a time when the
systems are less busy to perform maintenance on the failed component.
Consider these points when planning for hot spares:
•
If you use hot spares, the safest and simplest strategy is to create one hot
spare pool per diskset and per multihost disk expansion unit, then assign
each hot spare pool only to devices within the same multihost disk
expansion unit. Hot spares must belong to a specific diskset.
•
•
Hot spares are useful for assuring the availability of critical data.
You can add new disks to an existing diskset at any time, to be used as hot
spares.
For additional information about hot spares, refer to the Solstice DiskSuite 4.1
User’s Guide.
3.1.5 Power Sources and Location for Configurations
You must decide which kind of power sources to use to provide power to the
servers and multihost disk expansion units. You can choose to use an
uninterruptable power supply (UPS). If the power system at your site is
reliable, you might not need to take precautions.
Highest availability will be obtained if the key components of the Ultra
Enterprise Cluster HA system have independent power sources. For this
discussion, independent power sources means that power failure of one source
will not cause power failure in another source. For example, multiple UPS
systems will have independent power failures because they have no critical
component in common. Separate branch circuits are typically not independent
because they share a common main circuit breaker.
You can use multiple UPS systems to protect your system against failures in
any one UPS. If you have lower availability requirements, one UPS might be
satisfactory. If you are unconcerned with power failures, commercial power
might be acceptable.
3-12
Solstice HA 1.3 User’s Guide—April 1997
3
The requirement for ongoing system operation in a partial power failure is that
at least one processor and a majority of the disk drives survive the failure (half
if you are using mediators). This is done most easily by ensuring that power to
each processor is from an independent source, and that power to the multihost
disk expansion units is such that a majority of the drives can survive the
failure of one power source.
Consider these points when deciding the location of your HA servers and disk
expansion units:
•
You can connect the servers (and disk expansion) units to different power
sources.
•
You can separate the servers (and disk expansion units if your hardware
configuration allows) so that both are not located under the same sprinkler
system zone (if you have more than one computer room or more than one
sprinkler zone).
•
You can separate the servers (and disk expansion units if your hardware
configuration allows) into different air conditioning cooling zones (if you
have more than one computer room or more than one cooling zone).
3.1.6 Software on Local Disks
Each of the Ultra Enterprise Cluster HA systems must have the same software
available on the local disks. This includes the Solaris operating environment,
all Solstice HA software, and all Solstice DiskSuite software. Data services
software can reside on either the local disks or the multihost disks.
Consider these points when planning for layout of the local disks:
•
If you have sufficient disk space, you optionally can mirror the local disks.
However, mirroring the local disks might decrease availability because you
are not mirroring across controllers. The mirroring is not absolutely
necessary because the local data is replicated on the local disks of the two
servers in the Ultra Enterprise Cluster HA configuration. See “Configuration
Rules for Improved Reliability” on page 3-16 for a discussion of mirroring
the root disk.
Configuration Planning
3-13
3
•
During installation of the Solaris operating environment, you are instructed
to leave adequate space for three Solstice DiskSuite metadevice state
database replicas. Use Slice 4 of the boot disk for the three replicas. See
Chapter 7, “Software Configuration and Validation” for information about
how hasetup(1M) sets up the metadevice state database replicas.
•
The root slice (/) of the local disk must be large enough to accommodate the
Solaris system components that reside in root along with any components of
any additional software packages that are installed. The root slice must also
have enough inodes for the various files and directories as well as the
device inodes in /devices and symbolic links in /dev. Refer to “Disk
Partitioning Guidelines” on page 6-3 for additional information about the
size of the root slice.
•
Solstice HA Release 1.3 is supported on the Solaris 2.5.1 operating system.
3.1.7 Metadevice Naming and Creation
You must calculate the number of metadevice names needed for your
configuration before setting up the configuration.
To calculate the number of metadevice names needed, determine the largest of
the metadevice names to be used in either diskset. Note that the requirement is
based on the metadevice name value rather than on the actual quantity. For
example, if your metadevice names range from d950 to d1000, DiskSuite will
require one thousand names, not fifty.
If the calculated number needed exceeds 600, you must edit the
/kernel/drv/md.conf file. Refer to Appendix C, “Configuration
Worksheets” for worksheets to help you plan your metadevice configuration.
Changes to the /kernel/drv/md.conf file do not take effect until a
reconfiguration reboot is performed. The md.conf files on each server must be
identical.
Note – The DiskSuite documentation tells you the only modifiable field in the
/kernel/drv/md.conf file is the nmd field. However, you can also modify
the md_nsets field from 4 to 3.
3-14
Solstice HA 1.3 User’s Guide—April 1997
3
Set nmd in /kernel/drv/md.conf to the larger of either diskset. If you
modify md.conf, also set md_nsets to 3 (rather than the default 4, Ultra
Enterprise Cluster HA uses at most 3 disksets: the local set and two multihost
disksets). This will help conserve inodes in the root file system.
These values will be used to help determine the size of your root file system.
See “Disk Partitioning Guidelines” on page 6-3 for guidelines on setting root
file system sizes.
Consider these points when naming and creating metadevices:
•
Read your volume manager documentation for information on
configuration guidelines and considerations for performance, availability,
capacity, security, and compatibility.
•
It is easiest to allow hasetup(1M) to create the initial metadevices for you,
by creating an md.tab file before running hasetup(1M). Alternatively, you
can create metadevices by using either the Solstice DiskSuite commands or
the Solstice DiskSuite Tool graphical user interface, metatool(1M).
3.1.8 Migrating Existing Data
During initial configuration, the hasetup(1M) command optionally will
repartition all drives. All data on the drives will be lost. Thus, you cannot
move data into the Ultra Enterprise Cluster HA configuration by connecting
existing disks that contain data.
You can use ufsdump(1M) and ufsrestore(1M) or other suitable file system
backup products to migrate UNIX file system data to Ultra Enterprise Cluster
HA servers.
When migrating databases to a Solstice HA configuration, use the method
recommended by the database vendor.
3.1.9 Backing Up Multihost Data
Before loading data onto the multihost disks in an Ultra Enterprise Cluster HA
configuration, have a plan for backing up the data. Sun recommends that you
use Solstice Backup or ufsdump to back up your Ultra Enterprise Cluster HA
configuration.
Configuration Planning
3-15
3
If you are converting your backup method from Online: Backup™ to Solstice
Backup™, special considerations exist because the two products are not
compatible. The primary decision for the system administrator is whether or
not the files backed up with Online: Backup will be available on line after
Solstice Backup is in use. Refer to the Solstice Backup 4.1.2 Administration Guide
for additional details about conversion.
Refer to Chapter 18, “Administering Metadevices and Disksets” for additional
information on backing up your multihost data.
3.2 Configuration Rules for Improved Reliability
The rules discussed in this section help ensure that your Ultra Enterprise
Cluster HA configuration is highly available. These rules also help determine
the number of disks and controllers appropriate for your configuration.
3-16
•
The two systems must have identical local hardware. This means that if one
HA server is configured with two FC/S cards, then the sibling HA server
also must have two FC/S cards.
•
•
Multihost disks must be connected identically on the two servers.
•
Two multihost disk expansion units are required to build a highly available
system. This means each of the servers in the configuration must have
enough system boards and Fibre Channel SBus cards (if you are using
SPARCstorage Arrays) installed to support two multihost disk expansion
units.
•
You must have the same number of multihost disk controllers attached to
each system in the Ultra Enterprise Cluster HA configuration. You also must
ensure that the multihost disk controllers are cabled symmetrically.
•
You must have two private networks. Interfaces hme1 and hme2 generally
are used for these private network interfaces. The interface names depend
on the HA server hardware you are using.
The two systems must have identical network interface configurations. This
means the systems must have the same number and type of private and
public network connections. For example, if one node in your configuration
has two SunFastEthernet™ Adapter cards, the sibling systems must have the
same.
Solstice HA 1.3 User’s Guide—April 1997
3
•
Identify “redundant” hardware components on each node and plan their
placement to prevent the loss of both components in the event of a single
hardware failure. An example are the private nets—on the Ex000 system.
The minimum configuration consists of two I/O boards, each supporting
one of the private net connections, similarly for multihost disk connections
(the “redundancy” is not in respect to the multihost data, but the
metadevice state replicas). A localized failure on an I/O board is unlikely to
affect both private net connections, or both multihost disk connections.
This is not always possible, for example, on the Ultra Enterprise 2 Cluster,
there is a single system board, so this hardware configuration consideration
cannot be accommodated in all cases, however some of these concerns can
still be addressed. For example, an Ultra Enterprise 2 Cluster with two
SPARCstorage Arrays use the SBus Quad Ethernet Controller card (SQEC)
with one private net on it and the other connected to the on-board interface.
3.2.1 Mirroring Root
Mirroring root, /usr, /var, /opt, and swap on the local disks is optional.
There are many points to consider when deciding whether to mirror these file
systems.
You should consider the risks, complexity, cost, and service time for the
various alternatives concerning the root disk. There is not one answer for all
configurations. You might want to consider your local SunService
representative's preferred solution when deciding whether to mirror root.
Refer to the DiskSuite 4.1 documentation for instructions on mirroring root.
3.2.1.1 Mirroring Issues
Consider the following issues when deciding whether to mirror the root file
systems.
•
Mirroring root adds complexity to system administration and complicates
booting in single user mode.
•
Regardless of whether or not you mirror root, you also should perform
regular backups of root. Mirroring alone does not protect against
administrative errors; only a backup plan can allow you to restore files
which have been accidentally altered or deleted.
Configuration Planning
3-17
3
•
In failure scenarios in which metadevice state database quorum is lost, you
cannot reboot the system until maintenance is performed.
Refer to the discussion on metadevice state database and state database
replicas in the Solstice DiskSuite 4.1 Reference Guide.
•
Highest availability requires mirroring root on a separate controller and
keeping copies of the metadevice state database on three separate
controllers. This configuration tolerates both disk media and controller
failures. However, this is expensive and smaller hardware configurations
cannot accommodate these requirements.
•
You might regard the sibling server as the “mirror” and allow a takeover to
occur in the event of a local disk drive failure. Later, when the disk is
repaired, you can copy over data from the root disk on the sibling server.
Note, however, that there is nothing in the HA software that guarantees an
immediate takeover. The takeover might, in fact, not occur at all. For
example, presume some sectors of a disk are bad. Presume they are all in the
user data portions of a file that is crucial to some data service. The data
service will start getting I/O errors, but the HA server will stay up.
•
Even if a takeover occurs when the root disk fails, there will be a period of
vulnerability before the system disk is repaired, while only one node
remains in the cluster without a backup. Mirroring root prevents this, and
allows the switchover and repair to be scheduled at a convenient time.
•
Mirroring root prevents the potentially longer period of vulnerability while
the system disk is being replaced and only one node remains in the cluster
without a backup.
•
With a mirrored root, it is possible for the primary root disk to fail and work
to continue on the secondary (mirror) root disk.
At some later point the primary root disk might begin to work (perhaps
after a power cycle or transient I/O errors) and a boot performed using the
primary root disk specified in the OpenBoot PROM boot-device field.
Note that a DiskSuite resync has not occurred—that requires a manual step
when the drive is returned to service.
In this situation there was no manual repair task—the drive simply started
working “well enough” to boot.
3-18
Solstice HA 1.3 User’s Guide—April 1997
3
If there were changes to any files on the secondary (mirror) root device, they
would not be reflected on the primary root device during boot time (causing
a stale submirror). For example, changes to /etc/system would be lost. It
is possible that some DiskSuite administrative command changed
/etc/system while the primary root device was out of service.
Because the boot program never really understands it is booting from a
mirror instead of one of the underlying physical devices, the mirroring
becomes active part way through the boot process (after the metadevices are
loaded). Before this point the system is vulnerable to stale submirror
problems as described above.
3.2.1.2 Mirroring Alternatives
Consider the following alternatives when deciding whether to mirror root file
systems.
•
For highest availability, mirror root on a separate controller with metadevice
state database replicas on three different controllers. This tolerates both disk
and controller failures.
•
To tolerate disk media failures only:
a. mirror the root disk on a second controller and keep a copy of the
metadevice state database on a third disk on one of the controllers, or
b. mirror the root disk on the same controller and keep a copy of the
metadevice state database on a third disk on the same controller.
It is possible to reboot the system before performing maintenance in these
configurations, because a quorum is maintained after a disk media failure.
These configurations do not tolerate controller failures, with the exception
that option ‘a’ above tolerates controller failure of the controller that
contains metadevice state database replicas on a single disk.
If the controller that contains replicas on two disks fails, quorum is lost.
•
Mirroring the root disk on the same controller and storing metadevice state
database replicas on both disks tolerates a disk media failure and prevents
an immediate takeover. However, you cannot reboot the machine until after
maintenance is performed because more than half of the metadevice state
database replicas are not available after the failure.
Configuration Planning
3-19
3
•
Do not mirror the root disk, but perform a manual backup daily of the root
disk (for example, with dd(1) or some other utility) to a second disk which
can be used for booting if the root disk fails. Configure the second disk as an
alternate boot device in the OpenBoot PROM. The vfstab file might need
updating after the dd(1) operation to reflect the different root partition.
Configure additional metadevice state database replicas on slice 4 of the
second disk. In the event of failure of the first disk, these will continue to
point to the multihost disk replicas. Do not copy and restore (via dd(1) or
another utility) the metadevice state database. Rather, let DiskSuite do the
replication.
3.3 Configuration Restrictions
The following are Ultra Enterprise Cluster HA configuration restrictions:
3-20
•
Ultra Enterprise Cluster HA can be used to provide service only for data
services either supplied with Solstice HA or set up using the Solstice HA
data services API.
• Do not configure the Ultra Enterprise Cluster HA servers as mail servers,
because sendmail(1M) is not supported in an Ultra Enterprise Cluster
HA environment. No mail directories should reside on Ultra Enterprise
Cluster HA servers.
• Do not configure Ultra Enterprise Cluster HA systems as routers
(gateways). If the system goes down, the clients cannot find an alternate
router and recover.
• Do not configure Ultra Enterprise Cluster HA systems as NIS or NIS+
servers. Ultra Enterprise Cluster HA servers can be NIS or NIS+ clients.
• An Ultra Enterprise Cluster HA configuration cannot be used to provide a
highly available boot or install service to client systems.
• A Solstice HA configuration cannot be used to provide highly available
rarpd service.
•
Do not run, on either server, any applications that access the HA-NFS file
system locally. For example:
• On Ultra Enterprise Cluster HA systems, users should not access locally
any Solstice HA file systems that are NFS exported. This is because local
locking interferes with the ability to kill(1M) and restart lockd(1M).
Between the kill and the restart, a blocked local process is granted the
lock, which prevents the client machine that owns that lock from
reclaiming it.
Solstice HA 1.3 User’s Guide—April 1997
3
•
Ultra Enterprise Cluster HA does not support the use of the loopback file
system (lofs) on the Ultra Enterprise Cluster HA servers.
•
Do not run, on either server, any processes that run in the real-time
scheduling class.
•
Ultra Enterprise Cluster HA does not support Secure NFS or the use of
Kerberos with NFS. In particular, the 'secure' and 'kerberos' options to
share_nfs(1M) are not supported.
•
The HA administrative file system cannot be grown using the DiskSuite
growfs(1M) command. Refer to “Planning Your Multihost File System
Hierarchy” on page 3-7 for additional information.
•
The network time protocol (NTP) is not supported on Ultra Enterprise
Cluster HA systems.
•
A pair of SPARCcluster HA server nodes must have at least two multihost
disk expansion units.
•
Solstice HA supports at most two logical hosts. Each logical host has exactly
one Solstice DiskSuite diskset.
•
The two machines connected to the shared disks must be symmetric.
Specifically, the shared disks must have the same:
• /dev/rdsk/cntndn name
• driver name, i.e., “ssd”
• major/minor number as displayed by ls -lL /dev/rdsk/cntndnsn.
•
•
File system quotas are not supported.
•
•
HA-NFS requires that all NFS client mounts be “hard” mounts.
•
•
Logical network interfaces are reserved for use by Solstice HA.
Because Ultra Enterprise Cluster HA requires mirroring, the RAID 5 feature
in the Solstice DiskSuite product is not supported.
For HA-NFS, do not use host name aliases for the logical hosts. NFS clients
mounting HA file systems using host name aliases for the logical hosts
might experience statd lock recovery problems.
Sun Prestoserve™ is not supported. Prestoserve works within the host
system, which means that any data contained in the Prestoserve memory
would not be available to the HA sibling in the event of a switchover.
Configuration Planning
3-21
3
•
3-22
The following restrictions apply only to Ultra 2 Series configurations:
• The SPARCcluster HA server must be reinstalled to migrate from one
basic hardware configuration to another. For example, a configuration
with three FC/S cards and one SQEC card must be reinstalled to migrate
to a configuration with two FC/S cards, one SQEC card, and one SFE or
SunFDDI™ card.
• Dual FC/OMs per FC/S card is supported only when used with the SFE
or SunFDDI card.
• In the SFE or SunFDDI 0 card configuration, the recovery mode of a dual
FC/OM FC/S card failure is by a failover, instead of by DiskSuite
mirroring or hot spares.
Solstice HA 1.3 User’s Guide—April 1997
4
Installation Planning
This chapter describes the steps to take before installing the software using
custom JumpStart™ or from CD. When you have completed all of the
procedures described in this chapter, go to Chapter 5, “Licensing Solstice HA
Software” to get your Solstice HA licenses.
Selecting the Cluster Configuration
page 4-1
Planning the Network Connections
page 4-2
Choosing Host Names
page 4-3
Updating Naming Services
page 4-7
Creating the md.tab File
page 4-8
Setting Up the Hardware Configuration
page 4-14
Selecting the Install Method
page 4-17
Setting Up and Configuring the Install Server
page 4-17
This chapter includes the following procedures:
• “How to Set Up the Hardware Configuration” on page 4-14
• “How to Set Up and Configure the Install Server” on page 4-17
4.1 Selecting the Cluster Configuration
The configuration can be either symmetric or asymmetric. Use the guidelines
from the section “Type of Configuration” on page 3-2 to choose your
configuration.
4-1
4
4.2 Planning the Network Connections
When planning the network connections, consider the following:
•
Network controller interfaces hme1 and hme2 typically are used as the
private links. This can vary depending on your hardware platform and your
public network configuration. The requirement is that the two private links
do not share the same controller and thus cannot be disrupted by a single
point of failure.
Note – Throughout this guide, the network controller interfaces hme1 and
hme2 are shown for the private links and hme0 for the primary public network.
Refer to the hardware planning and installation guide for your HA servers for
the recommended private network controller interfaces to use in your
configuration.
•
•
The hme0 interfaces will be used typically for the primary public network.
This can vary depending on your hardware platform and your public
network configuration.
Other available network interfaces may be left either unused or available for
use with secondary public networks.
Note – The Ultra Enterprise Cluster HA servers cannot be used as routers.
Routing is turned off automatically at installation. Users should not change
this default or activate routing on either of the HA servers.
4-2
Solstice HA 1.3 User’s Guide—April 1997
4
Both HA servers must have identical hardware and software configurations.
This includes network controller configurations. In particular, the set of
network interfaces on the second server must be connected to the same set of
subnetworks as the network interfaces on the first server, and a one-to-one
correspondence must exist. For example, if hme0 is connected to subnetwork
192.9.200 on the first server, the second server must also use hme0 for
connecting to 192.9.200.
4.3 Choosing Host Names
Decide on the primary logical host name or names first. If you choose an
asymmetric configuration, there will be only one logical host; otherwise, there
will be two. The primary logical host names are the names by which HA data
service clients on the primary network will address their servers. If you are
replacing existing servers with an Ultra Enterprise Cluster HA configuration,
the logical host names typically will be the same as the original server or
servers that you are replacing.
Solstice HA makes a subtle distinction between the name of a logical host and a
logical host name. A logical host is defined by Solstice HA as the set of all
primary and secondary logical host names, and their network addresses,
associated with a given DiskSuite diskset. A primary logical host name is
defined as the name of a logical host connected to the primary public network
interface. A secondary logical host name is defined as the name of a logical
host connected to a secondary public network interface.
In this release, the name of a logical host always has the same name as the
logical host name assigned to its primary network. The diskset associated with
a logical host is always given the same name as its logical host. By assigning
primary logical host names, you also assign names to the logical hosts and the
DiskSuite disksets.
Two machines (or physical hosts) are required to build an Ultra Enterprise
Cluster HA configuration. Therefore, you must assign two primary physical
host names. By convention, the nodename reported by the uname -n
command is the physical host name.
In a symmetric configuration, each of the two physical hosts acts as a “default
master” for one of the two logical hosts. In an asymmetric configuration, there
is only one default master, because there is only one logical host.
Installation Planning
4-3
4
For new installations, you can streamline the Solstice HA setup process by
using a recommended naming convention for your physical hosts and logical
hosts. The convention is to first decide upon a logical host name and add the
prefix phys- to generate the associated physical host name. For example, if you
decided on the logical host name “hahost1,” you would create a physical host
named “phys-hahost1.” If you use these conventions, hasetup(1M) will:
•
•
•
require less user interaction while configuring your system
•
use the logical host name you selected (“hahost1”) as the default logical host
name associated with “phys-hahost1.”
use the name “phys-hahost1” as the primary physical host name
supply default names for the private network connections between HA
servers (“phys-hahost1-priv1,” for example)
See Figure 4-1 for an example of a configuration using these conventions. If
you are using physical hosts that already have names, you will not be able to
take advantage of this hasetup(1M)feature.
In an asymmetric configuration, one of the physical hosts will act only as a
“hot standby” and will not serve in a “default master” role, yet the “hot
standby” can be named “phys-hahost2,” for consistency.
If the Ultra Enterprise Cluster HA servers are to be connected to any secondary
networks, decide on logical and physical host names for these secondary
subnetworks at this time. The convention described above for deriving the host
names of default masters also can be extended to naming physical hosts on the
secondary networks.
There must be one complete set of logical and physical host names for each
secondary network. Each set must be a reflection of the primary set. For
example, if an asymmetric configuration is described by a set of three primary
host names, each additional set of secondary host names must describe the
same asymmetric configuration, using the same physical host for the default
master on each network.
Note – Each individual set of secondary logical and physical host names must
be connected to the same secondary network. The network IP addresses for
each set must reflect this fact. Each physical node can be connected to the same
subnet only once.
4-4
Solstice HA 1.3 User’s Guide—April 1997
4
In Figure 4-1, the last octet of the network number (201) is appended to the
logical host name to distinguish it from the other logical host name. You can
also use the Ethernet interface name, such as hme3, as a naming suffix.
Administration
Workstation
ttya
le0
Secondary Public Network (192.9.201)
Primary Public Network (192.9.200)
phys-hahost1-201
(hme3)
phys-hahost2
(hme0)
phys-hahost1
(hme0)
Logical interface names:
hahost1
hahost1-201
Terminal
Concentrator
ttya
ttya
Private interface names:
phys-hahost1-priv1
phys-hahost1-priv2
phys-hahost2-201
(hme3)
Logical interface names:
hahost2
hahost2-201
Private interface names:
(hme1)
Private Network
(204.152.64)
(hme1)
(hme2)
Private Network
(204.152.65)
(hme2)
Physical host names:
phys-hahost1
phys-hahost1-201
Figure 4-1
phys-hahost2-priv1
phys-hahost2-priv2
Physical host names:
phys-hahost2
phys-hahost2-201
Host Names of Logical Network Interfaces
Installation Planning
4-5
4
The following samples show the information for the primary and secondary
public networks for the configuration shown in Figure 4-1. Use the worksheets
in Appendix C, “Configuration Worksheets” to plan your host naming setup.
Table 4-1
Primary Network Naming
Primary Network Name
primary-net1
Primary Network Number
192.9.200
Physical Host Name
phys-hahost1
phys-hahost2
Physical Host Name IP Address
192.9.200.100
192.9.200.101
Logical Host Name
hahost1
hahost2
Logical Host Name IP Address
192.9.200.110
192.9.200.111
Network Interface
hme0
hme0
A logical host name on the primary network is used as the name of the logical
host associated with specific data services and as the name of the diskset
containing the data.
Table 4-2
Secondary Network Naming
Secondary Network Name
secondary-net2
Secondary Network Number
192.9.201
Physical Host Name
phys-hahost1-201
phys-hahost2-201
Physical Host Name IP Address
192.9.201.100
192.9.201.101
Logical Host Name
hahost1-201
hahost2-201
Logical Host Name IP Address
192.9.201.110
192.9.201.111
Network Interface
hme3
hme3
You can use the information in the worksheets in Table 4-1 and Table 4-2 to
make entries in the /etc/inet/networks, /etc/inet/hosts, and
/etc/inet/netmasks files as well as the corresponding name services tables
and maps. You also can use this information when configuring your Ultra
Enterprise Cluster HA systems with the hasetup(1M) command.
4-6
Solstice HA 1.3 User’s Guide—April 1997
4
4.3.1 Private Link Names
You do not need to decide on the four names assigned to the two private links.
The hasetup(1m) command will use physicalhostname-priv1 and
physicalhostname-priv2 as defaults.
Two class C network numbers, 204.152.64 and 204.152.65, have been
assigned by the Network Information Control Center (NIC) for private use by
the Solstice HA product. By default, hasetup(1M) uses these network
numbers for the “priv1” and “priv2” private nets. These unique class C
network numbers are only known within each server.
4.4 Updating Naming Services
If a host naming service, such as NIS, NIS+, or DNS is used at your site, update
the naming service with all logical and physical host names used in the Ultra
Enterprise Cluster HA configuration now, or manually add primary physical
host names to /etc/inet/hosts on both physical hosts before running
hasetup(1M).
If no naming service is used or not all host entries are added to the naming
service tables, hasetup(1m) will prompt you for the network addresses of
unrecognized host names (except for the primary physical host names) and
will update /etc/inet/hosts with the new information.
Note – Do not include private link names and their associated network
addresses in naming service tables.
When you run the hasetup(1M) command as part of the Solstice HA
installation (see Chapter 7, “Software Configuration and Validation”), the
/etc/nsswitch.conf file on each of the Ultra Enterprise Cluster HA servers
will be overwritten. The new /etc/nsswitch.conf file will be copied from
the /etc/opt/SUNWhadf/hadf directory. For instance, if you are using NIS+
and DNS, the nsswitch.conf file is overwritten with the
nsswitch.files.nisplus_dns from that directory.
Installation Planning
4-7
4
!
Caution – Running nisclient -i on an installed HA server overwrites the
/etc/nsswitch.conf file installed during your HA installation. The result is
slow system boot, slow step transitions during HA reconfigurations, and
possibly other problems when NIS+ service is unavailable.
The nsswitch.conf file installed by HA checks “files” followed by “nisplus,”
for example,
hosts:
files nisplus
However, after nisclient -i successfully completes, the standard
nisswitch.conf file is reinstated, for example,
hosts:
nisplus [NOTFOUND=return] files
If this problem is detected, copy either nsswitch.files_nisplus or
nsswitch.files_nisplus_dns from /etc/opt/SUNWhadf/hadf to
/etc/nsswitch.conf.
4.5 Creating the md.tab File
Use the guidelines described in this section along with those in Chapter 3,
“Configuration Planning” to decide on the metadevice configuration. Then,
create your md.tab file as described in this section. Refer to the Solstice
DiskSuite 4.1 User’s Guide for additional details on creating md.tab. Copy this
file to each of the HA servers after installing the Solstice HA and DiskSuite
software and before running hasetup(1M).
We suggest that you create the md.tab file as you plan and design your
metadevice configuration. The hasetup(1M) utility is designed to take
advantage of your preconfigured md.tab file. With an existing md.tab file,
hasetup(1M) can:
•
•
•
•
4-8
Perform a limited sanity check of md.tab before committing
Create and populate disksets based on md.tab
Use newfs(1M) to generate file systems and vfstab files based on
metatrans devices created from md.tab
Generate dfstab files based on vfstab (HA-NFS only)
Solstice HA 1.3 User’s Guide—April 1997
4
Note – In an asymmetric configuration, only one diskset can be defined for use
by Solstice HA. All multihost disks are assigned to that single diskset. In a
symmetric configuration, all multihost disks must be allocated into one of two
disksets.
4.5.1 md.tab Creation Guidelines
Follow these guidelines when setting up your disk configuration and the
associated md.tab file.
• If more than two disk strings are used, each diskset must include disks from
at least three separate controllers. If only two disk strings are used, each
diskset must include disks from the two controllers and mediators will be
configured. See Appendix D, “Dual-String Mediators” for more information
on mediators.
• For a symmetric configuration, the md.tab file describes exactly two
disksets.
• For an asymmetric configuration, the md.tab file describes exactly one
diskset.
• A multihost disk, and all the partitions found on that disk, can be included
in no more than one diskset.
• Each diskset name must match the name of the logical host to which it is
assigned.
• All metadevices used by data services must be fully mirrored. Two-way
mirrors are recommended, but three-way mirrors are acceptable.
• No components of a submirror for a given metamirror should be found on
the same controller as any other component in any other submirror used to
define that metamirror.
• Hot spares are recommended, but not required. If hot spares are used,
configure them so that the activation of any hot spare drive will not result in
components of a submirror for a given metamirror sharing the same
controller with any other component in any other submirror used to define
that given metamirror.
• Create multihost file systems on metatrans devices only. Both the logging
and master device components of each metatrans device must be mirrored.
• In consideration of performance, do not share spindles between logging and
master devices of the same metatrans, unless the devices are striped across
multiple drives.
Installation Planning
4-9
4
•
If hasetup(1M) is used to partition the multihost drives, partitioning will
occur on the majority of drives as follows:
Table 4-3
Multihost Disk Partitioning for Most Drives
Slice
Description
7
2 Mbytes, reserved for DiskSuite
6
UFS logs
0
remainder of the disk
2
overlaps slice 6 and 0
If UFS logs are created, the default size for slice 6 is 1% of the size of the
largest multihost disk found on the system.
Note – The overlap of slices 6 and 0 by slice 2 is used for raw devices where
there are no UFS logs.
In addition, the first drive on each of the first two controllers in each of the
disksets is partitioned as follows:
Table 4-4
4-10
Multihost Disk Partitioning for the First Drive on the First Two Controllers
Slice
Description
7
2 Mbytes, reserved for DiskSuite
5
2 Mbytes, UFS log for HA administrative file systems (see below)
4
9 Mbytes, UFS master for HA administrative file systems
6
UFS logs
0
remainder of the disk
2
overlaps slice 6 and 0
•
Each diskset has a small “HA administrative file system” associated with it.
This file system is not NFS shared. It is used for data service specific state or
configuration information, and is mounted on /logicalhostname.
•
Do not include the metadevice definitions for the HA administrative file
system in your md.tab file, if you plan to use md.tab as input to
hasetup(1M).
Solstice HA 1.3 User’s Guide—April 1997
4
If you do not want to use this partitioning scheme, you can bypass the portion
of hasetup(1M) that partitions disks. In this case, you will have to partition
the disks, create the disksets, the dfstab and vfstab files, and the HA
administrative file system manually. These procedures are described in
Chapter 7, “Software Configuration and Validation.”
Partition 7 must always be reserved for use by DiskSuite as the first 2 Mbytes
on each multihost disk.
4.5.2 Sample md.tab File
The ordering of lines in the md.tab file is not important, but construct your
file in a “top down” fashion described below. The following sample defines the
metadevices for the diskset named “hahost1.”
A sample md.tab file appears as follows. Note that the # character can be used
to annotate the file.
# Example md.tab file
hahost1/d10 -t hahost1/d11 hahost1/d14
hahost1/d11 -m hahost1/d12 hahost1/d13
hahost1/d12 1 2 c1t0d0s0 c1t0d1s0
hahost1/d13 1 2 c2t0d0s0 c2t0d1s0
hahost1/d14 -m hahost1/d15 hahost1/d16
hahost1/d15 1 1 c1t1d0s6
hahost1/d16 1 1 c2t1d0s6
The first line defines the trans device d10 to consist of a master (UFS)
metadevice d11 and a log device d14. The -t signifies this is a trans device;
the master and log devices are implied by their position after the -t flag.
hahost1/d10 -t hahost1/d11 hahost1/d14
The second line defines the master device as a mirror of the metadevices. The
-m in this definition signifies a mirror device.
hahost1/d11 -m hahost1/d12 hahost1/d13
Installation Planning
4-11
4
The fifth line similarly defines the log device.
hahost1/d14 -m hahost1/d15 hahost1/d16
The third line defines the first submirror of the master device as a two way
stripe on two disks. Note that the usual /dev/dsk or /dev/rdsk prefix can be
omitted in the md.tab file.
hahost1/d12 1 2 c1t0d0s0 c1t0d1s0
The next line defines the other master submirror.
hahost1/d13 1 2 c2t0d0s0 c2t0d1s0
Finally, the log device submirrors are defined. In this example, simple
metadevices for each submirror are created. No stripes or concatenations are
used.
hahost1/d15 1 1 c1t1d0s6
hahost1/d16 1 1 c2t1d0s6
4-12
Solstice HA 1.3 User’s Guide—April 1997
4
If hasetup(1M) is used to partition the multihost disks, it also creates the
“HA administrative file systems,” as described in “md.tab Creation
Guidelines” on page 4-9. As part of the hasetup(1M) process, the metadevices
used for the HA administrative file systems are displayed. The display appears
similar to the following:
#
#
#
#
#
#
#
#
#
#
#
The following metadevices were added by hasetup:
hahost1/d100 1 1 c1t0d0s5
hahost1/d101 1 1 c2t0d0s5
hahost1/d102 1 1 c1t0d0s4
hahost1/d103 1 1 c2t0d0s4
hahost1/d104 -m hahost1/d100 hahost1/d101
hahost1/d105 -m hahost1/d102 hahost1/d103
hahost1/d0 -t hahost1/d105 hahost1/d104
You can preserve this information by adding these lines from the
hasetup(1M) output to the comments section of md.tab for each diskset.
This information also is stored in the file
/etc/opt/SUNWmd/md.tab.hasetup_commands.
Once the md.tab file is set up, your metadevices can be automatically set up
and configured with file systems by running hasetup(1M) as described in
Chapter 7, “Software Configuration and Validation.”
If you have existing data on the disks that will be used for the submirrors, you
must back up the data before metadevice setup and restore it onto the mirror.
Installation Planning
4-13
4
4.6 Setting Up the Hardware Configuration
Use the hardware planning and installation guide for your HA servers to set
up your hardware configuration.
▼ How to Set Up the Hardware Configuration
1. Install the private links, the public network connections, all local and
multihost disks, the terminal concentrator, and any optional hardware.
2. Log in to both consoles from telnet(1) windows.
See Chapter 16, “Administering the Terminal Concentrator” for instructions.
3. Power on both HA servers, but do not boot all the way up.
If either system starts to boot past the OpenBoot PROM, press Ctrl-] to get
to the telnet(1) prompt and then send a break to the console.
telnet> send brk
4. If you are using SPARCstorage MultiPacks as your multihost storage
devices, skip this step. Otherwise, use the following command to reset the
OpenBoot PROM values to a known state.
ok set-defaults
Setting NVRAM parameters to default values.
Note – If you are using MultiPack storage devices, you should have set the
multi-initiator-scsi value in the OpenBoot™ PROM during the
hardware installation. Refer to your hardware installation documentation for
this procedure.
4-14
Solstice HA 1.3 User’s Guide—April 1997
4
5. Run the following commands to set the variables from the OpenBoot
PROM. Use the OpenBoot printenv command to check the values.
ok setenv watchdog-reboot? true
watchdog-reboot?= true
ok printenv
Parameter Name
Value
...
sbus-probe-list1
0123
sbus-probe-list0
0123
fcode-debug?
false
auto-reboot?
true
watchdog-reboot?
true
...
Default Value
0123
0123
false
true
false
6. If you will be booting or installing your system from the network, you
might need to set up an alias for the primary public network interface
using the OpenBoot PROM.
You will use the primary public network interface to boot the HA servers
and install the software from the install server. Use the information gathered
in Chapter 3, “Configuration Planning” to identify the primary public
network interface. Your primary public network interface is determined by
your particular hardware configuration.
If the “net” device alias is already assigned to the primary public network
interface, there is no reason to establish a new devalias for this device. You
can determine this by running the devalias command from the OpenBoot
PROM. If the “net” device alias matches the primary public network
interface, skip Step b and Step c below.
In the following example, we assume an Ultra 2 system where the “net”
alias does not correspond to the primary public network interface qe1, and
we choose the meaningful name netqe1.
The physical device associated with qe1 is a long path similar to:
/sbus@1f,0/qec@2,20000/qe@1,0.
By assigning a device alias for the qe1 interface, you can specify this path
for the boot command with a single word.
Installation Planning
4-15
4
On each HA server, do the following:
a. If you are not already at the OpenBoot PROM prompt, press Ctrl-] to
get to the telnet(1) prompt and type the following command or halt
the system.
telnet> send brk
b. Identify the device associated with the qe1 interface:
ok show-devs
c. Identify the device path by locating the line ending with /qe@1,0,
where @1 indicates port 1 (qe1). Set the netqe1 alias to the correct
network device.
ok nvalias netqe1 net_device
7. Verify the hardware configuration.
If your configuration includes SPARCstorage Arrays, boot each server in
single-user mode and run ssaadm(1M)to verify that the HA server
controllers and cables are configured identically.
ok boot netqe1 -s
or
ok boot cdrom -s
...
# ssaadm display controller
4-16
Solstice HA 1.3 User’s Guide—April 1997
4
4.7 Selecting the Install Method
You can install Solstice HA either from local CD-ROM or by using JumpStart
features from a network install server. If you are installing several Ultra
Enterprise Cluster HA configurations, consider a network install. Otherwise,
use the local CD-ROM. If you are using CD-ROM, skip the following steps and
go directly to Chapter 5, “Licensing Solstice HA Software.”
Note – Configurations using FDDI as the primary public network cannot be
network-installed directly using JumpStart, because the FDDI drivers are
unbundled and are not available in “mini-unix.” If you use FDDI as the
primary public network, use the CD installation method described in “How to
Install From CD-ROM” on page 6-6.
4.8 Setting Up and Configuring the Install Server
This section assumes that you are already familiar with the network
installation instructions found in the Advanced Installation Guide book.
Note – The install servers for Solstice HA must be running Solaris 2.4, Solaris
2.5, or Solaris 2.5.1.
▼ How to Set Up and Configure the Install Server
These are the high-level steps to set up and configure the install server:
•
•
•
•
•
Set up the install server.
Set up the JumpStart configuration directory on the install server and make
it an HA install server.
Specify the HA servers as install clients.
Update the client rules file and other system information.
Make optional customizations.
Installation Planning
4-17
4
These are the detailed steps to set up and configure the install server. Steps 1,
2, and 3 are necessary only if you are setting up an install server for the first
time. Refer to the instructions in the Advanced Installation Guide book that was
shipped with your Solstice HA system.
1. Set up an install server and copy the Solaris 2.5.1 software into the
installation directory using setup_install_server(1M).
Use the instructions in Advanced Installation Guide to:
• Set up a separate boot server if your install server and the HA servers are
on separate subnets.
• NFS share the new Solaris 2.5.1 image created by
setup_install_server(1M).
2. Set up the JumpStart configuration directory on the install server.
The JumpStart configuration directory instructions ask you to copy several
files from a template directory to the install server. However, the only file
required by Solstice HA is the check utility.
Note – The host chosen to act as the Solstice HA install server for any given
pair of HA servers must be the same host as its Solaris install server.
3. Set up the install server to act as a Solstice HA install server, as follows:
a. Mount the CD-ROM on a local directory.
The Volume Manager (vold) must be running on your machine. The CDROM is mounted automatically under /cdrom/solstice_ha_1_3
when it is loaded in the drive.
b. Copy the necessary Solstice HA-related software onto the install server.
Insert the Solstice HA 1.3 CD in the CD-ROM drive on the install server
and type the following commands:
# cd /
# /cdrom/solstice_ha_1_3/hainstall -a HA_install_dir
4-18
Solstice HA 1.3 User’s Guide—April 1997
4
In this command, HA_install_dir is the HA install directory on the install
server. If it does not exist, hainstall(1M) will create it. This command
will store the DiskSuite and Solstice HA software into
HA_install_dir/disksuite_4_1 and HA_install_dir/solstice_ha_1_3.
As hainstall -a runs, you are asked to mount the DiskSuite and the
HA CDs, as needed.
c. NFS share HA_install_dir on the install server.
Note – HA_install_dir must be a UFS file system on a local disk. An NFS
mounted file system cannot be used for this purpose.
4. Specify the HA servers as install clients.
On the install server, type:
# cd Sol_install_dir/Solaris2.5.1
# ./add_install_client -c install_server:/jmp_dir server arch
where Sol_install_dir is the Solaris installation directory, install_server is your
install server, jmp_dir is the JumpStart directory, and server is the physical
host name of one of your HA servers. Execute this command once for each
HA server. See the man page for add_install_client(1M) for details on
its use.
Installation Planning
4-19
4
5. Update the client rules file and other system information.
The rules file is described in Advanced Installation Guide. Update it by typing
the command:
# HA_install_dir/solstice_ha_1_3/hainstall -c -h \
phys-hahost1,phys-hahost2 jmp_dir
Specify your HA servers in place of phys-hahost1 and phys-hahost2. Note that
the jmp_dir is the directory created previously in Step 2.
Note – This form of the hainstall(1M) command should always be run from
the install directory on the install server and never from the CD itself.
This form of the hainstall(1M) command makes the necessary edits to
the rules file for the two HA servers. It also generates a custom JumpStart
class file and finish script for the 1.3 release, if they are not found. In
addition, it creates a special setup directory for each host in
jmp_dir/autohainstall.d/hosts/phys-hostname.
Note – You can edit the JumpStart class file provided with Solstice HA 1.3, as
long as these edits result in a Solaris install which continues to conform to the
guidelines set forth for installing Solaris 2.5.1 on a Solstice HA 1.3 server.
You must not edit the finish script, however. If hainstall(1M) detects that
the Solstice HA finish script has been edited, it will overwrite the corrupted file
with the original version.
6. (Optional) Customize the default class file if you want to change the
software profile or the disk partitioning used when Solaris is installed
from the install server.
The profile file, autohainstall.class, is a standard ASCII file that you
can edit with your favorite editor. It is located in a configuration directory
under the JumpStart directory on the install server:
jmp_dir/autohainstall.d/solstice_ha_1_3. Use the guidelines from
“Installation Guidelines” on page 6-2 to determine your space requirements
and edit the profile file appropriately.
4-20
Solstice HA 1.3 User’s Guide—April 1997
4
Note – If you are installing Solstice HA-DBMS for ORACLE7, add the Solaris
package names needed by Oracle into autohainstall.class so that they
can be automatically installed on the HA servers by JumpStart. See the Oracle7
Installation Guide for Sun SPARC Solaris 2.x for a list of packages that need to be
installed.
7. (Optional) Copy the md.tab file for the two HA servers into the
jmp_dir/autohainstall.d/hosts/phys-hostname directory for each HA
server.
Both HA servers should have identical md.tab files.
8. (Optional) Copy the license.dat file for the two HA servers into the
jmp_dir/autohainstall.d/hosts/phys-hostname directory for each HA
server.
See Chapter 5, “Licensing Solstice HA Software” for details on licensing and
the license.dat file.
9. (Optional) Customize the default environment for root on the HA servers.
You must set up certain paths and environment variables on the HA servers.
You also might have environment settings in your .profile or .login
files that you want as the default when you log into the HA servers. Both of
these can be addressed by placing a copy of your preferred .profile or
.login file into an archive directory on the install server. Then, your root
profile file will be installed automatically in the root directory of each HA
server as part of the JumpStart installation.
Refer to “Post-Installation Procedures” on page 6-8 for details about the
required path and environment variables to put into your .profile or
.login file. Once you have set up the file, create the archive directories for
each HA server on the install server and copy your file to the new directory.
# mkdir jmp_dir/autohainstall.d/hosts/phys-hostname/archive
# cp /my_.profile jmp_dir/archive/.profile
Note that jmp_dir is the JumpStart directory that you previously created on
the install server by running hainstall -c, and my_.profile is your profile
file set up with the required paths and environment variables. You can alter
the command to point to the appropriate profile file.
Installation Planning
4-21
4
!
Caution – If you configure csh as the root shell on the HA cluster nodes, then
do not put commands into the /.cshrc file that might produce output to
stdout or stderr, or that assume stdin or stdout to be a tty. In particular,
do not invoke stty(1). Such commands in the /.cshrc file will cause errors
when rsh(1) is invoked—and rsh(1) is used extensively by Solstice HA.
This completes the installation setup. Now go to Chapter 5, “Licensing Solstice
HA Software” to install your HA server licenses.
4-22
Solstice HA 1.3 User’s Guide—April 1997
5
Licensing Solstice HA Software
The Solstice HA product uses node-lock licensing to ensure that the software is
run only on licensed HA servers. Each HA server requires its own license. In
addition, you need licenses for HA-DBMS and HA Internet Pro data service
you will run on the Solstice HA configuration. This chapter describes the steps
to set up your HA licenses.
Licensing Overview
page 5-2
Gathering Information for Your License
page 5-2
Contacting the Sun License Center
page 5-4
Receiving Your License
page 5-4
Installing Your License
page 5-5
This chapter includes the following procedures:
• “How to Gather the Licensing Information” on page 5-3
• “How to Install Your License From an Email File” on page 5-6
• “How to Install Your License Using the halicense(1M) Program” on
page 5-7
Solstice HA release 1.3 licensing is required by hasetup(1M)and hareg(1M).
You cannot register data services without the appropriate licenses. Future
upgrades, patches, and releases might include additional license enforcement.
5-1
5
5.1 Licensing Overview
Complete these steps to set up licenses for your Solstice HA servers:
1. Gather product and host information required by the Sun License Center.
See “Gathering Information for Your License” on page 5-2.
2. Contact the License Center and supply them with the product and host
information.
See “Contacting the Sun License Center” on page 5-4.
3. Receive the license passwords from the License Center.
See “Receiving Your License” on page 5-4.
4. Install the license information on either the install server or the
individual HA servers.
See “Installing Your License” on page 5-5.
If you are installing the Solstice HA software from an install server,
complete the licensing procedure and install the license file on the install
server prior to installing any software on the HA servers.
If you are installing Solstice HA from a CD, complete the licensing
procedure after installing all software on the HA servers, but before running
hasetup(1M) to configure the HA environment. The hasetup(1M) utility
verifies the license information before allowing you to run Solstice HA.
5.2 Gathering Information for Your License
Before you contact the Sun License Center to get your password, use the
procedure below to obtain the following information:
•
•
•
•
•
Product Name
Product Version
Host Names of your two Solstice HA servers
Host IDs of your two Solstice HA servers
Serial Numbers from the two license certificates that you received
You must acquire license for the data service products you plan to run on the
Solstice HA servers. The framework license includes HA-NFS. You need one
license for each HA-DBMS data service and one license for all the HA Internet
Pro data services.
5-2
Solstice HA 1.3 User’s Guide—April 1997
5
▼ How to Gather the Licensing Information
1. Locate the product name, product version, and serial number from the
Solstice HA license certificates received with your Solstice HA software.
Your license certificate should look similar to the following:
Product Name:
Version:
Rights to Use:
Serial Number:
Solstice HA
1.3
0
1234 5678 9876 5432
2. If the HA servers are already installed, run the showrev(1M) command
on both servers to identify the host names and host IDs.
# showrev
Hostname: phys-hahost1
Hostid:72767be1
Release: 5.5.1
Kernel architecture: sun4u
Application architecture: sparc
Hardware provider: Sun_Microsystems
Domain: XYZ.DIV.Company.com
Kernel version: SunOS 5.5.1 Generic August 1996
Note – Do not run showrev(1M) on the install server.
3. If the HA servers are not installed, run the banner command from the
OpenBoot prompt to identify the host IDs.
This information is also included with your Customer Information Sheet
shipped with your HA server, if this is a new system.
Licensing Solstice HA Software
5-3
5
5.3 Contacting the Sun License Center
Contact the Sun License Center by email, phone, or fax. The most current
contact numbers are listed in the Solstice HA 1.3 New Product Information
document, or on the License Center web page
(http://www.sun.com/licensing/).
•
Email – Complete the License Request Form and send it to the appropriate
License Center. The template is an ASCII file that you can edit using your
preferred editor.
The template is located on the Solstice HA 1.3 CD. Copy it from the CD to
your host and edit it with your editor. Follow these steps to do so:
1. Load the Solstice HA 1.3 CD into the CD-ROM drive.
2. Change directory to the Solstice HA 1.3 license directory:
# cd /cdrom/solstice_ha_1_3/halicense.d
3. Copy the template to your host machine for editing.
# cp halicense.req.form temp_location
4. Fill out the template and email it to the appropriate License Center.
Note – If you receive your license by email, you can copy the email file directly
to the correct license file location on the install server or the HA servers.
•
•
Fax – Fill out the License Request Form supplied with the HA product and
fax it to the appropriate License Center.
Phone – Call the appropriate License Center. Have ready the information
described in “Gathering Information for Your License” on page 5-2.
5.4 Receiving Your License
After you have contacted the Sun License Center, you will receive one of the
following:
•
5-4
Email – You will receive a file containing your licenses. See “Installing Your
License From an Email File” on page 5-6 for more information.
Solstice HA 1.3 User’s Guide—April 1997
5
•
Fax or Phone – You will receive the following information:
• Host ID checksum
• Password
• Password checksum
To ensure accurate phone communication between you and the License
Center, start the HA license program halicense(1M) before calling the
License Center. The program allows you to confirm the communication of
the server host ID and password using a checksum.
The License Center will provide you with a data checksum for the host ID
you supply and a password checksum for the password that it supplies. The
halicense(1M) program asks you for the host ID and the password. It
generates checksums to compare with those supplied by the License Center.
If the checksums do not match, reconfirm the information with the License
Center before proceeding, because the license will not work. See the
halicense(1M) man page and “Installing Your License From Fax or
Phone” on page 5-7 for details about running halicense.
5.5 Installing Your License
There are three ways to receive a license so that you can install your Solstice
HA product. They are:
•
•
•
Email – Follow the instructions in “Installing Your License From an Email
File” on page 5-6.
Fax – Follow the instructions in “Installing Your License From Fax or
Phone” on page 5-7.
Phone – Follow the instructions in “Installing Your License From Fax or
Phone” on page 5-7.
We strongly recommend using email to receive your information for your
licenses. It is the least error prone way to receive and install your licenses.
Note – You must be superuser to install the license.
Licensing Solstice HA Software
5-5
5
5.5.1 Installing Your License From an Email File
If you receive your license by email, you can avoid mistyped information in
your license file by saving the email message directly into the correct license
file.
Note – Modify the email file that is mailed to you to resemble the file shown in
Step 9 of “How to Install Your License Using the halicense(1M) Program” on
page 5-7.
▼
How to Install Your License From an Email File
♦ Save to a file the email messages that you received from the Sun License
Center.
You will receive one email message for each HA server, and one email for
each data service for each server. Save all messages into a single file.
If you are installing the Solstice HA software from an install server, then on
the install server, save the license file to
jmp_dir/autohainstall.d/hosts/hostname/license.dat where
jmp_dir is the JumpStart directory created when you set up the install server
to install Solstice HA and hostname is the physical host name of each HA
server. Once the license file is set up on the install server, the licenses will be
installed automatically on the HA servers when the Solstice HA software is
installed.
If you are installing the Solstice HA software from CD, the installation
process creates the directory on each server into which you place the license
information. After installing the Solstice HA software, save the concatenated
email file to: /etc/opt/SUNWhadf/hadf/license.dat on each HA
server.
5-6
Solstice HA 1.3 User’s Guide—April 1997
5
Note – You will receive at least two license files, one for each HA server. Each
license file contains a single license, so if you are running two data services,
you will receive a total of six license files. The license file does not indicate the
HA server by name. Verify the host ID of the HA server against the host ID
field (the last field) of the license entry in the license file to make sure that you
are installing the correct license file. To simplify the process, you can also
append the second license file to the first license file and then copy the
combined license file to the proper location on both of the HA servers. See
“Installing Your License From Fax or Phone” on page 5-7 for a sample
concatenated license file.
5.5.2 Installing Your License From Fax or Phone
If you receive your license by fax or phone, install it using the
halicense(1M) program.
▼
How to Install Your License Using the halicense(1M) Program
These are the high-level steps to install your license using halicense(1M):
•
•
•
•
•
•
Start the halicense(1M) program.
Provide a location for the license file.
Provide the physical host names for both HA servers.
Verify the host ID checksum on both HA servers.
Verify the license password checksum on both HA servers.
Verify the license files and copy them to another location, if necessary.
Licensing Solstice HA Software
5-7
5
These are the detailed steps to install your license using halicense(1M):
1. Start the halicense(1M) program.
The halicense program comes with the Solstice HA software. It provides
an automated way to generate the license files and to verify that the
communication between you and the License Center is accurate.
The license script allows you to enter information for multiple HA servers.
You can run halicense from the Solstice HA 1.3 CD, the install server or, if
you already have installed the HA software, from the /opt/SUNWhadf/bin
directory on each HA server. To run it from the CD, mount the Solstice HA
1.3 CD and type:
# /cdrom/solstice_ha_1_3/halicense
To run it from your install server, type:
# /inst_dir/solstice_ha_1_3/halicense
where inst_dir is your install directory on the license server.
To run it from the HA server, type:
# /opt/SUNWhadf/bin/halicense
5-8
Solstice HA 1.3 User’s Guide—April 1997
5
Sample output from halicense(1M) is shown below.
To obtain a license for this product, please contact the Sun
License Center by e-mail, phone, or fax, using the License
Center information listed in the Solstice HA Software Planning
and Installation Guide.
The License Center will ask you for the following information:
Product Name
Product Version
Host Names of your two Solstice HA servers
Host IDs of your two Solstice HA server
Serial Numbers from two license certificates you received
Please Hit RETURN to continue .....
Do you want to install the license now (y/n) [y]:
Are you running this program on a JumpStart server (y/n) [n]:
Please enter the absolute path where you want to save the license
file [/usr/tmp/hadf]:
2. Enter a path to hold the license file, or accept the default location.
If you are running on a JumpStart server, the program prompts for the name
of the Solstice HA JumpStart directory. If you are not running on a
JumpStart server, it prompts you for a directory path to hold the license
files.
The default directories for JumpStart installations are
jmp_dir/autohainstall.d/hosts/hostname where jmp_dir is the
JumpStart directory created when you set up the install server for Solstice
HA, and hostname is the physical host name of each HA server. For example,
if you set up “install_info” as the JumpStart directory and you have
two HA servers, “phys-hahost1” and “phys-hahost2,” then you will have
the following directories on the install server:
install_info/autohainstall.d/hosts/phys-hahost1
install_info/autohainstall.d/hosts/phys-hahost2
Licensing Solstice HA Software
5-9
5
If these directories do not exist, halicense will produce an invalid path
error message and prompt you again for the directory names. If they do
exist, halicense will install the license files into these directories, and the
licenses will be installed on the HA servers as part of the automated
JumpStart process.
For non-JumpStart installations, if the HA software has already been
installed, the default path displayed by halicense is
/etc/opt/SUNWhadf/hadf. This is the location into which you must place
the license file before starting Solstice HA. If you choose this path, the
license will be installed correctly on the server that is running halicense.
Note – You must copy the license file to the same location on the sibling server
before configuring the HA software with hasetup.
If the HA software has not been installed, the default path displayed by
halicense is /usr/tmp/hadf. If this path is used, copy the license file to
/etc/opt/SUNWhadf/hadf/license.dat on both HA servers before
configuring the HA software with hasetup.
3. Provide the physical host names for both HA servers.
Please enter the host name of the first Solstice HA server:phys-hahost1
Please enter the host name of the second Solstice HA server:phys-hahost2
Note – Do not use the install server name.
4. Provide the host IDs for both HA servers.
Type the host IDs you obtained earlier with the showrev(1) command (see
“How to Gather the Licensing Information” on page 5-3).
Please enter the host ID of the Solstice HA server phys-hahost1:72767be1
Please enter the host ID of the Solstice HA server phys-hahost2:72767c9a
5-10
Solstice HA 1.3 User’s Guide—April 1997
5
5. Verify the data checksum for the first host.
This should match the data checksum provided by the License Center. If the
checksum does not match, type n at the prompt and retype the host ID.
The data checksum for ‘Solstice HA’ on Solstice HA server
phys-hahost1 is: b2
Is this correct (y/n) [y]:
6. Type the License Password for the first host supplied by the License
Center.
A password checksum is returned and must match the password checksum
provided by the License Center. If the checksums do not match, retype the
password.
Please enter the License Password for ‘Solstice HA’ on Solstice
HA server phys-hahost1: FBCA30316795C23BFB37
The password checksum for ‘Solstice HA’ on Solstice HA server
phys-hahost1 is: 21
Is this correct (y/n) [y]:
7. Repeat Step 5 and Step 6 for the second HA server.
The data checksum for ‘Solstice HA’ on Solstice HA server
phys-hahost2 is: cd
Is this correct (y/n) [y]:
Please enter the License Password for ‘Solstice HA’ on the
Solstice HA server phys-hahost2: 2B1AB031904E776EFBC8
The password checksum for ‘Solstice HA’ on Solstice HA server
phys-hahost1 is: 5d
Is this correct (y/n) [y]:
Licensing Solstice HA Software
5-11
5
8. Install licenses for HA data services.
You will need a separate license for each data service. After all licenses have
been entered, the license files are created in the specified location.
Do you want to install license for ‘Solstice HA-DBMS for ORACLE’
(y/n)? n
Do you want to install license for ‘Solstice HA-DBMS for INFORMIX’
(y/n)? n
Do you want to install license for ‘Solstice HA-DBMS for SYBASE’
(y/n)? n
Do you want to install license for ‘Solstice HA InternetPro’
(y/n)? n
Licenses for phys-hahost1 and phys-hahost2 are created in
/usr/tmp/hadf/license.dat
9. Verify the license files.
The license file for each server is created and placed into either
/etc/opt/SUNWhadf/hadf/license.dat or
/usr/tmp/hadf/license.dat on HA, or
jmpdir/autoinstall.d/hosts/hostname/license.dat on a JumpStart
server. The license file generated for the two servers will be similar to the
following:
#
# Solstice HA Host: phys-hahost1
#
FEATURE solstice_ha.hadf suntechd 1.200 01-jan-0 0
FBCA30316795C23BFB37 "" 72747be1
#
# Solstice HA Host: phys-hahost2
#
FEATURE solstice_ha.hadf suntechd 1.200 01-jan-0 0
2B1AB031904E776EFBC8 "" 72327c9a
5-12
Solstice HA 1.3 User’s Guide—April 1997
5
Note – In the license file displayed above, the FEATURE line appears to be two
lines. However, it must be a single line in license.dat.
The halicense(1M) program generates one license file per cluster. This
license file contains licenses for both nodes in the cluster.
10. Copy the license files to the appropriate location, if necessary.
If you are installing the HA software from an install server, the files have
already been placed into the correct locations on the install server. Once the
license files are set up on the install server, the licenses are automatically
installed on the HA servers when the Solstice HA software is installed.
If you are installing the Solstice HA software from CD, the installation
process creates, on each server, the directory /etc/opt/SUNWhadf/hadf
into which you place the license information. If you specified this path in
Step 2, copy the file to the same location on the sibling server. If you used
another path in Step 2, copy the file from that location to
/etc/opt/SUNWhadf/hadf/license.dat on each HA server.
Licensing Solstice HA Software
5-13
5
5-14
Solstice HA 1.3 User’s Guide—April 1997
6
Software Installation
This chapter includes guidelines and steps for installing the software and
configuring your HA servers to run Solstice HA. The software to be installed
includes Solaris 2.5.1, DiskSuite 4.1, Solstice HA 1.3, and applicable patches.
This chapter also describes the upgrade procedures between Solstice HA 1.3
and previous releases.
Installation Guidelines
page 6-2
Installation Procedures
page 6-5
Post-Installation Procedures
page 6-8
Upgrade Procedures
page 6-11
Note – Solstice HA 1.3 is supported only on the Solaris 2.5.1 operating system.
This chapter includes the following procedures:
• “How to Install From an Install Server” on page 6-5
• “How to Install From CD-ROM” on page 6-6
• “How to Complete the Post-Installation Procedures” on page 6-8
• “How to Upgrade From HA 1.0 to HA 1.3” on page 6-11
• “How to Upgrade from HA 1.2 to HA 1.3” on page 6-19
6-1
6
6.1 Installation Guidelines
This section describes general guidelines for installing the Solaris operating
system, DiskSuite 4.1, and Solstice HA 1.3 on your HA server local disks. The
guidelines include general restrictions on the Ultra Enterprise Cluster HA
system configuration and specific suggestions on how to partition the HA
server local disks.
6.1.1 Solaris Installation Guidelines
When you install Solaris 2.5.1 on Solstice HA servers, follow these general
rules:
•
Set up each Ultra Enterprise Cluster HA server to be identical. Set them up
with the same hardware configuration, disk partitioning, and installed
software.
•
Set up each of the Ultra Enterprise Cluster HA servers as standalone
machines. This is done in response to a question in the Solaris 2.5.1
installation program.
•
Use identical partitioning on the local disks of each of the Ultra Enterprise
Cluster HA servers where Solaris 2.5.1 is installed. Reserve at least 40
Mbytes in root (/). You might require more space, depending on your
configuration. Refer to the discussion on the root file system in Appendix C,
“Configuration Worksheets” for more information.
•
Slice 4 must be set aside for use by Solstice DiskSuite replicas. It must be 10
Mbytes (plus or minus 1 Mbyte) in size.
•
Minimally, install the end user software cluster on both Ultra Enterprise
Cluster HA servers.
Note – If you are installing data service software, you also must install
additional Solaris packages to support the data service(s). See the Sun
installation manuals specific to the data service(s) for information about these
packages.
•
6-2
Do not define a /export file system. This is primarily to avoid confusion
since HA-NFS file systems are not mounted on /export and only HA-NFS
file systems should be NFS shared on Ultra Enterprise Cluster HA servers.
Solstice HA 1.3 User’s Guide—April 1997
6
Note – If you are installing the HA servers from an install server using
JumpStart, a special class file is automatically installed in the Solstice HA
JumpStart directory that meets all of these guidelines. See “Setting Up and
Configuring the Install Server” on page 4-17 for more information on this class
file.
6.1.2 Disk Partitioning Guidelines
When Solaris 2.5.1 is installed, the install disk is partitioned into slices for the
root and other standard file systems. You must change the partition
configuration to meet the requirements of Solstice HA. Use the guidelines in
the following sections to partition your disks and allocate space accordingly.
6.1.2.1 The System Disk File System Slices
Table 6-1 shows the slice number, contents, and suggested space allocation for
file systems, swap space, and slice 4. The space on slice 4 is used for
metadevice state database replicas and must be 10 Mbytes (plus or minus 1
Mbyte). These values are used as the default when you use the JumpStart
installation method. The numbers in parenthesis following the allocation
values are the approximate amounts used in a fully installed HA configuration
including all data services and the HA AnswerBook™.
Table 6-1
File System Allocation
Number
Contents
Allocation (Mbytes)
0
/ (root)
40 (16)
1
swap
(varies depending on
server)
3
/var
remaining free space
(varies))
4
metadevice state database replicas
10
5
/opt
300 (75)
6
/usr
200 (160)
Software Installation
6-3
6
Note – If you exhaust the free space, you must reinstall the operating system
(on both servers) to obtain additional free space in the root partition. You
should err on the side of extra free space; 20 percent or more is suggested.
6.1.2.2 The Root Slice
The root slice (slice 0) on your local disk must have enough space for the
various files and directories as well as space for the device inodes in /devices
and symbolic links in /dev. By default, one inode is allocated per two
Kilobytes of file system capacity when newfs(1M) is run on the file system
during Solaris installation.
The root slice also must be large enough to hold the following:
•
•
The Solaris 2.5.1 system components
•
Data space for symbolic links in /dev for the disk arrays and Solstice
Disksuite metadevices
Some components from Solstice DiskSuite, Solstice HA, and any third party
software packages
When you install Solaris 2.5.1 using the JumpStart method, the default value
for the root file system is 40 Mbytes.
Use Table C-1 and Table C-2 in Appendix C, “Configuration Worksheets” to
determine your specific requirements.
6.1.2.3 The User File System Slice
The user slice holds the user file system. The JumpStart installation method
uses a set of default file system sizes. The default values can be changed by
editing the class file supplied with Solstice HA. If you install the software from
CD-ROMs, you must specify the allocation values as part of the Solaris 2.5.1
installation procedure. See the Advanced Installation Guide book for details
about changing the allocation values as Solaris is installed.
6-4
Solstice HA 1.3 User’s Guide—April 1997
6
6.2 Installation Procedures
You can install the software from an install server using JumpStart, or from
CD-ROM.
The install server must be set up as described in Chapter 4, “Installation
Planning.”
During installation, each HA server is booted three times from a network
install server. The first boot is initiated by the boot command typed at the
OpenBoot prompt. The second and third boots are initiated automatically by
the HA install software. The final boot (the reconfiguration reboot) can take up
to 15 minutes or longer.
Note – Configurations using FDDI as the primary public network cannot be
network-installed directly using JumpStart, because the FDDI drivers are
unbundled and are not available in “mini-unix.” If you use FDDI as the
primary public network, use the CD-ROM installation method described in
“How to Install From CD-ROM” on page 6-6.
▼ How to Install From an Install Server
This step installs the Solaris operating system, DiskSuite, and Solstice HA.
♦ Enter the OpenBoot PROM command to boot from the network on each
HA server console:
<#0> boot net_device_alias - install
The variable net_device_alias is the interface alias described in Step 5 of “How
to Set Up the Hardware Configuration” on page 4-14.
You might be asked for information regarding the terminal type, naming
service, time zone, or time and date, depending on your name service or
bootparams entries. Refer to the Advanced Installation Guide book for more
information.
Software Installation
6-5
6
▼ How to Install From CD-ROM
1. Install Solaris 2.5.1.
Use the instructions in the Solaris System Administration documentation
and the guidelines outlined in “Installation Guidelines” on page 6-2.
2. (Optional) If you are using an interface in which the driver software is not
included with the Solaris operating system as your primary network
interface (FDDI, for example), install and configure that interface on each
HA server now.
Install the interface hardware and software using the manufacturer’s
instructions, sys-unconfig(1M) each system, and then reboot to configure
the interface as the primary network interface.
3. Load the Solstice HA 1.3 CD-ROMs into the CD-ROM drives on each HA
server.
Within a few seconds, /cdrom/solstice_ha_1_3 should be mounted
and accessible on each HA server. If this does not happen, the Volume
Manager (vold) might not be running on your machines.
4. Run hainstall(1M) from root (/) on each HA server to install the
software.
Note – Both of the Ultra Enterprise Cluster HA servers should be up and
running on the primary network interface before you run hainstall(1M).
# cd /
# /cdrom/solstice_ha_1_3/hainstall -i
You are asked whether you want to install the Solstice HA AnswerBook. The
default answer is no.
Then hainstall(1M) asks which data service packages you want to
install. Select the data services to install or answer no if you do not want to
install any data services at this time. The hainstall(1M) utility then
installs any selected data services.
Next, hainstall(1M) ejects the Solstice HA 1.3 CD-ROM and prompts you
to load the Solstice DiskSuite 4.1 CD-ROM. Load the DiskSuite 4.1 CD-ROM
and press Return to install DiskSuite 4.1.
6-6
Solstice HA 1.3 User’s Guide—April 1997
6
Note – Some HA servers have a CD-ROM/Tape Device Door that must remain
open during execution of hainstall(1M) to allow the CD-ROM drive tray to
properly eject the CD-ROMs. If hainstall(1M) reports “Cannot eject CDROM,” please check this Device Door.
The hainstall(1M) program then asks for the name of the sibling host,
verifies that the two hosts are communicating, and adds a temporary entry
in the /.rhosts file for the sibling host.
As hainstall(1M) runs, it generates output that goes into a log file on the
HA server. The log file will go into either /var/opt/SUNWhadf/hadf or
/var/tmp. Error messages also are sent to the console.
The Solaris operating system, DiskSuite, and Solstice HA are now installed
on your HA servers. Press Return when hainstall(1M) asks whether you
want to reboot the system.
Note – You always must reboot the system at the end of an hainstall(1M)
session, before you run hasetup(1M). This reconfiguration reboot can take up
to 15 minutes or longer.
After the reboot, complete the post-installation procedures in Section 6.3,
“Post-Installation Procedures.”
Software Installation
6-7
6
6.3 Post-Installation Procedures
This section describes the steps to take after the software has been installed.
Perform these steps on each HA server.
▼ How to Complete the Post-Installation Procedures
These are the high-level steps to complete the post-installation procedures:
•
•
•
•
Verify that a complete md.tab file is located in /etc/opt/SUNWmd on each
HA server.
Obtain your Solstice HA licenses.
Update PATH and MANPATH with pointers to SUNWmd and SUNWhadf.
Install any required patches:
• If you are using SPARCstorage arrays, verify the firmware level and
update, if necessary
• Check for disk drive firmware updates
• Check for system Flash PROM updates
These are the detailed steps to complete the post-installation procedures:
1. If you installed from CD-ROM or if the md.tab file was not added to each
server from the install server, copy the md.tab file into
/etc/opt/SUNWmd now.
If you earlier left an md.tab file in each of the two
jmp_dir/autohainstall.d/hosts/hostname directories on the network
install server, these md.tab files should now be found in
/etc/opt/SUNWmd on their respective servers. The md.tab files on both
servers should be identical. Refer to “md.tab Creation Guidelines” on
page 4-9 for details about creating the md.tab file.
We recommend that you generate md.tab files and install them in
/etc/opt/SUNWmd before you run hasetup(1M).
2. Obtain your Solstice HA licenses.
If you have not already obtained Solstice HA 1.3 licenses for the two Solstice
HA servers, do so now. See Chapter 5, “Licensing Solstice HA Software” for
more information about this procedure.
6-8
Solstice HA 1.3 User’s Guide—April 1997
6
3. Update your PATH and MANPATH to include pointers to SUNWmd and
SUNWhadf.
Set your PATH and MANPATH variables in either your /.profile or
/.login file.
• Add /usr/opt/SUNWmd/sbin and /opt/SUNWhadf/bin to PATH.
• Add /usr/opt/SUNWmd/man and /opt/SUNWhadf/man to MANPATH.
The resulting .profile file should look similar to this, but varies slightly
depending on which shell you use.
PATH=/usr/opt/SUNWmd/sbin:/opt/SUNWhadf/bin:$PATH
MANPATH=/usr/opt/SUNWmd/man:/opt/SUNWhadf/man:/usr/man
export PATH MANPATH
!
Caution – If you configure csh as the root shell on the HA cluster nodes, then
do not put commands into the /.cshrc file that might produce output to
stdout or stderr, or that assume stdin or stdout to be a tty. In particular,
do not invoke stty(1). Such commands in the /.cshrc file will cause errors
when rsh(1) is invoked—and rsh(1) is used by Solstice HA.
4. Check the patch database for any patches required to run Solstice HA 1.3.
Contact your local service provider for any patches applicable to your
Solaris operating environment. The hasetup(1M) program requires the
latest revision of the following DiskSuite patch—please install it before
going any further:
104172-03
the Solstice DiskSuite 4.1 patch
If you are using SPARCstorage Arrays, also install the following
SPARCstorage Array patch:
103766-02
Jumbo patch for SPARCstorage Array
Install the latest revisions of these patches before starting Solstice HA.
Install any required patches by following the instructions in the README
file accompanying the patch, unless instructed otherwise by the Solstice HA
documentation or your service provider.
Software Installation
6-9
6
The SPARCstorage Array patch includes two components:
• drivers and other I/O
• Firmware update
You must install the drivers and other I/O patch, but the firmware update is
only necessary if your firmware revision is a lower revision number than the
one described in the patch README file.
For SPARCstorage Arrays, use the ssaadm display(1M) command to
determine the current version of the firmware. Specify the controller
number (n in the example) to the command. The ssaadm display(1M)
command needs to be run on only one of the HA servers.
For each SPARCstorage Array cn, type the command:
phys-hahost1# ssaadm display cn
Read the output for a line documenting the firmware revision. If the
revision level is below the one specified in the patch README file, you
must install the latest firmware patch(es). Also check for other firmware
updates that apply to your configuration such as for your disk drives or
system Flash PROM.
This completes the post-installation procedures. Now use the procedures
described in Chapter 7, “Software Configuration and Validation” to
configure the HA servers.
6-10
Solstice HA 1.3 User’s Guide—April 1997
6
6.4 Upgrade Procedures
This section describes the procedures for upgrading an existing Solstice HA 1.0
or Solstice HA 1.2 configuration to Solstice HA 1.3. The upgrade procedures
allow your HA system to remain on-line and available during the procedures.
Any interruption to services is minimal.
If you need to make configuration changes such as adding disks or services,
first complete the upgrade and then make the configuration changes by
following the procedures documented in Part 2 – Software Administration.
▼ How to Upgrade From HA 1.0 to HA 1.3
The system must have the latest version of patch 103287 installed before you
upgrade from HA 1.0 to HA 1.3. This patch repairs a bug in the SUNWhagen
package postremove script, which is invoked during the upgrade process.
Verify that the patch is installed using the showrev -p command.
These are the high-level steps to upgrade from HA 1.0 to HA 1.3:
•
•
•
•
•
•
•
•
•
•
•
Switchover all disks and data services to the sibling host, and then stop HA
on the local host.
Remove the start-up script /etc/rc3.d/S20SUNWhadf on the local host.
Upgrade Solaris on the local host and then reboot the system.
Update the /etc/system and /etc/syslog.conf files on the local host.
Upgrade Solstice DiskSuite from 4.0 to 4.1
Install new framework and data service licenses on the local host.
Update packages on the local host.
Install required patches on the local host.
Reboot the local host and verify the installation.
Switch the disks and data services back to the local host from the sibling.
Repeat the upgrade steps on the sibling host and verify the upgrade.
These are the detailed steps to upgrade from HA 1.0 to HA 1.3:
!
Caution – We strongly recommend that you back up all local and multihost
disks before starting the upgrade. Also, the systems must be operable and
robust. Do not attempt upgrade if systems are experiencing any difficulties.
Software Installation
6-11
6
1. Select one HA server and use haswitch(1M) to switch over all disks and
data services to that host.
In this example, “phys-hahost1” is the local host, and we upgrade it first.
phys-hahost1# haswitch phys-hahost2 hahost1
2. Once switchover is complete, stop HA on the local host.
phys-hahost1# /etc/init.d/SUNWhadf stop
3. Remove the start-up script /etc/rc3.d/S20SUNWhadf.
This prevents HA from being restarted on the local host when you reboot
Solaris.
phys-hahost1# rm /etc/rc3.d/S20SUNWhadf
4. On the local host, upgrade Solaris 2.4 to Solaris 2.5.1, using the upgrade
mode of suninstall(1M), and then reboot the system.
If your configuration includes Solstice HA-DBMS for ORACLE7, then
upgrade Oracle7 to the version supported by Solaris 2.5.1. Refer to your
Oracle documentation for instructions on upgrading Oracle7.
Note – The console might display “SCSI reservation conflict warning”
messages. You can ignore these safely; they will disappear once you install the
HA package.
If the Solaris upgrade fails, restore from backup to Solaris 2.4 and HA 1.0, and
retry the upgrade. See Chapter 21, “Administering HA Server and Multihost
Disks” for information on restoring the root disk from backup.
6-12
Solstice HA 1.3 User’s Guide—April 1997
6
5. Update /etc/system and /etc/syslog.conf files.
In HA 1.0, you were asked to add a line to your /etc/system file to
exclude lofs. Back out this edit before running hainstall(1M).
In HA 1.0, you were asked to add the following lines to your
/etc/syslog.conf file:
local7.emerg,local7.alert,local7.crit,local7.warning,
local7.notice,local7.info
/var/adm/messages
local7.emerg,local7.alert,local7.crit,local7.warning,
local7.notice,local7.info
/dev/console
Delete these lines and any other site-specific additions, before you run
hainstall(1M).
HA 1.3 upgrade software correctly edits the /etc/syslog.conf file for
you, and surrounds the edits with comment lines recognized by Solstice HA
1.3.
After you run hainstall(1M), you can restore any site-specific changes to
the /etc/syslog.conf file.
6. Install new license(s) for the framework and optional data services on the
local host.
Follow the steps described in Chapter 5, “Licensing Solstice HA Software.”
Note – Installation will fail if you do not install the necessary licenses for the
framework and data services.
7. From the root directory (/) on the local host, run the hainstall(1M)
command with the -u option.
The hainstall -u command replaces HA 1.0 packages with HA 1.3
packages.
Software Installation
6-13
6
Note – Do not reboot after performing this step. Complete Step 9 before
rebooting.
phys-hahost1# cd /
phys-hahost1# /cdrom/solstice_ha_1_3/hainstall -u
** NOTE: hainstall does not upgrade DiskSuite or other volume managers **
** Deinstalling HA-MAIL for Netscape **
Package
SUNWhansm...not installed
** Deinstalling HA-NEWS for Netscape **
Package
SUNWhanew...not installed
** Deinstalling HA-HTTP for Netscape **
Package
SUNWhahtt...not installed
** Deinstalling HA-DNS **
Package
SUNWhadns...not installed
** Deinstalling HA-DBMS for INFORMIX **
Package
SUNWhainf...not installed
** Deinstalling HA-DBMS for SYBASE **
Package
SUNWhasyb...not installed
** Deinstalling HA-DBMS for ORACLE7 **
Package
SUNWhaor....not installed
6-14
Solstice HA 1.3 User’s Guide—April 1997
6
continued
** Deinstalling HA-NFS **
Package
SUNWhanfs...found
Removing package SUNWhanfs...done
** Deinstalling Solstice HA Answerbook **
Package
SUNWabha....not installed
** Deinstalling Solstice HA **
Package
SUNWmdm.....not installed
Package
SUNWhapro...not installed
Package
SUNWhagen...found
Removing package SUNWhagen...done
Package
SUNWcmm.....found
Removing package SUNWcmm.....done
Package
SUNWff......found
Removing package SUNWff......done
** Installing Solstice HA **
SUNWff......done.
SUNWcmm.....done.
SUNWhagen...done.
SUNWhapro...done.
SUNWmdm.....done.
** Installing HA-NFS **
SUNWhanfs...done.
Detailed install log created /var/opt/SUNWhadf/hadf/hainstall.log.1213961930
Do you want to reboot now (yes/no) [yes]? no
The system should be rebooted before continuing!
Note – If hainstall(1M) does not run to completion, rerun hainstall -u.
Then verify that all data service packages are installed. If any are missing, add
them manually using the pkgadd(1M) utility. See “Troubleshooting HA
Installation and Configuration” on page 7-27 for more information.
Software Installation
6-15
6
Note – If you were instructed by Sun or your service provider to modify the
file /etc/opt/SUNWhadf/hadf/cmm_confcdb, your changes will be lost
during the upgrade. Your original cmm_confcdb file is saved with a
timestamp suffix by the upgrade procedure. Compare the new version with the
saved version to identify the special edits and put them into the new version.
8. Upgrade from DiskSuite 4.0 to DiskSuite 4.1.
The current procedure for upgrading to DiskSuite 4.1 requires you to add
the new DiskSuite packages, but does not require removing the previously
installed DiskSuite packages. Performing the following tasks will ensure a
cleaner upgrade to disksuite 4.1:
a. Before performing the DiskSuite upgrade, back up your
/etc/opt/SUNWmd and /etc/system files either to tape or to a safe
location.
b. Remove the Solstice Disksuite 4.0 Jumbo Patch #102580.
c. Solstice DiskSuite 4.1 does not include SUNWabmd (the 4.0 DiskSuite
AnswerBook package). If SUNWabmd package is installed, consider deinstalling it before upgrading as it will avoid confusion.
d. The SUNWmdg (Solstice DiskSuite Tool) package depends on
SUNWsadml (the Solstice AdminSuite launcher). If SUNWmdg is already
installed on the system to be upgraded, then add the SUNWsadml
package.
On the local host, upgrade DiskSuite by adding the two DiskSuite 4.1
packages.
6-16
Solstice HA 1.3 User’s Guide—April 1997
6
Note – Do not overwrite the existing configuration files.
phys-hahost1# pkgadd SUNWmd
...
## Checking for conflicts with packages already installed
The following files are already installed on the system and are being
used by another package:
* /etc/opt/SUNWmd/md.tab
* /etc/opt/SUNWmd/mddb.cf
* /kernel/drv/md.conf
Do you want to install these conflicting files [y,n,?,q] n
Do you want to continue with the installation of <SUNWmd> [y,n,?] y
...
phys-hahost1# pkgadd SUNWmdm
...
## Checking for conflicts with packages already installed
The following files are already installed on the system and are being
used by another package:
* /etc/opt/SUNWmd/md.tab
* /etc/opt/SUNWmd/mddb.cf
* /kernel/drv/md.conf
Do you want to install these conflicting files [y,n,?,q] n
Do you want to continue with the installation of <SUNWmdm> [y,n,?] y
...
9. Install the required patches for HA 1.3.
Install the latest DiskSuite patch. If you are using SPARCstorage Arrays,
also install the latest SPARCstorage Array patch. Obtain the patches from
SunService. Use the instructions in the patch README files to install the
patches.
Software Installation
6-17
6
10. Reboot the machine and verify the installation on the local host.
Use the hacheck(1M) command to check for problems in the configuration.
The -n option to hacheck(1M) limits checking to only the host on which
hacheck(1M) is invoked.
phys-hahost1# reboot
...
phys-hahost1# hacheck -n
11. Switch ownership of disks and data services from the sibling host to the
upgraded local host.
a. Stop HA 1.0 services on the sibling host.
The sibling host in this example is “phys-hahost2.”
phys-hahost2# /etc/init.d/SUNWhadf stop
b. Once HA 1.0 is stopped on the sibling host, start HA 1.3 on the
upgraded local host.
Since the sibling host is no longer running HA, the hastart(1M)
command causes the upgraded local host to take over all data services
for both systems.
phys-hahost1# hastart
c. Verify that the configuration on the local host is stable.
phys-hahost1# hastat
d. Verify that clients are receiving services from the local host.
12. Repeat steps 3-10 on the sibling host.
13. Return the sibling host to the HA 1.3 cluster.
phys-hahost2# hastart
6-18
Solstice HA 1.3 User’s Guide—April 1997
6
14. Once cluster reconfiguration on the sibling host is complete, switch over
the appropriate data services to the sibling from the local host.
phys-hahost1# haswitch phys-hahost2 hahost2
15. Verify that the HA 1.3 configuration on the sibling host is in stable state,
and that clients are receiving services.
phys-hahost2# hastat
This completes the upgrade procedure from HA 1.0 to HA 1.3.
▼ How to Upgrade from HA 1.2 to HA 1.3
These are the high-level steps to upgrade from HA 1.2 to HA 1.3:
•
•
•
•
•
•
•
Stop HA on the local host (the server to be upgraded first).
Update packages on the local host.
Upgrade DiskSuite from 4.0 to 4.1
Install required patches on the local host.
Reboot the local host and verify the installation.
Switch the disks and data services back to the local host from the sibling.
Repeat the upgrade steps on the sibling host and verify the upgrade.
These are the detailed steps to upgrade from HA 1.2 to HA 1.3:
!
Caution – We strongly recommend that you back up all local and multihost
disks before starting the upgrade. Also, the systems must be operable and
robust. Do not attempt to upgrade if systems are experiencing any difficulties.
1. Stop HA on the HA server to be upgraded first.
phys-hahost1# hastop
Software Installation
6-19
6
2. From the root directory (/) on the local host, run the hainstall(1M)
command with the -u option.
The hainstall -u command replaces HA 1.2 packages with HA 1.3
packages.
Note – Do not reboot after performing this step. Complete Step 9 before
rebooting.
phys-hahost1# cd /
phys-hahost1# /cdrom/solstice_ha_1_3/hainstall -u
** NOTE: hainstall does not upgrade DiskSuite or other volume managers **
** Deinstalling HA-MAIL for Netscape **
Package
SUNWhansm...not installed
** Deinstalling HA-NEWS for Netscape **
Package
SUNWhanew...not installed
** Deinstalling HA-HTTP for Netscape **
Package
SUNWhahtt...not installed
** Deinstalling HA-DNS **
Package
SUNWhadns...not installed
** Deinstalling HA-DBMS for INFORMIX **
Package
SUNWhainf...not installed
** Deinstalling HA-DBMS for SYBASE **
Package
SUNWhasyb...not installed
** Deinstalling HA-DBMS for ORACLE7 **
Package
SUNWhaor....not installed
** Deinstalling HA-NFS **
Package
SUNWhanfs...found
Removing package SUNWhanfs...done
** Deinstalling Solstice HA Answerbook **
Package
SUNWabha....not installed
6-20
Solstice HA 1.3 User’s Guide—April 1997
6
continued
** Deinstalling Solstice HA **
Package
SUNWmdm.....not installed
Package
SUNWhapro...not installed
Package
SUNWhagen...found
Removing package SUNWhagen...done
Package
SUNWcmm.....found
Removing package SUNWcmm.....done
Package
SUNWff......found
Removing package SUNWff......done
** Installing Solstice HA **
SUNWff......done.
SUNWcmm.....done.
SUNWhagen...done.
SUNWhapro...done.
SUNWmdm.....done.
** Installing HA-NFS **
SUNWhanfs...done.
Detailed install log created /var/opt/SUNWhadf/hadf/hainstall.log.1213961930
Do you want to reboot now (yes/no) [yes]? no
The system should be rebooted before continuing!
Note – If hainstall(1M) does not run to completion, rerun hainstall -u.
Then verify that all data service packages are installed. If any are missing, add
them manually using the pkgadd utility.
Note – If you were instructed by Sun or your service provider to modify the
file /etc/opt/SUNWhadf/hadf/cmm_confcdb, your changes will be lost
during the upgrade. Your original cmm_confcdb file is saved with a
timestamp suffix by the upgrade procedure. Compare the new version with the
saved version to identify the special edits and put them into to new version.
Software Installation
6-21
6
3. Upgrade from DiskSuite 4.0 to DiskSuite 4.1.
The current procedure for upgrading to DiskSuite 4.1 requires you to add
the new DiskSuite packages, but does not require removing the previously
installed DiskSuite packages. Performing the following tasks will ensure a
cleaner upgrade to disksuite 4.1:
a. Before performing the DiskSuite upgrade, back up your
/etc/opt/SUNWmd and /etc/system files either to tape or to a safe
location.
b. Remove the Solstice Disksuite 4.0 Jumbo Patch #102580.
c. Solstice DiskSuite 4.1 does not include SUNWabmd (the 4.0 DiskSuite
AnswerBook package). If SUNWabmd package is installed, consider deinstalling it before upgrading as it will avoid confusion.
d. The SUNWmdg (Solstice DiskSuite Tool) package depends on
SUNWsadml (the Solstice AdminSuite launcher). If SUNWmdg is already
installed on the system to be upgraded, then add the SUNWsadml
package.
On the local host, upgrade DiskSuite by adding the two DiskSuite 4.1
packages.
6-22
Solstice HA 1.3 User’s Guide—April 1997
6
Note – Do not overwrite the existing configuration files.
phys-hahost1# pkgadd SUNWmd
...
## Checking for conflicts with packages already installed
The following files are already installed on the system and are being
used by another package:
* /etc/opt/SUNWmd/md.tab
* /etc/opt/SUNWmd/mdd.cf
* /kernel/drv/md.conf
Do you want to install these conflicting files [y,n,?,q] n
Do you want to continue with the installation of <SUNWmd> [y,n,?] y
...
phys-hahost1# pkgadd SUNWmdm
...
## Checking for conflicts with packages already installed
The following files are already installed on the system and are being
used by another package:
* /etc/opt/SUNWmd/md.tab
* /etc/opt/SUNWmd/mdd.cf
* /kernel/drv/md.conf
Do you want to install these conflicting files [y,n,?,q] n
Do you want to continue with the installation of <SUNWmdm> [y,n,?] y
...
4. Install the required patches for HA 1.3.
Install the latest DiskSuite patch. If you are using SPARCstorage Arrays,
also install the latest SPARCstorage Array patch. Obtain the patches from
SunService. Use the instructions in the patch README files to install the
patches.
Software Installation
6-23
6
5. Reboot the machine and verify the installation on the local host.
Use the hacheck(1M) command to check for problems in the configuration.
The -n option to hacheck(1M) limits checking to only the host on which
hacheck(1M) is invoked.
phys-hahost1# reboot
...
phys-hahost1# hacheck -n
6. Use hastop(1M) and hastart(1M) to switch ownership of disks and
data services from the sibling host to the upgraded local host.
a. Stop HA 1.2 services on the sibling host.
The sibling host in this example is “phys-hahost2.”
phys-hahost2# hastop
b. Once HA 1.2 is stopped on the sibling host, start HA 1.3 on the
upgraded local host.
Since the sibling host is no longer running HA, the hastart(1M)
command causes the upgraded local host to take over all data services
for both systems.
phys-hahost1# hastart
c. Verify that the configuration on the local host is stable.
phys-hahost1# hastat
d. Verify that clients are receiving services from the local host.
7. Repeat steps 3-7 on the sibling host.
8. Return the sibling host to the HA 1.3 cluster.
phys-hahost2# hastart
6-24
Solstice HA 1.3 User’s Guide—April 1997
6
9. Once cluster reconfiguration on the sibling host is complete, switch over
the appropriate data services to the sibling from the local host.
phys-hahost1# haswitch phys-hahost2 hahost2
10. Verify that the HA 1.3 configuration on the sibling host is in stable state,
and that clients are receiving services.
phys-hahost2# hastat
This completes the upgrade procedure from HA 1.2 to HA 1.3.
Software Installation
6-25
6
6-26
Solstice HA 1.3 User’s Guide—April 1997
Software Configuration and
Validation
7
This chapter provides step-by-step instructions for creating an Ultra Enterprise
Cluster HA configuration using the hasetup(1M) command.
Overview of hasetup(1M)
page 7-2
Preparing to Run hasetup(1M)
page 7-2
Post-Configuration Procedures
page 7-23
Verifying and Validating the Configuration
page 7-24
Troubleshooting HA Installation and Configuration
page 7-27
This chapter includes the following procedures:
• “How to Run hasetup(1M)” on page 7-3
• “How to Set Up Disksets When md.tab Does Not Exist” on page 7-15
• “How to Set Up a Multihost UFS File System” on page 7-19
• “How to Complete the Post-Configuration Procedures” on page 7-23
• “How to Install a Data Service Package Using pkgadd(1M)” on page 7-27
• “How to Fix Problems in md.tab” on page 7-28
7-1
7
7.1 Overview of hasetup(1M)
The hasetup(1M) command prompts or checks for the following
information:
•
•
•
•
•
•
•
Host names and logical host names
Private network connections
Additional public network connections
Metadevice state database replicas on local disks
Data services in use
Space allocation for UFS logs
Metadevice state database replicas on multihost disks
7.2 Preparing to Run hasetup(1M)
The hasetup(1M) command runs as an interactive program and you must be
root to run it. The hasetup(1M) program provides default answers for most
questions, where possible. The default answers are displayed inside brackets.
To accept the default, press Return. If no default is displayed, you must
provide an entry.
!
Caution – Never edit the Solstice HA configuration files by hand, unless
instructed to do so as part of a documented procedure. The hasetup(1M)
command adds the necessary information to these files. If the information is
inconsistent or incorrect in these files, both Ultra Enterprise Cluster HA servers
might crash and leave services unavailable.
7.2.1 Preparation Checklist
Use the following checklist to make sure that you have everything you need to
successfully complete the configuration process with hasetup(1M).
7-2
•
Verify that /etc/opt/SUNWhadf/hadf/license.dat is in place on both
servers.
•
Select one of the HA servers to be used as the “administrative node” for
hasetup(1M).
•
Verify that the correct /etc/opt/SUNWmd/md.tab is in place on the
“administrative node” if you want hasetup(1M) to create the diskset
configuration.
Solstice HA 1.3 User’s Guide—April 1997
7
•
Complete the relevant portions of the configuration worksheets in
Appendix C, “Configuration Worksheets.” This information includes:
• logical host names and IP addresses
• private network host names and IP addresses
• other configuration information: symmetric or asymmetric
•
Update naming services, if used, as described in “Updating Naming
Services” on page 4-7.
▼ How to Run hasetup(1M)
Run the hasetup(1M) command from the HA server selected to be the
administrative node. If you have problems running hasetup(1M), refer to
Section 7.5, “Troubleshooting HA Installation and Configuration,” on
page 7-27.
Note – In an asymmetric configuration, the physical host that becomes the
default master is the host from which hasetup(1M) should be run.
These are the high-level steps to run hasetup(1M):
•
•
Invoke hasetup(1M) from the administrative node.
Through hasetup(1M):
• Verify the nsswitch.conf file and copy it to the sibling host.
• Set up the private networks and use hasetup(1M) to verify them.
• Update the /.rhosts files and check access.
• Set up additional network interfaces.
• Select the configuration type.
• Configure logical host names and IP addresses.
• Select data services and diskset configuration.
• Reserve space for UFS logs on multihost disks.
• Create file systems on all metatrans devices.
• Create new vfstab and dfstab files, and set up NFS shared file systems.
Software Configuration and Validation
7-3
7
These are the detailed steps to run hasetup(1M):
1. Set your TERM environment variable on the HA server that you selected
to use as the administrative node.
2. As root, invoke hasetup(1M) from the administrative node by typing the
following:
# hasetup
3. Verify the nsswitch.conf file, and copy it to the sibling host.
The hasetup(1M) command verifies that the /etc/nsswitch.conf file is
properly configured and if it is not, hasetup(1M) overwrites the file with a
new version.
Checking the local “nsswitch.conf” file for Solstice HA compliance ... done
Probing the local network controller configuration... done
Waiting for “hahost2”... done
Checking access to “hahost2” from “hahost1”... done
Checking access to “hahost1” from “hahost2”... done
Copying the “nsswitch.conf” file to host “hahost2”... done
4. Set up the private networks.
Next, hasetup(1M) configures and names the private links between the
two hosts. If you accept the defaults by pressing Return at the prompts,
hasetup(1M) assigns network names using the default HA convention of
appending -privn to the host name.
Local hostname for the 1st private net [phys-hahost1-priv1]?
IP address for host “phys-hahost1-priv1” [204.152.64.1]?
Updating hosts files... done
Network controller for private host “phys-hahost1-priv1” [hme1]?
Sibling hostname for the 1st private net [phys-hahost2-priv1]?
IP address for host “phys-hahost2-priv1” [204.152.64.2]?
Updating hosts files... done
...
This process is repeated to set up the IP addresses and network controllers
for the two other private interfaces on the private networks.
7-4
Solstice HA 1.3 User’s Guide—April 1997
7
5. Allow hasetup(1M) to verify the private link connectivity.
The link between the hosts allows remote command execution on the sibling
host, as well as a single point of administration. Network information about
the sibling host is also verified. You will see the following messages:
Updating netmasks files... done
Configuring private network controller
Configuring private network controller
Configuring private network controller
Configuring private network controller
Broadcast from “phys-hahost1-priv1” to
Broadcast from “phys-hahost2-priv2” to
“hme1” on the local host... done
“hme1” on the sibling host... done
“hme2” on the local host... done
“hme2” on the sibling host... done
test private net... done
test private net... done
6. Update /.rhosts files and check access.
The hasetup(1M) command adds the two private network names to both
/.rhosts files, checks access between the hosts, and removes the physical
host names from the /.rhosts files.
Adding host “phys-hahost2-priv1” to local /.rhosts... done
Adding host “phys-hahost1-priv1” to /.rhosts on sibling... done
Adding host “phys-hahost2-priv2” to local /.rhosts... done
Adding host “phys-hahost1-priv2” to /.rhosts on sibling... done
Checking access to “phys-hahost2-priv1” from “phys-hahost1-priv1”...
Checking access to “phys-hahost1-priv1” from “phys-hahost2-priv1”...
Checking access to “phys-hahost2-priv2” from “phys-hahost1-priv2”...
Checking access to “phys-hahost1-priv2” from “phys-hahost2-priv2”...
Is it okay to remove “phys-hahost2” from /.rhosts(yes/no)[yes]?
Removing host “phys-hahost2” from /.rhosts... done
Is it okay to remove “phys-hahost1” from /.rhosts on the
sibling(yes/no)[yes]?
Removing host “phys-hahost1” from /.rhosts on sibling... done
Software Configuration and Validation
done
done
done
done
7-5
7
7. Set up additional network interfaces.
You now are asked whether you want to set up additional network
interfaces on the local host. The default answer is no. To accept this default,
press Return at the prompt.
There are 2 unused network controllers on the local host
Do you want to setup any of those interfaces now (yes/no) [no]?
Turning off network controller “hme3” on the local host ... done
Turning off network controller hme4” on the local host ... done
Refreshing the local network controller configuration ... done
This process repeats to set up the network interfaces on the sibling host.
Probing the network controller configuration on the sibling host ...done
There are 2 unused network controllers on the sibling host
Do you want to setup any of those interfaces now (yes/no) [no]?
Turning off network controller “hme3” on the sibling host ... done
Turning off network controller “hme4” on the sibling host ... done
Refreshing the network controller configuration for sibling... done
Finding the name of the sibling host for the main public net ... done
Verifying that the two primary hostnames are on the same net ... done
8. Select the type of configuration.
You are now asked whether the configuration is symmetric. If you answer
no, then an asymmetric configuration is created—that is, a configuration
with one logical host. If you choose an asymmetric configuration, then you
are asked whether the current host is the default master of the single logical
host. In this example, the default (symmetric) configuration is selected.
Is this configuration symmetric (yes/no) [yes]?
7-6
Solstice HA 1.3 User’s Guide—April 1997
7
9. Enter the logical host name for each server.
Only symmetric configurations see this prompt. The logical host names are
used by the clients to communicate with the logical hosts. When the names
are entered, the name service is checked for the associated IP addresses. If
the IP address is found, it is used. If it is not found, you are prompted for
the IP address and it is entered in the local and remote hosts’
/etc/inet/host file only. The network name service is not updated
automatically. You must update it manually later.
Logical hostname whose default master is “phys-hahost1” [hahost1]?
Logical hostname whose default master is “phys-hahost2” [hahost2]?
The hasetup(1M) command then checks the host and network information
for consistency and updates as necessary.
Final checking of hosts files... done
Updating netmasks files... done
The hasetup(1M) command then prints the following four informational
lines.
Diskset assigned to logical host “hahost1”... hahost1
Diskset assigned to logical host “hahost2” ...hahost2
Mount point directory for logical host “hahost1” .../hahost1
Mount point directory for logical host “hahost2” ... /hahost2
10. Select the highly available data services that will be used in the
configuration.
You are asked to register the data services being used in the configuration.
You will be prompted to register each data service that is installed. To accept
the default, press Return at the prompt. An error message is returned if you
attempt to register a data service that is not licensed.
Would you like to register dataservice (yes/no) [yes]?
Software Configuration and Validation
7-7
7
Note – We recommend postponing registration of HA Internet Pro data
services until you have completed Solstice HA configuration.
The configuration files are updated and copied to the sibling host with all
the information that you previously entered.
Updating “/etc/opt/SUNWhadf/hadf/hadfconfig” ... done
Updating “/etc/opt/SUNWhadf/hadf/.hadfconfig_services” ... done
Updating “/etc/opt/SUNWhadf/hadf/cmm_confcdb” ... done
Copying the “hadfconfig” file to host “phys-hahost2” ... done
Copying the “.hadfconfig_services” file to host “phys-hahost2”
Copying the “cmm_confcdb” file to host “phys-hahost2” ... done
The hasetup(1M) command checks and verifies the existence of Solstice
DiskSuite metadevice state database replicas on the root disks of each
server. If the metadevice state databases are not found, hasetup(1M)
verifies that slice 4 on both root disks can be used for the replicas, and then
creates them.
Root disk on the local host ... c1t14d0
Root disk on the sibling host ... c1t14d0
Checking for Solstice DiskSuite replicas on the local host ... done
No replicas were found on the local host
Checking access to c0t3d0s4 on the local host ... done
Verifying that c0t3d0s4 is not in the local host's mount table ... done
Verifying that c0t3d0s4 is about 10MB in size on the local host ... done
Slice 4 of the root disk (c0t3d0) on the local host
appears to be set aside for replica creation.
But, creating DiskSuite replicas in this area will
cause any and all data to be lost from c0t3d0s4.
Is it okay to create these replicas (yes/no)? yes
Creating Solstice DiskSuite replicas on the local host ... done
Checking for Solstice DiskSuite replicas on the sibling host ... done
No replicas found...
Following the creation of replicas on the local host, hasetup(1M) performs
similar verification on the sibling host and prompts for whether you want to
create replicas on the sibling host or not.
7-8
Solstice HA 1.3 User’s Guide—April 1997
7
11. Decide how to create the disksets.
Do you want to use “hasetup” for creating disksets (yes/no) [yes]?
If you answer no, you must create the disksets manually using the
metaset(1M) command. Refer to the DiskSuite documentation and “How
to Set Up a Multihost UFS File System” on page 7-19 for information on
creating and setting up the disksets manually.
If you answer yes, hasetup(1M) verifies the disksets, compiles a list of
multihost disks, and inspects your md.tab file. If md.tab does not exist,
hasetup(1M) will continue, but will use the process described in “How to
Set Up Disksets When md.tab Does Not Exist” on page 7-15.
Checking Solstice DiskSuite for disksets... done
Compiling the list of multihost disks ... done
Checking the list of multihost disks ... done
Inspection “md.tab” ... done
If md.tab is valid, hasetup(1M) asks you if you want to create the disksets
and metadevices. Answer yes to the following question, and hasetup(1M)
will attempt to use your existing md.tab file to create the disksets.
If, for any reason, you do not want hasetup(1M) to create your disksets
from your existing md.tab file, answer no to the following question. This
will bring up the interactive session described in “How to Set Up Disksets
When md.tab Does Not Exist” on page 7-15. You then can create the disksets
manually.
Do you want to create disksets from your md.tab file (yes/no) [yes]?
Is it okay to create metadevices from this md.tab file (yes/no) [yes]?
Software Configuration and Validation
7-9
7
If it finds an md.tab file, but determines that it is not usable, hasetup(1M)
generates a message:
One or more disksets were defined in the local md.tab file.
But, the file cannot be used due to one or more of the
following indicated (**) reasons:
- This is a symmetric configuration and there were not
exactly two disksets described in md.tab.
- This is an asymmetric configuration and there was not
exactly one diskset described in md.tab.
- The names of the logical hosts do not match the names of
disksets found in md.tab.
** Disk slices other than 0, 6, or 2 were used by
metadevices in md.tab.
- Disksets in the md.tab file use one or more disks
which do not exist.
- An attempt was made to use one or more disks in more
than one diskset.
- One or more of the diskset(s) do not include disks
from at least three controllers.
- Disksets already exist, but the lists of disks do not exactly
match the lists found in md.tab.
It is recommended that you quit "hasetup" now, fix the problem(s)
in md.tab, then re-run "hasetup". Or, you may choose to continue.
If you decide to continue, your md.tab file will be ignored.
Would you like to continue anyway (yes/no) [no]?
7-10
Solstice HA 1.3 User’s Guide—April 1997
7
If there was a problem with your md.tab file, you either can continue with
hasetup(1M) to configure the multihost disks and specify the diskset
configuration using the supplied curses(3X) interface, or you can exit
hasetup(1M), fix the md.tab file, and rerun hasetup(1M). If you use the
curses(3X) interface to configure the multihost disks, you also must
perform manually the steps that hasetup(1M) normally performs after it
sets up the disksets. These additional steps are described in “How to Set Up
Disksets When md.tab Does Not Exist” on page 7-15. After completing these
steps, you can perform the post-configuration procedures.
If you continue, hasetup(1M) responds with the following messages:
All multihost disks will now be repartitioned and
populated with metadevice state database replicas.
Is this okay (yes/no)?
If you answer yes, hasetup(1M) verifies the sizes of the disks on the
multihost disk list. If you answer no, hasetup(1M) exits.
Sizing the disks on the multihost disk list... done
12. Reserve space for UFS logs on multihost disks.
The hasetup(1M) command provides an easy way to allocate space for
UFS logs. By default, hasetup(1M) reserves space on slice 6 of each disk in
the diskset for UFS logs.
UFS logging is required of all UFS file systems residing on Solstice HA
logical hosts.
By default, hasetup(1M) reserves a log partition on each disk equal to 1%
of the size of the largest multihost disk. The maximum size accepted is 64
Mbytes. Refer to the DiskSuite documentation for more information on
space requirements for the log partition.
Do you want to reserve UFS log space at this time (yes/no) [yes]?
How large do you want the UFS log partitions (Mbytes) [10]?
Software Configuration and Validation
7-11
7
A response of yes or Return causes the disks to be repartitioned, the
disksets to be created, and metadevices to be configured as specified in the
md.tab file, including the creation of the HA administrative file system
described in Chapter 4, “Installation Planning.” If this is a dual-string
configuration, mediators will also be created.
Repartitioning all multihost disks for diskset "hahost2" ... done
Repartitioning all multihost disks for diskset "hahost1" ... done
creating diskset "hahost2" ... done
creating diskset "hahost1" ... done
populating diskset "hahost2" ... done
populating diskset "hahost1" ... done
########################################
#
# Creating the trans device for /hahost1 ...
#
########################################
...
Disksets are created and metainit(1M) is run on the disksets to set up the
metadevices. If you encounter problems during this procedure, see “Fixing
md.tab” on page 7-28 for information on fixing the problems. Then rerun
hasetup(1M) as described in “Restarting hasetup(1M)” on page 7-29.
...
########################################
#
# Executing “metainit -s hahost2 -a”...
#
########################################
...
7-12
Solstice HA 1.3 User’s Guide—April 1997
7
Note – As metainit(1M) runs, you will see messages similar to the following:
metainit: hahost1/d10: WARNING: This form of metainit is
not recommended. The submirrors may not have the same data.
Please see ERRORS in metainit(1M) for additional
information. hahost1/d10: Mirror is setup.
These metainit(1M) error messages can be ignored safely.
13. Allow hasetup(1M) to create file systems on all metatrans devices.
Is it okay to create filesystem on all metatrans devices (yes/no) [yes]?
The hasetup(1M) command launches newfs on the metatrans devices and
generates status messages:
Launching "newfs" for
Launching "newfs" for
Launching "newfs" for
...
All "newfs" processes
hahost1/rdsk/d0 ... done
hahost1/rdsk/d1 ... done
hahost1/rdsk/d2 ... done
completed ... done
14. Allow hasetup(1M) to create new vfstab files.
You are prompted as to whether you want to create new vfstab files.
Do you want to create new Solstice HA vfstab files (yes/no) [yes]?
Would you like to use the default mount points (yes/no) [no]? yes
Mount point for metadevice d1 under /hahost1 (^D to skip) [d1]?
mount /dev/md/hahost1/dsk/d0 /hahost1... done
mount /dev/md/hahost1/dsk/d1 /hahost1/d1... done
Copying the "vfstab.hahost1" file to host "phys-hahost2" ... done
...
Software Configuration and Validation
7-13
7
15. Allow hasetup(1M) to create new dfstab files, and set up NFS shared
file systems.
You are asked whether you want to create new dfstab files, and which file
systems to NFS share. The dfstab files are used only by HA-NFS.
Do you want to create new Solstice HA dfstab files (yes/no) [yes]?
NFS share everything other than /hahost1 and /hahost2 (yes/no) [no]?
Will you want to nfs share /hahost1/d1 (yes/no) [yes]?
Copying the "dfstab.hahost1" file to host "phys-hahost2" ... done
Will you want to nfs share /hahost2/d1 (yes/no) [yes]?
Copying the "dfstab.hahost2" file to host "phys-hahost2" ... done
...
Setup was completed successfully
#
You can modify the disksets after configuration but before starting HA, using
the metaset(1M) command.
The hasetup(1M) procedure is now complete. At this point, continue with the
procedures described in “Post-Configuration Procedures” on page 7-23 to
complete the configuration.
7-14
Solstice HA 1.3 User’s Guide—April 1997
7
▼ How to Set Up Disksets When md.tab Does Not Exist
If you choose not to have hasetup(1M) set up your disksets from an md.tab
file, you can use the following procedure to set them up manually.
These are the high-level steps to set up disksets when md.tab does not exist:
•
•
•
Allocate the disks between the disksets.
Repartition and populate disks with metadevice state databases.
Set up your multihost file systems.
These are the detailed steps to set up disksets when md.tab does not exist:
1. If for any reason hasetup(1M) does not create the disksets from your
md.tab file, and if your configuration is symmetric, then hasetup(1M)
asks whether you want to use the default allocation.
Do you accept the default allocation of disks into disksets (yes/no) [yes]?
If you answer no, hasetup(1M) brings up a screen showing the default
allocation based on existing drives on the system.
Software Configuration and Validation
7-15
7
By default, the hasetup(1M) program automatically allocates the disks as
evenly as possible between the two disksets (in a symmetric configuration).
This allocation is subject to the majority drive requirements of Solstice
DiskSuite. You have the option of editing the allocations of disks to the two
disksets.
===================== Default Diskset Allocation =====================
hahost2
c1t0d0,
c1t4d0,
c2t2d1,
c3t0d0,
c3t4d0,
c1t0d1,
c1t4d1,
c2t2d2,
c3t0d1,
c3t5d0
c1t1d0,
c1t5d0,
c2t3d0,
c3t1d0,
hahost1
c1t1d1
c2t2d0
c2t3d1
c3t1d1
Total number of disks: 18
c1t2d0,
c2t0d1,
c2t4d0,
c2t5d1,
c3t3d0,
c1t2d1,
c2t0d2,
c2t4d1,
c2t5d2,
c3t4d1
c1t3d0,
c2t1d0,
c2t4d2,
c3t2d0,
c2t0d0
c2t1d1
c2t5d0
c3t2d1
Total number of disks: 18
======================================================================
Do you accept the default allocation of disks into disksets [y|n]? y
If you respond with no at the above prompt, you are allowed to edit the
allocation of disks to each of the disksets, as shown in the following screen.
You interact with the following screen using the up and down arrows. To add
disks to a different diskset, type the drive name (cntndn). Shell syntax wild
carding is accepted. The “Total number of disks” fields reflect any changes
made during editing.
7-16
Solstice HA 1.3 User’s Guide—April 1997
7
When editing is complete, move the cursor to the last line and type y.
=================== Diskset Allocation =======================
hahost1
c1t0d0,
c1t4d0,
c2t2d1,
c3t0d0,
c3t4d0,
c1t0d1,
c1t4d1,
c2t2d2,
c3t0d1,
c3t5d0
hahost2
c1t1d0,
c1t5d0,
c2t3d0,
c3t1d0,
c1t1d1
c2t2d0
c2t3d1
c3t1d1
c1t2d0,
c2t0d1,
c2t4d0,
c2t5d1,
c3t3d0,
c1t2d1,
c2t0d2,
c2t4d1,
c2t5d2,
c3t4d1
c1t3d0,
c2t1d0,
c2t4d2,
c3t2d0,
c2t0d0
c2t1d1
c2t5d0
c3t2d1
Total number of disks: 18
Total number of disks: 18
======================= Edit Disksets =========================
Add to hahost1:
Add to hahost2:
Revert back to default diskset allocation [y]?
===============================================================
Is disk allocation editing complete [y|n]? y
If you create a diskset that violates the configuration rules, hasetup(1M)
will not allow the configuration to be saved. The following message
appears:
>> WARNING: disk configuration rules for one or both disksets violated! <<
Is disk allocation editing complete [y|n]?
Software Configuration and Validation
7-17
7
2. Repartition and populate disks with metadevice state databases.
When editing is complete, you are asked whether you are ready to have
hasetup(1M) repartition and populate the disks with metadevice state
database replicas.
!
Caution – Existing data on the multihost disks is destroyed when the disks are
repartitioned and populated with metadevice state databases.
...
All multihost disks will now be repartitioned and
populated with metadevice state database replicas.
Is this okay (yes/no)? y
Repartitioning all multihost disks ... done
Creating diskset “hahost1” ... done
Populating diskset “hahost1” ... done
Releasing diskset “hahost1” ... done
Creating diskset “hahost2” ... done
Populating diskset “hahost2” ... done
#
If you respond with yes, the disksets are automatically created and
populated with metadevice state database replicas. If you respond with no,
metadevice state database placement on multihost disks and diskset
creation are bypassed and hasetup(1M) configures the servers with only
the data previously entered.
!
Caution – If you repartition the disk manually, create a partition 7 starting at
cylinder 0 that is large enough to hold a database replica (approximately 2
Mbytes). The Flag field in slice 7 must have V_UNMT (unmountable) set and
must not be set to read-only. Slice 7 must not overlap with any other slice on
the disk. Do this to prevent metaset(1M) from repartitioning your disks.
You can modify the disksets after configuration but before starting HA,
using the metaset(1M) command.
7-18
Solstice HA 1.3 User’s Guide—April 1997
7
3. Set up your multihost file systems.
Continue with the procedure “How to Set Up a Multihost UFS File System”
to perform this step.
▼ How to Set Up a Multihost UFS File System
If you did not have hasetup(1M) set up your file systems, use the following
procedure to set up UFS file systems on the multihost disks after you have set
up the disksets.
These are the high-level steps to set up a multihost UFS file system:
•
•
•
•
•
•
Plan your file system layout
Create the md.tab file
Partition the multihost disks
Run metainit(1M) using md.tab
Run newfs(1M) on the disksets
Access and edit the vfstab.logicalhost files on each server in the
configuration.
These are the detailed steps to set up a multihost UFS file system:
1. Plan your file system layout.
Use the information in “md.tab Creation Guidelines” on page 4-9 and
“Sample md.tab File” on page 4-11 to create these file systems and to set up
the “HA administrative file system.”
2. Create md.tab(1M)
Follow the instructions in “md.tab Creation Guidelines” on page 4-9 and
“Sample md.tab File” on page 4-11.
3. Manually partition the multihost disks.
Use the information in “md.tab Creation Guidelines” on page 4-9 to
complete this step.
4. Run metainit(1M) using md.tab(1M)
This will cause the disks to be repartitioned, the disksets to be created, and
metadevices to be configured as specified in the md.tab file,
Software Configuration and Validation
7-19
7
5. Invoke newfs(1M) on the disksets.
Run newfs on each diskset in the configuration. Before you can run newfs
on the disksets, you might need to take ownership using the metaset(1M)
command. For example, the following list of metatrans devices is used for
file systems that will be shared by clients on logical host “hahost1.”
phys-hahost1# newfs /dev/md/hahost1/rdsk/d0
phys-hahost1# newfs /dev/md/hahost1/rdsk/d1
phys-hahost1# newfs /dev/md/hahost1/rdsk/d2
If you took ownership of the disksets using the metaset(1M) command
before running newfs, release ownership of the disks once the newfs
operation completes.
6. Use the hafstab(1M) command to update the vfstab.logicalhost files on
one server in the configuration.
Note – The hafstab(1M) command automatically updates files on both
servers so it need be run only on one of the HA servers. See the hafstab(1M)
man page for details.
The vfstab.logicalhost file is in vfstab format. The hafstab(1M)
command allows editing a copy of the vfstab.logicalhost file, performs a
limited sanity check on the vfstab.logicalhost file, then distributes the file to
both servers in the configuration. The editor defined by the EDITOR
environment variable is used. A template of the vfstab.logicalhost file is
presented for editing if no version of the file exists.
phys-hahost1# hafstab vfstab.hahost1
Failed to copy phys-hahost2 version.
Type ‘y’ to edit phys-hahost1 version; type ‘n’ to exit. [y|n] y
7. Edit the vfstab.logicalhost file to include the names of your disksets and
metadevices.
7-20
Solstice HA 1.3 User’s Guide—April 1997
7
After the editor begins, the following template file appears.
#
#ident “@(#)vfstab.tmpl
1.6
94/07/23 SMI”
#
# Copyright 26 Jul 1995 Sun Microsystems, Inc. All Rights Reserved
#
# This file must be replicated on both servers of the HADF configuration;
# use hafstab(1M) to edit and distribute.
#device
device
mount
FS
fsck mount mount
#to mount
to fsck
point
type pass all
options
#
#/dev/md/<setname>/dsk/d0 /dev/md/<setname>/rdsk/d0 /<pathprefix> ufs - yes
#/dev/md/<setname>/dsk/d1 /dev/md/<setname>/rdsk/d1 /<pathprefix>/1 ufs - yes
#/dev/md/<setname>/dsk/d2 /dev/md/<setname>/rdsk/d2 /<pathprefix>/2 ufs - yes
-
Add appropriate lines to the file, using the commented lines as examples.
Change setname to be the diskset name, which must be the same as the
logical host name, and correct the metadevice names (d0, d1, d2) as needed.
Change pathprefix entries to be the logical host name. Also correct the mount
points as necessary.
The resulting file should look similar to the following:
#device
device
mount
FS
fsck mount mount
#to mount
to fsck
point
type pass all
options
#
#/dev/md/<setname>/dsk/d0 /dev/md/<setname>/rdsk/d0 /<pathprefix>
ufs - yes
#/dev/md/<setname>/dsk/d1 /dev/md/<setname>/rdsk/d1 /<pathprefix>/1 ufs - yes
#/dev/md/<setname>/dsk/d2 /dev/md/<setname>/rdsk/d2 /<pathprefix>/2 ufs - yes
#
/dev/md/hahost1/dsk/d0 /dev/md/hahost1/rdsk/d0 /hahost1
ufs - yes /dev/md/hahost1/dsk/d1 /dev/md/hahost1/rdsk/d1 /hahost1/1 ufs - yes /dev/md/hahost1/dsk/d2 /dev/md/hahost1/rdsk/d2 /hahost1/2 ufs - yes -
Software Configuration and Validation
7-21
7
8. Save the file and copy it to the sibling.
If you respond with a y, the edited version of the vfstab.logicalhost file will
be distributed to the sibling host.
Would you like to save these changes locally and distribute them
to host1 now? [y|n] y
changes to vfstab.hahost1 are saved on phys-hahost1.
Copying vfstab.hahost1 to phys-hahost2 ... copy complete.
phys-hahost1#
9. If you have a symmetric configuration, repeat all previous steps for the
second logical host.
This completes the multihost file system set up. Continue with the procedures
described in “Post-Configuration Procedures” on page 7-23 to complete the
configuration.
7-22
Solstice HA 1.3 User’s Guide—April 1997
7
7.3 Post-Configuration Procedures
Complete the following procedures after you have installed all Solstice HA
software, have set up your disksets, and have configured your data services.
▼ How to Complete the Post-Configuration Procedures
1. On each of the two servers, run hacheck(1M).
# hacheck
The hacheck(1M) utility displays any errors that it finds.
2. Run hastart -r on each of the two servers.
This will cause the servers to automatically start Solstice HA on subsequent
reboots.
3. Reboot the two servers in unison.
4. Install and configure the data services.
Install and configure your data services now, using the procedures
described in Part 2 – Installing, Configuring, and Administering Data Services.
5. (Optional) Migrate your data service data to the HA servers.
See “Migrating Existing Data” on page 3-15 for data migration
information.
6. If you have registered data services with hasetup(1M), start them using
hareg(1M).
# hareg -Y
Run hareg(1M) on only one of the HA servers. See the hareg(1M) man
page for details on registering and starting data services.
This completes the post-configuration procedures. If you encountered any
problems while installing or configuring Solstice HA, refer to Section 7.5,
“Troubleshooting HA Installation and Configuration” for troubleshooting
Software Configuration and Validation
7-23
7
information. Once you have successfully completed the installation, verify and
validate the configuration using the procedures described in Section 7.4,
“Verifying and Validating the Configuration.”
7.4 Verifying and Validating the Configuration
Verifying and validating the Ultra Enterprise Cluster HA configuration
involves:
•
•
•
•
•
Running the hacheck(1M) command
Running the haswitch(1M) command (as part of the physical and manual
tests)
Performing physical and manual tests
Testing the fault detection
Verifying that the data services run and failover correctly
7.4.1 Running the hacheck(1M) Command
Run the hacheck(1M) command on both servers in the Ultra Enterprise
Cluster HA configuration. The command automatically performs the following
on both servers in the Solstice HA configuration:
•
•
Checks that all HA-DBMS products are installed properly.
Checks and verifies all Solstice HA configuration information.
Run hacheck(1M) by typing the following command on both servers:
phys-hahost1# hacheck
A null response from hacheck(1M) means that it completed successfully.
Error messages reported by hacheck(1M) are documented in Appendix A,
“Error Messages.”
7-24
Solstice HA 1.3 User’s Guide—April 1997
7
7.4.2 Running the haswitch(1M) Command
The haswitch(1M) command transfers the specified disksets along with the
associated data services and logical IP addresses to the specified server.
Run the haswitch(1M) command from each side of the Ultra Enterprise
Cluster HA configuration. The following sample command line associates the
diskset named “hahost1,” along with its data services and logical IP addresses
with physical host “phys-hahost2.”
phys-hahost1# haswitch phys-hahost2 hahost1
7.4.3 Performing Takeover and Failover Tests
Conduct both physical and manual tests of the Ultra Enterprise Cluster HA
configuration to make sure one system will take over if the other fails. You
must perform each of the tests listed.
1. Make sure diskset ownership moves from one server to the other when
the power is turned off on the default master.
Perform the following steps to conduct this test:
a. Turn off the power on one of the servers.
You begin to see private network error messages on the console of the
sever that remains running.
b. Verify the other system has taken ownership of the diskset that was
mastered by the server you turned off.
c. Turn the power back on.
Let the system reboot. The system automatically will start the
membership monitor software. The host then rejoins the configuration.
d. Perform a switchover (using haswitch(1M)) to give ownership of the
diskset back to the default master.
e. Repeat the procedure, by turning off the power to the second server.
Software Configuration and Validation
7-25
7
2. Ensure a takeover occurs when one system is halted.
Perform the following steps to conduct this test:
a. As root, invoke uadmin(1M) on one host. For example:
phys-hahost1# /sbin/uadmin 1 0
Program terminated
Type help for more information
<#0> ok
b. Make sure the sibling host has taken over the diskset that was
mastered by system you halted.
c. Reboot the server.
d. Perform a switchover (using haswitch(1M)), moving ownership of the
diskset back to the default master.
e. Repeat the procedure on the other server.
7.4.4 Performing the Fault Detection Test
There are two methods to test the fault detection monitor that runs on each
system in an Ultra Enterprise Cluster HA configuration.
You can use the private network connections:
1. Disconnect one of the private network connections.
You can verify that this action is recognized by the Solstice HA software
when error messages are displayed on the Ultra Enterprise Cluster HA
consoles on each host or in the /var/adm/messages file. This fault does
not result in a takeover.
2. Reconnect the private network connection.
Alternatively, you can use the public network connections:
1. Disconnect all the public network connections on one of the servers.
It might take several minutes before error messages are generated and a
takeover occurs.
2. Reconnect the network and wait for the server to reboot.
7-26
Solstice HA 1.3 User’s Guide—April 1997
7
7.4.5 Verifying Data Services
Verify and validate the data services with the following steps:
1. Access your data services to ensure that they are up and running.
2. Stop and restart them.
3. If possible, induce a failure and see that the service fails over to the other
logical host.
Refer to Part 2 – Installing, Configuring, and Administering Data Services for more
information on verifying your data services.
7.5 Troubleshooting HA Installation and Configuration
If you encounter problems or enter incorrect information while running
hasetup(1M), use this section to take corrective action. See Appendix A,
“Error Messages” for a list of error messages that might occur while running
hasetup(1M).
7.5.1 Adding Data Services
If hasetup(1M) exits before you have set up a data service, you can add the
service by rerunning hasetup(1M) and entering the data service name at the
appropriate prompt.
If a data service package was not installed by hainstall(1M), use the
following procedure to install the package from CD-ROM.
▼
How to Install a Data Service Package Using pkgadd(1M)
1. Mount the Solstice HA CD-ROM image from either the CD-ROM or as an
NFS mount from the install server.
Software Configuration and Validation
7-27
7
2. Use pkgadd(1M) to add the data service package.
# pkgadd -d mounted-install-directory data_service_package
For example:
# pkgadd -d /cdrom/solstice_ha_1_3 SUNWhanfs
3. Configure and register the data service.
After the package is added, you must configure and register the data service
with Solstice HA. Refer to the appropriate chapter in Part 2 - Installing,
Configuring, and Administering Data Services for details.
7.5.2 Fixing md.tab
If your md.tab file does not contain correct diskset or metadevice
configuration information, hasetup(1M) might fail at one of several points.
If some metadevices have already been created for one or both of the disksets,
use the following procedure to fix problems in md.tab.
▼
How to Fix Problems in md.tab
1. Exit hasetup(1M).
2. Fix any errors detected by metainit(1M) when it was run by
hasetup(1M).
3. Run metaclear -s diskset -a to clear all shared metadevices from the
configuration.
!
Caution – Do not run metaclear(1M) if you have live data on any of the
metadevices. The metaclear(1M) command will make it impossible to access
that data.
4. Rerun hasetup(1M).
7-28
Solstice HA 1.3 User’s Guide—April 1997
7
7.5.3 Restarting hasetup(1M)
If you exit out of hasetup(1M) any time prior to Step 11 in the procedure
“How to Run hasetup(1M),” you can remove the file
/etc/opt/SUNWhadf/hadf/hadfconfig (if it exists) and rerun
hasetup(1M). If you still cannot run hasetup(1M) at this point, you might
need to reinstall Solaris and the Solstice HA software before running
hasetup(1M) again.
If you exit out of hasetup(1M) after Step 11 in “How to Run hasetup(1M),”
you might need to use metaclear(1M) to clear all metadevices from the
disksets before you are able to rerun hasetup(1M). This will cause
hasetup(1M) to bypass most of the previous steps and allow you to
reconfigure the disksets.
7.5.4 The hasetup(1M) Program Reports No Shared Disks
If hasetup(1M) reports that it finds no shared disks, the problem might be
that the SPARCstorage Array packages were not installed until after
SUNWhagen was installed. SUNWhagen normally updates
/kernel/drv/ssd.conf with an entry that turns off the SCSI reservation
messages when the SPARCstorage Array packages are present. In this
situation, you will need to install the SPARCstorage Array packages and add
the following lines to /kernel/drv/ssd.conf:
# Start of lines added by Solstice HA
sd_retry_on_reservation_conflict=0;
# End of lines added by Solstice HA
Software Configuration and Validation
7-29
7
7-30
Solstice HA 1.3 User’s Guide—April 1997
Part 2 — Installing, Configuring, and
Administering Data Services
Data Services Overview
8
The chapters in this part describe the procedures used to install, configure, and
administer the data services provided with Solstice HA. Each chapter includes
everything you need to set up and administer a particular Solstice HA data
service. This information should be used in conjunction with the user
documentation supplied by the data service vendor.
The following steps describe the general procedure used to set up a Solstice
HA data service. See the chapters listed for details and information.
1. Register the data service.
This is generally done as part of the installation and configuration of the
cluster software as described in Chapter 7, “Software Configuration and
Validation.” If you add a data service to an existing configuration, you must
add the package and register the service as described in Section 7.5.1,
“Adding Data Services.” The HA Internet Pro data services are registered
after the cluster is up and running. Follow the instructions in Chapter 13,
“Setting Up and Administering Solstice HA Internet Pro” to register these
data services.
2. License the data services software.
Each data service must be licensed to run in your configuration. Refer to
Chapter 5, “Licensing Solstice HA Software.”
3. Install and configure the data service software.
This is described in the chapter for each data service.
8-1
8
4. Migrate any existing data for the data service to the multihost disks.
Check with your data service vendor to determine the best way to migrate
your data to the multihost disks.
5. Start the data services.
You can start individual data services or start all data services using
hareg(1M). Each time you start an individual data service, you cause a
cluster reconfiguration. If you start all data services with a single invocation
of hareg(1M) (hareg -Y), you cause only a single cluster reconfiguration.
6. Verify and validate the data services.
Ensure that the data services are installed and configured correctly. Refer to
Section 7.4.5, “Verifying Data Services.”
After you complete these steps, your highly available data services will be
ready for users to access.
8-2
Solstice HA 1.3 User’s Guide—April 1997
Setting Up and Administering
HA-NFS
9
This chapter provides instructions for setting up and administering the Solstice
HA-NFS data service.
Overview of Tasks
page 9-2
Setting Up Metadevices for HA-NFS
page 9-2
Setting Up and Sharing HA-NFS File Systems
page 9-2
Administering HA-NFS
page 9-7
This chapter includes the following procedures:
• “How to Share HA-NFS File Systems” on page 9-3
• “How to Register and Activate HA-NFS” on page 9-5
• “How to Add HA-NFS to a System Already Running Solstice HA” on
page 9-6
• “How to Add an Existing UFS to a Logical Host” on page 9-7
• “How to Remove a Logging UFS From a Logical Host” on page 9-8
• “How to Add an HA-NFS File System to a Logical Host” on page 9-8
• “How to Remove an HA-NFS File System From a Logical Host” on
page 9-9
• “How to Change Share Options on an HA-NFS File System” on page 9-10
9-1
9
9.1 Overview of Tasks
This chapter describes the steps necessary to configure and run HA-NFS on
your HA servers. It also describes the steps you would take to add HA-NFS to
a system that is already running Solstice HA.
If you are running multiple data services in your Ultra Enterprise Cluster HA
configuration, you can set up the data services in any order, with one
exception: you must set up HA-DNS before setting up the HA Internet Pro
data services.
9.2 Setting Up Metadevices for HA-NFS
If you are running HA-NFS on Ultra Enterprise Cluster HA systems, you must
create one or more trans devices that contain a mirrored log and a mirrored
master. The submirrors can consist of either concatenations or stripes. See
Chapter 3, “Configuration Planning” for information about setting up your
trans devices.
If you decide to use metatool(1M) to create the metadevices, refer to the
Solstice DiskSuite 4.1 User’s Guide for details about using this utility.
9.3 Setting Up and Sharing HA-NFS File Systems
The procedure in this section assumes that you have planned all file systems,
created the disksets, and set up trans (UFS logging) devices (see Chapter 3,
“Configuration Planning”).
Follow the procedure described in “How to Set Up a Multihost UFS File
System” on page 7-19 before sharing your NFS file systems.
Use the hafstab(1M) command to edit the logical host’s vfstab.logicalhost
and dfstab.logicalhost files. Run this command on only one server. The files
are automatically distributed to the other server.
9-2
Solstice HA 1.3 User’s Guide—April 1997
9
▼ How to Share HA-NFS File Systems
These are the high-level steps to share HA-NFS file systems. (Note that NFS
file systems are not shared until you perform a cluster reconfiguration as
outlined in “How to Register and Activate HA-NFS” on page 9-5.)
•
•
Create your multihost UFS file systems.
Use hafstab(1M) to edit the dfstab.logicalhost files and copy them to the
sibling.
These are the detailed steps to share HA-NFS file systems:
1. Create your multihost UFS file systems.
Use the procedure specified in “How to Set Up a Multihost UFS File
System” on page 7-19 to create the multihost file system.
2. Use the hafstab(1M) command on one HA server to edit the
dfstab.logicalhost files.
The dfstab.logicalhost file is in dfstab format. The hafstab(1M)
command allows editing the dfstab.logicalhost files and then distributes
the file to both servers in the configuration. The editor defined as the
EDITOR environment variable is used. A template of the dfstab.logicalhost
file (dfstab.tmpl) is presented for editing if no version of the file exists.
Start hafstab(1M) with the following argument and respond to the
prompts.
phys-hahost1# hafstab dfstab.hahost1
Failed to copy phys-hahost2 version.
Type ‘y’ to edit phys-hahost1 version; type ‘n’ to exit. [y|n] y
In the following example, the file system on d0 is not shared.
Setting Up and Administering HA-NFS
9-3
9
After the editor begins, the following template file appears:
#
#ident “@(#)dfstab.tmpl
1.10
95/07/26 SMI”
#
# Copyright 26 Jul 1995 Sun Microsystems, Inc. All Rights Reserved.
#
# This file must be replicated on both servers of the HADF configuration;
# use hafstab(1M) to edit and distribute.
#
#
Place the share(1M) commands at the end of this file.
#
#
share [-F fstype] [ -o options] [-d “<text>”] <pathname> [resource]
#
.e.g,
#
share -F nfs -o rw=engineering -d “home dirs” /export/home2
#
#
Notes: If you use the “rw”, “rw=”, “ro”, and/or “ro=” options to the
#
share command, then HA-NFS fault monitoring will work best if you
#
grant access to both of the HA server hosts, to ALL of their
#
hostnames. Look at your hadfconfig file,
#
/etc/opt/SUNWhadf/hadf/hadfconfig. For all of the HOSTNAME
#
lines, all of the physical hostnames, which are the 2nd column and
#
4th column of the HOSTNAME line(s), should be granted access.
#
If you use netgroups in the share command (rather than names of
#
individual hosts) please add all of those HA server hostnames to
#
the appropriate netgroup.
#
Also, ideally, both read and write access should be granted
#
to all of the HA server hosts’ hostnames, to enable the NFS fault
#
probes do a more thorough job.
#
# Example share command lines:
#
share -F nfs -d “description” /<pathprefix>/1
#
share -F nfs -d “description” /<pathprefix>/2
3. Make the following changes to the dfstab.logicalhost file:
Add appropriate lines to the file, by copying the share lines and editing the
copied versions.
a. Change <pathprefix> entries to be the logical host name.
b. Correct the mount points as necessary.
9-4
Solstice HA 1.3 User’s Guide—April 1997
9
c. Change the description to be a description of the resources being
shared. In this example, the field includes the logical host name, the
use (nfs), and the mount point name.
The resulting file will look like this:
share
share
-F nfs
-F nfs
-d “hahost1 fs 1” /hahost1/1
-d “hahost1 fs 2” /hahost1/2
Note – When constructing share options, generally avoid using the “root”
option and avoid mixing ro and rw options.
4. Save the file and quit the editor. Copy the file to the sibling.
If you respond with y, the edited version of the dfstab.logicalhost file will
be distributed to the sibling host.
Would you like to save these changes locally and distribute them
to phys-hahost1 now? [y|n] y
changes to dfstab.hahost1 are saved on phys-hahost1.
Copying dfstab.hahost1 to phys-hahost2 ... copy complete.
phys-hahost1#
5. If you have created a symmetric configuration, repeat Steps 1-4 for the
second logical host.
After completing these steps, register and activate HA-NFS using the following
procedure.
▼ How to Register and Activate HA-NFS
After setting up and configuring HA-NFS, you must activate it using
hareg(1M) to start the Solstice HA monitor. If you did not use hasetup(1M)
to register HA-NFS, you should do so now.
Setting Up and Administering HA-NFS
9-5
9
1. Register HA-NFS.
The following command registers the HA-NFS data service with Solstice
HA.
# hareg -s -r nfs
2. Activate the HA-NFS service by invoking hareg(1M) on one host.
# hareg -y nfs
These steps complete the process of setting up, registering, and activating
HA-NFS on your Solstice HA servers.
▼ How to Add HA-NFS to a System Already Running Solstice HA
1. Mount the Solstice HA CD-ROM image from either the CD or as an NFS
mount from the install server.
2. Use pkgadd(1M) to add the HA-NFS package, for example:
# pkgadd -d mounted-install-directory SUNWhanfs
3. Use hafstab(1M) to create the dfstab.logicalhost file.
Follow the instructions in “How to Share HA-NFS File Systems” on page 9-3
to edit the dfstab file.
4. Register HA-NFS.
The following command registers the HA-NFS data service with Solstice
HA.
# hareg -s -r nfs
5. Activate the HA-NFS service by invoking hareg(1M) on one host.
# hareg -y nfs
9-6
Solstice HA 1.3 User’s Guide—April 1997
9
9.4 Administering HA-NFS
This section described the procedures used to administer HA-NFS.
9.4.1 Adding an Existing UFS to a Logical Host
After Solstice HA is running, use the following procedures to add an
additional UFS to a logical host.
Note – Exercise caution when manually mounting multihost disk file systems
that are not listed in the Solstice HA vfstab.logicalhost and dfstab.logicalhost
files. If you forget to unmount that file system, a subsequent switchover of the
logical host containing that file system will fail because the metaset(1M)
command will find that device busy. However if that file system is listed in the
appropriate Solstice HA fstab files, the software can execute a lockfs
command to enable a forceful unmount of the file system, and the
metaset(1M) command (with the -r option to release the device) will
succeed.
▼ How to Add an Existing UFS to a Logical Host
1. Add an entry for the UFS to the vfstab.logicalhost file using
hafstab(1M).
2. Run mount(1M) to mount the new file system.
Specify the device and mount point. Alternatively, you can wait until the
next membership reconfiguration for the file system to be automatically
mounted.
3. Add the HA-NFS file system to the logical host.
Follow the procedure in “Adding an HA-NFS File System to a Logical Host”
on page 9-8.
Setting Up and Administering HA-NFS
9-7
9
9.4.2 Removing a Logging UFS From a Logical Host
Use the following procedure to remove a logging UFS file system from a
logical host running HA-NFS.
▼ How to Remove a Logging UFS From a Logical Host
1. Remove the logging UFS entry from the vfstab.logicalhost file using the
hafstab(1M) command.
Refer to Chapter 7, “Software Configuration and Validation” for instructions
on using the hafstab(1M) command.
2. Run the umount(1M) command to unmount the file system.
3. (Optional) Clear the associated trans device and its mirrors using either
the metaclear -r or the metatool(1M) command.
Refer to the Solstice DiskSuite 4.1 User’s Guide or the Solstice DiskSuite 4.1
Reference Guide for instructions about clearing trans devices.
9.4.3 Adding an HA-NFS File System to a Logical Host
Use the following procedure to add an HA-NFS file system to a logical host.
▼ How to Add an HA-NFS File System to a Logical Host
1. Make the appropriate entry for each logging UFS file system that will be
shared by HA-NFS in the vfstab.logicalhost file using the hafstab(1M)
command.
Refer to the “How to Set Up a Multihost UFS File System” on page 7-19 for
instructions about using the hafstab(1M) command.
2. Make the corresponding entry in the dfstab.logicalhost file using the
hafstab(1M) command.
9-8
Solstice HA 1.3 User’s Guide—April 1997
9
3. Execute a membership reconfiguration of the servers.
See “Forcing a Membership Reconfiguration” on page 17-4 for more
information.
Alternatively, the file system can be shared manually. If the procedure is
performed manually, the fault monitoring processes will not be started
either locally or remotely until the next membership reconfiguration is
performed.
9.4.4 Removing an HA-NFS File System From a Logical Host
Use the following procedure to remove an HA-NFS file system from a logical
host.
▼ How to Remove an HA-NFS File System From a Logical Host
1. Remove the entry for the HA-NFS file system from the dfstab.logicalhost
file using the hafstab(1M) command.
Refer to “How to Set Up a Multihost UFS File System” on page 7-19 for
instructions about using the hafstab(1M) command.
2. Run the unshare(1M)command.
The fault monitoring system will try to access the file system until the next
membership reconfiguration. Errors will be logged, but a takeover of
services will not be initiated by the Solstice HA software.
3. (Optional) Remove the logging UFS from the logical host. If you want to
retain the UFS file system for a non-HA-NFS purpose, such as an
HA-DBMS file system, skip to Step 4.
To perform this task, use the procedure described in “Removing a Logging
UFS From a Logical Host” on page 9-8.
4. Execute a membership reconfiguration of the servers.
Setting Up and Administering HA-NFS
9-9
9
9.4.5 Changing Share Options on an HA-NFS File System
If you use the rw, rw=, ro, or ro= options to the share(1M) command,
HA-NFS fault monitoring will work best if you grant access to all the physical
host names or netgroups associated with both Ultra Enterprise Cluster HA
servers.
If you use netgroups in the share(1M) command add all of the Ultra
Enterprise Cluster HA host names to the appropriate netgroup. Ideally, you
should grant both read and write access to all the Ultra Enterprise Cluster HA
host names to enable the NFS fault probes to do a complete job.
Note – Before you change share options, study the share_nfs(1M) man page
to understand which combinations of options are legal. When modifying the
share options, we recommend that you execute your proposed new
share(1M) command, interactively, as root, on the HA server that currently
masters the logical host. This will give you immediate feedback as to whether
your share options combination is legal. If the new share(1M) command fails,
immediately execute another share(1M) command with the old options. After
you have a new working share(1M) command, change the
dfstab.logicalhostname file to incorporate the new share(1M) command.
▼ How to Change Share Options on an HA-NFS File System
1. Make the appropriate share changes to the dfstab.logicalhost file using
the hafstab(1M) command.
Refer to “How to Set Up a Multihost UFS File System” on page 7-19 for
instruction about using the hafstab(1M) command.
2. Perform a membership reconfiguration using the instructions in “Forcing
a Membership Reconfiguration” on page 17-4.
If a reconfiguration is not possible, you can run the share(1M) command
with the new options. Some changes can cause the fault monitoring
subsystem to issue messages. For instance, a change from read-write to
read-only will generate messages.
9-10
Solstice HA 1.3 User’s Guide—April 1997
Setting Up and Administering
Solstice HA-DBMS for ORACLE7
10
This chapter provides instructions for setting up and administering the Solstice
HA-DBMS for ORACLE7 data service.
Overview of Tasks
page 10-1
Setting Up Metadevices for Solstice HA-DBMS for ORACLE7
page 10-2
Setting Up Solstice HA-DBMS for ORACLE7
page 10-2
Verifying the Solstice HA-DBMS for ORACLE7 Installation
page 10-15
Configuring the ORACLE SQL*Net V2 Listener
page 10-16
This chapter includes the following procedures:
• “How to Prepare Solstice HA Servers for Oracle Installation” on page 10-2
• “How to Prepare Logical Hosts for Oracle Databases” on page 10-5
• “How to Create an Oracle Database” on page 10-6
• “How to Set Up Solstice HA-DBMS for ORACLE7” on page 10-7
• “How to Verify the Solstice HA-DBMS for ORACLE7 Installation” on
page 10-15
• “How to Configure the ORACLE SQL*Net V2 Listener” on page 10-16
10.1 Overview of Tasks
This chapter describes the steps necessary to configure and run Solstice
HA-DBMS for ORACLE7 on your HA servers.
10-1
10
If you are running both HA-NFS and Solstice HA-DBMS for ORACLE7 in your
Ultra Enterprise Cluster HA configuration, you can set up the data services in
any order.
10.2 Setting Up Metadevices for Solstice HA-DBMS for ORACLE7
You can configure Solstice HA-DBMS for ORACLE7 to use UFS logging or raw
mirrored metadevices. Refer to Chapter 4, “Installation Planning” for details
about setting up UFS or raw mirrored metadevices.
10.3 Setting Up Solstice HA-DBMS for ORACLE7
Before setting up Solstice HA-DBMS for ORACLE7, you must have performed
on each Solstice HA server the procedures described in Chapter 7, “Software
Configuration and Validation.”
▼ How to Prepare Solstice HA Servers for Oracle Installation
These are the high-level steps to prepare Solstice HA servers for Oracle
installation:
•
•
•
•
•
!
Choose a location for the ORACLE_HOME directory.
Create /etc/group and /etc/password entries for the ORACLE_HOME
directory.
Install the Oracle software.
If you are running Release 7.3 of Oracle7, configure the SQL*net V2 listener.
Set up a method to start the listener.
Caution – Perform all steps described in this section on both Solstice HA
servers.
Consult your Oracle documentation before performing this procedure.
These are the detailed steps to prepare Solstice HA servers for Oracle
installation:
1. Prepare the environment for Oracle installation.
Choose a location for the $ORACLE_HOME directory.
10-2
Solstice HA 1.3 User’s Guide—April 1997
10
Note – If you choose to install the Oracle binaries on a logical host, mount the
Oracle software distribution as a file system on its own separate disk, if
possible. This prevents Oracle from being overwritten if the operating system
is reinstalled.
2. On each HA server, create a /etc/group entry for the database
administrator group.
This group normally is named dba. Verify that root and oracle are
members of the dba group. For example:
dba:*:520:root,oracle
While you can make the name service entries in a network name service (for
example, NIS or NIS+) so that the information is available to Solstice
HA-DBMS for ORACLE7 clients, you also should make entries in the local
/etc files to eliminate dependency on the network name service.
Note – This duplicate information must be kept consistent when you make
changes.
3. On each HA server, create a /etc/passwd entry for the Oracle user ID
(oracle_id).
This entry is normally oracle for the user ID. For example:
# useradd -u 120 -g dba -d /oracle oracle
4. Verify that the ORACLE_HOME directory is owned by oracle_id and is
included in the dba group.
# chown oracle /oracle
# chgrp dba /oracle
Setting Up and Administering Solstice HA-DBMS for ORACLE7
10-3
10
5. Note the requirements for Oracle installation.
If you plan to install Oracle software on the logical host, you first must start
Solstice HA and take ownership of the logical host. See “How to Prepare
Logical Hosts for Oracle Databases” on page 10-5 for details.
When first installing Oracle, select the Install/Upgrade/Patch
Software Only option. This is necessary because database initialization
and configuration files must be modified to reflect the logical hosts as the
location for the database. Locating the database on the logical hosts ensures
high availability of the database during a cluster reconfiguration.
Note – For ORACLE 7.2 or earlier releases, Solstice HA requires SQL*Net V1.
For the ORACLE 7.3 release, Solstice HA requires SQL*Net V2.
6. Install the Oracle software.
On each HA server, modify the /etc/systems directories according to
standard Oracle installation procedures. Also, on each HA server, create
/var/opt/oracle directories for user oracle and group dba.
Log in as oracle to ensure ownership of the entire directory before
performing this step. Oracle binaries can be installed on either the physical
host or the logical host. Note, however, that any binaries installed on the
logical host will be included in mirroring of the logical host. For complete
instructions on installing Oracle software, refer to the ORACLE7 Installation
and Configuration Guide and the Oracle7 for Sun SPARC Solaris 2.x Installation
and Configuration Guide.
7. Verify the Oracle installation.
a. Verify that the Oracle kernel, $ORACLE_HOME/bin/oracle, is owned
by oracle and is included in the dba group.
b. Verify that the $ORACLE_HOME/bin/oracle permissions are set as
follows:
-rwsr-x--x
c. Verify that the listener binaries exist in $ORACLE_HOME/bin.
10-4
Solstice HA 1.3 User’s Guide—April 1997
10
d. Verify that the $ORACLE_HOME/orainst/RELVER file exists.
This file should contain the version number of the Oracle software
installed on the host. For example:
# cat $ORACLE_HOME/orainst/RELVER
RELEASE_VERSION=7.3.2.1.0
10.3.1 Creating an Oracle Database and Setting Up Solstice HA-DBMS for
ORACLE7
Complete both of the following procedures to create and configure the initial
Oracle database in a Solstice HA configuration. If you are creating and setting
up subsequent databases, perform only the procedure in “How to Create an
Oracle Database” on page 10-6.
▼ How to Prepare Logical Hosts for Oracle Databases
1. Start Solstice HA and take ownership of the disksets.
You must be root to perform this step. Use hastart(1M) to start Solstice
HA on one of the hosts. The hastart(1M) operation will cause that host to
take ownership of the disksets.
2. Set up raw mirrored metadevices on both servers.
If you will be using raw mirrored metadevices to contain the databases,
change the owner, group, and mode of each of the raw mirrored
metadevices. (If you are not using raw mirrored metadevices, skip this step.)
Instructions for creating mirrored metadevices are provided in Chapter 4,
“Installation Planning.”
If you are creating raw mirrored metadevices, type the following commands
for each metadevice.
# chown oracle_id /dev/md/logicalhost/rdsk/dn
# chgrp dba_id /dev/md/logicalhost/rdsk/dn
# chmod 600 /dev/md/logicalhost/rdsk/dn
Setting Up and Administering Solstice HA-DBMS for ORACLE7
10-5
10
!
Caution – While Oracle supports raw I/O to both raw physical devices and
raw metadevices (mirrored or nonmirrored), Solstice HA only supports raw
Oracle I/O on raw mirrored metadevices. You cannot use devices such as
/dev/rdsk/c1t1d1s2 to contain Oracle data under Solstice HA.
▼ How to Create an Oracle Database
These are the high-level steps to create an Oracle database:
•
•
•
Prepare the database configuration files.
Create the database.
Create the v_$sysstat view.
These are the detailed steps to create an Oracle database:
1. Prepare database configuration files.
Place all parameter files, data files, redolog files, and control files on the
logical host.
Within the init$ORACLE_SID.ora file, you might need to modify the
assignments for control_files and background_dump_dest to specify
the location of control files and alert files on the logical host.
Note – If you are using Solaris authentication for database logins, the
remote_os_authent variable in the init$ORACLE_SID.ora file must be set
to TRUE.
2. Create the database.
During creation, ensure that all configuration and database files are placed
on the logical hosts.
a. Start the Oracle installer (orainst) and select the Create New
Database Objects option.
b. During the orainst session, place all the database files on the logical
hosts.
Override the default file locations provided by the Oracle installer.
c. Verify that the file names of your control files match the file names in
your configuration files.
10-6
Solstice HA 1.3 User’s Guide—April 1997
10
Alternatively, you can create the database using the Oracle sqldba
command or, on Oracle 7.3 and later versions, the svrmgrl command.
Note – The Solstice HA-DBMS for ORACLE7 fault monitoring script parses the
init$ORACLE_SID.ora files. This script assumes a blank space on either side
of the = sign for background_dump_dest. While Oracle does not require the
spaces, Solstice HA-DBMS for ORACLE7 does. The background_dump_dest
assignment must appear in the init$ORACLE_SID.ora file.
3. Create the v$sysstat view.
Run the catalog scripts that create the v$sysstat view. This view is used
by the Solstice HA fault monitoring scripts.
▼ How to Set Up Solstice HA-DBMS for ORACLE7
These are the high-level steps to set up Solstice HA-DBMS for ORACLE7:
•
•
•
•
•
•
Make entries for all of the database instances in the
/var/opt/oracle/oratab files on both HA servers.
Enable user and password for fault monitoring and, optionally, grant
permission for the database to use Solaris authentication.
Verify installation of the Oracle listener, Solstice HA licensing, Solstice HA
software, and the cluster daemon.
Activate the Oracle data service, using hareg(1M).
Configure the haoracle_databases file.
Bring the Oracle database instance into service.
These are the detailed steps to set up Solstice HA-DBMS for ORACLE7:
1. Make entries for the Solstice HA-DBMS for ORACLE7 databases (SIDs)
of all database instances.
You must include the SID of the instance associated with your database in
the file /var/opt/oracle/oratab on both Solstice HA servers. You must
keep this file current on both Solstice HA servers for a failover to succeed.
Update the file manually as SIDs are added or removed. If the oratab files
do not match, an error message will be returned and the haoracle start
command will fail.
Setting Up and Administering Solstice HA-DBMS for ORACLE7
10-7
10
All entries in the /var/opt/oracle/oratab file should have the :N
option specified to ensure that the instance will not start automatically on
OS reboot. For example:
oracle_sid:/oracle:N
2. Optionally, enable access for the user and password to be used for fault
monitoring.
You must complete this step if you choose not to enable Solaris
authentication, as described in Step 3.
In the following examples the user is scott and the password is tiger.
Note that the user and password pair must agree with those used in Step 10,
if you are using Oracle authentication.
For all supported Oracle releases except Oracle version 7.1.6, enable access
by typing the following script into the screen brought up by the
srvmgrl(1M) command (for Oracle 7.1.6, bring up the screen with the
sqldba lmode=y command).
# srvmgrl
connect internal;
grant connect, resource to scott identified by tiger;
grant select on v_$sysstat to scott;
grant create session to scott;
grant create table to scott;
disconnect;
exit;
#
10-8
Solstice HA 1.3 User’s Guide—April 1997
10
3. Optionally, grant permission for the database to use Solaris
authentication.
You must complete this step if you chose not to complete Step 2.
The following sample entry enables Solaris authentication (use the sqldba
command for Oracle 7.1.6).
# srvmgrl
connect internal;
create user ops$root identified by externally;
grant select on v_$sysstat to ops$root;
grant create session to ops$root;
grant create table to ops$root;
disconnect;
exit;
#
4. If you are running Release 7.3 of Oracle7, configure SQL*Net V2 for
Solstice HA.
Note – You must configure and start the SQL*Net listeners differently
depending on whether you locate the Oracle binaries on the physical or logical
host.
a. If you place the Oracle binaries on the logical host, configure and start
the SQL*Net listener as follows.
If you use only one listener, Solstice HA will start a default listener,
LISTENER, automatically for you. In the event of a failover or
switchover, Solstice HA will restart the listener process automatically.
You can use the startup script in /etc/rc3.d to achieve this behavior.
See Step 5.
Setting Up and Administering Solstice HA-DBMS for ORACLE7
10-9
10
Note – You must indicate the physical host name in the listener.ora file,
and the logical host name in the tnsnames.ora file.
In this example section of the listener.ora file, the physical host is
“phys-hahost1”:
LISTENER =
(ADDRESS_LIST =
(ADDRESS =
(PROTOCOL = TCP)
(HOST = phys-hahost1)
(PORT = 1527)
)
In the tnsnames.ora file, specify the logical host as the host on which
the database instance is running. In this example section, the logical host
is “hahost1”:
SERVICE =
(DESCRIPTION =
(ADDRESS_LIST =
(ADDRESS =
(PROTOCOL = TCP)
(HOST = hahost1)
(PORT = 1527)
)
)
(CONNECT_DATA =
(SID = orasid1)
)
)
If you use multiple listeners, you must specify which instance will be
serviced by which listener. See Step 9 for a complete example. You can
continue to use the startup script in /etc/rc3.d to achieve this
behavior.
10-10
Solstice HA 1.3 User’s Guide—April 1997
10
b. If you place the Oracle binaries on the logical host, configure and start
the SQL*Net listener as follows.
You must split up the listener.ora file in /var/opt/oracle to one
listener process per logical host, and you must specify which instance
will be serviced by which listener. For example, you might configure
LISTENER.hahost1 for the logical host “hahost1,” and
LISTENER.hahost2 for the logical host “hahost2.”
Note – At boot time, the logical host is not yet known. Therefore, when Oracle
binaries reside on the logical host, the startup script in /etc/rc3.d is not able
to start the SQL*Net listener process.
See “Configuring the ORACLE SQL*Net V2 Listener” on page 10-16 for
an example of how to configure the SQL*Net V2 listener for symmetric
HA configurations.
5. Optionally, set up a method to start the SQL*Net listener.
If you place the Oracle binaries on the physical host, you can choose to
create a script in the /etc/rc3.d directory to start the listener, and then
start it manually or reboot. You must start the listener with the opsrooton
option if you want to use Solaris authentication.
Setting Up and Administering Solstice HA-DBMS for ORACLE7
10-11
10
If you have installed Oracle 7.1.6 and plan to use the ORACLE SQL*Net V2
listener, you can use a startup script similar to the following. Since the HA
fault monitor requires the V1 listener for Oracle 7.1.6, you must start up
both the V1 and V2 listeners.
ORACLE_HOME=/oracle_7.1.6; export ORACLE_HOME
ORACLE_OWNER=oracle; export ORACLE_OWNER
PATH=$ORACLE_HOME/bin:/usr/bin:$PATH; export PATH
case "$1" in
'start')
# Start V1 and V2 listeners
su $ORACLE_OWNER -c "tcpctl start"
su $ORACLE_OWNER -c "lsnrctl start"
;;
'stop')
# Stop V1 and V2 listeners
su $ORACLE_OWNER -c "tcpctl stop"
su $ORACLE_OWNER -c "lsnrctl stop"
;;
esac
6. Verify that the Solstice HA license for Solstice HA-DBMS for ORACLE7
is installed.
See Chapter 5, “Licensing Solstice HA Software” for details.
7. Verify that Solstice HA and the cluster daemon are installed and running
on both hosts.
# hastat
If they are not running already, start them with hastart(1M).
8. Activate Solstice HA-DBMS for ORACLE7, using hareg(1M).
You need to run the hareg(1M) command on only one host.
If the cluster is running already, then activate the Oracle data service using
hareg(1M):
# hareg -y oracle
10-12
Solstice HA 1.3 User’s Guide—April 1997
10
If the Oracle server is not yet registered, then use hareg(1M) to register it:
# hareg -s -r oracle
9. Set up the haoracle_databases(4) file using haoracle insert.
Add an entry to the haoracle_databases file, so that the instance will be
monitored by Solstice HA:
# haoracle insert $ORACLE_SID logicalhost 60 10 120 300 user/password \
/logicalhost/.../init$ORACLE_SID.ora LISTENER.logicalhost
The previous command line includes the following:
• haoracle insert – The command and subcommand.
• $ORACLE_SID – The name of the Oracle database instance.
• logicalhost – The logical host serving $ORACLE_SID (not the physical host).
• 60 10 120 300 – These parameters specify a probe cycle time of 60
seconds, a connectivity probe cycle count of 10 seconds, a probe time out
of 120 seconds, and a restart delay of 300 seconds.
• user/password – The user and password to be used for fault monitoring.
These must agree with the permission levels granted in Step 2. To use
Solaris authentication, enter a / instead of the user name and password.
• /logicalhost/.../init$ORACLE_SID.ora – The pfile to use to start up
the database. This must be on a logical host’s diskset.
• LISTENER.logicalhost – The SQL*Net V2 listener. The default is
LISTENER. This field is optional.
Caution – Use only the haoracle(1M) command to modify the
haoracle_databases file.
Setting Up and Administering Solstice HA-DBMS for ORACLE7
10-13
10
10. Bring the database instance into service.
Bring the Solstice HA-DBMS for ORACLE7 database into service by
executing haoracle(1M). Monitoring for that instance will start
automatically.
# haoracle start $ORACLE_SID
Note – If you did not start the Oracle instance before issuing the above
command, then Solstice HA will start the Oracle instance for you when you
issue the command.
10.3.2 Setting Up Solstice HA-DBMS for ORACLE7 Clients
Clients always must refer to the database using the logical host name and not
the physical host name.
For example, in the tnsnames.ora file for SQL*Net V2, you must specify the
logical host as the host on which the database instance is running. See Step 4 in
“How to Prepare Solstice HA Servers for Oracle Installation” on page 10-2.
Note – Oracle client-server connections will not survive a Solstice HA-DBMS
for ORACLE7 switchover. The client application must be prepared to handle
disconnection and reconnection or recovery as appropriate. A transaction
monitor might simplify the application. Further, Solstice HA-DBMS for
ORACLE7 server recovery time is application-dependent.
If your application uses functions from RDBMS dynamic link libraries, you
must ensure these libraries are available in the event of failover. To do so:
•
•
10-14
Install the link libraries on the client, or
Copy the libraries to the logical host and set the environment variables to
the directory path of the link libraries, if HA-NFS is a registered data
service.
Solstice HA 1.3 User’s Guide—April 1997
10
10.4 Verifying the Solstice HA-DBMS for ORACLE7 Installation
Perform the following verification tests to ensure the Solstice HA-DBMS for
ORACLE7 installation was performed correctly.
The purpose of these sanity checks is to ensure that the Oracle instance can be
started by both HA servers and can be accessed successfully by the other HA
server in the configuration. Perform these sanity checks to isolate any problems
starting Oracle from the Solstice HA-DBMS for ORACLE7 data service.
▼ How to Verify the Solstice HA-DBMS for ORACLE7 Installation
1. Log in to the HA server mastering the logical host, and set the Oracle
environment variables.
Log in as oracle to the HA server that currently masters the logical host,
and set the environment variables ORACLE_SID and ORACLE_HOME.
a. Confirm that you can start the Oracle instance from this host.
b. Confirm that you can start the Oracle listener from this host.
For ORACLE 7.2 or earlier releases, use the following command:
# tcpctl start
For Oracle 7.3, use the following command:
# lsnrctl start listener_name
Setting Up and Administering Solstice HA-DBMS for ORACLE7
10-15
10
c. Confirm that you can connect to the Oracle instance.
For ORACLE 7.2 or earlier releases, use the sqlplus command. For
example:
# sqlplus scott/tiger@T:hahost1:oracle_sid
For Oracle 7.3, use the sqlplus command with the tns_service variable
defined in the tnsnames.ora file:
# sqlplus scott/tiger@tns_service
d. Shut down the Oracle instance.
2. Transfer the logical host to the sibling.
Use the haswitch(1M) command to transfer the logical host containing the
Oracle instance to the sibling HA server.
3. Log in to the sibling server and repeat the checks listed in Step 1.
Log in as oracle to the other HA server (the one that now owns the logical
host) and confirm interactions with the Oracle instance.
10.5 Configuring the ORACLE SQL*Net V2 Listener
This section contains an example of how to configure the ORACLE SQL*Net
V2 Listener on a symmetric HA system if the Oracle software is installed on
the logical hosts. You might need to configure the listener when you prepare
the Solstice HA servers for Oracle installation.
▼ How to Configure the ORACLE SQL*Net V2 Listener
Note – You must indicate the logical host name in both the listener.ora file
and the tnsnames.ora file.
In this example, the physical host names are “phys-hahost1” and
“phys-hahost2”, and the logical host names are “hahost1” and “hahost2”.
10-16
Solstice HA 1.3 User’s Guide—April 1997
10
1. On both hosts, configure the listener.ora file as follows:
# LISTENER.hahost1 - listener for instances served by hahosts1
LISTENER.hahost1 =
(ADDRESS_LIST =
(ADDRESS =
(PROTOCOL = TCP)
(HOST = hahost1)
(Port = 1521)
)
)
SID_LIST_LISTENER.hahost1 =
(SID_LIST =
(SID_DESC =
(SID_NAME = orasid1)
(ORACLE_HOME = /hahost1/oracle_7.3.2)
)
)
# LISTENER.hahost2 - listener for instances served by hahosts2
LISTENER.hahost2 =
(ADDRESS_LIST =
(ADDRESS =
(PROTOCOL = TCP)
(HOST = hahost2)
(Port = 1522)
)
)
SID_LIST_LISTENER.hahost2 =
(SID_LIST =
(SID_DESC =
(SID_NAME = orasid2)
(ORACLE_HOME = /hahost2/oracle_7.3.2)
)
)
Setting Up and Administering Solstice HA-DBMS for ORACLE7
10-17
10
2. On both hosts, configure the tnsnames.ora files as follows:
# tnsnames.ora on both systems
hahost1 =
(DESCRIPTION =
(ADDRESS_LIST =
(ADDRESS =
(PROTOCOL = TCP)
(HOST = hahost1)
(PORT = 1521)
)
)
(CONNECT_DATA =
(SID = orasid1)
)
)
hahost2 =
(DESCRIPTION =
(ADDRESS_LIST =
(ADDRESS =
(PROTOCOL = TCP)
(HOST = hahost2)
(PORT = 1522)
)
)
(CONNECT_DATA =
(SID = orasid2)
)
)
10-18
Solstice HA 1.3 User’s Guide—April 1997
Setting Up and Administering
Solstice HA-DBMS for SYBASE
11
This chapter provides instructions for setting up and administering the Solstice
HA-DBMS for SYBASE data service.
Overview of Tasks
page 11-1
Setting Up Solstice HA-DBMS for SYBASE Metadevices
page 11-2
Setting Up Solstice HA-DBMS for SYBASE
page 11-2
Verifying the Solstice HA-DBMS for SYBASE Installation
page 11-10
This chapter includes the following procedures:
• “How to Prepare Solstice HA Servers for Sybase Installation” on page 11-2
• “How to Prepare Logical Hosts for Sybase SQL Servers and Databases” on
page 11-4
• “How to Create a Sybase SQL Server and Databases” on page 11-5
• “How to Set Up Solstice HA-DBMS for SYBASE” on page 11-6
• “How to Verify the Solstice HA-DBMS for SYBASE Installation” on
page 11-10
11.1 Overview of Tasks
This chapter describes the steps necessary to configure and run Solstice
HA-DBMS for SYBASE on your HA servers.
11-1
11
If you are running both HA-NFS and Solstice HA-DBMS for SYBASE data
services in your Ultra Enterprise Cluster HA configuration, you can set up the
data services in any order.
11.2 Setting Up Solstice HA-DBMS for SYBASE Metadevices
You can configure Solstice HA-DBMS for SYBASE to use UFS logging or raw
mirrored metadevices. See Chapter 4, “Installation Planning” for details about
setting up metadevices.
11.3 Setting Up Solstice HA-DBMS for SYBASE
Before setting up Solstice HA-DBMS for SYBASE, you must have performed on
each Solstice HA server the procedures described in Chapter 7, “Software
Configuration and Validation.”
▼ How to Prepare Solstice HA Servers for Sybase Installation
!
Caution – All steps described in this section should be performed on both
Solstice HA servers.
Consult your Sybase documentation before performing this procedure.
1. Prepare the environment for Sybase installation.
Choose a location for the $SYBASE directories, on either a local or multihost
disk.
Note – If you choose to install the Sybase binaries on a local host, then mount
the Sybase software distribution as a file system on its own separate disk, if
possible. This prevents the Sybase binaries from being overwritten if the
operating system is reinstalled.
2. Create a /etc/group entry for the database administrator group.
This group normally is named dba. Verify that root and sybase are
members of the dba group. For example:
dba:*:520:root,sybase
11-2
Solstice HA 1.3 User’s Guide—April 1997
11
While you can make the name service entries in a network name service (for
example, NIS or NIS+) so that the information is available to Solstice
HA-DBMS for SYBASE clients, you also should make entries in the local
/etc files to eliminate dependency on the network name service.
Note – This duplicate information must be kept consistent when you make
changes.
3. Create a /etc/passwd entry for the Sybase login ID.
This login ID is normally sybase. For example:
# useradd -u 120 -g dba -d /sybase sybase
4. Verify that the Sybase directories are owned by sybase and are included
in the dba group.
# chown sybase /sybase
# chgrp dba /sybase
5. Note the requirements for Sybase installation.
If you plan to install Sybase software on the logical host, you first must start
Solstice HA and take ownership of the logical host. See “How to Prepare
Logical Hosts for Sybase SQL Servers and Databases” on page 11-4 for
details.
6. Install the Sybase software.
Log in as sybase to ensure ownership of the entire directory before
performing this step. Sybase binaries can be installed on either the physical
host or the logical host. There are no additional steps necessary for installing
binaries on the logical host. Note, however, that any binaries installed on the
logical host will be included in mirroring of the logical host.
For complete instructions about installing Sybase software, refer to the
Sybase documentation.
Setting Up and Administering Solstice HA-DBMS for SYBASE
11-3
11
Note – The Solstice HA-DBMS for SYBASE fault monitor
requires that the ctlib.loc file exist in the directory
$SYBASE/locales/us_english/iso_1. You can obtain this file by
installing a Sybase connectivity tool such as Open Client (DB-Library).
11.3.1 Creating a Sybase SQL Server and Setting Up Solstice HA-DBMS
for SYBASE
Use both of the following procedures to create and set up the initial Sybase
SQL Server and databases in a Solstice HA configuration. If you are creating
and setting up subsequent databases, perform only the procedure in “How to
Create a Sybase SQL Server and Databases” on page 11-5.
▼ How to Prepare Logical Hosts for Sybase SQL Servers and
Databases
1. Start Solstice HA and take ownership of the disksets.
You must be root to perform this step. Use hastart(1M) to start Solstice
HA on one of the hosts. The hastart(1M) operation will cause that host to
take ownership of the disksets.
2. Set up raw mirrored metadevices on both servers.
If you will be using raw mirrored metadevices to contain the databases,
change the owner, group, and mode of each of the raw mirrored
metadevices. (If you are not using raw mirrored metadevices, skip this step.)
Instructions for creating mirrored metadevices are provided in Chapter 4,
“Installation Planning.”
If you are creating raw mirrored metadevices, type the following commands
for each metadevice.
# chown sybase_id /dev/md/logicalhost/rdsk/dn
# chgrp dba_id /dev/md/logicalhost/rdsk/dn
# chmod 600 /dev/md/logicalhost/rdsk/dn
11-4
Solstice HA 1.3 User’s Guide—April 1997
11
!
Caution – While Sybase supports raw I/O to both raw physical devices and
raw metadevices (mirrored or non-mirrored), Solstice HA only supports raw
Sybase I/O on raw mirrored metadevices. You cannot use devices such as
/dev/rdsk/c1t1d1s2 to contain Sybase data under Solstice HA.
▼ How to Create a Sybase SQL Server and Databases
These are the high-level steps to create a Sybase SQL Server and databases:
•
•
•
Prepare the SQL Server configuration files and set up the SQL Server.
Prepare the Sybase environment.
Create the database.
These are the detailed steps to create a Sybase SQL Server and databases:
1. Become user sybase.
You must be defined as user sybase to run the Sybase commands.
2. Prepare the Sybase environment.
Prepare the Sybase environment using the following command. In csh:
# setenv SYBASE base_dir
3. Prepare database configuration files and set up the SQL Server.
Use sybinit to create the RUN_server and RUN_backupserver files in the
Sybase installation directory. These files are optional.
Place the Sybase installation directory on the logical host or on the local
disk.
If you place the Sybase installation directory on the local disk, use rcp(1)
to copy the RUN_ files to the sibling, update the interfaces file on the
sibling server with entries for the new servers, and place all transaction logs,
databases, the server.cfg file, the server.krg file, and the errorlog file on
the logical host’s diskset or the local diskset. If you place these files on the
local diskset, use rcp(1) to copy them to the sibling.
If you use the sp_configure store procedure to modify configuration
settings or to edit the configuration file directly, use rcp(1) to copy the
server.cfg file to the sibling.
Setting Up and Administering Solstice HA-DBMS for SYBASE
11-5
11
Note – When using Solstice HA, there must be only one SQL Server for each
backup server.
Set up the Sybase SQL Server using sybinit.You must use the logical host
name when defining the database device. Later, when installing Sybase on
the sibling server, add an identical line to the interfaces file through
sybinit.
4. Create the database and place it on the logical host.
▼ How to Set Up Solstice HA-DBMS for SYBASE
These are the high-level steps to set up Solstice HA-DBMS for SYBASE:
•
•
•
•
•
•
•
•
Make entries for all of the SQL Servers in the /var/opt/sybase/sybtab
files on both HA servers.
Start the SQL Server.
Optionally, create a Sybase sa login and password for fault monitoring.
Verify installation of the Solstice HA license for Solstice HA-DBMS for
SYBASE.
Start Solstice HA using hastart(1M) on both hosts.
Activate the Sybase data service using hareg(1M).
Configure the hasybase_databases file, using hasybase(1M).
Bring the Sybase SQL Server into service, using hasybase(1M).
These are the detailed steps to set up Solstice HA-DBMS for SYBASE:
1. Make entries for the names of all SQL Servers.
You must include the server names associated with your databases in the
file /var/opt/sybase/sybtab on both Solstice HA servers. You must
keep this file current on both Solstice HA servers for a failover to succeed.
Update the file manually as SQL Servers are added or removed.
Entries in the /var/opt/sybase/sybtab file have the following format:
sql_server:sybase_directory
11-6
Solstice HA 1.3 User’s Guide—April 1997
11
Note – The Solstice HA-DBMS for SYBASE fault monitor does not monitor
backup servers. Therefore, do not make separate entries for backup servers in
either/etc/opt/SUNWhadf/hadf/hasybase_databases or
/var/opt/sybase/sybtab.
2. Start the SQL Server.
If the SQL Server is not running already, start it with the following
command:
# startserver -f RUN_server
3. Create a login and password to be used for fault monitoring.
Create a Sybase login “new_login_name” with sa_role to start and stop the
server.
Note – Skip this step if you want to use the sa login for fault monitoring.
# isql -Usa -P -Ssql_server_name
>sp_addlogin new_login_name, password
>go
>sp_role “grant”, “sa_role”, new_login_name
>go
>exit
#
4. Verify that the Solstice HA license for Solstice HA-DBMS for SYBASE is
installed.
See the Chapter 5, “Licensing Solstice HA Software” for details.
5. Verify that Solstice HA and the cluster daemon are installed and running
on both hosts.
# hastat
If they are not running already, start them with hastart(1M).
Setting Up and Administering Solstice HA-DBMS for SYBASE
11-7
11
6. Activate Solstice HA-DBMS for SYBASE using hareg(1M)
You need to run the hareg(1M) command on only one host.
If the cluster is running already, then activate the Sybase data service using
hareg(1M):
# hareg -y sybase
If the Sybase service is not yet registered, then use hareg(1M) to register it:
# hareg -s -r sybase
7. Set up the hasybase_databases(4) file, using hasybase insert.
Add an entry to the hasybase_databases file, so that the SQL Server will
be monitored by Solstice HA. This file is owned by root and has a mode of
600 to protect the information.
# hasybase insert sql_server logicalhost 60 10 120 300 user/password \
$SYBASE/install/RUN_server backupserver $SYBASE/install/RUN_backupserver
The above command line includes the following:
• hasybase insert – The command and subcommand.
• sql_server – The name of the SQL Server.
• logicalhost – The logical host serving server (not the physical host).
• 60 10 120 300 – These parameters specify a probe cycle time of 60
seconds, a connectivity probe cycle count of 10 seconds, a probe timeout
of 120 seconds, and a restart delay of 300 seconds.
• user/password – The login and password to be used for fault monitoring.
You created the login name in Step 3.
• $SYBASE/install/RUN_server – The file used to start the SQL Server.
• backupserver (optional) – The name of the backup server.
• $SYBASE/install/RUN_backupserver (optional) – The file used to start
the backup server.
11-8
Solstice HA 1.3 User’s Guide—April 1997
11
8. Bring the Sybase Server into service.
Bring the SQL Server into service by executing hasybase(1M). Monitoring
for that SQL Server will start automatically. See the hasybase(1M) man
page for additional details.
# hasybase start sql_server
Note – If you did not start the Sybase SQL Server before issuing the above
command, then Solstice HA will start the SQL Server for you when you issue
the command.
11.3.2 Solstice HA-DBMS for SYBASE Client Set Up
Clients always must refer to the database using the logical host name and not
the physical host name. Except for during start-up, the database always should
be available if the logical host is responding on the network.
Note – Sybase client-server connections will not survive a Solstice HA-DBMS
for SYBASE switchover. The client application must be prepared to cope with
disconnection and reconnection or recovery as appropriate. A transaction
monitor might simplify the application. Further, Solstice HA-DBMS for
SYBASE server recovery time is application-dependent.
If your application uses functions from RDBMS dynamic link libraries, you
must ensure these libraries are available in the event of failover. To do so:
•
•
Install the link libraries on the client, or
Copy the libraries to the logical host and set the environment variables to
the directory path of the link libraries, if HA-NFS is a registered data
service.
Setting Up and Administering Solstice HA-DBMS for SYBASE
11-9
11
11.4 Verifying the Solstice HA-DBMS for SYBASE Installation
Perform the following verification tests to ensure the Solstice HA-DBMS for
SYBASE installation was performed correctly.
The purpose of these sanity checks is to ensure that the Sybase SQL Server can
be started by both HA servers and can be accessed successfully by the other
HA server in the configuration. Perform these sanity checks to isolate any
problems starting Sybase from the Solstice HA-DBMS for SYBASE data service.
▼ How to Verify the Solstice HA-DBMS for SYBASE Installation
1. Log in to one HA server and set the SYBASE environment variable.
Log in as sybase to one of the HA servers. Set the SYBASE environment
variable to point to the directory in which the interfaces file resides.
a. Confirm that you can start the SQL Server from this host.
b. Confirm that you can connect to the Sybase SQL Server from this host.
c. Shut down the SQL Server.
2. Transfer the logical host to the sibling.
Use the haswitch(1M) command to transfer the logical host containing the
SQL Server to the sibling HA server.
3. Log in to the sibling server and repeat the checks listed in Step 1.
Log in as sybase to the other HA server (the one that now owns the logical
host) and confirm interactions with the SQL Server.
11-10
Solstice HA 1.3 User’s Guide—April 1997
Setting Up and Administering
Solstice HA-DBMS for INFORMIX
12
This chapter provides instructions for setting up and administering the Solstice
HA-DBMS for INFORMIX data service.
Overview of Tasks
page 12-1
Setting Up Metadevices for Solstice HA-DBMS for INFORMIX
page 12-2
Setting Up Solstice HA-DBMS for INFORMIX
page 12-2
Verifying the Solstice HA-DBMS for INFORMIX Installation
page 12-10
This chapter includes the following procedures:
• “How to Prepare Solstice HA Servers for Informix Installation” on
page 12-2
• “How to Prepare Logical Hosts for Informix Databases” on page 12-4
• “How to Create an Informix Database” on page 12-5
• “How to Set up Solstice HA-DBMS for INFORMIX” on page 12-6
• “How to Verify the Solstice HA-DBMS for INFORMIX Installation” on
page 12-10
12.1 Overview of Tasks
This chapter describes the steps necessary to configure and run Solstice
HA-DBMS for INFORMIX on your HA servers.
12-1
12
If you are running both HA-NFS and Solstice HA-DBMS for INFORMIX data
services in your Ultra Enterprise Cluster HA configuration, you can set up the
data services in any order.
12.2 Setting Up Metadevices for Solstice HA-DBMS for INFORMIX
You can configure Solstice HA-DBMS for INFORMIX to use UFS file system
logging or raw mirrored metadevices. See Chapter 4, “Installation Planning”
for details about setting up metadevices.
12.3 Setting Up Solstice HA-DBMS for INFORMIX
Before setting up Solstice HA-DBMS for INFORMIX, you must have performed
on each Solstice HA server the procedures described in Chapter 7, “Software
Configuration and Validation.”
▼ How to Prepare Solstice HA Servers for Informix Installation
!
Caution – Perform all steps described in this section on both HA servers.
Consult your Informix documentation before performing this procedure.
1. Prepare the environment for Informix installation.
Choose a location for the $INFORMIXDIR directories, on either a local or
multihost disk. If you choose to place the $INFORMIXDIR directories on a
multihost disk, note that fault monitoring will be running only from the
local HA server, and not from the remote HA server.
Note – If you install $INFORMIXDIR on a local disk, install it as a file system
on its own separate disk, if possible. This prevents Informix from being
overwritten if the operating system is reinstalled.
2. Create a /etc/group entry for the informix group.
The group normally is named informix. Ensure that root and user
informix are members of the informix group. For example:
informix:*:520:root,informix
12-2
Solstice HA 1.3 User’s Guide—April 1997
12
While you can make the name service entries in a network name service (for
example, NIS or NIS+) so that the information is available to Solstice
HA-DBMS for INFORMIX clients, you also should make entries in the local
/etc files to eliminate dependency on the network name service.
Note – This duplicate information must be kept consistent when you make
changes.
3. Create a /etc/passwd entry for the Informix user ID (informix_id).
This entry is normally informix for the user ID. For example:
# useradd -u 135 -g informix -d /informix informix
4. Verify that the $INFORMIXDIR directory is owned by informix_id and is
included in the informix group.
# chown informix /informix
# chgrp informix /informix
5. Note the requirements for Informix installation.
If you plan to install Informix software on the logical host, you first must
start Solstice HA and take ownership of the logical host. See “How to
Prepare Logical Hosts for Informix Databases” on page 12-4 for details.
6. Install the Informix software.
Informix binaries can be installed on either the physical host or the logical
host. Note that any binaries installed on the logical host will be included in
mirroring of that host. All logs and databases must go on the logical host’s
diskset. If you plan to install Informix software on the logical host, you must
start Solstice HA and take ownership of the diskset. You also must install
the INFORMIX_ESQL Embedded Languages Runtime Facility product in
/var/opt/informix on both HA servers, using the installesqrl
command. See “How to Prepare Logical Hosts for Informix Databases” on
page 12-4 for details.
For complete instructions about installing Informix, refer to the Informix
installation documentation.
Setting Up and Administering Solstice HA-DBMS for INFORMIX
12-3
12
12.3.1 Creating an Informix Database and Setting Up Solstice HA-DBMS
for INFORMIX
Use the following procedures to create and set up the initial Informix database
in a Solstice HA configuration. If you are creating and setting up subsequent
databases, perform only the procedures described in “How to Create an
Informix Database” on page 12-5 and “How to Set up Solstice HA-DBMS for
INFORMIX” on page 12-6.
▼ How to Prepare Logical Hosts for Informix Databases
1. If Solstice HA has not yet been started, start it and take ownership of the
disksets.
You must be root to perform this step. Use hastart(1M) to start Solstice
HA on one of the hosts. The hastart(1M) operation will cause that host to
take ownership of the disksets.
2. Set up raw mirrored metadevices on both servers.
If you will be using raw mirrored metadevices to contain the databases,
change the owner, group, and mode of each of the raw mirrored
metadevices. (If you are not using raw mirrored metadevices, skip this step.)
Instructions for creating mirrored metadevices are provided in Chapter 4,
“Installation Planning.”
If you are creating raw mirrored metadevices, type the following commands
for each metadevice.
# chown informix_id /dev/md/logicalhost/rdsk/dn
# chgrp informix_id /dev/md/logicalhost/rdsk/dn
# chmod 600 /dev/md/logicalhost/rdsk/dn
!
12-4
Caution – While Informix supports raw I/O to both raw physical devices and
raw metadevices (mirrored or nonmirrored), Solstice HA only supports raw
Informix I/O on raw mirrored metadevices. You cannot use devices such as
/dev/rdsk/c1t1d1s2 to contain Informix data under Solstice HA.
Solstice HA 1.3 User’s Guide—April 1997
12
▼ How to Create an Informix Database
These are the high-level steps to create an Informix database:
•
•
•
•
Prepare the Informix environment.
Create and customize the $ONCONFIG file.
Create Informix entries in the sqlhosts file.
Configure the /etc/services file.
These are the detailed steps to create an Informix database:
1. Prepare the Informix environment.
Prepare the Informix environment using the following commands. In csh:
#
#
#
#
setenv
setenv
setenv
setenv
INFORMIXDIR base_dir
INFORMIXSERVER server_name
ONCONFIG file_name
INFORMIXSQLHOSTS $INFORMIXDIR/etc/sqlhosts
2. Create and customize the $ONCONFIG file, and copy it to the sibling server.
Place the $ONCONFIG file in the $INFORMIXDIR/etc directory. Customize
the ROOTPATH, ROOTSIZE and PHYSFILE variables in the $ONCONFIG file,
and set DBSERVERNAME=$INFORMIXSERVER. Once the $ONCONFIG file is
customized, copy it to the sibling server, if $INFORMIXDIR is on the
physical host.
3. Create Informix entries in the sqlhosts file.
Entries in the sqlhosts file are composed of four fields:
•
•
•
•
DBSERVERNAME – This is the $INFORMIXSERVER.
NETTYPE – Select ONSOCTCP or ONTLITCP.
HOSTNAME – This is the logical host name.
SERVICENAME – This must match the SERVICENAME entry in the
/etc/services file.
Setting Up and Administering Solstice HA-DBMS for INFORMIX
12-5
12
4. Configure the /etc/services file.
You must be root to perform this step. Edit the /etc/services file; add
the SERVICENAME and listener port number. The listener port number must
be unique.
When you use the TCP/IP connection protocol, the SERVICENAME in the
sqlhosts file must correspond to the SERVICENAME entry in the
/etc/services file.
▼ How to Set up Solstice HA-DBMS for INFORMIX
These are the high-level steps to set up Solstice HA-DBMS for INFORMIX:
• Update the /var/opt/informix/inftab file.
• Activate the Informix data service.
• Enable user and password for fault monitoring.
• Shut down the Informix database.
• Verify installation of the Solstice HA license, Solstice HA software, and
cluster daemon.
• Activate the Informix data service using hareg(1M).
• Configure the hainformix_databases file.
• Bring the Informix database into service.
1. Update the /var/opt/informix/inftab file with $ONCONFIG
information.
You must include entries for all $ONCONFIG files associated with your
databases in the file /var/opt/informix/inftab on both Solstice HA
servers. You must keep this file current on both Solstice HA servers for a
failover to succeed. Update the file manually as database servers are added
or removed.
Entries in the /var/opt/informix/inftab file have the following format:
ONCONFIG_file_name:$INFORMIXDIR
12-6
Solstice HA 1.3 User’s Guide—April 1997
12
2. Activate the Informix data service.
Log in as user informix and perform the following command, which
formats or “cooks” the raw disk or UFS filespace assigned in the
$ONCONFIG file, as specified by the ROOTPATH variable.
# oninit -iy
3. Enable access for the user and password to be used for fault monitoring.
Invoke the dbaccess dbname command and add the following lines to the
appropriate dbaccess screen.
# dbaccess dbname
...
grant connect to root;
grant resource to root;
grant dba to root
grant select on sysprofile to root;
The database to be probed by the HA fault monitor is identified in the
hainformix_databases file. If that database is not sysmaster, use the
dbaccess dbname command to add the following line to the appropriate
dbaccess screen:
create synonym sysprofile for sysmaster:informix_owner.sysprofile;
4. Shut down the Informix database.
As user informix, perform the following command to shut down the
Informix database:
# onmode -ky
5. Verify that the Solstice HA license for Solstice HA-DBMS for INFORMIX
is installed.
See the Chapter 5, “Licensing Solstice HA Software” for licensing details.
Setting Up and Administering Solstice HA-DBMS for INFORMIX
12-7
12
6. Verify that Solstice HA and the cluster daemon are installed and running
on both hosts.
As root, verify the configuration with the following command:
# hastat
If they are not running already, start them with hastart(1M).
7. Activate the Informix data service using hareg(1M).
You need to run the hareg(1M) command on only one host.
# hareg -y informix
If the Informix data service is not yet registered, then use hareg(1M) to
register it:
# hareg -s -r informix
8. Update the hainformix_databases(4) file.
Update /etc/opt/SUNWhadf/hadf/hainformix_databases using the
hainformix insert command, after database creation. This file is owned
by root and has a mode of 600 to protect the information.
# hainformix insert $ONCONFIG logicalhost 60 10 120 300
dbname $INFORMIXSERVER
\
The above command line includes the following:
• hainformix insert – The command and subcommand.
• $ONCONFIG – The name of the Informix database server startup file.
• logicalhost – The logical host serving $ONCONFIG (not the physical host).
• 60 10 120 300 – These parameters specify a probe cycle time of 60
seconds, a connectivity probe cycle count of 10 seconds, a probe time out
of 120 seconds, and a restart delay of 300 seconds.
• dbname – The name of the database that Solstice HA is to monitor.
• $INFORMIXSERVER – The name of the Informix server.
12-8
Solstice HA 1.3 User’s Guide—April 1997
12
9. Bring the Solstice HA-DBMS for INFORMIX database into service.
Bring the Solstice HA-DBMS for INFORMIX database into service by
executing hainformix(1M).
# hainformix start $ONCONFIG
Note – If you choose to place the $INFORMIXDIR directories on a multihost
disk, note that fault monitoring will be running only from the local HA server,
and not from the remote HA server.
Note – If you did not start the Informix OnLine server before issuing the above
command, then Solstice HA will start the Informix OnLine Server for you
when you issue the command.
12.3.2 Solstice HA-DBMS for INFORMIX Client Set Up
Clients always must refer to the database using the logical host name and not
the physical host name. Except during start-up, the database always should be
available if the logical host is responding on the network.
Note – Informix client-server connections will not survive a Solstice HA-DBMS
for INFORMIX switchover. The client application must be prepared to handle
disconnection and reconnection or recovery as appropriate. A transaction
monitor might simplify the application. Further, Solstice HA-DBMS for
INFORMIX server recovery time is application-dependent.
If your application uses functions from RDBMS dynamic link libraries, you
must ensure these libraries are available in the event of failover. To do so:
•
•
Install the link libraries on the client, or
Copy the libraries to the logical host and set the environment variables to
the directory path of the link libraries, if HA-NFS is a registered data
service.
Setting Up and Administering Solstice HA-DBMS for INFORMIX
12-9
12
12.4 Verifying the Solstice HA-DBMS for INFORMIX Installation
Perform the following verification tests to ensure the Solstice HA-DBMS for
INFORMIX installation was performed correctly.
The purpose of these sanity checks is to ensure that the Informix OnLine server
can be started by both HA servers and can be accessed successfully by the
other HA server in the configuration. Perform these sanity checks to isolate
any problems starting Informix from the Solstice HA-DBMS for INFORMIX
data service.
▼ How to Verify the Solstice HA-DBMS for INFORMIX Installation
1. Log in to one HA server and set the Informix environment variables.
Log in as informix to one of the HA servers. Set the environment variables
INFORMIXDIR, INFORMIXSERVER, ONCONFIG, and INFORMIXSQLHOSTS.
a. Confirm that you can start the Informix OnLine server from this host.
b. Confirm that you can connect to the Informix OnLine server from this
host:
# dbaccess sysmaster@$INFORMIXSERVER
c. Shut down the Informix OnLine server.
2. Transfer the logical host to the sibling.
Use the haswitch(1M) command to transfer the logical host containing the
Informix OnLine server to the sibling HA server.
3. Log in to the sibling server and repeat the checks listed in Step 1.
Log in as informix to the other HA server (the one that now owns the
logical host) and confirm interactions with the Informix OnLine server.
12-10
Solstice HA 1.3 User’s Guide—April 1997
Setting Up and Administering
Solstice HA Internet Pro
13
This chapter provides instructions for setting up and administering the Solstice
HA Internet Pro data services.
Overview of Tasks
page 13-2
Installing Netscape Services
page 13-3
Installing DNS
page 13-5
Installing Netscape News
page 13-6
Installing Netscape Web or HTTP Server
page 13-11
Installing Netscape Mail
page 13-15
Configuring the HA Internet Pro Data Services
page 13-21
This chapter includes the following procedures:
• “How to Install Netscape Services” on page 13-3
• “How to Install DNS” on page 13-5
• “How to Install Netscape News” on page 13-6
• “How to Install Netscape Web or HTTP Server” on page 13-11
• “How to Install Netscape Mail” on page 13-16
• “How to Configure HA-DNS” on page 13-23
• “How to Configure HA-NEWS for Netscape” on page 13-23
• “How to Configure HA-HTTP for Netscape” on page 13-24
• “How to Configure HA-MAIL for Netscape” on page 13-25
13-1
13
13.1 Overview of Tasks
The HA Internet Pro data services consist of a group of Internet applications
that can be made highly available by running them in the Solstice HA
environment. These data services include HA-NEWS for Netscape, HA-MAIL
for Netscape, HA-HTTP for Netscape, and HA-DNS. For Solstice HA 1.3, these
data services were tested with the following Netscape releases:
•
•
•
•
•
•
Netscape
Netscape
Netscape
Netscape
Netscape
Netscape
News Server 1.1
Mail Server 2.0
Commerce Server 1.12
FastTrack Server 2.0
Enterprise Server 2.0a
Communications Server 1.12
To run Internet data service applications under Solstice HA, you must:
•
•
Install and configure Netscape service using ns-setup
Configure the service to run under Solstice HA using hainetconfig(1M)
When you install the Netscape service, you must provide some specific
information required by Solstice HA.
The procedures described in this chapter assume that you are familiar with the
Solstice HA concepts of disksets, logical hosts, physical hosts, switchover,
takeover, and data services.
Before you install and configure the HA Internet Pro data services, you first
must install, license, and configure the Solstice HA framework. The general
steps used to install and configure HA Internet Pro data services are described
in the following list.
1. Install the Solaris and the Solstice HA environments.
Refer to Chapter 6, “Software Installation.” Use hainstall(1M) to install
all of the HA Internet Pro packages that you will be using. Complete the
post-installation procedures to install any required patches.
Note – Do not install any patches that are not required by Solstice HA at this
time.
2. License the HA framework and HA Internet Pro data services.
Refer to Chapter 5, “Licensing Solstice HA Software.”
13-2
Solstice HA 1.3 User’s Guide—April 1997
13
3. Run hasetup(1M) and start Solstice HA using hastart(1M).
Refer to Chapter 7, “Software Configuration and Validation.”
Note – At this point, do not register the Internet Pro data services with
hasetup(1M).
After completing this step, the cluster should be up and running and the
HA file systems should be mounted on their default masters.
4. Install the Netscape services and test them independently of HA.
See Section 13.2, “Installing Netscape Services.”
Note – If the cluster is also a DNS server, then install, configure, and enable
HA-DNS first, since other HA services depend on having DNS up and
running. If the cluster is using another DNS server, then configure the cluster
to be a DNS client first. After installation do not manually start and stop the
Netscape Services. Once started, they are controlled by Solstice HA.
5. Configure HA Internet Pro services by running hainetconfig(1M).
See “Configuring the HA Internet Pro Data Services” on page 13-21. The
hainetconfig(1M) utility is used to configure all HA Internet Pro data
services. Refer to the specific instructions in this chapter for each data
service.
6. Register and start the HA Internet Pro data services.
Refer to “Configuring the HA Internet Pro Data Services” on page 13-21.
13.2 Installing Netscape Services
Before you begin the Netscape services installation, you should have
completed Step 1 through Step 3 in “Overview of Tasks” on page 13-2.
▼ How to Install Netscape Services
Consult your Internet application documentation before performing this
procedure. All of the procedures in this chapter must be performed as root.
Setting Up and Administering Solstice HA Internet Pro
13-3
13
1. Have each logical host served by its default master.
Each Netscape application will be installed from the physical host that is the
logical host’s default master. If necessary, switch over the logical hosts to be
served by their respective default master.
The logical host names you use in your Solstice HA configuration should be
used as the server names when you install and configure the Internet
applications in the following step. This is necessary for failover of the
Netscape server to work properly.
2. Configure, test, register, and start HA-DNS or configure the cluster to be a
DNS client.
Configure HA-DNS using the instructions in “How to Install DNS” on
page 13-5. Register HA-DNS by typing:
phys-hahost1# hareg -s -r dns
Note – DNS software is included in the Solaris environment.
3. Once cluster reconfiguration is complete, install the Internet application
software on the logical hosts using the Netscape ns-setup program on
the distribution CD.
You should install and test the Internet application software (DNS, Netscape
HTTP Server, Netscape News, and Netscape Mail) independent of Solstice
HA. Refer to the Internet application software installation documentation
for installation instructions.
Note – Before you install the Internet application software, refer to the section
in this chapter describing the configuration procedures for each Internet
application. These sections describe Solstice HA-specific configuration
information that you must supply when you install the Internet applications.
Proceed to the next section to configure the HA Internet Pro data services.
13-4
Solstice HA 1.3 User’s Guide—April 1997
13
13.3 Installing DNS
HA-DNS is DNS running under the control of Solstice HA. This section
describes the steps to take when installing DNS to enable it to run as the
HA-DNS data service.
▼ How to Install DNS
Refer to DNS documentation in AnswerBook for how to set up DNS. The
differences in a Solstice HA configuration are:
•
•
the location of the database is on the multihost disks rather than on the
private disks
the DNS server is a logical host rather than a physical host
1. Decide which logical host is to provide DNS service.
2. Choose a location on the logical host for the DNS database.
Place named.boot and the rest of the files comprising the database here.
For example: /logicalhost/dns.
3. In /etc/resolv.conf on both HA servers, specify the IP address of the
logical host providing DNS service.
4. In /etc/nsswitch.conf add the string dns after files.
5. Test DNS outside the HA environment. For example:
# cd /<logicalhost>/dns
/usr/sbin/in.named -b /<logicalhost>/dns/named.boot
# nslookup <physicalhost>
Setting Up and Administering Solstice HA Internet Pro
13-5
13
13.4 Installing Netscape News
HA-NEWS for Netscape is Netscape News running under the control of
Solstice HA. This section describes how to install Netscape News (using
ns-setup) to enable it to run as the HA-NEWS for Netscape data service.
Refer to Netscape documentation for the standard Netscape installation
instructions.
There are two pre-requisites to installing Netscape News with ns-setup.
1. A user name and a group name must be configured for the news server.
Create these names on both HA servers and verify that they have the same
ID numbers on both systems.
2. DNS must be up and running.
▼ How to Install Netscape News
1. Run ns-setup from the Netscape News install directory on the CD.
Change directory to the Netscape News distribution location on the CD, and
run ns-setup.
phys-hahost1# cd /cdrom/news_server/solaris/news/install
phys-hahost1# ./ns-setup
You see:
Netscape Communications Corporation
Netscape Commerce Server QuickStart installation.
To start the installation, you must enter your machine's full
name. A full name is of type <hostname>.<domainname> such as
foobar.widgets.com
To accept the default in brackets, press return.
Enter the logical host name for the Netscape News Server and the
appropriate DNS domain name. A full name is of type hostname.domainname
such as hahost1.sun.com.
13-6
Solstice HA 1.3 User’s Guide—April 1997
13
Note – You must use the logical host name rather than the physical host name
here for HA-NEWS to failover correctly.
For example,
Full name [phys-hahost1]:hahost1.sun.com
Using hostname hahost1, port 1698
After you enter the logical host name and DNS domain name, you see the
following:
All configuration for the server will be done through a
forms-capable network navigator. Please enter the name of the
network navigator that should be started, followed by any
command line options (such as -display) which should be used.
If you want or need to use a PC, Macintosh, or other remote
system, enter NONE here, and open the URL
http://hostname.domainname:1698/ with your forms-capable PC
or Macintosh network navigator.
2. Bring up the Netscape browser.
Network navigator [netscape]:<return>
This brings up the Netscape browser. Click on “Start the installation!” The
Installation Overview page will appear.
Setting Up and Administering Solstice HA Internet Pro
13-7
13
3. Use the browser to configure the News server.
Click on “Server Config” to bring up the Server Configuration Form. You
are presented with a list of configuration options.
a. Specify your choice of user and group names.
Click on “Server user and group” or scroll down to the “Server User”
section, and specify your choices.
Make sure there are /etc/{passwd,group} entries or other name service
entries on both machines for the names you specify.
Server User:
news
Server Group:
news
b. Next, specify the Administrator’s email address.
Admin e-mail:
13-8
usenet
Solstice HA 1.3 User’s Guide—April 1997
13
c. Specify the server port numbers.
You are presented with three options: default news port (119), default
secure news port (563), or your choice of port. Click on either of the
defaults, or click on “Use this port” and specify the port number. The
port specified here corresponds to the port value that will be requested
later by hainetconfig(1M).
Note – If you specify a port number other than the defaults, you must specify
a unique port number. If you are running multiple instances of News, you
must specify a different port number for each instance. You may specify any
unused port number.
d. Specify a server location.
Specify a location on a logical host disk. For example:
Server Location:
/hahost1/nsnews
Click on “Make These Changes” to save your server configuration
choices.
4. Configure the News server clients.
Specify your configuration choices for the clients, then click on “Make These
Changes” to save your choices and to move to the Newsgroup
Configuration page.
Setting Up and Administering Solstice HA Internet Pro
13-9
13
5. Configure the Newsgroups.
Specify your configuration choices for Newsgroups.
Note that for spool directories the default value offered should be
acceptable; NNNN is the news port you chose in Step 3. However, you may
choose another location on the multihost disks under /logicalhost.
Spool directory:
/hahost1/nsnews/news-NNNN/spool
Click on “Make These Changes” to save your newsgroup configuration
choices and to move to the Administrative Configuration page.
6. Configure the “Administrative Configuration” section.
Specify your configuration choices for administration, then click on “Make
These Changes” to save your choices and to bring up the Configuration
Summary page.
7. Review your choices and complete the installation.
Review your configuration choices. If they are correct, click on “Go for it!”
at the bottom of the page. If you see any errors, go back and make the
appropriate changes. Upon completion of the installation, you see a
“Congratulations” message from the Netscape News Server.
13-10
Solstice HA 1.3 User’s Guide—April 1997
13
13.5 Installing Netscape Web or HTTP Server
HA-HTTP for Netscape is a Netscape Web or HTTP Server running under the
control of Solstice HA. This section describes the steps to take when installing
the Netscape Web or HTTP Server (using ns-setup) to enable it to run as the
HA-HTTP for Netscape data service.
You can install any of a number of Netscape web server products. This
example installs the Netscape Commerce Server 1.12. Refer to Netscape
documentation for standard installation instructions for Netscape Commerce
Server 1.12.
Note – You must follow certain conventions when you configure URL
mappings for the web server. For example, when setting the CGI directory, to
preserve availability you must locate the mapped directories on the multihost
disks associated with the logical host serving HTTP requests for this mapping.
In this example, you would map your CGI directory to
/logicalhost/commerce/ns-home/cgi-bin.
In situations where the CGI programs access “back-end” data, make sure the
data also is located on the multihost disks associated with the logical host
serving the HTTP requests.
In situations where the CGI programs access “back-end” servers such as
RDBMS, make sure that the “back-end” server also is controlled by Solstice
HA. If the server is an RDBMS supported by Solstice HA, use one of the
HA-DBMS packages. If not, you can put the server under HA control using the
APIs documented in the Solstice HA 1.3 Programmer’s Guide.
▼ How to Install Netscape Web or HTTP Server
1. Run ns-setup from the Netscape Commerce install directory on the CD.
Change directory to the Netscape Commerce distribution location on the
CD, and run ns-setup.
phys-hahost1# cd /cdrom/commerce/solaris/us/https/install
phys-hahost1# ./ns-setup
Setting Up and Administering Solstice HA Internet Pro
13-11
13
You see:
Netscape Communications Corporation
Netscape Commerce Server QuickStart installation.
To start the installation, you must enter your machine's full
name.A full name is of type <hostname>.<domainname> such as
foobar.widgets.com
To accept the default in brackets, press return.
Choose the default by pressing Return. The host name used here is not
stored anywhere in the server configuration, but is used temporarily for
starting an install server.
After you press Return, you will see the following:
All configuration for the server will be done through a
forms-capable network navigator. Please enter the name of the
network navigator that should be started, followed by any
command line options (such as -display) which should be used.
If you want or need to use a PC, Macintosh, or other remote
system, enter NONE here, and open the URL
http://hostname.domainname:1698/ with your forms-capable PC
or Macintosh network navigator.
2. Bring up the Netscape browser.
Network navigator [netscape]:
This brings up the Netscape browser. Click on “Start the installation!” The
Installation Overview page will appear.
3. Use the browser to configure the HTTP Server.
Click on “Server Config” to bring up the Server Configuration Form. You
are presented with a list of configuration options.
13-12
Solstice HA 1.3 User’s Guide—April 1997
13
a. Specify the Server name.
Click on “Server name” or scroll down to the “Server Name” section and
specify the logical host and DNS domain name. For example:
Server Name:
hahost1.sun.com
b. Specify the IP address (bind address).
Bind address:
You can leave the bind address blank. If you do, the server will bind to
INADDR_ANY.
Note – The IP address/port combination for each instance of the Web server
must be unique.
c. Specify a port number for this instance of the Commerce Server.
For example:
Server Port:
443
d. Specify a location on the logical host.
For example:
Server Location:
/hahost1/commerce/ns-home
Setting Up and Administering Solstice HA Internet Pro
13-13
13
e. Specify a Server User name.
The server user name must be a valid user name in the /etc/passwd
files on both HA servers or in the name service.
Server User:
f. Configure the remainder of the “Server Configuration” options.
Specify your preferences for number of processes, recording errors, host
name resolution, and access logging. Solstice HA does not mandate
particular values for these fields.
When finished, click on “Make These Changes” to save your server
configuration choices and to move to the Document Configuration page.
4. Configure the “Document Configuration” section.
Specify your configuration choices for Documents.
You should specify a location for the document root on the logical host. For
example:
Document root:
/hahost1/commerce/ns-home/docs
Click on “Make These Changes” to save your document configuration
choices and to move to the Administrative Configuration page.
5. Configure the “Administrative Configuration” section.
Specify your configuration choices for administration, then click on “Make
These Changes” to save your choices and to bring up the Configuration
Summary page.
6. Review your choices and complete the installation.
Review your configuration choices. If they are correct, click on “Go for it!”
at the bottom of the page. If you see any errors, go back and make the
appropriate changes. Upon completion of the installation, you see a
“Congratulations” message from the Netscape Commerce Server.
13-14
Solstice HA 1.3 User’s Guide—April 1997
13
13.6 Installing Netscape Mail
HA-MAIL for Netscape is Netscape Mail running under control of Solstice HA.
This section describes the steps to take when installing Netscape Mail (using
ns-setup) to enable it to run as the HA-MAIL for Netscape data service.
The HA-MAIL for Netscape data service is an asymmetric data service. That is,
there is only one logical host in the cluster that provides the mail services.
Note – The HA-MAIL for Netscape service fault probing might cause
/var/log/syslog to fill up quickly. To avoid this, disable logging of
mail.debug messages in /etc/syslog.conf by commenting out the
mail.debug entry and sending a HUP signal to syslogd(1M).
The following are required on the HA servers before configuring HA-MAIL for
Netscape:
•
Each server must have a unique user id and unique group id that contains
only this unique user id. These particular ids will be used by the mail
system. The names and numbers must be identical on both servers.
•
DNS must be configured and enabled on both servers. Both servers must
have the same /etc/resolv.conf, and the hosts entry in
/etc/nsswitch.conf must include dns.
Netscape Mail is installed on one server and HA-MAIL for Netscape requires
some variation from the default installation parameters, notably:
•
•
Specify the logical host name rather than the physical host name.
Install the Netscape Mail software and spool directories on the multihost
disks.
Setting Up and Administering Solstice HA Internet Pro
13-15
13
▼ How to Install Netscape Mail
The following procedure shows the user interaction with the ns-setup utility.
Only the sections that are specific to HA-MAIL for Netscape are shown here.
For the other sections, choose or change the default value.
1. Run ns-setup from the Netscape Mail install directory on the CD.
Change directory to the Netscape Mail distribution location on the CD, and
run ns-setup:
phys-hahost1# cd /cdrom/solaris/mail/install
phys-hahost1# ./ns-setup
This program will extract the server files from the distribution
media and install them into the directory you specify. This
directory is called the server root and will contain the server
programs, the administration server, and the server
configuration files.
To accept the default shown in brackets, press return.
2. Set up the server root directory and configure the server.
Server Root [/usr/ns-home]: /hahost1/nsmail/ns-home
Extracting files...
Extraction successful.
You can now configure and start your new server.
Configure new server now? [yes]:
13-16
Solstice HA 1.3 User’s Guide—April 1997
13
Press return to configure the new server.
This program allows you to configure and install a new
server. Configuration for the server will be done through a
forms-capable network navigator.
To start configuration, you must enter your machine's full
name. A full name is of type <hostname>.<domainname> such as
foobar.widgets.com
To accept the default shown in brackets, press return.
Full name [phys-hahost1.sun.com]: hahost1.sun.com
Enter the name of the logical host rather than a physical host.
Setting Up and Administering Solstice HA Internet Pro
13-17
13
3. Specify user and group names.
Enter the user name you configured for the mail server on both machines.
The Netscape Mail Server has been designed so that it does
not need to run as a privileged user. Any special tasks
requiring root permission are performed by secure setuid-root
programs.
It is recommended that you create a new user for the mail
system, whose primary group is used for group permissions of
the system. This group does not need to have any special
permissions either. It is highly recommended that you create
a new group without any members, since anyone in the group
can read all the mail in the system.
The user and group must exist on the system for the rest of
the installation to succeed, so you should quit now and
create them if they do not yet exist (suggestions: user=mta,
group=mta).
What user name do you want Netscape Mail Server to run as?
You see:
The Netscape Mail Server will be installed with group
permission of 'mtag' (this is the primary group of 'mta').
If this is not what you want, you should quit the
installation now and fix the primary group of 'mta' to be
what you want.
Enter 'y' to continue, 'n' or 'q' to quit.
Continue with installation?
Type y for yes.
13-18
Solstice HA 1.3 User’s Guide—April 1997
13
4. Specify directories for system components.
You are asked the names of the three directories where the various
components of the system will be installed. The use of each directory is
explained, along with a suggested location.
The Netscape Mail Server does most of its work in a directory
called the Post Office. This is the area where incoming and
outgoing messages are stored and configuration and account
information is kept. This directory can grow to be quite
large if you handle a lot of mail, and its contents change
often. Usually the /var partition is used for this type of
directory.
The default location is /var/spool/postoffice if you press
[Return].
Enter a location on the logical host. For example,
/hahost1/spool/postoffice.
The Netscape Mail Server also has its own user Mailbox
directory. This is an area where users' mail collects while
waiting to be delivered via POP or IMAP. If you plan to have
many users access their mail this way, this directory should
be correspondingly large. As with the Post Office, /var is a
good choice for the location.
The default location is /var/spool/mailbox if you press
[Return].
Enter a location on the logical host, for example, /hahost1/spool/mailbox.
Executable programs are installed in a separate directory,
usually on a separate disk. Typical choices are in the /opt
or /usr/local directories depending on local conventions.
The default is /hahost1/nsmail/ns-home/mail/server if you
press [Return] now.
Setting Up and Administering Solstice HA Internet Pro
13-19
13
5. Specify choices for mail accounts.
Accept the default or select another location on the logical host.
Electronic mail accounts can be created automatically for the
users that currently have UNIX login accounts. Please select
one of the following methods for setting up the accounts:
[A] Search for all users, including those in the /etc/passwd
file and NIS/NIS+.
[P]
Search through /etc/passwd only.
[N]
Don't automatically set up any accounts.
Which method?
All/Passwd/None/Quit [P]
Type N.
This completes the installation of Netscape Mail.
13-20
Solstice HA 1.3 User’s Guide—April 1997
13
13.7 Configuring the HA Internet Pro Data Services
Once you have installed the HA Internet Pro packages and the Netscape
applications, you are ready to configure the individual data services.
HA Internet Pro uses the notion of configurable instances, which are
independent of each other. For example, you can install and configure any
number of web servers; each such server is considered an instance.
All HA Internet Pro data services are configured using the
hainetconfig(1M) utility.
1. Run hainetconfig(1M) to configure HA-DNS, HA-NEWS for Netscape,
HA-HTTP for Netscape, and HA-MAIL for Netscape.
The hainetconfig(1M) utility is used to create, edit, and delete instances
of an HA Internet Pro data service. See the hainetconfig(1M) man page
for details. Refer to “Configuration Parameters” on page 13-22 for
information on the input you will need to supply to hainetconfig(1M).
phys-hahost1# hainetconfig
Note – HA-NEWS and HA-HTTP support installation of multiple instances of
news and http servers, which can be located anywhere in the cluster. Due to
the nature of the mail protocol (listens to a well-known port), only one instance
of HA-MAIL can exist in a cluster.
2. If you did not register the HA Internet Pro data services with
hasetup(1M), do so now.
Table 13-1 Data Service Registration Names and Syntax
HA-HTTP for Netscape
hareg -s -r nshttp
HA-NEWS for Netscape
hareg -s -r nsnews
HA-MAIL for Netscape
hareg -s -r nsmail
Setting Up and Administering Solstice HA Internet Pro
13-21
13
3. Run hareg -Y to enable all services and perform a cluster
reconfiguration.
phys-hahost1# hareg -Y
The configuration is complete.
13.7.1 Configuration Parameters
This section describes the information you supply to hainetconfig(1M) to
create configuration files for each HA Internet Pro data service. The
hainetconfig(1M) utility uses templates to create these configuration files.
The templates contain some default, some hard coded, and some unspecified
parameters. You must provide values for those parameters that are
unspecified.
The fault probe parameters, in particular, can affect the performance of HA
Internet Pro data services. Consider these points when tuning configurable
fault probe parameters:
•
Tuning the PROBE INTERVAL value too low (increasing the frequency of
fault probes) might encumber system performance.
•
Tuning the PROBE TIMEOUT value too low can result in false takeovers or
attempted restarts when the system is simply slow.
Fault probe parameters are configurable for HA-DNS, HA-HTTP, and
HA-NEWS. Fault probe parameters are not configurable for HA-MAIL.
13-22
Solstice HA 1.3 User’s Guide—April 1997
13
▼ How to Configure HA-DNS
♦ In the hainetconfig(1M) input form, supply the parameters shown in
Table 13-2.
Table 13-2 HA-DNS Configuration Parameters
Name of the instance
Nametag used as an identifier for the instance. The log
messages generated by HA refer to this nametag. The
hainetconfig(1M) utility prefixes the package name
to the value you supply here. For example, if you
specify “nsdns_119,” hainetconfig(1M)produces
“SUNWhadns_nsdns_119.”
Logical host
Name of logical host that provides HA-DNS service.
Configuration Directory
Rooted path name specifying the directory of DNS
config files and database on multihost disk.
Take over flag
Do you want the failure of this instance to cause a
takeover or a failover of the logical host associated
with the data service instance?
Possible values are y or n.
▼ How to Configure HA-NEWS for Netscape
♦ In the hainetconfig(1M) input form, supply the parameters shown in
Table 13-3.
Table 13-3 Configuration Parameters for HA-NEWS for Netscape
Name of the instance
Nametag used as an identifier for the instance. The log
messages generated by HA refer to this nametag. The
hainetconfig(1M) utility prefixes the package name to the
value you supply here. For example, if you specify
“nsnews_119,” hainetconfig(1M)produces
“SUNWhanew_nsnews_119.”
Logical host
Name of the logical host that provides service for this
instance of HA-NEWS for Netscape.
Setting Up and Administering Solstice HA Internet Pro
13-23
13
Table 13-3 Configuration Parameters for HA-NEWS for Netscape
Base directory of
product installation
Rooted path name specifying the location on the multihost
disk of the Netscape News installation. This is the “instance
path,” for example, “/usr/ns-home/news_119.”
Server port number
Unique port for this instance of HA-NEWS for Netscape.
This is the “Server Port” value you supplied to ns-setup.
Take over flag
Do you want the failure of this instance to cause a takeover
or a failover of the logical host associated with the data
service instance?
Possible values are y or n.
▼ How to Configure HA-HTTP for Netscape
♦ In the hainetconfig(1M) input form, supply the parameters shown in
Table 13-4.
Table 13-4 Configuration Parameters for HA-HTTP for Netscape
Name of the instance
Nametag used as an identifier for the instance. The log
messages generated by HA refer to this nametag. The
hainetconfig(1M)utility prefixes the package name to the
value you supply here. For example, if you specify
“nshttp_80,” hainetconfig(1M) produces
“SUNWhahtt_nshttp_80.”
Logical host
Name of logical host that provides service for this instance of
HA-HTTP for Netscape.
Base directory of
product installation
This is the base directory of the product installation, plus the
server type and server port number. For example,
“/usr/ns-home/httpd-80/”
Server port number
Unique port for this instance of HA-HTTP for Netscape. This
is the “Server Port” value you supplied to ns-setup.
Take over flag
Do you want the failure of this instance to cause a takeover
or a failover of the logical host associated with the data
service instance?
Possible values are y or n.
13-24
Solstice HA 1.3 User’s Guide—April 1997
13
▼ How to Configure HA-MAIL for Netscape
In the hainetconfig(1M) input form, supply the parameters shown in
Table 13-5.
Table 13-5 Configuration Parameters for HA-HTTP for Netscape
Name of the instance
Nametag used as an identifier for the instance. The log
messages generated by HA refer to this nametag. The
hainetconfig(1M)utility prefixes the package name to the
value you supply here. For example, if you specify “nsmail,”
hainetconfig(1M) produces “SUNWhansm_nsmail.”
Logical host
Name of logical host that provides service for this instance of
HA-MAIL for Netscape.
Take over flag
Do you want the failure of this instance to cause a takeover
or a failover of the logical host associated with the data
service instance?
Possible values are y or n.
Setting Up and Administering Solstice HA Internet Pro
13-25
13
13-26
Solstice HA 1.3 User’s Guide—April 1997
Part 3 — Software Administration
Administration Overview
14
The chapters in this part provide the information necessary to administer the
Ultra Enterprise Cluster HA system. This information includes general
administration preparation and descriptions of the procedures used to
administer the system. The chapters focus on different aspects of Solstice HA
administration. Data service administration is covered in Part 2 – Installing,
Configuring and Administering Data Services.
The procedures described in these chapters use utility programs and
commands included with Solstice HA or DiskSuite. The Solstice HA utilities
and commands are described in Chapter 1, “Product Overview” and in the
man pages included in Part 4 – Technical Reference. The DiskSuite functionality
is described in Chapter 1, “Product Overview” and the commands are
described in the Solstice DiskSuite 4.1 Reference Guide.
The topics described in these chapters cover the following aspects of the Ultra
Enterprise Cluster HA system.
1. General preparation.
Chapter 15, “Preparing for Administration” describes the information to
save in order to administer the system.
2. The terminal concentrator.
Chapter 16, “Administering the Terminal Concentrator” describes the
procedures to set up and maintain the terminal concentrator used to access
the HA server consoles.
14-1
14
3. General administrative procedures.
Chapter 17, “General Solstice HA Maintenance” describes the procedures
used to administer the Solstice HA framework.
4. Metadevices and disksets.
Chapter 18, “Administering Metadevices and Disksets” describes the
procedures used to set up and maintain metadevices.
5. System monitors.
Chapter 19, “Monitoring the Ultra Enterprise Cluster HA Servers” describes
the tools available for monitoring system status.
6. Power failures.
Chapter 20, “Recovering From Power Loss” describes the procedures used
to recover from Solstice HA server power failures.
7. Disk administration.
Chapter 21, “Administering HA Server and Multihost Disks” describes the
procedures used to restore, replace, and add disks to Solstice HA servers
and multihost disk expansion units.
8. SPARCstorage Array administration.
Chapter 22, “Administering SPARCstorage Arrays” describes all of the
procedures used to maintain the SPARCstorage Arrays.
9. Network interfaces.
Chapter 23, “Administering Network Interfaces” describes the procedures
used to replace, add, or remove network interfaces.
10. Server components.
Chapter 24, “Administering Server Components” describes the procedures
used to replace, add, or remove components from the HA servers.
14-2
Solstice HA 1.3 User’s Guide—April 1997
Preparing for Administration
15
This chapter provides information about administration of an Ultra Enterprise
Cluster HA configuration.
Saving Device Information
page 15-1
Restoring Device Information
page 15-3
Recording the Device Configuration Information
page 15-4
Instance Names and Numbering
page 15-5
Logging Into the Servers as Root
page 15-7
15.1 Saving Device Information
You should have a record of the disk partitioning you selected for the disks in
your multihost disksets. You need this multihost partitioning information to
perform disk replacement.
The disk partitioning information for the local disks is not as critical because
the local disks on both servers should have been partitioned identically. You
can obtain the local disk partitioning from the sibling server if a local disk fails.
When a multihost disk is replaced, the replacement disk must have the same
partitioning as the disk it is replacing. Depending on how a disk has failed, this
information might not be available when replacement is performed. Therefore,
it is especially important to retain a record of the disk partitioning information
if you have several different partitioning schemes in your disksets.
15-1
15
A simple way to record this information is shown in the sample script in
Figure 15-1. This type of script should be run following Solstice HA
configuration. In this example, the files containing the volume table of contents
(VTOC) information are written to the local /etc/opt/SUNWhadf/vtoc
directory by the prtvtoc(1M) command.
#! /bin/sh
DIR=/etc/opt/SUNWhadf/vtoc
mkdir -p $DIR
cd /dev/rdsk
for i in *s7
do prtvtoc $i >$DIR/$i || rm $DIR/$i
done
Figure 15-1 Sample Script for Saving VTOC Information
Each of the disks in a diskset is required to have a slice 7 on which the
metadevice state database replicas reside. This requirement allows the script in
Figure 2-1 to work correctly.
If a local disk also has a valid slice 7, the VTOC information will also be saved
by the sample script in Figure 15-1. However, this should not occur for the boot
disk, because typically a boot disk does not have a valid slice 7.
Note – Make certain that the script is run while none of the disks are owned by
the sibling host. The script will work if the logical hosts are in maintenance
mode, if the logical hosts are owned by the local host, or if Solstice HA is not
running.
Maintain this information on both servers in the Ultra Enterprise Cluster HA
configuration. Keep this information up-to-date as new disks are added to the
disksets and when any of the disks are repartitioned.
15-2
Solstice HA 1.3 User’s Guide—April 1997
15
15.2 Restoring Device Information
Typically, you should restore VTOC information before placing a disk back into
a diskset.
If you have saved the VTOC information for all multihost disks, this
information can be used when a disk is replaced. The sample script shown in
Figure 15-2 uses the VTOC information saved by the script shown in
Figure 15-1 to give the replacement disk the same partitioning as the failed
disk. Use the actual names of the disk or disks to be added in place of the
placeholders c1t0d0s7 and c1t0d1s7 in the example. You specify multiple disks
as a space-delimited list.
#! /bin/sh
DIR=/etc/opt/SUNWhadf/vtoc
cd /dev/rdsk
for i in c1t0d0s7 c1t0d1s7
do fmthard -s $DIR/$i $i
done
Figure 15-2 Sample Script for Restoring VTOC Information
Note – The replacement drive must be of the same size and geometry
(generally the same model from the same manufacturer) as the failed drive.
Otherwise the original VTOC might not be appropriate for the replacement
drive.
Preparing for Administration
15-3
15
If you did not record this VTOC information, but you have mirrored slices on a
disk-by-disk basis (for example, the VTOCs of both sides of the mirror are the
same), it is possible to copy the VTOC information from the other submirror
disk to the replacement disk. For this procedure to be successful, the
replacement disk must be in maintenance mode or must be owned by the same
host as the failed disk, or Solstice HA must be stopped. An example of this
procedure is shown in Figure 15-3.
#! /bin/sh
cd /dev/rdsk
OTHER_MIRROR_DISK=c2t0d0s7
REPLACEMENT_DISK=c1t0d0s7
prtvtoc $OTHER_MIRROR_DISK | fmthard -s - $REPLACEMENT_DISK
Figure 15-3 Sample Script to Copy VTOC Information From a Mirror
If you did not save the VTOC information and did not mirror on a disk-by-disk
basis, you can examine the component sizes reported by the metastat(1M)
command and reverse engineer the VTOC information. Because the
computations used in this procedure are so complex, the procedure should be
performed only by a trained service representative.
15.3 Recording the Device Configuration Information
It is important for you to record the /etc/path_to_inst and the
/etc/name_to_major information on removable media (that is, floppy disk
or backup tape).
The path_to_inst(4) file contains the minor unit numbers for disks in each
multihost disk expansion unit. This information will be necessary if the boot
disk on either Ultra Enterprise Cluster HA server fails and has to be replaced.
The name_to_major file contains the major device numbers for multihost
disks. Solstice DiskSuite relies upon the major numbers remaining the same
across OS installs.
15-4
Solstice HA 1.3 User’s Guide—April 1997
15
15.4 Instance Names and Numbering
Instance names are occasionally reported in driver error messages. An instance
name refers to system devices such as ssd20 or hme5.
You can determine the binding of an instance name to a physical name by
looking at /var/adm/messages or dmesg(1M) output:
ssd20 at SUNW,pln0:
ssd20 is /io-unit@f,e0200000/sbi@0,0/SUNW,soc@3,0/SUNW,pln@a0000800,20183777/ssd@4,0
le5 at lebuffer5: SBus3 slot 0 0x60000 SBus level 4 sparc ipl 7
le5 is /io-unit@f,e3200000/sbi@0,0/lebuffer@0,40000/le@0,60000
Once an instance name has been assigned to a device, it remains bound to that
device.
Instance numbers are encoded in a device’s minor number. To keep instance
numbers persistent across reboots, the system records them in the
/etc/path_to_inst file. This file is read only at boot time and is currently
updated by the add_drv(1M) and drvconfig(1M) commands. For
additional information refer to the path_to_inst(4) man page.
When you perform a Solaris installation on a server, instance numbers can
change if hardware was added or removed since the last Solaris installation.
For this reason, use caution whenever you add or remove devices such as SBus
or FC/OM cards on Ultra Enterprise Cluster HA servers. It is important to
maintain the same configuration of existing devices, so that the system(s) are
not confused in the event of a reinstall or reconfiguration reboot.
Preparing for Administration
15-5
15
The following example highlights the instance number problems that can arise
in a configuration. In this example, the Ultra Enterprise Cluster HA
configuration consists of three SPARCstorage Arrays with Fibre Channel/Sbus
(FC/S) cards installed in SBus slots 1, 2, and 4 on each of the servers. The
controller numbers are c1, c2, and c3. If the system administrator adds
another SPARCstorage Array to the configuration using a FC/S card in SBus
slot 3, the corresponding controller number will be c4. If Solaris is reinstalled
on one of the servers, the controller numbers c3 and c4 will refer to different
SPARCstorage Arrays. The other Ultra Enterprise Cluster HA server will still
refer to the SPARCstorage Arrays with the original instance numbers. Solstice
DiskSuite will not communicate with the disks connected to the c3 and c4
controllers.
Other problems can arise with instance numbering associated with the
Ethernet connections. For example, each of the Ultra Enterprise Cluster HA
servers has three Ethernet SBus cards installed in slots 1, 2, and 3, and the
instance numbers are le1, le2, and le3. If the middle card (le2) is removed
and Solaris is reinstalled, the third SBus card will be renamed from le3 to le2.
15.4.1 Reconfiguration Reboots
During some of the administrative procedures documented in this book, you
are instructed to perform a reconfiguration reboot. You perform a
reconfiguration reboot using the OpenBoot PROM boot -r command or by
creating the file /reconfigure on the server and then rebooting.
Note – It is not necessary to perform a reconfiguration reboot to add disks to
an existing multihost disk expansion unit.
Avoid performing Solaris reconfiguration reboots when any hardware
(especially a multihost disk expansion unit or disk) is powered off or otherwise
defective. In such situations, the reconfiguration reboot removes the inodes in
/devices and symbolic links in /dev/dsk and /dev/rdsk associated with
the disk devices. These disks become inaccessible to Solaris until a later
reconfiguration reboot. A subsequent reconfiguration reboot might not restore
the original controller minor unit numbering and, therefore, cause Solstice
DiskSuite to reject the disks. When the original numbering is restored, Solstice
DiskSuite can access the associated metadevices.
15-6
Solstice HA 1.3 User’s Guide—April 1997
15
If all hardware is operational, you can perform a reconfiguration reboot safely
to add a disk controller to a server. You must add such controllers
symmetrically to both servers (though a temporary unbalance is allowed while
the servers are upgraded). Similarly, if all hardware is operational, it is safe to
perform a reconfiguration reboot to remove hardware.
15.5 Logging Into the Servers as Root
If you want to log in to Ultra Enterprise Cluster HA servers as root through a
terminal other than the console, you must edit the /etc/default/login file
and comment out the following line:
CONSOLE=/dev/console
This will allow you to have root logins using rlogin(1), telnet(1), and
other programs.
Preparing for Administration
15-7
15
15-8
Solstice HA 1.3 User’s Guide—April 1997
Administering the Terminal
Concentrator
16
This chapter provides instructions for using the terminal concentrator when
performing administration of Ultra Enterprise Cluster HA configurations.
Connecting to the Ultra Enterprise Cluster HA Server Console
page 16-2
Resetting Terminal Concentrator Connections
page 16-4
Entering the OpenBoot PROM on an Ultra Enterprise Cluster HA
Server
page 16-6
Troubleshooting the Terminal Concentrator
page 16-7
The following procedures are included in this chapter.
• “How to Connect to the Ultra Enterprise Cluster HA Server Console” on
page 16-2
• “How to Reset a Terminal Concentrator Connection” on page 16-4
• “How to Enter the OpenBoot PROM” on page 16-6
• “How to Correct a Port Configuration Access Error” on page 16-7
• “How to Establish a Default Route” on page 16-9
16-1
16
16.1 Connecting to the Ultra Enterprise Cluster HA Server Console
You can perform administrative tasks from a window connected to either Ultra
Enterprise Cluster HA server. The procedures for initial set up of a terminal
concentrator and how to set up security are in the hardware planning and
installation manual for your HA server and the terminal concentrator
documentation.
The following procedure describes how to create connections from the
administrative workstation in an Ultra Enterprise Cluster HA configuration.
Because shelltool(1) can be of variable size, and the connection is made
through a serial-port console interface, the console port is incapable of
determining the window size of the shelltool from which the connection was
made. You must set the window size manually on the servers, for any
applications that require information about row and column quantities.
▼ How to Connect to the Ultra Enterprise Cluster HA Server Console
1. Open a shelltool(1) window on the desktop of a workstation.
2. Run the tput(1) command and note the size of the shelltool window.
These numbers will be used in Step 6.
# tput lines
35
# tput cols
80
3. Type the following command to open a telnet(1) connection to one of
the Ultra Enterprise Cluster HA servers, through the terminal
concentrator.
# telnet terminal_concentrator_name 5002
Trying 192.9.200.1 ...
Connected to 192.9.200.1.
Escape character is ’^]’.
16-2
Solstice HA 1.3 User’s Guide—April 1997
16
Note – Port numbers are configuration dependent. Typically, ports 2 and 3
(5002 and 5003 in the examples) are used for the first HA cluster at a site.
4. Open another shelltool(1) window and type the following command
to open a telnet(1) connection to the other server.
# telnet terminal_concentrator_name 5003
Trying 192.9.200.1 ...
Connected to 192.9.200.1.
Escape character is ’^]’.
Note – If you set up security as described in the hardware planning and
installation guide for your HA server, you will be prompted for the port
password. After establishing the connection, you will be prompted for the
login name and password.
5. Log in to the server.
Console login: root
Password: root_password
6. Use the stty(1) command to reset the terminal rows and cols attributes
to those found in Step 2.
Enter the following commands using the sizes obtained in step 2.
# stty rows 35
# stty cols 80
7. Set the TERM environment variable to the appropriate value based on the
type of window used in Step 1.
For example, if you are using an xterm window, type:
# TERM=xterm; export TERM (sh or ksh)
or
# setenv TERM xterm (csh)
Administering the Terminal Concentrator
16-3
16
16.2 Resetting Terminal Concentrator Connections
This section provides instructions for resetting a terminal concentrator
connection.
If another user has a connection to the HA server console port on the terminal
concentrator, you can reset the port to disconnect that user. This procedure will
be useful if you need to immediately perform an administrative task.
If you cannot connect to the terminal concentrator, the following message
appears:
# telnet terminal_concentrator_name 5002
Trying 192.9.200.1 ...
telnet: Unable to connect to remote host: Connection refused
#
If you use the port selector, you might see a port busy message.
▼ How to Reset a Terminal Concentrator Connection
1. Press an extra return after making the connection and select the command
line interface (cli) to connect to the terminal concentrator.
The annex: prompt appears.
# telnet terminal_concentrator_name
...
Enter Annex port name or number: cli
...
annex:
2. Enter the su command and password.
By default, the password is the IP address of the terminal concentrator.
annex: su
Password:
16-4
Solstice HA 1.3 User’s Guide—April 1997
16
3. Determine which port you want to reset.
The port in this example is port 2. Use the terminal concentrator’s built-in
who command to show connections.
annex#
Port
2
v1
who
What
PSVR
CLI
User
-----
Location
-----
When
-----
Idle
1:27
Address
192.9.75.12
192.9.76.10
4. Reset the port.
Use the terminal concentrator’s built-in reset command to reset the port.
This example breaks the connection on port 2.
annex# admin reset 2
5. Disconnect from the terminal concentrator.
annex# hangup
6. Reconnect to the port.
# telnet terminal_concentrator_name 5002
Administering the Terminal Concentrator
16-5
16
16.3 Entering the OpenBoot PROM on an Ultra Enterprise Cluster HA Server
This section contains information for entering the OpenBoot PROM from the
terminal concentrator.
▼ How to Enter the OpenBoot PROM
1. Stop the system, if necessary, with hastop(1M), and then halt the system.
Halt the system gracefully using halt(1M).
# halt
If halting the system with halt(1M) is not possible, then enter the
telnet(1) command mode. The default telnet(1) escape character is
control-].
telnet>
2. Connect to the port.
# telnet terminal_concentrator_name 5002
Trying 192.9.200.1 ...
Connected to 129.9.200.1 .
Escape character is ’^]’.
3. Send a break to the server.
telnet> send brk
4. Execute the OpenBoot PROM commands.
16-6
Solstice HA 1.3 User’s Guide—April 1997
16
16.4 Troubleshooting the Terminal Concentrator
This section describes troubleshooting techniques associated with the terminal
concentrator.
16.4.1 Error Using telnet(1) to Access a Particular Port
A “connect: Connection refused” message while trying to access a particular
terminal concentrator port using telnet(1) can have two possible causes:
•
•
The port is being used by someone else
The port is misconfigured and not accepting network connections
▼ How to Correct a Port Configuration Access Error
1. Telnet to the terminal concentrator without specifying the port, and then
interactively specify the port.
# telnet terminal_concentrator_name
Trying ip_address ..
Connected to 192.9.200.1
Escape character is '^]'.
[you may have to enter a RETURN to see the following prompts]
Rotaries Defined:
cli
-
Enter Annex port name or number: 2
If you see the following message, the port is in use.
Port(s) busy, do you wish to wait? (y/n) [y]:
If you see the following message, the port is misconfigured.
Port 2
Error: Permission denied.
Administering the Terminal Concentrator
16-7
16
If the port is in use, reset the terminal concentrator connections using the
instructions in “Resetting Terminal Concentrator Connections” on page 16-4.
If the port is misconfigured, do the following:
a. Select the command-line interpreter (cli) and become the terminal
concentrator superuser.
Enter Annex port name or number: cli
Annex Command Line Interpreter
*
Copyright 1991 Xylogics, Inc.
annex: su
Password:
b. As the terminal concentrator superuser, reset the port mode.
annex# admin
Annex administration MICRO-XL-UX R7.0.1, 8 ports
admin: port 2
admin: set port mode slave
You may need to reset the appropriate port, Annex subsystem or
reboot the Annex for changes to take effect.
admin: reset 2
admin:
The port is now configured correctly.
For more information about the terminal concentrator administrative
commands see the Sun Terminal Concentrator General Reference Guide.
16-8
Solstice HA 1.3 User’s Guide—April 1997
16
16.4.2 Random Interruptions to Terminal Concentrator Connections
Terminal concentrator connections made through a router can experience
intermittent interruptions. These connections might come alive for random
periods, then go dead again. When the connection is dead, any new terminal
concentrator connection attempts will time out. The terminal concentrator will
show no signs of rebooting. Subsequently, a needed route might be reestablished, only to disappear again. The problem is due to terminal
concentrator routing table overflow and loss of network connection.
This is not a problem for connections made from a host that resides on the
same network as the terminal concentrator.
The solution is to establish a default route within the terminal concentrator and
disable the routed feature. You must disable the routed feature to prevent
the default route from being lost. The following procedure shows how to do
this. See the terminal concentrator documentation for additional information.
The file config.annex is created in the terminal concentrator’s EEPROM file
system and defines the default route to be used. You also can use the
config.annex file to define rotaries that allow a symbolic name to be used
instead of a port number. Disable the routed feature using the terminal
concentrator’s set command.
▼ How to Establish a Default Route
1. Open a shelltool(1) connection to the terminal concentrator.
# telnet terminal_concentrator_name
Trying 192.9.200.2 ...
Connected to xx-tc.
Escape character is ’^]’.
Rotaries Defined:
cli
-
Enter Annex port name or number: cli
Annex Command Line Interpreter
Administering the Terminal Concentrator
*
Copyright 1991 Xylogics, Inc.
16-9
16
2. Enter the su command and administrative password.
By default, the password is the IP address of the terminal concentrator.
annex: su
Password: administrative_password
3. Edit the config.annex file.
When the terminal concentrator’s editor starts, the following message
appears:
annex# edit config.annex
4. Enter the highlighted information appearing in the following example,
substituting the appropriate IP address for your default router:
Ctrl-W:save and exit Ctrl-X: exit Ctrl-F:page down Ctrl-B:page up
%gateway
net default gateway 192.9.200.2 metric 1 active ^W
5. Disable the local routed.
annex# admin set annex routed n
You may need to reset the appropriate port, Annex subsystem or
reboot the Annex for changes to take effect.
annex#
6. Reboot the terminal concentrator.
annex# boot
It takes a few minutes for the terminal concentrator to boot. During this
time, the HA server consoles are inaccessible.
16-10
Solstice HA 1.3 User’s Guide—April 1997
General Solstice HA Maintenance
17
This chapter provides instructions for general maintenance procedures such as
restarting failed servers in Ultra Enterprise Cluster HA configurations.
Switching Over Data Services
page 17-2
Starting the Membership Monitor
page 17-3
Stopping the Membership Monitor
page 17-3
Forcing a Membership Reconfiguration
page 17-4
Handling Split-Brain Syndrome
page 17-5
Shutting Down Ultra Enterprise Cluster HA Servers
page 17-5
Starting Servers Without Running Solstice HA
page 17-7
Setting the OpenBoot PROM
page 17-8
Maintaining the /var File System
page 17-11
Maintaining Solstice HA Packages
page 17-13
Changing the Host Name of a Server or a Logical Host
page 17-13
Changing the Time in Ultra Enterprise Cluster HA Configurations
page 17-14
17-1
17
This chapter contains the following procedures:
• “How to Shut Down One Server” on page 17-6
• “How to Shut Down an Ultra Enterprise Cluster HA Configuration” on
page 17-6
• “How to Halt an Ultra Enterprise Cluster HA Server” on page 17-7
• “How to Start Servers Without Running Solstice HA” on page 17-8
• “How to Set the OpenBoot PROM” on page 17-9
• “How to Configure the OpenBoot PROM to Handle Split-Brain
Syndrome” on page 17-10
• “How to Repair a Full /var File System” on page 17-12
• “How to Remove Solstice HA Packages” on page 17-13
17.1 Switching Over Data Services
You use the haswitch(1M) command to move all data services from one Ultra
Enterprise Cluster HA server to the other. The command also allows you to put
logical hosts in maintenance mode.
For example, to execute a switchover of all data services from “phys-hahost1”
to “phys-hahost2” (with the logical hosts being named “hahost1” and
“hahost2”), enter the following command:
phys-hahost2# haswitch phys-hahost2 hahost1 hahost2
You cannot switch over just one data service if more than one is running.
17.1.1 Putting Logical Hosts in Maintenance Mode
To put the disksets of a logical host in maintenance mode, use the -m option of
the haswitch(1M) command. Maintenance mode is useful for some
administration tasks on file systems and disksets.
Note – Unlike other types of ownership of a logical host, maintenance mode
persists across server reboots.
17-2
Solstice HA 1.3 User’s Guide—April 1997
17
A sample use of the maintenance option would be:
phys-hahost2# haswitch -m hahost1
This command stops the data services associated with “hahost1” on the HA
server that currently owns the diskset, and also halts the fault monitoring
programs associated with “hahost1” on both HA servers. The command also
executes an unshare(1M) and umount(1M) of any HA file systems on the
logical host. The associated diskset ownership is released.
You can run the command on either host, regardless of current ownership of
the logical host and diskset.
You can remove a logical host from maintenance mode by performing a
switchover specifying the physical host that is to own the diskset. For example,
you could use the following command to remove “hahost1” from maintenance
mode:
phys-hahost1# haswitch phys-hahost1 hahost1
17.2 Starting the Membership Monitor
You start or restart the Solstice HA membership monitor by running the
hastart(1M) command. The hastart(1M) command starts Solstice HA on
the individual node from which it is executed. To start the Solstice HA
membership monitor on both hosts, you must run hastart(1M) on both
hosts. Once hastart(1M) has run, Solstice HA restarts automatically on each
system boot until such time that hastop(1M) is issued.
17.3 Stopping the Membership Monitor
To put the server in any mode other than multiuser, or to halt or reboot the
server, you must first stop the Solstice HA membership monitor. You then can
use your site’s preferred method for further server maintenance.
General Solstice HA Maintenance
17-3
17
You can stop the membership monitor only when no logical hosts are owned
by the local HA server. To stop the membership monitor on one host, switch
over the logical host(s) to the other physical host using haswitch(1M) and
stop the HA server by typing the following command:
phys-hahost1# hastop
If a logical host is owned by the server when the hastop(1M) command is
run, ownership will be transferred to the other HA server before the
membership monitor is stopped.
If the other HA server is down, the command will take down the data services
in addition to stopping the membership monitor.
To stop the membership monitor on both HA servers, run the haswitch(1M)
command and stop the membership monitor on one of the servers. Then run
hastop(1M) on both servers simultaneously.
After hastop(1M) runs, Solstice HA will remain stopped, even across system
reboots, until hastart(1M) is run.
17.4 Forcing a Membership Reconfiguration
You can force a membership reconfiguration by changing ownership of a
logical host.
A regular switchover (using haswitch(1M)with no flags) accomplishes this
task, but you will be required to perform a second switchover to restore the
original configuration (that is, to have the logical hosts associated with the
default masters).
Another method of performing a membership reconfiguration is to use
haswitch -r. This command performs the membership reconfiguration
without changing ownership of the disksets. For example:
phys-hahost1# haswitch -r
See the haswitch(1M) man page for additional information.
17-4
Solstice HA 1.3 User’s Guide—April 1997
17
17.5 Handling Split-Brain Syndrome
In the split-brain syndrome, both private links are down but both servers are
up. The failure of both private links constitutes a double failure, for which
Solstice HA does not claim to provide service. Even though service is not being
provided, Solstice HA uses the SCSI reservation mechanism to prevent data
corruption in the split-brain scenario.
In the split-brain syndrome, the sibling server detects the loss of diskset
ownership and panics due to the disk reservation conflict. Sometimes, both
servers panic. Although no service is provided, data corruption is avoided.
After panicking, the system reboots, rejoins the cluster, and forcibly takes
ownership of the diskset(s). Then, the other server panics with the reservation
conflict, reboots and rejoins the cluster, and forcibly takes ownership of the
diskset(s). This ping-pong situation where the hosts continually panic and
reboot can be avoided by preventing one of the servers from rebooting after a
panic. This can be accomplished using the procedure “How to Configure the
OpenBoot PROM to Handle Split-Brain Syndrome” on page 17-10.
17.6 Shutting Down Ultra Enterprise Cluster HA Servers
You might have to shut down one or both Ultra Enterprise Cluster HA servers
to perform hardware maintenance procedures such as adding or removing
SBus cards. The following sections describe the procedure for shutting down a
single server or the entire configuration.
If you want the data in a logical host (diskset) to remain available when a
server is shut down, you must first switch ownership of the diskset to the other
server using the haswitch(1M) command.
General Solstice HA Maintenance
17-5
17
▼ How to Shut Down One Server
1. If it is not necessary to have the data available, place the logical host
(diskset) in maintenance mode.
Refer to “Putting Logical Hosts in Maintenance Mode” on page 17-2 for
additional information.
Note – It is possible to halt an Ultra Enterprise Cluster HA server using
halt(1M) and allow a takeover to restore the logical host services on the other
server. The halt(1M) operation might cause the server to panic. However, the
haswitch(1M) command offers a more reliable method of switching
ownership of the logical hosts.
2. Enter the following commands to stop Solstice HA on a server without
stopping services running on the sibling:
phys-hahost1# hastop
3. Halt the server.
phys-hahost1# halt
▼ How to Shut Down an Ultra Enterprise Cluster HA Configuration
You might want to shut down both servers in an Ultra Enterprise Cluster HA
configuration if a bad environmental condition exists, such as a cooling failure
or a severe lightning storm.
1. Stop the membership monitor on both servers simultaneously using
hastop(1M).
phys-hahost1# hastop
phys-hahost2# hastop
17-6
Solstice HA 1.3 User’s Guide—April 1997
17
2. Halt both servers using halt(1M).
phys-hahost1# halt
phys-hahost2# halt
▼ How to Halt an Ultra Enterprise Cluster HA Server
♦ You can shut down either server using halt(1M) or uadmin(1M).
If the membership monitor is running when a host is shut down, the server
will most likely take a “Failfast timeout” and display the following message:
panic[cpu9]/thread=0x50f939e0: Failfast timeout - unit
You can avoid this by stopping the membership monitor before shutting down
the server. Refer to “Stopping the Membership Monitor” on page 17-3 for
additional information.
17.7 Starting Servers Without Running Solstice HA
You might need to start a server without running the Solstice HA software.
One way to do this is to run hastop(1M) before halting the system. When you
reboot the system, Solstice HA will not start automatically.
If you cannot run hastop(1M) before halting the system, use the following
procedure.
General Solstice HA Maintenance
17-7
17
▼ How to Start Servers Without Running Solstice HA
1. Boot the server to single-user mode.
Note that Solstice HA software is started at run level 3.
# boot -s
...
INIT: SINGLE USER MODE
Type Ctrl-d to proceed with normal startup,
(or give root password for system maintenance): root_password
Entering System Maintenance Mode
#
2. Mount the /opt directory.
# mount /opt
3. Run hastop(1M)
This will prevent Solstice HA from starting automatically on the next reboot.
# hastop
cm_stop: rpc request timed out
4. Reboot normally.
17.8 Setting the OpenBoot PROM
For correct Solstice HA operation, set the OpenBoot PROM options on both
servers to the factory defaults—with the exception of the watchdog-reboot?
variable, which you set to true. The default setting for auto-boot?, which is
true, generally should not be changed. These settings ensure that Ultra
Enterprise Cluster HA servers will boot upon power up and after a kernel
watchdog reset. The one reason for which you might want to change the
boot-device? setting is to avoid ping-ponging behavior that occurs when the
servers are experiencing split-brain syndrome.
17-8
Solstice HA 1.3 User’s Guide—April 1997
17
Note – Under some circumstances, the Solstice HA software might execute a
halt(1M) command on a server rather than a reboot(1M) command. This is
confined ordinarily to initial configuration problems. In this case, you must
boot the server manually to return it to service.
▼ How to Set the OpenBoot PROM
1. If Solstice HA is currently running stop it.
# hastop
2. Shut down the Ultra Enterprise Cluster HA server to the OpenBoot
PROM.
# halt
3. Run the following commands to set the variables from the OpenBoot
PROM.
Use the OpenBoot printenv command to check the values.
ok set-defaults
Setting NVRAM parameters to default values.
ok setenv watchdog-reboot? true
watchdog-reboot?= true
ok printenv
Parameter Name
Value
Default Value
...
sbus-probe-list1
0123
0123
sbus-probe-list0
0123
0123
fcode-debug?
false
false
auto-reboot?
true
true
watchdog-reboot?
true
false
...
General Solstice HA Maintenance
17-9
17
17.8.1 OpenBoot PROM Settings to Handle Split-Brain
To prevent one of the servers from rebooting after a panic, you can program
the OpenBoot boot-device parameter to a non-existent device, e.g., noboot.
You can set this from the OpenBoot PROM monitor, similar to how you would
set the watchdog-reboot? parameter. For more information on split-brain
syndrome, see “Handling Split-Brain Syndrome” on page 17-5 and Chapter 25,
“Solstice HA Fault Detection.”
You might want to configure the OpenBoot PROM of only one server of the
HA server pair this way if your site is concerned that the loss of both private
links will cause a loss of availability.
Configuring the boot-device parameter this way prevents this system from
booting-up automatically after a power failure or other event which brings the
system down. You can decide which is more suitable for your site: this
configuration or the convenience of automatic booting on power-up or reboot.
If you use this approach, you can use one of the following methods. The
system must be power-cycled or reset in order for the change to take affect.
▼ How to Configure the OpenBoot PROM to Handle Split-Brain
Syndrome
Note – Make this OpenBoot PROM change on only one server of the pair.
1. Set the OpenBoot PROM boot-device.
At the OBP monitor level:
(4) ok set boot-device noboot
boot-device= noboot
(4) ok reset
resetting ...
...
17-10
Solstice HA 1.3 User’s Guide—April 1997
17
From SunOS:
phys-hahost1# eeprom boot-device=noboot
phys-hahost1#
2. Bring the system down to the OpenBoot PROM monitor and either run
the OpenBoot PROM reset command or power-cycle the system.
3. Boot the system manually.
Substitute your boot device for the variable bootdevice. Note that this step
always must be done to boot the system at the end of this procedure.
(4) ok boot bootdevice
17.9 Maintaining the /var File System
Because Solaris and Solstice HA software error messages are written to the
/var/adm/messages file, the /var file system can become full. If the /var
file system becomes full while the server is running, the server will continue to
run. In most cases, you cannot log into the server with the full /var file
system. If the server goes down, Solstice HA will not start and a login will not
be possible.
If the server goes down, you must reboot in single-user mode (boot -s).
If the server reports a full /var file system and continues to run Solstice HA
services, follow the steps in the next section. In the sample procedure,
“phys-hahost1” has a full /var file system.
General Solstice HA Maintenance
17-11
17
▼ How to Repair a Full /var File System
1. Perform a switchover.
phys-hahost2# haswitch phys-hahost2 hahost1 hahost2
2. Stop the Solstice HA services.
If you have an active login to “phys-hahost1,” enter the following:
phys-hahost1# hastop
If you do not have an active login to “phys-hahost1,” abort the server using
the procedure described in “Entering the OpenBoot PROM on an Ultra
Enterprise Cluster HA Server” on page 16-6.
3. Reboot the server in single-user mode.
(0) ok boot -s
INIT: SINGLE USER MODE
Type Ctrl-d to proceed with normal startup,
(or give root password for system maintenance): root_password
Entering System Maintenance Mode
Sun Microsystems Inc. SunOS 5.5.1 Generic May 1996
#
4. Perform the steps you would normally take to clear the full file system.
When you are done, use the following command to enter multiuser mode.
# exit
Use hastart(1M) to cause the server to rejoin the configuration.
# hastart
17-12
Solstice HA 1.3 User’s Guide—April 1997
17
17.10 Maintaining Solstice HA Packages
The only Solstice HA or Solstice DiskSuite packages that can be removed safely
are the AnswerBook documents. By default, the AnswerBooks for Solstice
DiskSuite reside in /opt/SUNWabmd and the AnswerBooks for Solstice HA
reside in /opt/SUNWabha. To remove these packages, use the following
procedure.
To upgrade the servers with a new version of Solstice HA, use the procedure
described in Chapter 6, “Software Installation.”
▼ How to Remove Solstice HA Packages
♦ Remove the packages from each of the Ultra Enterprise Cluster HA
servers, using the pkgrm(1M) command on each server.
phys-hahost1# pkgrm SUNWabha SUNWabmd
phys-hahost2# pkgrm SUNWabha SUNWabmd
17.11 Changing the Host Name of a Server or a Logical Host
Changing the host name of a server in an Ultra Enterprise Cluster HA
configuration is a complex procedure. This procedure should only be
performed by a trained service representative.
Renaming a logical host is not possible.
Do not use host name aliases for the logical hosts. NFS clients mounting HA
file systems using logical host hostname aliases might experience statd lock
recovery problems.
General Solstice HA Maintenance
17-13
17
17.12 Changing the Time in Ultra Enterprise Cluster HA Configurations
A simple time synchronization protocol is run on both Ultra Enterprise Cluster
HA servers and ensures the clocks stay synchronized. Both nodes try to adjust
their time to match the other—they are both adjusting towards the average of
the two times. The “window of error” is roughly three seconds. This interval is
sufficient because a switchover or takeover takes longer than three seconds to
complete. In the event of a switchover or takeover, the time stamp difference
for HA-NFS clients will go unnoticed.
This synchronization occurs only within the Ultra Enterprise Cluster HA
configuration. No reference is made by the servers to external time standards
that are used at your site. For this reason, the time on the Ultra Enterprise
Cluster HA servers can drift out of sync with other hosts on the network.
!
17-14
Caution – An administrator cannot adjust the time of the servers in an Ultra
Enterprise Cluster HA configuration. Never attempt to perform a time change
using either the date(1) or the rdate(1M) commands.
Solstice HA 1.3 User’s Guide—April 1997
Administering Metadevices and
Disksets
18
This chapter provides instructions for administering metadevices and disksets.
Overview of Metadevice and Diskset Administration
page 18-2
Mirroring Guidelines
page 18-3
Diskset Administration
page 18-3
Multihost Metadevice Administration
page 18-5
Local Metadevice Administration
page 18-10
Destructive Metadevice Actions to Avoid
page 18-10
Backing Up Multihost Data Using Solstice Backup
page 18-10
The following procedures are included in this chapter:
• “How to Add a Disk to a Diskset” on page 18-4
• “How to Remove a Disk From a Diskset” on page 18-5
18-1
18
18.1 Overview of Metadevice and Diskset Administration
Metadevices and disksets are created and administered using either Solstice
DiskSuite command-line utilities or the DiskSuite Tool (metatool(1M))
graphical user interface.
Your primary source of information about administration of Solstice DiskSuite
devices is the Solstice DiskSuite 4.1 Reference Guide and Solstice DiskSuite 4.1
User’s Guide.
Read the information in this chapter before using the DiskSuite documentation
to administer disksets and metadevices in an Ultra Enterprise Cluster HA
configuration.
Disksets are groups of disks. The primary administration task that you perform
on disksets involves adding and removing disks.
Before using a disk that you have placed in a diskset, you must set up a
metadevice using the disk’s slices. A metadevice can be: a UFS logging device
(also called a transdevice), concatenation, stripe, metamirror, or a hot spare
pool.
Note – Metadevice names begin with ‘d’ and are followed by a number. By
default in a Solstice HA configuration there are 600 unique metadevices in the
range 0 to 599. Each UFS logging device that you create will use at least seven
metadevice names. Therefore, in a large Ultra Enterprise Cluster HA
configuration, you might need more than the 600 default metadevice names.
For instructions about changing the number, refer to the Solstice DiskSuite 4.1
User’s Guide.
In DiskSuite 4.1, you can modify the nmd and md_nsets fields in the
/kernel/drv/md.conf file. If you modify md.conf, you should set
md_nsets to 3 (rather than the default 4, Ultra Enterprise Cluster HA uses at
most 3 disksets: the local set and two multihost disksets). This will help
conserve inodes (and therefore space) in the root file system.
18-2
Solstice HA 1.3 User’s Guide—April 1997
18
18.2 Mirroring Guidelines
No two components in different submirrors of a single mirror can be located in
the same multihost disk expansion unit chassis. This allows submirrors to be
taken off line and the chassis to be powered off.
Additional information about mirroring guidelines can be found in Chapter 3,
“Configuration Planning.”
18.3 Diskset Administration
Diskset administration consists of adding and removing disks from the diskset.
The steps for these procedures are included in the following sections.
Note – If the logical hosts are up and running, you should never perform
diskset administration using either the -t (take ownership) or -r (release
ownership) options of the metaset(1M) command. These options are used
internally by the Solstice HA software and must be coordinated between the
two servers.
If the logical host is in maintenance mode, as reported by hastat(1M), you
can use the metaset -t command to take ownership of the diskset. However,
before returning the logical host to service you must release the diskset
ownership using the metaset -r command.
To place a logical host in maintenance mode, run the haswitch -m command.
If a multihost disk expansion unit tray must be spun down to perform the
administration tasks, you must have ownership of any disks in the tray.
Change ownership using the haswitch(1M) command.
If you are using SPARCstorage Arrays, note that you cannot use the
ssaadm(1M) command to perform maintenance on a SPARCstorage Array if
the sibling host has ownership of the logical host. If the logical host is either in
maintenance mode or is locally owned, use the ssaadm(1M) command.
Administering Metadevices and Disksets
18-3
18
Before using the ssaadm(1M) command, make sure that no drives in the tray
are owned by the sibling server. The following command will show whether
any drives are reserved by the sibling host.
phys-hahost1# ssaadm display c1
Chapter 20, “Recovering From Power Loss,” Chapter 21, “Administering HA
Server and Multihost Disks,” and Chapter 22, “Administering SPARCstorage
Arrays” provide additional details about performing maintenance procedures.
18.3.1 Adding a Disk to a Diskset
If the disk being added to a diskset will be used as a submirror, you must have
two disks available on two different multihost disk expansion units to allow
for mirroring. However, if the disk will be used as a hot spare, you can add a
single disk.
▼ How to Add a Disk to a Diskset
1. Ensure that no data is on the disk.
This is important because the partition table will be rewritten and space for
a metadevice state database replica will be allocated on the disk.
2. Insert the disk device into the multihost disk expansion unit.
Use the instructions in “Adding a Multihost Disk” on page 21-5.
18-4
Solstice HA 1.3 User’s Guide—April 1997
18
18.3.2 Removing a Disk From a Diskset
You can remove a disk from a diskset at any time, as long as none of the slices
on the disk are currently in use in metadevices or hot spare pools.
▼ How to Remove a Disk From a Diskset
1. Use the metastat(1M) command to ensure that none of the slices are in
use as metadevices or as hot spares.
2. Invoke the following command from the HA server that owns the diskset:
# metaset -s logicalhost -d diskname
The metaset(1M) command automatically discovers whether a metadevice
state database replica exists on the disk and, if so, it finds a suitable location for
a replacement replica on another disk.
18.4 Multihost Metadevice Administration
The following sections contain information about the differences in
administering metadevices in the multihost Ultra Enterprise Cluster HA
environment versus a single-host environment.
Unless noted in the following sections, you can use the instructions in the
Solstice DiskSuite 4.1 User’s Guide.
Note – Before using the instructions in either of the Solstice DiskSuite books,
refer to the SPARCcluster documentation set. The instructions in the Solstice
DiskSuite books are relevant only for single-host configurations.
The following sections describe the Solstice DiskSuite command-line programs
to use when performing a task. Optionally, you can use the metatool(1M)
graphical user interface for all the tasks unless directed otherwise. Use the
-s option when running metatool(1M), because it allows you to specify the
diskset name.
Administering Metadevices and Disksets
18-5
18
18.4.1 Managing Metadevices
For ongoing management of metadevices, you must constantly monitor the
metadevices for errors in operation, as discussed in Chapter 19, “Monitoring
the Ultra Enterprise Cluster HA Servers.”
Use the hastat(1M) command to monitor the status of the disksets. When
hastat(1M) reports a problem with a diskset, use the metastat(1M)
command to locate the errored metadevice.
You must use the -s option when running either metastat(1M) or
metatool(1M), so that you can specify the diskset name.
Note – You should save the metadevice configuration information when you
make changes to the configuration. Use metastat -p to create output similar
to what is in the md.tab file and then save the output.
18.4.2 Adding a Mirror to a Diskset
Mirrored metadevices can be used as part of a logging UFS file system for
HA-NFS or HA-DBMS applications.
Idle slices on disks within a diskset can be configured into metadevices by
using the metainit(1M) command.
18.4.3 Removing a Mirror from a Diskset
HA-DBMS applications can use raw mirrored metadevices for database
storage. While these are not mentioned in the dfstab.logicalhost or
vfstab.logicalhost files, they appear in the related HA-DBMS configuration
files. The mirror must be removed from these files and the HA-DBMS system
must be stopped using the mirror. Then the mirror can be deleted by using the
metaclear(1M) command.
18-6
Solstice HA 1.3 User’s Guide—April 1997
18
18.4.4 Taking Submirrors Off line
If you are using SPARCstorage Arrays, note that before replacing or adding a
disk drive in a SPARCstorage Array tray, all metadevices on that tray must be
taken off line.
In symmetric configurations, taking the submirrors off line for maintenance is
complex because disks from each of the two disksets might be in the same tray
in the SPARCstorage Array. You must take the metadevices from each diskset
off line before removing the tray.
Use the metaoffline(1M) command to take off line all submirrors on every
disk in the tray.
18.4.5 Creating New Metadevices
After a disk is added to a diskset, create new metadevices using
metainit(1M) or metatool(1M). If the new devices will be hot spares, use
the metahs(1M) command to place the hot spares in a hot spare pool.
18.4.6 Replacing Errored Components
When replacing an errored metadevice component, use the metareplace(1M)
command.
A replacement slice (or disk) must be available as a replacement. This could be
an existing device that is not in use or a new device that you have added to the
diskset.
You also can return to service drives that have sustained transient errors (for
example, as a result of a chassis power failure), by using the metareplace -e
command.
18.4.7 Deleting a Metadevice
Before deleting a metadevice, verify that none of the components in the
metadevice is in use by HA-NFS. Then use the metaclear(1M) command to
delete the metadevice.
Administering Metadevices and Disksets
18-7
18
18.4.8 Growing a Metadevice
To grow a metadevice, you must have a least two slices (disks) in different
multihost disk expansion units available. Each of the two new slices should be
added to a different submirror with the metainit(1M) command. You then
use the growfs(1M) command to grow the file system. See “Mirroring
Guidelines” on page 18-3 for information on mirroring.
!
Caution – When the growfs(1M) command is running, clients might
experience interruptions of service.
If a takeover occurs while the file system is growing, the file system will not be
grown. You must reissue the growfs(1M) command (from the command line)
after the takeover completes.
Note – The file system that contains /logicalhost/statmon cannot be grown.
Because the statd(1M) program modifies this directory, it would be blocked
for extended periods while the file system is growing. This would have
unpredictable effects on the network file locking protocol. This is a problem
only for configurations using HA-NFS.
18.4.9 Managing Hot Spare Pools
You can add or delete hot spare devices to or from hot spare pools at any time,
as long as they are not in use. In addition, you can create new hot spare pools
and associate them with submirrors using the metahs(1M) command.
18.4.10 Managing UFS Logs
All UFS logs on multihost disks are mirrored. When a submirror fails, it is
reported as an errored component. Repair the failure using either
metareplace(1M) or metatool(1M).
If the entire mirror that contains the UFS log fails, you must unmount the file
system, back up any accessible data, repair the error, repair the file system
(using fsck(1M)), and remount the file system.
18-8
Solstice HA 1.3 User’s Guide—April 1997
18
18.4.10.1 Adding UFS Logging to a Logical Host
All UFS file systems within a logical host must be logging UFS file systems to
ensure that the failover or haswitch(1M) timeout criteria can be met.
The logging UFS file system is set up by creating a trans device with a
mirrored log and a mirrored UFS master file system. Both the log and UFS
master device must be mirrored following the mirroring guidelines explained
in “Mirroring Guidelines” on page 18-3.
During Solstice HA configuration, the hasetup(1M) command optionally
reserves space on slice 6 of each drive in a diskset for use as a UFS log. The
slices can be used for UFS log submirrors. If the slices are smaller than the log
size you want, several can be concatenated. Typically, one Mbyte per 100
Mbytes is adequate for UFS logs, up to a maximum of 64 Mbytes (see “UNIX
File System Logging” on page 1-14). Ideally, log slices should be drive-disjoint
from the UFS master device.
Note – If you must repartition the disk to gain space for UFS logs, then
preserve the existing slice 7, which starts on cylinder 0 and contains at least
two Mbytes. This space is required and reserved for metadevice state database
replicas. The Tag and Flag fields (as reported by the format(1M) command)
must be preserved for slice 7. The metaset(1M) command sets the Tag and
Flag fields correctly when the initial configuration is built.
After the trans device has been configured, create the UFS file system using
newfs(1M) on the trans device.
After the newfs process is completed, add the UFS file system to the
vfstab.logicalhost file using the hafstab(1M) command.
If the file system will be shared by HA-NFS, follow the procedure in “Adding
an HA-NFS File System to a Logical Host” on page 9-8.
The new file system will be mounted automatically at the next membership
monitor reconfiguration. To force membership reconfiguration, use the
following command:
# haswitch -r
Administering Metadevices and Disksets
18-9
18
18.5 Local Metadevice Administration
Local disks are usually not mirrored. However, some local file systems might
have UFS logs. If an error occurs, perform the same actions as when the entire
mirror fails, as specified in “Managing UFS Logs” on page 18-8.
If the entire root disk fails, use the instructions in “Restoring a Boot Disk from
Backup” on page 21-2.
18.6 Destructive Metadevice Actions to Avoid
The metadevice actions that are not supported in Ultra Enterprise Cluster HA
configurations include:
•
•
•
Creation of a one-way mirror in a diskset
Creation of a configuration with too few metadevice state database replicas
on the local disks
Modification of metadevice state database replicas on multihost disks,
unless there are explicit instructions to do so in this or another
SPARCcluster book.
18.7 Backing Up Multihost Data Using Solstice Backup
This section contains suggestions for using Solstice Backup to back up Ultra
Enterprise Cluster HA file systems.
Solstice Backup is designed to run each copy of the server software on a single,
licensed server. You obtain an “enabler” code and an “authorization” code,
which are associated with a single physical host. Solstice Backup expects files
to be recovered using the same physical server from which they were backed
up.
Solstice Backup has considerable data about the physical machines (host names
and host IDs) corresponding to the server and clients. Solstice Backup’s
information about the underlying physical machines on which the logical hosts
are configured affects how it stores client indexes.
Do not put the Solstice Backup /nsr database on the multihost disks. Conflicts
can arise if two different Solstice Backup servers attempt to access the same
/nsr database.
18-10
Solstice HA 1.3 User’s Guide—April 1997
18
Because of the way Solstice Backup stores client indexes, do not back up a
particular client using different Solstice Backup servers on different days. Make
sure that a particular logical host is always mastered by the same physical
server whenever backups are performed. This will enable future recover
operations to succeed.
Note – By default, Ultra Enterprise Cluster HA systems might not generate the
full file system list for your backup configuration. When you are testing your
backup procedures, verify that all of the HA file systems that need to be
backed up appear in the Solstice Backup file system list.
Four methods of configuring Solstice Backup are presented here. You might
prefer one depending on your particular Ultra Enterprise Cluster HA
configuration. Switchover times could influence your decision. Once you
decide on a method, continue using that method so that future recover
operations will succeed.
Here is a description of the configuration methods:
•
Use a third, non-high availability server configured as a Solstice Backup
server.
Configure a third server apart from the two Ultra Enterprise Cluster HA
servers to act as the Solstice Backup server. Configure the logical hosts as
clients of the server. For best results, always ensure that the logical hosts are
configured on their respective default masters before doing the daily
backup. This might require a switchover. Having the logical hosts mastered
by alternate servers on different days (possibly as the result of a takeover)
could cause Solstice Backup to become confused upon attempting a recover
operation, due to the way Solstice Backup stores client indexes.
•
Use one Ultra Enterprise Cluster HA server configured to perform local
backups.
Configure one of the Ultra Enterprise Cluster HA servers to perform local
backups. Always switch the logical hosts to the Solstice Backup server
before performing the daily backup. That is, if “phys-hahost1” and
“phys-hahost2” are the HA servers, and “phys-hahost1” is the Solstice
Backup server, always switch the logical hosts to “phys-hahost1” before
performing backups. When backups are complete, switch back the logical
host normally mastered by “phys-hahost2.”
Administering Metadevices and Disksets
18-11
18
•
Use the two Ultra Enterprise Cluster HA servers configured as Solstice
Backup servers.
Configure each Ultra Enterprise Cluster HA server to perform local backups
of the logical host it masters by default. Always ensure that the logical hosts
are configured on their respective default masters before performing the
daily backup.This might require a switchover. Having the logical hosts
mastered by alternate servers on different days (possibly as the result of a
takeover) could cause Solstice Backup to become confused upon attempting
a recover operation, due to the way Solstice Backup stores client indexes.
•
Use one Ultra Enterprise Cluster HA server configured as the Solstice
Backup server.
Configure one Ultra Enterprise Cluster HA server to back up its logical host
locally and to back up its sibling’s logical host over the network. Always
ensure that the logical hosts are configured up on their respective default
masters before doing the daily backup. This might require a switchover.
Having the logical hosts mastered by alternate servers on different days
(possibly as the result of a takeover) could cause Solstice Backup to become
confused upon attempting a recover operation, due to the way Solstice
Backup stores client indexes.
In all four of the above backup options, you can have another server
configured to temporarily perform backups in the event the designated Solstice
Backup server is down. Note that you will not be able to use the temporary
Solstice Backup server to recover files backed up by the normal Solstice Backup
server, and that you cannot recover files backed up by the temporary server
from the normal backup server.
18-12
Solstice HA 1.3 User’s Guide—April 1997
Monitoring the Ultra Enterprise
Cluster HA Servers
19
This chapter describes how to use the Solstice HA and Solstice DiskSuite
commands to monitor the behavior of an Ultra Enterprise Cluster HA
configuration.
Overview of Solstice HA Monitoring
page 19-1
Monitoring the Ultra Enterprise Cluster HA Configuration Status
page 19-2
Monitoring the Load of the Ultra Enterprise Cluster HA Servers
page 19-5
Monitoring Metadevices
page 19-5
Monitoring Metadevice State Database Replicas
page 19-7
Checking Message Files
page 19-9
Using Solstice SunNet Manager to Monitor Ultra Enterprise Cluster HA
Servers
page 19-9
19.1 Overview of Solstice HA Monitoring
You use six utilities in addition to the /var/adm/messages files when
monitoring the behavior of an Ultra Enterprise Cluster HA configuration. The
utilities are hastat(1M), haload(1M), metastat(1M), metadb(1M),
metatool(1M), and mdlogd(1M).
19-1
19
19.2 Monitoring the Ultra Enterprise Cluster HA Configuration Status
The hastat(1M) program displays the current state of the Ultra Enterprise
Cluster HA configuration. The program displays status information about the
hosts, logical hosts, private networks, public networks, data services, local
disks, and disksets, along with the most recent error messages.
Here is an example of output from hastat(1M):
# hastat
Configuration State: Stable
hahost1 - Owned by phys-hahost1
hahost2 - Owned by phys-hahost2
phys-hahost1 phys-hahost2 -
1:56pm
1:56pm
up 2 day(s), 4:54, 2 users, load average: 0.12, 0.09, 0.07
up 2 day(s), 5 hr(s), 0 users, load average: 0.11, 0.09, 0.12
Data Service HA-NFS: hahost1 - Unknown; hahost2 - Ok
Local metadevices: phys-hahost1 - (none); phys-hahost2 - (none)
Local metadb replicas: phys-hahost1 - Ok; phys-hahost2 - Ok
Diskset hahost1
metadevice status: Ok
replica status: Ok
Diskset hahost2
metadevice status: Ok
replica status: Ok
Private nets: Ok
Public nets: phys-hahost1 - Ok; phys-hahost2 - Ok
Extract of Message Log (examine /var/adm/messages for the full context):
. . .
#
Figure 19-1 Sample hastat(1M) Output
The status is reported as follows:
•
•
19-2
Ok – The component’s status is okay.
Not Ok – The component is not functioning; for example, no public
networks are responding.
Solstice HA 1.3 User’s Guide—April 1997
19
•
Degraded – The component is working well enough to provide partial
service to some clients but needs some repair.
•
Unknown – There is not enough information about the component to
determine the status. For instance, when the sibling host is down, the
remaining host will list the private nets as Unknown.
If Solstice HA has recently reconfigured, the state of some components will
be shown as Unknown for a few minutes, until the Solstice HA fault probes
have run and gathered recent information.
The following list explains the output displayed:
•
Ultra Enterprise Cluster HA configuration state – Either Down,
Reconfiguring, or Stable. Down indicates that the Ultra Enterprise
Cluster HA configuration is not functioning. The string Reconfiguring is
displayed when the configuration is in the process of a transition from one
state to another because of a takeover or switchover. Stable says the server
is functioning as expected.
•
Logical hosts – The names of the logical hosts associated with the two
disksets along with the name of the current owner, or the string
Maintenance mode if the logical host has been taken down by an
administrator.
•
Physical servers – The names of both physical servers in the Ultra Enterprise
Cluster HA configuration are displayed with the current time, the length of
time the server has been up (in days and hours), the number of users, and
the load average over the past 1, 5, and 15 minutes. The output is the same
as that provided by the uptime(1) command.
•
Status of data services – The data services running on which of the logical
hosts. For HA-NFS, the status is represented as Ok, Not Ok, or Degraded.
For HA-DBMS, the status of each database is reported as running,
maintenance, not configured correctly, or stopped. If a data
service is not running on a logical host, that logical host is not listed for that
data service. Not Ok indicates the data service has failed. If the status is
Not Ok or Degraded, read the Message Log or the messages file
(/var/adm/messages) to see whether an error has been reported.
Monitoring the Ultra Enterprise Cluster HA Servers
19-3
19
•
Local metadevices – The status of local Solstice DiskSuite metadevices,
reported as Ok, Not Ok, or Unknown. If the status is Not Ok, read the
Message Log or messages file (/var/adm/messages) to see whether an
error has been reported. If not, run the metastat(1M) command to
discover the problem. If the local file systems are not on metadevices, this
field displays a status of none.
•
Local metadb replicas – The status of the metadevice state database replicas
on the local disks, reported as Ok or Not Ok. If the status is Not Ok, one or
more database replicas are inactive. Run the metadb(1M) command for
additional information.
•
Disksets – The status of the multihost disksets and metadevice state
database replicas, reported as Ok, Not Ok, or Unknown. If the status is Not
Ok, read the Message Log or message file to see whether an error has been
reported. If not, run the metastat -s logicalhost command to discover the
problem. If the metadb replica status is Not Ok, then one or more of the
metadevice state database replicas are inactive. Invoke the metadb(1M)
command to obtain more information.
•
Private networks – The status of private networks, displayed as either Ok,
Not Ok, Degraded, or Unknown. A status of Not Ok or Degraded
indicates a problem with one or both of the private network interfaces. Read
the Message Log or message file (/var/adm/messages) for additional
information, or directly troubleshoot the interface for hardware or software
faults by using a command such as ping(1M), by swapping cables, or by
swapping controllers.
•
Public networks – The status of public networks, displayed as either Ok, Not
Ok, Degraded, or Unknown. A status of Not Ok or Degraded indicates a
problem with the client network interface(s). Read the Message Log or
message file (/var/adm/messages) for additional information, or
troubleshoot the problem directly.
•
Recent error messages – The hastat(1M) program extracts Solstice HArelated error messages from /var/adm/messages and outputs the last few
messages from each host.
Note – Because the recent error messages list is a filtered extract of the log
messages, the context of some messages might be lost. Check the
/var/adm/messages file for a complete list of the messages.
19-4
Solstice HA 1.3 User’s Guide—April 1997
19
19.3 Monitoring the Load of the Ultra Enterprise Cluster HA Servers
The haload(1M) utility is used to monitor the load on the pair of Ultra
Enterprise Cluster HA servers. Monitoring is necessary because if there is
insufficient excess capacity between the two servers and a takeover occurs, the
remaining server might be unable to take care of the combined workload.
The haload(1M) utility monitors both servers and logs occurrences of an
overload. The administrator should take corrective actions to eliminate the
possibility of an overload. If an overload occurs, haload(1M) will exit with
the special exit code 99.
The haload(1M) utility is run automatically by Solstice HA, in the
background, all the time.
19.4 Monitoring Metadevices
Use the metastat(1M) command or the DiskSuite Tool (metatool(1M)) to
monitor metadevices. Complete details about the two commands are located in
the Solstice DiskSuite 4.1 User’s Guide and Solstice DiskSuite 4.1 Reference Guide.
By default, metastat(1M) prints information to the screen about all
metadevices and hot spare pools that are in the local diskset on the local host.
Monitoring the Ultra Enterprise Cluster HA Servers
19-5
19
To view diskset status, run the command on the server that owns the diskset.
You must specify a diskset name using -s diskset. The variable diskset is also the
logical host name (“hahost1” in the sample below). A sample output of the
metastat(1M) command follows.
# metastat -s hahost1
hahost1/d0: Trans
State: Okay
Size: 14182560 blocks
Master Device: hahost1/d125
Logging Device: hahost1/d122
hahost1/d125: Mirror
Submirror 0: hahost1/d127
State: Okay
Submirror 1: hahost1/d126
State: Okay
Pass: 1
Read option: roundrobin (default)
Write option: parallel (default)
Size: 14182560 blocks
hahost1/d127: Submirror of hahost1/d125
State: Okay
Hot spare pool: hahost1/hsp000
Size: 14182560 blocks
Stripe 0:
Device
Start Block Dbase State
c1t0d0s0
0
No
Okay
Stripe 1:
Device
Start Block Dbase State
c1t1d0s0
0
No
Okay
Stripe 2:
Device
Start Block Dbase State
c1t1d1s0
0
No
Okay
...
19-6
Solstice HA 1.3 User’s Guide—April 1997
Hot Spare
Hot Spare
Hot Spare
19
You can view individual metadevice status by specifying the name of the
metadevice on the metastat(1M) command line. For instance:
# metastat -s hahost1 d0
DiskSuite Tool displays the status of metadevices and hot spares several ways.
The problem list window of the DiskSuite Tool contains a scrolling list of
current metadevice problems (but not a history of problems). The list is
updated each time DiskSuite Tool registers a change in status. Each item on the
list is given a time stamp.
As an alternative to metastat(1M), you can use an SNMP-based DiskSuite
log daemon, mdlogd(1M), to generate a generic SNMP trap when DiskSuite
logs a message to the syslog. You can configure mdlogd(1M) to send a trap
only when certain messages are logged by specifying a regular expression in
the configuration file mdlogd.cf(4). The trap is sent to the administration
host specified in the configuration file. The administration host should be
running a network management application such as Solstice SunNet
Manager™. You can use mdlogd(1M) if you don't want to run metastat(1M)
periodically or scan the syslog output periodically looking for DiskSuite errors
or warnings. See the mdlogd(1M) man page for more information.
19.5 Monitoring Metadevice State Database Replicas
Use the metadb(1M) command to monitor the status of the metadevice state
database replicas that reside on both local disks and in disksets. To display the
status of replicas that reside on local disks, execute metadb(1M) on the server
where the disks are connected.
Complete details about the metadb(1M) command are located in the Solstice
DiskSuite 4.1 Reference Guide.
You also can use the metatool(1M) utility to check the status of metadevice
state database replicas. Refer to the Solstice DiskSuite 4.1 User’s Guide for
details.
Monitoring the Ultra Enterprise Cluster HA Servers
19-7
19
To display the status of replicas that reside on disks in a diskset, execute the
command shown below. The -i option prints the information message at the
bottom of the output. The setname used as an argument to metadb(1M) is the
name of the logical host.
# metadb -i -s setname
flags
first blk
block count
a m
luo
16
1034
/dev/dsk/c1t0d0s7
a
luo
1050
1034
/dev/dsk/c1t0d0s7
a
luo
16
1034
/dev/dsk/c1t1d0s7
a
luo
1050
1034
/dev/dsk/c1t1d0s7
a
luo
16
1034
/dev/dsk/c1t2d0s7
a
luo
1050
1034
/dev/dsk/c1t2d0s7
a
luo
16
1034
/dev/dsk/c1t3d0s7
a
luo
1050
1034
/dev/dsk/c1t3d0s7
o - replica active prior to last mddb configuration change
u - replica is up to date
l - locator for this replica was read successfully
c - replica’s location was in /etc/opt/SUNWmd/mddb.cf
p - replica’s location was patched in kernel
m - replica is master, this is replica selected as input
W - replica has device write errors
a - replica is active, commits are occurring to this replica
M - replica had problem with master blocks
D - replica had problem with data blocks
F - replica had format problems
S - replica is too small to hold current data base
R - replica had device read errors
#
19-8
Solstice HA 1.3 User’s Guide—April 1997
19
19.6 Checking Message Files
The Solstice HA software writes messages to the /var/adm/messages files in
addition to reporting messages to the console. The following is an example of
the messages reported when a disk error occurs.
...
Jun 1 16:15:26 host1 unix: WARNING: /iounit@f,e1200000/[email protected]/SUNW,pln@a0000000,741022/ssd@3,4(ssd49):
Jun 1 16:15:26 host1 unix: Error for command ‘write(I))’ Err
Jun 1 16:15:27 host1 unix: or Level: Fatal
Jun 1 16:15:27 host1 unix: Requested Block 144004, Error Block: 715559
Jun 1 16:15:27 host1 unix: Sense Key: Media Error
Jun 1 16:15:27 host1 unix: Vendor ‘CONNER’:
Jun 1 16:15:27 host1 unix: ASC=0x10(ID CRC or ECC error),ASCQ=0x0,FRU=0x15
...
Note – Because Solaris and Solstice HA error messages are written to the
/var/adm/messages file, the /var directory might become full. Refer to
“Maintaining the /var File System” on page 17-11 for the procedure to correct
this problem.
19.7 Using Solstice SunNet Manager to Monitor Ultra Enterprise Cluster HA
Servers
You can use Solstice SunNet Manager and its agents to monitor Ultra
Enterprise Cluster HA configurations. Solstice SunNet Manager enables you to
set up procedures to get information such as:
•
•
•
Ownership change
Status of private links
Host and network performance
This information can be presented in the following ways:
•
•
•
•
Graphically, through Solstice SunNet Manager
Through custom scripts
Through event monitors that watch Solstice SunNet Manager data for
significant changes
Through SNMP traps sent by mdlogd(1M)
Monitoring the Ultra Enterprise Cluster HA Servers
19-9
19
Solstice SunNet Manager is optional, but if you decide to use it, version 2.2.3 or
higher must be installed on the workstation that you will be using to monitor
the HA servers.
You can receive notification in the Solstice SunNet Manager console window
by the blinking and coloring effect of the glyph. You also can be notified by
mail(1) or by the execution of your customized script.
19.7.1 Solstice HA Agents for Monitoring
In addition to the agents provided by Solstice SunNet Manager, some agents
provided by Solstice HA allow you to remotely monitor the HA configuration
through Solstice SunNet Manager. The information provided by these agents is
similar to the information you can get using the hastat(1M) command.
Solstice HA also provides two sample databases that can be modified easily to
suit the configuration that will be monitored. The agents and the sample
databases are installed in the following subdirectories on the Ultra Enterprise
Cluster HA servers under the HA installation path (/opt/SUNWhadf):
snm/agents – Agents, scripts, and agent schemas
snm/struct – HA-specific components schema file and sample database
files
snm/icons – Icons used by the agents
To monitor Ultra Enterprise Cluster HA configuration status, install the
required Solstice SunNet Manager packages on your management workstation.
Then, copy the following files from one of your installed HA servers to the
locations shown below:
•
•
19-10
/opt/SUNWhadf/snm/agents/*.schema files
Copy these files to the /opt/SUNWconn/snm/agents directory.
If you copy them to a different directory, update the
snm.console.schemaPath_2.x variable in the $HOME/.SNMdefaults
file with the correct path.
/opt/SUNWhadf/snm/struct/ha_components.schema file
Copy this file to the /opt/SUNWconn/snm/struct directory. If you do not
copy the file to this directory, update the snm.console.schemaPath2.x
variable in the $HOME/.SNMdefaults file with the correct path.
Solstice HA 1.3 User’s Guide—April 1997
19
•
•
•
/opt/SUNWhadf/snm/icons/*.icon files
Copy these files to the /opt/SUNWconn/snm/icons directory. If you do
not copy them to this directory, update the snm.console.iconPath_2.x
variable in the $HOME/.SNMdefaults file with the correct path.
/opt/SUNWhadf/snm/struct/*.db files
These are database template files that you can put anywhere on your
management workstation. Modify them according to the instructions given
at the beginning of these files.
If you have not installed the Solstice SunNet Manager libraries and agents
on both physical hosts, you need to create the /var/opt/SUNWconn/snm
directory on both hosts.
After you have copied the files listed above, type the following on the
command line:
# snm -i database_name
where database_name is the name of the customized database.
You can easily generate a customized database for your Ultra Enterprise
Cluster HA configuration from the sample database file template.db. To
customize the database, follow the instructions given at the beginning of the
sample database file. Because data services are optional for the Ultra Enterprise
Cluster HA configuration, a separate sample database file,
template_data_srvc.db, is provided for them.
If data services are running in your Ultra Enterprise Cluster HA configuration,
follow the instructions given in the file to customize the part of the database
used for monitoring data services. After you have made any modifications for
data services, append this database to the database file that you customized
from the template.db file.
Monitoring the Ultra Enterprise Cluster HA Servers
19-11
19
The agents for monitoring Ultra Enterprise Cluster HA configuration status
and their functions are described in Table 19-1.
Table 19-1 Solstice HA Monitor Agents
Agent
Description
na.haconfig(1M)
This proxy agent reports the status of the current Ultra
Enterprise Cluster HA configuration.
na.hadtsrvc(1M)
This proxy agent can be used to monitor the status of the data
services that are provided by the logical hosts within the HA
configuration.
na.halhost(1M)
This proxy agent reports the status of the logical hosts along
with the name and the IP address of the current owner (the
physical host).
na.hamdstat(1M)
This proxy agent reports the status of the local Solstice
DiskSuite metadevices, the metadevice state database replicas
on the local disks, the multihost disksets and the metadevice
state database replicas on the multihost disksets.
The proxy agents must run on one of the logical or physical hosts within the
HA configuration. The status is reported to the management workstation. For
the details about each reported status, refer to “Monitoring the Ultra Enterprise
Cluster HA Configuration Status” on page 19-2 or to Appendix B, “Man
Pages.”
19-12
Solstice HA 1.3 User’s Guide—April 1997
Recovering From Power Loss
20
This chapter describes different power loss scenarios and the steps the System
Administrator takes to return the system to normal operation.
Total Power Loss
page 20-2
Partial Power Loss
page 20-3
Maintaining HA configurations includes handling failures such as power loss.
A power loss can occur to an entire HA configuration or to one or more
components within a configuration. HA servers behave differently depending
on which components lose power. The following sections describe typical
scenarios and expected behavior.
20-1
20
20.1 Total Power Loss
In HA configurations with a single power source, a power failure takes down
both Ultra Enterprise Cluster HA servers along with their multihost disk
expansion units. When both servers lose power, the entire configuration fails.
In a total failure scenario, there are several ways in which the cluster hardware
might come back up.
•
In a symmetric configuration, one server reboots faster than the other.
The first server to reboot takes ownership of both disksets. You can return
one of the disksets to the default master using haswitch(1M).
•
An HA server reboots before the terminal concentrator.
Any errors reported when the server is rebooting must be viewed by
looking in /var/adm/messages or the error log pointed to in
/etc/syslog.conf.
•
An HA server reboots before a multihost disk expansion unit.
The associated disks will not be accessible. In this case, one or both servers
must be rebooted, after the multihost disk expansion unit comes up. There
also might be some DiskSuite cleanup required (see “Recovering From
Power Loss” on page 22-2).
Once the servers are up, run hastat(1M) and metastat(1M) to search for
errors that occurred due to the power outage.
20-2
Solstice HA 1.3 User’s Guide—April 1997
20
20.2 Partial Power Loss
If the HA servers and the multihost disk expansion units have separate power
sources, a failure can take down one or more components. Several scenarios
can occur. The most likely cases are:
•
•
•
•
The power to one HA server fails, taking down only the server.
The power to one multihost disk expansion unit fails, taking down only the
expansion unit.
The power to one HA server fails, taking down at least one multihost disk
expansion unit.
The power to one HA server fails, taking down the server, at least one
multihost disk expansion unit, and the terminal concentrator.
20.2.1 Failure of One Server
If separate power sources are used on the servers and the multihost disk
expansion units, and you lose power to only one of the servers, the other
server detects the failure and initiates a takeover.
When power is restored to the server that failed, it boots, waits for the
membership state to become stable, and rejoins the configuration. At that
point, both disksets are owned by the server that did not fail. Perform a
manual switchover using haswitch(1M) to restore the default diskset
ownership.
20.2.2 Failure of a Multihost Disk Expansion Unit
If you lose power to one of the multihost disk expansion units, Solstice
DiskSuite detects errors on the affected disks and places the slices in error
state. Solstice DiskSuite mirroring masks this failure from the Solstice HA fault
monitoring. No switchover or takeover occurs.
When power is returned to the multihost disk expansion unit, perform the
procedure documented in “Recovering From Power Loss” on page 22-2.
Recovering From Power Loss
20-3
20
20.2.3 Failure of a Server and One Multihost Disk Expansion Unit
If power is lost to one of the HA servers and one multihost disk expansion
unit, the other server immediately initiates a takeover.
When the power is restored, the server reboots, rejoins the configuration, and
begins monitoring activity. You must run haswitch(1M)manually to give
ownership of the diskset back to the server that had lost power.
After the diskset ownership has been returned to the default master, any
multihost disks (submirrors, hot spares, and metadevice state database
replicas) that reported errors must be returned to service. Use the instructions
provided in “Recovering From Power Loss” on page 22-2 to return the
multihost disks to service.
Note – The server might reboot before the multihost disk expansion unit.
Therefore, the associated disks will not be accessible. In this case, the server
must be rebooted after the multihost disk expansion unit comes up. Some
DiskSuite cleanup might be required (see “Recovering From Power Loss” on
page 22-2).
20.2.4 Failure of a Server, Two Multihost Disk Expansion Units, and the
Terminal Concentrator
If power is lost to one of the HA servers and two multihost disk expansion
units, either a Solstice DiskSuite panic occurs because there is a minority of
metadevice state database replicas, or the Solstice HA software initiates a
panic.
When any I/O is done to the disks in either of the two multihost disk
expansion units, the problem is noted by Solstice DiskSuite. DiskSuite retries
the I/O, and then initiates a replica minority panic when it attempts to record
the error status of the affected submirrors and discovers it has only a minority
of replicas accessible.
The HA-NFS fault probing might observe the problem as slow response before
Solstice DiskSuite actually receives the disk I/O error. In this case, a takeover
might be initiated and, if so, a panic will occur during diskset takeover, when a
minority of the replicas are accessible.
20-4
Solstice HA 1.3 User’s Guide—April 1997
20
Note – The console messages might not be visible if the terminal concentrator
is also down.
When power is restored, the HA server might reboot before the terminal
concentrator. Thus, you must view any errors reported when the server is
rebooting by looking in /var/adm/messages or the error log pointed to in
/etc/syslog.conf.
Note – The server might reboot before a multihost disk expansion unit.
Therefore, the associated disks will not be accessible. In this case, the server
must be rebooted after the multihost disk expansion unit comes up.
Recovering From Power Loss
20-5
20
20-6
Solstice HA 1.3 User’s Guide—April 1997
Administering HA Server and
Multihost Disks
21
This chapter provides instructions for administering local and multihost disks.
Restoring a Boot Disk from Backup
page 21-2
Replacing a Local Non-Boot Disk
page 21-4
Adding a Multihost Disk
page 21-5
Replacing a Multihost Disk
page 21-14
This chapter includes the following procedures:
• “How to Restore a Boot Disk From Backup” on page 21-2
• “How to Replace a Local Non-Boot Disk” on page 21-4
• “How to Add a Multihost Disk” on page 21-6
• “How to Replace a Multihost Disk” on page 21-14
As part of standard Solstice HA administration, you should monitor the status
of the configuration. See Chapter 19, “Monitoring the Ultra Enterprise Cluster
HA Servers,” for information about monitoring methods.
During the monitoring process you might discover problems with local and
multihost disks. The following sections provide instructions for correcting
these problems.
Also use the service manual for your multihost disk expansion unit and the
Solstice DiskSuite 4.1 User’s Guide when you are replacing or repairing
hardware in the HA configuration
21-1
21
21.1 Restoring a Boot Disk from Backup
Some situations require you to replace the boot disk, such as when a software
problem leaves the boot disk in an unknown state, an operating system
upgrade fails, or a hardware problem occurs. Use the following procedure to
restore the boot disk to a known state, or to replace the disk.
Note – This procedure assumes the existence of a backup copy of the boot disk.
▼ How to Restore a Boot Disk From Backup
When the two physical hosts are in the same cluster, this procedure is
performed on the local host while the sibling host provides data services for
both hosts. In this example, “phys-hahost1” and “phys-hahost2” are the
physical hosts, and “hahost1” and “hahost2” are the logical hosts.
These are the high-level steps to restore a boot disk from backup.
•
•
•
•
•
•
•
•
Remove the host containing the boot disk from the disksets.
Restore the boot disk from backup.
Disable HA start-up on the restored disk and reboot the host.
Renew or create replicas on the restored disk.
Add the host back to the disksets. Disable HA start-up on the restored disk
and reboot the host.
Run hacheck(1M) on both hosts.
Enable HA start-up on the host with the restored disk, and start Solstice HA
on that host.
Switch over the host to its default master.
These are the detailed steps to restore a boot disk from backup. In this
example, “phys-hahost1” contains the disk to be restored.
1. Halt the host requiring the restore.
2. On the sibling host, remove the host being restored from the disksets.
phys-hahost2# metaset -s hahost1 -f -d -h phys-hahost1
phys-hahost2# metaset -s hahost2 -f -d -h phys-hahost1
21-2
Solstice HA 1.3 User’s Guide—April 1997
21
3. Restore the boot disk on the host being restored from the backup media.
Follow the procedure described in “Restoring Files and File Systems” in the
System Administration Guide to restore the boot disk file system.
Note – Do not reboot the machine. Rebooting the machine now will cause a
cluster reconfiguration.
4. Create a nostartup file on the host that is being restored.
phys-hahost1# touch /a/etc/opt/SUNWhadf/hadf/nostartup
5. Reboot the host that is being restored.
6. Remove old DiskSuite replicas.
If you are replacing a failed disk, old replicas will not be present. If you are
restoring a disk, use the metadb(1M) command to check whether old
replicas are present. If so, delete the old replicas.
Note – The default location for replicas is slice 4. However, you are not
required to place replicas on slice 4.
phys-hahost1# metadb -d -f c0t3d0s4
phys-hahost1# reboot
7. Create new DiskSuite replicas on the restored disk:
phys-hahost1# metadb -afc 3 c0t3d0s4
8. Add the restored host to the diskset or disksets, from the sibling host.
There will be only one diskset in an asymmetric configuration. This example
shows a symmetric configuration.
phys-hahost2# metaset -s hahost1 -a -h phys-hahost1
phys-hahost2# metaset -s hahost2 -a -h phys-hahost1
9. Run hacheck(1M) on both servers.
Administering HA Server and Multihost Disks
21-3
21
10. Start Solstice HA on the local host.
phys-hahost1# hastart
11. Switch over the logical host to the default master.
phys-hahost1# haswitch phys-hahost1 hahost1
21.2 Replacing a Local Non-Boot Disk
This procedure covers the replacement of a failed local disk that does not
contain the Solaris operating environment.
In general, if a local non-boot disk fails, you recover using a backup to restore
the data to a new disk.
The procedure for restoring a local boot disk is covered in “How to Restore a
Boot Disk From Backup” on page 21-2.
These are the high-level steps to replace a failed local non-boot disk.
•
•
•
•
•
•
Switch ownership of logical hosts to the server without the failed disk.
Stop Solstice HA on the server with the bad disk, and shut down that server.
Replace the disk.
Format and partition the new disk.
Restore data from backup tapes.
Restart Solstice HA, and switch the logical host back to its default master.
▼ How to Replace a Local Non-Boot Disk
These are the detailed steps to replace a failed local non-boot disk. In this
example, “phys-hahost2” contains the disk that failed.
1. Use hastop(1M) to shut down the Solstice HA services on the server with
the failed disk.
2. Halt Solaris and turn off the server.
3. Perform the disk replacement.
Use the procedure described in the service manual for your HA server.
21-4
Solstice HA 1.3 User’s Guide—April 1997
21
4. Power up the server and start it in single-user mode.
5. Use format(1M) or fmthard(1M) to repartition the new disk.
Make sure that you partition the new disk exactly as the disk that was
replaced. (Saving the disk format information was recommended in
Chapter 15, “Preparing for Administration.”)
6. Run newfs(1M) on the new slices to create file systems.
7. Run mount(1M) to mount the appropriate file systems.
Specify the device and mount points for each file system.
8. Restore data from backup tapes.
Use the instructions in the Solaris System Administration documentation to
perform this step.
9. Set Solstice HA to start on the next reboot and then reboot the server.
phys-hahost2# hastart -r
...
phys-hahost2# ^D (to reboot in multi-user mode)
10. Switch the logical host back to its default master.
When the host has rejoined the Ultra Enterprise Cluster HA configuration,
use haswitch(1M) to return the logical host to its default master.
phys-hahost2# haswitch phys-hahost2 hahost2
21.3 Adding a Multihost Disk
Depending upon the disk enclosure, adding multihost disks might involve
taking off line all metadevices in the affected disk tray or disk enclosure.
Additionally, in a symmetric configuration, the disk tray or disk enclosure
might contain disks from each of the disksets and will require that a single
node own all of the affected disksets.
Administering HA Server and Multihost Disks
21-5
21
▼ How to Add a Multihost Disk
Note – Solstice HA supports two multihost disk expansion units:
SPARCstorage Arrays and SPARCstorage MultiPacks. Depending on which
type you have, adding a disk might require you to prepare all disks connected
to a particular controller, all disks in a particular array tray, or only the disk
being added, depending on the electrical and mechanical characteristics of the
disk enclosure. For example, in the SPARCstorage Array 200 series with the
differential SCSI tray, you must prepare the array controller and the disk
enclosure. In the SPARCstorage Array 200 series with RSM™ (214 RSM), as well
as in the SPARCstorage MultiPack, you need to prepare only the new disk. In
the SPARCstorage Array 110, you must prepare a single tray.
For this particular procedure, if you have a SPARCstorage Array 100 series
array, follow the steps as documented. If you have a SPARCstorage Array 200
series array with differential SCSI tray, you must bring down all disks attached
to the array controller that will connect to the new disk. This means you repeat
all of the tray-specific steps for all disk enclosures attached to the array
controller that will connect to the new disk. If you have a SPARCstorage Array
214 RSM or a SPARCstorage MultiPack, you need not perform any of the
tray-specific steps, since individual disk drives can be installed without
affecting other disks.
Refer to the hardware service manual for your multihost disk expansion unit
for a description of your disk enclosure.
These are the high-level steps to add a multihost disk:
•
•
•
•
21-6
Identify the controller for this new disk.
• Locate an empty slot in the tray or enclosure.
If necessary, prepare the disk enclosure for removal of a disk tray. This is
necessary for Model 100 series SPARCstorage Arrays.
If necessary, power down the controller and all attached disks. This is
necessary for Model 200 series SPARCstorage Arrays with wide differential
SCSI disk trays. You must:
• Delete all hot spares from the affected drives.
• Delete all metadevice state databases from the affected drives.
• Take off line all metadevices containing affected drives.
• Spin down all affected drives.
Add the new disk.
Solstice HA 1.3 User’s Guide—April 1997
21
•
•
Return the affected drives to service.
• Spin up all drives.
• Bring back on line all affected metadevices.
• Add back all deleted hot spares.
• Recreate all deleted metadevices.
Perform the administrative actions to prepare the disk for use by HA.
• Create the /devices special files and /dev/dsk and /dev/rdsk links.
• Add the disk to the diskset.
• Format and partition the disk, if necessary.
• Perform the DiskSuite-related administrative tasks.
Administering HA Server and Multihost Disks
21-7
21
These are the detailed steps to add a new multihost disk.
1. If necessary, switch ownership of both logical hosts to one of the HA
servers.
You must perform this step only if your configuration is symmetric and if
disks from both disksets will be affected.
phys-hahost1# haswitch phys-hahost1 hahost1 hahost2
If you have an asymmetric configuration, no switchover is required.
2. If you are using SPARCstorage Arrays, determine the controller number
of the tray to which the disk will be added.
SPARCstorage Arrays are assigned World Wide Names. The World Wide
Name displayed on the front of the SPARCstorage Array also appears as
part of the /devices entry, which is linked by pointer to the /dev entry
containing the controller number. For example:
phys-hahost1# ls -l /dev/rdsk | grep -i world_wide_number | tail -1
If the World Wide Name displayed on the front of the SPARCstorage Array
is 36cc, the following output will display and the controller number would
be c2:
phys-hahost1# ls -l /dev/rdsk | grep -i 36cc | tail -1
lrwxrwxrwx 1 root
root
94 Jun 25 22:39 c2t5d2s7 ->
../../devices/io-unit@f,e1200000/sbi@0,0/SUNW,soc@3,0/SUNW,pln@a0000800,20183
6cc/ssd@5,2:h,raw
phys-hahost1#
Use mount(1M) or format(1M) to determine the controller number of a
SPARCstorage MultiPack.
21-8
Solstice HA 1.3 User’s Guide—April 1997
21
3. Locate an appropriate empty disk slot in the tray for the disk being
added.
For a SPARCstorage Array, use the ssaadm(1M) command with the
display option to view the empty slots. The output shown below is from a
SPARCstorage Array 110; your display will be slightly different if you are
using a different series SPARCstorage Array. The empty slots are shown
with a NO SELECT status.
phys-hahost1# ssaadm display c2
SPARCstorage Array Configuration
(ssaadm version: 1.10 95/11/27)
Controller path:
/devices/iommu@f,e0000000/sbus@f,e0001000/SUNW,soc@0,0/SUNW,pln
@a0000000,779a16:ctlr
DEVICE STATUS
TRAY 1
TRAY 2
TRAY 3
slot
1
Drive: 0,0
Drive: 2,0
Drive: 4,0
2
Drive: 0,1
Drive: 2,1
Drive: 4,1
3
NO SELECT
NO SELECT
NO SELECT
4
NO SELECT
NO SELECT
NO SELECT
5
NO SELECT
NO SELECT
NO SELECT
6
Drive: 1,0
Drive: 3,0
Drive: 5,0
7
Drive: 1,1
NO SELECT
NO SELECT
8
NO SELECT
NO SELECT
NO SELECT
9
NO SELECT
NO SELECT
NO SELECT
10
NO SELECT
NO SELECT
NO SELECT
CONTROLLER STATUS
Vendor:
SUN
Product ID:
SSA110
Product Rev:
1.0
Firmware Rev: 3.9
Serial Num:
000000779A16
Accumulate Performance Statistics: Enabled
phys-hahost1#
On a SPARCstorage MultiPack, identify the empty slots either by observing
the disk drive LEDs on the front of the MultiPack, or by removing the left
side cover of the unit. The target address IDs corresponding to the slots
appear on the middle partition of the drive bay.
Administering HA Server and Multihost Disks
21-9
21
Determine the tray to which you will add the new disk. If you can add the
disk without affecting other drives, skip forward to Step 11.
In the remainder of the procedure, tray 2 is used as an example. The slot
selected for the new disk is tray 2 slot 7. The new disk will be known as
c2t3d1.
4. Locate all hot spares affected by the installation.
To determine the status and location of all hot spares, run the metahs(1M)
command with the -i option on each of the logical hosts.
phys-hahost1# metahs -s hahost1 -i
...
phys-hahost1# metahs -s hahost2 -i
...
Note – Save a list of the hot spares. The list is used later in this maintenance
procedure. Be sure to note the hot spare devices and the hot spare pools that
they are in.
5. Use the metahs(1M) command with the -d option to delete all affected
hot spares.
Refer to the man page for details on the metahs(1M) command.
phys-hahost1# metahs -s hahost1 -d hot_spare_pool components
phys-hahost1# metahs -s hahost2 -d hot_spare_pool components
6. Locate all metadevice state database replicas that are on affected disks.
Run the metadb(1M) command on each of the logical hosts to locate all
metadevice state databases. Direct the output into temporary files.
phys-hahost1# metadb -s hahost1 > /usr/tmp/mddb1
phys-hahost1# metadb -s hahost2 > /usr/tmp/mddb2
The output of metadb(1M) shows the location of metadevice state database
replicas in this disk enclosure. Save this information for the step in which
you restore the replicas.
21-10
Solstice HA 1.3 User’s Guide—April 1997
21
7. Delete the metadevice state database replicas that are on affected disks.
Keep a record of the number and locale of the replicas that you delete. The
replicas must be restored in a later step.
phys-hahost1# metadb -s hahost1 -d replicas
phys-hahost1# metadb -s hahost2 -d replicas
8. Run the metastat(1M) command to determine all the metadevice
components on affected disks.
Direct the output from metastat(1M) to a temporary file so that you can
use the information later when deleting and re-adding the metadevices.
phys-hahost1# metastat -s hahost1 > /usr/tmp/replicalog1
phys-hahost1# metastat -s hahost2 > /usr/tmp/replicalog2
9. Take off line all submirrors containing affected disks.
Use the temporary files to create a script to take off line all affected
submirrors in the disk expansion unit. If only a few submirrors exist, run the
metaoffline(1M) command to take each off line. The following is a
sample script.
#!/bin/sh
# metaoffline -s <setname> <metamirror> <submirror>
metaoffline -s hahost1 d15 d35
metaoffline -s hahost2 d15 d35
...
10. Spin down the affected disks.
This step is necessary only on SPARCstorage Arrays. Spin down the
SPARCstorage Array disks in the tray using the ssaadm(1M) command:
phys-hahost1# ssaadm stop -t 2 c2
Administering HA Server and Multihost Disks
21-11
21
11. Add the new disk.
Use the instructions in your multihost disk expansion unit service manual to
perform the hardware procedure of adding the disk. If your disk enclosure
is a SPARCstorage Array 214 RSM or a SPARCstorage MultiPack, skip
forward to Step 16.
12. Make sure all disks in the tray spin up.
The new disk in the SPARCstorage MultiPack will spin up automatically
following the hardware procedure. The disks in the SPARCstorage Array
tray should spin up automatically, but if the tray fails to spin up within two
minutes, force the action using the following command:
phys-hahost1# ssaadm start -t 2 c2
13. Bring the submirrors back on line.
Modify the script that you created in Step 9 to bring the submirrors back on
line.
#!/bin/sh
# metaonline -s <setname> <metamirror> <submirror>
metaonline -s hahost1 d15 d35
metaonline -s hahost2 d15 d35
...
14. Restore the hot spares that were deleted in Step 5.
phys-hahost1# metahs -s hahost1 -a hot_spare_pool components
phys-hahost1# metahs -s hahost2 -a hot_spare_pool components
15. Restore the original count of metadevice state database replicas to the
devices in the tray.
The replicas were removed in Step 7.
phys-hahost1# metadb -s hahost1 -a replicas
phys-hahost1# metadb -s hahost2 -a replicas
21-12
Solstice HA 1.3 User’s Guide—April 1997
21
16. Run the drvconfig(1M) and disks(1M) commands to create the new
entries in /devices, /dev/dsk, and /dev/rdsk for all new disks.
phys-hahost1# drvconfig
phys-hahost1# disks
17. Switch ownership of the logical hosts to the other HA server.
phys-hahost1# haswitch phys-hahost2 hahost1 hahost2
18. Run the drvconfig(1M) and disks(1M) commands on the server that
now owns the diskset(s).
phys-hahost2# drvconfig
phys-hahost2# disks
19. Add the disk to a diskset.
In this example, the disk is being added to diskset hahost2.
phys-hahost2# metaset -s hahost2 -a drivename
!
Caution – The metaset(1M) command might repartition this disk
automatically. See the Solstice DiskSuite 4.1 User’s Guide for more information.
20. Perform the usual administration actions on the new disk.
You can now perform the usual administration steps that are performed
when a new drive is brought into service. These include partitioning the
disk, adding it to the configuration as a hot spare, or configuring it as a
metadevice. See the Solstice DiskSuite 4.1 User’s Guide for more information
on these tasks.
21. If necessary, switch each logical host back to its default master.
phys-hahost2# haswitch phys-hahost1 hahost1
Administering HA Server and Multihost Disks
21-13
21
21.4 Replacing a Multihost Disk
This section describes replacing a multihost disk without interrupting Solstice
HA services (on-line replacement). Consult the Solstice DiskSuite 4.1 User’s
Guide for off-line replacement procedures.
Use the following procedure if you have determined that a disk with
components in maintenance state needs to be replaced, a hot spare has
replaced a component, or a disk is generating intermittent errors.
▼ How to Replace a Multihost Disk
Note – Solstice HA supports two multihost disk expansion units:
SPARCstorage Arrays and SPARCstorage MultiPacks. Depending on which
type you have, replacing a disk might require you to prepare all disks
connected to a particular controller, all disks in a particular array tray, or only
the disk being replaced, depending on the electrical and mechanical
characteristics of the disk enclosure. For example, in the SPARCstorage Array
200 series with the differential SCSI tray, you must prepare the array controller
and all attached disk enclosures. In the SPARCstorage Array 200 series with
RSM (214 RSM), as well as in the SPARCstorage MultiPack, you need to
prepare only the affected disk. In the SPARCstorage Array 110, you must
prepare a single tray.
For this particular procedure, if you have a SPARCstorage Array 100 series
array, follow the steps as documented. If you have a SPARCstorage Array 200
series array with differential SCSI tray, you must bring down all disks attached
to the array controller that will connect to the affected disk. This means you
repeat all of the tray-specific steps for all disk enclosures attached to the array
controller that connects to the affected disk. If you have a SPARCstorage Array
214 RSM or a SPARCstorage MultiPack, you need not perform any of the
tray-specific steps, since individual disk drives can be installed without
affecting other drives.
Refer to the hardware service manual for your multihost disk expansion unit
for a description of your disk enclosure.
21-14
Solstice HA 1.3 User’s Guide—April 1997
21
These are the high-level steps to replace a multihost disk. Some of the steps in
this procedure apply only to configurations using SPARCstorage Array 100
series or SPARCstorage Array 200 series with the differential SCSI tray.
•
•
•
•
•
•
•
•
•
•
•
•
•
•
•
•
•
•
•
•
Determine which disk needs replacement.
Determine which tray holds the disk to be replaced.
Detach submirrors on the affected tray or disk enclosure. (SSA 100 and
SSA200 only)
Run metaclear(1M) on the detached submirrors. (SSA 100 and SSA 200
only)
Delete Available hot spares in the affected disk tray. (SSA 100 and SSA 200
only)
Remove the bad disk from the diskset.
Delete any affected metadevice state database replicas on disks in the
affected tray. (SSA 100 and SSA 200 only)
Produce a list of metadevices in the affected tray. (SSA 100 and SSA 200
only)
Use metaoffline(1M) to take submirrors in the affected tray or
submirrors using hot spares in the tray. (SSA 100 and SSA 200 only)
Flush NVRAM, if enabled. (SSA 100 and SSA 200 only)
Spin down the disk(s) and remove the tray or disk enclosure.
Replace the disk drive.
Add the new disk to the diskset.
Partition the new disk.
Use metainit(1M) to initialize any devices that were cleared previously
with metaclear(1M). (SSA 100 and SSA 200 only)
Bring off-line mirrors back on line using metaonline(1M) and
resynchronize. (SSA 100 and SSA 200 only)
Attach submirrors unattached previously. (SSA 100 and SSA 200 only)
Replace any hot spares in use in the submirrors that have just been attached.
(SSA 100 and SSA 200 only)
Return the deleted hot spare devices to their original hot spare pools. (SSA
100 and SSA 200 only)
Run metastat(1M) to verify the problem has been fixed.
Administering HA Server and Multihost Disks
21-15
21
These are the detailed steps to replace a failed multihost disk.
Note – Run the procedure on the host that masters the diskset in which the bad
disk resides. This might require you to switchover the diskset using
haswitch(1M).
1. Identify the disk to be replaced by examining metastat(1M) and
/var/adm/messages output.
When metastat(1M)reports that a device is in maintenance state or some
of the components have been replaced by hot spares, you must locate and
replace the device. A sample metastat(1M) output follows. In this
example, device c3t3d4s0 is in maintenance state:
phys-hahost1# metastat -s hahost1
...
d50:Submirror of hahost1/d40
State: Needs Maintenance
Stripe 0:
Device
Start Block
c3t3d4s0
0
...
Dbase
No
State
Okay
Hot Spare
c3t5d4s0
Check /var/adm/messages to see what kind of problem has been
detected.
...
Jun 1 16:15:26 host1 unix: WARNING:
/io-unit@f,e1200000/[email protected]/SUNW,pln@a0000000,741022/ssd@3,4(ssd49):
Jun 1 16:15:26 host1 unix: Error for command ‘write(I))’ Err
Jun 1 16:15:27 host1 unix: or Level: Fatal
Jun 1 16:15:27 host1 unix: Requested Block 144004, Error Block: 715559
Jun 1 16:15:27 host1 unix: Sense Key: Media Error
Jun 1 16:15:27 host1 unix: Vendor ‘CONNER’:
Jun 1 16:15:27 host1 unix: ASC=0x10(ID CRC or ECC error),ASCQ=0x0,FRU=0x15
...
21-16
Solstice HA 1.3 User’s Guide—April 1997
21
2. Determine the location of the problem disk.
On a SPARCstorage Array, find the tray where the problem disk resides by
running the ssaadm(1M) command. The ssaadm(1M) command lists the
trays and the drives associated with them. The output displayed from
ssaadm(1M) is different for each different SPARCstorage Array series. The
output shown below is from a SPARCstorage Array 100 series array. The
damaged drive (c3t3d4) is highlighted in the output shown below.
phys-hahost1# ssaadm display c3
SPARCstorage Array Configuration
Controller path:
/devices/iommu@f,e0000000/sbus@f,e0001000/SUNW,soc@0,0/SUNW,pln@a00
00000,779a16:ctlr
DEVICE STATUS
TRAY1
TRAY2
TRAY3
Slot
1
Drive:0,0
Drive:2,0
Drive:4,0
2
Drive:0,1
Drive:2,1
Drive:4,1
3
Drive:0,2
Drive:2,2
Drive:4,2
4
Drive:0,3
Drive:2,3
Drive:4,3
5
Drive:0,4
Drive:2,4
Drive:4,4
6
Drive:1,0
Drive:3,0
Drive:5,0
7
Drive:1,1
Drive:3,1
Drive:5,1
8
Drive:1,2
Drive:3,2
Drive:5,2
9
Drive:1,3
Drive:3,3
Drive:5,3
10
Drive:1,4
Drive:3,4
Drive:5,4
CONTROLLER STATUS
Vendor:
SUN
Product ID: SSA110
Product Rev: 1.0
Firmware Rev: 3.9
Serial Num: 000000741022
Accumulate performance Statistics: Enabled
3. Detach all submirrors with components on the disk being replaced.
If you are detaching a submirror that has a failed component, you must
force the detach using the metadetach -f option. The following example
command detaches submirror d50 from metamirror d40.
phys-hahost1# metadetach -s hahost1 -f d40 d50
Administering HA Server and Multihost Disks
21-17
21
4. Use metaclear(1M) to clear the submirrors detached in Step 3.
phys-hahost1# metaclear -s hahost1 -f d50
5. Delete all hot spares that have Available status and are in the same tray
as the problem disk.
This includes all hot spares, regardless of their logical host assignment. In
the following example, metahs(1M) reports hot spares on “hahost1,” but
shows that none are present on “hahost2.”
phys-hahost1# metahs -s hahost1 -i
hahost1:hsp000 2 hot spares
c1t4d0s0
Available
2026080 blocks
c3t2d5s0
Available
2026080 blocks
phys-hahost1# metahs -s hahost1 -d hsp000 c3t2d4s0
hahost1:hsp000:
Hotspare is deleted
phys-hahost1# metahs -s hahost2 -i
phys-hahost1#
hahost1:hsp000 1 hot spare
c3t2d5s0
Available
2026080 blocks
!
Caution – Before deleting replicas and hot spares, make a record of the location
(slice), number of replicas, and hot spare information (names of the devices
and list of devices that contain hot spare pools) so that the actions can be
reversed following the disk replacement.
6. Use the metaset(1M) command to remove the failed disk from the
diskset.
This can take up to fifteen minutes or more, depending on the size of your
configuration and the number of disks.
phys-hahost1# metaset -s hahost1 -d c3t3d4
21-18
Solstice HA 1.3 User’s Guide—April 1997
21
7. Delete any metadevice state database replicas that are on disks in the tray
to be serviced.
The metadb(1M) command with the -s option reports replicas in a
specified diskset.
phys-hahost1#
phys-hahost1#
phys-hahost1#
phys-hahost1#
metadb
metadb
metadb
metadb
-s
-s
-s
-s
hahost1
hahost2
hahost1 -d replicas_in_tray
hahost2 -d replicas_in_tray
8. Locate the submirrors using components that reside in the affected tray.
One method is to use the metastat(1M) command to create temporary
files that contain the names of all metadevices. For example:
phys-hahost1# metastat -s hahost1 > /usr/tmp/hahost1.stat
phys-hahost1# metastat -s hahost2 > /usr/tmp/hahost2.stat
Search the temporary files for the components in question (c3t3dn and
c3t2dn in this example). The information in the temporary files will look
like this:
...
hahost1/d35: Submirror of hahost1/d15
State: Okay
Hot Spare pool: hahost1/hsp100
Size: 2026080 blocks
Stripe 0:
Device
Start Block
Dbase
c3t3d3s0
0
No
hahost1/d54: Submirror of hahost1/d24
State: Okay
Hot Spare pool: hahost1/hsp106
Size: 21168 blocks
Stripe 0:
Device
Start Block
Dbase
c3t3d3s6
0
No
...
Administering HA Server and Multihost Disks
State
Okay
Hot Spare
State
Okay
Hot Spare
21-19
21
9. Take off line all other submirrors that have components in the affected
tray.
Using the output from the temporary files in Step 8, run the
metaoffline(1M) command on all submirrors in the affected tray.
phys-hahost1# metaoffline -s hahost1 d15 d35
phys-hahost1# metaoffline -s hahost1 d24 d54
...
Run metaoffline(1M) as many times as necessary to take all the
submirrors off line. This forces Solstice DiskSuite to stop using the
submirror components.
10. If enabled, flush the NVRAM on the controller, tray, individual disk or
disks.
phys-hahost1# ssaadm sync_cache pathname
A confirmation appears, indicating that NVRAM has been flushed. See
Appendix E, “Administering SPARCstorage Array NVRAM” for details on
flushing NVRAM data.
11. Spin down all disks in the affected SPARCstorage Array tray(s).
On SPARCstorage MultiPacks and SPARCstorage Array RSM
configurations, this does not apply.
On SPARCstorage Arrays, use the ssaadm stop command to spin down
the disks. Refer to the ssaadm(1M) man page for details.
phys-hahost1# ssaadm stop -t 2 c3
!
Caution – Do not run any Solstice DiskSuite commands while a SPARCstorage
Array tray is spun down because the commands might have the side effect of
spinning up some or all of the drives in the tray.
12. Replace the bad disk.
Refer to the hardware service manuals for your SPARCstorage Array or
MultiPack for details on this procedure.
21-20
Solstice HA 1.3 User’s Guide—April 1997
21
13. Make sure all disks in the affected multihost disk expansion unit spin up.
The disks in the multihost disk expansion unit should spin up automatically.
If you are using SPARCstorage Arrays and the tray fails to spin up within
two minutes, force the action using the following command:
phys-hahost1# ssaadm start -t 2 c3
14. Add the new disk back into the diskset using the metaset(1M)
command.
phys-hahost1# metaset -s hahost1 -a c3t3d4
15. Use format(1M) or fmthard(1M) to repartition the new disk.
Make sure that you partition the new disk exactly as the disk that was
replaced. (Saving the disk format information was recommended in
Chapter 15, “Preparing for Administration.”)
16. Use metainit(1M) to reinitialize disks that were cleared in Step 4.
phys-hahost1# metainit -s hahost1 d50
17. Bring on line all submirrors that were taken off line in Step 9.
phys-hahost1# metaonline -s hahost1 d15 d35
phys-hahost1# metaonline -s hahost1 d24 d54
...
Run metaonline(1M) as many times as necessary to bring on line all the
submirrors.
When the submirrors are brought back on line, Solstice DiskSuite
automatically performs resyncs on all the submirrors, bringing all data
up-to-date.
Note – Running metastat(1M) at this time would show that all metadevices
with components residing in the affected tray are resyncing.
Administering HA Server and Multihost Disks
21-21
21
18. Attach submirrors that were detached in Step 3.
Use metattach(1M) to perform this step. See the man page for details on
using the metattach(1M) command.
phys-hahost1# metattach -s hahost1 d40 d50
19. Replace any hot spares in use in the submirrors attached in Step 18.
If a submirror had a hot spare replacement in use before you detached the
submirror, this hot spare replacement will be in effect after the submirror is
reattached. The following step returns the hot spare to Available status.
phys-hahost1# metareplace -s hahost1 -e d40 c3t3d4s0
20. Restore all hot spares that were deleted in Step 5.
Use metahs(1M) to add back the hot spares. See the metahs(1M) man
page for details.
phys-hahost1# metahs -s hahost1 -a hsp000 c3t2d5s0
21. If necessary, switch each logical host back to its default master.
phys-hahost1# haswitch phys-hahost2 hahost2
22. Verify that the replacement corrected the problem.
phys-hahost1# metastat -s hahost1
21-22
Solstice HA 1.3 User’s Guide—April 1997
Administering SPARCstorage
Arrays
22
This chapter provides instructions for administering your SPARCstorage
Arrays.
Recovering From Power Loss
page 22-2
Repairing a Lost SPARCstorage Array Connection
page 22-4
Adding a SPARCstorage Array
page 22-6
Removing and Replacing SPARCstorage Array Components
page 22-7
Replacing a SPARCstorage Array Controller and Changing the World
Wide Name
page 22-12
This chapter includes the following procedures:
• “How to Recover from Power Loss” on page 22-2
• “How to Repair a Lost Connection” on page 22-4
• “How to Add a SPARCstorage Array” on page 22-6
• “How to Take a SPARCstorage Array Tray Out of Service” on page 22-8
• “How to Bring a SPARCstorage Array Tray Back Into Service” on
page 22-10
• “How to Change a SPARCstorage Array World Wide Name” on
page 22-13
Also use the service manual for your SPARCstorage Array and the Solstice
DiskSuite 4.1 Reference Guide when you are replacing or repairing
SPARCstorage Array hardware in the HA configuration.
22-1
22
22.1 Recovering From Power Loss
When power is lost to one SPARCstorage Array, I/O operations to the
submirrors, hot spares, and metadevice state database replicas generate
Solstice DiskSuite errors. The errors are reported at the slice level rather than
the drive level. Errors are not reported until I/O operations are made to the
disk. Hot spare activity can be initiated if affected devices have assigned hot
spares.
You should monitor the configuration for these events using hastat(1M) and
metastat(1M) as explained in Chapter 19, “Monitoring the Ultra Enterprise
Cluster HA Servers.”
▼ How to Recover from Power Loss
These are the high-level steps to recover from power loss to a SPARCstorage
Array.
•
•
•
•
•
Identify the errored replicas
Return the errored replicas to service
Identify the errored devices
Return the errored devices to service
Resync the disks
These are the detailed steps to recover from power loss to a SPARCstorage
Array.
1. When power is restored, use the metadb(1M) command to identify the
errored replicas:
# metadb -s logicalhost
2. Return replicas to service.
After the loss of power, all metadevice state database replicas on the affected
SPARCstorage Array chassis enter an errored state. Because metadevice
state database replica recovery is not automatic, it is safest to perform the
recovery immediately after the SPARCstorage Array returns to service.
22-2
Solstice HA 1.3 User’s Guide—April 1997
22
Otherwise, a new failure can cause a majority of replicas to be out of service
and cause a kernel panic. This is the expected behavior of Solstice DiskSuite
when too few replicas are available.
While these errored replicas will be reclaimed at the next takeover
(haswitch(1M) or reboot(1M)), you might want to return them to service
manually by first deleting and then adding them back.
Note – Make sure that you add back the same number of replicas that were
deleted on each slice. You can delete multiple replicas with a single
metadb(1M) command. If you need multiple copies of replicas on one slice,
you must add them in one invocation of metadb(1M) using the -c flag.
3. Use the metastat(1M) command to identify the errored devices:
# metastat -s logicalhost
4. Return errored devices to service using the metareplace(1M) command,
and resync the disks.
# metareplace -s logicalhost -e metamirror component
The -e option transitions the component to the available state and resyncs
the failed component. Where component is a slice (partition) on a disk drive.
Components that have been replaced by a hot spare should be the last
devices replaced using the metareplace(1M) command. If the hot spare is
replaced first, it could replace another errored submirror as soon as it
becomes available.
You can perform a resync on only one component of a submirror
(metadevice) at a time. If all components of a submirror were affected by the
power outage, each component must be replaced separately. It takes
approximately 10 minutes for a resync to be performed on a 1.05-Gigabyte
disk.
If both disksets in a symmetric configuration were affected by the power
outage, resync the affected submirrors concurrently by logging into each
host separately and running metareplace(1M).
Administering SPARCstorage Arrays
22-3
22
Note – Depending on the number of submirrors and the number of
components in these submirrors, the resync actions can require a considerable
amount of time. A single submirror made up of 30 1.05-Gigabyte drives might
take about five hours to complete. A more manageable configuration made up
of five component submirrors might take only 50 minutes to complete.
22.2 Repairing a Lost SPARCstorage Array Connection
When a connection from a SPARCstorage Array to one of the hosts fails, the
failure is probably due to a fiber optic cable, an SBus FC/S card, or an FC/OM
module.
In any event, the host on which the failure occurred will begin generating
errors when the failure is discovered. Later accesses to the SPARCstorage
Array will generate additional errors. The host will exhibit the same behavior
as though power had been lost to the SPARCstorage Array.
In dual-hosted configurations, I/O operations from the other host to the
SPARCstorage Array are unaffected by this type of failure.
To diagnose the failure, inspect the SPARCstorage Array’s display. The display
will show whether the A or B connection has been lost. Use the procedures for
testing the FC/S card and FC/OM modules in the service manual for your HA
server to determine which component failed. You should free up one HA
server and the SPARCstorage Array that appears to be down, for hardware
debugging.
▼ How to Repair a Lost Connection
1. Prepare the HA system for component replacement.
Depending on the cause of the connection loss, prepare the HA system with
one of the following procedures.
• If the failed component is an FC/S card or the FC/OM module for an
FC/S card, see Chapter 24, “Administering Server Components” to
prepare the HA server for power down.
• If the problem is a bad fiber optic cable, the DiskSuite software will have
detected the problem and prepared the system for cable replacement.
22-4
Solstice HA 1.3 User’s Guide—April 1997
22
• If the SPARCstorage Array FC/OM module has failed, use the procedure
“How to Take a SPARCstorage Array Tray Out of Service” on page 22-8 on
each SPARCstorage Array tray to prepare the entire SPARCstorage Array.
2. Replace the failed component.
If the fiber optic cable, SBus FC/S card, or an FC/OM module fails, refer to
the service manual for your HA server for detailed instructions on replacing
them.
3. Recover from Solstice DiskSuite errors.
Use the procedure described in “Recovering From Power Loss” on
page 22-2.
Administering SPARCstorage Arrays
22-5
22
22.3 Adding a SPARCstorage Array
You can add SPARCstorage Arrays to a Solstice HA configuration at any time.
You must review the metadevice distribution in your Solstice HA configuration
before adding a SPARCstorage Array. The discussions in the Chapter 3,
“Configuration Planning,” and Chapter 18, “Administering Metadevices and
Disksets,” in this book will help determine the impact of the SPARCstorage
Array on the distribution of metadevices.
▼ How to Add a SPARCstorage Array
1. Shut down one of the Solstice HA servers.
Use the procedure in “Shutting Down Ultra Enterprise Cluster HA Servers”
on page 17-5 to shut down the server.
2. Install the Fibre Channel SBus card (FC/S) in the server.
Use the instructions in the hardware service manual for your HA server to
install the FC/S card.
Note – Install the FC/S card in the first available empty SBus slot, following all
other cards in the server. This will ensure the controller numbering will be
preserved if the Solaris operating environment is reinstalled. Refer to “Instance
Names and Numbering” on page 15-5 for more information.
3. Connect the cables to the SPARCstorage Array and FC/S card.
Use the instructions in the hardware service manual for your HA server.
4. Perform a reconfiguration reboot of the server.
ok boot -r
5. Switch ownership of all logical hosts to the rebooted server.
Use the haswitch(1M) command.
phys-hahost1# haswitch phys-hahost2 hahost1 hahost2
6. Repeat Step 1 through Step 4 on the sibling Solstice HA server.
22-6
Solstice HA 1.3 User’s Guide—April 1997
22
Note – The hardware must be installed identically on each of the servers. This
means the new SBus card must be installed on the same system board and
SBus slot on each server.
7. Switch ownership of the logical hosts back to the appropriate default
master.
For example:
phys-hahost1# haswitch phys-hahost2 hahost2
8. Add the disks in the SPARCstorage Arrays to the selected diskset.
Use the instructions in “Diskset Administration” on page 18-3 to add the
disks to disksets.
22.4 Removing and Replacing SPARCstorage Array Components
This section describes procedures for replacing SPARCstorage Array trays,
controllers, and the World Wide Name. Adding or replacing the SPARCstorage
Array multihost disks is described in Chapter 21, “Administering HA Server
and Multihost Disks.”
Use the procedures described in your server hardware manual to identify the
failed component.
Note – To guard against data loss and a failure that might require you to
replace the entire SPARCstorage Array chassis, set up all metadevices with
only one submirror of a mirror on a single chassis.
Administering SPARCstorage Arrays
22-7
22
▼ How to Take a SPARCstorage Array Tray Out of Service
Note – There are several different SPARCstorage Array models supported by
Solstice HA. The following procedure is only applicable to the SPARCstorage
Array 100 series.
Before removing a SPARCstorage Array tray, you must halt all I/O and spin
down all drives in the tray. The drives automatically spin up if I/O requests
are made, so it is necessary to stop all I/O before the drives are spun down.
These are the high-level steps to take a SPARCstorage Array tray out of service.
•
•
•
•
•
Switch logical hosts to one HA server
Stop I/O to the affected tray
Identify any replicas, hot spares, and submirrors on the affected tray
Flush NVRAM data, if appropriate
Spin down and remove the tray
If the entire SPARCstorage Array is being serviced, you must perform these
steps on each tray.
These are the detailed steps to take a SPARCstorage Array tray out of service:
1. Switch ownership of both logical hosts to one HA server using a
command similar to the following:
phys-hahost1# haswitch phys-hahost1 hahost1 hahost2
The SPARCstorage Array tray to be removed might contain disks from both
disksets. If this is the case, switch ownership of both disksets to the server
where the ssaadm(1M) command will be used later to spin down the disks.
In this example, we have switched the disksets to phys-hahost1, so we will
use phys-hahost2 to perform the administrative functions.
2. Use the metastat(1M) command to identify all submirrors containing
slices on the tray to be removed.
22-8
Solstice HA 1.3 User’s Guide—April 1997
22
3. Stop I/O to the submirrors whose components (slices) are on the affected
tray.
Use the metaoffline(1M) command for this step. This takes the submirror
off line. You can use the metadetach(1M) command to stop the I/O, but
the resync cost is greater.
When the submirrors on a tray are taken off line, the corresponding mirrors
provide only one-way mirroring (that is, there will be no data redundancy).
When the mirror is brought back on line, an automatic resync occurs.
With all affected submirrors off line, I/O to the tray is stopped.
4. Use the metadb(1M) command to identify any replicas on the tray.
Save this information to use when the tray is replaced.
5. Use the metahs(1M) command to identify any available hot spare devices
and their associated submirror.
Save this information to use when the tray is replaced.
6. Remove the tray or flush NVRAM.
If NVRAM is enabled, go to Step 7. If NVRAM is not enabled, skip to Step 8.
7. If NVRAM is enabled, flush the NVRAM data on the appropriate
controller, tray, or disk(s).
phys-hahost1# ssaadm sync_cache pathname
A confirmation appears, indicating that NVRAM data has been flushed. If
you need to remove the tray go to Step 8. See Appendix E, “Administering
SPARCstorage Array NVRAM” for details on flushing NVRAM data.
8. Use the ssaadm stop command to spin down the tray.
When the tray lock light is out, remove the tray and perform the required
service.
phys-hahost1# ssaadm stop c1
Administering SPARCstorage Arrays
22-9
22
▼ How to Bring a SPARCstorage Array Tray Back Into Service
Note – There are several different SPARCstorage Array models supported by
Solstice HA. The following procedure is only applicable to the SPARCstorage
Array 100 series.
These are the high-level steps to bring a SPARCstorage Array tray back into
service.
•
•
•
Spin up the drives
Restore all replicas, submirrors, and hot spares
Switch each logical host back to its default master
If the entire SPARCstorage Array has been serviced, you must perform the
steps on each tray.
These are the detailed steps to bring a SPARCstorage Array tray back into
service.
1. If the SSA was removed, spin up the drives in the SPARCstorage Array
tray. Otherwise skip to Step 3.
When you have completed work on a SPARCstorage Array tray, replace the
tray in the chassis. The disks will spin up automatically. However, if the
disks fail to spin up, use the ssaadm start command to manually spin up
the entire tray. There is a short delay (several seconds) between invocation
of the ssaadm(1M) command and spin-up of drives in the SPARCstorage
Array. In this example, c1 is the controller id:
phys-hahost1# ssaadm start c1
2. Add all metadevice state database replicas that were deleted from disks
on this tray.
Use the information saved from Step 4 in “How to Take a SPARCstorage
Array Tray Out of Service” on page 22-8 to restore the metadevice state
database replicas.
phys-hahost1# metadb -s hahost1 -a deleted_replicas
22-10
Solstice HA 1.3 User’s Guide—April 1997
22
3. After the disks spin up, place on line all the submirrors that were taken
off line.
Use the metaonline(1M) command appropriate for the disks in this tray.
phys-hahost1# metaonline -s hahost1 d15 d35
phys-hahost1# metaonline -s hahost1 d24 d54
...
When the metaonline(1M) command is run, an optimized resync
operation automatically brings the submirrors up-to-date. The optimized
resync copies only those regions of the disk that were modified while the
submirror was off line. This is typically a very small fraction of the
submirror capacity.
Run metaonline(1M) as many times as necessary to bring back on line all
of the submirrors.
Note – If you used metadetach(1M) to detach the submirror rather than
metaoffline(1M), you must synchronize the entire submirror using
metattach(1M). This typically takes about 10 minutes per Gigabyte of data.
4. Add back all hot spares that were deleted when the SPARCstorage Array
was taken out of service.
Use the metahs(1M) command as appropriate for your hot spare
configuration. Use the information saved from Step 5 in “How to Take a
SPARCstorage Array Tray Out of Service” on page 22-8 to replace your hot
spares.
phys-hahost1# metahs -s hahost1 -a hotspare cNtXdYsZ
5. Switch each logical host back to its default master.
phys-hahost1# haswitch phys-hahost2 hahost2
Administering SPARCstorage Arrays
22-11
22
22.5 Replacing a SPARCstorage Array Controller and Changing the World Wide
Name
The SPARCstorage Array controller has a unique identifier known as the World
Wide Name (WWN) that identifies the controller to Solaris. Therefore, when
SPARCstorage Array failures make it necessary to replace the controller or the
entire chassis containing the controller, special procedures apply.
The WWN is like the host ID stored in the host IDPROM of a desktop
SPARCstation™. The last four digits of the SPARCstorage Array WWN are
displayed on the LCD panel of the chassis. The WWN is part of the /devices
path associated with the SPARCstorage Array and its component drives.
When you replace the SPARCstorage Array controller assembly or the
SPARCstorage Array chassis in an Ultra Enterprise Cluster HA configuration,
you can change the WWN of the replacement chassis to be that of the chassis
you are replacing. This is easier than reconfiguring Solstice DiskSuite.
If you must replace the SPARCstorage Array controller or the entire chassis,
the Ultra Enterprise Cluster HA servers will discover the new WWN when
they are rebooted. This confuses the identity of disks within a diskset. To avoid
this, change the WWN of the new controller to the WWN of the old controller.
(This is similar to swapping the IDPROM when replacing a System Board in a
desktop SPARCstation.)
Consider the following two situations when performing the WWN
replacement procedure:
22-12
•
If the SPARCstorage Array has not entirely failed or is being swapped for
some other reason, prepare for the swap by performing the steps described
in “How to Take a SPARCstorage Array Tray Out of Service” on page 22-8
for each tray in the SPARCcluster Storage Array.
•
If the SPARCstorage Array controller has failed entirely, DiskSuite has
already prepared for the swap. In this case, you can proceed with the steps
described in the following section.
Solstice HA 1.3 User’s Guide—April 1997
22
▼ How to Change a SPARCstorage Array World Wide Name
These are the high-level steps to change a SPARCstorage Array World Wide
Name (WWN).
•
•
•
•
•
•
•
•
Switch ownership of both hosts to one HA server
Obtain the WWN of the previous array
Replace the controller or array
Stop Solstice HA and halt the host that does not own the disks
With “mini-unix”, reboot the host that does not own the disks
Determine the controller number for the new array
Set the new WWN and reset the array
Reboot the sibling host, if necessary
These are the detailed steps to change a SPARCstorage Array World Wide
Name.
1. On the administrative host, stop Solstice HA and halt the system.
Use the hastop(1M) and halt(1M) commands to force ownership of all
disksets to one host, and to stop Solstice HA.
In this example, we switch the disksets to “phys-hahost1,” so we will use
“phys-hahost2” to perform the administrative functions. We refer to “physhahost2” as the “administrative host” throughout the rest of this procedure.
phys-hahost2# hastop
Apr 1 12:01:06 phys-hahost2 hadf: NOTICE: starting "return" transition
Apr 1 12:01:07 phys-hahost2 hadf: NOTICE: finished "return" transition
Apr 1 12:01:07 phys-hahost2 hadf: NOTICE: starting "stop" transition
Apr 1 12:01:08 phys-hahost2 hadf: NOTICE: cltrans_stop_all: Starting
with args: /var/opt/SUNWhadf/hadf/ha_env
Apr 1 12:02:06 phys-hahost2 hadf: WARNING: cltrans_stop_all: Stop/Abort
completed, will exit from clustd leaving this host up.
Apr 1 12:02:06 phys-hahost2 hadf: NOTICE: finished "stop" transition
Apr 1 12:02:37 phys-hahost2 faultd[297]: Got SIGTERM/SIGINT signal.
Apr 1 12:02:37 phys-hahost2 faultd[297]: Got SIGTERM/SIGINT signal.
Apr 1 12:02:37 phys-hahost2 faultd[297]: Exiting due to SIGTERM/SIGINT.
Apr 1 12:02:37 phys-hahost2 faultd[297]: Exiting due to SIGTERM/SIGINT
phys-hahost2# halt
Administering SPARCstorage Arrays
22-13
22
2. Obtain the WWN of the previously configured SPARCstorage Array.
If the SPARCstorage Array is powered down, use the following instructions
to obtain the WWN.
The WWN is composed of 12 hexadecimal digits. The digits are shown as
part of the device path component containing the characters pln@a0. They
are the 12 digits following the characters pln@a0, excluding the comma.
Use the ls(1) command on either HA server to identify the current WWN.
phys-hahost1# ls -l /dev/rdsk/cNt0d0s0
...SUNW,pln@a0000000,7412bf ...
In this example, the WWN for the SPARCstorage Array being replaced is
shown in boldface font (0000007412bf). The variable N in the device name
represents the controller number for the previously configured
SPARCstorage Array. The string “t0d0s0” is just an example. Use a device
name you know exists on the SPARCstorage Array.
If the SPARCstorage Array is up and running, you can obtain the WWN
using the ssaadm(1M) command. When you run ssaadm(1M) with the
display option and specify a controller, all the information about the
SPARCstorage Array is displayed. The serial number reported by
ssaadm(1M) is the WWN.
3. Replace the controller or SPARCstorage Array.
Use the instructions in your SPARCstorage Array service manual to perform
this step.
If the SPARCstorage Array has not failed entirely or is being swapped for a
reason other than controller failure, prepare for the swap by performing the
steps described in “How to Take a SPARCstorage Array Tray Out of Service”
on page 22-8 for each tray in the SPARCcluster Storage Array.
If the SPARCstorage Array controller has failed entirely, DiskSuite has
already prepared for the swap.
22-14
Solstice HA 1.3 User’s Guide—April 1997
22
4. Enter the OpenBoot PROM and boot the administrative host with “miniunix.”
Do this from the distribution CD or net equivalent to put the host into
single-user mode.
<#0> ok boot cdrom -s
or
<#0> ok boot netqe1 -s
Use “mini-unix” to avoid making any permanent device information
changes to the HA server.
5. Determine the controller number for the new SPARCstorage Array.
Use the ls(1) command and the four digits displayed on the LCD display
of the new SPARCstorage Array to identify the controller number.
In this example, the four digits shown on the LCD display are 143b. Note
that the device name (c*t0d0s0) uses pattern matching for the controller
number but specifies a slice that is known to exist. This reduces the number
of lines generated in the output.
# ls -l /dev/rdsk/c*t0d0s0 | grep -i 143b
lrwxrwxrwx
1 root
root
98 Mar 14 13:38
/dev/rdsk/c3t0d0s0 ->
../../devices/iommu@f,e0000000/sbus@f,e0001000/SUNW,soc@3,0/SUN
W,pln@a0000000,74143b/ssd@0,0:a,raw
In this example, 3 (/dev/rdsk/c3...) is the controller number of the new
SPARCstorage Array under “mini-unix”.
Note – The hex digits in the LCD display are in mixed case—letters A,C,E, and
F are in upper case and letters b and d are in lower case. The example uses
grep -i to ignore case in the comparison.
Administering SPARCstorage Arrays
22-15
22
6. Run the ssaadm download command from /usr/sbin to set the WWN.
Use the controller number determined in Step 5. For example, the following
command would change the WWN from the current value to the value
determined in Step 2, 0000007412bf. The SPARCstorage Array controller is
controller 3.
phys-hahost2# /usr/sbin/ssaadm download -w 0000007412bf c3
Note – The leading zeros must be entered as part of the WWN to make a total
of 12 digits.
!
Caution – Do not interrupt the download process.
7. Reset the SPARCstorage Array using the SYS OK button on the unit.
There will be a short delay until the unit reboots and begins communicating
with the HA servers.
8. Abort “mini-unix” and boot the host normally.
Press Ctrl-] to get to the telnet(1) prompt and then send a break to the
console.
telnet> send brk
<#0>ok boot
9. Verify the SPARCstorage Array firmware level, and update, if required.
You must update your SPARCstorage Array firmware if the your firmware
is at a lower revision than the one described in the latest patch README
file. If your current firmware level is already at the level described in the
patch README file, you do not need to install that patch. Contact your local
service provider for the latest revisions of the required patch(es)
Use the ssaadm(1M) command to determine the current version of the
firmware. Specify the controller number (n in the example) to the
ssaadm(1M) command.
phys-hahost2# ssaadm display cn
22-16
Solstice HA 1.3 User’s Guide—April 1997
22
Read the output for a line documenting the firmware revision. If the
revision level is below the level described in the latest README file for
your SPARCstorage Array patch, you need to install the patch(es).
The last two digits of the patch name are the revision number. If your
service provider has a new patch, install it before starting Solstice HA.
Install the patch(es) following the instructions in the README file
accompanying each patch, unless instructed otherwise by the Solstice HA
documentation or your service provider.
10. (Optional) Switch both logical hosts to the administrative host.
Switch the logical hosts to “phys-hahost2” using haswitch(1M).
phys-hahost2# haswitch phys-hahost2 hahost1 hahost2
11. Complete the replacement by restoring the submirrors, hot spares, and
metadevice state databases.
This procedure is described in “How to Bring a SPARCstorage Array Tray
Back Into Service” on page 22-10.
12. Reboot the sibling server, if necessary.
You might need to reboot the sibling server, if it is unable to recognize all
disks in the SPARCstorage Array following the replacement. If this is the
case, use hastop(1M) to stop Solstice HA activity, then reboot. After the
reboot, switch the logical hosts back to their default masters.
Administering SPARCstorage Arrays
22-17
22
22-18
Solstice HA 1.3 User’s Guide—April 1997
23
Administering Network Interfaces
This chapter provides instructions for adding or replacing network interface
components.
Replacing Network Cables and Interfaces
page 23-1
Adding a Public Network
page 23-3
Removing a Public Network
page 23-6
This chapter includes the following procedures:
• “How to Replace a Public or Client Ethernet Cable” on page 23-2
• “How to Replace a Private Network Cable” on page 23-2
• “How to Add a Public Network Connection” on page 23-3
• “How to Remove a Public Network” on page 23-6
Also use the service manual for your HA server and the Solstice DiskSuite 4.1
Reference Guide when you are replacing or repairing hardware in the HA
configuration.
23.1 Replacing Network Cables and Interfaces
Three types of failures require the replacement of network cables and
interfaces. These include:
•
•
•
Public or client Ethernet cable failure
Private network cable failure
Public or private Ethernet interface failure
23-1
23
If a public Ethernet cable fails completely, then HA failover occurs
automatically. Therefore, manual switchover is not necessary; you only need to
replace the cable, as in Step 2 below. If you must replace a cable that is faulty
or working intermittently, then you must perform both a switchover and cable
replacement, as in Steps 1-3 below.
▼ How to Replace a Public or Client Ethernet Cable
1. Switch ownership of both logical hosts to the Ultra Enterprise Cluster HA
server that does not need an Ethernet cable replaced.
For instance, if the cable is being replaced on “phys-hahost1,” enter the
following:
phys-hahost1# haswitch phys-hahost2 hahost1 hahost2
2. Replace the cable using the hardware instructions in the service manual
for your HA server.
3. Switch ownership of the logical hosts back to the appropriate default
master.
For instance:
phys-hahost1# haswitch phys-hahost1 hahost1
▼ How to Replace a Private Network Cable
When a private network cable fails, both servers recognize that a private
network connection is not working. The Solstice HA services will not be
affected because of the second private network cable.
♦ Unplug the faulty Ethernet cable and replace it with a new one.
You can use either of Sun Microsystems™ replacement part numbers
530-2149 or 530-2150. If you are not using standard Sun parts, be sure the
replacement Ethernet cable has the pairs crossed. Refer to the service
manual for your HA server for cable information.
23-2
Solstice HA 1.3 User’s Guide—April 1997
23
23.2 Adding a Public Network
Adding a public network connection in an Ultra Enterprise Cluster HA
configuration involves both software and hardware procedures.
When you add an interface card or board to your HA systems, you install on
one server at a time.
These are the high-level steps to add a public network.
•
•
•
•
•
•
Install the new network interface. You must have the data service(s) on the
other server to allow this HA server to be shutdown for the card or board
installation. Use haswitch(1M) if necessary, and then run hastop(1M) it
prepare the system to be halted. Follow the instructions supplied with this
network product.
If necessary, update the /etc/inet/hosts and /etc/inet/netmasks
files, and create the /etc/hostname.* file.
Reboot this server if the new network interface has not been configured.
Switch the data service(s) to the other server and perform these same steps.
Add the new network interfaces to the hadfconfig(4) HA configuration
file.
Perform a membership reconfiguration to have HA start using these new
network interfaces.
▼ How to Add a Public Network Connection
These are the high-level steps to add a public network connection.
•
•
•
•
•
•
Move the data services to a single host.
Stop Solstice HA.
Install and configure the new network interface.
Start Solstice HA.
Edit and distribute the hadfconfig(4) file.
Run hacheck(1M) to verify the installation.
If you are adding new hardware to support this addition of a new network
connection, perform the following steps. If no new hardware is being added,
skip directly to step 5.
Administering Network Interfaces
23-3
23
These are the detailed steps to add a public network connection.
1. Run haswitch(1M) to move the data services that are running to a single
host.
In this example, “phys-hahost2” will be the first to receive the new public
network connection.
phys-hahost1# haswitch phys-hahost1 hahost1 hahost2
2. Stop Solstice HA on this server.
phys-hahost2# hastop
3. Install the new network interface hardware following the instructions
accompanying this new card or board.
4. Complete the software configuration of this new network interface on this
node.
• Update the physical host information:
Add the new host names to the local /etc/inet/hosts file and to the
network name service. If this is a new network number, make the
appropriate entries in the /etc/inet/netmasks file.
Update the /etc/hostname.xxn file with the host name associated with
the new interface if this was not done as part of the network interface
installation. Replace the xxn suffix with the type and number of the
interface (for example qe3).
• Update the logical host information:
Add the host name to the local /etc/inet/hosts file for the new
logical host.
5. Reboot this server if this new network interface has not been configured
up.
phys-hahost2# reboot
On reboot, ifconfig(1M) automatically assigns an address to the network
interface and enters the address in /etc/inet/hosts.
23-4
Solstice HA 1.3 User’s Guide—April 1997
23
6. Run hastart(1M).
The hastart(1M) utility starts the membership monitor. The server will
not take back ownership of the diskset or data services.
7. Repeat the entire procedure on the sibling server.
8. Edit the hadfconfig(4) file on one HA server.
After the new interfaces are configured appropriately and entries have been
added to the name service, the /etc/inet/hosts file, and the
/etc/hostname.xxn file, the interface must be added to the
/etc/opt/SUNWhadf/hadf/hadfconfig file. Make entries for the new
physical and logical host in the hadfconfig file using the following format:
HOSTNAME phys-hahost1-nnn hahost1-nnn host2-nnn hahost2-nnn
Following the naming convention, in the above example the nnn represents
the third octet of the associated network number. This example also assumes
a class C subnet mask.
Note – If this is an asymmetric configuration with a single logical host
(diskset), the string hahost2-nnn is replaced with a hyphen (-). You must
make these changes manually on both machines for correct operation.
9. Distribute the hadfconfig file changes to the sibling HA server.
phys-hahost1# rcp /etc/opt/SUNWhadf/hadf/hadfconfig \
phys-hahost2:/etc/opt/SUNWhadf/hadf/hadfconfig
10. Run the hacheck(1M) command on both hosts.
phys-hahost2# hacheck
A null response from hacheck(1M) means that it completed successfully.
Do not continue to the next step until hacheck(1M) runs without errors.
Administering Network Interfaces
23-5
23
Services will be offered through the new network connections on the next
membership reconfiguration. This can be performed by either running
haswitch(1M) to move one (or both) logical hosts from one HA server to
the other, or by performing a Solstice HA cluster reconfiguration (haswitch
-r) if you do not need to move a logical host. Refer to Section 17.4, “Forcing
a Membership Reconfiguration,” on page 17-4.
23.3 Removing a Public Network
This section describes the software procedures used to remove public network
connections from the Ultra Enterprise Cluster HA configuration.
Note – This procedure can be performed only on secondary public network
interfaces. It cannot be performed on a primary network.
▼ How to Remove a Public Network
1. Notify users that the subnetwork is going to be removed.
Verify that users are off the subnetwork.
2. Edit the hadfconfig(4) files.
a. Edit the hadfconfig(4) file on one HA Server.
Remove, or comment out, the appropriate HOSTNAME line in the
/etc/opt/SUNWhadf/hadf/hadfconfig file on both Ultra Enterprise
Cluster HA servers.
b. Distribute the hadfconfig file changes to the sibling HA server.
phys-hahost1# rcp /etc/opt/SUNWhadf/hadf/hadfconfig \
phys-hahost2:/etc/opt/SUNWhadf/hadf/hadfconfig
3. Perform a membership monitor reconfiguration.
The logical hosts on the associated network will cease to offer services
following the membership reconfiguration. To perform a membership
reconfiguration, enter the following command on only one host:
phys-hahost1# haswitch -r
23-6
Solstice HA 1.3 User’s Guide—April 1997
23
4. On each server, determine which interface and logical interfaces will be
removed.
a. Look for the host name in /etc/inet/hosts to locate the IP address.
b. Use the IP address and ifconfig -a to identify the physical network
interface.
c. Use ifconfig -a to identify all the associated logical interfaces.
After the membership reconfiguration, Solstice HA will forget about the
network, but will not completely clean up. The ifconfig -a command
will report that the associated logical interfaces are still up, as follows:
phys-hahost1# ifconfig -a
le5: flags=863<UP,BROADCAST,NOTRAILERS,RUNNING,MULTICAST> mtu
1500 inet 192.9.76.12 netmask ffffff00 broadcast 192.9.76.255
ether 8:0:20:1c:b2:92
le5:1: flags=843<UP,BROADCAST,RUNNING,MULTICAST> mtu 1500
inet 192.9.76.18 netmask ffffff00 broadcast 192.9.76.255
le5:2: flags=842<BROADCAST,RUNNING,MULTICAST> mtu 1500
inet 192.9.76.13 netmask ffffff00 broadcast 192.9.76.255
5. On each server, remove the /etc/hostname.nnn file associated with the
interface.
This step is necessary only if the hardware is being removed from both
servers.
phys-hahost1# rm /etc/hostname.nnn
6. Execute the ifconfig down and ifconfig unplumb commands on both
servers.
Enter the following commands on both servers.
phys-hahost1#
phys-hahost1#
phys-hahost1#
phys-hahost1#
ifconfig
ifconfig
ifconfig
ifconfig
Administering Network Interfaces
le5:1 down
le5:2 down
le5 down
le5 unplumb
23-7
23
7. If necessary, remove the network interface card.
a. Stop Solstice HA on one server using hastop(1M).
phys-hahost1# hastop
b. Halt the server.
phys-hahost1# halt
c. Power down the server and remove the network interface card.
d. Boot the server and then invoke hastart(1M).
phys-hahost1# boot -r
...
phys-hahost1# hastart
Note – Avoid performing Solaris reconfiguration reboots when any hardware
(especially a multihost disk expansion unit or disk) is powered off or otherwise
defective. In such situations, the reconfiguration reboot can render the disks
inaccessible to Solaris until a later reconfiguration reboot. See Section 15.4.1,
“Reconfiguration Reboots” for more information.
e. Repeat steps a-e on the sibling server.
23-8
Solstice HA 1.3 User’s Guide—April 1997
Administering Server Components
24
This chapter describes the software procedure for adding or removing HA
server components.
System Board Replacement
page 24-1
Adding Board-Level Modules
page 24-2
Replacing SBus Cards
page 24-3
This chapter includes the following procedures:
• “How to Add Board-Level Modules” on page 24-2
• “How to Replace an SBus Card” on page 24-4
24.1 System Board Replacement
The Solstice DiskSuite component of Solstice HA is sensitive to device
numbering and can become confused if system boards are moved around.
When the server is booted initially, the multihost disk expansion unit entries in
the /dev directory are tied to the connection slot.
For example, when the server is booted, system board 0 and SBus slot 1 will be
part of the identity of the multihost disk expansion unit. If the board or SBus
card is shuffled to a new location, Solstice DiskSuite will be confused because
Solaris will assign new controller numbers to the SBus controllers when they
are in a new location.
24-1
24
Note – The SBus cards can be moved as long as the type of SBus card in a slot
remains the same.
Shuffling the fiber cables that lead to the multihost disk expansion units also
can create problems. The system boards on each of the Solstice HA servers must
be configured identically (that is, the same type of SBus cards in each slot). When
SBus cards are switched you must also reconnect the multihost disk expansion
units back to the same SBus slot they were connected to before the changes.
24.2 Adding Board-Level Modules
Adding or replacing board-level modules such as SIMMs and CPUs involves
both software and hardware procedures.
▼ How to Add Board-Level Modules
1. Stop Solstice HA on the server that is to receive the board-level module.
In this example, “phys-hahost2” will be the first to receive the board-level
module.
phys-hahost2# hastop
Apr 1 12:01:06 phys-host2 hadf: NOTICE: starting "return" transition
Apr 1 12:01:07 phys-host2 hadf: NOTICE: finished "return" transition
Apr 1 12:01:07 phys-host2 hadf: NOTICE: starting "stop" transition
Apr 1 12:01:08 phys-host2 hadf: NOTICE: cltrans_stop_all: Starting with
args: /var/opt/SUNWhadf/hadf/ha_env
Apr 1 12:02:06 phys-host2 hadf: WARNING: cltrans_stop_all: Stop/Abort
completed, will exit from clustd leaving this host up.
Apr 1 12:02:06 phys-host2 hadf: NOTICE: finished "stop" transition
Apr 1 12:02:37 phys-host2 faultd[297]: Got SIGTERM/SIGINT signal.
Apr 1 12:02:37 phys-host2 faultd[297]: Got SIGTERM/SIGINT signal.
Apr 1 12:02:37 phys-host2 faultd[297]: Exiting due to SIGTERM/SIGINT.
Apr 1 12:02:37 phys-host2 faultd[297]: Exiting due to SIGTERM/SIGINT
24-2
Solstice HA 1.3 User’s Guide—April 1997
24
2. Halt the server.
phys-hahost2# halt
3. Power off the server.
4. Install the board-level module using the instructions in the appropriate
hardware manual.
5. Power on the server.
6. Perform a reconfiguration reboot.
ok boot -r
7. Run hastart(1M).
8. Repeat Step 1 through Step 7 on the sibling server.
Both servers must have exactly the same hardware installed.
9. Switch each logical host back to its default master.
phys-hahost2# haswitch phys-hahost1 hahost1
24.3 Replacing SBus Cards
Replacement of SBus cards in Solstice HA servers can be done by switching
over the data services to the server that is functioning and performing the
hardware procedure to replace the board. The logical hosts should be switched
back to the default masters following the procedure.
Administering Server Components
24-3
24
▼ How to Replace an SBus Card
1. Switch ownership of both logical hosts to the Solstice HA server that does
not need an SBus card replaced.
For instance, if the board is being replaced on the physical host, “physhahost2.” type the following:
phys-hahost1# haswitch phys-hahost1 hahost1 hahost2
2. Stop Solstice HA on the affected server.
Run the hastop(1M)command on the host that has the failed SBus card .
phys-hahost2# hastop
Apr 1 12:01:06 phys-host2 hadf: NOTICE: starting "return" transition
Apr 1 12:01:07 phys-host2 hadf: NOTICE: finished "return" transition
Apr 1 12:01:07 phys-host2 hadf: NOTICE: starting "stop" transition
Apr 1 12:01:08 phys-host2 hadf: NOTICE: cltrans_stop_all: Starting with
args: /var/opt/SUNWhadf/hadf/ha_env
Apr 1 12:02:06 phys-host2 hadf: WARNING: cltrans_stop_all: Stop/Abort
completed, will exit from clustd leaving this host up.
Apr 1 12:02:06 phys-host2 hadf: NOTICE: finished "stop" transition
Apr 1 12:02:37 phys-host2 faultd[297]: Got SIGTERM/SIGINT signal.
Apr 1 12:02:37 phys-host2 faultd[297]: Got SIGTERM/SIGINT signal.
Apr 1 12:02:37 phys-host2 faultd[297]: Exiting due to SIGTERM/SIGINT.
Apr 1 12:02:37 phys-host2 faultd[297]: Exiting due to SIGTERM/SIGINT
3. Halt and power off the affected server.
4. Perform the hardware replacement procedure.
Refer to the instructions in the appropriate hardware service manual to
replace the SBus card.
5. Power on the server and run hastart(1M).
The server automatically will rejoin the Solstice HA configuration.
6. Switch the logical hosts back to the default masters.
phys-hahost1# haswitch phys-hahost2 hahost2
24-4
Solstice HA 1.3 User’s Guide—April 1997
Part 4 — Technical Reference
Solstice HA Fault Detection
25
This chapter describes fault detection for Solstice HA.
Introduction
page 25-1
Fault Detection Overview
page 25-2
Network Fault Monitoring
page 25-6
Data Service-Specific Fault Probes
page 25-9
Configuration of Fault Monitoring is Not Supported
page 25-13
Some of the information presented is specific to this release of Solstice HA, and
is expected to change as the product evolves. The times given to detect various
faults are rough approximations and are intended only to give the reader a
general understanding about how Solstice HA behaves. This document is not
intended to be a program logic manual for the internals of Solstice HA nor
does it describe a programming interface.
25.1 Introduction
This section presents an overview of the Solstice HA fault detection. This fault
detection encompasses three general approaches:
•
•
•
A heartbeat mechanism
Fault monitoring of networks
Fault monitoring of specific data services
25-1
Fault monitoring performs sanity checks to ensure that the faulty host is the
one being blamed for a problem, and not the healthy host. Solstice HA also
performs a cursory form of load monitoring to alert the administrator that the
servers are already overloaded and, thus, that the system is unlikely to provide
acceptable service in the event that one server goes down and the remaining
server has to run the entire workload.
25.2 Fault Detection Overview
As noted in the basic HA architecture discussion, when one server goes down
the other server takes over. This raises an important issue: how does one server
recognize that its sibling server is down?
Solstice HA uses three methods of fault detection.
•
•
•
Heartbeat: A heartbeat mechanism is run over the two private links.
Network fault monitoring: Both server’s public network connections are
monitored: if a server cannot communicate over the public network, because
of a hardware or software problem, then the sibling server will take over.
Data service-specific fault probes: Each HA data service performs fault
detection that is specific for that data service. This last method addresses the
issue of whether the data service is performing useful work, not just the
low-level question of whether the machine and operating system appear to
be running.
For the second and third methods, one server is probing the other server for a
response. After detecting an apparent problem, the probing server carries out a
number of sanity checks of itself before forcibly taking over from the other
server. These sanity checks try to ensure that a problem on the probing server
is not the real cause of the lack of response from the other server. These sanity
checks are provided in a library subroutine that is part of the base framework
layer of Solstice HA; hence, data service-specific fault detection code need only
call this subroutine to perform sanity checks on the probing server.
25.2.1 Heartbeat Mechanism: Cluster Membership Monitor
Solstice HA uses a heartbeat mechanism. The heartbeat processing is
performed by a real-time high-priority process which is pinned in memory,
that is, it is not subject to paging. This process is called the cluster membership
monitor. In a ps(1) listing, its name appears as clustd.
25-2
Solstice HA 1.3 User’s Guide—April 1997
Each server sends out an “I am alive” message, or heartbeat, over both private
links approximately once every two seconds. In addition, each server is
listening for the heartbeat messages from its sibling server, on both private
links. Receiving the heartbeat on either private link is sufficient evidence that
the sibling server is running. A server will decide that its sibling server is
down if it does not hear a heartbeat message from its sibling for a sufficiently
long period of time, approximately 12 seconds. Because the cluster
membership monitor is a real-time priority process, and because it is pinned in
memory, the short timeout on the absence of heartbeats is justified.
Once a server recognizes that its sibling is down, it will perform cluster
reconfiguration. Part of cluster reconfiguration includes taking over I/O
mastery of the disksets. In taking over the disksets, the server reserves each
disk in the diskset, using the SCSI reserve facility.
It might be that the sibling server is not completely down, but is ill. If the sick
server were to continue to write to the disks, data corruption could ensue,
because the server which just took over is also writing to the disks. Even a
server whose operating system is very sick might still attempt to do I/O,
because I/O is typically processed by interrupt routines. The server that takes
over does a SCSI reserve of the diskset, which prevents the sick server from
continuing to read or write the disks—its attempts to read or write are rejected
by the disk drive, with the SCSI error condition “Reservation Conflict”.
As a heuristic, when a server recognizes that its sibling server is down, the
server tries using the public network connection before it tries to claim
ownership of the diskset. Only if the attempt to use the public network is
successful does the server try to claim ownership of the diskset. This heuristic
prevents a server whose communication software is hung (from a buffer leak
or internal deadlock, for example) from claiming ownership of the diskset and
causing its sibling to panic. The test of using the public network is
accomplished by doing a broadcast ping(1) on all public networks. Any
response from any other machines, on any of the public networks, is evidence
that the server’s own communication software is working.
Solstice HA Fault Detection
25-3
In the overall fault detection strategy, the cluster membership monitor
heartbeat mechanism is the first line of defense. The absence of the heartbeat
will immediately detect hardware crashes and operating system panics. It
might also detect some gross operating system problems, for example, leaking
away all communication buffers. The heartbeat mechanism is also Solstice
HA’s fastest fault detection method. Because the cluster membership monitor
runs at real-time priority and because it is pinned in memory, a relatively short
timeout for the absence of heartbeats is justified. Conversely, for the other fault
detection methods, Solstice HA must avoid labelling a server as being down
when it is merely very slow. For those methods, relatively long timeouts of
several minutes are used, and, in some cases, two or more such timeouts are
required before Solstice HA will perform a takeover.
The fact that the cluster membership monitor runs at real-time priority and is
pinned in memory leads to the paradox that the membership monitor might be
alive even though its server is performing no useful work at the data service
level. This motivates the data service-specific fault monitoring, presented in
“Data Service-Specific Fault Probes” on page 25-9.
25.2.2 Split-Brain Syndrome
Consider the split-brain syndrome, in which both private links are down but
both servers are up. The failure of both private links is really a double failure,
for which Solstice HA does not claim to provide service. Even though service is
not being provided, any credible highly available system must prevent data
corruption in the split brain scenario. In Solstice HA, the SCSI reservation
mechanism is used to prevent data corruption. If both private links fail, the
absence of the heartbeat messages will cause both of the servers to try to claim
ownership of the disksets. At most one of the servers will succeed in reserving
the disksets; the other server will panic. The reason the panic must occur is to
ensure that data will not be corrupted. In fact, in the split-brain scenario, it is
possible that both servers will panic, with the result that no service is
provided. Although no service is being provided, data corruption has been
avoided.
25-4
Solstice HA 1.3 User’s Guide—April 1997
When split-brain occurs, both servers attempt to take ownership of the
diskset(s). The sibling server detects the loss of diskset ownership and panics
due to the disk reservation conflict. Sometimes, both servers panic. After
panicking, the system reboots, rejoins the cluster, and forcibly takes ownership
of the diskset(s). Then, the other server panics with the reservation conflict,
reboots, and rejoins the cluster, and forcibly takes ownership of the diskset(s).
This ping-pong situation where the hosts continually panic and reboot can be
prevented by preventing one of the servers from rebooting after a panic.
To prevent one of the servers from rebooting after a panic, you can
intentionally program the OpenBoot boot-device parameter to a non-existent
device, e.g., noboot. See “Setting the OpenBoot PROM” on page 17-8 for
information on setting the OpenBoot PROM boot-device parameter for this
situation.
25.2.3 Sanity Checking of Probing Host
The network fault probing and data service-specific fault probing require each
host to probe its sibling host for a response. Before doing a takeover, the
probing host performs a number of basic sanity checks of itself. These checks
attempt to ensure that the problem does not really lie with the probing host.
They also try to ensure that taking over from the server that seems to be
having a problem really will improve the situation. Without the sanity checks,
the problem of false takeovers would likely arise. That is, a sick host would
wrongly blame its sibling for lack of response and would take over from the
healthier server.
The probing host performs the following sanity checks on itself before doing a
takeover from the sibling host:
•
The probing host checks its own ability to use the public network, as
described in “Network Fault Monitoring” on page 25-6.
•
The probing host tries to use the name service (for example, NIS or NIS+)
and checks whether the name service responds within a timeout period. If
the name service is not responsive, takeover is inhibited, because:
a. Takeover is itself very naming intensive and is likely to need the name
service, and
Solstice HA Fault Detection
25-5
b. The underlying reason why the sibling data service didn’t respond might
be that it is waiting for the name service to respond. If takeover were
performed, the data service on the host that is taking over would soon be
stuck in the same way.
•
The probing host also checks whether its own HA data services are
responding. All the HA data services that the probing host is already
running are checked. If any are not responsive, takeover is inhibited, on the
assumption that the probing host will not do any better trying to run its
sibling’s services if it can’t run its own. Furthermore, the failure of the
probing host’s own HA data services to respond might be an indication of
some underlying problem with the probing host that could be causing the
probe of the sibling host to fail. HA-NFS provides an important example of
this phenomenon: to lock a file on the sibling host, the probing host’s own
lockd and statd daemons must be working. By checking the response of
its lockd and statd daemons, the probing host rules out the scenario
where its own daemons’ failure to respond makes the sibling look
unresponsive.
25.3 Network Fault Monitoring
Solstice HA provides fault monitoring of both the public and private network
connections.
The key fault probe for network communication attempts to analyze the
relative ability of this host and its sibling to communicate over the public
networks. The goal of this analysis is to try to distinguish the case where the
public network is not working for either server (for which a takeover will not
help) from the case where the public network has failed for just one of the
servers. These cases correspond, for example, to a total failure of the public
network itself, versus the failure of the particular server's interface to the
public network.
This key probe is named net_diagnose_comm and is called as a subroutine
when considering whether or not to do a takeover. The probe consists of three
main steps:
25-6
Solstice HA 1.3 User’s Guide—April 1997
1. On this host, for each public network, ping(1M) the sibling server using
that public network.
If successful, go on to the next public network. If unsuccessful, do a
broadcast ping on this network and see if there is any response from a host
other than this host. If a response is received, it is likely that the sibling
server has the problem rather than this host or the network. Record all
outcomes for use later.
2. Try calling the sibling server over both private links, picking the first one
that responds.
If neither responds, go to Step 3.
Call the sibling via the private network link and have it execute Step 1 and
feed this host its results. Compare the sibling host’s results with this host’s.
If results are the same, no takeovers are done, and the subroutine has
completed.
If this host and the sibling host have different numbers of public networks,
or are on different sets of public networks, Solstice HA assumes that some
kind of rolling upgrade for adding new public networks to both hosts is in
progress, and no takeovers are done (the subroutine is finished).
If the sibling host has some non-responding public networks and this host
has more public networks that do respond than its sibling does, then this
host does a takeover. The subroutine has completed.
3. The subroutine reaches this step if this host could call the sibling host on
either of the private links. In this scenario, it is necessary to determine
whether the blame for the non-communication lies with this host or with
its sibling.
This situation uses the saved outcomes from Step 1 above, where Solstice
HA attempted to ping the sibling host and also attempted broadcast pings
of the networks.
If some of the attempts to communicate with the sibling host over public
networks failed but all of this host’s public networks responded to the
broadcast pings, then this host does a takeover. The subroutine has
completed.
If none of the attempts to communicate with the sibling host succeeded but
some of the broadcast pings to this host’s nets got an answer, then this host
does a takeover. The subroutine has completed.
Solstice HA Fault Detection
25-7
The networking diagnosis probe is also called during cluster reconfiguration,
in the event that a server believes that it is the only server in the cluster. This is
especially important when each host thinks that it is the only host in the cluster
and neither is communicating with the other. Assuming that the public and
private physical network links are intact, the most likely cause of this noncommunication might be buffer congestion or leakage in one (or both) of the
host operating systems. In this scenario, Solstice HA does not want the host
that cannot communicate over the public networks to take over ownership of
the disksets. Instead, it loops in cluster reconfiguration, waiting for the
situation to possibly rectify itself.
One way that the above situation can be rectified is: if the sibling host
determines that it can communicate using its public networks, and if it thinks
that it is the only node in the cluster, then it will forcibly take over from the
host described above which was looping in cluster reconfiguration. If the
looping host owned any multihost disks at the time of the takeover, the act of
takeover will cause this host to panic. This is a form of the split-brain scenario
described earlier; the panic is induced to avoid data corruption.
Note – In reality, Solstice HA has never observed loss of communications due
to buffer leakage or congestion with Solaris. Thus, the scenario just described is
hypothetical.
The net_diagnose_comm subroutine does extensive diagnosis of the ability of
both servers to communicate over the public networks. When possible, this
involves exchanging information over the private links about their ability to
use the public network(s). By examining both servers, it inhibits doing a
takeover when the public network is not working for both servers. However,
the analysis that the subroutine does is somewhat expensive, and can take
several minutes to complete.
Solstice HA periodically executes several network fault probes. Note that
net_diagnose_comm is not executed periodically itself, but is called as a
subroutine by a probe that is executed periodically.
One fault probe that is run periodically monitors the public network
connections between the two hosts. It opens a remote procedure call (RPC)
connection to the sibling host on all the public network paths to the sibling
host. It then periodically executes a NULL RPC on each of these connections. If
any of the NULL RPCs timeout, then it calls net_diagnose_comm to analyze
the situation.
25-8
Solstice HA 1.3 User’s Guide—April 1997
A similar periodic fault probe monitors the private network links. It does not
call net_diagnose_comm if one private link fails. Rather, it performs error
logging to syslog. This probe also does not cause a takeover, because if both
private links are down, the cluster membership monitor would have already
caused a takeover. The error logging is important because when one private
link has failed, the administrator should repair it in a timely fashion, before the
second link has time to fail.
The network fault monitoring also periodically calls the netstat(1M)
program to extract error statistics for the network interfaces. If the ratio of
error packets to non-error packets is too high, an error message is logged to
syslog. However, the netstat error statistics are too undependable to use as
the basis for a takeover decision. The error statistics can be high even though
the network interface is basically working, and, conversely, they can be low
even when network traffic is not getting through.
25.4 Data Service-Specific Fault Probes
The motivation for performing data service-specific fault probing is that
although the server machine and its operating system are up, the software or
hardware might be in such a confused state that no useful work at the data
service level is occurring. In the overall architecture, the total failure of the
machine or its operating system is detected by the cluster membership
monitor’s heartbeat mechanism. However, a machine might be working well
enough for the heartbeat mechanism to continue to execute even though the
data service is not doing useful work.
Conversely, the data service-specific fault probes do not need to detect the state
where one host has crashed or has stopped sending cluster heartbeat messages.
The assumption is made that the cluster membership monitor detects such
states, and the data service fault probes themselves contain no logic for
handling these states.
The basic logic of the data service fault probes is that the probes behave like a
client of the data service. The fault probes running on a machine monitor both
the data service exported by that machine and, more importantly, the data
service exported by the sibling server. A sick server is not reliable enough to
detect its own sickness, so each server is monitoring its sibling in addition to
itself.
Solstice HA Fault Detection
25-9
In addition to behaving like a client, the data service-specific fault probes will
also, in some cases, use statistics from the data service as an indication that
useful work is or is not occurring. These probes might also check for the
existence of certain processes that are crucial to a particular data service.
Typically, the fault probes react to the absence of service state by having one
server machine forcibly take over from its sibling. In some cases, the fault
probes will first attempt to restart the data service on the original machine
before doing the takeover. If many restarts occur within a short time, the
indication is that the machine has serious problems. In this case, a takeover by
the sibling server is executed immediately, without attempting another local
restart.
25.4.1 HA-NFS Fault Probes
The probing server runs two types of periodic probes against the sibling
server’s NFS service.
1. The probing server does a NULL RPC to all of the sibling daemon processes
that are required to provide NFS service; these daemons are: rpcbind,
mountd, nfsd, lockd, and statd.
2. The probing server does an end-to-end test: it tries to mount an NFS file
system from the sibling, and then to read and write a file in that file system.
It does this end-to-end test for every file system that the sibling is currently
sharing. Because the mount is expensive, it is executed less often than the
other probes.
If any of these probes fail, the probing host will consider doing a takeover from
the serving host. However, certain conditions might inhibit this from taking
place immediately:
•
25-10
Grace Period for Local Restart: Before doing the takeover, the probing host
waits for a short time period that is intended to:
• give the victim host a chance to notice its own sickness and fix the
problem by doing a local restart of its own daemons; and
• give the victim host a chance to be less busy (if it is merely overloaded).
After waiting, the prober retries the probe, going on with takeover
consideration only if it fails again. In general, two entire timeouts of the
basic probe are required for a takeover, to allow for a slow server.
Solstice HA 1.3 User’s Guide—April 1997
•
Multiple Public Networks: If the sibling host is on multiple public
networks, the probing host will try the probe on at least two of them.
•
Lockfs: Some backup utilities exploit the lockfs(1M) facility, which locks
out various types of updates on a file system, so that backup can take a
snapshot of an unchanging file system. Unfortunately, in the NFS context,
lockfs makes a file system appear unavailable; NFS clients will see the
condition NFS server not responding. Before doing a takeover, the
probing host queries the sibling host to find out whether the file system is in
lockfs state, and, if so, takeover is inhibited. The takeover is inhibited
because the lockfs is part of a normal, intended administrative procedure
for doing backup. Note that not all backup utilities use lockfs; some
permit NFS service to continue uninterrupted.
•
Lockd and statd unresponsiveness do not cause a takeover. Lockd and
statd are the daemons which, together, provide network locking for NFS
files. If these daemons are unresponsive, the condition is merely logged to
syslog, and a takeover does not occur. lockd and statd, in the course of
their normal work, must perform RPC's to client machines, so that a dead or
partitioned client can cause lockd and statd to hang for long periods of
time. Thus, a bad client can make lockd and statd on the server look sick.
And if a takeover by the probing server were to occur, it is very likely that
the probing server would soon be hung up with the bad client in the same
way. It is unacceptable that a bad client could cause a false takeover.
After passing these HA-NFS-specific tests, the process of considering whether
or not to do a takeover continues with calls to the sanity checks subroutine that
is provided in the base layer of Solstice HA (see “Sanity Checking of Probing
Host” on page 25-5).
Solstice HA Fault Detection
25-11
The probing server also checks its own NFS service. The logic is similar to the
probes of the sibling server, but instead of doing takeovers, error messages are
logged to syslog and an attempt is made to restart any daemons whose process
no longer exists. In other words, the restart of a daemon process is performed
only when the daemon process has exited or crashed. The restart of a daemon
process is not attempted if the daemon process still exists but is not
responding, because that would require killing the daemon without knowing
which data structures it is updating. The restart is also not done if a local
restart has been attempted too recently (within the last hour). Instead, the
sibling server is told to consider doing a takeover (provided the sibling server
passes its own sanity checks). Finally, the rpcbind daemon is never restarted:
doing so would be ineffective, because there is no way to inform processes that
had registered with rpcbind that they need to re-register.
25.4.2 Load Monitoring
The need for some excess capacity is a major issue for high availability
systems. When both servers are up, there must be some excess capacity,
otherwise, when one server fails, the remaining server will be unable to handle
the load and still give reasonable response to clients.
The purpose of Solstice HA load monitoring is to monitor the load on both
systems during normal operation. If the sum of their loads exceeds a certain
threshold, over a sufficiently long period of time, then an error report is logged
to syslog. This error report is intended to alert the administrator that there is
not enough excess capacity, and that in the event of a failure of one server, the
remaining server is unlikely to handle the combined load satisfactorily.
Currently, only the CPU load on the two servers is monitored; other resources,
such as disk I/O capacity and memory utilization, are not examined.
The load monitoring itself never causes a takeover, as that would serve no
purpose.
25-12
Solstice HA 1.3 User’s Guide—April 1997
25.5 Configuration of Fault Monitoring is Not Supported
The internal Solstice HA file hafmconfig is purely for the internal use of
Solstice HA, and changing values in this file is not supported by Sun
Microsystems. This file is not a supported interface; we expect to change its
format and behavior in future releases of the Solstice HA product.
It is not feasible to decrease values in the hafmconfig file to achieve faster
fault detection and reconfiguration. The values are necessarily large based on
experience in development and testing. Attempts to set them to lower values
will cause spurious takeovers, for example, a host taking over from its sibling
because the sibling is moderately loaded.
Solstice HA Fault Detection
25-13
25-14
Solstice HA 1.3 User’s Guide—April 1997
Part 5 — Appendices
Error Messages
A
This appendix contains the error messages returned when problems arise with
Ultra Enterprise Cluster HA.
General Error Messages
page A-1
Membership Monitor Error Messages
page A-2
hacheck(1M) Command Error Messages
page A-6
hasetup(1M) Command Error Messages
page A-15
A.1 General Error Messages
Errors that deal with command usage and other simple error messages are not
documented in this appendix.
command name: flag unknown flag
The above message indicates that an unsupported option (flag) was used with
the Solstice HA command, command name.
command name: command line error
The above message indicates that a command-line error was detected when the
Solstice HA command, command name, was invoked.
A-1
A
command name: must be root to run this command
The above message indicates that you must be superuser (root) to invoke the
Solstice HA command, command name.
A.2 Membership Monitor Error Messages
The following messages are returned by the membership monitor daemon. All
of the errors result in the daemon calling the abort programs and a takeover
being performed by the sibling.
Aborting node with stale seqnum number
A server is in an unexpected state.
add_hostname: nodeid id is out of range, nodeid
The nodeid specified in the cmm_confcdb file has a value greater than 32. If this
message appears, contact your service representative.
cdbmatch value, fullkey, cdb_sperrno
The values in the cmm_confcdb file are corrupted. If this message appears,
contact your service representative.
comm_addnode: duplicate nodeid id, nodeid
Contact your service provider if this message appears.
A-2
Solstice HA 1.3 User’s Guide—April 1997
A
invalid value for parameter failfast
The fastfailmode parameter in the cmm_confcdb file is wrong. If this message
appears, contact your service representative.
must be superuser to start
A user without superuser privileges attempted to invoke the cluster monitor.
This occurs only if the user attempted to start the cluster monitor from the
command line. Either allow the monitor to start automatically when the system
is rebooted or run the following command:
# hastart
newipaddr: unknown host hostname
The cluster monitor is unable to obtain information about the private network
names specified in the cmm_confcdb file. A possible problem is that the
private network names specified are not in the /etc/inet/hosts. Add the
private network names to the /etc/inet/hosts file. This problem should
have been discovered by either hasetup(1M) or hacheck(1M) during initial
configuration.
Error Messages
A-3
A
node cannot bind to any host address
The cluster monitor is unable to bind to any of the addresses specified in the
cmm_confcdb file. These addresses are the names mapping to the private
Ethernets. The problem could be that the interfaces are not configured or that
the cable connections are wrong. Check the cable connections and test the
connections using ping(1M). This problem should have been discovered by
either hasetup(1M) or hacheck(1M) during initial configuration.
nodetimeout cannot be lower than msgtimeout
The default values in the cmm_confcdb file are corrupted. If this message
appears, contact your service representative.
parameter parameter must be an integer
A parameter in the cmm_confcdb file is corrupted. If this message appears,
contact your service representative.
parameter parameter must be either true or false
A parameter in the cmm_confcdb file is corrupted. If this message appears,
contact your service representative.
parameter parameter must be numeric
A parameter in the cmm_confcdb file is corrupted. If this message appears,
contact your service representative.
A-4
Solstice HA 1.3 User’s Guide—April 1997
A
parameter parameter not found in config file
A parameter is missing from the cmm_confcdb file. If this message appears,
contact your service representative.
received signal signal
The cluster monitor, clustd, received a SIGTERM, SIGPOLL, SIGALRM, or
SIGINT signal.
t_bind cannot bind to requested address
The cluster monitor, clustd, cannot bind to the port number specified in
cmm_confcdb. If this message appears, contact your service representative.
transition timeout
The cluster reconfiguration program was not completed within the specified
transition timeout. This error will result in a takeover being performed by the
other system in the configuration.
Error Messages
A-5
A
unknown scheduling class class
An invalid scheduling class was specified in the cmm_confcdb file. The only
valid choice is RT.
unsupported version number number (supported number)
The version number of the cmm_confcdb does not match the version number
expected by the cluster monitor. The default file has a value of 2. Install the
same Solstice HA packages on both systems.
A.3 hacheck(1M) Command Error Messages
The hacheck(1M) command displays the following messages to standard
error. The messages are in alphabetic order by the message text. Use the
information here to correct the error.
attempt to set logical network interface (/etc/hostname.name)
Ultra Enterprise Cluster HA systems use /etc/hostname.name files at boot
time to assign host names to network interfaces. A colon (:) in the name
position of the file name is interpreted as an attempt to set a logical or virtual
address for the host. Remove the indicated hostname.name file.
bad keyword value for base directory directory_name
There is an error in the hadfconfig file. Contact your service provider for
assistance.
A-6
Solstice HA 1.3 User’s Guide—April 1997
A
base directory must begin with /
There is an error in the hadfconfig file. Contact your service provider for
assistance.
cannot check firmware version number of the SPARCstorage Arrays
This message appears when hacheck(1M) cannot successfully read the
/usr/lib/firmware/ssa/ssafirmware file to determine the firmware
version number. Verify that the SPARCstorage Array packages are installed on
the machine. If not, install them. Verify that the
/usr/lib/firmware/ssa/ssafirmware file exists. If the file is not present,
then remove and re-install the SPARCstorage Array package. Verify that the
/usr/lib/firmware/ssa/ssafirmware file is readable by root. If it is not,
make it readable and then rerun hacheck(1M).
If hacheck(1M) continues to fail after you perform all of these verification
steps, contact your service provider for support.
cannot find address in /etc/inet/hosts for host hostname
There is an error in the hadfconfig file. Contact your service provider for
assistance.
cannot find local host name in the HOSTNAME entries
There is an error in the hadfconfig file. Contact your service provider for
assistance.
Error Messages
A-7
A
cannot find netmask in /etc/inet/netmasks for host hostname
There is an error in the hadfconfig file. Contact your service provider for
assistance.
cannot find remote host name in the HOSTNAME entries
There is an error in the hadfconfig file. Contact your service provider for
assistance.
did not find framework configuration file (hadfconfig)
The hacheck(1M) command could not access the hadfconfig(4) file. The
hadfconfig file should be in /etc/opt/SUNWhadf/hadf. Check for access
to the file. The original installation might be incomplete or corrupted. Verify
that the necessary packages are in place using the pkgchk(1M) command.
DISKSET - bad number of lines num for asymmetric configuration
DISKSET - bad number of lines num for symmetric configuration
There is an error in the hadfconfig file. Contact your service provider for
assistance.
A-8
Solstice HA 1.3 User’s Guide—April 1997
A
duplicate local host names found in HOSTNAME entries entries
duplicate remote host names found in HOSTNAME entries entries
There is an error in the hadfconfig file. Contact your service provider for
assistance.
error(s) found in performing “configuration” checks
One or more errors or warnings occurred while performing the configuration
category of checks. Refer to other messages for the source of the problem.
ERROR - Unexpected version n of firmware loaded on SSA cn
Two situations can produce this message. One possibility is that the revision of
the firmware downloaded into the SPARCstorage Array is lower than the
revision of the firmware in /usr/lib/firmware/ssa/ssafirmware. In this
case, you must download the newer SPARCstorage Array firmware.
The other possibility is that the revision of the firmware downloaded into the
SPARCstorage Array is higher than the revision of the firmware in
/usr/lib/firmware/ssa/ssafirmware. In this case, you must install a
later version of the SPARCstorage Array patch. Contact your service provider
for information about the latest revision of the SPARCstorage Array patch.
Error Messages
A-9
A
failed to get Firmware Revision number of SPARCstorage Array n
This message appears if the ssaadm display command failed. Verify that the
SPARCstorage Array is operational, and rerun ssaadm display. If the
ssaadm display command fails, refer to Chapter 22, “Administering
SPARCstorage Arrays,” to troubleshoot the SPARCstorage Array, or contact
your service provider for assistance. If the ssaadm display command
succeeds in showing the firmware revision number but subsequent invocation
of the hacheck(1M) command fails, contact your service provider for
assistance.
FATAL ERROR: unable to initialize list of services from
.hadfconfig_services
There are not enough system resources (such as swap or memory), the services
configuration file is not found, the services file currently is being updated by
hasetup(1M) or hareg(1M), or the services configuration information is
corrupt.
Check for the existence of the configuration file
/etc/opt/SUNWhadf/hadf/.hadfconfig_services. If it does not exist or
does not match the .hadfconfig_services file on the sibling host, replace
the file with a good copy from the sibling. If system resources are short, correct
the problem and try again later. If hasetup(1M) or hareg(1M) are already
running, rerun hacheck(1M) once they have completed.
file hostname.name describes unknown host host
Ultra Enterprise Cluster HA systems use /etc/hostname.name files at boot
time to assign host names to network interfaces. If a host name that is not
known as an Ultra Enterprise Cluster HA system is found in any of the
/etc/hostname.name files, this message is issued. Remove the file and reboot
the system.
A-10
Solstice HA 1.3 User’s Guide—April 1997
A
found number PATHPREFIX entries
There is an error in the hadfconfig(4) file. Contact your service provider for
assistance.
HA_BASEDIR and HA_FILES settings are inconsistent
There is an error in the hadfconfig(4) file. Contact your service provider for
assistance.
misplaced - found in HOSTNAME entries entries
There is an error in the hadfconfig(4) file. Contact your service provider for
assistance.
more than one network interface is assigned to host
Ultra Enterprise Cluster HA systems use /etc/hostname.interface files at
boot time to assign host names to network interfaces. This error message
indicates that the same hostname is found in more than one of these files.
Remove or correct the incorrect /etc/hostname.interface files and reboot the
system.
Error Messages
A-11
A
netmask in /etc/inet/netmasks conflicts with ifconfig for host
hostname
There is an error in the hadfconfig file. Contact your service provider for
assistance.
network interface mismatch in PRIVATELINK entry entry for host host
There is an error in the hadfconfig file. Contact your service provider for
assistance.
network naming service required to find address for host
There is an error in the hadfconfig file. Contact your service provider for
assistance.
no HOSTNAME entries found in config_file
There is an error in the hadfconfig file. Contact your service provider for
assistance.
no PATHPREFIX entries found in filename
There is an error in the hadfconfig file. Contact your service provider for
assistance.
A-12
Solstice HA 1.3 User’s Guide—April 1997
A
not enough memory
You must reconfigure the system with additional swap space.
PATHPREFIX - bad number of lines num for asymmetric configuration
PATHPREFIX - bad number of lines num for symmetric configuration
There is an error in the hadfconfig file. Contact your service provider for
assistance.
the default lookup facility failed to get address for host host
There is an error in the hadfconfig file. Contact your service provider for
assistance.
there is no hostname.name file for local host hostname
Ultra Enterprise Cluster HA systems use /etc/hostname.name files at boot
time to assign host names to network interfaces. There should be a
hostname.name file for all local physical public and private interfaces found
in the HOSTNAME and PRIVATELINK keyword parameter declarations in the
hadfconfig file. Create the necessary /etc/hostname.name file.
trying the default lookup facility for host host
There is an error in the hadfconfig file. Contact your service provider for
assistance.
Error Messages
A-13
A
unable to determine local host name from entries
unable to determine local host names from names
unable to determine remote host name from names
There is an error in the hadfconfig file. Contact your service provider for
assistance.
unable to generate list of local physical public hosts
unable to generate list of remote physical public hosts
There is an error in the hadfconfig file. Contact your service provider for
assistance.
unexpected local host name found for this configuration
unexpected remote host name found for this configuration
There is an error in the hadfconfig file. Contact your service provider for
assistance.
A-14
Solstice HA 1.3 User’s Guide—April 1997
A
A.4 hasetup(1M) Command Error Messages
The following messages are reported by the hasetup(1M) command.
/.rhosts - no such file or directory
The /.rhosts file does not exist.
Address already in use by host “<hostname>”
At one of the prompts for a network IP address, you entered an IP address that
is already assigned to the indicated hostname. You cannot use hasetup(1M)
to create host name aliases. Re-enter a correct network IP address.
Attempting to discover local network controller config ... failed
Attempting to discover remote network controller config ... failed
One or more errors were encountered while hasetup(1M) attempted to
compile a list of all the local network controllers. Verify that the SUNWhagen
package is installed correctly on both servers, and the
/opt/SUNWhadf/bin/haconfig file has the correct execute permissions.
Attempting to rediscover local network controller
config ... failed
Attempting to rediscover remote network controller
config ... failed
One or more errors were encountered when hasetup(1M) attempted to
compile a list of all the assigned local network controllers. Verify that the
SUNWhagen package is installed correctly on both servers, and the
/opt/SUNWhadf/bin/haconfig file has the correct execute permissions.
Error Messages
A-15
A
Bad configuration file - /etc/opt/SUNWhadf/hadf/hadfconfig
The hasetup(1M) command found an existing hadfconfig file that was
corrupted. Remove or rename the file and restart hasetup(1M). If the problem
persists, contact your support representative.
Bad configuration parameters!
Errors occurred during an internal check. These errors might be due to a lack
of swap space. Check the server for available swap space. If the swap space is
too small, correct the problem and restart hasetup(1M). If this is not the
problem, contact your support representative.
Broadcast from “<hostname>” to test the private net...”
Hostname “<hostname>” is not on a private network
The indicated hostname for the private link is not on a private link. This is
known because more than one other host replied to a broadcast on the link.
Enter a different host name. You also can exit hasetup(1M) by entering
Control-D, correct the problem, and restart hasetup(1M).
Broadcast from “<hostname>” to test the private net...”
No response from the sibling host on this network
The broadcast to hostname timed out with no response. The sibling host might
be down, you might have a bad network connection, or you might have
entered an invalid host name. Try re-entering the host name first. You also can
exit hasetup(1M) by pressing a Control-D, correct the problem, and restart
hasetup(1M).
A-16
Solstice HA 1.3 User’s Guide—April 1997
A
Cannot locate bin directory ...
Cannot locate etc directory ...
Cannot locate files directory ...
These messages appears when either an internal error has occurred or there is
not enough swap space. Check the server for the amount of available swap
space. If the swap space is low, correct the problem and restart hasetup(1M).
If swap space is not the problem, contact your service provider.
Can’t find “hostname” in the hosts map
Do you want to add it now (yes/no) [yes]?
The host name that you entered has no IP address. If you answer yes, enter the
IP address. If you answer no, enter a different host name.
Can’t find “hostname” in the hosts map
Try again or type control-D to exit ...
At one of the host name prompts, you entered a host name for a private link
that does not have an IP address. Because the private links must be entered
into /etc/inet/hosts before running hasetup(1M), you are not given the
opportunity to enter a network IP address. Exit hasetup(1M) by pressing
Control-D, set up the private links, and restart hasetup(1M).
Can’t find the sibling host in the hosts map
The host name of the respondent is unknown.
Error Messages
A-17
A
Checking access to “<hostname>” from “<hostname>” ... failed
Access to the specified host name failed. Verify that the /.rhosts files on both
systems are set up correctly. Each host should have the sibling host identified
as having root access in their ./rhost file. Check that all required Solaris
packages are installed correctly on both systems and that /bin/rsh and
/bin/echo are working correctly. Run the rsh command with a simple
echo(1) command to the host that rejects access (#rsh hostname echo
“test”).
Checking for Solstice DiskSuite replicas on the local
host ... failed
No feedback from “metadb” on the local host. If you have recently
cleared these replicas, try re-booting
Checking for Solstice DiskSuite replicas on the local
host ... failed
Unable to execute “metadb” on the local host
Checking for Solstice DiskSuite replicas on the local
host ... failed
Unexpected response or other error while executing “metadb”
Checking for Solstice DiskSuite replicas on the local
host ... failed
Error running “metadb” on the local host
Any of the above messages indicates there was a error when hasetup(1M)
attempted to execute the metadb(1M) command on the local host. Make sure
the SUNWmd package is installed correctly. Run the
/usr/opt/SUNWmd/sbin/metadb command with no options to make sure it
is functioning properly.
A-18
Solstice HA 1.3 User’s Guide—April 1997
A
Checking for Solstice DiskSuite replicas on the sibling
host ... failed
No replicas were found on the sibling host
No metadevice state database replicas were found on the private disks of the
sibling server. Solstice HA requires that a minimum of three replicas be created
on the local boot disk on each of the servers. The hasetup(1M) utility will
attempt to set up the replicas on slice 4 of the local boot disk. Refer to
Chapter 7, “Software Configuration and Validation,” for information about
how hasetup(1M) sets up the replicas.
Checking for Solstice DiskSuite replicas on the sibling
host ... failed
There must be at least 3 private replicas on each host
But, only <n> replicas were found on the sibling host
Fewer than three metadevice state database replicas were found on the boot
disk of the sibling server. Solstice HA requires that a minimum of three replicas
be created on the local boot disks on each of the servers before running
hasetup(1M). Refer to Chapter 7, “Software Configuration and Validation,”
for information about how hasetup(1M) sets up the replicas.
Error Messages
A-19
A
Checking for Solstice DiskSuite replicas on the sibling
host ... failed
Unable to execute “metadb” on the sibling host
Checking for Solstice DiskSuite replicas on the sibling
host ... failed
Unexpected response from “metadb” on the sibling host
Checking for Solstice DiskSuite replicas on the sibling
host ... failed
Error running “metadb” on the sibling host
Any of the above messages indicates an error when hasetup(1M) attempted
to execute the metadb(1M) command on the sibling host. Make sure the
SUNWmd package is installed correctly. Run the
/usr/opt/SUNWmd/sbin/metadb command with no options to make sure it
is functioning properly. Verify that you can communicate with the sibling host
using the rsh command (#rsh hostname echo “test”).
Checking the list of multihost disks ...
ERROR: unable to open “<disk>”
Checking the list of multihost disks ...
ERROR: unable to get geometry of “<disk>”
When hasetup(1M) checked the list of multihost disks, it discovered that
failures occurred for the specified disks. Check the console for disk errors and
correct the problem before restarting hasetup(1M). Also, check the /dev and
/device names along with the permissions. Use the format(1M) command
to verify that all multihost disks have a label.
A-20
Solstice HA 1.3 User’s Guide—April 1997
A
Compiling the list of multihost disks ... failed
The hasetup(1M) command failed to compile the list of multihost disks.
Verify that all multihost disks are cabled correctly and the disk names for these
disks are identical on each of the servers. Check for error in the console. Verify
that all required Solaris packages are installed correctly. Run pkgchk to verify
that the SUNWhagen package is installed correctly and that
/opt/SUNWhadf/bin/haconfig has the correct execute permissions.
Configuration updates are already locked out. Another instance of
hasetup may already be running on this host.
You attempted to run hasetup(1M) while an instance of hasetup(1M) or
hareg(1M) was already running. The hasetup(1M) command running on
one host in a cluster cannot detect another instance of hasetup(1M) running
on another host in the cluster.
Configuring network controller interface ... failed
The configuration of the network controller interface failed. Verify that all
required Solaris packages are installed correctly on both servers, and that
ifconfig is working. Make sure the SUNWhagen package is installed correctly
and the /opt/SUNWhadf/bin/haconfig file has the correct execute
permissions. Rebooting the servers might solve the problem.
Copying the <filename> to host “<hostname>” ... failed
The indicated copy operation failed. Verify that all required Solaris packages
are installed correctly and the use of the rcp(1) command through the private
link interfaces is successful.
Error Messages
A-21
A
Creating diskset “<diskset>” ... failed
Error executing “metaset” command
hasetup(1M) discovered an error when it attempted to execute the metaset
command during diskset creation. Check for any error messages printed by the
metaset command. (Refer to the Solstice DiskSuite 4.1 Reference Guide for
additional information.) Before attempting to restart the hasetup(1M)
command, manually remove any disksets that were created. Run pkgchk on
the sibling host to verify that the SUNWmd package is installed correctly.
Exiting before configuration is complete ...
You quit hasetup(1M) without allowing the program to complete all of its
functions. You either pressed Control-D or responded with negative answers to
certain questions. (This message does not appear if hasetup(1M) is
terminated as a result of a signal.) Depending on where in the configuration
setup you were when you quit the program, there might have been additional
instructions telling you how to manually complete certain steps. Restart
hasetup(1M) to complete the necessary setup procedures. Refer to Chapter 7,
“Software Configuration and Validation,” for additional information.
Exiting due to fatal error
The hasetup(1M) command has encountered an unrecoverable error. This
message is always preceded by other error or warning messages. Check those
messages for additional information.
A-22
Solstice HA 1.3 User’s Guide—April 1997
A
Finding the name of the sibling host for the main
public net ... failed
The host name for the sibling server, as reported by uname, does not match any
of the hosts assigned to the configured network controllers. Verify the
following:
•
•
•
•
•
•
•
The /etc/inet/hosts file on the sibling server has the correct IP address
for the host.
The /etc/inet/hosts files on both servers are in agreement.
The SUNWhagen package is installed correctly on both servers, and the
/opt/SUNWhadf/bin/haconfig file has the correct execute permissions.
The uname -n command on the sibling server returns the correct name for
your host. If not, update the /etc/nodename file and reboot the server.
The uname -n output matches that of /etc/nodename and also matches
one of the /etc/hostname.* files.
No warning messages alerted you to unsupported network controller types.
The rsh command works across the private link interfaces.
“HA-<data service>” is not licensed for installation on host
“<hostname>”
The license file on this host is not valid for this data service. You must license
the data services displayed in the message. Refer to Chapter 5, “Licensing
Solstice HA Software” for instructions.
Error Messages
A-23
A
“hasetup” is an interactive program
Only keyboard input is accepted
“hasetup” is an interactive program
Output must go to your screen
The hasetup(1M) command is designed to run interactively and must send
output to your terminal or terminal window. If this message appears,
hasetup(1M) has found that standard input or output is not associated with a
tty device. Restart hasetup(1M) from the shell prompt. Do not attempt to
redirect standard output away from your terminal or terminal window.
Hostname “<hostname>” has already been used
The host name that you entered has already been used. Select a different one.
Hostname “<hostname>” is not configured
Try again or type control-D to exit ...
At one of the host name prompts, you entered a host name for one of the
private links that is not configured. Enter a different host name.
Hostname “<hostname>” is not legal
At one of the host name prompts, you entered an illegal host name for one of
the private links. You might have entered a host name associated with a logical
network interface. Enter a different host name. You also can exit hasetup(1M)
by pressing Control-D, set up the private links, and restart hasetup(1M).
A-24
Solstice HA 1.3 User’s Guide—April 1997
A
Hostname “<hostname>” is not on the same network as “<hostname>”
At one of the host name prompts you entered a host name for one of the
remote private links that does not have a network IP address matching it or the
corresponding local private link name. Enter a different host name. You also
can exit hasetup(1M) by pressing Control-D, correct the problem, and restart
hasetup(1M).
“<hostname>” is already assigned
The host name that you entered is already in use. Enter a different host name.
If the problem is due to an earlier entry, exit hasetup(1M) by pressing
Control-D and restart the program.
Hostname “<phys-hostname-priv1>” has already been used
The host name that you entered is already in use in the configuration.
Hostname “<phys-hostname-priv1>” is not on a private network
More than one host responded to the ping.
How large will the UFS logs be (MB) [10]?
Error: “<number>” is out of range [1 - 64]
UNIX file system logs must be between 1 and 64 Mbytes in size. Enter a value
in this range.
Error Messages
A-25
A
Initialization errors ...
Errors occurred during the initialization phase of hasetup(1M). Such errors
are likely the result of a lack of swap space. Check the system for the amount
of available swap. If swap space is low, correct the problem and restart
hasetup(1M). If swap space is not the problem, contact your service provider.
Interface for host “<hostname>” is not up
At one of the host name prompts you entered a host name for one of the
private links that is configured but not marked as up (see ifconfig). The
private links must be configured before running hasetup(1M). Enter a
different host name. You also can exit hasetup(1M) by pressing a Control-D,
use ifconfig to configure the private links, and restart hasetup(1M).
Internal error - bad filename
Contact your service provider if this message appears.
Internal error getting private hosts ...
Contact your service provider if this message appears.
Internal error while matching private hosts
Contact your service provider if this message appears.
A-26
Solstice HA 1.3 User’s Guide—April 1997
A
Internal error while searching for primary host
Contact your service provider if this message appears.
Logical hosts MUST be on the same subnets as their masters
Try again ...
The logical host names must be on the same network as the master. Enter the
correct logical host name for the master.
Network controller interface “<ifname>” is already in use
The network controller interface that you entered is already in use.
No response from the sibling host on this network
The ping timed out.
Please use the unqualified hostname; do not include
trailing domain names!
A dot (.) was found in one or more of the host names. Remove the domain
name portion of the host name from the /etc/inet/hosts files.
Error Messages
A-27
A
Populating diskset “<diskset>” ... failed
Error executing “metaset” command
An error occurred when attempting to execute the metaset command. Check
for any error messages printed by the metaset command. Refer to the Solstice
DiskSuite 4.1 User’s Guide for additional information. Before attempting to
restart the hasetup(1M) command, manually remove any existing diskset.
Run pkgchk on the sibling host to verify that the SUNWmd package is installed
correctly.
Repartitioning all multihost disks ...
ERROR: unable to open “<disk>”
Repartitioning all multihost disks ...
ERROR: unable to get geometry of “<disk>”
Repartitioning all multihost disks ...
ERROR: get disk info for “<disk>”
Repartitioning all multihost disks ...
ERROR: unable to write vtoc of “<disk>”
The above errors are reported when one or more failures occurs on the
specified multihost disk. Check the console for disk errors and correct the
problem before restarting hasetup(1M). Also, check the /dev and /device
names along with the permissions. Use the format(1M) or prtvtoc (1M)
commands to verify that all multihost disks have a label.
Solstice DiskSuite is not correctly installed on the local host
The SUNWmd package is not correctly installed. You must install this package
before proceeding.
A-28
Solstice HA 1.3 User’s Guide—April 1997
A
Solstice DiskSuite is not correctly installed on the sibling host
The SUNWmd package is not correctly installed on the sibling host. You must
install this package before proceeding.
Solstice HA is not licensed for installation on host
“<phys-hostname>”
The license file is not valid for this host.
The cluster monitor is active on the local host!
The cluster membership monitor is running on the local host. Ultra Enterprise
Cluster HA does not allow the cluster membership monitor (clustd) to be
active on either host while hasetup(1M) is running. Stop the HA software on
both hosts by typing the following command on each host:
# hastop
The cluster monitor is active on the remote host!
The cluster membership monitor is running on the sibling host. Ultra
Enterprise Cluster HA does not allow the cluster membership monitor
(clustd) to be active on either host while hasetup(1M) is running. Stop the
HA software on both hosts by typing the following command on each host:
# hastop
Error Messages
A-29
A
The “/etc/opt/SUNWhadf/hadf/hadfconfig” file is found to already
exist.
If this message is printed, hasetup(1M) will skip over the steps necessary for
the creation of the hadfconfig file. The hasetup(1M) command will never
overwrite an existing hadfconfig file on the local system. Instead, it will
check the contents of the file and find the information it needs to continue with
other parts of the setup. No action is necessary when this message is displayed.
The “/etc/opt/SUNWhadf/hadf/hadfconfig” file is found to already
exist
But, one or more other critical configuration files are not found!
You may need to remove the “hadfconfig” file and try again
The files noted in this message are important to the configuration of Solstice
HA. The files are always created at the same time by hasetup(1M). You might
need to remove or rename the hadfconfig file, and restart hasetup(1M).
The latest rev of patch ID patchid is not installed on the sibling
host!
A patch required for this version of Solstice HA is installed correctly on the
local host, but is not installed on the sibling host. This will cause
hasetup(1M) to exit. Install the patches that are included on the local host on
the sibling and rerun hasetup(1M).
A-30
Solstice HA 1.3 User’s Guide—April 1997
A
The latest rev of patch ID patchid is not installed on this host!
A patch required for this version of Solstice HA is not installed. Following this
message, you are prompted to determine whether this patch has been made
obsolete by a newer version. If this is the case, answer y and continue running
hasetup(1M). If you are not sure whether a newer patch has been installed,
answer n at the prompt and hasetup(1M) will exit. You should then contact
your service provider for information about the latest revisions of required
patches.
The primary host is not on the network!
The host name for the local machine, as reported by uname(1) does not match
any of the hosts assigned to the configured network controllers. Verify the
following:
•
•
•
•
•
•
You are not attempting to run hasetup(1M) from a standalone,
non-networked machine.
The SUNWhagen package is installed correctly on both servers, and the
/opt/SUNWhadf/bin/haconfig file has the correct execute permissions.
The /etc/inet/hosts file has the correct IP address for the host.
The uname -n command returns the correct name for your host. If not,
update the /etc/nodename file and reboot the server.
The uname -n output matches that of /etc/nodename, and it also
matches one or more of the /etc/hostname.* files.
No warning messages alerted you about unsupported network controller
types.
Error Messages
A-31
A
The sibling host is not running the same version of SunOS as the
local host
Both hosts must be running the same version of SunOS. Check the version on
the local host. install the same version on the sibling host, and rerun
hasetup(1M).
This release of Solstice HA has only been qualified with the
following:
SunOS version
Solstice HA is qualified to run under particular SunOS releases. The version of
SunOS you are running on this host is not supported.
You should not continue with the installation unless you have been given
explicit instructions to do so from your service provider. Only the indicated
SunOS release platform(s) are supported for this release of Solstice HA, unless
you are informed otherwise by Sun or your service provider.
Two private networks are required
For your Ultra Enterprise Cluster HA configuration to meet requirements, at
least two private networks are required. Verify that the output from ifconfig
shows at least three assigned and configured networks: one for the primary
local host and two for the private networks. Verify that all required Solaris
packages are installed correctly and that ifconfig is working. Use the
pkgchk(1M) command to verify the SUNWhagen package is installed correctly
and the /opt/SUNWhadf/bin/haconfig file has the correct execute
permissions.
A-32
Solstice HA 1.3 User’s Guide—April 1997
A
Unable to determine if the cluster monitor is running on the local
host
An attempt to check for an instance of the cluster membership monitor on the
local host failed. Verify that all required Solaris packages are installed correctly
and the ps(1) command is working. Make sure the SUNWhagen package is
installed correctly, and the /opt/SUNWhadf/bin/haconfig file has the
correct execute permissions.
Unable to determine if the cluster monitor is running on the remote
host
An attempt to check for an instance of the cluster membership monitor on the
local host failed. Verify that all required Solaris packages are installed correctly
and the ps(1) command is working correctly. Make sure the SUNWhagen
package is installed correctly and the /opt/SUNWhadf/bin/haconfig file
has the correct execute permissions. Make sure that the use of the rsh
command through the private link interfaces is successful.
Unable to execute “ping”
Program is unable to execute /usr/bin/ping.
Unable to initialize services configuration
There are not enough system resources, such as swap and memory, or the
services configuration file already exists but is corrupt. If system resources are
short, correct the problem and try again. Otherwise, remove both
/etc/opt/SUNWhadf/hadf/hadfconfig and
/etc/opt/SUNWhadf/hadf/.hadfconfig_services and try again.
Error Messages
A-33
A
Unable to locate sibling host <sibling_privatehost> in the
sibling network config
The hasetup(1M) command could not find the remote (sibling) host. Verify
the following:
•
•
•
•
•
The use of the rsh command through the private link interfaces was
successful.
The SUNWhagen package is installed correctly on both servers, and the
/opt/SUNWhadf/bin/haconfig file has the correct execute permissions.
The /etc/inet/hosts file on the sibling server has the correct IP address
for the host name.
The /etc/inet/hosts files on both servers are in agreement.
No warning messages alerted you to unsupported network controller types.
Unable to setup necessary variables
Errors occurred during an internal check. These errors might be due to a lack
of swap space.
•
•
Run hacheck(1M) to gather additional information.
Check the server for available swap space. If the swap space is too small,
correct the problem and restart hasetup(1M). If this is not the problem,
contact your support representative.
Unknown network controller interface
The network controller interface that you entered is unknown.
A-34
Solstice HA 1.3 User’s Guide—April 1997
A
Updating /etc/inet/hosts ... failed
Either a local or remote update to the /etc/inet/hosts file failed. Verify that
all required Solaris packages are installed correctly on both servers. Make sure
the SUNWhagen package is installed correctly on both servers, and the
/opt/SUNWhadf/bin/haconfig file has the correct execute permissions.
Updating /etc/inet/netmasks ... failed
An update to the /etc/inet/netmasks file failed. Verify that all required
Solaris packages are installed correctly on both servers. Make sure the
SUNWhagen package is installed correctly on both servers, and the
/opt/SUNWhadf/bin/haconfig file has the correct execute permissions.
Updating “/etc/opt/SUNWhadf/hadf/cmm_confcdb” ... failed
The hasetup(1M) command was unable to update or create the
cmm_confcdb file. Verify the following:
•
•
•
All required Solaris packages are installed correctly.
The SUNWhagen package is installed correctly on both servers. Use pkgchk
to check this.
If only a partial update was found to occur to the cmm_confcdb file,
remove the file before restarting hasetup(1M).
Error Messages
A-35
A
Updating “/etc/opt/SUNWhadf/hadf/hadfconfig” ... failed
The hasetup(1M) command was unable to update or create the hadfconfig
file. Verify the following:
•
•
•
All required Solaris packages are installed correctly.
The SUNWhagen package is installed correctly on both servers. Use pkgchk
to check this.
If only a partial update occurred to the hadfconfig file, remove the file
before restarting hasetup(1M).
Updating local /etc/nsswitch.conf file for Solstice HA
compliance ... failed
The operation of updating the /etc/nsswitch.conf file failed on the local
server. Verify that all required Solaris packages are installed correctly. Check
that the SUNWhagen package is installed correctly and that
/opt/SUNWhadf/bin/haconfig has the correct execute permissions.
USAGE: hasetup
The hasetup(1M) command does not accept command line arguments.
WARNING: found logical net interface configured as “<ctrl>:n”
(<hostname>)
WARNING: reboot is recommended
One or more logical network interface is configured. Reboot the server and
restart the hasetup(1M) command.
A-36
Solstice HA 1.3 User’s Guide—April 1997
A
WARNING: found logical net interface configured as “<ifN:M>”
(<hostname>) on sibling host
WARNING: reboot of remote host is recommended
One or more logical network interfaces are configured on the sibling host.
Reboot the sibling server and restart hasetup(1M).
WARNING: network controller name mismatch for
hostnames “<hostname>” and “<hostname>”
The two host names given are either primary or secondary host names, which
are both assigned to the same networks. However, their network controller
names do not match. This is not a supported configuration. Ultra Enterprise
Cluster HA installation procedures recommend symmetric hardware and
software configurations between the two servers. Correct the problem by
matching the network controller names with the networks on both machines.
This might involve changes to the hardware configuration or to the
/etc/hostnames.* files. You must reboot before restarting hasetup(1M).
You must be root to run “hasetup”
You must be the superuser to run hasetup(1M). Use the su(1M) command to
become root and restart hasetup(1M).
Error Messages
A-37
A
You will need to use the metaset(1m) command to create
diskset(s) manually!
You answered no at the prompt:
All multihost disks will now be repartitioned and populated with
metadevice state database replicas. Is this okay? no
The necessary operations for repartitioning the disks and creating disksets
must be done manually. If you entered no, restart hasetup(1M). Otherwise,
refer to the Solstice DiskSuite 4.1 User’s Guide for instructions about creating
disksets.
A-38
Solstice HA 1.3 User’s Guide—April 1997
Man Pages
B
This appendix contains a quick reference to the syntax for the commands and
utilities associated with the Solstice HA framework and the Solstice HA data
services. It also contains the complete text of the man pages.
Note – The complete man pages described in this appendix are included in the
printed version of this book. These pages are not available when you use the
AnswerBook on-line documentation to view this manual. They are available
on line by using the man(1) command.
B.1 Solstice HA Man Pages Quick Reference
The syntax for each of the Solstice HA man pages is included below.
•
hacheck(1M) – Checks and validates Solstice HA configurations.
hacheck[-n]
•
hafstab(1M) – Edits and distributes dfstab(4) and vfstab(4) files in
a Solstice HA configuration.
hafstab dfstab.hostname
hafstab vfstab.hostname
B-1
B
•
hainstall(1M) – Installs Solstice HA and DiskSuite on the Ultra
Enterprise Cluster HA servers.
cdrom-mnt-pt/hainstall -i [ -n ] [ -h node,node ]
[ - s srvc,... ] [ -d cdimage_dir ]
cdrom-mnt-pt/hainstall -a [ -s srvc,... ]
[ -d cdimage_dir ] install_dir
install_dir/hainstall -c -h node,node [ - s srvc,... ]
config_dir
cdrom-mnt-pt/hainstall -r
•
halicense(1M) – Verifies and installs Solstice HA licenses.
halicense
•
haload(1M) – Monitors the load on the Ultra Enterprise Cluster HA
servers.
haload [ -i minutes ] [ -p threshold ]
•
haremove(1M) – De-installs the Solstice HA software.
haremove
•
hasetup(1M) – Sets up Ultra Enterprise Cluster HA configurations.
hasetup [ -n ] [ -i netiftypes]
•
hastart(1M) – Starts Solstice HA on the Ultra Enterprise Cluster HA
servers.
hastart [ -r ]
B-2
Solstice HA 1.3 User’s Guide—April 1997
B
•
hastat(1M) – Monitors status of Ultra Enterprise Cluster HA
configurations.
hastat [ -i interval ] [ -m message-lines ]
•
hastop(1M) – Stops Solstice HA on the Ultra Enterprise Cluster HA
servers.
hastop
•
haswitch(1M) – Performs a switchover of services or a cluster
reconfiguration in an Ultra Enterprise Cluster HA configuration.
haswitch destination_hostname logicalhostname...
haswitch -m logicalhostname...
haswitch -r
•
na.haconfig(1M) – Reports Ultra Enterprise Cluster HA configuration
status.
na.haconfig
•
na.hadtsrvc(1M) – Reports Solstice HA data service status.
na.hadtsrvc
•
rpc.pmfd(1M) – RPC-based process monitor server.
/opt/SUNWhadf/bin/rpc.pmfd
•
hadfconfig(4) – Contains the Ultra Enterprise Cluster HA configuration
information.
hadfconfig
Man Pages
B-3
B
•
na.halhost(1M) – Reports information on a Solstice HA logical host.
na.halhost
•
na.hamdstat(1M) – Reports status of Solstice HA DiskSuite trans devices
and the metadevice state database replicas.
na.hamdstat
B.2 Data Services Man Pages Quick Reference
The syntax for each of the Solstice HA data service man pages is included
below.
•
hainetconfig(1M) – HA Internet Pro configuration command.
/opt/SUNWhadf/bin/hainetconfig
•
haoracle(1M) – Solstice HA-DBMS for ORACLE7 administration
command.
/opt/SUNWhadf/bin/haoracle [-s] command [instance] [datafield1 ...]
•
haoracle_config_V1(4) – configuration file for Solstice HA-DBMS for
ORACLE7 fault monitor.
/etc/opt/SUNWhadf/hadf/haoracle_config_V1
•
haoracle_databases(4) – table of Solstice HA-DBMS for ORACLE7
databases.
/etc/opt/SUNWhadf/hadf/haoracle_databases
B-4
Solstice HA 1.3 User’s Guide—April 1997
B
•
haoracle_support(4) – table of Solstice HA-DBMS for ORACLE7
releases supported by Solstice HA.
/etc/opt/SUNWhadf/hadf/haoracle_support
•
hainformix(1M) – Solstice HA-DBMS for INFORMIX administration
command.
/opt/SUNWhadf/bin/hainformix [-s] command [server] [datafield1 ...]
•
hainformix_config_V1(4) – configuration file for Solstice HA-DBMS
for INFORMIX fault monitor.
/etc/opt/SUNWhadf/hadf/hainformix_config_V1
•
hainformix_databases(4) – table of Solstice HA-DBMS for INFORMIX
databases.
/etc/opt/SUNWhadf/hadf/hainformix_databases
•
hainformix_support(4) – table of Solstice HA-DBMS for INFORMIX
releases supported by Solstice HA.
/etc/opt/SUNWhadf/hadf/hainformix_support
•
hasybase(1M) – Solstice HA-DBMS for SYBASE administration command.
opt/SUNWhadf/bin/hasybase [-s] command [server] [datafield1 ...]
Man Pages
B-5
B
•
hasybase_config_V1(4) – configuration file for Solstice HA-DBMS for
SYBASE fault monitor.
/etc/opt/SUNWhadf/hadf/hasybase_config_V1
•
hasybase_databases(4) – table of Solstice HA-DBMS for SYBASE
databases.
/etc/opt/SUNWhadf/hadf/hasybase_databases
•
hasybase_support(4) – table of Solstice HA-DBMS for SYBASE releases
supported by Solstice HA.
/etc/opt/SUNWhadf/hadf/hasybase_support
B-6
Solstice HA 1.3 User’s Guide—April 1997
Configuration Worksheets
C
This appendix provides worksheets for planning:
•
•
•
•
Root file system size for Solaris
Network connections
Metadevice configuration
Host naming
Use Table C-1 and Table C-2 to calculate the approximate size requirements for
your root file system. If you use the JumpStart installation method, the file
system will default to 40 Mbytes.
Table C-1 Root Slice Calculation Template
Components
SPARCstorage Array 100 with 30 disks
number of SPARCstorage Arrays (SSA)
Solstice DiskSuite metadevices
(md_nsets times nmd)
Inode Calculations
Kbyte Calculations
SSAs * 960 = ____ inodes
nmd * md_nsets * 4 = ____ inodes
SSAs * 480 Kbytes = _____ Kbytes
nmd * md_nsets * 2 = _____ Kbytes
Solaris 2.5
3,000 inodes
= 15,000 Kbytes
Totals
total inodes
_____ Kbytes
total inodes times 2 Kbytes =
minimum UFS size _____ Kbytes
C-1
C
You should take the larger of Inode Calculations and Kbyte Calculations from
the last line of Table C-1 to use as your required root file system size. You also
need to allow for additional free space.
Table C-2 shows the required root file system size. The table should be used
with the maximum number of drives you ultimately expect to have in the
configuration, not the number you have during initial configuration. Similarly
the metadevice parameters (md_nsets and nmd) should reflect your ultimate
needs. The table entries are of the form size (free space), where size is the
amount of space required in megabytes for the root file system and the amount
of free space after the Solaris operating system, Solstice HA, and other required
software have been installed.
In Table C-2 you must determine which of the columns you want to use based
on the number of metadevice names needed in the largest diskset. You must
configure both servers with the same size root file system and the same values
entered in the /kernel/drv/md.conf file. Refer to Section 3.1.7, “Metadevice
Naming and Creation” for help in determining which of the columns you
should use.
!
Caution – Remember that you cannot enlarge the size of the root file system
without reinstalling the Solaris operating environment. So you should calculate
your disk needs based on future growth of the Solstice HA configuration.
Table C-2 Required Root File System Sizes and md.conf Values
C-2
Change md.conf
File Values to:
md_nsets=4
nmd=128
md_nsets=3
nmd=256
md_nsets=3
nmd=512
md_nsets=3
nmd=1024
Number of Drives
root (free)
in Mbytes
root (free)
in Mbytes
root (free)
in Mbytes
root (free)
in Mbytes
30
17 (0)
17 (0)
20 (1.6)
32 (11)
60
17 (0)
18 (0)
22 (3)
34 (12)
90
18 (0)
18 (0)
24 (4.4)
36 (13)
120
18 (0)
20 (1.3)
26 (5.8)
38 (15)
150
20 (1.2)
22 (2.7)
28 (7.2)
40 (16)
180
22 (2.6)
24 (4.1)
30 (8.6)
42 (18)
210
23 (4.1)
25 (5.6)
31 (10)
43 (19)
Solstice HA 1.3 User’s Guide—April 1997
C
Table C-2 Required Root File System Sizes and md.conf Values
Change md.conf
File Values to:
md_nsets=4
nmd=128
md_nsets=3
nmd=256
md_nsets=3
nmd=512
md_nsets=3
nmd=1024
Number of Drives
root (free)
in Mbytes
root (free)
in Mbytes
root (free)
in Mbytes
root (free)
in Mbytes
240
25 (5.5)
27 (7)
33 (11)
45 (20)
270
27 (6.9)
29 (8.4)
35 (13)
47 (22)
300
29 (8.3)
31 (9.8)
37 (14)
49 (23)
330
29 (9.7)
33 (11)
39 (16)
51 (25)
360
33 (11)
35 (13)
41 (17)
53 (26)
390
35 (12)
37 (14)
43 (18)
55 (27)
420
37 (14)
39 (15)
45 (20)
57 (29)
450
38 (15)
40 (17)
46 (21)
58 (30)
480
40 (17)
42 (18)
48 (23)
60 (32)
510
42 (18)
44 (20)
50 (24)
62 (33)
540
44 (20)
46 (21)
52 (26)
64 (35)
570
46 (21)
48 (22)
54 (27)
66 (36)
600
48 (22)
50 (24)
56 (28)
68 (37)
Configuration Worksheets
C-3
C
Figure C-1
HA Configuration Worksheet
Secondary Public Network _____________
Logical host name
______________
Logical IP address
______________
Primary Public Network ____________________
_____________ Logical host name
_____________
Logical host name
______________
Logical IP address
______________
_____________ Logical IP address
_____________
Logical interface name
_____________
_____________ Logical Interface name
_____________
Logical interface name
_____________
Physical host name
________________
_____________ Physical host name
_____________
Physical host name
________________
Physical IP address
_______________
_____________ Physical IP address
_____________
Physical IP address
_______________
Physical interface name
_______________
_____________ Physical interface name _____________
Physical interface name
_______________
Admin Workstation:
IP Address _____________
host name ______________
Terminal Concentrator:
host name ___________
IP address ___________
Private Networks
First private net interface ___________
First private net IP address __________
Second private net interface __________
Second private net IP address _________
Physical host name __________________
C-4
Physical host name __________________
Solstice HA 1.3 User’s Guide—April 1997
C
Table C-3 Solstice HA Host Naming Worksheet
Server1 Public
Physical
Host Name
Logical Host
Name
Server2 Public
Network
Interface
Physical
Host Name
Logical Host
Name
Network
Interface
1st Network
_____________
_____________
_____________
_____________
_____________
_____________
2nd Network
_____________
_____________
_____________
_____________
_____________
_____________
3rd Network
_____________
_____________
_____________
_____________
_____________
_____________
Server1 Priv
Private Link
Host Name
Server2 Priv
Network
Interface
Private Link
Host Name
Network
Interface
204.152.64
_____________
_____________
_____________
_____________
204.152.65
_____________
_____________
_____________
_____________
Configuration Worksheets
C-5
C
Table C-4 SPARCcluster HA Metadevice Planning Worksheet
File System
A
Metatrans Metamirrors Metamirrors Submirrors Submirrors
(Data)
(Log)
(Data)
(Log)
d10
d11
d14
C-6
Hot Spare
Pool
Physical
Device
(Data)
d12
hsp000
c1t0d0s0
d13
hsp000
c2t0d1s0
Physical
Device
(Log)
d15
hsp006
c1t0d1s6
d16
hsp006
c2t1d0s6
Solstice HA 1.3 User’s Guide—April 1997
C
Table C-4 SPARCcluster HA Metadevice Planning Worksheet (Continued)
File System
Metatrans Metamirrors Metamirrors Submirrors Submirrors
(Data)
(Log)
(Data)
(Log)
Configuration Worksheets
Hot Spare
Pool
Physical
Device
(Data)
Physical
Device
(Log)
C-7
C
Figure C-2
SPARCcluster HA Disk Setup Worksheet - Creating md.tab
C___
C-8
C___
C___
0.0
2.0
4.0
0.0
2.0
4.0
0.0
2.0
4.0
0.1
2.1
4.1
0.1
2.1
4.1
0.1
2.1
4.1
0.2
2.2
4.2
0.2
2.2
4.2
0.2
2.2
4.2
0.3
2.3
4.3
0.3
2.3
4.3
0.3
2.3
4.3
0.4
2.4
4.4
0.4
2.4
4.4
0.4
2.4
4.4
1.0
3.0
5.0
1.0
3.0
5.0
1.0
3.0
5.0
1.1
3.1
5.1
1.1
3.1
5.1
1.1
3.1
5.1
1.2
3.2
5.2
1.2
3.2
5.2
1.2
3.2
5.2
1.3
3.3
5.3
1.3
3.3
5.3
1.3
3.3
5.3
1.4
3.4
5.4
1.4
3.4
5.4
1.4
3.4
5.4
Solstice HA 1.3 User’s Guide—April 1997
Dual-String Mediators
D
This appendix describes the Solstice DiskSuite feature that allows Solstice HA
to run highly available data services using only two disk strings (dual string).
Overview
page D-1
Why Mediators are Needed
page D-2
What are Mediators
page D-3
Failures Addressed by Mediators
page D-5
Administering the Mediator Host
page D-9
HA Administration Tasks When Using Mediators
page D-9
The following procedures are included in this chapter:
• “How to Check the Status of Mediator Data” on page D-9
• “How to Fix Bad Mediator Data” on page D-10
D.1 Overview
The requirement for Solstice HA is that a dual string must survive the failure
of a single host or a single string of drives without user intervention.
In a dual-string configuration, metadevice state database replicas are always
placed such that exactly half of the replicas are on one string and half are on a
second string. A quorum (half + 1 or more) of the replicas is required to
D-1
D
guarantee that the most current data is being presented. In the dual-string
configuration, if one string becomes unavailable, a quorum of the replicas will
not be available.
The introduction of mediators enables the Solstice HA software to ensure that
the most current data is presented in the case of a single string failure in the
dual-string configuration. Mediators are used as a “third vote” in a dual-string
configuration to determine whether access to the metadevice state database
replicas can be granted. In the Solstice HA environment, both HA servers are
always designated as mediator hosts to provide the necessary third vote.
Mediator information is used only when exactly half the database replicas are
available. If half + 1 or more replicas are accessible, then the mediator
information is not needed or used. If fewer than half the replicas are available,
then the database is stale and ownership can only be granted in read-only
mode. You can view mediator status information using the medstat(1M)
command.
D.2 Why Mediators are Needed
Solstice DiskSuite requires a replica quorum (half + 1) to determine when
“safe” operating conditions exist. This guarantees data correctness. With a
dual-string configuration it is possible that only one string is accessible. In this
situation it is impossible to get a replica quorum. If mediators are used and a
mediator quorum is present, the mediator data can be used to decide whether
the data on the accessible string is up-to-date and safe to use.
D-2
Solstice HA 1.3 User’s Guide—April 1997
D
D.3 What are Mediators
A mediator is a host or hosts that stores mediator data. Mediator data provides
information on the location of other mediators and contain a “commit count”
that is identical to the commit count stored in the database replicas. This
commit count is used to confirm that the mediator data is in sync with the data
in the database replicas. Mediator data is individually verified before use.
To avoid unnecessary user intervention in some dual-string failure scenarios,
the concept of a golden mediator has been implemented. If exactly half of the
database replicas are accessible and an event occurs that causes the mediator
hosts to be updated, two mediator updates are attempted. The first update
attempts to change the commit count and to set the mediator to not golden.
The second update occurs if, and only if, during the first phase, all mediator
hosts were successfully contacted and the number of replicas that were
accessible, and which had their commit count advanced, were exactly half of
the total number of replicas. If all the conditions are met, the second update
sets the mediator status to golden. The golden status enables a takeover to
proceed to the host with the golden status without user intervention. If the
status is not golden, the data will be set to read-only and user intervention is
required for a takeover or failover to succeed if exactly half of the replicas are
accessible. The default state for mediators is not golden.
The golden state is stored in volatile memory (RAM) only. Once a takeover
occurs, the mediator data is once again updated. If any mediator hosts cannot
be updated, the golden state is revoked. Since the state is in RAM only, a
reboot of a mediator host causes the golden state to be revoked.
Figure D-1 shows an HA system configured with two strings and mediators on
both HA servers. If the hasetup(1M) program detects that there are only two
strings available, it adds the necessary mediator hosts to each diskset in the
configuration.
D-3
D
To simplify the presentation, the configurations shown in this appendix use
only one diskset. The number of disksets is not significant in the scenarios
described here. In the stable state, the diskset is mastered by phys-hahost1.
Figure D-1 HA System in Steady State with Mediators
phys-hahost1
phys-hahost2
string 1
mediator
mediator
(masters diskset)
string 2
Normally, if half + 1 of the database replicas are accessible, then mediators are
not used. When exactly half the replicas are accessible then the mediator’s
commit count can be used to determine whether the accessible half is the most
up-to-date. To guarantee that the correct mediator commit count is being used,
both of the mediators must be accessible, or the mediator must be golden. Half
+ 1 of the mediators constitutes a mediator quorum. The mediator quorum is
independent of the replica quorum.
D-4
Solstice HA 1.3 User’s Guide—April 1997
D
D.4 Failures Addressed by Mediators
With mediators, it is possible to recover from some double failures as well as
single failures. Since Solstice HA only guarantees automatic recovery from
single failures, only the single-failure recovery situation is covered in detail.
The double failure scenarios are included, but recovery processes for them are
not fully described here.
Figure D-1 shows a dual-string configuration in the stable state. This is the
configuration that hasetup(1M) sets up when it detects only two strings.
Note that mediators are established on both HA servers, so both servers must
be up for a mediator quorum to exist and for mediators to be used. If one HA
server fails, a replica quorum will exist and, if a takeover of the diskset is
necessary, it will occur without the use of mediators.
The following sections show various failure scenarios and describe how
mediators help recover from these failures.
D-5
D
D.4.1 Single Server Failure
Figure D-2 shows the situation where one HA server fails. This case does not
use the mediator software since there is a replica quorum available. HA server
phys-hahost2 will takeover the diskset previously mastered by phys-hahost1.
Recovery from this scenario is identical to the process followed when one HA
server fails and there are more than two disk strings. No administrator action
is required except perhaps to switchover the diskset after phys-hahost1 rejoins
the cluster. The switchover procedure is described in Chapter 17, “General
Solstice HA Maintenance.”
Figure D-2 Single HA Server Failure with Mediators
phys-hahost1
phys-hahost2
string 1
mediator
mediator
(masters diskset)
string 2
D-6
Solstice HA 1.3 User’s Guide—April 1997
D
D.4.2 Single String Failure
Figure D-3 illustrates the case where, starting from the steady state shown in
Figure D-1, a single string fails. When string 1 fails, the mediator hosts on both
phys-hahost1 and phys-hahost2 will be updated to reflect the event, and the
system will continue to run as follows:
•
•
•
No takeover occurs
HA server phys-hahost1 continues to own the diskset
Once the failure on string 1 is fixed, the data from the disks on string 2 must
be resynchronized with the data on string 1. This is a manual process that is
described in Chapter 21, “Administering HA Server and Multihost Disks.”
The commit count is incremented and the mediators remain golden.
Figure D-3 Single String Failure with Mediators
phys-hahost1
phys-hahost2
string 1
mediator
mediator
(masters diskset)
string 2
The administration required in this scenario is the same that is required when
a single string fails in the three or more string configuration. Refer to
Chapter 22, “Administering SPARCstorage Arrays” for details on these
procedures.
D-7
D
D.4.3 Host and String Failure
Figure D-4 shows a double failure where both string 1 and phys-hahost2 fail. If
the failure sequence is such that the string fails first, and later, the host fails,
the mediator on phys-hahost1 could be golden. In this case, we have the
following conditions:
•
•
•
•
The mediator on phys-hahost1 is golden
Half of the mediators are available
Half of the replicas are accessible
The mediator “commit count” on phys-hahost1 matches the commit count
found in the replicas on string 2
Figure D-4 Multiple Failure – One Server and One String
phys-hahost1
phys-hahost2
string 1
mediator
(masters diskset)
mediator
string 2
This case is automatically recovered by Solstice HA. If phys-hahost2 mastered
the diskset, phys-hahost1 will take over mastery of the diskset. Otherwise,
mastery of the diskset will be retained by phys-hahost1. When string 1 is fixed,
the data from string 2 must be used to resynchronize the data on string 1. This
is a manual process described in Chapter 21, “Administering HA Server and
Multihost Disks.”
D-8
Solstice HA 1.3 User’s Guide—April 1997
D
!
Caution – Although you can recover from this scenario, you must be sure to
restore the failed components immediately since a third failure will cause the
cluster to be unavailable.
If the mediator on phys-hahost1 is not golden, this case is not automatically
recovered by Solstice HA and requires administrative intervention. In this case,
Solstice HA generates an error message and the logical host is put into
maintenance mode (read-only). If this, or any other multiple failure occurs,
contact SunService to assist you.
D.5 Administering the Mediator Host
Mediator hosts are administered using the mediator(7) command. You can
use mediator(7) to add or delete mediator hosts. See the mediator(7) man
page for details.
When a host is added to a diskset that has mediator hosts, the add operation
updates the mediator hosts. Similarly, when a host is removed from a diskset
that has mediator hosts, the delete operation updates the mediator hosts.
D.6 HA Administration Tasks When Using Mediators
Use the procedures shown in this section to administer the mediator hosts.
▼ How to Check the Status of Mediator Data
♦ Run the medstat(1M) command.
phys-hahost1# medstat -s diskset
If the output indicates that the mediator data for any one of the mediator
hosts for a given diskset is bad (see medstat(1M)), refer to “How to Fix
Bad Mediator Data” to fix the problem.
D-9
D
▼ How to Fix Bad Mediator Data
1. Remove the bad mediator host(s) from all affected diskset(s).
Log into the HA server that owns the affected diskset and type:
phys-hahost1# metaset -s diskset -d -m bad_mediator_host
2. Restore the mediator host and its aliases:
phys-hahost1# metaset -s diskset -a -m physical_host, physical_host_alias,...
See the mediator(7) man page for details on this use of the metaset(1M)
command.
Note – The hastat(1M) command checks the status of mediators. Use this
procedure if hastat(1M) reports that a mediator host is bad.
D.6.1 How to Proceed for Failures with no Automatic Recovery
Certain double failure scenarios exist that do not allow for automatic recovery
by Solstice HA. They include the following:
D-10
•
Both a server and a string have failed in a dual string configuration, but the
mediator on the surviving server was not golden. This scenario is further
described in Section D.4.3, “Host and String Failure.”.
•
Mediator data is bad, stale, or non-existent on one or both of the servers and
one of the strings in a dual string configuration fails. The next attempt to
take ownership of the affected logical host(s) will fail.
•
A string fails in a dual string configuration, but the number of good replicas
on the surviving string does not represent at least half of the total replica
count for the failed diskset. The next attempt by DiskSuite to update these
replicas will result in a system panic.
•
A failure with no automatic recovery has occurred, and an attempt is made
to bring the affected logical host(s) out of maintenance mode before manual
recovery procedures have been completed.
Solstice HA 1.3 User’s Guide—April 1997
D
It is very important to monitor the state of the disksets, replicas, and mediators
on a regular basis. The hastat(1M) command is useful for this purpose. Bad
mediator data, replicas, and disks should always be repaired immediately to
avoid the risk of potentially damaging multiple failure scenarios.
When a failure of this type does occur, one of the following sets of error
messages will be logged:
ERROR: metaset -s <diskset> -f -t exited with code 66
ERROR: Stale database for diskset <diskset>
NOTICE: Diskset <diskset> released
ERROR: metaset -s <diskset> -f -t exited with code 2
ERROR: Tagged data encountered for diskset <diskset>
NOTICE: Diskset <diskset> released
ERROR: metaset -s <diskset> -f -t exited with code 3
ERROR: Only 50% replicas and 50% mediator hosts available for
diskset <diskset>
NOTICE: Diskset <diskset> released
Eventually, the following set of messages also will be issued:
ERROR: Could not take ownership of logical host(s) <lhost>, so
switching into maintenance mode
ERROR: Once in maintenance mode, a logical host stays in
maintenance mode until the admin intervenes manually
ERROR: The admin must investigate/repair the problem and if
appropriate use haswitch command to move the logical host(s) out
of maintenance mode
The first thing to remember for a dual failure of this nature is that high
availability goals are sacrificed in favor of attempting to preserve data
integrity. Your data might be unavailable for some time. In addition, it is not
possible to guarantee complete data recovery or integrity.
SunService should be contacted immediately. Only a SunService service person
should attempt manual recovery from this type of dual failure. A carefully
planned and well coordinated effort is essential to data recovery. Do nothing
until SunService arrives at the site.
D-11
D
SunService will inspect the log messages, evaluate the problem, and, possibly,
repair any damaged hardware. SunService then might be able to regain access
to the data by using some of the special metaset(1M) options described on
the mediator(7) man page. However, such options should be considered
with extreme care in order to avoid recovery of the wrong data. Attempts to
alternate access between the two strings should be avoided at all costs; it can
only make the situation worse.
Before restoring client access to the data, exercise any available validation
procedures on the entire dataset or any data affected by recent transactions
against the dataset.
Before you use haswitch(1M) to return the logical host(s) from maintenance
mode, make sure that you release ownership of their associated diskset(s).
D.6.2 Error Log Messages Associated with Mediators
The following syslog or console messages indicate that there is a problem with
mediators or mediator data. Use the procedure “How to Fix Bad Mediator
Data” to address the problem.
Attention required - medstat shows bad mediator data on host %s
for diskset %s
Attention required - medstat finds a fatal error in probing
mediator data on host %s for diskset %s!
Attention required - medstat failed for diskset %s
D-12
Solstice HA 1.3 User’s Guide—April 1997
Administering SPARCstorage
Array NVRAM
E
This appendix describes NVRAM and the SPARCstorage Array fast write
capability, and provides instructions for administering NVRAM and fast write.
Overview
page E-1
Enabling and Disabling NVRAM
page E-2
Flushing and Purging NVRAM Data
page E-4
The following procedures are included in this chapter:
• “How to Enable and Disable NVRAM” on page E-2
• “How to Flush and Purge NVRAM Data” on page E-5
E.1 Overview
NVRAM supports the fast write capability for SPARCstorage Arrays. Without
NVRAM, synchronous write requests from a program must be committed to
disk and an acknowledgment must be received by the program before another
request can be submitted. The NVRAM caches write requests in non-volatile
memory and periodically flushes the data to disk. Once the data is in the
NVRAM, an acknowledgment is returned to the program just as if the data had
been written to disk. This enhances performance of write-intensive
applications using SPARCstorage Arrays.
This chapter describes the procedures used to:
• Enable and disable NVRAM
• Flush and purge NVRAM
E-1
E
The procedures use the command-line interface; however, you also can use the
GUI interface supplied with Solstice DiskSuite to administer NVRAM for a
disk, tray, or controller. For information on DiskSuite, see the Solstice DiskSuite
4.1 User’s Guide or Solstice DiskSuite 4.1 Reference.
!
Caution – Use this functionality with care. It provides a powerful way to
manage the SPARCstorage Array. As a minimum precaution, you should have
a current backup of your data before using these procedures.
E.2 Enabling and Disabling NVRAM
Fast writes can be configured:
•
•
•
at the controller level, affecting all drives in the SPARCstorage Array
at the drive level, setting fast write for an individual drive.
at the tray level, through the DiskSuite GUI.
When fast write is enabled, it can be saved—across power cycles—as part of
the SPARCstorage Array’s configuration.
If the NVRAM battery is low, missing, or has failed, then fast write is disabled
on the controller.
Before enabling fast write, you must stop all I/O to the controller or disk. In
particular, ensure that diskset ownership has been released since an implicit
I/O stream exists while ownership of a diskset is maintained. The detailed
steps required to stop all I/O are documented within the procedures.
You use the ssaadm(1M) command to enable and disable NVRAM. Refer to
the ssaadm(1M) man page for complete information on this command.
▼ How to Enable and Disable NVRAM
These are the high-level steps to enable or disable NVRAM.
•
•
•
•
•
•
E-2
Make sure you have a current backup of all data.
Make sure you have root privilege.
Identify the controller or disk on which to enable or disable NVRAM.
Stop all I/O to the device.
Enable or disable NVRAM.
Bring the device back up and resynchronize the data.
Solstice HA 1.3 User’s Guide—April 1997
E
These are the detailed steps to enable or disable NVRAM.
1. Identify the controller, tray, or individual disk to be enabled or disabled.
You can use the ssaadm(1M) to display information for a specified
controller, tray, or individual disk. For example, the following display
identifies all of the disks on controller c2.
phys-hahost1# ssaadm display c2
SPARCstorage Array Configuration
(ssaadm version: 1.10 95/11/27)
Controller path:
/devices/iommu@f,e0000000/sbus@f,e0001000/SUNW,soc@0,0/SUNW,pln
@a0000000,779a16:ctlr
DEVICE STATUS
TRAY 1
TRAY 2
TRAY 3
slot
1
Drive: 0,0
Drive: 2,0
Drive: 4,0
2
Drive: 0,1
Drive: 2,1
Drive: 4,1
3
NO SELECT
NO SELECT
NO SELECT
4
NO SELECT
NO SELECT
NO SELECT
5
NO SELECT
NO SELECT
NO SELECT
6
Drive: 1,0
Drive: 3,0
Drive: 5,0
7
Drive: 1,1
NO SELECT
NO SELECT
8
NO SELECT
NO SELECT
NO SELECT
9
NO SELECT
NO SELECT
NO SELECT
10
NO SELECT
NO SELECT
NO SELECT
CONTROLLER STATUS
Vendor:
SUN
Product ID:
SSA110
Product Rev:
1.0
Firmware Rev: 3.9
Serial Num:
000000779A16
Accumulate Performance Statistics: Enabled
phys-hahost1#
2. Stop all I/O to the affected device.
For a controller or tray, perform the steps in “How to Take a SPARCstorage
Array Tray Out of Service” on page 22-8 for each tray on the controller. For
an individual disk, perform steps 5-9 in “How to Replace a Multihost Disk”
on page 21-14.
E-3
E
3. Enable or disable fast write on the controller or individual disk.
There are three options to the ssaadm(1M) command that can be used
depending on whether you are enabling fast write for all writes, enabling
fast write only for synchronous writes, or disabling fast write.
• -e enables fast write for all writes
• -c enables fast write for only synchronous writes
• -d disables fast write
The following example saves the NVRAM configuration across power cycles
and enables fast write for all writes. See the ssaadm(1M) man page for
details on these options.
phys-hahost# ssaadm fast_write -s -e pathname
A confirmation appears, indicating that fast write has been enabled.
4. Perform the steps needed to bring the component into normal operation
under Solstice HA.
For controllers, use the procedure “How to Bring a SPARCstorage Array
Tray Back Into Service” on page 22-10. For disks, use steps 15-21 in the
procedure “How to Replace a Multihost Disk” on page 21-14.
E.3 Flushing and Purging NVRAM Data
The ssaadm sync_cache command flushes any outstanding writes from
NVRAM to the disk drive. If you get an error while flushing data, you must
purge the data using the ssaadm purge command. Purging data “throws
away” any outstanding writes in NVRAM.
!
Caution – Purging fast write data should be performed with caution, and only
when a drive has failed, as it could result in the loss of data.
If the NVRAM battery is low, missing, or has failed, then NVRAM is
non-functional and data is lost.
E-4
Solstice HA 1.3 User’s Guide—April 1997
E
▼ How to Flush and Purge NVRAM Data
These are the high-level steps to flush or purge all outstanding writes for the
selected controller (and all disks) or individual writes from the NVRAM to
disk.
•
•
•
•
•
•
Make sure you have a current backup of all data.
Make sure you have root privilege.
Identify the controller or disk on which to flush or purge writes.
Flush or purge all outstanding writes.
Stop all I/O to the device.
Bring the device back into service under Solstice HA.
E-5
E
These are the detailed steps to flush or purge NVRAM data.
1. Identify the controller or the individual disk to flush or purge.
You can use the ssaadm(1M) command to display information for a
specified controller, tray, or individual disk. For example, the following
display identifies all of the disks on controller c2.
phys-hahost1# ssaadm display c2
SPARCstorage Array Configuration
(ssaadm version: 1.10 95/11/27)
Controller path:
/devices/iommu@f,e0000000/sbus@f,e0001000/SUNW,soc@0,0/SUNW,pln
@a0000000,779a16:ctlr
DEVICE STATUS
TRAY 1
TRAY 2
TRAY 3
slot
1
Drive: 0,0
Drive: 2,0
Drive: 4,0
2
Drive: 0,1
Drive: 2,1
Drive: 4,1
3
NO SELECT
NO SELECT
NO SELECT
4
NO SELECT
NO SELECT
NO SELECT
5
NO SELECT
NO SELECT
NO SELECT
6
Drive: 1,0
Drive: 3,0
Drive: 5,0
7
Drive: 1,1
NO SELECT
NO SELECT
8
NO SELECT
NO SELECT
NO SELECT
9
NO SELECT
NO SELECT
NO SELECT
10
NO SELECT
NO SELECT
NO SELECT
CONTROLLER STATUS
Vendor:
SUN
Product ID:
SSA110
Product Rev:
1.0
Firmware Rev: 3.9
Serial Num:
000000779A16
Accumulate Performance Statistics: Enabled
phys-hahost1#
2. Stop all I/O to the affected device.
For a controller or tray, perform the steps in “How to Take a SPARCstorage
Array Tray Out of Service” on page 22-8 for each tray on the controller. For
an individual disk, perform steps 5-9 in “How to Replace a Multihost Disk”
on page 21-14.
E-6
Solstice HA 1.3 User’s Guide—April 1997
E
3. Flush or purge the NVRAM on a controller, tray, or individual disk
If you can access drives in the SPARCstorage Array, flush the NVRAM. Only
purge the NVRAM if you can no longer access the SPARCstorage Array or
disk.
phys-hahost1# ssaadm sync_cache pathname
or
phys-hahost1# ssaadm purge pathname
A confirmation appears, indicating that NVRAM has been flushed or
purged.
4. Perform the steps needed to bring the component into normal operation
under Solstice HA.
For controllers, use the procedure “How to Bring a SPARCstorage Array
Tray Back Into Service” on page 22-10. For disks, use steps 12-21 in the
procedure “How to Replace a Multihost Disk” on page 21-14.
E-7
E
E-8
Solstice HA 1.3 User’s Guide—April 1997
Glossary
F
Asymmetric configuration
A configuration that contains a single diskset. In an asymmetric configuration,
one server acts as the default master of the diskset and the other server acts as
a hot standby.
Cluster reconfiguration
An ordered multistep process that is invoked whenever there is a significant
change in cluster state, such as takeover, switchover, or a physical host reboot.
During cluster reconfiguration, the Solstice HA software coordinates all of the
physical hosts that are up and communicating. Those hosts agree on which
logical host(s) should be mastered by which physical hosts.
Concatenation
A metadevice created by sequentially mapping blocks on several physical
slices (partitions) to a logical device. Two or more physical components can be
concatenated. The slices are accessed sequentially rather than interlaced (as
with stripes).
Data service
A network service that implements read-write access to disk-based data from
clients on a network. NFS is an example of a data service. The data service may
be composed of multiple processes that work together.
Default master
The server that is master of a diskset if both servers rebooted simultaneously.
The default master is specified when the system is initially configured.
F-1
F
Disk expansion unit
The physical storage enclosure that holds the multihost disks. Solstice HA
supports SPARCstorage Arrays and SPARCstorage MultiPacks.
Diskset
A group of disks that move as a unit between the two servers in a HA
configuration.
DiskSuite state database
A replicated database that is used to store the configuration of metadevices
and the state of these metadevices.
Fault detection
Solstice HA programs that detect two types of failures. The first type includes
low-level failures such as system panics and hardware faults (that is, failures
that cause the entire server to be inoperable). These failures can be detected
quickly. The second type of failures are related to data service, such as
HA-NFS. These types of failures take longer to detect.
Golden mediator
The in-core state of a mediator host set if specific conditions were met when
the mediator data was last updated. The state permits take operations to
proceed even when a quorum of mediator hosts is not available.
HA Administrative file system
A special file system created on each logical host when Solstice HA is first
installed. It is used by Solstice HA and by layered data services to store copies
of their administrative data.
HA-NFS
Highly available NFS (Sun’s distributed computing file system). HA-NFS
provides highly available remote mount service, status monitor service, and
network locking service.
Heartbeat
A periodic message sent between the two membership monitors to each other.
Lack of a heartbeat after a specified interval and number of retries may trigger
a takeover.
F-2
Solstice HA 1.3 User’s Guide—April 1997
F
Highly available data service
A data service that appears to remain continuously available, despite singlepoint failures of server hardware or software components.
Hot standby
In an asymmetric (single diskset) configuration, the machine that is not the
current master of the diskset. If both servers reboot simultaneously, the hot
standby will not master the diskset and thus will not be running any Solstice
HA data services.
Local disks
Disks attached to a HA server but not included in a diskset. The local disks
contain the Solaris distribution and the Solstice HA and DiskSuite software
packages. Local disks must not contain data exported by the Solstice HA data
service.
Logical host
A diskset and its collection of logical host names and their associated IP
addresses. Each logical host is mastered by one physical host at a time.
Logical host name
The name assigned to one of the logical network interfaces. A logical host
name is used by clients on the network to refer to the location of data and data
services. The logical host name is the name for a path to the logical host.
Because a host may be on multiple networks, there may be multiple logical
host names for a single logical host.
Logical network interface
In the Internet architecture, a host may have one or more IP addresses. HA
configures additional logical network interfaces to establish a mapping
between several logical network interfaces and a single physical network
interface. This allows a single physical network interface to respond to
multiple logical network interfaces. This also enables the IP address to move
from one HA server to the other in the event of a takeover or haswitch(1M),
without requiring additional hardware interfaces.
Glossary
F-3
F
Master
The server with exclusive read and write access to a diskset. The current
master host for the diskset runs the data service and has the logical IP
addresses mapped to its Ethernet address.
Mediators
In a dual-string configuration, provides a “third vote” in determining whether
access to the metadevice state database replicas can be granted or must be
denied. Used only when exactly half of the metadevice state database replicas
are accessible.
Mediator host
A host that is acting in the capacity of a “third vote” by running the
rpc.metamed(1M) daemon and has been added to a diskset.
Mediator quorum
The condition achieved when half + 1 of the mediator hosts are accessible.
Membership monitor
A process running on both HA servers that monitors the servers. The
membership monitor sends and receives heartbeats to its sibling host. The
monitor can initiate a takeover if the heartbeat stops. It also keeps track of
which servers are active.
Metadevice
A group of components accessed as a single logical device by concatenating,
striping, mirroring, or logging the physical devices. Metadevices are
sometimes called pseudo devices.
Metadevice state database
Information kept in nonvolatile storage (on disk) for preserving the state and
configuration of metadevices.
Metadevice state database replica
A copy of the state database. Keeping multiple copies of the state database
protects against the loss of state and configuration information. This
information is critical to all metadevice operations.
F-4
Solstice HA 1.3 User’s Guide—April 1997
F
Mirroring
Replicating all writes made to a single logical device (the mirror) to multiple
devices (the submirrors), while distributing read operations. This provides
data redundancy in the event of a failure.
Multihomed host
A host that is on more than one public network.
Multihost disk
A disk configured for potential accessibility from multiple servers. Solstice HA
software enables data on a multihost disk to be exported to network clients via
a highly available data service.
Multihost disk expansion unit
See “Disk expansion unit.”
Replica
A single copy of the DiskSuite metadevice state database.
Replica quorum
The condition achieved when HALF + 1 of the metadevice state database
replicas are accessible.
Sibling host
One of the two physical servers in a HA configuration.
Solstice HA
See Solstice High Availability.
Solstice High Availability
A software package that enables two machines to act as read-write data servers
while acting as backups for each other.
Solstice DiskSuite
A software product that provides data reliability through disk striping,
concatenation, mirroring, UFS logging, dynamic growth of metadevices and
file systems, and metadevice state database replicas.
Glossary
F-5
F
SPARCcluster High Availability
The combination of Solstice HA software with Sun hardware creating a highly
available system.
Stripe
Similar to concatenation, except the addressing of the component blocks is
non-overlapped and interlaced on the slices (partitions), rather than placed
sequentially. Striping is used to gain performance. By striping data across disks
on separate controllers, multiple controllers can access data simultaneously.
Submirror
A metadevice that is part of a mirror. See also mirroring.
Switchover
The coordinated moving of a logical host (diskset) from one operational HA
server to the other. A switchover is initiated by an administrator using the
haswitch(1M) command.
Symmetric configuration
A HA configuration that contains two disksets. In a symmetric configuration,
each server is the default master for one diskset.
Takeover
The automatic moving of a logical host from one HA server to the other after a
failure has been detected. The HA server that has the failure is forced to give
up mastery of the logical host.
Trans device
A pseudo device responsible for managing the contents of a UFS log.
UFS
An acronym for the UNIX® file system.
UFS logging
Recording UFS updates to a log (the logging device) before the updates are
applied to the UFS (the master device).
F-6
Solstice HA 1.3 User’s Guide—April 1997
F
UFS logging device
The component of a transdevice that contains the UFS log.
UFS master device
The component of a transdevice that contains the UFS file system.
Glossary
F-7
F
F-8
Solstice HA 1.3 User’s Guide—April 1997
Index
Symbols
/.rhosts file, description, 1-16
/etc/inet/hosts file
adding network interfaces, 23-4
description, 1-16
/etc/inet/netmasks file
adding network interfaces, 23-4
description, 1-16
/etc/nsswitch.conf file,
description, 1-16
/etc/SUNWmd/md.conf file,
description, 1-16
/var file system, repairing, 17-11 to
17-12
autohainstall.class,
description, 4-20
availability of database
Informix, 12-9
Sybase, 11-9
B
backup
Solstice Backup, 18-10 to 18-12
strategy, 3-16
board-level modules, adding, 24-2
boot disk, restoring from backup, 21-2
booting, single-user mode, 17-12
bringing up servers without starting
Solstice HA, 17-7
A
access, enabling
Informix, 12-7
Oracle, 10-8
Sybase, 11-7
administration workstation, 3-3
agents for monitoring, 19-10
asymmetric configuration
description, 1-2, 3-2
authentication, 10-6, 10-8, 10-9
auto-boot? variable, setting, 17-8
C
calculating size of root slice, inode
usage, 6-4
checksums, 5-5, 5-10, 5-11
class file, JumpStart, 4-20
cli terminal concentrator interface, 16-4
client set-up
Informix, 12-9
Sybase, 11-9
Index-1
client-server connections
Informix, 12-9
Oracle, 10-14
Sybase, 11-9
clustd, description, 25-2
cluster membership monitor, 25-2 to 25-4
cluster reconfiguration
description, 25-3
networking diagnosis probe, 25-8
cmm_confcdb file, description, 1-15
command layer description, 1-9
Commerce Server, Netscape
configuring, 13-11
commit count, mediators, D-3
concatenation description, 1-13
config.annex file, 16-9
configuration
creating, 7-1
parameters, Internet Pro, 13-22
planning
backing up multihost data, 3-15
configuration types, 3-2
data migration, 3-6
data on local disks, 3-13
disk space growth, 3-9
host names, 3-5
hot spares, 3-12
metadevices, 3-14
migrating existing data, 3-15
mirroring, 3-10
network configuration, 3-2
overview, 3-1
power sources, 3-12
size of disksets, 3-8
trans devices, 3-11
requirements, 1-4
restrictions, 3-20
rules, 3-16
troubleshooting, 7-27
types, 1-2
worksheets, C-1
Index-2
Solstice HA 1.3 User’s Guide—April 1997
console connection, 16-2
controller numbers, determining, 21-8
CPU, load monitoring, 25-12
customer support, xxviii
D
data protection, 1-3
and mediators, D-11
data service class setup
NFS, 9-2
Oracle, 10-1
Sybase, 11-1
data services
addition, 7-27
failure, 1-11
Internet Pro applications, 13-2
status checking, 19-3
switchover, 17-2
data storage, disk planning, 3-6
database device, Sybase, 11-6
database file location
Informix, 12-6
Oracle, 10-6
database placement, Sybase, 11-6
dbaccess command, 12-7
device alias setup, 4-15
device information
recording, 15-2
restoring, 15-3
saving, 15-1
device numbers
minor numbers, 15-5
storage location, 15-4
dfstab file, creation, 7-14
dfstab.logicalhost file
copying to sibling, 9-5
description, 1-15
description field, 9-5
HA-NFS entries, 9-8 to 9-9
sample, 9-5
updating, 9-3
disk arrays, number needed, 3-11
disk media failures, avoiding, 3-19
disk space, growth considerations, 3-9
disks
array types supported, 3-10
determining diskset ownership, 18-4
dual string, D-1
partitioning, 15-1, 21-5
partitioning guidelines, 6-3
repartitioning, using
format(1M), 21-21
replacing local disks, 21-4
replacing multihost disks, 21-14
reserving, 18-4
restoring a boot disk, 21-2
size requirements, planning, 3-6
spinning down, 21-11, 21-20
spinning up, 21-12
disks(1M), sample usage, 21-13
diskset layout, sample, 1-5
disksets
adding a disk, 18-4, 21-13
administrative file system, 4-10
allocation by hasetup(1M), 7-16
allocation example, 3-9
allocation, manual, 7-16
assigning disks, 7-16
creation guidelines, 7-9
description, 1-3, 1-13
distinguished file system
defaults, 4-13
naming, 4-3
ownership by servers, 1-13
planning worksheet, C-8
quantity of drives, 3-8
removing a disk, 18-5
size guidelines, 3-8
status checking, 19-4, 19-6
DNS, installing HA-DNS, 13-5
drvconfig(1M), sample usage, 21-13
dual strings
mediators, D-1 to D-12
survival requirements, D-1
dump media size, 3-6
E
error messages
general, A-1 to A-2
hacheck(1M), A-6
hasetup(1M), A-15
mediators, D-11 to D-12
membership monitor, A-2 to A-6
errored components, replacing, 18-7
F
failover, after network failure, 23-2
failures
of mediators, D-10
of total configuration, 20-2
prevention by mirroring root, 3-19
types of failures tolerated by HA, 1-3
fast writes, NVRAM, E-2
fault detection, description, 25-1
fault monitor
daemon, changing, 1-12
description, 1-6
HA-NFS, 1-11
network fault probes, 25-5
probes, 1-11
verification, 7-26
fault probes
data services, 25-9 to 25-12
net_diagnose_comm, 25-6
network, 25-6 to 25-9
sanity checks, 25-5
tuning for Internet Pro, 13-22
FDDI installation, 6-6
file systems
creating with newfs(1M), 21-5
growing, 18-8
logging, 1-14
setup, 7-20
size, 3-6, 3-8
firmware, SPARCstorage Array, 22-16
flag fields, 7-18, 18-9
Index-3
fmthard(1M)
partitioning a disk, 21-5
repartitioning a disk, 21-21
format(1M)
partitioning a disk, 21-5
repartitioning a disk, 21-21
G
getting help, xxviii
golden mediators, definition, D-3
group entry
Informix, 12-2
Oracle, 10-3
Sybase, 11-2
growfs(1M), cautions and usage, 18-8
H
HA administrative file system
description, 4-10
hacheck(1M)
description, 1-9
error messages, A-6
sample usage, 23-5
syntax, man page, B-1
verifying the configuration, 7-24, 23-5
verifying the installation, 7-23
hadfconfig(4)
syntax, man page, B-3
hadfconfig(4) file
description, 1-16
editing, 23-5
HA-DNS, installing, 13-5
hafstab(1M)
adding UFS entries, 9-7
description, 1-9
editing dfstab and vfstab, 9-2
sample usage, 9-3
starting, 9-3
syntax, man page, B-1
hainetconfig(1M), syntax, man
page, B-4
Index-4
Solstice HA 1.3 User’s Guide—April 1997
hainetpro(1M), usage, 13-21
hainformix(1M), syntax, man
page, B-5
hainformix(1M), usage, 12-8
hainformix_config_V1(4)
syntax, man page, B-5
hainformix_databases file, 12-7, 12-8
hainformix_databases(4), syntax,
man page, B-5
hainformix_support(4), syntax, man
page, B-5
hainstall(1M)
description, 1-9
installation process, 6-6
syntax, man page, B-2
halicense(1M)
description, 1-9
syntax, man page, B-2
verifying license, 5-5
haload(1M)
description, 1-9
syntax, man page, B-2
usage suggestions, 19-5
halting a server, 17-7
HA-MAIL for Netscape
installing and configuring, 13-15
HA-NEWS for Netscape
configuring, 13-6
HA-NFS fault probes, 25-10 to 25-12
HA-NFS file system
adding, 9-8
changing share options, 9-10
removing, 9-9
haoracle(1M)
syntax, man page, B-4
haoracle(1M), usage, 10-13
haoracle_config_V1(4)
syntax, man page, B-4
haoracle_databases(4)
syntax, man page, B-4
haoracle_support(4)
syntax, man page, B-5
hardware configuration procedure, 4-14
haremove(1M)
description, 1-9
syntax, man page, B-2
hasetup(1M)
capabilities, 4-8
description, 1-9
error messages, A-15
overview, 7-2
restarting, 7-29
running, 7-3
sample run, 7-4
syntax, man page, B-2
troubleshooting, 7-29
hastart(1M)
description, 1-9, 17-3
starting HA after installation, 7-23
syntax, man page, B-2
hastat(1M)
description, 1-10
display, 19-2, 19-3
status output, 19-2 to 19-4
syntax, man page, B-3
hastop(1M)
description, 1-10, 17-4
sample usage, 17-6, 21-4, 22-13
syntax, man page, B-3
haswitch(1M)
description, 1-10
membership monitor
reconfiguration, 23-6
-r option, description, 17-4
sample usage, 7-24, 22-8, 22-11, 23-4,
24-3
syntax, man page, B-3
hasybase(1M)
sample usage, 11-9
syntax, man page, B-5
hasybase_config_V1(4)
syntax, man page, B-6
hasybase_databases file, 11-8
hasybase_databases(4)
syntax, man page, B-6
hasybase_support(4)
syntax, man page, B-6
heartbeat mechanism, description, 25-2 to
25-4
host names
changing, 17-13
naming conventions, 3-3 to 3-5
planning, 3-5, 4-3
server names, 13-4
worksheet, C-5
hosts, mediator, D-2
hot spares
adding, 21-12, 22-11
assigning to disksets, 3-12
considerations, 3-12
deleting, 21-10
deleting, caution notice, 21-18
description, 1-14
locating, 21-10
managing, 18-8
replacing, 21-22, 22-3
I
I/O, stopping, 22-9
identical configurations, 1-2
ifconfig(1M), identifying network
interfaces, 23-7
Informix installation, 12-2
informixtab file, 12-6
inftab file, 12-6
init.ora file, 10-6, 10-7
install client, setup, 4-19
install directory location, 4-19
install location
Informix, 12-2
Oracle, 10-2
install server
planning, 4-17
Index-5
installation
from CD-ROM, 6-6
Informix, 12-2 to 12-10
Internet Pro, 13-3 to 13-20
licenses, 5-5
Netscape services, 13-3 to 13-4
Oracle, 10-2 to 10-12
overview, 2-1
software guidelines, 6-2
software, Solaris, 6-2
Sybase, 11-2 to 11-3
troubleshooting, 7-27
user file system size calculations, 6-4
instance names, device binding, 15-5
instance numbers
encoding, 15-5
problems, 15-6
Internet Pro
configuring data services, 13-21
data services overview, 13-2
registration, 13-21
tuning fault probes, 13-22
IP addresses
and default routers, 16-10
and haswitch(1M), 7-25
and host names, table, 3-4
and secondary networks, 4-4
as terminal concentrator
passwords, 16-4
configuration worksheet, C-4
locating by host name, 23-7
reserved for private network, 3-3
setting up with hasetup(1M), 7-4
using to identify network
interfaces, 23-7
web server requirements, 13-13
J
JumpStart
class file editing, 4-20
configuration setup, 4-17
installation setup, 4-19
Index-6
Solstice HA 1.3 User’s Guide—April 1997
L
license.dat file
description, 1-16
location on HA servers, 4-21
licensing
copying the license files to the HA
servers, 5-13
gathering license information, 5-3
license file location, 5-9
license installation, 5-5 to 5-7
license.dat file
location, 4-21
overview, 5-2
requirements, 5-1
running halicense(1M), 5-9
starting halicense(1M), 5-5
Sun License Center, 5-4
verifying the license files, 5-12
limitations, metadevice creation, 18-10
listener, Oracle SQL*Net V2, 10-11
listener.ora file, configuration, 10-10,
10-16
load monitoring, 25-12
local disk administration, 3-13
local metadevice administration, 18-10
location of disk expansion units
guidelines, 3-13
location of servers, guidelines, 3-13
logging UFS
adding, 9-7
removing, 9-8
logical host
adding a UFS, 9-7
definition, 4-3
host name suffix, 4-5
maintenance mode, 17-2 to 17-3
naming, 3-3 to 3-5, 4-3
network host names, 4-3 to 4-4
renaming, restriction, 17-13
status checking, 19-3
switching ownership, 17-12, 22-8,
22-11, 23-4
logical host preparation
Informix, 12-4
Oracle, 10-5
Sybase, 11-4
logical network interfaces, 3-3
login id, Sybase, 11-3
lost connections
repairing, 22-4
SPARCstorage Array, 22-4
M
maintenance
bringing up servers without starting
Solstice HA, 17-7
changing host names, 17-13
changing the time, 17-14
forcing a membership
reconfiguration, 17-4
halting a server, 17-7
public network administration, 23-6
putting logical hosts in maintenance
mode, 17-2
removing a logical host, 17-3
removing a public network, 23-6
repairing the /var file system, 17-11
setting the OpenBoot PROM, 17-8
shutting down a configuration, 17-6
shutting down a server, 17-5
Solstice HA packages, 17-13
stopping the membership
monitor, 17-3
switching over data services, 17-2
maintenance option to
haswitch(1M), 17-3
maintenance state
identified by metastat(1M), 21-16
man pages
Solstice HA command quick
reference, B-1
Solstice HA commands, B-4, B-6
MANPATH variable, 6-9
master server, description, 1-7
md.conf file
changing, 3-14
description, 3-14, 18-2
values to change, 3-15
md.conf file, description, 1-16
md.tab file
building top down, 4-11
creation guidelines, 4-9
description, 1-15
example, 4-11
planning guidelines, 4-8
planning worksheet, C-8
troubleshooting, 7-28
mediators, D-1 to D-12
administration tasks, D-9 to D-12
and multihost disk expansion
units, 3-11
checking status of data, D-9
definition, D-2 to D-3
double failures, D-10
error messages, double failures, D-11
error messages, general, D-12
failures addressed, D-5
failures, diagrams, D-6 to D-8
fixing bad data, D-10
golden, D-3
host administration, D-9
manual recovery, D-10
monitoring guidelines, D-11
quorum, definition, D-4
steady state, diagram, D-4
medstat(1M) command, usage, D-9
membership monitor
description, 1-6
error messages, A-2 to A-6
features, 1-11
reconfiguring, 23-6
starting, 17-3, 23-5
stopping, 17-3
membership reconfiguration, 9-7
forcing, 9-9, 17-4
message files, checking, 19-9
metaclear(1M), deleting a
metadevice, 18-7
Index-7
metadb(1M)
sample usage, 21-12, 21-19, 22-10
usage and output, 19-7 to 19-8
metadetach(1M)
sample usage, 21-17
usage versus
metaoffline(1M), 22-11
metadevice
actions, destructive, 18-10
configuration information,
saving, 18-6
description, 1-12
planning worksheet, C-6
metadevice administration
adding mirrors to disksets, 18-6
adding UFS logs, 18-9
checking status, 19-4
creating
on Informix, 12-2
on NFS, 9-2
on Oracle, 10-2
on Sybase, 11-2
creating metadevices, 18-7
deleting metadevices, 18-7
destructive actions, 18-10
growing file systems, 18-8
hot spare pools, 18-8
local disks, 18-10
managing metadevices, 18-6
monitoring actions, 19-5
naming metadevices, 3-14, 18-2
overview, 18-2
removing mirrors from disksets, 18-6
replacing errored components, 18-7
taking submirrors offline, 18-7
UFS logs, 18-8
metadevice state database
populating by hasetup(1M), 7-18
Index-8
Solstice HA 1.3 User’s Guide—April 1997
metadevice state database replicas
adding back after failure, 22-10
and mediators, D-2
deleting, 21-11
deleting, caution notice, 21-18
description, 1-13
locating, 18-5, 21-10
monitoring, 19-7
placement, 1-13, 7-18
restoring, 21-12
status checking, 19-4, 19-8
metadisk driver, description, 1-12
metahs(1M)
-d option, usage, 21-10
sample usage, 21-10, 21-18, 21-22
metamirror, description, 1-14
metaoffline(1M)
sample usage, 21-11, 21-20
usage versus
metadetach(1M), 22-11
metaonline(1M)
description, 22-11
sample usage, 21-12, 22-11
metareplace(1M)
sample usage, 21-22, 22-3
metaset(1M)
sample usage, 18-5, 21-13
usage with mediators, D-9
metastat(1M)
determining slice status, 18-5
identifying errored devices, 22-3
identifying submirrors, 22-8
locating submirrors, 21-19
output, 19-5 to 19-7
reporting device errors, 21-16
metattach(1M), sample usage, 21-22
migrating data, 3-15
mini-unix, changing World Wide
Name, 22-15 to 22-16
mirrored metadevices, set-up
Informix, 12-4
Oracle, 10-5
Sybase, 11-2, 11-4
mirrors
adding to diskset, 18-6
description, 1-14
failures, 18-8
guidelines, 3-10, 18-3
mirroring root, 3-17 to 3-20
root file system, 3-20
three-way, 3-10
monitor agents, 19-12
monitor layer description, 1-11
monitoring
checking message files, 19-9
configuration status, 19-2 to 19-4
metadevice actions, 19-5
overview, 19-1
using haload(1M), 19-5
using hastat(1M), 19-2
using metadb(1M), 19-7
using SunNet Manager, 19-9
multihost disk expansion units
adding a disk, 21-5
number needed, 3-11
power failure, 20-2 to 20-3
multihost disks
adding, 21-8
backing up, 18-10 to 18-12
description, 1-3
determining number needed, 3-11
high vs. low capacity, 3-11
I/O bandwidth, 3-11
partitioning defaults, 4-10
partitioning information, 15-1
partitioning manually, 4-11
replacing, 21-14, 22-2
takeover speed, 3-11
multihost file system
hierarchy, 3-7
mount points, 3-7
planning, 3-7
setting up, 7-19
statmon file system, 3-7
multihost metadevice
administration, 18-5 to 18-9
multiple data services, set-up order, 9-2
N
na.haconfig(1M)
monitor agent, 19-12
syntax, man page, B-3
na.hadtsrvc(1M)
monitor agent, 19-12
syntax, man page, B-3
na.halhost(1M)
monitor agent, 19-12
syntax, man page, B-4
na.hamdstat(1M)
monitor agent, 19-12
syntax, man page, B-4
name service, maps and tables,
configuration worksheets, 4-6
name service entries
Informix, 12-3
Oracle, 10-3
Sybase, 11-3
name_to_major file, description, 15-4
naming, updating services, 4-7
net_diagnose_comm, fault probe, 25-6
to 25-9
Netscape
Commerce Server, configuring, 13-11
data services supported on HA, 13-2
installing data services, 13-3
News Server, configuring, 13-6
network fault monitoring, 25-5
network fault probes, 25-6 to 25-9
Index-9
network interfaces, configuration
files, 23-5
networks
configuration planning, 3-2
connections, planning, 4-2
diagram, general, 4-5
FDDI limitations, 4-17
installation considerations, 4-17
naming, 4-6
numbers reserved for private
networks, 4-7
secondary, guidelines, 4-4
newfs(1M), sample usage, 21-5
node-lock licensing, 5-1
non-boot disk replacement, 21-4
ns-setup, usage, 13-6
nsswitch.conf file
caution notice, 4-8
changes from HA install, 4-7
NVRAM, E-1 to E-7
backup procedure, caution, E-2
battery problems, E-2, E-4
description, E-1
enabling and disabling, E-2 to E-4
purging and flushing data, E-4 to E-7
purging data, caution, E-4
O
OpenBoot PROM
default settings for HA, 4-14, 4-15
device alias, 4-15
entering, 16-6
sending a break to the server, 16-6
split-brain syndrome
avoidance, 17-10
variables, 17-8
Oracle installation
preparing servers, 10-2
requirements, 10-4
oratab file, entries, 10-7
overload caution, 3-2
Index-10
Solstice HA 1.3 User’s Guide—April 1997
P
panic, rebooting after, 25-5
partitioning Solaris install disk, 6-3
patches
firmware, 6-10, 22-16
required for HA 1.3, 6-9
SPARCstorage Array, 22-17
PATH variable, 6-9
path_to_inst file, description, 15-4
pathprefix entries, changing, 9-4
pfile, Oracle, 10-13
physical host
naming, 3-5, 4-3
secondary network host names, 4-4
“port busy” message, terminal
concentrator, 16-4
port configuration, correcting access
error, 16-7
port mode, resetting, 16-8
port numbers
and IP addresses, Internet Pro, 13-13
defaults, Internet Pro, 13-9
listener port, Informix, 12-6
server ports, Internet Pro, 13-24
typical numbers used for first HA
cluster, 16-3
post-installation procedures, 6-8
power loss, 20-2 to 20-5
multihost disk expansion unit, 20-3
partial, 3-13, 20-3
separate power sources, 20-3
single power source, 20-2
single server, 20-3
SPARCstorage Array, 22-2
terminal concentrator, 20-4
power sources, planning
considerations, 3-12
primary host name, definition, 3-5
primary logical host name, definition, 4-3
primary public network, configuration
worksheet, 4-6
printenv OpenBoot PROM
command, 17-9
private host name, naming
conventions, 3-5
private network
cable replacement, 23-2
configuring, 7-4
connections, 1-3
definition, 3-3
IP addresses, 4-7
naming, 3-4, 4-7, 7-4
network addresses, 3-2
reserved IP addresses, 3-3
status checking, 19-4
verifying, 7-5
PROBE INTERVAL, tuning for Internet
Pro, 13-22
PROBE TIMEOUT, tuning for Internet
Pro, 13-22
product description, Ultra Enterprise
Cluster HA, 1-8
profile file,
autohainstall.class, 4-20
prtvtoc(1M), recording VTOC
information, 15-2
public Ethernet cable
failure, 23-1
replacement, 23-2
public network
adding, 3-6, 23-3
administration, 23-6
connections, 1-3
removing, 23-6
status checking, 19-4
Q
quorum, mediator, D-4
quorum, replica, D-2
R
raw mirrored metadevices
limitations, 10-6
on Informix, 12-4
on Oracle, 10-5
on Sybase, 11-2 to 11-4
reconfiguration reboot, 15-6
performing, 24-3
recovery
from mediator double failures, D-12
from SPARCstorage Array power
loss, 22-2
reliability, rules for improvement, 3-16
remote login, through a terminal, 15-7
repairing the /var file system, 17-11
replacing
failed disks, 21-1
hot spares, 22-3
local boot disk, 21-4
local non-boot disk, 21-4
network cables, 23-1
network interfaces, 23-1
SBus cards, 24-3
SPARCstorage Array
components, 22-7
system board, 24-1
replicas
and mediators, D-2
deleting, 21-11
deleting, caution notice, 21-18
locating, 18-5, 21-10
losing half, recovery
procedures, D-10
monitoring, 19-7
placing on multihost disks, 7-18
recovering manually, 22-2
restoring, 21-3, 21-12, 22-10
status checking, 19-4
restart(1M), configuring, 21-5
restoring a boot disk from backup, 21-2
restrictions, HA configuration, 3-20
Index-11
resync performance, 22-3
root file system
mirroring, 3-17 to 3-20
size, C-2
root logins, 15-7
root profile file, customizing, 4-21
root slice
size calculation, 6-4
size calculation worksheet, C-1
routed feature, disabling, 16-9
rpc.pmfd(1M), syntax, man page, B-3
rules file, updates, 4-20
rules to improve reliability, 3-16
RUN_backupserver file, Sybase, 11-5
RUN_server file, Sybase, 11-5
S
SBus cards, replacing, 24-3
secondary public network
configuration worksheet, 4-6
naming, 4-4
send brk from OpenBoot PROM, 16-6
server listener, Sybase, 11-6
servers
communication between servers, 1-3
configuration requirements, 1-2, 4-3
hardware, overview, 1-3
logging in, through terminal
concentrator, 16-3
maintenance
shutting down servers, 17-5, 17-6
starting servers without running
Solstice HA, 17-7
naming, 4-3
naming, Sybase, 11-6
power failure, 20-3
router limitation, 4-2
status checking, 19-3
time synchronization, 17-14
Index-12
Solstice HA 1.3 User’s Guide—April 1997
service layer description, 1-8
share options, setting for HA-NFS file
systems, 9-5 to 9-10
share(1M), using with HA-NFS, 9-5
share_nfs(1M), verifying options, 9-5
shelltool(1), setting window
size, 16-2
shutting down HA servers, 17-5 to 17-7
sibling server, description, 1-3
SID, Oracle, 10-7
single-user mode, booting, 17-8, 17-12
software installation
calculating root slice, 6-4
from a CD-ROM, 6-6
guidelines, 6-2
inode calculations, 6-4
installing patches, 6-9, 6-23
installing Solaris, 6-2
post-installation procedures, 6-8
root file system default size, 6-4
user file system slices, 6-4
software overview, 1-6
Solaris authentication, set-up, 10-6
Solaris installation, guidelines, 6-2
Solstice Backup, 3-16
backing up multihost data, 18-10 to
18-12
Solstice DiskSuite
definition, F-5
description, 1-7
introduction, 1-2
overview, 1-12 to 1-15
Solstice HA
command layer, supported
utilities, 1-9
data protection, 1-3
data services layer, supported
services, 1-8
description, 1-6
elements, 1-8
fault detection
introduction, 25-1
overview, 25-2
monitor layer
supported monitors, 1-11 to 1-12
monitoring agents, 19-10
monitoring, overview, 19-1
packages, 17-13
software layers, 1-8
Solstice HA, elements of, 1-8
space allocation
free space, 6-4
metadevice state database
replicas, 3-14
mirroring, 3-10
planning disk requirements, 3-6
planning for growth, 3-9
root slice, 6-4
system disk file system, 6-3
trans devices, 3-11
UFS logs on multihost disks, 7-11
user slice, 6-4
SPARCstorage Array
controller numbers, 22-15
enabling and disabling NVRAM, E-2
firmware level, verifying, 22-16
firmware, verification and
validation, 6-10, 22-16
flushing writes from NVRAM, E-5
lost connection, repairing, 22-4
NVRAM administration, E-1 to E-7
tray, bringing back into service, 22-10
World Wide Name, 22-12 to 22-16
split-brain syndrome
description, 17-5, 25-4
prevention, 17-10
sqldba, Oracle, 10-7
ssaadm(1M)
determining firmware level, 22-16
display option, 21-9
sample usage, 18-4
downloading a World Wide
Name, 22-16
HA limitations, 18-3
sample usage, 21-20
usage with NVRAM, E-2, E-3
starting HA on next reboot, 21-5
statmon file
growing file system warning, 18-8
stopping Solstice HA, 17-6, 22-13, 23-4,
24-2
strings, dual, D-1
stripes, description, 1-13
stty(1), setting rows and cols, 16-3
submirrors
attaching, 21-22
bringing back on line, 21-12
description, 1-14
detaching, 21-17
identifying with
metastat(1M), 22-8
locating with metastat(1M), 21-19
resyncing, 22-11
taking off line, 21-11, 21-20
SunNet Manager, using to monitor, 19-9
switching over data services, 17-2
switchover limitation, Oracle, 10-14
Sybase installation, preparing
servers, 11-2
Sybase Server, creation, 11-5
sybinit, setting up listener, 11-6
sybtab file, 11-6
Index-13
symmetric configuration, 3-2, 3-3
description, 1-2
system board, replacement, 24-1
system disk file system, space
allocation, 6-3
system files
associated with Solstice HA, 1-15 to
1-16
updated by Solstice HA, 1-16
T
tag fields, 18-9
takeover
actions, 1-7
during file system growing, 18-8
false takeovers, 25-5
heuristics, 25-3
telnet(1)
to the terminal concentrator, 16-2
troubleshooting connection
problems, 16-7
TERM environment variable, setting, 16-3
terminal concentrator
administrative setup, 16-2 to 16-3
connections, resetting, 16-4 to 16-7
disconnecting, 16-5
host name, 3-3
IP address, 3-3
“port busy” message, 16-4
port configuration access errors, 16-7
ports, defaults for HA, 16-2
ports, misconfigured, 16-8
ports, resetting, 16-5
power failure, 20-4
root password, default, 16-4
troubleshooting, 16-7 to 16-10
“unable to connect” message, 16-4
time synchronization protocol, 17-14
time, changing the time on servers, 17-14
Index-14
Solstice HA 1.3 User’s Guide—April 1997
tnsnames.ora file, configuration, 10-10
tput(1)shelltool window size, 16-2
trans device
creation, HA-NFS, 9-2
description, 1-14
log and master I/O, 3-11
log sizes, 3-11
planning considerations, 3-11
troubleshooting
hasetup(1M), 7-29
installation problems, 7-27
md.tab, 7-28
U
UFS
adding, 9-7
description, 1-14
removing, 9-8
setting up, 7-20
UFS logging, description, 1-14
UFS logs
adding, 18-9
managing, 18-8
setting location, 1-14
setting size, 1-15
Ultra Enterprise Cluster HA
product description, 1-1 to 1-8
“unable to connect” message, terminal
concentrator, 16-4
unshare(1M), removing an HA-NFS file
system, 9-9
UPS power source, 3-12
user file system, space allocation, 6-4
user id
Informix, 12-3
Oracle, 10-3
Sybase, 11-3
V
verification and validation
fault detection, 7-26
hacheck(1M), 7-24
HA-INFORMIX, 12-10
haswitch(1M), 7-25
HA-SYBASE, 11-10
SPARCstorage Array firmware, 6-10,
22-16
tasks, 7-24
tests, 7-25
verification of installation
Informix, 12-10
Oracle, 10-4, 10-15
Sybase, 11-10
vfstab file
creation by hasetup(1M), 7-13
vfstab.logicalhost file
adding a UFS entry, 9-7
adding an HA-NFS entry, 9-8
description, 1-15
removing a UFS entry, 9-8
updating, 7-20
VTOC information
recording, 15-2
restoring, 15-4
W
watchdog-reboot? variable,
setting, 17-8
World Wide Name
description, 22-12, 22-14
display, 21-8
replacing, 22-12
setting, 22-16
Index-15
Index-16
Solstice HA 1.3 User’s Guide—April 1997
Copyright 1997 Sun Microsystems Inc., 2550 Garcia Avenue, Mountain View, Californie 94043-1100, U.S.A. Tous droits
réservés.
Ce produit ou document est protégé par un copyright et distribué avec des licences qui en restreignent l’utilisation, la copie,
la distribution, et la décompilation. Aucune partie de ce produit ou de sa documentation associée ne peut être reproduite sous
aucune forme, par quelque moyen que ce soit, sans l’autorisation préalable et écrite de Sun et de ses bailleurs de licence, s’il
y en a.
Des parties de ce produit pourront être dérivées du système UNIX® licencié par Novell, Inc. et du système Berkeley 4.3 BSD
licencié par l’Université de Californie. UNIX est une marque enregistrée aux Etats-Unis et dans d’autres pays et licenciée
exclusivement par X/Open Company Ltd. Le logiciel détenu par des tiers, et qui comprend la technologie relative aux polices
de caractères, est protégé par un copyright et licencié par des fournisseurs de Sun.
Sun, Sun Microsystems, le logo Sun, Solaris, SunSoft, le logo SunSoft, SunOS, Solstice, OpenWindows, DeskSet,
SunFastEthernet, SunFDDI, SunNetManager, AnswerBook, JumpStart, OpenBoot, RSM, Solstice DiskSuite, Solstice Backup,
ONC, ONC+, NFS, et Ultra Enterprise sont des marques déposées ou enregistrées de Sun Microsystems, Inc. aux Etats-Unis et
dans d’autres pays. Toutes les marques SPARC, utilisées sous licence, sont des marques déposées ou enregistrées de SPARC
International, Inc. aux Etats-Unis et dans d’autres pays. Les produits portant les marques SPARC sont basés sur une architecture
développée par Sun Microsystems, Inc.
Les interfaces d’utilisation graphique OPEN LOOK® et Sun™ ont été développées par Sun Microsystems, Inc. pour ses
utilisateurs et licenciés. Sun reconnaît les efforts de pionniers de Xerox pour la recherche et le développement du concept des
interfaces d’utilisation visuelle ou graphique pour l’industrie de l’informatique. Sun détient une licence non exclusive de
Xerox sur l’interface d’utilisation graphique Xerox, cette licence couvrant aussi les licenciés de Sun qui mettent en place
l’interface d’utilisation graphique OPEN LOOK et qui en outre se conforment aux licences écrites de Sun.
Le système X Window est un produit de X Consortium, Inc.
CETTE PUBLICATION EST FOURNIE “EN L’ETAT” SANS GARANTIE D’AUCUNE SORTE, NI EXPRESSE NI IMPLICITE,
Y COMPRIS, ET SANS QUE CETTE LISTE NE SOIT LIMITATIVE, DES GARANTIES CONCERNANT LA VALEUR
MARCHANDE, L’APTITUDE DES PRODUITS A RÉPONDRE A UNE UTILISATION PARTICULIERE, OU LE FAIT QU’ILS
NE SOIENT PAS CONTREFAISANTS DE PRODUITS DE TIERS.