1
Viking M
Service Manual
English
Prod. No. 2040005, 2040015, 2040035
3EN370401-16
2012-12-27
Proj. 1707
Prod. No. 2040005
S/N 7 100 101-7 200 200
Prod. No. 2040015
S/N 7 500 401 - 7 600 500
Prod. No. 2040035
S/N 9 200 001 - 9 300 000
© Copyright Liko AB
5HSDLUVDQGPDLQWHQDQFHPD\RQO\EHSHUIRUPHGE\SHUVRQQHODXWKRUL]HGE\+LOO5RPLiko
and using original Liko spare parts.
)RULQIRUPDWLRQUHJDUGLQJ6HUYLFHDQG0DLQWHQDQFHHGXFDWLRQFRQWDFW\RXU+LOO5RPLiko representative.
)RUFRQWDFWLQIRUPDWLRQSOHDVHYLVLWRXUZHEVLWHwww.liko.com
/LNR$%1HGUHYlJHQ6(/XOHn6ZHGHQ
WHOID[
LQIR#OLNRVHZZZOLNRFRP
Table of Contents
1.0
Page
7DEOHRIFRQWHQWV ...................................................................3
2.0 Spare Parts Positions............................................................4
3.0 Technical Data
3.1 Viking M 2040005 ........................................................5
3.2 Viking M 2040015 ........................................................6
3.3 Viking M 2040035 ........................................................7
7URXEOHVKRRWLQJ
4.1 Viking M 2040005 ........................................................8
4.2 Viking M 2040015 .......................................................9
4.3 Viking M 2040035 ......................................................10
4.4 Control Unit CBL 20 .................................................... 11
5.0 Spare Parts List....................................................................12
$WWDFKPHQWIRU&RQWURO%R[ ......................... 17
+DQG&RQWUROEXWWRQ ................................. 18
&DEOHIRU&KDUJLQJ ...................................... 19
)URQW:KHHOPP ..................................... 20
5HDU:KHHOPP ................................... 21
+DQG&RQWURO((EXWWRQ ........................... 22
([WUD%DWWHU\%R[ ........................................ 23
5.159
Front Fork Cover ........................................ 24
([WHQVLRQ&DEOH .......................................... 25
5.194
Rear Fork Cover .......................................... 26
/LIW$UP3ODVWLF&RYHU .................................. 27
2YHUKHDG%HDP5HVWRUDWLRQVHW ................. 28
5.199
Locking Handle ........................................... 29
([WHQVLRQ&DEOH86 .................................... 30
/DWFK8QLYHUVDO6OLQJEDU ............................. 31
%DVH0RWRUFRPSOHWH.................................. 32
5.267
Actuator Viking M ........................................ 34
&RQWURO%R[9LNLQJ0 ................................... 35
)URQW:KHHOPP6WDQGDUG ..................... 36
5HDU:KHHOPP6WDQGDUG ...................... 37
+RRNIRUKDQGFRQWURO .................................. 38
/LIW$UP3ODVWLF&RYHU .................................. 39
2YHUKHDG%HDP5HVWRUDWLRQVHW ................. 40
/DWFKFRPSRVLWH ......................................... 42
5HVWRUDWLRQVHWPRWRUDWWDFKPHQW ............... 43
2XWHU7XEH ..................................................45
5.333
Wireless hand control HBL20 ...................... 47
5.334
Control Unit CBL, Vi M ................................ 48
&
&RQWURO8QLO&%/9L0&DEOH ...................... 50
&RQWURO8QLW&%/E\61............................. 52
&
&RQWURO8QLW&%/E\61............................. 54
5.347
Actuator Vi M .............................................. 56
([WHQVLRQFDEOH&%/ ............................. 57
([WUDEDWWHU\ER[ ......................................... 58
5.351
Beltclip HBL20 ............................................. 59
&OLSVZLWKKRRN+%/ ................................ 60
&KDUJHFDEOHKRRN ...................................... 61
5.354
Hand control hanger .................................... 62
5.410
Viking M Legs .............................................. 63
5.418
Mast Viking M .............................................. 65
5.422
Locking device CBL20................................. 66
5.439
Bracket Cover.............................................. 67
5.460
Leg Cover M ................................................ 68
)OH[OLQN ........................................................70
)RUNORFNLQJDWWDFKPHQW .............................. 71
5.486
Wheel Fork ..................................................72
6OLQJ%DU$VVHPEO\VHW................................. 73
5.511
Locking Ring Hand Control CBL ................. 74
6.0 Service,Control Unit CBL
3DUDPHWHU&RGH.H\..................................................75
5HVHW6HUYLFH,QWHUYDO3DUDPHWHUV ............................ 76
/LNR6HUYLFH6\VWHP/66 ....................................................77
/LNR'LDJQRVWLF6\VWHP6HUYLFH/'6................................ 78
9.0 Periodic Inspection ...............................................................79
10.0 Preventative Maintenance....................................................85
11.0 Product Changes .................................................................93
2.0
Spare Parts Positions
PROD. NO.
PRODUCT
2040005
2040015
2040035
Viking M
Viking M (intelligent control box)
Viking M (intelligent control box and cable hand control)
Product No. 2040005 (61 7100101-7200200)
197 308
196 307
461
418
490
55 292
264 311
331
439
139
267
19
Fits Viking M, all models:
268
22 23 24 248
199
410
266
328
285
460
159 485 486
284
194
29
30
7R61
7R61
Product No. 2040015 (61
2040035 (61
353
307
160 263
308
333 351 352 354 511
461
20
418
490
331
264 311
422
334
336
350
347
439
Service Tools, see page 79
334C 336C
199
266
460
410
328
/LNR6HUYLFH6\VWHP
/LNR'LDJQRVWLF6\VWHP
159 485 486
285
348 349
284
ZZZOLNRFRP
4
3.1
Technical Data
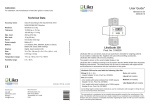
Viking M, Prod. No. 2040005
Lifting speed:
FPVLQFKVZLWKRXWORDG
Wheels:
Batteries:
Two 12 V 2.9 Ah valve-regulated
lead-acid gel-type batteries.
New batteries are provided by the
supplier.
Front: 75 mm twin castor wheels.
5HDUPPEUDNHHTXLSSHGWZLQ
castor wheels.
Intermittent
operation:
,QW2SDFWLYHRSHUDWLRQPD[
2 min. Out of a time of 100, active
must be less than 10, though not
more than 2 min.
Battery charger:
Built-in charger, 100-240 VAC,
+]PD[P$
Motor (mast):
24 V, 9.2 A, permanent magnetic
motor with mechanical safety
mechanism and safety nut.
Motor (base):
Degree of
protection:
24 V, 5.5 A, permanent magnetic
motor.
IP 43
Built for indoor operation.
Material:
Aluminium
Emergency
lowering:
Type B, according to the degree of protection
against electrical shock.
Mechanical and electrical
Class ll equipment.
Measurements
G
A
L
E
D
B1
F F1
C
B
L*
A*
A*
B
B1
C
D
E*
F
F1
Viking M Max.
load
L*
A:
205
179
174
169
52
47
42
202
197
192
144
139
134
123
87
69-111 56-97
100
105
110
10,5 4,5
B:
450
70
69
67
21
19
17
80
78
76
57
55
53
49
34
27-44
39
41
43
4.1
Max. Min. Max. Min.
22-38
1.6
G
Weight
Weight
Total
Part
Turning
diameter
88 35
18
140
35 77
40
55
A: Max. load and weight in kg. Measurement in cm.
B: Max. load and weight in lbs. Measurement in inch.
* These measures depend on in which hole the mast is levelled and secured. See assembly instructions page 5.
ZZZOLNRFRP
5
3.2
Technical Data
Viking M, Prod. No. 2040015
Maximum load: NJOEV
HandControl
IR
Material:
$OXPLQLXP
Weight:
Total weight:
Heaviest part:
34.0NJOEV 15.3NJOEV
%DWWHULHV2 AAA LR03 1.5 V.
5HDFKPLQ
Electrical Data: 24 V
Intermittent
operation:
,QW2SDFWLYHRSHUDWLRQPD[PLQ
2QO\RIDJLYHQOHQJWKRIWLPHPD\
EHDFWLYH\HWQRPRUHWKDQPLQ
Batteries:
NiMH cells, 2.2 Ah. 1HZEDWWHULHVprovided
E\WKHVXSSOLHU
Em. Lowering: Manual and electrical
Battery
Charger:
&%/EXLOWLQ9$&
+]PD[P$
Lifting interval: PPLQ
Lift Motor:
3HUPDQHQWPDJQHWPRWRUZLWKPHFKDQLFDO
VDIHW\PHFKDQLVP 24 V, 8.5 A
)URQWPPLQFKWZLQZKHHOV
5HDUPPLQFKWZLQZKHHOVZLWKEUDNHV
Wheels:
Turning diam- PPLQ
eter:
Lifting Speed
(no load):
PPVDQGPPVUHVSHFWLYHO\
(1.7 in/s and 1.5 in/s, respectively)
Sound Level:
46 dB(A)
Protection
Class:
IP 54
Op. Forces
of Controls:
+DQG&RQWURO1
2SHUDWLRQ3DQHO1
Motor for
base-width
adjustment:
3HUPDQHQWPDJQHWPRWRU
24 V, 6 A
7KHGHYLFHLVLQWHQGHGIRUXVHLQGRRUV
7\SH%LQDFFRUGDQFHZLWKWKHHOHFWULFDOVKRFNSURWHFWLRQFODVV
&ODVV,,HTXLSPHQW
Lateral view
Top view
M
LPD[
**700 mm (28 in)
APD[
N
C
**600 mm (24 in)
APLQ
O
LPLQ
D
D1
E
F F1
D2
Max. reach position of lift arm
B3
B2
B1
B
Max. reach position of lift arm
Measurement in mm
Amax.* Amin.*
2020
1970
1920
1440
1390
1340
B
1230
B1
870
B2
B3***
660
650
650
595
C
D
max.
min.
max.
min.
1110
690
970
560
D2**
E*
F
F1
195
1100
1050
1000
105
30
Lmax* Lmin*
1790
1740
1690
520
470
420
M
N
O
385
220
495
Measurement in inch.
A max.*
A min.*
79.5
77.6
75.6
56.7
54.7
52.8
B
B1
B2
48.4 34.3 26.0
B3***
25.6
25.6
23.4
C
D
max.
min.
max.
min.
43.3
27.2
38.2
22.0
D2**
E*
F
F1
7.7
43.3
41.4
39.4
4.2
1.2
Lmax* Lmin*
70.5
68.5
66.5
20.5
18.5
16.5
M
N
O
15.2
8.7
19.5
1RWH7KHPHDVXUHPHQWVDUHEDVHGRQWKHOLIWEHLQJHTXLSSHGZLWKVWDQGDUGVOLQJEDUDQGVWDQGDUGZKHHOV:KHQFKDQJLQJWRRWKHUOLIWLQJ
DFFHVVRULHVRURWKHUZKHHOVFKHFNWKDWWKHOLIWVWLOODFKLHYHVGHVLUHGOLIWLQJKHLJKW
'
LIIHUHQWPHDVXUHPHQWVDSSO\WR9LNLQJ0GHSHQGLQJRQWKHKHLJKWVHWWLQJSRVLWLRQVHH´$VVHPEO\´LQWKH,QVWUXFWLRQ*XLGH
5HIHUHQFHPHDVXUHPHQWDFFRUGLQJWR6WDQGDUG(1,62
ZZZOLNRFRP
6
3.3
Technical Data
Viking M, Prod. No. 2040035
Operating Forces +DQG&RQWURO2.4 N
of Controls:
2SHUDWLRQ3DQHO1
Maximum load:
NJOEV
Material:
$OXPLQLXP
Weight:
7RWDOZHLJKW
Heaviest part
NJ,EVNJ,EV
Wheels:
)URQWPPLQFKWZLQZKHHOV
5HDUPPLQFKWZLQZKHHOVZLWKEUDNHV
Electrical data:
24 V
Intermittent
power:
Int. Op 10/90, active operation
PD[PLQ2QO\RIDJLYHQ
OHQJWKRIWLPHPD\EHDFWLYHEXWQR
PRUHWKDQPLQ
Batteries:
NiMH cells, 2.2 Ah. 1HZEDWWHULHV
SURYLGHGE\WKHVXSSOLHU
Battery charger:
&%/EXLOWLQ9$&
+]PD[P$
Lift motor:
3HUPDQHQWPDJQHWPRWRUZLWK
PHFKDQLFDOVDIHW\PHFKDQLVP
24 V, 8.5 A
Turning diameter PPLQ
Emergency
lowering device:
Mechanical and electrical
Lifting interval:
PPLQ
Lifting speed
(no load)
PPVDQGPPVUHVSHFWLYHO\
(1.7 in/s and 1.5 in/s, respectively)
Sound level:
46 dB(A)
Motor for base3HUPDQHQWPDJQHWPRWRU
width adjustment: 24 V, 6 A
7KHGHYLFHLVLQWHQGHGIRUXVHLQGRRUV
7\SH%LQDFFRUGDQFHZLWKWKHHOHFWULFDOVKRFNSURWHFWLRQFODVV
Protection class: IP 54
&ODVV,,HTXLSPHQW
Lateral view
Top view
M
**700 mm (28 in)
APD[
LPD[
N
C
**600 mm (24 in)
APLQ
O
LPLQ
D
D1
E
F F1
D2
Max. reach position of lift arm
B3
B2
B1
B
Max. reach position of lift arm
Measurement in mm
Amax.* Amin.*
2020
1970
1920
1440
1390
1340
B
B1
B2
B3***
1230
870
660
650
650
595
C
D
max.
min.
max.
min.
1110
690
970
560
D2**
E*
F
F1
195
1100
1050
1000
105
30
Lmax* Lmin*
1790
1740
1690
520
470
420
M
N
O
385
220
495
Measurement in inch.
A max.*
A min.*
79.5
77.6
75.6
56.7
54.7
52.8
B
B1
B2
48.4 34.3 26.0
B3***
25.6
25.6
23.4
C
D
max.
min.
max.
min.
43.3
27.2
38.2
22.0
D2**
E*
F
F1
7.7
43.3
41.4
39.4
4.2
1.2
Lmax* Lmin*
70.5
68.5
66.5
20.5
18.5
16.5
M
N
O
15.2
8.7
19.5
1RWH7KHPHDVXUHPHQWVDUHEDVHGRQWKHOLIWEHLQJHTXLSSHGZLWKVWDQGDUGVOLQJEDUDQGVWDQGDUGZKHHOV:KHQFKDQJLQJWRRWKHUOLIWLQJ
DFFHVVRULHVRURWKHUZKHHOVFKHFNWKDWWKHOLIWVWLOODFKLHYHVGHVLUHGOLIWLQJKHLJKW
'LIIHUHQWPHDVXUHPHQWVDSSO\WR9LNLQJ0GHSHQGLQJRQWKHKHLJKWVHWWLQJSRVLWLRQVHH´$VVHPEO\´LQWKH,QVWUXFWLRQ*XLGH
5HIHUHQFHPHDVXUHPHQWDFFRUGLQJWR6WDQGDUG(1,62
ZZZOLNRFRP
7
4.1
Trouble shooting
Viking M, Prod. No. 2040005
The lift does not work up/down.
Width adjustment does not
work in/out.
1. Check that the emergency stop button is not
pushed in. (p. 7).
2. Check that the cables are connected correctly.
(p. 5).
3. Check that the charging cable is not connected
to the wall socket.
4. Check that the battery is charged. (p. 8).
5. Check that the contact plates of the battery pack
are not defective or broken off.
6. If the lift still does not work satisfactorily, contact
Liko/Hill-Rom.
Battery charging does not
work.
1. Check that the emergency stop button is not
pushed in. (p. 7).
2. Check that the contact plates of the battery pack
are not defective or broken off.
3. If the lift still does not work satisfactorily, contact
Liko/Hill-Rom.
The lift stops in the elevated
position.
1. Check that the emergency stop button is not
pushed in. (p. 7).
2. 8VHWKHHOHFWULFDOHPHUJHQF\ORZHULQJWRVDIHO\
ORZHUWKHSDWLHQW.S
3. Use the mechanical emergency lowering device
(marked) to safely lower the patient .(p. 7).
4. Check that the battery is charged.
5. If the lift still does not work satisfactorily, contact
Liko/Hill-Rom.
If you hear unusual sounds.
Contact Liko/Hill-Rom.
ZZZOLNRFRP
8
4.2
Trouble shooting
Viking M, Prod. No. 2040015
The lift does not work up/down
with the HandControl IR.
The base-width adjustment
doesn’t work (in/out) with
the HandControl IR.
0DNHVXUHWKDWWKHHPHUJHQF\VWRSLVQRWHQJDJHG
,IWKHOLIWKDVQRWEHHQXVHGIRUKRXUVHQDEOHWKHV\VWHP
&KHFNWKDWWKH+DQG&RQWURO,5LVHQDEOHG
&KHFNWKDWWKHFKDUJHUFDEOHLVQRWFRQQHFWHGWRDQHOHFWULF
outlet.
+DQG&RQWURO,5LQGLFDWHVEDWWHU\FKDQJH
,IWKHOLIWZRUNVYLDWKHRSHUDWLRQSDQHO
change the HandControl IR.
7. ,IWKHSUREOHPSHUVLVWVSOHDVHFRQWDFW/LNR+LOO5RP
The lift does not work up/down
with the operation panel.
The base-width adjustment
doesn’t work (in/out) with
the operation panel.
0DNHVXUHWKDWWKHHPHUJHQF\VWRSLVQRWHQJDJHG
0DNHVXUHWKDWWKHFDEOHVWRWKHFRQWUROER[DUHFRQQHFWHG
correctly.
&KHFNWKDWWKHFKDUJHUFDEOHLVQRWFRQQHFWHGWRDQHOHFWULF
outlet.
&KHFNWKHEDWWHU\FDSDFLW\
&KHFNWKDWWKHEDWWHU\¶VFRQWDFWSODWHVDUHQRWGHIHFWLYHRU
EURNHQ
6. If the problem persists, please contact Liko/Hill-Rom.
The charger doesn’t work.
0DNHVXUHWKDWWKHHPHUJHQF\VWRSLVQRWHQJDJHG
&KHFNWKDWWKHFKDUJLQJFDEOHLVFRUUHFWO\FRQQHFWHG
0DNHVXUHWKDWWKHEDWWHU\LVSURSHUO\DWWDFKHG
&KHFNWKDWWKHEDWWHU\¶VFRQWDFWSODWHVDUHQRWGHIHFWLYHRU
EURNHQ
5. ,IWKHSUREOHPSHUVLVWVSOHDVHFRQWDFW/LNR+LOO5RP
The lift is stuck in the high
position.
0DNHVXUHWKDWWKHHPHUJHQF\VWRSLVQRWHQJDJHG
2. &KHFNWKHEDWWHU\FDSDFLW\
3. +DQG&RQWURO,5LQGLFDWHVEDWWHU\FKDQJH
4. 8VHWKHHOHFWULFDOHPHUJHQF\ORZHULQJGHYLFHWRORZHU
WKHSDWLHQWRQWRD¿UPVXUIDFH
8VHWKHPDQXDOHPHUJHQF\ORZHULQJGHYLFHWRORZHU
WKHSDWLHQWRQWRD¿UPVXUIDFH
6. If the problem persists, please contact Liko/Hill-Rom.
Contact Liko/Hill-Rom.
If you hear unusual sounds.
ZZZOLNRFRP
9
4.3
Trouble shooting
Viking M, Prod. No. 2040035
The lift doesn’t ZRUNXSGRZQ
with Hand Control.
The base-width adjustment
GRHVQ¶WZRUNLQRXW with the
Hand Control.
1. Check that the emergency stop button has not been pressed.
2. Check the battery capacity.
3. Check that the charger cable is not connected to an electric
outlet.
4. Check that the hand control cable is correctly connected.
5. If the lift works via the operation panel, change the Hand Control.
6. If the problem persists, please contact Liko/Hill-Rom.
The lift GRHVQRWZRUNXS
down with the operation panel.
The base-width adjustment
GRHVQ¶WZRUNLQRXWwith
the operation panel.
1. Check that the emergency stop button has not been pressed.
2. Check that the cables to the control box are connected correctly.
3. Check that the charger cable is not connected to an electric
outlet.
4. Check the battery capacity.
5. If the problem persists, please contact Liko/Hill-Rom.
The charger doesn’t work.
1. Check that the emergency stop button has not been pressed.
2. Check that the charger cables are connected correctly.
3. Make sure that the battery is properly attached.
4. If the problem persists, please contact Liko/Hill-Rom.
The lift is stuck in the high
position.
1. Check that the emergency stop button has not been pressed.
2. Check the battery capacity.
3. Check that the hand control cable is connected correctly.
4. Electrical emergency lowering, use the operation panel to lower
WKHSDWLHQWRQWRD¿UPVXUIDFH
5. Use the mechanical emergency lowering device to lower the
SDWLHQWRQWRD¿UPVXUIDFH
6. If the problem persists, please contact Liko/Hill-Rom.
If you hear unusual sounds.
Contact Liko/Hill-Rom.
ZZZOLNRFRP
10
4.4
Trouble shooting
Control Unit CBL
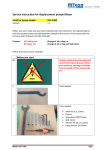
Tools Required
Note! Begin with Simple trouble shooting from Service manual for the
actual product. If problem remains continue as described below.
Multimeter
Check point:
1.
Make sure that:
- the emergency stop 1 is not activated.
- the battery is assembled correctly.
- the charging cable is not connected to mains.
2.
Check operation panel function´s for actuator and base motor
Push control buttons on operation panel 2 at control box
- If both actuator and base motor functions response, continue to step 5.
green, LED
- If no function, continue to step 3.
- If only one of either the actuator or base motor function response:
change position on actuator and base motor cables then check control
function of operation panel, to see if fault is on output channels or the
motors. If control box function is ok! Continue to step 5.
If control box is faulty. Replace the control box.
yellow, LED
3
1
2
3.
Check battery capacity
3a)
Push in the battery capacity button 3 :
- If any of the three LED´s on the battery start´s the battery is OK, continue
to step 4.
- If not, continue to step 3b.
3b)
Measure battery voltage: release battery, 4 measure on contact 1 and 3:
- If voltage over 0V the battery is ok! Continue to step 4.
4.
Verify contact between control box and battery.
4a) Remove the battery and wait for green LED to turn off.
4b)
Put back the battery and see if green LED start automatically.
- If green LED starts, battery contact is ok!
- If not, try to ensure that the battery´s contact plates are not defective
or broken and try to bend them out carefully, then repeat step 4.
- If still no contact, continue to step 5.
1 2 3
1 2 3
5.
Check charging function
5a)
Connect the charging cable to mains
- If charging starts within 1 minute, charge and then continue to step 6.
4
5
- If charging doesn´t start, continue to step 5b.
5b)
Measure output voltage on the control box 5 on contact 1 and 3.
- If voltage is 3-4V charging is OK! Replace the battery, continue to step 6.
- If voltage is 0V when the charging cable is connected to mains the control
box needs to be replaced! Replace the control box.
6.
&KDUJHWKHEDWWHU\XQWLOJUHHQ/('LVÀDVKLQJRQWKHEDWWHU\
- Check that all function´s on the control box is ok!
If not , Replace control box.
Customers FAQ:
- The liftarms up/down function or base width in/out function doesn´t work?
a) Change position on actuator and base motor cables.
b) Perform step 2 and see if fault is on output channel or motors.
- The control panel function´s on controlbox is ok, but the hand control has no function?
a) Check to ensure that battery contact plates in the hand control are not defective or broken.
- There´s no charging function?
a) Verify contact between control box and battery. Perform step 4.
b) Check charging function. Perform step 5.
ZZZOLNRFRP
11
5.0
Spare parts
Viking M
PROD. NO.
POS. NO.
NAME
UNIT
2040005 2040015 2040035
7KHUHDUHWZRPRGHOVRI9LNLQJ03URG1RDQG
:KLFKVSDUHSDUWWKDW¿WVWRHDFKPRGHOFDQEHUHDGLQWKHFROXPQVWRWKHULJKW[ ¿WVZLWKWKLVPRGHO
Viking M Control Units
352'12 326121$0(
81,7
20490013
268
&RQWUROER[9LNLQJ0
S/N 7100101-7200200
20490013US
268
&RQWUROER[9LNLQJ086
S/N 7100101-7200200
only for the US-market
20490032
334
Control Unit CBL, Viking M
Before use; requires Software
and, needs to be programmed
with Liko Service System,
Prod. No. 21090024
20490053
[
[
pce
pce
&RQWURO8QLW&%/E\61
Can only be ordered if S/N
(serial number) can be provided
to Liko Customer Service.
Will be programmed at Liko
before delivery.
2 weeks delivery time from Liko.
pce
336C &RQWURO8QLW&%/E\61&DEOH
Can only be ordered if S/N
(serial number) can be provided
to Liko Customer Service.
Will be programmed at Liko
before delivery.
2 weeks delivery time from Liko.
pce
336
2040005 2040015 2040035
[
334C &RQWURO8QLW&%/9LNLQJ0&DEOH
Before use; requires Software
and, needs to be programmed
with Liko Service System,
Prod. No. 21090024
20490039
20490054
pce
[
[
[
Viking M Spare Parts
$WWDFKPHQWIRU&RQWURO%R[
SFH
20090089
20
Hand control 6-Button
pce
ZZZOLNRFRP
12
[
[
5.0
Spare parts
Viking M
PROD. NO.
POS. NO.
NAME
UNIT
2040005 2040015 2040035
20090026
20090027
20090028
22
23
24
&DEOHIRUFKDUJLQJ(8
&DEOHIRUFKDUJLQJ8.
&DEOHIRUFKDUJLQJ86
pce
[
[
[
)URQWZKHHOPP
to S/N 7102063
pce
[
5HDUZKHHOPP
to S/N 7102063
pce
[
20190017
55
+DQGFRQWURO((EXWWRQV
pce
[
2006106
139
([WUD%DWWHU\
pce
[
20390006
159
Front Fork Cover
pair
[
21090001
160
([WHQVLRQFDEOH
pce
[
5HDUIRUNFRYHU
to S/N 7102063
pair
[
/LIW$UP3ODVWLF&RYHU
to S/N 7106200
set
[
20490008
197
5HVWRUDWLRQVHW2YHUKHDGEHDP
to S/N 7106200
set
[
20490010
199
Locking handle Viking XL
pair
20090050
248
&DEOHIRUFKDUJLQJ$81=
21090011
263
31590011
20490011
ZZZOLNRFRP
[
[
[
[
[
[
[
[
[
[
[
pce
[
[
[
([WHQVLRQ&DEOH86
pce
[
264
Latch Universal SlingBar
pair
[
266
Base Motor Viking M, L
(Viking M 2040005 up to S/N 7107499
also need spare part 20490028, Pos
328)
pce
[
[
[
13
5.0
Spare parts
Viking M
PROD. NO.
POS. NO.
NAME
UNIT
2040005 2040015 2040035
20490012
267
Actuator Viking M
S/N 7100101-7200200
pce
[
)URQW:KHHOPP6WDQGDUG
from S/N 7102064
pce
[
[
[
5HDU:KHHOPP6WDQGDUG
from S/N 7102064
pce
[
[
[
+RRNIRU+DQGFRQWURO
SFH
[
/LIW$UP3ODVWLF&RYHU
from S/N 7106201
set
[
[
[
20490024
308
2YHUKHDG%HDP5HVWVHW
from S/N 7106201
set
[
[
[
[
[
[
[
[
[
/DWFKFRPSRVLWH
Fits Universal SlingBar
from S/N 1299511
pair
[
[
[
5HVWRUDWLRQVHWPRWRUDWWDFK
PHQW
set
[
[
[
20490030
331
2XWHU7XEH
set
[
[
[
20490031
333
Wireless hand control HBL20
set
ZZZOLNRFRP
14
[
5.0
Spare parts
Viking M
PROD. NO.
POS. NO.
NAME
UNIT
2040005 2040015 2040035
20490033
347
Actuator Vi M
S/N 7500401 - 7600500
pce
[
[
21090018
348
([WHQVLRQFDEOH&%/
pce
[
[
21090019
349
([WHQVLRQFDEOH&%/86
pce
[
[
2006107
350
([WUDEDWWHU\ER[
pce
[
[
21090020
351
Beltclip HBL20
pair
[
&OLSVZLWKKRRN+%/
SDLU
[
&KDUJHFDEOHKRRNSFH
VHW
[
21090023
354
Hand control hanger, 10 pce
set
[
20490036
410
Viking M Legs
pair
[
[
[
set
[
[
[
[
[
[
from S/N 7100308
20490038
418
Mast Viking M
including handle and motor
attachment
20090077
ZZZOLNRFRP
422
Locking device CBL20, 10 pce
set
15
5.0
Spare parts
Viking M
PROD. NO.
POS. NO.
NAME
UNIT
2040005 2040015 2040035
20490040
439
Bracket Cover
set
[
[
[
20490048
460
Leg Cover M
set
[
[
[
)OH[OLQN
VHW
[
[
[
)RUNORFNLQJDWWDFKPHQWSDLU
VHW
[
[
[
20090081
486
Wheel Fork
pair
[
[
[
6OLQJ%DU$VVHPEO\VHW
VHW
[
[
[
20490057
511
Locking Ring CBL, 10 pce
set
ZZZOLNRFRP
16
[
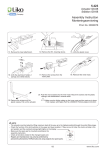
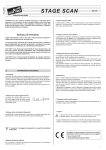
5.19
Attachment for Control Box
Monteringsbeslag kontrollbox
Assembly Instruction
Monteringsanvisning
Contains:
Qty:
Screw MRT-GF M5x16
3
Screw MCL6S M5x8
4
Control box attachment
1
Fits:
Golvo 7000ES/7007ES, 7007 LowBase
Uno 100 EM/EE
Uno 102 EM/EE/ES
Sabina EM/EE
Sabina II EM/EE
Viking XL (Prod. No. 2040003)
Viking L (Prod. No. 2040004)
Viking M (Prod. No. 2040005)
Liko M220 / M230
Prod. No. 20090023
3SE630238-05
2011-02-08
Tools required:
3 mm
T25
1.
2.
x 3 (Viking M, L, XL, Golvo 7000ES/7007ES)
x 3 (Sabina, Uno, Liko M220/M230)
3.
4.
5. (Holder for the charging cable, is
not standard on every lift model)
x1
NOTE
- Make sure the spare part is mounted according to the assembly instruction.
- Check all functions related to the changed spare part.
- Repairs and maintenance may only be performed by personnel authorized by Liko/Hill-Rom and using original Liko spare parts.
ZZZOLNRFRP
17
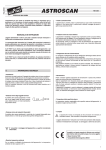
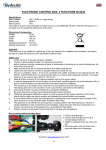
5.20
Hand Control ES 6-Button
Handkontroll ES 6-knappar
Assembly Instruction
Monteringsanvisning
Contains:
Hand control ES
Locking Ring
Qty:
1
1
Prod. No. 20090089
3SE690232-02
2013-01-17
Tools required
Product:
Viking XL
Viking L
Viking M
Golvo 8000
Golvo 8008
Golvo 8008 LowBase
Prod. No.
2040033
2040034
2040035
2000034
2000035
2000039
2. Remove the
locking ring.
3. Remove the
hand control.
Assemble in
reverse order.
4. Make sure the
rectangular
tabs at the
locking ring
DUH¿[HG
1. Release the locking ring
by pressing the triangular
tab.
Triangular tab
facing out.
Product:
Golvo 7000ES/7007ES
Golvo 7007 LowBase
Uno 102 ES
Sabina EE
Sabina II EE
Connect cable
Use no locking
ring on these
products.
NOTE
- Make sure the spare part is mounted according to the assembly instruction.
- Check all functions related to the changed spare part.
- Repairs and maintenance may only be performed by personnel authorized by Hill-Rom/Liko and using original Liko spare parts.
ZZZOLNRFRP
18
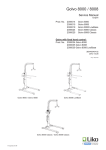
5.22
Cable for Charging
Laddningskabel
Assembly Instruction
Monteringsanvisning
Contains:
Charging cable
Qty:
1
Prod. No. 20090026 EU
Fits:
Golvo 7000ES / 7007ES / 7007 LowBase
Golvo 8000 / 8008 / 8008 LowBase
Uno 100 EM/EE
Uno 102 EM/EE/ES
Sabina EM/EE
Sabina II EM/EE
Viking XL
Viking L
Viking M
20090027 UK
20090028 US
20090050 AU/NZ
3SE630237-06
2012-09-11
Lift equipped with Liko Diagnostic System™
The lift cannot be used when the charger cable is plugged into an electrical outlet.
NOTE
- Never charge batteries in a wet area.
- The lift cannot be charged with the emergency stop engaged.
- When charging, a yellow indicator light on the control box will illuminate. The yellow light turns off when the battery is fully
charged. If the light has not turned off after 8 hours of charging, the battery may need to be replaced. Stop charging and
replace the battery.
- Make sure the spare part is mounted according to the assembly instruction.
- Check all functions related to the changed spare part.
- Repairs and maintenance may only be performed by personnel authorized by Liko/Hill-Rom and using original Liko spare parts.
ZZZOLNRFRP
19
5.29
Front Wheel 75 mm
Framhjul 75 mm
Contains:
Front wheel 75mm
Locking nut M10 nyloc
Assembly Instruction
Monteringsanvisning
Qty:
1
1
Prod. No. 20090034
3SE640273-02
2010-04-21
Fits:
Golvo 1000, 2000, 3000
Golvo 7000/7007, 7000 S/7007 S
Golvo 7000 ES, to S/N 7024205
Golvo 7007 ES, to S/N 7729721
Viking M Prod. No. 2040005, to S/N 7102063
Tools required:
17 mm
1.
2.
3.
NOTE
- Make sure the spare part is mounted according to the assembly instruction.
- Check all functions related to the changed spare part.
- Repairs and maintenance may only be performed by personnel authorized by Liko/Hill-Rom and using original Liko spare parts.
ZZZOLNRFRP
20
5.30
Rear Wheel 100 mm
Bakhjul 100 mm
Assembly Instruction
Monteringsanvisning
Contains:
Lockable castor, d=100 mm
Nut M12
Qty:
1
1
Prod. No. 20090035
3SE650201-04
2012-11-09
Fits:
Golvo 1000, 2000, 3000
Golvo 7000/7007, 7000 S/7007 S
Golvo 7000/7007
Golvo 7000 ES, to S/N 7024205
Golvo 7007 ES, to S/N 7729721
Viking M, Prod. No. 2040005, to S/N 7102063
Tools required:
19 mm
1.
2.
3.
NOTE
- Make sure the spare part is mounted according to the assembly instruction.
- Check all functions related to the changed spare part.
- Repairs and maintenance may only be performed by personnel authorized by Hill-Rom/Liko and using original Liko spare parts.
ZZZOLNRFRP
21
5.55
Hand Control 2, 4-button
Handkontroll 2, 4-knapp
Assembly Instruction
Monteringsanvisning
20190016 Contains:
Hand control EM 2-Button
Qty:
1
20190017 Contains:
Hand Control EE 4-Button
Qty:
1
Prod. No. 20190016, 20190017
20190016 Hand control EM 2-Button, Fits:
LikoLight
Sabina EM
Sabina II EM
Uno 100 EM
Uno 102 EM
Viking S
Viking XS
3SE630204-11
2012-09-11
20190017 Hand control EE 4-Button, Fits:
Uno 100 EE
Uno 102 EE
Viking XL Prod. No. 2040003
Viking L Prod. No. 2040004
Viking M Prod. No. 2040005
Connect cable
Connect cable
NOTE
- Make sure the spare part is mounted according to the assembly instruction.
- Check all functions related to the changed spare part.
- Repairs and maintenance may only be performed by personnel authorized by Hill-Rom/Liko and using original Liko spare parts.
ZZZOLNRFRP
22
5.139
Extra Battery Box, incl Batteries
Batteribox inkl batterier
Assembly Instruction
Monteringsanvisning
Contains:
Battery box
Qty:
1
Prod. No. 2006106
3SE630224-06
2011-02-24
Fits:
Caroli
Capella
Golvo 7000 ES/7007 ES (all models), 7007 Low Base
LikoLight
Liko M220 / M230
Sabina
Uno 100EM,EE,102EM,EE,ES
Viking XL (Prod. No. 2040003)
Viking L (Prod. No. 2040004)
Viking M (Prod. No. 2040005)
(Holder for the charging cable, is
not standard on every lift model)
1
1
2
2
NOTE
- Make sure the spare part is mounted according to the assembly instruction.
- Check all functions related to the changed spare part.
- Repairs and maintenance may only be performed by personnel authorized by Liko/Hill-Rom
and using original Liko spare parts.
- Old batteries are to be left at the nearest recycling station or given to personnel authorized by Liko.
ZZZOLNRFRP
23
5.159
Front Fork Cover LL,Vi, Golvo
Framhjulskåpa LL,Vi, Golvo
Assembly Instruction
Monteringsanvisning
Contains:
Qty:
Nylon screw M5x16 Nature
2
Front fork cover grey light
2
Fits:
Golvo 7000 ES from S/N 7024206
Golvo 7007 ES from S/N 7729722
Golvo 7000 ES Classic / 7007 ES Classic
Golvo 8000 / 8008 (all models)
LikoLight
Viking XL
Viking L
Viking M
Viking S
Viking XS
Roll On
Prod. No. 20390006
3SE380202-04
2010-05-04
Tools required:
4,2 mm
M5
1.
2.
3. If not prepared with hole, drill [mm.]
4.
22,2
5
38,4
5.
6.
NOTE
- Make sure the spare part is mounted according to the assembly instruction.
- Check all functions related to the changed spare part.
- Repairs and maintenance may only be performed by personnel authorized by Hill-Rom/Liko and using original Liko spare parts.
ZZZOLNRFRP
24
5.160
Extension Cable
Skarvkabel
Assembly Instruction
Monteringsanvisning
Contains:
Extension cable EU
Qty:
1
Prod. No. 21090001
3SE630225-05
2011-03-02
Fits:
Golvo 7000ES/7007ES
Golvo 7007 LowBase
Uno 100 EM/EE
Uno 102 EM/EE/ES
Sabina EM/EE
Sabina II EM/EE
Viking XL (Prod. No. 2040003)
Viking L (Prod. No. 2040004)
Viking M (Prod. No. 2040005)
1.
Length 21 cm/ 8.5 inch
2.
3.
NOTE
- Make sure the spare part is mounted according to the assembly instruction.
- Check all functions related to the changed spare part.
- Repairs and maintenance may only be performed by personnel authorized by Liko/Hill-Rom and using original Liko spare parts.
ZZZOLNRFRP
25
5.194
Rear fork cover
Bakhjulskåpa
Assembly Instruction
Monteringsanvisning
Contains:
Rear wheel cover, grey
Qty:
2
Prod. No. 20490005
3SE630295-03
2010-04-14
Fits:
Viking XL
Viking L
Viking M, Prod No. 2040005 (Up to S/N 7102063)
Tools required:
NOTE
- Make sure the spare part is mounted according to the assembly instruction.
- Check all functions related to the changed spare part.
- Repairs and maintenance may only be performed by personnel authorized by Liko and using original Liko spare parts.
ZZZOLNRFRP
26
5.196
Lift Arm Plastic Cover
Pelarkåpa sats
Contains:
Plastic cover mast Viking
Cover hat Liko
Cover hat Liko bottom
Sleeve bearing Mob.62
Locking nut M6 Nyloc
Washer TBRB 6,4x12x3
Screw M6S M6x75
Assembly Instruction
Monteringsanvisning
Qty:
2
2
2
1
1
3
1
Prod. No. 20490007
3SE630240-05
2011-03-11
Fits:
Viking XL (Prod. No. 2040003), to S/N 801999
Viking L (Prod. No. 2040004), to S/N 7200794
Viking M (Prod. No. 2040005), to S/N 7106200
Tools required:
2X
10 mm
NOTE
- Make sure the spare part is mounted according to the assembly instruction.
- Check all functions related to the changed spare part.
- Repairs and maintenance may only be performed by personnel authorized by Liko/Hill-Rom and using original Liko spare parts.
ZZZOLNRFRP
27
5.197
Overhead Beam Restoration set
Renoveringssats lyftarm
Contains:
Assembly Instruction
Monteringsanvisning
Qty:
Plastic cover mast Viking
Cap Y Viking
Cap I Viking
Cover hat Liko & bottom
Sleeve bearing Mob.38
Sleeve bearing Mob.50
Sleeve bearing Mob.62
Locking nut M6 Nyloc
Screw M6S M6x50
Screw M6S M6x60
Screw M6S M6x75
Washer PS 6x12x1
2
2
2
6
1
1
1
3
1
1
1
7
Prod. No. 20490008
3SE630228-06
2011-03-03
Tools required:
2X
10 mm
Fits:
Viking XL (Prod. No. 2040003), to S/N 801999
Viking L (Prod. No. 2040004), to S/N 7200794
Viking M (Prod. No. 2040005), to S/N 7106200
M6x60
Bearing
Mob.38
M6x75
Bearing
Mob.50
Bearing
Mob.62
M6x50
0DNHVXUHWKHEHDULQJVDUH¿[HGLQWKHVH
positions when the arm is mounted.
NOTE
- Make sure the spare part is mounted according to the assembly instruction.
- Check all functions related to the changed spare part.
- Repairs and maintenance may only be performed by personnel authorized by Liko/Hill-Rom and using original Liko spare parts.
ZZZOLNRFRP
28
lik
5.199
Locking Handle Viking XL
Låsvred Viking XL
Assembly Instruction
Monteringsanvisning
Contains:
Lever M10 grey
Lever M10x85 grey
Qty:
1
1
Prod. No. 20490010
3SE630244-03
2009-06-26
Fits:
Viking XL
Viking L
Viking M
Viking XS
Tools required:
Place locking handle in lower hole and tighten.
NOTE
- Make sure the spare part is mounted according to the assembly instruction.
- Check all functions related to the changed spare part.
- Repairs and maintenance may only be performed by personnel authorized by Liko/Hill-Rom and using original Liko spare parts.
ZZZOLNRFRP
29
5.263
Extension Cable, US
Skarvkabel, US
Assembly Instruction
Monteringsanvisning
Contains:
Extension cable US
Qty:
1
Prod. No. 21090011
3SE630218-06
2011-05-02
Fits:
Golvo 7000ES/7007ES
Golvo 7007 LowBase
Uno 100 EM/EE
Uno 102 EM/EE/ES
Sabina EM/EE
Sabina II EM/EE
Viking XL Prod. No. 2040003
Viking L Prod. No. 2040004
Viking M Prod. No. 2040005
Length 26.5 cm/ 10.5 inch
1.
2.
3.
NOTE
- Make sure the spare part is mounted according to the assembly instruction.
- Check all functions related to the changed spare part.
- Repairs and maintenance may only be performed by personnel authorized by Liko/Hill-Rom and using original Liko spare parts.
ZZZOLNRFRP
30
5.264
Latch Universal Slingbar
Urkrokningsskydd Universalbygel
Assembly Instruction
Monteringsanvisning
Contains:
Latch
Qty:
2
Prod. No. 31590011
Fits:
3156074 Universal SlingBar 350
3156075 Universal SlingBar 450
3156076 Universal SlingBar 600
3156077 Universal TwinBar 670
3156079 Universal SideBars 450
3156084 Universal SlingBar 350 with Quick-release Hook
3156085 Universal SlingBar 450 with Quick-release Hook
3156086 Universal SlingBar 600 with Quick-release Hook
3156087 Universal TwinBar 670 with Quick-release Hook
3156094 Universal SlingBar 350 R2R
3156095 Universal SlingBar 450 R2R
3SE630229-04
2011-05-25
NOTE
- Make sure the spare part is mounted according to the assembly instruction.
- Check all functions related to the changed spare part.
- Repairs and maintenance may only be performed by personnel authorized by Hill-Rom/Liko and using original Liko spare parts.
ZZZOLNRFRP
31
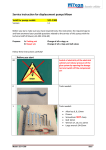
5.266
Base Motor Viking M / L
Benbreddningsmotor Viking M / L
Assembly Instruction
Monteringsanvisning
Contains:
Qty:
Actuator LA30 Viking L/M complete 1
Motor cable Viking M Mini Fit
1
3SE630296-08
2012-12-17
Pos:
A
Slide bearing 10/12x6
B
Nylon bearing with collar
C Cover Hat
D Screw M10x40
E
Locking Nut M10
Fits:
Viking M
Viking M
Viking M
Viking L
Viking L
Viking L
Prod No. 20490011
2
2
4
2
2
Tools required:
2x
T3 mm
17 mm
2040005, from S/N 7107500*
2040015
2040035
2040004, from S/N 7202000*
2040014
2040034
*Fits Viking M/L with lower S/N, together with spare part 20490028;
Rest. set Motor attachment.
Viking M 2040015 + 2040035
Viking L 2040014 + 2040034:
Assemble the enclosed motor cable.
Viking M 2040015 + 2040035
Viking L 2040014 + 2040034:
1
3
2
- Base motor cable; socket 3
Assembly of cable,
see next page.
A
B
x2
C
*
Flat side facing
the actuator.
Viking L
Unfasten the base motor by removing the bolt connections.
Attach the slide bearings (A)
Fasten the Nylon bearing with collar (B)
Change the Base motor by pushing the motor axle in to the middle beam hole.
Before mounting the Base Motor, unscrew the piston rods* to its end position and then
EDFNXQWLOLW¿WVLQWKHEUDFNHWVDWWKHOHJVLQFORVHGSRVLWLRQ
Finish the assembly by mounting the bolt connections, assemble the cable and attach
the cable cover.
ZZZOLNRFRP
D
32
E
x2
Viking L
5.266
Base Motor Viking M / L
Benbreddningsmotor Viking M / L
Assembly of cable for:
Prod No:
Viking M
Viking L
2040015 and 2040035
2040014 and 2040034
Assembly Instruction
Monteringsanvisning
Prod No. 20490011
Cable connection:
Red
Green
Blue
X
Red
X
Make sure distances X are identical.
NOTE
- Make sure the spare part is mounted according to the assembly instruction.
- Check all functions related to the changed spare part.
- Repairs and maintenance may only be performed by personnel authorized by Hill-Rom/Liko and using original Liko spare parts.
ZZZOLNRFRP
33
5.267
Actuator Viking M
Ställdon Viking M
Assembly Instruction
Monteringsanvisning
Contains:
Actuator Viking M
Outer Tube
Locking nut M10 Nyloc
Locking nut M6 Nyloc
Prod. No. 20490012
1
1
2
2
3SE630297-04
2010-08-02
Fits:
Viking M (2040005)
Tools required:
2X
10mm
or
2X
M10
17 mm
M6
M10
M6
From S/N 7103094, use M6 locking nut
Old version, use M10 locking nut
NOTE
- Make sure the spare part is mounted according to the assembly instruction.
- Check all functions related to the changed spare part.
- Repairs and maintenance may only be performed by personnel authorized by Liko and using original Liko spare parts.
ZZZOLNRFRP
34
lik
5.268
Control Box
Kontrollbox
Assembly Instruction
Monteringsanvisning
For the North American market
Spare Part No:
20090022US, 20190014US, 20190076US, 20290011US, 20290024US, 20390007*, 20490009US, 20490013US
Contains:
Qty:
Control Box
1
Extension cable, US
1
For other markets:
Spare Part No:
20090022, 20190014, 20190076, 20290011, 20290024, 20390007*, 20490009, 20490013
Contains:
Qty:
Control Box
1
Extension cable
1
3SE630223-10
2012-08-09
Tools required:
3 mm
Part No.
Fits:
20090022,
20090022US
Golvo 7000ES / 7007ES, 7007 LowBase
20190014,
20190014US
Uno 102 ES
20190076,
20190076US
Uno 100 EM/EE
Uno 102 EM/EE
20290011,
20290011US
Sabina EM/EE
20290024,
20290024US
Sabina II EM/EE
20390007
LikoLight (*Spare part without extension cable)
20490009,
20490009US
Viking XL (Prod. No. 2040003)
Viking L (Prod. No. 2040004)
20490013,
20490013US
Viking M (Prod. No. 2040005)
NOTE:
Uno 100 EM
Uno 102 EM
Sabina EM
Sabina ll EM
Use plug from the
replaced control box!
NOTE: LikoLight has no extension cable
NOTE
- Make sure that the spare part is approved for the lift, and that it is mounted according to the assembly instruction.
- Check all functions related to the changed spare part.
- Repairs and maintenance may only be performed by personnel authorized by Hill-Rom/Liko and using original Liko spare parts.
ZZZOLNRFRP
35
5.284
Front Wheel 75 mm
Framhjul 75 mm
Assembly Instruction
Monteringsanvisning
Contains:
Front wheel 75mm
20390001 Fits:
20490014 Fits:
Qty:
1
Prod. No. 20390001, 20490014
3SE630220-05
2010-05-20
LikoLight
Golvo 7000 fr S/N 7024206
Golvo 7007 fr S/N 7729722
Golvo 7000ES Classic / 7007 ES Classic
Golvo 7007 LowBase
Golvo 8000/8008
Golvo 8000 Classic / 8008 Classic
LikoLight (from S/N 2503102)
RollOn
Viking M 20490005 (from S/N 7102064)
Viking M 2040015
Viking S
Viking XS
Tools required:
16 mm
B)
A)
A&B)
Mount the new spare part. Assemble in reverse order.
NOTE
- Make sure the spare part is mounted according to the assembly instruction.
- Check all functions related to the changed spare part.
- Repairs and maintenance may only be performed by personnel authorized by Hill-Rom/Liko and using original Liko spare parts.
ZZZOLNRFRP
36
5.285
Rear Wheel 75 mm
Bakhjul 75 mm
Contains:
Rear wheel 75mm
Assembly Instruction
Monteringsanvisning
Qty:
1
20390002 Fits: LikoLight up to S/N 2503101
20490015 Fits: Golvo 7000 fr S/N 7024206
Golvo 7007 fr S/N 7729722
Golvo 7000ES Classic / 7007 ES Classic
Golvo 7007 LowBase
Golvo 8000/8008 (all models)
LikoLight (from S/N 2503102)
RollOn
Viking M 20490005 (from S/N 7102064)
Viking M 2040015
Viking S
Viking XS
Prod. No. 20390002
20490015
3SE630221-05
2010-05-20
Tools required:
16 mm
B)
A)
A&B)
Mount the new spare part. Assemble in reverse order.
NOTE
- Make sure the spare part is mounted according to the assembly instruction.
- Check all functions related to the changed spare part.
- Repairs and maintenance may only be performed by personnel authorized by Hill-Rom/Liko and using original Liko spare parts.
ZZZOLNRFRP
37
5.292
Hook for HandControl 2, 4, 6 button
Krok för handkontroll 2, 4, 6 knappar
Assembly Instruction
Monteringsanvisning
Prod. No. 20090058
Contains:
Hook for Hand control 2,4,6
Qty:
1
3SE630210-06
2012-10-16
Fits:
20090089 HandControl 6-button
20190016 HandControl EE 4-button
20190017 HandControl EM 2 button
Tools required:
T10
NOTE
- Make sure the spare part is mounted according to the assembly instruction.
- Check all functions related to the changed spare part.
- Repairs and maintenance may only be performed by personnel authorized by Hill-Rom/Liko and using original Liko spare parts.
ZZZOLNRFRP
38
5.307
Lift Arm Plastic Cover
Pelarkåpa
Assembly Instruction
Monteringsanvisning
Contains:
Qty:
A Cover hat Liko
2
A B
B Screw M6S M6x75
1
C DE F
C Washer PS 6x12x1
3
D Cover hat Liko bottom
2
E Flanged washer
2
F Distance washer PS 12x18x1 2
G Plastic cover mast Vi XS
2
H Sleeve bearing Mob.62
1
I Locking nut M6 Nyloc
1
Fits:
Viking XL
Viking XL
Viking XL
Viking L
Viking L
Viking L
Viking M
Viking M
Viking M
Viking XS
Prod. No. 20490023
G
H
FD
E CI
3SE630250-07
2012-08-22
A
Tools required:
2x
10 mm
Prod. No.
2040003 from S/N 802000
2040013
2040033
2040004 from S/N 7200795
2040014
2040034
2040005 from S/N 7106201
2040015
2040035
2040007
NOTE
- Make sure the spare part is mounted according to the assembly instruction.
- Check all functions related to the changed spare part.
- Repairs and maintenance may only be performed by personnel authorized by Hill-Rom/Liko and using original Liko spare parts.
ZZZOLNRFRP
39
5.308
Overhead Beam Restoration set
Renoveringssats lyftarm
Assembly Instruction
Monteringsanvisning
Pos
Contains:
Qty:
A
Cap Y Viking
2
B
Cap I Viking
2
C
Cover hat Liko
6
D
Cover hat Liko bottom
6
E
Sleeve bearing Mob.38
1
F
Sleeve bearing Mob.50
1
G
Sleeve bearing Mob.62
1
H
Plastic cover mast Vi XS
2
I
Nylon bearing 10/12x15
2
J
Locking nut M6 Nyloc
3
K
Distance washer PS 12x18x1
2
L
Screw M6S M6x50
1
M
Screw M6S M6x60
1
N
Screw M6S M6x75
1
O
Washer PS 6x12x1
6
P
Flanged washer
2
Fits:
Prod. No.
Viking XL
2040003
Viking XL
2040013
Viking XL
2040033
Viking L
2040004
Viking L
2040014
Viking L
2040034
Viking M
2040005
Viking M
2040015
Viking M
2040035
Viking XS
2040007
Prod. No. 20490024
3SE630251-08
2012-09-10
Tools required:
10 mm
2x
1.
2.
3.
from S/N 802000
Viking XS
from S/N 7200795
from S/N 7106201
1.
H
H
P
K
K
P
C
N
O
D
G
ZZZOLNRFRP
40
D
O
J
C
5.308
Overhead Beam Restoration set
Renoveringssats lyftarm
Assembly Instruction
Monteringsanvisning
Pos
Contains:
Qty:
A
Cap Y Viking
2
B
Cap I Viking
2
C
Cover hat Liko
6
D
Cover hat Liko bottom
6
E
Sleeve bearing Mob.38
1
F
Sleeve bearing Mob.50
1
G
Sleeve bearing Mob.62
1
H
Plastic cover mast Vi XS
2
I
Nylon bearing 10/12x15
2
J
Locking nut M6 Nyloc
3
K
Distance washer PS 12x18x1
2
L
Screw M6S M6x50
1
M
Screw M6S M6x60
1
N
Screw M6S M6x75
1
O
Washer PS 6x12x1
6
P
Flanged washer
2
Prod. No. 20490024
2. Viking XS
Viking XS
E
E
D O L
C
I
3.
C
O D
D
O
I
2. Viking M, L, XL
C J
L
C
D O L
M
C
D
A
Viking M
Viking L
D O J
F
B
B
C
A
Viking XL
NOTE
- Make sure the spare part is mounted according to the assembly instruction.
- Check all functions related to the changed spare part.
- Repairs and maintenance may only be performed by personnel authorized by Hill-Rom/Liko and using original Liko spare parts.
ZZZOLNRFRP
41
5.311
Latch, composite
Urkrokningsskydd komposit
Assembly Instruction
Monteringsanvisning
Contains:
Latch composite
Fits:
3156074
3156075
3156076
3156077
3156079
3156084
3156085
3156086
3156087
3156094
3156095
20590006
Qty:
2
Prod. No. 31590014
Universal SlingBar 350
Universal SlingBar 450
Universal SlingBar 600
Universal TwinBar 670
Universal SideBars 450
Universal SlingBar 350 with Quick-release Hook
Universal SlingBar 450 with Quick-release Hook
Universal SlingBar 600 with Quick-release Hook
Universal TwinBar 670 with Quick-release Hook
Universal SlingBar 350 R2R
Universal SlingBar 450 R2R
SlingBar Liko 450
From S/N:
1299511
1299511
1299511
1299511
1299511
1299511
1299511
1299511
1299511
1299511
1299511
1700101
3SE640242-05
2011-02-22
The Latch can only be used on
composite hooks equipped with a
locator.
NOTE
- Make sure the spare part is mounted according to the assembly instruction.
- Check all functions related to the changed spare part.
- Repairs and maintenance may only be performed by personnel authorized by Hill-Rom/Liko and using original Liko spare parts.
ZZZOLNRFRP
42
5.328
Restoration set motor attachment
Renoveringssats motorinfästning
Assembly Instruction
Monteringsanvisning
Contains:
Qty:
Link attachment Viking M Alu
2
Distance Leg 12/9
2
Screw M6S M10x40 GL=15mm
2
Nylon bearing 10x12x6
2
Locking nut M10 nyloc
2
Screw K6S M8x60
2
Nut M6LM M8
2
Coverhat M10 grey
4
Prod. No. 20490028
3SE640258-05
2010-04-21
2x
Fits:
Viking M
Tools required:
17 mm
4 mm & 5 mm
8,2 mm / 0,32 inch
Kernite Unlock 2000
1.
2.
3.
4.
x2
Specify center of existing hole. Mark the same
distance on opposite side with a centre punch.
Drill one hole, Ø 8.2 mm / 0,32 inch on each leg.
ZZZOLNRFRP
43
5.328
Restoration set motor attachment
Renoveringssats motorinfästning
Prod. No. 20490028
5.
x2
7KHOLQNDWWDFKPHQWWRJHWKHUZLWK1\ORQEHDULQJ[[LVDVVHPEOHGVRWKDWWKHQXW¿WVLQWRWKH
groove, in line with the leg. Then - tighten the screw.
7.
6.
Apply Kernite Unlock 2000 on each screw tip.
8.
9.
Connect the cables as follows:
- Handcontrol cable to socket No.1
- Cable for lift arm motor to socket No.2
- Base motor cable to socket No.3
NOTE
- Make sure the spare part is mounted according to the assembly instruction.
- Check all functions related to the changed spare part.
- Repairs and maintenance may only be performed by personnel authorized by Liko and using original Liko spare parts.
ZZZOLNRFRP
44
5.331
Outer Tube
Skyddsrör
Contains:
a Top cover
b Screw P6SS M4x5
c Tube
d Snap bushing
e Two sided adhesive
f Bushing
g Compression spring
Qty:
1
6
1
2
2
1
1
Assembly Instruction
Monteringsanvisning
a
b
c
Prod. No. 20490030
3SE640260-05
2011-03-03
d
Tools required:
Fits:
Viking M
Viking L Prod. No. 2040004
Viking XL Prod. No. 2040003
10 mm
2x
e
10 mm
f
b
g
2 mm
Isopropyl alcohol and water + rag
1.
2.
3.
5.
6.
hold
4.
132±5mm
(5,2
120mm (4,7 inch)
100mm (3,9
inch)
Lock
Before fastening the snap bushing
Clean marked area with 50/50
Isopropyl alcohol and water.
ZZZOLNRFRP
Remove the tape cover!
45
5.331
Outer Tube
Skyddsrör
7.
Assembly Instruction
Monteringsanvisning
8.
9.
Prod. No. 20490030
3SE640260-05
2011-03-03
Tools required:
10.
12.
11.
The three screws should be tightHQHGXQWLOÀXVKZLWKVXUIDFHRIWXEH
Make sure the Outer Tube easy
slides up and down.
13.
NOTE
- Make sure the spare part is mounted according to the assembly instruction.
- Check all functions related to the changed spare part.
- Repairs and maintenance may only be performed by personnel authorized by Liko/Hill-Rom and using original Liko spare parts.
ZZZOLNRFRP
46
5.333
Wireless Handcontrol HBL 20
Handkontroll IR HBL20
Contains:
Handcontrol HBL20
Clips with hook HBL20
Charge Cable Hook
Assembly Instruction
Monteringsanvisning
Qty:
1
1
2
Prod. No. 20490031
3SE640298-04
2011-03-03
Fits:
Golvo 8000 / 8008
Viking M Prod. No. 2040015
Viking L Prod. No. 2040014
Viking XL Prod. No. 2040013
Tools required:
1.
2.
Choice
3.
Golvo
Viking M, Viking L, Viking XL
50 mm / 2 inch
132 mm / 5 inch
4.
A. To activate IR control: Hold the hand
control IR about 20 cm/0.8
/ inch. from the
control unit’s IR receiver and press the
large UP and DOWN buttons on the hand
control simultaneously for about 2 seconds.
A signal is heard when the function is
activated. The lift is now ready to use with
Handcontrol IR.
5.
B. Check to determine if other lifts in the
room are affected by your hand control. If
other lifts are affected by your hand control:
Use the large UP and DOWN buttons on
the operation panel of the lift that is to be
used. Press both buttons simultaneously
until a signal sounds. The lift has now been
assigned a unique communication code.
Now, activate IR control according to procedure A, above.
NOTE
- Make sure the spare part is mounted according to the assembly instruction.
- Check all functions related to the changed spare part.
- Repairs and maintenance may only be performed by personnel authorized by Hill-Rom/Liko and using original Liko spare parts.
ZZZOLNRFRP
47
5.334
Control Unit CBL Vi M
Kontrollbox CBL Vi M
Assembly Instruction
Monteringsanvisning
Contains:
Control Unit CBL20
Cable cover
Screw cable cover
Allen Key 2,5 mm
Screw M5x35
Qty:
1
1
2
1
2
Fits:
Viking M
Prod. No.
2040015
Requires:
Liko Service System
(for programming)
Prod. No.
21090024
Prod. No. 20490032
3SE640299-04
2012-10-25
Tools required:
2,5 & 3 mm
1.
Before use!
Control Unit CBL Vi M must be programmed with Liko Service System,
Prod. No. 21090024 according to the Instruction Guide for the Service System.
2.
With permanent marker,
¿OOLQWKH61DWWKH
product label
(same as on the Viking M)
Product name
EAN-13
" ² " ¦ ¬¸¾¬ ¬ ¬ ¬ ¬ ¬ ÅÅ "
" Ðв " ¦ ¬¸¾¬ ÐЬ ¬ ¬ ¬ ¬ ÅÅÐÐ"
Serial.no.
Prod. No. 1234567
S/N:
¦ ¬ ² ¦ ¦¦ ¦ ¬ ²¬¬ ¦ ¬ ¦ ¦ ¬ ¦ ¦ ¬ ² ¦ ¦¦ ¦ ¬ ²¬¬ ¦ ¬ ¦ ¦ ¬ ¦ Y/M : 2012-3
Max xxx kg / xxx lbs
24 V DC - 2.2 Ah IP54 IEC 60601-1
9801154
TESTED
Liko AB, Nedre vägen 100, 975 92 Luleå, Sweden
Conforms to ISO 10535:2006 with ANSI/AAMI ES60601-1:2005 and
is certified to ISO 10535:2006 with CSA- C22.2 No. 60601-1:08.
Int. Op: 10/90 Active time 2 min.
Controlbox CBL20
Prod. No 20490032
only for use with:
Viking M
Prod. No 2040015
www.liko.com
Product
Prod. No.
name
1234567
Serial.no.
EAN-13
" ² " " Ðв " ¦¦ ¬¸¾¬ ¬ ¬ ¬ ¬ ¬ Å
¬¸¾¬ ÐЬ ¬ ¬ ¬ ¬ Å Å "
ÅÐÐ"
¦ ¬ ² ¦
¦ ¬ ² ¦ ¦¦ ¦ ¬ ²¬¬ ¦ ¬ ¦ ¦ ¬
¦
¦¦ ¦ ¬ ²¬¬
¦ ¬ ¦ ¦ ¬ ¦ Y/M : 2012-3
Max xxx
24 V DC
- 2.2 Ah
kg / xxx
Conforms
to
is certified ISO 10535:2006 with
to
ANSI/AAMI
Int. Op: 10/90ISO 10535:2006 with
ES60601-1:2005
CSA- C22.2
Active time
No. 60601-1:08. and
2 min.
lbs
Sweden
IP54 IEC
60601-1
92 Luleå,
9801154
3.
ZZZOLNRFRP
Liko AB,
Nedre
vägen
100, 975
TESTED
www.liko.com
4.
5.
48
6.
5.334
Control Unit CBL Vi M
Kontrollbox CBL Vi M
Assembly Instruction
Monteringsanvisning
Prod. No. 20490032
7.
Lower holes
8.
”click”
1
2
3
- Charger cable; socket 1
- Lift motor cable; socket 2
- Base-motor cable; socket 3
9.
Enable IR control:
Hold the HandControl IR approx. 20 cm (8 in) from the
control box’s IR receiver and press the hand control’s
large Up and Down buttons simultaneously for approx.
2 sec. When a sound signal is emitted, the function is
enabled.
The lift is now ready to be used with the HandControl IR.
NOTE
- Make sure the spare part is mounted according to the assembly instruction.
- Check all functions related to the changed spare part.
- Repairs and maintenance may only be performed by personnel authorized by Hill-Rom/Liko and using original Liko spare parts.
ZZZOLNRFRP
49
5.334C
Control Unit CBL Vi M, Cable
Kontrollbox CBL Vi M, kabel HK
Assembly Instruction
Monteringsanvisning
1.
Contains:
Control Unit CBL20 with cable
Cable cover
Screw cable cover
Screw M5x35
Allen Key 2,5 mm
Qty:
1
1
2
2
1
Fits:
Viking M
Prod. No.
2040035
Requires:
Liko Service System
(for programming)
Prod. No.
21090024
Prod. No. 20490053
3SE690226-01
2012-10-25
Tools required:
2,5 & 3 mm
Before use!
Control Unit CBL Vi M must be programmed with Liko Service System,
Prod. No. 21090024 according to the Instruction Guide for the Service System.
2.
S/N:
With permanent marker,
¿OOLQWKH61DWWKH
product label
(same as on the Viking M)
Product name
EAN-13
Serial.no.
Prod. No. 1234567
" ² " ¦ ¬¸¾¬ ¬ ¬ ¬ ¬ ¬ ÅÅ "
" Ðв " ¦ ¬¸¾¬ ÐЬ ¬ ¬ ¬ ¬ ÅÅÐÐ"
¦ ¬ ² ¦ ¦¦ ¦ ¬ ²¬¬ ¦ ¬ ¦ ¦ ¬ ¦ ¦ ¬ ² ¦ ¦¦ ¦ ¬ ²¬¬ ¦ ¬ ¦ ¦ ¬ ¦ Y/M : 2012-3
Max xxx kg / xxx lbs
24 V DC - 2.2 Ah IP54 IEC 60601-1
9801154
TESTED
Liko AB, Nedre vägen 100, 975 92 Luleå, Sweden
Conforms to ISO 10535:2006 with ANSI/AAMI ES60601-1:2005 and
is certified to ISO 10535:2006 with CSA- C22.2 No. 60601-1:08.
Int. Op: 10/90 Active time 2 min.
Controlbox CBL20
Prod. No 20490032
only for use with:
Viking M
Prod. No 2040015
www.liko.com
Product
Prod. No.
name
1234567
Serial.no.
EAN-13
" ² " " Ðв " ¦¦ ¬¸¾¬ ¬ ¬ ¬ ¬ ¬ Å
¬¸¾¬ ÐЬ ¬ ¬ ¬ ¬ ÅÅÅ "
ÐÐ"
¦ ¬ ² ¦
¦ ¬ ² ¦ ¦¦ ¦ ¬ ²¬¬ ¦ ¬ ¦ ¦ ¬
¦
¦¦ ¦ ¬ ²¬¬
¦ ¬ ¦ ¦ ¬ ¦ Y/M : 2012-3
Max xxx
24 V DC
- 2.2 Ah
kg / xxx
Conforms
to ISO 10535:2006
is certified
with ANSI/AAMI
to
Int. Op: 10/90ISO 10535:2006 with
ES60601-1:2005
CSA- C22.2
Active time
No. 60601-1:08. and
2 min.
lbs
Sweden
IP54 IEC
60601-1
92 Luleå,
9801154
3.
ZZZOLNRFRP
Liko AB,
Nedre
vägen
100, 975
TESTED
www.liko.com
4.
5.
50
6.
5.334C
Control Unit CBL Vi M, Cable
Kontrollbox CBL Vi M, kabel HK
Assembly Instruction
Monteringsanvisning
Prod. No. 20490053
7.
Lower holes
8.
”click”
1
2
3
- Charger cable; socket 1
- Lift motor cable; socket 2
- Base-motor cable; socket 3
9.
Connect the Hand control.
Make sure the rectangular tabs
DWWKHORFNLQJULQJDUH¿[HG
Attach the locking ring.
NOTE
- Make sure the spare part is mounted according to the assembly instruction.
- Check all functions related to the changed spare part.
- Repairs and maintenance may only be performed by personnel authorized by Hill-Rom/Liko and using original Liko spare parts.
ZZZOLNRFRP
51
5.336
Control Unit CBL, by S/N
Kontrollbox CBL S/N-styrd
Contains:
&RQWURO8QLW&%/
Cable cover
Screw cable cover
6FUHZ0[
6FUHZ0[
Allen Key 2,5 mm
Qty:
SUHFRQ¿JXUHG
1
2
9LNLQJ
*ROYR
1
Fits:
9LNLQJ;/ 9LNLQJ/ 9LNLQJ0 Golvo 8008 LowBase
*ROYR
Golvo 8008
*ROYR&ODVVLF
Golvo 8008 Classic
Prod. No.
2000019
2000015
2000025
only for use with:
Viking M
Prod. No 2040015
2.
To order this Spare Part:
3SE650270-03
2012-10-24
S/N from the Viking M
the Control Unit is intended for,
Tools required:
is required!
2,5 mm
3 mm
PP
61
Product name
ZZZOLNRFRP
EAN-13
Max xxx kg / xxx lbs
9'&$K ,3,(&
TESTED
/LNR$%1HGUHYlJHQ/XOHn6ZHGHQ
Conforms to ISO 10535:2006 with ANSI/AAMI ES60601-1:2005 and
is certified to ISO 10535:2006 with CSA- C22.2 No. 60601-1:08.
Int. Op: 10/90 Active time 2 min.
www.liko.com
Product
3URG1R
name
EAN-13
" ² " " Ðв " ¦¦ ¬¸¾¬ ¬ ¬ ¬ ¬ ¬ Å
¬¸¾¬ ÐЬ ¬ ¬ ¬ ¬ Å Å "
ÅÐÐ"
¦ ¬ ² ¦
¦ ¬ ² ¦ ¦¦ ¦ ¬ ²¬¬ ¦ ¬ ¦ ¦ ¬
¦¦ ¦ ¬ ²¬¬
¦ ¬ ¦ ¦ ¬ ¦¦ <0
Max xxx
9'&$K
kg / xxx
Conforms
to ISO 10535:2006
is certified
with ANSI/AAMI
to
Int. Op: 10/90ISO 10535:2006 with
ES60601-1:2005
CSA- C22.2
Active time
No. 60601-1:08. and
2 min.
lbs
Product
,3,(&
TESTED
www.liko.com
EAN-13
3URG1R
name
" ² " ¦ ¬¸
" Ðв " ¦ ¬¸¾¬ ¬ ¬ ¬ ¬ ¬ ÅÅ "
¾¬ ÐЬ ¬ ¬ ¬ ¬ ÅÅÐÐ"
Serial.no.
¦ ¬ ² ¦ ¦¦ ¦
¦ ¬ ² ¦ ¦¦ ¦¬ ²¬¬¦¬ ¬¦¦ ¬ ¦ ¬ ²¬¬¦¬ ¬¦¦
¬ ¦ <0
Max xxx
kg / xxx
9'&$K
lbs
,3;,(&
Conforms to
ISO 10535:2006
with ANSI/AAMI
ES60601-1:2005
and is certified
ISO 10535:2006
to
with CSA- C22.2
Int. Op: 10/90
No. 60601-1:08.
Active time 2
min.
TESTED
www.liko.com
MED
!
TRANSPORTSTÖD
MONTERING.
REMOVE
BORTFÖRE
TAG
BRACKET.
SKRUVAR
ASSEMBLING
SAFETY TRANSPORTBEFORE
TRANSPORT
AUFSTELLEN
DEM ENTFERNEN.
DÉMONTER
VOR
SICHERUNG
TRANSPORT.
DE
ASSEMBLAGE,
AVANT
SÉCURITÉ
LA
9LNLQJ
3.
4.
6. Viking:
M5x35
Serial.no.
3URG1R " ² " ¦ ¬¸¾¬ ¬ ¬ ¬ ¬ ¬ ÅÅ "
" Ðв " ¦ ¬¸¾¬ ÐЬ ¬ ¬ ¬ ¬ ÅÅÐÐ"
¦ ¬ ² ¦ ¦¦ ¦ ¬ ²¬¬ ¦ ¬ ¦ ¦ ¬ ¦ ¦ ¬ ² ¦ ¦¦ ¦ ¬ ²¬¬ ¦ ¬ ¦ ¦ ¬ ¦ <0
Serial.no.
Before use!
Make sure the
S/N on the label
on Control
Unit CBL is the
same as on the
lift.
/LNR$%1HGUHYlJHQ/XOHn6ZHGHQ
Controlbox CBL20
Prod. No 20490032
Prod. No. 20490039
/LNR$%1HGUHYlJHQ/XOHn6ZHGHQ
1.
Assembly Instruction
Monteringsanvisning
Golvo
5.
Golvo:
9LNLQJ0
The lower holes.
(no choice on the
9LNLQJ/;/
M5x50
52
5.336
Control Unit CBL, by S/N
Kontrollbox CBL S/N-styrd
Assembly Instruction
Monteringsanvisning
Prod. No. 20490039
7.
”click”
1
2
3
&KDUJHUFDEOHVRFNHW
- Lift motor cablesocket 2
- Base-motor cablesocket 3
8.
A.7RDFWLYDWH,5FRQWURO+ROGWKHKDQGFRQWURO
,5DERXWFPLQFKIURPWKHFRQWUROXQLW¶V
/
,5UHFHLYHUDQGSUHVVWKHODUJH83DQG'2:1
EXWWRQVRQWKHKDQGFRQWUROVLPXOWDQHRXVO\IRU
DERXWVHFRQGV$VLJQDOLVKHDUGZKHQWKH
IXQFWLRQLVDFWLYDWHG7KHOLIWLVQRZUHDG\WR
XVHZLWK+DQGFRQWURO,5
B.&KHFNWRGHWHUPLQHLIRWKHUOLIWVLQWKHURRP
DUHDIIHFWHGE\\RXUKDQGFRQWURO,IWKH\DUH
8VHWKHODUJH83DQG'2:1EXWWRQVRQWKH
RSHUDWLRQSDQHORIWKHOLIWWKDWLVWREHXVHG
3UHVVERWKEXWWRQVVLPXOWDQHRXVO\XQWLOD
VLJQDOVRXQGV7KHOLIWKDVQRZEHHQDVVLJQHG
DXQLTXHFRPPXQLFDWLRQFRGH1RZDFWLYDWH
,5FRQWURODFFRUGLQJWRSURFHGXUH$DERYH
NOTE
0DNHVXUHWKHVSDUHSDUWLVPRXQWHGDFFRUGLQJWRWKHDVVHPEO\LQVWUXFWLRQ
&KHFNDOOIXQFWLRQVUHODWHGWRWKHFKDQJHGVSDUHSDUW
- 5HSDLUVDQGPDLQWHQDQFHPD\RQO\EHSHUIRUPHGE\SHUVRQQHODXWKRUL]HGE\Hill-Rom//LNRDQGXVLQJRULJLQDO/LNRVSDUHparts.
ZZZOLNRFRP
53
5.336C
Control Unit CBL, by S/N, Cable
Kontrollbox CBL S/N-styrd, kabel HK
Assembly Instruction
Monteringsanvisning
Contains:
&RQWURO8QLW&%/FDEOH
Cable cover
Screw, cable cover
Screw M5x35
Screw M5x50
Allen Key 2,5 mm
Qty:
SUHFRQ¿JXUHG
1
2
2 (Viking)
2 (Golvo)
1
Prod. No. 20490054
3SE690227-02
2013-01-31
Tools required:
2.
S/N:
Product name
ZZZOLNRFRP
EAN-13
¦ ¬ ² ¦ ¦¦ ¦ ¬ ²¬¬ ¦ ¬ ¦ ¦ ¬ ¦ ¦ ¬ ² ¦ ¦¦ ¦ ¬ ²¬¬ ¦ ¬ ¦ ¦ ¬ ¦ Y/M : 2012-3
Max xxx kg / xxx lbs
24 V DC - 2.2 Ah IP54 IEC 60601-1
9801154
TESTED
Liko AB, Nedre vägen 100, 975 92 Luleå, Sweden
Conforms to ISO 10535:2006 with ANSI/AAMI ES60601-1:2005 and
is certified to ISO 10535:2006 with CSA- C22.2 No. 60601-1:08.
Int. Op: 10/90 Active time 2 min.
www.liko.com
Product
Prod. No.
name
1234567
Serial.no.
EAN-13
" ² " " Ðв " ¦¦ ¬¸¾¬ ¬ ¬ ¬ ¬ ¬ Å
¬¸¾¬ ÐЬ ¬ ¬ ¬ ¬ Å Å "
ÅÐÐ"
¦ ¬ ² ¦
¦ ¬ ² ¦ ¦¦ ¦ ¬ ²¬¬ ¦ ¬ ¦ ¦ ¬
¦¦ ¦ ¬ ²¬¬
¦
¦ ¬ ¦ ¦ ¬ ¦ Y/M : 2012-3
kg / xxx
lbs
Product
IP54 IEC
60601-1
Prod. No.
EAN-13
Sweden
TESTED
name
1234567
" ² " ¦ ¬
" Ðв " ¦ ¬¸¸¾¬ ¬ ¬ ¬ ¬ ¬ ÅÅ "
¾¬ ÐЬ ¬ ¬ ¬ ¬ ÅÅÐÐ"
¦ ¬ ² ¦ ¦¦ ¦
¦ ¬ ² ¦ ¦¦ ¦¬ ²¬¬¦¬ ¬¦¦ ¬ ¦ ¬ ²¬¬¦¬ ¬¦¦
¬ ¦ Y/M : 2012-6
Serial.no.
- 2.2 Ah
Max xxx
24 V DC
kg / xxx
- 2.2 Ah
lbs
Conforms to
ISO 10535:2006
with ANSI/AAMI
ES60601-1:2005
and is certified
ISO 10535:2006
to
with CSA- C22.2
Int. Op: 10/90
No. 60601-1:08.
Active time 2
min.
IPX4 IEC
60601-1
9801154
TESTED
www.liko.com
Liko AB, Nedre vägen 100, 975 92 Luleå, Sweden
Max xxx
24 V DC
Conforms
to ISO 10535:2006
is certified
with ANSI/AAMI
to
Int. Op: 10/90ISO 10535:2006 with
ES60601-1:2005
CSA- C22.2
Active time
No. 60601-1:08. and
2 min.
9801154
www.liko.com
MED
!
TRANSPORTSTÖD
MONTERING.
REMOVE
BORTFÖRE
TAG
BRACKET.
SKRUVAR
ASSEMBLING
SAFETY TRANSPORTBEFORE
TRANSPORT
AUFSTELLEN
DEM ENTFERNEN.
DÉMONTER
VOR
SICHERUNG
TRANSPORT.
DE
ASSEMBLAGE,
AVANT
SÉCURITÉ
LA
Viking
3.
4.
6. Viking:
M5x35
" ² " ¦ ¬¸¾¬ ¬ ¬ ¬ ¬ ¬ ÅÅ "
" Ðв " ¦ ¬¸¾¬ ÐЬ ¬ ¬ ¬ ¬ ÅÅÐÐ"
Serial.no.
Prod. No. 1234567
92 Luleå,
Before use!
Make sure the
S/N on the label
on Control
Unit CBL is the
same as on the
lift.
100, 975
Prod. No 2040015
3 & 4mm
vägen
Controlbox CBL20
Prod. No 20490032
only for use with:
Viking M
2,5 mm
(provided)
Nedre
1.
Prod. No.
2040033
2040034
2040035
2000039
2000034
2000035
Liko AB,
Fits:
Viking XL
Viking L
Viking M
Golvo 8008 LowBase
Golvo 8000
Golvo 8008
Golvo
5.
Golvo:
Viking M:
The lower holes.
(no choice on the
Viking L & XL)
M5x50
54
5.336C
Control Unit CBL, by S/N, Cable
Kontrollbox CBL S/N-styrd, kabel HK
Assembly Instruction
Monteringsanvisning
Prod. No. 20490054
3SE690227-02
8.
”click”
1
2
3
- Charger cable; socket 1
- Lift motor cable; socket 2
- Base-motor cable; socket 3
Battery
Prod. No. 2006107
9.
Triangular tab
facing out.
Connect the Hand control.
Make sure the rectangular tabs
DWWKHORFNLQJULQJDUH¿[HG
Attach the locking ring.
NOTE
- Make sure the spare part is mounted according to the assembly instruction.
- Check all functions related to the changed spare part.
- Repairs and maintenance may only be performed by personnel authorized by Hill-Rom/Liko and using original Liko spare parts.
ZZZOLNRFRP
55
5.347
Actuator Viking M
Ställdon Viking M
Contains:
Actuator Viking M with Outer Tube
Sleeve bearing Mob.38
Coverhat Liko + Cover hat Liko bottom
Washer PS 6x12x1
Screw M6S M6x50
Locking nut M6 Nyloc
Assembly Instruction
Monteringsanvisning
Qty:
1
2
4
4
2
2
Prod. No. 20490033
3SE650214-02
2010-04-13
Tools required:
Fits:
Viking M (Prod. No. 2040015)
2X
10mm
Screw M6S M6x50
Sleeve bearing Mob.38
Screw M6S M6x50
Sleeve bearing Mob.38
-
NOTE
Make sure the spare part is mounted according to the assembly instruction.
Check all functions related to the changed spare part.
Repairs and maintenance may only be performed by personnel authorized by Liko and using original Liko spare parts.
Make sure the Outer Tube easy slides up and down.
ZZZOLNRFRP
56
5.348-349
Extension cable CBL20
Skarvkabel CBL20
Assembly Instruction
Monteringsanvisning
Prod. No. 21090018 Extension cable CBL20
21090019 Extension cable CBL20, US
Contains:
Adapter cable charging
Qty:
1
Fits:
Golvo 8000/8008
Viking XL
Viking L
Viking M
Prod. No:
(all models)
2040013 and 2040033
2040014 and 2040034
2040015 and 2040035
3SE650216-05
2012-09-11
Tools required:
2,5 mm
Connect the Charging cable to the Extension cable and
the Extension cable to the wall socket (100-240 V AC).
The battery is fully charged after 5 hours.
After completed charging, place the cable on the
Charge cable hook.
NOTE
- Make sure the spare part is mounted according to the assembly instruction.
- Check all functions related to the changed spare part.
- Repairs and maintenance may only be performed by personnel authorized by Hill-Rom/Liko and using original Liko spare parts.
ZZZOLNRFRP
57
5.350
([WUDEDWWHU\ER[
([WUDEDWWHULER[
$VVHPEO\,QVWUXFWLRQ
Monteringsanvisning
Contains:
Batteri BAL20
Fits:
Viking M
Viking M
Viking L
Viking L
Viking XL
Viking XL
*ROYR
Qty:
1
Prod. No. 2006107
Prod. No.
2040015
2040035
2040014
2040034
2040013
2040033
DOOPRGHOV
³FOLFN´
NOTE
%HIRUHXVHFKDUJHWKHEDWWHULHVaccording to the instruction guide.
0DNHVXUHWKHVSDUHSDUWLVPRXQWHGDFFRUGLQJWRWKHDVVHPEO\LQVWUXFWLRQ
&KHFNDOOIXQFWLRQVUHODWHGWRWKHFKDQJHGVSDUHSDUW
- 5HSDLUVDQGPDLQWHQDQFHPD\RQO\EHSHUIRUPHGE\SerVRQQHODXWKRUL]HGE\+LOO5RP/LNRDQGXVLQJRULJLQDO/LNRVSDUHparts.
- 2OGEDWWHULHVDUHWREHOHIWDWWKHQHDUHVWUHF\FOLQJVWDWLRQ
NiMH
ZZZOLNRFRP
58
5.351
Beltclip HBL20
Bältesclips HBL20
Assembly Instruction
Monteringsanvisning
Contains:
Belt Clips HBL20
Qty:
1
Prod. No. 21090020
3SE650217-04
2011-03-04
Fits:
Wireless hand control HBL20 Prod. No. 21090020
Tools required:
NOTE
- Make sure the spare part is mounted according to the assembly instruction.
- Check all functions related to the changed spare part.
- Repairs and maintenance may only be performed by personnel authorized by Hill-Rom/Liko and using original Liko spare parts.
ZZZOLNRFRP
59
5.352
Clips with hook HBL20
Clips med krok HBL20
Assembly Instruction
Monteringsanvisning
Prod. No. 21090021
Contains:
Clips with hook
Qty:
1
3SE650218-04
2011-03-04
Fits:
Wireless hand control HBL20 Prod. No. 21090020
Tools required:
NOTE
- Make sure the spare part is mounted according to the assembly instruction.
- Check all functions related to the changed spare part.
- Repairs and maintenance may only be performed by personnel authorized by Hill-Rom/Liko and using original Liko spare parts.
ZZZOLNRFRP
60
5.353
Charge cable hook
Laddkabelkrok
Assembly Instruction
Monteringsanvisning
Contains:
Charge cable hook
Qty:
10
Fits:
Golvo 8000/8008
Liko M220
Liko M230
Viking XL
Viking L
Viking M
Prod. No.
(all models)
2050010
2050015
2040013 and 2040033
2040014 and 2040034
2040015 and 2040035
Prod. No. 21090022
3SE650219-06
2012-09-11
1:
2: Viking XL
Viking L
Viking M
132 mm / 5,2 inch
Golvo
132 mm / 5,2 inch
132 mm / 5,2 inch
Liko M220 / M230
50 mm / 2 inch
245 mm / 9,6 inch
ZZZOLNRFRP
61
NOTE
- Make sure the spare part is
mounted according to the
assembly instruction.
- Check all functions related to the
changed spare part.
- Repairs and maintenance may
only be performed by personnel
authorized by Hill-Rom/Liko and
using original Liko spare parts.
5.354
HandControl hanger
Handkontrollupphängare
Contains:
HandControl hanger
Assembly Instruction
Monteringsanvisning
Qty:
10
Prod. No. 21090023
3SE650220-04
2011-03-04
Fits:
Golvo 8000 / 8008
Viking M Prod. No. 2040015
Viking L Prod. No. 2040014
Viking XL Prod. No. 2040013
Golvo
Viking M, Viking L, Viking XL
50 mm / 2 inch
132 mm / 5 inch
NOTE
- Make sure the spare part is mounted according to the assembly instruction.
- Check all functions related to the changed spare part.
- Repairs and maintenance may only be performed by personnel authorized by Hill-Rom/Liko and using original Liko spare parts.
ZZZOLNRFRP
62
5.410
Viking M Legs
Ben vä + hö Viking M
Contains:
Leg, right Mk ll incl.
link attachment and decal
Leg, left Mk ll incl.
link attachment and decal
Qty:
Nylon bearing 10x12x6
Screw M6S M10x40
Cover hat M10 grey U102
Locking nut M10 nyloc
2
2
4
2
Assembly Instruction
Monteringsanvisning
1
Prod. No. 20490036
1
3SE650259-02
2010-06-14
Tools required
4mm
Fits:
Viking M, from S/N 7100308
(S/N below 7100308; Remove link attachment from spare part
and use existing link attachment on lift.)
Before mounting; Press button for narrower base-width adjustment
2x
17 mm
Kernite Unlock 2000
37)(JUHDVH
to end position.
Grease the tip of the screws with
Kernite Unlock 2000.
x2
Markings on the
underside of the right leg!
Lubricate the inside of the
Leg casing Viking outer,
ZLWKÀRXUÀRQ37)(JUHDVH
x2
ZZZOLNRFRP
63
5.410
Viking M Legs
Ben vä + hö Viking M
1
Assembly Instruction
Monteringsanvisning
Prod. No. 20490036
Pos. No
1
Name:
Pce
2
Nylon bearing 10x12x6
2
3
4
Pos. No
-
Name:
3
Pce
2
Screw M6S M10x40
2
3
Cover hat M10 grey U102
4
4
Locking nut M10 nyloc
2
NOTE
Make sure the legs are mounted parallel to each other
Make sure the spare part is mounted according to the assembly instruction.
Check all functions related to the changed spare part.
Repairs and maintenance may only be performed by personnel authorized by Liko and using original Liko spare parts.
ZZZOLNRFRP
64
5.418
Mast Viking M
Pelare Viking M
Assembly Instruction
Monteringsanvisning
Contains:
Qty:
Mast Viking M MKll
1
(including handle and motor attachment)
Prod. No. 20490038
3SE650269-01
2010-04-12
Fits:
Viking M (all models)
Tools required
3 mm
T25
2x 10 mm
2x 17 mm
Use the lower holes.
With permanent marker, fill in the
dotted lines at the product label
(same as on the replaced Mast)
4
23 & 4%!
!5
,-.../...
01
..............................
.....................
!!"#$"%&'
()*+
NOTE
- Make sure the spare part is mounted according to the assembly instruction.
- Check all functions related to the changed spare part.
- Repairs and maintenance may only be performed by personnel authorized by Liko and using original Liko spare parts.
ZZZOLNRFRP
65
5.422
Locking device CBL20
Låsanordning CBL20
Assembly Instruction
Monteringsanvisning
Prod. No. 20090077
Contains:
Locking device
Qty:
10
3SE640217-01
2010-05-27
Fits:
Control Unit CBL20
Tools required:
NOTE
- Make sure the spare part is mounted according to the assembly instruction.
- Check all functions related to the changed spare part.
- Repairs and maintenance may only be performed by personnel authorized by Hill-Rom/Liko and using original Liko spare parts.
ZZZOLNRFRP
66
5.439
Bracket Cover
Skyddskåpor motorfäste
Assembly Instruction
Monteringsanvisning
Contains:
Bracket cover, pillar
Bracket cover, arm
Sleeve bearing Mob.38
Cover hat Liko bottom
Washer PS 6x12x1
Screw M6S M6x50
Locking nut M6 Nyloc
Cover hat Liko
Prod. No. 20490040
Qty:
1
1
2
4
4
2
2
4
3SE650273-01
2010-10-19
Tools required:
2X
10 mm
Fits:
Viking M (all models)
Viking L, Prod. No. 2040004
Viking XL (all models)
NOTE
- Make sure the spare part is mounted according to the assembly instruction.
- Check all functions related to the changed spare part.
- Repairs and maintenance may only be performed by personnel authorized by Liko and using original Liko spare parts.
ZZZOLNRFRP
67
5.460
Leg cover
Benkåpor
Contains:
Leg cover, 3 pce
Assembly Instruction
Monteringsanvisning
Qty:
2
Prod. No. 20490047 Leg cover L & XL
20490048 Leg cover M
20490047 Fits:
Viking L
Viking XL
3SE650294-01
2011-04-01
Tools required
20490048 Fits:
Viking M
2,5 mm
2x
17 mm
)ORXUÀRQ37)(JUHDVH
Before mounting; Press button for narrower base-width adjustment
to end position.
Prod. No.
2040003, Viking XL
2040004, Viking L
2040005, Viking M
Prod. No.
2040013, Viking XL
2040014, Viking L
2040015, Viking M
1
2
3
- Base motor cable; socket 3
- Base motor cable; socket 3
Viking XL, Viking L, Viking M, All models:
ZZZOLNRFRP
68
Unfasten the base motor by removing
the bolt connections.
Remove the Base motor by pushing
the motor axle in to the middle beam
hole.
5.460
Leg cover
Benkåpor
Assembly Instruction
Monteringsanvisning
Prod. No. 20490047 Leg cover L & XL
20490048 Leg cover M
Flat side down.
Lubricate the inside of the
Leg casing Viking outer,
ZLWKÀRXUÀRQ37)(JUHDVH
x2
Flat side up.
Finish the assembly by mounting the base motor and bolt connections.
(Picture showing Viking XL, same assembly for Viking M and Viking L.)
-
NOTE
Make sure the legs are mounted parallel to each other
Make sure the spare part is mounted according to the assembly instruction.
Check all functions related to the changed spare part.
Repairs and maintenance may only be performed by personnel authorized by Liko/Hill-Rom and using original Liko spare parts.
ZZZOLNRFRP
69
5.461
Flexlink
Assembly Instruction
Monteringsanvisning
Prod. No. 20490049
Contains:
Qty:
Friction washer Link
2
Link Viking
1
Sleeve bearing Mob.34
1
Cover hat Liko, bottom
4
Screw M6S M6x45
1
Washer TBRB 6x12x1
Locking nut M6 Nyloc
2
2
Cover hat Liko
Cap I Viking
Cap Y Viking
Sleeve bearing Mob.50
Screw M6S M6x60
4
2
2
1
1
3SE650295-01
2011-04-01
Tools required
2x
Fits:
Viking XL, Viking L, Viking M, Viking XS
10 mm
NOTE
- Make sure the spare part is mounted according to the assembly instruction.
- Check all functions related to the changed spare part.
- Repairs and maintenance may only be performed by personnel authorized by Liko/Hill-Rom and using original Liko spare parts.
ZZZOLNRFRP
70
5.485
Fork locking attachment
Låssats hjulgaffel
Assembly Instruction
Monteringsanvisning
Contains:
1
2
Prod. No. 20090080
Qty:
Front fork locking light
4
Nut M6LM M10 ISO
4
3SE690208-01
2011-09-23
Tools required
Fits 75 mm Wheels and 100 mm Wheels on:
Golvo
LikoLight
Viking
RollOn
16 mm
1
1
2
2
NOTE
- Make sure the spare part is mounted according to the assembly instruction.
- Check all functions related to the changed spare part.
- Repairs and maintenance may only be performed by personnel authorized by Hill-Rom/Liko and using original Liko spare parts.
ZZZOLNRFRP
71
5.486
Wheel Fork
Hjulgaffel
Assembly Instruction
Monteringsanvisning
Contains:
Fork
Fits:
Qty:
Prod. No. 20090081
2
3SE690209-01
2011-09-28
Front Wheel:
Rear Wheel:
Golvo
X
X
Golvo LowBase
-
X
LikoLight
X
X
Viking XL
X
-
Viking L
X
-
Viking M
X
X
Viking S
X
X
Viking XS
X
X
RollOn
X
X
Tools required
16mm
4 mm
Assembly on front wheel:
Assembly on rear wheel:
NOTE
- Make sure the spare part is mounted according to the assembly instruction.
- Check all functions related to the changed spare part.
- Repairs and maintenance may only be performed by personnel authorized by Hill-Rom/Liko and using original Liko spare parts.
ZZZOLNRFRP
72
5.490
SlingBar Assembly set
Lyftbygelinfästning
Assembly Instruction
Monteringsanvisning
Contains:
Slingbar bolt casing R2R
Slingbar Adapter
Threaded casing M6 10x16,5
Screw MRT M6x8 Ezloc A2
Qty:
1
1
1
2
Prod. No. 20490052
3SE690210-01
2011-09-26
Tools required
Fits:
Golvo (all models)
Uno 200
LikoLight
Viking L, M, S, XS
Universal Slingbar 350 / 450 / 600
4 mm
4 mm
6 mm
13 mm
Golvo
Uno 200
LikoLight
2x
10 mm
2x
17 mm
Viking
Tightening torque 11±1 Nm
NOTE
- Make sure the spare part is mounted according to the assembly instruction.
- Check all functions related to the changed spare part.
- Repairs and maintenance may only be performed by personnel authorized by Hill-Rom/Liko and using original Liko spare parts.
ZZZOLNRFRP
73
5.511
Locking Ring Hand Control CBL
Låsring för handkontroll CBL
Assembly Instruction
Monteringsanvisning
Contains:
Locking Ring
Fits:
Viking M
Viking L
Viking XL
Golvo 8000
Golvo 8008
Golvo 8008 LowBase
Qty:
10
Prod. No. 20490057
3SE690231-02
2013-01-17
Prod No.
2040035
2040034
2040033
2000034
2000035
2000039
Tools required
Press the triangular tab, then remove the locking ring
and the hand control
Triangular tab
facing out.
Connect the Hand control.
Attach the locking ring.
Make sure the rectangular tabs
DWWKHORFNLQJULQJDUH¿[HG
NOTE
- Make sure the spare part is mounted according to the assembly instruction.
- Check all functions related to the changed spare part.
- Repairs and maintenance may only be performed by personnel authorized by Hill-Rom/Liko and using original Liko spare parts.
ZZZOLNRFRP
74
6.1
PARAMETER Code Key
/LNR'LDJQRVWLF6\VWHPRSHUDWLQJGDWDLVVWRUHGLQ&RQWURO8QLW&%/
Parameter:
Information:
TAAxT [Ah]
Totally Accumulated Amphours (current x time)
TAAxTR [Ah]
Totally Accumulated Amphours, resetable (current x time)
Can be reset by the manufacturer.
PAAxT [Ah]
Periodically Accumulated Amphours (current x time)
Calculated continuously from the moment the lift is used until the
¿UVWVHUYLFH
PAKT [Months]
Periodically Accumulated Calendar time.
&DOFXODWHGEHWZHHQVHUYLFHV
TADT [Hours]
7RWDOO\DFFXPXODWHGGULYHWLPH
AAS [Starts]
Accumulated starts.
The number of lifting motions counted from the moment the lift was
XVHGWKH¿UVWWLPH
ASERV >6HUYLFHV@
$FFXPXODWHGVHUYLFHV
1XPEHURISHUIRUPHGVHUYLFHHYHQWVPDGHXVLQJ/66RU/'6
IMED [A]
$YHUDJHSRZHUFRQVXPSWLRQGXULQJ7$'7
2YHUDOODFFXPXODWHGRSHUDWLQJWLPH
ALA [Charges]
Accumulatet number of started chargings.
AALA [Charges]
Accumulated number of completed chargings
AOLA [Charges]
Accumulated numbers of not completed charging.
&RXQWVHDFKGLVUXSWHGFKDUJLQJHYHQW
AABT >5HPRYDOV@
Accumulated number of battery replacements.
Counts each battery replacement where a used battery is replaced.
AEUP [Endpos. up]
Accumulated number of end positions during lifting motion up.
AFSERV >6HUYLFHV@
$FFXPXODWHGQXPEHURIUHVHW6HUYLFH
1XPEHURI³&OHDU6HUYLFH´SHUIRUPHGPDQXDOO\
Control Unit CBL
AEDWN [Endpos. down] Accumulated number of end positions during lifting motion down.
SFSTAT
N/A (This funktion is not in use)
IDNR
Identity number of the control box.
AOLUP >2YHUORDGV@
$FFXPXODWHGQXPEHURIVWRSVGXHWRRYHUORDG
PADT [Hours]
Periodically accumulated operating time.
IMED 20 [A]
$YHUDJHFXUUHQWFRQVXPSWLRQ5HFRXQWHGIRUHDFKOLIWLQJPRWLRQ
(up) which lasts more than 20 seconds.
ELT [Ah]
7$$[75OLPLWFRQVWDQWIRU(/7LQGLFDWLRQ
ELTCNT [Commands]
1XPEHURI(/7UHVHWVRQO\SHUIRUPHGDWUHSODFHPHQWRIDFWXDWRU
CLIM_1 [A]
Current limit for lifting motion (up).
CLCT [ms]
0D[LPXPDOORZHGWLPHWRRYHUULGH&/,0BEHIRUHFXWRII
CLIM_2 [A]
&XUUHQWOLPLWIRUZLGHQLQJPRWLRQEDVHZLGWKDGMXVWPHQW
SINTT [Months]
,QGLFDWHVVHUYLFHLQWHUYDOVLQFDOHQGDUPRQWKV
SINTAS [Ah]
$[7OLPLWIRUVHUYLFHHYHQWFXUUHQW[WLPH
CYCLET [Hours]
&\FOHWLPHLVDFRQVWDQWIRUDPHGLXPGULYLQJF\FOH
PAOLUP >2YHUORDGV@
3HULRGLFDFFXPXODWHGQXPEHURIVWRSVGXHWRRYHUORDG
7KHLQIRUPDWLRQOLVWHGDERYHLVVWRUHGLQWKH&RQWURO8QLW&%/
5HSODFLQJWKH&RQWURO8QLW&%/ZLWKRXWXVLQJWKH/66PD\FDXVHVRPHGDWDORVVDVWKLVGDWDLVUHFRUGDEOHE\
/66DQGDFRPSXWHU:KHQGDWDLVVWRUHGLQ/LNRGDWDEDVHLWFDQEHUHWULHYHGLIQHHGHG
5HVHWWLQJWKH6HUYLFH,QWHUYDOXVLQJWKH/66/'6RU0DQXDOO\ZLOOUHVHWWKH$FFXPXODWHG$PSKRXUV3$$[7
$FFXPXODWHG7LPH3$.7$FFXPXODWHG2SHUDWLQJ7LPH3$'7DQG$FFXPXODWHGQXPEHURIVWRSVGXHWR
RYHUORDG3$2/83
ZZZOLNRFRP
75
6.2
RESET SERVICE INTERVAL PARAMETERS
$IWHUWKH3HULRGLF,QVSHFWLRQKDVEHHQSHUIRUPHG6HUYLFH/LJKWDQG6HUYLFH,QWHUYDO3DUDPHWHUVin the /LNR
'LDJQRVWLF6\VWHP has to be reset. Reset can be done using one of the following6HUYLFH7RROV0HWKRGV
Prod. No.
1. Liko Service System, LSS (Requires a computer)
Read and store the data from the Control Unit CBL into a computer. Data can
also be transfered to a Liko Server. Can also reset the ELT-light (Expected Life Time).
Use when Periodic Inspection or Preventative maintenance is performed.
Service Documents for the lift can be printed. Use for tracking and and transfer
data when Spare Parts are changed.
Prod. No.
-
2. LDS Service (LDS)
Reads the data from the Control Unit CBL. Use when Periodic Inspection or
Preventative maintenance is performed.
3. Manual Service
Resets the Service Interval Parameters*.
Service Interval Parameters should only be reset after a complete Periodic Inspection
Use the following combination of buttons on the control panel:
1
3
2
A: Press and hold button 1 & 2
B: While holding 1 & 2, press button 3, and hold all three
buttons for three seconds.
(Works from Item No: CBL20001-05 on CBL (see label on CBL)
INPACT ON PARAMETERS
&KDQJHVRISDUDPHWHUVZKHQ/66/'6RU0DQXHO6HUYLFHreset has been used:
Parameter:
1. LSS:
2. LDS:
3. Manual Service:
Check Points in PM ***
6HUYLFH/LJKW
Unlit
Unlit
Unlit
TAAxT
unchanged
unchanged
unchanged
TAAxTR
unchanged
unchanged
unchanged
3$$[7
0
0
0
3$.7
0
0
0
7$'7
unchanged
unchanged
unchanged
AAS
unchanged
unchanged
unchanged
ASERV
unchanged
[
,0('
unchanged
unchanged
unchanged
[
[
[
[
$/$
unchanged
unchanged
unchanged
[
$$/$
unchanged
unchanged
unchanged
[
$2/$
unchanged
unchanged
unchanged
[
AABT
unchanged
unchanged
unchanged
[
AEUP
unchanged
unchanged
unchanged
[
AFSERV
0
0
[
[
$(':1
unchanged
unchanged
unchanged
SFSTAT
N/A
N/A
N/A
,'15
unchanged
unchanged
unchanged
[
$2/83
unchanged
unchanged
unchanged
[
3$'7
0
0
0
[
,0('
unchanged
unchanged
unchanged
(/7
unchanged
unchanged
unchanged
(/7&17
unchanged
unchanged
unchanged
&/,0
unchanged
unchanged
unchanged
&/&7
unchanged
unchanged
unchanged
&/,0
unchanged
unchanged
unchanged
SINTT
unchanged
unchanged
unchanged
SINTAS
unchanged
unchanged
unchanged
&<&/(7
unchanged
unchanged
unchanged
3$2/83
0
0
0
[
,QGLFDWHV6HUYLFH3HULRGLF,QVSHFWLRQLQWHUYDOUHDFKHG
6HUYLFH,QWHUYDO3DUDPHWHUVWKH3$$[73$.73$'7DQG3$2/83DUHDOOXVHGWRGHWHUPLQH6HUYLFHLQWHUYDOV
3DUDPHWHUVWRXVHLQWKH3UHYHQWDWLYH0DLQWHQDQFH
ZZZOLNRFRP
76
7.0
Liko Service System
LSS
Prod. No. 21090024
Product Description
/LNR6HUYLFH6\VWHPLVDVRIWZDUHGHYHORSHGWRHQDEOHVHUYLFHWHFKQLFLDQVWRFRQGXFWVHUYLFHLQDQHDV\ZD\
RQDOOOLIWVHTXLSSHGZLWKWKHFRQWUROXQLW&%/,WDOVRJLYHVWKHVHUYLFHWHFKQLFLDQWKHSRVVLELOLW\WRSURJUDPWKH
VSDUHSDUWRQWKH¿HOG
Detailed information can be found in the instruction guide accompanying the product.
/66/LNR6HUYLFH6\VWHP
ZZZOLNRFRP
8.0
Liko Diagnostic System - Service
LDS Service Prod. No. 21090016
Product Description
/LNROLIWVHTXLSSHGZLWK LDS /LNR'LDJQRVWLF6\VWHPUHFRUGDQGVWRUHLQIRUPDWLRQRQKRZWKHOLIWLV
used. LDS Service can read the LQIRUPDWLRQVWRUHGLQWKH&RQWUROXQLW&%/
LDS Service FDQEHXVHGDVKDQGFRQWUROWRRSHUDWH/LNR¶V,5FRQWUROOHGOLIWV
LDS Service is specially developed IRU/LNR¶VDXWKRUL]HGVHUYLFHWHFKQLFLDQVto reset the Control Unit
&%/VHUYLFHLQWHUYDODIWHUFRPSOHWHGVHUYLFHSHULRGLFLQVSHFWLRQ
Detailed information can be found in the instruction guide accompanying the product.
LDS Service
78
ZZZOLNRFRP
9.0
Periodic Inspection
Viking XL
Viking L
Viking M
2040003
2040004
2040005
2040013
2040014
2040015
2040033
2040034
2040035
Prod. No.
Output (TAAxT):
Ah (Prod. No. 2040013-2040035)
(Use Liko Service System or Liko Diagnostic System to read data from the CBL)
Customer references
Lift type:
.........................................................................
Agreement No: .....................................................
Prod. No:
.........................................................................
Name: ....................................................................
Serial No:
.........................................................................
Address: ................................................................
Prod. Year: .........................................................................
Post code: ............................................................
The lift must be thoroughly inspected when the Service Light at the Control Unit CBL iIluminates, or at least once per year.
Viking with other control unit shall be thoroughly inspected at least once per year. Inspection and service must be carried out by
Hill-Rom/Liko authorized personnel. Instructions for check points, from the next page.
Check points:
Approved
Not
Comments:
approved
3URGXFWGHFDO
9LVLEOHGDPDJHWRWKHOLIWVXUIDFH¿QLVK
................................................................
................................................................
Base
&DVWRUZKHHOVIRUNVDQGIRUNFRYHUV
&DVWRUEUDNHV
%DVHFRYHUV
%DVHRSHQLQJDQGFORVLQJOLQNDJH
%DVHIUDPHFDVWRUSOD\DQGOHYHOOLQJ
................................................................
................................................................
................................................................
................................................................
................................................................
Mast
/RFNLQJKDQGOHV
/LIWDUPKDUGZDUHDQGFRYHUV
)OH[OLQNWRDUPKDUGZDUHDQGFRYHUV
)OH[OLQNWRVOLQJEDUKDUGZDUHDQGFRYHUV
6OLQJEDU
0DVWDFWXDWRU
%DWWHU\DQGHOHFWULFDOFDEOHLQVWDOODWLRQV
+DQGFRQWURO
(PHUJHQF\VWRSIXQFWLRQ
(PHUJHQF\ORZHULQJGHYLFH
&RQWUROXQLW&%/
................................................................
................................................................
................................................................
................................................................
................................................................
................................................................
................................................................
................................................................
................................................................
................................................................
................................................................
Load Testing
0D[ORDGWHVW
0HFKDQLFDOHPHUJHQF\ORZHULQJORDGWHVW
................................................................
................................................................
Accessory
$UPUHVW
................................................................
Documentation
,QVWUXFWLRQJXLGH
&OHDU6HUYLFH&%/
................................................................
................................................................
Approval to use the mobile lift
Approved
Not approved
Not approved:
If the mobile lift has one or more check points with result “Not approved” the mobile lift must not be used.
Inspection performed by: _____________________________________
Date:______________________
Final approval by:
________________________________________
Approval date: _____________
Next inspection:
________________________________________
Inspection performed in accordance with ISO 10535:2006 Annex B- Periodic inspection
79
ZZZOLNRFRP
Periodic Inspection
2012-11-05
To be actioned:
Actions according to the “Instructions for the check points” should be performed immediatley. After performed actions sign
below. If anything is unclear or if you have questions, please contact Hill-Rom/Liko or your local Hill-Rom/Liko representative.
Contact information is to be found at www.liko.com.
9.0
Check points
Viking XL
Viking L
Viking M
Prod. No. 2040003
Prod. No. 2040004
Prod. No. 2040005
Viking XL
10
12
9
11
12
21
13
20
15
14
17
16
8
1
6
4
5
3
7
Check points
Viking XL
Viking L
Viking M
Prod. No. 2040013, 2040033
Prod. No. 2040014, 2040034
Prod. No. 2040015, 2040035
9
Viking L & Viking XL
Viking XL
10
15
12
13
11
20
12
13
20
18
16
21
1
14
8
7
6
3
4
Periodic Inspection
5
80
ZZZOLNRFRP
9.0
Instructions for the check points
1 Product decal
- Verify presence of mast decal with model type and serial number.
9LVLEOHGDPDJHWRWKHOLIWVXUIDFH¿QLVK
- Check for scratches, dents, deformities or unusual surface wear.
3 Castor wheels, forks and fork covers
5ROOWKHOLIWXQORDGHGDQGZLWKORDGDORQJWKHÀRRU&KHFNWRHQVXUHWKDWDOOFDVWRUVUROODQGWXUQIUHHO\
- Verify that the castor fasteners are tight. There should not be any play between the fork and the castor nut.
- Remove the front fork cover and inspect safety casing and bolt channel for cracks or fractures.
4 Castor brakes
- Lock the brakes. Make sure the wheels do not turn and the castor housing does not swivel when the lift is pushed.
5 Base covers
- Verify that the protective plastic covers are secure.
6 Base opening and closing linkage
- Inspect the linkage between legs and base motor. Make sure there is no cracks or deformations at the legs.
- Inspect the plastic protective cover shell for cracks, deformation or gaps.
- Open and close the base to maximum and minimum dimensions.
- Listen for particular noises and vibrations.
7 Base frame castor play and levelling
- Manually open and close legs at the front castors to measure wheel play. Base width wheel play should not
exceed 35mm / 1,38 Inch total.
8 Locking handles
- Loosen & re tighten locking handles. Verify that threads are not damaged or binding.
9 Lift arm hardware and covers
- With the lift in it’s lowest position, manually raise the lift arm. Verify that the shaft lowers and raises freely.
If the arm is binding, the mounting screw is to tight.
- Inspect the plastic protective cover shells for cracks, deformation or gaps.
- Make sure the holes in the mast are not deformed on:
Product
Product No.
Up to S/N:
Viking XL
2040003
801 999
Viking L
2040004
7 200 795
Viking M
2040005
7 106 200
X¹
Verify that the diameter of the holes in the mast (where the arm
and mast is connected) is not bigger than 12 mm/0,47 inch,
It can be done by measuring the distance from cover hat, to top of
the“ear”. The length should be the same on each side (X¹=X²)±1 mm.
X²
10 Flexlink to arm hardware and covers
:LWKWKHVOLQJEDUKDQJLQJLQLW¶VORZHVWSRVLWLRQPDQXDOO\UDLVHWKHVOLQJEDUDQGÀH[OLQNDUP
9HULI\WKDWWKHÀH[OLQNDUPORZHUVDQGUDLVHVIUHHO\,IWKHÀH[OLQNLVELQGLQJWKHVFUHZLVWRRWLJKW
- Inspect the plastic protective cover shells for cracks, deformation or gaps.
11 Flexlink to slingbar hardware and covers
:LWKWKHVOLQJEDUKDQJLQJLQLW¶VORZHVWSRVLWLRQPDQXDOO\SLYRWWKHVOLQJEDUVLGHWRVLGH9HULI\WKDWWKHÀH[OLQN DUPORZHUVDQGUDLVHVIUHHO\,IWKHÀH[OLQNLVELQGLQJWKHPRXQWLQJVFUHZLVWRRWLJKW
- Verify that hardware covering plastic caps are secure.
,IQRDFFHVVRULHVLVDWWDFKHGYHULI\WKDWWKHVOLQJEDULVDVVHPEOHGGLUHFWO\WRWKHÀH[OLQN
Periodic Inspection
81
ZZZOLNRFRP
9.0
Instructions for the check points
12 Slingbar
- Inspect visually to ensure that the slingbar is free from any scratches,
sharp edges or deformities.
- Check that the unit rotates freely on its bearings.
- Make sure the lower slingbolt has a mark, as the picture shows.
If not, the slingbar must be replaced.
- Make sure that both latches are mounted and fall back against
the body of the slingbar.
13 Mast actuator
- Verify that the upper and lower actuator fasteners to the mast are tight.
9LVXDOLQVSHFWLRQRIWXEHVEDFN¿[WXUHDQGSLVWRQURGH\H
- Check of abnormal noise.
- If the lift is equipped with Outer tube: Pull the Outer Tube to the top and bottom (with the lift arm in its highest
position). Make sure the Outer Tube not get stuck in any position.
- Check of electric end stop
Prod. No. 2040003-2040005:
By using test box 21090014 UK or 21090015 US
Run the lift all the way up and down. Verify that the
Prod. No. 2040013-2040015 and 2040033-2040035:
Indicator lamp for overload (orange light) not lights.
14 Battery and electrical cable installations
- Verify that all cables are properly inserted. Re-insert if uncertain.
- Make sure the charge cable hook is mounted at the mast.
Prod. No. 2040003-2040005: Verify battery charge (recharge battery or test with Prod. No. 2101100 Battery tester with diodes).
Prod. No. 2040013-2040015 and 2040033-2040035:
Inspect that the cable cover is mounted correctly.
Verify battery charge. During charging the lights shall
shine alternatively (orange, orange, green). Completed
FKDUJLQJLVLQGLFDWHGE\DÀDVKLQJJUHHQOLJKW
15 Hand control
- With the emergency stop out, verify that all functions on the hand control are working.
Prod. No. 2040013-2040015 and 2040033-2040035:
With the emergency stop out, verify that all functions on the
operation panel are working.
16 Emergency Stop function
- Press the emergency stop button. With the emergency stop pressed in, verify the lift does not operate with the
hand control buttons.
- Turn the red emergency button in the direction of the arrows. Verify the button releases from the locked position
into the raised, open position.
17 Emergency lowering device (only on Prod. No. 2040003-2040005)
- With the emergency stop out, verify that the electrical emergency-lowering device functions.
18 Control unit CBL 20 ( Prod. No. 2040013-2040015 and and 2040033-2040035)
- With the emergency stop out, verify the function of the electrical emergency-lowering device at the operation panel.
19 Max. load test
- Run the lift with maximum load, all the way up and down.
Max load
kg
lbs
Viking M
Viking L
205
450
250
550
Periodic Inspection
82
ZZZOLNRFRP
9.0
Instructions for the check points
Viking XL
300
660
- Run the base in and out with maximum load.
0DNHVXUHDOOIRXUZKHHOVKDYHFRQWDFWZLWKWKHÀRRU
- Listen for peculiar noises and vibrations.
20 Mechanical emergency lowering load test
- Raise with maximum load (see table above) and with (50 kg/110 lbs) until the arm is parallel to the ground.
Prod. No. 2040003-2040005, 2040015, 2040035:
Lift red emergency handle on the actuator upwards and
hold, verify that the load lowers.
Prod. No. 2040013, 2040014, 2040033, 2040034:
Manually turn the red actuator collar in the direction of the
arrows to lower.
21 Armrest (accessory)
- Verify that both arms rotate freely and hang vertically when not in use.
- Rotate arms to raised position. Perform a load test of the armrest with (40 kg/88 lbs).
22 Documentation
- Verify that the Instruction guide is provided.
23 Clear Service (CBL 20)
- Only products with Control Unit CBL20 (Prod No 2040013 - 2040015 and 2040033-2040035)
Service indicator (orange light)
- Illuminates when service is needed.
When the Periodic Inspection has been performed, reset the service indicator with LSS, LDS or Manual Service
according to instructions “Reset Service Interval Parameters” in the Service Manual.
Periodic Inspection
83
ZZZOLNRFRP
ZZZOLNRFRP
84
10.0
Preventative Maintenance
Prod. No.
Viking XL
Viking L
Viking M
2040003
2040004
2040005
2040013*
2040014*
2040015*
2040033*
2040034*
2040035*
* Lift equipped with Control Unit CBL
Lift type:
Customer references
..............................................................
Product No: ..............................................................
Agreement No: .......................................................
Serial No:
..............................................................
Name: ......................................................................
Prod. Year: ..............................................................
Address: ..................................................................
Use Liko Service System (LSS) or Liko Diagnostic System (LDS) to
read data from lifts equipped with Control Unit CBL.
If you don’t have the LSS, write down the values in the columns
below. (With LSS you can store data)
Post code: ..............................................................
TAAxT
Ah
AABT
Removals
PAAxT
Ah
AEUP
EposUp
AAS
Starts
AFSERV
Services
ASERV
Times
AEDWN
EposDn
IMED
mA
IDNR
ALA
Charges
AOLUP
OverLoads
AALA
Charges
PADT
Hours
AOLA
Charges
PAOLUP
OverLoads
To ensure maximum life cycle, Preventative Maintenance should be carried out according to how much the lift has been used
TAAxT (Totally Accumulated Amphours) or according to years in use, see table below. TAAxT can only be read from lifts
equipped with Control Unit CBL. Inspection and service must be carried out by Hill-Rom/Liko authorized personnel.
Check points:
1
2
3
4
5
6
7
8
9
10
Surface treatment ............................................
Front castors....................................................
Rear castors / brakes ......................................
Pivot bolts ........................................................
Base opening and closing linkage ...................
Base motor linkage ..........................................
Lift arm.............................................................
Flexlink / Lift arm joint / Slingbar bolt ...............
Battery. ............................................................
Actuator ...........................................................
11
Control Unit CBL..............................................
Lubricate with PTFE or silicon grease
1
204
182
140
2
3
408
364
280
4
5
612
546
420
6
7
816
728
560
8
1020
910
700
9 10
:KHQPDLQWHQDQFHLVSHUIRUPHGPDUNVSHFL¿HGVTXDUHZLWK³;´
:KHQSDUWLVUHSODFHGPDUNVSHFL¿HGVTXDUHZLWK³5´
Interval/Month: _____________ Date: ____________
85 Serviced by: __________________________________
ZZZOLNRFRP
Preventative Maintenance
2012-11-08
Maintenance according to used TAAxT (Ah):
Viking XL: (with Control Unit CBL)
Viking L: (with Control Unit CBL)
Viking M: (with Control Unit CBL)
Maintenance according to years of use:
10.0
Check points
10
7
8
11
9
6
3
4
5
2
Instructions regarding the check points
1 Surface treatment
Viking L & Viking XL
Visually inspect the lift for external damage or wear.
If needed, clean the patient lift with warm water or ethanol.
Warning! Do not use chemicals containing phenol or chlorine, since the aluminium parts may be damaged.
Preventative Maintenance
86
ZZZOLNRFRP
10.0
Instructions regarding the check points
2 Front castors
Check and clean front castors. If wheels are in poor condition, replace them. (For Spare Part No, see the
Spare Parts List)
Front castors needs to be replaced after:
or
Replace according to years in use:
Viking XL
1020 Ah
Viking L
910 Ah
10
3 Rear castors / brakes
10
Viking M
700 Ah
10
Viking M
Viking L & XL
Check and clean rear castors. If wheels are in poor condition, replace them.
(For Spare Part No, see the Spare Parts List)
Check the brakes. They should lock in all directions.
Preventative Maintenance
87
ZZZOLNRFRP
10.0
Instructions regarding the check points
4 Pivot bolts
x2
Flat side down
Inspect plastic cover, clean them if necessary.
Lubricate inner side
ZLWKÀRXUÀRQ37)(
grease.
Remove pivot bolt, inner and outer bearing sleeves and hardware.
Clean and lubricate pivot bolt, inner and outer bearing sleeves.
5 Base opening and closing linkage
Remove hardware covers from middle beam and actuator.
Remove leg from middle beam and actuator.
(a) Remove pivot bolt, inner and outer bearing sleeves and hardware.
(b) Remove link arm cover, bolt and nut.
Remove plastic covers and inspect middle beam edges for burrs. File smooth
if required.
Clean and inspect the three pieces of plastic cover. Replace if cracked or
deformed. (For Spare Part No see the Spare Parts List)
Clean, lubricate and reassemble pivot bolt, bearing sleeves and hardware.
Tighten pivot bolt and apply plastic hardware covers.
Reconnect actuator to link arm. Apply plastic hardware covers.
Leg covers needs to be replaced after:
or
Replace according to years in use:
Preventative Maintenance
88
Viking XL
612 Ah
6
Viking L
546 Ah
6
Viking M
420 Ah
6
ZZZOLNRFRP
10.0
Instructions regarding the check points
6 Base motor linkage
Remove link arm cover, bolt and nut.
Clean, lubricate and reassemble pivot bolt, bearing sleeves and hardware.
Inspect the legs at the linkage. If the linkage are in poor condition, replace them
with Restoration set motor attachment.
(For Spare Part No, see the Spare Parts List)
Reconnect actuator to link arm. Apply plastic hardware covers.
x2
Restoration set motor attachment
7 Lift arm
Remove hardware covers.
Remove and lubricate lift arm bolt.
Visually inspect lift arm, plastic covers
for wear, cracks or deformation.
Reassemble in reverse order.
Raise the arm and then release,
so that it falls to the lowest position.
If the arm does not fall to the lowest position, the screw is too tight.
x2
x3
x6
x6
x2
Remove and lubricate actuator hardware. Visually inspect actuator
plastic bushings for wear. Replace if worn. Reassemble in reverse
order.
Overhead beam Restoration set
(For Spare Part No, see the
Service Manual.)
Viking XL
Overhead beam Rest. set needs to be replaced after: 1020 Ah
or
Replace according to years in use:
10
Preventative Maintenance
89
Viking L Viking M
910 Ah
700 Ah
10
10
ZZZOLNRFRP
10.0
Instructions regarding the check points
8 Flexlink / Lift arm joint / Slingbar bolt
Inspect Flexlink:
1. Remove covers.
5HPRYHFOHDQDQGOXEULFDWHÀH[OLQN Inspect shell covers for cracks or gaps.
3. Pull out the Flexlink and check for wear. Re-assemble in reverse order.
4. Lift up the slingbar and then release, so that it falls to the lowest position. If the link does not fall to the lowest
position, the screw is too tight.
Inspect Slingbar bolt:
(Universal SlingBar and Universal TwinBar)
1. Check slingbar bolt for wear.
2. Remove slingbar centerbolt and bearing, wipe of any dirty,
dust or residue. (Universal Twinbar)
3. Reassemble in reverse order pivot slingbar centerbolt
within the Flexlink. If the slingbar is binding, the screw is too tight.
X
Max wear: M = X -3mm
Exposed to wear
Pull out the Flexlink and check for wear
by measuring with the sliding caliper. Replace link with Spare Part No. 20490049,
if its worn more than 3mm (0,12 inch)
Reassemble in reverse order.
Viking XL
1020 Ah
Flexlink needs to be replaced after:
or
Replace according to years in use:
Preventative Maintenance
10
90
Viking L
910 Ah
10
Viking M
700 Ah
10
ZZZOLNRFRP
10.0
Instructions regarding the check points
9 a) Battery to Control UnitCBL
2
3
4
Battery capacity
Check battery capacity by pressing the i button (1).
The following information is displayed:
2 – Green light: More than 50% of battery capacity remaining.
3 – Yellow light: 25% -50% of battery capacity remaining.
4 – Yellow light: 0% -25% of battery capacity remaining.
The indicator lamps light for about 30 seconds before switching off.
Battery capacity is also displayed during lift operation.
1
Maximum charge is reached after about 5 hours. When
the batteries are fully charged, the charger switches
automatically to maintenance charging.
The lamps blink alternately (yellow/yellow/green) during
charging. A blinking green lamp indicates that charging
is complete. When operating time is
noticeably shorter than normal, the batteries should
probably be replaced. Discontinue charging and replace
the batteries with 2006107 Extra battery box.
Batteries needs to be replaced after:
and:
or
Replace according to years in use:
Prod. No.
2006107 Extra battery box
Viking XL
408 Ah
816 Ah
Viking L
364 Ah
728 Ah
Viking M
280 Ah
560 Ah
4 and 8
4 and 8
4 and 8
9 b) Battery to ”Jumbo” Control Box
1.
2.
1. Remove the charger cable holder.
2. Remove the battery.
3. Inspect V-shaped metal contacts on the batterypack casing for
uniformity. Check the battery with the battery tester Part. No. 2101100.
A signal should be audible for more than 5 sec. If not, replace battery
with spare part 2006106.
3.
4. Inspect V-shaped metal contacts on control box for uniformity. Verify that
plastic housing for metal contacts is not damaged/deformed.
Tighten screws.
5. Place the removable battery pack into position on top of the control box.
Adjust until you hear a clicking sound.
4.
5.
Replace according to years in use: Every 3rd year
Preventative Maintenance
91
ZZZOLNRFRP
10.0
Instructions regarding the check points
10 Actuator
1. Visually inspect the actuator and the Outer tube
(Outer Tube only on Viking M) for wear, cracks or
deformation.
2. Replace the actuator after 700 Ah. (For Spare Part
No, see the Service Manual.)
Viking XL
1020 Ah
Actuator needs to be replaced after:
or
Replace according to years in use:
10
Viking L
910 Ah
10
Viking M
700 Ah
10
11 Control Unit CBL
Use LSS or LDS to check that the correct current limit is programmed in CBL20:
CLIM_2
CLIM_1
Power limit for lifting motion (up) Power limit for widening motion
(base motor)
(actuator)
Viking M
8,5 [A]
(CBL version 0-3: 9,2 [A])
6 [A]
Viking L
Viking XL
6,4 [A]
6 [A]
8,0 [A]
6 [A]
Preventative Maintenance
92
ZZZOLNRFRP
11.0
Viking M
Product changes
Prod. No. 2040005, 2040015, 2040035
2012-11-15
Prod. No. 2040035
Prod. No. 2040015
Prod. No. 2040005
S/N 9 200 001 -
S/N 7 500 401 - 7 600 500
S/N 7 100 101 - 7 200 200
9 300 000
Changes
Model
2040035
S/N
Model
2040015
S/N
Model
2040005
S/N
Project
9 200 001
-
-
1707
2012
1HZPRGHORI9LNLQJ0ZLWK¿[HGKDQGFRQWUROLVLQWURGXFHG
Prod. No 2040035
2010
&RYHUVWRPRWRUEUDFNHWVLQWURGXFHG
7 505 000 -
791
6SULQJLQ2XWHU7XEHDOWHUHG1HZVFUHZVWRIDVWHQWKHKDQGOH'LDJRQDOSUR¿OHKDV
EHHQVKRUWHQHG
7 503 472 -
791
-
974
2009
2XWHU7XEHDOVRLQWURGXFHGRQ3URG1R
7 108 587
2008
PPVKRUWHUPLGGOHEHDP/LQNDWWDFKPHQWIRUEDVHPRWRUDGMXVWHG.
7 502 500 -
671
9LNLQJ0SURGQRZLWKQHZFRQWUROER[DQG,5KDQGFRQWURO
7 500 401 -
556
2007
1HZOLQNDJHEHWZHHQOHJVDQGPRWRU
7 107 500
633
1HZZDVKHUV36[[DUPPDVW
7 107 064
EFR
758
6HDOWDSHDW6OLQJEROWLQWURGXFHGRQ6OLQJEDUVIURPVQ
-
493
1HZZDVKHUVDUPPDVW36[[
7 106 528
EFR
694
+ROGHUIRU4XLFN5HIHUHQFH*XLGHDQGWDSHKDVEHHQDGGHG
7 106 201
519
2OGODWFKEDFN
7 105 310
619
1HZ&RPSRVLWH/DWFK
7 105 034
467
1HZZDVKHUV7%5%[[LQWKHSLYRWSRLQWRQWKHPDVW
ZZZOLNRFRP
93
11.0
Viking M
Product changes
Prod. No. 2040005, 2040015, 2040035
2012-11-15
Model
2040005
S/N
Changes
Project
2006
:DVKHU[KDVEHHQDGGHGWREDVHZLGWKDGMXVWPHQW
7104347
1HZSLYRWSRLQWVEHWZHHQDUPPDVWDFWXDWRUDUPPDVWDFWXDWRUDUPOLQNDQGOLQNVOLQJEDU
0VFUHZDQGQXWV
7 103 094
370
2005
1HZ/RFNLQJKDQGOHV
7 102 079
1HZZKHHOVDQGIRUNVPP
(PHUJHQF\JXDUGIRUFRQWUROER[
7 102 064
351
%DVHPRWRUPRYHGPPEDFNWRDYRLGWRXFKLQJWKHPLGGOHEHDP
7 101 100
213
1HZFXUUHQWOLPLWLQFRQWUROER[
7 101 023
2004
1HZ6OLQJEDU´8QLYHUVDO6OLQJEDU´
7 100 862
9LNLQJ0GHOLYHUHGZLWKWKHROG6OLQJEDU6WDQGDUG
7 100 382
:LGWKRIEDVHLQFUHDVHGZLWKPP
9LNLQJ0LVIURPQRZRQHTXLSSHGZLWKDQHZ$GDSWHU
7 100 308
ZZZOLNRFRP
94
226
ZZZOLNRFRP
95
w w w . l i k o . com
Manufacturer:
Liko AB
6(/XOHn
6ZHGHQ
LQIR#OLNRVH