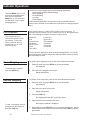
1
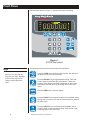
Model E1070 Indicator
User’s Manual
EUROPEAN COUNTRIES
WARNING
This is a Class A product. In a domestic environment this product may cause radio
interference in which the user may be required to take adequate measures.
CAUTION
Risk of electrical shock. Do not remove cover. No user serviceable parts inside. Refer servicing to qualified service personnel.
Avery Weigh-Tronix reserves the right to change
specifications at any time.
09/09/04 E1070_U.P65 PN 43036-0016A e1 Printed in USA
2
Model E1070 Indicator User’s Manual
Table of Contents
Specifications .............................................................................................. 4
Introduction .................................................................................................5
About This Manual ................................................................................5
Setup and Power-up ...................................................................................5
Front Panel .................................................................................................6
Keys ...................................................................................................6
Annunciators ......................................................................................... 6
Menu Mode .................................................................................................7
Indicator Operations .................................................................................... 8
PLU Channels ....................................................................................... 8
Gross Weighing ....................................................................................8
Tare/Net Weighing ................................................................................8
Accumulator Weighing ..........................................................................9
Using Cutoffs in the Accumulator Application ...............................10
Batch Weighing ..................................................................................13
Auto Batching by Weight ...............................................................14
Manual Batching by Percentage ....................................................15
Checkweighing ...................................................................................16
Performing a Checkweighment .....................................................17
Using Cutoffs in Checkweigher Application ...................................18
Counting .............................................................................................19
Dribble Sampling ...........................................................................20
Displaying Count Information ........................................................20
Using Cutoffs in the Counting Application .....................................21
Peak Weighing ...................................................................................22
Using Cutoffs .................................................................................22
Communications .......................................................................................23
Error Messages .........................................................................................23
Indicator Diagnostics .................................................................................24
Testing Indicator Functions .................................................................24
Model E1070 Indicator User’s Manual
3
Specifications
Power requirements
Standard inputs
• 85-265 Volts AC @ 0.3Amp maximum
• 50/60 Hz
Excitation
Standard outputs
• +/- 5 volts DC
• Supports up to eight 350-ohm weight sensors
Analog signal input range
• +/-60 mV
Analog signal sensitivity
• 0.2 µV/V/divisions minimum
• 1.0 µV/V/divisions recommended
Calibration
• 10/100 Ethernet (Modbus/TCP, TCP/IP, SMTP,
DHCP, Ethernet/IP)
• PROFIBUS DP
• DeviceNet
• Two serial ports
• RS-232/422/485 (SensorComm) selectable
• RS232 or 20mA current loop
• Three cutoff outputs
Serial Command Inputs/Outputs
2 to 5 points stored
Operational keys
• Twenty-two keys: Tare, Select, Zero, Print, Units,
F1, Clear, Mode, Escape, Enter, On/Off, Decimal,
0-9 numeric
Operational annunciators
•
•
•
•
• Three logic level inputs for: Zero, Print, Tare, Units
and F1
Center of Zero, Motion, Gross, Net, Tare,
Under/Target//Over
Units of measure (LB, KG)
Print, OP1, OP2, OP3, Pt Tare
Display
• Six-digit, seven-segment, 0.8-inch high, LED
Display rate
• Programmable serial response to ASCII character
input
• SMA protocol, Broadcast
Self diagnostics
• Display, keys, inputs, outputs, serial port, A to D
converter
Circuitry protection
• RFI, EMI, and ESD protection
Options
• Analog output/Pulse input
• ControlNetTM
• TIU3
Operating applications
• Selectable (1, 2, 5, 10)
• General weighing with accumulation,
Batching, Counting, Checkweighing, Peak
measurement, Remote display
Analog to digital conversion rate
• 100 times per second
Unit of measure
Operating temperature
• Pounds, kilograms, custom
Capacity selections
• 999,999 with decimal located from zero to five
places
Incremental selections
• 14 to 104° F (-10 to 40° C) approved
• -40 to 140° F (-40 to 60° C) non-legal
• Up to 95% non-condensing humidity
Enclosure
• Stainless steel NEMA 6/4X
• Multiples and sub-multiples of 1, 2, 5
Programmable selections
• Zero range, motion detection, automatic zero
tracking, five-point linearization.
Time and date/RAM
Dimensions
• 9.25" W x 9.25" H x 4.5" D (without mounting
bracket)
• 9.75" W x 11" H x 7" D (with mounting bracket)
Weight
• Battery backed up real time clock and RAM
standard
Internal resolution
• 53,687,100 counts per mV/V per second
Harmonizer™ digital filtering
• Fully programmable to ignore noise and vibration
• 8.5 lb, 4 kg
Agencies
•
•
•
•
•
NTEP CC#04-031 Class III/IIIL:10,000 divisions
OIML pending
Canadian Weights and Measures pending
UL/CUL
CE marked
ODVA™, Ethernet/IP™ and DeviceNet™ are trademarks of ODVA.
PROFIBUS® is a registered trademark of PROFIBUS International.
4
Model E1070 Indicator User’s Manual
Introduction
The Model E1070 is a full function, high connectivity indicator for most
weighing applications and process control situations. It is ideal for connected
system weighing applications. The display includes a multi-segment fan
graph for fast visual awareness for checkweighing. Also, the indicator can
perform counting functions, peak weight functions, and act as a remote
display. The indicator also has 11 memory channels for storing data.
Communication ports allow connection to a many peripheral devices and to
DeviceNet, ProfiBus and EtherNet/IP interfaces.
All this in a NEMA 6/4X rated enclosure.
About This Manual
Major sections of this manual are headed by titles in a black bar like Introduction above. Subheadings appear in the left column. Instructions and text
appear on the right side of the page. Occasionally notes, tips, and special
instructions appear in the left column.
Setup and Power-up
Your indicator will be installed by a qualified Avery Weigh-Tronix distributor.
They will make the required connections to your scale and peripheral
devices.
1. With the unit plugged in, see note at left, press and release the
switch to turn the indicator on.
2. The indicator powers up in normal operation mode.
Plug the Model E1070 into
properly grounded socketoutlet of the correct voltage,
installed near the equipment
and easily accessible. Never
use the unit without an appropriate earthground connection.
Any computer based system
should have a separate,
grounded power circuit. We
recommend one for the
Model E1070.
Model E1070 Indicator User’s Manual
5
Front Panel
The front panel, shown in Figure 1, consists of the keys and display.
Figure 1
E1070 front panel
The functions of the keys on the front panel are listed below.
Keys
Never press a key with anything but your finger. Damage
to the overlay may result if
sharp or rough objects are
used.
Press the TARE key to perform a tare function. Also acts as a
left arrow key when in the User menu.
Press the SELECT key to toggle between Gross, Tare, Net,
Count, Gross Accumulator, Net Accumulator, Transaction
Counter, Piece Weight, and Peak. Dependent on the current
application. Also acts as an up arrow key when in the User
menu.
Press the ZERO key to zero the display.
Press the PRINT key to send information to a peripheral device
through the Comm port. Also acts as a down arrow key when in
the User menu.
Press the UNITS key to scroll through the available units of
measure while in normal operating mode. Also acts as a right
arrow key when in the User menu.
6
Model E1070 Indicator User’s Manual
Press the F1 key to select application specific choices. Press
and hold to access the cutoffs (trips) function. Also used to
access PLU memory channels.
Press the C/CE key to clear entries.
Press the MODE key to scroll through the activated applications. Press and hold for 3-5 seconds to see the name of the
currently active application.
Press the ESC key to escape a function or return to normal
operation mode. Use to access the password display for the
User menu.
Press the ENTER key to accept displayed choices.
Use the numeric keypad to enter values.
Press and release the ON/OFF key to turn the unit on. Press
and hold the ON/OFF key until the unit turns off.
Model E1070 Indicator User’s Manual
7
There are several annunciators around the edge of the display. The illustration below explains each one.
Annunciators
Checkweighing
graph
Custom Unit
Kilogram
Motion
Pound
Gross weight
Center of zero
Accumulator,
Count, or Peak
Weight
Output 3
Net weight
Output 2
Output 1
Tare weight
Preset Tare
Print
Bottom LED color
SCOM:
Red – a cell has been ghosted.
Check the ghost log.
Green – a sensorcomm error
has occurred. Check the error
log.
Off – Scale is functioning
normally.
Network 1 or 2:
Red – A network error has
occurred. Check the network
settings on the indicator and
PLC, and reboot the indicator.
Green – The network connection has been established.
Amber – The network is ready
for a connection, but no
connection has been established.
8
Network &
SensorComm
status
Center of Zero
Lights when weight on the scale is within the zero range
Motion
Lights during scale motion. Goes out when scale is
stable
Gross
Lights when gross weight is displayed
Net
Lights when net weight is displayed
Tare
Lights when tare weight is displayed
Print
Lights when print format sent through serial port
OP 1
Lights when output one is activated
OP 2
Lights when output two is activated
OP 3
Lights when output three is activated
PT
Lights when preset tare is active
Network &
SensorComm
Status
This is configurable to light to show status of the Net
work 1, Network 2 or SensorComm. See note at left.
Accumulator,
Count
Lights when an accumulation occurs and while in the
count and peak applications
Custom Unit
Lights when a custom unit of measure is active
KG
Lights when kilograms is the active unit of measure
LB
Lights when pounds is the active unit of measure
Checkweigher
Lights when checkweighing application is active
Model E1070 Indicator User’s Manual
Menu Mode
The E1070 has a User menu you use to do the following:
User menu password is 111.
You must key in the password
within 10 seconds or the
display returns to normal
operation mode.
The display represents M by
nn so min becomes nnin,
mode becomes nnode, etc.
• See software information
• See A to D mV/V values
• Do a display test
• Do a button test
• Test the serial ports
• Audit the number of configurations and calibrations performed
1. Access the User menu by pressing and holding the ESC key for 3-5
seconds. Release the key when. . .
PASS_ is displayed.
2. Key in the User menu password = 111 and press ENTER. Figure 2
shows a flowchart of the User menu items. Use the keys shown in the
box in Figure 2 to navigate through the menu and choose the items you
want.
Figure 2
User menu flowchart
Specific instructions on the User menu appear in the section Indicator
Diagnostics later in the manual.
Model E1070 Indicator User’s Manual
9
Indicator Operations
Press the MODE key to scroll
through the activated applications. Press and hold the
MODE key for 3-5 seconds to
see the name of the currently
active application.
PLU Channels
This indicator has an 11
channel PLU (Product Look
Up) memory. To access a
memory channel, press a
number from 0 to 10, then
press the F1 key.
The E1070 comes equipped with several weighing applications;
• Accumulator weighing (default setting)
• Batch weighing
• Checkweighing
• Counting
• Peak weighing
These different applications are activated using a password protected
Service menu. See the Service Manual for instructions on changing applications.
This indicator has an 11 channel PLU (Product Look Up) memory. To
access a memory channel, key in a number from 0 to 10, then press the F1
key. The following information, if present, becomes active:
Channel #
ID #
Gross Accum.
Net Accum.
Count Accum.
Total
Tare Value
Lower Limit
Upper Limit
Piece Weight
Cutoff Wt1
Cutoff Wt2
Cutoff Wt3
The accumulator application comes as the default application. You can do
gross weighments, tare/net weighments and accumulator functions. Below
are instructions for each.
Gross Weighing
To perform gross weighing, power up the unit and follow these steps:
1. Empty the scale and press ZERO key to zero the display. . .
0 is displayed.
To change unit of measure,
press the UNITS key.
2. Place item to be weighed on the scale. . .
Weight is displayed.
Tare/Net Weighing
To perform a net weighment, power up the unit and follow these steps:
1. Empty the scale and press ZERO key to zero the display. . .
0 is displayed.
2. Place item to be tared on the scale. . .
Weight is displayed.
3. Press the TARE key. . .
0 is displayed and the NET annunciator lights.
4. Place material to be weighed on the scale. . .
To clear a tare weight, remove
all weight from the scale and
press the TARE key.
10
Net weight of material is displayed.
5. Repeatedly press the SELECT key to scroll through gross, tare, and net
modes. Remove the weight from the scale and press TARE to return to
gross mode.
Model E1070 Indicator User’s Manual
Acummulator Weighing
The Accumulator application
comes as the default active
application in the E1070.
The accumulator is memory that collects individual weighments (gross and
net) and stores the totals. These totals can be recalled at any time. The
number of weighments included in the totals can be displayed and all
information can be reviewed and deleted.
To use the accumulator, power up the unit and follow these steps:
1. Empty the scale and press ZERO key to zero the display. . .
0 is displayed.
2. Place item on the scale. .
Weight is displayed.
You can use tare/net weighing
with the accumulator application. The accumulator stores
both gross and net totals for
later recall.
3. Press the F1 or PRINT key to add weight to the accumulator. Pressing
the PRINT key also prints the default print format . . .
A circle annunciator lights briefly on the right side of the display to
show the weight was accumulated.
4. Remove weight from the scale. Weight must return to zero before
another accumulation can be recorded.
5. Repeat 2 through 4 for each weighment you want to accumulate.
You must remove all weight
from the scale to scroll through
the items listed at right. With
weight on the scale, repeatedly
pressing the SELECT key will
only show the gross, net and
tare values.
Press the MODE key to scroll
through the activated applications. Press and hold for 3-5
seconds to see the name of the
currently active application.
6. To review the accumulator total and the number of weighments, remove
all weight from the scale and press the SELECT key repeatedly. . .
1st press = Net weight displayed
2nd press = Tare weight displayed
3rd press = Display toggles between showing ACCUM. and
gross total of all weighments
4th press = Display toggles between showing ACCUM. and net
total of all weighments
5th press = Display toggles between showing TOTAL and
number of weighments
6th press = Display returns to gross weigh mode
You need the supervisor’s password to clear the accumulator. See
the Service Manual for instructions.
Model E1070 Indicator User’s Manual
11
Using Cutoffs in the
Accumulator Application
If enabled, you can use the cutoff (trips) function while in the accumulator
application. Cutoffs are enabled in a password protected menu. See the
Service Manual for instructions. Follow these steps to set up to three cutoffs:
1. With the indicator powered up, press and hold the F1 key until. . .
OP1 is displayed.
2. Press the PRINT key. . .
The current value for OP1 is displayed.
3. Press ENTER to accept this value
OR
Key in a value and press the ENTER key.
OP1 is displayed.
4. Scroll through all three outputs by using the TARE or UNITS key.
5. Repeat steps 2 and 3 for each output.
6. Press ESC key. . .
SAVE is displayed.
7. Press ENTER to save the changes or ESC to abort the changes. . .
The unit returns to normal operation mode with the saved outputs
active.
8. As you apply weight to the scale, output one will activate above its
setpoint and deactivate below its setpoint. The same is true for the other
two setpoints. When activated each output’s annunciator will light on the
display.
12
Model E1070 Indicator User’s Manual
Batch Weighing
Press the MODE key to scroll
through the activated applications. Press and hold the
MODE key for 3-5 seconds to
see the name of the currently
active application.
This indicator has an 11
channel PLU (Product Look
Up) memory. To access a
memory channel, key in a
number from 0 to 10, then
press the F1 key.
This section applies if your indicator has the batching application active.
The batching application has 11 recipes, each with up to 8 ingredients. In
the recipe, the following items are set:
Batch type can be by weight or a percentage.
Weight
Batches are all the same size and the weight of each
ingredient is predetermined by the recipe.
Percentage
Batch size is chosen by the operator and each ingredient is determined by the percentage set in the recipe.
Batching mode can be Manual or Automatic. (The PLU recipe channel must
be selected prior to a batching operation.)
Manual
If the recipe is set up for manual mode, you press the
F1 key to start the batch and you need to press the F1
key each time a setpoint is reached to activate the next
ingredient output.
Automatic
If the recipe is set up for automatic mode, you press the
F1 key to start the batch and each output is activated
and deactivated automatically by the indicator.
The Basis of each ingredient can be weight, time or pulse counts.
Pulse count requires optional
feature.
Weight
If an ingredient basis is weight, the output activates at
the appropriate time and deactivates when the weight
set in the recipe is reached.
Time
If an ingredient basis is time, the output activates for the
time set in the recipe and then deactivates.
Counter
If an ingredient basis is counts from a pulse counter, the
output activates for the value based on pulse count
units set in the recipe and then deactivates.
The recipe values are set in a password protected menu. You cannot
change a recipe without using the password. If the Batch Type is Percentage, you can set the batch size but not change the percentage of each
ingredient. See the Service Manual for instructions on creating a recipe.
Examples of two batching routines are given on the next pages.
Model E1070 Indicator User’s Manual
13
Auto Batching by Weight
Following is an example of batching for a recipe set as follows:
Batch type:
Batch mode:
Basis:
Constant
Automatic
Weight
1. With the indicator powered up and the scale empty, zero the scale by
pressing the ZERO key. . .
0 is displayed.
2. Press the F1 key. . .
The OP1 annunciator lights and output 1 is activated.
3. Add weight to the scale. . .
Each ingredient may have a
built in delay time between
deactivation of one ingredient
and activation of the next.
When the weight reaches the setpoint for ingredient 1, OP1
annunciator light goes out, OP2 annunciator lights and output 2
activates. See note at left.
4. Add weight to the scale. . .
When the weight reaches the setpoint for ingredient 2, OP2
annunciator light goes out, OP3 annunciator lights and output 3
activates. See note at left.
5. Add weight to the scale. . .
When the weight reaches the setpoint for ingredient 3, OP3
annunciator light goes out and output 3 deactivates.
6. Empty the scale and repeat steps 1-5 for the next batch.
14
Model E1070 Indicator User’s Manual
Manual Batching by
Percentage
Following is an example of batching for a recipe set as follows:
Batch type:
Batch mode:
Basis:
Percentage
Manual
Weight
1. With the indicator powered up and the scale empty, zero the scale by
pressing the ZERO key. . .
0 is displayed.
2. Press the F1 key. . .
The size of the last batch is displayed.
3. Press the ENTER key to accept the batch size
OR
Key in a new batch size and press the ENTER key. . .
The OP1 annunciator lights and output 1 is activated.
4. Add weight to the scale. . .
When the weight reaches the percentage of the batch size set in
the recipe for ingredient 1, OP1 annunciator light goes out.
5. Press the F1 key. . .
OP2 annunciator lights and output 2 activates.
6. Add weight to the scale. . .
When the weight reaches the percentage of the batch size set in
the recipe for ingredient 2, OP2 annunciator light goes out.
7. Press the F1 key. . .
OP3 annunciator lights and output 3 activates.
8. Add weight to the scale. . .
When the weight reaches the percentage of the batch size set in
the recipe for ingredient 3, OP3 annunciator light goes out and
output 3 deactivates.
9. Empty the scale and repeat steps 1-8 for the next batch.
Model E1070 Indicator User’s Manual
15
Checkweighing
The smallest orange segment
of the fan graph, shown in
Figure 3, will be lit when in the
checkweighing mode as a
reminder that this application is
active.
This section applies if your indicator has the checkweighing application
active. Applications are activated through a password protected menu. See
the Service Manual for instructions.
Checkweighing allows a quick, visual check of the acceptability or unacceptability of an item’s weight.
You set your target weight in one of two ways. It depends on how your
indicator is configured. The choice is made in the password protected
Supervisor menu which is explained in the Service Manual.
Your unit will be configured with limits mode or sample mode. Each are
explained below;
Limits Mode
Enter the upper and lower limits for the item and the
indicator will use those values to run the display. See
Figure 3.
The graph is based off of net
weight so if a tare is active only
the net weight is considered for
checkweighing. If there is no
tare, gross weight is used as
the basis for the graph.
Press the MODE key to scroll
through the activated applications. Press and hold the
MODE key for 3-5 seconds to
see the name of the currently
active application.
Figure 3
Limits mode
Sample Mode
Place a correct weight “product” on the scale and press
the F1 key. The indicator will use this weight to run the
display. Upper and lower limits will automatically be 1
division above and below the target weight respectively.
Figure 4 shows how the graphic display works in
Sample mode. Each graduation is equal to 1 scale
division. The TARGET light stays lit if weight is ±1
division of the target weight.
Figure 4
Sample mode
Directions for using each mode follows.
16
Model E1070 Indicator User’s Manual
Limits Mode: Entering Upper Follow these steps to setup and use the checkweigher in limits mode:
and Lower Limits
1. Empty the scale, press the ZERO key to zero the display, then press the
F1 key. . .
This indicator has an 11
channel PLU (Product Look
Up) memory. To access a
memory channel, press a
number from 0 to 10, then
press the F1 key.
Hi is displayed.
2. Key in the upper weight limit using the numeric entry procedure. Press
the ENTER key to accept the value or ESC to skip. . .
LO is displayed.
3. Key in the lower weight limit. Press the ENTER key to accept the value
or ESC to skip.
4. Place item(s) on the scale and the display will show if the weight is over,
under or acceptable based on the limits you have set.
You can repeatedly press the
SELECT key to view the items
listed in the Sample and Limits
modes on this page.
Performing a
Checkweighment in
Limits Mode
You can repeatedly press the SELECT key to view the following from the
gross weight display:
1st press Net annunciator lights and net weight is displayed.
2nd press Tare annunciator lights and tare weight is displayed.
3rd press Display toggles between HI and the upper weight tolerance, in
the current unit of measure.
4th press Display toggles between LO and the lower weight tolerance, in
the current unit of measure.
5th press Display returns to gross weighing mode.
1. With your target weight set as described above, place your item on the
scale. . .
If the weight is within the upper and lower tolerances you set, the
TARGET annunciator lights. If not, the upper or lower segments
will be lit.
2. Repeat step 1 for all products of this weight.
Sample Mode: Using
Product to Set Target
Weight
Follow these steps to setup and use the checkweigher in sample mode:
1. Zero the empty scale then place a sample of the correct weight on the
scale. . .
Weight is displayed.
2. Press the F1 key.
The weight is captured, the display reads 0 (net weight) and your
indicator is ready to use as a checkweigher. The target weight will
be the same as your sample item and the target will stay lit
whenever an item’s weight is within ±1 division of the target
weight.
You can repeatedly press the SELECT key to view the following from the
gross weight display:
1st press Net annunciator lights and net weight is displayed.
2nd press Tare annunciator lights and tare weight is displayed.
3rd press Display toggles between HI and the upper weight tolerance, in
the current unit of measure. This will always be one division.
4th press Display toggles between LO and the lower weight tolerance, in
the current unit of measure. This will always be one division.
5th press Display returns to gross weighing mode.
Model E1070 Indicator User’s Manual
17
Performing a Checkweighment in Sample Mode
You can repeatedly press the
SELECT key to view the items
listed in the Sample and Limits
modes on this page.
1. With your target weight set as described above, place your item on
the scale. . .
If the weight is correct, 0 is displayed and the TARGET annunciator lights. If the weight varies from the target value, upper or lower
segments may be lit and the weight will show a plus or minus
weight reading for the deviation from the target weight.
2. Repeat step 1 for all products of this weight.
Using Cutoffs in Checkweigher Application
Standard Cutoffs
If enabled, you can use the cutoff (trips) function while in the checkweigher
application. Cutoffs are enabled in a password protected menu. See the
Service Manual for instructions. Follow these steps to set up to three
outputs:
1. With the indicator powered up in normal checkweighing mode, press
and hold the F1 key until. . .
OP1 is displayed.
2. Press the PRINT key. . .
The current value for OP1 is displayed.
3. Press ENTER to accept this value
OR
Key in a value and press the ENTER key.
OP1 is displayed.
4. Scroll through all three outputs by using the left and right arrow keys.
5. Repeat steps 2 and 3 for each output.
6. Press ESC key to exit the cutoffs setup. . .
7. As you apply weight to the scale, output one will activate above its
setpoint and deactivate below its setpoint. The same is true for the other
two setpoints. When activated each output’s annunciator will light on the
display.
Target Cutoffs
18
If cutoffs are configured for Target mode in the Supervisor menu, cutoffs will
follow the limits and accept values. This means there is no additional
configuration required.
Model E1070 Indicator User’s Manual
Counting
Press the MODE key to scroll
through the activated applications. Press and hold the
MODE key for 3-5 seconds to
see the name of the currently
active application.
This indicator has an 11
channel PLU (Product Look
Up) memory. To access a
memory channel, key in a
number from 0 to 10, then
press the ENTER key.
Bulk Sampling
This section applies if your indicator has the counting application active.
Applications are activated through a password protected menu. See the
Service Manual for instructions.
There are two types of sampling; bulk and dribble. These are selected in a
password protected menu. See the Service Manual for instructions.
Bulk sampling
In this sampling method you place the specified number
of items on the scale all at once (in bulk) and the scale
automatically starts to calculate piece weight and then
shows the count.
Dribble sampling In this sampling method you can count out the specified
number of items onto the scale and when you are
ready, press the F1 key and the scale starts to calculate
piece weight and then shows the count.
Each method is described below.
1. In gross weight mode, press the F1 key. . .
A numeric value is displayed. This is the current sample size.
2. Accept the current sample size by pressing ENTER
OR
Enter a new sample size (see note at left) and press ENTER. . .
Zeroin is briefly displayed. This shows the indicator is zeroing
itself. Add is then displayed.
3. Place the correct sample size on the scale all at the same time.
Busy is briefly displayed, followed by one of two possible outcomes:
a. If the sample met the minimum sample requirements and the
weight is stable, the display will show the correct number of
parts on the scale and the green annunciator is lit.
The display is showing counts
when the green annunciator on
the right of the display is lit.
b. If the sample size was not large enough or if the weight was
unstable, Abort is displayed and the display returns to gross
weight mode. Repeat steps 1-3 using a larger sample size.
4. Place the parts on the scale to be counted.
5. You can accumulate the counts and track the number of transactions by
pressing the PRINT key while in count mode. See Displaying Count
Information about displaying this information.
Model E1070 Indicator User’s Manual
19
Dribble Sampling
1. In gross weight mode, press the F1 key. . .
A numeric value is displayed. This is the current sample size.
2. Accept the current sample size by pressing ENTER
OR
Enter a new sample size (see note at left) and press ENTER. . .
Zeroin is briefly displayed. This shows the indicator is zeroing
itself. Add is then displayed.
3. Place the correct sample size on the scale and press the F1 key. Busy
is briefly displayed, followed by one of two possible outcomes:
a. If the sample met the minimum sample requirements and the
weight is stable, the display will show the correct number of
parts on the scale and the Count annunciator is lit.
b. If the sample size was not large enough or if the weight was
unstable, Abort is displayed and the display returns to gross
weight mode. Repeat steps 1-3 using a larger sample size.
4. Place the parts on the scale to be counted.
5. You can accumulate the counts and track the number of transactions by
pressing the PRINT key while in count mode. See Displaying Count
Information below about displaying this information.
Displaying Count
Information
20
You can scroll through the following information by using the SELECT key:
From count displaypress SELECT -
The display toggles between PIECE and the piece
weight.
press SELECT -
The display toggles between CNT TOT and the count
total.
press SELECT -
The display toggles between TOTAL and the number of
accumulations done.
press SELECT -
The Gross annunciator lights and gross weight is
displayed.
press SELECT -
The Net annunciator lights and net weight is displayed.
press SELECT -
The Tare annunciator lights and tare weight is displayed.
press SELECT -
The count display returns.
Model E1070 Indicator User’s Manual
Using Cutoffs in the
Counting Application
If enabled, you can use the cutoff (trips) function while in the counting
application. Cutoffs are enabled in a password protected menu. See the
Service Manual for instructions. Follow these steps to set up to three
outputs:
1. With the indicator powered up, press and hold the F1 key until. . .
OP1 is displayed.
2. Press the PRINT key. . .
The current value for OP1 is displayed.
You can press the SELECT
key or the ESC key to abort the
process in step 3.
3. Press ENTER to accept this value
OR
Key in a value and press the ENTER key.
OP1 is displayed.
4. Scroll through all three outputs by using the left and right arrow keys.
5. Repeat steps 2 and 3 for each output.
6. Press ESC key to exit the cutoffs setup. . .
7. As you apply weight to the scale, output one will activate above its
setpoint and deactivate below its setpoint. The same is true for the other
two setpoints. When activated each output’s annunciator will light on the
display.
Model E1070 Indicator User’s Manual
21
Peak Weighing
This section applies if your indicator has the Peak application active.
Only the highest weight applied to the scale is displayed in the Peak application. A lit green LED indicates that peak weight is being displayed.
Press the MODE key to scroll
through the activated applications. Press and hold the
MODE key for 3-5 seconds to
see the name of the currently
active application.
As a reminder that you are in peak mode, a green annunciator is lit to the
right of the weight display.
1. Add weight to the scale. . .
Weight is displayed.
2. Remove weight. . .
Peak weight is displayed.
3. To clear the peak value, be sure scale is empty and press the F1 key. . .
0 is displayed.
4. Repeat steps 1-3.
5. Press the SELECT key to cycle through Gross, Tare, Net and Peak.
Using Cutoffs
If enabled, you can use the cutoff (trips) function while in the peak application. Cutoffs are enabled in a password protected menu. See the Service
Manual for instructions. Follow these steps to set up to three outputs:
1. With the indicator powered up, press and hold the F1 key until. . .
OP1 is displayed.
2. Press the PRINT key. . .
The current value for OP1 is displayed.
You can press the SELECT
key or the ESC key to abort the
process in step 3.
3. Press ENTER to accept this value
OR
Key in a value and press the ENTER key.
OP1 is displayed.
4. Scroll through all three outputs by using the left and right arrow keys.
5. Repeat steps 2 and 3 for each output.
6. Press ESC key to exit the cutoffs setup. . .
7. As you apply weight to the scale, output one will activate above its
setpoint and deactivate below its setpoint. The same is true for the other
two setpoints. When activated each output’s annunciator will light on the
display.
8. As weight is removed the displayed weight will remain unchanged due to
being in peak mode but the OP annunciators will go out as each cutoff is
reached.
22
Model E1070 Indicator User’s Manual
Communications
The E1070 provides an RS-232 output for data transmission to a peripheral
device. Refer to the Service Manual for RS-232 interface connections.
If your indicator has a peripheral device connected, from the gross/net
weighing mode press the PRINT key to transmit the selected output(s).
The default serial port parameters are 9600 baud, 8
databits, no parity and 1 stop
bit.
Stop bits for the serial
communication are preset to
1 stop bit. This is not configurable.
The PRINT annunciator will illuminate while data is transmitted and the data
configured to be printed will be output to the printer.
Print Format #1 for weighing applications
G 1234.56 lb<CR><LF>
OR
T 34.56 lb<CR><LF>
OR
N 1200.00 lb<CR><LF>
Print Format #1 for counting application
Count: 12230
Print Format #1 for peak application
12230 lb<CR>
Error Messages
The following are displays you may see if problems occur or if invalid
operations are attempted with your indicator:
Display
Description
Over-range weight.
The display represents M by
nn so min becomes nnin,
mode becomes nnode, etc.
Under-range weight.
The unit cannot perform a function.
Displayed while a key is pressed when attempting to
modify a sealed selection without edit privileges.
Model E1070 Indicator User’s Manual
23
Indicator Diagnostics
Testing Indicator
Functions
The user menu lets you test various functions of the indicator. The user
menu is shown in Figure 8. Instructions for using the menu are found below.
Figure 8
User Menu
1. Access the User menu by pressing and holding the ESC key for 3-5
seconds.
PASS_ is displayed.
2. Key in the User menu password (111) and press ENTER.
TEST is displayed.
3. Press the PRINT key.
ABOUT is displayed. Press the PRINT key then the UNITS key to
view the part number and revision level for the software found in
your indicator.
Press SELECT key to return to ABOUT.
4. Press the UNITS key. . .
ADC is displayed. This is the mV/V output of the connected
analog scale.
5. Press the PRINT key. . .
The mV/V value is displayed. This value should increase as
weight is applied to the scale
24
Model E1070 Indicator User’s Manual
6. Press the SELECT key. . .
ADC is displayed.
7. Press the UNITS key. . .
DISP is displayed. This is the display test item.
8. Press the PRINT key to perform a dynamic test of the display. . .
All parts of the display flash.
9. Press the ESC key to stop the test. . .
The display flashes a couple more times and then DISP is shown.
10. Press the UNITS key. . .
BUTTON is displayed. This is the button test item.
11. Press the PRINT key to perform a button test. Each key you press will
be reflected on the display screen to confirm the button is functioning
correctly. The ESC key is excluded from this test. It is used to stop the
testing and return to the menu item
12. Press ESC key to stop the button test.
BUTTON is displayed.
13. Press the UNITS key. . .
SERIAL is displayed. This is the serial test item.
14. Press the PRINT key to access the serial test.
PORT1 is displayed. If you jumper the transmit and receive lines
on the serial port and press the PRINT key, the display should
show PASS. If there is a problem the display will show FAIL.
15. Press the SELECT key after checking the port function. . .
PORT1 is displayed.
16. Press the UNITS key. . .
PORT 2 is displayed. Repeat the test from step 14 to check the
port.
17. Press the SELECT key twice to exit the serial test.
SERIAL is displayed.
18. Press the SELECT key. . .
TEST is displayed.
19. Press the UNITS key. . .
AUDIT is displayed.
Model E1070 Indicator User’s Manual
25
20. Press the PRINT key. . .
CFG is displayed. This stands for the configuration audit counter.
21. Press the PRINT key to see the number of times the configuration has
been altered on this indicator.
22. Press the SELECT key. . .
CFG is displayed.
23. Press the UNITS key. . .
CAL is displayed. This stands for the calibration audit counter.
24. Press the PRINT key. . .
The number of times the indicator has been calibrated is displayed.
25. Press the ESC key twice. . .
The display returns to normal operation mode.
This completes the User menu.
26
Model E1070 Indicator User’s Manual
Model E1070 Indicator User’s Manual
27
WORLDWIDE AVERY WEIGH-TRONIX COMPANIES
For information please contact your local Avery Weigh-Tronix support center or one of the addresses shown below.
Europe
Austria
Schember Berkel Ges.m.b.H.
2355 Wiener Neudorf
Industriezentrum NÖ-Süd
Strasse 3,0bjekt 30
Tel:
+ 43 2236 626310
Fax:
+ 43 2236 626316
Email:
[email protected]
Web site: www.averyweigh-tronix.com
France
Berkel S.A.
36 Avenue de I’Europe
95335 Domont Cedex
Tel:
+33 1 39 35 57 00
Fax:
+33 1 39 35 57 57
Email:
averyweigh-tronix-france@
awtxglobal.com
Web site: www.averyweigh-tronix.com
Ireland
Berkel (Ireland) Limited
Western Industrial Estate
Naas Road
Dublin 12
Tel:
+353 1 4600088
Fax
+353 1 4600096
Email:
[email protected]
Web site: www.averyweigh-tronix.com
Italy
Brevetti van Berkel S.p.A.
Via F. Olgiati 12
20143 Milan
Tel:
+39 2 81861
Fax:
+39 2 810945
Email:
[email protected]
Web site: www.averyweigh-tronix.com
Sweden
Berkel AB
Fågelviksvägen 18-20
S-145 53 Norsborg
Tel:
+46 8 534 701 50
Fax:
+ 46 8 534 701 69
Email:
[email protected]
Web site: www.averyweigh-tronix.com
United Kingdom
Avery Berkel Limited
Foundry Lane
Smethwick
West Midlands
England
B66 2LP
Tel:
+44 870 90 3434
Fax:
+44 121 224 8183
Email:
[email protected]
Web site: www.averyweigh-tronix.com
Avery Berkel Consumables (UK)
Tel:
+44 870 90 30108
Fax:
+44 870 90 00366
Emai:
[email protected]
Web site: www.averyweigh-tronix.com
Americas
Canada
Industrial products
Avery Weigh-Tronix Canada, ULC
217 Brunswick Boulevard
Pointe Claire
QC H9R 4R7 Canada
Tel:
+1 514 695 0380
Toll free: +1 800 561 9461
Fax:
+1 514 695 6820
Email:
[email protected]
Web site: www.weigh-tronix.ca
Mexico
Constructa de Basculas S.A. de C.V.
Norte 59 No 880-B Local B
Col. Industrial Vallejo
02300 Mexico DF
Tel:
+ 52 5 36 84033
Fax:
+52 5 58 70156
Email:
[email protected]
Web site: www.averyweigh-tronix.com
USA
Industrial products
Weigh-Tronix, Inc
1000 Armstrong Drive
Fairmont
MN 56031 USA
Tel:
+1 507 238 4461
Fax:
+1 507 238 4195
Email:
[email protected]
Web site: www.averyweigh-tronix.com
WORLDWIDE AVERY WEIGH-TRONIX COMPANIES
For information please contact your local Avery Weigh-Tronix support center or one of the addresses shown below.
Retail products
Avery Berkel North America
1758 Genesis Drive
Suite A
LaPorte
Indiana 46350
Tel:
+1 800 237 1886
Fax:
+1 219 325 9587
Web site: www.averyweigh-tronix.com
Africa
Kenya
Avery Kenya Limited
Factory Street
P.O. Box 30417
00100 Nairobi
Tel:
+254 2 559004
Fax:
+254 2 543956
Email:
[email protected]
Web site: www.averyweigh-tronix.com
Asia and Pacific
India
Avery India Limited
Ballabgarh Works
Plot Nos 50 - 59
Sector 25
Ballabgarh
Haryana
Tel:
+91 129 223 4625
Fax:
+91 129 223 2557
Email:
[email protected]
Web site: www.averyweigh-tronix.com
Malaysia
Avery Malaysia Sdn. Bhd
No 8A Jalan 213
46050 Petaling Jaya
Selangor
Tel:
+60 3 7781 4344
Fax:
+60 3 7781 5623
Email:
[email protected]
Web site: www.averyweigh-tronix.com
30
Model E1070 Indicator User’s Manual
Model E1070 Indicator User’s Manual
31
Weigh Bar ® is a registered trademark
of Avery Weigh-Tronix and may be
registered in certain jurisdictions.
ODVA™, Ethernet/IP™ and DeviceNet™ are trademarks of ODVA.
PROFIBUS ® is a registered trademark of PROFIBUS International.
Avery Weigh-Tronix
1000 Armstrong Dr.
Fairmont, MN 56031 USA
Telephone: 507-238-4461
Facsimile: 507-238-4195
e-mail: [email protected]
www.wtxweb.com
Avery Weigh-Tronix Canada, ULC
217 Brunswick Boulevard
Pointe Claire, QC H9R 4R7 Canada
Telephone: 514-695-0380
Toll free: 800-561-9461
Facsimile: 514-695-6820
www.weigh-tronix.ca