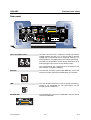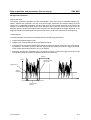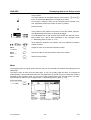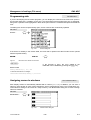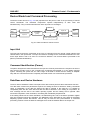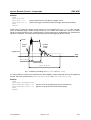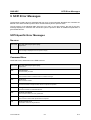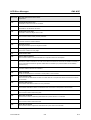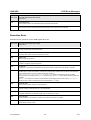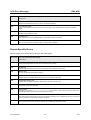
1
Test and Measurement Division Operating Manual Power Meter R&S NRP 1143.8500.02 Printed in the Federal Republic of Germany 1144.1400.12-04- 1 Dear Customer, R&S® is a registered trademark of Rohde & Schwarz GmbH & Co. KG. Trade names are trademarks of the owners. 1144.1400.12-04- 2 R&S NRP Supplement Supplement to Operating Manual R&S NRP 1144.1400.12-04Dear Customer, Your power meter is equipped with firmware version ≥ 03.00. A number of functions have been modified since the printing of the manual, and the modifications are described on the following pages. Ethernet For remote control via a TCP/IP-based LAN, the R&S NRP can be fitted with an optional 10/100BaseT Ethernet interface (option R&S NRP-B4). The socket is located on the rear panel of the R&S NRP. Via this interface, a controller can remote-control the R&S NRP by means of the power meter's SCPI commands, using the VXI11 protocol (TCP/IP instrument protocol specification), version 1.0, released on 17 July 1995 by the VXIbus Consortium. Ethernet connection socket 1144.1400.12-04- Supplement 1 E-1 Supplement R&S NRP VXI11 The VXI11 protocol uses ONC RPC (open network computing remote procedure calls), making it possible to call R&S NRP functions at the source code level as if they were running locally on the controller. The following figure shows the relationships of the relevant protocol layers in the OSI reference model. A p p lic a tio n V X I1 1 N e tw o rk In s tru m e n t P r e s e n ta tio n X D R ( D a ta r e p r e s e n ta tio n ) S e s s io n O N C R P C T ra n s p o rt T C P N e tw o rk IP D a ta L in k E th e rn e t/8 0 2 .3 P h y s ic a l 1 0 /1 0 0 B A S E -T The VXI11 protocol stack in the OSI reference model A VXI11 remote-control connection consists of three channels (core, abort and interrupt) which can be used to set up as many links as desired. The concept of links makes it possible to connect a network instrument client in a controller with a number of logical measurement devices in a host computer via a single VXI11 remote-control connection. A link is then set up to each logical device. It is also possible to set up several links to one logical device, provided that several servers are running on the network instrument host or a network instrument client is being served by several controllers. To prevent problems caused by several controllers simultaneously accessing one device, links can be locked. A locked link has exclusive access rights to a particular device. Accesses via other links are then not possible. An exception is an abort via the abort channel, which can be executed at any time and also aborts the execution of commands via other links. N e tw o rk In s tru m e n t H o s t C o n tr o lle r C o re C h a n n e l N e tw o rk In s tru m e n t C lie n t L in k 1 L in k 2 L in k n L in k 1 , L in k 2 , L in k n A b o rt C h a n n e l In te rru p t C h a n n e l R & S N R P : N e tw o rk In s tru m e n t H o s t L in k 1 L in k 2 L in k n N e tw o rk In s tru m e n t S e rv e r D e v ic e L in k 1 , L in k 2 , L in k n Diagram of a VXI11 connection with several links 1144.1400.12-04- Supplement 2 E-1 R&S NRP Supplement Communication channels of a VXI11 connection Channel Meaning Core All client-server communication, excluding aborts and interrupts, is handled via this channel. Abort Since the commands in the core channel are serialized and therefore cannot be interrupted, asynchronous abort commands must be transmitted via a separate, independent channel. This channel serves no further purpose. Interrupt Service requests (SRQs) are reported to the network instrument client via this channel. As all links share this channel, the client must subsequently determine which device triggered the SRQ by polling the status bytes (device_readstb() function) of all connected devices. Connection setup A socket connection is set up for each channel. All commands via the core or abort channel contain an ID that is used to assign the command to a link. The interrupt channel, which is also implemented using sockets, is shared by all links. Commands transmitted via this channel do not contain a link ID. The setup is handled by the network instrument client, which first requests the connections from the network instrument server's portmapper service at port 111. The portmapper subsequently activates the channel in the R&S NRP and tells the client at which ports channel services can be addressed. For this reason, it is important that any firewalls or routers between the client and the R&S NRP enable free access from the controller to the R&S NRP (core and abort channels) and vice versa (interrupt channel). As the ports for the channels are dynamically assigned, reliable information regarding the port numbers used cannot be provided. Remote control via VXI11 The following possibilities are suggested for remote-controlling the R&S NRP via VXI11: 1. The simplest way to create remote-control programs is by using a VISA (virtual instruments software architecture) implementation and creating the remote-control programs under Visual Basic or C/C++. VISA implementations provide an application programming interface (API) that offers all necessary functions. Knowledge about VXI11 is helpful but not required. The VISA resource identifier used to identify a VXI11 device has the following format: TCPIP::<IP address>::INSTR The IP address is specified using the familiar dot notation (e.g. 89.10.65.59). 2. The "TCP/IP Instrument Protocol Specification VXI11" contains in annex C an RPCL description of the protocol. The program rpcgen, which is contained in any ONC RPC distribution, is used to generate stubs, which can be inserted into separate C programs, where the functions from the following table can be called like ordinary library functions. This procedure requires RPC programming skills. 1144.1400.12-04- Supplement 3 E-1 Supplement R&S NRP VXI11 protocol functions Function name Channel Meaning create_link() core Opens a link to a network instrument device, setting up socket connections for the core and abort channels, but not for the interrupt channel. destroy_link() core Cancels a link to a network instrument device. device_write() core Sends an IEEE 488.2 or SCPI command as a string to a network instrument device. device_read() core Reads responses from a network instrument device. device_readstb() core Reads the status byte of a network instrument device. device_trigger() core Triggers a trigger in a network instrument device and is equivalent to *TRG. device_clear() core Triggers a "device clear" (DCL) in a network instrument device. In the R&S NRP, DCL and abort have the same effect. Because device_abort(), unlike device_clear(), is transmitted over the abort channel, it is not serialized with other commands but goes directly to the device and is therefore preferable. device_remote() core Changes the network instrument device to the remote state. device_local() core Changes the network instrument device to the local state. device_lock() core LLO (local lock out). The keyboard of the network instrument device is locked. device_unlock() core Cancels the LLO state. device_docmd() core The network instrument device executes a command. device_abort() abort The network instrument device aborts an in-progress command. See device_clear(). create_intr_chan() core An interrupt channel to the network instrument device is set up. destroy_intr_chan() core An existing interrupt channel to the network instrument device is cleared down. device_enable_srq() core The sending of service requests from the network instrument device to the network instrument controller is activated/deactivated. device_intr_srq() 1144.1400.12-04- interrupt This is the only function that the network instrument server calls from the network instrument device. It signals a service request (SRQ). Supplement 4 E-1 R&S NRP Supplement USB If the R&S NRP is connected to a controller via a USB 1.1 interface, it logs on as a USBTMC (USB test and measurement class) device, provided that USB is selected as a remote interface in the SystemÆRemote menu. The USBTMC standard describes how IEEE 488.2-compatible communication with can be implemented via USB. As with remote control via VXI11, the use of a VISA distribution that must include a USBTMC driver is recommended for remote control via USB. The VISA resource identifier used to identify a USBTMC device has the following format: USB::<vendor ID>::<product ID>::<serial number>::INSTR <vendor ID> 0x0aad <product ID> 0x001b <serial number> The serial number is a string that can be found in the SystemÆSystem Info menu. In addition, the VISA resource identifier appears on the R&S NRP display if the USB remote interface is selected. 1144.1400.12-04- Supplement 5 E-1 R&S NRP Tabbed Divider Overview Tabbed Divider Overview Data Sheet Safety Instructions Certificate of Quality EU Certificate of Conformity List of R&S Representatives Tabbed Divider 1 Chapter 1: Putting into Operation 2 Chapter 2: Getting Started 3 Chapter 3: Operation 4 Chapter 4: Functional Description 5 Chapter 5: Remote Control – Basics 6 Chapter 6: Remote Control – Commands 7 Chapter 7: for future extensions 8 Chapter 8: Maintenance 9 Chapter 9: Error Messages 10 1144.1400.12 Chapter 10: for future extensions RE E-1 Safety Instructions This unit has been designed and tested in accordance with the EC Certificate of Conformity and has left the manufacturer’s plant in a condition fully complying with safety standards. To maintain this condition and to ensure safe operation, the user must observe all instructions and warnings given in this operating manual. Safety-related symbols used on equipment and documentation from R&S: Observe operating instructions 1. Weight indication for units >18 kg PE terminal Ground terminal The unit may be used only in the operating conditions and positions specified by the manufacturer. Unless otherwise agreed, the following applies to R&S products: IP degree of protection 2X, pollution severity 2 overvoltage category 2, only for indoor use, altitude max. 2000 m. The unit may be operated only from supply networks fused with max. 16 A. Unless specified otherwise in the data sheet, a tolerance of ±10% shall apply to the nominal voltage and of ±5% to the nominal frequency. 2. For measurements in circuits with voltages Vrms > 30 V, suitable measures should be taken to avoid any hazards. (using, for example, appropriate measuring equipment, fusing, current limiting, electrical separation, insulation). 3. If the unit is to be permanently wired, the PE terminal of the unit must first be connected to the PE conductor on site before any other connections are made. Installation and cabling of the unit to be performed only by qualified technical personnel. 4. For permanently installed units without built-in fuses, circuit breakers or similar protective devices, the supply circuit must be fused such as to provide suitable protection for the users and equipment. 5. Prior to switching on the unit, it must be ensured that the nominal voltage set on the unit matches the nominal voltage of the AC supply network. If a different voltage is to be set, the power fuse of the unit may have to be changed accordingly. 6. Units of protection class I with disconnectible AC supply cable and appliance connector may be operated only from a power socket with earthing contact and with the PE conductor connected. 095.1000 Sheet 17 Danger! Shock hazard Warning! Hot surfaces Ground Attention! Electrostatic sensitive devices require special care 7. It is not permissible to interrupt the PE conductor intentionally, neither in the incoming cable nor on the unit itself as this may cause the unit to become electrically hazardous. Any extension lines or multiple socket outlets used must be checked for compliance with relevant safety standards at regular intervals. 8. If the unit has no power switch for disconnection from the AC supply, the plug of the connecting cable is regarded as the disconnecting device. In such cases it must be ensured that the power plug is easily reachable and accessible at all times (length of connecting cable approx. 2 m). Functional or electronic switches are not suitable for providing disconnection from the AC supply. If units without power switches are integrated in racks or systems, a disconnecting device must be provided at system level. 9. Applicable local or national safety regulations and rules for the prevention of accidents must be observed in all work performed. Prior to performing any work on the unit or opening the unit, the latter must be disconnected from the supply network. Any adjustments, replacements of parts, maintenance or repair may be carried out only by authorized R&S technical personnel. Only original parts may be used for replacing parts relevant to safety (eg power switches, power transformers, fuses). A safety test must be performed after each replacement of parts relevant to safety. (visual inspection, PE conductor test, insulationresistance, leakage-current measurement, functional test). continued overleaf Safety Instructions 10. Ensure that the connections with information technology equipment comply with IEC950 / EN60950. 11. Lithium batteries must not be exposed to high temperatures or fire. Keep batteries away from children. If the battery is replaced improperly, there is danger of explosion. Only replace the battery by R&S type (see spare part list). Lithium batteries are suitable for environmentally-friendly disposal or specialized recycling. Dispose them into appropriate containers, only. Do not short-circuit the battery. 12. Equipment returned or sent in for repair must be packed in the original packing or in packing with electrostatic and mechanical protection. 095.1000 Sheet 18 13. Electrostatics via the connectors may dam- age the equipment. For the safe handling and operation of the equipment, appropriate measures against electrostatics should be implemented. 14. The outside of the instrument is suitably cleaned using a soft, lint-free dustcloth. Never use solvents such as thinners, acetone and similar things, as they may damage the front panel labeling or plastic parts. 15. Any additional safety instructions given in this manual are also to be observed. Certified Quality System Certified Environmental System ISO 9001 ISO 14001 DQS REG. NO 1954 QM DQS REG. NO 1954 UM Qualitätszertifikat Certificate of quality Certificat de qualité Sehr geehrter Kunde, Dear Customer, Cher client, Sie haben sich für den Kauf eines Rohde & Schwarz-Produktes entschieden. Hiermit erhalten Sie ein nach modernsten Fertigungsmethoden hergestelltes Produkt. Es wurde nach den Regeln unseres Qualitätsmanagementsystems entwickelt, gefertigt und geprüft. Das Rohde & SchwarzQualitätsmanagementsystem ist u.a. nach ISO 9001 und ISO14001 zertifiziert. You have decided to buy a Rohde & Schwarz product. You are thus assured of receiving a product that is manufactured using the most modern methods available. This product was developed, manufactured and tested in compliance with our quality management system standards. The Rohde & Schwarz quality management system is certified according to standards such as ISO9001 and ISO14001. Vous avez choisi d'acheter un produit Rohde & Schwarz. Vous disposez donc d'un produit fabriqué d'après les méthodes les plus avancées. Le développement, la fabrication et les tests respectent nos normes de gestion qualité. Le système de gestion qualité de Rohde & Schwarz a été homologué, entre autres, conformément aux normes ISO 9001 et ISO14001. EC Certificate of Conformity Certificate No.: 2002-36 This is to certify that: Equipment type Stock No. Designation NRP 1143.8500.02 Power Meter NRP-B1 NRP-B2 NRP-B5 NRP-B6 1146.9008.02 1146.8801.02 1146.9608.02 1146.9908.02 Sensor Check Source Second Sensor Input 3rd und 4th Sensor Rear-Panel Sensor NRP-Z3 NRP-Z4 NRP-Z11 NRP-Z21 NRP-Z22 NRP-Z23 NRP-Z24 NRP-Z51 NRP-Z55 1146.7005.02 1146.8001.02 1138.3004.02 1137.6000.02 1137.7506.02 1137.8002.02 1137.8502.02 1138.0005.02 1138.2008.02 USB Adapter USB Adapter Average Power Sensor Average Power Sensor Average Power Sensor Average Power Sensor Average Power Sensor Thermal Power Sensor Thermal Power Sensor complies with the provisions of the Directive of the Council of the European Union on the approximation of the laws of the Member States - relating to electrical equipment for use within defined voltage limits (73/23/EEC revised by 93/68/EEC) - relating to electromagnetic compatibility (89/336/EEC revised by 91/263/EEC, 92/31/EEC, 93/68/EEC) Conformity is proven by compliance with the following standards: EN61010-1 : 1993 + A2 : 1995 EN55011 : 1998 + A1 : 1999 EN61326 : 1997 + A1 : 1998 + A2 : 2001 For the assessment of electromagnetic compatibility, the limits of radio interference for Class B equipment as well as the immunity to interference for operation in industry have been used as a basis. Affixing the EC conformity mark as from 2002 Munich, 2003-11-13 1143.8500.02 ROHDE & SCHWARZ GmbH & Co. KG Mühldorfstr. 15, D-81671 München Central Quality Management FS-QZ / Becker CE E-4 Support Center Telefon / Telephone: Fax: E-mail: +49 (0)180 512 42 42 +49 89 41 29 137 77 [email protected] Für technische Fragen zu diesem Rohde & Schwarz-Gerät steht Ihnen die Hotline der Rohde & Schwarz Vertriebs-GmbH, Support Center, zur Verfügung. Unser Team bespricht mit Ihnen Ihre Fragen und sucht Lösungen für Ihre Probleme. Die Hotline ist Montag bis Freitag von 8.00 bis 17.00 Uhr MEZ besetzt. Bei Anfragen außerhalb der Geschäftszeiten hinterlassen Sie bitte eine Nachricht oder senden Sie eine Notiz per Fax oder E-Mail. Wir setzen uns dann baldmöglichst mit Ihnen in Verbindung. Um Ihr Gerät stets auf dem neuesten Stand zu halten, abonnieren Sie bitte Ihren persönlichen Newsletter unter http://www.rohde-schwarz.com/www/response.nsf/newsletterpreselection. Sie erhalten dann regelmäßig Informationen über Rohde & Schwarz-Produkte Ihrer Wahl, über Firmware-Erweiterungen, neue Teiber und Applikationsschriften. Should you have any technical questions concerning this Rohde & Schwarz product, please contact the hotline of Rohde & Schwarz Vertriebs-GmbH, Support Center. Our hotline team will answer your questions and find solutions to your problems. You can reach the hotline Monday through Friday from 8:00 until 17:00 CET. If you need assistance outside office hours, please leave a message or send us a fax or e-mail. We will contact you as soon as possible. To keep your instrument always up to date, please subscribe to your personal newsletter at http://www.rohde-schwarz.com/www/response.nsf/newsletterpreselection. As a subscriber, you will receive information about your selection of Rohde & Schwarz products, about firmware extensions, new drivers and application notes on a regular basis. 1007.8684.14-02.00 Adressen/Addresses FIRMENSITZ/HEADQUARTERS Rohde & Schwarz GmbH & Co. KG Mühldorfstraße 15 · D-81671 München Postfach 80 14 69 · D-81614 München Phone Fax E-mail +49 (89) 41 29-0 +49 89 4129-121 64 - WERKE/PLANTS Rohde & Schwarz Messgerätebau GmbH Riedbachstraße 58 · D-87700 Memmingen Postfach 1652 · D-87686 Memmingen +49 (8331) 108-0 +49 (8331) 108-11 24 - Rohde & Schwarz GmbH & Co. KG Werk Teisnach Kaikenrieder Straße 27 · D-94244 Teisnach Postfach 1149 · D-94240 Teisnach +49 (9923) 857-0 +49 (9923) 857-11 74 - Rohde & Schwarz GmbH & Co. KG +49 (2203) 49-0 Dienstleistungszentrum Köln +49 (2203) 49 51-308 Graf-Zeppelin-Straße 18 · D-51147 Köln [email protected] Postfach 98 02 60 · D-51130 Köln [email protected] Zweigniederlassung Süd, Geschäftsstelle München Mühldorfstraße 15 · D-81671 München Postfach 80 14 69 · D-81614 München +49 (89) 41 86 95-0 +49 (89) 40 47 64 - Zweigniederlassung Süd, Geschäftsstelle Nürnberg Donaustraße 36 D-90451 Nürnberg +49 (911) 642 03-0 +49 (911) 642 03-33 - Zweigniederlassung Mitte, Geschäftsstelle Neu-Isenburg Siemensstraße 20 D-63263 Neu-Isenburg +49 (6102) 20 07-0 +49 (6102) 20 07 12 - ADRESSEN WELTWEIT/ADDRESSES WORLDWIDE Albania siehe / see Austria Algeria ROHDE & SCHWARZ Bureau d'Alger 5B Place de Laperrine 16035 Hydra-Alger Argentina PRECISION ELECTRONICA S.R.L. Av. Pde Julio A. Roca 710 - 6° Piso (C1067ABP) Buenos Aires Australia ROHDE & SCHWARZ (AUSTRALIA) Pty. Ltd. Sales Support Unit 6 2-8 South Street Rydalmere, N.S.W. 2116 Austria ROHDE & SCHWARZ-ÖSTERREICH Ges.m.b.H. +213 (21) 48 20 18 +213 (21) 69 46 08 TOCHTERUNTERNEHMEN/SUBSIDIARIES Rohde & Schwarz Vertriebs-GmbH Mühldorfstraße 15 · D-81671 München Postfach 80 14 69 · D-81614 München +49 (89) 41 29-137 74 +49 (89) 41 29-137 77 - Rohde & Schwarz International GmbH Mühldorfstraße 15 · D-81671 München Postfach 80 14 60 · D-81614 München +49 (89) 41 29-129 84 +49 (89) 41 29-120 50 - Rohde & Schwarz Engineering and Sales GmbH Mühldorfstraße 15 · D-81671 München Postfach 80 14 29 · D-81614 München +49 (89) 41 29-137 11 +49 (89) 41 29-137 23 - R&S BICK Mobilfunk GmbH Fritz-Hahne-Str. 7 · D-31848 Bad Münder Postfach 2062 · D-31844 Bad Münder +49 (5042) 998-0 +49 (5042) 998-105 - Rohde & Schwarz FTK GmbH Wendenschlossstraße 168, Haus 28 D-12557 Berlin +49 (30) 658 91-122 +49 (30) 655 50-221 - Rohde & Schwarz SIT GmbH Agastraße 3 D-12489 Berlin +49 (30) 658 84-0 +49 (30) 658 84-183 ADRESSEN DEUTSCHLAND/ADDRESSES GERMANY Rohde & Schwarz Vertriebs-GmbH Mühldorfstraße 15 · D-81671 München Postfach 80 14 69 · D-81614 München ROHDE & SCHWARZ Azerbaijan Liaison Office Baku ISR Plaza 340 Nizami Str. 370000 Baku Baltic Countries siehe / see Denmark Bangladesh BIL Consortium Ltd. Corporation Office House No: 95/A, Block - 'F' Road No. 4, Banani Dhaka-1213 Belgium ROHDE & SCHWARZ BELGIUM N.V. Excelsiorlaan 31 Bus 1 1930 Zaventem Brasil ROHDE & SCHWARZ DO BRASIL LTDA. +55 (11) 56 44 86 11 (general) Av. Alfredo Egidio de Souza Aranha n° 177, +55 (11) 56 44 86 25 (sales) 1° andar - Santo Amaro +55 (11) 56 44 86 36 04726-170 Sao Paulo - SP [email protected] Brunei GKL Equipment PTE. Ltd. Jurong Point Post Office P.O.Box 141 Singapore 916405 Bulgaria ROHDE & SCHWARZ ÖSTERREICH Representation Office Bulgaria 39, Fridtjof Nansen Blvd. 1000 Sofia BosniaHerzegovina siehe / see Slovenia +49 (30) 34 79 48-0 +49 (30) 34 79 48 48 - +49 (228) 918 90-0 +49 (228) 25 50 87 - Zweigniederlassung Nord, Geschäftsstelle Hamburg Steilshooper Alle 47 · D-22309 Hamburg Postfach 60 22 40 · D-22232 Hamburg +49 (40) 63 29 00-0 +49 (40) 630 78 70 - Zweigniederlassung Mitte, Geschäftsstelle Köln Niederkasseler Straße 33 · D-51147 Köln Postfach 900 149 · D-51111 Köln +49 (2203) 807-0 +49 (2203) 807-650 - +43 (1) 602 61 41-0 +43 (1) 602 61 41-14 [email protected] Azerbaijan +49 89 4129-133 74 +4989 4129-133 77 - Zweigniederlassung Büro Bonn Josef-Wirmer-Straße 1-3 · D-53123 Bonn Postfach 140264 · D-53057 Bonn +61 (2) 88 45 41 00 +61 (2) 96 38 39 88 [email protected] Am Euro Platz 3 Gebäude B 1120 Wien Zweigniederlassungen der Rohde & Schwarz Vertriebs-GmbH/Branch offices of Rohde & Schwarz Vertriebs-GmbH Zweigniederlassung Nord, Geschäftsstelle Berlin Ernst-Reuter-Platz 10 · D-10587 Berlin Postfach 100620 · D-10566 Berlin +541 (14) 331 41 99 +541 (14) 334 51 11 [email protected] +994 (12) 93 31 38 +994 (12) 93 03 14 [email protected] +880 (2) 881 06 53 +880 (2) 882 82 91 +32 (2) 721 50 02 +32 (2) 725 09 36 [email protected] +65 (6) 276 06 26 +65 (6) 276 06 29 [email protected] +359 (2) 963 43 34 +359 (2) 963 21 97 [email protected] Adressen/Addresses Canada ROHDE & SCHWARZ CANADA Inc. 555 March Rd. Kanata, Ontario K2K 2M5 Canada TEKTRONIX CANADA Inc. Test and Measurement 4929 Place Olivia Saint-Laurent, Pq +1 (613) 592 80 00 +1 (613) 592 80 09 [email protected] +1 (514) 331 43 34 +1 (514) 331 59 91 Denmark ROHDE & SCHWARZ DANMARK A/S Ejby Industrivej 40 2600 Glostrup Ecuador REPRESENTACIONES MANFRED WEINZIERL Vía Láctea No. 4 y Via Sta. Inés P.O.Box 17-22-20309 1722 Cumbayá-Quito Egypt U.A.S. Universal Advanced Systems 31 Manshiet El-Bakry Street Heliopolis 11341 Cairo El Salvador siehe / see Mexico Estonia ROHDE & SCHWARZ DANMARK A/S Estonian Branch Office Narva mnt. 13 10151 Tallinn Finland Orbis Oy P.O.Box 15 00421 Helsinski 42 France ROHDE & SCHWARZ FRANCE Immeuble "Le Newton" 9-11, rue Jeanne Braconnier 92366 Meudon La Forêt Cédex France Niederlassung/Subsidiary Rennes 37 Rue du Bignon Bât. A F-35510 Cesson Sevigne +33 (0) 299 51 97 00 +33 (0) 299 51 98 77 - France Niederlassung/Subsidiary Toulouse Technoparc 3 B.P. 501 F-31674 Labège Cédex +33 (0) 561 39 10 69 +33 (0) 561 39 99 10 - France Aix-en-Provence +33 (0) 494 07 39 94 +33 (0) 494 07 55 11 - France Office Lyon +33 (0) 478 29 88 10 +33 (0) 478 79 18 57 France Office Nancy +33 (0) 383 54 51 29 +33 (0) 383 54 82 09 Ghana KOP Engineering Ltd. P.O. Box 11012 3rd Floor Akai House, Osu Accra North +233 (21) 77 89 13 +233 (21) 701 06 20 Greece MERCURY S.A. 6, Loukianou Str. 10675 Athens +302 (10) 722 92 13 +302 (10) 721 51 98 [email protected] Guatemala siehe / see Mexico Honduras siehe / see Mexico Hongkong Electronic Scientific Engineering 36/F Dorset House, Taikoo Place 979 King's Road Quarry Bay Hong Kong Hungary ROHDE & SCHWARZ Budapesti Iroda Váci út 169 1138 Budapest Iceland siehe / see Denmark +45 (43) 43 66 99 +45 (43) 43 77 44 +593 (22) 89 65 97 +593 (22) 89 65 97 [email protected] Montreal H4R 2V6 Chile DYMEQ Ltda. Av. Larrain 6666 Santiago China ROHDE & SCHWARZ China Ltd. Representative Office Shanghai Central Plaza 227 Huangpi North Road RM 807/809 Shanghai 200003 +86 (21) 63 75 00 18 +86 (21) 63 75 91 70 ROHDE & SCHWARZ China Ltd. Representative Office Beijing Room 602, Parkview Center 2 Jiangtai Road Chao Yang District Beijing 100016 +86 (10) 64 31 28 28 +86 (10) 64 37 98 88 [email protected] China +56 (2) 339 20 00 +56 (2) 339 20 10 [email protected] China ROHDE & SCHWARZ China Ltd. Representative Office Guangzhou Room 2903, Metro Plaza 183 Tianhe North Road Guangzhou 510075 China ROHDE & SCHWARZ China Ltd. Representative Office Chengdu Unit G, 28/F, First City Plaza 308 Shuncheng Avenue Chengdu 610017 +86 (28) 86 52 76 05 to 09 +86 (28) 86 52 76 10 [email protected] ROHDE & SCHWARZ China Ltd. Unit 3115 31/F Entertainment Building 30 Queen's Road Central Hongkong +85 (2) 21 68 06 70 +85 (2) 21 68 08 99 China China China China ROHDE & SCHWARZ China Ltd. Representative Office Xi'an Room 10125, Jianguo Hotel Xi'an No. 2, Huzhu Road Xi'an 710048 +86 (20) 87 55 47 58 +86 (20) 87 55 47 59 +86 (29) 321 82 33 +86 (29) 329 60 15 [email protected] Shanghai ROHDE & SCHWARZ Communication Technology Co.Ltd. Central Plaza, Unit 809 227 Huangpi North Road Shanghai 200003 Beijing ROHDE & SCHWARZ Communication Technology Co.Ltd. Room 106, Parkview Centre No. 2, Jiangtai Road Chao Yang District Beijing 100016 Croatia siehe / see Slovenia Cyprus HINIS TELECAST LTD. Agiou Thoma 18 Kiti +86 (10) 64 38 80 80 +86 (10) 64 38 97 06 +357 (24) 42 51 78 +357 (24) 42 46 21 [email protected] +20 (2) 455 67 44 +20 (2) 256 17 40 [email protected] +372 (6) 14 31 23 +372 (6) 14 31 21 [email protected] +358 (9) 47 88 30 +358 (9) 53 16 04 [email protected] +33 (1) 41 36 10 00 +33 (1) 41 36 11 73 +852 (25) 07 03 33 +852 (25) 07 09 25 [email protected] Larnaca 7550 Czech Republic ROHDE & SCHWARZ - Praha s.r.o. Hadovka Office Park Evropská 33c 16000 Praha 6 +420 (2) 24 31 12 32 +420 (2) 24 31 70 43 [email protected] +36 (1) 412 44 60 +36 (1) 412 44 61 [email protected] Adressen/Addresses India ROHDE & SCHWARZ India Pvt. Ltd. Bangalore Office No. 24, Service Road, Domlur 2nd Stage Extension Bangalore - 560 071 +91 (80) 535 23 62 +91 (80) 535 03 61 [email protected] India ROHDE & SCHWARZ India Pvt. Ltd. Hyderabad Office 302 & 303, Millenium Centre 6-3-1099/1100, Somajiguda +91 (40) 23 32 24 16 +91 (40) 23 32 27 32 [email protected] India ROHDE & SCHWARZ India Pvt. Ltd. +91 (11) 26 32 63 81 244, Okhla Industrial Estate, Phase-III +91 (11) 26 32 63 73 New Delhi 110020 [email protected] [email protected] India ROHDE & SCHWARZ India Pvt. Ltd. RS India Mumbai Office B-603, Remi Bizcourt, Shah Industrial Estate, Off Veera Desai Road Mumbai - 400 058 PT ROHDE & SCHWARZ Indonesia Graha Paramita 5th Floor Jln. Denpasar Raya Blok D-2 +62 (21) 252 36 08 +62 (21) 252 36 07 [email protected] [email protected] ROHDE & SCHWARZ IRAN Groundfloor No. 1, 14th Street Khaled Eslamboli (Vozara) Ave. 15117 Tehran Ireland siehe / see United Kingdom Israel EASTRONICS LTD. Messtechnik / T&M Equipment 11 Rozanis St. P.O.Box 39300 Tel Aviv 61392 Korea ROHDE & SCHWARZ Korea Ltd. 83-29 Nonhyun-Dong, Kangnam-Ku +254 (2) 55 80 88 +254 (2) 54 46 79 +82 (2) 514 45 46 +82 (2) 514 45 49 [email protected] [email protected] Kuwait Group Five Trading & Contracting Co. Mezanine Floor Al-Bana Towers Ahmad Al Jaber Street Sharq +965 (244) 91 72/73/74 +965 (244) 95 28 [email protected] Latvia ROHDE & SCHWARZ DANMARK A/S Latvian Branch Office Merkela iela 21-301 1050 Riga +371 (7) 50 23 55 +371 (7) 50 23 60 [email protected] Lebanon ROHDE & SCHWARZ Liaison Office +966 (1) 465 64 28 Ext. 303 c/o Haji Abdullah Alireza Co. Ltd. +966 (1) 465 64 28 Ext. 229 P.O.Box 361 [email protected] Riyadh 11411 Lebanon Netcom Liechtenstein siehe / see Switzerland Lithuania ROHDE & SCHWARZ DANMARK A/S Lithuanian Office Lukiskiu 5-228 2600 Vilnius Luxembourg siehe / see Belgium Macedonia siehe / see Slovenia Malaysia DAGANG TEKNIK SDN. BHD. No. 9, Jalan SS 4D/2 Selangor Darul Ehsan +91 (22) 26 30 18 10 +91 (22) 26 32 63 73 [email protected] Jakarta 12940 Iran Excel Enterprises Ltd Dunga Road P.O.Box 42 788 Nairobi Seoul 135-010 Hyderabad - 500 016 Indonesia Kenya +98 (21) 872 42 96 +98 (21) 871 90 12 [email protected] +972 (3) 645 87 77 +972 (3) 645 86 66 [email protected] +370 (5) 239 50 10 +370 (5) 239 50 11 +60 (3) 27 03 55 68 +60 (3) 27 03 34 39 [email protected] 47301 Petaling Jaya Israel J.M. Moss (Engineering) Ltd. Kommunikationstechnik/ Communications Equipment 9 Oded Street P.O.Box 967 52109 Ramat Gan +972 (3) 631 20 57 +972 (3) 631 40 58 [email protected] Italy ROHDE & SCHWARZ ITALIA S.p.a. Centro Direzionale Lombardo Via Roma 108 20060 Cassina de Pecchi (MI) +39 (02) 95 70 42 03 +39 (02) 95 30 27 72 [email protected] Italy ROHDE & SCHWARZ ITALIA S.p.a. Via Tiburtina 1182 00156 Roma +39 (06) 41 59 82 18 +39 (06) 41 59 82 70 Japan ADVANTEST Corporation RS Sales Department 1-32-1, Asahi-cho Nerima-ku Tokyo 179-0071 Jordan Jordan Crown Engineering & Trading Co. Jabal Amman, Second Circle Youssef Ezzideen Street P.O.Box 830414 Amman, 11183 Kazakhstan ROHDE & SCHWARZ Kazakhstan Representative Office Almaty Pl. Respubliki 15 480013 Almaty +81 (3) 39 30 41 90 +81 (3) 39 30 41 86 [email protected] +962 (6) 462 17 29 +962 (6) 465 96 72 [email protected] Malta ITEC International Technology Ltd B'Kara Road San Gwann SGN 08 Mexico Rohde & Schwarz de Mexico (RSMX) S. de R.L. de C.V. German Centre Oficina 4-2-2 Av. Santa Fé 170 Col. Lomas de Santa Fé 01210 Mexico D.F. +52 (55) 85 03 99 13 +52 (55) 85 03 99 16 [email protected] Mexico Rohde & Schwarz de Mexico (RSMX) Av. Prol. Americas No. 1600, 2° Piso Col. Country Club Guadalajara, Jal. Mexico CP, 44610 +52 (33) 36 78 91 70 +52 (33) 36 78 92 00 Moldavia siehe / see Romania Netherlands ROHDE & SCHWARZ NEDERLAND B.V. Perkinsbaan 1 3439 ND Nieuwegein New Zealand Nichecom 1 Lincoln Ave. +356 (21) 37 43 00 or 37 43 29 +356 (21) 37 43 53 [email protected] +31 (30) 600 17 00 +31 (30) 600 17 99 [email protected] +64 (4) 232 32 33 +64 (4) 232 32 30 [email protected] Tawa, Wellington +7 (32) 72 63 55 55 +7 (32) 72 63 46 33 [email protected] Nicaragua siehe / see Mexico Nigeria Ferrostaal Abuja Plot 3323, Barada Close P.O.Box 8513, Wuse Off Amazon Street Maitama, Abuja +234 (9) 413 52 51 +234 (9) 413 52 50 [email protected] Adressen/Addresses Norway ROHDE & SCHWARZ NORGE AS Enebakkveien 302 B 1188 Oslo Oman Mustafa Sultan Science & Industry Co.LLC. For Test & Measurement ONLY Way No. 3503 Building No. 241 Postal Code 112 Al Khuwair, Muscat +47 (23) 38 66 00 +47 (23) 38 66 01 Spain ROHDE & SCHWARZ ESPANA S.A. Salcedo, 11 +34 (91) 334 10 70 +34 (91) 329 05 06 [email protected] 28034 Madrid Pakistan Siemens Pakistan 23, West Jinnah Avenue Islamabad Panama siehe / see Mexico Papua-New Guinea siehe / see Australia Philippines MARCOM INDUSTRIAL EQUIPMENT, Inc. 6-L Vernida I Condominium 120 Amorsolo St. Legaspi Village Makati City/ Philippines 1229 +968 636 000 +968 607 066 [email protected] +63 (2) 813 29 31 +63 (2) 810 58 07 [email protected] ROHDE & SCHWARZ Österreich SP.z o.o. +48 (22) 860 64 94 Przedstawicielstwo w Polsce +48 (22) 860 64 99 ul. Stawki 2, Pietro 28 [email protected] 00-193 Warszawa Portugal Rohde & Schwarz Portugal, Lda. +351 (21) 415 57 00 +351 (21) 415 57 10 [email protected] Alameda Antonio Sergio, n° 7 R/C, Sala A 2795-023 Linda-a-Velha Russian Federation Saudi Arabia LANKA AVIONICS 658/1/1, Negombo Road Mattumagala Ragama Sudan SolarMan Co. Ltd. P.O.Box 11 545 North of Fraouq Cementry 6/7/9 Bldg. 16 Karthoum Sweden ROHDE & SCHWARZ SVERIGE AB Marketing Div. Flygfältsgatan 15 128 30 Skarpnäck Switzerland Roschi Rohde & Schwarz AG Mühlestr. 7 3063 Ittigen Syria Electro Scientific Office +92 (51) 227 22 00 +92 (51) 227 54 98 [email protected] Poland Romania Sri Lanka ROHDE & SCHWARZ Representation Office Bucharest Str. Uranus 98 Sc. 2, Et. 5, Ap. 36 76102 Bucuresti, Sector 5 +40 (21) 410 68 46 +40 (21) 411 20 13 [email protected] ROHDE & SCHWARZ Representative Office Moscow 119180, Yakimanskaya nab., 2 Moscow +7 (095) 745 88 50 to 53 +7 (095) 745 88 54 [email protected] Mr. Chris Porzky +966 (1) 465 64 28 Ext. 303 ROHDE & SCHWARZ International GmbH +966 (1) 465 6428 Ext. 229 c/o Haji Abdullah Alireza Co. Ltd. [email protected] P.O.Box 361 Riyadh 11411 Saudi Arabia GENTEC SerbiaMontenegro Representative Office Belgrade Tose Jovanovica 7 11030 Beograd Slovak Republic Specialne systemy a software, a.s. Svrcia ul. 841 04 Bratislava Slovenia ROHDE & SCHWARZ Representation Ljubljana Tbilisijska 89 1000 Ljubljana South Africa Protea Data Systems (Pty.) Ltd. Communications and Measurement Division Private Bag X19 Bramley 2018 +27 (11) 719 57 00 +27 (11) 786 58 91 [email protected] South Africa Protea Data Systems (Pty.) Ltd. Cape Town Branch Unit G9, Centurion Business Park Bosmandam Road Milnerton Cape Town, 7441 +27 (21) 555 36 32 +27 (21) 555 42 67 [email protected] +381 (11) 305 50 25 +381 (11) 305 50 24 +94 (1) 95 66 78 +94 (1) 95 83 11 [email protected] +249 (11) 47 31 08 +249 (11) 47 31 38 [email protected] +46 (8) 605 19 00 +46 (8) 605 19 80 [email protected] +41 (31) 922 15 22 +41 (31) 921 81 01 [email protected] +963 (11) 231 59 74 +963 (11) 231 88 75 [email protected] Baghdad Street Dawara Clinical Lab. Bldg P.O.Box 8162 Damascus Taiwan Lancer Communication Co. Ltd. for Div. 1 and 7 16F, No. 30, Pei-Ping East Road Taipei +886 (2) 23 91 10 02 +886 (2) 23 95 82 82 [email protected] Taiwan System Communication Co. Ltd. for Div. 2 and 8 16F, No. 30, Pei-Ping East Road Taipei +886 (2) 23 91 10 02 +886 (2) 23 95 82 82 [email protected] Tanzania SSTL Group P.O. Box 7512 Dunga Street Plot 343/345 Dar es Salaam Thailand Schmidt Electronics (Thailand) Ltd. +66 (2) 643 13 30 to 39 63 Government Housing Bank Bldg. +66 (2) 643 13 40 Tower II, 19th floor, Rama 9 Rd. [email protected] Huaykwang, Bangkapi om Bangkok 10320 Thailand TPP Operation Co., Ltd. 41/5 Mooban Tarinee Boromrajchonnee Road Talingchan, Bangkok 10170 Trinidad &Tobago siehe / see Mexico Tunisia TELETEK 71, Rue Alain Savary Residence Alain Savary (C64) 1003 Tunis Turkey ROHDE & SCHWARZ International GmbH Liaison Office Istanbul Bagdad Cad. 191/3, Arda Apt. B-Blok 81030 Selamicesme-Istanbul Ukraine ROHDE & SCHWARZ Representative Office Kiev 4, Patris Loumoumba ul 01042 Kiev United Arab Emirates ROHDE & SCHWARZ International GmbH Liaison Office Abu Dhabi P.O. Box 31156 Abu Dhabi +255 (22) 276 00 37 +255 (22) 276 02 93 [email protected] +66 (2) 880 93 47 +66 (2) 880 93 47 [email protected] +421 (2) 65 42 24 88 +421 (2) 65 42 07 68 [email protected] +386 (1) 423 46 51 +386 (1) 423 46 11 [email protected] +90 (216) 385 19 17 +90 (216) 385 19 18 [email protected] +38 (044) 268 60 55 +38 (044) 268 83 64 [email protected] +971 (2) 633 56 70 +971 (2) 633 56 71 [email protected] Adressen/Addresses United Arab Emirates ROHDE & SCHWARZ Bick Mobile Communication P.O.Box 17466 +971 (4) 883 71 35 +971 (4) 883 71 36 www.rsbick.de Dubai United Arab Emirates ROHDE & SCHWARZ Emirates L.L.C. Ahmed Al Nasri Building, Mezzanine Floor, P.O.Box 31156 Off old Airport Road Behind new GEMACO Furniture Abu Dhabi United Kingdom ROHDE & SCHWARZ UK Ltd. Ancells Business Park Fleet Hampshire GU 51 2UZ England Uruguay AEROMARINE S.A. Cerro Largo 1497 11200 Montevideo USA ROHDE & SCHWARZ, Inc. Broadcast & Comm. Equipment (US Headquarters) 7150-K Riverwood Drive Columbia, MD 21046 USA Rohde & Schwarz Inc. Marketing & Support Center / T&M Equipment 2540 SW Alan Blumlein Way M/S 58-925 Beaverton, OR 97077-0001 +1 (503) 627 26 84 +1 (503) 627 25 65 [email protected] USA Rohde & Schwarz Inc. Systems & EMI Products 8080 Tristar Drive Suite 120 Irving, Texas 75063 +1 (469) 713 53 00 +1 (469) 713 53 01 [email protected] Venezuela EQUILAB TELECOM C.A. Centro Seguros La Paz Piso 6, Local E-61 Ava. Francisco de Miranda Boleita, Caracas 1070 Venezuela REPRESENTACIONES BOPIC S.A. Calle C-4 Qta. San Jose Urb. Caurimare Caracas 1061 +58 (2) 129 85 21 29 +58 (2) 129 85 39 94 [email protected] Vietnam Schmidt Vietnam Co., (H.K.) Ltd., Representative Office in Hanoi Intern. Technology Centre 8/F, HITC Building 239 Xuan Thuy Road Cau Giay, Tu Liem Hanoi +84 (4) 834 61 86 +84 (4) 834 61 88 [email protected] West Indies siehe / see Mexico GEDIS GmbH Sophienblatt 100 Postfach 22 01 24021 Kiel +971 (2) 631 20 40 +971 (2) 631 30 40 [email protected] +44 (1252) 81 88 88 (sales) +44 (1252) 81 88 18 (service) +44 (1252) 81 14 47 [email protected] +598 (2) 400 39 62 +598 (2) 401 85 97 [email protected] +1 (410) 910 78 00 +1 (410) 910 78 01 [email protected] [email protected] +58 (2) 12 34 46 26 +58 (2) 122 39 52 05 [email protected] +49 (431) 600 51-0 +49 (431) 600 51-11 [email protected] R&S NRP Table of Contents Chapter 1 Table of Contents 1 Putting into Operation ......................................................................................................1.1 Notes on putting into operation......................................................................................................1.1 Unpacking the meter...................................................................................................................1.1 Setting up the meter ...................................................................................................................1.2 Front and rear views ........................................................................................................................1.3 Front panel..................................................................................................................................1.3 Rear panel ..................................................................................................................................1.5 Installation in a 19" rack ..................................................................................................................1.7 AC supply voltage ............................................................................................................................1.7 AC supply fuses ...............................................................................................................................1.7 EMC....................................................................................................................................................1.7 Switching the meter on/off ..............................................................................................................1.8 Welcome screen and function test .............................................................................................1.8 Resetting and setting brightness and contrast .........................................................................1.10 ON state....................................................................................................................................1.10 Preset...............................................................................................................................................1.11 1144.1400.12 I-1.1 E-2 R&S NRP Notes on putting into operation 1 Putting into Operation This Chapter describes putting into operation (unpacking, AC supply connection, switching the meter on and off), function testing and installing the meter, the preset or default settings and also contains front and rear views of the meter. Notes on putting into operation Before putting the R&S NRP into operation, ensure that • the sensor inputs are not overloaded, • the meter’s outputs are not overloaded or wrongly connected, • the ventilation holes are not obstructed. The meter may be damaged if these precautions are not observed. Unpacking the meter When you have removed the meter from its packing, check that nothing is missing using the delivery note and the accessory lists. If there is any damage, contact the carrier. Keep all the packing to support any claims for compensation. It is also best to use the original packing if the meter has to be shipped or transported at a later date. 1144.1400.12 1.1 E-2 Notes on putting into operation R&S NRP Setting up the meter Carrying handle If the R&S NRP is not installed in a rack, it should be set up so that the viewing angle for the display is optimal. The carrying handle can be locked in a variety of positions to act as a stand. To adjust the handle, pull the two side-pieces of the handle outwards so that the handle can be rotated. The handle locks at angles which are multiples of 60°. 1144.1400.12 1.2 E-2 R&S NRP Front and rear views Front and rear views NRP . POWER METER DEL/1TRIG MENU ESC/LOCAL FREQ (PRE) SET ZERO / CAL Front panel Sensor connector The front panel accommodates a maximum of two sensor connectors (for sensors A and B). The power sensors are connected by inserting the male connector. To disconnect hold the connector by its sleeve. Pulling on the sensor cable will not release the sensor connector. Test generator The test generator connector (option R&S NRP-B1) provides a high-precision, unmodulated sine signal with a power of 1 mW and a frequency of 50 MHz for checking the sensors. P O W E R R E F The generator is turned on and off from the System menu (see Chapter 4.6 System Settings). 1144.1400.12 1.3 E-2 Front and rear views Keypad R&S NRP See Chapter 3 (Manual Operation). DEL/1TRIG MENU ESC /LOCAL FREQ (PRE)SET ZERO / CAL 1144.1400.12 1.4 E-2 R&S NRP Front and rear views Rear panel TRIG / OUT 2 OUT 1 625 ETHERNET IEEE 488 SCPI USB LR 114 196 C ® US AUTOMATIC POWER SELECTION 100 ... 120 V 50 ... 400 Hz 220 ... 240 V 50 ... 60 Hz 80 VA SENSOR INPUT C (A) D (B) F1/F2: IEC 127 T 2.0 H / 250 V OPTION INCL. OUT1 and TRIG / OUT2 T R IG / O U T 2 O U T 1 The BNC connector OUT1 outputs an analog signal with a voltage between 0V and 3.3 V. It can be used to output a voltage that is proportional to the measured value (e.g. for level regulation) or a digital signal for threshold monitoring. The BNC connector TRIG / OUT2 can be used either as an external trigger input or as a second analog output. The inputs/outputs are configured from the System menu (see Chapter 4.6 System Settings). Ethernet The Ethernet connector (option R&S NRP-B4) is an RJ45 socket for remote controlling the R&S NRP via a network. E th e rn e t USB The type-B USB connector is used to update firmware by means of PC downloads (for more information, see the service manual, Chapter 4). U S B IEC/IEEE bus $ The IEC/IEEE bus connector to IEEE488 is used to remote control the R&S NRP. 1144.1400.12 # IE E E 4 8 8 S C P I 1.5 E-2 Front and rear views AC supply connector R&S NRP The AC supply connector comprises a standard, IEC lowtemperature connector and contains a fuse holder for two miniature fuses. The fuse holder can be taken out with a screwdriver. See ) AC supply voltage on page 1.7 for more on connecting the AC supply. Sensor connectors Sensor connectors A and B (option R&S NRP-B6) or C and D (option R&S NRP-B5) can be accommodated on the rear panel. S E N S O R IN P U T C (A ) D (B ) 1144.1400.12 1.6 E-2 R&S NRP Installation in a 19" rack Installation in a 19" rack Caution If the meter is rack-mounted ensure there is a free flow of air through the holes in the side panels. The R&S NRP can be installed in 19" racks using a variety of rack adapters (see data sheet for order Nos.). The installation instructions come with the adapter. AC supply voltage The R&S NRP can be operated from AC lines with a voltage range of 100 V to 240 V and a frequency range of 50 Hz to 60 Hz. Note that a restricted voltage range (100 V to 120 V) applies to 400 Hz networks. The AC supply connector is at the rear of the meter. The meter sets itself automatically to the applied voltage if it is in range. AC supply fuses The R&S NRP has two fuses as indicated by the type plate. The fuses are accommodated in a fuse holder in the AC supply connector. The holder can be pulled out to insert fuses. The power supply has its own fuse. Caution Only the service department may replace the internal fuse. AC supply connector Fuse holder AC supply connector at the rear of the meter EMC To prevent EMI, the meter must always be installed to meet the relevant EMC standards. Never operate the instrument with its enclosure removed. Only use shielded signal and control cables that meet the relevant EMC standards. 1144.1400.12 1.7 E-2 Switching the meter on/off R&S NRP Switching the meter on/off ON/STANDBY key ( Ø ) key The ON/STANDBY key is used to toggle between the on and standby states. Yellow LED (AC supply) The yellow LED indicates that the AC supply is connected to the R&S NRP. Green LED (ON) The green LED indicates when the meter is on. The following are, therefore, the possible operating states: The meter is off and disconnected from the AC supply. The meter is on standby. The AC supply is connected and the power supply is operating correctly. If option R&S NRP-B3 (battery) has been installed, automatic charging will be started if the battery is low. The meter is on and is being powered from the AC supply. The meter is on and is being battery powered (only applies if option R&S NRP-B3 has been installed). Caution If you want to completely isolate the meter from the AC supply, pull out the AC supply plug. Selecting the standby mode does not disconnect the AC supply. Welcome screen and function test After switch-on, the R&S NRP performs a selftest. The contents of all non-volatile memories, the RAM and the addressability of all interfaces is checked. Messages indicate which options have been installed. Function test on the RAM. 1144.1400.12 1.8 E-2 R&S NRP Switching the meter on/off Addressability check on the interfaces for the sensor channels. Only one of the icons shown on the left is displayed to show the number of channels that have been installed. Channel A. Appears if the device is single-channel. Channel A or channels A and B, fitted on the front panel. Appears only if option R&S NRP-B2 is installed (second measurement input). Channels A and B, fitted on the rear panel. Appears only if option R&S NRP-B6 is installed at the rear (sensor connectors A (B)). Channels A to D. Appears only if option R&S NRP-B5 is installed (3rd and 4th measurement input). Addressability check on the keypad controller. Addressability check on the USB interface at the rear of the meter. Addressability check on the test generator. Appears only if option R&S NRP-B1 is installed. (test generator). Addressability test on the Ethernet interface. The transmission rate is displayed. Appears only if option R&S NRP-B4 is installed (Ethernet). The “Ok” below the network icon indicates that the interface can be addressed. If the R&S NRP is not connected to a network hub or if a connection cannot be established during booting, the message NC (Not Connected) is displayed instead of OK. It is however possible to establish a network connection later on at any time. Addressability check on the battery and charging regulator. Appears only if option R&S NRP-B3 (battery) is installed. If an error occurs when an interface test is being performed, the message failed is displayed under the appropriate icon and the icon is shown in inverse video. When all the tests are completed, booting is interrupted; booting can be restarted by pressing the continue softkey. 1144.1400.12 1.9 E-2 Switching the meter on/off R&S NRP If an error is detected when the non-volatile memory containing instrument settings is checked, an error message is displayed when booting is completed. The non-volatile memory is then re-initialized completely and the R&S NRP goes into the preset state. All instrument settings that have been saved are lost as a result of this procedure. Resetting and setting brightness and contrast If you press the (Æ) key immediately after switching on the R&S NRP, after about 3 seconds the R&S NRP goes into a state in which you can adjust brightness and contrast. Initially, contrast and brightness are automatically set to their default values. You can then make the settings you want using the diagram on the screen. ON state Whenever the meter is switched off, its settings are saved. The next time it is switched on, these settings are automatically restored. If the last setup before switch-off is to be restored, the R&S NRP must be switched off with the standby key ( Ø ). If the meter is turned off by disconnecting the AC supply, it is possible that the settings being used immediately beforehand are not saved. 1144.1400.12 1.10 E-2 R&S NRP Preset Preset You can change the R&S NRP to a defined default state by pressing the ({PRE}SET) key twice. Various parameters including the following will be set as a result: • All channels in the Cont Av mode (continuous average power). • Absolute power measurement in dBm. • One window per channel opened. • Offset: 0 dB • Automatic filtering (normal mode). When the preset state is selected, all default parameters are set – even those for operating modes that have not been activated. 1144.1400.12 1.11 E-2 R&S NRP Table of Contents Chapter 2 Table of Contents 2 Getting Started.....................................................................................................................2.1 Requirements....................................................................................................................................2.1 Measuring average power (Cont Av mode) ...................................................................................2.2 Window handling............................................................................................................................2.11 Setting measurement functions....................................................................................................2.16 Graphically representing power versus time (Scope mode) .....................................................2.18 Measuring av. burst power (Burst Av mode)...............................................................................2.21 Measuring average power in defined time interval.....................................................................2.22 1144.1400.12 I-2.1 E-2 R&S NRP Requirements 2 Getting Started This Chapter contains step-by-step instructions for simple measurements and provides an introduction to the R&S NRP's basic modes of operation. Each step is listed in order. The operating steps that are to be performed are highlighted in grey, while the sections between contain screenshots and also comments and references to more information. The five sections describe the following: ) Measuring average power Step-by-step introduction to standard power measurements with the R&S NRP. ) Window handling (p. 2.11) and ) Setting measurement functions (p. 2.16) Basic techniques for configuring measurement windows. ) Graphically representing versus time (Scope mode), Graphical representation of the time characteristic. power ) Measuring av. burst power (Burst Av mode), p. 2.21 Measurement of burst power without external triggering. ) Measuring average power in defined time interval, p. 2.22 Power measurement in one or more successive timeslots with internal or external triggering. Some of the sections later on in this Chapter assume familiarity with the basic operating techniques which are introduced in the first two sections. It is, therefore, advisable to go through the first two sections before considering other topics. Requirements • Read the notes on putting the meter into operation in Chapter 1. • A single-channel R&S NRP is sufficient for most of the examples used in the sequel. However, if you want to work through all the steps in the section ) Setting measurement functions (p. 2.16), you will need a dual-channel instrument. • An R&S NRP-Z1x or R&S NRP-Z2x sensor is required for the section ) Measuring av. burst power (Burst Av mode) (p. 2.21); all other sections can be worked through with the Thermal Sensors R&S NRP-Z5x. • A signal source is required for the measurements that are described. It is best to use a signal generator whose level can be adjusted. If a generator of this type is not available, the R&S NRP’s integral power reference (option R&S NRP-B1) can be used instead. 1144.1400.12 2.1 E-2 Measuring average power (Cont Av mode) R&S NRP Measuring average power (Cont Av mode) 1 Set the R&S NRP to the PRESET state. The instrument is set to a well-defined initial state to prevent any previous settings from causing incorrect results. ¾ Put the R&S NRP into operation as described in Chapter 1 and connect a sensor to connector A. ({PRE}SET) * ¾ Press the ({PRE}SET) key. The File menu appears. The appearance of Preset on a black background means that this function can also be started by pressing the ({PRE}SET) key again. ({PRE}SET) * ¾ Press the ({PRE}SET) key again or the Preset softkey. The Setup dialog box disappears and the meter is in the preset state. A display window indicates the result (in dBm) obtained with sensor A. 1144.1400.12 2.2 E-2 R&S NRP Measuring average power (Cont Av mode) 2 Zeroing the meter A zero error correction is one of the meter’s default settings. This procedure should be repeated as and when necessary, but primarily when the sensor reaches its operating temperature. ¾ If the sensor is already connected to a signal source, switch off the power. (ZERO/CAL) ¾ Press the (ZERO/CAL) key * The Zero/Cal dialog box is displayed. The appearance of Zero (All) on a black background means that this function can also be started by pressing the (ZERO/CAL) key again. (ZERO/CAL) ¾ Press the (ZERO/CAL) key again or the Zero (All) softkey. * The correction measurement takes several seconds. When completed a GO/NOGO message is output. 3 Setting the frequency The R&S NRP must be set to the carrier frequency of the applied signal if the specified measurement accuracy is to be reached. ¾ Connect an unmodulated signal with a level between –10 dBm and +10 dBm to the sensor. (FREQ) ¾ Press the (FREQ) key * The dialog box for entering the frequency appears. A|B|C|D – ( ) *↔* 1144.1400.12 ¾ Select channel A by pressing the appropriate rocker switch. 2.3 E-2 Measuring average power (Cont Av mode) Frequency – ( ) * * R&S NRP ¾ Press the Frequency softkey A panel with all the characters you will need to enter the frequency is displayed next to the softkeys. 1234567890U. – ( ) * * ¾ Clear the field with the (DEL/1TRIG) key. ¾ Enter the frequency of the signal that is fed in by pressing the appropriate softkeys. ¾ Using the UNIT softkey, select the unit you want. 9 Try the following: To familiarize yourself with the editor, try the following steps: ¾ Using the left/right cursor keys, move the block cursor and overwrite the digits with new values. ¾ Use the up/down cursor keys to scroll the digits to the cursor position. ¾ Move the insertion mark to the right onto the units. Use the vertical up/down keys to change the unit. (¶ MENU) ¾ Confirm your entry. (¶ MENU) ¾ Close the dialog box. * * 1144.1400.12 2.4 E-2 R&S NRP Measuring average power (Cont Av mode) 4 Setting the unit in the display – ( ) *↔ * ¾ Using the topmost rocker switch or the cursor keys (ÕÖ), select the Measurement menu. The menu opens out automatically for this procedure. ¾ Press the (¶ MENU) key, if the menu is not displayed. The results of post-processing are summarized in the menu. Measurement Window – ( ) *↔ * 1234 ¾ Use the Window softkey to select window 1. The functions in the Windows and Measurement menu are all defined for the selected window. The dark title bar indicates the window that has been selected. 9 Tip: You can also select windows with the up/down cursor keys. Func- | W dBm tion… dBµV 1144.1400.12 – ( ) ¾ Select the unit W with the adjacent rocker switch. * 2.5 E-2 Measuring average power (Cont Av mode) R&S NRP The result is displayed in W. 1144.1400.12 2.6 E-2 R&S NRP Measuring average power (Cont Av mode) 5 Setting a fixed offset correction – ( ) *↔ * ¾ Using the topmost rocker switch or the cursor keys (ÕÖ), select the Sensor menu. All sensor-related settings can be made in the Sensor menu. This determines the type and details of data acquisition. Offset… | Filter – ( * ) ¾ Press the Offset… softkey (left-hand side of rockerswitch). The Offset dialog box opens. Factors for correcting external signal losses or gains, due to an attenuator, for example, can be set in this box. Global – ( * ) ¾ Activate the editor for the global offset by pressing the left-hand side of the rocker switch next to Global. Positive values are for correcting losses and negative values for gains. 1234567890. – ( ) * * (¶ MENU) * 1144.1400.12 ¾ If you have an attenuator at hand, enter its value and connect the attenuator between the sensor and the signal source, otherwise just enter 10 dB. ¾ Confirm the entry. 2.7 E-2 Measuring average power (Cont Av mode) Global (¶ MENU) * – ( ) * R&S NRP ¾ Activate the global offset correction by pressing the right-hand side of the rocker switch next to Global. ¾ Accept the warning concerning the triggerlevel. Global offset correction is now on. The displayed value is increased or decreased depending on the sign of the offset. Factors which are not, or only minimally, dependent on frequency can be corrected in this way. (¶ MENU) ¾ Close the dialog box. (¶ MENU) ¾ Close the menu. * * If you have connected an attenuator and entered its attenuation, the R&S NRP will display about the same value as before. In the note line of the measurement window, the ∆ symbol indicates that global offset correction has been activated. 1144.1400.12 2.8 E-2 R&S NRP Measuring average power (Cont Av mode) 6 Relative power measurements The R&S NRP can calculate and display the relative difference between a measured value and a reference value. The reference value can be a measured value that has been saved or an arbitrary value that is entered. – ( ) *↔ * Relative – ( ) * ¾ Using the topmost rocker switch or the cursor keys (ÕÖ), select the Measurement menu. ¾ To activate the relative mode, press the right-hand side of the rocker switch next to Relative. As the default setup was loaded in step relative to 0 dBm is displayed. Relative – ( ) * 1, the value ¾ Press the rocker switch next to Relative again on the right-hand side. In the second line, Off On Reset is displayed briefly and then the original display returns. The last power result obtained has now been made the new reference value. If the power has not changed in the meantime, the reference value and the power are equal and the indicated value is 0 dB. ¾ If an attenuator is still connected, remove it now and connect the sensor directly to the signal source. The displayed value should now equal the attenuation that has been entered. 1144.1400.12 2.9 E-2 Measuring average power (Cont Av mode) R&S NRP 7 Checking settings (window zoom). – ( ) *↔ * ¾ Using the topmost rocker switch, or the cursor keys (ÕÖ), select the Windows menu The Windows menu contains all the functions required for opening, closing and configuring windows. Select – Close | Expand ( ) ¾ Check if window 1 has been selected. ) ¾ Press the Expand softkey. *↔ * 1234 – ( * Window 1 now expands to occupy the full space below the menu bar and displays all the key measurement parameters: The frequency from 3, the offset correction from 5 and the relative display from 6. ¾ To return the window to its normal size, open the Windows menu with the (¶ MENU) key and press the Arrange softkey. 1144.1400.12 2.10 E-2 R&S NRP Window handling Window handling Up to four windows can be shown simultaneously on the R&S NRP‘s display. Each window can be configured for a separate measurement. The following examples show how to handle windows. 1 Opening, creating, zooming and closing windows. ({PRE}SET) ¾ Press the ({PRE}SET) key twice. * A display window indicating the result from sensor A (in dBm) appears. | – ( ) *↔ * ¾ Using the topmost rocker switch or the cursor keys (ÕÖ), select the Windows menu. The Windows softkey can be used to select which window the functions in the Windows menu and in the Measurement menu will act on. 9 Tip The cursor keys (â ) (ô ) can, in most cases, be used instead of the rocker switch to select windows. This also applies to opened dialog boxes. Windows 1234 1144.1400.12 – ( ) *↔ * ¾ Select window 1. 2.11 E-2 Window handling R&S NRP The third softkey is now labelled Close | Expand. Close | Expand – ( ) * ¾ Press the Expand key The window expands to occupy the full display height and indicates all parameters relevant to the measurement. The currently displayed values are the default values obtained after a preset. Instead of Expand, the Arrange function is now available to arrange all opened windows. (¶ MENU) ¾ Open the menu again. * Close | Arrange – ( ) * ¾ Press the Arrange key. Window 1 returns to its previous size. The following steps show the difference between the Open and Init functions. You first have to change two settings of window 1. Dig D/A – – ( ( ) * ¾ Using the Dig D/A softkey, activate the analog display of results. ) ¾ Go to the Measurement menu and select Relative On. *↔ * ¾ Return to the Windows menu. 1144.1400.12 2.12 E-2 R&S NRP Window handling Window 1 now displays the A Rel function on an analog scale. Close | Arrange – ( * ) ¾ Now, close window 1 with the Close softkey. “Select” in Window shows that window 1 is still selected. The labelling next to the third softkey is now Open | Init. Open | Init – ( ) * ¾ Now, press the Open softkey (not Init). The appearance of the window has not changed, and all window-specific settings have been maintained. Close | Arrange – ( ) ( ) * Open | Init – ¾ Again close window 1 with Close, but open it this time with Init. * The window again displays the measurement function A in digital format. The difference between Open and Init is that Open keeps the values of all the parameters that have been previously set in this window while Init sets all the parameters to their default values. 1144.1400.12 Caution: This function only resets the window settings made in the Windows and Measurement menus, but it does not affect the sensor settings! 2.13 E-2 Window handling R&S NRP 2 Display options The Dig and D&A softkeys are used to select various display modes. The standard display mode is Digital measured value. Dig D/A Graph – ( ) * ¾ Select the D/A display mode. Window 1 now shows an analog scale and a digital reading. The menu now includes the new item "Analog Meter…" for setting the scale limits. Dig D/A – ( * 1144.1400.12 ) ¾ Switch back to Dig display mode. 2.14 E-2 R&S NRP 3 Window handling Auxiliary values (Maximum, Minimum, Max, Min, …). – ( ) *↔ * Function… – ( * ) ¾ Select the Measurement menu. ¾ Select Function…in this menu. The measurement function, unit, sensors used and the auxiliary value can be selected in the Function & Unit dialog box. Auxiliary Value – ( ) ¾ Open the Auxiliary Value drop-down list. ( ) ¾ Select Max. *↔ * Auxiliary Value – *↔ * (¶ MENU) * ¾ Close the dialog box. ¾ Press the Max Hold Reset softkey and close the menu with (¶ MENU). The updated maximum is now displayed on the right next to the measured value. If you reduce the signal power, the maximum should remain the same. However, if the signal power is increased, the maximum changes accordingly. 1144.1400.12 2.15 E-2 Setting measurement functions R&S NRP Setting measurement functions A multichannel meter with two sensors connected is required for this section. If only one sensor is available, you can only select the measurement functions "Primary" and "Secondary". 1 Measuring one power relative to another. ¾ Connect the two sensors to connectors A and B on the R&S NRP and apply an unmodulated signal with a level between –10 dBm and +10 dBm to each of the sensors. ({PRE}SET) ¾ Press the ({PRE}SET) key twice. * Now, two display windows with the results (in dBm) from sensors A and B appear. A window for each sensor is opened with Preset. – ( ) *↔ * Function… – ( ) ( ) * Function – *↔ * ¾ Select the Measurement menu and then select Function… from this menu. ¾ Open the Function drop-down list in the Function & Unit dialog box. In this window, you can select the function used to calculate the result in the active window. For example, Ratio (A/B) yields the quotient from the measured power values in channels A and B. 1144.1400.12 2.16 E-2 R&S NRP Setting measurement functions ¾ Check whether Sensor A is selected in the drop-down list for the primary channel and Sensor B in the dropdown list for the secondary channel. If not, switch to the primary channel, for example. The secondary channel is then automatically set to the other sensor. 9 Tip You can also operate the drop-down lists by means of the cursor keys (ô) (â) instead of the rocker switch. Function Unit – – ( ) *↔ * ¾ Select Ratio (A/B) from the drop-down list for the measurement function and close the drop-down list with (¶ MENU). ( ¾ Now, press the Unit softkey. ) *↔ * The ratio of two powers is dimensionless – this is why only dB, ∆% and 1 are available in the unit list. The symbol ∆% represents the relative uncertainty in % (0 % means the powers in both channels are equal), the symbol 1 represents a straight ratio, i.e. not the log of a ratio. 1144.1400.12 2.17 E-2 Graphically representing power versus time (Scope mode) R&S NRP Graphically representing power versus time (Scope mode) In the Scope mode, power versus time can be represented graphically as with an oscilloscope. If you wish to carry out time-dependent measurements (in the Burst or Timeslot mode) on modulated signals, displaying the signal in the Scope mode is always initially recommended since stable triggering by the R&S NRP is most clearly recognized in this mode. 1 Setting the Scope mode. ¾ Connect a power sensor of the R&S NRP-Z1x or R&S NRP-Z2x family to connector A of the R&S NRP and apply an amplitude-modulated or pulsed signal having a modulation or pulse frequency of approx. 1 kHz. The maximum level should be between –10 dBm and +10 dBm. ({PRE}SET) ¾ Press the ({PRE}SET) key twice. ** A measurement window is now available. – ( ) *↔* Mode … – ( ) ( ) * … T'slot T'gate Scope – *↔* ¾ Change to the Sensor menu and select Mode. ¾ Switch to the Scope mode. The associated parameters will appear in the lower part of the dialog box. You can leave the parameters unchanged for this exercise. For a detailed description, see Chapter 4, Displaying data in the Scope mode. (¶ MENU) ¾ Close the Mode dialog box. * – ( ) *↔* 1144.1400.12 ¾ Change to the Windows menu and press Expand. 2.18 E-2 R&S NRP Graphically representing power versus time (Scope mode) Close | Expand – ( ) * The window is now in the Scope display mode and shows the Trace page. The Max and Min fields are used to choose the level range (the vertical resolution), and the Length field to choose the horizontal resolution. If you do not see a trace, the trigger threshold probably does not match the signal. In this case, a ? symbol on a black background (see step o) will apear in the row of warning symbols below the window title bar. The other pages that can be selected via the tabs are used to configure the parameters of the Timeslot mode (T'slots, ) Measuring average power in defined time interval) as well as to set gates (Gates) by using markers and to perform measurements within these gates (Meas). 1144.1400.12 2.19 E-2 Graphically representing power versus time (Scope mode) R&S NRP 2 Settings for reliable triggering ¾ Change to the Sensor menu. Trigger … – ( ) * * ¾ Open the Trigger dialog box. If the Trigger dialog box is opened in the Scope display, a dotted line indicates the trigger threshold in the diagram. ¾ (trigger threshold) Choose between external triggering (connector I/O2 at the rear) or internal triggering (derived from the signal) and between positive or negative edge. Source Note: ¾ Since I/O2 functions both as a trigger input and analog output, be sure to select the correct setting (SystemÆI/O dialog)! Level In the case of internal triggering, set the trigger threshold here. 9 Tip When a ? symbol in the display shows, that the sensor doesn’t trigger, the (DEL/1TRIG)-key can be used to trigger the sensor once. The then appearing graph often can give a hint how to choose trigger settings. Next … – ( ) * * ¾ Open the second page of the Trigger dialog box. The Holdoff and Hysteresis parameters allow you to make settings that enable reliable triggering even in the case of complex signals. ¾ Holdoff Use this parameter to set the time range in which additional trigger events (measured from the last successful triggering) are to be ignored. ¾ Hysteresis Setting the trigger hysteresis to a value other than 0 dB will prevent triggering from occurring again until the measurement level has fallen below the trigger threshold by at least this value. For a detailed description of these parameters, refer to Chapter 4, Trigger settings. 1144.1400.12 2.20 E-2 R&S NRP Measuring av. burst power (Burst Av mode) Measuring av. burst power (Burst Av mode) An R&S NRP-Z1x or R&S NRP-Z2x diode sensor is required for this measurement. To make measurements possible, a pulsed RF signal with a pulse repetition frequency not exceeding 10 kHz should be available. The R&S NRP-Z1x and R&S NRP-Z2x sensors have two measurement modes for RF burst power: Burst Av and Timeslot. An external trigger is not required in the Burst Av mode – the sensor automatically determines the trigger point from the measured signal. It is also not necessary to specify the width of the burst as the sensor determines the end of the burst automatically. 1 Setting the burst mode. ¾ Connect an R&S NRP-Z1x or R&S NRP-Z2x sensor to connector A on the R&S NRP and apply a pulsed signal with a level between –10 dBm and +10 dBm. ({PRE}SET) ** ¾ Press the ({PRE}SET) key twice. A measurement window is now available. ¾ Change to the Sensor menu and select Mode…. When the Mode dialog box opens, select Scope. ¾ Once in the Scope mode (see section ) Scope), make sure that the sensor detects a signal and reliably triggers. ¾ Change back to the Sensor menu and select Mode…. When the Mode dialog box opens, select Burst. The burst mode parameters are displayed at the bottom of the dialog box. To exclude the pulse build-up and decay phases from the measurement, you can set the Excluded from Start and Excluded from End parameters accordingly. The parameter Dropout helps to ensure the reliable detection of the end of modulated-signal bursts (e.g. NADC). See Chapter 4, Measuring the average burst power, for a detailed description. 1144.1400.12 2.21 E-2 Measuring average power in defined time interval R&S NRP Measuring average power in defined time interval (Timeslot mode) In the Timeslot mode, average power can be measured in a defined time interval of any complex signal. An external trigger signal is normally used since it always ensures reliable triggering and the measurement of very low power. Thus, for example, the power in one or more timeslots of TDMA signals can be measured simultaneously. 1 Setting the Timeslot mode. ¾ Connect a power sensor of the R&S NRP-Z1x or R&S NRP-Z2x family to connector A of the R&S NRP and apply a signal having TDMA time structure within the level range –10 dBm to +10 dBm. ¾ Once in the Scope mode (see section ) Scope), make sure that the sensor detects a signal and reliably triggers. ¾ Change to the Sensor menu and select Mode…. When the Mode dialog box opens, select Timeslot. The associated parameters will appear in the lower part of the dialog box. ¾ Under Nominal Width, set the nominal value of the timeslot width. ¾ Under Excluded from Start and Excluded from End, define the portions to be excluded from the measurement. ¾ Use No. of Timeslots to set the number of timeslots in a TDMA frame. 9 Tip Excluded from Start and Excluded from End can also be set interactively in the Scope display on the T'slots page. For a detailed description, see Chapter 4, "Measuring the power of TDMA signals". 1144.1400.12 2.22 E-2 R&S NRP Measuring average power in defined time interval 2 Settings to ensure reliable triggering (¶ MENU) ¾ * Trigger … – ( ) * * Close the Mode dialog box. ¾ Open the Trigger dialog box. The Timeslot mode provides not only the Source and Level parameters described in the section ) Settings for reliable triggering but also the Delay parameter which is used when the start of timeslot 1 (Frame Start) does not coincide with to the trigger time. ¾ Delay Define the start of timeslot 1 with reference to the triggering edge. The value can be positive or negative. 9 Tip The Scope display shows physical and delayed trigger times in the form of a triangle so that Delay can be interactively adjusted to the signal. 3 Simultaneous measurement in multiple timeslots. – ( ) *↔ * ¾ Change to the Windows menu. ¾ Use the rocker switch beside Timeslot # to view the various timeslot values in the measurement window. 9 Tip You can open a separate window for each slot and thus display up to 4 timeslot values simultaneously. 1144.1400.12 2.23 E-2 R&S NRP Table of Contents Chapter 3 Table of Contents 3 Manual Operation ...............................................................................................................3.1 Keys ...................................................................................................................................................3.1 Screen layout ....................................................................................................................................3.3 Menu layout.......................................................................................................................................3.5 Menu handling ..................................................................................................................................3.7 Dialog boxes and their controls......................................................................................................3.8 Display windows.............................................................................................................................3.11 Window sizes and types ...........................................................................................................3.11 Special symbols ........................................................................................................................3.12 1144.1400.12 I-3.1 E-2 R&S NRP Keys 3 Manual Operation This Chapter describes the controls, displays, etc, the screen layout and how to operate the R&S NRP. Keys Keys on the front panel of the meter are used to manually operate the instrument. There are several groups of keys, each group having a different function: Softkeys The six softkeys are rocker switches – in other words, they can be “rocked” backwards and forwards by pressing on the right or left side of the key. The softkey function is context-sensitive and is indicated by screen labelling. For more information on the softkeys see Menu handling on p. 3.7 and Dialog boxes and their control elements on p. 3.8. Hardkeys The hardkeys are a direct way of activating the main functions and are always available for use: F R E Q (P R E )S E T Z E R O /C A L • Brightness/contrast • Frequency entry • Preset and setups • Zeroing For further information on using the hardkeys, see Chapter 4, section "Hardkeys". Cursor keypad The cursor-key functions are context-sensitive. They can be used to • Select the menu, • Select the active window, • Move the cursor in text boxes, • Change the value of an entry in a text box, • Select an element from a drop-down list, • Adjust the brightness and contrast of the display. With the exception of moving the cursor, the functions referred to above can also be activated using softkeys. 1144.1400.12 3.1 E-2 Keys R&S NRP Enter / MENU key M E N U As the (¶) key (i.e. Enter key), it is used to confirm entries in text fields and dialog boxes and to confirm selections in the drop-down lists. As the (MENU) key, it is used to fold out and fold back the menus next to the softkeys. The function of the key is determined according to context – in other words, the Enter or MENU function is always selected automatically for the operator by the instrument. ESC / LOCAL E S C /L O C A L This key is used as an (ESC) key to escape from the entry mode in text boxes and drop-down lists. It is also used to close dialog boxes and menus without losing any entries that have been made ( Title bar on p. 3.8). As the (LOCAL) key, it is used to switch the R&S NRP from remote control mode (all controls disabled) to manual mode. The key is automatically assigned its function according to context – in other words, there is no manual assignment by the operator. The (DEL) key is used to delete numbers or text in a field so that a completely new entry can be made. DEL / 1 TRIG D E L /1 T R IG As the (1 TRIG) key, it triggers single-shot measurements in the Scope mode. The function of the key is selected automatically according to context. 1144.1400.12 3.2 E-2 R&S NRP Screen layout Screen layout Window The R&S NRP displays results in windows. A maximum of four windows can be displayed simultaneously on the screen. They are numbered 1 to 4. Windows have a title bar which contains the number (not user-assignable) and a name (user-selectable) for the window. Windows do not have any control elements. Menu bar A menu bar is always displayed at the top of the screen. It contains the names of the R&S NRP’s menus. One of these names is always in inverse video and this is the name of the active menu. active menu Menu selection ( ) The menu you want to activate can be selected by pressing the right- or left-hand side of the topmost rocker switch one or more times. Alternatively you can also use the cursor keys (ê) (û). ( Folding menus out or back ) (¶ MENU) folds out the active menu. The usual PC convention is not followed – instead of dropping down directly below the menu name in the menu bar, menus fold out to the right-hand edge of the screen. This means that the menu items are directly next to the rocker switches used to select them. If you press the (¶ MENU) key again, the menu folds back. The menu also folds out automatically if another menu is selected. 1144.1400.12 3.3 E-2 Screen layout R&S NRP Menus See p. 3.7, Dialog boxes Dialog boxes can be opened from the menus. The dialog boxes present a group of related parameters that can be set. Menu handling for more information. See Dialog boxes on p. 3.8 for more information on handling dialog boxes. 1144.1400.12 3.4 E-2 R&S NRP Menu layout Menu layout Sensor All sensor settings can be made using the Sensor menu. The type and details of data acquisition can be specified with this menu. See Chapter 4, section "Data acquisition and parameters", for a detailed description. Windows The Windows menu is used to configure windows and the result display in the windows. See Chapter 4, section "Displaying measurement results", for a detailed description. Measurement The details of postprocessing are summarized in the Measurement menu. See Chapter 4, section "Configuring measurements", for a detailed description. 1144.1400.12 3.5 E-2 Menu layout File R&S NRP The File menu is used to handle the setup memories and display information about the instrument and any sensors that have been connected. See Chapter 4, section "Management of settings", for a detailed description. System The System menu is used to handle functions that are not specifically used to perform measurements. See Chapter 4, section "System settings", for a detailed description. 1144.1400.12 3.6 E-2 R&S NRP Menu handling Menu handling The menus can contain up to eight menu items which are used to perform an action, open a dialog box or set a parameter. Perform action If the menu contains only one or two descriptive terms, an action is performed directly. Close Use hardkey to perform action Preset Open dialog box If the name of the action to be performed is shown in a wide black field, you can start the action by pressing the hardkey of the same name, e.g. ({Pre}set) in this case. If a menu item is followed by three dots “…”, it can be used to open a dialog box to set a variety of parameters. Mode… Set parameters Parameter-setting options are presented in the menu. The currently selected option is shown in inverse video. You can select the option you want by pressing the left or right side of the rocker switch. Relative Off On Reset Softkeys with dual assignments Close | Expand 1144.1400.12 ( ) Some softkeys are assigned two menu items. One is selected by pressing the left-hand side of the rocker switch, the other, the right-hand side. The two menu items are separated by a vertical line. 3.7 E-2 Dialog boxes and their controls R&S NRP Dialog boxes and their controls Dialog boxes contain check boxes, option fields, editing fields and drop-down lists as control elements. They are activated using the appropriate rocker switch to their right. If two control elements are positioned side by side, the element on the left is operated with the left-hand side of the rocker switch and the element on the right with the right-hand side of the rocker switch. Title bar Dialog boxes have a title bar which displays the name of the dialog box and the [¶] symbol which is a reminder that the dialog box can be closed with the (¶ MENU) key. Caution: Dialog boxes with tabs Settings made in dialog boxes are immediately set on the R&S NRP – in other words you do not need to close the dialog box to activate the settings in the box. Channel-specific settings are made in a special page in a super-ordinate dialog box. In the top row of the dialog box, there are tabs which you can use to switch between pages. Channels which do not have a sensor connected and channels that have not been installed are shown in grey and cannot be selected. Check boxes Check boxes are used to activate and de-activate functions. You can toggle between the two states by pressing the appropriate softkey. Option fields Option fields contain groups of mutually exclusive operating modes. When you press the left-hand side of the rocker switch, the next option on the left is selected. When you press the right-hand side of the rocker switch, the next option on the right is selected. In the System I/O dialog box, option fields are assigned to only one side of a rocker switch. It is therefore only possible to scroll through in one direction. Editing fields Entry active Not active Editing fields are used to enter or modify numbers and text. The editor is activated by pressing the appropriate rocker switch — or the appropriate side of the rocker switch if there is a dual assignment. Editing can be performed in overwrite mode, indicated by the marked character being in inverse video. Modifications can be made either with the (ô) (â) cursor keys or numeric/digit softkeys which are provided in a digit or letter panel when the editor is activated. The (ê) (û) cursor keys are used to select the digit to be edited. 1144.1400.12 3.8 E-2 R&S NRP Editing fields (cont.) Dialog boxes and their controls In the editing fields for quantities with units, the left/right cursor keys can be used to select the unit too; the up/down cursor keys are used to edit it. Usually, the digit panel also contains a unit softkey which you can use to change the unit whenever you want. If you want to make a completely new entry, the whole field can be cleared with the (DEL/1TRIG) key. In the insert mode (indicated by the Ι cursor), you can enter digits and/or letters. Any changes you make to a field can be confirmed with the (¶ MENU) key. When this key is pressed, the new value is subjected to a validity check. If the check discovers an error, a warning message is output. You can quit the editor by pressing the (ESC) key; this leaves the old values unchanged. Any warning messages are cleared. Tip To set the maximum or minimum value permitted for a parameter, first move the insertion mark to the left edge of the entry field by using the (û) key. Then press the (â) key (several times if necessary) to set the maximum permissible value or the (ô) key to set the mimimum permissible value. Editing fields with direct entry of val- The Filter, Range, Trigger and Trigger Advanced dialog ues boxes are designed such that you can read the values even when the dialog box is open. If you edit a value in a dialog box using the cursor keys (ô) (â), the new value is accepted immediately when you press a key. This feature allows you to quickly assess the effect of editing and to perform interactive adjustment. If you enter a new value with the letter panel (see below), however, the symbol [¶] appears above the editing field to indicate that the new value is not accepted until you confirm it with the (¶ MENU) key. 1144.1400.12 3.9 E-2 Dialog boxes and their controls Digit and letter panels R&S NRP Panels which are displayed when an editing field is activated (see above) are used to enter digits, letters and units. Entering letters with the letter panel is like entering letters on a phone keypad. The Caps key is used to select upper case for the next letter. Caution! Drop-down lists To edit the Trigger Delay, you must select the unit by means of the cursor keys (see above). Drop-down lists are used to select an item from an “a la carte” list. When the drop-down list is activated, the list “folds out” upwards or downwards. The up/down cursor keys, or one of the rocker switches next to the list, are used to select items from folded out pop-up menus. Confirm the selection with the (¶ MENU) key or reject with the (ESC) key. 1144.1400.12 3.10 E-2 R&S NRP Display windows Display windows Window sizes and types Results are displayed in the main section of the screen in windows. Windows come in three sizes: half height, quarter height and full height. In windows, values can be displayed digitally or in a combined digital and analog mode (See Chapter 4, section "Displaying measurement results", for instructions on selecting these modes). DIG window, full height Analog window, full height Scope window, full height Scope window, half height DIG window, half height Analog window, half height DIG window, quarter height Analog window, quarter height You can expand all opened windows to full height by activating the Expand function from the Windows menu. In this state, the full-height windows can be displayed consecutively using the Window 1 2 3 4 menu item. The opened windows can be reduced to their previous sizes with the Arrange menu item. Otherwise, it is not possible to change the size of the windows – the window size is determined by the number of windows. 1144.1400.12 3.11 E-2 Display windows R&S NRP Special symbols The following table defines the individual symbols: Window symbols Display values Frequency in the primary and secondary channel Window number Window name [¶] Close box, operated with the (¶ MENU) key Measurement function Auxiliary value; here, max-min Auxiliary value symbol Measurement function Max-Min Relative measurement mode ON Max Min Correction functions Duty cycle correction ON Offset correction ON Twoport correction ON (S-parameter device) Filter Trigger symbols Averaging filter Trigger Filter size with auto-filter (normal mode) or for manual mode Noise component with autofilter in "Fixed Noise" mode Free-running trigger Trigger remains OFF Single-shot pected Noise ratio exceeded mode, trigger ex- Single-shot mode, measurement over Other Battery level indicator Trigger source (channel A, B, C, D or external) Battery charging Trigger on rising slope Over limit Trigger on falling slope Measurement in progress Measurement stopped 1144.1400.12 3.12 E-2 R&S NRP Table of Contents Chapter 4 Table of Contents 4 Instrument Functions........................................................................................................4.1 Hardkeys ...........................................................................................................................................4.2 Stored settings (Presets) ............................................................................................................4.2 Frequency settings (FREQ) ........................................................................................................4.3 Zeroing (ZERO/CAL) ..................................................................................................................4.3 Test Measurement (ZERO/CAL) ................................................................................................4.4 Test Report .....................................................................................................................4.5 Configuring the test measurement..................................................................................4.5 Contrast and brightness (Contrast/Brightness) ..........................................................................4.6 Data acquisition and parameters (Sensor menu) .........................................................................4.7 Setting the measurement mode..................................................................................................4.7 Free-running average-power measurements .................................................................4.8 Measuring the average burst power .............................................................................4.11 Measuring the power of TDMA signals.........................................................................4.13 Measuring power in gates.............................................................................................4.14 Analyzing the envelope power ......................................................................................4.15 Offset correction .......................................................................................................................4.16 Table editor for offset tables ........................................................................................4.18 Filter / averaging .......................................................................................................................4.19 Measurement ranges................................................................................................................4.22 Effect of the RF source .............................................................................................................4.23 Trigger settings .........................................................................................................................4.24 Trigger sequence control ..........................................................................................................4.26 Displaying measurement results (Windows menu) ....................................................................4.27 Window labelling .......................................................................................................................4.27 Arranging windows ...................................................................................................................4.27 The windows menu...................................................................................................................4.27 Selecting a window .......................................................................................................4.27 Using windows ..........................................................................................................................4.28 Opening windows (Open) .............................................................................................4.28 Creating windows (Init) .................................................................................................4.28 Closing windows (Close)...............................................................................................4.28 Expanding windows (Expand).......................................................................................4.29 Arranging windows (Arrange) .......................................................................................4.29 Selecting the result display mode.............................................................................................4.29 Configuring the result display ...................................................................................................4.30 Setting the resolution (Resolution)................................................................................4.30 Setting the analog scale (Scale) ...................................................................................4.31 Scrolling between timeslots (Timeslot #) ......................................................................4.31 1144.1400.12 I-4.1 E-2 Table of Contents Chapter 4 R&S NRP Configuring measurements (Measurement menu) .....................................................................4.32 Measurement windows .............................................................................................................4.32 The Measurement menu...........................................................................................................4.32 Selecting a window .......................................................................................................4.32 Selecting a measurement function ...........................................................................................4.33 Functions and their use.................................................................................................4.34 Expanded configuration for sensors in the Scope mode ..............................................4.35 Setting units ..................................................................................................................4.36 Setting the auxiliary value .............................................................................................4.38 Resetting the extreme value display.............................................................................4.38 Additional functions...................................................................................................................4.39 Relative measurements ................................................................................................4.39 Setting the reference value manually ...........................................................................4.39 Limit monitoring.............................................................................................................4.40 Displaying data in the Scope mode..............................................................................................4.41 Switching the sensor to the Scope mode .................................................................................4.41 Selecting a window ...................................................................................................................4.43 Trigger settings .........................................................................................................................4.43 Filter settings ............................................................................................................................4.43 Setting parameters ...................................................................................................................4.44 Trace .............................................................................................................................4.44 T’slots............................................................................................................................4.45 Gates.............................................................................................................................4.46 Meas .............................................................................................................................4.47 Management of settings (File menu) ............................................................................................4.49 Default setting (Preset) .............................................................................................................4.49 Storing user-defined settings (Setups) .....................................................................................4.49 Loading user-defined settings (Setups)....................................................................................4.50 Loading settings for mobile radio standards.............................................................................4.50 Programming aids.....................................................................................................................4.52 Assigning names to windows....................................................................................................4.52 System settings (System menu) ...................................................................................................4.54 Configuring the remote control interfaces.................................................................................4.55 Selecting a remote control interface .............................................................................4.55 Configuring the GPIB ....................................................................................................4.55 Remote control via USB................................................................................................4.56 Configuring the Ethernet ...............................................................................................4.56 Setting the analog outputs ........................................................................................................4.58 Selftest ......................................................................................................................................4.60 Keyboard test............................................................................................................................4.61 Test generator ..........................................................................................................................4.62 1144.1400.12 I-4.2 E-2 R&S NRP Table of Contents Chapter 4 System information ...................................................................................................................4.62 Information about sensors ............................................................................................4.62 Information about the R&S NRP ...................................................................................4.63 Miscellaneous Operation at low ambient temperatures ...........................................................4.64 Messages and alarms ....................................................................................................................4.65 1144.1400.12 I-4.3 E-2 List of Figures and Tables Chapter 4 R&S NRP Figs. Fig. 4-1 Fig. 4-2 Fig. 4-3 Fig. 4-4 Fig. 4-5 Fig. 4-6 Fig. 4-7 Fig. 4-8 Fig. 4-9 Fig. 4-10 Fig. 4-11 Fig. 4-12 Fig. 4-13 Fig. 4-14 Fig. 4-15 Fig. 4-16 Fig. 4-17 Fig. 4-18 Fig. 4-19 Fig. 4-20 Fig. 4-21 Fig. 4-22 Fig. 4-23 Fig. 4-24 Fig. 4-25 Fig. 4-26 Fig. 4-27 Fig. 4-28 Fig. 4-29 Fig. 4-30 Fig. 4-31 Fig. 4-32 Fig. 4-33 Fig. 4-34 Fig. 4-35 Fig. 4-36 Fig. 4-37 Fig. 4-38 Fig. 4-39 Fig. 4-40 Fig. 4-41 Fig. 4-42 Fig. 4-43 Fig. 4-44 1144.1400.12 Setup dialog box ...............................................................................................................4.2 Frequency dialog box........................................................................................................4.3 Zero/Cal dialog box ...........................................................................................................4.3 Zeroing error message......................................................................................................4.4 Zero/Cal dialog box ...........................................................................................................4.4 Test Report dialog box ......................................................................................................4.5 Config Test dialog box ......................................................................................................4.6 Display dialog box .............................................................................................................4.6 Sensor menu.....................................................................................................................4.7 Mode dialog box................................................................................................................4.7 Mode dialog box, Normal mode ........................................................................................4.8 Mode dialog box, Burst mode .........................................................................................4.11 Mode dialog box, Timeslot mode ....................................................................................4.13 Mode dialog box, Timegate mode...................................................................................4.14 Offset dialog box .............................................................................................................4.16 Offset dialog box, Table editor ........................................................................................4.18 Filter dialog box...............................................................................................................4.20 Auto Filter dialog box ......................................................................................................4.21 Range dialog box ............................................................................................................4.22 RF Source dialog box .....................................................................................................4.23 Trigger dialog box ...........................................................................................................4.24 Trigger Advanced dialog box .........................................................................................4.25 Windows menu, Window softkey ...................................................................................4.27 Windows menu, softkeys for controlling the windows.....................................................4.28 Window menu, softkeys for controlling the display mode ...............................................4.29 Windows menu, display-specific softkeys.......................................................................4.30 Meter Scaling dialog box.................................................................................................4.31 Windows menu, softkey for scrolling between timeslots.................................................4.31 Measurement menu ........................................................................................................4.32 Func & Unit dialog box ....................................................................................................4.33 Func & Unit dialog box ....................................................................................................4.35 Measurement window, ....................................................................................................4.38 Ref. Value dialog box ......................................................................................................4.39 Limits dialog box .............................................................................................................4.40 Mode dialog box, Scope mode .......................................................................................4.41 Expanded window with control elements in the Scope mode.........................................4.43 Mode dialogHalf-height window in the Scope mode.......................................................4.43 Scope mode display – Trace page .................................................................................4.44 Scope mode display – Timeslot page .............................................................................4.45 Scope mode display – Gates page .................................................................................4.46 Scope mode display – Meas page..................................................................................4.47 File menu ........................................................................................................................4.49 Recall Setup dialog box ..................................................................................................4.49 Recall Setup – dialog box ...............................................................................................4.50 I-4.4 E-2 R&S NRP Fig. 4-45 Fig. 4-46 Fig. 4-43 Fig. 4-48 Fig. 4-49 Fig. 4-50 Fig. 4-51 Fig. 4-52 Fig. 4-53 Fig. 4-54 Fig. 4-55 Fig. 4-56 Fig. 4-57 Fig. 4-58 Fig. 4-59 Fig. 4-60 Fig. 4-61 List of Figures and Tables Chapter 4 Recall Setup dialog box ..................................................................................................4.51 Errorlist dialog box ..........................................................................................................4.52 Menu bar in the remote control mode .............................................................................4.52 Window Name dialog box ...............................................................................................4.52 System menu ..................................................................................................................4.54 Remote dialog box ..........................................................................................................4.55 Remote dialog box, GPIB ...............................................................................................4.55 Remote – Dialog, GPIB...................................................................................................4.56 Remote – Dialog, GPIB...................................................................................................4.56 IP Address – Dialog, Manual ..........................................................................................4.57 IP Address – Dialog, DHCP ............................................................................................4.57 Analog Out dialog box.....................................................................................................4.58 Selftest dialog box...........................................................................................................4.60 Selftest Keyboard dialog box ..........................................................................................4.61 Sensor Info dialog box ....................................................................................................4.62 System Info dialog box....................................................................................................4.63 Miscellaneous dialog box................................................................................................4.64 Tables Table 4-1 1144.1400.12 Example of a network configuration for a direct R&S NRP – PC connection using a crossover cable......................................................4.57 I-4.5 E-2 R&S NRP Hardkeys 4 Instrument Functions This Chapter contains a systematic description of the R&S NRP’s functions in the order in which they occur in the menus. The grey text in the headings provides additional information that should prove helpful. • Hardkeys for opening dialog boxes: ----------------------------------------------- (KEY) • Menu items which directly perform an operation when selected: ---------- Menu menu item • Menu items that open dialog boxes: ---------------------------------------------- Menu menu item… • Dialog-box elements: Dialog: Dialog element The symbols in the left-hand column of the description indicate the following: Sensor menu: Context in which the operation below can be performed. Mode dialog: –( Name ) (KEY) Softkey (menu item or dialog element) Hardkey –( ) Function is activated with the left-hand side of the rocker switch. –( ) Function is activated with the right-hand side of the rocker switch. ä ä –( ) Function can be activated with either side of the rocker switch. ä ä –( ) ä↔ä Selection function (change direction by pressing the other side of the rocker switch) Action arrow Action 1144.1400.12 Result 4.1 E-2 Hardkeys R&S NRP Hardkeys The main settings for the Power Meter R&S NRP can be accessed via hardkeys. Stored setting ({PRE}SET) ({PRE}SET) is used to change the instrument to its default state (Preset) or to a user-defined (Setup) state (maximum of 10 possible); pressing this key once opens the File menu; pressing it a second time loads the Preset setting. The user-defined setups and settings for measurements on mobile radio standards can also be loaded from the File menu. Hardkey ({PRE}SET) Fig. 4-1 –( Preset ) ä ä or ({PRE}SET) ä Setup dialog box Changes the R&S NRP to its default state (Preset). Tip The black background of the text indicates that the function can also be started by pressing the ({PRE}SET) hardkey if the File menu is open. Remote Control *RST or SYSTem:PRESet 1144.1400.12 (Default state for remote-control operation) (Default state for manual operation) 4.2 E-2 R&S NRP Hardkeys Frequency setting (FREQ) (FREQ) is used to set the carrier frequency of the applied signal. This corrects any frequencydependent effects introduced by the sensor. If the sensor is to reach the specified measurement accuracy, a frequency entry must be made. Hardkey (FREQ) ä Fig. 4-2 A|B|C|D –( ) –( ) ä↔ä Frequency ä ä Frequency dialog box Tabs for selecting the sensor. Field for frequency entries with the units kHz, MHz or GHz. Remote Control [SENSe[1..4]]:FREQuency[:CW|:FIXed][?] <float_value> (ZERO/CAL) Zeroing (ZERO/CAL) starts the autozero function or a test to check the confidence level of sensor results (see next section). Hardkey (ZERO/CAL) ä Fig. 4-3 –( Zero All ) ä ä or (ZERO/CAL) ä Zero/Cal dialog box Zeroes all connected sensors. Tip The black background of the text indicates that the function can also be started by pressing the (ZERO/CAL) hardkey if the Zero/Cal dialog box is open. Remote Control CALibration:ALL:ZERO:AUTO[?] ONCE Caution Turn off all test signals before zeroing. 1144.1400.12 4.3 E-2 Hardkeys R&S NRP –( Zero A | B ) ä Starts zeroing in channel A. Zeroing for channels B, C and D. Zero A | B Remote Control CALibration[1..4]:ZERO:AUTO[?] Zero C | D Zero C | D Zeroing failure ONCE If the power measured during zeroing is too large, the R&S NRP reports an error. The most common cause of this error is that the user started zeroing without turning off the test signal beforehand. Otherwise the sensor probably has a hardware defect. Fig. 4-4 Zeroing error message Test Measurement The R&S NRP-Z power sensors are absolutely calibrated; a calibration measurement after switching on the instrument is not necessary and also not planned. The sensors should be recalibrated in regular intervals; for details on this, please refer to the data sheet. However, overload, other damage or extreme operating conditions may cause the measurement uncertainty to exceed the specified values. The option R&S NRP-B1 (sensor check source) makes it possible to check the reliability of the sensor by performing a test measurement. In the case of sensors with a lead-in attenuator (pad) – R&S NRPZ22, R&S NRP-Z23 and R&S NRP-Z24 – the test measurement can be made with or without an attenuator. Hardkey (ZERO/CAL) ä Fig. 4-5 Test at Power Ref Sensor only –( Test at Power Ref …with Pad –( Report… –( 1144.1400.12 Zero/Cal dialog box ) Starts a test measurement for a sensor without a lead-in attenuator. The sensor must be connected to the sensor check source. If an attenuator is present, it must first be removed. ) Starts a test measurement for a sensor with a lead-in attenuator. The sensor with attenuator must be connected to the sensor check source. ) Opens the dialog box displaying the results of the test measurement. ä ä 4.4 E-2 R&S NRP Config… Hardkeys –( ) Opens a dialog box for entering tolerance limits. ä Test Report The test report shows the type and serial number of the tested sensor, and on two pages the deviations between the sensor and the power reference. Differences up to 0.02 dB at room temperature are absolutely normal and are due to the uncertainty in the calibration of the sensor and the power reference. Greater differences can be caused by high/low ambient temperatures but also by a damage to the sensor. With multipath sensors (R&S NRP-Z2x family), the paths are each measured individually and the results displayed separately. Zero/Cal dialog box Report… –( ) ä Fig. 4-6 A|B|C|D –( ) ä↔ä More… Previous… –( ) ä ä Test Report dialog box Tabs for selecting the measurement channel. When the dialog box opens, it shows the data of the sensor last tested. The measured values are lost when the R&S NRP is switched off. Switches between the pages Sensor only and Sensor & Pad. Configuring the test measurement The tolerance limits can be set in this dialog box; exceeding these limits results in an error message. The factory default settings depend on the sensor and are in line with the data sheet values. They should be observed in the entire ambient temperature range. If the base unit and the sensors are used only at room temperature, the tolerance limits can be restricted so that any damage to the sensor can be quickly detected. 1144.1400.12 4.5 E-2 Hardkeys R&S NRP Zero/Cal dialog box –( Config… ä ) Fig. 4-7 Config Test dialog box –( ) Tabs for selecting the measurement channel. When the dialog box opens, it shows the data of the sensor last tested. Test Limits Sensor –( ) Tolerance limits for sensors without a lead-in attenuator or with an attenuator that has been removed. Test Limits Sensor & Pad –( Set to defaults –( A|B|C|D ä↔ä ä ä ä Settings locked ) ä ä –( Tolerance limits for sensors with a lead-in attenuator. ) Resets the factory default settings. ) Protects the settings against being changed by mistake. ä Contrast and brightness (Æ) Hardkey (Æ) ä Fig. 4-8 Contrast –( ) Sets the display contrast. –( ) Sets the display brightness. ä ä Brightness ä ä 1144.1400.12 Display dialog box Remote Control DISPlay:ILLumination[?] 4.6 ON | OFF E-2 R&S NRP Data acquisition and parameters (Sensor menu) Data acquisition and parameters Sensor - menu Depending on the options that have been installed, up to four sensors can be connected to the R&S NRP. The sensors perform the complete power measurement from the acquisition of the RF signal to every aspect of result processing. All parameters for configuring data acquisition are entered in the Sensor menu. Some of the parameters listed below are not available for certain types of sensor. The Sensor menu contains the following items: Setting the measurement mode, page 4.7. Offset correction, page 4.16 and Filter / averaging, page 4.19. Measurement ranges, page 4.22. Effect of the RF source, page 4.23. Trigger settings, page 4.24. Fig. 4-9 Sensor menu Setting the measurement mode Sensor Mode… The measurement mode is selected and configured in the Mode dialog box. In addition to the Cont Av mode, there are further measurement modes for the various sensor types available. Sensor menu: Mode… –( ) ä ä Fig. 4-10 A|B|C|D –( ) ä↔ä Cont Av, Burst… –( ) ä↔ä Mode dialog box Tabs for sensor selection. Measurement modes. In the Continuous Average mode, the average signal power is continuously measured without the window and signal being in sync. ( Freerunning average-power , page 4.8). The Burst mode is for measuring the average burst power of pulsed signals. ( Measuring the average burst power, page 4.11). In the Timeslot and Timegate modes, the average power can be measured over defined time intervals of a periodic signal. The Timeslot mode should be used peferably for TDMA signals with 1144.1400.12 4.7 E-2 Data acquisition and parameters (Sensor menu) multiple timeslots ( R&S NRP Measuring the power of TDMA signals, p. 4.13). The Timegate mode provides four user-configurable gates for measurement ( Measuring power in gates, p. 4.14). In the Scope mode, the R&S NRP records the power versus time and displays it graphically. The time parameters of the Timeslot and Timegate modes can also be interactively configured in this mode ( Analyzing the envelope power, p. 4.15). Remote Control [SENSe[1..4]]:FUNCtion[:ON][?] <string> Free-running average-power measurements Mode : Cont Av The Continuous Average mode is the preferred measurement method if the measurement is not to be, or cannot be, synchronized with a specific signal event. This is the only available measurement mode for thermal sensors because they are too slow for the other measurement modes. Mode dialog box: Cont Av, Burst… –( ) ä↔ä Fig. 4-11 Sampling Window –( ä ) Mode dialog box, Normal mode This parameter defines the duration of the measurement window. In the manual mode, the default setting of 20 ms combined with smoothing (see below) is usually adequate. Another value, generally larger, is essential if the result exhibits fluctuations due to modulation. With very low frequency modulation in particular, it is a good idea to set the size of the sampling window so that it exactly equals the modulation period, so ensuring optimal display settling: Optimal sampling-window size Off N × modulation period / 2 On N × modulation period × 2 Smoothing 1144.1400.12 4.8 E-2 R&S NRP Data acquisition and parameters (Sensor menu) N = 1, 2, 3, … This means that the minimum theoretical measurement time can only be obtained with smoothing turned off. The more modulation periods fit into a sampling window, the less critical it is whether N is an integer or not. With smoothing on, about five periods are enough to reduce fluctuations caused by modulation to an acceptable level – even if N is not an integer. With more than nine periods, the fluctuations are imperceptible. With smoothing off, the situation is much less favourable as instead of just five periods as many as 300 are required; the fluctuations only completely disappear with more than 3000 periods. However, it is not advisable to make the sampling window too wide by selecting an excessively large N, as the intrinsic noise of the sensor increases. To reduce display fluctuations due to noise, it is best to use the averaging filter. ( Filter / averaging, page 4.19) For more information, see Background information, page 4.10. Remote Control [SENSe[1..4]][:POWer][:AVG]:APERture[?] Sampling Rate –( ) ä If a sensor contains a sampling A/D converter, the sampling rate can be adjusted to prevent aliasing effects for particular types of modulation signal. Aliasing can occur with some sensors because the sampling frequency is located within the video bandwidth, which means that spectral components of the modulation signal can fall in this frequency range. Changing the sampling rate will make the aliasing effects disappear. Remote Control [SENSe[1..4]]:SAMPling[?] Duty Cycle –( ) ä ä <float_value> FREQ1 | FREQ2 Using the duty cycle correction, the average power of RF bursts can be calculated from the average power of the whole signal. The average power of the whole signal is divided by the duty cycle of the signal. If thermal sensors are used, this is the only way of determining burst power. If diode sensors from the R&S NRP-Z1x and R&S NRP-Z2x series are used, this method must be employed if the bursts are so short that their power cannot be measured in the Burst Av or Timeslot modes. Remote Control [SENSe[1..4]]:CORRection:DCYCle:STATe[?] ON | OFF [SENSe[1..4]]:CORRection:DCYCle[:INPut][:MAGNitude][?] <float_value> Smoothing of –( modulated Signals ä ) ä To reduce result fluctuations caused by modulation, this parameter should always be activated if the size of the sampling window cannot be exactly adjusted to the modulation period or if this is not required. If the size of the sampling window is 5 to 9 times greater than a modulation period, in general, the reduction in display fluctuation will be sufficient. With smoothing off, 300 to 3000 periods are required to obtain the same effect ( Sampling Window). Remote Control [SENSe[1..4]][:POWer][:AVG]:SMOothing:STATe[?] 1144.1400.12 4.9 ON | OFF E-2 Data acquisition and parameters (Sensor menu) R&S NRP Background information Sampling window As the sensor amplifiers use chopping, a measurement comprises at least two sampling windows and a sensorspecific deadtime of a few 100 µs. Samples at equal time intervals over the duration of a sampling window are taken and a partial measurement result is formed from these samples. The partial measurement results of two adjacent sampling windows are combined and the average is either output as the final result or is subjected to further averaging as one of a number of intermediate results ( Filter / averaging, page 4.19). In the remote control mode, the sampling window determines the minimum measurement time that can be achieved (2 × sampling window + deadtime). However, there is no point in selecting sampling window times very much smaller than 1 ms if, to reduce display noise, the averaging filter has to be used. Due to the unavoidable deadtime of the order of a few 100 µs per sampling window, the measurement time does not drop in proportion to the reduction in sampling window time. This may even mean that, to obtain a well-defined noise component in the result, a greater measurement time overall is required, if a sampling window that is too small is selected. Smoothing modulated signals With smoothing turned off, the samples within a sampling window are given equal weighting and averaged, which turns the instrument into an integrating device. As described above, optimal reduction of fluctuations in the measurement result due to modulation can be obtained, if the size of the sampling window is an exact integer multiple of the modulation period. If this is not the case, modulation can have a considerable effect even if the sampling window is many times greater than the modulation period. This situation can be improved considerably if the samples are weighted (raised von-Hann window) before averaging. This is like video filtering and is exactly what happens when smoothing is activated. 1144.1400.12 4.10 E-2 R&S NRP Data acquisition and parameters (Sensor menu) Measuring the average burst power Mode : Burst Av The Burst Average mode is the simplest method of measuring the average burst power. It is available with sensors from the R&S NRP-Z1x and R&S NRP-Z2x series. When this mode is selected, the sensor itself detects the start and end of the burst; no external trigger signal is required. The parameter Dropout Tolerance and the trigger parameters Holdoff and Hysteresis are ways of providing stable triggering. Using the parameters Exclude from Start and Exclude from End, the starts and ends of bursts can be excluded from the measurement. This means that signal overshoots can be omitted from measurements, for example. Mode dialog box: Cont Av, Burst… –( ) ä↔ä Fig. 4-12 Dropout Tolerance – ( ) ä ä Mode dialog box, Burst mode Prevents brief power drops due to modulation from being misinterpreted as the end of a burst. Remote Control [SENSe[1..4]][:POWer]:BURSt:DTOLerance[?] <float_value> Caution The Dropout Tolerance must be less than the no-power interval between the end and start of a burst. Excluded from End – ( ä ) This time interval at the end of the burst is excluded from the measurement. Remote Control [SENSe[1..4]]:TIMing:EXCLude:STOP[?] … from Start –( ) ä <float_value> This time interval at the start of the burst is excluded from the measurement. Remote Control [SENSe[1..4]]:TIMing:EXCLude:STARt[?] <float_value> Tip For the most common mobile radio standards, the specified parameters can easily be loaded via the "Recall Standard" dialog box in the File menu. 1144.1400.12 4.11 E-2 Data acquisition and parameters (Sensor menu) R&S NRP Background information Dropout tolerance The Dropout parameter facilitates the clear identification of the burst end of modulated signals (e.g. NADC). Without this parameter, the end of the burst might erroneously be detected within the burst owing to the considerable modulation-specific power drops of such signals. Dropout is set at least for the duration of modulation-dependent power drops within the burst; thus, the end of the burst cannot be detected until the set time has elapsed after the power has dropped below the trigger threshold. If the trigger threshold is exceeded again during the dropout time, the process restarts from the beginning. Timing diagram The timing diagram below shows the relation between the following parameters: • Trigger threshold and trigger event • Trigger event, exclude intervals and measurement interval • During the burst the signal frequently falls below the trigger threshold without the end of a burst being detected. The reason for this is that the signal then also quickly exceeds the trigger threshold, which means that the dropout time has not yet elapsed. • During the dropout time indicated below, the signal no longer exceeds the trigger threshold so that the last falling slope in the burst is detected as the end of the burst. Dropout Power Last falling slope in the burst Trigger event Trigger threshold Time Exclude Start Exclude End Measurement interval 1144.1400.12 4.12 E-2 R&S NRP Data acquisition and parameters (Sensor menu) Mode : Timeslot Measuring the power of TDMA signals The Timeslot mode is an easy-to-configure method for simultaneously measuring average power in multiple timeslots of a TDMA signal. It is available only with sensors of the R&S NRP-Z1x and R&S NRP-Z2x families. This measurement mode can be used only if all timeslots of the TDMA signal are equal in length. Up to 26 timeslots are allowed. A period to be excluded from the measurement can be defined at the beginning and end of each timeslot by using the Excluded from Start and Excluded from End parameters. Measurement can be started with an external trigger signal or automatically triggered by an internal signal. ( Trigger settings, p. 4.24). Mode dialog box: Burst Av, T’slot… –( ) ä↔ä Fig. 4-13 No of Timeslots –( ä Nominal Width –( ) Mode dialog box, Timeslot mode Number of timeslots on which a simultaneous meas. is to be made. Remote Control [SENSe[1..4]][:POWer]:TSLot:COUNt[?] ) ä Timeslot length. When measurements are made on TDMA signals (GSM/EDGE, PDC, NADC, PMS etc), the nominal timeslot length must be entered here, i.e. the frame length divided by the number of timeslots. GSM example: Frame length: No. timeslots: ⇒ Nominal width 4.615 8 ms 4.615 / 8 ms = 576.875 µs Remote Control [SENSe[1..4]][:POWer]:TSLot:WIDTh[?] Excluded from End – ( ) ä … from Start –( ) ä <int_value> <float_value> These intervals at the start/end of the timeslot whose length is defined with Nominal Width are excluded from the measurement. Measurement can thus be restricted to the relevant part of a timeslot. Remote Control [SENSe[1..4]]:TIMing:EXCLude:STARt[?] [SENSe[1..4]]:TIMing:EXCLude:STOP[?] <float_value> <float_value> Tip For the most common mobile radio standards, the specified parameters can easily be loaded via the "Recall Standard" dialog box in the File menu. They can also be set interactively in the Scope mode ( T’slots, p. 4.45). 1144.1400.12 4.13 E-2 Data acquisition and parameters (Sensor menu) R&S NRP Background information Timing diagram The timing diagram below shows the relation between the following parameters: • Trigger event, trigger delay and start of the first timeslot • Width, exclude intervals and measurement interval of the timeslots Trigger event (internal) Power Trigger threshold (internal) #1 #2 #3 #4 Measurement interval #1 Time Exclude Start Exclude End Width Delay Trigger event (external) Measuring power in gates Mode : Timegate The Timegate mode is used to measure power in time windows (gates). Up to four different gates can be configured, although measurement can be performed only in one of them at a time. Measurement can be started with an external trigger signal or automatically triggered by an internal signal. ( Trigger settings, p. 4.24). Mode dialog box: T’slot, T’gate… –( ) ä↔ä Fig. 4-14 1144.1400.12 Mode dialog box, Timegate mode 4.14 E-2 R&S NRP Data acquisition and parameters (Sensor menu) –( Gate# ) ä ä Start of Gate –( ) –( ) ä and End of Gate ä Number of the gate to be configured. Remote Control In the following commands, the gate to be configured is determined by the TGATe suffix. Start or end of the gate referenced to the delayed ( Trigger Delay, p. 4.24) trigger time. Remote Control [SENSe[1..4]][:POWer]:TGATe[1..4]:OFFSet:TIME[?] [SENSe[1..4]][:POWer]:TGATe[1..4]:TIME[?] Trigger settings, <float_value> <float_value> Tip These parameters can also be set interactively in the Scope mode ( Gates, p. 4.46). Analyzing the envelope power The Scope mode is used to record evelope power versus time. Its configuration and operation are described in Displaying data in the Scope mode on page 4.41. 1144.1400.12 4.15 E-2 Data acquisition and parameters (Sensor menu) R&S NRP Offset correction Sensor Offset… The Offset dialog box is for activating and entering correction factors to effect an increase or decrease in the measurement result which is not level-dependent. This means that the effects of any attenuators, directional couplers or amplifiers that are connected ahead of the sensor can be allowed for. is used to set a fixed correction factor. Frequency-dependent corrections can be made with Table. Both types of correction can be made simultaneously. Global S Parameter Device is for correcting the effects of a twoport connected ahead of the sensor in terms of its S-parameters. The S-parameters of the twoport must be stored in the sensor (see Program module Update S_Parameters in the sensor operating manual). Sensor menu: Offset… –( ) ä ä Fig. 4-15 A|B|C|D –( ) Tabs for selecting the sensor. –( ) Field for entering the global offset. Positive values correspond to external losses, negative values to external gains. ä↔ä [ ... ] Global Offset dialog box ä Remote Control [SENSe[1..4]]:CORRection:OFFSet[?] Global [ß ]– ( ) ä Table –( ) ä <float_value> Activates the global offset correction. Remote Control [SENSe[1..4]]:CORRection:OFFSet:STATe[?] ON | OFF The left-hand Table softkey opens a drop-down list with correction tables. There are 10 tables, each of which can contain up to 80 frequency/offset pairs. The default names of the Tables are Table 1 to Table 10; however, the names can be changed using the table editor. Remote Control [SENSe[1..4]]:CORRection:FDOTable[:SELect][?] Table –( ) ä Activates the frequency-dependent offset correction specified in the Table you have selected. Remote Control [SENSe[1..4]]:CORRection:FDOTable:STATe[?] 1144.1400.12 <string> 4.16 ON | OFF E-2 R&S NRP Edit Table… Data acquisition and parameters (Sensor menu) –( ) ä ä S Parameter Device –( ) ä ä Opens a dialog box for editing the selected offset correction table. Remote Control MEMory:TABLe:FREQuency[?] <NRf>{,<NRf>} MEMory:TABLe:GAIN[:MAGNitude][?] <NRf>{,<NRf>} Activates the S-parameter set stored in the sensor for a twoport that has been connected ahead of the sensor. Remote Control [SENSe[1..4]]:CORRection:SPDevice:STATe[?] 1144.1400.12 4.17 ON | OFF E-2 Data acquisition and parameters (Sensor menu) Table editor for offset tables R&S NRP Offset : Edit Table… The table editor displays the name of the table being edited in its title bar. Below the title bar, there is a two-column list containing frequency and offset pairs. There are two table-editor modes: • Selection mode: In this mode, using the cursor keys, you can select the number field you want to Edit, Insert or Delete. Note: • The whole of a long list cannot be displayed in the window. The entries are, therefore, viewed through a “window” which automatically moves if the cursor keys take the cursor outside the section that can be seen. The position of the currently active field is shown by the scroll bar. Edit mode: When you press the Edit rocker switch the value in the selected field can be edited. In this mode, the cursor keys cannot be used for selection, but can be used “normally” to edit values in the entry field. Offset dialog box: Edit Table –( ä ) Fig. 4-16 In the selection mode, the cursor keys are used to select the field you want to edit. (â), (ê), (ô), (û) Edit –( ) ä ä Insert –( ) ä ä Delete The entry can be confirmed with the (¶MENU) key or aborted with the (ESC) key. Afterwards, the table editor is again in the selection mode. Inserts a new line containing the values of the selected line. The values from the line in the selected field are also copied into the new fields. The maximum table length is 80 lines. ) Deletes the marked line. –( ) Sorts the lines in the table so that the frequencies in the lines are in ascending order. ä ä Name For selecting the edit mode for the marked field. –( ä ä Sort Offset dialog box, Table editor –( ) ä ä For renaming the selected table to make it easier to identify. The character editor is described in Chapter 3, in the section Dialog boxes and their controls. Remote Control MEMory:TABLe:MAP 1144.1400.12 <string>,0..9 4.18 E-2 R&S NRP Data acquisition and parameters (Sensor menu) Filter / averaging Sensor Filter… The averaging filter is used to reduce fluctuations in the measured result to the extent desired. Such fluctuations can be caused by inherent noise of the measuring instrument, modulation of the measurement signal or beats from the superposition of adjacent carriers. A more stable display has to be traded off against longer measurements. Note In manual mode, “longer measurements” does not mean that it takes longer to display a new result, but rather that it takes longer for the result to settle when the power changes. The measurement result is obtained from a two-stage averaging process. First, a measured value is obtained for the time window specified in the Mode dialog box – either by weighted summation of samples or by integration. Mode Sensor Time window ContAv R&S NRP-Z1x or R&S NRP-Z2x Sampling Window (page 4.10) Timeslot R&S NRP-Z1x or R&S NRP-Z2x Nominal Width (page 4.13) Burst R&S NRP-Z1x or R&S NRP-Z2x Determined by the sensor according to the signal Gate R&S NRP-Z1x or R&S NRP-Z2x End of Gate – Start of Gate Measuring power in gates (page 4.14) Measurements are continuously repeated in the selected time window. Repetitions are continuous in the ContAv mode and trigger-controlled in the Burst, Timeslot and Scope modes. The measurement result is obtained by averaging the measured values for the last 2N time windows. The number N is the filter length (Length), the factor of 2 arises because the output signals from the microwave detector to suppress low-frequency noise are chopped at the same rate as the time windows, which means that an independent measured value can only be obtained from two consecutive values. The filter length can be selected automatically or can be manually set to a fixed value. As a preliminary, you should always check if the autofilter mode is giving satisfactory results because you will always have to adjust an optimal, manual filter-length setting if the power is not constant. There are two autofilter operating modes. The Normal mode finds a balance between measurement time and display noise. Display noise can be adjusted using the Resolution parameter in the Windows menu ( Resolution, page 4.30). A higher resolution means greater filter lengths and so longer measurements. In the Fixed Noise mode, the filter length is selected so that the sensor’s intrinsic noise (2 standard deviations) does not exceed the specified Noise Content. To avoid very long settling times when the power is low, the filter length can be limited with the Max Settling Time parameter. If the display noise then exceeds this preset value, the symbol S/N is displayed. 1144.1400.12 4.19 E-2 Data acquisition and parameters (Sensor menu) R&S NRP Sensor menu: Filter… –( ) ä Fig. 4-17 A|B|C|D –( ) ä↔ä Auto [ß ] –( ) ä ä Filter dialog box Tabs for selecting the sensor. Remote Control In the following commands, [1..4] represents the channel number (1 for channel A, 2 for channel B, etc). Toggles between automatic and manual filter setting. Auto-filtering is not possible in the Scope mode. Remote Control [SENSe[1..4]]:AVERage:COUNt:AUTO[?] Length –( ) ä ä ON | OFF For setting the filter length manually. The function can be called only when autofilter is off. Changes are made immediately when a key is pressed. Remote Control [SENSe[1..4]]:AVERage:COUNt[?] <int_value> Initializes the averaging filter with the value currently being measured. Thus, the display can be updated quickly after a change in level, particularly in the case of a large filter length. Reset Remote Control [SENSe[1..4]]:AVERage:RESet Auto Once –( ) ä ä Determines a “one-off” optimal filter length for the instantaneous measured value and enters this value in the Length field. This function can be called only when autofilter is off. Remote Control [SENSe[1..4]]:AVERage:COUNt:AUTO[?] Auto Config… –( ) ä ä 1144.1400.12 ONCE Opens a dialog box for configuring the autofilter mode. 4.20 E-2 R&S NRP Data acquisition and parameters (Sensor menu) Filter dialog box: Auto Config… –( ) ä ä Fig. 4-18 A|B|C|D –( ) ä↔ä Normal –( ä Fixed Noise –( ) –( Tabs for selecting the sensor. Selects the autofilter Normal mode. Remote Control [SENSe[1..4]]:AVERage:COUNt:AUTO:TYPE[?] ) ä Noise Content Auto Filter dialog box ) ä ä RESolution Select the autofilter Fixed Noise mode. Remote Control [SENSe[1..4]]:AVERage:COUNt:AUTO:TYPE[?] RESolution Selects the proportion of intrinsic noise in the measured result. Specifically, Noise Content gives the permitted relative variation of the result which may not be exceeded for 95% of the observation time. Remote Control [SENSe[1..4]]:AVERage:COUNt:AUTO:NSRatio[?] Max Settling Time –( ) ä ä Specifies an upper limit for the settling time in the Fixed Noise mode. Limit exceeded S/N Remote Control [SENSe[1..4]]:AVERage:COUNt:AUTO:MTIMe[?] Ref Timeslot –( ) ä ä <float_value> Specifies the timeslot to which autofilter is applied when measurements are being performed in the Timeslot mode. This parameter is not available in the other measurement modes. Remote Control [SENSe[1..4]]:AVERage:COUNt:AUTO:SLOT[?] 1144.1400.12 <float_value> 4.21 <int_value> E-2 Data acquisition and parameters (Sensor menu) R&S NRP Measurement ranges Sensor Range… R&S NRP sensors do not have measurement ranges in the conventional sense. Instead, the R&S NRP-Z1x and R&S NRP-Z2x multipath diode sensors have several measurement paths with different sensitivities which are always simultaneously active. The Auto range function automatically selects the most suitable paths, i.e. those that are neither overdriven or underdriven. The final measurement result for the “crossover” of the two measurement paths is derived from the measured values for both paths. There are only a few cases where it makes sense to intervene in this process, e.g. test signals with a large peak-to-average ratio. To prevent measurement paths which have been overdriven by signal peaks from being included in the evaluation, the User defined Crossover function can be used to reduce levels in the measurement path crossover. The effect of setting the Level parameter to –6 dB, for example, is to reduce the crossover by 6 dB. This corresponds to an increase in drive range of the same magnitude, which reduces measurement deviations due to modulation to 25% of the original value. While large signal characteristics improve as the crossover level drops, the effects of zero deviations and intrinsic noise on the result become more marked. The reason for this is that above the crossover ranges the less sensitive of the two measurement paths is underdriven. This is why there is little point in changing the crossover level by more than 10 dB. If you want to turn off the Auto range function, e.g. to test the drive range of a path, you can define one of the three paths as the measurement range with Path. Thermal sensors (R&S NRP-Z5x) have only one measurement range over the whole dynamic range. No facilities for switching between measurement ranges are, therefore, provided. Sensor menu: Range… –( ) ä ä Fig. 4-19 A|B|C|D –( ) ä↔ä Auto –( ) ä ä Path 123 User def'd Crossover 1144.1400.12 –( ) ä ä –( ) ä ä Range dialog box Tabs for selecting the sensor. For turning the Auto range function on/off. Remote Control [SENSe[1..4]][:POWer][:AVG]:RANGe:AUTO[?] ON | OFF For selecting a measurement path when the Auto range function is off. Remote Control [SENSe[1..4]][:POWer][:AVG]:RANGe[?] 0 | 1 | 2 Activates a decrease in the crossover range. 4.22 E-2 R&S NRP Level Data acquisition and parameters (Sensor menu) –( ) ä ä dB value by which the crossover level is reduced. Editing field with direct entry of values (see Chapter 3, Dialog boxes and their controls). Remote Control [SENSe[1..4]][:POWer][:AVG]:RANGe:AUTO:CLEVel[?] Effect of the RF source <float_value> Sensor RF Source… In this dialog box, you can enter information relating to the reflection coefficients, Γ, of the signal source. If Source Γ considered for Enhanced Accuracy is activated, measurement accuracy can be increased by correcting for the effect of source mismatch on the measured value (gamma correction). To do this, the magnitude and phase of Γ must be specified. Sensor menu: Source Match… –( ) ä ä Fig. 4-20 Source Γ consid. for Enhanced Accuracy –( A|B|C|D –( ) ä ä ) ä↔ä Source Γ Magnitude Source Γ Phase –( ) ä –( ä RF Source dialog box Increases measurement accuracy with gamma correction. Remote Control [SENSe[1..4]]:SGAMma:CORRection:STATe[?] Tabs for selecting the sensor. Magnitude of the source reflection coefficient Γ. Remote Control [SENSe[1..4]]:SGAMma[:MAGNitude][?] ) <float_value> Phase of the source reflection coefficient Γ. Remote Control [SENSe[1..4]]:SGAMma:PHASe[?] 1144.1400.12 ON | OFF 4.23 <float_value> E-2 Data acquisition and parameters (Sensor menu) R&S NRP Trigger settings Sensor Trigger… The trigger system, which is required for the BurstAv, Timeslot and Scope measurement modes, is configured in the Trigger dialog box and the Trigger (Adv) dialog box. Sensor menu: Trigger… –( ) ä ä Fig. 4-21 A|B|C|D –( ) Tabs for selecting the sensor. –( ) Trigger delay. Setting a positive value delays the effect of the trigger event until the set time has elapsed. Entering negative values allows pretriggering (limited to a few ms, depending on the sensor). ä↔ä Delay Trigger dialog box ä ä The trigger delay is set in an editing field with direct entry of values (see Chapter 3, Dialog boxes and their controls). Tip Entering a correct value for the trigger delay is absolutely essential for accurate measurements in the Timeslot mode. For this reason, the setting should always be checked in the Scope mode ( T’slots, p. 4.45). Remote Control TRIGger[1..4|:ALL]:DELay[?] Source –( ) ä ä <float_value> Drop-down list for the trigger source (external or internal) and trigger slope (positive or negative). Remote Control TRIGger[1..4|:ALL]:SOURce[?] BUS | EXTernal | HOLD | IMMediate | INTernal Level –( ) ä ä When this level is exceeded, a measurement is triggered (or when the signal drops below this level in the case of a falling slope). The trigger level is set in an editing field with direct entry of values (see Chapter 3, Dialog boxes and their controls). Remote Control TRIGger[1..4|:ALL]:LEVel[?] Next… –( ) ä ä 1144.1400.12 <float_value> Switches to the second page of the Trigger dialog box. 4.24 E-2 R&S NRP Data acquisition and parameters (Sensor menu) Trigger dialog box: Advanced… –( ) ä ä Fig. 4-22 A|B|C|D –( ) Tabs for selecting the sensor. –( ) Allows the Holdoff time to be entered. During the Holdoff time, which starts with the trigger event, other trigger events are suppressed. ä↔ä Holdoff Trigger Advanced dialog box ä ä The holdoff time is set in an editing field with direct entry of values (see Chapter 3, Dialog boxes and their controls). Remote Control TRIGger[1..4|:ALL]:HOLDoff[?] Hysteresis –( ) ä ä <float_value> Allows a trigger hysteresis to be set. The signal level must be lower (higher) than the trigger level minus hysteresis (trigger level plus hysteresis) before triggering can occur again (brackets apply to triggering on the falling edge). The trigger hysteresis is set in an editing field with direct entry of values (see Chapter 3, Dialog boxes and their controls). Remote Control TRIGger[1..4|:ALL]:HYSTeresis[?] Single –( ) ä <float_value> This setting is used to stop continuous triggering and thus execute only one trigger event at a time. To enable the trigger, refer to Trigger sequence control p. 4.26. To record single events in the Scope mode, the Realtime check box must be enabled in the Mode dialog box. The chopper for the measurement is thus switched off. Otherwise a second measurement would automatically follow the regular measurement initiated by the trigger event and corrupt the measurement result. Remote Control INITiate[1..4|:ALL]:CONTinuous[?] Previous… –( ) ä ä 1144.1400.12 ON | OFF Switches to the first page of the Trigger dialog box 4.25 E-2 Data acquisition and parameters (Sensor menu) R&S NRP Trigger sequence control The (DEL/1TRIG) key is used in the Scope mode to manually control the trigger sequence: In continuous (not single-shot) mode, the (DEL/1TRIG) is used to interrupt (STOP) or continue (RUN) the measurement. In single-shot mode, each individual measurement must be released by pressing the (DEL/1TRIG) key before it can be initiated by the next trigger event. Pressing the key a second time before the trigger event also initiates a measurement (manual triggering). 1144.1400.12 4.26 E-2 R&S NRP Displaying measurement results (Windows menu) Displaying measurement results Windows - menu Window labelling The R&S NRP has a total of four windows for displaying results. They are numbered 1 to 4 and so have a unique label. The window’s number is displayed in the top left of its title bar. Note: Remote control commands that act on windows contain the number of the window in question in the command, e.g. DISPlay:WINDow2:SELect. Windows can also be assigned a name. The Window Name function in the File menu is used to assign names to windows. The name is also displayed in the window’s title bar and makes it easier to identify results. A name like Amplifier output is more informative than Channel A or Window 2. The names of the windows are also stored in the setups. Assigning meaningful names to the windows makes it much easier to recognize the associated measurement. Arranging windows Displayed windows are shown in numerical order from the top to the bottom of the screen. The R&S NRP automatically selects the window size according to which combination of windows is displayed. The windows menu The windows menu is context-sensitive and displays only those menu items that are relevant to the current measurement scenario. Selecting a window Windows Window You can select one of the windows numbered 1 to 4 whenever you want. All the functions offered in the Windows and Measurement menus act on the selected window. Fig. 4-23 Windows menu, Window softkey Windows menu: Window 1234 1144.1400.12 –( ) ä↔ä Selects the window whose number is highlighted in the menu. If the window is already open, it is also identified by the window title bar being in inverse video and by the “shadow” that appears along the right and bottom edges of the window. 4.27 E-2 Displaying measurement results (Windows menu) R&S NRP Using windows The labelling of the second rocker switch in the Windows menu is context-sensitive and changes according to the status of the active window. Open opens the selected window. Init opens and initializes the selected window. Close closes the selected window. Expand expands all windows to fill the display. Arrange arranges all windows in cascade fashion. Fig. 4-24 Windows menu, softkeys for controlling the windows Opening windows Windows menu: Open | Init –( ) ä Windows Open Opens a window with the previous settings. This means that a measurement which has been removed from the display can be restored. Remote Control DISPlay[:WINDow][1..4][:STATe][?] ON Creating windows Windows menu: Open | Init –( ) Windows Init Opens a window with preset values. Configures a completely new measurement. ä Closing windows Windows menu: Close | Expand –( ä 1144.1400.12 Windows Close ) Closes an opened window. The sizes of any remaining windows are adjusted accordingly. Remote Control DISPlay[:WINDow][1..4][:STATe][?] 4.28 OFF E-2 R&S NRP Displaying measurement results (Windows menu) Expanding windows Windows menu: Close | Expand –( ) ä Windows Expand All opened windows are expanded to the full display height. The selected window is the only window that can be seen as all the other windows are “masked” by the selected window. However, the “masked” windows are still open and can be selected in sequence with Window 1 2 3 4 or by means of the up/down cursor keys. Expanded windows display all relevant parameters. For a graphical representation of the various window types and a description of symbols see Chapter 3, section Window sizes and types and Special symbols. Remote Control DISPlay:WINDow:SIZE[?] ZOOMed Arranging windows Windows menu: Close | Arrange –( ) ä Windows Arrange Expanded windows are reduced to their normal size and returned to their original state with Arrange. Remote Control DISPlay:WINDow:SIZE[?] NORMal Selecting the result display mode Windows Type In the windows, a variety of result display modes can be selected. The digital display (Dig) displays measured values as a number with additional information next to the reading. The hybrid digital/analog display (D/A) displays the measured value on an analog scale and also digitally. If the primay channel is in the Scope mode, oscilloscope display is automatically selected. The Graph display mode plots measured values against time. This display mode is only available in the Scope mode Fig. 4-25 Window menu, softkeys for controlling the display mode The Dig D/A softkey is used for switching between the various window display modes. Windows menu: Dig D/A Graph –( ) Digital display. ä↔ä Dig D/A Graph –( ) Hybrid digital/analog display. –( ) Graph display mode in the Scope mode ä↔ä Dig D/A Graph ä↔ä Remote control DISPlay[:WINDow][1..4]:FORMat[?] 1144.1400.12 4.29 DIGital | ANALog E-2 Displaying measurement results (Windows menu) R&S NRP Configuring the result display Each of the display modes has special configuration parameters. In the digital display, the resolution is adjustable ( 4.30). Resolution, page In the hybrid digital/analog mode, you can adjust the resolution of the digital display ( Resolution, page 4.30) and specify the scaling for the analog scale ( Scale, page 4.31). In the Graph display mode, there are no other parameters in the menu. The many possible settings in this display mode are made directly in the window, which for this purpose has to be expanded ( Expanding windows (Expand) , p. 4.29). Fig. 4-26 Windows menu, display-specific softkeys Setting the resolution Windows Resolution The resolution of the digital measurement result can be set in 4 stages, designated as 1 dB, 0.1 dB, 0.01 dB and 0.001 dB. If dB, dBm or dBµV is selected as the unit, the number of places after the decimal point is set directly. In the linear mode (W, ∆%, 1), the number of digits after the decimal point depends on the resolution, a digit being added or removed for each resolution stage that is added or removed. The selected resolution also influences the action of the autofilter in the The Normal mode (see page 4.19). The greater the selected resolution, the longer the averaging filter to reflect the number of digits. Windows menu: Resolution (dB) 1 0.1 0.01 0.001 1144.1400.12 –( ) ä↔ä Sets the result resolution you want. Remote Control DISPlay[:WINDow][1..4]:RESolution[?] 4.30 1 | 0.1 | 0.01 | 0.001 E-2 R&S NRP Displaying measurement results (Windows menu) Setting the analog scale Windows Scale The analog scale in the combined digital/analog display (D/A) can be set with the Analog Meter softkey. Windows menu: –( Analog Meter… Fig. 4-27 ä ) Meter Scaling dialog box –( Auto Once ) ä ä Automatically selects the appropriate scaling so that the instantaneous measured value is in the middle of the scale. Remote Control DISPlay[:WINDow][1..4]:METer|:ANALog:AUTo[?] –( Left ) ä ä –( Right ) ä ä ONCE | OFF Enables input of the left end-of-scale value. Remote Control DISPlay[:WINDow][1..4]:METer|:ANALog:LOWer[?] <float_value> Enables input of the right end-of-scale value. Remote Control DISPlay[:WINDow][1..4]:METer|:ANALog:UPPer[?] Scrolling between timeslots <float_value> Windows Time Slot If the timeslot mode has been selected for a sensor, you can use the Time Slot softkey in the Windows menu to select the timeslot whose measured values you want to display. Fig. 4-28 Windows menu, softkey for scrolling between timeslots Windows menu: Time Slot [1] –( ) ä↔ä Specifies which of the timeslots on which a simultaneous measurement is being performed are displayed in the active window. If you want to display further timeslots simultaneously, a separate window must be opened and configured for each additional timeslot. Remote Control DISPlay[:WINDow][1..4]:TSLot[?] 1144.1400.12 4.31 <int_value> E-2 Configuring measurements (Measurement menu) R&S NRP Configuring measurements Measurement windows For every window opened via the Windows menu, you can configure a measurement in the Measurement menu. The measurement channels (A, B, C and D), how the measured values are processed (ratio, difference), the unit for the result, additional information (max, min), etc are also defined. This procedure does not change the sensor operating modes that have been set in the Mode menu. All key parameters are displayed along with the result in the appropriate window. In the manual mode, four measurements can be configured, corresponding to the maximum number of windows (1, 2, 3 and 4); in the remote control mode, additional measurements 5 to 8 can be configured (not displayed on screen). The Measurement menu The Measurement menu contains the functions required to configure measurements. Selecting a window, page 4.32. Selecting a measurement function and the unit, page 4.33. Relative measurements, page 4.39. Setting the reference value manually, page 4.39. Limit monitoring, page 4.40. Resetting the extreme value display, page 4.38. Fig. 4-29 Measurement menu Selecting a window Measurement Window You can select one of the windows (1 to 4) as and when you want. All Windows and Measurement menu functions act on the selected window. Measurement menu: Window 1234 1144.1400.12 –( ) ä↔ä Selects the window whose number is displayed in the menu. If the window is open, this is also indicated by the window’s title bar being in inverse video and by the “shadow” along the window’s right and bottom edges. 4.32 E-2 R&S NRP Configuring measurements (Measurement menu) Selecting a measurement function Measurement Function… The R&S NRP can combine measured values from several channels (sensors) using a mathematical function and display the result in the selected window. The necessary settings are made in the Function... dialog box. The first step is to select the measurement function, i.e. the mode of combination for multi-channel measurements. Possible functions are the power ratio of two channels, a matching measurement function derived from this or the power in a single measurement channel. All or any of the connected sensors can be selected. A primary channel, and possibly a secondary channel, can be selected for each measurement window. The simplest case is a measurement with just one sensor. To configure this measurement, first of all select Primary (X) or Secondary (X) (X = A, B, C or D) in the Function list and then the channel (sensor) you want in the Primary Channel or Secondary Channel list. Select the function Ratio (X/Y) to measure the power ratio and then the measurement channel assignment. For all dual-channel measurements, the first argument “X” of the measurement function is the primary measurement channel. For the sake of clarity, the primary measurement channel is referred to as the Incident Power for matching measurement functions (SWR, Rcoeff and Rloss) and indicates the forward wave, i.e. the wave that is incident at the DUT. Measurement menu Function… –( ) ä Fig. 4-30 1144.1400.12 Func & Unit dialog box 4.33 E-2 Configuring measurements (Measurement menu) Functions and their use Func & Unit dialog box Function –( ) ä↔ä R&S NRP Func & Unit : Function The Function drop-down list itemizes all the measurement functions provided by the R&S NRP. These are: Function Primary (A) Secondary (B) Ratio (A/B) SWR (A,B) RCoeff (A,B) RLoss (A,B) Diff (A-B) Sum (A+B) Scope (A) Power in the primary channel, e.g. A. Power in the secondary channel, e.g. B. Ratio of the power in the primary channel to the power in the secondary channel. Standing wave ratio Reflection coefficient Return loss Power difference between the primary and secondary channel. Sum of power from first and second channel. This function cannot be selected from the "Function & Unit“ dialog box but automatically appears there when the primary channel is in the Scope mode. The Scope mode does not allow relative measurements or two-channel measurement functions (ratio, SWR, etc). The functions for the matching measurement are so defined that the forward power must be measured in the primary channel and the reverse power in the secondary channel. Remote Control CALCulate[1..8]:MATH[:EXPRession][?] Prim. Channel –( ) ä↔ä <string> Selects the primary channel which is to be used to calculate the displayed value. If the selected channel is operating in the Scope mode, its power is automatically shown as a function of time ("Scope (X)" function). Except for the graphical display, it is the same as the "Primary (X)" function. It is not possible to select another measurement function. Sec. Channel –( ) ä↔ä 1144.1400.12 Selects the secondary channel which is to be used for the calculation. 4.34 E-2 R&S NRP Configuring measurements (Measurement menu) Expanded configuration for sensors in the Scope mode The measurement results of sensors operated in the Scope mode can be further processed and displayed in two ways: a) by a power/time diagram (measurement window in the Graph display mode display mode, p. 4.29). Selecting the result b) in the form of gated measurement results (measurement window in the Dig or D&A display) Whereas the Graph mode allows only an absolute display of the measured values, gated measurement results can also be further processed like other measurement results: as absolute values relative to a fixed reference value or another measurement channel. For this purpose, the Func&Unit dialog box provides expanded configuration possibilities, including the number of the gate and the type of measurand (Avg, Peak, Peak/Avg). Note the following: • • • Restrictions regarding Peak and Peak/Avg are described in the background information to Meas, p. 4.47 Only functions whose result is a power or a dimensionless ratio can be created The reference of a gate measured value to the value of another gate in the same channel is not possible Func & Unit- Dialog Primary or secondary channel in the Scope mode. Fig. 4-31 Gate# –( ) Determines which gate is to be evaluated for the function. –( ) Selects one of the available measurands: ä↔ä Eval. ä↔ä 1144.1400.12 Func & Unit dialog box Avg Peak Peak/Avg Average power in the gate Peak power in the gate Ratio of peak power to average power in the gate 4.35 E-2 Configuring measurements (Measurement menu) R&S NRP Setting units Func & Unit : Unit –( Unit ) The Unit drop-down list is used to set the result unit. Only those units which are compatible with the selected measurement function are included as menu items: ä ä Function Primary, Secondary, Diff, Sum Ratio SWR, RCoeff RLoss Measurement menu: W Func | dBm tion… dBµV Remote Control UNIT[1..8]:POWer[?] UNIT[1..8]:POWer:RATio[?] –( ä Unit W, dBm, dBµV ∆%, dB, 1 1 dB The units can be selected directly from the Measurement menu by using the right half of ) the function rocker switch. DBM | W | DBUV DB | DPCT | O The following tables show the mathematical function used to determine the measurement result. This function depends on the measurement function and the measurement unit that is set, and is defined as either not relative to (Relative Off) or relative to (Relative On) a stored reference value Relative measurements (page 4.39): Absolute power measurement (Relative Off) Primary Secondary W P dBm dBµV P 10 lg 1 mW P⋅Z 20 lg 1 µ V Power ratio measurement (Relative Off) ∆% dB Ratio (A,B) SWR (A,B) P 10 lg A PB – 1 P 100 A −1 P B PA PB RLoss (A,B) 1144.1400.12 P 10 lg A PB PB PA 1− PB PA – Rcoeff (A,B) – 1+ PB PA – – – 4.36 E-2 R&S NRP Configuring measurements (Measurement menu) Sum and difference of power measurements (Relative Off) Sum (A+B) Diff (A-B) W dBm PA + PB P + PB 10 lg A 1 mW P − PB 10 lg A 1 mW PA − PB dBµV 20 lg 20 lg (PA + PB ) ⋅ Z (PA − PB ) ⋅ Z 1 µV 1 µV Measurement result relative to reference value (Relative On) 1 ∆% dB Primary Secondary P PR P 10 lg PR Sum Diff PA ± PB PR P ± PB 10 lg A PR Ratio PA PB PX PY R P 100 −1 PR PA PB PX PY R P ± PB − 1 100 A PR PA PB 100 PX PY R − 1 Power Power in channel A (forward power) P PA PB PR Px PY 10 lg Power in channel B (reverse power) Reference (power) R 1144.1400.12 Reference (power ratio) 4.37 E-2 Configuring measurements (Measurement menu) Setting the auxiliary value R&S NRP Func & Unit : Auxiliary Value In the Digital display mode, the result and another value that characterizes the result can be displayed. Fig. 4-32 Measurement window, Auxiliary Value Auxiliary Value –( ) ä↔ä Selecting the auxiliary value: Max Min Max-Min The greatest value that has been measured since the extreme value function was last reset ( Resetting the extreme value display, page 4.38). The smallest value that has been measured since the extreme value function was last reset ( Resetting the extreme value display, page 4.38). The interval that includes all values measured since the extreme value function was last reset ( Resetting the extreme value display, page 4.38). Remote Control CALCulate[1..8][:MINimum | :MAXimum | :PTPeak]:DATA? DISPlay[:WINDow][1..4]:AVALue[?] MINimum|MAXimum|PTPeak|OFF Resetting the extreme value display Measurement Max Hold Reset For each window, the R&S NRP continuously saves the maximum and minimum value measured since the start of the measurement or since these values were last reset. These values should, therefore, be reset before the measurement is started. Measurement menu: Max Hold Reset Clears the extreme values and restarts recording of extreme values. –( ä 1144.1400.12 ) Remote Control CALCulate[1..8]:EXTRemes:RESet 4.38 E-2 R&S NRP Configuring measurements (Measurement menu) Additional functions Relative measurements Measurement Rel The Rel function is a simple way of obtaining the ratio of a measured value to a constant value, e.g. a measured power. Measurement menu: Rel Off On Reset –( ) Off: Measurement using the measurement function that has been set. Rel Off On Reset –( ) On: Relative display mode. Rel Off On Reset ä↔ä ä↔ä –( ) ä↔ä Remote Control CALCulate[1..8]:RELative:STATe[?] ON | OFF If the right-hand side of the rocker switch is pressed when On is selected, the current measured value is transferred to the active window’s reference memory. The display then returns to On. Fernsteuerung CALCulate[1..8]:RELative[:MAGNitude]:AUTO[?] Setting the reference value manually ONCE Measurement Ref. Val The reference value can also be directly entered or edited using the Ref. Val… dialog box. Measurement menu: Ref. Val… –( ) ä Fig. 4-33 Ref. Value –( ) ä ä Result Ref –( ) ä ä Ref. Value dialog box For directly entering a new reference value or for editing an old value. Remote Control CALCulate[1..8]:RELative[:MAGNitude][?] <float_value> The current result is transferred to the reference value memory of the active window and displayed. This function can also be started from the Measurement menu by using the Reset softkey. Remote Control CALCulate[1..8]:RELative[:MAGNitude]:AUTO[?] ONCE 1144.1400.12 4.39 E-2 Configuring measurements (Measurement menu) R&S NRP Limit monitoring Measurement Limits An upper and a lower limit for each window can be set in the Limits… dialog box. If either limit is violated, a warning is issued. The warning may be one of the following: • The LIMIT FAIL message is displayed on the screen. • A warning tone is output. • A signal is issued on analog output OUT1 ( Setting the analog outputs on page 4.58). Measurement menu: –( Limits… ) ä Fig. 4-34 [ß ]– ( Upper [ .... ] Upper –( ) ä ) ä Lower [ß ]– ( Warning Beep –( ä –( ) ) Remote Control CALCulate[1..8]:LIMit:UPPer:STATe[?] ) ON | OFF Upper limit. <float_value> Turns monitoring of the lower limit on/off. Remote Control CALCulate[1..8]:LIMit:LOWer:STATe[?] ON | OFF Lower limit Remote Control CALCulate[1..8]:LIMit:LOWer[:DATA][?] ä↔ä 1144.1400.12 Turns monitoring of the upper limit on/off. Remote Control CALCulate[1..8]:LIMit:UPPer[:DATA][?] ä [ .... ] Lower Limits dialog box <float_value> For activating the acoustic alarm. Remote Control CALCulate[1..8]:LIMit:BEEP[?] 4.40 ON | OFF E-2 R&S NRP Displaying data in the Scope mode Displaying data in the Scope mode Mode : Scope Envelope power versus time can be graphically displayed in the Scope mode, allowing timeslot and gate structures to be blended into the signal characteristic and configured. The average and peak power values measured within a gate and the Peak/Avg ratio can be numerically displayed. Switching the sensor to the Scope mode To use the Scope mode display, the sensor must first be switched to a special operating mode (Scope) and configured. This is done by way of the Mode dialog box in the Sensor menu. Mode dialog box: T’gate, Scope… –( ) ä↔ä Fig. 4-35 Points –( ) ä ä Mode dialog box, Scope mode Desired number of measurement points. Each point represents the average power of a time interval whose width is determined by the length of the measurement window ( Trace, p. 4.44) and the number of measurement points. Remote control [SENSe[1..4]]:TRACe:POINts If the desired time resolution cannot be obtained with the connected sensor, the number of measurement points is automatically reduced. With the Sensors R&S NRP-Z1x and R&S NRP-Z2x, this limit is approximately 2.5 µs per measurement point (external triggering). 10 µs is possible with internal triggering. Reduced to Realtime <int_value> –( ä ) In the Realtime mode each measurement point comes from a single sweep. Successively recorded traces are not averaged. For this purpose, the chopper is switched off and the averaging filter deactivated. Advantage: unstable or unclear trigger conditions are detected immediately, preventing the display of unrealistic traces caused by averaging asynchronous measurement values. Disadvantage: if power is very low, display noise, zero offset and linearity are worse than in the Normal mode. Remote control [SENSe[1..4]]:TRACe:REALtime[?] 1144.1400.12 4.41 ON | OFF E-2 Displaying data in the Scope mode R&S NRP Background information Points The highest possible number of measurement points (312) corresponds exactly to the number of pixels available on the display of the R&S NRP. The most detailed image is obtained with this value. If the required time resolution is too high (depending on the width of the measurement window), the number of measurement points is automatically reduced to the largest possible value ( Reduced to display). A closed trace is always displayed, with linear interpolation between the measurement points. Generally 312 measurement points should be set and the reduction performed automatically. See also the tip on page 3.9. An exception is smoothing noisy traces by decreasing the number of points. As each measurement point represents the average power of an equivalent time interval, noise can be reduced by 30 % by reducing the number of points by half. Another means of reducing noise is the averaging filter ( Filter / averaging, p. 4.19), which can be used whenever Realtime is not enabled. With very large averaging factors, the display will tend to respond slowly. Realtime When the R&S NRP is in the Normal mode, averaging is always performed across a number of sweeps. Because of the chopper amplifier ( Sampling window, p. 4.10), two sweeps are always taken into account in calculating the measurement result, even if the averaging filter is set to 1 ( Filter / averaging, p. 4.19). If the measurement points to be averaged originate from different trigger events, this can produce a new, perhaps totally unrealistic trace. A noisy signal or a signal with more than one possible trigger point can result in different trigger events, especially if internal triggering ( Trigger settings, p. 4.24) is used. Using the Realtime mode helps to set stable trigger conditions, as unstable trigger behaviour can be detected immediately. Since the dynamic range in the Realtime mode is reduced because of larger zero offsets, stronger noise and poorer linearity, it should be switched off when triggering is stable. If triggering is external, the Realtime mode is generally unnecessary (exception: single-shot measurement Trigger settings p. 4.24). 1144.1400.12 4.42 E-2 R&S NRP Displaying data in the Scope mode Selecting a window The traces recorded by a sensor in the Scope mode can be displayed in an expanded or a half-height window. The most important thing is that the sensor that has been switched to the Scope mode is entered in the Primary Channel of this window ( Functions and their use, p. 4.34). The window should be expanded so that the additional control elements of the Scope mode display can be used. As usual, the functions in the Windows menu are used to switch between the expanded Expand (p. 4.29) and half-height window Arrange (p. 4.29). Fig. 4-36 Expanded window with control elements in the Scope mode Fig. 4-37 Mode dialogHalf-height window in the Scope mode Trigger settings To obtain a stable image, the trigger parameters must be set in the Trigger and Trigger (Adv.) dialog boxes so that they correspond to the signal ( Trigger settings and Trigger sequence control, p. 4.24). Filter settings Like any other result of a power measurement, the displayed trace can also be smoothed using the averaging filter. For this purpose, a number of sweeps are recorded, and the corresponding points of each sweep are averaged. For configuring the filter Filter / averaging, p. 4.19. To prevent the measurement result from being corrupted by unstable trigger conditions (non-correlating points of different sweeps are averaged), a test should first be run in the Realtime mode to determine whether stable trigger conditions exist ( Realtime, p. 4.42). 1144.1400.12 4.43 E-2 Displaying data in the Scope mode R&S NRP Setting parameters All parameters relevant to the trace display can be directly set in the expanded window. The parameters are spread across four pages marked by tabs. Symbols Tabs for selecting the page. Marks the trigger level (visible at the left- and right-hand edges). If the Trigger dialog box is open, an unbroken line appears. Time of trigger event. Time at which the trigger delay has elapsed (delayed trigger). In the Timeslot mode, this time should coincide with the beginning of the first timeslot. Tip If you use the up/down cursor keys for making changes to parameters ( Entry fields on page 3.8), you can observe the effects immediately and make adjustments interactively. Coarse or fine adjustments are possible, depending on the decimal place in which you "scroll". Trace The parameters on the Trace page are used to determine the position and the size of the screen window. The number of measurement points must be specified in the Mode menu ( Switching the sensor to the Scope mode, p. 4.41). Scope mode display T’slots, Trace… –( ) ä↔ä Fig. 4-38 Start –( ä ) Scope mode display – Trace page Start of the measurement window (left-hand screen edge) relative to the delayed trigger. The value can be negative so that signal components before the trigger event can be shown (limited to a few ms, depending on the sensor). Remote control [SENSe[1..4]]:TRACe:OFFSet:TIME[?] 1144.1400.12 4.44 <float_value> E-2 R&S NRP Length Displaying data in the Scope mode –( ) ä Length of the measurement window (image width). Co-determines the time resolution, together with the number of measurement points. ( Background information, p. 4.45). Remote control [SENSe[1..4]]:TRACe:TIME[?] Max Min –( –( ) ä ) ä <float_value> Maximum power that can be displayed. Remote control DISPlay[:WINDow][1..4]:TRACe:UPPer[?] <float_value> Minimum power that can be displayed. Remote control DISPlay[:WINDow][1..4]:TRACe:LOWer[?] <float_value> Tip The number panel for Min and Max contains an auto-softkey for adapting the power range to the trace. Background information The time resolution of the trace is determined by the length of the measurement window and the number of measurement points ( Switching the sensor to the Scope mode, p. 4.41). A measurement point therefore represents the power for a time interval within which the test signal can considerably vary. Among the different ways of finding a representative value, each measurement point is assigned the average power of the correlating time interval, which can result in deviations from the expected characteristic of the envelope power. In this case, the time resolution must be increased by shortening the measurement window and/or raising the number of measurement points. This aspect should be given special attention, especially when measuring the peak power and the Peak/Avg ratio ( Meas, p. 4.47). T’slots On this page of the Scope mode display, a timeslot structure – the configuration that was defined for the Timeslot mode in the Mode menu – is blended into the power characteristic ( Measuring the power of TDMA signals, p. 4.13). In addition, the average power of a timeslot that can be selected from this is displayed, taking into account the exclude times. As the exclude times on the set page can be changed, the effects on the measurement result can be seen immediately. Scope mode display T’slots, Trace… –( ) ä↔ä Fig. 4-39 1144.1400.12 Scope mode display – Timeslot page 4.45 E-2 Displaying data in the Scope mode R&S NRP Marks the set timeslot including the exclude start and end times. Average power for the set timeslot. The displayed value is obtained by averaging the measurement points between the inner vertical lines. Measurement accuracy can be increased if the Timeslot mode is selected for the actual measurement. Average Slot# –( ) ä↔ä Excluded from End – ( ä … from Start –( ) ) ä Selection of the marked timeslot. For this purpose, an average power calculated from the measurement points is displayed. Setting of the exclude times. These parameters can also be set in the Mode dialog box. ( Measuring the power of TDMA signals, p. 4.13). Tip for power measurement in timeslots 1. Enter TDMA standard parameters in the Mode menu (Timeslot). 2. Switch the sensor to the Scope mode. 3. Make the horizontal and vertical display settings on the Trace page. 4. Blend in the timeslot structure on the T'slots page. 5. Open the Trigger dialog box and set the delay so that the timeslot structure coincides with the trace. 6. Change the exclude times if necessary. Gates The R&S NRP provides four separately configurable time windows ("gates") for signal evaluation. The start and end of each gate can be set on the Gates page with the aid of markers. Measurements in the time windows can be made by using the Meas page ( switching to the Timegate mode ( Measuring power in gates, p. 4.14). Meas, page 4.47), or by Scope mode display …Trace, Gates… –( ) ä↔ä Fig. 4-40 1144.1400.12 Scope mode display – Gates page 4.46 E-2 R&S NRP Displaying data in the Scope mode Active marker. The active marker can be shifted pixel by pixel using the (ê) and (û) keys, re-entered with Marker Edit or changed by scrolling. The number 1 marks the start of a time window and the number 2 the end, regardless whether the marker is active or passive. Passive marker. Time position of the markers and power level at the marker positions. All indicated times are relative to the delayed trigger. The indicated times for the selected time window are identical to the Start of Gate and End of Gate parameters in the Timegate mode ( Measuring power in gates, p. 4.14). Time difference between the markers and level difference between marker positions. Marker Edit Select –( ) Marker Edit Select –( ) Opens an editor for the time position of the active marker. Gate# –( ) Selects a time window. ä ä ä↔ä Swaps the roles of the active and passive marker. Meas The average power, the peak power and their ratio for the selected time window are displayed on the Meas page. The page is easy to reach from the Gates page, so you can quickly judge the effect of changing the marker position. As the measured values are calculated from the pixels, they do not attain the accuracy specified for the Timegate mode. For a more accurate measurement of the average power, it is therefore advisable to switch to the Timegate mode ( Measuring power in gates, p. 4.14). Scope mode display …Gates, Meas –( ) ä↔ä Fig. 4-41 1144.1400.12 Scope mode display – Meas page 4.47 E-2 Displaying data in the Scope mode R&S NRP Active marker. The active marker can be shifted pixel by pixel using the (ê) and (û) keys. The number 1 marks the start of a time window and the number 2 the end, regardless whether the marker is active or passive. Passive marker. Average power for the set time window. For the following two items, please read Background information, p.4.12. Peak power for the set window. Ratio of peak power to average power for the set time window. Remote control, configuration CALCulate[1..8]:FEED[?] CALCulate[1..8]:FEED[?] CALCulate[1..8]:FEED[?] "POWer:AVERage ON SWEep[1..4]" "POWer:PEAK ON SWEep[1..4]" "POWer:PTAVerage ON SWEep[1..4]" Read result FETCh[1..8]? Marker Edit Select –( Gate# –( ) Swaps the roles of the active and passive marker. ) Selects a time window. ä ä↔ä Background information To ensure accurate measurement of the peak power and the Peak/Avg ratio, two factors must be taken into account: 1. First of all, the video bandwidth of the power sensor must be greater than the RF bandwidth of the test signal so that the display of the envelope power characteristic is not corrupted. The video bandwidth of the Sensors R&S NRP-Z1x and R&S NRP-Z2x is about 100 kHz, allowing the peak power of many amplitude-modulated signals and also several TDMA signals such as NADC (RF bandwidth approx. 50 kHz) to be measured. If the RF bandwidth is considerably greater than the video bandwidth, values displayed for the peak power and the Peak/Avg ratio will generally be too low. 2. For the peak power measurement, the horizontal resolution should be high enough to allow the peak value to appear in the diagram as a round cap several pixels wide. Otherwise the displayed and/or measured value may be too low. The reason lies in the fact that a measurement point represents the power for a time interval and the average power is assigned by the R&S NRP. 1144.1400.12 4.48 E-2 R&S NRP Management of settings (File menu) Management of settings File - menu Default setting (Preset), p. 4.49. Loading user-defined settings und Storing user-defined settings, p. 4.49/4.50. Loading settings for mobile radio standards, p. 4.50. Programming aids, p. 4.52 Assigning names to windows, p. 4.52. Fig. 4-42 File menu Default setting The Preset softkey in the File menu changes the R&S NRP to its default setting. The black background of the text indicates that the function can also be started by pressing the ({PRE}SET) hardkey. In the default setting, a window is opened for each connected sensor. The default setting is sensorspecific. Storing user-defined settings The R&S NRP provides 19 memory spaces in which complete device settings can be stored (Setup memory). Settings can be stored by using the Save Setup… dialog box. The memory spaces can be labelled with a name for identification. File menu: Setup Save –( ä ) Fig. 4-43 [Setup] Edit Name –( ) Selects a setting. –( ) Used to rename the selected setting. ä ä ä ä 1144.1400.12 Recall Setup dialog box Remote Control MEMory:STATe:MAP <string>, 1..19 4.49 E-2 Management of settings (File menu) Save –( ) ä ä R&S NRP Stores the current settings under the selected name. After settings are stored successfully, the dialog box is closed. Another way to store settings and close the dialog box is to press the (¶ MENU) key. A dialog can be cancelled by using (ESC). Remote Control *SAV 1..19 Loading user-defined settings The Recall Setup… dialog box is used to load stored settings. File menu: Setup Recall –( ä ) Fig. 4-44 Recall Setup – dialog box [Setup] –( ) Selects a setting. Recall –( ) Loads the selected setting. After the setting is loaded successfully, the dialog box is closed. ä ä ä ä The same effect can be achieved by pressing the (¶ MENU) key. Pressing (ESC) cancels the dialog. Remote Control *RCL 0..19 Loading settings for mobile radio standards Predefined settings for the most common mobile radio standards can be loaded in the Recall Standard dialog box for quick configuring of messages in the Timeslot and Scope modes. In contrast to Recall Setup, essentially only the parameters that affect the connected sensors are reconfigured (Sensor menu). The name of the set standard appears in the title bar of all open windows and is also treated like any other window name ( Assigning names to windows, p.4.52). The name can therefore be changed and deleted as desired, but above all it is not automatically deleted when one of the preset parameters is changed and the instrument setting no longer corresponds to the loaded standard. A table of sensor parameter values for the different standards can be found at the end of Chapter 6 under Standard configurations. 1144.1400.12 4.50 E-2 R&S NRP Management of settings (File menu) File menu: Standard Recall –( ) ä ä Fig. 4-45 [Standard] Preserve Window Settings Recall Setup dialog box –( ) Selects a mobile radio standard. –( ) If enabled, only the sensor parameters are loaded but the windows are not reconfigured. ä ä ä ä Remote Control SYSTem:STANdard:PWSettings External Trigger –( ) ä ä ON | OFF Selects between configurations with an internal or an external trigger. External triggering should be selected if the test signal yields no clearly defined or only an unstable trigger event. If external triggering is used in the timeslot mode, ensure that the trigger delay setting is such that the start of the first timeslot coincides with the delayed trigger. ( Trigger settings, p. 4.24). Remote Control SYSTem:STANdard:TRIGger:SOURce Remote Control SYSTem:STANdard:PREset 1144.1400.12 4.51 INT | EXT <string> E-2 Management of settings (File menu) R&S NRP Programming aids File Errorlist… If you are developing remote control programs, you can display the contents of the SCPI error queue in the Errorlist dialog box. In addition to the error, the command line that triggered the error is displayed, along with a question mark highlighted in black at the point where the command interpreter detected the error. The dialog box can be left permanently open, and its contents are continuously updated. File menu: –( Errorlist… ) ä ä Fig. 4-46 Errorlist dialog box If the device is already in the remote state, the menu bar is replaced and the Errorlist can be opened with the topmost softkey. –( ) ä ä Fig. 4-47 Menu bar in the remote control mode (DEL/1TRIG) If the Errorlist is open, the error queue of the R&S NRP can be deleted by pressing the (DEL) key. Remote control DISPlay:ERRorlist[?] ON | OFF To activate extended error messages: SYSTem:ERRor:EXTended[:STATe][?] <boolean> Assigning names to windows File Window Name… Each display window is automatically labelled with a number (1, 2, 3, 4). In addition, you can enter a name for each window to more closely indicate the type of measurement result. This is particularly recommended for settings to be stored in a setup memory. The Window Name dialog box is used to assign names to windows. File menu: Window Name… –( ) ä ä Fig. 4-48 1144.1400.12 Window Name dialog box 4.52 E-2 R&S NRP Window 1 Management of settings (File menu) –( ) Assigns a name to window 1. Pressing the softkey will open an editor for entering a name. –( ) Assign names to windows 2 to 4. ä ä Window 2…4 ä ä 1144.1400.12 Remote Control DISPlay[:WINDow][1..4]:NAME[?] 4.53 <string> E-2 System settings (System menu) R&S NRP System settings System - menu Configuring the remote control interfaces, page 4.55. Setting the analog outputs, page 4.58. Selftest, page 4.60. Test generator, page 4.62. System information, page 4.62. Miscellaneous Operation at low ambient temperatures, page 4.64. Fig. 4-49 System menu 1144.1400.12 4.54 E-2 R&S NRP System settings (System menu) Configuring the remote control interfaces System Remote Selecting a remote control interface System menu: Remote… –( ä ) Fig. 4-50 GPIB Ethernet –( ) ä ä Remote dialog box Selects the installed remote control interfaces or turns them off. Configuring the GPIB Remote Remote : GPIB dialog box: GPIB USB –( ) ä↔ä Fig. 4-51 GPIB Address –( ) ä ä 1144.1400.12 Remote dialog box, GPIB A GPIB address in the range 0 to 30 can be selected. RemoteControl SYSTem:COMMunicate:GPIB[:SELF]:ADDRess 4.55 <NR1> E-2 System settings (System menu) R&S NRP Remote control via USB Remote Remote : USB dialog box: GPIB USB –( ) ä↔ä Fig. 4-52 Remote – Dialog, GPIB Remote control of the R&S NRP via the USB is according to the USBTMC standard. For this purpose, a VISA library that supports remote control via the USB is required by the remote-control computer. The VISA library is equipped with the necessary USB device driver. The R&S NRP has a fixed, unchangeable address comprising a manufacturer number (0x0AAD for Rohde & Schwarz), an instrument number (2 for the R&S NRP) and the serial number of the R&S NRP. The serial number can be displayed in the System Info dialog box ( Information about the R&S NRP, page 4.63) and must be completely, as displayed, included in the address. The VISA address string suitable for the device is displayed in the dialog box. Configuring the Ethernet Remote : VXI 11 Remote control of the R&S NRP via Ethernet is according to the VXI-11 standard. Prerequisite for this is the installation of the R&S NRP-B5 option. Due to the complexity of the protocol, the use of a VISA library is also urgently recommended here. The VISA library that is used must support VXI-11. The R&S NRP must have a unique IP address in the Ethernet. This address can be assigned either manually or automatically using the DHCP protocol. Remote dialog box: VXI11 Eth –( ) ä↔ä Fig. 4-53 IP Address –( ) ää 1144.1400.12 Remote – Dialog, GPIB Opens the dialog box for the configuration of the IP address. 4.56 E-2 R&S NRP System settings (System menu) Fig. 4-54 Manual DHCP –( ) ä↔ä IP Address –( ) ä↔ä Mask –( ) ä↔ä Gateway –( ) ä↔ä IP Address – Dialog, Manual Fig. 4-55 IP Address – Dialog, DHCP Selects between configuring the IP address manually or automatically. Remote control SYSTem:COMMunicate:GPIB[:SELF]:ADDRess <NR1> Manual input of IP address. Manual input of network mask. Gateway computer connecting the local network with other networks. For automatic assignment, a DHCP server must be accessible in the network. If the R&S NRP is to be integrated into a larger network, please contact your network administrator regarding the data to be set. If the network consists only of the R&S NRP and the control computer, the two units can be connected with each other directly using a special network crossover cable. The IP addresses are then set manually and can, for example, be selected according to the following table: Table 4-1 IP Address Mask Gateway 1144.1400.12 Example of a network configuration for a direct R&S NRP – PC connection using a crossover cable. R&S NRP PC 192.168.0.2 192.168.0.1 255.255.255.0 255.255.255.0 192.168.0.3 192.168.0.3 4.57 E-2 System settings (System menu) R&S NRP Setting the analog outputs System IO… There are two multifunction BNC connectors at the rear of the R&S NRP. The function of these connectors is specified in the Analog Out dialog box. System menu: IO… –( ) ä Fig. 4-56 Analog … Pass/Fail – ( ä ) Analog Out dialog box Selects the function of port Out 1. In the case of Analog, a voltage is output that is proportional to the value currently displayed in the selected window (Window 1...). In the case of Pass/Fail, a logic signal is output in the selected window (Window 1...) to indicate that a limit value has been exceeded. Remote Control, Analog OUTPut:TTL[1]:STATe[?] OFF;OUTPut:RECorder[1..2]:STATe[?] Pass/Fail OUTPut:RECorder[1..2]:STATe[?] Window 1234 0 V Equivalent –( –( ä 3 V Equivalent ) ä –( ) ) –( ä ) Remote Control OUTPut:RECorder[1..2]:FEED[?] OUTPut:TTL[1]:FEED[?] –( ) ä <float_value> Display value which corresponds to an output voltage of 3 V. Remote Control OUTPut:RECorder[1..2]:LIMit:UPPer[?] <float_value> Logic level within the limits that have been set. The valid range is 0 V to 3.3 V. <float_value> Logic level when there is a limit violation. The valid range is 0 V to 3.3 V. Remote Control OUTPut:TTL[1]:LVOLtage[?] 1144.1400.12 <string> <string> Display value which corresponds to an output voltage of 0 V. Remote Control OUTPut:TTL[1]:HVOLtage[?] Fail ON Specifies the window the output pertains to. Remote Control OUTPut:RECorder[1..2]:LIMit:LOWer[?] ä Pass OFF;OUTPut:TTL[1]:STATe[?] ON 4.58 <float_value> E-2 R&S NRP Analog Out Trigger In System settings (System menu) –( ä ) Selects the function of port I/O 2. In the case of Analog Out, a voltage is output to I/O 2 that is proportional to the value currently displayed in the selected window (Window 1...). In the case of Trigger In, I/O 2 serves as an external trigger input. Remote Control, Analog OUTPut:TTL[1]:STATe[?] ON Trigger In OUTPut:TTL[1]:STATe[?] OFF Background information The voltage at the analog outputs does not follow the power fed to the sensor continuously but rather at discrete points of time. Every time the sensor has transmitted a new measured value to the base unit, i.e. after a time window has been evaluated ( Filter / averaging, page 4.19), the voltage is adjusted to the new value. In the ContAv mode, you can influence the rate at which the voltage is updated with the aid of the sampling window ( Free-running average-power measurements, page 4.8). The time between two updates of the output voltage is approximately twice the length of the sampling window. The lower limit of this length of time, during which the R&S NRP can still regularly update the output voltage, depends on the number of sensors connected and their measurement mode. With a connected sensor in the ContAv mode, it is about 1 ms. Switching on the averaging filter does not affect the refresh rate, but the speed at which the output voltage changes can be expected to slow down as a result of the filter effect. For applications having high requirements on the dynamic behaviour of the analog outputs, for example phase-locked loops, it is advisable to freeze the screen of the R&S NRP to avoid discontinuities caused by writing to the screen memory ( Miscellaneous Operation at low ambient temperatures, page 4.64). 1144.1400.12 4.59 E-2 System settings (System menu) R&S NRP Selftest System Test… While booting up, the R&S NRP performs a system test. The system test is described in Chapter 1, Welcome screen and function test. Hardware faults are reported at this stage. The Selftest dialog box in the System menu is used to check the keyboard and the display and to start a selftest function in the sensors. System menu: Test… –( ) ä Fig. 4-57 Keyboard… –( ) ä ä Selftest dialog box Opens the dialog box for testing the keyboard. Display Test Patterns –( ) Displays a sequence of different test patterns for checking the display. The procedure can be aborted by pressing any key. Sensor A B ... Test Sensor –( ) The right-hand softkey starts a hardware test function in the sensor selected with the left-hand softkey. ä ä ä ä Remote Control SYSTem:SENSor[1..4]:TEST? Test Sensor Details 1144.1400.12 –( ) ä ä Opens a window containing detailed data of the sensor test. 4.60 E-2 R&S NRP System settings (System menu) Keyboard test Selftest : Keyboard… In the keyboard selftest dialog box, the keys can be pressed in any order. Each time a key is pressed, there is acoustic feedback and the detected key is marked. If a key is pressed more than once a warning is output. This means that specific keys or the whole keyboard can be tested. This dialog box can be quit only if the [¶] symbol appears on the right of the title bar. This symbol appears either after all keys have been pressed or when no key has been pressed for 15 seconds. Selftest dialog box: Keyboard… –( ) ä Fig. 4-58 Selftest Keyboard dialog box The first stage in testing the whole keyboard is to press all the keys in any order without checking each response in the display. If each key has been activated once and only once, an OK message is output and the test is over. Keys that are not activated during the test do not output a tone and afterwards do not exhibit any marking. If a keystroke, e.g. due to a short, activates several keys, a warning message is output during the test. You should then repeat the test, observing the response on the display intensively. 1144.1400.12 4.61 E-2 System settings (System menu) R&S NRP Test generator System Power Ref How to use the test generator (option R&S NRP-B1) for Zeroing is described on page 4.3. As it is a high-precision generator with an output power of 1 mW at 50 MHz, it can also be used for other applications. System menu: Power Ref Off On –( ) ä ä Switches the test generator on/off. Remote Control OUTPut:ROSCillator[:STATe][?] ON | OFF System information Information about sensors System Info Sensor The following information about connected power sensors can be obtained with the Info:Sensor dialog box: • Type and material number of sensor • Serial number • Software status • Date of last calibration • Frequency and power ranges • Other technical data System menu: Info Sensor… –( ) ä Fig. 4-59 1144.1400.12 Sensor Info dialog box 4.62 E-2 R&S NRP A|B|C|D System settings (System menu) –( ) ä↔ä Tabs for selecting the sensor. (¶Menu ) This dialog box can be closed with the (¶Menu ) key. (â) (ô) The up/down cursor keys can be used to scroll the window contents if they cannot all be viewed simultaneously. Remote Control SYSTem:SENSor[1..4]:INFO? [<string>] Tip The possible values for the <string> parameter are exactly the same as the items shown in this dialog, e.g. "Manufacturer" or "HWVersion". Thus, the values available for a specific sensor model are very easy to determine. Information about the R&S NRP System Info System The Info:System dialog box displays the following basic-device characteristics: • Type and material number of sensor • Serial number • Software status of system, BIOS and keyboard controller • Installed options • Memory expansions • Ethernet MAC address (for instruments with option R&S NRP-B4 installed) System menu: Info System… –( ) ä Fig. 4-60 System Info dialog box (¶Menu ) The dialog box can be closed with the (¶Menu ) key. (â) (ô) The up/down cursor keys can be used to scroll the window contents if they cannot all be viewed simultaneously. Remote Control SYSTem:INFO? 1144.1400.12 [<string>] 4.63 E-2 System settings (System menu) R&S NRP Miscellaneous Operation at low ambient temperatures System Miscellaneous The built-in acoustic alarm can be configured in the Misc dialog. At very low ambient temperatures, the display becomes sluggish and the rapidly changing decimal places at the end of the reading in particular cannot be reliably determined. To improve readability under these circumstances, you can reduce the display update rate. System menu: Misc… –( ) ä ä Fig. 4-61 Beep Overload –( ) ä ä Miscellaneous dialog box Activates an acoustic alarm when the sensor is overloaded. Remote Control SYSTem:BEEPer:NOTify:OVERload[?] ON | OFF Beep Limit Warning –( ) Activates or deactivates an acoustic alarm when there is a limit violation simultaneously in all measurement windows. ( Limit monitoring, page 4.40). Beep Key Click –( ) Activates acoustic feedback to indicate when a key is pressed. ä ä ä ä Remote Control SYSTem:BEEPer:NOTify:KEY[?] ON | OFF Display Update –( Normal Slow Freeze ä ) ä Switches the rate at which the new measured values are displayed between Normal, Slow and Freze. The Slow setting has been provided with very low ambient temperatures in mind If one of the analog outputs is being used and a time resolution of a few milliseconds is needed, the screen contents can be frozen. Otherwise the picture setup leads to brief interruptions at the analog output. Remote Control DISPlay:UPDate[?] NORMal | SLOW | FREeze 1144.1400.12 4.64 E-2 R&S NRP Messages and alarms Messages and alarms Overload One or more sensors are subjected to overload. Caution! Overload can destroy the sensor (depending on amount and duration of overload). The upper measurement limit is specified in the data sheet for the sensor. The nominal value of the upper measurement limit is also displayed in the Sensor Info dialog box ( System information, page 4.62). An alarm sounds when the message is displayed. The alarm can be disabled in the Misc dialog box ( Miscellaneous, page 4.64). Overrange This message is displayed only if the Auto range function is off. It indicates that the permissible range has been exceeded. ( Measurement ranges, page 4.22). Measurement aborted Trunc. Meas. is displayed when there is an overflow of the sensor-internal buffer for samples. Overflow occurs if a burst is too long. 1144.1400.12 4.65 E-2 Messages and alarms R&S NRP Resolution reduced in the Scope mode The settings require a sampling rate located outside the range supported by the sensor. Thus, the number of sampled points is temporarily reduced. Hardware error A sensor has detected a hardware error. Automatic window initialization If an additional sensor is connected to the R&S NRP during operation and if no currently open window displays the values measured in the channel concerned, the R&S NRP automatically offers to open a window and to configure it for measurements with the additional sensor connected. The previous settings of the newly opened window are lost. To prevent this, we recommend you to cancel with the (ESC) key and to manually configure a window. 1144.1400.12 4.66 E-2 R&S NRP Table of Contents Chapter 5 Table of Contents 5 Remote Control - Fundamentals ..................................................................................5.1 Differences between Remote Control and Manual Control..........................................................5.1 Display ........................................................................................................................................5.1 Measurement Modes ..................................................................................................................5.2 Calculate Blocks .........................................................................................................................5.2 Connecting a Controller to the Base Unit ......................................................................................5.3 Settings in Base Unit ..................................................................................................................5.3 Hardware Requirements.............................................................................................................5.3 IEC/IEEE Bus..................................................................................................................5.3 Switchover to Remote Control (REMOTE) .....................................................................................5.3 Return to Manual Operation (LOCAL) ............................................................................................5.3 Communication on Data Lines........................................................................................................5.4 Interface Messages ....................................................................................................................5.4 Device-Dependent Messages (Commands and Responses) ....................................................5.4 Commands......................................................................................................................5.4 Responses ......................................................................................................................5.5 Structure and Syntax of Device-Dependent Messages ................................................................5.6 SCPI Standard ............................................................................................................................5.6 Command Structure....................................................................................................................5.6 Common Commands ......................................................................................................5.6 Device-Specific Commands............................................................................................5.7 Structure of a Program Message................................................................................................5.9 Responses to Queries ..............................................................................................................5.10 Parameters ...............................................................................................................................5.11 Device Model and Command Processing ....................................................................................5.13 Input Unit...................................................................................................................................5.13 Command Identification (Parser) ..............................................................................................5.13 Data Base and Device Hardware .............................................................................................5.13 Status Reporting System ..........................................................................................................5.14 Output Unit................................................................................................................................5.14 Command Sequence and Command Synchronization ............................................................5.14 Annex: Automatic Settings for Manual Selection of a Measurement Mode.............................5.15 Annex: Correspondence between Remote Control and Manual Control .................................5.17 1144.1400.12 I-5.1 E-3 List of Figs. and Tables Chapter 5 R&S NRP Figs. Fig. 5-1: SCPI command tree ..................................................................................................................5.7 Fig. 5-2: Device model for remote control .............................................................................................5.13 Tables Table 5-1: Synchronization with *OPC, *OPC? and *WAI...................................................................5.14 Table 5-2: Automatic settings for manual selection of a measurement mode ......................................5.15 Table 5-3: Correspondence between remote control and manual control ............................................5.17 1144.1400.12 I-5.2 E-3 R&S NRP Remote Control - Fundamentals 5 Remote Control - Fundamentals The Power Meter R&S NRP is equipped with an interface that can be connected to a controller for remote control. • • • IEC/IEEE-bus interface (standard equipment) in line with the standards IEC 60625.1 (IEEE 488.1) and IEC 60625.2 (IEEE 488.2) Ethernet 10/100 BASE T interface. USB interface for remote control and firmware update. Connectors are installed at the rear of the power meter. The two interfaces support the SCPI (Standard Commands for Programmable Instruments) standard, version 1999.0 of May 1999. The SCPI standard is based on the IEEE 488.2 standard and defines a standardized command language for controlling measuring and test instruments with functions beyond the scope of the IEEE 488.2 standard. In addition to the commands, error handling and status management are also described. The present Chapter explains the differences between remote control and manual control, familiarizes the user with fundamentals of remote control and describes the status reporting system as well as the procedure for connecting a PC for remote control. Differences between Remote Control and Manual Control The manual control of the R&S NRP is designed for ergonomic operation. This means, among other things, that certain parameters are assigned default values that cannot be changed and that specific changes of device settings influence other settings. In the remote control mode, all settings can be changed and the user has to make sure that the device is correctly set for the measurement to be performed. We therefore recommend performing a reset (*RST or Æ SYSTem:PRESet, page 6.98) prior to a remote control measurement so that the device is placed in a defined state. Display In the REMOTE mode, the display of measured values can be disabled (SYSTem:SPEed FAST); the display is cleared except for a status line at the top of the screen. Blanking of menu elements that need not be continually updated increases the data processing speed. The display can be reactivated with the SCPI command SYSTem:SPEed NORMal. The backlighting can also be completely switched off with DISPlay:ILLumination OFF. In the remote mode, the menu line at the upper screen edge is blanked and replaced by the indication "Remote Mode". The SCPI error queue can be displayed using the topmost softkey (labelled "Error List..."). If the LLO character is displayed in the upper status line, the keyboard including (ESC/LOCAL) has been disabled via the LLO command. In this case, returning to local mode is only possible with the remote control command GTL or by a power-on reset. 1144.1400.12 5.1 E-3 Remote Control - Fundamentals R&S NRP Measurement Modes To simplify operation in the manual mode, preset values are used in some cases for the trigger system (TRIGger command) and the timing of the measurement (SENSe[1..4]:TIMing:EXCLude:STARt and :STOP) when the measurement mode (ContAv, Burst, Timeslot, Scope) is selected (Æ Table 5-2). This is not the case in the remote control mode. Here the trigger system and the timing can be configured by the user as required. Calculate Blocks The R&S NRP manages 8 internal calculate blocks. Each calculate block has two input channels (primary and secondary channel) to which one of up to 4 power sensors can be assigned. The channels can be processed together by means of a selectable function. The result is available at the output of the calculate block. In the manual mode, the measurement results of the first four calculate blocks (Æ "CALCulate System", page 6.10) are shown in windows 1 to 4, while 8 calculate blocks are available in the remote control mode. 1144.1400.12 5.2 E-3 R&S NRP Remote Control - Fundamentals Connecting a Controller to the Base Unit Settings in Base Unit Before a link can be established between the controller and the R&S NRP, the R&S NRP must be assigned an IEC/IEEE-bus address. In the manual control mode, this is done in the SystemÆRemote menu. IEC/IEEE bus configuration: ¾ Select GPIB as the active interface. ¾ Set the GPIB address to the desired value. Any value between 0 and 30 is permissible. Hardware Requirements IEC/IEEE Bus In order to control the R&S NRP via the IEC/IEEE bus, a controller with an IEC/IEEE-bus interface and an IEC/IEEE-bus cable are required. Switchover to Remote Control (REMOTE) A link has been established between the controller and the R&S NRP and is assumed to have been correctly configured. After power up, the R&S NRP is always in the manual control mode (LOCAL). The R&S NRP is switched to remote control irrespective of the selected interface as soon as an SCPI command is sent to the R&S NRP. All settings are maintained when the device is switched to the REMOTE mode. Return to Manual Operation (LOCAL) In the remote mode, all front-panel controls are disabled. except for the (ESC/LOCAL) key and the topmost toggle softkey used to insert the window with the SCPI error queue. The device remains in this state until it is switched back to manual control either on the front panel (ESC/LOCAL)) or with the remote control command GTL. Note: 1144.1400.12 The remote control command LLO also allows the (ESC/LOCAL) key to be disabled. In this case, return to manual operation is only possible by remote control or by switching the R&S NRP off and on again (Power On Reset). 5.3 E-3 Remote Control - Fundamentals R&S NRP Communication on Data Lines The IEC/IEEE bus is the most common remote interface for measuring devices. It has also been implemented in the R&S NRP. The remote controller and the R&S NRP communicate by means of messages. The messages sent on the data lines (Æ section "Interfaces", page 6.124) can be divided into two groups: • • Interface messages Device-dependent messages Interface Messages Interface messages are transmitted on the data lines of the IEC/IEEE bus when the ATN control line is active. Interface messages allow the controller and the device to communicate and can only be sent by a controller which serves as the IEC/IEEE-bus controller. Interface commands can be further classified as • • common commands addressed commands Common commands affect all devices connected to the IEC/IEEE bus without requiring an address, whereas addressed commands only affect devices addressed as a listener. The interface messages relevant for the device are described in the annex Æ "Interface Messages", page 6.127. Device-Dependent Messages (Commands and Responses) Device-dependent messages are transmitted on the data lines of the IEC/IEEE bus when the ATN control line is not active. The ASCII code is used. Device-dependent messages are classified according to the direction in which they are sent: Commands are messages sent by the controller to the R&S NRP. They control the device functions and request information. The commands are classified according to the effect they have on the device: Setting commands trigger device settings, e.g. an device reset or a configuration of the trigger system. Queries cause device data to be provided in the output queue, where they can be fetched via the IEC/IEEE bus. Queries are available for most of the setting commands. They are obtained by adding a question mark to the setting command. 1144.1400.12 5.4 E-3 R&S NRP Remote Control - Fundamentals according to their definition in the IEEE 488.2 and SCPI 1999.0 standard: Common commands are precisely defined in the IEEE 488.2 standard in terms of function and notation. They relate to functions such as the management of standardized status registers, resetting and self test. Device-specific commands relate to functions that depend on device characteristics such as the frequency setting. Most of these commands are also standardized by the SCPI Consortium (Æ "SCPI Standard", page 5.6). The standard allows device-specific extensions of commands. Parallelism: Overlapping commands can be executed while another command is being executed. Sequential commands can only be executed when the execution of all other commands is completed. Note: In the R&S NRP, only the remote control commands INIT:IMM and CAL:ZERO:AUTO ONCE can overlap with other commands. Responses are messages sent by the device to the controller after a query. This may be measurement results, for instance, or device status information. 1144.1400.12 5.5 E-3 Remote Control - Fundamentals R&S NRP Structure and Syntax of Device-Dependent Messages SCPI Standard SCPI (Standard Commands for Programmable Instruments) describes a standardized command set for the programming of instruments regardless of the type of instrument or manufacturer. The objective of the SCPI Consortium is to standardize device-specific commands as far as possible. For this purpose, a device model has been developed which defines identical functions within a device or between different devices. Command systems have been created and assigned to these functions so that it is possible to address identical functions with the same commands. The command systems have an hierarchical structure. Fig. 5-1 shows this tree structure, using details from the SENSe command system which selects the measurement to be performed by the device. Most of the other examples of command syntax and structure are taken from this command system. SCPI is based on the IEEE 488.2 standard, i.e. it uses the same syntax elements and the common commands defined in IEEE 488.2. The syntax of the responses is subjected to somewhat stricter rules than those specified by the IEEE 488.2 standard (Æ section "Responses to Queries", page 5.10). Command Structure Commands consist of a header and usually one or several parameters. Header and parameters are separated by a white space (ASCII code 0 to 9, 11 to 32 decimal, e.g. space). The headers may be composed of several keywords. The query is created by appending a question mark directly to the header. Common Commands Device-independent commands consist of a header preceded by an asterisk (*) The header may be followed by one or several parameters. Examples: *RST Reset, resets the device. *ESE 253 Event Status Enable, sets the bits of the Standard Event Status Enable Register. *ESR? Event Status Query, queries the contents of the Standard Event Status Register. 1144.1400.12 5.6 E-3 R&S NRP Remote Control - Fundamentals Device-Specific Commands Hierarchy Device-specific commands have a hierarchical structure (Æ Fig. 5-1). The various levels are represented by compound headers. Headers at the highest level (root level) have one keyword only. This keyword describes an entire command system. Example: SENSe[1..4] This keyword denotes the command system SENSe<n>. For lower-level commands, the full path has to be specified, starting with the highest level in the left-most position. The individual keywords are separated by a colon ":". Example: SENSe[1..4]:TRACe:POINts <int_value> This command is at the third level of he SENSE system and sets the number of test points for the Scope mode. SENSe FREQuency AVG FUNCtion TSLot POWer BURSt SWEep OFFSet POINts Fig. 5-1: SCPI command tree Some keywords are used at several levels within a command system. Their effect depends on the command structure, i.e. on their position in the command header. Example: SENSe1:TRACe:POINts <int_value> This command contains the POINts keyword in the third level. Example: SENSe1:TRACe:OFFSet:POINts <int_value> This command contains the POINts keyword in the fourth level. It defines the time offset for the display of points in the Scope mode. Optional keywords: In some command systems certain keywords can be inserted into or removed from the header. These keywords are shown in the manual in square brackets. For reasons of compatibility with the SCPI standard, the device must be able to recognize the full length of the command. Some of the commands become considerably shorter when the optional keywords are omitted. Example: [SENSe1]:POWer:TSLot:COUNt 6 1144.1400.12 5.7 E-3 Remote Control - Fundamentals R&S NRP This command sets the number of timeslots in the Timeslot mode to 6. The following command has the same effect. :POWer:TSLot:COUNt 6 Note: An optional keyword cannot be omitted if its effect is specified in more detail by a numeric suffix. Example: SENSe2:POWer:TSLot:COUNt 6 in short form: SENSe2:POWer:TSLot:COUNt 6 Long and short The keywords have a long and a short form. The keyword may be entered in short form or in long form; other abbreviations are not allowed. The short form uses the first four characters of the long form. If the fourth character is a vowel and the long form consists of more than four characters, only the first three characters are used for the short form. The short form is shown by upper-case characters, and the long form is the entire keyword. Example: STATus:QUEStionable:ENABle 1 and STAT:QUES:ENAB 1 Note: Parameters Upper- and lower-case letters are only used for identifying the long and short form in the manual; the device itself does not differentiate between the two types of characters. The parameter must be separated from the header by a white space. If a command contains several parameters, they have to be separated by a comma (,). Some of the commands allow the specification of the parameters MINimum, MAXimum and DEFault. For a description of the parameter types see Æ section Parameters, page 5.11. Example: SENSe1:TIMing:EXCLude:STARt? MINimum Response: 0 This query asks for the minimum setting value. Numeric suffix If a device has several identical functions or features, e.g. inputs, the desired function can be selected by a suffix to the command. Commands without a suffix are interpreted as having a suffix of 1. Example: SENSe2:FUNCtion "POWer:AVG" This command sets the measurement mode of sensor 2 to the ContAv mode 1144.1400.12 5.8 E-3 R&S NRP Remote Control - Fundamentals Structure of a Program Message A program message may contain one or several commands. Several commands in a program message are separated by a semicolon (;). If the next command belongs to a different command system, the semicolon is followed by a colon. The colon stands for the root node of the command tree. Example: SYSTem:TIME 20,30,00;:SENSe:FUNCtion "POWer:AVG" This program message contains two commands. The first command belongs to the SYSTem system and is used to set the time of the system clock. The second command belongs to the SENSe system and must be preceded by a colon. Otherwise confusion might be caused if the SYSTem tree also had a subordinate SENSe node. In this case, it would be possible to omit the introductory keyword SYSTem. (see the following explanation:) If the successive commands belong to the same system and therefore have one or several common levels, the program message may be abbreviated. The second command following the semicolon then starts at the level that is below the common levels. The colon after the semicolon must be omitted in this case. Example: SENSe2:TIMing:STARt 10; SENSe2:TIMing:STOP 10 This program message contains two commands separated by a semicolon. Both commands belong to the SENSe system and its TIMing subsystem, i.e. they have two common levels. In the abbreviated program message the second command starts at the level below SENSe:TIMing. The colon after the semicolon has to be omitted. The short form of the program message is: SENSe2:TIMing:STARt 10; STOP 10 A new program message always starts with the full path however. Example: SENSe2:TIMing:STARt 10 SENSe2:TIMing:STOP 10 Note: Processing of a program message is aborted if an error occurs. If only sensor 2 is connected to a multichannel device, for example, the program message SENS1:FREQ 50 GHZ;:SENS2:FREQ 50 GHZ will be aborted after the first command and a second frequency setting will not be performed. 1144.1400.12 5.9 E-3 Remote Control - Fundamentals R&S NRP Responses to Queries Unless otherwise expressly specified, a query is defined for each command. The query is created by appending a question mark to the associated command. Some of the SCPI rules for query responses are stricter than those of the IEEE 488.2 standard: 1. The required value is sent without header. Example: SENSe:AVERage:TCONTrol? Response: MOV 2. Maximum and minimum values as well as all other quantities queried by a special text parameter are returned as numeric values. Example: SENSe:POWer:TSLot:COUNt? MAXimum Response: 26 3. Numeric values are output without a unit. Physical quantities refer to the basic units or to the units set with the UNIT command. Example: SENSe3:FREQuency? Response: 1.000000E06 (for 1 MHz) 4. Boolean values are returned as 0 (for OFF) and 1 (for ON). Example: SYSTem:BEEPer:STATe? Response: 1 5. Character data is returned in short form (Æ also see section "Parameters", page 5.11). Example: UNIT2:POWer? Response: DBM 1144.1400.12 5.10 E-3 R&S NRP Remote Control - Fundamentals Parameters Most commands require the specification of a parameter. Parameters must be separated from the header by a white space. Parameters may be specified as numeric values, Boolean parameters, character data, strings or block data. The type of parameter required for the specific command as well as the permissible value range are described together with the commands. Numeric values Numeric values may be entered in any customary form, i.e. with sign, decimal point and exponent. If the values exceed the resolution of the device, they will be rounded off. Values between -9.9E37 and +9.9E37 can be entered. The exponent is denoted by "E" or "e". The exponent alone must not be used. Units Physical quantities may be stated with the unit. Permissible prefixes for the unit are G (Giga), MA (Mega, MHZ is also allowed), K (kilo), M (milli), U (micro) and N (nano). If no unit is specified, the basic unit will be used. Some settings allow relative values to be stated in "One" and percent. According to SCPI, these units are represented by the strings O or DPCT. The unit DPCT designates the deviation of a measurand from 100%. A power ratio of 95% thus corresponds to -5 ∆%. Unit used in the R&S NRP SCPI notation Watt W dBm DBM dBµV DBUV dB DB 1 O ∆% DPCT Hertz HZ Second S Example: SENSe1:FREQuency 1.5 GHZ is equivalent to SENSe1:FREQuency 1.5E9 Special numeric values The parameters MINimum, MAXimum, and DEFault are interpreted as special numeric values. The numeric value is returned in response to a query. Example: Command: SENSe2:POWer:APERture MAXimum Query: SENSe2:POWer:APERture? Response: 1.000000E02 1144.1400.12 MIN/MAX MINimum and MAXimum denote the minimum and maximum value. DEF DEFault denotes a preset value. This value is identical to the basic setting called by the *RST command. NAN Not A Number (NAN) stands for 9.91E37. NAN is only sent as a device response. This value is not defined. NAN is typically returned for dividing by zero, subtracting a value from infinity and representing missing data. 5.11 E-3 Remote Control - Fundamentals Boolean parameters R&S NRP Boolean parameters represent two states. The ON state (logical true) is represented by ON or a numeric value other than 0. The OFF state (logical false) is represented by OFF or the numeric value 0. Queries yield 0 or 1. Example: Command: SENSe:POWer:BUFFered ON Query: SENSe:POWer:BUFFered? Response: 1 Character data Character data follows the syntax rules for keywords, i.e. it also has both a short and a long form. They must be separated from the header by a white space same as any parameter. A query returns the short form of the character data. Example: Command: SENSe2:AVERage:TCONTrol MOVING Query: SENSe2:AVERage:TCONTrol? Response: MOV Strings Strings must always be indicated in single or double quotes. Example: SENSe1:FUNCtion:ON "POWer:AVG" or SENSe1:FUNCtion:ON 'POWer:AVG' Block data The block data format is suitable for the transmission of large data volumes. A command with a block data parameter has the following structure: Example: DISPlay:PIXMap? Response: #49600xxxxxxxx..... The ASCII character # denotes the beginning of the data block. The next numeral specifies the number of subsequent digits defining the length of the data block. In the example above, the four digits specify a length of 9600 bytes. The data bytes follow next. During transmission of these data bytes, all terminators and other control data are ignored. Coupled commands Setting one command influences the value of another command. According to SCPI 1999, this should be avoided but it makes sense when user-friendly highlevel measurement commands are to be provided to configure an entire section of the device at once. The high-level commands CONF, FETCh, READ and MEASure are therefore an exception to this rule. 1144.1400.12 5.12 E-3 R&S NRP Remote Control - Fundamentals Device Model and Command Processing The device model shown in Fig. 5-2 was prepared from the point of view of the processing of remote control commands. The individual components operate independently of each other and simultaneously. They communicate with each other by means of messages. Data set IEC/IEEE Bus Input unit Ethernet Input unit Command identification (parser) Device hardware Output unit IEC/IEEE Bus Output unit Ethernet Status reporting system Fig. 5-2: Device model for remote control Input Unit The input unit receives the commands in the form of characters from the remote control interface and collects them in the input buffer. The input unit sends a message to the command identification as soon as the input buffer is full or as soon as it receives a delimiter. The received data is processed in the parser (command identification). Command Identification (Parser) The parser analyzes the data received from the input unit. Data is processed in the sequence in which it was received. Syntax errors in the command are recognized and passed on to the status reporting system. Following the syntax test, the value range of the data is verified and the setting is adapted. Only after the command has been completely executed will the next command be processed. Data Base and Device Hardware The term "device hardware" refers to that part of the device which performs the measurement function. The data base contains all parameters required for setting the device hardware. Setting commands cause a modification of the data set. Before the data is entered in the data set, it is verified for compatibility both with the other data and with the device hardware. If the setting is not possible, an error message will be sent to the status reporting system and the setting will be ignored. After successful completion of the verification, the setting will immediately be performed. If the setting influences the result calculation, the MEASuring bit is set in the status operation register until new measured values are available. The MEASuring bit is described in more detail in the Status Reporting System section that follows. This bit may be used for the synchronization of command processing. Queries cause the data-set management to send the desired data to the output unit. 1144.1400.12 5.13 E-3 Remote Control - Fundamentals R&S NRP Status Reporting System The status reporting system collects information on the device status and makes it available to the output unit on request. Structure and function of this system are described in the following section. Output Unit The data output unit collects the information requested by the controller from the data set management. It processes the information in line with the SCPI rules and makes it available in the output buffer. Command Sequence and Command Synchronization All commands are executed in the order in which they are sent. There is no overlapping of command processing. (Exception: the commands INIT and CAL:ZERO:AUTO ONCE.) The user therefore can determine the sequence of execution. If a long program message is terminated by *OPC or *OPC?, the end of command processing is signalled to the controller, provided the controller has been adequately programmed (Æ Table 5-1). Table 5-1: Synchronization with *OPC, *OPC? and *WAI Command Effect Programming of controller *OPC Sets the Operation Complete bit in the ESR after all commands sent prior to *OPC have been processed. Set bit 0 in the ESE of the R&S NRP. Set bit 5 in the SRE of the R&S NRP. Wait for service request (SRQ). *OPC? Writes 1 in the output buffer after all commands sent prior to *OPC? have been processed. IEC/IEEE bus: the R&S NRP is addressed as a talker. *WAI Commands can be sent but they are only executed after completion of all commands sent prior to *WAI. *WAI is sent directly after the command that should be completed before other commands can be executed. Dividing commands timewise before/after *WAI serializes the command sequence. 1144.1400.12 5.14 E-3 R&S NRP Remote Control - Fundamentals Annex: Automatic Settings for Manual Selection of a Measurement Mode When the measurement mode of a sensor is manually selected (SensorÆMode), automatic settings are made for the trigger system and timing, which cannot be changed by manual control. This considerably simplifies operation. These settings are not changed when the measurement mode is selected by remote control (SENSe:FUNCtion) and have to be set to the desired value by appropriate SCPI commands. The following table lists the respective setting capabilities and the values that are automatically set in manual control. Table 5-2: Automatic settings for manual selection of a measurement mode Mode ContAv Burst Timegate SCPI command Value Remark TRIGger[1..4]:SOURce IMMediate Cannot be modified in manual mode. TRIGger[1..4]:SLOPe - Unchanged, is irrelevant. TRIGger[1..4]:COUNt 1 Cannot be modified in manual mode. TRIGger[1..4]:DELay - Unchanged, is irrelevant. TRIGger[1..4]:HOLDoff 1 NS Cannot be modified in manual mode. TRIGger[1..4]:LEVel - Unchanged, is irrelevant. [SENSe[1..4]]:TIMing:EXCLude:STARt - Unchanged, is irrelevant. [SENSe[1..4]]:TIMing:EXCLude:STOP - Unchanged, is irrelevant. INITiate[1..4]:CONTinuous ON Cannot be modified in manual mode. TRIGger[1..4]:SOURce - Unchanged, is irrelevant. TRIGger[1..4]:SLOPe - Unchanged, is irrelevant. TRIGger[1..4]:COUNt 1 Cannot be modified in manual mode. TRIGger[1..4]:DELay - Unchanged, is irrelevant. TRIGger[1..4]:HOLDoff Depends on sensor User-selectable. TRIGger[1..4]:LEVel Depends on sensor User-selectable. [SENSe[1..4]]:TIMing:EXCLude:STARt Depends on sensor User-selectable. [SENSe[1..4]]:TIMing:EXCLude:STOP Depends on sensor User-selectable. INITiate[1..4]:CONTinuous ON Cannot be modified in manual mode. TRIGger[1..4]:SOURce EXTernal | INTernal User-selectable. TRIGger[1..4]:SLOPe POSitive | NEGative User-selectable. TRIGger[1..4]:COUNt 1 in der HB nicht veränderbar TRIGger[1..4]:DELay Depends on sensor User-selectable. TRIGger[1..4]:HOLDoff Depends on sensor User-selectable. TRIGger[1..4]:LEVel Depends on sensor User-selectable. [SENSe[1..4]]:TIMing:EXCLude:STARt - Unchanged, is irrelevant. [SENSe[1..4]]:TIMing:EXCLude:STOP - Unchanged, is irrelevant. INITiate[1..4]:CONTinuous ON Cannot be modified in manual mode. 1144.1400.12 5.15 E-3 Remote Control - Fundamentals Mode Timeslot Scope SCPI command R&S NRP Value Remark TRIGger[1..4]:SOURce EXTernal | INTernal User-selectable. TRIGger[1..4]:SLOPe POSitive | NEGative User-selectable. TRIGger[1..4]:COUNt 1 Cannot be modified in manual mode. TRIGger[1..4]:DELay Depends on sensor User-selectable. TRIGger[1..4]:HOLDoff Depends on sensor User-selectable. TRIGger[1..4]:LEVel Depends on sensor User-selectable. [SENSe[1..4]]:TIMing:EXCLude:STARt - Unchanged, is irrelevant. [SENSe[1..4]]:TIMing:EXCLude:STOP - Unchanged, is irrelevant. INITiate[1..4]:CONTinuous ON Cannot be modified in manual mode. TRIGger[1..4]:SOURce EXTernal | INTernal User-selectable. TRIGger[1..4]:SLOPe POSitive | NEGative User-selectable. TRIGger[1..4]:COUNt 1 Cannot be modified in manual mode. TRIGger[1..4]:DELay 0 S Cannot be modified in manual mode. TRIGger[1..4]:HOLDoff Depends on sensor User-selectable. TRIGger[1..4]:LEVel Depends on sensor User-selectable. [SENSe[1..4]]:TIMing:EXCLude:STARt 0 S Cannot be modified in manual mode. [SENSe[1..4]]:TIMing:EXCLude:STOP 0 S Cannot be modified in manual mode. INITiate[1..4]:CONTinuous ON Cannot be modified in manual mode. 1144.1400.12 5.16 E-3 R&S NRP Remote Control - Fundamentals Annex: Correspondence between Remote Control and Manual Control Table 5-3 compares the control elements of the graphical user interface for manual control with the SCPI commands for remote control in order to simplify the transfer of manual control procedures to a remote control program. Table 5-3: Correspondence between remote control and manual control Menu item in manual control SCPI command in short form SensorÆMode SENS[1..4]:FUNCtion SensorÆModeÆContAvÆWindow SENS[1..4]:POW:APER SensorÆModeÆContAvÆSampling Rate SENS[1..4]:SAMP SensorÆModeÆContAvÆDutyCycle SENS[1..4]:CORR:DCYC SensorÆModeÆContAvÆDutyCycle SENS[1..4]:CORR:DCYC:STAT SensorÆModeÆBurstÆDropout SENS[1..4]:BURSt:DTOL SensorÆModeÆBurstÆSmoothing of Modulated Signals SENS[1..4]:SMO:STAT SensorÆModeÆBurstÆExclude Start SENS[1..4]:TIM:EXCL:STAR SensorÆModeÆBurstÆExclude Stop SENS[1..4]:TIM:EXCL:STOP SensorÆModeÆTimeslotÆNo. of Timeslots SENS[1..4]:POW:TSL:COUN SensorÆModeÆTimeslotÆNominal Width SENS[1..4]:POW:TSL:WIDT SensorÆModeÆTimeslotÆExclude Start SENS[1..4]:TIM:EXCL:STAR SensorÆModeÆTimeslotÆExclude Stop SENS[1..4]:TIM:EXCL:STOP SensorÆModeÆT'gateÆGate # SENS[1..4]:SWE:SEL SensorÆModeÆT'gateÆStart of Gate SENS[1..4]:SWE[1..4]:OFFS:TIME SensorÆModeÆT'gateÆEnd of Gate Sum of SENS[1..4]:SWE[1..4]:OFFS:TIME and SENS[1..4]:SWE[1..4]:TIME SensorÆModeÆScopeÆPoints SENS[1..4]:TRAC:POIN SensorÆModeÆScopeÆRealtime SENS[1..4]:TRAC:REAL SensorÆOffsetÆGlobal SENS[1..4]:CORR:OFFS SENS[1..4]:CORR:OFFS:STAT 1144.1400.12 5.17 E-3 Remote Control - Fundamentals R&S NRP SensorÆOffsetÆTable SENS[1..4]:CORR:FDOT SENS[1..4]:CORR:FDOT:STAT SensorÆOffsetÆEdit Table... see MEMory SensorÆOffsetÆS Parameter Device SENS[1..4]:CORR:SPD:STAT SensorÆFilterÆAuto SENS[1..4]:AVER:COUN:AUTO In Scope mode: SENS[1..4]:TRAC:AVER:COUN:AUTO SensorÆFilterÆLength SENS[1..4]:AVER:COUN In Scope mode: SENS[1..4]:TRAC:AVER:COUN SensorÆFilterÆAuto Once SENS[1..4]:AVER:COUN:AUTO ONCE In Scope mode: SENS[1..4]:TRAC:AVER:COUN:AUTO ONCE SensorÆFilterÆAuto Config...ÆNormal SENS[1..4]:AVER:COUN:AUTO:TYPE RES In Scope mode: SENS[1..4]:TRAC:AVER:COUN:AUTO:TYPE RES Menu item in manual control SCPI command in short form SensorÆFilterÆAuto Config...ÆFixed Noise SENS[1..4]:AVER:COUN:AUTO:TYPE NSR In Scope mode: SENS[1..4]:TRAC:AVER:COUN:AUTO:TYPE NSR SensorÆFilterÆAuto Config...ÆFixed NoiseÆRef Timeslot # SENS[1..4]:AVER:COUN:AUTO:SLOT In Scope mode: SENS[1..4]:TRAC:AVER:COUN:AUTO:SLOT SensorÆFilterÆAuto Config...ÆFixed NoiseÆNoise Content SENS[1..4]:AVER:COUN:AUTO:NSR In Scope mode: SENS[1..4]:TRAC:AVER:COUN:AUTO:NSR SensorÆFilterÆAuto Config...ÆFixed NoiseÆMax. Settl. Time SENS[1..4]:AVER:COUN:AUTO:MTIM In Scope mode: SENS[1..4]:TRAC:AVER:COUN:AUTO:MTIM SensorÆRangeÆAuto SENS[1..4]:RANG:AUTO SensorÆRangeÆPath SENS[1..4]:RANG SensorÆRangeÆUser def'd Crossover SensorÆRangeÆLevel SENS[1..4]:RANG:CLEV SensorÆRF SourceÆSource Γ considered SENS[1..4]:SGAM:CORR:STAT SensorÆRF SourceÆPhase of Source Γ SENS[1..4]:SGAM:PHAS SensorÆRF SourceÆMagnitude of Source Γ SENS[1..4]:SGAM SensorÆTriggerÆDelay TRIG[1..4]:DEL 1144.1400.12 5.18 E-3 R&S NRP Remote Control - Fundamentals SensorÆTriggerÆSource TRIG[1..4]:SOUR TRIG[1..4]:SLOP SensorÆTriggerÆLevel TRIG[1..4]:LEV SensorÆTriggerÆAdvanced...ÆHoldoff TRIG[1..4]:HOLD SensorÆTriggerÆAdvanced...Æ Hyseresis TRIG[1..4]:HYST SensorÆTriggerÆAdvanced...ÆSingle There is no remote control command. The functionality can only be achieved with an appropriate trigger system configuration (e.g. INIT:CONT ON;TRIG:SOUR BUS and triggering with *TRG). WindowsÆWindow 1234 DISP:SEL WindowsÆOpen/Close DISP[1..4][:STAT] WindowsÆExpand/Restore DISP:SIZE WindowsÆDig/D&A/Graph DISP[1..4]:FORM WindowsÆResolution DISP[1..4]:RES SENS[1..4]:AVER:COUN:AUTO:RES WindowsÆTimeslot # WindowsÆT'slot DISP[1..4]:TSLot WindowsÆAnalog Meter...ÆAuto Once DISP[1..4]:MET:AUTO ONCE DISP[1..4]:ANAL:AUTO ONCE WindowsÆAnalog Meter...ÆLeft DISP[1..4]:MET:LOW DISP[1..4]:ANAL:LOW WindowsÆAnalog Meter... ÆRight DISP[1..4]:MET:UPP DISP[1..4]:ANAL:UPP Menu item in manual control SCPI command in short form MeasurementÆWindow 1234 DISP[1..4]:SEL MeasurementÆFunction...ÆPrimary Channel MeasurementÆFunction...ÆSecondary Channel MeasurementÆFunction...ÆFunction CALC[1..8]:MATH:EXPR MeasurementÆFunction...ÆUnit UNIT:POW and UNIT:POW:RAT MeasurementÆFunction...ÆAuxiliary Value = Max = Min = Max - Min DISP[1..8]:AVAL CALC[1..8]:MAX:DATA? CALC[1..8]:MIN:DATA? CALC[1..8]:PTP:DATA? MeasurementÆW / dBm / dBµV UNIT:POW MeasurementÆdB / ∆% / 1 UNIT:POW:RAT MeasurementÆRel On / Off CALC[1..8]:REL:STAT and 1144.1400.12 5.19 E-3 Remote Control - Fundamentals R&S NRP MeasurementÆRel Reset CALC[1..8]:REL:AUTO ONCE MeasurementÆRef. Val...ÆRef. Value CALC[1..8]:REL MeasurementÆRef. Val...ÆRef. ValueÆReset (Result Æ Ref) CALC[1..8]:REL:AUTO ONCE MeasurementÆLimits...ÆWarning Sound CALC[1..8]:LIM:BEEP MeasurementÆLimits...ÆUpper Limit On CALC[1..8]:LIM:UPP:STAT MeasurementÆLimits...ÆUpper Limit CALC[1..8]:LIM:UPP[:DATA] MeasurementÆLimits...ÆLower Limit On CALC[1..8]:LIM:LOW:STAT MeasurementÆLimits...ÆLower Limit CALC[1..8]:LIM:LOW[:DATA] MeasurementÆMax Hold Reset CALC[1..8]:EXTR:RES FileÆ Preset SYST:PRES or *RST FileÆSetup Recall...ÆRecall *RCL FileÆSetup Save...ÆSave *SAV FileÆSetup Save...ÆEdit Name MEM:STAT:DEF FileÆStandard Recall...ÆPreserve Window Settings SYST:STAN:PWS FileÆStandard Recall...ÆTrigger Source SYST:STAN:TRIG:SOUR FileÆStandard Recall...ÆRecall SYST:STAN:PRES FileÆSensor Info... SYSTem:SENS[1..4]:INFO? FileÆSystem Info... SYSTem:INFO? FileÆWindow Name DISP:NAME SystemÆRemote... ÆGPIBÆGPIB Address SYST:COMM:GPIB:ADDR SystemÆI/O... ÆOut 1 1234 OUTP:REC1:FEED or OUTP:TTL:FEED SystemÆI/O... ÆOut 1ÆAnalog OUTP:REC1:STAT ON SystemÆI/O... ÆOut 1ÆPass/Fail OUTP:TTL:STAT ON SystemÆI/O... ÆOut 1ÆOff OUTP:REC1:STAT ON OUTP:TTL:STAT ON SystemÆI/O... ÆOut 1Æ0 V Equivalent (if Analog is selected) OUTP:REC1:LIM:LOW... SystemÆI/O... ÆOut 1Æ3 V Equivalent (if Analog is selected) OUTP:REC1:LIM:UPP... SystemÆI/O... ÆOut 1ÆFail (if Pass/Fail is selected) OUTP:TTL:FAIL HIGH and OUTP:TTL:HVOLT 1144.1400.12 5.20 E-3 R&S NRP Remote Control - Fundamentals SystemÆI/O... ÆOut 1ÆPass (if Pass/Fail is selected) OUTP:TTL:FAIL HIGH and OUTP:TTL:LVOLT SystemÆI/O... ÆI/O 2 1234 OUTP:REC2:FEED SystemÆI/O... ÆI/O 2ÆAnalog Out OUTP:REC2:STAT ON SystemÆI/O... ÆI/O 2ÆTrigger In OUTP:REC2:STAT OFF SystemÆI/O... ÆI/O 2Æ0 V Equivalent (if Analog Out is selected) OUTP:REC2:LIM:LOW... SystemÆI/O... ÆI/O 2Æ3 V Equivalent (if Analog Out is selected) OUTP:REC2:LIM:UPP... SystemÆErrorlist SYSTem:ERRor? DISP:ERR:STAT Menu item in manual control SCPI command in short form SystemÆTest... ÆSensor ABCD / Init. Test SYST:SENS[1..4]:TEST? *TST? SystemÆPower Ref OUTP:ROSC SystemÆDisplay Update DISP:UPD SystemÆMisc...ÆBeeperÆKey SYST:BEEP:NOT:KEY SystemÆMisc...ÆBeeperÆOverload SYST:BEEP:NOT:OVER ( Æ ) DISP:CONT (DEL/1TRIG) If the "Single" check box was enabled in the Scope mode, pressing (DEL/1TRIG) sends a *TRG to the sensor. ({PRE}SET) Opens the File menu (FREQ) SENS[1..4]:FREQ (ZERO/CAL) CAL:ZERO:AUTO 1144.1400.12 5.21 E-3 R&S NRP Table of Contents 6 Table of Contents 6 Remote Control - Commands ........................................................................................6.1 Notation.......................................................................................................................................6.1 Types of Parameters.......................................................................................................6.3 Common Commands to IEEE 488.1 ..........................................................................................6.4 DCL - Device CLear.........................................................................................................6.4 GTL - Go To Local...........................................................................................................6.4 LLO - Local Lock Out ......................................................................................................6.4 PPC - Parallel Poll Configure...........................................................................................6.4 PPD - Parallel Poll Disable ..............................................................................................6.4 PPE - Parallel Poll Enable ...............................................................................................6.4 PPU - Parallel Poll Unconfigure.......................................................................................6.4 SDC - Selected Device Clear...........................................................................................6.4 SPD - Serial Poll Disable .................................................................................................6.5 SPE - Serial Poll Enable ..................................................................................................6.5 Common Commands to IEEE 488.2 ..........................................................................................6.5 *CLS - CLear Status .......................................................................................................6.5 *ESE 0..255 - Standard Event Status Enable.............................................................6.5 *ESE? - Standard Event Status Enable Query...............................................................6.5 *ESR? - Standard Event Status Register Query ............................................................6.5 *IDN? - IDeNtification Query..........................................................................................6.5 *IST? - Individual Status Query.....................................................................................6.6 *OPC - OPeration Complete ...........................................................................................6.6 *OPC? - OPeration Complete Query ..............................................................................6.6 *OPT? - OPTion Query ...................................................................................................6.6 *PRE 0..255 - Parallel Poll Enable Register Command .............................................6.7 *PRE? - Parallel Poll Enable Register Query .................................................................6.7 *PSC 0|1 - Power On Status Clear Command.............................................................6.7 *PSC? - Power On Status Clear Query ..........................................................................6.7 *RCL 0..19 - Recall .....................................................................................................6.7 *RST - Reset...................................................................................................................6.7 *SAV 1..19 - Save .......................................................................................................6.7 *SRE 0..255 - Service Request Enable ......................................................................6.8 *SRE? - Service Request Enable Query ........................................................................6.8 *STB? - Status Byte Query.............................................................................................6.8 *TRG - Trigger.................................................................................................................6.8 *TST? - Self Test Query .................................................................................................6.8 *WAI - Wait .....................................................................................................................6.8 1144.1400.12 I-6.1 E-3 Table of Contents 6 R&S NRP SCPI Commands ........................................................................................................................6.9 Overview of Command Systems ....................................................................................6.9 High-Level Measurement Commands (CONFigure, MEASure, READ and FETCh) ....6.11 CALCulate (Configuration of Calculate Blocks) ............................................................6.21 CALibration ...................................................................................................................6.29 DISPlay .........................................................................................................................6.30 FORMat.........................................................................................................................6.38 MEMory.........................................................................................................................6.39 OUTPut .........................................................................................................................6.44 SENSe (Sensor Commands) ........................................................................................6.50 SERVice........................................................................................................................6.66 STATus .........................................................................................................................6.68 SYSTem........................................................................................................................6.93 TRIGger ......................................................................................................................6.103 UNIT............................................................................................................................6.108 List of Remote Control Commands ............................................................................................6.109 Compatibility Information ............................................................................................................6.122 Interfaces.......................................................................................................................................6.124 IEC/IEEE Bus Interface ..........................................................................................................6.124 Characteristics of the Interface ...................................................................................6.124 Bus Lines ....................................................................................................................6.124 Interface Functions .....................................................................................................6.126 Interface Messages.....................................................................................................6.127 Standard Configurations .............................................................................................................6.128 1144.1400.12 I-6.2 E-3 R&S NRP List of Figs. and Tables Chapter 6 Figs. Fig. 6-1: Overview of SCPI command systems and their mutual interaction ..........................................6.9 Fig. 6-2: SENSe system ........................................................................................................................6.10 Fig. 6-3: Command system CALCulate .................................................................................................6.10 Fig. 6-4: Relationship between the commands CONFigure, READ?, FETCh? and MEASure? ...........6.12 Fig. 6-5: Characteristic of analog outputs..............................................................................................6.45 Fig. 6-6: Voltage at TTL output..............................................................................................................6.49 Fig. 6-7: Meaning of drop-out TOLerance. ............................................................................................6.58 Fig. 6-8: Timing parameters for the Timegate mode. ............................................................................6.59 Fig. 6-9: Effect of commands SENS[1..4]:TIM:EXCL:STAR and :STOP ........................................6.65 Fig. 6-10: Standard SCPI status register...............................................................................................6.70 Fig. 6-11: Overview on structure of Status Reporting System ..............................................................6.73 Fig. 6-12: Operation Status Register .....................................................................................................6.74 Fig. 6-13: Questionable Status Register ...............................................................................................6.75 Fig. 6-14: Pin assignment of IEC/IEEE-bus interface..........................................................................6.124 Tables Table 6-1: High-level measurement commands....................................................................................6.14 Table 6-2: Commands of the CALCulate system ..................................................................................6.21 Table 6-3: Output unit of measured value of calculate block. ...............................................................6.27 Table 6-4: Commands of the CALibration system.................................................................................6.29 Table 6-5: Commands of the DISPlay system ......................................................................................6.30 Table 6-6: Commands of the FORMat command system.....................................................................6.38 Table 6-7: Commands of the MEMory system ......................................................................................6.39 Table 6-8: Commands of the OUTPut system ......................................................................................6.44 Table 6-9: Voltage at TTL output...........................................................................................................6.49 Table 6-10: Commands of the SENSe system......................................................................................6.50 Table 6-11: Measurement modes..........................................................................................................6.56 Table 6-12: Commands of the SERVice command system ..................................................................6.66 Table 6-13: Queries for status registers ................................................................................................6.69 Table 6-14: Commands for the configuration of status registers ..........................................................6.69 Table 6-15: Decimal value of individual bits in the SCPI status register ...............................................6.71 Table 6-16: Meaning of bits used in the status byte..............................................................................6.76 Table 6-17: Meaning of bits used in the Device Status Register ..........................................................6.77 Table 6-18: Meaning of bits used in the Questionable Status Register ................................................6.78 Table 6-19: Meaning of bits used in the Standard Event Status Register ............................................6.79 1144.1400.12 I-6.3 E-3 List of Figs. and Tables Chapter 6 R&S NRP Table 6-20: Meaning of bits used in the Operation Status Register......................................................6.80 Table 6-21: Meaning of bits used in the Operation Calibrating Status Register ...................................6.81 Table 6-22: Meaning of bits used in the Operation Measuring Status Register....................................6.82 Table 6-23: Meaning of bits used in the Operation Status Register......................................................6.83 Table 6-24: Meaning of bits used in the Operation Sense Status Register ..........................................6.84 Table 6-25: Meaning of bits used in the Operation Lower Limit Fail Status Register ...........................6.85 Table 6-26: Meaning of bits used in the Operation Upper Limit Fail Status Register ...........................6.86 Table 6-27: Meaning of bits used in the Questionable Power Status Register .....................................6.87 Table 6-28: Meaning of bits used in the Questionable Window Status Register ..................................6.88 Table 6-29 Meaning of bits used in the Questionable Calibration Status Register...............................6.89 Table 6-30: Initialization of device status ..............................................................................................6.92 Table 6-31: Commands of the SENSe system......................................................................................6.93 Table 6-32: Valid parameter values for the SYSTem:KEY command. ................................................6.96 Table 6-33: Preset and *RST value.......................................................................................................6.98 Table 6-34: Commands for setting the trigger system of a sensor .....................................................6.103 Table 6-35: Commands of the UNIT system .......................................................................................6.108 Table 6-36: Compatibility information about remote control commands .............................................6.122 Table 6-37: Interface functions of IEC/IEEE bus.................................................................................6.126 Table 6-38: Common commands ........................................................................................................6.127 Table 6-39: Addressed commands .....................................................................................................6.127 1144.1400.12 I-6.4 E-3 R&S NRP Remote Control - Commands 6 Remote Control - Commands Notation In the following sections, all commands implemented in the device are first listed in a table according to the command system and then described in detail. For the most part, the notation used complies with SCPI specifications. Command tables For a quick overview of available commands, the commands are listed in a table before they are described. Except for the high-level measurement commands and the STATus commands, these tables contain the following four columns. Indentations Command: The commands and their hierarchical order (see indentations). Parameter: Required parameters. Unit: Basic unit of physical parameters. Remark: This column indicates which commands • do not have a query form • are available as a query only The various levels of the SCPI command hierarchy are shown in the table by indentations to the right. The lower the level, the greater the indentation. It should be noted that the complete notation of the command always includes the higher levels. Example: SENSe[1..4]:AVERage:COUNt is shown in the table as follows: SENSe[1..4] first level :AVERage second level :COUNt third level In the individual description, the command is shown in full length. An example of the command is indicated at the end of the description. [1 to 4] or [1 to 8] This notation indicates the numeric suffix of a command. With the SENSe commands the suffix may assume the values 1 to 4; with the CALCulate and highlevel measurement commands the values 1 to 8. If the suffix is not specified, it is internally set to 1. 1144.1400.12 6.1 E-3 Remote Control - Commands [] R&S NRP Keywords and parameters in square brackets may be omitted in compound commands. This will not change the meaning of the command. Therefore, not only is there a short and a long form for the commands (distinguished here by lowercase and uppercase letters) but also a short form which is created by omitting keywords. For instance, the following commands are identical: [SENSe[1..4]] :CORRection :GAIN2 [:INPut][:MAGNitude] 1 SENSe1:CORRection:GAIN2:INPut:MAGNitude 1 SENSe1:CORRection:GAIN2:INPut 1 SENSe1:CORRection:GAIN2 1 SENSe:CORRection:GAIN2 1 :CORRection:GAIN2 1 [?] ? A question mark in square brackets at the end of a command indicates that this command can either be used as a setting command (without question mark) or as a query (with question mark). If the question mark is not in square brackets, the command is a query only. Example: [SENSe[1..4]]:POWer[:AVG]:APERture[?] SENS1:POW:AVG:APER 1ms sets the integration time in the ContAv mode to 1 ms. SENS1:POW:AVG:APER? returns the currently set integration time. SYSTem:SENSor3:INFO? queries information of sensor C which cannot be modified. For this reason, this command is only available as a query. | (for commands) A selection of keywords with an identical effect exists for several commands. These keywords are entered in the same line and separated by a vertical bar. Only one of these keywords has to be indicated in the header of the command. The effect of the command is independent of the keyword entered. Example: SENSe[1..4] first level :FREQuency second level [:CW|:FIXed] third level SENSe[1..4]:FREQuency:CW 1E6 is equivalent to SENSe[1..4]:FREQuency:FIXed 1E6 | (for parameters) A vertical bar in the notation of parameters is used to separate alternative options and is to be seen as an "or". The effect of the command differs depending on the parameter stated. Example: Selection of parameter for the command INITiate:CONTinuous ON | OFF ON or OFF can be specified as a parameter. {} 1144.1400.12 Parameters in braces may be included in the command once, several times or not at all. 6.2 E-3 R&S NRP Remote Control - Commands Types of Parameters <NR1> Stands for integers with sign. Examples: • 1 • -33 • 32767 <NRf> Stands for floating point numbers that can also be written in exponential notation. Examples: • 1 • 1.0 • -21.2345553e-6 <int_value> Is an abbreviation for <NR1>|MINimum|MAXimum|DEFault. <float_value> Is an abbreviation for <NRf>|MINimum|MAXimum|DEFault. <boolean> Stands for ON|OFF|0|1, where ON and 1 are identical in meaning as are OFF and 0. <string> Stands for character strings that have to be within single or double quotes. Examples: • 'Harry Potter' • "Sirius Black" <block_data> Stands for block data (Æ section "Parameters" on page 5.11). <non-decimal_numeric> Is a non-decimal value in one of the following representations: • binary (e. g. #b0111010101001110 or #B0111010101001110) • hexadecimal (e.g. #h754e or #H754E) • octal (e.g. #q72516 or #Q75216) 1144.1400.12 6.3 E-3 Remote Control - Commands R&S NRP Common Commands to IEEE 488.1 The following messages are interface commands developed for the IEC/IEEE bus, which can be sent when the ATN line is active (Æ section "IEC/IEEE Bus Interface", page 6.124). DCL - Device CLear All commands and messages in progress are aborted. The TRIGger system goes to the IDLE state, input and output queues are cleared, and the parser is reset and waits for the beginning of a new command. When INITiate:CONT ON is set, a new measurement is started. This command makes the device ready to receive commands. GTL - Go To Local The device is set to local mode and can again be operated manually. LLO - Local Lock Out Deactivates the front-panel keypad with the exception of the power key ( Ø ) . In the LLO state, it is possible to return to the LOCAL mode only by remote control (GTL command) or switching the R&S NRP off and on again. PPC - Parallel Poll Configure Sets the device to the "Parallel Poll Addressed to Configure State" (PACS). PPD - Parallel Poll Disable In the PACS, the parallel poll function is deactivated with PPD. PPE - Parallel Poll Enable In the PACS, the parallel poll function is activated with PPE and the bit position and the sense bit are set. PPU - Parallel Poll Unconfigure This command deactivates the parallel poll function without previous addressing. SDC - Selected Device Clear Same as DCL except that it applies to all devices that are currently in the listen mode. 1144.1400.12 6.4 E-3 R&S NRP Remote Control - Commands SPD - Serial Poll Disable Terminates the serial poll mode. SPE - Serial Poll Enable Activates the serial poll mode. When addressed as a talker, the device sends the status byte. Common Commands to IEEE 488.2 The Common Commands to IEEE 488.2 are device commands that can be sent via the IEC/IEEE bus. *CLS - CLear Status Clears the status of the R&S NRP by resetting the following registers: • • • • Status byte register Standard event status register Error / event queue All SCPI status registers Note: The enable and transition registers (NTRansition and PTRansition) are not changed! *ESE 0..255 - Standard Event Status Enable Sets the ENABle register of the Standard Event Status Register (ESR) to the specified value(Æ SCPI command STATus, page 6.68). *ESE? - Standard Event Status Enable Query Returns the content of the ENABle register of the Standard Event Status RegisterÆ SCPI command STATus , page 6.68). *ESR? - Standard Event Status Register Query Returns the content of the EVENt register of the Standard Event Status RegisterÆ SCPI command STATus , page 6.68). *IDN? - IDeNtification Query Returns a string with information on the R&S NRP identity (device identification code). The string has the following format <string1>,<string2>,<string3>,<string4>. 1144.1400.12 6.5 E-3 Remote Control - Commands R&S NRP Definition of string components: <string1> designation <string2> manufacturer <string3> serial number of the R&S NRP <string4> firmware version *IST? - Individual Status Query Returns the current value of the IST flag. The IST flag is described in section Æ "IST Flag and Parallel Poll Enable Register (PPE)" on page 6.77. *OPC - OPeration Complete Sets the operation complete bit in the Standard Event Status Register as soon as all currently executed commands have been completed. This bit can be used to trigger a service request. *OPC must be at the end of a program message. *OPC? - OPeration Complete Query After completion of all currently executed commands, the R&S NRP writes a "1" into the output queue. Since *OPC? waits until all previous commands are executed, "1" is returned in all cases. *OPC? basically functions like the *WAI command, but *WAI does not return a response. *OPC? is preferred to *WAI because with *OPC?, the execution of commands can be queried from a controller program before new commands are sent. This avoids an overflow of the input queue when too many commands are sent that cannot be executed. Unlike *WAI, *OPC? must be at the end of a program message. *OPT? - OPTion Query Returns a string to the output queue containing information about all options installed. Option Response string 1 "NRP-B1: Test generator installed" 2 "NRP-B2: Second channel interface installed" 3 "NRP-B3: Battery installed" 4 "NRP-B4: Ethernet interface installed" 5 "NRP-B5: Four channel interface installed" 6 "NRP-B6: Sensor A/B rear socket" 1144.1400.12 6.6 E-3 R&S NRP Remote Control - Commands *PRE 0..255 - Parallel Poll Enable Register Command Sets the Parallel Poll Enable Register to the defined value. *PRE? - Parallel Poll Enable Register Query Returns the current content of the Parallel Poll Enable Register. *PSC 0|1 - Power On Status Clear Command Determines whether the content of the ENABle registers is retained or cleared upon power-up. *PSC 0 causes the status registers to retain their content. With appropriate configuration of the ESE and SRE status registers, a service request may be triggered upon power-up. *PSC 1 clears the registers. *PSC? - Power On Status Clear Query The query *PSC? reads out the content of the power-on-status-clear flag. The response can be "0" or "1" . *RCL 0..19 - Recall Calls the device state which has been stored with the *SAV command under the indicated number. The effect of *RCL 0 to 19 is the same as if one of the setups 0 to 19 had been selected in manual control. *RCL 0 resets the device to the default state. *RST - Reset Sets the device to the defined default state and has almost the same effect as the SCPI command SYSTem:PRESet. (Table 6-33). The table also provides default settings. The following table documents the difference. SYST:PRES acts like the frontpanel key (PRES). INITiate:CONTinuous SENSe:AVERage:TCONtrol *RST OFF REPeat SYSTem:PRESet ON MOVing *SAV 1..19 - Save Stores the current device state under the indicated number. 1144.1400.12 6.7 E-3 Remote Control - Commands R&S NRP *SRE 0..255 - Service Request Enable Sets the Service Request Enable Register bits. This command determines the conditions under which a service request is triggered. *SRE? - Service Request Enable Query Returns the value of the Service Request Enable Register. *STB? - Status Byte Query Returns the current value of the Status Byte Register. *TRG - Trigger Generates a BUS-trigger event. If the sensor is in the WAIT_FOR_TRG state and the source for the trigger is set to BUS (TRIG:SOUR BUS), the sensor enters the MEASURING state. *TRG invalidates all current measuring results. A query of measurement data following *TRG will thus always return the measured value determined in response to *TRG. Error messages: -211 -211 "Trigger ignored": No sensor is in the WAIT_FOR_TRG state. "Trigger ignored": A sensor is in the WAIT_FOR_TRG state but the trigger source is not BUS. *TST? - Self Test Query Triggers a selftest and returns 0 (no error found) or 1 (an error has occurred). *WAI - Wait Prevents the execution of new commands until one of the following criteria is met: • • • All previous commands have been executed. A DCL command is received. The device is switched off and on again (power-on-reset). 1144.1400.12 6.8 E-3 R&S NRP Remote Control - Commands SCPI Commands Overview of Command Systems The SCPI commands described below are grouped in command systems according to their function. Only the most important functions are shown in the figures. M e a s u re d v a lu e s M E A S u r e m e n t ( h ig h - le v e l m e a s u r e m e n t c o m m a n d s ) D IS P la y S E N S e S Y S T e m C A L C u la te U N IT F O R M a t T R IG g e r s e n s o r re fe re n c e d c o m m a n d s y s te m s M a n u a l c o n tro l M E M o ry S T A T u s R e m o te c o n tro l - IE C -B u s - E th e rn e t O U T P u t In fo r m a tio n flo w A n a lo g O u t P o w e r R e fe re n c e Fig. 6-1: Overview of SCPI command systems and their mutual interaction Fig. 6-1 gives an overview of the SCPI command systems of the R&S NRP. The measured values are forwarded to the SENSe block where they are processed and handed to the CALCulate blocks. The values from the SENSe block are not immediately made available to the user, but only after they have been processed in the CALCulate blocks. In the CALCulate blocks, the values of several sensors can be processed together before they are output. MEASurement commands may be used to configure SENSe and CALCulate blocks with a single command. This may considerably simplify operation of the R&S NRP. The frequency-dependent correction tables for the measured values are managed by the MEMory command system. The other command systems have the following functions: DISPlay: Configures the reading on the R&S NRP display. FORMat: Sets the data format on the remote control interfaces. OUTPut: Switches the test generator on/off and calibrates it. STATus: Configures and queries the Status Reporting System (Æ page 5.14.). SYSTem: Makes different system settings that affect the operation of the R&S NRP. UNIT: Sets the output unit of the measured values. 1144.1400.12 6.9 E-3 Remote Control - Commands R&S NRP SENSe System Command system SENSe (incl. CALibration) :RANGe CALibration :CORRection :FREQuency :APERture :TIMing :FUNCtion - ContAv - BurstAv - Timeslot - Scope :AVERage Measured values :BUFFer to CALCulate blocks Fig. 6-2: SENSe system This command system is used for configuring the sensors and determines the processing of measured data in the sensors. The blocks have the following functions: :RANGe Shifts the range boundaries to increase the measurement accuracy. CALibration Is a command system of its own and responsible for sensor calibration. :CORRection :FREQuency Corrects measured values in three steps (fixed offset value, frequency-dependent offset value and duty cycle). :APERture :TIMing Determines the timeslot in which power values are averaged. :FUNCtion Determines a measurement mode. :AVERage Filters the measured values. :BUFFer Stores the measured values temporarily to optimize the speed of data transmission to the remote controller. CALCulate System S E S E S E S E N S N S N S N S e 1 e 2 e 3 e 4 S E S E S E S E N S N S N S N S e 1 e 2 e 3 e 4 P r im a r y C h a n n e l :F E E D 1 S e c o n d a ry C h a n n e l :F E E D 2 :M A - "( - "( - "( - "( - "S - "R - "R T H :E X P R e s s io n S E N S n )" S E N S n - S E N S m )" S E N S n + S E N S m )" S E N S n / S E N S m )" W R (S E N S n ,S E N S m )" E F L (S E N S n ,S E N S m )" L O S (S E N S n ,S E N S m )" :R E L a tiv e :D :M :M :P A T IN A X T P A ? im u m :D A T A ? im u m :D A T A ? e a k :D A T A ? D a ta o u tp u t U N IT :L IM it C A L C u la te [1 ..8 ] Fig. 6-3: Command system CALCulate Eight CALCulate blocks are available to process the data supplied by the sensors. These blocks process the results of up to 2 sensors (primary and secondary channel) together. A calculation function can be selected for this purpose with the aid of :MATH:EXPRession. The result can then be correlated to a reference value (:RELative) before it is made available to the user by the UNIT block. Measured values can be monitored with the :LIMit commands. 1144.1400.12 6.10 E-3 R&S NRP Remote Control - Commands High-Level Measurement Commands (CONFigure, MEASure, READ and FETCh) The high-level measurement commands CONFigure, MEASure, READ and FETCh combine several setting commands and thus simplify programming of the R&S NRP. The most convenient command is MEASure. This command configures sensors and calculate blocks, initiates a measurement and provides measurement results. The other commands perform only portions of these functions and thus allow the user to make specific modifications between the individual steps. Strictly speaking, the CONFigure command is not a measurement command because it does not yield data and only configures a measurement. It differs from the other three high-level measurement commands as follows: a question mark at the end of the command provides information on current settings. With other commands, the question mark is compulsory and shows that the measured data is queried. The commands have different functions: CONFigure:... The calculate blocks and the associated sensors are configured by means of the parameter list. A measurement is not started. A question mark at the end of the command provides information on the parameters transferred by the last CONFigure or MEASure command, respectively. Since the device settings can be changed after a CONFigure, the query does not return the current device setup1. CONFigure is performed internally by SENSe and CALCulate commands. One or several measurement channels are configured as follows: Measurement mode: ContAv Burst Timeslot Scope INIT:CONT OFF OFF OFF OFF TRIG:SOUR IMM INT EXT IMM TRIG:COUN 1 1 1 1 TRIG:DEL:AUTO ON ON ON ON SENS:AVER:COUN:AUTO ON ON ON - SENS:AVER:COUN:AUTO:TYPE ON ON ON - SENS:AVER:COUN:AUTO:SLOT - - 1 - ON ON ON ON SENS:AVER:STAT Is set as a function of the selected calculation function. UNIT:POW UNIT:RAT 1 See also Annex "Compatibility Information". 1144.1400.12 6.11 E-3 Remote Control - Commands FETCh:...? R&S NRP The last valid result is returned. The command is only completed after a valid measurement has been performed. When BUS is set as the trigger source, a measurement cannot be started after the FETCh command and an SCPI error is output (-214, Trigger deadlock). In compliance with SCPI 1999.0, different results can be queried with FETCh without having to restart a measurement. This is only possible if the SENSe block is not reconfigured. This is the case if only the calculation function (e.g. :RATio:RELative) changes. In all other cases, an SCPI error (-221, Setting conflict) is returned and the command aborted. READ:...? A measurement is started without further configuration and the measurement result is returned. The parameter list is compared to the current settings before the measurement is started. If the list does not agree, an SCPI error (-221, Setting conflict) is returned and the command aborted. Apart from this check, READ corresponds to the program message INIT:IMM; FETCh[1..8]:...? MEASure:...? Combines CONFigure and READ. FETCh? The FETCh? command without parameters has a special meaning. While suppressing parameters normally means that default values are used and checked, the current measured value under FETCh? is supplied when it is valid. If a measured value is not yet available, processing is suspended until a valid result is available. READ? Can be compared with FETCh?. READ?; starts a measurement and returns a measured value without checking the current settings. C O N F i g u r e I N I T F E T C h ? C O N F i g u r e R E A D ? M E A S u r e ? Fig. 6-4: Relationship between the commands CONFigure, READ?, FETCh? and MEASure? 1144.1400.12 6.12 E-3 R&S NRP Remote Control - Commands Syntactical Structure of High-Level Measurement Commands The high-level measurement commands can be divided as follows: <head><function>[<expression>][?] <parameter_list> <head> CONFigure[1..8], READ[1..8], MEASure[1..8], FETCh[1..8] <function> Selection of one of the measurement modes ContAv, ContAv with data buffering, Burst, Timeslot or Scope. (ÆSENSe[1..4]:FUNCtion command on page 6.56). Keywords: • [:SCALar][:POWer][:AVG] • [:SCALar][:POWer]:TSLot • [:SCALar][:POWer]:BURSt • :ARRay[:POWer][:AVG] • :XTIMe[:POWer] <expression> Specification of a calculation function for the addressed CALCulate block (Æ CALCulate[1..8]:MATH:EXPRession command on page 6.26). If <expression> is not specified, the measured value of the primary channel is output. Keywords: • :RELative • :DIFFerence • :DIFFerence:RELative • :SUM • :SUM:RELative • :RATio • :RATio:RELative • :RLOSs • :SWR • :REFLection [?] Queries must be terminated with an "?". <parameter_list> A list with parameters whose meaning is determined by the selected <function>. Since all four high-level measurement commands use the same parameter lists, they are described together in this section. 1144.1400.12 6.13 E-3 Remote Control - Commands R&S NRP Table 6-1: High-level measurement commands CONFigure commands Measurement commands Parameters CONFigure[1..8]? FETCh[1..8]? READ[1..8]? ContAv mode CONFigure[1..8] [:SCALar] [:POWer] [:AVG] :RELative :DIFFerence :RELative :SUM :RELative :RATio :RATio:RELative :SWR :REFLection :RLOSs READ[1..8] | MEASure[1..8] | FETCh[1..8] [:SCALar] [:POWer] [:AVG]? <contav_parameter_list> :RELative? <contav_parameter_list> :DIFFerence? <contav_parameter_list> :RELative? <contav_parameter_list> :DIFFerence? <contav_parameter_list> :RELative? <contav_parameter_list> :RATio? <contav_parameter_list> :RATio:RELative? <contav_parameter_list> :SWR? <contav_parameter_list> :REFLection? <contav_parameter_list> :RLOSs? <contav_parameter_list> Timeslot mode CONFigure[1..8] [:SCALar] [:POWer]:TSLot [:AVG] :RELative :DIFFerence :RELative :SUM :RELative :RATio :RATio:RELative :SWR :REFLection :RLOSs READ[1..8] | MEASure[1..8] | FETCh[1..8] [:SCALar] [:POWer]:TSLot <timeslot_parameter_list> [:AVG]? :RELative? <timeslot_parameter_list> :DIFFerence? <timeslot_parameter_list> :RELative? <timeslot_parameter_list> :DIFFerence? <timeslot_parameter_list> :RELative? <timeslot_parameter_list> :RATio? <timeslot_parameter_list> :RATio:RELative? <timeslot_parameter_list> :SWR? <timeslot_parameter_list> :REFLection? <timeslot_parameter_list> :RLOSs? <timeslot_parameter_list> Burst mode CONFigure[1..8] [:SCALar] [:POWer]:BURSt [:AVG] :RELative :DIFFerence :RELative :SUM :RELative :RATio :RATio:RELative :SWR :REFLection :RLOSs 1144.1400.12 READ[1..8] | MEASure[1..8] | FETCh[1..8] [:SCALar] [:POWer]:BURSt [:AVG]? <burst_parameter_list> :RELative? <burst_parameter_list> :DIFFerence? <burst_parameter_list> :RELative? <burst_parameter_list> :DIFFerence? <burst_parameter_list> :RELative? <burst_parameter_list> :RATio? <burst_parameter_list> :RATio:RELative? <burst_parameter_list> :SWR? <burst_parameter_list> :REFLection? <burst_parameter_list> :RLOSs? <burst_parameter_list> 6.14 E-3 R&S NRP Remote Control - Commands ContAv mode (with data buffering) CONFigure[1..8] :ARRay [:POWer] [:AVG] :RELative :DIFFerence :RELative :SUM :RELative :RATio :RATio:RELative :SWR :REFLection :RLOSs READ[1..8] | MEASure[1..8] | FETCh[1..8] :ARRay [:POWer] [:AVG]? <buffered_parameter_list> :RELative? <buffered_parameter_list> :DIFFerence? <buffered_parameter_list> :RELative? <buffered_parameter_list> :DIFFerence? <buffered_parameter_list> :RELative? <buffered_parameter_list> :RATio? <buffered_parameter_list> :RATio:RELative? <buffered_parameter_list> :SWR? <buffered_parameter_list> :REFLection? <buffered_parameter_list> :RLOSs? <buffered_parameter_list> Scope mode CONFigure[1..8] :XTIMe [:POWer] 1144.1400.12 READ[1..8] | MEASure[1..8] | FETCh[1..8] :XTIMe [:POWer]? <scope_parameter_list> 6.15 E-3 Remote Control - Commands R&S NRP Calculation Functions The CALCulate blocks receive measurement data from the sensors via input channels which are called primary and secondary channel. The following functions are available for calculating the primary channel (PC) and the secondary channel (SC). One-parameter functions ( <source_list> = (@n); n = 1,2,3,4 ) - PC Yields the measured average power of the sensor assigned to the PC. :RELative PC / reference value The value measured in the PC is divided by the reference value determined with the aid of one of the following commands: CALCulate[1..8]:RELative[:MAGNitude] CALCulate[1..8]:RELative:AUTO. Two-parameter functions ( <source_list> = (@n),(@m); n = 1,2,3,4; m = 1,2,3,4 ) :DIFFerence PC - SC Yields the difference between the PC and SC. This means that two sensors must be specified in <source_list>. This also applies to the following functions. :DIFFerence:RELative (PC - SC) / reference value The difference between the PC and SC is divided by the reference value determined with the aid of one of the following commands: CALCulate[1..8]:RELative[:MAGNitude] CALCulate[1..8]:RELative:AUTO. :SUM PC+ SC Yields the sum of the PC and SC. The <source_list> must therefore contain two sensors. This also applies to the following functions. :SUM:RELative (PC + SC) / reference value The sum of the PC and SC is divided by the reference value determined with the aid of one of the following commands: CALCulate[1..8]:RELative[:MAGNitude] or CALCulate[1..8]:RELative:AUTO. :RATio PC / SC Yields the ratio of PC to SC. :RATio:RELative (PC / SC) / reference value The ratio of the PC and SC is divided by the reference value determined with the aid of one the following commands: CALCulate[1..8]:RELative[:MAGNitude] CALCulate[1..8]:RELative:AUTO. 1144.1400.12 6.16 E-3 R&S NRP :SWR Remote Control - Commands 1 + SC / PC 1 − SC / PC If the forward power of a wave is measured in the PC and the reflected power in the SC, the measurement command yields the standing wave ratio. The output unit is set to "One" (UNIT:RAT O). :REFLection SC / PC If the forward power of a wave is measured in the PC and the reflected/transmitted power in the SC, the calculate block yields the reflection coefficient/transmission factor of the DUT. The output unit is set to "One" (UNIT:RAT O). :RLOSs − 20 log10 SC / PC If the forward power of a wave is measured in the PC and the reflected or transmitted power in the SC, the calculate block yields the return loss/transmission loss of the DUT. This function principally yields the same result as the :RATio function. The only difference is the output unit which is automatically set to dB by means of this command (UNIT:RAT DB). 1144.1400.12 6.17 E-3 Remote Control - Commands R&S NRP Parameters Five different parameter lists are used in the command table, depending on the selected measurement mode. The elements of these lists can be omitted starting at the end and working backward. They will then be replaced by their default values. The parameter lists are defined as follows: ContAv mode <contav_parameter_list> [<expected_value> [,<resolution>]] [,<source_list>] Timeslot mode <timeslot_parameter_list> <tslot_width>, <no_slots>, <start_exclude> , <end_exclude> [,<expected_value> [,<resolution>]] [,<source_list>] Burst mode <burst_parameter_list> <dtolerance>, <start_exclude> , <end_exclude> [,<expected_value> [,<resolution>]] [,<source_list>] ContAv mode (with data buffering) <buffered_parameter_list> (<buffered_size>), [<expected_value> [,<resolution>]] [,<source_list>] Scope mode <scope_parameter_list> (<scope_size>), <capture_time> [,<source_list>] The elements of the parameter lists have the following meaning: <expected_value> Value range: <float_value> | DEF According to the SCPI-1999.0 standard, a value in the order of the expected measured value can be specified. This allows the device to set an adequate measurement range. This is not required in the R&S NRP because the measurement is performed simultaneously in all measurement ranges. Any value can therefore be specified for the <expected_value> parameter, especially the DEFault value. The value is always ignored. <resolution> Value range:1 | 0.1 | 0.01 | 0.001 | 1 | 2 | 3 | 4 Default value: 3 (0.01) Specifies the limit up to which the measurement result should be free of noise. The R&S NRP tries to set an adequate window for the averaging filter. This does not affect the accuracy of the measured data. The window can only be set if automatic setting of the filter window has not been disabled by the user (SENSe:AVERage:COUNt:AUTO OFF). Since the automatic setting is activated by CONF and MEAS? as a default, the user normally does not need to alter this setting. 1144.1400.12 6.18 E-3 R&S NRP Remote Control - Commands Æ [SENSe[1..4]]:AVERage:COUNt:AUTO:RESolution[?] 1 | 2 | 3 | 4, Æ [SENSe[1..4]]:TRACe:AVERage:COUNt:AUTO:RESolution[?] 1|2|3|4 and Æ DISPlay[:WINDow][1..4]:RESolution[?] | 0.001 1 | 0.1 | 0.01 Example: If <resolution> is set to 3 or 0.01, three significant points are assigned to the value when it is displayed on a linear scale. When a log scale is used, 2 places are displayed after the decimal point. <source_list> Value range: (@n) | (@n),(@m) Default value: (@1) or (@1),(@2) n and m may assume the values 1, 2, 3 or 4. With this list, sensors are assigned to the primary and possibly to the secondary channel of a calculate block. The number for each sensor is preceded by the character @ and the entire expression is enclosed in parentheses. Example: (@1)is used for sensor A. Example: The values (@3),(@2) are set for <source_list>. Sensor C is assigned to the primary channel and sensor B to the secondary channel. The calculate blocks process the primary channel together with the secondary depending on the desired function. If :RATio is selected as the calculation function, the result from the calculate block is the ratio of the values measured by sensor C and sensor B. <tslot_width> Value range: depending on sensor. Default value: depending on sensor. Unit: S Width of a timeslot in the Timeslot mode. Æ [SENSe[1..4]][:POWer]:TSLot:[AVG]:WIDTh[?] <float_value> <no_slots> Value range: depending on sensor. Default value: depending on sensor. Unit: Number of timeslots to be measured in the Timeslot mode. <start_exclude> <end_exclude> Value range: depending on sensor. Default value: depending on sensor. Unit: S Amount of time at the beginning and the end of a timeslotor integration period that should not be taken into account. Æ [SENSe[1..4]]:TIMing:EXCLude:STARt[?] <float_value> and Æ [SENSe[1..4]]:TIMing:EXCLude:STOP[?] <float_value> 1144.1400.12 6.19 E-3 Remote Control - Commands R&S NRP <dtolerance> Value range: depending on sensor. Unit: S Default value: depending on sensor. The length of a time interval in which the power level may drop below the trigger level without the end of a power pulse being detected. Æ[SENSe[1..4]][:POWer]:BURSt:DTOLerance[?] <float_value> <capture_time> Value range: depending on sensor. Unit: S Default value: depending on sensor. Period within which measured data are captured in the Scope mode. Æ [SENSe[1..4]]:TRACe:TIME[?] <float_value> (<buffered_size>) Value range: depending on sensor. Default value: depending on sensor. Unit: Number of requested measured values. Æ [SENSe[1..4]][:POWer][:AVG]:BUFFer:SIZE[?] <int_value> (<scope_size>) Value range: depending on sensor. Default value: depending on sensor. Unit: Number of measured values in one data set. Æ [SENSe[1..4]]:TRACe:POINts <int_value> Error messages 24 "Sensor mode not supported": A sensor does not support a measurement mode. -221 "Settings conflict": This error is generated when a FETCH or READ command is sent and the current device settings do not correspond to the transmitted parameters. The parameters transmitted in these two commands are not used for device configuration but rather to check the settings. -108 "Parameter not allowed": The parameter list contains unexpected parameter types or the parameters are not sent in the correct order. -127 "Invalid numeric data": An invalid value was specified for <resolution>. -171 "Invalid expression": Error in the <source_list> parameter. Two sensors were specified instead of one, or the specified sensor is not correct. 1144.1400.12 6.20 E-3 R&S NRP Remote Control - Commands CALCulate (Configuration of Calculate Blocks) The calculate blocks calculating the measurement results from the sensor data are configured with the CALCulate command. Eight blocks are available, each with two input channels (primary and secondary channel). The available sensors (1 to 4, depending on device configuration and connected sensors) can be assigned to the channels. With the aid of a selectable function (CALC:MATH), the channels can be processed together. Table 6-2: Commands of the CALCulate system Command Parameter Unit CALCulate[1..8] :DATA? :MINimum:DATA? :MAXimum:DATA? :PTPeak:DATA? :EXTRemes:RESet :FEED[1..2][?] :LIMit :BEEP[?] :CLEar[:IMMediate] :AUTO[?] :FAIL? :FCOunt? :UPPer [:DATA][?] - - - - - - Remark Query only. The unit is the current measurement result. Query only. The unit is the current measurement result. Query only. The unit is the current measurement result. Query only. The unit is the current measurement result. No query unit of the unit of the unit of the unit of the <string> - ON|OFF - - No query <float_value> - The value range of the parameter depends on the output unit of the measured value. :POWer[?] <float_value> :RATio[?] <float_value> DBM| W|DBUV DB| DPCT|O - :STATe[?] :LOWer [:DATA][?] ON|OFF <float_value> - :POWer[?] <float_value> :RATio[?] <float_value> DBM| W|DBUV DB| DPCT|O - :STATe[?] :MATH [:EXPRession][?] :CATalog? :RELative [:MAGNitude][?] ON|OFF <string> - - <float_value> - :AUTO[?] :POWer[:MAGNitude][?] OFF|ONCE <float_value> :RATio[:MAGNitude][?] <float_value> :STATe[?] ON|OFF DBM| W|DBUV DB| DPCT|O - 1144.1400.12 6.21 No query Query only Query only The value range of the parameter depends on the output unit of the measured value. Query only The value range of the parameter depends on the output unit of the measured value. E-3 Remote Control - Commands R&S NRP CALCulate[1..8][:MINimum | :MAXimum | :PTPeak]:DATA? With this command the current output value of a calculate block can be queried. If one of the optional keywords :MAXimum, :MINimum or :PTPeak is specified, other values can be queried instead of the current measured value. :MAXimum :MINimum Maximum and minimum of all measured values that previously occurred in this calculate block. The two limit values are set to the current measured value when • the device is switched on • a reset is performed (*RST) • the values are explicitly set to the current measured value using the command CALCulate[1..8]:EXTRemes:RESet. :PTPeak Peak-to-peak distance (maximum - minimum) of measured values in the calculate block. Unit: Æ Table 6-3 on page 6.27. CALCulate[1..8]:EXTRemes:RESet2 The R&S NRP stores the maximum and minimum values for each calculate block. The current measured value is stored with CALC[1..8]:EXTR:RES as the new minimum and maximum value. The extreme values can be queried with CALC[1..8]:MIN:DATA? and CALC[1..8]:MAX:DATA?. CALCulate[1..8]:FEED[1..2][?] <string> The sensors connected with the calculate block via the primary and secondary channel can yield differently processed data: peak value, average value, peak-to-average value or even a measurement sequence, as is the case in the Scope mode. The CALC:FEED determines which of this data is to be processed by the calculate block. Depending on the measurement mode, the following settings are possible: Primary channel measurement mode <string> Meaning ContAv "POWer:AVERage" Average value Burst "POWer:AVERage" Average value Timeslot "POWer:AVERage" Average value Timegate "POWer:AVERage" Average value "POWer:TRACe" "POWer:AVERage ON SWEep[1..4]" "POWer:PTAVerage ON SWEep[1..4]" "POWer:PEAK ON SWEep[1..4]" Measurement sequence Average value in time gate 1, 2, 3 or 4 Peak-to-average value in time gate 1, 2, 3 or 4 Peak value in time gate 1, 2, 3 or 4 Scope CALC:FEED is only important if used in the Scope mode. Average values are processed exclusively in all other modes. *RST value: "POW:AVER" 2 CALC:EXTR:RES is identical to CALC:PHOLd:CLEar. See Annex "Compatibility Information". 1144.1400.12 6.22 E-3 R&S NRP CALCulate[1..8]:LIMit:BEEP Remote Control - Commands ON | OFF Switches the acoustic warning for limit violations on or off. *RST value: OFF CALCulate[1..8]:LIMit:CLEar[:IMMediate] Resets the limit monitoring state and the internal counter for limit violations. CALCulate[1..8]:LIMit:CLEar:AUTO ON | OFF | ONCE Automatically resets the limit monitoring state and the internal counter for limit violations if any of the following events occurs: • • • • INITiate[:IMMediate] is executed INITiate:CONTinuous ON is executed A MEASure? or MEASure:...? query is executed. A READ? or READ:...? query is executed. If the automatic function is set to ONCE, the counter is reset only when the next of these events occurs. *RST value: OFF CALCulate[1..8]:LIMit:FAIL? Queries whether upper or lower limits have been exceeded. The status is reset by the following events (0 = no limit violation): • • • The device is switched on A reset is performed (*RST) The CALCulate[1..8]:LIMit:CLEar command is sent. 1144.1400.12 6.23 E-3 Remote Control - Commands R&S NRP CALCulate[1..8]:LIMit:FCOunt? This query returns the number of limit violations that occurred. The counter is zeroed when the following events occur: • • • The device is switched on A reset is performed (*RST) The CALCulate[1..8]:LIMit:CLEar command is sent. CALCulate[1..8]:LIMit:LOWer[:DATA][?] <float_value> This command sets a lower limit for the measured values. The R&S NRP can respond when the values drop below this limit (see other CALCulate[1..8]:LIMit commands). The parameter unit is determined according to Table 6-3. The value range depends on the current output unit of the calculate block's measured value: Unit of measured value W DBM DBUV DPCT DB O Value range -9.99999E5 .. 9.99999E5 -120 .. 90 -13.0103 .. 196.897 -100 .. 999.99 -200 .. 200 -1E20 .. 1E20 Unit: Æ Table 6-3 on page 6.27. *RST value: 0 DBM or 0 DB CALCulate[1..8]:LIMit:LOWer[:DATA]:POWer[?] <float_value> This command sets a lower limit for the measured power (unit W, DBM or DBUV). The R&S NRP can respond when the values drop below this limit (see other CALCulate[1..8]:LIMit commands). Unit: DBM | W | DBUV Default unit: DBM Value range: -120 DBM to 90 DBM *RST value: 0 DBM CALCulate[1..8]:LIMit:LOWer[:DATA]:RATio[?] <float_value> This command sets a lower limit for the measured power ratios (unit DB, DPCT or O). The R&S NRP can respond when the ratios drop below this limit (see other CALCulate[1..8]:LIMit commands). Unit: DB | DPCT | O Default unit: DB Value range: -200..200 DB *RST value: 0 DB 1144.1400.12 6.24 E-3 R&S NRP Remote Control - Commands CALCulate[1..8]:LIMit:LOWer:STATe[?] ON | OFF This command switches the monitoring function for the lower limit on or off. *RST value: OFF CALCulate[1..8]:LIMit:UPPer[:DATA][?] <float_value> This command sets an upper limit for the measured values. The R&S NRP can respond when this limit is exceeded (see other CALCulate[1..8]:LIMit commands). The value range depends on the current output unit of the measured value of the calculate block. Unit of measured value W DBM DBUV DPCT DB O Value range -9.99999E5 .. 9.99999E5 -120 .. 90 -13.0103 .. 196.897 -100 .. 999.99 -200 .. 200 -1E20 .. 1E20 Unit: Æ Table 6-3 on page 6.27. *RST value: 0 DBM or 0 DB CALCulate[1..8]:LIMit:UPPer[:DATA]:POWer[?] <float_value> This command sets an upper limit for the measured power (unit W, DBM or DBUV). The R&S NRP can respond when this limit is exceeded (see other CALCulate[1..8]:LIMit commands). Unit: DBM | W | DBUV Default unit: DBM Value range: -120 DBM to 90 DBM *RST value: 0 DBM CALCulate[1..8]:LIMit:UPPer[:DATA]:RATio[?] <float_value> This command sets an upper limit for the measured power ratios (unit DB, DPCT or O). The R&S NRP can respond when this limit is exceeded (see other CALCulate[1..8]:LIMit commands). Unit: DB | DPCT | O Default unit: DB Value range: -200 DB to 200 DB *RST value: 0 DB CALCulate[1..8]:LIMit:UPPer:STATe[?] ON | OFF This command switches the monitoring function for the upper limit on or off. *RST value: OFF 1144.1400.12 6.25 E-3 Remote Control - Commands R&S NRP CALCulate[1..8]:MATH[:EXPRession][?] <string> The <string> parameter may assume the following values (1, 2, 3 and 4 for n and m). A sensor must be connected to the respective channel. <string> Meaning "(SENS1)" "(SENS2)" "(SENS3)" "(SENS4)" The calculate block outputs the measured value of sensor A. The calculate block outputs the measured value of sensor B. The calculate block outputs the measured value of sensor C. The calculate block outputs the measured value of sensor D. "(SENSn-SENSm)" The calculate block outputs the difference between the measured values of sensor n and sensor m. "(SENSn+SENSm)" The calculate block outputs the sum of the measured values of sensor n and sensor m. "(SENSn /SENSm)" The calculate block outputs the quotient of the values measured by sensor n and m. "SWR(SENSn,SENSm)" 1 + SENSm / SENSn 1 − SENSm / SENSn If sensor n measures the forward power of a wave and sensor m the reflected power, the calculate block outputs the standing wave ratio of this wave. The output unit is set to percent (UNIT:RAT PCT). "REFL(SENSn,SENSm)" SENSm / SENSn If sensor n measures the forward power of a wave and sensor m the reflected/transmitted power, the calculate block outputs the reflection coefficient/transmission factor of a DUT. The output unit is set to percent (UNIT:RAT PCT). "RLOS(SENSn,SENSm)" − 20 log10 SENSm / SENSn If sensor n measures the forward power of a wave and sensor m the reflected/transmitted power, the calculate block outputs the return loss/transmission loss of a DUT. This function principally supplies the same result as the (SENSn/SENSm) function. The difference is that the output unit is automatically set to dB. (UNIT:RAT DB). This command selects a measurement function that processes one sensor or two together. The result of this calculation is made available as a measured value and can be queried with FETch[1..8]? or CALCulate[1..8]:DATA?. *RST value: CALC1:MATH CALC2:MATH CALC3:MATH CALC4:MATH CALC5:MATH CALC6:MATH CALC7:MATH CALC8:MATH "(SENS1)", "(SENS2)", "(SENS3)", "(SENS4)", "(SENS1)", "(SENS1)", "(SENS1)", "(SENS1)". Error messages: -151 "Invalid string data": An invalid <string> parameter was transmitted. 1144.1400.12 6.26 E-3 R&S NRP Remote Control - Commands CALCulate[1..8]:MATH[:EXPRession]:CATalog? Lists all supported calculation functions. All functions are sent in the form of strings which are allowed as parameters for the CALCulate[1..8]:MATH:EXPRession command. CALCulate[1..8]:RELative[:MAGNitude][?] <float_value> This command determines a value that is used as a divisor (logarithmic subtraction) for all measured values of the calculate block in the CALC:REL:STAT ON state. The unit of this value is equal to the unit of the output value of the calculate block and is defined according to Table 6-3: Table 6-3: Output unit of measured value of calculate block. CALC:MATH? CALC:REL:STAT OFF CALC:REL:STAT ON "(SENSn)" DBM | W | DBUV DB | DPCT | O "(SENSn-SENSm)" DBM | W | DBUV DB | DPCT | O "(SENSn+SENSm)" DBM | W | DBUV DB | DPCT | O "(SENSn/SENSm)" DB | DPCT | O DB | DPCT | O "SWR(SENSn,SENSm)" O - "REFL(SENSn,SENSm)" O - "RLOS(SENSn,SENSm)" DB - The value range depends on the current output unit of the measured value of the calculate block. Unit of measured value W DBM DBUV DPCT DB O Value range -9.99999E5 .. 9.99999E5 -120 .. 90 -13.0103 .. 196.897 -100 .. 999.99 -200 .. 200 -1E20 .. 1E20 Unit: Æ Table 6-3. *RST value: 0 DBM or 0 DB 1144.1400.12 6.27 E-3 Remote Control - Commands R&S NRP CALCulate[1..8]:RELative:POWer[:MAGNitude] [?] <float_value> Has the same direct effect as CALC:REL on the reference value for measured values that share the unit of a power. Unit: DBM | W Default unit: DBM Value range: 1e-18..1e18 W | -150..210 DBM *RST value: 0 DBM CALCulate[1..8]:RELative:RATio[:MAGNitude] [?] <float_value> Has the same direct effect as CALC:REL on the reference value for measured values that share the unit of a power ratio. Unit: DB | PCT Default unit: DB Value range: -200..200 DB | 1e-18..1e22 PCT *RST value: 0 DB CALCulate[1..8]:RELative[:MAGNitude]:AUTO[?] OFF | ONCE Sets the current measured value as the reference value. When used as a setting command, this command can only be called by the parameter ONCE. OFF will be ignored. OFF is always returned in response to a query. *RST value: OFF Error messages: -230 "Data corrupt or stale": The current measured value is invalid. CALCulate[1..8]:RELative:STATe[?] ON | OFF Determines whether a reference value is used. If this command is called with ON, all results of the calculate block are divided by the reference value set with CALCulate[1..8]:RELative[:MAGNitude]. *RST value: OFF 1144.1400.12 6.28 E-3 R&S NRP Remote Control - Commands CALibration Table 6-4: Commands of the CALibration system Command Parameter CALibration[1..4|:ALL] :ZERO :AUTO[?] :DATA[?] Unit ON|OFF|ONCE <block_data> CALibration[1..4|:ALL]:ZERO:AUTO[?] Remark ON | OFF | ONCE The CALibration[1..4]:ZERO:AUTO ONCE command performs zeroing using the signal at the sensor input. The sensor must be disconnected from all power sources. If the signal at the input considerably deviates from 0 W, an error message is issued and the command is aborted (SCPI error 231, "Data questionable; ZERO ERROR"). When used as a setting command, CAL[1..4]:ZERO:AUTO accepts only the parameter ONCE (start of zeroing); OFF is ignored and ON is not accepted. A query returns ON if a calibration is running, in all other cases OFF. The command is overlapping, i.e. other commands can be sent to the R&S NRP while one or more calibrations are running. Zeroing is recommended if • • • • the temperature has varied by more than about 5 °C, the sensor has been replaced, no zeroing was performed in the last 24 hours, signals of very low power are to be measured, for instance, if the expected measured value is less than 10 dB above the lower measurement range limit. *RST value: OFF Error messages: -224 "Illegal parameter value": The transfer parameter is a numeric value unequal 0 (corresponds to OFF). CALibration[1..4|:ALL]:DATA[?] <block_data> This command is used to read and write binary calibration data sets for the sensors. 1144.1400.12 6.29 E-3 Remote Control - Commands R&S NRP DISPlay The DISPlay command system is mainly used to configure the display of windows on the R&S NRP. The WINDow commands are assigned to the calculate blocks 1 to 4. The values calculated from the sensor values by the respective calculate block with the aid of the measurement function are displayed. Table 6-5: Commands of the DISPlay system Command Parameter DISPlay :ILLumination[?] <boolean> - <boolean> - - - - - :ERRorlist[:STATe][?] :MESSage [:STATe][?] :TEXT :CLEar [:DATA] :TYPE[?] :PIXMap? :UPDate[?] [:WINDow][1..4] :AVALue[?] :FORMat[?] :METer | :ANALog :AUTo[?] :LOWer[?] QUERy|MESSage NORMal|SLOW|FREeze MINimum | MAXimum PTPeak | OFF DIGital|ANALog| GRAPhical ONCE|OFF <float_value> :POWer[?] <float_value> :RATio[?] <float_value> :UPPer[?] Unit | Remark No query No query Query only - - The value range of the parameter depends on the output unit of the measured value. DBM| W|DBUV DB| DPCT|O The value range of the parameter - <float_value> depends on the output unit of the measured value. :POWer[?] <float_value> :RATio[?] <float_value> :NAME[?] :RESolution[?] [:STATe][?] :TRACe :LOWer[?] :UPPer[?] :TSLot[?] :WINDow :SELect[?] :SIZE[?] <string> 1|0.1|0.01|0.001 ON|OFF <float_value> DBM| W|DBUV DBM| W|DBUV - <float_value> <int_value> 1|2|3|4 NORMal|ZOOMed DISPlay:ILLumination[?] DBM| W|DBUV DB| DPCT|O - - ON | OFF3 This command switches the backlighting (ON) or (OFF). Backlighting is switched on again in case of a reset. *RST value: ON 3 DISP:ILL is identical to DISP:ENABle. See Annex "Compatibility Information". 1144.1400.12 6.30 E-3 R&S NRP Remote Control - Commands DISPlay:ERRorlist[?] ON | OFF Displays (ON) or removes (OFF) a windows which contains the contents of the SCPI error queue. The queue may be deleted by pressing the ( DEL ) key. *RST-Value: OFF DISPlay:MESSage[:STATe][?] ON | OFF Displays a window containing a user-defined message. The message text is defined via DISP:MESS:TEXT. In addition, DISP:MESS:TYPE can select between two types of message windows. Calling the command with the OFF parameter is ignored if DISP:MESS:TYPE QUERy is set, because in this case a window must be closed by pressing the (¶MENU) key. *RST value: OFF DISPlay:MESSage:TEXT:CLEar Deletes the stored text for user-defined messages. DISPlay:MESSage:TEXT[:DATA] <string> Defines the text that can be displayed in a message window. The text can contain ASCII characters from code 32 (" ") to code 126 ("~"). The string "\n" is interpreted as a line break. Up to 4 lines (DISP:MESS:TYPE MESS) or up to 2 lines (DISP:MESS:TYPE QUERy) can be shown. The length of a line depends on the characters used, because a proportional font is used. Lines that are too long are cut off, which is indicated by "..." at the end of the line. *RST value: none DISPlay:MESSage:TYPE QUERy | MESSage Sets the mode for the expected user response, if the window with the user-defined message is displayed: QUERy The message window must be closed by pressing the (¶MENU) key. The execution of remote control commands is blocked until this has been done. MESSage Remote control command processing is immediately continued. The message window must be closed with DISP:MESS OFF if it is no longer needed. *RST value: MESSage 1144.1400.12 6.31 E-3 Remote Control - Commands R&S NRP DISPlay:PIXMap? <block_data> Supplies the display content as binary block data. The content is sent line by line with one bit corresponding exactly to one pixel. Example: DISP:PIXM? returns: #49600xxxxxxx...x, with x in binary format comprising the display contents. DISPlay:UPDate[?] NORMal | SLOW | FREeze Adjust the update frequency of the measured values in the display. In case of discontinuities in the voltage progress at the analog outputs display updates may be suspended with DISP:UPD FREeze. The display won't consume CPU time in this state. *RST-Value: NORMal DISPlay[:WINDow][1..4]:AVALue[?] MINimum | MAXimum | PTPeak | OFF Determines which additional information about the measured values is shown in the display. MINimum MAXimum Minimum/Maximum of all measured values since the last CALC:EXTR:RES or Power On, respectively. PTPeak Differenz (linear units) or logarithmic ratio (logarithmic units) of maximum and minimum of all measured values since the last CALC:EXTR:RES or Power On, respectively. OFF No additional information is displayed. *RST-Wert: OFF DISPlay[:WINDow][1..4]:FORMat[?] DIGital | ANALog | GRAPhical Selects the display mode for measured data. DIGital Measured values are displayed in numeric format. ANALog Measured values are indicated by a marker on a scale. The values at the upper and lower scale end as well as the type of scaling (linear or logarithmic) are set with the following :METer commands. GRAPhical Measured values are plotted over time. This kind of presentation is possible only if the Primary Channel is operated in Scope mode. *RST value: DIGital 1144.1400.12 6.32 E-3 R&S NRP Remote Control - Commands DISPlay[:WINDow][1..4]:METer|:ANALog:AUTo[?] ONCE | OFF DISP:AUTO ONCE automatically determines scaling for the analog display. The upper and the lower limit value of the display is set as a function of the current measurement data. Only the ONCE parameter is permissible; a query always supplies the value OFF. *RST value: OFF DISPlay[:WINDow][1..4]:METer|:ANALog:LOWer[?] <float_value> Sets the lower limit value of the analog scale. The value range depends on the current output unit of the measured value of the window. Unit of measured value Value range for <float_value> W DBM PCT DB 1e-18..1e18 -150..210 1e-18..1e22 -200..200 Unit: Æ Table 6-3 on page 6.27. *RST value: -90 DBM or -120 DB DISPlay[:WINDow][1..4]:METer|:ANALog:LOWer:POWer[?] <float_value> Sets the lower limit value of the analog scale. This value is used if the unit of the measurement result is Watt, dBm or dBµV, i.e. the measurement result is a power. Unit: DBM | W | DBUV Default unit: DBM Value range: see DISPlay[:WINDow]:METer|:ANALog:LOWer[?] *RST value: -90 DBM DISPlay[:WINDow][1..4]:METer|:ANALog:LOWer:RATio[?] <float_value> Sets the lower limit value of the analog scale. This value is used if the unit of the measurement result is dB, percent or the number 1, i.e. the measurement result is a power ratio. Unit: DB | DPCT | O Default unit: DB Value range: see DISPlay[:WINDow]:METer|:ANALog:LOWer[?] *RST value: -120 DB 1144.1400.12 6.33 E-3 Remote Control - Commands R&S NRP DISPlay[:WINDow][1..4]:METer|:ANALog:UPPer[?] <float_value> Sets the upper limit value of the analog scale. The value range depends on the current output unit of the measured value of the window. Unit of measured value W DBM DBUV DPCT DB O Value range -9.99999E5 .. 9.99999E5 -120 .. 90 -13.0103 .. 196.897 -100 .. 999.99 -200 .. 200 -1E20 .. 1E20 Unit: Æ Table 6-3 on page 6.27. *RST value: 30 DBM or 60 DB DISPlay[:WINDow][1..4]:METer|:ANALog:UPPer:POWer[?] <float_value> Sets the upper limit value of the analog scale. This value is used if the unit of the measurement result is Watt, dBm or dBµV, i.e. the measurement result is a power. Unit: DBM | W | DBUV Default unit: DBM Value range: see DISPlay[:WINDow]:METer|:ANALog:UPPer[?] *RST value: 30 DBM DISPlay[:WINDow][1..4]:METer|:ANALog:UPPer:RATio[?] <float_value> Sets the upper limit value of the analog scale. This value is used if the unit of the measurement result is dB, percent or the number 1, i.e. the measurement result is a power ratio. Unit: DB | DPCT | O Default unit: DB Value range: see DISPlay[:WINDow]:METer|:ANALog:UPPer[?] *RST value: 60 DB DISPlay[:WINDow][1..4]:NAME[?] <string> Determines the string to be displayed in the titlebar of the respective window. The reset values depend on the window (<n> = 1, 2, 3 or 4). *RST value: "" Example: DISP1:NAME "Power In" DISP2:NAME "Power Out" The measured values in the display are now visually assigned to the different test points in the test setup. (Input power in window 1, output power in window 2). 1144.1400.12 6.34 E-3 R&S NRP Remote Control - Commands DISPlay[:WINDow][1..4]:RESolution[?] 1 | 0.1 | 0.01 | 0.001 Specifies the number of significant places of the mantissa when the measurement result is displayed on a linear scale. The R&S NRP tries to adjust the averaging filter range so that the display noise decreases with increasing resolution. The values of the transfer parameter have the following meaning: Parameter Linear scale of measurement result Logarithmic scale of measurement result 1 1 significant place No decimal place 0.1 2 significant places 1 decimal place 0.01 3 significant places 2 decimal places 0.001 4 significant places 3 decimal places Note: Automatic filter ranging must be switched on (SENSe[1..4]:AVERage:COUNt:AUTO ON). DISP[1..8]:RES has an effect on the setting SENS[1..4]:AVER:COUN:AUTO:RES of the sensors used in the measurement function (CALC[1..8]:MATH). However, the resolution setting of the sensors does not affect the resolution of values in the display. This command corresponds to the <resolution> option of the high-level measurement commands CONFigure, FETCH, READ and MEASure. *RST value: 0.01 Error messages: -127 "Invalid numeric data": An invalid number was specified for the resolution. Example: DISP:WIND1:RES 0.1 With a measured value of 123.456789 W, the first two places are free of noise and thus 120 W is displayed. DISPlay[:WINDow][1..4][:STATe][?] ON | OFF Opens or closes a window. When a window is closed the other windows are automatically expanded so that the free space is utilized. Likewise, open windows become smaller when a new one is opened. *RST value: ON (Window 1) OFF (Window 2,3,4) 1144.1400.12 6.35 E-3 Remote Control - Commands R&S NRP DISPlay[:WINDow][1..4]:TRACe:LOWer[?] <float_value> Sets the lower limit for the power axis in the Scope mode. The value range depends on the unit. Unit of measured value W DBM DBUV Value range -999.999E3 .. 999.999E3 -120 .. 90 -13.010 .. 136.990 Default unit: DBM Unit: DBM | W | DBUV Value range: see above *RST value: -120 DBM DISPlay[:WINDow][1..4]:TRACe:UPPer[?] <float_value> Sets the upper limit for the power axis in the Scope mode. The value range depends on the unit. Unit of measured value W DBM DBUV Value range -999.999E3 .. 999.999E3 -120 .. 90 -13.010 .. 136.990 Default unit: DBM Unit: DBM | W | DBUV Value range: see above *RST value: 30 DBM DISPlay[:WINDow][1..4]:TSLot[?] <int_value> Sets the displayed timeslot, if the primary or secondary channel is operated in the Timeslot mode. Value range: depends on sensor *RST value: 1 DISPlay:WINDow:SELect[?] 1 | 2 | 3 | 4 Selects a window. *RST value: 1 1144.1400.12 6.36 E-3 R&S NRP Remote Control - Commands DISPlay:WINDow:SIZE[?] NORMal | ZOOMed Sets the window size. NORMal The window size is determined automatically and depends on the total number of open windows. ZOOMed The selected window (DISP:WIND:SEL[?]) is set to maximum size, regardless of the the number of visible windows. Any other open windows are covered. *RST value: NORMal 1144.1400.12 6.37 E-3 Remote Control - Commands R&S NRP FORMat The FORMat command system sets the format of numeric data (measured values) that is exchanged beween the remote control computer and the R&S NRP if high-level measurement commands are used. Table 6-6: Commands of the FORMat command system Command Parameter FORMat[:READings] :BORDer[?] [:DATA][?] NORMal | SWAPped ASCii | REAL FORMat[:READings]:BORDer[?] Unit Remark - NORMal | SWAPped Influences the order of bytes in 64-bit binary data. NORMal The 1st byte is the MSB (most significant byte), the 8th byte the LSB (least significant byte). This fulfills the Big Endian convention (Big Endian: "the big end comes first"). SWAPped The 1st byte is the LSB (least significant byte), the 8th byte the MSB (most significant byte). This fulfills the Little Endian convention. *RST value: NORMal FORMat[:READings][:DATA][?] ASCii | REAL Specifies whether numeric data is sent as block data in binary form (REAL) or as character strings in plain text (ASCII). *RST value: ASCii 1144.1400.12 6.38 E-3 R&S NRP Remote Control - Commands MEMory The MEMory system is used for storing device states (:STATe) and correction tables (:TABLe). :STATe To allow a rapid and convenient changeover between device setups for different applications, up to 20 setups can be stored in the device. The setup with the number 0 is the default setup made in the factory. This setup can neither be changed nor cleared. :TABLe Tables can be stored for a frequency-dependent correction of measured values. Up to 10 tables with two columns and up to 80 entries (lines) can be created. Thus, not only the sensors but also the frequency response of various test assemblies can be compensated for during the measurement. The tables are selected with [SENSe[1..4]]:CORRection:FDOT[:SELect]and then activated and deactivated with [SENSe[1..4]]:CORRection:FDOT[?]:STATe. Names can be assigned to the tables. Some commands which do not specify a table name affect the table currently selected with MEM:TABL:SEL <name>. Note: Stored data is not affected by an *RST command. Table 6-7: Commands of the MEMory system Command MEMory :CATalog [:ALL]? :STATe? :TABLe? :CLEar [:NAME] :TABLe :FREE [:ALL]? :STATe? :TABLe? :NSTates? :STATe :CATalog? :DEFine|:MAP[?] :TABLe :FREQuency[?] :POINts? :GAIN [:MAGNitude][?] :POINts? :MAP[?] :MOVE :SELect[?] 1144.1400.12 Parameter Unit Remark - - Query only Query only Query only <name> - - No query No query - - Query only Query only Query only Query only <string>, 0..19 - Query only <NRf>{,<NRf>} - HZ - <NRf>{,<NRf>} <string>, 0..9 <string>,<string> <string> 6.39 Query only DB|PCT Query only No query - E-3 Remote Control - Commands R&S NRP MEMory:CATalog[:ALL]? Lists the names of all stored device states and correction tables. The length of the response depends on how many device states and tables are stored. It has the following format: <NR1>, <NR1> {,"<string>"} The first two values denote the length in bytes of the occupied RAM and of the RAM still available for storing states and tables. These values are followed by a string for each stored state and then for each stored table; this string again consists of two strings and a numeric value: <string>, <type>, <NR1> <string> gives the name of the stored data item, <type> the type (TABL or STAT) and <NR1> the length of the data item in bytes. Example: The response to query MEM:CAT? could be: 956,99044,"REFL,STAT,408","NRPZ21,TABL,432","SPLITTER1,TABL,116" MEMory:CATalog:STATe? This query only gives a MEMory:CATalog[:ALL]?. list of stored device states and is otherwise identical with MEMory:CATalog:TABLe? This query only gives a list of stored correction tables and is otherwise identical with MEMory:CATalog[:ALL]?. MEMory:CLEar[:NAME] <string> Clears the content of the correction table or the stored device state with the designation <name>. The table is maintained but does not contain entries. Caution: This command cannot be cancelled. Cleared values are irretrievably lost. MEMory:CLEar:TABLe This command may be used as an alternative to MEMory:CLEar[:NAME] <string>. The content of the table currently selected with MEMory:TABLe:SELect[?] <string> is cleared. MEMory:FREE[:ALL]? Returns the number of bytes available in memory for storing correction tables and device states as well as the memory already used. 1144.1400.12 6.40 E-3 R&S NRP Remote Control - Commands MEMory:FREE:STATe? Returns the number of bytes available in memory for storing device states as well as the memory already used for device states. MEMory:FREE:TABLe? Returns the number of bytes available in memory for storing device states as well as the memory already used for device states. MEMory:NSTates? Returns the number of storable device states. Since 20 device states can be stored, 20 is always returned. MEMory:STATe:CATalog? Returns a list of names of stored device states in the format <string>{,<string>} MEMory:STATe:DEFine|:MAP <string>, 1..19 MEMory:STATe:DEFine|:MAP? <string> The value 0 to 19 are assigned to the memory locations of the device states, where the memory location with the number 0 is the factory-set state and cannot be changed. Names (<string>) can be assigned to these numbers with MEM:STAT:DEF (except for the factory-set state). The command MEM:CLE[:NAME] expects parameters that are actually strings rather than the numbers of the memory locations. The default names of these memory locations are "Setup 0" to "Setup 19". The name may contain the characters A to Z, a to z, 0 to 9 and "_". The query of this command returns the number of the memory location with the name of <string>. MEMory:TABLe:FREQuency[?] <NRf>{,<NRf>} This command enters frequencies in the first column of the table selected with MEM:TABL:SEL. Existing data for frequencies will be overwritten. The number of frequencies should match the number of offset values. If the number of frequencies differs from the number of offset values, the shorter column length will be used. SENS[1..4]:FREQ can be used to determine a frequency for which a correction factor is then defined by means of the offset table. If the exact frequency selected is not in the table, the values in the table are interpolated. If the selected frequency is outside the specified frequency range, the frst or last offset value of the table is selected. Interpolation is linear in the units HZ and DB. Unit: HZ *RST values: Tables are not changed in case of a *RST. 1144.1400.12 6.41 E-3 Remote Control - Commands R&S NRP MEMory:TABLe:FREQuency:POINts? Returns the number of entries (lines) in the table selected with MEM:TABL:SEL <name>. MEMory:TABLe:GAIN[:MAGNitude][?] <NRf>{,<NRf>} This command enters offset values in the second column of the table selected with MEM:TABL:SEL. Existing data for offset values will be overwritten. The number of frequencies should match with the number of offset values. If the number of frequencies differs from the number of offset values, the shorter column length will be used. A frequency can be determined with SENS[1..4]:FREQ, for which a correction factor is then calculated by means of the offset table. If the exact frequency selected is not in the table, the values in the table are interpolated. If the selected frequency is outside the specified frequency range, the first or last offset value of the table is selected. Interpolation is linear in the units HZ and DB. Unit: DB | PCT Default unit: DB *RST values: Tables are not changed in case of *RST. MEMory:TABLe:GAIN:POINts? Returns the number of entries (lines) in the table selected with MEM:TABL:SEL <string>. MEMory:TABLe:MAP <string>, 1..9 MEMory:TABLe:MAP? <string> The numbers 0 to 9 are permanently assigned to the memory locations for device states. Names (<string>) can be assigned to the numbers with MEM:TABL:MAP. The MEM:CLE[:NAME], MEM:TABL:MOVE and MEM:TABL:SEL commands expect these names as parameters, not the numbers of the memory locations. By default the tables are assigned the names "Table 1" to "Table 10". The name can contain the characters "A" to "Z", "a" to "z", "0" to "9" and "_". The query form of this command returns the number of the memory location with the name <string>. MEMory:TABLe:MOVE <string>,<string> This command allows tables to be renamed. The first parameter specifies the old name, the second the new name. No data is copied, i.e. only the name of the table changes. Example: The command MEM:TABL:MOVE "Table 1","Test setup" renames the table "Table 1" into "Test setup" . 1144.1400.12 6.42 E-3 R&S NRP MEMory:TABLe:SELect[?] Remote Control - Commands <string> Selects the table name < string>. The following commands affect this table: • • • MEMory:CLEar[:NAMe] <string> MEMory:CLEar:TABLe all MEMory:TABLe commands The selection is not changed in case of an *RST or a SYSTem:PRESet. *RST value: none Error messages: -256 "File name not found": A table named <string> is not known. 1144.1400.12 6.43 E-3 Remote Control - Commands R&S NRP OUTPut The OUTPut system serves for generator configuration. The R&S NRP can be equipped with an optional RF test generator which produces a reference power of 1 mW at 50 MHz. Moreover, the analog outputs at the rear of the power meter can be configured. Table 6-8: Commands of the OUTPut system Command Parameter Unit OUTPut :RECorder[1|2] :FEED[?] :LIMit :LOWer[?] <string> - <float_value> - :POWer[?] <float_value> :RATio[?] <float_value> :UPPer[?] <float_value> Remark The value range of the parameter depends on the output unit of the measured value. DBM| W|DBUV DB| DPCT|O The value range of the parameter depends on the output unit of the measured value. :POWer[?] <float_value> :RATio[?] <float_value> :STATe[?] :ROSCillator [:STATe][?] :CALibration :READ? :WRIte :TTL[1] :ACTive[?] :FAIL[?] :FEED[?] :HVOLtage :LVOLtage :STATe[?] ON|OFF DBM| W|DBUV DB| DPCT|O Option R&S NRP-B1 ON|OFF <NR1> <NR1>,<NR1> - LOW|HIGH HIGH|LOW <string> <float_value> <float_value> ON|OFF V V - OUTPut:RECorder[1..2]:FEED[?] Option R&S NRP-B1 Option R&S NRP-B1 <string> Assigns a calculate block to one of the two analog outputs. On the basis of the set characteristic, the measured value is converted to a DC voltage that can be tapped at the appropriate output. Value range: "CALC1", "CALC2", "CALC3", "CALC4" *RST value: output 1: "CALC1" output 2: "CALC2" 1144.1400.12 6.44 E-3 R&S NRP Remote Control - Commands OUTPut:RECorder[1..2]:LIMit:LOWer[?] <float_value> Voltage 3.3 V 3.0 V Power 0.0 V OUTP:REC:LIM:LOW OUTP:REC:LIM:UPP Figure 6-5: Characteristic of analog outputs Specifies the lower power limit of the characteristic for one of the two analog outputs (ÆFigure 6-5). The unit corresponds to the output unit of the measured value. The value range also depends on which output unit the measured value in the window currently has: Unit of measured value W DBM DBUV DPCT DB O Value range -9.99999E5 .. 9.99999E5 -120 .. 90 -13.0103 .. 196.897 -100 .. 999.99 -200 .. 200 -1E20 .. 1E20 Unit: Æ Table 6-3 on page 6.27. *RST value: -20 DBM or 0 DB Note: The characteristic is linear in the selected unit of the measured value. OUTPut:RECorder[1..2]:LIMit:LOWer:POWer[?] <float_value> Specifies the lower power limit of the characteristic for one of the two analog outputs if the associated calculate block returns a power (unit DBM, W or DBUV) as measured value (ÆFigure 6-5). Value range: -120 DBM to 90 DBM Unit: DBM | W | DBUV Default unit: DBM *RST value: -20 DBM 1144.1400.12 6.45 E-3 Remote Control - Commands R&S NRP OUTPut:RECorder[1..2]:LIMit:LOWer:RATio[?] <float_value> Specifies the lower power limit of the characteristic for one of the two analog outputs if the associated calculate block returns a power ratio (unit DB, DPCT or O) as the measured value (ÆFigure 6-5). Value range: -200 DB .. 200 DB Unit: DB | DPCT | O Default unit: DB *RST value: 0 DB OUTPut:RECorder[1..2]:LIMit:UPPer[?] <float_value> Specifies the upper power limit of the characteristic for one of the two analog outputs (ÆFigure 6-5). The unit corresponds to the output unit of the measured value. The value range also depends on the current output unit of the measured value in the window: Unit of measured value W DBM DBUV DPCT DB O Value range -9.99999E5 .. 9.99999E5 -120 .. 90 -13.0103 .. 196.897 -100 .. 999.99 -200 .. 200 -1E20 .. 1E20 Unit: Æ Table 6-3 on page 6.27. *RST value: 20 DBM or 10 DB OUTPut:RECorder[1..2]:LIMit:UPPer:POWer[?] <float_value> Specifies the upper power limit of the characteristic for one of the two analog outputs if the associated calculate block returns a power (unit DBM, W or DBUV) as the measured value (ÆFigure 6-5). Value range: -120 DBM to 90 DBM Unit: DBM | W | DBUV Default unit: DBM *RST value: 20 DBM OUTPut:RECorder[1..2]:LIMit:UPPer:RATio[?] <float_value> Specifies the upper power limit of the characteristic for one of the two analog outputs if the associated calculate block returns a power ratio (unit DB, DPCT or O) as the measured value (ÆFigure 6-5). Value range: -200 DB .. 200 DB Unit: DB | DPCT | O Default unit: DB *RST value: 10 DB 1144.1400.12 6.46 E-3 R&S NRP Remote Control - Commands OUTPut:RECorder[1..2]:STATe[?] ON | OFF Switches the analog outputs (OUT1 and OUT2/TRIG on rear panel) ON or OFF. The magnitude of the output voltage (0 V to 3.3 V) depends on the measured power of the assigned calculate block (OUTP:REC:FEED) and the configuration of the characteristic (OUTP:REC:LIM). As in manual operation, this setting is coupled to other operating modes of the outputs. Only one mode can be active at any one time: Connector Analog output (OUTP:REC) TTL output (OUTP:TTL) Off Ext. Trigger In OUT1 x x x - OUT2/TRIG x - - x *RST value: output 1: ON output 2: OFF OUTPut:ROSCillator[:STATe][?] ON | OFF The command switches the optional RF generator (ON) or (OFF). *RST value: OFF OUTPut:ROSCillator:CALibration:READ? <NR1> Reads the setting of one of the internal electronic potentiometers of the test generator (option R&S NRP-B1). The number of the potentiometer (1 to 4) is indicated with the parameter <NR1>. The response is an 8-bit integer with a sign (-128 to 127). *RST value: none OUTPut:ROSCillator:CALibration:WRIte <NR1>,<NR1> Sets the test generator (option R&S NRP-B1). Refer to the following table for the meaning of the two parameters: 1st parameter <NR1> 2nd parameter <NR1> 01: Generator on/off (2nd parameter 0: on / 1: off) 02: Power stage (2nd parameter 0: -20 dBm, 1: 0 dBm) 03: LED state (2nd parameter 0: off, 1: on, 0x02: blinking) 04: Start of calibration 05: Setting of potentiometer 1 (2nd parameter –128 to 127) 06: Setting of potentiometer 2 (2nd parameter –128 to 127) 07: Setting of potentiometer 3 (2nd parameter –128 to 127) 08: Setting of potentiometer 4 (2nd parameter –128 to 127) 09: Confirm calibration 10: Abort calibration Data if 1st parameter 01, 02, 03, 05, 06, 07 or 08. 0 if 1st parameter 04, 09 or 10. *RST value: none 1144.1400.12 6.47 E-3 Remote Control - Commands OUTPut:TTL[1]:ACTive[?] R&S NRP LOW | HIGH Specifies whether the value set via OUTP:TTL:LVOL (LOW) or via OUTP:TTL:HVOL (HIGH) should be applied if the measured value causes a limit violation at the TTL output. *RST value: LOW OUTPut:TTL[1]:FAIL[?] LOW | HIGH Specifies whether the value set via OUTP:TTL:LVOL (HIGH) or via OUTP:TTL:HVOL (LOW) should be applied if the measured value causes a limit violation at the TTL output. *RST value: HIGH Note: The OUTP:TTL:ACT and OUTP:TTL:FAIL commands are identical, except for the opposite meaning of the parameters. OUTPut:TTL[1]:FEED[?] <string> Sets the calculate block whose limit handling controls the TTL voltage. If the measured value of this calculate block violates a limit and limit monitoring is active, the voltage specified in ÆTable 6-9 (first line) is output. Value range: *RST value: "CALC1:LIM","CALC2:LIM","CALC3:LIM","CALC4:LIM" "CALC1:LIM" OUTPut:TTL[1]:HVOLtage[?] <float_value> Sets the high voltage for the TTL output. Unit: V Value range: *RST value: 0 V to 3.3 V 3.3 V OUTPut:TTL[1]:LVOLtage[?] <float_value> Sets the low voltage for the TTL output. Unit: V Value range: *RST value: 0 V to 3.3 V 0 V Note: 1144.1400.12 The value for the lower TTL level may be greater than the value for the upper TTL level. 6.48 E-3 R&S NRP Remote Control - Commands OUTPut:TTL[1]:STATe[?] ON | OFF Activates (ON) or deactivates (OFF) the TTL operating mode of the OUT1 connector (rear panel). The magnitude of the two possible output voltages can range from 0 V to 3.3 V (OUTP:TTL:HVOL and OUTP:TTL:LVOL). Refer to ÆTable 6-9 and Æ Figure 6-6 to determine which voltage is available at the output: OUTP:TTL:ACT LOW (OUTP:TTL:FAIL HIGH) OUTP:TTL:ACT HIGH (OUTP:TTL:FAIL LOW) Measured value violates limit OUTP:TTL:LVOL OUTP:TTL:HVOL Measured value is within limit OUTP:TTL:HVOL OUTP:TTL:LVOL Table 6-9: Voltage at TTL output O U T P : T T L : A C T H I G H ( O U T P : T T L : F A I L L O W ) V o lta g e O U T P : T T L : A C T ( O U T P : T T L : F A I L L O W H I G H ) O U T P : T T L : H V O L T P o w e r O U T P : T T L : L V O L T D I S P : L I M : L O W D I S P : L I M : U P P D I S P : L I M : L O W D I S P : L I M : U P P Figure 6-6: Voltage at TTL output *RST value: 1144.1400.12 OFF 6.49 E-3 Remote Control - Commands R&S NRP SENSe (Sensor Commands) The commands of the SENSe group configure the power sensors with the exception of the trigger system. This includes the measurement modes (ContAv, Burst, Timeslot or Scope), the offset corrections and the filter settings. Note: When the sensors are connected to the R&S NRP, they inform the device about the SENSe and TRIGger commands supported and about the value ranges for parameters. This applies to both numeric and text parameters. For this reason, no fixed ranges are specified with these commands; the ranges can be obtained from the respective sensor manual. Table 6-10: Commands of the SENSe system Command [SENSe[1..4]] :AVERage [:STATe][?] :COUNt[?] :AUTO[?] :MTIMe[?] :RESolution[?] :SLOT :NSRatio[?] :TYPE[?] :RESet [:STATe][?] :TCONtrol[?] :CORRection :OFFSet[?] :STATe[?] :DCYCle [:INPut][:MAGNitude][?] :STATe[?] :FDOFfset [:INPut][:MAGNitude]? :FDOTable [:SELect][?] :STATe[?] :SPDevice:STATe[?] :FREQuency[:CW|:FIXed][?] :FUNCtion[:ON][?] [:POWer] [:AVG] :APERture[?] :BUFFer:SIZE[?] :BUFFer:STATe[?] :RANGe[?] :AUTO[?] :AUTO:CLEVel[?] :SMOothing:STATe[?] :TGATe[1..4] :OFFSet:TIME[?] :TIME[?] :TGATe:SELect[?] :TSLot :COUNt[?] :WIDTh[?] 1144.1400.12 Parameter Unit ON|OFF <int_value> ON|OFF|ONCE <float_value> 1|2|3|4 <int_value> <float_value> RESolution|NSR ON|OFF MOVing|REPeat S DB|PCT - <float_value> ON|OFF DB|PCT - <float_value> ON|OFF PCT - - DB <string> ON|OFF ON|OFF <float_value> <string> HZ - <float_value> <int_value> ON|OFF 0|1|2 ON|OFF <float_value> ON|OFF S DB|PCT - <float_value> <float_value> 1|2|3|4 S S <int_value> <float_value> S 6.50 Remark no query E-3 R&S NRP Command :BURSt :DTOLerance[?] :SAMPLing[?] :SGAMma [:MAGNitude][?] :PHASe[?] :CORRection:STATe[?] :TRACe :AVERage [:STATe][?] :COUNt[?] :AUTO[?] :MTIMe[?] :RESolution[?] :POINt[?] :NSRatio[?] :TYPE[?] :TCONtrol[?] :OFFSet:TIME[?] :POINts[?] :REALtime[?] :TIME[?] :TIMing:EXCLude :STARt[?] :STOP[?] Remote Control - Commands Parameter Unit <float_value> FREQ1|FREQ2 S - <float_value> <float_value> ON|OFF - ON|OFF <int_value> ON|OFF|ONCE <float_value> 1|2|3|4 <int_value> <float_value> RESolution|NSR MOVing|REPeat <float_value> <int_value> ON|OFF <float_value> S DB|PCT S S <float_value> <float_value> S S [SENSe[1..4]]:AVERage[:STATe][?] Remark ON | OFF This command switches the filter function of a sensor on or off. When the filter is switched on, the number of measured values set with [SENSe[1..4]]:AVERage:COUNt is averaged. This reduces the effect of noise so that more reliable results are obtained. *RST value: depending on sensor [SENSe[1..4]]:AVERage:COUNt[?] <int_value> This command sets the filter length i.e. the number of readings to be averaged for one measured value.. The higher the count the lower the noise and the longer it takes to obtain a measured value. Unit: Value range: depending on sensor *RST value: depending on sensor [SENSe[1..4]]:AVERage:COUNt[?]:AUTO[?] ON | OFF | ONCE This command can be used to automatically determine a value for the filter legth [SENSe[1..4]]:AVERage:COUNt. If the command is called with the parameter ONCE, the filter length is automatically detected during the next measurement and set to that value. Thereafter automatic filter length detection is switched off. The setting can then be queried via SENS[1..4]:AVER:COUN?. If the automatic switchover is activated with the ON parameter, the sensor always defines a suitable filter length which can also be queried via SENS[1..4]:AVER:COUN?. *RST value: depending on sensor 1144.1400.12 6.51 E-3 Remote Control - Commands R&S NRP [SENSe[1..4]]:AVERage:COUNt:AUTO:MTIMe[?] <float_value> If the R&S NRP has to determine the filter length automatically, the filter length can become large and thus also the measurement time. An upper time limit can be set via SENS[1..4]:AVER:COUN:AUTO:MTIME (maximum time). It should never be exceeded. Undesired long measurement times can thus be prevented (in the SENS:AVER:COUN:AUTO:TYPE NSR mode) if the automatic filter length switchover is on. Unit: S Value range: depending on sensor *RST value: depending on sensor [SENSe[1..4]]:AVERage:COUNt:AUTO:RESolution[?] 1 | 2 | 3 | 4 Defines the number of significant places for linear units and the number of decimal places for logarithmic units which should be free of noise in the measurement result. This setting is also performed by the DISP[1..4]:RES command (Æ page 6.35) that tries to set the sensors involved in the measurement results accordingly. (For further details, see Chapter 4.) The setting is only taken into account, if SENS:AVER:COUN:AUTO:TYPE is set to RES SENS:AVER:COUN:AUTO is ON. and However, SENS[1..4]:AVER:COUN:AUTO:RES does not affect the DISPlay command. The parameters of the two commands are different but have the same meaning. SENS[1..4]:AVER:COUN:AUTO:RES 1 2 3 4 DISP[1..4]:RES 1 0.1 0.01 0.001 Unit: Value range: depending on sensor *RST value: depending on sensor [SENSe[1..4]]:AVERage:COUNt:AUTO:SLOT[?] <int_value> Sets a timeslot whose measured value is used to automatically determine the filter length. Unit: Value range: depending on sensor *RST value: depending on sensor 1144.1400.12 6.52 E-3 R&S NRP Remote Control - Commands [SENSe[1..4]]:AVERage:COUNt:AUTO:NSRatio[?] <float_value> Indicates the maximum noise ratio in the measurement result.Achieving the same result by filter length setting is attempted only if SENS[1..4]:AVER:COUN:AUTO ON and SENS[1..4]:AVER:COUN:AUTO:TYPE NSR are set. Unit: DB | PCT Default unit: DB Value range: depending on sensor *RST value: depending on sensor [SENSe[1..4]]:AVERage:COUNt:AUTO:TYPE[?] RESolution | NSR Selects a method by which the automatic filter length switchover can operate: SENS[1..4]:AVER:COUN:AUTO:TYPE Setting taken into account RESolution SENS[1..4]:AVER:COUN:AUTO:RES NSR SENS[1..4]:AVER:COUN:AUTO:NSR *RST value: depending on sensor [SENSe[1..4]]:AVERage:RESet Initializes the digital filter by deleting the stored measured values. *RST value: none [SENSe[1..4]]:AVERage:TCONtrol[?] MOVing | REPeat As soon as a new single value is determined, the filter window is advanced by one value so that the new value is taken into account by the filter and the oldest value is forgotten. [SENSe[1..4]]:AVERage:TCONtrol (terminal control) then determines whether a new result is calculated immediately after a new measured value is available (MOVing) or only after an entire range of new values is available for the filter (REPeat). *RST-Wert: (PRES) and SYST:PRES: *RST: Note: 1144.1400.12 MOV REP In the MOVing mode, data from a point of time before the start of the current measurement can influence the measurement result if the data is still in the filter. 6.53 E-3 Remote Control - Commands R&S NRP [SENSe[1..4]]:CORRection:OFFSet[?] <float_value> With this command a fixed offset value can be defined for multiplying (logarithmically adding) the measured value of a sensor. If the parameters are specified without a unit, the unit set by UNIT:POW:RAT will be used. Unit: DB | PCT Default unit: DB Value range: depending on sensor *RST value: depending on sensor [SENSe[1..4]]:CORRection:OFFSet[?]:STATe ON | OFF This command switches the offset correction on or off. *RST value: depending on sensor [SENSe[1..4]]:CORRection:DCYCle[:INPut][:MAGNitude][?] <float_value> This command informs the R&S NRP about the duty cycle of the power to be measured. The duty cycle correction is only applied in the ContAv mode where measurements are performed continuously without taking the timing of the signal into account. Unit: PCT Value range: depending on sensor *RST value: depending on sensor [SENSe[1..4]]:CORRection:DCYCle:STATe[?] ON | OFF This command switches duty cycle correction for the measured-value on or off. *RST value: depending on sensor [SENSe[1..4]]:CORRection:FDOFfset[:INPut][:MAGNitude]? <float_value> This command is a query only. The frequency-dependent measured-value correction is set by selecting a table with the [SENSe[1..4]]:CORRection:FDOTable[:SELect] and [SENSe[1..4]]:CORRection:FDOTable:STATe ON commands. The respective frequencydependent correction factor is determined by means of the active tables (if necessary by interpolation) and can be queried with [SENSe[1..4]]:CORRection:FDOFfset[:INPut][:MAGNitude]? (frequency-dependent offset). Unit: DB *RST value: none 1144.1400.12 6.54 E-3 R&S NRP Remote Control - Commands [SENSe[1..4]]:CORRection:FDOTable[:SELect][?] <string> The name of the current frequency-dependent offset table can be set or queried by the [SENSe[1..4]]:CORRection:FDOTable[:SELect][?] command. The R&S NRP can manage up to ten such tables (MEMory commands). The frequency-dependent offset tables consist of two columns; the first containing the frequencies, the second the associated correction values. When the R&S NRP is informed about the signal frequency with command [SENSe[1..4]]:FREQuency[:CW|:FIXed] <float_value>, an appropriate correction factor is determined by means of the table. If the table was activated with [SENSe[1..4]]:CORRection:FDOTable:STATe[?] ON , the measurement result obtained by the sensor is multiplied by this factor. *RST value: Settings are not changed in case of *RST. Error messages: -256 "File name not found": A table named <name> is not known. [SENSe[1..4]]:CORRection:FDOTable:STATe[?] ON | OFF This command activates and deactivates the current frequency-dependent offset table. The current table is selected with the [SENSe[1..4]]:CORRection:FDOTable[:SELect] command. Only one table can be active at a time. *RST value: OFF [SENSe[1..4]]:CORRection:SPDevice:STATe[?] ON | OFF Instructs the sensor to perform a measured-value correction by means of the stored s-parameter device. *RST value: depending on sensor [SENSe[1..4]]:FREQuency[:CW|:FIXed][?] <float_value> This command informs the R&S NRP about the frequency of the power to be measured since this frequency is not automatically determined. The frequency is used to determine a frequency-dependent correction factor for the measurement results. Unit: HZ Value range: depending on sensor *RST value: depending on sensor 1144.1400.12 6.55 E-3 Remote Control - Commands [SENSe[1..4]]:FUNCtion[:ON][?] R&S NRP <string> This command sets the sensor to one of the measurement modes of Table 6-11. Table 6-11: Measurement modes <string> Measurement mode "POWer:AVG" ContAv After a trigger event, the power is integrated over a time interval (averaging) set with SENS:POW:APER. "POWer:TSLot:AVG" Timeslot The power is simultaneously measured in up to 26 time windows. The number of time windows is set with SENS:POW:TSL:COUN. The length of a time window is determined via SENS:POW:TSL:WIDT. The measurement result is represented by a vector that can contain up to 26 indices and contains the power of a time window at each index. "POWer:TGATe:AVG" Timegate The Timegate mode is a pseudo-mode. It is used to determine accurate measured values in the gates defined with the aid of the Scope mode in manual operation. If one of the four gates is selected (SENS:TRAC:SEL), the sensor is internally put into the Timeslot mode and configured such that it determines the average power in this gate with high accuracy. "POWer:BURSt:AVG" Burst In remote control, this measurement mode is very similar to the ContAv mode. The integration time is, however, not predefined but determined by the sensor with the aid of a burst detector. The start of a burst is detected when the measurement signal rises above the set trigger level. The end is set when the signal drops below the trigger threshold. SENS:POW:BURS:DTOL defines the time interval during which a signal drop below the trigger level is not interpreted as the end of the burst. In the Burst mode, the set trigger source is ignored and TRIG:SOUR INT is implicitly assumed. "XTIMe:POWer" Scope A sequence of measurements is performed. The individual measured values are determined as in the ContAv mode. The length of an individual measurement is determined from the ratio of the total time (SENS:TRAC:TIME) and the number of individual test points (SENS:TRAC:POIN). In remote control, the timing (SENS:TIM:EXCL:STAR and -:STOP) and the trigger system of all measurement modes (except the Burst mode) are user-selectable. Note: To increase measurement accuracy, the sensors measure each signal twice in the Burst, Timeslot and Scope measurement modes (exception: in the Scope mode, with SENS:TRAC:REAL ON). As long as the trigger system is set to internal or external triggering, this is usually of no importance to the user. If TRIG:SOUR HOLD or BUS is used, however, then each measurement must be triggered twice (with *TRG or TRIG:IMM). *RST value: depending on sensor Error messages: 24 "Sensor mode not supported": A sensor does not support a measurement mode. 28 "Sensor not idle": The sensor is not in the IDLE state. -151 "Invalid string data": An invalid parameter was transmitted for <string>. 1144.1400.12 6.56 E-3 R&S NRP Remote Control - Commands [SENSe[1..4]][:POWer][:AVG]:APERture[?] <float_value> This command determines the integration time for a single measurement in the ContAv mode. To increase the measurement accuracy, this integration is followed by a second averaging procedure in a window with a selectable number of values. The filter window is configured with the [SENSe[1..4]]:AVERage commands. Unit: S Value range: depending on sensor *RST value: depending on sensor [SENSe[1..4]][:POWer][:AVG]:BUFFer:SIZE[?] <int_value> Sets the number of desired values for the buffered ContAv mode. Unit: Value range: 1..400000 *RST value: depending on sensor [SENSe[1..4]][:POWer][:AVG]:BUFFer:STATe[?] ON | OFF Switches on the buffered ContAv mode, after which data blocks rather than single measured values are then returned. In this mode a higher data rate is achieved than in the non-buffered ContAv mode. The number of desired measured values is set with the SENSe[1..4]:POWer:ARR:SIZE command. *RST value: depending on sensor [SENSe[1..4]][:POWer][:AVG]:RANGe[?] 0 | 1 | 2 Selects a measurement range in which the corresponding sensor is to perform a measurement. This setting will only become effective if SENS[1..4]:RANG:AUTO ON is set. *RST value: depending on sensor [SENSe[1..4]][:POWer][:AVG]:RANGe:AUTO[?] ON | OFF Sets the automatic selection of a measurement range to ON or OFF. *RST value: depending on sensor [SENSe[1..4]][:POWer][:AVG]:RANGe:AUTO:CLEVel[?] <float_value> Sets the cross-over level. Shifts the transition ranges between the measurement ranges. This may improve the measurement accuracy for special signals, i.e. signals with a high crest factor. Unit: DB | PCT Default unit: DB Value range: depending on sensor *RST value: depending on sensor 1144.1400.12 6.57 E-3 Remote Control - Commands R&S NRP [SENSe[1..4]][:POWer][:AVG]:SMOothing:STATe[?] ON | OFF Activates digital lowpass filtering of the sampled video signal. The problem of instable display values due to a modulation of a test signal described under SENS[1..4]:SAMP can also be eliminated by lowpass filtering of the video signal. The lowpass filter eliminates the variations of the display even in case of unperiodic modulation and does not require any other setting. If the modulation is periodic, the setting of the sampling window is the better method since it allows for shorter measurement times. *RST value: depending on sensor [SENSe[1..4]][:POWer]:BURSt:DTOLerance[?] <float_value> The end of a burst (power pulse) is recognized when the signal level drops below the trigger level. Especially with modulated signals, this may also happen for a short time within a burst. To prevent the supposed end of the burst from being recognized too early or incorrectly at these positions, a time interval can be defined via SENS[1..4]:BURS:DTOL (drop-out tolerance) in which the pulse end is only recognized if the signal level no longer exceeds the trigger level. This is shown in Fig. 6-7: the drop-out time, i.e. the time in which the signal remains below the trigger level, is shorter than the drop-out tolerance. The burst end is thus recognized correctly. Power Trigger level Time Drop-out time BURSt:DTOLerance BURSt:DTOLerance Pulse interval Fig. 6-7: Meaning of drop-out TOLerance. Unit: S Value range: depending on sensor *RST value: depending on sensor 1144.1400.12 6.58 E-3 R&S NRP Remote Control - Commands [SENSe[1..4]][:POWer]:TGATe[1..4]:OFFSet:TIME[?] <float_value> This command is used for configuring the Timegate mode. It specifies the start of one of the four gates (sweeps) relative to the delayed trigger point. If this value is negative, the gate starts before the trigger point. This is possible because the sensor stores samples of the measured powers and can thus transfer the start of a measurement to the past. In manual operation, the start and duration of the gates can also be defined graphically if the sensor is operated in the Scope mode. Unit: S Value range: depending on sensor *RST value: depending on sensor Power Trigger event Trigger level Delayed trigger point Time Trigger delay Gate 1 Gate 2 Gate 3 Gate 4 SENS:TRAC1:OFFS:TIME SENS:TRAC1:TIME SENS:TRAC2:OFFS:TIME SENS:TRAC2:TIME Figure 6-8: Timing parameters for the Timegate mode. [SENSe[1..4]][:POWer]:TGATe:SELect[?] 1 | 2 | 3 | 4 This command selects one of the four gates in which the average power is measured if the Timegate mode is selected. *RST value: 1 [SENSe[1..4]][:POWer]:TGATe[1..4]:TIME[?] <float_value> This command is used for configuring the Timegate mode. It specifies the duration of one of the four gates (sweeps) relative to the delayed trigger point. In manual operation, the start and duration of the gates can also be defined graphically if the sensor is operated in the Scope mode. Unit: S Value range: depending on sensor *RST value: depending on sensor 1144.1400.12 6.59 E-3 Remote Control - Commands R&S NRP [SENSe[1..4]][:POWer]:TSLot:COUNt[?] <int_value> Sets the number of simultaneously measured timeslots in the Timeslot mode. Unit: Value range: depending on sensor *RST value: depending on sensor [SENSe[1..4]][:POWer]:TSLot:[AVG]:WIDTh[?] <float_value> Sets the length of the timeslot in the Timeslot mode. Unit: S Value range: depending on sensor *RST value: depending on sensor [SENSe[1..4]]:SAMPling[?] FREQ1 | FREQ2 If the signal to be measured has modulation sections just above the video bandwidth of the sensor used, measurement errors might be caused due to aliasing effects. In this case, the sampling rate of the sensor can be set to a safe lower value (FREQ2). However, the measurement time required to obtain noise-free results is extended compared to the normal sampling rate (FREQ1). *RST value: depending on sensor [SENSe[1..4]]:SGAMma[:MAGNitude][?] <float_value> The R&S NRP can perform a measured-value correction taking the complex reflection coefficient (source gamma) of the signal source into account. SENS[1..4]:SGAM:CORR:STAT ON must be set. The magnitude of the reflection coefficient is set with SENS[1..4]:SGAM[:MAGN]. Unit: Value range: depending on sensor *RST value: depending on sensor [SENSe[1..4]]:SGAMma:PHASe[?] <float_value> The R&S NRP can perform a measured-value correction taking the complex reflection coefficient (source gamma) of the signal source into account. SENS[1..4]:SGAM:CORR:STAT ON must be set. The phase angle of the reflection coefficient is set with SENS[1..4]:SGAM:PHAS. Unit: - (Degree is assumed as unit) Value range: depending on sensor *RST value: depending on sensor [SENSe[1..4]]:SGAMma:CORRection:STATe[?] ON | OFF Switches the measured-value correction of the reflection coefficient effect of the source gamma ON or OFF. *RST value: depending on sensor 1144.1400.12 6.60 E-3 R&S NRP Remote Control - Commands [SENSe[1..4]]:TRACe:AVERage[:STATe][?] ON | OFF For the Scope mode, this command switches the filter function of a sensor on or off. When the filter is switched on, the number of measured values set with [SENSe[1..4]]:AVERage:COUNt is averaged. This reduces the effect of noise so that more reliable results are obtained. *RST value: depending on sensor [SENSe[1..4]]:TRACe:AVERage:COUNt[?] <int_value> This command sets the length of the filter for the Scope mode. The wider the filter, the lower the noise and the longer it takes to obtain a measured value. n <int_value> can only be 1, 2, 4, 8, 16,..., 2 . If <int_value> is not a power of two, the value is n rounded to the next 2 value without an error message. Note: The SENS:TRAC:AVER:COUN command switches the automatic filter length switchover off (SENS:TRAC:AVER:COUN:AUTO OFF). Unit: Value range: depending on sensor *RST value: depending on sensor [SENSe[1..4]]:TRACe:AVERage:COUNt[?]:AUTO[?] ON | OFF | ONCE This command can be used to automatically determine a value for [SENSe[1..4]]:AVERage:COUNt for the Scope mode. If the command is called with the parameter ONCE, automatic switchover is deactivated (setting OFF) and the suitable filter length will then be defined and set automatically. The setting can then be queried via SENS[1..4]:AVER:COUN?. If the automatic switchover is activated with the ON parameter, the sensor always defines a suitable filter length which can also be queried via SENS[1..4]:AVER:COUN?. *RST value: depending on sensor [SENSe[1..4]]:TRACe:AVERage:COUNt:AUTO:MTIMe[?] <float_value> If the R&S NRP has to determine the filter length automatically in the Scope mode, the filter length can become large and thus also the time to fill the filter. An upper time limit (maximum time) can be set via SENS[1..4]:AVER:COUN:AUTO:MTIME. It should never be exceeded. Undesired long measurement times can thus be prevented (in the SENS:AVER:COUN:AUTO:TYPE NSR mode) if the automatic filter length switchover is on. Unit: S Value range: depending on sensor *RST value: depending on sensor 1144.1400.12 6.61 E-3 Remote Control - Commands R&S NRP [SENSe[1..4]]:TRACe:AVERage:COUNt:AUTO:RESolution[?] 1|2|3|4 Defines the number of significant places for the Scope mode for linear units and the number of decimal places for logarithmic units which should be free of noise in the measurement result. This setting is also performed by the DISP[1..4]:RES command (Æ page 6.35) which tries to set the sensors involved in the measurement result accordingly. (For further details, see Chapter 4.) However, SENS[1..4]:AVER:COUN:AUTO:RES does not affect the DISPlay command. The parameters of the two commands are different but have the same meaning. SENS[1..4]:AVER:COUN:AUTO:RES 1 2 3 4 DISP[1..4]:RES 1 0.1 0.01 0.001 Unit: Value range: depending on sensor *RST value: depending on sensor [SENSe[1..4]]:TRACe:AVERage:COUNt:AUTO:POINt[?] <int_value> Specifies the measured value in the Scope mode used for the automatic determination of the filter length. Unit: Value range: depending on sensor *RST value: depending on sensor [SENSe[1..4]]:TRACe:AVERage:COUNt:AUTO:NSRatio[?] <float_value> Indicates the maximum noise ratio in the measurement result for the Scope mode. The setting is taken into account only if SENS[1..4]:TRAC:AVER:COUN:AUTO ON and SENS[1..4]:TRAC:AVER: COUN:AUTO:TYPE NSR are set. Unit: DB | PCT Default unit: DB Value range: depending on sensor *RST value: depending on sensor 1144.1400.12 6.62 E-3 R&S NRP Remote Control - Commands [SENSe[1..4]]:TRACe:AVERage:COUNt:AUTO:TYPE[?] RESolution | NSR Selects a method for the Scope mode by which the automatic filter length switchover can operate: SENS[1..4]:AVER:COUN:AUTO:TYPE Setting taken into account RESolution SENS[1..4]:AVER:COUN:AUTO:RES NSR SENS[1..4]:AVER:COUN:AUTO:NSR SENS[1..4]:AVER:COUN:AUTO:MTIM *RST value: depending on sensor [SENSe[1..4]]:TRACe:AVERage:TCONtrol[?] MOVing | REPeat As soon as a new single value is determined, the filter window is advanced by one value so that the new value is taken into account by the filter and the oldest value is forgotten. [SENSe[1..4]]:AVERage:TCONtrol (terminal control) then determines in the Scope mode whether a new result will be calculated immediately after a new measured value is available (MOVing) or only after an entire range of new values is available for the filter (REPeat). *RST-Wert: (PRES) and SYST:PRES: *RST: MOV REP [SENSe[1..4]]:TRACe:OFFSet:TIME[?] <float_value> This command determines the relative position of the trigger event in relation to the beginning of the Scope measurement sequence. Unit: S Value range: depending on sensor *RST value: depending on sensor [SENSe[1..4]]:TRACe:POINts <int_value> Sets the number of desired values per Scope sequence. Unit: Value range: depending on sensor *RST value: depending on sensor Error messages: 28 "Sensor not idle": The sensor is not in the IDLE state. 1144.1400.12 6.63 E-3 Remote Control - Commands R&S NRP [SENSe[1..4]]:TRACe:REALtime[?] ON | OFF In the default state (OFF), each measurement from the sensor is averaged. With [SENSe[1..4]]:TRACe::REALtime ON , this behaviour can be switched off, which may increase the measurement speed. This ensures that the measured values of an individual measurement are immediately delivered. (See also Chapter 4.) *RST value: depending on sensor [SENSe[1..4]]:TRACe:TIME[?] <float_value> Sets the time to be covered by the Scope sequence. Unit: S Value range: depending on sensor *RST value: depending on sensor [SENSe[1..4]]:TIMing:EXCLude:STARt[?] <float_value> Sets a time that is to be excluded at the beginning of the integration (Æ Fig. 6-9). Unit: S Value range: depending on sensor *RST value: depending on sensor [SENSe[1..4]]:TIMing:EXCLude:STOP[?] <float_value> Sets a time that is to be excluded at the beginning of the integration (Æ Fig. 6-9). Unit: S Value range: depending on sensor *RST value: depending on sensor 1144.1400.12 6.64 E-3 R&S NRP Remote Control - Commands Power Time EXCLude:STARt EXCLude:STOP Integration period Fig. 6-9: Effect of commands SENS[1..4]:TIM:EXCL:STAR and :STOP 1144.1400.12 6.65 E-3 Remote Control - Commands R&S NRP SERVice The commands of the SERVice system are used for maintenance or test purposes. They were implemented primarily to support device development. The numeric suffix refers to the sensors. Note: Before commands of the SERVice system can be sent to a sensor, they must be enabled via the SERVice:UNLock 1234 command. Table 6-12: Commands of the SERVice command system Command Parameter SERVice[1..4] :CALibration :TEST? :TEMP :TEMP:DATA? :RCOunt[?] :RESult[?] :UNLock[?] <NR1> ONCE <NR1 > <NR1> <NR1> 1234 SERVice[1..4]:CALibration:TEST? Unit Kelvin - Remark Query only No query Query only <NR1> Tests the consistency of the calibration data set according to three criteria: If the following bit is set in <NR1>, the following action is executed. 0 The serial number of the calibration data set is tested. 1 The checksum of the calibration data set is tested. 2 The header of the calibration data set is tested. If an inconsistency of the data set is detected, the query returns a 1, otherwise a 0. Value range: 0 to 255 *RST value: none SERVice[1..4]:CALibration:TEMP ONCE Initiates a temperature measurement of the sensor in question. The temperature can be queried with SERV:CAL:TEMP:DATA?. SERVice[1..4]:CALibration:TEMP:DATA? <NR1> Returns the temperature of the sensor in Kelvin if a temperature measurement was previously initiated by means of SERV:CAL:TEMP ONCE. 1144.1400.12 6.66 E-3 R&S NRP Remote Control - Commands SERVice[1..4]:RCOunt[?] SERVice[1..4]:RESult[?] <NR1> <NR1> These commands allow simulated measured values to be specified for test purposes. SERV:RCO specifies the number of SERV:RES pairs to follow. The first SERV:RES command specifies the measured value in watts, the second SERV:RES command determines how often the measured value should be obtained. The measurement sequences defined in this way are repeated until the sensor is disconnected from the R&S NRP and reconnected. Example: The command sequence SERV2:RCO SERV2:RES SERV2:RES SERV2:RES SERV2:RES 2 3 2 4 1 makes sensor 2 return the measured values 3 W, 3 W, 4 W (, 3 W, 3 W, 4W, ....) from now on. *RST value: none. The simulation mode is not exited in the case of *RST. SERVice[1..4]:UNLock[?] 1234 Before other SERVice system commands are accepted, they must be enabled with SERV:UNL 1234. 1144.1400.12 6.67 E-3 Remote Control - Commands R&S NRP STATus The status registers of the R&S NRP can be read and configured with commands of the STATus system. The R&S NRP uses the following status registers: • • • • • • • • • • • • • Standard Event Status Register (specified in IEEE 488.2. Reading and configuring with *ESR? and *ESE. This register is not handled by the STATus system.) Device Status Register Questionable Status Register Questionable Power Status Register Questionable Window Status Register Questionable Calibration Status Register Operation Status Register Operation Calibrating Status Register Operation Measuring Status Register Operation Trigger Status Register Operation Sense Status Register Operation Lower Limit Fail Status Register Operation Upper Limit Fail Status Register Except for the Standard Event Status Register, each of these registers comprises five subregisters with which the function of the register can be configured. These subregisters are called • • • • • EVENt CONDition NTRansition PTRansition ENABle The registers are 16 bits wide but only the lower 15 bits are used. This prevents problems with programs that cannot handle integers without sign. For the sake of conciseness, not all commands are listed here. For a complete Æ List of Remote Control Commands see page 6.109. The STATus system uses the following types of commands: 15 Queries return a decimal value between 0 and 32767 (=2 -1). Configuration commands set the ENABle, PTRansition, NTRansition registers of a status register and thus determine the response of the register to status changes in the R&S NRP. 1144.1400.12 6.68 E-3 R&S NRP Remote Control - Commands Queries Table 6-13: Queries for status registers Command Status register STATus :DEVice? :OPERation? :CALibrating[:SUMMary]? :LLFail[:SUMMary]? :ULFail[:SUMMary]? :MEASuring[:SUMMary]? :SENSe[:SUMMary]? :TRIGger[:SUMMary]? :QUEStionable? :CALibration[:SUMMary]? :POWer[:SUMMary]? :WINDow[:SUMMary]? Device Status Operation Status Operation Calibrating Operation Lower Limit Fail Operation Upper Limit Fail Operation Measuring Operation Sense Operation Trigger Questionable Status Questionable Calibration Questionable Power Questionable Window Configuration Commands If the status register queries are extended by the character strings [:EVENt], :CONDition, :ENABle, :PTRansition or NTRansition (without a question mark "?" at the end), the respective subregisters can be accessed. The enable and transition registers can also be set with these commands. The effect of the status reporting system can thus be adapted to user requirements. The parameters have the following meaning: <status_register_summary_command> One of the status register queries from Table 6-13 is to be used here (without a terminating question mark "?"). <NR1> Is a decimal value between 0 and 32767. The values DEFAULT, MINIMUM and MAXIMUM are not permissible. <non-decimal numeric> Is a non-decimal value in one of the following formats, where the decimal value must be between 0 and 32767: • binary (e. g. #b0111010101001110 or #B0111010101001110) • hexadecimal (e.g. #h754e or #H754E) • octal (e.g. #q72516 or #Q75216) Table 6-14: Commands for the configuration of status registers Command <status_register_summary_command> [:EVENt]? :CONDition? :ENABle[?] :NTRansition[?] :PTRansition[?] STATus:PRESet 1144.1400.12 Parameter Remark Query only Query only 0..32767 | <non-decimal numeric> 0..32767 | <non-decimal numeric> 0..32767 | <non-decimal numeric> Æ Table 6-30 6.69 E-3 Remote Control - Commands R&S NRP The status reporting system stores all information about the current operating status of the device and errors that occur. The information is stored in the status registers and the error queue. The contents of the status registers and error queue can be queried via the IEC/IEEE bus. The information is hierarchically structured. The highest level is formed by the Status Byte Register (STB) defined by IEEE 488.2 and the associated Service Request Enable (SRE) register. The STB receives its information from the Standard Event Status Register (ESR) also defined by IEEE 488.2 and the associated Standard Event Status Enable (ESE) Register, as well as from the SCPI-defined Operation Status Register and the Questionable Status Register, which contain detailed information on the device, and from the Device Status Register. The status reporting system also includes the IST flag (Individual STatus) and the Parallel Poll Enable Register (PPE) assigned to it. The IST flag, like the SRQ, combines the complete device status in a single bit. The PPE has the same function for the IST flag as the SRE has for the service request. The output buffer (output queue) contains the messages the device returns to the controller. It is not part of the status reporting system but since it determines the value of the MAV bit in the STB it is also shown in Fig. 6-11. Structure of SCPI Status Register Each SCPI register consists of five 16-bit registers which have different functions (Æ Fig. 6-10). The individual bits are independent of each other, i.e. each hardware status is assigned a bit number which is the same for all five registers. For instance, bit 4 of the operation status register is assigned to the hardware status "Measurement" in all five registers. Bit 15 (the most-significant bit) is set to zero in all registers. This prevents problems some controllers have with the processing of unsigned integers. States, events or summary bits of other registers CONDition register 3 2 1 0 15 14 13 12 PTRansition register 3 2 1 0 15 14 13 12 NTRansition register 3 2 1 0 + 15 14 13 12 15 14 13 12 & & & & 15 14 13 12 EVENt register & & & & & & & ENABle register & 3 2 1 0 & & & & 3 2 1 0 Logic OR of all bits + Logic AND of EVENT and ENABle bits Simplified diagram Summary bit of SCPI register, written into a bit of the STB or into the CONDition bit of a superordinate register. Fig. 6-10: Standard SCPI status register 1144.1400.12 6.70 E-3 R&S NRP Remote Control - Commands Table 6-15: Decimal value of individual bits in the SCPI status register Bit No. Decimal value Bit No. Decimal value Bit No. Decimal value Bit No. Decimal value 0 1 4 16 8 256 12 4096 1 2 5 32 9 512 13 8192 2 4 6 64 10 1024 14 16384 3 8 7 128 11 2048 15 32768 CONDition register The CONDition register is directly written by the hardware or the summary bit of the next lower register. Its content reflects the current device status. This register can only be read; it cannot be written to or cleared. Reading the register does not change its contents. PTRansition register The Positive TRansition register acts as a transition filter. When a bit of the CONDition register changes from 0 to 1, the associated PTR bit determines whether the EVENt bit will be set to 1. PTR bit = 1: the EVENt bit is set. PTR bit = 0: the EVENt bit is not set. This register can be written to and read. Reading the register does not change its contents. NTRansition register The Negative TRansition register also acts as a transition filter. Upon transition of a bit of the CONDition register from 1 to 0, the associated NTR bit determines whether the EVENt bit is set to 1. NTR bit = 1: the EVENt bit is set. NTR bit = 0: the EVENt bit is not set. This register can be written to and read. Reading the register does not change its contents. With the aid of these two transition filter registers the user can define the status change of the CONDition register (none, 0 to 1, 1 to 0 or both) that is to be recorded in the EVENt register. EVENt register The EVENt register reports whether an event has occurred since its last reading; it is the "memory" of the CONDition register. It only registers events that have been reported by the transition filters. The EVENt register is continuously updated by the device. It can only be read by the user. Reading this register clears its contents. This register is frequently referred to as the overall register. 1144.1400.12 6.71 E-3 Remote Control - Commands ENABle register R&S NRP The ENABle register determines whether the associated EVENt bit influences the summary bit (see below). Each bit of the EVENt register is ANDed (symbol '&') with the associated ENABle bit. The events of all logical operations of this register are ORed (symbol '+') and passed on to the summary bit. ENABle bit = 0: the associated EVENt bit does not affect the summary bit. bit = 1: if the associated EVENT bit is "1", the summary bit is also set to "1". This register can be written to and read as required. Reading the register does not change its contents. Summary bit Note: 1144.1400.12 As stated above, the summary bit for each register is derived from the EVENt and ENABle registers. The result is entered into a bit of the CONDition register of the next higher register. The device automatically generates the summary bit for each register. An event may thus cause a service request through all hierarchical levels. The Service Request Enable register (SRE) defined by IEEE488.2 can be viewed as the ENABle register of the STB. Accordingly, the ESE can be viewed as the ENABle register of the ESR. 6.72 E-3 R&S NRP Remote Control - Commands 2 0 Sensor A connected Sensor B connected Sensor A error Sensor B error Sensor A Front/Rear Sensor B Front/Rear Sensor C connected Sensor D connected Sensor C error Sensor D error Sensor C Front/Rear Sensor D Front/Rear 0 Key pressed 0 STAT:DEV Operation Complete 0 Query Error Device dependent Error Execution Error Command Error User Request Power On 0 1 2 3 4 5 6 7 Operation CAL Summary 0 0 0 Operation MEAS Summary Operation TRIG Summary 0 0 0 0 Operation SENSe Summary Lower Limit Fail Uper Limit Fail 0 0 0 0 0 & 0 1 2 3 4 5 6 7 8 9 10 11 12 13 14 15 1 & 1 2 & 2 3 & 3 MAV & 4 ESB & STAT:OPER + + Error-/Event Queue Service Request Enable *SRE Status Byte *STB RQS/MSS + Operation Status Register 0 1 2 3 4 5 6 7 8 9 10 11 12 13 14 15 Standard Event Status Register *ESE Output Queue (output buffer) 0 0 0 Questionable Power Summary Questionable Window Summary 0 0 0 Questionable Calibration Summary POST Failure 0 0 0 0 Warning 0 Questionable Status Register STAT:QUES 0 1 2 3 4 5 6 7 8 9 10 11 12 13 14 15 + Device Status Register 7 5 X & 7 + Service Request to controller at transition from 0 to 1 Fig. 6-11: Overview on structure of Status Reporting System 1144.1400.12 6.73 E-3 Remote Control - Commands STAT:OPER:TRIG Operation Sense Status Register STAT:OPER:SENS Operation Lower Limit Fail Status Register STAT:OPER:LLF Operation Upper Limit Fail Status Register STAT:OPER:ULF + + Summary Operation Status Register 0 Sensor A waiting for trigger Sensor B waiting for trigger Sensor C waiting for trigger Sensor D waiting for trigger 0 0 0 1 2 3 4 ... 15 0 Sensor A initializing Sensor B initializing Sensor C initializing Sensor D initializing 0 0 0 1 2 3 4 ... 15 0 Window 1 Lower Limit Fail Window 2 Lower Limit Fail Window 3 Lower Limit Fail Window 4 Lower Limit Fail Window 5 Lower Limit Fail Window 6 Lower Limit Fail Window 7 Lower Limit Fail Window 8 Lower Limit Fail 0 0 0 1 2 3 4 0 Window 1 Upper Limit Fail Window 2 Upper Limit Fail Window 3 Upper Limit Fail Window 4 Upper Limit Fail Window 5 Upper Limit Fail Window 6 Upper Limit Fail Window 7 Upper Limit Fail Window 8 Upper Limit Fail 0 0 5 6 7 8 ... 15 Summary Summary 0 1 2 3 4 5 6 7 8 9 10 11 12 13 14 15 to bit 7 of status byte register (STB) + Operation Trigger Status Register 0 1 2 3 4 ... 15 + STAT:OPER:MEAS 0 Sensor A measuring Sensor B measuring Sensor C measuring Sensor D measuring 0 0 Summary + Operation Measuring Status Register 0 1 2 3 4 ... 15 + STAT:OPER:CAL 0 Sensor A calibrating Sensor B calibrating Sensor C calibrating Sensor D calibrating 0 0 Summary 0 1 2 3 4 5 6 7 8 ... 15 + Operation Calibrating Status Register R&S NRP Summary Fig. 6-12: Operation Status Register 1144.1400.12 6.74 E-3 Questionable Power Status Register STAT:QUES:POW Remote Control - Commands 0 1 2 3 4 5 6 7 8 ... 15 0 Sensor A Power Sensor B Power Sensor C Power Sensor D Power Sensor A please zero Sensor B please zero Sensor C please zero Sensor D please zero 0 0 + R&S NRP Questionable Status Register STAT:QUES:WIND Questionable Calibrating Status Register STAT:QUES:CAL 0 Sensor A Calibration Sensor B Calibration Sensor C Calibration Sensor D Calibration 0 0 0 1 2 3 4 5 6 7 8 ... 15 0 1 2 3 4 ... 15 1 2 3 4 5 6 7 8 9 10 11 12 13 14 15 to bit 3 of status byte register (STB) + 0 Window 1 Power Window 2 Power Window 3 Power Window 4 Power Window 5 Power Window 6 Power Window 7 Power Window 8 Power 0 0 + Questionable Window Status Register + 0 Fig. 6-13: Questionable Status Register Description of Status Registers In the following sections the SCPI status registers shown in Fig. 6-11 to Fig. 6-13 are described in detail: • • • • • • • • • • • • • • • Status Byte (STB) Service Request Enable Register (SRE) Device Status Register Questionable Status Register Standard Event Status Register (ESR) with ENABle register (ESE) Operation Status Register Operation Calibrating Status Register Operation Measuring Status Register Operation Trigger Status Register Operation Sense Status Register Operation Lower Limit Fail Status Register Operation Upper Limit Fail Status Register Questionable Power Status Register Questionable Window Status Register Questionable Calibration Status Register 1144.1400.12 6.75 E-3 Remote Control - Commands R&S NRP Status Byte (STB) and Service Request Enable Register (SRE) The STB is already defined in IEEE 488.2. It gives a rough overview of the device status, collecting information from the lower-level registers. It is comparable with the CONDition register of a SCPI-defined register and is at the highest level of the SCPI hierarchy. Its special feature is that bit 6 acts as the summary bit of all other bits of the Status Byte Register. The status byte is read by the query *STB? or a serial poll. The SRE is associated with the STB. The function of the SRE corresponds to that of the ENABle register of the SCPI registers. Each bit of the STB is assigned a bit in the SRE. Bit 6 of the SRE is ignored. If a bit is set in the SRE and the associated bit in the STB changes from 0 to 1, a service request (SRQ) will be generated on the IEC/IEEE bus, which triggers an interrupt in the controller configured for this purpose, and can be further processed by the controller. The SRE can be set by the command *SRE and read by the query *SRE?. Table 6-16: Meaning of bits used in the status byte Bit No. Meaning 0 Not used 1 Device Status Register summary bit Depending on the configuration of the device status register, this bit is set when a sensor is connected or disconnected, when an error has occurred in a sensor or when a key has been pressed. 2 Error Queue not empty The bit is set if the error queue has an entry. If this bit is enabled by the SRE, each entry of the error queue will generate a service request. An error can thus be recognized and specified in detail by querying the error queue. The query yields a conclusive error message. This procedure is recommended since it considerably reduces the problems of IEC/IEEE-bus control. 3 Questionable Status Register summary bit This bit is set if an EVENt bit is set in the QUEStionable Status Register and the associated ENABLe bit is set to 1. A set bit denotes a questionable device status which can be specified in greater detail by querying the QUEStionable Status Register. 4 MAV-Bit (Message available) This bit is set if a readable message is in the output queue. This bit may be used to automate reading of data from the device into the controller. 5 ESB: Standard Event Status Register summary bit This bit is set if one of the bits in the Standard Event Status Register is set and enabled in the Event Status Enable Register. Setting this bit denotes a serious error which can be specified in greater detail by querying the Standard Event Status Register. 6 MSS: Master-Status summary bit This bit is set if the device triggers a service request. This is the case if one of the other bits of this register is set together with its enable bit in the Service Request Enable register SRE. 7 Operation Status Register summary bit This bit is set if an EVENt bit is set in the Operation Status Register and the associated ENABLe bit is set to 1. A set bit denotes that an action is being performed by the device. Information on the type of action can be obtained by querying the Operation Status Register. 1144.1400.12 6.76 E-3 R&S NRP Remote Control - Commands IST Flag and Parallel Poll Enable Register (PPE) Similar to the SRQ, the IST flag combines the complete status information in a single bit. It can be queried by a parallel poll (Æ section Parallel Poll, page 6.91) or by the *IST? command. The Parallel Poll Enable Register (PPE) determines which bits of the STB affect the IST flag. The bits of the STB are ANDed with the corresponding bits of the PPE; bit 6 is also used - in contrast to the SRE. The IST flag is obtained by ORing all results together. The PPE can be set by the *PRE command and read by the *PRE? query. Device Status Register This register contains information on current device states (CONDition register) or states that occurred since the last query (EVENt register). The register can be read by the queries STATus:DEVice:CONDition? or STATus:DEVice[:EVENt]?. Table 6-17: Meaning of bits used in the Device Status Register Bit No. Meaning 0 Not used 1 Sensor A connected 2 Sensor B connected 3 Sensor A error Sensor A is erroneous. 4 Sensor B error Sensor B is erroneous. 5 Sensor A Front/Rear Indicates whether sensor A is connected at the front (bit is not set) or rear (bit is set) of the device. 6 Sensor B Front/Rear Indicates whether sensor B is connected at the front (bit is not set) or rear (bit is set) of the device. 7 Sensor C connected 8 Sensor D connected 9 Sensor C error Sensor C is erroneous. 10 Sensor D error Sensor D is erroneous. 11 Sensor C Front/Rear Indicates whether sensor C is connected at the front (bit is not set) or rear (bit is set) of the device. 1144.1400.12 6.77 E-3 Remote Control - Commands Bit No. R&S NRP Meaning 12 Sensor D Front/Rear Indicates whether sensor D is connected at the front (bit is not set) or rear (bit is set) of the device. 13 Not used 14 Key pressed This bit is always set if a key on the front panel is pressed (CONDition) or was pressed (EVENt). 15 Bit 15 will never be used. Questionable Status Register This register contains information on questionable device states. Such states may occur when the device is not operated in compliance with its specifications. The register can be read by the queries STATus:QUEStionable:CONDition? or STATus:QUEStionable[:EVENt]?. Table 6-18: Meaning of bits used in the Questionable Status Register Bit No. Meaning 0 to 2 Not used 3 Questionable Power Status Register summary bit Corresponds to the summary bit of the Questionable Power Status Register. 4 Questionable Window Status Register summary bit Corresponds to the summary bit of the Questionable Windows Status Register. 5 to 7 Not used 8 Questionable Calibration Status Register summary bit Corresponds to the summary bit of the Questionable Calibration Status Register. 9 POST Failure The built-in test of the R&S NRP carried out automatically upon power-up has generated an error. 10 to 13 Not used 14 Warning 15 Bit 15 will never be used. 1144.1400.12 6.78 E-3 R&S NRP Remote Control - Commands Standard Event Status Register (ESR) Standard Event Status Enable Register (ESE) The ESR is already defined in the IEEE 488.2 standard. It is comparable to the EVENt register of an SCPI register. The Standard Event Status Register can be read out by the query *ESR?. The ESE forms the associated ENABle register. It can be set by the command *ESE and read out by the query *ESE?. Table 6-19: Meaning of bits used in the Standard Event Status Register Bit No. Meaning 0 Operation Complete When the *OPC command is received, this bit is set if all previous commands have been executed. 1 Not used 2 Query Error This bit is set in either of the two following cases: the controller wants to read data from the device but has not sent a query, or it sends new commands to the device before it retrieves existing requested data. A frequent cause is a faulty query which cannot be executed. 3 Device-dependent Error This bit is set if a device-dependent error occurs. An error message with a number between -300 and -399 or a positive error number denoting the error in greater detail will be entered in the error queue. 4 Execution Error This bit is set if the syntax of a received command is correct but the command cannot be executed due to various marginal conditions. An error message with a number between -200 and -300 denoting the error in greater detail will be entered in the error queue. 5 Command Error This bit is set if an undefined command or a command with incorrect syntax is received. An error message with a number between -100 and -200 denoting the error in greater detail will be entered in the error queue. 6 User Request This bit is set upon pressing the [LOCAL] key, i.e. when the device is switched to manual control. 7 Power On This bit is set when the device is switched on. 1144.1400.12 6.79 E-3 Remote Control - Commands R&S NRP Operation Status Register The CONDition register contains information on the operations currently being performed by the device, while the EVENt register contains information on the operations performed by the device since the last readout of the register. These two registers can be read by the queries STATus:OPERation:CONDition? or STATus:OPERation[:EVENt]?. Table 6-20: Meaning of bits used in the Operation Status Register Bit No. 0 1 to 3 Meaning Operation Calibrating Status Register summary bit This bit is set if one of the sensors is being calibrated. Not used 4 Operation Measuring Status Register summary bit This bit is set if one of the sensors is performing a measurement. 5 Operation Trigger Status Register summary bit This bit is set if a sensor is in the WAIT_FOR_TRG state, i.e. waiting for a trigger event. 6 Not used 7 to 9 Not used 10 Operation Sense Status Register summary bit This bit is set if a sensor is initialized. 11 Operation Lower Limit Fail Status Register This bit is set if a displayed value has dropped below a lower limit value. 12 Operation Upper Limit Fail Status Register This bit is set if a displayed value has exceeded an upper limit value. 13 to 14 15 Not used Bit 15 will never be used. 1144.1400.12 6.80 E-3 R&S NRP Remote Control - Commands Operation Calibrating Status Register The CONDition register contains information as to whether a sensor is currently being calibrated and, depending on the configuration of the transition register, the EVENt register indicates whether a calibration was started or completed since the last readout of this register. The Operation Calibration Status Register can be read by the following commands: STATus:OPERation:CALibrating[:SUMMary]:CONDition? STATus:OPERation:CALibrating[:SUMMary][:EVENt]? . Table 6-21: Meaning of bits used in the Operation Calibrating Status Register Bit No. Meaning 0 Not used 1 Sensor A is being calibrated 2 Sensor B is being calibrated 3 Sensor C is being calibrated 4 Sensor D is being calibrated 5 to 14 15 Not used Bit 15 will never be used. 1144.1400.12 6.81 E-3 Remote Control - Commands R&S NRP Operation Measuring Status Register The CONDition register contains information as to whether a measurement is being performed by a sensor and, depending on the configuration of the transition register, the EVENt register indicates whether a measurement was started or completed since the last readout of this register. The Operation Measuring Status Register can be read by the following commands: STATus:OPERation:MEASuring[:SUMMary]:CONDition? STATus:OPERation:MEASuring[:SUMMary][:EVENt]?. Table 6-22: Meaning of bits used in the Operation Measuring Status Register Bit No. Meaning 0 Not used 1 Sensor A measuring Sensor A is performing a measurement. 2 Sensor B measuring Sensor B is performing a measurement. 3 Sensor C measuring Sensor C is performing a measurement. 4 Sensor D measuring Sensor D is performing a measurement. 5 to14 15 Not used Bit 15 will never be used. 1144.1400.12 6.82 E-3 R&S NRP Remote Control - Commands Operation Trigger Status Register The CONDition register contains information as to whether a sensor is currently in the WAIT_FOR_TRG state, i.e. expecting a trigger event and, depending on the configuration of the transition register, the EVENt register indicates whether the WAIT_FOR_TRG state was entered or quit by a sensor since the last readout of the register. The Operation Trigger Status Register can be read by the following commands: STATus:OPERation:TRIGger[:SUMMary]:CONDition? STATus:OPERation:TRIGger[:SUMMary][:EVENt]? . Table 6-23: Meaning of bits used in the Operation Status Register Bit No. Meaning 0 Not used 1 Sensor A waiting for trigger Sensor A is in the WAIT_FOR_TRG state and is waiting for a trigger event that will change it to the MEASURING state. 2 Sensor B waiting for trigger Sensor B is in the WAIT_FOR_TRG state and is waiting for a trigger event that will change it to the MEASURING state. 3 Sensor C waiting for trigger Sensor C is in the WAIT_FOR_TRG state and is waiting for a trigger event that will change it to the MEASURING state. 4 Sensor D waiting for trigger Sensor D is in the WAIT_FOR_TRG state and is waiting for a trigger event that will change it to the MEASURING state. 5 to 14 15 Not used Bit 15 will never be used. 1144.1400.12 6.83 E-3 Remote Control - Commands R&S NRP Operation Sense Status Register The CONDition register contains information as to whether a sensor is currently being initialized and, depending on the configuration of the transition register, the EVENt register indicates whether a sensor initialization was started or completed since the last readout of this register. This status is assumed by a sensor if one of the following conditions is met: • • • the supply voltage is switched on (power up) the sensor was just connected a reset was performed (*RST or SYSTem:PRESet) The Operation Sense Status Register can be read by the following commands: STATus:OPERation:SENSe[:SUMMary]:CONDition? STATus:OPERation:SENSe[:SUMMary][:EVENt]? Table 6-24: Meaning of bits used in the Operation Sense Status Register Bit No. Meaning 0 Not used 1 Sensor A initializing Sensor A is being initialized. 2 Sensor B initializing Sensor B is being initialized. 3 Sensor C initializing Sensor C is being initialized. 4 Sensor D initializing Sensor D is being initialized. 5 to 14 15 Not used Bit 15 will never be used. 1144.1400.12 6.84 E-3 R&S NRP Remote Control - Commands Operation Lower Limit Fail Status Register The CONDition register contains information as to whether a displayed value is currently below a configured lower limit and the EVENt register indicates whether a measured value dropped below a limit value since the last readout of the Operation Lower Limit Fail Status Register. Details of the behaviour are defined by the transition register. The limit value can be set with the command CALC:LIM:LOW:DATA <float_value> . Command CALC:LIM:LOW:STAT ON configures the PTRansition and NTRansition registers so that the corresponding bit is set in the EVENt register when the displayed value drops below the limit. The Operation Lower Limit Fail Status Register can be read by the following commands: STATus:OPERation:LLIMit[:SUMMary]:CONDition? STATus:OPERation:LLIMit[:SUMMary][:EVENt]? Table 6-25: Meaning of bits used in the Operation Lower Limit Fail Status Register Bit No. Meaning 0 Not used 1 Window 1 Lower Limit Fail The measured value returned by the first Calculate block drops below the lower limit value. 2 Window 2 Lower Limit Fail The measured value returned by the second Calculate block drops below the lower limit value. 3 Window 3 Lower Limit Fail The measured value returned by the third Calculate block drops below the lower limit value. 4 Window 4 Lower Limit Fail The measured value returned by the fourth Calculate block drops below the lower limit value. 5 Window 5 Lower Limit Fail The measured value returned by the fifth Calculate block drops below the lower limit value. 6 Window 6 Lower Limit Fail The measured value returned by the sixth Calculate block drops below the lower limit value. 7 Window 7 Lower Limit Fail The measured value returned by the seventh Calculate block drops below the lower limit value. 8 Window 8 Lower Limit Fail The measured value returned by the eighth Calculate block drops below the lower limit value. 9 to 14 15 Not used Bit 15 will never be used. 1144.1400.12 6.85 E-3 Remote Control - Commands R&S NRP Operation Upper Limit Fail Status Register The CONDition register contains information as to whether a displayed value is currently above a configured upper limit and the EVENt register indicates whether a limit value was exceeded since the last readout of the Operation Upper Limit Fail Status Register. Details of the behaviour are defined by the transition register. The limit value can be set with the command CALC:LIM:UPP:DATA <float_value> . Command CALC:LIM:UPP:STAT ON configures the PTRansition and NTRansition registers so that the corresponding bit is set in the EVENt register when the displayed value exceeds the upper limit value. The Operation Upper Limit Fail Status Register can be read by the commands STATus:OPERation:ULIMit[:SUMMary]:CONDition? and STATus:OPERation:ULIMit[:SUMMary][:EVENt]? . Table 6-26: Meaning of bits used in the Operation Upper Limit Fail Status Register Bit No. Meaning 0 Not used 1 Window 1 Upper Limit Fail The measured value returned by the first Calculate block exceeds the upper limit value. 2 Window 2 Upper Limit Fail The measured value returned by the second Calculate block exceeds the upper limit value. 3 Window 3 Upper Limit Fail The measured value returned by the third Calculate block exceeds the upper limit value. 4 Window 4 Upper Limit Fail The measured value returned by the fourth Calculate block exceeds the upper limit value. 5 Window 5 Upper Limit Fail The measured value returned by the fifth Calculate block exceeds the upper limit value. 6 Window 6 Upper Limit Fail The measured value supplied by the sixth Calculate block exceeds the upper limit value. 7 Window 7 Upper Limit Fail The measured value supplied by the seventh Calculate block exceeds the upper limit value. 8 Window 8 Upper Limit Fail The measured value supplied by the eighth Calculate block exceeds the upper limit value. 9 to14 15 Not used Bit 15 will never be used. 1144.1400.12 6.86 E-3 R&S NRP Remote Control - Commands Questionable Power Status Register The CONDition register contains information as to whether the measured power values are questionable. The Questionable Power Status Register can be read by the following commands: STATus:QUEStionable:POWer[:SUMMary]:CONDition? STATus:QUEStionable:POWer[:SUMMary][:EVENt]? Table 6-27: Meaning of bits used in the Questionable Power Status Register Bit No. Meaning 0 Not used 1 Sensor A Power The measurement data of sensor A is corrupt. 2 Sensor B Power The measurement data of sensor B is corrupt. 3 Sensor C Power The measurement data of sensor C is corrupt. 4 Sensor D Power The measurement data of sensor D is corrupt. 5 Sensor A please zero The zero correction for sensor A is no longer correct and should be repeated. 6 Sensor B please zero The zero correction for sensor B is no longer correct and should be repeated. 7 Sensor C please zero The zero correction for sensor C is no longer correct and should be repeated. 8 Sensor D please zero The zero correction for sensor D is no longer correct and should be repeated. 9 to 14 15 Not used Bit 15 will never be used. The sensor power bit is set when error -230, "Data corrupt or stale", or -231, "Data questionable", occurs in the respective sensor. 1144.1400.12 6.87 E-3 Remote Control - Commands R&S NRP Questionable Window Status Register The CONDition register contains information as to whether the displayed data or the power calculated by the calculate blocks is questionable. The Questionable Window Status Register can be read by the following commands: STATus:QUEStionable:WINDow[:SUMMary]:CONDition? STATus:QUEStionable:WINDow[:SUMMary][:EVENt]? Table 6-28: Meaning of bits used in the Questionable Window Status Register Bit No. Meaning 0 Not used 1 Window 1 Power The measured values returned by Calculate block 1 are corrupt. 2 Window 2 Power The measured values returned by Calculate block 2 are corrupt. 3 Window 3 Power The measured values returned by Calculate block 3 are corrupt. 4 Window 4 Power The measured values returned by Calculate block 4 are corrupt. 5 Window 5 Power The measured values returned by Calculate block 5 are corrupt. 6 Window 6 Power The measured values returned by Calculate block 6 are corrupt. 7 Window 7 Power The measured values returned by Calculate block 7 are corrupt. 8 Window 8 Power The measured values returned by Calculate block 8 are corrupt. 9 to 14 15 Not used Bit 15 will never be used. A bit is set if the error -231, "Data questionable", occurs in the respective calculate block. 1144.1400.12 6.88 E-3 R&S NRP Remote Control - Commands Questionable Calibration Status Register The EVENt register and the CONDition register contain information as to whether the zero offset of a sensor is still valid. The Questionable Calibration Status Register can be read by the following commands: STATus:QUEStionable:CALibration[:SUMMary]:CONDition? andSTATus:QUEStionable:CALibration[:SUMMary][:EVENt]? Table 6-29 Meaning of bits used in the Questionable Calibration Status Register Bit No. Meaning 0 Not used 1 Sensor A Calibration Zeroing of sensor A was not successful. 2 Sensor B Calibration Zeroing of sensor B was not successful. 3 Sensor C Calibration Zeroing of sensor C was not successful. 4 Sensor D Calibration Zeroing of sensor D was not successful. 5 to 14 15 Not used Bit 15 will never be used. Use of Status Reporting System For an efficient use of the status reporting system, the information it contains has to be transferred to the controller and further processed. There are various methods which are described in the following. 1144.1400.12 6.89 E-3 Remote Control - Commands R&S NRP Service Request, Use of the Hierarchical Structure Under certain conditions, the device may send a service request (SRQ) to the controller. This service request usually causes an interrupt at the controller to which the controller program can respond by suitable actions. As shown in Fig. 6-11, an SRQ will always be triggered if one or several of the bits 2, 3, 4, 5 or 7 have been set in the Status Byte Register and enabled in the SRE. Each of these bits combines the information from another register, from the error queue or the output buffer. If the ENABle registers of the status registers are set accordingly, any bit in any status register will be able to trigger an SRQ. To utilize the possibilities of the service request, all bits in the enable registers SRE and ESE should be set to "1". Examples (see also Fig. 6-11): Use the *OPC command to generate an SRQ: ¾ Set bit 0 (operation complete) in the ESE. ¾ Set bit 5 (ESB) in the SRE. ¾ The device generates an SRQ upon completion of its settings. Informing the controller by an SRQ that a measurement has been completed: ¾ Set bit 7 (summary bit of Status Operation Register) in the SRE. ¾ Set bit 4 (measuring) in the ENABle register of the Status Operation Register. ¾ Set bit 4 in the NTRansition register of the Status Operation Register to ensure that the transition of measuring bit 4 from 1 to 0 (end of measurement) is also recorded in the EVENt register. ¾ The device generates an SRQ when the measurement is completed. The SRQ is the only way for the device to become active of its own. Each controller program should set the device such that a service request is triggered in case of malfunctions. The program should respond accordingly to the service request. Serial Poll Like the *STB? command, the serial poll is used to query the status byte of a device. Querying is implemented by interface messages, however, and is therefore much quicker. The serial poll method has already been defined in the IEEE 488.1 standard, and used to be the only standard method of querying the Status Byte Register. This method also works with devices that conform neither to SCPI nor to IEEE 488.2. Serial poll is mainly used to obtain a quick overview of the device status of several devices connected to the IEC/IEEE bus. 1144.1400.12 6.90 E-3 R&S NRP Remote Control - Commands Parallel Poll In case of a parallel poll, up to eight devices are simultaneously requested by the controller to transmit one bit of information on the data line, i.e. to set the data line assigned to each device to logical 0 or 1. Analogously to the SRE register, which determines the conditions for generating an SRQ, a Parallel Poll Enable Register (PPE) is available which is ANDed bit-by-bit with the STB (taking into account bit 6). The results are ORed and the result is then sent (possibly in inverted format) to the controller as a response to a parallel poll. The result can also be read without a parallel poll by the query *IST?. The parallel poll mode is mainly used to quickly find out which of the many devices connected to the IEC/IEEE bus caused an SRQ. For this purpose, SRE and PPE must be set to the same value. Queries Each part of a status register can be read out by queries. The queries are specified in the description of the SCPI commands (command system STATus). The queries always yield a number representing the bit pattern of the queried register. This number is evaluated by the controller program. Queries are mainly used after an SRQ to obtain detailed information about the cause of the SRQ. Error Queue Query Each error in the device causes an entry in the error queue. The entries in the error queue are error messages in plain text. If a sensor is connected, sensor-specific errors can be seen via manual control in the menu FileÆError List or in remote control via "Error List...". Usually, the error queue is read with the SCPI query SYSTem:ERRor?. Each SYSTem:ERRor? query is answered by an entry from the error queue. If there are no more error messages in the error queue, 0 = "No error" is returned by the device. The error queue should be queried in the controller program after each SRQ since the queue entries provide a more precise description of the error cause than the status registers. In particular, in the test phase of a controller program the error queue should be queried at regular intervals since it also registers faulty commands from the controller to the device. 1144.1400.12 6.91 E-3 Remote Control - Commands R&S NRP Initialization of the SCPI Status Registers The commands *RST, *DCL and SYSTem:PRESet as well as powering on the device also affect the status reporting system. Table 6-30 contains the various commands and events causing a reset of the status reporting system. None of the commands, with the exception of *RST and SYSTem:PRESet, affects the functional device settings. In particular, DCL does not clear the device settings. Table 6-30: Initialization of device status Result Power On Power-OnStatus Clear (*PSC) Effect DCL, SDC (Device Clear, Selected Device Clear) *RST or SYSTem:PRESet STATus:PRESet *CLS 0 1 -- yes -- -- -- yes -- yes -- -- -- -- Clear PPE (Parallel Poll Enable) -- yes -- -- -- -- Clear EVENt register -- yes -- -- -- yes Clear ENABle register of all OPERation and QUEStionable registers -- yes -- -- yes -- Fill PTRansition register with "1", delete NTRansition register -- yes -- -- yes -- Clear error/event queue yes yes -- -- -- yes Clear output queue yes yes yes 1) 1) 1) Stop command processing (parser) and clear input queue yes yes yes -- -- -- Clear STB (Status Byte) and ESR (Standard Event Status Register) Clear SRE (Service Request Enable) and ESE (Standard Event Status Enable) 1) Any command sent to a non-empty output queue causes the error -410, "Query interrupted". 1144.1400.12 6.92 E-3 R&S NRP Remote Control - Commands SYSTem With the aid of the SYSTem system, administrative device settings can be made and queried. This includes: • • • • • • • list of error messages IEC/IEEE-bus address resetting the R&S NRP setting the date and time audible signals version numbers of hardware and software setting the system speed Table 6-31: Commands of the SENSe system Command SYSTem :BEEPer [:IMMediate] :NOTify :OVERload[?] :KEY[?] :STOP :TIME :COMMunicate :GPIB [:SELF]:ADDRess :DATE[?] :INFO? :ERRor? :KEY :PRESet :SENSor[1..4] :INFO? :RESet :TEST? :SPEed :STANdard :CATalog? :PRESet :PWSettings[?] :TRIGger:SOURce[?] :TIME[?] :VERSion? Parameter Unit Remark Query only No query ON | OFF ON | OFF <NRf> S No query No query 0..30 <year>,<month>,<day> [<string >] <NR1> | character_value> - No query [<string >] NORMal | FAST Query only No query Query only No query <string> ON|OFF INT|EXT <hour>,<minute>,<second> - Query only Query only No query No query - - No query No query Query only SYSTem:BEEPer[:IMMediate] Generates an audible signal via the built-in loudspeaker. The duration of the signal is set with SYST:BEEP:TIME. Frequency and volume cannot be changed. The signal is only output if it is not switched off with SYS:BEEP:STAT OFF. SYSTem:BEEPer:NOTify:OVERload[?] ON | OFF Determines if the R&S NRP shall emit an acoustic signal when the power at a sensor exceeds the power limit. *RST-Wert: OFF 1144.1400.12 6.93 E-3 Remote Control - Commands R&S NRP SYSTem:BEEPer:NOTify:KEY[?] ON | OFF Enables (ON) or disables (OFF) acoustic key clicks, respectively. *RST-Wert: OFF SYSTem:BEEPer:STOP Stops the output of an audible signal. SYSTem:BEEPer:TIME <NRf> Sets the length in milliseconds of the audible signal output with SYS:BEEP. Value range: 1..60 Unit: S *RST value: This setting is not changed by *RST. SYSTem:COMMunicate:GPIB[:SELF]:ADDRess <NR1> Sets the address with which the R&S NRP can be addressed via the IEC/IEEE bus. The address is factory-set to 20 and is not changed by a reset. Value range: 0..30 *RST value: This setting is not changed by *RST. SYSTem:DATE[?] <year>,<month>,<day> Parameter Value range <year> 2000 ... 2100 <month> 1 (January) ... 12 (December) <day> 1 ... 31 Sets the date. Since the R&S NRP has no battery-backed clock, the date has to be reset if the clock was not set after the last power-on of the R&S NRP. *RST value: This setting is not changed by *RST. 1144.1400.12 6.94 E-3 R&S NRP Remote Control - Commands SYSTem:INFO? [<string>] Returns information about the system. <string_value> is used to query a specific information item. If called without parameters, the command returns all available information in the form of a list of strings separated by commas. <string_value> can have the following values. No difference is made between upper-case and lower-case letters: <string_value> Meaning "Manufacturer" Manufacturer of device "Type" Type (R&S NRP) "Stock Number" Order No. of R&S NRP "Serial" Serial number "HWVersion" Hardware version "SW Build" Firmware version "BootloadVer" Version of boot loader "KeybCtrlVer" Version of keyboard controller "Options" Installed options "MACAddr" MAC address of the R&S NRP if Ethernet option has been installed "RAMSize" RAM size "ROMSize" ROM size "CPUClock" Clock frequency of processor "CPLDVersion" Version of CPLD chip "PICVersion" Version of PIC-Chip SYSTem:ERRor? This query returns error numbers and text from the error/event queue of the R&S NRP. A specific error number with text is entered in the error/event queue for each error that occurs in the R&S NRP. The queue functions according to the FIFO principle. The message entered first in the queue is also output first when a SYST:ERR? query is sent. Querying clears the message. Up to 30 errors can be stored in the error/event queue. If further errors occur, the most recent error is overwritten by the message -350, "Queue overflow". If the error/event queue is empty, the message 0, "No error" is returned as a response. The queue is cleared by *CLS. It is not changed by *RST. For further information on the error/event queue see section Æ"STATus", page 5.1. 1144.1400.12 6.95 E-3 Remote Control - Commands R&S NRP SYSTem:ERRor:EXTended[:STATe][?] <boolean> SYST:ERR:EXT ON activates extended error messages (SYST:ERR?). The location of errors in the parsed command strings is also shown. *RST-Wert: OFF SYSTem:KEY <NR1> | <character_value> This command is used for testing purposes only and simulates a single stroke of an R&S NRP front-panel key. The key to be simulated is described either in plain text (<character_value>) or by a key code (<NR1>) (Æ Table 6-32). Table 6-32: Valid parameter values for the SYSTem:KEY command. Simulated front-panel key <character_value> <NR1> Softkey toggle 1 left SK1L 1 Softkey toggle 1 right SK1R 2 Softkey toggle 2 left SK2L 3 Softkey toggle 2 right SK2R 4 Softkey toggle 3 left SK3L 5 Softkey toggle 3 right SK3R 6 Softkey toggle 4 left SK4L 7 Softkey toggle 4 right SK4R 8 Softkey toggle 5 left SK5L 9 Softkey toggle 5 right SK5R 10 Softkey toggle 6 left SK6L 11 Softkey toggle 6 right SK6R 12 ({PRE}SET ) PRESet 13 ( ZERO/CAL ) ZERO 14 ( FREQ ) FREQ 15 ( Æ ) CONTrast 16 ( Ø ) POWer 17 1144.1400.12 6.96 E-3 R&S NRP Remote Control - Commands Simulated front-panel key <character_value> <NR1> DELete 18 ENTer 19 ESCape 20 (â) UP 21 (ô) DOWN 22 (û) LEFT 23 (ê) RIGHt 24 ( DEL/1TRIG ) (¶MENU) (ESC/LOCAL) Note: 1144.1400.12 The R&S NRP can be switched off via remote control by means of the SYST:KEY POWER command. 6.97 E-3 Remote Control - Commands R&S NRP SYSTem:PRESet Resets the R&S NRP to default (*RST) values. No difference is made between reset and preset values (exceptions: INIT:CONT, SENS:AVER:TCON und SENS:TRAC:AVER:TCON). For preset values see Table 6-33 . Table 6-33: Preset and *RST value Command Preset and *RST value CALC[1..8]:FEED[1..2] "POW:AVER" CALC[1..8]:LIM:BEEP OFF CALC[1..8]:LIM:CLE:AUTO OFF CALC[1..8]:LIM:FAIL? CALC[1..8]:LIM:FCO? CALC[1..8]:LIM:UPP:DATA 0 0 0 W or 0 DB OFF CALC[1..8]:LIM:UPP:STAT 0 W or 0 DB OFF CALC[1..8]:LIM:LOW:DATA CALC[1..8]:LIM:LOW:STAT CALC[1..8]:MATH Æ For command description see 6.26 CALC[1..8]:REL 0 DBM or 0 DB 0 DBM 0 DB OFF CALC[1..8]:REL:POW CALC[1..8]:REL:RAT CALC[1..8]:REL:STAT DISP:ILL - DISP[1..4]:AVAL OFF DISP:MESS DISP:MESS:TEXT DISP:MESS:TYPE OFF MESS DISP[1..4]:FORM DISP[1..4]:MET:LOW DISP[1..4]:NAME DISP[1..4]:RES DIG -90 DBM -120 DB 70 DBM 60 DB "" 0.01 DISP:SEL DISP:SIZE DISP[1..4] 1 NORM ON | OFF DISP[1..4]:TRAC:LOW -120 DBM DISP[1..4]:MET:UPP 1144.1400.12 6.98 Remark The calculate block processes average power values ("Average"). No audible signal in case of limit violations. No automatic reset of the limit monitoring function when a measurement is started. Limit violation. Number of limit violations is reset. Upper limit value for measurements. No monitoring function for upper limit value. Lower limit value for measurements. No monitoring function for lower limit value. The calculate block returns the measured value of the sensor assigned to the primary channel. Measurements are not converted into a reference value. Display lighting remains unchanged and can be activated by pressing ( Æ ). Dont show additional information on measured values. Do not display messages. No change. Messages cannot be confirmed manually. Digital result display. Lower limit value for analog result display. Upper limit value for analog result display. Text to be displayed in result window. Measurement accuracy and display accuracy. Selection of first result window. Automatic window sizes. A window will automatically be opened for each sensor. Lower limit of power axis in Scope mode E-3 R&S NRP Command Remote Control - Commands Preset and *RST value DISP[1..4]:TRAC:UPP 30 DBM DISP[1..4]:TSL DISP[1..4]:UPD FORM FORM:BORD 1 NORM ASC NORM MEM:... - OUTP:REC1:FEED "CALC1" OUTP:REC2:FEED "CALC2" OUTP:REC1:STAT OUTP:REC2:STAT OUTP:ROSC OUTP:TTL:ACT -20 DBM or 0 DB 20 DBM or 10 DB ON OFF OFF LOW OUTP:TTL:FAIL HIGH OUTP:TTL:FEED "CALC1:LIM" OUTP:REC[1..2]:LIM:LOW OUTP:REC[1..2]:LIM:UPP OUTP:TTL:HVOLT OUTP:TTL:LVOLT SENS[1..4]:AVER SENS[1..4]:AVER:COUN SENS[1..4]:AVER:COUN:AUTO SENS[1..4]:AVER:COUN:AUTO:MTIMe SENS[1..4]:AVER:COUN:AUTO:RES SENS[1..4]:AVER:COUN:AUTO:SLOT SENS[1..4]:AVER:COUN:AUTO:NSR SENS[1..4]:AVER:COUN:AUTO:TYPE SENS[1..4]:AVER:TCON SENS[1..4]:CORR:DCYC SENS[1..4]:CORR:DCYC:STAT SENS[1..4]:CORR:FDOT SENS[1..4]:CORR:FDOT:STAT SENS[1..4]:CORR:OFFS SENS[1..4]:CORR:OFFS:STAT SENS[1..4]:FREQ SENS[1..4]:FUNC 1144.1400.12 3.3 V 0.0 V ON | OFF <NR1> OFF <NRf> <NRf> <NR1> <NRf> RES | NSR MOV REP <NRf> ON |OFF OFF <NRf> ON | OFF "POW:AVG"| "POW:BURS:AVG"| "POW:TSL:AVG"| "XTIM:POW" 6.99 Remark Upper limit of power axis in Scope mode First timeslot Frequent display updates. Measured data in ASCII format. "Big-Endian" byte sequence of measured data, if FORM REAL. The settings in the MEMory command system will not be affected. Analog outputs are fed by the first calculate block. Analog outputs are fed by the second calculate block. 0 V equivalent at analog output. 3 V equivalent at analog output. Analog output active. Trigger input active. Test generator is switched off. OUTP:TTL:LVOLT is applied to the TTL output if a limit is violated. OUTP:TTL:HVOLT is applied to the TTL output if a limit is violated. The TTL output is fed by the limit monitoring function of calculate block 1. High voltage at TTL output Low voltage at TTL output Depending on sensor. Depending on sensor. Depending on sensor. Depending on sensor. Depending on sensor. Depending on sensor. Depending on sensor. Depending on sensor. (PRES) and SYST:PRES. *RST. Depending on sensor. Depending on sensor. No change. Depending on sensor. Depending on sensor. No change. Depending on sensor. E-3 Remote Control - Commands Command SENS[1..4]:APER SENS[1..4]:BUFF:STAT SENS[1..4]:BUFF:SIZe SENS[1..4]:TGAT:OFFS:TIME SENS[1..4]:TGAT:SEL SENS[1..4]:TGAT:TIME SENS[1..4]:TSL:COUNt SENS[1..4]:TSL:WIDTh SENS[1..4]:BURS:DTOL SENS[1..4]:RANG SENS[1..4]:RANG:AUT SENS[1..4]:RANG:CLEV SENS[1..4]:SAMP SENS[1..4]:SMO:STAT SENS[1..4]:AC:RANG SENS[1..4]:AC:RANG:AUT SENS[1..4]:AC:RANG:CLEV SENS[1..4]:TRAC:AVER SENS[1..4]:TRAC:AVER:COUN SENS[1..4]:TRAC:AVER:COUN:AUTO SENS[1..4]:TRAC:AVER:COUN:AUTO:MTIMe SENS[1..4]:TRAC:AVER:COUN:AUTO:RES SENS[1..4]:TRAC:AVER:COUN:AUTO:POIN SENS[1..4]:TRAC:AVER:COUN:AUTO:NSR SENS[1..4]:TRAC:AVER:COUN:AUTO:TYPE SENS[1..4]:TRAC:AVER:TCON SENS[1..4]:TRAC:OFFS:TIME SENS[1..4]:TRAC:POINt SENS[1..4]:TRAC:TIME SENS[1..4]:TRAC:REAL SENS[1..4]:TIMing:EXCL:STARt SENS[1..4]:TIMing:EXCL:STOP SYST:BEEP:NOT:KEY SYST:BEEP:NOT:OVER SYST:ERR:EXT R&S NRP Preset and *RST value <NRf> ON | OFF <NR1> <NRf> 1 <NRf> <NR1> <NRf> <NRf> 1 | 2 | 3 ON | OFF <NRf> FREQ1 | FREQ2 ON | OFF 1 | 2 | 3 ON | OFF <NRf> ON | OFF <NR1> OFF <NRf> <NRf> <NR1> <NRf> RES | NSR MOV REP <NRf> <NR1> <NRf> ON|OFF <NRf> <NRf> OFF OFF OFF Remark Depending on sensor. Depending on sensor. Depending on sensor. Depending on sensor. Depending on sensor. Depending on sensor. Depending on sensor. Depending on sensor. Depending on sensor. Depending on sensor. Depending on sensor. Depending on sensor. Depending on sensor. Depending on sensor. Depending on sensor. Depending on sensor. Depending on sensor. Depending on sensor. Depending on sensor. Depending on sensor. Depending on sensor. Depending on sensor. Depending on sensor. Depending on sensor. (PRES) and SYST:PRES. *RST. Depending on sensor. Depending on sensor. Depending on sensor. Depending on sensor. Depending on sensor. Depending on sensor. No key click. No warning on sensor overload. Keine erweiterte Fehlemeldungen für SYST:ERR? SYST[1..4]:SPEed SYST:STAN:PWS SYST:STAN:TRIG:SOUR INIT[1..4|:ALL]:CONT NORM OFF INT ON OFF OFF OFF ON | OFF <NR1> <NRf> ON|OFF <NRf> <NRf> INIT[1..4|:ALL]:DIS TRIG:ALL:SYNC TRIG[1..4|:ALL]:ATR TRIG[1..4|:ALL]:COUN TRIG[1..4|:ALL]:DELay TRIG[1..4|:ALL]:DEL:AUTO TRIG[1..4|:ALL]:HOLD TRIG[1..4|:ALL]:HYST 1144.1400.12 6.100 Depending on sensor. Window Internal triggering. (PRES) and SYST:PRES. *RST. Depending on sensor. Depending on sensor. Depending on sensor. Depending on sensor. Depending on sensor. Depending on sensor. E-3 R&S NRP Remote Control - Commands Command Preset and *RST value Remark TRIG[1..4|:ALL]:LEV TRIG[1..4|:ALL]:SLOP TRIG[1..4|:ALL]:SOUR <NRf> POS | NEG IMM | HOLD | EXT | INT | BUS DBM DB Depending on sensor. UNIT[1..8]:POW UNIT[1..8]:POW:RAT Depending on sensor. Depending on sensor. Logarithmic result scaling. Logarithmic result scaling. SYSTem:SENSor[1..4]:INFO? [<string>] Returns information on a sensor. <string> is used to query a specific information item. If called without parameters, the command returns all available information in the form of a list of strings separated by commas. The permissible values for <string> depend on the sensor. For details refer to the documentation of the corresponding sensor. Value range: depending on sensor SYSTem:SENSor[1..4]:RESet From the point of view of the R&S NRP base unit, the sensors are stand-alone measuring devices. They communicate with the R&S NRP via a command set complying with SCPI. SYST:SENS[1..4]:RES prompts the base unit to send an *RST to the sensor in question. Measurements in progress are interrupted. SYSTem:SENSor[1..4]:TEST? Performs a sensor test and returns a list of strings separated by commas. The contents of this test protocol is sensor-specific. For its meaning, please refer to the sensor documentation. SYSTem:SPEed NORMal | FAST The data processing speed of the R&S NRP can be increased when FAST is selected. The display is switched off and the measured values are no longer displayed since the continuous update of the screen content requires computation time. *RST value: NORM SYSTem:STANdard:CATalog? Returns a list of stored standards containing a series of strings separated by commas. The strings can be used as parameters for the SYSTem:STANdard:PRESet <string> command. *RST value: none 1144.1400.12 6.101 E-3 Remote Control - Commands SYSTem:STANdard:PRESet R&S NRP <string> The R&S NRP can be easily configured for measuring standardized signals (e.g. mobile radio standards). For this purpose, the standards listed in the Annex (Æ Standard Configurations) are stored in the R&S NRP. The SYST:STAN:PRES command sets the listed parameters and, if desired, also configures front-panel display windows (if SYST:STAN:PWS ON). *RST value: none SYSTem:STANdard:PWSettings ON | OFF If SYST:STAN:PRES <string> is used, SYST:STAN:PWS (Preserve Window Settings) determines whether the window system is also configured with the calculate blocks (OFF) or whether exclusively sensor parameters are set (ON). *RST value: OFF SYSTem:STANdard:TRIGger:SOURce INT | EXT If SYST:STAN:PRES <string> is used, this command determines whether the sensors are set to internal (INT) or external (EXT) triggering. *RST value: INT SYSTem:TIME[?] Parameter Value range <hour> 0 ... 24 <minute> 0 ... 59 <second> 0 ... 59 <hour>,<minute>,<second> Sets the time. Since the R&S NRP has no battery-backed clock, the time has to be reset if the clock was not set after the last power-on of the R&S NRP. (Æ SYSTem:DATE[?] <year>,<month>,<day>). SYSTem:VERSion? Returns a string that contains the current version number of the SCPI standard. 1144.1400.12 6.102 E-3 R&S NRP Remote Control - Commands TRIGger The trigger commands are used to configure the timing conditions for the start of a measurement. Note: When the sensors are connected to the R&S NRP, they inform the device about the SENSe and TRIGger commands supported and about the value ranges for parameters. This applies to both numeric and text parameters. For this reason, no fixed ranges are specified with these commands; the ranges can be obtained from the respective sensor manual. Table 6-34: Commands for setting the trigger system of a sensor Command Parameter ABORt[1..4|:ALL] INITiate[1..4|:ALL] :CONTinuous[?] :DISable[?] [:IMMediate] TRIGger:ALL :SYNChronize[:STATe][?] TRIGger[1..4|:ALL] :ATRigger[:STATe][?] :COUNt[?] :DELay[?] :AUTO[?] :HOLDoff[?] :HYSTeresis[?] [:IMMediate] :LEVel[?] :SLOPe[?] :SOURce[?] Unit Remark No query ON | OFF ON | OFF - - ON | OFF - ON | OFF <int_value> <float_value> ON | OFF <float_value> <float_value> <float_value> POSitive | NEGative BUS | EXTernal | HOLD | IMMediate | INTernal S S DB|PCT DBM|W - No query No query ABORt[1..4|:ALL] Immediately sets the respective sensors to the IDLE state. Measurements in progress are interrupted. If INIT:CONT ON is set, a new measurement is immediately started since the trigger system is not influenced. INITiate[1..4|:ALL]:CONTinuous[?] ON | OFF Selects either single-shot or continuous (free-running) measurement cycles. In the course of a measurement cycle, a sensor passes through the IDLE, INITIATED, WAIT_FOR_TRG and MEASURING states before it is again set to the IDLE (INIT:CONT OFF) or the INITIATED (INIT:CONT ON) state. The settings are not changed when control is switched from manual to remote. INIT:CONT ON is set when remote control is switched back to manual control. INIT:CONT ON Continuous measurements are performed. If a measurement is completed, the respective sensors do not return to the IDLE state but are immediately set to INITIATED and then to WAIT_FOR_TRG. A measurement cycle is only performed once. After completion, the sensors remain in the IDLE state. INIT:CONT OFF has no effect when the sensor is already in the IDLE state. A measurement in progress is completed. *RST-Wert: (PRES) and SYST:PRES: ON *RST: OFF INIT:CONT OFF 1144.1400.12 6.103 E-3 Remote Control - Commands INITiate[1..4|:ALL]:DISable[?] R&S NRP ON | OFF This command prevents the execution of the INIT:IMM command for one or more sensors. It can thus suppress the start of a measurement for specific sensors if the INIT:ALL:IMM command is used. *RST value: OFF INITiate[1..4|:ALL][:IMMediate][?] This command starts a single-shot measurement. The respective sensor goes to the INITIATED state. The command is completely executed when the sensor returns to the IDLE state. The command is ignored when the sensor is not in the IDLE state or when continuous measurements are selected (INIT:CONT ON). The command is only fully executed when the measurement is completed and the trigger system has again reached the IDLE state. Besides CAL:ZERO:AUTO INIT is the only remote control command that permits overlapping execution. Other commands can be received and processed while the command is being executed. Note: INIT:IMM invalidates all previous measuring results. A FETCh? command following INIT will thus always return a new measurement result. Error messages: 28 "Sensor not idle": The sensor is not in the IDLE state. TRIGger:ALL:SYNChronize[:STATe][?] ON | OFF Using this command one can assure, that measurements with externally triggered sensors start synchronously. As the initiation of measurements in the sensors is serialised in the R&S NRP it is possible that a sensor is triggered before another sensor is initiated (if synchronisation is off). Sensors to be synchronised are required to have the same TRIG:SLOP setting, otherwise a SCPI error -221, "Settings conflict" occurs on TRIG:ALL:SYNC ON. Example (synchronised measurement with 2 heads): *RST TRIG:ALL:SLOP POS TRIG:ALL:SOUR EXT TRIG:ALL:SYNC ON INIT:ALL FETCh1?; FETCh2? *RST-Value: OFF TRIGger[1..4|:ALL]:ATRigger[:STATe][?] ON | OFF When TRIG:ATR is set to ON, the WAIT_FOR_TRG state is automatically exited when no trigger event occurs within a period that corresponds to the reciprocal of the display update rate. *RST value: depending on sensor 1144.1400.12 6.104 E-3 R&S NRP Remote Control - Commands TRIGger[1..4|:ALL]:COUNt[?] <int_value> Sets the number of measurement cycles to be performed when the measurement is started with INIT. Unit: 1 Value range: depending on sensor *RST value: depending on sensor TRIGger[1..4|:ALL]:DELay[?] <float_value> Defines the delay between the trigger event and the beginning of the actual measurement (integration). Unit: S Value range: depending on sensor *RST value: depending on sensor TRIGger[1..4|:ALL]:DELay:AUTO[?] ON | OFF TRIG:DEL:AUTO ON ensures by means of an automatically determined delay that a measurement is started only after the sensor has settled. This is important when thermal sensors are used. The automatically determined delay is ignored when a longer period was set with TRIG[1..4]:DEL. *RST value: depending on sensor TRIGger[1..4|:ALL]:HOLDoff[?] <float_value> Defines a period after a trigger event within which all further trigger events are ignored. Unit: S Value range: depending on sensor *RST value: depending on sensor TRIGger[1..4|:ALL]:HYSTeresis[?] <float_value> This command is used to specify how far the signal level has to drop below the trigger level before a new signal edge can be detected as a trigger event. Thus, this command can be used to eliminate the effects of noise in the signal on the edge detector of the trigger system. Unit: DB | PCT Default unit: DB Value range: depending on sensor *RST value: depending on sensor 1144.1400.12 6.105 E-3 Remote Control - Commands R&S NRP TRIGger[1..4|:ALL][:IMMediate] Performs triggering and ensures that the sensor directly changes from the WAIT_FOR_TRG state to the MEASURING state irrespective of the selected trigger source (TRIG:SOUR). A trigger delay set with TRIG:DEL is ignored but not the automatic delay determined when TRIG:DEL:AUTO:ON is set. When the trigger source is HOLD, a measurement can only be started with TRIG. Error messages: -211 "Trigger ignored": The sensor is not in the WAIT_FOR_TRG state. TRIGger[1..4|:ALL]:LEVel[?] <float_value> Determines the power a trigger signal must exceed (TRIG:SLOP POS) or fall short of (TRIG:SLOP NEG) before a trigger event is detected. This setting is only used for the trigger signal source (TRIG:SOUR) INTernal. Unit: DBM | W Default unit: DBM Value range: depending on sensor *RST value: depending on sensor TRIGger[1..4|:ALL]:SLOPe[?] POSitive | NEGative This command determines whether the rising (POSitive) or the falling (NEGative) edge of the signal is used for triggering. *RST value: depending on sensor 1144.1400.12 6.106 E-3 R&S NRP Remote Control - Commands TRIGger[1..4|:ALL]:SOURce[?] BUS | EXTernal | HOLD | IMMediate | INTernal Sets the trigger signal source for the WAIT_FOR_TRG state. BUS The trigger event is initiated by TRIG:IMM or *TRG. In this case, the other trigger setting are meaningless. EXTernal Triggering is performed with an external signal applied to the trigger connector. The TRIG:SLOP command determines whether the rising or the falling edge of the signal is to be used for triggering. Waiting for a trigger event can be skipped by TRIG:IMM. IMMediate The sensor does not remain in the WAIT_FOR_TRG state but immediately changes to the MEASURING state. HOLD A measurement can only be triggered when the command TRIG:IMM is executed. INTernal The sensor determines the trigger time by means of the signal to be measured. When this signal exceeds (TRIG:SLOP POS) or fall short of (TRIG:SLOP NEG) the power set by TRIG:LEV, the measurement is started after the time set by TRIG:DEL. Similar to TRIG:SOUR EXT, waiting for a trigger event can also be skipped by TRIG:IMM. *RST value: depending on sensor 1144.1400.12 6.107 E-3 Remote Control - Commands R&S NRP UNIT Table 6-35: Commands of the UNIT system Command Parameter UNIT[1..8] :POWer[?] :RATio[?] DBM | W UNIT[1..8]:POWer[?] Unit Remark - DB | PCT DBM | W | DBUV Selects the output unit for the measured power values. This setting also determines the unit for the parameters of the following commands: • • • • • • • CALC:REL CALC:LIM:UPP CALC:LIM:LOW DISP:MET:UPP DISP:MET:LOW OUTP:REC:LIM:LOW OUTP:REC:LIM:UPP *RST value: DBM UNIT[1..8]:POWer:RATio[?] DB | DPCT | O Selects the output unit for the measured power ratio values. This setting also determines the unit for the parameters of the following commands: • • • • • • • CALC:REL CALC:LIM:UPP CALC:LIM:LOW DISP:MET:UPP DISP:MET:LOW OUTP:REC:LIM:LOW OUTP:REC:LIM:UPP *RST value: DB Error messages: If the compute function of the associated calculate block is :SWR, :RLOSs or :REFLection, then the unit cannot be changed and error message 26,"State not supported", is output. 1144.1400.12 6.108 E-3 R&S NRP Remote Control - Commands List of Remote Control Commands The R&S NRP supports remote control commands to the SCPI 1999.0 standard. Command Page High-level measurement commands CONFigure[1..8]? 6.11 CONFigure[1..8][:SCALar][:POWer][:AVG] 6.11 CONFigure[1..8][:SCALar][:POWer][:AVG]:RELative 6.11 CONFigure[1..8][:SCALar][:POWer][:AVG]:DIFFerence 6.11 CONFigure[1..8][:SCALar][:POWer][:AVG]:DIFFerence:RELative 6.11 CONFigure[1..8][:SCALar][:POWer][:AVG]:SUM 6.11 CONFigure[1..8][:SCALar][:POWer][:AVG]:SUM:RELative 6.11 CONFigure[1..8][:SCALar][:POWer][:AVG]:RATio 6.11 CONFigure[1..8][:SCALar][:POWer][:AVG]:RATio:RELative 6.11 CONFigure[1..8][:SCALar][:POWer][:AVG]:SWR 6.11 CONFigure[1..8][:SCALar][:POWer][:AVG]:RLOSs 6.11 CONFigure[1..8][:SCALar][:POWer][:AVG]:REFLection 6.11 CONFigure[1..8][:SCALar][:POWer]:TSLot[:AVG] 6.11 CONFigure[1..8][:SCALar][:POWer]:TSLot[:AVG]:RELative 6.11 CONFigure[1..8][:SCALar][:POWer]:TSLot[:AVG]:DIFFerence 6.11 CONFigure[1..8][:SCALar][:POWer]:TSLot[:AVG]:DIFFerence:RELative 6.11 CONFigure[1..8][:SCALar][:POWer]:TSLot[:AVG]:SUM 6.11 CONFigure[1..8][:SCALar][:POWer]:TSLot[:AVG]:SUM:RELative 6.11 CONFigure[1..8][:SCALar][:POWer]:TSLot[:AVG]:RATio 6.11 CONFigure[1..8][:SCALar][:POWer]:TSLot[:AVG]:RATio:RELative 6.11 CONFigure[1..8][:SCALar][:POWer]:TSLot[:AVG]:SWR 6.11 CONFigure[1..8][:SCALar][:POWer]:TSLot[:AVG]:RLOSs 6.11 CONFigure[1..8][:SCALar][:POWer]:TSLot[:AVG]:REFLection 6.11 CONFigure[1..8][:SCALar][:POWer]:BURSt[:AVG] 6.11 CONFigure[1..8][:SCALar][:POWer]:BURSt[:AVG]:RELative 6.11 1144.1400.12 6.109 E-3 Remote Control - Commands R&S NRP CONFigure[1..8][:SCALar][:POWer]:BURSt[:AVG]:DIFFerence 6.11 CONFigure[1..8][:SCALar][:POWer]:BURSt[:AVG]:DIFFerence:RELative 6.11 CONFigure[1..8][:SCALar][:POWer]:BURSt[:AVG]:SUM 6.11 CONFigure[1..8][:SCALar][:POWer]:BURSt[:AVG]:SUM:RELative 6.11 CONFigure[1..8][:SCALar][:POWer]:BURSt[:AVG]:RATio 6.11 CONFigure[1..8][:SCALar][:POWer]:BURSt[:AVG]:RATio:RELative 6.11 CONFigure[1..8][:SCALar][:POWer]:BURSt[:AVG]:SWR 6.11 CONFigure[1..8][:SCALar][:POWer]:BURSt[:AVG]:RLOSs 6.11 CONFigure[1..8][:SCALar][:POWer]:BURSt[:AVG]:REFLection 6.11 CONFigure[1..8]:ARRay[:POWer][:AVG] 6.11 CONFigure[1..8]:ARRay[:POWer][:AVG]:RELative 6.11 CONFigure[1..8]:ARRay[:POWer][:AVG]:DIFFerence 6.11 CONFigure[1..8]:ARRay[:POWer][:AVG]:DIFFerence:RELative 6.11 CONFigure[1..8]:ARRay[:POWer][:AVG]:SUM 6.11 CONFigure[1..8]:ARRay[:POWer][:AVG]:SUM:RELative 6.11 CONFigure[1..8]:ARRay[:POWer][:AVG]:RATio 6.11 CONFigure[1..8]:ARRay[:POWer][:AVG]:RATio:RELative 6.11 CONFigure[1..8]:ARRay[:POWer][:AVG]:SWR 6.11 CONFigure[1..8]:ARRay[:POWer][:AVG]:RLOSs 6.11 CONFigure[1..8]:ARRay[:POWer][:AVG]:REFLection 6.11 CONFigure[1..8]:XTIMe[:POWer] 6.11 FETCh[1..8]? 6.11 FETCh[1..8][:SCALar][:POWer][:AVG] 6.11 FETCh[1..8][:SCALar][:POWer][:AVG]:RELative 6.11 FETCh[1..8][:SCALar][:POWer][:AVG]:DIFFerence 6.11 FETCh[1..8][:SCALar][:POWer][:AVG]:DIFFerence:RELative 6.11 FETCh[1..8][:SCALar][:POWer][:AVG]:SUM 6.11 FETCh[1..8][:SCALar][:POWer][:AVG]:SUM:RELative 6.11 FETCh[1..8][:SCALar][:POWer][:AVG]:RATio 6.11 FETCh[1..8][:SCALar][:POWer][:AVG]:RATio:RELative 6.11 1144.1400.12 6.110 E-3 R&S NRP Remote Control - Commands FETCh[1..8][:SCALar][:POWer][:AVG]:SWR 6.11 FETCh[1..8][:SCALar][:POWer][:AVG]:RLOSs 6.11 FETCh[1..8][:SCALar][:POWer][:AVG]:REFLection 6.11 FETCh[1..8][:SCALar][:POWer]:TSLot[:AVG] 6.11 FETCh[1..8][:SCALar][:POWer]:TSLot[:AVG]:RELative 6.11 FETCh[1..8][:SCALar][:POWer]:TSLot[:AVG]:DIFFerence 6.11 FETCh[1..8][:SCALar][:POWer]:TSLot[:AVG]:DIFFerence:RELative 6.11 FETCh[1..8][:SCALar][:POWer]:TSLot[:AVG]:SUM 6.11 FETCh[1..8][:SCALar][:POWer]:TSLot[:AVG]:SUM:RELative 6.11 FETCh[1..8][:SCALar][:POWer]:TSLot[:AVG]:RATio 6.11 FETCh[1..8][:SCALar][:POWer]:TSLot[:AVG]:RATio:RELative 6.11 FETCh[1..8][:SCALar][:POWer]:TSLot[:AVG]:SWR 6.11 FETCh[1..8][:SCALar][:POWer]:TSLot[:AVG]:RLOSs 6.11 FETCh[1..8][:SCALar][:POWer]:TSLot[:AVG]:REFLection 6.11 FETCh[1..8][:SCALar][:POWer]:BURSt[:AVG] 6.11 FETCh[1..8][:SCALar][:POWer]:BURSt[:AVG]:RELative 6.11 FETCh[1..8][:SCALar][:POWer]:BURSt[:AVG]:DIFFerence 6.11 FETCh[1..8][:SCALar][:POWer]:BURSt[:AVG]:DIFFerence:RELative 6.11 FETCh[1..8][:SCALar][:POWer]:BURSt[:AVG]:SUM 6.11 FETCh[1..8][:SCALar][:POWer]:BURSt[:AVG]:SUM:RELative 6.11 FETCh[1..8][:SCALar][:POWer]:BURSt[:AVG]:RATio 6.11 FETCh[1..8][:SCALar][:POWer]:BURSt[:AVG]:RATio:RELative 6.11 FETCh[1..8][:SCALar][:POWer]:BURSt[:AVG]:SWR 6.11 FETCh[1..8][:SCALar][:POWer]:BURSt[:AVG]:RLOSs 6.11 FETCh[1..8][:SCALar][:POWer]:BURSt[:AVG]:REFLection 6.11 FETCh[1..8]:ARRay[:POWer][:AVG] 6.11 FETCh[1..8]:ARRay[:POWer][:AVG]:RELative 6.11 FETCh[1..8]:ARRay[:POWer][:AVG]:DIFFerence 6.11 FETCh[1..8]:ARRay[:POWer][:AVG]:DIFFerence:RELative 6.11 FETCh[1..8]:ARRay[:POWer][:AVG]:SUM 6.11 1144.1400.12 6.111 E-3 Remote Control - Commands R&S NRP FETCh[1..8]:ARRay[:POWer][:AVG]:SUM:RELative 6.11 FETCh[1..8]:ARRay[:POWer][:AVG]:RATio 6.11 FETCh[1..8]:ARRay[:POWer][:AVG]:RATio:RELative 6.11 FETCh[1..8]:ARRay[:POWer][:AVG]:SWR 6.11 FETCh[1..8]:ARRay[:POWer][:AVG]:RLOSs 6.11 FETCh[1..8]:ARRay[:POWer][:AVG]:REFLection 6.11 FETCh[1..8]:XTIMe[:POWer] 6.11 READ[1..8]? 6.11 READ[1..8][:SCALar][:POWer][:AVG] 6.11 READ[1..8][:SCALar][:POWer][:AVG]:RELative 6.11 READ[1..8][:SCALar][:POWer][:AVG]:DIFFerence 6.11 READ[1..8][:SCALar][:POWer][:AVG]:DIFFerence:RELative 6.11 READ[1..8][:SCALar][:POWer][:AVG]:SUM 6.11 READ[1..8][:SCALar][:POWer][:AVG]:SUM:RELative 6.11 READ[1..8][:SCALar][:POWer][:AVG]:RATio 6.11 READ[1..8][:SCALar][:POWer][:AVG]:RATio:RELative 6.11 READ[1..8][:SCALar][:POWer][:AVG]:SWR 6.11 READ[1..8][:SCALar][:POWer][:AVG]:RLOSs 6.11 READ[1..8][:SCALar][:POWer][:AVG]:REFLection 6.11 READ[1..8][:SCALar][:POWer]:TSLot[:AVG] 6.11 READ[1..8][:SCALar][:POWer]:TSLot[:AVG]:RELative 6.11 READ[1..8][:SCALar][:POWer]:TSLot[:AVG]:DIFFerence 6.11 READ[1..8][:SCALar][:POWer]:TSLot[:AVG]:DIFFerence:RELative 6.11 READ[1..8][:SCALar][:POWer]:TSLot[:AVG]:SUM 6.11 READ[1..8][:SCALar][:POWer]:TSLot[:AVG]:SUM:RELative 6.11 READ[1..8][:SCALar][:POWer]:TSLot[:AVG]:RATio 6.11 READ[1..8][:SCALar][:POWer]:TSLot[:AVG]:RATio:RELative 6.11 READ[1..8][:SCALar][:POWer]:TSLot[:AVG]:SWR 6.11 READ[1..8][:SCALar][:POWer]:TSLot[:AVG]:RLOSs 6.11 READ[1..8][:SCALar][:POWer]:TSLot[:AVG]:REFLection 6.11 1144.1400.12 6.112 E-3 R&S NRP Remote Control - Commands READ[1..8][:SCALar][:POWer]:BURSt[:AVG] 6.11 READ[1..8][:SCALar][:POWer]:BURSt[:AVG]:RELative 6.11 READ[1..8][:SCALar][:POWer]:BURSt[:AVG]:DIFFerence 6.11 READ[1..8][:SCALar][:POWer]:BURSt[:AVG]:DIFFerence:RELative 6.11 READ[1..8][:SCALar][:POWer]:BURSt[:AVG]:SUM 6.11 READ[1..8][:SCALar][:POWer]:BURSt[:AVG]:SUM:RELative 6.11 READ[1..8][:SCALar][:POWer]:BURSt[:AVG]:RATio 6.11 READ[1..8][:SCALar][:POWer]:BURSt[:AVG]:RATio:RELative 6.11 READ[1..8][:SCALar][:POWer]:BURSt[:AVG]:SWR 6.11 READ[1..8][:SCALar][:POWer]:BURSt[:AVG]:RLOSs 6.11 READ[1..8][:SCALar][:POWer]:BURSt[:AVG]:REFLection 6.11 READ[1..8]:ARRay[:POWer][:AVG] 6.11 READ[1..8]:ARRay[:POWer][:AVG]:RELative 6.11 READ[1..8]:ARRay[:POWer][:AVG]:DIFFerence 6.11 READ[1..8]:ARRay[:POWer][:AVG]:DIFFerence:RELative 6.11 READ[1..8]:ARRay[:POWer][:AVG]:SUM 6.11 READ[1..8]:ARRay[:POWer][:AVG]:SUM:RELative 6.11 READ[1..8]:ARRay[:POWer][:AVG]:RATio 6.11 READ[1..8]:ARRay[:POWer][:AVG]:RATio:RELative 6.11 READ[1..8]:XTIMe[:POWer] 6.11 MEASure[1..8]? 6.11 MEASure[1..8][:SCALar][:POWer][:AVG] 6.11 MEASure[1..8][:SCALar][:POWer][:AVG]:RELative 6.11 MEASure[1..8][:SCALar][:POWer][:AVG]:DIFFerence 6.11 MEASure[1..8][:SCALar][:POWer][:AVG]:DIFFerence:RELative 6.11 MEASure[1..8][:SCALar][:POWer][:AVG]:SUM 6.11 MEASure[1..8][:SCALar][:POWer][:AVG]:SUM:RELative 6.11 MEASure[1..8][:SCALar][:POWer][:AVG]:RATio 6.11 MEASure[1..8][:SCALar][:POWer][:AVG]:RATio:RELative 6.11 MEASure[1..8][:SCALar][:POWer][:AVG]:SWR 6.11 1144.1400.12 6.113 E-3 Remote Control - Commands R&S NRP MEASure[1..8][:SCALar][:POWer][:AVG]:RLOSs 6.11 MEASure[1..8][:SCALar][:POWer][:AVG]:REFLection 6.11 MEASure[1..8][:SCALar][:POWer]:TSLot[:AVG] 6.11 MEASure[1..8][:SCALar][:POWer]:TSLot[:AVG]:RELative 6.11 MEASure[1..8][:SCALar][:POWer]:TSLot[:AVG]:DIFFerence 6.11 MEASure[1..8][:SCALar][:POWer]:TSLot[:AVG]:DIFFerence:RELative 6.11 MEASure[1..8][:SCALar][:POWer]:TSLot[:AVG]:RATio 6.11 MEASure[1..8][:SCALar][:POWer]:TSLot[:AVG]:RATio:RELative 6.11 MEASure[1..8][:SCALar][:POWer]:BURSt[:AVG] 6.11 MEASure[1..8][:SCALar][:POWer]:BURSt[:AVG]:RELative 6.11 MEASure[1..8][:SCALar][:POWer]:BURSt[:AVG]:DIFFerence 6.11 MEASure[1..8][:SCALar][:POWer]:BURSt[:AVG]:DIFFerence:RELative 6.11 MEASure[1..8][:SCALar][:POWer]:BURSt[:AVG]:RATio 6.11 MEASure[1..8][:SCALar][:POWer]:BURSt[:AVG]:RATio:RELative 6.11 MEASure[1..8]:SWR 6.11 MEASure[1..8]:REFLection 6.11 MEASure[1..8]:RLOSs 6.11 MEASure[1..8]:ARRay[:POWer][:AVG] 6.11 MEASure[1..8]:ARRay[:POWer][:AVG]:RELative 6.11 MEASure[1..8]:ARRay[:POWer][:AVG]:DIFFerence 6.11 MEASure[1..8]:ARRay[:POWer][:AVG]:DIFFerence:RELative 6.11 MEASure[1..8]:ARRay[:POWer][:AVG]:RATio 6.11 MEASure[1..8]:ARRay[:POWer][:AVG]:RATio:RELative 6.11 MEASure[1..8]:XTIMe[:POWer] 6.11 CALCulate commands CALCulate[1..8]:DATA? 6.21 CALCulate[1..8]:MINimum:DATA? 6.21 CALCulate[1..8]:MAXimum:DATA? 6.21 CALCulate[1..8]:PTPeak:DATA? 6.21 CALCulate[1..8]:EXTRemes:RESet 6.22 1144.1400.12 6.114 E-3 R&S NRP Remote Control - Commands CALCulate[1..8]:LIMit:BEEP 6.22 CALCulate[1..8]:LIMit:CLEar[:IMMediate] 6.23 CALCulate[1..8]:LIMit:FAIL? 6.23 CALCulate[1..8]:LIMit:FCOunt? 6.24 CALCulate[1..8]:LIMit:UPPer[:DATA][?] 6.24 CALCulate[1..8]:LIMit:UPPer:STATe[?] 6.25 CALCulate[1..8]:LIMit:LOWer[:DATA][?] 6.24 CALCulate[1..8]:LIMit:LOWer:STATe[?] 6.25 CALCulate[1..8]:MATH[:EXPRession][?] 6.26 CALCulate[1..8]:MATH[:EXPRession]:CATalog? 6.27 CALCulate[1..8]:RELative[:MAGNitude][?] 6.27 CALCulate[1..8]:RELative[:MAGNitude]:AUTO[?] 6.28 CALCulate[1..8]:RELative:POWer[:MAGNitude][?] 6.28 CALCulate[1..8]:RELative:RATio[:MAGNitude][?] 6.28 CALCulate[1..8]:RELative:STATe[?] 6.28 CALibration command 6.29 CALibration[1..4]:ZERO:AUTO[?] DISPlay command DISPlay:ILLumination[?] 6.30 DISPlay:ERRorlist:STATe[?] 6.31 DISPlay:MESSage[:STATe][?] 6.31 DISPlay:MESSage:TEXT:CLEar 6.31 DISPlay:MESSage:TEXT[:DATA] 6.31 DISPlay:MESSage:TYPE 6.31 DISPlay:PIXMap? 6.31 DISPlay:UPDate[?] 6.32 DISPlay[:WINDow][1..4]:AVALue[?] 6.32 DISPlay[:WINDow][1..4]:FORMat[?] 6.32 DISPlay[:WINDow][1..4]:METer|:ANALog:AUTo[?] 6.33 DISPlay[:WINDow][1..4]:METer|:ANALog:LOWer[?] 6.33 1144.1400.12 6.115 E-3 Remote Control - Commands R&S NRP DISPlay[:WINDow][1..4]:METer|:ANALog:UPPer[?] 6.33 DISPlay[:WINDow][1..4]:NAME[?] 6.34 DISPlay[:WINDow][1..4]:RESolution[?] 6.35 DISPlay[:WINDow][1..4]:SELect[?] 6.36 DISPlay[:WINDow][1..4]:SIZE[?] 6.37 DISPlay[:WINDow][1..4][:STATe][?] 6.35 MEMory commands MEMory:CATalog[:ALL]? 6.40 MEMory:CATalog:STATe? 6.40 MEMory:CATalog:TABLe? 6.40 MEMory:CLEar[:NAME] 6.40 MEMory:CLEar:TABLe 6.40 MEMory:FREE[:ALL]? 6.40 MEMory:FREE:STATe? 6.41 MEMory:FREE:TABLe? 6.41 MEMory:NSTates? 6.41 MEMory:STATe:CATalog? 6.41 MEMory:STATe:DEFine[?] 6.41 MEMory:TABLe:FREQuency[?] 6.41 MEMory:TABLe:FREQuency:POINts? 6.42 MEMory:TABLe:GAIN[:MAGNitude][?] 6.42 MEMory:TABLe:GAIN[:MAGNitude]:POINts? 6.42 MEMory:TABLe:MOVE 6.42 MEMory:TABLe:SELect[?] 6.43 OUTPut command 6.47 OUTPut:ROSCillator[:STATe][?] SENSe commands [SENSe[1..4]]:AVERage[:STATe][?] 6.51 [SENSe[1..4]]:AVERage:COUNt[?] 6.51 [SENSe[1..4]]:AVERage:COUNt:AUTO[?] 6.51 1144.1400.12 6.116 E-3 R&S NRP Remote Control - Commands [SENSe[1..4]]:AVERage:COUNt:AUTO:MTIMe[?] 6.52 [SENSe[1..4]]:AVERage:COUNt:AUTO:RESolution[?] 6.52 [SENSe[1..4]]:AVERage:COUNt:AUTO:SLOT[?] 6.52 [SENSe[1..4]]:AVERage:COUNt:AUTO:NSRatio[?] 6.53 [SENSe[1..4]]:AVERage:COUNt:AUTO:TYPE[?] 6.53 [SENSe[1..4]]:AVERage:RESet 6.53 [SENSe[1..4]]:AVERage:TCONtrol[?] 6.53 [SENSe[1..4]]:CORRection:DCYCle[:INPut][:MAGNitude][?] 6.54 [SENSe[1..4]]:CORRection:DCYCle:STATe[?] 6.54 [SENSe[1..4]]:CORRection:FDOFfset[:INPut][:MAGNitude]? 6.54 [SENSe[1..4]]:CORRection:FDOT[:SELect][?] 6.55 [SENSe[1..4]]:CORRection:FDOT:STATe[?] 6.55 [SENSe[1..4]]:CORRection:OFFSet[?] 6.54 [SENSe[1..4]]:CORRection:OFFSet:STATe 6.54 [SENSe[1..4]]:FREQuency[:CW|:FIXed][?] 6.55 [SENSe[1..4]]:FUNCtion[:ON][?] 6.56 [SENSe[1..4]]:[POWer][:AVG]:APERture[?] 6.57 [SENSe[1..4]]:[POWer][:AVG]:BUFFer:SIZE[?] 6.57 [SENSe[1..4]]:[POWer][:AVG]:BUFFer:STATe[?] 6.57 [SENSe[1..4]]:[POWer]:TSLot:[AVG]:COUNt[?] 6.57 [SENSe[1..4]]:[POWer]:TSLot:[AVG]:WIDTh[?] 6.60 [SENSe[1..4]]:[POWer]:BURSt:DTOLerance[?] 6.58 [SENSe[1..4]]:[POWer][:AVG]:RANGe[?] 6.57 [SENSe[1..4]]:[POWer][:AVG]:RANGe:AUTo[?] 6.57 [SENSe[1..4]]:[POWer][:AVG]:RANGe:AUTo:CLEVel[?] 6.57 [SENSe[1..4]]:[POWer][:AVG]:SMOothing:STATe[?] 6.58 [SENSe[1..4]]:[POWer][:AVG]:SAMPling[?] 6.59 [SENSe[1..4]]:SGAMma[:MAGNitude][?] 6.60 [SENSe[1..4]]:SGAMma:PHASe[?] 6.60 [SENSe[1..4]]:SGAMma:CORRection:STATe[?] 6.60 1144.1400.12 6.117 E-3 Remote Control - Commands R&S NRP [SENSe[1..4]]:TRACe:AVERage[:STATe][?] 6.61 [SENSe[1..4]]:TRACe:AVERage:COUNt[?] 6.61 [SENSe[1..4]]:TRACe:AVERage:COUNt:AUTO[?] 6.61 [SENSe[1..4]]:TRACe:AVERage:COUNt:AUTO:MTIMe[?] 6.61 [SENSe[1..4]]:TRACe:AVERage:COUNt:AUTO:RESolution[?] 6.62 [SENSe[1..4]]:TRACe:AVERage:COUNt:AUTO:POINt[?] 6.62 [SENSe[1..4]]:TRACe:AVERage:COUNt:AUTO:NSRatio[?] 6.62 [SENSe[1..4]]:TRACe:AVERage:COUNt:AUTO:TYPE[?] 6.63 [SENSe[1..4]]:TRACe:AVERage:TCONtrol[?] 6.63 [SENSe[1..4]]:TRACe:OFFSet:TIME[?] 6.63 [SENSe[1..4]]:TRACe:POINts[?] 6.63 [SENSe[1..4]]:TRACe:REALtime[?] 6.64 [SENSe[1..4]]:TRACe:TIME[?] 6.64 [SENSe[1..4]]:TIMing:EXCLude:STARt[?] 6.64 [SENSe[1..4]]:TIMing:EXCLude:STOP[?] 6.64 STATus commands STATus:DEVice[:EVENt]? 6.69 STATus:DEVice:CONDition? 6.69 STATus:DEVice:ENABle[?] 6.69 STATus:DEVice:NTRansition[?] 6.69 STATus:DEVice:PTRansition[?] 6.69 STATus:OPERation [:EVENt]? 6.69 STATus:OPERation:CONDition? 6.69 STATus:OPERation:ENABle[?] 6.69 STATus:OPERation:NTRansition[?] 6.69 STATus:OPERation:PTRansition[?] 6.69 STATus:OPERation:CALibrating[:SUMMary][:EVENt]? 6.69 STATus:OPERation:CALibrating[:SUMMary]:CONDition? 6.69 STATus:OPERation:CALibrating[:SUMMary]:ENABle[?] 6.69 STATus:OPERation:CALibrating[:SUMMary]:NTRansition[?] 6.69 1144.1400.12 6.118 E-3 R&S NRP Remote Control - Commands STATus:OPERation:CALibrating[:SUMMary]:PTRansition[?] 6.69 STATus:OPERation:LLFail[:SUMMary][:EVENt]? 6.69 STATus:OPERation:LLFail[:SUMMary]:CONDition? 6.69 STATus:OPERation:LLFail[:SUMMary]:ENABle[?] 6.69 STATus:OPERation:LLFail[:SUMMary]:NTRansition[?] 6.69 STATus:OPERation:LLFail[:SUMMary]:PTRansition[?] 6.69 STATus:OPERation:ULFail[:SUMMary][:EVENt]? 6.69 STATus:OPERation:ULFail[:SUMMary]:CONDition? 6.69 STATus:OPERation:ULFail[:SUMMary]:ENABle[?] 6.69 STATus:OPERation:ULFail[:SUMMary]:NTRansition[?] 6.69 STATus:OPERation:ULFail[:SUMMary]:PTRansition[?] 6.69 STATus:OPERation:MEASuring[:SUMMary][:EVENt]? 6.69 STATus:OPERation:MEASuring[:SUMMary]:CONDition? 6.69 STATus:OPERation:MEASuring[:SUMMary]:ENABle[?] 6.69 STATus:OPERation:MEASuring[:SUMMary]:NTRansition[?] 6.69 STATus:OPERation:MEASuring[:SUMMary]:PTRansition[?] 6.69 STATus:OPERation:SENSe[:SUMMary][:EVENt]? 6.69 STATus:OPERation:SENSe[:SUMMary]:CONDition? 6.69 STATus:OPERation:SENSe[:SUMMary]:ENABle[?] 6.69 STATus:OPERation:SENSe[:SUMMary]:NTRansition[?] 6.69 STATus:OPERation:SENSe[:SUMMary]:PTRansition[?] 6.69 STATus:OPERation:TRIGger[:SUMMary][:EVENt]? 6.69 STATus:OPERation:TRIGger[:SUMMary]:CONDition? 6.69 STATus:OPERation:TRIGger[:SUMMary]:ENABle[?] 6.69 STATus:OPERation:TRIGger[:SUMMary]:NTRansition[?] 6.69 STATus:OPERation:TRIGger[:SUMMary]:PTRansition[?] 6.69 STATus:QUEStionable[:EVENt]? 6.69 STATus:QUEStionable:CONDition? 6.69 STATus:QUEStionable:ENABle[?] 6.69 STATus:QUEStionable:NTRansition[?] 6.69 1144.1400.12 6.119 E-3 Remote Control - Commands R&S NRP STATus:QUEStionable:PTRansition[?] 6.69 STATus:QUEStionable:CALibration[:SUMMary][:EVENt]? 6.69 STATus:QUEStionable:CALibration[:SUMMary]:CONDition? 6.69 STATus:QUEStionable:CALibration[:SUMMary]:ENABle[?] 6.69 STATus:QUEStionable:CALibration[:SUMMary]:NTRansition[?] 6.69 STATus:QUEStionable:CALibration[:SUMMary]:PTRansition[?] 6.69 STATus:QUEStionable:POWer[:SUMMary][:EVENt]? 6.69 STATus:QUEStionable:POWer[:SUMMary]:CONDition? 6.69 STATus:QUEStionable:POWer[:SUMMary]:ENABle[?] 6.69 STATus:QUEStionable:POWer[:SUMMary]:NTRansition[?] 6.69 STATus:QUEStionable:POWer[:SUMMary]:PTRansition[?] 6.69 STATus:QUEStionable:WINDow[:SUMMary][:EVENt]? 6.69 STATus:QUEStionable:WINDow[:SUMMary]:CONDition? 6.69 STATus:QUEStionable:WINDow[:SUMMary]:ENABle[?] 6.69 STATus:QUEStionable:WINDow[:SUMMary]:NTRansition[?] 6.69 STATus:QUEStionable:WINDow[:SUMMary]:PTRansition[?] 6.69 STATus:PRESet 6.69 SYSTem commands SYSTem:BEEPer[:IMMediate] 6.93 SYSTem:BEEPer:NOTify:OVERload[?] 6.93 SYSTem:BEEPer:NOTify:KEY[?] 6.94 SYSTem:BEEPer:TIME 6.93 SYSTem:COMMunicate:GPIB[:SELF]:ADDRess 6.94 SYSTem:DATE[?] 6.94 SYSTem:INFO? 6.95 SYSTem:ERRor? 6.95 SYSTem:KEY 6.96 SYSTem:PRESet 6.98 SYSTem:SENSor[1..4]:INFO? 6.101 SYSTem:SENSor[1..4]:RESet 6.101 1144.1400.12 6.120 E-3 R&S NRP Remote Control - Commands SYSTem:SPEed 6.101 SYSTem:TIME[?] 6.101 SYSTem:VERSion? 6.102 Trigger system ABORt[1..4|:ALL] 6.103 INITiate[1..4|:ALL]:CONTinuous[?] 6.103 INITiate[1..4|:ALL][:IMMediate][?] 6.103 TRIGger:ALL:SYNChronize[:STATe][?] TRIGger[1..4|:ALL]:ATRigger[:STATe][?] 6.104 TRIGger[1..4|:ALL]:COUNt[?] 6.105 TRIGger[1..4|:ALL]:DELay[?] 6.105 TRIGger[1..4|:ALL]:DELay[?]:AUTO 6.105 TRIGger[1..4|:ALL]:HOLDoff[?] 6.105 TRIGger[1..4|:ALL]:HYSTeresis[?] 6.105 TRIGger[1..4|:ALL][:IMMediate] 6.106 TRIGger[1..4|:ALL]:LEVel[?] 6.106 TRIGger[1..4|:ALL]:SLOPe[?] 6.106 TRIGger[1..4|:ALL]:SOURce[?] 6.107 UNIT commands UNIT[1..8]:POWer[?] 6.108 UNIT[1..8]:RATio[?] 6.108 1144.1400.12 6.121 E-3 Remote Control - Commands R&S NRP Compatibility Information This section contains information regarding the compatibility of the R&S NRP remote control commands with those of the E4418B and E4419B power meters from Agilent. The R&S NRP is largely downward-compatible to the above-mentioned devices but offers additional capabilities. Table 6-36: Compatibility information about remote control commands E4418B/E4419B command Compatibility information *DDT Is not implemented in the R&S NRP. CONFigure? Returns the current configuration. The R&S NRP returns the last setting made with CONFigure, as specified by the SCPI standard. CALCulate:GAIN Is not implemented in the R&S NRP. CALCulate:PHOLd Is implemented in the R&S NRP and has the same effect as CALC:EXTR:RES. CALibration :ECONtrol :RCALibration :RFACtor Is not implemented in the R&S NRP. DISPlay:ENABle[?] Is implmented in the R&S NRP and has the same effect as DISPlay:ILLUmination. DISPlay:SCREen:FORMat [:NUMeric[1]|2] Is not implemented in the R&S NRP. INITiate :CONTinuous:SEQUence[1]|2 :IMMediate:SEQUence[1]|2 The :SEQUence node is not implemented in the R&S NRP. MEMory:TABLe:GAIN Agilent specifies the values without a unit; the unit PCT (percent) is implicitly assumed. The units DB (dB), DPCT (∆%) and O (unit 1) can be specified in the R&S NRP. The default unit is DB. OUTPut:TRIGger:STATe Is not implemented in the R&S NRP. SENSe :BANDwidth :AVERage:COUNt:AUTO:SDETect :DETector:FUNCtion :MRATe :SPEed :V2P Is not implemented in the R&S NRP. SENSe[1|2]:CORRection :CSET[1]|CSET2[:SELect] and SENSe[1|2]:CORRection :CSET[1]|CSET2:STATe The R&S NRP does not recognize any tables with frequencydependent calibration values since the sensors have to be calibrated only once in production. For this reason, there is no compliance with CSET1. Tables with frequency-dependent offset correction values can be defined and addressed via :CSET2 (Agilent and R&S NRP) or .:FDOTable (R&S NRP only). SENSe[1|2]:CORRection:GAIN[1]? Has the same effect as SENSe[1..2]:CORRection:CFACtor? 1144.1400.12 6.122 E-3 R&S NRP Remote Control - Commands SENSe[1|2]:CORRection:GAIN2[?] Has the same effect as SENSe[1..2]:CORRection:OFFSet[?]. With :GAIN2, no unit may be specified. Unit 1 is valid. SENSe[1|2]:CORRection:LOSS2[?] Corresponds to the reciprocal of SENSe[1..2]:CORRection:OFFSet[?]. With :LOSS2, no unit may be specified. Unit 1 is valid. SENSe[1|2]:CORRection:GAIN3[?] Has the same effect as SENSe[1..2]:CORRection:DCYCle[?]. With :GAIN3, no unit may be specified. Unit 1 is valid. SENSe[1|2]:CORRection:GAIN4? Has the same effect as SENSe[1..2]:CORRection:FDOFfset[:INPut][:MAGNitude]? SENSe:SWEep:OFFSet:TIME[?] Is implemented in the R&S NRP and has the same effect as SENSe:TGATe:OFFSet:TIME[?] SENSe:SWEep:TIME[?] Is implemented in the R&S NRP and has the same effect as SENSe:TGATe:TIME[?] SYSTem :COMMunicate:SERial :HELP:HEADers? :LOCal :REMote :RINTerface :RWLock Is not implemented in the R&S NRP. TRACe:STATe Is not implemented in the R&S NRP. TRACe:DATA? Is not implemented in the R&S NRP in this form. Data of the Scope mode can only be queried via the high-level commands (FETCh?, READ?, MEAS?) and CALC:DATA?. TRACe:UNIT? The UNIT node is only globally available in the R&S NRP and affects all measurement results (including Scope data) and the unitless command parameters of the commands CALC:LIM:LOW, CALC:LIM:UPP, DISP:MET|:ANAL:LOW, DISP:MET|:ANAL:UPP, OUTP:REC:LIM:LOW and OUTP:REC:LIM:UPP. TRIGger[:SEQUence[1]|2] The R&S NRP does not recognize the:SEQUence header and uses no TRIGger command globally but only on a sensor-by-sensor basis. If TRIGger or SENSe commands are to have a global effect, the:ALL header must be used instead of the numeric suffix. UNIT:POWer The R&S NRP recognizes the units W, DBM and DBUV. UNIT:POWer:RATio The R&S NRP recognizes the units DB, DPCT and O. :AC Agilent recognizes the keyword :AC of some high-level commands and SENSe commands: CONFigure | READ | MEASure | FETCh [:SCALar][:POWer:AC] :RELative :DIFFerence :DIFFerence:RELative :RATio :RATio:RELative SENSe:POWer:AC:RANGe:AUTO The R&S NRP also recognizes these commands but :AVG should be used instead of :AC since R&S NRP sensors eventually also measure DC components and the designation in the R&S NRP is not used in the sense of SCPI. 1144.1400.12 6.123 E-3 Remote Control - Commands R&S NRP Interfaces IEC/IEEE Bus Interface The R&S NRP is fitted with an IEC/IEEE bus interface as standard. The connector in line with IEEE 488 is located on the rear panel. A controller can be connected to this interface for remote control. A shielded cable is used for the connection. Characteristics of the Interface • 8-bit parallel data transmission • Bidirectional data transmission • Three-wire handshake • Data transmission rate up to 350 Kbyte/s • Connection of up to 15 devices • Max. length of connecting cables: 15 m (length of single cable: 2 m) • Wired OR links when several devices are connected in parallel. ATN Shield IFC SRQ NRFD NDAC 12 11 10 9 EOI DAV 8 7 6 DIO3 DIO4 5 4 3 2 DIO1 DIO2 1 24 23 22 21 20 19 18 17 16 15 14 13 GND(11) logic GND GND(9) GND(10) GND(7) GND(8) DIO8 GND(6) DIO6 DIO5 REN DIO7 Fig. 6-14: Pin assignment of IEC/IEEE-bus interface Bus Lines 1. Data bus with 8 lines DIO 1 to DIO 8 Transmission is bit-parallel and byte-serial in ASCII/ISO code. DIO 1 is the least-significant and DIO 8 the most-significant bit. 2. Control bus with 5 lines IFC (Interface Clear) Active LOW resets the interfaces of connected devices to the default state. 1144.1400.12 6.124 E-3 R&S NRP Remote Control - Commands ATN (Attention) Active LOW indicates the transmission of interface messages; non-active HIGH indicates the transmission of device messages. SRQ (Service Request) Active LOW enables a device to send a service request to the controller. REN (Remote Enable) Active LOW allows switchover to the remote control mode. EOI (End or Identify) together with ATN has two functions: ATN = HIGH: active LOW marks the end of data transmission. ATN = LOW: active LOW triggers a parallel poll. 3. Handshake bus with three lines DAV (Data Valid) Active LOW signals a valid data byte on the data bus. NRFD (Not Ready For Data) Active LOW signals that one of the connected devices is not ready to accept data. NDAC (Not Data Accepted) Active LOW until the connected device has accepted the data on the bus. 1144.1400.12 6.125 E-3 Remote Control - Commands R&S NRP Interface Functions Devices remote-controlled via an IEC/IEEE-bus may be equipped with different interface capabilities. Table 6-37 shows the IEC/IEEE bus capabilities of the R&S NRP. For coding of the different capabilities see the IEEE488 standard. Table 6-37: Interface functions of IEC/IEEE bus IEEE488 Standard Code Interface capabilities SH1 Source handshake AH1 Acceptor handshake L3 LE3 T5 Listener function, Listen-Only mode, unaddressed for MSA and TPAS, recognizes END and EOS. Extended Listener function, Listen-Only mode, unaddressed for MSA and TPAS, recognizes END and EOS. Talker function, capability to respond to serial poll, Talk-Only mode, unaddressed on MLA, sends END or EOS. TE5 Extended talker function, capability to respond to serial poll, Talk-Only mode, unaddressed for MLA and LPAS, sends END or EOS. SR1 Service request function PP1 Remote parallel-poll function PP2 Local parallel-poll function RL1 Remote/local switchover function DC1 Device clear E2 3-state driver (open-collector driver during parallel poll) DT1 Device trigger C0 No controller capabilities 1144.1400.12 6.126 E-3 R&S NRP Remote Control - Commands Interface Messages Interface messages are transmitted to the device on data lines, where the ATN is set to active LOW. They are used for communication between the controller and the R&S NRP. Common Commands Common commands are in the code range 0x10 to 0x1F. They affect all devices on the bus without any addressing being required. Table 6-38: Common commands Command Effect on device DCL (Device Clear) Interrupts processing of received commands and sets the command processing software to a defined initial state. This command does not change the device setting. IFC (Interface Clear) Resets the interfaces to their initial condition. LLO (Local Lockout) Manual switchover to LOCAL is disabled. SPE (Serial Poll Enable) Ready for serial poll. SPD (Serial Poll Disable) End of serial poll. PPU (Parallel Poll Unconfigure) End of parallel poll query status. Addressed Commands Addressed commands are in the code range 0x00 to 0x0F hex. They only affect devices addressed as a listener. Table 6-39: Addressed commands Command Effect on device SDC (Selected DeviceClear) Interrupts processing of received commands and sets the command processing software to a defined initial state. This command does not change the device setting. GTL (Go to Local) Change to local mode (manual control). PPC (Parallel Poll Configure) Configures device for parallel poll. 1144.1400.12 6.127 E-3 Remote Control - Commands R&S NRP Standard Configurations The following tables list the settings that can be made when configuring the R&S NRP with the SYST:STAN:PRE <string> remote control command. The following values are provided for the <string> parameter. • "GSM/EDGE" • "NADC/UPLINK" • "NADC/DOWNLINK" • "PDC/UPLINK" • "PDC/DOWNLINK" • "DECT" • "WCDMA/3GPP FDD" • "WCDMA/3GPP TDD DL" • "WCDMA/3GPP TDD UL" • "TD-SCDMA" • "Bluetooth DH1" • "Bluetooth DH3" • "Bluetooth DH5" • "CDMA2000" Note: 1144.1400.12 The tables list only the sensor parameters. If SYSTem:STANdard:PWSettings OFF is set, the calculate blocks (CALCulate:...), the window system (DISPlay:...) and the output unit (UNIT:...) are also configured. 6.128 E-3 R&S NRP Remote Control - Commands "GSM/EDGE" Sensor parameter Remote control command in short form Value Sensor Mode SENS:FUNC "POW:XTIM" Integration Time SENS:APER 4.615 ms Duty Cycle SENS:DCYC 11.762 % Duty Cycle Correction SENS:DCYC:STAT ON Smoothing SENS:SMO OFF Dropout Tolerance SENS:BURST:DTOL 577 µs Exclude Time Start SENS:TIM:EXCL:STAR 20 µs Exclude Time End SENS:TIM:EXCL:STOP 30 µs Number Of Timeslots SENS:TSL:COUN 8 Timeslot Width SENS:TSL:WIDT 577 µs Timegate Offset SENS:TGAT:OFFS:TIME 1: 20 µs 2: 2.328 ms Timegate Time SENS:TGAT:TIME 1: 527 µs 2: 527 µs Scope Offset Time SENS:TRAC:OFFS:TIME -100 µs Scope Capture Time SENS:TRAC:TIME 5 ms Scope Number Of Points SENS:TRAC:POIN 312 Scope Realtime SENS:TRAC:REAL OFF Trigger Delay TRIG:DEL 0s Trigger Level TRIG:LEV -30 dBm Trigger Source TRIG:SOUR INT Trigger Slope TRIG:SLOP POS Trigger Holdoff TRIG:HOLD 27 ms Trigger Hysteresis TRIG:HYST 3 dB 1144.1400.12 6.129 E-3 Remote Control - Commands R&S NRP "NADC/DOWNLINK" Sensor parameter Remote control command in short form Value Sensor Mode SENS:FUNC "POW:AVG" Integration Time SENS:APER 40 ms Duty Cycle Correction SENS:DCYC:STAT OFF Smoothing SENS:SMO OFF Trigger Source TRIG:SOUR EXT 1144.1400.12 6.130 E-3 R&S NRP Remote Control - Commands "NADC/UPLINK" Sensor parameter Remote control command in short form Value Sensor Mode SENS:FUNC "POW:XTIM" Integration Time SENS:APER 40 ms Duty Cycle SENS:DCYC 16.267 % Duty Cycle Correction SENS:DCYC:STAT ON Smoothing SENS:SMO OFF Dropout Tolerance SENS:BURST:DTOL 3 ms Exclude Time Start SENS:TIM:EXCL:STAR 130 µs Exclude Time End SENS:TIM:EXCL:STOP 140 µs Number Of Timeslots SENS:TSL:COUN 6 Timeslot Width SENS:TSL:WIDT 6.667 ms Timegate Offset SENS:TGAT:OFFS:TIME 1: 130 µs 2: 20.130 ms Timegate Time SENS:TGAT:TIME 1: 6.390 ms 2: 6.390 ms Scope Offset Time SENS:TRAC:OFFS:TIME -500 µs Scope Capture Time SENS:TRAC:TIME 42 ms Scope Number Of Points SENS:TRAC:POIN 312 Scope Realtime SENS:TRAC:REAL OFF Trigger Delay TRIG:DEL 0s Trigger Level TRIG:LEV -30 dBm Trigger Source TRIG:SOUR INT Trigger Slope TRIG:SLOP POS Trigger Holdoff TRIG:HOLD 79 ms Trigger Hysteresis TRIG:HYST 3 dB 1144.1400.12 6.131 E-3 Remote Control - Commands R&S NRP "PDC/DOWNLINK" Sensor parameter Remote control command in short form Value Sensor Mode SENS:FUNC "POW:AVG" Integration Time SENS:APER 40 ms Duty Cycle Correction SENS:DCYC:STAT OFF Smoothing SENS:SMO OFF Trigger Source TRIG:SOUR EXT 1144.1400.12 6.132 E-3 R&S NRP Remote Control - Commands "PDC/UPLINK" Sensor parameter Remote control command in short form Value Sensor Mode SENS:FUNC "POW:XTIM" Integration Time SENS:APER 40 ms Duty Cycle SENS:DCYC 16.25 % Duty Cycle Correction SENS:DCYC:STAT ON Smoothing SENS:SMO OFF Dropout Tolerance SENS:BURST:DTOL 3 ms Exclude Time Start SENS:TIM:EXCL:STAR 125 µs Exclude Time End SENS:TIM:EXCL:STOP 135 µs Number Of Timeslots SENS:TSL:COUN 6 Timeslot Width SENS:TSL:WIDT 6.667 ms Timegate Offset SENS:TGAT:OFFS:TIME 1: 125 µs 2: 20.125 ms Timegate Time SENS:TGAT:TIME 1: 6.406 ms 2: 6.406 ms Scope Offset Time SENS:TRAC:OFFS:TIME -500 µs Scope Capture Time SENS:TRAC:TIME 42 ms Scope Number Of Points SENS:TRAC:POIN 312 Scope Realtime SENS:TRAC:REAL OFF Trigger Delay TRIG:DEL 0s Trigger Level TRIG:LEV -30 dBm Trigger Source TRIG:SOUR INT Trigger Slope TRIG:SLOP POS Trigger Holdoff TRIG:HOLD 79 ms Trigger Hysteresis TRIG:HYST 3 dB 1144.1400.12 6.133 E-3 Remote Control - Commands R&S NRP "DECT" Sensor parameter Remote control command in short form Value Sensor Mode SENS:FUNC "POW:XTIM" Integration Time SENS:APER 10 ms Duty Cycle SENS:DCYC 3.7 % Duty Cycle Correction SENS:DCYC:STAT ON Smoothing SENS:SMO OFF Dropout Tolerance SENS:BURST:DTOL 416.7 µs Exclude Time Start SENS:TIM:EXCL:STAR 15 µs Exclude Time End SENS:TIM:EXCL:STOP 25 µs Number Of Timeslots SENS:TSL:COUN 24 Timeslot Width SENS:TSL:WIDT 416.667 µs Timegate Offset SENS:TGAT:OFFS:TIME 1: 15 µs 2: 5.015 ms Timegate Time SENS:TGAT:TIME 1: 348.055 ms 2: 348.000 ms Scope Offset Time SENS:TRAC:OFFS:TIME -200 µs Scope Capture Time SENS:TRAC:TIME 10.250 ms Scope Number Of Points SENS:TRAC:POIN 312 Scope Realtime SENS:TRAC:REAL OFF Trigger Delay TRIG:DEL 0s Trigger Level TRIG:LEV -30 dBm Trigger Source TRIG:SOUR INT Trigger Slope TRIG:SLOP POS Trigger Holdoff TRIG:HOLD 39.9 ms Trigger Hysteresis TRIG:HYST 3 dB 1144.1400.12 6.134 E-3 R&S NRP Remote Control - Commands "WCDMA/3GPP FDD" Sensor parameter Remote control command in short form Value Sensor Mode SENS:FUNC "POW:AVG" Integration Time SENS:APER 10 ms Duty Cycle Correction SENS:DCYC:STAT OFF Smoothing SENS:SMO OFF Filter SENS:AVER:COUN:AUTO OFF Filter Length SENS:AVER:COUN 16 Trigger Source TRIG:SOUR EXT 1144.1400.12 6.135 E-3 Remote Control - Commands R&S NRP "WCDMA/3GPP TDD DL" Sensor parameter Remote control command in short form Value Sensor Mode SENS:FUNC "POW:XTIM" Integration Time SENS:APER 10 ms Duty Cycle SENS:DCYC 6.667 % Duty Cycle Correction SENS:DCYC:STAT ON Smoothing SENS:SMO OFF Dropout Tolerance SENS:BURST:DTOL 666.667 µs Exclude Time Start SENS:TIM:EXCL:STAR 25 µs Exclude Time End SENS:TIM:EXCL:STOP 40 µs Number Of Timeslots SENS:TSL:COUN 15 Timeslot Width SENS:TSL:WIDT 666.667 µs Timegate Offset SENS:TGAT:OFFS:TIME 1: 25 µs 2: 5.358 ms Timegate Time SENS:TGAT:TIME 1: 601.667 µs 2: 602 µs Scope Offset Time SENS:TRAC:OFFS:TIME -200 µs Scope Capture Time SENS:TRAC:TIME 10.250 ms Scope Number Of Points SENS:TRAC:POIN 312 Scope Realtime SENS:TRAC:REAL OFF Trigger Delay TRIG:DEL 0s Trigger Level TRIG:LEV -30 dBm Trigger Source TRIG:SOUR INT Trigger Slope TRIG:SLOP POS Trigger Holdoff TRIG:HOLD 19.9 ms Trigger Hysteresis TRIG:HYST 3 dB 1144.1400.12 6.136 E-3 R&S NRP Remote Control - Commands "WCDMA/3GPP TDD UL" Sensor parameter Remote control command in short form Value Sensor Mode SENS:FUNC "POW:XTIM" Integration Time SENS:APER 10 ms Duty Cycle SENS:DCYC 6.420 % Duty Cycle Correction SENS:DCYC:STAT ON Smoothing SENS:SMO OFF Dropout Tolerance SENS:BURST:DTOL 666.667 µs Exclude Time Start SENS:TIM:EXCL:STAR 15 µs Exclude Time End SENS:TIM:EXCL:STOP 40 µs Number Of Timeslots SENS:TSL:COUN 15 Timeslot Width SENS:TSL:WIDT 666.667 µs Timegate Offset SENS:TGAT:OFFS:TIME 1: 15 µs 2: 5.348 ms Timegate Time SENS:TGAT:TIME 1: 611.667 µs 2: 612 µs Scope Offset Time SENS:TRAC:OFFS:TIME -200 µs Scope Capture Time SENS:TRAC:TIME 10.250 ms Scope Number Of Points SENS:TRAC:POIN 312 Scope Realtime SENS:TRAC:REAL OFF Trigger Delay TRIG:DEL 0s Trigger Level TRIG:LEV -30 dBm Trigger Source TRIG:SOUR INT Trigger Slope TRIG:SLOP POS Trigger Holdoff TRIG:HOLD 19.9 ms Trigger Hysteresis TRIG:HYST 3 dB 1144.1400.12 6.137 E-3 Remote Control - Commands R&S NRP "TD-SCDMA " Sensor parameter Remote control command in short form Value Sensor Mode SENS:FUNC "POW:XTIM" Integration Time SENS:APER 5 ms Duty Cycle SENS:DCYC 13.250 % Duty Cycle Correction SENS:DCYC:STAT ON Smoothing SENS:SMO OFF Timegate Offset SENS:TGAT:OFFS:TIME 1: 20 µs 2: 710 µs 3: 835 µs 4: 5.970 ms Timegate Time SENS:TGAT:TIME 1: 620 µs 2: 30 µs 3: 85 µs 4: 620 µs Scope Offset Time SENS:TRAC:OFFS:TIME -200 µs Scope Capture Time SENS:TRAC:TIME 10.250 ms Scope Number Of Points SENS:TRAC:POIN 312 Scope Realtime SENS:TRAC:REAL OFF Trigger Delay TRIG:DEL 0s Trigger Level TRIG:LEV -30 dBm Trigger Source TRIG:SOUR INT Trigger Slope TRIG:SLOP POS Trigger Holdoff TRIG:HOLD 19.9 ms Trigger Hysteresis TRIG:HYST 3 dB 1144.1400.12 6.138 E-3 R&S NRP Remote Control - Commands "Bluetooth DH1" Sensor parameter Remote control command in short form Value Sensor Mode SENS:FUNC "POW:XTIM" Integration Time SENS:APER 1.25 ms Duty Cycle SENS:DCYC 29.28 % Duty Cycle Correction SENS:DCYC:STAT ON Smoothing SENS:SMO OFF Dropout Tolerance SENS:BURST:DTOL 366 µs Exclude Time Start SENS:TIM:EXCL:STAR 10 µs Exclude Time End SENS:TIM:EXCL:STOP 15 µs Timegate Offset SENS:TGAT:OFFS:TIME 1: 10 µs 2: 660 µs Timegate Time SENS:TGAT:TIME 1: 341 µs 2: 341 µs Scope Offset Time SENS:TRAC:OFFS:TIME -30 µs Scope Capture Time SENS:TRAC:TIME 1.280 ms Scope Number Of Points SENS:TRAC:POIN 312 Scope Realtime SENS:TRAC:REAL OFF Trigger Delay TRIG:DEL 0s Trigger Level TRIG:LEV -30 dBm Trigger Source TRIG:SOUR INT Trigger Slope TRIG:SLOP POS Trigger Holdoff TRIG:HOLD 2.480 ms Trigger Hysteresis TRIG:HYST 3 dB 1144.1400.12 6.139 E-3 Remote Control - Commands R&S NRP "Bluetooth DH3" Sensor parameter Remote control command in short form Value Sensor Mode SENS:FUNC "POW:XTIM" Integration Time SENS:APER 2.50 ms Duty Cycle SENS:DCYC 64.88 % Duty Cycle Correction SENS:DCYC:STAT ON Smoothing SENS:SMO OFF Dropout Tolerance SENS:BURST:DTOL 1.622 ms Exclude Time Start SENS:TIM:EXCL:STAR 10 µs Exclude Time End SENS:TIM:EXCL:STOP 15 µs Timegate Offset SENS:TGAT:OFFS:TIME 1: 10 µs 2: 1.885 ms Timegate Time SENS:TGAT:TIME 1: 1.597 ms 2: 351 µs Scope Offset Time SENS:TRAC:OFFS:TIME -30 µs Scope Capture Time SENS:TRAC:TIME 2.530 ms Scope Number Of Points SENS:TRAC:POIN 312 Scope Realtime SENS:TRAC:REAL OFF Trigger Delay TRIG:DEL 0s Trigger Level TRIG:LEV -30 dBm Trigger Source TRIG:SOUR INT Trigger Slope TRIG:SLOP POS Trigger Holdoff TRIG:HOLD 4.980 ms Trigger Hysteresis TRIG:HYST 3 dB 1144.1400.12 6.140 E-3 R&S NRP Remote Control - Commands "Bluetooth DH5" Sensor parameter Remote control command in short form Value Sensor Mode SENS:FUNC "POW:XTIM" Integration Time SENS:APER 3.75 ms Duty Cycle SENS:DCYC 76.533 % Duty Cycle Correction SENS:DCYC:STAT ON Smoothing SENS:SMO OFF Dropout Tolerance SENS:BURST:DTOL 2.870 ms Exclude Time Start SENS:TIM:EXCL:STAR 10 µs Exclude Time End SENS:TIM:EXCL:STOP 15 µs Timegate Offset SENS:TGAT:OFFS:TIME 1: 10 µs 2: 3.135 ms Timegate Time SENS:TGAT:TIME 1: 2.845 ms 2: 351 µs Scope Offset Time SENS:TRAC:OFFS:TIME -30 µs Scope Capture Time SENS:TRAC:TIME 2.530 ms Scope Number Of Points SENS:TRAC:POIN 312 Scope Realtime SENS:TRAC:REAL OFF Trigger Delay TRIG:DEL 0s Trigger Level TRIG:LEV -30 dBm Trigger Source TRIG:SOUR INT Trigger Slope TRIG:SLOP POS Trigger Holdoff TRIG:HOLD 7.480 ms Trigger Hysteresis TRIG:HYST 3 dB 1144.1400.12 6.141 E-3 Remote Control - Commands R&S NRP "CDMA2000" Sensor parameter Remote control command in short form Value Sensor Mode SENS:FUNC "POW:AVG" Integration Time SENS:APER 80 ms Duty Cycle Correction SENS:DCYC:STAT OFF Smoothing SENS:SMO OFF Filter SENS:AVER:COUN:AUTO OFF Filter Length SENS:AVER:COUN 16 Trigger Source TRIG:SOUR EXT 1144.1400.12 6.142 E-3 R&S NRP Table of Contents Annex Chapter I Table of Contents I Programming Measurements with the R&S NRP .......................................................... I.1 Measuring with high-level commands............................................................................................ I.1 The simplest measurement............................................................................................. I.1 Relative measurements .................................................................................................. I.2 Processing the results of two sensors............................................................................. I.3 Selecting a measurement mode ..................................................................................... I.4 Selecting the output unit for measured values ................................................................ I.6 Division of MEAS?........................................................................................................... I.7 Trigger state system......................................................................................................................... I.9 Logic relationship of command systems SENSe, CALCulate and UNIT .................................. I.11 Measuring with low-level commands ........................................................................................... I.12 The simplest measurement........................................................................................... I.12 Configuration of the trigger system ............................................................................... I.12 Configuration of sensor settings.................................................................................... I.16 Configuration of CALCulate blocks ............................................................................... I.20 Optimization of measurement speed............................................................................................ I.21 1144.1400.12 I-Annex.1 E-2 List of Figs. Annex Chapter I R&S NRP Figs. Fig. I-1: Overview of basic relationships in the trigger state system ..................................................... I.10 Fig. I-2: Processing of measured values in the R&S NRP .................................................................... I.11 Fig. I-3: Meaning of settings for TRIG:HOLD and TRIG:DEL ............................................................... I.14 1144.1400.12 I-Annex.2 E-2 R&S NRP I Annex: Remote Control - Commands Programming Measurements with the R&S NRP Measuring with high-level commands The R&S NRP is based on the instrument model defined in the SCPI 1999.0 standard. This model provides a number of logic blocks that can be configured via remote-control commands. The R&S NRP is provided with high-level measurement commands that automatically perform the most important settings and simplify measurements, thus making it unnecessary to completely configure these blocks for each measurement. Only the high-level commands are described, starting with the simplest command, which is expanded in the following sections. Note the following for the syntax of commands: There is a short and a long form for the commands. The short form is normally used. However, commands are sometimes indicated in their long form so that their meaning is easier to understand. The R&S NRP makes no distinction between upper case and lower case letters; they are only used to distinguish between the short and long form. The simplest measurement The simplest way to obtain a measured value is to use the high-level measurement command MEAS?, which configures sensor 1 in the ContAv mode, starts a measurement and always outputs a result that is stored in the output queue. The following settings are performed: • • • • • • • • • • INIT:CONT OFF TRIG:SOUR IMM TRIG:COUN 1 TRIG:DEL:AUTO ON SENS:AVER:STAT ON SENS:AVER:COUN:AUTO ON SENS:AVER:COUN:AUTO:TYPE RES SENS:AVER:COUN:AUTO:RES 3 CALC:MATH "(SENS1)" CALC:REL:STAT OFF The command can also be used with a list of parameters, which are separated by a comma and allow the measurement accuracy and the addressed sensor to be selected: MEAS? DEF, <resolution>, <source_list> The first parameter should always assume the DEF value; it is ignored and is available only for reasons of compatibility. The second parameter may assume the values 1, 2, 3 and 4. It specifies the number of places up to which the measurement result should be noise-free. With linear units, the setting corresponds to the number of significant places that are noise-free; with logarithmic units, 1, 2, 3 and 4 correspond to a resolution of 1, 0.1, 0.01 and 0.001 (number of decimal places). With a <resolution> of 3, two decimal places are thus noise-free with logarithmic display. The default setting is 3. The third parameter selects a sensor. It has the syntax (@n), where n can assume the values 1 to 4. The default setting is (@1). 1144.1400.12 Annex - I.1 E-2 Annex: Remote Control - Commands R&S NRP Relative measurements If the measurement results are to be output not as absolute values, but relative to a reference value, the keyword :RELative can be added to the measurement command. The result is then divided by a value that was previously set by means of CALC:REL:POW or CALC:REL:AUTO ONCE. MEAS? CALC:REL:AUTO ONCE MEAS:REL? The first MEAS command determines the reference value, which is acquired and stored with CALC:REL:AUTO ONCE. The second measurement command MEAS:REL? and all other MEAS:REL? commands will divide the absolute measured value by the stored reference value. CALC:REL:POW <float_value> is used to define such a reference value. CALC:REL:POW 0 DBM MEAS:REL? All measured values are then divided by 0 dBm (1 mW) prior to being transferred to the user. The following section describes an extension of the MEAS command in which the result no longer carries a power unit, but represents a power ratio. The reference value also must have a power unit and be set with CALC:REL:RAT. The R&S NRP stores the reference values for power values and power ratios independently of each other and automatically uses the correct reference value depending on the unit of the measurement result. The CALC:REL command is available for entering the reference value. It assumes a numeric parameter whose unit is determined from the current device settings. This command is provided only for reasons of compatibility and should not be used unless avoidable. 1144.1400.12 Annex - I.2 E-2 R&S NRP Annex: Remote Control - Commands Processing the results of two sensors The R&S NRP offers measurement commands for processing the results of two sensors. The calculated result can also be partly referenced to a stored reference value. The measurement commands are obtained by adding one of the following keywords: :DIFF :DIFF:REL :RAT :RAT:REL :SWR :RLOS :REFL (difference) (difference with reference value) (ratio) (ratio with reference value) (standing wave ratio) (return loss) (reflection coefficient) The list of parameters is modified for these commands since two sensors have to be entered in the <source_list>. Example: MEAS:RAT DEF,3,(@1),(@4) A CALCulate block is used for processing the measured values. Each CALCulate block has two input channels called the primary and secondary channel. In the above example, the primary channel is assigned sensor 1 and the secondary channel sensor 4 via the <source_list>. The measurement result is the ratio of the results from sensors 1 and 4. Example: MEAS:SWR DEF,2,(@1),(@2) It is assumed that sensor 1 delivers the forward power of a wave and sensor 2 the reflected power of a wave. The measurement result represents the SWR of the two power values: P= 1+ 1− (@ 2) / (/@1) (@ 2) / (/@ 1) Note that the unit is automatically set to percent (refer to Selecting the output unit for measured values). 1144.1400.12 Annex - I.3 E-2 Annex: Remote Control - Commands R&S NRP Selecting a measurement mode Other MEAS commands are available for measurements to be performed in a mode other than the ContAv mode. The short form of these commands is obtained by adding a keyword for the measurement mode to keyword MEAS. Timeslot measurement: MEAS:TSLot? <tslot_width>,<no_slots>,<start_exclude>,<stop_exclude> BurstAv measurement: MEAS:BURSt? <dtolerance>,<start_exclude>,<stop_exclude> Scope measurement: MEAS:XTIMe? (<scope_size>),<capture_time> Measurement in the ContAv mode with data buffering: MEAS:ARRay? <tslot_width>,<no_slots>,<start_exclude>,<stop_exclude> Note: In the Timeslot mode, the trigger source is set to EXTernal. In the BurstAv mode, it is not modified but ignored. Triggering in response to the signal is performed as if TRIGger:SOURce INTernal were set. These commands have the specified parameters, whose meanings are explained in the operating manual. In addition, parameters DEF, <resolution>, <source_list> can be optionally specified as for the MEAS? command. Examples: MEAS:TSLot? 577 us, 8, 18 us, 18 us A timeslot measurement of a GSM signal is performed (8 timeslots with a length of 577 µs each). 18 µs at the beginning and the end of the timeslots are ignored. The measurement is carried out with sensor 1 (default). The instrument is triggered by an external signal, which must be routed to the R&S NRP rear panel via the trigger input. The measurement result is a list of 8 measured values separated by a comma for the timeslots. MEAS:BURSt? 5 us, 10 us, 0 us, DEF, 3, (@2) Sensor 2 measures in the BurstAv mode. Triggering (in response to a rising edge) is internal. At the beginning of the power pulse, 10 µs are ignored to avoid overshoots in the signal, which could distort the measurement result. If the power falls below the trigger level but does not exceed 5 µs (dropout time) the measurement will not be stopped. The measurement result is noise-free within the first 3 places and it is measured with sensor 2 ((@2)). MEAS:XTIMe? (256), 577 us Within the next 577 µs, 256 measured values are recorded and displayed with respect to time in te same manner as with an oscilloscope in order to display the power characteristics. There is no triggering (TRIG:SOUR IMM); the measurements are started after the command is received from the R&S NRP. After a partial measurement has been completed, the next one is started. If the trigger source setting is to be changed, MEAS:XTIMe? must be replaced by the CONF:XTIMe and READ:XTIMe? commands, between which user-defined settings can be performed. Dividing MEAS? into the CONF and READ? commands is described further down. The measurement result is a list of 256 measured values separated by a comma. 1144.1400.12 Annex - I.4 E-2 R&S NRP Annex: Remote Control - Commands MEAS:ARRay? (1000) 1000 measured values are recorded in the ContAv mode. After termination of the last measurement, the results are stored in the output queue. There is no triggering as in the ContAv mode. The measurement result is a list of 1000 measured values separated by a comma. The keywords for processing two sensors can be added to the MEAS:TSL, MEAS:BURS and MEAS:ARRay commands, but the :SWR, :RLOS and :REFL functions are not available. Example: MEAS:TSL:RAT? 577 us, 8, 18 us, 18 us, DEF, 3, (@1), (@3) The above timeslot example is extended to two sensors. The measurement result is a list of 8 measured values separated by a comma for the 8 timeslots; these values were obtained by division from the measured values of sensors 1 and 3. 1144.1400.12 Annex - I.5 E-2 Annex: Remote Control - Commands R&S NRP Selecting the output unit for measured values So far, no information has been given on the unit of the measured values. It is possible to modify the output unit of the measured values. A distinction is made as to whether the result represents a power or a power ratio. Relative measurements always deliver power ratios. This also applies to the :RATio, :SWR, :RLOS and :REFL functions. The units are set by means of the following commands: UNIT:POWer DBM | W | DBUV and UNIT:RATio DB | DPCT | O The default settings are DBM for power values and DB for power ratios. Physical unit SCPI notation Meaning dBm DBM Power in dB referenced to 1 mW: x / W = 10 log ( x / (1 mW) ) / dBm Watt W dBµV DBUV dB DB ∆% DPCT 1 O Power in dB referred to (1µV)2 / 50 Ω: x dBm ≈ (x + 107) dBµV Deviation from 100% in %: x ∆% = (x + 100) % When the :SWR, :RLOS and :REFL functions are used, the output unit, however, is implicitly set by the MEAS command: Measurement function Output unit :SWR O :RLOS DB :REFL O Note: 1144.1400.12 The UNIT commands affect the parameters of the following commands: CALC:LIMit:UPPer, CALC:LIMit:LOWer, CALC:RELative, DISP:METer:UPPer and DISP:METer:LOWer. Annex - I.6 E-2 R&S NRP Annex: Remote Control - Commands Division of MEAS? MEAS? can be divided into other high-level measurement commands. MEAS? ⇔ CONF [<parameters list>] READ? [<parameters list>] The CONF command configures the measurement, whereas READ? starts the measurement, and calculates and provides the result. This division offers two advantages: 1. The measurement has to be configured only once and several measurements (with several READ? commands) can be performed in succession. This means better performance as compared to measurements performed with MEAS?, since the time for configuring the measurement is only used once. 2. After CONF, settings can be adapted to user’s requirements by means of low-level commands (see below). Note: If a list of parameters is indicated for the READ command, it must correspond to the list for the preceding CONF command. After a measurement has been completed, i.e. the data from the sensors is available, it is sometimes interesting to evaluate this data several times without starting a new measurement each time. Since this is not possible with the above commands, the READ? command can be replaced by the INIT and FETCh? commands. READ? ⇔ INIT FETCh? [<list of parameters>] FETCh? evaluates existing data if the data is valid. FETCh? may select another calculation function if the measurement can be evaluated with the available measured data. Example: The following sequence of commands provides the difference between measured values from sensors 1 and 2 by means of FETCh:DIFF?, which measure in the ContAv mode as the default setting. CONF:DIFF INIT:ALL FETCh:DIFF? FETCh:RAT? FETCh:BURst? (OK) (OK) ( Å -221, "Settings conflict") The FETCh:RAT? command then delivers the ratios of the two measured values. This is possible without a new measurement, since the required data is available. The last FETCh command requires a result that was measured in the BurstAv mode. Such a measured value is not available and thus, this command will generate a SCPI error (-221, "Settings conflict"). FETCh? immediately delivers a measured value if a valid result is available. If no measured value is available, the R&S NRP waits for such a value and then answers the query. During this time, no other command should be sent to the R&S NRP, since the query has to be answered first. If a command is sent to the R&S NRP, the SCPI error -410, "Query interrupted", is output. However, FETCh? should wait only if a measurement result is expected, since command processing is blocked if a command is not answered. If FETCh? is executed although no measured values are expected, the SCPI error -214, "Trigger deadlock", is output. This may occur if the trigger source is set to BUS or HOLD with low-level TRIG:SOUR and FETCh? immediately follows INIT. 1144.1400.12 Annex - I.7 E-2 Annex: Remote Control - Commands R&S NRP Example: CONF TRIG:SOUR BUS INIT FETCh? ( Å -214, "Trigger deadlock", *TRG or GET is not possible if FETCh? is waiting). 1144.1400.12 Annex - I.8 E-2 R&S NRP Annex: Remote Control - Commands Trigger state system The accuracy of a result largely depends on how accurately the sequence of a measurement can be determined. The R&S NRP manages a trigger state system to SCPI 1999.0 for each sensor to define the exact start and stop time of a measurement. This system defines the sequence of a measurement cycle. 4 different device states are defined in the trigger state system implemented in the R&S NRP. IDLE The R&S NRP is in the idle state and performs no measurement. On power-up of the R&S NRP, it is in the LOCAL mode and in the IDLE state. All connected sensors are set to INIT:CONT ON to allow measurements to be continuously displayed. Thus, the IDLE state is exited and the instrument is again in this state if INIT:CONT OFF is sent via the remote control. INITIATED This state is a transition state, which is exited immediately after it has been entered. It has been defined so as to allow the user to decide whether the next measurement cycle is to be immediately started (INIT:CONT ON or all cycles defined via TRIG:COUNT have not yet been processed) or the R&S NRP returns to the IDLE state. The state is only entered internally and is not noticed by the user. WAIT_FOR_TRG The R&S NRP waits for a trigger event. The source for this event is set via TRIG:SOUR. When the event defined in this way occurs, the R&S NRP enters the MEASURING state. MEASURING As long as the R&S NRP measures data, it remains in this state and exits it immediately after completion of the measurement. 1144.1400.12 Annex - I.9 E-2 Annex: Remote Control - Commands R&S NRP TRIG:SOUR BUS INT EXT TRIG:IMM TRIG:IMM or Trigger signal *TRG, GET or TRIG:IMM MEASURING HOLD IMM WAIT_FOR_TRG ABORT ON INIT:CONT? OFF INITIATED IDLE *RST, PowerOn INIT:IMM INIT:CONT ON ? Fig. I-1: Overview of basic relationships in the trigger state system Fig. I-1: Overview of basic relationships in the trigger state system shows the basic structure of the trigger system. It is possible to improve the sequence of measurement using the commands from the TRIGger command system. 1144.1400.12 Annex - I.10 E-2 R&S NRP Annex: Remote Control - Commands Logic relationship of command systems SENSe, CALCulate and UNIT The following section provides an overview of the measurement procedure of the R&S NRP. The commands are mentioned as examples. These commands are described in detail in chapter 6. To perform measurements with the R&S NRP, the user should have a good understanding of the trigger system and be familiar with the result processing. The measured values delivered by the sensors cannot be directly queried. As shown in Fig. I-2: Processing of measured values in the R&S NRP, the raw data is first determined in the sensors taking into account the SENSe settings. It is then transferred to the CALCulate blocks where the measured values of up to two sensors are processed and made available to the user in the unit defined by UNIT. Data output: output queue in REMOTE mode or display in LOCAL mode Measured values ("raw data") SENS[1..4]:... SENSe CALC[1..8]:MATH:EXPR - "SENSn" - "SENSn - SENSm" - "SENSn / SENSm" - "REFL" - "SWR - "RLOS" CALC[1..8]:REL CALCulate UNIT[1..8]:POW UNIT[1..8]:RAT UNIT Fig. I-2: Processing of measured values in the R&S NRP Note: 1144.1400.12 The high-level commands and the SENSe block allow indices to be specified. These indices refer to the connected sensors (indices 1 to 4) for the SENSe commands whereas the indices of the high-level commands select the CALCulate blocks (indices 1 to 8). Depending on the configuration of the first CALCulate block, FETCh? (same meaning as FETCh1?) may not deliver the measured value of sensor 1 in contrast to the above examples. After *RST, the first CALCulate block delivers the measured value of sensor 1 (CALC1:MATH "(SENS1)") and the second one the measured value of sensor 2, etc. (see command SYSTem:PRESet). Annex - I.11 E-2 Annex: Remote Control - Commands R&S NRP Measuring with low-level commands Low-level commands allow the user to perform the most important modifications on the measurement configuration. In the present context, low-level commands are all commands that do not belong to highlevel commands. These are in particular the commands of the SENSe, TRIGger and CALCulate systems. Since the high-level commands combine different low-level commands, they allow a simpler configuration of measurements. Each measurement configuration should begin with the *RST command, which sets the R&S NRP to a defined output state. The accurate settings are described in the documentation of remote control command SYSTem:PRESet. The most important settings are listed below: • • • • • • Continuous measurements are stopped (INIT:CONT OFF) Offset correction are deactivated (SENSe:CORRection:OFFSet:STATe OFF, SENSe:CORRection:DCYCle:STATe OFF, SENSe:CORRection:FDOFfset:STATe OFF). All other settings of the SENSe system depend on the sensor used and are specified in the corresponding manual. The first 4 CALCulate blocks are set to sensors 1 to 4 (CALCulaten:MATH "(SENSn)"). The values are measured as absolute values (CALulate:RELative:STATe OFF). Logarithmic units are used (UNIT:POWer dBm and UNIT:RATio dB). The simplest measurement The fastest way to obtain a result is to use the following sequence of commands *RST INIT FETCh? Normally, *RST will set the ContAv mode. The concept of smart-sensor technology provides that each sensor determines the reset values of the assigned SENSe and TRIGger block. Thus, another mode than ContAv may come after *RST with future sensors. Information is provided in the operating manual of the sensor used. INIT initiates the measurement. After *RST, the trigger system is set to "straight through" (TRIG:SOUR IMM) so that the trigger system state changes to MEASURING via INITIATED and WAIT_FOR_TRG. After the measurement has been completed, FETCh? delivers the result to the output queue from which it can be fetched. Configuration of the trigger system Trigger source After a measurement is started with INIT, the state WAIT_FOR_TRG is entered. This is a preliminary stage to the measurement, which has been initiated so that the measurement may start with high accuracy at a defined point in time. For this purpose, different sources can be defined for the trigger event, which triggers the measurement. In manual operation, a trigger event is not expected in the ContAv mode. Since the measurement is to be performed continuously, the trigger source (TRIGger:SOURce) is set to IMMediate. 1144.1400.12 Annex - I.12 E-2 R&S NRP Annex: Remote Control - Commands If triggering needs to occur in response to a rising signal edge, the trigger system has to be configured with TRIG:SOUR INT and TRIG:SLOP POS: *RST TRIG:SOUR INT (triggering in response to a signal edge) TRIG:SLOP POS (triggering in response to a rising signal edge) INIT FETCh? Note: The settings of commands TRIG:SOUR and TRIG:SLOP are ignored in the BurstAv mode. In this mode the beginning and the end of the power pulse are automatically recognized. For this reason, the instrument always triggers INTernal even if TRIG:SOUR has a different setting. If a trigger signal is to be routed to the instrument rear panel via the external trigger connector, the trigger source has to be configured with TRIG:SOUR EXT. *RST TRIG:SOUR EXT (triggering in response to the edge of an external signal) TRIG:SLOP POS (triggering in response to a rising signal edge) INIT FETCh? TRIG:SOUR BUS can be set if measurements are to be started with *TRG or GET. This procedure is provided by standard IEEE 488.2, which stipulates that *TRG or GET can also be used to perform complete measurements. This includes the generation of an answer, the measurement result. In the R&S NRP, *TRG does not have this meaning: *TRG only executes a trigger event and thus only causes the status transitions from WAIT_FOR_TRG to MEASURING. *TRG delivers no measurement result and has no effect if TRIG:SOUR is not set to BUS or if the instrument is not in the state WAIT_FOR_TRG. The latter situation applies, for example, if the R&S NRP is IDLE, i.e. INIT:CONT ON is not set nor was INIT executed. Delay, holdoff and exclude Normally, the measurement immediately starts after the trigger event has been executed. This may not be desirable if the measurement is to be started before or after the trigger point. The start of the measurement with reference to the trigger point can be offset using the TRIG:DEL command. A negative sign means that the measurement begins before the trigger point. This is possible because the sensors store sampling values for a while and can use past values when the measurement is started. The command is also used when overshoots are to be ignored at the beginning of a power pulse. 1144.1400.12 Annex - I.13 E-2 Annex: Remote Control - Commands Example: *RST TRIG:SOUR INT TRIG:DEL 50 us TRIG:HOLD 800 us INIT FETCh? R&S NRP (starts measurement 50 µs after the trigger event) (starts next trigger event 800 µs after the trigger event at the earliest) Another way to modify the trigger system timing is to set a holdoff time (TRIG:HOLD). After a trigger event, all following trigger events are ignored if they occur within the holdoff time. This is to prevent signal components that have not yet decayed from causin triggering by mistake after the measurement has been completed. This makes sense especially with internal triggering (BurstAv mode). Power Trigger event Ignored trigger event Trigger level Time TRIG:DELay Measurement TRIG:HOLDoff Fig. I-3: Meaning of settings for TRIG:HOLD and TRIG:DEL It is also possible to exclude time domains from the integration of the measured value at the beginning and the end of the measurement (SENS:TIM:EXCL:STARt and SENS:TIM:EXCL:STOP): Example: *RST SENS:FUNC "POW:BURS:AVG" SENS:TIM:EXCL:STAR 10 US SENS:TIM:EXCL:STOP 10 US INIT FETCh? 1144.1400.12 (ignores 10 µs at the beginning of the measurement) (ignores 10 µs at the end of the measurement) Annex - I.14 E-2 R&S NRP Annex: Remote Control - Commands Level, hysteresis and dropout time With internal and external triggering (TRIG:SOUR INT | EXT), a trigger event is recognized when the level of a trigger signal exceeds a specific value. This value is the trigger level and can be set with TRIG:LEV. With internal triggering, the end of the measurement is recognized when the power level falls below the trigger level. This is not desirable with modulated signals or short interruptions and also when the level just falls slightly below the trigger level: • • SENS:BURS:DTOL is used to define a time span during which the power to be measured in the BurstAv mode must remain below the trigger level so that the end of the burst can be detected. TRIG:HYST is used to specify a value in dB by which the signal must fall below the trigger level so that the end of a burst can be detected. 1144.1400.12 Annex - I.15 E-2 Annex: Remote Control - Commands R&S NRP Configuration of sensor settings The sensor settings are controlled by the SENSe command system. The sensors tell the basic unit which commands they understand and which parameters are allowed. As a result, the commands described below cannot be used for some sensors. Selecting a measurement mode The most important sensor-dependent setting is the selection of a measurement mode: • ContAv mode (SENS:FUNC "POW:AVG"): Continuous measurement with only one integration time specified (SENS:APER), within which the power is integrated as a measurement result. Example: *RST SENS:FUNC "POW:AVG" SENS:APER 10 MS INIT FETCh? • Timeslot mode (SENS:FUNC "POW:TSL:AVG"): After the trigger event, the power is measured in timeslots, the number of which is defined with SENS:TSL:COUN. The length of the timeslots is set with SENS:TSL:WIDT. Example: *RST SENS:FUNC "POW:TSL:AVG" SENS:TSL:WIDT 577 US SENS:TSL:COUN 8 TRIG:SOUR EXT INIT FETCh? • BurstAv mode (SENS:FUNC "POW:BURS:AVG"): Measurement of power pulses (bursts) with automatic detection of the beginning and end of pulses. The trigger source setting is ignored. As described above, the conditions for the detection of the pulse end can be set with commands SENS:BURS:DTOL and TRIG:HYST. Example: *RST SENS:FUNC "POW:BURS:AVG" SENS:BURS:DTOL 100 MS TRIG:HYST 3 DB INIT FETCh? 1144.1400.12 Annex - I.16 E-2 R&S NRP • Annex: Remote Control - Commands Scope mode (SENS:FUNC "XTIM:POW"): This mode is used to determine a large number of measured values in succession. The number of required measured values is set with SENS:SWE:POI and the total measurement time with SENS:SWE:TIM. Note that each measurement must be triggered separately. This point is a difference between the Scope mode and the Timeslot mode, in which it is only necessary to start the measurement for measuring the power in all timeslots. Example: *RST SENS:FUNC "XTIM:POW" SENS:SWE:POIN 256 SENS:SWE:TIM 600 us TRIG:COUN 256 (change to IDLE state after the 256th measurement) INIT FETCh? Averaging/filters The power values to be measured are sampled by the sensors. The sampling values then undergo twostage filtering before they are made available as measured values. The first filter stage is a time integration. The integration time is either set explicitly (ContAv mode: SENS:APER, Timeslot mode: SENS:TSL:WIDT and Scope mode: SENS:SWE:POIN and -:TIME) or determined automatically (BurstAv mode). Filtering (averaging) is the second filter stage, which is configured via the command path SENS:AVERage. These settings are used to obtain a stable (noise-free) result up to a required accuracy. This is done by means of a digital filter, which has a variable length: the longer the filter, the more stable the result. • Manual filter setting: The filter-length automatic mode is deactivated and the filter length is set in power-of-two numbers. Example: *RST SENS:AVER:STAT ON SENS:AVER:COUN:AUTO OFF SENS:AVER:COUN 4 INIT FETCh? 1144.1400.12 (activates filtering) (switches off filter-length automatic mode) 2 (permanently sets filter length to 4 = 2 ) Annex - I.17 E-2 Annex: Remote Control - Commands R&S NRP Automatic filter setting: SENS:AVER:COUN:AUTO:TYPE NSR | RES is used to select whether the noise component should remain below a specific threshold (NSR) or the measurement result should be stable up to a specific accuracy (RES). To avoid long measurement times, SENS:AVER:COUNT:AUTO:MTIM can be used to specify a maximum measurement time. The maximum filter length is set such that the measurements do not exceed this time, even if the desired stability has not yet been obtained. Example: *RST SENS:AVER:STAT ON SENS:AVER:COUN:AUTO ON SENS:AVER:COUN:AUTO:TYPE RES SENS:AVER:COUN:AUTO:RES 3 INIT FETCh? (activates filtering) (switches on filter-length automatic mode) (sets automatic mode to RESolution) (maintains 3 places noise-free in the result) Example: *RST SENS:AVER:STAT ON SENS:AVER:COUN:AUTO ON SENS:AVER:COUN:AUTO:TYPE NSR SENS:AVER:COUN:AUTO:NSR 0.01 DB SENS:AVER:COUN:AUTO:MTIM 10 S INIT FETCh? (activates filtering) (switches on filter-length automatic mode) (sets automatic mode to NSRatio) (maximum noise component in the result) (but does not measure more than 10 s) All intermediate pushed values delivered by the first filter stage are stored in the filter. The earliest measured value is ousted out of the filter, since the filter has only a limited length. SENS:AVER:TCON MOV | REP is used to set when the filter algorithm is to be applied to the filter. With the setting MOVing, a new measure value is calculated for each new intermediate measured value. This is the default setting in the LOCAL mode. SENS:AVER:TCON REPeat is set in the REMOTE mode. In this particular case, new measured values are calculated when all intermediate measured values have been replaced by new ones. Note: 1144.1400.12 Changing from SENS:AVER:TCON MOV to REP in the LOCAL-REMOTE transition causes the update rate of measured values to be reduced, since the filter must be completely filled for each new measured value. Annex - I.18 E-2 R&S NRP Annex: Remote Control - Commands Measured-value corrections The R&S NRP offers different options for correcting measured values in the instrument. These options all require an existing knowledge of the test setup or the time structure of the signal. Offsets in the result can be corrected globally and depending on the frequency, and it is possible to consider the duty cycle of a signal and the influence of the complex reflection coefficient (Γ) of the power source. • Global offset correction: All measured values are multiplied by a correction factor (logarithmically added). Example: *RST SENS:CORR:OFFS:STAT ON SENS:CORR:OFFS 20 DB INIT FETCh? • (global offset correction ON) (corrects result by +20 dB) Frequency-dependent offset correction: Two-column tables can be entered in which frequencies and correction values can be stored. A frequency-dependent correction value is determined by linear interpolation in the units Hz and dB using the signal frequency (defined with SENS:FREQ). The interpolated correction value can be queried with SENS:FDOF? for checking purposes. Example: *RST MEM:TABL:MOVE "Table 1" "Splitter" MEM:TABL:SEL "Splitter" MEM:TABL:CLEar MEM:TABL:FREQ 0,1e4,5e4,1e5,1e9 MEM:TABL:GAIN 3.1,3.1,3.0,2.9,2.9 SENS:FREQ 900 MHZ SENS:CORR:FDOT:STAT ON SENS:CORR:FDOT "Splitter" SENS:CORR:FDOF? INIT FETCh? (renames first table) (selects table) (deletes selected table) (interpolation points on the frequency axis) (associated offset values) (signal frequency) (activates frequency-dependent offset correction) (selects an offset table) (queries correction value used) This example assumes that a table called "Table 1" is available. • Duty cycle: If the duty cycle of a pulsed signal (SENS:DCYC) is reported to the R&S NRP, the R&S NRP delivers the average power in the pulse. Example: *RST SENS:CORR:DCYC:STAT ON SENS:CORR:DCYC 30 PCT INIT FETCh? 1144.1400.12 (duty-cycle correction ON) (duty cycle of 30%) Annex - I.19 E-2 Annex: Remote Control - Commands • R&S NRP Reflection coefficient of the source (source gamma, Γ ): Reflections at the power source may distort the result. If the reflection coefficient of the source is known, it can be specified for the measured-value correction via command path SENS:SGAM. Example: *RST SENS:SGAM:CORR:STAT ON SENS:SGAM:MAGN 0.01 SENS:SGAM:PHAS 179 INIT FETCh? (considers the reflection coefficient Γ of the source) (magnitude of Γ ) (phase angle of Γ) Configuration of CALCulate blocks The function of the CALCulate blocks has already been explained. Its most important task is the calculation and provision of measurement results. Calculation function and relative measurement The calculation functions mentioned in connection with high-level commands are internally implemented via commands CALC:MATH and CALC:REL:STAT. Keyword for selecting a calculation function with high-level commands Corresponding low-level commands (n,m=1,2,3,4) :DIFF (Difference) CALC:MATH "(SENSn-SENSm)"; REL:STAT OFF :DIFF:REL (Difference with reference value) CALC:MATH "(SENSn-SENSm)"; REL:STAT ON :RAT (Ratio) CALC:MATH "(SENSn/SENSm)"; REL:STAT OFF :RAT:REL (Ratio with reference value) CALC:MATH "(SENSn/SENSm)"; REL:STAT ON :SWR (Standing wave ratio) CALC:MATH "SWR(SENSn)"; REL:STAT OFF :RLOS (Return loss) CALC:MATH "RLOS(SENSn)"; REL:STAT OFF :REFL (Reflection coefficient) CALC:MATH "REFL(SENSn)"; REL:STAT OFF Example: *RST CALC:MATH "(SENS1/SENS2)" CALC:REL:STAT ON CALC:REL 23 dB INIT:ALL FETCh? 1144.1400.12 (processes sensors 1 and 2) (relative measurement) (sets reference value) (starts measurements on all sensors) Annex - I.20 E-2 R&S NRP Annex: Remote Control - Commands Optimization of measurement speed The duration of a message can be reduced by making the following setting: SYST:SPEed FAST (deactivates screen content !!!) The following settings also affect the measurement speed to a greater or lesser extent. Which of these settings are possible, however, depends on what is to be measured. For example, if measurement accuracy is important, filtering may also have to be activated, which can reduce the measurement speed. The length of the integration time also directly affects the measurement time and should therefore be kept as short as possible if a short measurement time is desired. Consequently, the following list can only serve as a guideline for minimizing the measurement time. SYST:SPEed FAST SENS:AVER:STAT OFF SENS:FUNC "POW:AVG" SENS:BUFF:STAT OFF SENS:APER MIN SENS:RANG:AUTO OFF SENS:CORR:OFFS:STAT OFF SENS:CORR:DCYC:STAT OFF SENS:CORR:FDOT:STAT OFF SENS:SGAM:CORR:STAT OFF TRIG:DEL 0 TRIG:DEL:AUTO OFF CALC1:MATH "(SENS1)" CALC2:MATH "(SENS2)" CALC3:MATH "(SENS2)" CALC4:MATH "(SENS2)" CALC5:MATH "(SENS2)" CALC6:MATH "(SENS2)" CALC7:MATH "(SENS2)" CALC8:MATH "(SENS2)" 1144.1400.12 (deactivates screen content) (deactivates filtering of measured values) (ContAv mode) (no buffered measurements) (integration time as short as possible) (automatic range selection OFF) (no global offset correction) (no duty cycle correction) (no frequency-dependent offset correction) (no measured-value correction for reflection coefficient of source) (no delay on triggering) (no delay on triggering) (only uses the first CALCulate block) Annex - I.21 E-2 R&S NRP Table of Contents Chapter 8 Table of Contents 8 Maintenance ......................................................................................................................... 8.1 Sensor test ....................................................................................................................................... 8.1 Instrument selftest........................................................................................................................... 8.1 Cleaning the exterior ....................................................................................................................... 8.1 Storage.............................................................................................................................................. 8.1 1144.1400.12 I-8.1 E-1 R&S NRP Maintenance 8 Maintenance Under normal operating conditions the R&S NRP does not require any regular maintenance except for occasional cleaning of the front panel. Sensor test The sensor selftest is described in Chapter 4 in the section "Selftest". Instrument selftest The R&S NRP carries out a selftest during booting. This selftest is described in Chapter 1 in the section titled "Welcome screen and function test". Cleaning the exterior To clean the exterior, use a soft, lintfree cloth and an alcohol-free solvent, e.g. a commercially available dishwashing liquid. Storage The R&S NRP has a storage temperature range of –20 °C to +70 °C. 1144.1400.12 8.1 E-1 R&S NRP Table of Contents Chapter 9 Contents 9 SCPI Error Messages ....................................................................................................... 9.1 SCPI-Specific Error Messages ....................................................................................................... 9.1 No error ...................................................................................................................................... 9.1 Command Error.......................................................................................................................... 9.1 Execution Error .......................................................................................................................... 9.3 Device-Specific Errors................................................................................................................ 9.4 Query Errors............................................................................................................................... 9.5 Device-Dependent Errors................................................................................................................ 9.5 1144.1400.12 I-9.1 E-2 R&S NRP SCPI Error Messages 9 SCPI Error Messages The list below contains all error messages that may occur in the instrument. Negative error numbers are defined in the SCPI standard, positive error numbers identify device-specific errors. The left column of the following table gives the error code. In the right column, the text of the error message displayed or entered in the error/event queue is printed in bold. An additional explanation is given below this text. SCPI-Specific Error Messages No error Error code Error text returned upon queue query Explanations 0 No error This message is displayed if the error queue is empty. Command Error Command errors; causes bit 5 in the ESR to be set. Error code Error text returned upon queue query Explanations -100 Command error Command faulty or invalid. -101 Invalid character The command contains a character which is invalid for that type. -102 Syntax error The command is invalid. -103 Invalid separator Command contains an illegal character where a separator is expected. -104 Data type error Command contains an invalid data element. -108 Parameter not allowed The command contains too many parameters. -109 Missing parameter The command contains fewer parameters than required. -111 Header separator error The header contains an illegal delimiter. 1144.1400.12 9.1 E-2 SCPI Error Messages R&S NRP Error code Error text returned upon queue query Explanations -112 Program mnemonic too long The header contains more than 12 characters. -113 Undefined header The header is not defined for the device. -114 Header suffix out of range The header contains an illegal numeric suffix. -120 Numeric data error The command contains a faulty numeric parameter. -121 Invalid character in number A numeric contains an invalid character. -123 Exponent too large The magnitude of the exponent is larger than 32000. -124 Too many digits The numeric contains too many digits. -127 Invalid numeric data -128 Numeric data not allowed The command contains a numeric data element in a position where it is not accepted. -131 Invalid suffix The suffix is invalid for this device. The suffix is the index that indexes the sensor with the SENSe commands (14), the CALCulate block with the high-level measurement commands (1-4) and the window with the DISPlay commands (1-4). -134 Suffix too long The suffix contains more than 12 characters. -138 Suffix not allowed A suffix is not allowed for this command or at this position in the command. -141 Invalid character data Either the character data element contains an invalid character or the particular element received is not valid for this command. -144 Character data too long The character data element contains too many characters. -148 Character data not allowed The character data element used is not allowed for this command or at this position of the command. -151 Invalid string data The command contains invalid string data. -158 String data not allowed The command contains a valid string data element at a position where it is not allowed. -161 Invalid block data The command contains invalid block data. -168 Block data not allowed The command contains a legal block data element at a point where it is not allowed. 1144.1400.12 9.2 E-2 R&S NRP SCPI Error Messages Error code Error text returned upon queue query Explanations -171 Invalid expression The command contains an invalid mathematical expression data element. -178 Expression data not allowed The command contains mathematical expression data at a point where they are not allowed. Execution Error Execution errors; cause bit 4 in the ESR register to be set Error code Error text returned upon queue query Explanations -200 Execution error An error occurred upon command execution. -203 Command protected An attempt was made to execute a protected command. -210 Trigger error Error on triggering the device. -211 Trigger ignored A *TRG or a triggering signal was ignored. -213 Init ignored A request for a measurement initialization was ignored as another measurement was already in progress. -214 Trigger deadlock A measurement could not be started or a result query could not be processed since the device would otherwise enter a deadlock state. This occurs under the following conditions: (1) TRIG:SOUR BUS;:INIT;:FETCh?: A *TRG or TRIG:IMM would be required for triggering but these commands cannot be executed since FETCh? blocks the entry. But FETCh? waits until the measured values are available. (2) FETCh? was called but no valid result was available and the trigger system of the sensor is IDLE. FETCh? blocks the entry so that a measurement cannot be started with INIT either. -220 Parameter error The command contains a faulty or invalid parameter. -221 Settings conflict There is a setting conflict between two or more parameters. -222 Data out of range A program data element is outside the legal range as defined by the device. -223 Too much data A valid parameter is received but it contains more data than the device can handle. -224 Illegal parameter value The parameter value is invalid. 1144.1400.12 9.3 E-2 SCPI Error Messages R&S NRP Error code Error text returned upon queue query Explanations -225 Out of memory The device has insufficient memory to perform the required operation. -226 Lists not same length A list of offset values and frequencies has not the same length as an associated list of frequency and offset values. -230 Data corrupt or stale The data are incomplete or invalid. -240 Hardware error The command cannot be executed because of a hardware problem in the device. -241 Hardware missing The command cannot be executed because of missing device hardware. Device-Specific Errors Device-specific error; causes bit 5 to be set in the ESR register Error code Error text returned upon queue query Explanations -300 Device-specific error Generic device-dependent error that cannot be defined more precisely. -310 System error Indicates that some system error has occurred. Please contact the R&S service center. -311 Memory error An error was detected in the device’s memory. -314 Save/recall memory lost Indicates that the nonvolatile data saved by the *SAV? command has been lost. -315 Configuration memory lost Indicates that nonvolatile configuration data saved by the device has been lost. -330 Self-test failed The self-test could not be executed. -341 Zeroing failed The zeroing of a sensor (CALibration:ZERO:AUTO ONCE) has failed. The most frequent cause for this error is a signal that is applied to the sensor input and prevents zeroing. -350 Queue overflow This code is entered into the queue in lieu of the code that caused the error. It indicates that an error occurred but was not recorded. Five entries are accepted in the queue. -363 Input buffer overrun More commands were sent to the device than can be simultaneously executed or stored. 1144.1400.12 9.4 E-2 R&S NRP SCPI Error Messages Query Errors Query errors; cause bit 2 in the ESR register to be set Error code Error text returned upon queue query Explanations -400 Query error Generic query error that cannot be defined more precisely. -410 Query INTERRUPTED The query was interrupted. Example: The query is followed by new data before the response was completely sent. -420 Query UNTERMINATED An incomplete query was received. -430 Query DEADLOCKED The query cannot be processed. -440 Query UNTERMINATED after indefinite response A query is received in the same program message after a query requesting an indefinite response. Device-Dependent Errors Device-dependent error; causes bit 5 to be set in the ESR register Error code Error text returned upon queue query Explanations 1 Device-dependent error This error message is sent when the device cannot detect a more specific error. 2 IEEE 1174 error (unknown emulation code) An invalid IEEE-1174 emulation mode was selected for the Ethernet link. 22 IEEE1174 mode 488.1 not allowed Setting the IEEE 1174.1 mode is not permissible. 24 Sensor mode not supported An attempt was made to set the sensor to a measurement mode which is not supported. 25 Not supported A command is not supported (by the sensor). 26 State not supported Attempt was made to set an invalid value. The permissible values for sensor-dependent commands can be declared as impermissible by a sensor depending on the context. 27 Sensor not present A command could not be executed because the required sensor is not connected. 1144.1400.12 9.5 E-2 SCPI Error Messages R&S NRP Error code Error text returned upon queue query Explanations 28 Sensor not idle A command could not be executed because the respective sensor was not in the IDLE state at that time. 29 Measurement aborted while waiting for data A measurement was aborted while the device was waiting for measurement results. 30 No extremes available in this mode Extreme values (minimum, maximum und peak-to-peak values) are not calculated in the set measurement mode. 39 Sensor removed while waiting for result A sensor was disconnected while the device was waiting for measurement results. 42 Failed to initialize sensor A sensor could not be initialized. 43 Error in receiving calibration data from sensor An error occurred in receiving calibration data from the sensor (command CALibration[1..4]:DATA?). 44 Error in sending calibration data to sensor An error occurred in sending calibration data to the sensor (command CALibration[1..4]:DATA <block_data>). 45 Command not supported by sensor Attempt was made to send a command to a sensor that does not support this command. This may depend on the current sensor status. The sensors can inform the R&S NRP at any point which commands they support or do not support. This mainly concerns commands of the Sense and Trigger systems. 46 Sensor failure: no command receipt A sensor did not acknowledge any command. 47 Error in receiving battery data An error occurred in receiving battery data (command SYSTem:BATTery:STATus?). 48 Error in sending battery data An error occurred in sending battery data (command SYSTem:BATTery:MODE <block_data>). 50 Fatal sensor error A sensor signalled a serious error. If the problem persists, please contact the R&S servicing center. 51 Overload A sensor signalled that the signal applied has exceeded the permissible maximum power. CAUTION! Sensor overload can destroy the electronic measurement system. 52 Overrange This error is signalled if a sensor detects that one of its measurement channels is overranged. The result is then probably incorrect. This error can occur if the automatic range function is deactivated (SENSe:RANGe:AUTO OFF) and the manually selected measurement channel is not suitable or the cross-over level (SENSe:RANGe:AUTO:CLEVel) was incorrectly selected. 53 Truncated measurement In the BurstAv mode, the samples for the power are stored in an internal buffer until the end of the power pulse is detected. If the buffer overflows the measurement is terminated and error 53 "Truncated measurement" is generated. 1144.1400.12 9.6 E-2 R&S NRP SCPI Error Messages Error code Error text returned upon queue query Explanations 54 Sample error Samples were lost while sampling the signal applied. The measured value can thus be incorrect. 55 Sensor hardware error A sensor signalled an error in the sensor hardware. If the problem persists, please contact the R&S servicing center. 56 Filter truncated With the automatic filter function activated, a sensor tries to set the filter length such that the required accuracy is obtained. If the measurement time required for this exceeds the value set with SENSe:AVERage:COUNt:AUTO:MTIMe (max. time), the filter length is shortened such that a measurement does not last more than the max. time and error message 56 "Filter truncated" is generated. 57 Standard settings incomplete The R&S NRP can be configured for measuring standardized signals with SYSTem:STANdard:PRESet <string>. This command sets a number of predefined parameters. If a sensor does not support a specific parameter (e.g. a measurement mode), execution error message 57 "Standard settings incomplete" is generated. 1144.1400.12 9.7 E-2