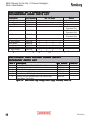
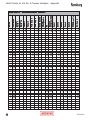
1
SERVICE MANUAL
CP-97-03.6
(Supercedes CP-97-03.5)
9040 CLASSIC HIGH VOL
TAGE POWER SUPPL
Y
VOLT
SUPPLY
for the No. 2 ProcessTM Handgun
MODELS:
76657-14
76657-142
NO.2 HANDGUN, ELECTRIC MOTOR, DOMESTIC VERSION
NO.2 HANDGUN, ELECTRIC MOTOR, EXPORT VERSION
IMPOR
TANT
IMPORT
ANT:: Before using this equipment,
carefully read SAFETY PRECAUTIONS,
starting on page 1, and all instructions in
this manual. Keep this Service Manual for
future reference.
Service Manual Price: $30.00 (U.S.)
N O T E : This manual has been changed from revision CP-97-03.5 to revision CP-97-03.6
CP-97-03.6.
Reasons for this change are noted under “Manual Change Summary” inside the
back cover of this manual.
9040 Classic for the No. 2 Process Handgun - Contents
CONTENTS
SAFETY:
PAGE
1-5
SAFETY PRECAUTIONS......................................................... 1
HAZARDS / SAFEGUARDS..................................................... 2
INTRODUCTION:
6-7
GENERAL DESCRIPTION....................................................... 6
SPECIFICATIONS..................................................................... 7
INSTALLATION:
8-10
LOCATION................................................................................. 8
INPUT VOLTAGE SELECTION................................................ 8
INPUT CONNECTIONS............................................................ 9
EXTERNAL CONNECTIONS................................................... 9
OPERATION:
11-12
THEORY OF OPERATION....................................................... 11
OPERATING PROCEDURES.................................................. 12
MAINTENANCE:
13-23
ROUTINE PREVENTIVE MAINTENANCE..............................13
TROUBLESHOOTING..............................................................13
TROUBLESHOOTING GUIDE.................................................17
9040 CLASSIC NO.2 POWER SUPPLY BLOCK DIAGRAM..19
SERVICE LEVEL.......................................................................20
REPLACEMENT PROCEDURES............................................ 20
PARTS IDENTIFICATION:
24-27
9040 CLASSIC NO.2 POWER SUPPLY / PARTS LIST.......... 24
RECOMMENDED SPARE PARTS LIST.................................. 26
ACCESSORY PARTS LIST...................................................... 26
WARRANTY POLICIES:
28
LIMITED WARRANTY............................................................... 28
APPENDIX:
29-33
PAINT AND SOLVENT SPECIFICATIONS............................. 29
VISCOSITY CONVERSION CHART........................................30
VOLUMETRIC CONTENT OF HOSE OR TUBE.....................32
KV OUTPUT TEST & GROUND TEST LOG........................... 33
CP-97-03.6
CP-97-03.6
9040 Classic for the No. 2 Process Handgun - Safety
SAFETY
SAFETY PRECAUTIONS
Before operating, maintaining or servicing any
Ransburg coating system, read and understand
all of the technical and safety literature for your
Ransburg products. This manual contains information that is important for you to know and
understand. This information relates to USER
SAFETY and PREVENTING EQUIPMENT
PROBLEMS. To help you recognize this information, we use the following symbols. Please
pay particular attention to these sections.
A WARNING! states information to alert you
to a situation that might cause serious injury
if instructions are not followed.
A CAUTION! states information that tells
how to prevent damage to equipment or
how to avoid a situation that might cause
minor injury.
A NOTE is information relevant to the procedure in progress.
While this manual lists standard specifications
and service procedures, some minor deviations
may be found between this literature and your
equipment. Differences in local codes and plant
requirements, material delivery requirements,
etc., make such variations inevitable. Compare
this manual with your system installation drawings and appropriate Ransburg equipment
manuals to reconcile such differences.
!
WARNING
! The user MUST read and be familiar
with the Safety Section in this manual and
the Ransburg safety literature therein
identified.
! This manual MUST be read and thoroughly understood by ALL personnel who
operate, clean or maintain this equipment!
Special care should be taken to ensure that
the WARNINGS and safety requirements
for operating and servicing the equipment
are followed. The user should be aware of
and adhere to ALL local building and fire
codes and ordinances as well as NFPA 33
SAFETY STANDARD, 2000 EDITION,
prior to installing, operating, and/or servicing this equipment.
!
WARNING
! The hazards shown on the following
page may occur during the normal use of
this equipment. Please read the hazard
chart beginning on page 2.
Careful study and continued use of this manual
will provide a better understanding of the equipment and process, resulting in more efficient operation, longer trouble-free service and faster,
easier troubleshooting. If you do not have the
manuals and safety literature for your Ransburg
system, contact your local Ransburg representative or Ransburg.
CP-97-03.6
1
9040 Classic for the No. 2 Process Handgun - Safety
AREA
HAZARD
SAFEGUARDS
Tells where
Tells what the hazard is.
Tells how to avoid the hazard.
Fire Hazard
Fire extinguishing equipment must be present in the
spray area and tested periodically.
hazards may occur.
Spray Area
Improper or inadequate operation and maintenance procedures Spray areas must be kept clean to prevent the
will cause a fire hazard.
accumulation of combustible residues.
Protection against inadvertent
arcing that is capable of causing
fire or explosion is lost if any
safety interlocks are disabled
during operation. Frequent
power supply shutdown indicates
a problem in the system requiring correction.
Smoking must never be allowed in the spray area.
The high voltage supplied to the atomizer must be
turned off prior to cleaning, flushing or maintenance.
When using solvents for cleaning:
Those used for equipment flushing should have flash
points equal to or higher than those of the coating
material.
Those used for general cleaning must have flash
points above 100oF (37.8oC).
Spray booth ventilation must be kept at the rates
required by NFPA 33, 2000 Edition, OSHA and local
codes. In addition, ventilation must be maintained
during cleaning operations using flammable or
combustible solvents.
Electrostatic arcing must be prevented.
Test only in areas free of combustible material.
Testing may require high voltage to be on, but only as
instructed.
Non-factory replacement parts or unauthorized
equipment modifications may cause fire or injury.
The paint process and equipment should be set up
and operated in accordance with NFPA 33, NEC, and
OSHA requirements.
Explosion Hazard/ Halogenated hydrocarbon solvents Aluminum is widely used in other spray application
for example: methylene chloride equipment - such as material pumps, regulators,
Incompatible
and 1,1,1,-Trichloroethane are not triggering valves, etc. Halogenated hydrocarbon
Materials
chemically compatible with the
aluminum that might be used in
many system components. The
chemical reaction caused by these
solvents reacting with aluminum
can become violent and lead to an
equipment explosion.
2
solvents must never be used with aluminum equipment
during spraying, flushing, or cleaning. Read the label
or data sheet for the material you intend to spray. If
in doubt as to whether or not a coating or cleaning
material is compatible, contact your material supplier.
Any other type of solvent may be used with aluminum
equipment.
CP-97-03.6
9040 Classic for the No. 2 Process Handgun - Safety
AREA
HAZARD
SAFEGUARDS
Tells where
Tells what the hazard is.
Tells how to avoid the hazard.
Electrostatic Arcing
Never operate the spray gun without properly
grounding the following.
hazards may occur.
Spray Area
A. Operators:
Operators must be grounded. Rubber soled
insulating shoes should not be worn. Grounding
leg straps may be used.
Operators must maintain contact with the
handle of the gun. If work gloves are used, the
palm section should be cut out.
Operators must remove from themselves all
metal objects that are not grounded.
NOTE: REFER TO NFPA 33, CHAPTER 10, 2000
EDITION REGARDING OPERATOR GROUNDING.
B. Parts being sprayed: Resistance between the
part and a grounded conveyor must not exceed
1 megohm.
C. Every metal and conductive object in the spray
area: This includes the booth, parts hangers,
fire extinguishers, conductive flooring, etc.
D. Unless specifically approved for use in
hazardous locations, the power supply and
other electrical equipment must not be used in
Class I, Division 1 or 2 locations.
Grounded conductive flooring must be provided in
the spray area.
Turn off voltage at the power supply before flushing
out, cleaning, or removing any parts from the gun.
Never install a spray gun into a fluid system using
an isolated solvent supply.
Do not touch gun electrode while gun is energized.
Ensure the Ground Wire Assembly is connected
from the power supply ground stud to a true earth
ground.
Ensure that the power supply is plugged in to a
properly grounded outlet.
CP-97-03.6
3
9040 Classic for the No. 2 Process Handgun - Safety
AREA
HAZARD
SAFEGUARDS
Tells where
Tells what the hazard is.
Tells how to avoid the hazard.
Improper operation or maintenance may create a hazard.
Personnel must be given training in accordance
with the requirements of NFPA 33, Chapter 16,
2000 edition.
hazards may occur.
General Use and
Maintenance
Personnel must be properly
trained in the use of this equipment.
Instructions and safety precautions must be read
and understood prior to using this equipment.
Comply with appropriate local, state, and national
codes governing ventilation, fire protection, operation maintenance, and housekeeping. OSHA references are Sections 1910.94 and 1910.107. Also
refer to NFPA 33, 2000 edition and your insurance
company requirements.
Always turn power to the power supply OFF, unplug the electrical cord from its outlet, and remove
the front panel fuse, before opening the power supply door. If necessary, lock the power supply out
so that it cannot be turned ON until the work is finished.
Whenever removing high voltage cables from
equipment, ground the contact end of the cable by
holding the cable such that the contact touches
earth ground for several seconds. Do not touch
the contact until it has been grounded. This will
reduce the possibility of residual charge causing
electrical shock.
The High Voltage Multiplier Assembly contains energy storage components that can cause serious
shock injury, and therefore is not field repairable.
Warranty will be voided if the High Voltage Multiplier seal is broken. If the High Voltage Multiplier
is defective contact your authorized Ransburg representative for exchange or repair.
The High Voltage Multiplier and high voltage cable
contain significant capacitance that will store
charge. Allow approximately 10 seconds for this
charge to bleed off before opening the cabinet door
or removing the high voltage cable from the power
supply or spray gun.
4
CP-97-03.6
9040 Classic for the No. 2 Process Handgun - Safety
AREA
HAZARD
SAFEGUARDS
Tells where
Tells what the hazard is.
Tells how to avoid the hazard.
hazards may occur.
Toxic Substances Certain material may be harmful
if inhaled, or if there is contact
with the skin.
Follow the requirements of the Material Safety Data
Sheet supplied by coating material manufacturer.
Adequate exhaust must be provided to keep the air
free of accumulations of toxic materials.
Use a mask or respirator whenever there is a
chance of inhaling sprayed materials. The mask
must be compatible with the material being sprayed
and its concentration. Equipment must be as prescribed by an industrial hygienist or safety expert,
and be NIOSH approved.
CP-97-03.6
5
9040 Classic for the No. 2 Process Handgun - Introduction
INTRODUCTION
GENERAL DESCRIPTION
The Ransburg
No. 2 Handgun Process
The No. 2 ProcessTM is an electrical atomization
method for applying coatings to objects electrostatically. The No. 2 Process Handgun system
applies a high voltage, negative, DC charge to
the applicator bell, creating an electrostatic field
between the bell and the target object. The target is electrically grounded through its support
which may be stationary or moving; or through
an electrical connection to a known true earth
ground.
A regulated pressure fluid system delivers coating material to the bell when the gun is triggered.
There, the fluid travels across the face of the
rotating bell and becomes charged. The fluid is
electrically atomized at the edge of the bell forming a fine mist which, under the influence of the
electrostatic field, is attracted to and deposited
on the target object. The forces between the
charged particles and the grounded target are
sufficient to turn almost all overspray around
and deposit it on the side and back surfaces of
the target. Thus, a high percentage of the spray
is deposited on the target and overspray is controlled.
The 9040 Classic High V
oltage
Voltage
Power Supply
The 9040 Classic Power Supply converts standard AC line voltage to a high frequency, low
voltage signal ranging from 0 to 10 Vrms. This
signal is supplied to the High Voltage Multiplier
where it is converted to DC high voltage. The
high voltage DC is then transferred from the
9040 Classic Power Supply to the No. 2 Process spray gun through a super flex high voltage cable. The voltage/current characteristic is
designed to optimize the charging process under varying load conditions and to limit the operating current to a safe maximum value.
6
In addition to supplying high voltage output to
the spray gun, the 9040 Classic power supply
also provides controls for AC power ON/OFF, a
high voltage meter, a current meter, a POWER
ON indicator, a HIGH VOLTAGE ON indicator,
and a CURRENT OVERLOAD indicator and
reset switch. Additionally, output terminals are
provided for remote overload reset and interlock
connections for a conveyor, exhaust fan and
high voltage control on all 9040 Classic Power
Supplies.
NOTE
The 9040 Classic No. 2 Power Supply
is factory supplied with a cabinet latch
that can be opened using a slotted screwdriver. If desired, the standard latch can
be easily replaced with a latch that requires the use of a key to open. This key
lock can be ordered from: Austin Hardware, Inc., 8001 Central Ave. N. E.,
Minneapolis, MN 55432; 1-800-328-2423;
Key Lock Part Number: C8052-14A.
!
The 9040 Classic Power Supply is available
as follows:
9040
Part No.
Used with No. 2
Gun Type
Gun
No.
76657-14 Electric Motor, Domestic
19372
76657-142 Electric Motor, Export
19372
Figure 1:
9040 Classic Power Supply
Availability
NOTE
! Except where indicated, this manual is
applicable to all models of the 9040 Classic No. 2 Process Handgun Power Supply.
CP-97-03.6
9040 Classic for the No. 2 Process Handgun - Introduction
SPECIFICA
TIONS
SPECIFICATIONS
Electrical
Physical
Input:
Voltage:
Current:
Frequency:
Wattage:
Output:
Voltage:
Current:
90-264 VAC
0.6/0.3 Amps AC
50/60 Hertz
60 Watts (Maximum)
14 inches (35.6 cm)
12 inches (30.5 cm)
6 inches (15.2 cm)
24 pounds (10.9 kg)
0-100 kV DC
100 Microamps Max.
Figure 2:
CP-97-03.6
Height:
Width:
Depth:
Weight:
9040 Classic No. 2 Power Supply Features
7
9040 Classic for the No. 2 Process Handgun - Installation
INST
ALLA
TION
INSTALLA
ALLATION
! WARNING
The 9040 Classic Power Supply MUST
be located outside the hazardous area.
(See National Fire Protection Association
Bulletin No. 33; the Occupational Safety
and Health Act of 1970, sections 1910.106
and 1910.107 and Ransburg Bulletin IL247, Operating Your Electrostatic Coating
System Safely.)
!
The user MUST read and be familiar
with the SAFETY and SAFETY PRECAUTIONS SECTIONS of this manual.
!
! This manual MUST be read and thoroughly understood by ALL personnel who
operate, clean or maintain this equipment!
Special care should be taken to ensure that
the warnings and requirements for operating and servicing safely are followed. The
user should be aware of and adhere to ALL
local building and fire codes and ordinances
as well as NFPA Standard 33 and The
Occupational Safety and Health Act of
1970 (OSHA) prior to installing, operating
and/or servicing this equipment.
NOTE
! As each installation is unique, this information is intended to provide general installation information for the 9040 Classic
Power Supply. Consult your authorized
Ransburg distributor for specific directions
pertaining to the installation of your equipment.
LOCA
TION
LOCATION
Install the 9040 Classic Power Supply in an
area outside the hazardous location, where it
will be protected from the possibility of environmental intrusion, such as dust or moisture, and
ambient temperatures do not exceed 120oF, but
as close to the applicator as possible to mini-
8
mize the length of the high voltage cable. The
Power Supply may be free standing on any flat
surface or wall mounted by rotating the wall
mount brackets (supplied) as shown in Figure 3.
In either case, the power supply MUST be
mounted in an upright position. DO NOT lay
the power supply on its side or back.
!
CAUTION
DO NOT locate the power supply near
or adjacent to heat producing equipment
such as ovens, high wattage lamps, etc.
!
Figure 3:
Wall Mount Brackets
INPUT VOL
TAGE
VOLT
SELECTION
The 9040 Classic Power Supply accepts universal input voltage between 90 and 264 VAC.
There is no need to change any switch settings
when changing input from 115 to 230 VAC or
from 230 to 115 VAC.
NOTE
! 9040 units shipped from the factory for
115 VAC input will have a 72771-06, 1 amp
front panel fuse installed. While 9040 units
shipped from the factory for 230 VAC input
will have a 72771-01, 0.5 amp front panel
fuse installed. If the other input is required,
it is recommended that the fuse be
changed in order to keep the same level of
protection. Both fuses are shipped with
9040 power supplies.
CP-97-03.6
9040 Classic for the No. 2 Process Handgun - Installation
INPUT CONNECTIONS
Plug the AC line cord into a properly grounded
AC outlet. Any extension of the AC line cord
MUST conform to the following:
• It must be properly connected to wire with
ground.
• It must be 14 gauge minimum.
• It must be less than 100 feet total length.
• It should be continuous (as few connections
as possible).
NOTE
! For portable use, the 9040 Classic
No. 2 Power Supply comes factory wired
with an AC line cord. For permanent installations, conduit is generally required. However, if national and local codes permit, the
AC power may be supplied via the factory
installed line cord for permanent installations
also. If conduit is utilized, the power supply
wiring MAY be routed through an optional
explosion proof switch mounted on or near
the spray booth where it will be convenient
to the operator.
Input Circuit T
est
Test
Prior to applying AC power to the Power Supply, the phase and ground of the AC receptacle
and/or extension cord MUST be tested using
the Circuit Tester, P/N 20868-00. If the circuit is
found to be faulty or out of phase, the circuit
MUST be corrected before operating the power
supply.
!
CAUTION
! Operation of the power supply on an
ungrounded or improper circuit can lead to
component failure or unsafe operation.
CP-97-03.6
EXTERNAL
CONNECTIONS
NOTE
! When connecting external control wires
to the 9040 Classic Power Supply, route the
wiring through the external wiring grommet
located on the side panel.
High V
oltage (HV)
Voltage
Cable Connection
Remove the plastic protective plug from the HV
Cable Connector and squirt enough of the supplied dielectric oil (70863-00) into the HV Tube
to cover the electrical contact point.
NOTE
! Squirting dielectric oil (70863-00) down
the HV Tube significantly reduces corona
discharge that can cause deterioration of the
HV connection components.
With a clean, dry cloth, wipe the end of the HV
Cable. Insert the HV Cable into the HV Cable
Connector and tighten the cable nut securely.
Safety Ground
Crimp the appropriate connector onto the
Ground Wire Assembly and install from the
power supply ground stud, located on the side
panel, to a true earth ground.
!
CAUTION
The Ground Wire Assembly MUST be
connected from the Power Supply ground
stud to a true earth ground. DO NOT
attach the ground wire from the Power
Supply to the part being coated. Damage to
the power supply will occur! Separate
ground wires MUST be used for grounding
the part and the Power Supply.
!
9
9040 Classic for the No. 2 Process Handgun - Installation
Interlocks
! WARNING
! ALWAYS ensure that high voltage is
OFF before flushing the spray gun with
solvent. NEVER flush the spray gun with
high voltage ON
ON, as this is a severe fire
hazard and risk to personnel safety. It is
recommended that the high voltage control
be interlocked with the solvent flush signal
so that high voltage is automatically locked
out whenever flushing occurs. Consult
your authorized Ransburg representative
for information on interlocking the high
voltage OFF signal with the solvent flush
signal.
As outlined in NFPA 33 and OSHA standard
1910, the AC power line must be series interlocked with both the exhaust fan and conveyor.
To interlock the 9040 Classic power supply with
the exhaust fan and conveyor perform the following:
1.
Ensure the front panel fuse is removed,
the power supply is unplugged, and the
ON/OFF switch is in the OFF position.
2.
Open the power supply cabinet door.
! WARNING
! ALWAYS double check that the power
supply is unplugged from its AC Outlet
before working with any internal wiring.
3.
Using a small blade screw driver, remove the factory installed jumper from 1
TB-L1 to 1TB-L2.
4.
Route exhaust fan and conveyor interlock (supplied by user) wiring through
the external wiring grommet on the side
of the power supply and connect to 1TBL1 and 1TB-L2 as shown in Figure 4.
The Interlock contacts should be
rated for at least 1 Amp at 240
volts AC.
5.
10
Secure the cabinet door, replace the
fuse, and plug the power supply in.
Figure 4:
Terminal Block One (1TB)
External Relay Contacts
A set of external relay contacts for High Voltage
(K1) and overload (K2) conditions is provided at
6PL-5, -6, & -7. See Figure 10 in the "Maintenance" section of this manual for exact wiring
locations. These relay contacts are sometimes
useful in configuring the control of the spray gun
system.
External High V
oltage Control
Voltage
If a method of high voltage triggering, other than
the factory supplied method, is required, the 9040
Classic Power Supply allows for external high
voltage control from a PLC, pressure switch, air
flow switch, or other user supplied device. To turn
the high voltage on, the user supplied device must
create a contact closure between terminals 6 and
7 of terminal block one (1TB). To connect the user
supplied, external high voltage control device,
perform the following:
1.
Ensure the front panel fuse is removed,
the power supply is unplugged, and the
ON/OFF switch is in the OFF position.
2.
Open the power supply cabinet door.
3.
Route the contact wires of the control
device through the external wiring grommet and connect to the existing wiring
for 1TB-6 and 1TB-7. The control device contacts must be rated for at least
100 milliamps at 15 volts DC.
4.
Secure the cabinet door, replace the
fuse, and plug in the power supply.
CP-97-03.6
9040 Classic for the No. 2 Process Handgun - Operation
OPERA
TION
OPERATION
Figure 5:
Operating Controls
! WARNING
The electrical discharge which is
available from the charging electrode of the
applicator must not exceed 0.25 mJ of
energy. To achieve this limit, any flow of
energy from the paint supply through the
paint line to the gun electrode MUST be
prevented by grounding the paint line at the
gun handle or body. Verify that the applicator is actually grounded BEFORE
operating it! (See the appropriate spray
gun manual.) If improper readings are
obtained, check that the power supply is
grounded (see "Ground Test Procedure" in
the "Maintenance" section of this manual).
!
CP-97-03.6
! WARNING
The user MUST read and be familiar
with the "SAFETY" SECTION of this
manual and the Ransburg safety literature
therein identified BEFORE OPERATING
the 9040 Classic power supply.
!
THEOR
Y OF OPERA
TION
THEORY
OPERATION
-REFER TO FIGURE 10
Line Voltage (90-264 VAC) is applied to input
terminals 11PL-1 and 11PL-2 of 18 VDC Power
Supply 1SUP through the user supplied exhaust
fan and conveyor interlocks, fuse 1FU and ON/
OFF switch 1SW. Line voltage from ON/OFF
switch 1SW is also supplied to the input of the
24 VDC power supply 2SUP. The 24 VDC output of the power supply is then supplied to
11
9040 Classic for the No. 2 Process Handgun - Operation
LED1, the (+) end of relay coil K3 (mounted on
the relay board), and one of its normally open
contacts.
The output of power supply 1SUP, through PC
board fuse F2, provides the DC voltage which
powers the PC Board regulators and the AC
power ON LED. The DC input to the oscillator
circuit is obtained from a board regulator. The
oscillator circuit outputs a low voltage, high frequency AC signal to the High Voltage Multiplier
Circuit. The High Voltage Multiplier Circuit rectifies the AC voltage to DC and steps it up to provide rated kV to the spray gun via the high voltage cable.
!
CAUTION
Check that the power supply is properly
grounded!
!
2.
Turn the ON/OFF switch to the ON position. The green LED will light indicating
that AC power is being supplied to the
power supply.
3.
The voltage to the No. 2 hand gun is activated by turning the toggle switch on
the back of the gun to the ON position.
Kilovolt and Microamp Meters
The DC input to the oscillator is interlocked with
1TB terminals 6 and 7, such that the oscillator
will not function unless terminals 6 and 7 are
connected together. In this manner, high voltage to the spray gun is controlled as follows:
The kilovolt meter indicates the voltage in thousands of volts (kV) present at the bell edge.
The microamp meter indicates the current in millionths of amps (µA) leaving the bell edge.
1.
High V
oltage Safety Circuit
Voltage
Turning the ON/OFF toggle switch at the
back of the spray gun to the ON position
grounds relay board coil K3, thereby activating the coil. Activation of the coil
closes its two normally open contacts.
Closure of one set of contacts supplies
LED2 and 24 VDC to the motor. Closure of the second set of contacts connects 1TB-6 and 7 together, thereby providing high voltage to the handgun.
2.
Contact closure of a programmable controller output, robot output, or some other
user supplied device connected to terminals 1TB-6 and 7 will activate high voltage at the spray gun.
3.
For testing and troubleshooting, board
jumper JP4 connects 1TB-6 and 7 together, thereby providing high voltage
output. (See "PC Board Test Jumper" in
the "Maintenance" section of this
manual.)
OPERA
TING PROCEDURES
OPERATING
1.
12
Ensure that the AC power and high voltage cables are connected as described
in the "Installation" section of this
manual.
The 9040 Printed Circuit Board (PCB) contains
a safety circuit that prevents high voltage from
being present at the gun if the high voltage trigger device (gun toggle switch, flow switch, pressure switch, PC contact, etc.) has not been triggered. If a failure mode should occur that would
attempt to send high voltage to the gun, even
though the high voltage trigger has not been activated, the PC Board will shut down and enter
an overload condition. If repeated overloads occur, every time the overload reset button is
pushed, open the cabinet door and see if the red
LED (LED1, see Figure 7 for location) on the
PC Board lights for about 2 seconds after pushing the reset button. If it does, the PC Board
has failed and should be replaced.
High V
oltage ON Indicator
Voltage
The red high voltage on LED will light when high
voltage is present at the spray gun.
AC Power ON Indicator
The green AC power ON LED will light when the
AC Power ON/OFF switch is in the ON position.
CP-97-03.6
9040 Classic for the No. 2 Process Handgun - Maintenance
MAINTENANCE
ROUTINE PREVENTIVE
MAINTENANCE
In general, little maintenance is necessary to
ensure proper operation. It is important, however, to keep the interior of the unit clean and
free from moisture or foreign material. For this
reason:
1.
Keep the exterior of the unit free from
dust accumulation.
2.
Always clean the exterior prior to opening the cabinet door.
3.
Open the cabinet door only to perform
maintenance or repair.
4.
If the power supply end of the high voltage cable becomes dirty, clean the end
of the cable with a suitable, clean, nonpolar solvent and apply a light coat of
dielectric grease. On a yearly basis,
check to ensure that the dielectric oil
(70863-00) is covering the electrical
contact point in the High Voltage Tube.
If not, add oil as needed.
NOTE
! Squirting dielectric oil (70863-00) down
the HV Tube significantly reduces corona
discharge that can cause deterioration of
the HV connection components.
5.
PC Board T
est Jumper
Test
To assist in testing and troubleshooting, a
jumper (JP4) has been incorporated on the
9040 PC Board. By covering (shorting) both
terminals the high voltage on relay is triggered.
Thus, for testing and troubleshooting, high voltage output can be obtained without the need to
trigger the spray gun or user supplied control
device. Just remember to reposition the jumper
after testing, so that it covers only one terminal
(open) or the high voltage will stay on all the
time (see Figure 7 for location of test jumper
JP4).
!
CAUTION
! Never immerse any part of, or all of an
assembled applicator in any liquid.
CAUTION
! If JP4 is left covering (shorting) both
terminals, high voltage will be on whenever
AC power is turned on. This could be
hazardous in some applications.
Ground T
est Procedure
Test
Equipment Required:
Ohmmeter - To Measure Resistance
If shocks or sparks are noticed at any point in
the spray system, immediately turn off the
power supply and check the complete system
for proper grounding. Proper grounding of the
spray gun system can be verified as follows:
1.
Ensure that the clamp of the 14 AWG
Ground Wire Assembly is connected to
true earth ground. The resistance between the clamp and a known earth
ground should read less than 25 ohms.
2.
Place one end of the ohmmeter on the
clamp of the Ground Wire Assembly and
the other end on the Power Supply
ground stud. If the ohmeter reads
greater than 25 ohms, replace the 14
AWG Ground Wire Assembly.
Perform a Current Output (SCI) Test approximately every 50 hours of high voltage operation.
!
CP-97-03.6
TROUBLESHOOTING
13
9040 Classic for the No. 2 Process Handgun - Maintenance
3.
Connect one end of the ohmeter to the
Power Supply ground stud and the other
to the metal gun handle. If the ohmeter
reads greater than 25 ohms repair or replace the high voltage cable.
! WARNING
ALWAYS ensure step 3 has been
completed before proceeding with step 4.
!
4.
Insert the Test Resistor (16688-02) into
the High Voltage Tube of the power supply.
5.
Set the switch on the Test Assembly
(76652-02) to the µA position (if using a
VOM set the scale for 200 microamps).
6.
Connect the AC source power and turn
the power supply ON/OFF switch to the
ON position.
7.
Using the clip lead, short circuit the High
Voltage Cable Connector pin 1CON-3 to
ground (rim of High Voltage Cable Connector), as shown in the balloon of Figure 6. When proper connection is made,
the red high voltage ON Indicator will
light.
Current Output (SCI) T
est
Test
When a lack of high voltage at the applicator indicates a problem, a Current Output (SCI) Test
should be performed to help determine if the
power supply is at fault (see Figure 6).
NOTE
! If the power supply SCI is normal and
the control circuit operates correctly when
jumpered, then any lack of high voltage or
control malfunction should be isolated to
the gun and/or high voltage cable.
Equipment Required:
Test Assembly (76652-02)
Test Resistor (16688-02)
Clip Lead (User Supplied)
1.
Turn high voltage OFF and disconnect
AC power to the unit.
2.
Remove the high voltage (HV) cable
from the power supply.
! WARNING
NOTE
PC Board Test Jumper JP4 may be
used instead of the user supplied clip lead,
to trigger the high voltage on. (See "PC
Board Test Jumper", discussed earlier in
this section, for further information.)
!
8.
Read the current draw on the Test Assembly (76652-02) (or VOM). The reading should be approximately 75 to 110
microamps. Readings outside of these
limits are indications of a defective
power supply. Refer to the "Troubleshooting Guide" (Figure 9) to locate the
specific problem.
9.
Turn all power OFF, wait 10 seconds to
allow high voltage charge to drain off,
remove the Test Assembly and Resistor, and restore the unit to operating condition.
! Whenever removing high voltage cables
from equipment, ground the plug end of the
cable(s) by contacting the plug to electrical
ground. DO NOT touch the plug until it has
been grounded. This will eliminate the possibility of residual charge causing electrical shock.
3.
14
Using the 76652-02 Test Assembly with
gun test leads attached (or other suitable
VOM), connect the negative lead (white)
to the grooved, metal end of the Test
Resistor (16688-02) and the positive
lead (black) to the rim of the High Voltage Cable Connector.
CP-97-03.6
9040 Classic for the No. 2 Process Handgun - Maintenance
KV Output T
est
Test
4.
Attach the appropriate HV cable to the
Test Probe (76652-01), properly ground
the probe to a true earth ground and turn
the Test Probe Meter on (see Operation
Manual of 76652-01 Tester).
5.
Insert the Test Probe HV cable into the
Power Supply HV Tube until it bottoms
out.
When a lack of high voltage at the spray gun
indicates a problem, a kV Output Test of the
Power Supply may be performed to help determine whether it is at fault.
NOTE
! Ensure that the Test Probe HV cable
makes good contact both inside the Test
Probe and inside the Power Supply HV
Tube.
Figure 6:
6.
Turn the power supply ON
ON.
7.
Read the output voltage displayed on the
meter, then turn the power supply OFF.
If the voltage DOES READ correctly
(see "Specifications" in the "Introduction"
section of this manual), the problem is
not in the Power Supply, therefore the
HV Cable and spray gun should be
checked for the cause. If the voltage
DOES NOT READ correctly, the
problem is with the power supply. Consult the "Troubleshooting Guide" (Figure
9) to locate the specific problem.
8.
Disconnect the Test Probe (76652-01)
and reposition JP4 so that it covers only
one terminal. When ready to resume
spray operations, reconnect the spray
gun HV cable and turn the power supply
on.
Current Output Test
Equipment Required:
Calibrated Ransburg High Voltage Test Probe
and Meter (76652-01)
KV Output T
est Procedure
Test
1.
Turn AC power to the power supply
OFF.
OFF
2.
Remove the high voltage (HV) cable
from the power supply.
! WARNING
! Whenever removing high voltage cables
from equipment, ground the plug end of the
cable(s) by contacting the plug to electrical
ground. DO NOT touch the plug until it has
been grounded. This will eliminate the
possibility of residual charge causing electrical shock.
3.
Open the cabinet door and position
jumper JP4 on the main PC Board so
that it covers (shorts) both terminals.
Figure 7:
CP-97-03.6
Main PC Board
15
9040 Classic for the No. 2 Process Handgun - Maintenance
Bench T
esting
Testing
Diagnostic LED's
Equipment Required:
Volt/ohmmeter
There are two diagnostic LED's located on the
relay board inside the cabinet (see Figure 8).
LED1 is a green LED that indicates 24 VDC input is being received from power supply 2SUP.
LED1 should be lit whenever the power supply
ON/OFF switch is ON. LED2 is a red LED that
indicates 24 VDC is being output to the gun motor. LED2 should be lit whenever the toggle
switch at the back of the gun is turned ON.
The "Troubleshooting Guide" (Figure 9) provides information for troubleshooting the power
supply when improper operation is obtained and
the problem has been traced to the power supply. Proper troubleshooting should ONLY be
accomplished with specific test equipment by
qualified electronics technicians or authorized
Ransburg representatives.
! WARNING
Procedures outlined in the "Troubleshooting Guide" (Figure 9) require measurement of voltage potentials that can cause
SERIOUS BODILY INJURY if proper
measuring procedures are not followed. For
this reason, proper troubleshooting should
ONLY be accomplished with specific test
equipment by qualified electronics technicians or authorized Ransburg representatives.
!
Before troubleshooting, ensure that the power
supply is plugged into a live outlet of the appropriate voltage. All electrical measurements in
the "Troubleshooting Guide" (Figure 9) are
nominal and may vary as much as ±10% depending on the test conditions and the test
equipment used. Refer to Figures 7 and 8 for
location of parts called out in the "Troubleshooting Guide".
Figure 8:
Troubleshooting Diagram
For bench testing, jumper JP4 should be used
to trigger the high voltage output (see "PC
Board Test Jumper" previously discussed in
this section).
!
CAUTION
! The High Voltage Multiplier and high
voltage cable contain significant capacitance that will store charge. ALLOW
approximately 10 seconds for this charge
to bleed off BEFORE opening the cabinet
door OR REMOVING the high voltage
cable from the power supply or spray gun.
16
CP-97-03.6
9040 Classic for the No. 2 Process Handgun - Maintenance
TROUBLESHOOTING GUIDE
General Problem
Possible Cause
Solution
AC Power ON Indicator 1. Front panel fuse 1FU or
1. Replace defective fuse.
(Green LED) Does Not
PC Board fuse F2
Light When ON/OFF
defective
Switch Is On
2. Connector 7PL or 9PL not 2. Properly attach connector.
properly plugged into main
PC board
3. Improper input line voltage 3. Ensure voltage across terminals L1 and N of
terminal block 1TB is between 90 and 264
VAC.
4. Improper exhaust fan or
conveyor interlock
connections
4. Correct connection so that voltage across
terminals L2 and N of 1TB is between 90 and
264 VAC.
5. Defective ON/OFF switch
1SW
5. Voltage across terminals 1A and 2A of ON/OFF
switch 1SW should be between 90 and 264
VAC. If not, replace switch 1SW.
6. Defective power supply
1SUP
6. Voltage across terminals 2 and 3 of plug 7PL on
main PC board should be 18 VDC. If not,
replace power supply 1SUP.
7. Defective LED display
board
7. If all other functions of power supply are normal,
replace LED display board.
Motor Rotating, But No 1. Connector 6PL or 1PL not 1. Properly attach connector.
Or Low kV Output At
properly plugged in to
Spray Gun
respective locations
2. Defective spray gun or
high voltage cable
2. Perform a Current Output Test on the power
supply. If proper readings are obtained, check
cable or spray gun for cause. (See Spray Gun’s
Service Manual.)
3. Loose or broken wire in
power supply
3. Check all wiring connections for integrity.
Repair wiring as needed.
4. Main PC board defective
4. Disconnect 1PL from high voltage multiplier
and plug in to LTST5000 Tester. If improper
readings are obtained, replace main PC board.
5. Defective high voltage
multiplier
5. Disconnect HV cable from power supply. If
problem is still present, connect LTST5000
Tester to 1PL and test. If results of test are
okay, replace high voltage multiplier.
Figure 9:
CP-97-03.6
Troubleshooting Guide (Continued on Next Page)
17
9040 Classic for the No. 2 Process Handgun - Maintenance
General Problem
Motor Not Rotating
And No kV Output At
Spray Gun, LED1 Off
Motor Not Rotating
And No kV Output At
Spray Gun, LED1 On
Possible Cause
1. Improper input line voltage 1. Ensure voltage across terminals 1 and 2 of
to connector 8PL
connector 8PL is between 90 and 264 VAC.
2. Defective 24 VDC power
supply 2SUP
2. Voltage across terminals 1 and 6 of plug
10PL of power supply 2SUP should be
24VDC. If not, replace power supply 2SUP.
1. Defective control wires in
cable or switch in gun
1. Check for continuity from 2TB-3 of relay
board to gun handle when switch at gun is
ON. If no continuity, replace high voltage
cable or gun ON/OFF switch.
2. Defective relay board
2. If #1 above checks ok, replace relay board.
Motor Not Rotating
But kV Output Ok,
LED2 Off
1. Defective relay board fuse 1. Replace defective fuse.
F4
Motor Not Rotating
But kV Output Ok,
LED2 On
1. Defective control wires in
high voltage cable
1. Replace high voltage cable.
Intermittent Motor
Operation
1. Defective high voltage
multiplier
1. Replace high voltage multiplier.
Motor Rotating Too
Fast
1. Defective power supply
2SUP
1. Voltage across terminals 1 and 6 of plug
10PL of power supply 2SUP should be
24VDC. If not, replace power supply 2SUP.
Excessive Current
Draw
1. Short in cable or gun
1. Remove cable from power supply. If problem
goes away, check gun or cable for cause.
2. Defective main PC board
2. Test PC board with LTST5000 Tester.
Replace PC board if improper results are
obtained.
3. Defective high voltage
multiplier
3. If 1 and 2 above are okay, replace high
voltage multiplier.
1. Discontinuity in ground
circuit
1. Perform the Ground Test Procedure as
described in the "Maintenance" section of
this manual.
Excessive Shocking
Figure 9:
18
Solution
Troubleshooting Guide (Continued)
CP-97-03.6
9040 Classic for the No. 2 Process Handgun - Maintenance
Figure 10:
CP-97-03.6
9040 Classic No. 2 Power Supply Block Diagram
19
9040 Classic for the No. 2 Process Handgun - Maintenance
SERVICE LEVEL
Personnel who service this unit must be qualified electronics technicians. Replacement parts
are designed to be made at the assembly level.
See "Parts Identification" section of this manual
for part numbers and ordering information.
! WARNING
ALWAYS turn power to the power
supply OFF
OFF, unplug the electrical cord from
its outlet, remove the front panel fuse, and
lock the power supply out before making
repairs or replacements.
!
!
4.
PC Board Fuse F2
- REFER TO FIGURE 7 FOR FUSE
LOCATION
1.
Ensure power supply is unplugged from
AC outlet and open cabinet door.
2.
Replace defective fuse (see "Parts Identification" section of this manual for part
numbers).
CAUTION
NOTE
DO NOT attempt to make repairs to
the printed circuit board!
!
DO NOT attempt to make repairs
beyond those described. All others should
be made ONLY by Ransburg service
personnel.
! A spare F2 PC board fuse, included
from the factory, is located in the lower
right hand corner inside the cabinet door.
!
REPLACEMENT
PROCEDURES
3.
Front Panel Fuse 1FU
Secure cabinet door and plug power
supply back in.
ON/OFF Switch 1SW
1.
Before making replacements, check for defective wiring or connections between the affected
components. If there is a broken wire, defective
insulation, or dirty, loose or corroded connections, repair or replace them before going to the
expense of replacing a component.
1.
Insert fuse holder back into front panel
and with a slight inward pressure, rotate
screwdriver clockwise until it locks into
place.
Ensure power supply is unplugged from
AC outlet and open the cabinet door.
! WARNING
ALWAYS double check that the power
supply is unplugged from its AC outlet
before working with any internal wiring.
!
2.
Insert screwdriver into slot in front panel
fuse holder, push in, and rotate counterclockwise.
Remove the four quick connect terminals from the rear of ON/OFF switch
1SW.
NOTE
! It is recommended that the four ON/
2.
Remove screwdriver and fuse holder will
slide out.
3.
Remove fuse from fuse holder and replace with new fuse (see "Parts Identification" section of this manual for part
numbers).
20
OFF switch wires be tagged with their respective terminal connections to 1SW before removing.
3.
Press panel retaining clips on top and
bottom of switch 1SW together and push
switch out of panel from the inside.
CP-97-03.6
9040 Classic for the No. 2 Process Handgun - Maintenance
4.
Press new switch (see "Parts Identification" section of this manual for part numbers) into panel opening with terminals
1A and 2A to the bottom of the cabinet.
5.
High V
oltage Multiplier
Voltage
NOTE
! Because the high voltage multiplier
contains energy storage components that
can cause serious shock injury, it is not
field repairable. Warranty will be voided if
the high voltage multiplier seal is broken. If
the high voltage multiplier is defective, contact your authorized Ransburg representative for exchange or repair.
Reconnect the four quick connect terminals to the new switch as follows:
6.
From
To
1FU-2
1TB-N
1TB-S1
1TB-S2
1SW-1
1SW-2
1SW-1A
1SW-2A
Secure cabinet door and plug power
supply back in.
AC Line Cord
1.
Ensure power supply is unplugged from
AC outlet and open the cabinet door.
1.
Remove HV cable from power supply.
2.
Ensure power supply is unplugged from
AC outlet and open cabinet door.
3.
Unplug connector 1PL from the top of
the high voltage multiplier.
4.
Remove the screws that mount the high
voltage multipliers’ aluminum housing to
the back panel.
5.
Disconnect 8PL and 10PL from 24 VDC
power supply 2SUP and remove (4)
mounting screws from the relay board.
6.
Rotate the high voltage multiplier assembly out from the power supply.
7.
Remove the (3) screws that secure the
aluminum housing to the high voltage
multiplier.
8.
Install the aluminum housing on the new
high voltage multiplier (see "Parts Identification" section of this manual for ordering information). Ensure connector 1PL
faces the front of the housing before installing.
9.
Install the high voltage multiplier assembly in the power supply by securing the
(6) mounting screws to the back panel.
10.
Plug connector 1PL back into the high
voltage multiplier, reconnect 8PL and
10PL to 24 VDC supply 2SUP and secure the relay board.
! WARNING
ALWAYS double check that the power
supply is unplugged from its AC outlet
before working with any internal wiring.
!
2.
Using a screwdriver, disconnect damaged line cord from 1TB-L1, 1TB-N, and
1TB-GROUND.
3.
Loosen the line cord grommet on side
panel and pull damaged cord out.
4.
Insert new line cord (see "Parts Identification" section of this manual for part
numbers) through grommet and connect
to 1TB as follows:
1TB-GROUND
1TB-N
1TB-L1
Line Cord Ground
Line Cord Neutral/Common
Line Cord Hot/Line
5.
Tighten side panel grommet.
6.
Secure cabinet door and plug power
supply back in.
CP-97-03.6
21
9040 Classic for the No. 2 Process Handgun - Maintenance
11.
Secure the cabinet door and plug the
power supply back in.
12.
Reinstall the HV cable.
LED Display Board
1.
2.
Ensure power supply is unplugged from
AC outlet and open cabinet door.
Remove (2) hex nuts that mount display
board to inside of cabinet door and remove display board from power supply.
4.
Install new display board (see "Parts
Identification" section of this manual for
part numbers) in power supply.
5.
Reconnect connector 9PL to main PC
board.
Secure the cabinet door and plug the
power supply back in.
Kilovolt (kV) or
Microamp (µA) Meter
1.
2.
3.
4.
Ensure power supply is unplugged from
AC outlet and open cabinet door.
Remove (2) hex nuts from wiring terminals and remove wire lugs.
Remove (4) hex nuts that mount meter
to door.
Remove old meter and install new one.
(See "Parts Identification" section of this
manual for part numbers.)
5.
Reconnect wire lugs to meter (purple
wire goes to + terminal of meter).
6.
Secure cabinet door and plug power
supply back in.
22
1.
Ensure power supply is unplugged from
AC outlet and open cabinet door.
2.
Disconnect plugs 6PL, 7PL, and 9PL
(see Figure 7).
3.
Remove (2) screws from heat sink base
and lift the PC board out.
Unplug display board connector from
9PL on main PC board.
3.
6.
Main PC Board
!
CAUTION
DO NOT remove the PC board from
the heat sink, as it is an integrated assembly.
!
4.
Insert new PC Board (see "Parts Identification" section of this manual for part
numbers) and secure the (2) heat sink
screws.
5.
Reconnect plugs 6PL, 7PL, and 9PL.
6.
Secure cabinet door and plug power
supply back in.
Relay Board
1.
Ensure power supply is unplugged from
AC outlet and open cabinet door.
2.
Disconnect plug 2TB from the relay
board.
3.
Remove the (4) mounting screws from
the relay board.
4.
Install new relay board (see "Parts Identification" section of this manual for part
numbers) and secure mounting screws.
5.
Reconnect plug 2TB to the relay board.
6.
Secure the cabinet door and plug the
power supply back in.
CP-97-03.6
9040 Classic for the No. 2 Process Handgun - Maintenance
Power Supply 1SUP
1.
2.
Ensure power supply is unplugged from
AC outlet and open the cabinet door.
Remove the screws that mount the high
voltage multipliers’ aluminum housing to
the back panel.
5.
Disconnect plugs 8PL and 10PL from 24
VDC power supply 2SUP and remove
the (4) mounting screws from the relay
board.
6.
Rotate the high voltage multiplier assembly out from the power supply.
7.
Remove the (4) mounting screws from
the 24 VDC supply.
8.
Install the new 24 VDC supply (see
"Parts Identification" section of this
manual for part numbers). Ensure two
pin connector of 24 VDC supply is closest to bottom of unit when installing.
9.
Reinstall high voltage multiplier assembly in power supply.
10.
Plug connector 1PL back into the high
voltage multiplier. Reconnect plugs 8PL
and 10PL to the 24 VDC supply and
resecure the relay board.
11.
Secure the cabinet door, plug the power
supply back in and reinstall the HV
cable.
Remove the (4) screws from the 1SUP
power supply cover plate and remove
the plate.
! WARNING
! ALWAYS double check that the power
supply is unplugged from its AC outlet
before removing the cover plate from power
supply 1SUP.
3.
Remove connectors 11PL and 12PL
from power supply 1SUP.
4.
Remove the (4) cover plate standoffs
from power supply 1SUP and remove
the power supply from the unit.
5.
4.
Install new 1SUP power supply (see
"Parts Identification" section of this
manual for part numbers) using the (4)
cover plate standoffs. Ensure larger terminal strip (12PL) of power supply 1SUP
faces left side of unit as shown in Figure
8.
6.
Connect connectors 11PL and 12PL to
new power supply and reinstall cover
plate.
7.
Secure cabinet door and plug power
supply back in.
24 VDC Power Supply 2SUP
1.
Remove HV cable from power supply.
2.
Ensure power supply is unplugged from
AC outlet and open cabinet door.
3.
Unplug connector 1PL from the top of
the high voltage multiplier.
CP-97-03.6
23
9040 Classic for the No. 2 Process Handgun Parts Identification
PAR
TS IDENTIFICA
TION
ARTS
IDENTIFICATION
Figure 11:
24
9040 Classic No. 2 Power Supply Parts Diagram
CP-97-03.6
9040 Classic for the No. 2 Process Handgun Parts Identification
SUPPLY
PAR
ARTS
9040 CLASSIC NO. 2 POWER SUPPL
Y - P
AR
TS LIST
Item #
1
2
3
4
5
7
8
9
10
11
12
13
14
15
16
17
CP-97-03.6
Description
PC Board & Heat Sink Assembly:
For 76657-14 and 76657-142
High Voltage Multiplier:
For 76657-14 and 76657-142
ON/OFF Switch
Kilovolt (kV) Meter
Microamp (µA) Meter
18 VDC Power Supply
Fuse, PC Board, Slow Blow, 4 Amp
(See Figure 7 for Location)
Fuse, Front Panel:
Slow Blow, 1 Amp, 110-120 VAC Input
Slow Blow, 0.5 Amp, 220-240 VAC Input
AC Line Cord
Ground Wire Assembly
LED Display Board
Overload Indicator & Reset Switch Assembly:
Reset Switch, Normally Closed
Lens, Yellow
Bulb
Rubber Feet
24 VDC Power Supply
Relay Board
Fuse, Relay Board, Slow Blow, 1 Amp
11)
(Figure 1
1)
Part Number
Notation
76892-14
76304-03
76434-01
76436-91
76436-92
75337-05
LSME0082-04
72771-06
72771-01
6262-00
70539-00
76455-02
76442-01
76441-00
76443-01
5627-00
75337-04
76649-00
11689-03
1SW
1M
2M
1SUP
F2
1FU
1FU
2SUP
F4
25
9040 Classic for the No. 2 Process Handgun Parts Identification
9040 CLASSIC NO. 2 POWER SUPPL
Y
SUPPLY
SPARE
PAR
ARTS
RECOMMENDED SP
ARE P
AR
TS LIST
Description
Part Number
Ammeter
Fuse, Front Panel
Fuse, PC Board
Deluxe Test Kit
76436-92
72771-06
LSME0082-04
76652-04
1
2
1
1
1
2
1
1
2
4
2
1
2
4
2
1
Tester
LTST5000-00
1
1
1
1
Test Resistor
16688-02
1
1
1
1
High Voltage Multiplier
24 VDC Supply
Relay Board
Fuse, Relay Board
Main PC Board
18 VDC Supply
76304-03
75337-04
76649-00
11689-03
76892-14
75337-05
1
1
1
1
1
1
1
1
1
1
1
1
1
1
1
2
1
1
1
1
1
2
1
1
Figure 12:
No. of Guns
Notes
Two Required
For Troubleshooting
Purposes Only
For Troubleshooting
Purposes Only
For Troubleshooting
Purposes Only
9040 Classic High Voltage Power Supply Recommended Spare Parts List
VOLT
SUPPLY
9040 CLASSIC HIGH VOL
TAGE POWER SUPPL
Y
ACCESSORY
PAR
ARTS
ACCESSOR
Y P
AR
TS LIST
Item #
1
2
3
4
5
6
Description
Control Unit/Power Supply Test Assembly
High Voltage Test Probe and Meter
Circuit Tester
Test Assembly, SCI & Sprayability
Test Resistor, 525 Megohms
Deluxe Test Kit (Includes Items 2 & 4 above and
Paint Meter Test Probe)
Figure 13:
26
Part Number
LTST5000-00
76652-01
20868-00
76652-02
16688-02
76652-04
Notation
9040 Classic High Voltage Power Supply Accessory Parts List
CP-97-03.6
9040 Classic for the No. 2 Process Handgun Parts Identification
NOTES:
CP-97-03.6
27
9040 Classic for the No. 2 Process Handgun Warranty Policies
WARRANTY POLICIES
LIMITED W
ARRANTY
WARRANTY
Ransburg will replace or repair without charge
any part and/or equipment that falls within the
specified time (see below) because of faulty
workmanship or material, provided that the
equipment has been used and maintained in accordance with Ransburg's written safety and
operating instructions, and has been used under
normal operating conditions. Normal wear items
are excluded.
THE USE OF OTHER THAN RANSBURG
APPROVED PARTS, VOID ALL WARRANTIES.
SPARE PARTS: One hundred and eighty (180)
days from date of purchase, except for rebuilt
parts (any part number ending in "R") for which
the warranty period is ninety (90) days.
EQUIPMENT: When purchased as a complete
unit, (i.e., guns, power supplies, control units,
etc.), is one (1) year from date of purchase.
WRAPPING THE APPLICATOR, ASSOCIATED VALVES AND TUBING, AND
SUPPORTING HARDWARE IN PLASTIC,
SHRINK-WRAP, OR ANY OTHER NONAPPROVED COVERING, WILL VOID
THIS WARRANTY.
RANSBURG'S ONLY OBLIGATION UNDER THIS WARRANTY IS TO REPLACE
PARTS THAT HAVE FAILED BECAUSE
OF FAULTY WORKMANSHIP OR MATERIALS. THERE ARE NO IMPLIED WARRANTIES NOR WARRANTIES OF EITHER MERCHANTABILITY OR FITNESS
FOR A PARTICULAR PURPOSE.
RANSBURG ASSUMES NO LIABILITY
FOR INJURY, DAMAGE TO PROPERTY
OR FOR CONSEQUENTIAL DAMAGES
FOR LOSS OF GOODWILL OR PRODUCTION OR INCOME, WHICH RESULT FROM USE OR MISUSE OF THE
EQUIPMENT BY PURCHASER OR OTHERS.
EXCLUSIONS:
If, in Ransburg's opinion the warranty item in
question, or other items damaged by this part
was improperly installed, operated or maintained, Ransburg will assume no responsibility
for repair or replacement of the item or items.
The purchaser, therefore will assume all responsibility for any cost of repair or replacement
and service related costs if applicable.
FLUID HANDLING: One (1) year from date of
purchase (i.e., Totalizer, CCV Valves, etc.).
AIR BEARING ROTATORS: Fifteen thousand
(15,000) hours or three (3) years, whichever occurs first. Warranty period begins on the date of
purchase.
28
CP-97-03.6
9040 Classic for the No. 2 Process Handgun - Appendix
APPENDIX
PAINT AND SOL
VENT SPECIFICA
TIONS
SOLVENT
SPECIFICATIONS
RECOMMENDED VISCOSITY USING A ZAHN NO. 2
PAINT ELECTRICAL RESISTANCE**
RECOMMENDED DELIVERY (UP TO)
REA TM / EFM TM
18 TO 30 SEC
.1 MΩ TO ∞
1000 cc/min
REM TM / M90 TM NO. 2 HAND GUN TURBODISK T M
20 TO 60 SEC
18 TO 30 SEC
20 TO 60 SEC
.1 TO 1 MΩ
.1 MΩ TO ∞
.1 MΩ TO ∞
1500 cc/min
1000 cc/min
180 cc/min
AEROBELL ® II***
AEROBELL®
AEROBELL ® 33
RMA-101 T M
20 TO 60 SEC
.1 MΩ TO ∞
500 cc/min
GUIDE T
O USABLE SOL
VENT SELECTION
TO
SOLVENT
Chemical
Name
Common
Name
Category
Methylene Chloride Chlorinated Solvents
DICHLOROMETHANE
Aliphatic Hydrocarbons
Naptha
VM & P NAPHTHA
Ketones
ACETONE
Esters
METHYL ACETATE
Aromatic Hydrocarbons
BENZENE
Esters
ETHYL ACETATE
Ketones
MEK
2-BUTANONE
Esters
ISO-PROPYL ACETATE
Alcohols
IPA
ISOPROPYL ALCOHOL
Ketones
MPK
2-PENTANONE
Alcohols
Methyl Alcohol
METHANOL
Esters
n-Propyl Acetate
PROPYL ACETATE
Aromatic Hydrocarbons
Toluene
TOLUOL
Ketones
MIBK
METHYL ISOBUTYL KETONE
Esters
ISOBUTYL ACETATE
Alcohols
Ethyl Alcohol
ETHANOL
ACETA
BUTYL ACET
ATE
Esters
ETHYLBENZENE
Aromatic Hydrocarbons
n-Propyl Alcohol
1-PROPANOL
Alcohols
sec.-Butyl Alcohol
2-BUTANOL
Alcohols
Xylene
XYLOL
Aromatic Hydrocarbons
AMYL ACETATE
Esters
iso-Butyl Alcohol
2-METHYLPROPANOL
Alcohols
METHYL AMYL ACETATE
Esters
MIAK
5-METHYL-2-HEXANONE
Ketones
n-Butyl Alcohol
1-BUTANOL
Alcohols
2-ETHOXYETHANOL
Glycol Ethers
MAK
2-HEPTANONE
Ketones
CYCLOHEXANONE
Ketones
SC#100
AROMATIC-100
Aromatic Hydrocarbons
DIBK
DIISOBUTYL KETONE
Ketones
Amyl Alcohol
1-PENTANOL
Alcohols
DIACETONE ALCOHOL
Ketones
Butyl Cellosolve
2-BUTOXYETHANOL
Glycol Ethers
CYCLOHEXANOL
Alcohols
SC#150
AROMATIC-150
Aromatic Hydrocarbons
AROMATIC-200
Aromatic Hydrocarbons
Flash Point †† *CAS
Number
(TCC)
75-09-2
8030-30-6
65oF
67-64-1
-18oF
79-20-9
90oF
71-43-2
12oF
141-78-6
24oF
78-93-3
16oF
108-21-4
35oF
67-63-0
53oF
107-87-9
104oF
67-56-1
50oF
109-60-4
55oF
108-88-3
48oF
108-10-1
60oF
110-19-0
69oF
64-17-5
7 8 oF
123-86-4
64oF
100-41-4
74oF
71-23-8
78-92-2
72oF
1330-02-07
79oF
628-63-7
106oF
78-83-1
82oF
108-84-9
96oF
110-12-3
96oF
71-36-3
95oF
110-80-5
164oF
110-43-0
102oF
108-94-1
111oF
111oF
108-83-8
120oF
71-41-0
123-42-2
133oF
111-76-2
154oF
108-93-0
111oF
149oF
203oF
Evap.
Rate†
14.5
10
5.6
5.3
5.1
3.9
3.8
3.4
2.5
2.5
2.1
2.1
1.9
1.6
1.5
1.4
1.0
.89
.86
.81
.80
.67
.62
.50
.50
.43
.38
.40
.29
.20
.19
.15
.12
.07
.05
.004
.003
⇑F
A
S
T
E
R
S
L
O
W
E
R
⇓
Elec.
Res.**
HIGH
HIGH
LOW
LOW
HIGH
MEDIUM
MEDIUM
LOW
LOW
MEDIUM
LOW
LOW
HIGH
MEDIUM
LOW
LOW
LOW
HIGH
LOW
LOW
HIGH
MEDIUM
LOW
LOW
MEDIUM
LOW
LOW
MEDIUM
MEDIUM
HIGH
MEDIUM
LOW
LOW
LOW
LOW
HIGH
HIGH
* CAS Number: Chemical Abstract Service Number.
© 04/2003 Illinois Tool Works Inc. All rights reserved.
** Electrical Resistance using the Ransburg Meter.
*** Solvent Base Configuration Only.
†
Information Obtained From: http://solvdb.ncms.org
††
The lowest temperature at which a volatile fluid will ignite.
Evaporation Rate is Based Upon Butyl Acetate Having a Rate of 1.0
NOTE: Chart provides resistance and control information that we feel is necessary when using Ransburg equipment.
CP-97-03.6
29
9040 Classic for the No. 2 Process Handgun - Appendix
30
15
12
10
.25
25
37
14
35
17
15
12 A-2
.3
30
43
15
39
18
19
14 A-1
.4
40
50
16
50
21
25
18
.5
50
57
17
24
29
22
.6
60
64
18
29
33
25
.7
70
20
33
36
28
.8
80
22
39
41
31
.9
90
23
44
45
32
1.0
100
25
50
50
34
1.2
120
30
62
58
1.4
140
32
66
1.6
160
1.8
2.0
2.2
A
Din Cup 4
13
Sears
Craftsman Cup
32
Zahn 5
20
Zahn 4
.2
Zahn 3
8 A-3
Zahn 2
5 A-4
25
Zahn 1
20
12
Saybolt
Universal SSU
11
30
Gardner Lithographic
Krebs Unit
KU
Gardner Holdt Bubble
Ford Cup 4
Ford Cup 3
27
15
Fisher 2
DuPont
Parlin 10
10
Fisher 1
DuPont
Parlin 7
.1
.15
Poise
30
Centipoise
VISCOSITY CONVERSION CHART
60
30
16
10
80
34
17
11
100
37
18
12
130
41
19
13
160
44
20
14
210
52
22
19
15
30
260
60
24
20
16
33
320
68
27
21
18
35
370
30
23
21
37
430
34
24
23
38
480
37
10
26
25
D
40
530
41
12
10
27
27
41
E
43
580
49
14
11
31
31
45
F
46
690
58
16
13
34
34
37
50
G
48
790
66
18
14
38
38
180
41
54
50
900
74
20
16
40
43
200
45
58
H
52
1000
82
23
17
10
44
46
220
62
I
54
1100
25
18
11
51
2.4
240
65
J
56
1200
27
20
12
55
2.6
260
68
58
1280
30
21
13
58
2.8
280
70
K
59
1380
32
22
14
63
3.0
300
74
L
60
1475
34
24
15
68
3.2
320
M
1530
36
25
16
72
3.4
340
N
1630
39
26
17
76
3.6
360
O
62
1730
41
28
18
82
3.8
380
1850
43
29
19
86
4.0
400
P
64
1950
46
30
20
90
4.2
420
2050
48
32
21
95
4.4
440
Q
4.6
460
R
4.8
480
5.0
500
5.5
B
C
000
2160
50
33
22
100
66
2270
52
34
23
104
67
2380
54
36
24
109
S
68
2480
57
37
25
112
550
T
69
2660
63
40
27
124
6.0
600
U
71
2900
68
44
30
135
7.0
700
74
3375
51
35
160
8.0
800
77
3380
58
40
172
9.0
900
V
81
4300
64
45
195
10.0 1000
W
85
4600
49
218
11.0 1100
88
5200
55
12.0 1200
92
5620
59
00
0
CP-97-03.6
9040 Classic for the No. 2 Process Handgun - Appendix
X
14.0 1400
18.0 1800
1
Y
103
9850
22.0 2200
10300
Z
2
24.0 2400
Z-1
3
Din Cup 4
Sears
Craftsman Cup
129 16500
133 18500
Z-3
136 21000
23500
55.0 5500
26000
Z-4
4
2800
65.0 6500
30000
70.0 7000
32500
75.0 7500
35000
80.0 8000
37000
85.0 8500
39500
90.0 9000
41000
95.0 9500
43000
Z-5
5
46500
110.0 11000
51000
120.0 12000
55005
130.0 13000
60000
140.0 14000
65000
150.0 15000
Zahn 5
121 14500
Z-2
50.0 5000
100.0 10000
Zahn 4
114 11600
40.0 4000
60.0 6000
105 10750
109 11200
30.0 3000
45.0 4500
Zahn 3
9400
21.0 2100
35.0 3500
Zahn 2
9000
20.0 2000
25.0 2500
64
8500
19.0 1900
23.0 2300
Zahn 1
Saybolt
Universal SSU
8000
Gardner Holdt Bubble
101
Ford Cup 4
7500
17.0 1700
Ford Cup 3
7000
100
Fisher 2
98
16.0 1600
Fisher 1
15.0 1500
DuPont
Parlin 10
6480
13.0 1300
DuPont
Parlin 7
6100
96
Centipoise
95
Poise
Gardner Lithographic
Krebs Unit
KU
VISCOSITY CONVERSION CHART (Continued)
Z-6
67500
160.0 16000
74000
170.0 17000
83500
180.0 18000
83500
190.0 19000
88000
200.0 20000
93000
300.0 30000
140000
Note: All viscosity comparisons are as accurate as possible with existing information.
Comparisons are made with a material having a specific gravity of 1.0.
CP-97-03.6
31
9040 Classic for the No. 2 Process Handgunf - Appendix
VOLUMETRIC CONTENT OF HOSE OR TUBE
(English Units)
Cross
Section
Length
(in. 2 )
5ft. (60") 10ft. (120") 15ft. (180") 25ft. (300") 50ft. (600")
I.D.
(inches)
cc/ft.
1/8
2.4
.012
3/16
5.4
.028
1/4
9.7
.049
5/16
15.1
.077
3/8
21.7
.110
1/2
38.6
.196
.003 gal.
.4 fl. oz.
.007 gal.
.9 fl. oz.
.013 gal.
1.6 fl. oz.
.020 gal.
2.5 fl. oz.
.029 gal.
3.7 fl. oz.
.051 gal.
6.5 fl. oz.
.006 gal.
.8 fl. oz.
.014 gal.
1.8 fl. oz.
.025 gal.
3.3 fl. oz.
.040 gal.
5.1 fl. oz.
.057 gal.
7.3 fl. oz.
.102 gal.
13.1 fl. oz.
.010 gal.
1.2 fl. oz.
.022 gal.
2.8 fl. oz.
.038 gal.
4.9 fl. oz.
.060 gal.
7.6 fl. oz.
.086 gal.
11.0 fl. oz.
.153 gal.
19.6 fl. oz.
.016 gal.
2.0 fl. oz.
.036 gal.
4.6 fl. oz.
.064 gal.
8.2 fl. oz.
.100 gal.
12.7 fl. oz.
.143 gal.
18.4 fl. oz.
.255 gal.
32.6 fl. oz.
.032 gal.
4.1 fl. oz.
.072 gal.
9.2 fl. oz.
.127 gal.
16.3 fl. oz.
.199 gal.
25.5 fl. oz.
.287 gal.
36.7 fl. oz.
.510 gal.
65.3 fl. oz.
VOLUMETRIC CONTENT OF HOSE OR TUBE
(Metric Units)
32
I.D.
(mm)
cc/m
3.6
Cross
Section
Length
(mm 2 )
1.5m
3.0m
4.5m
6.0m
7.5m
10.2
10.2
15.3 cc
30.5 cc
45.8 cc
61.1 cc
76.3 cc
5.6
24.6
24.6
36.9 cc
73.9 cc
110.8 cc
147.8 cc
184.7 cc
6.8
36.3
36.3
54.5 cc
109.0 cc
163.4 cc
217.9 cc
272.4 cc
8.8
60.8
60.8
91.2 cc
182.5 cc
273.7 cc
364.9 cc
456.2 cc
CP-97-03.6
9040 Classic for the No. 2 Process Handgun - Appendix
Date
kV Output Test
Pages 16 & 17 / Yearly
Figure 14:
CP-97-03.6
Ground Test
Pages 15 & 16 / Yearly
kV Output Test & Ground Test Log
33
NOTES:
CP-97-03.6
MANUAL CHANGE SUMMAR
Y
SUMMARY
This manual was published to replace Service
Manual CP-97-03.5
CP-97-03.5, 9040 Classic High
Voltage Power Supply for the No. 2 Process
Handgun, to make the following changes:
1.
CP-97-03.6
Revised "Paint and Solvent Specifications"
in the "Appendix" section.
Service Manual Price: $30.00 (U.S.)
Manufacturing
1910 North Wayne Street
Angola, Indiana 46703-9100
Telephone: 260/665-8800
Fax: 260/665-8516
Technical/Service Assistance
Automotive Assembly and Tier I
Industrial Systems
Ransburg Guns
Telephone: 800/ 626-3565 Fax: 419/ 470-2040
Telephone: 800/ 233-3366 Fax: 419/ 470-2071
Telephone: 800/ 233-3366 Fax: 419/ 470-2071
Technical Support Representative will direct you to the appropriate telephone number
for ordering Spare Parts.
© 2004 Illinois Tool Works Inc. All rights reserved.
Models and specifications subject to change without notice.
Form No. CP-97-03.6
10/04