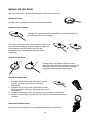
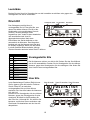
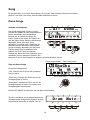
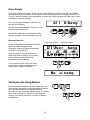
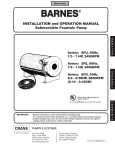
1
DD-503 E-Drum Set
Bedienungsanleitung
00030676
Version 12/2014
Sicherheitshinweise
Jede Veränderung oder Modifikation an der Bauweise dieses Gerätes, die nicht ausdrücklich vom
Hersteller genehmigt ist, kann den Garantieanspruch beeinträchtigen.
Bitte beachten Sie:
Wenn Sie elektrische Geräte benutzen, sollten Sie stets die Sicherheitsvorschriften befolgen,
inklusive der folgenden:
Das Gerät wurde getestet und im Einklang mit den Beschränkungen für Klasse B Geräte (Teil 15
der FCC-Bestimmungen) befunden. Außerdem entspricht es folgenden Standards:
EN55022-2006
EN55024:1998/+A1:2001/+A2:2003
EN55013:2001/+A1:2003/+A3:2006
EN55020:2007
EN61000-3-2:2006 EN61000-3-3:1995/+A1:2001/+A2:2003
Diese Richtlinien schützen den Anwender vor gefährlichen Interferenzen. Das Gerät generiert
Radiowellen und strahlt sie ab, was gefährlich sein kann, wenn das Gerät nicht in
Übereinstimmung mit den Vorgaben installiert und benutzt wird. Sollte dieses Gerät Ihren Radiooder Fernsehempfang stören, was durch an- und abschalten des Geräts überprüft werden kann,
können Sie mit folgenden Maßnahmen für Abhilfe sorgen:
- Stellen Sie die Empfangsantenne anders oder an einem anderen Ort auf.
- Vergrößern Sie den Abstand zwischen Gerät und Receiver.
- Verbinden Sie das Gerät mit einem anderen Stromkreis.
- Ersuchen Sie Ihren Händler oder einen Radio-Fernsehtechniker um Hilfe.
2
Informationen zu Handhabung und Pflege
Service
• Öffnen Sie niemals das Gehäuse Ihres Gerätes!
• Das Produkt sollte von einer Fachwerkstatt gewartet werden wenn
• ein Kabel oder das Netzteil beschädigt wurden
• Feuchtigkeit oder Näss in das Sound-Modul gelangt ist
• das Instrument nicht wie gewohnt oder auffällig anders funktioniert
• das Instrument fallen gelassen worden ist oder das Gehäuse beschädigt wurde
Handling und Transport
• Benutzen Sie niemals Gewalt an den Reglern, Verbindungen oder anderen Teilen des
Instrumentes.
• Reißen Sie nicht an den Steckern, sondern ziehen Sie diese vorsichtig heraus.
• Lösen sie alle Kabelverbindungen, bevor Sie das Gerät transportieren.
• Vermeiden Sie physische Erschütterungen durch Schütteln oder fallen lassen.
• Legen Sie keine schweren Gegenstände auf dem Instrument ab, dies kann zu Kratzern oder
ernsteren Schäden führen.
Reinigung
• Säubern Sie das Gerät mit einem trockenen, weichen Tuch.
• Um hartnäckige Verschmutzungen zu entfernen, benutzen Sie ein leicht angefeuchtetes Tuch.
• Benutzen Sie niemals Alkohol oder chemische Reinigungsmittel.
• Vermeiden Sie das Ablegen von Vinyl auf der Oberfläche (Vinyl verklebt und verfärbt die
Oberfläche).
Standort
Um ernsthafte Schäden, Verfärbungen und Fehlfunktionen zu vermeiden, setzen Sie ihr Gerät
niemals folgenden Umweltbedingungen aus:
• Direktes Sonnenlicht
• Hohe Temperaturen (nahe Heizkörpern oder tagsüber im Auto)
• Hohe Luftfeuchtigkeit
• übermäßiger Staub
• Feuchtigkeit und Nässe
• Starke Vibrationen
Stromversorgung
• Benutzen Sie ausschließlich das beiliegende Netzteil.
• Schalten Sie das Gerät aus, wenn Sie es nicht benutzen.
• Um Schaden am Gerät oder an anderen verbundenen Geräten zu vermeiden, schalten Sie alle
Stromversorgungen aus, wenn Sie die Verkabelung vornehmen oder lösen.
• Trennen Sie das Gerät vom Strom, wenn das Netzteil beschädigt ist oder Flüssigkeit in das
Gerät gelangt ist.
• Schalten Sie das Gerät nicht kurz hintereinander aus und wieder ein, das belastet die
elektronischen Komponenten.
• Benutzen Sie das Gerät nicht an der gleichen Steckdose wie andere Geräte mit hohem
Energieverbrauch, wie elektrischen Heizkörpern oder Öfen.
3
Inhaltsverzeichnis
Informationen zu Handhabung und Pflege
3
Inhaltsverzeichnis
4
Aufbau
5
Rack-System
5
Aufbau des Racks
7
Zusammenbau der Komponenten
8
Sound-Modul
10
Bedienfeld
10
Anschlüsse
11
Spielen
11
Einschalten
11
Spielen mit den Pads
12
Lautstärke
13
Drum Kit
13
Voreingestellte Kits
13
User Kits
13
Song
14
Demo-Songs
14
User-Songs
15
Verlassen des Song-Modus
15
Metronom
16
Drum Kit Bearbeitung
17
Set Up
21
Reset
24
Aufnahme
26
Aufnehmen
26
Abspielen und speichern
26
Löschen eines Songs
26
USB und MIDI
27
Übersicht über die Sounds
28
Spezifikationen
29
WEEE-Erklärung / Entsorgung
30
Herstellerangaben
30
4
Aufbau
Die Zeichnung zeigt ein komplettes Drum Kit nach dem Aufbau.
Netzteil und Kabel sind nicht abgebildet.
Rack-System
5
Gefaltetes Rack im Paket
6
Aufbau des Racks
1. Breiten Sie die Arme des Racks aus, positionieren Sie Arme und Cross Beam und ziehen Sie
dann die Flügelschrauben fest.
2. Bauen Sie den rechten und linken Fuß an, so dass die Füße fest auf dem Boden stehen und
ziehen Sie die Flügelschrauben fest.
3. Drehen und bewegen Sie die Pad-Klammern in die richtige Position.
4. Drehen Sie den L-Rod in die richtige Position und ziehen Sie abschließend die
Flügelschrauben fest.
5. Setzen Sie den Cymbal-Rod ein und passen Sie seine Position an.
6. Bewegen und drehen Sie die Cymbal-Klammern in die richtige Position und ziehen Sie die
Flügelschrauben fest.
7
Zusammenbau der Komponenten
Hi-Hat
1. Entfernen Sie Flügelschraube, Beilagscheibe und Filz.
2. Setzen Sie das Hi-Hat auf den Stab, ziehen Sie Filz und Beilagscheibe
darüber und befestigen Sie die die Flügelschraube.
3. Justieren Sie Winkel und Höhe des Stabes und ziehen Sie die
Flügelschraube fest.
Crash und Ride
1.Entfernen Sie Flügelschraube, Beilagscheibe und Filz.
2.Setzen Sie das Becken auf den Stab, ziehen Sie Filz und Beilagscheibe
darüber und befestigen Sie die Flügelschraube mit etwas Spielraum, um ein
leichtes Schwingen des Beckens zu ermöglichen.
3.Justieren Sie den Winkel des Stabes und ziehen Sie die Flügelschraube
fest.
Bitte beachten Sie, dass Crash und Ride unterschiedliche
Teilenummern haben!
Snare
1. Setzen Sie die Snare auf den L-förmigen Stab und ziehen Sie die
Flügelschraube fest.
2. Justieren Sie den Winkel des Stabes und ziehen Sie die
Flügelschraube in der Klammer an.
Tom
1. Setzen Sie die Snare auf den L-förmigen Stab und ziehen Sie die
Flügelschraube fest.
2. Justieren Sie den Winkel des Stabes und ziehen Sie die
Flügelschraube in der Klammer an.
Alle Toms nutzen das gleiche Pad.
8
Fußmaschine
1. Bringen Sie die Löcher von Ständer (2)
und Halter (1) auf gleiche Höhe, setzen
Sie die Schrauben ein und befestigen
Sie sie.
2. Setzen Sie die Zunge des Ständers in
den passenden Spalt im Pedal (3).
Ziehen Sie die Flügelschraube am
Pedal an um es zu fixieren.
Sound-Modul
1. Bringen Sie die Löcher von Halter und Sound-Modul auf gleiche
Höhe, setzen Sie die Schrauben ein und befestigen Sie sie.
2. Setzen Sie den Stab des Halters in die Klammer und ziehen Sie
dann die Flügelschraube an.
Fertigstellung
Bringen Sie Arme, Klammern und Stäbe in die für Sie angenehmste Spielposition.
Anschlüsse
Eine Anleitung für die elektronischen Anschlüsse finden Sie im nächsten Kapitel.
9
SOUND MODULE
Sound-Modul
CONTROL PANEL
DD 503
2
3
1
4
9
10
5
11
6
12
7
13
8
14
15
16
(1) DISPLAY: The screen displays such as kit number, names and other information.
Bedienfeld
(2) POWER: Turns ON/OFF the sound module.
NOTE: When you turn the power off, do not turn it on immediately. Wait at least five seconds to turn
1. Display:
Hieron
können
Kit Nummer,
Sound Nummer, etc. ablesen.
the power
so thatSie
the Informationen,
electronic circuitswie
canz.B.
properly
reset.
The
sound
module
will
shut
down
automatically
if
there
is
no
operation
20 minutes,
in order to save
2. POWER: An-/Ausschaltknopf des Sound-Moduls. Bitte warten Sieinnach
dem Ausschalten
des
energy.
To
disable
this
function,
power
on
the
module
while
pressing
on
snare
rim.
Moduls mindestens fünf Sekunden bevor Sie es erneut einschalten! Diese Zeitspanne
VOL: um
Rotate
knob to adjust the
output
headphone
line out.
(3) HEADPHONE
benötigen
die Schaltkreise
sichthis
zurückzusetzen.
Wenn
Sielevel
das of
Modul
länger and
als 20
Rotate
it
clockwise
to
increase
volume.
Minuten nicht benutzen, schaltet es sich automatisch ab um Energie zu sparen. Wenn Sie
(4) EDIT: Press this button to configure drum kits.
diese
Funktion deaktivieren möchten, drücken Sie während des Einschaltens auf den Snare
(5) SETUP: Press this button to edit system parameters.
Rim.
(6) MODE: Press to change the playing mode for demo songs.
3. VOLUME:
Drehen
Sieand
diesen
Knopf
um die Lautstärke für Kopfhörer und Line Out
(7) CLICK:
Switch
set up
the metronome.
anzupassen.
Das
Drehen
im
Uhrzeigersinn
bewirkt
eine songs.
Erhöhung der Lautstärke.
(8) TEMPO: Change the speed of metronome
and demo
4. EDIT:
Sietodiesen
(9) Drücken
KIT: Press
select Knopf
kits. um die Einstellungen für die Drum Kits zu konfigurieren.
(10)
Press
play demo
songs
user songs.
5. SET
UP:DEMO:
Drücken
Sietodiesen
Knopf
um and
die System-Parameter
einzustellen.
or
enter
submenu.
(11)
ENTER:
To
confirm
operation
6. MODE: Drücken Sie diesen Knopf um den Abspielmodus der Demosongs zu verändern.
(12) Zum
SCROLL
WHEEL:
Rotate to
change
value, kit, or demo. Press this button to adjust master
7. CLICK:
An- und
Abschalten
des
Metronoms.
volume.
8. TEMPO: Mit dieser Taste können Sie das Tempo des Metronoms ändern, auch für Aufnahme
(13) EXIT: To cancel operation or back to root menu.
und(14)
Pattern.
Record button: Press it to record user songs.
9. KIT:(15)
Durch Drücken
TastePress
können
Sieplaying
die Kitscurrent
auswählen.
Play and dieser
stop button.
to stop
song or recording. For details, please
10. DEMO:
Drücken
Sie
diesen
Knopf
um
Demound
Usersongs
abzuspielen.
refer to related chapter.
11. ENTER:
Dieser
Knopf dient
zurmode,
Bestätigung
einerbuttons
Eingabe
oder and
zumlisten
Aufrufen
(16) ¨PAD
BUTTONS:
In edit
press these
to select
to theeines
corresponding
pad.
Untermenüs.
12. SCROLL WHEEL: Drehen Sie diesen Knopf um Einstellungen für Werte, Kits oder Demo zu
verändern. Drücken Sie den Knopf um die Gesamtlautstärke anzupassen.
5
13. EXIT: Hiermit können Sie Befehle abbrechen oder zum Hauptmenü zurück gelangen.
14. RECORD: Drücken Sie den Knopf um eine Aufnahme zu starten.
15. PLAY und STOP: Drücken Sie den Knopf um einen Song oder eine Aufnahme abzuspielen.
Weitere Informationen finden Sie im entsprechenden Kapitel.
16. Pad-Auswahltasten: Drücken Sie einen der Knöpfe im Bearbeitungsmodus um ein Pad
auszuwählen und den Sound zu hören.
10
SOUND MODULE
Anschlüsse
BACK PANEL
HEADPHONE LINEIN
1
2
L/MONO
R
TRIGGER
USB
DC9V
3
4
5
6
7
(1) HEADPHONE: This is the headphone output of the sound module. Connect a 1/8¡± TRS cable
to this output.
1. (2)
HEADPHONE:
Dies
ist der
Kopfhörer-Ausgang
des Sound-Moduls.
Sie können
hier einen
LINEIN: Analog
input
socket
of the sound module,
1/8¡± TRS. An extra
1/8¡± male
to male
Kopfhörer
mit
einem
3,5“-Klinkenstecker
anschließen.
cable will be needed if you want connect your sound module to any sound source such as iPod,
2. CD
LINE
IN: An
dieser
Buchse
können Sie
über
einen
3,5“ Klinkenstecker
iPod,
CD-Player,
player,
mobile
phone
or computer.
Play
and
practice
with your favorite
music.
Smartphone oder Computer anschließen. Sie können mit Ihrer Lieblingsmusik spielen.
(3) - (4) L/MONO, R: Line output of the sound module. Connect this output to any amplifier using 1/
3. L/Mono: Wenn Sie einen einzelne Verstärkung nutzen, schließen Sie sie bitte nur an dieser
4” TS cable. While using single amplifier, please connect L/MONO only.
Buchse an.
(5) TRIGGER: Trigger inputs socket of sound module. Connect the multi-trigger connector (AKA
4. L/Mono und L/Mono, R: Line-Ausgang des Sound-Moduls. Sie können an diesen Buchse ein
25pin connector) to this socket and lock it. There tags on all cables. Connect all cables to their
externes Verstärkersystem mit Hilfe eines 1/4“-Kabels anschließen.
according
to their
tags.Hi-Hat-Pedal haben beschriftete Kabel, die in einem einzigen
5. instrument
TRIGGER:
Jedes Pad
und das
(6)
USB:
Connect
standard
B
cable toSie
this
socket
gaming, recording
and using
Anschluss zusammengefassttype
sind.USB
Schließen
zuerst
diefor,
Komponenten
an undMIDI
verbinden
plug-ins
for more sound
on computer.
Sie abschließend
das andere
Ende (AKA 25 pin) mit dieser Buchse und schrauben Sie es fest.
(7)
DC
9V:
Connect
the
DCdas
9V power
adapter
thisUSB-Port
socket. Ihres Computers
6. USB-Buchse: Hierüber included
können Sie
Gerät direkt
anto
den
anschließen (Standard-USB-Kabel, Typ B).
7. Anschlussbuchse für das beiliegende Netzteil, DC 9V.
Spielen
Einschalten
1. Drosseln Sie bitte die Lautstärke der mit dem Schlagzeug verbundenen Sound-Quelle.
2. Schalten Sie das Gerät ein (POWER). Schlagen Sie unterdessen nicht auf ein Pad und
betätigen Sie kein Pedal.
3. Schalten Sie externe Geräte ein.
4. Schlagen Sie auf ein Pad und passen Sie die Lautstärke an.
6
11
All pads have striking force sensitivity feature.
Strike the pad harder to make higher volume and
strike the pad softer to make lower volume.
Playing Tom Drum
Strike the central position to make sound.
Spielen mit den Pads
Playing Tom Drum
(2
Strike the central position to make sound.
All pads have striking force sensitivity feature.H
Playing Hi-Hat
(3
Strike thethe
pad
harder to make higher volume and
(1) Strike the Hi-Hat pad without pressing
Hi-Hat
strike
the pad softer to make lower volume. co
control pedal to make open Hi-Hat
sound.
cl
(2) Strike the Hi-Hat pad with fully pressing the Hi(4
Tom Drum
Hat control pedal to make closePlaying
Hi-Hat sound.
pe
Strike the
(3) Strike the Hi-Hat pad while pressing
thecentral
Hi-Hatposition to make sound.
Alle Pads sind sensitiv: je fester Sie schlagen, umso lauter der Sound.
Spielen mit Toms
control pedal gradually to make consecutive open to
close Hi-Hat sound. Playing Cymbal
(4) Press the Hi-Hat pedal
down
quickly
to make
Strike
rubber
area
of theHi-Hat
crash and ride pad to make
pedal sound.
cymbal sound.
Schlagen Sie in die Mitte des Pads um Sound zu erzeugen.
Pl
Pr
Playing Cymbal
so
Strike rubber area of the crash and ride pad to m
cymbal sound.
Playing Cymbal
Strike rubber area of the crash and ride pad to make
Spielen mit den Cymbals
cymbal sound.
PLAY PAD PLAY PAD
Drum
Schlagen SiePlaying
auf denKick
gummierten
Bereich
vonchoke
Crashfeature.
oder Ride
The
crash has
Strikeum
the crash
Press thezu
Kick
drum pedal
to
make
kick
drum
einen Becken-Sound
erzeugen.
pad, its sound will sustain. Then squeeze the
ON THE POWER Playing SnarePlaying
TURN ON THETURN
POWER
Drum Snare Drum
sound.
edge portionStrike
to mute
sound.
thethe
central
(head)
of the pad to
Strike the central position
(head)position
of the pad
to make
head
sound,
strike
the
rim
of
the
pad
to make
(1) Adjust
volume
of external
audio device
connected
head
sound, strike the rim of the pad to make rim
(1) Adjust volume
of external
audio
device connected
sound.
with
the
drum to lower level.
sound.
with
the drum
to
lower
level.
The crash has choke
feature.
Strike
the
crash
(2) Press
the
POWER
button
while
Head
(2) Press
the über
POWER
while don’t
strike
paddon’t
or strike pad orThe crash
Head has choke
Rim the crash R
pad, its sound
sustain.
Then
squeeze
the
Daswill
Crash
verfügt
einebutton
Choke-Funktion.
Wenn
Sie
feature. Strike
press
the
Hi-Hat
control
pedal.
press
the
Hi-Hat
control
pedal.
edge portionauf
to mute
the sound.
das Becken
schlagen, wird ein Sustain erzeugt, das
pad, its sound will sustain. Then squeeze the
(3) Turn
on external
(3) Turn on lassen
external
devices
connected.
Sie verstummen
können,
wenndevices
Sie denconnected.
edge portion to mute the sound.
(4) Strike
adjust
the volume
(4) Strike
pad
and
adjustpad
the and
volume
to proper
level.to proper level.
Randbereich
des
Crash-Beckens
drücken
(siehe
Zeichnung).
Ro
PLAYING PADS
PLAYING PADS
th
Playing Snare Drum
th
Strike the central position (head) of the pad to make
All of
pads
have
striking
force
sensitivityMASTER
feature. VOLUME
Spielen
der
Snare
Allmit
pads
have
striking
sensitivity
feature.
lo
sound,
strike
the
rim
theforce
pad to
make rim
connected head
Strike the
pad harder
make and
higher volume and
to make
higherto
volume
sound. Strike the pad harder
Playing Hi-HatPlaying Hi-Hat
Rotate
the MASTER
strike to
themake
pad softer
to
make lower
volume. VOLUME knob to change
strike theHead
pad softer
lowerRim
volume.
rike pad or
(1) Strike
the Hi-Hat
pad without
pressing the Hi
(1) the
Strike
the Hi-Hat
without
pressing
the Hi-Hat
the volume.
Rotate
knob
clockwise
to louder
Schlagen
Sie
in die
Mitte
derpad
Snare
um
denopen
control
pedal
to
make
Hi-Hat
sound.
control
pedalcounter-clockwise
to make open Hi-Hat
rotateSnare-Sound
the knob
tosound.
typischen
zu erzeugen oder
auf den
Playing Tom Drum the volume;
Playing Tom Drum
(2) Strike
Hi-Hat
pad with the
fullyHi-pressing
(2)um
Strike
the Rim-Sound
Hi-Hat
padthe
with
fully pressing
lower the
volume.
Rand
(Rim)
einen
zu erzeugen
Strike
the central
position
sound.
11
per level.
Strike the central
position
to make
sound.to make
Hat
control
pedal
to
make
close
control pedal to Zeichnung).
make close Hi-Hat sound. Hi-Hat sound
(vergleicheHat
nebenstehende
(3) Strike
Hi-Hat
pad the
while
pressing the Hi
(3) Strike the Hi-Hat
pad the
while
pressing
Hi-Hat
MASTERpedal gradually to make consecutive o
control
control pedal gradually
to
make
consecutive
open
to
VOLUME
close
Hi-Hat
sound.
close Hi-Hat sound.
ure.
(4) Press
Hi-Hat
pedal
(4) Press the Hi-Hat
pedalthe
down
quickly
to down
make quickly
Hi-Hat to make
11
me and
Playing Hi-Hat
pedal
sound.
pedal
sound.
Spielen mit dem Hi-Hat
.
(1) Strike the Hi-Hat pad without pressing the Hi-Hat
control pedal to make open Hi-Hat sound.
1. Schlagen Sie auf
das Hi-Hat,
ohne das Pedal zu
Playing
Cymbal
Cymbal
(2) StrikePlaying
the Hi-Hat
pad
with fully
the Hidrücken,
um einen
„Open pressing
Hi-Hat“-Sound
zu
Strike
rubber
area
of
the crash
ride pad to make
Hat control
pedal
to make
close
Hi-Hat
sound.
Strike
rubber
area
of the
crash
and ride
pad toand
make
produzieren.
cymbal
sound.
(3) Strikecymbal
the Hi-Hat
the Hi-Hat
sound.
2. Schlagen
Siepad
aufwhile
das pressing
Hi-Hat und
drücken Sie das
control pedal gradually to make consecutive open to
Pedal ganz durch, um einen „Closed Hi-Hat“-Sound
close Hi-Hat sound.
Playing Kick Drum
Playing Kick Drum
zu erzeugen.
(4) Press the Hi-Hat pedal down quickly to make Hi-Hat
Kick
to make kick dr
3. Schlagen Sie auf das Hi-Hat und drücken Sie das Pedal
durch.
Pressnur
theleicht
KickPress
drumthe
pedal
todrum
makepedal
kick drum
pedal sound.
sound. zu
4. Drücken Sie das Pedal schnell zu um den typischen sound.
Hi-Hat Pedal-Sound
d to make
ash
he
erzeugen.
crash
has choke
The crash hasThe
choke
feature.
Strike feature.
the crashStrike the crash
its sound
will squeeze
sustain. Then
pad, its sound pad,
will sustain.
Then
the squeeze the
edge
portion
to
mute
the
sound.
edge
to mute
the sound.
Spielen
mitportion
der Bass
Drum
Playing Kick Drum
Drücken
Sie drum
das Pedal
den
Bassdrum-Sound zu produzieren.
Press
the Kick
pedal durch,
to makeum
kick
drum
sound.
12
MASTER VOLUME
MASTER VOLUME
Rotate the
MASTER
VOLUME
knob to c
Rotate the MASTER
VOLUME
knob
to change
Rotate the MASTER VOLUME knob to turn the
master volume up/down. Rotate the knob clockwise to increase the volume; rotate the knob
counter-clockwise to decrease the volume.
Lautstärke
DRUM KIT
Drehen Sie den Knopf im Uhrzeigersinn um die Lautstärke zu erhöhen oder gegen den
There
are 10 preset
kits and 10 User Kits. The kit is combination of different instrument voice
Uhrzeigersinn
um siedrum
zu vermindern.
assigned to each pad which has unitary style for performance. All the kits are for your choice. Any
DRUM
KIT be edited
7
DRUM
KIT and saved as your own User Kit. After power,
kit could
it’ll enter the kit selection mode
automatically
while
the
KIT
button
indicator
There areThere
10 preset
drum
kitsdrum
and 10
User Kits.
The Kits.
kit is The
combination
of different
voice
are
10
preset
kits
10 User
kit is combination
of instrument
different instrument
voice
will
light
up.
The
kit number
andand
its
name
assigned
to
each
pad
which
has
unitary
style
for
performance.
All
the
kits
are
for
your
choice.
Any
Preset
kit
mark
Kit
number
Kit
name
assigned
to
each
pad
which
has
unitary
style
for
performance.
All
the
kits
are
for
your
choice.
Any
displayed.
kit couldwill
be be
edited
and
saved
assaved
your own
Userown
Kit. User
After Kit.
power,
it’llpower,
enter the
kit selection
mode
kit
could
be
edited
and
as
your
After
it’ll
enter
the
kit
selection
mode
Das
Schlagzeug
verfügt modes,
über 10you may
In
some
other
automatically
while
theoperation
KIT button
indicator
automatically
while
theUser
KIT
button
indicator
voreingestellte
und
10
Kits
aus
thekitKIT
buttonand
to enter
the Kits,
kit select
will light press
up.
The
number
its
name
mark kit
Kitmark
number
Kit name Kit name
will
light
up.
The
kit
number
and
its
name
denen Siemode.
wählen können. Ein Kit ist die Preset kitPreset
Kit number
operation
will be displayed.
will
be
displayed.
Kombination von verschiedenen Sounds
In some(Voices),
other
operation
modes,
you
may
In some
other
operation
modes,
die
den
jeweiligen
Padsyou may
PRESET
KITto
press the
KIT
button
enter
the
kit
select
press the KIT
button
to enter
the kit select
zugewiesen
sind.
Jedes
Kit
The
kit number
is ranged
01 kann
- 50. bearbeitet
operation
mode.
operation
mode.
und anschließend
alsWHEEL
User Kitto select a kit
Rotate
the SCROLL
abgespeichert werden. Nach dem
you
desire. Rotate the knob clockwise to inPRESET
KIT
Einschalten
des Geräts befindet es sich
PRESET
KIT
crease
the
kit number
and anticlockwise to
The kit number
isnumber
ranged
01
- 50.
automatisch
im Kitmodus.
Das
Lämpchen
The
kit
is
ranged
01
- 50.
decrease
the WHEEL
kit number.
All
preset
kit numRotate the
SCROLL
to
select
a
leuchtet
auf SCROLL
und die Nummer
des
Kits wird
Rotate
the
WHEEL
to kit
select
a kit
ber
and
name
are
listed
in
the
KIT
LIST.
you desire.
Rotate
knob the
clockwise
to inim
Display
angezeigt.
Wenn
das Gerät
you
desire.the
Rotate
knob sich
clockwise
to increase the
kit number
anticlockwise
tokönnen to
increase
einem
anderen
Modus
befindet,
the
kit and
number
and
anticlockwise
KIT
LIST
decrease
the
kit
number.
All
preset
kit
numSie
den Kitmodus
aufrufenAll
indem
SiekitKIT
drücken.
decrease
the kit number.
preset
num27
ber and name
are
listed
in
the
KIT
LIST.
ber and name are listed in the KIT LIST.
069 143
KIT LISTKIT LIST
27
3 27
18
Voreingestellte Kits
069 143 069 143
1
Die Kit-Nummern reichen von 00 bis 50. Drehen Sie das Scroll Wheel
9483
um ein Kit auszuwählen. Drehen Sie im Uhrzeigersinn für eine höhere
3 18
3 18
832
Nummer, gegen den Uhrzeigersinn für eine niedrigere. Hier finden Sie
1
1 5
eine Liste mit den voreingestellten Kits:
9483
639483
1
832
832
832
5
5
63 1 63 1
USER KIT
User kit mark User Kit number User Kit name
You can832
create your
own
user
kit
by
edit
832
Kits
function. Click the KIT buttonUser
repeatedly
will
switch
the
Preset
Kit
and
User
Kit
selection.
USER KIT
User kit mark
Kit number
Kit name
USER
KIT
User kitUser
mark
User Kit User
number
User Kit name
User
Kit number
is U01
- U10.
Increate
der
Bearbeitungs-Funktion
(Edit)
können
You canThe
your
own
user
kit
by
edit
You can create your own user kit by edit
Ihrthe
eigenes
User Kit
kreieren.will
Drücken
function.Sie
Click
KIT button
repeatedly
function.
Click
the KIT
button repeatedly
will
Rotate
the
SCROLL
WHEEL
to
select
an
Sie
die
Taste
KIT
um
zwischen
switch the
Preset
KitPreset
and User
Kit selection.
switch
the
Kit
and
User
Kit
selection.
user
you desire.
theKits
knob
voreingestellten
KitsRotate
User
zuclockThe User
Kit kit
number
U01
-und
U10.
The
User
Kit isnumber
is U01
- U10.
wise
to
increase
the
kit
number
and
wechseln. Die User Kits haben die Nummern
anticlockwise
decrease
the kit an
number.
U01SCROLL
bis U10. to
Rotate the
WHEEL
to select
Rotate
the setting
SCROLL
WHEEL
to
select
an
The
factory
for
all
User
Kits
ishöhere
UniDrehen
Sie
im
Uhrzeigersinn
für
eine
user kit you
desire.
Rotate
the
knob
clockuser kit
you
desire. Rotate
the even
knob clockKit.
You
call them
you
Nummer,
gegen
den
wise toversal
increase
thecould
kit Uhrzeigersinn
number
and fürif eine
wise
to
increase
the
kit
number
and
don’t
create
your
own
user
kit.
Of
course,
niedrigere.
Ab Werk
Einstellung für
anticlockwise
to decrease
theistkitdie
number.
anticlockwise
to decrease
the kit number.
you
couldKits
replace
it by editing.
Please
alle User
„Universal
Kit“.isSie
könnensee
Sie
The factory
all User
UniThesetting
factoryfor
setting
for Kits
all User
Kits is Uni<EDIT>
Chapter
in
this
manual
for
details.
benutzen,
auch
ohne
Sie
zu
verändern
oder
versal Kit.
You Kit.
could
callcould
themcall
even
if you
versal
You
them
even if you
Press
the KIT
button
again
tound
back
the preSie können
Sie
bearbeiten
alstoUser
Kit
don’t create
your
own
user
kit.
Of
course,
don’t create your own user kit. Of course,
set
kit.
abspeichern.
you could
replace
by editing.
you
could itreplace
it byPlease
editing.see
Please see
<EDIT> Chapter
in
this
manual
for
details.
<EDIT> Chapter in this manual for details.
Press thePress
KIT button
again
to back
pre-to the prethe KIT
button
againtotothe
back
set kit. set kit.
Drum Kit
ROCK
ROCK
ROCK
Us e r K i t 01
Us eUs
r Kei rtK01
i t 01
138
8
Song
EsSONG
gibt zwei Arten von Songs: Demo-Songs, die Sie zum Üben benutzen können oder einfach
anhören, und einen User-Song, den Sie selbst aufnehmen können.
There
are two types of song. The demonstration song (Demo) is for your enjoyment and practice.
SONG
User song is your own recorded song.
Demo-Songs
SONG
two types of song. The demonstration song (Demo) is for your enjoyment and practice.
1. There
DEMOare
SONG
User song is your own recorded song.
(1)
Select
andtypes
Play Demo
Song
There
areund
two
of song.
The demonstration song (Demo) is for your enjoyment and practice.
Auswahl
Abspielen
There
are
52
demo
songs
built
in.song.
User
song isSONG
your own recorded
1. DEMO
Press the DEMO button once to engage the
Das
Gerät
verfügt
über Demo
52 Demo-Songs.
Select
and with
Play
Songlighting. The
demo
songSONG
mode
the indicator
1. (1)
DEMO
Drücken
Sie
DEMO
um
den entsprechenden
There
are
52
demo
songs
built
display will show “All Demo”.in.Press the
Modus
aufzurufen;
die
Anzeigelampe
(1)Press
Select
and
Play
Demo
Song
the
DEMO
button
oncesongs
to engage
button
immediately,
all demo
will playthe
leuchtet
auf,
im
Display
erscheint
There
are
52
demo
songs
built
in.„Alllighting. The
demo
song
mode
with
the
indicator
one
by the
one.
If youSie
don’t
select
song,
after
3 secDemo“.
Drücken
sofort
die
Taste
PLAY
Press
DEMO
button
once
to engage
the
display
will
show
“All
Demo”.
Presswill
the
ond
the
first
demo
song
number
and
name
und
alle
Demo-Songs
werden
nacheinander
demo
song
mode
with
the
indicator
lighting.
The
button
immediately,
all
demo
songs
will
play
appear
the
display.
abgespielt.
Wenn
Sie “All
keinen
Song Press the
displayonwill
show
Demo”.
one
by
one.
If
you
don’t
select
song,
after
3 secTo
select
a
song
you
desire,
rotate
the SCROLL
auswählen,
erscheint nach
3 Sekunden
dieplay
button
immediately,
all number
demo
songs
will
ond
the
first
demo
song
and
name
will
WHEE tound
choose
a song.
Nummer
der
Name
des ersten
Demoone
by
one.
If
you
don’t
select
song,
after
3
secappear
on the display.
Songs
imfirst
Display.
Benutzen
Sie das
Scrollond
the
demo
song
number
andthe
name
will
To
select
athe
song
you
desire,
rotate
SCROLL
Thenum
press
button
to
start
play;
the
Rad
einen
Song
auszuwählen
und
appear
on
the
display.
WHEE
to choose
a up.
song.
button
indicator
lights
drücken
Sie
PLAY;
die
Kontrolllampe
To
select
a
song
you
desire,
rotate
When select
single
song,
it’llthe
beSCROLL
played
leuchtet
auf.
Wenn
Sie
einen
einzelnen
Song
WHEE
to
choose
a
song.
Then
press
the
button
to
start
repeatedly.
auswählen, wird er wiederholt. Drücken play;
Sie theDemo song number
button
indicator
lights
up.
When the demo
song
playing,
press the
buttondie Kontrollleuchte erlischt.Demo song name
abermals
PLAY
umisdas
Playback
zu stoppen;
Then
press
the
button
to
start
play;
the
When
single
song,
it’ll be played
again
to toselect
stop the
playing,
the indicator
turns
button
indicator lights up.
repeatedly.
off.
Demo song name
When
song,press
it’ll the
be played
When select
the demosingle
song is playing,
button Demo song number
(2)
Practice
with
Demo
Song
repeatedly.
again
to stop the playing, the indicator turnsDemo song number
Demo song name
Üben
mitto
Demo-Songs
You
practice
ownpress
performance
with
When
the
demo
songyour
is playing,
the
button
off.may
the
demo
again
to tosong.
stop the playing, the indicator turns
Es
gibt
dreithree
Übungsmodi:
(2)
Practice
with
Demo
Songpractice:
There
modes
for your
off. are
You
may
practice
your
own
performance
with
FULL - When press the
button,
you will
(2)the
Practice
with
Demo
Song
Demo song tempo
Demo song beat
„Full“:
Drücken
Sie
PLAY
um
den
gesamten
demo song.
hear complete
song
You
may
practice
your
own
performance
with
Song
zuONLY
hören.
There
are three
modes
for the
your practice:
DRUM
- When
press
button,
the
demo
song.
FULL
When
press
the
button,
youtowill
you will hear drum sound only. It helps you
Demo song tempo
Demo song beat
There
are
three
modes
forPLAY
your practice:
„Drum
Only“:
Drücken
Sie
um
nur
die
hear
complete
song
get idea how to perform drum.
FULL
- When
press
the press button,
you
will
Schlagzeugspur
zu
hören.
DRUM
ONLY
- When
the
button,
DRUM
MUTE
- When
press the
button,
Demo song tempo
Demo song beat
hear
complete
song
you
hear
drum sound
only.without
It helpsdrum
you to
you
willwill
hear
background
music
DRUM
ONLY
-to
When
press
the
button,
„Drum
Mute“:
Drücken
Sie
PLAY
die
get idea
how
perform
drum.
sound.
Then,
you
can play
drumsum
bynur
yourself.
you
will
hear
drum
sound
only.
It
helps
you
to
Hintergrundmusik
hören,
Sie the
können den
DRUM MUTE - zu
When
press
button,
getyou
idea
to background
perform
drum.
Schlagzeugpart
selbst
spielen.
willhow
hear
music without
drum
Press
the
MODE
button
repeatedly
to change
DRUM
MUTE
When
press
the
button,
thesound.
mode.Then, you can play drums by yourself.
you will hear
background
music without
Drücken
Sie MODE
um zwischen
den dreidrum
Modi umzuschalten.
sound.
Then,
you can
playrepeatedly
drums by yourself.
Press
the
MODE
button
to
change
Tip: Volume of the background music and
the of
mode.
drum
the demo song is adjustable
Press the MODE button repeatedly to change
separately. Please see Chapter SETUP for
theTip:
mode.
Tip:
Die
Lautstärken
von
Hintergrundmusik
und
Volume
of the
background
music and
more
information.
Schlagzeugspur
sind
getrennt
regelbar.
Weitere
drum of the demo song is adjustable
Tip:
Volume of
the background
music
Informationen
finden
Sie
Kapitel
„Setand
Up“.
separately.
Please
seeim
Chapter
SETUP
for
drum
of
the
demo
song
is
adjustable
more information.
separately. Please see Chapter SETUP for
more information.
Al l
Demo
A l l Demo
A l l Demo
Ch aCh a
Ch aCh a
Ch aCh a
D r um
Mu t e
D r um Mu t e
D r um Mu t e
14
9
SONG
User-Songs
2. USER SONG
SONG
There
are
10 User10
songs
in maximum
recorded aufnehmen. Drücken Sie die Taste DEMO
Sie
können
maximal
eigene
Songs (User-Songs)
SONG
by
user.
zweimal schnell hintereinander um den Modus „User-Song“ aufzurufen. Im Display erscheint „All
Press Wenn
the DEMO
button Song
twice quickly
to engage
U-Song“.
Sie keinen
auswählen,
erscheint nach drei Sekunden der Name des ersten
2.verfügbaren
USER
SONG
User
Song mode
with the indicator lighting.
Songs
im Display.
2. the
USER
SONG
The
display
will
show
U-Song”.
If you don’t
There
areare
10 10
User
songs
in “All
maximum
recorded
There
User
songs
in maximum
recorded
select
song,
after
3
second
the
first
available
einen Song auszuwählen, benutzen Sie
byUm
user.
by
user.song number and name will appear on the
user
bitte the
dasDEMO
Scroll button
Wheel.twice quickly to engage
Press
Press
the DEMO
button twice quickly to engage
display.
thethe
User
Song
mode
withwith
thethe
indicator
lighting.
User Song mode
indicator
lighting.
Drücken
Sie
anschließend
die
Taste
PLAY;
die
TheThe
display
willwill
show
“All“All
U-Song”.
If you
don’t
display
show
U-Song”.
If
you
don’t
If
you
want
to
select
a
song
you
desire,
Kontrolllampe
leuchtet
auf. the first availablerotate
select
song,
after
3 second
select
song,
after
3 second
the firsta available
the
SCROLL
WHEEL
towill
choose
song.
user
song
number
and
name
appear
on
thethe
user song number and name will
appear
on
Drücken Sie abermals um das Playback des
display.
display.
User song number
User song name
Then
thedie Kontrolllampe
button to start
play; the
Songs
zu press
stoppen;
erlischt.
button
indicator
lights
up.
If you want to select a song you desire, rotate
If you want to select a song you desire, rotate
the SCROLL WHEEL to choose a song.
theWhen
SCROLL
to choose a song.
the WHEEL
user
Bitte
beachten
Sie: song is playing, press the
button
to to stop
the playing,
the indi-User song number
User song name
Then press
the againbutton
to start
play; the
User song number
User song name
Then press the
button to start play; the
Ist das
Intervall
beimup.
zweimaligen Drücken
cator
turnslights
off.
button
indicator
button indicator lights up.
der Taste DEMO länger als zwei
Note:
Ifwird
thesong
interval
the
first the
and secSekunden,
der
Kit-Modus
aufgerufen
When
the user
is between
playing,
press
When
the userofsong
is playing,
press
the
ond
pressing
the
DEMO
button
is
longer
anstelle
des
Song-Modus.
button again to to stop the playing, the indi- than
速度
拍号
button
again
to
to
stop
the
playing,
the
indi2
seconds,
it’ll
turn
to
Kit
mode
instead
of
Song
cator turns off.
cator
turns
off. Song aufgenommen
mode.
Wenn
Sie
keinen
Note:
you didn’t
record„No
anyfirst
song,
display
haben
imbetween
Display
U-Song“
Note:
If erscheint
the Ifinterval
the
andthe
secNote:
IfGerät
the“No
interval
between
the
first and
secwill
show
u-song”.
After
3
second,
the
und
das
wechselt
nach
drei
ond pressing of the DEMO button is longer thanmode
速度
拍号
ond
pressing
oftothe
DEMO
button is longer than
速度
will
change
KitKit
select
in turn
den
Kit-Modus.
拍号
2 Sekunden
seconds,
it’ll
to
modeautomatically.
instead of Song
2 seconds, it’ll turn to Kit mode instead of Song
mode.Tip: You may erase User Song in the User Song
mode.
Im
Son-Modus
Sie
einen
Note:
If you Please
didn’tkönnen
record
any
song,Userthe display
mode.
refer
to
the
chapter
Note:
If you didn’t
record
any<RECORD>
song,
the display
Song
löschen.
Nähere
Angaben
hierzu
will show
“No
u-song”.
After
3 second,
the mode
in
the
Manual
for
details.
will show
“No
u-song”.
After 3 second, the mode
finden
Sieto
imKit
Kapitel
will
change
select„Aufnahme“.
automatically.
will change to Kit select automatically.
Tip: You
may THE
eraseSONG
User Song
in the User Song
3. You
EXIT
Tip:
may erase
UserMODE
Song in the User Song
mode. Please refer to the <RECORD> chapter
mode. may
Please
refer
topress
the <RECORD>
chapter
noted
that
the DEMO button
once
in theYou
Manual for
details.
in the
Manual
for
details.
to enter the Demo mode; press the DEMO but-
Al l
U-Song
AAl ll l U-Song
U-Song
Us e r
Song
Us
Useer r Song
Song
No
u- s ong
No
No u-u-s song
ong
ton twice quickly to enter the Song mode.
3. EXIT
THE SONG
theMODE
Demo/User
Song mode press
3. Therefore,
EXIT THE in
SONG
MODE
the
DEMO
button
again
to
exit
the Demo/User
You may noted that press the DEMO button
once
You
maymode
noted and
that press
the
DEMO
button once
Verlassen
des
Song-Modus
Song
turn
to
the
Kit
selection
to enter the Demo mode; press the DEMO but-mode.
to The
enterDEMO
the Demo
mode;
press
the DEMO butindicator
turns
ton twice
quickly
to enter
theoff.
Song mode.
ton
twice
quickly
to
enter
the
Song
mode.
Durch
Drücken
DEMO
wird
der
Or,einmaliges
you
simply
pressder
theTaste
EXIT
button
to
stop
Therefore,
in can
the Demo/User
Song
mode
press
Therefore,
in
the
Demo/User
Song
mode
press
Demo-Modus
aufgerufen,
durch
zweimaliges
Drücken
palying
,
exit
the
Demo/Song
mode
and
turn
to
the DEMO button again to exit the Demo/User
thethe
DEMO
button again
to exit the Demo/User
der
Song-Modus.
Kit selection
mode.
Song
mode
and turnDurch
to
theabermaliges
Kit selectionDrücken
mode.
Song mode
and
turn
to the Kit
selection mode.
verlassen
Sie
den
jeweiligen
The DEMO indicator turns off. Modus wieder. Sie können
The durch
DEMODrücken
indicatorder
turns
off.
auch
Taste
das
Or,
you can simply
press the
EXITEXIT
button
toPlayback
stop
Or,
you
can
simply
press
the
EXIT
button
to stop
stoppen,
den
Modus
verlassen
und
zum
Kit-Modus
palying , exit the Demo/Song mode and turn
to
palying
,
exit
the
Demo/Song
mode
and
turn to
zurückkehren.
the
Kit selection mode.
the Kit selection mode.
10
15
10
10
METRONOME
1. METRONOME
Press
the CLICK button to sound the
METRONOME
Metronom
metronome. Press the button again to stop it.
1. METRONOME
Drücken
SieCLICK
CLICKbutton
um das
Metronom
Press the
twice
to setupzuthe
Time signature
aktivieren.
Drücken
Sie
erneut
CLICK
um das
metronome.
Press
the CLICK button to sound the
Metronom wieder zu stoppen.
metronome. Press the button again to stop it.
(1) Time Signature Setting - At first, you
could set
timebutton
signature.
The
current
Press
the the
CLICK
twice
to the
setup
the
Time signature
Taktart
time
signature
will
blink
in
the
second
row of
metronome.
the display. Rotate the SCROLL WHEEL to
Zuerst
sollten
Sie signature.
die Setting
TaktartAvailable
(Time
Signature)
change
the
time
time
(1)
Time
Signature
- At first,
you
festlegen.
Die
aktuell
ausgewählte
Taktart
signature
is 1-8/2,
1-8/4, 1-8/8,
1-8/16,
The
could
set the
time signature.
The
the current
wird
insignature
der
zweiten
Reihe
Displays
default
setting
is 4/4.
Press
ENTER
button
time
will
blink
indes
thethe
second
row
of
angezeigt.
Benutzen
Sie
das
Scroll
Wheel
um
to confirm
setting
turn to WHEEL
the next to
the
display.you
Rotate
theand
SCROLL
die
Taktart
ändern.
Zur Auswahl
stehen:
parameter
of
thesignature.
metronome.
change
thezu
time
Available
time
1-8/2,
1-8/4,
1-8/8,
1-8/16.
Die
signature is 1-8/2, 1-8/4, 1-8/8, 1-8/16, The
Werkseinstellung
ist 4/4.
Drücken
Sie
ENTER
(2) Metronome
Setting
- After
press
default
setting is Volume
4/4.
Press
the ENTER
button
um
Ihre
Auswahl
zu
bestätigen
und
den
the
ENTER
button
to
finish
the
time
signature
to confirm you setting and turn to the next
nächsten
Parameter
einzustellen.
setting, the
to setup is metroparameter
ofnext
the parameter
metronome.
nome volume. The display will show “Metro
Vol”Metronome
and currentVolume
volume is
blinking.
Rotate
the
(2)
Setting
- After
press
Lautstärke
SCROLL
WHEEL
to
change
the
volume
the ENTER button finish the time signature
ranged the
0 - 127,
default to
setting
setting,
next The
parameter
setupisis96.
metroEinstellung
der Lautstärke
(Metronome
Press volume.
the ENTER
confirm
nome
The button
displayto
will
show you
“Metro
Volume):
Dieser
erscheint
imof thethe
setting
turn Parameter
to
the next
parameter
Vol”
andand
current
volume
is blinking.
Rotate
Display,
nachdem
die Eingabe
der Taktart
metronome..
SCROLL
WHEELSie
to change
the volume
bestätigt
haben.
Die
aktuell
eingestellte
ranged 0 - 127, The default setting is 96.
Lautstärke
erscheint
blinkend
im in
Display.
You can
thebutton
EXIT
button
any
step to
Press
thepress
ENTER
to confirm
you
Drehen
Sie
das
Scroll
Wheel
um
die of the
exit metronome
setting.
setting
and turn to
the next parameter
Lautstärke
(0-127) anzupassen. Ab Werk ist
metronome..
96
eingestellt.
Drücken
ENTER will
um keep
Ihre
During
the setting,
the Sie
metronome
Auswahl
zu
bestätigen.
sound.
You can press the EXIT button in any step to
exit metronome setting.
Sie hören das Metronom während der Einstellung. Sie können jederzeit die Metronom2. TEMPO
Einstellungen
durchthe
Drücken
der Taste
ENTER verlassen.
During
the setting,
metronome
will keep
sound.
Press the TEMPO button,the current tempo
value will blink in the display. Rotate the
Tempo
SCROLL
2.
TEMPOWHEEL to change the tempo
ranged
40 - 240.
Um das Tempo
des Metronoms zu ändern
Tempo
Press thedrehen
TEMPO
button,the
tempo
(40-240),
Sie
bitte dascurrent
Scroll Rad.
Presswill
the
ENTER
button
to confirm
value
blink
in the
display.
Rotateyou
the
Drücken
Sie
ENTER
um
Ihre
Auswahl
zu
setting.
SCROLL
WHEEL
to
change
the
tempo
bestätigen. Nach etwa 10 Sekunden wird die
ranged 40 -automatisch
240.
Einstellung
abgebrochen. Sie
Tempo
After about
seconds,
thisEXIT
operation
will exit
können
auch10
über
die Taste
den Modus
automatically.
Or,
press
the
EXIT
button
to
Press the ENTER button to confirm you
verlassen.
exit the tempo setting immediately.
setting.
T i me -S i g
T i me -S i g
Me t r o
Vo l
Me t r o
Vo l
Tempo
Tempo
After about 10 seconds, this operation will exit
automatically. Or, press the EXIT button to
exit the tempo setting immediately.
11
11
16
DRUM KIT EDIT
Drum
Bearbeitung
DRUMKit
KIT EDIT
A drum kit consists of drum pads, cymbals pads and Hi-Hat pedal physically.
Ein Drum Kit besteht physisch aus Pads, Cymbals (Becken) und Hi-Hat Pedal. Durch Schlagen auf
unterschiedliche
Bereiche
werden
verschiedene
erzeugt:
Pad
(Schlagfläche)
oder Rimby
They
generate
sound
different
such as
by Sounds
striking
head
or rim
of
drum pad, triggered
A drum
kit consists
ofindrum
pads,way
cymbals
pads
and
Hi-Hat
pedal
physically.
(Rand),Crash
Crashbow
Bell or
(Glocke)
oder Edge
(Rand),
Hi-Hat
oder
striking
edge, pressing
Hi-Hat
pedal.
We Pedal
call theoffen
source
togeschlossen.
generate sound as Part.
Theypart
generate
soundon
in the
different
as by
striking
or rim
of drum
triggered
by
Jeder
dieser
Bereiche
ist
auf display
dem way
Display
Each
is identified
bysuch
theidentifizierbar.
icon
with
mark.head
The icon
refers
to partpad,
of striking
head
striking
Crash
bow
orshown
edge,
pressing
Hi-Hat
pedal.
We call
theHi-Hat
source
topressing
generate
Part.
Als
H.PDL
wird
derisSound
bezeichnet,
der refers
durch
Drücken
des
Pedals
erzeugt
wird. aspedal.
of
pad
and
cymbal
below.
H.PDL
to
sound
generated
by
thesound
Hi-Hat
Each part
is identified
on thesound
displaygenerated
by the icon
mark.
iconcymbal.
refers to part of striking head
HIHAT
refers
to Open Hi-Hat
bywith
striking
theThe
Hi-Hat
of pad and cymbal is shown below. H.PDL refers to sound generated by pressing the Hi-Hat pedal.
HIHAT refers to Open Hi-Hat sound generated by striking the Hi-Hat cymbal.
Alternative part of the same instrument is shown by extra mark under the icon. For example, the
part generating sound by striking the Rim 1 of the snare is marked by an arch under the SNARE
Alternative part of the same instrument is shown by extra mark under the icon. For example, the
icon.
Alternative Schlagbereiche desselben Instruments werden durch eine Markierung unterhalb
part generating sound by striking the Rim 1 of the snare is marked by an arch under the SNARE
angezeigt:
icon.
Snare Rim Edge of CRASH HI-Hat Close
Snare Rim Edge of CRASH HI-Hat Close
Each part has multi parameters to create its characteristics such as voice, volume, reverb level and
Jeder
Schlagbereich
hat viele Parameter
Charakter beeinflussen, wie z.B. Sound,
Pan
etc.
The detailed description
is listed Indie
theseinen
table below.
Each part has
multi parameters
to create
its characteristics
as Sie
voice,
volume,
reverb
level and
Lautstärke,
Reverb,
Pan, etc. Eine
detaillierte
Beschreibungsuch
finden
in der
folgenden
Tabelle:
Pan etc. The detailed description is listed In the table below.
PARAMETER
DESCRIPTION
EDIT RANGE
VOICE
Voice
assigned
to
the
part
– 418
PARAMETER
DESCRIPTION
EDIT1 RANGE
Parameter
Beschreibung
Bearbeitungsbereich
VOLUME
Volume
of the part
127part
refers to the highest volume
0~127
VOICE
Voice assigned
to,the
1 – 418
PAN
Stereo
pan
of
the
part.
-64
refers
to
the
most
left,
63
Sound
(Voice)
Der
Sound,
der
dem
Schlagbereich
zugewiesen
ist.
1-418
VOLUME
Volume of the part , 127 refers to the highest volume
0~127
refers
to
the
most
right,
0
refers
to
the
center
position
-64~63
PAN
Stereo
pan ofdes
theSchlagbereichs;
part. -64 refers127
to ist
thedie
most
left, 63
Lautstärke
maximale
Lautstärke
PITCH (Volume)
Pitch
of
the
part.
-10
refers
to
the
lowest
and
10
to the highest pitch.0-127
-10~10
refers
to
the
most
right,
0
refers
to
the
center
position
-64~63
Lautstärke.
REVERB
Reverb
level-10
of the
part,
127lowest
refers to
the
level pitch. 0~127
PITCH
Pitch ofeffect
the part.
refers
to the
and
10highest
to the highest
-10~10
Pan
(Panorama)
REVERB
Panorama; -64 is ganz links, 63 ganz rechts, 0 ist die
-64-63
Reverb
effect level of the part, 127 refers to the highest level
0~127
Mittelposition.
The edit feature is to set parameter for each part, partly or for all parts in a kit. the Edit feature
Tonhöhe
des
Breichs; selected
-10 ist dasdrum
Minimum,
10 dasIn this way, you may create
makes
it possible
the
currently
kit
setting.
Pitchedit
(Tonhöhe)
-10-10
The
feature istotochange
set parameter
for each part, partly
or for
all parts in a kit. the Edit
feature
Maximum.
your
own
drum
kit
and
save
it
as
UserKit.
makes it possible to change the currently selected drum kit setting. In this way, you may create
your own drum kit and
save it as UserKit.
Reverb-Effekt
des Schlagbereichs; 127 ist das höchste
Reverb (Hall)
0-127
Level.
In der Bearbeitungsfunktion können Sie die einzelnen Parameter für jeden Schlagbereich
anpassen. So können Sie ein ausgewähltes Kit komplett überarbeiten und als User-Kit
abspeichern.
Das Bearbeiten funktioniert für jeden Parameter gleich. Das Wichtigste ist das Zuweisen des
Sounds. Wenn Sie damit vertraut sind, ist es sehr einfach, die anderen Parameter zu bearbeiten.
Daher finden Sie im Folgenden eine Beschreibung der Soundzuweisung.
12
12
17
Auswahl eines Kits zur
Bearbeitung:
Wählen Sie ein Kit aus, das Sie
bearbeiten möchten (wie im Kapitel
„Drum Kit“ bereits erklärt); im
Display erscheinen Name und
Nummer des Kits.
Aktivieren des
Bearbeitungsmodus (Kit Edit):
Drücken Sie die Taste EDIT; im
Display erscheinen die Kit-Nummer
und das Symbol.
Auswahl der Komponente:
Drücken Sie die Auswahltaste für
das Teil, das Sie bearbeiten
möchten; das Symbol beginnt zu
blinken. Einige Instrumente
bestehen aus verschiedenen Teilen
(Schlagbereichen), das CrashBecken beispielsweise aus Bell und
Edge. Drücken Sie die Taste
zweimal um einen Schlagbereich
zur Bearbeitung auszuwählen. Das
zugehörige Symbol leuchtet auf.
Eine einfache Methode der Auswahl
ist es, einfach auf den
entsprechenden Teil des Drumsets
zu schlagen.
18
DRUM KIT EDIT
Auswählen eines Parameters:
4. Select
parameter toTeil
editdes Drumsets
Der zur Bearbeitung
ausgewählte
After select part, the current parameter will be
wird blinkend im Display angezeigt. Um einen
blinking . Rotate the SCROLL WHEEL to seParameter auszuwählen,
benutzen
das select
lect a parameter
to edit. InSie
thisbitte
example,
Scroll Rad. In VOICE.
diesemThe
Falldefault
wählen
Sie bitte
„Voice“
parameter
is VOICE.
aus. Drücken Sie
ENTER
um button
die Auswahl
zuyou choice.
Press
the ENTER
to confirm
bestätigen.
5. Edit the parameter
The current contents of this parameter will blink.
In this example, it is the voice number. Rotate
the SCROLL
WHEEL to change contents of the
Bearbeiten eines
Parameters:
parameter. In this example, you’ll change voice
assigned
to Snare
rim. Any
parameter
has its
Der ausgewählte
Parameter
blinkt.
Drehen
Sie das
own range to set. For example, there are 95
Scroll Rad umvoices
die verschiedenen
Optionen
can be selected to assign to a part.
anzuzeigen. Im
Beispiel
ändern
Sie
denLIST
Sound
des
Please see Appendix VOICE
for details.
Snare Rims. Zur
Auswahl
stehen
95
Sounds
Press the ENTER button to confirm your setting.
it’ll return
to die
the parameter
selection
(Voices). Eine Then,
Übersicht
über
Sounds finden
Sieoperation
stage.
im Anhang. Drücken Sie ENTER um Ihre Auswahl
Vo i c e
xRo c k
zu bestätigen. Das Gerät kehrt anschließend in den
Modus für die Parameter-Auswahl zurück.
6. Edit another parameter or part
Now, the parameter (the VOICE in this example)
editing for a selected part is finished. You may
continue to edit other parameters in this part or
Bearbeiten eines
weiteren
Parameters oder
change
part to edit.
eines Schlagbereichs:
Die erste Bearbeitung
ist abgeschlossen.
(1) Edit other
parameter in theSie
current part
After you
press the ENTER
button to finish curkönnen nun weitere
Parameter
verändern.
rent editing, it’ll turn back to the parameter selection stage with the next parameter blinking.
Press the ENTER button to edit this parameter
or select other parameter by rotating the
Bearbeiten eines
weiteren
Parameters
am
SCROLL
WHEEL.
Then, edit parameters
in the
aktuellen Teil:same way explained in the Step 4 - Step 5 above.
Parameters can be edited are listed in the table
in pagesich
12. im Modus für die
Das Gerät befindet
Vo l ume
Parameter-Auswahl nachdem Sie ENTER gedrückt
haben. Drücken Sie ENTER um den Parameter
nochmals zu ändern oder wählen Sie einen anderen
Parameter indem Sie das Scroll Wheel drehen.
Bearbeiten Sie dann den nächsten Parameter wie zuvor beschrieben.
Bearbeiten eines weiteren Drumset-Teils:
Wählen Sie ein anderes Teil des Drumsets aus wie zuvor14
beschrieben. Der aktuell eingestellte
Parameter wird dadurch nicht verändert. Das vereinfacht das Bearbeiten.
19
plained in Page 13. The current parameter to
edit will keep no change. It provides you easy
method to edit the same parameter for each part.
7. Complete the edit
After der
finishBearbeitung:
all editing job for the current drum kit,
Beenden
you may terminate the edit.
Press
the EXIT button, “Save
it?”. Then, you
Um die
Bearbeitungsfunktion
zu verlassen,
have
two
choices:
drücken Sie ENTER.
(1) Save edited drum kit as your own user
Im Display erscheint „Save it?“ („Möchten Sie
kit:
die Einstellungen sichern?“). Sie haben nun
Press the ENTER button. “User Kit” with User
zwei Möglichkeiten:
kit number blinking will appear. Rotate the
SCROLL WHEEL to choose number, then press
Speichern Sie das Kit als User-Kit. Die
the ENTER
button to
confirm.blinkend im
Nummer
des User-Kits
erscheint
Sa v e
i t?
Us e r
Ki t
Display. Mithilfe des Scroll Rads können Sie die
Note: There are 10 built-in preset User Kit. All
Nummer verändern. Drücken Sie ENTER um
of them are the same as Kit 01. When you save
die Auswahl zu bestätigen.
your own User Kit, it’ll replace the existing one.
Bitte beachten
Sie:isEs
gibt 10 voreingestellte
If the saving
successful,
it’ll turn to the Kit
User-Kits,
die
alle
gleich
sind. Wenn
Siepad
Ihr select
select mode. The indicators
of the
eigenes
Kit speichern,
wird
eines
button
and the EDIT
button
willder
turn10off.
voreingestellten
dadurch
ersetzt.
The display always asks “Replace it”?. Press
Im Display
erscheint
stets
„Replace
the ENTER
button
to replace
existing one with
it?“ („ your
Möchten
Sie
es
ersetzen?“).
Drücken
new editing. Press the EXIT
buttonSie
then
ENTER
um ein
Kit zunumber.
ersetzen
oder
drücken
change
another
If you
really
don’t want
Sie EXIT
um den
to cover
any Speichervorgang
existing User Kit, press the EXIT
abzubrechen.
button again, and it will cover the current edited
kit then turn to the Kit Select mode. .
Wenn die Speicherung erfolgreich war, kehrt
The User
KitModus
setting
nonvolatile
even the
das Gerät
in den
fürisdie
Kit-Auswahl
power
turns
off.
zurück
und die
Kontrollleuchte
der Taste EDIT
erlischt.
(2) Press the EXIT button to exit the edit mode
and return to the
Selection
mode without
Ein gespeichertes
KitKit
bleibt
gespeichert,
auchsaving
as
User
kit.
The
indicators
of
the
pad
select
wenn das Gerät ausgeschaltet wird.
button and the EDIT button will turn off.
TheSie
edited
results
willBearbeitungs-Modus
cover the current drum
Drücken
EXIT
um den
kit and activate
immediately. When
the power
zu verlassen.
Die Kontrollleuchten
erlöschen.
turn off, this changes will reset.
Rep l ace
Sie können User-Kits durch die Reset-Funktion
Tip: You may reset the kit changes by Reset
löschen. Weitere Informationen dazu finden Sie
feature. Please see <SETUP> chapter in this
im entsprechenden Kapitel.
Manual for details.
15
20
it
Set Up
Drücken Sie die Taste SETUP um in den Set Up-Modus zu gelangen; die entsprechende
Kontrolllampe leuchtet auf, die einzustellenden Parameter blinken. Betätigen Sie das Scroll Rad
um einen der 7 Parameter aufzurufen. Dessen aktueller Wert wird im Display angezeigt. Wenn Sie
den Modus verlassen möchten, drücken Sie bitte EXIT.
SETUP
Lautstärke der Begleitung
In the Kit Selection or Demo/Song stage,
press the SETUP
button
to enter
thedie
Setup
Während ein Demo-Song abgespielt
wird,
können
Sie
mode and its indicator lights up. The paramLautstärke der Hintergrundmusik
regeln. Der Parameter
eter to be setup will blink. Rotate the SCROLL
wird als „Accomp Vol“ im Display
angezeigt. Benutzen Sie
WHEEL to select one of the 7 items listed
das Scoll Wheel um den Wert
zuthen
verändern
(0-24).
below,
press the ENTER
to confirm and
current value
be displayed.
Drücken Sie Enter um Ihreits
Auswahl
zu will
bestätigen
oder
In the item selection stage, press the EXIT butEXIT um den Modus zu verlassen.
Accomp Vo l
1
ton to exit setup opration and turn to the Kit
Selection mode.
3
2
1. Accompaniment Volume for Demo
Lautstärke der Percussion
When play demo song, you may hear background music accompanied. Adjust this
Während ein Demo-Song abgespielt
die
background wird,
music können
volume bySie
parameter
Lautstärke der Percussion regeln.
DerRotate
Parameter
wirdWHEEL
als
Accomp Vol.
the SCROLL
to change the
volume ranged
- 24. The de„D. Drum Vol“ im Display angezeigt.
Benutzen
Sie0 das
fault setting is 7.
Scroll Wheel um den Wert zu
verändern (0-24). Ab Werk ist
Press the ENTER button to confirm and turn
11 eingestellt. Drücken Sie Enter
umparameter.
Ihre Auswahl
to the next
Press thezu
EXIT button
to exit
and turn
the parameter selection.
bestätigen oder EXIT um den
Modus
zutoverlassen.
2. Percussion Volume for Demo
When play demo song, you may adjust percussion volume. Adjust this volume by paMaster Tune
rameter D.Drum Vol. Rotate the SCROLL
WHEEL to change the volume ranged 0 - 24.
Dieser Parameter wird als „Master
Tune“ im Display
The default setting is 11.
angezeigt und beeinflusst generell
Tonhöhe.
Benutzen
Press the die
ENTER
button to confirm
and turn
to
the
next
parameter.
Press
Sie das Scroll Wheel um den Wert zu verändern the
(0-EXIT
+/- button
50).
to cancle
current
and 440
turn back
Ab Werk ist 0 eingestellt, was
sich auf
einedit
A bei
Hz to the
parameter selection.
bezieht. Drücken Sie Enter um
Auswahl
zuexit
bestätigen
PressIhre
the EXIT
button to
and to the parameter
selection.
oder EXIT um den Modus zu
verlassen.
fortgeschrittenen Bearbeitung dagegen ist es, die
4. Advanced
Edit
physischen Eigenschaften eines
PadsParameter
zu verändern,
wie
The purpose of the drum kit edit is to change
z.B. Empfindlichkeit, Trigger-Kurve,
etc.
sound characteristics such as voice, volume,
21
Vo l
D . D r um
Vo l
Ma s t e r Tune
3. Master Tune
This parameter affects sound pitch globally.
Fortgeschrittene Bearbeitung
Rotate the SCROLL WHEEL to change the
master tuning ranged 0 to +/- 50. The default
Setting is 0 which refers to 440 Hz at A4 note.
Der Zweck der Kit-Bearbeitung
ist es, die SoundPress the ENTER button to confirmand turn
Charakteristik eines Kit zu verändern,
indemPress
mantheSound,
to the next parameter.
EXIT button
exit current
edit and
Lautstärke, Panorama, etc. to
einstellt.
Das
Zielturn
derto the parameter
selection.
pan etc. The target of advanced parameter
edit is physical characteristics of pad such
as sensitivity, trigger curve etc.
Ac comp
Ad v a n c e d
16
Wenn „Advanced“ blinkt, drücken Sie bitte ENTER um die
Auswahl zu bestätigen. Der Parameter
„Sensitive“ (Empfindlichkeit) erscheint im Display. Sie
können die Einstellung mit Hilfe des Scroll Rads verändern.
Die Parameter sind für die Pads individuell angepasst. Sie
müssen ein Pad für die Bearbeitung auswählen. Das
können Sie tun indem Sie entweder auf das Pad schlagen
oder die Auswahltaste benutzen.
Bitte beachten Sie: Sie können keine zusätzlichen
Funktionen wie Rim oder Edge auswählen. Dieser Modus
betrifft nicht das Hi-Hat Pedal.
Wenn Sie einen Parameter und ein Pad ausgewählt haben,
drücken Sie bitte ENTER um Ihre Auswahl zu bestätigen.
Der aktuelle Wert erscheint im Display und blinkt. Nun
können Sie den Wert verändern.
Es gibt 4 Parameter, die Sie einstellen können:
Sensitivity
Der Bereich geht von 1 bis 127. Betätigen Sie das Scroll
Rad um den Wert zu verändern. Ein höherer Wer entspricht
einer höheren Empfindlichkeit. Drücken Sie ENTER um Ihre
Auswahl zu bestätigen und zum nächsten Parameter zu
gelangen.
Dynamic Range
Mit diesem Parameter können Sie die Beziehung zwischen
Spielkraft und Lautstärke einstellen. Schlagen Sie mit der
gewünschten Kraft auf ein Pad mit der Sie die maximale
Lautstärke erreichen möchten. Der Wert wird automatisch
angezeigt. Der maximale Wert ist 127. Drücken Sie ENTER
um Ihre Eingabe zu bestätigen oder EXIT um die Einstellung
abzubrechen.
22
SETUP
SETUP
Trigger-Kurve
Trigger Curve
Curve type
Trigger Curve
Curve
type
This feature allows you select a proper curve
Mit dieser Funktion können Sie eine von 6
from
6 preset
curves
control
the relation
This
feature
allows
youto
select
a proper
curve
voreingestellten
Kurven auswählen, die die
SETUP
between
thecurves
strikingtoforce
andthe
changes
from
6 preset
control
relationin
Beziehung vom Schlagkraft und Lautstärke
between
strikingthe
force
anduntil
changes
in
volume.the
Change
curve
the response
regeln. Mit Hilfe des Scroll Rads können Sie
volume.
Change
until the response
feels as
naturalthe
as curve
possible.
eine
Kurve
auswählen (Linear, Exp 1, Exp 2,
Trigger
Curve
Curve type
feels as natural as possible.
Log
1
,
Log
2
und
Spline).
Drücken
Sie
ENTER
Rotate
the SCROLL
WHEEL
choosecurve
a
This
feature
allows you
select to
a proper
um
Ihre
Eingabe
zu you
bestätigen
oder
EXIT
um
Rotate
the
SCROLL
WHEEL
to
choose
a
curve.
The
corves
may
select
are
Linear,
from 6 preset curves to control the relation
die
Einstellung
abzubrechen.
Ab Werk
ist
curve.
The
corves
you
mayand
select
are Linear,
Exp1,
Exp2,
Log1,
Log2
Press
between
the
striking
force
andSpline.
changes
in
„Linear“
eingestellt.
Exp1,
Exp2,
Log1,
Log2
and until
Spline.
Press
the ENTER
button
tocurve
confirm
your
volume.
Change
the
thesetting.
response
the
ENTER
button
topossible.
confirm
your
setting.
Press
the
EXIT button
to exit
current
operafeels
as
natural
as
Press
the EXIT
to exit menu.
current The
operation and
back button
to Advanced
default
Rotate
the
SCROLL
WHEEL
to The
choose
a
tion
and is
back
to Advanced
menu.
default
curve
Linear.
curve.
The
corves
you
may
select
are
Linear,
curve is Linear.
Exp1, Exp2, Log1, Log2 and Spline. Press
the ENTER button to confirm your setting.
Exp1
Log1
Log2
Spline
Press the EXIT button toLinear
exit current
opera-Exp2
Linear
Exp1
Exp2
Log1
Log2
Spline
tion and back to Advanced menu. The
defaultof 4 types of the curve
Diagram
curve is Linear.
Diagram of 4 types of the curve
T r i gge r
T r i gge r
Exp1
Exp2
Log1
Log2
Volume
Volume
Linear
Volume
Volume
Volume
Volume
Volume
Volume
T r i gge r
Spline
Strength
Log
Strength
Log
Volume
Strength
Exp
Strength
Exp
Volume
Strength
Strength
Linear
Linear
Volume
Volume
Diagram of 4 types of the curve
Strength
Spline
Strength
Spline
Cross Talk
Cross
Talk
Select
Cross Talk in the menu and press
Select
Cross
in the
menu
and
ENTER.
TheTalk
option
"Cross
Talk"
onpress
screen
Strength
ENTER.
The
option
"Cross
Talk"
on
screen
Strength
Strength
will stop blinking, which indicates you have
Strength
Linear
Log
Spline
will
stop blinking,
which
indicates
have
entered
cross
talk
adjusting
mode.you Exp
Cross
Talk
entered
cross talk
adjusting
mode.
Keep striking
a single
pad repeatedly
with high
Cross
Talk
Keep
striking
a single
pad repeatedly
with high
velocity
,and
the system
will eliminate
unexWählen
Sie
die
Funktion
„Cross
Talk“
aus
und
velocity
,and
the
system
will
eliminate
unexSelect
Cross
Talk
in
the
menu
and
press
pected sounds on all other pads.
drücken
Sie
ENTER.
Die
Option
hörtonauf
zu is
pected
on
all other
pads.
ENTER.
The
option
"Cross
Talk"
screen
Go tosounds
next
pad
after
no
unexpected
sound
blinken
und
zeigt
damit
an,indicates
dass
sich
dashave
Gerät
Go
to stop
next
pad
after
no Finish
unexpected
sound
is
will
blinking,
which
you
heard
by
other
pads.
all the
cross
talk
im
richtigen
Modus
befindet.
heard
by other
pads.
Finish
the
cross talk
entered
cross
talk
adjusting
mode.
adjustment
and
press
EXITallto
finish.
adjustment
andapress
to finish. with high
Keep striking
singleEXIT
pad repeatedly
Ziel
Einstellung
ist hear
es,
velocity
,and
the
system
willunerwünschte
eliminate
unexFordieser
example,
if you
can
sound from
pad
Nebengeräusche
durch
andere
Pads
For
you
can
hear
sound
pected
on
allstriking
other
pads.
B example,
whensounds
you ifare
only
pad
A,from
thenpad
there
Bauszuschließen.
when
are
only
striking
pad
A, pad
thensound
there is
Go
to you
next
pad
after
no
unexpected
is
cross
talk
between
pad
A
and
B.
is heard
cross
talk
between
pad
A
and
pad
B.
by
other
pads.
Finish
all
the
cross
talk
Enter Cross Talk adjusting mode and keep
Schlagen
SieTalk
wiederholt
hoher
Enter
Cross
adjusting
and
adjustment
and
press
EXITmode
tomit
finish.
striking
pad
Adazu
hard
repeatedly
until
nokeep
sound
Geschwindigkeit
auf
ein Pad.
Das
System
wird
striking
pad B
A hard
repeatedly
until
no sound
from pad
is audible.
Press
EXIT
to finish
alle
zufälligen
Geräusche
der EXIT
anderen
Pads
from
pad
B is audible.
Press
finish
For
example,
if you can
hear
soundtofrom
pad
adjustment.
unterdrücken.
Sobald
dies erfolgt
ist,then
gehen
Sie zum nächsten Pad. Wenn alle Pads fertig
adjustment.
B when you are
only striking
pad A,
there
eingestellt
sind,
drücken
SieAall
bitte
EXIT
is
crossThe
talk
between
pad
and
B.um
NOTE:
response
from
thepad
pads
areden
bit Modus zu verlassen.
NOTE:
response
from
all the
padsand
arekeep
bit
Enter
Cross
Talk with
adjusting
mode
slowerThe
compared
when
playing
kits.
This
Achtung!
slower
compared
withrepeatedly
when playing
striking
padphenomenon.
A hard
untilkits.
no This
sound
is a normal
18
Reaktion
der
Pads
ist
in
diesem
Modus
etwas18
langsamer als beim Spielen.
isDie
a
normal
phenomenon.
from pad B is audible. Press EXIT to finish
adjustment.
C r oss Ta l k
C r oss Ta l k
C r oss Ta l k
NOTE: The response from all the pads are bit
slower compared with when playing kits. This 23
is a normal phenomenon.
18
pedal position is lower than close threshold, striking the Hi-Hat pad makes close Hi-Hat sound.
When press the pedal quickly and reach bottom position, it'll make Hi-Hat pedal sound and you don’t
need striking the Hi-Hat pad. The quicker the pressing, the higher the volume of the pedal sound. This
bottom position is determined by Pedal Threshold.
Hi-Hat Pedal-Einstellungen
The scale of Hi-Hat pedal movement is 0 Schlagen Sie auf das Hi-Hat-Pad ohne das
127. 0 represents the lowest position of the
Pedal zu betätigen um einen „Open Hi-Hatpedal (completely pressed) and 127 repreSound“ zu erzeugen. Das Hi-Hat Pedal
sents the highest position (completely
verfügt über drei Zonen, die durch eine
raised).
Schwelle in offen (open) und geschlossen
This feature allows you to set thresholds per
(closed)
eingeteilt pressing
sind.
your comfortable
strength.
Wenn Sie das Pedal schnell bis zum
Anschlag
betätigen,
Sie
den typischen
The Threshold
pointshören
can be
adjusted
in the
Hi-Hat
Pedal-Sound,
ohne
dass
das
Sensitive settings by pressing Sie
the auf
Hi-Hat
Pad
schlagen
müssen.
Je
schneller
das
pedal. The parameter will be "Open THR"
Betätigen
desItsPedals
umso höher
die
and blinking.
currenterfolgt,
close threshold
nalue
Lautstärke.
Diese
Grundposition
durch
will be shown
. Press
the ENTERwird
button
to
den
Schwellenwert
des
Pedals
bestimmt.
confirm. Then, press the pedal to position
Op en
Hi-Hat pedal icon blinks
2
1
you desire as close threshold while the real
Die
Skala der
Pedal-Bewegung
reicht
von 0
threshold
value
will be shown and
blinking.
bis 127. 0 bezeichnet die niedrigste Position
des
Pedals,
also vollständig
durchgetreten
Press
the ENTER
button to confirm
and turn
und
127
die
höchste
Position,
also
to the pedal threshold setting; the
parameter
vollständig
offen. Sie können den
is "Pedal THR".
Schwellenwert so einstellen, wie es für Sie
angenehm
ist. Pedal threshold in the same
Then, set the
way above while you could try by pressing
Der
Parameter
wird als „Open THR“
the pedal
quickly.
angezeigt und der aktuelle Wert. Drücken
Sie
ENTER
um Ihrebutton
Auswahl
zu bestätigen.
Press
the ENTER
to confirm.
Drücken
Sie
nun
das
Pedal
in
die Position,
Press the EXIT button to exit current
die
Sie
wünschen.
Drücken
Sie
operation and back to AdvancedENTER
menu. um
Ihre Auswahl zu bestätigen; der nächste
Parameter („Pedal THR“) wird angezeigt.
Nehmen Sie Ihre Einstellung vor, drücken
Sie ENTER um sie zu bestätigen oder EXIT
SETUP
um den
Modus zu verlassen und ins
Advanced-Menü
zurückzukehren.
SETUP
In the Advanced menu window, press the
Drücken
Sie im
EXIT um
in den
EXIT button
toAdvanced-Menü
turn to the Kit Selection
mode.
In
the
Advanced
menu
window,
press
the
Kit-Auswahlmodus
zu gelangen.
Sie
If you did some changes
duringWenn
the Advanced
EXIT button to vorgenommen
turn to the Kit Selection
mode.
Veränderungen
haben,
werden
setting, the changes will be saved
If
you
did
some
changes
during
the
Advanced
diese
automatisch
gesichert.
Im say
Display
automatically.
The
display will
“Saving...”
19
setting, the
changes will be saved
erscheint
„Saving…“.
automatically. The display will say “Saving...”
5. Reset
After setup, kit editing and recording, all of
5. Reset
changes are saved in the unit. This feature alAfter setup, kit editing and recording, all of
lows you to recover the factory settings.
changes are saved in the unit. This feature alSelect Reset in the parameter selection stage
lows you to recover the factory settings.
then press ENTER button. There are four types
Select Reset in the parameter selection stage
of reset operations
can
be selected. Rotate
the
Nach
Up, der
Kit-Bearbeitung
undtypes
der
thendem
pressSet
ENTER
button.
There are four
SCROLL
WHEELalle
to
select.
Aufnahme
werden
Daten
im GerätRotate the
of
reset operations
can
be selected.
gespeichert.
Die
Reset-Funktion
SCROLL WHEEL to select. erlaubt Ihnen,
die
Werkseinstellung
wieder
herzustellen.
Reset
Kit - Reset sound
parameters
in all User
Wählen
Sie
„Reset“
in
den
Parameterkits which changed during the kit editing. When
Reset Kit - Reset
sound parameters
in all User
Einstellungen
drücken
Siethe
ENTER.
gibt
“Reset Kit” isund
blinking,
press
ENTEREs
button.
which changed
during the kit editing.
When
4 kits
verschiedene
zur Auswahl:
The
display willReset-Funktionen
show “AreYouSure”.
Press the
“Reset Kit” is blinking, press the ENTER button.
ENTER button to confirm or press the EXIT
The display will show “AreYouSure”. Press the
button to cancel. Then, it’ll return to the Setup
ENTER button to confirm or press the EXIT 24
parameter selection.
button to cancel. Then, it’ll return to the Setup
Reset Setup - Reset changes in Setup
parameter selection.
operation. When “ResetSetup” is blinking, press
Reset Setup - Reset changes in Setup
Reset
THR
3
Open
4
THR
5
C l ose
THR
Peda l
THR
Sa v i ng . . .
Sa v i ng . . .
Re s e t
Re s e t
Re s e t
Re s e t
Ki t
Ki t
Reset Kit - Reset sound parameters in all User
kits which changed during the kit editing. When
“Reset Kit” is blinking, press the ENTER button.
The display will show “AreYouSure”. Press the
ENTER
Reset
Kitbutton to confirm or press the EXIT
button to cancel. Then, it’ll return to the Setup
parameter
selection.
Mit
dieser Funktion
können Sie alle KitReset
Setup
- Reset changes
Setup
Einstellungen zurücksetzen.
Wenn dieinAnzeige
operation.
When
“ResetSetup”
is
blinking,
press
"Reset Kit“ blinkt, drücken Sie bitte ENTER.
Im
the
ENTER
button.
The
display
will
show
Display erscheint die Anzeige „Are you
“AreYouSure”.
Press
the ENTER
button
sure?“
(„Sind Sie
sicher?“)
Drücken
Sie to confirm
and
return
to
the
Kit
Selection
mode.
Or,
ENTER, wenn Sie die Kit-Einstellungen
löschen
press
the
EXIT
button
to
return
to
the
Setup
möchten oder EXIT um den Vorgang
parameter selection.
abzubrechen.
Das Gerät kehrt daraufhin zu der
Reset Song - Erasezurück.
all songs recorded by user.
Parameter-Auswahl
When “Reset Song” is blinking, press the ENTER button. Press the ENTER button to confirm orSet
press
Reset
Up the EXIT button to cancel. Then,
it’ll return to the Setup parameter selection.
Reset All
- Besides
reset all items above, it also
Hiermit
werden
alle Einstellungen
reset physical parameter
changes
in kits which
zurückgesetzt,
die Sie im Set
Up-Modus
changed
during
the
kit
advanced
editing.
vorgenommen haben. Wenn die Anzeige When
“ResetSet
All” Up“
is blinking,
press theSie
ENTER
button.
"Reset
blinkt, drücken
bitte ENTER.
Press
the erscheint
ENTER button
to confirm
or press
Im
Display
die Anzeige
„Are you
the EXIT
button
to cancel.Drücken
Then, it’ll
sure?“
(„Sind
Sie sicher?“)
Siereturn to
the Setup
parameter
ENTER,
wenn
Sie dieselection.
Einstellungen löschen möchten oder EXIT um den Vorgang abzubrechen.
Das
Gerät
kehrt
daraufhin
zu der Parameter-Auswahl zurück.
Note:
Re s e t
Ki t
A r eYouSu r e
1. Don not strike any pad after press the ENTER button until it back to the Setup parameter
Reset
Song
stage or
Kit Selection mode. It needs couple of
second.
Diese Funktion löscht alle User-Songs. Wenn die Anzeige "Reset Song“ blinkt, drücken Sie bitte
2. When enter the Setup mode from the Demo/
ENTER. Im Display erscheint die Anzeige „Are you sure?“ („Sind Sie sicher?“) Drücken Sie
song stage, the reset operation is not available.
ENTER, wenn Sie die User-Songs löschen möchten oder EXIT um den Vorgang abzubrechen.
Das Gerät kehrt daraufhin zu der Parameter-Auswahl zurück.
20
Rest All
Mit dieser Funktion werden alle Einstellungen gelöscht, das Gerät wird auf die Werkseinstellung
zurückgesetzt. Wenn die Anzeige "Reset All“ blinkt, drücken Sie bitte ENTER. Im Display erscheint
die Anzeige „Are you sure?“ („Sind Sie sicher?“) Drücken Sie ENTER, wenn Sie die Einstellungen
löschen möchten oder EXIT um den Vorgang abzubrechen. Das Gerät kehrt daraufhin zu der
Parameter-Auswahl zurück.
Bitte beachten Sie:
Schlagen Sie nicht auf ein Pad, nachdem Sie ENTER gedrückt haben. Warten Sie bitte ein paar
Sekunden bis das Gerät den Modus verlassen hat. Der Reset-Modus ist vom Demo-Modus aus
nicht verfügbar.
25
RECORD
B ef
or e r e co rd i ng , y ou sh ou l d p re pa r
RECORD
Aufnahme
neccessary settings including drum kit,
Re c o r d
Re c o r d
metronome, tempo, time signature etc. Press
B ef orSie
e
rmit
e co
i ng , the
y ou record
sh ou lmode.
d psollten
reThe
pa r
Bevor
der
Aufnahme
beginnen,
the
button
tordenter
neccessary
settings
including
drum
kit,
Sie
die
gewünschten
Anpassungen
von
Kit,
indicator will blink. Now, it is ready for recording.
metronome,
tempo,
time
signature
etc.
Press
Metronom, Pattern und Tempo vornehmen.
theRecord
button
toTaste
enterRECORD
the record
The
1.
Drücken
Sie die
ummode.
das Gerät
indicator
will
blink. Now,
itzu
is ready
recording.
meature
count-in,
the for
record
inAfter
den one
Aufnahme-Modus
versetzen;
diestarts
immediately, no
matter you strike drum pad or
Kontrollleuchte
blinkt.
Measure
1. Record
not.
If the metronome is turned on, you can hear
After
one meature
count-in,
the record starts
the
metronome
during
the recording.
immediately,
no matter
drum pad or
Measure
The
record indicator
will you
keepstrike
blinking.
not.
If
the
metronome
is
turned
on,
you
can
hear
The record measure count will appear on the
Aufnehmen
the metronome during the recording.
display.
The record indicator will keep blinking.
Press
the eintaktigen
button again
to will
stopappear
the
Nach
Einzähler
beginntondie
Aufnahme automatisch, ob Sie spielen oder nicht.
The einem
record
measure
count
the
recording.
The
display
will
go
to
the
save
Das
Metronom ist aktiv, Sie können es während der Aufnahme hören. Die Kontrollleuchte des
display.
stage.
Record-Knopfs
blinkt.again
Die Anzahl
Press the
button
to stopder
theaufgenommenen Takte erscheint im Display. Drücken Sie
RECORD
abermals
um
die
Aufnahme
zu beenden.
recording. The display will go to the save
2. Play back your recording
stage.
After stop the recording, press the
button
to
playback
button
2. Play
backyour
yourrecording.
recordingPress
again to stop theund
playback.
Abspielen
speichern
After stop the recording, press the
button
to
playback
your
recording.
Press
button
After youSie
save
the um
recording
as User Song, In
Drücken
PLAY,
Ihre Aufnahme
again
to stop
theyou
playback.
the
Song
mode
can
also
selectum
user
song
abzuspielen. Drücken Sie abermals
das
to playback.
Please refer
to the
<SONG>
chapPlayback
zu
beenden.
Wenn
Sie
Aufnahme
After
you
save
theforrecording
as die
User
Song, In
ter
in
this
Manual
details.
als
speichern,
können
Sieuser
sie auch
theUser-Song
Song mode
you can also
select
song
im
Song-Modus
anhören.
Weiter
Informationen
to
playback.
Please
refer
to
the
<SONG>
chap3. Save
User Song
finden
Sieas
imaKapitel
ter
in
this
Manual
for „Song“.
details.
In the save operation,
the User Song number
for
saving
your
record
will
blink. You
Beim
Speichern
blinkt
die Nummer
des may
User-ro3. Save
as a User
Song
tate
thesave
SCROLL
WHEEL
choose
song
name.
Songs.
Sie
können
die Nummer
mit
Hilfe
des
In the
operation,
thetoUser
Song
number
Press
the
ENTER
button
to
save
recorded
song,
Scroll
Rads
verändern.
Drücken
Sie
ENTER
for saving your record will blink. You may
ropress
the
EXIT
button
to
turn
to
the
Kit
Selection
um Ihren Song zu sichern oder EXIT um den
tate the SCROLL WHEEL to choose song name.
mode without
saving.
Vorgang
abzubrechen.
Press the ENTER button to save recorded song,
press the EXIT button to turn to the Kit Selection
Ist
die song
ausgewählte
Song-Nummer
If
the
name
was
already usedbereits
for the premode
without
saving.
vergeben,
erscheint
im
Display
„Replace
vious recording, it’ll ask you do you want to reit“place
(„Wollen
Siethe
dennew
Song
ersetzen?“).Press
Drücken
it with
recording?
the
If the
song name
was
already
used
for the preSie
ENTER
um
den
Song
durch
die
neue
ENTER button to replace it or press the EXIT
vious recording,
it’ll askoder
youEXIT
do you
want
Aufnahme
ersetzen
um
eine to rebutton to zu
select
another song
number.
place
it
with
the
new
recording?
Press
the
andere Nummer auszuwählen.
ENTER
to replace it or press the EXIT
4.
Erasebutton
User Song
button
to
select
song the
number.
In the Kit selectionanother
mode, press
DEMO
2
1
3
button twice to enter the User Song mode.
4. Erase User Song
Select an User
song then
press the ENTER
Löschen
eines
Songs
In the Kit selection
mode,
press the DEMO
button. “ Erase it?” will appear on the display.
2
1
3
button twice to enter the User Song mode.
Press
the
ENTER
button
to
erase
this
song
Drücken
SieUser
zweimal
um in
User
Select an
song DEMO
then press
theden
ENTER
or press the EXIT
button toWählen
give upSie
erasing.
Song-Modus
zu
gelangen.
einen
button. “ Erase it?” will appear on the display.
Then, it’ll return
to the User
Song mode.
User-Song
und drücken
Sie
Imsong
Display
Press the ENTER
button
toENTER.
erase this
erscheint
„Erase
it“.
(„Wollen
Sie
ihn
löschen?“).
or press the EXIT button to give up erasing.
21
Drücken
Sie
ENTER
umUser
den Song
Song mode.
zu löschen
Then, it’ll
return
to the
oder EXIT um den Vorgang abzubrechen.
Re co r d i ng
Re co r d i ng
Us e r
Us e r
Song
Song
Rep l ace
Rep l ace
21
26
it
it
Us e r
Us e r
Song
Song
E r ase
E r ase
i t?
i t?
USB und MIDI
MIDI
& USBDigital Interface“. Es handelt sich dabei um einen
Die Abkürzung MIDI steht für „Musical
Instrument
weltweiten Standard einer Schnittstelle, die es elektronischen Musikinstrumenten und Computern
MIDI stands
Musical
Digital
Interface. This is a world wide stan
USB & MIDIzu kommunizieren,
ermöglicht, miteinander
so for
dass
DatenInstrument
und Befehle
untereinander
interface
that enables electronic
musical
instruments
andganzen
computers to comm
ausgetauscht werden können. Dieser
Informationsaustausch
ermöglicht
den
Aufbau eines
other
so
that
instructions
and
other
data
can
pass
between
them. This excha
MIDI stands
for Musical Instrument
Interface.
ThisVielseitigkeit
is a world wide
standard
communication
interface
Systems
von Instrumenten
mit einerDigital
weitaus
größeren
und
Kontrolle
als es mit einem
makes
it
possible
to
create
a
system
of
MIDI
instruments
and
devices that of
that enables
electronic
musical
instruments
computers
communicateder
with
each other so that
isolierten
Instrument
möglich
wäre.
Dadurchand
ergibt
sich dietoMöglichkeit
Kommunikation
mitinstructility
and
control
than
is
available
with
isolated
instruments.
Whether
you inter
tions and Sequenzern,
other data can Expandern
pass between
them.
This exchange
of information
makes
it possible to create
a
Computern,
oder
anderem
Equipment.
Sie können
beispielsweise
Ihr
sequencers,
expanders
or versatility
other
equipment
your
musical
horizons
system
of MIDI instruments
devices
offers
greater
andden
control
than
is available
with will be grea
Spiel
im Computer
bearbeitenand
oder
einenthat
Song
amfar
Computer
abspielen,
Sie
mit
dem
instance,
you
can
edit
your
playing
in
computer
or
playback
MIDI
song from c
isolated instruments.
Whether you interface with computers, sequencers, expanders or other equipment your
Schlagzeug
begleiten können.
the
drum.
musical horizons will be greatly enhanced. For instance, you can edit your playing in computer or playback
MIDI song from computer while play
the -drum.
USB
The USB connector allows you to connect the drum directly to your
USB
computer. It can connected without driver installation under the Windo
Die USB-Buchse ermöglicht es, Ihr Schlagzeug
direkt mit
Ihrem
Computer
zu verbinden.The drum will be recog
XP, Windows
Vista
& MAC
OSX
environment.
USB - The USB connector allows you to connect
the drum
directly
to your
computer.
It can
Die Verbindung ist ohne die Installation eines
Treibers
möglich
unter
Windows
XP und the same MIDI message
as under
USB Audio
deviceXP,
to Windows
receive and
connected without driver installation
the Windows
Vistatransmit
& MAC
Vista und unter Mac OSX. Das Schlagzeug
wird als above.
Audiogerät erkannt und die oben
described
OSX environment. The drum will be
recognized
as USB Audio device to receive and
beschriebenen
MIDI-Kommunikation ist ermöglicht.
MIDI APPLICATION CHART
transmit the same MIDI messages described above.
Fun ction
Function
Basic Channel
Note Number
Velocity:
Note ON
Note OFF
Major Controls:
B9h 04h xxh
Bxh 79h 00h
Bxh 7Bh 00h
Program Change
System Exclusive
RPN
NRPN
Transmitted
Basic Chann el
10
MIDI APPLICATION CHART
No te Numbe r
0-127
Transmitted
Recognized
Velocity: N ote ON
1-127
10
N ote OFF 1-16
64
0-127
0-127
M ajor Con trols:
Reco gnized
Remarks
0-127
0-127
0-127
1-127B9h 04h xxh
0-127
Yes
X
H i-Ha
Bxh
79h
00h
Yes
Yes
Res e
64
0-127
Bxh 7Bh 00 h
Yes
Yes
All
Prog ra m C hange
X
Yes *
Yes
X
Hi-Hat pedal control
System Exc lusive
Yes
Yes **
Yes
Yes
Reset All Controller
R PN
X **
Yes **
Yes
Yes
All Notes OFF
N RPN
Yes
Yes **
X
Yes *
* C han el 10 sup ports Bank 0 only
Yes **
** If Yes
y ou ne ed deta iled information
a bout Exc lus ive, RPN a nd NR PN , p le
X
**
Yes
**
vende r
Yes
Yes ** chanel 1 0 for each pad if fixed as below :
Note:
Tra nsm ited note through
* Chanel 10 supports Bank 0 only
P AD
NOTE
** If you need detailed information about Exclusive, RPN and NRPN, please
contact your vender
Tom1
48
MIDI-Belegung
Note: Transmited note through chanel 10 for each pad if fixed as below:
Tom2
45
*Kanal 10 unterstützt nur Bank 0
** Wenn Sie weiterführende Informationen benötigen,
PAD
NOTE
kontaktieren Sie bitte Ihren Händler
Tom3
NOTE
Snare
Tom1
48
Ride
51
Snare Rim
Bitte beachten Sie: Tom2
45
Hi-Hat Open
46
Crash
Hier finden Sie die über Kanal 10 gesendeten Noten, die für
Tom3
41
Hi-Hat Close Crash Edge
42
jedes Pad wie folgt festgelegt sind:
R
1-16
Snare
38
Snare Rim
37
Crash
55
PAD
Hi-Hat Pedal Ride
Kick
Ride Edge
Hi-Hat Open
44
36
Hi-Hat Close
Hi-Hat Pedal
Kick
27
41
38
37
55
49
51
59
46
42
44
36
22
VOICE
LIST
Übersicht
6
6
6
6
6
6
6
6
6
6
6
über die Sounds
KICK
58 032
916
9
9
2 07
2 07
8372
0
721 9
721 9
721 9
SNARE
58 032
916
916
9
9
2 07
2 07
8372
8372
0
0
52 0
721 9
721 9
721 9
721 9
721 9
4
TOM
58 032
58 032
58 032
916
916
916
9
9
9
2 07
2 07
2 07
8372
8372
8372
0
0
0
52 0
52 0
52 0
721 9
721 9
721 9
721 9
721 9
721 9
721 9
721 9
721 9
4
4
4
RIDE
58 032
916
2 07
8372
52 0
721 9
721 9
721 9
4
CRASH
1 58 032
1 916
1 916
1 2 07
1 2 07
1 8372
1 8372
1 8372
1 0
EXTRA
49 58 032
41 58 032
4 58 032
49 916
41 916
4 916
49 52 0
41 52 0
4 52 0
49 721 9
41 721 9
4 721 9
49
4
41
4
4
4
All voice name has prefix:
k refers to kick, s refers to snare, x refers to cross-stick, r refers to ride, c refers to
crash,
ho refers toder
hihat
open, hc refers to hihat closed, hp refers to hihat pedal
Erläuterungen
Prefixe:
k: Kick, s: Snare, x: Cross Stick, r: Ride, c: Crash, ho: Hi-Hat open, hc: Hi-Hat closed, hp: Hi-Hat
Pedal
28
Spezifikationen
Konfiguration
3x 8“ Toms, 8“ Snare (mit Rim), 12“ Crash Becken (mit
Choke-Funktion), 12“ Ride Becken, 8“ Hi-Hat, 6“ Kick,
Hi-Hat Pedal
Sounds
95
Drum Kit
10 voreingestellte Kits, 10 User Kits
Pattern
52, jeweils mit und ohne Drumspur
Sound Effekt
Reverb mit professionellem DSP Prozessor
Set Up Menü
Lautstärke für Begleitung, Drums, Master, Advanced
und Reset
Pad Bearbeitung
Sound, Lautstärke, Pan, Pitch, Reverb
Tempo
ab Werk 96, Bereich 40-240
Metronom
an/aus, Tempo, Taktart, Lautstärke
Aufnahme
10 Songs
Display
hintergrundbeleuchtetes LED
Stromversorgung
9 V DC
Anschlussbuchsen
Kopfhörer, Line In/Out, L (Mono)/R USB,
Netzteil DC 9V
Alle Spezifikationen können ohne vorhergehende Ankündigung geändert werden.
29
WEEE-Erklärung / Entsorgung
Ihr Produkt wurde mit hochwertigen Materialien und Komponenten entworfen und
hergestellt, die recyclebar sind und wieder verwendet werden können. Dieses Symbol
bedeutet, dass elektrische und elektronische Geräte am Ende ihrer Nutzungsdauer
vom Hausmüll getrennt entsorgt werden müssen. Bitte entsorgen Sie dieses Gerät bei
Ihrer örtlichen kommunalen Sammelstelle oder im Recycling Center. Bitte helfen Sie
mit, die Umwelt, in der wir leben, zu erhalten.
!
Technische Änderungen und Änderungen im Erscheinungsbild vorbehalten. Alle Angaben
entsprechen dem Stand bei Drucklegung. Für die Richtigkeit und Vollständigkeit der enthaltenen
Beschreibungen, Abbildungen und Angaben übernimmt Musikhaus Kirstein GmbH keinerlei
Gewähr. Abgebildete Farben und Spezifikationen können geringfügig vom Produkt abweichen.
Musikhaus Kirstein GmbH - Produkte sind nur über autorisierte Händler erhältlich. Distributoren
und Händler sind keine Handlungsbevollmächtigten von Musikhaus Kirstein GmbH und haben
keinerlei Befugnis, die Musikhaus Kirstein GmbH in irgendeiner Weise, sei es ausdrücklich oder
durch schlüssiges Handeln, rechtlich zu binden. Diese Bedienungsanleitung ist urheberrechtlich
geschützt. Jede Vervielfältigung, bzw. jeder Nachdruck, auch auszugsweise, und jede Wiedergabe
der Abbildungen, auch in verändertem Zustand, ist nur mit schriftlicher Zustimmung der Firma
Musikhaus Kirstein GmbH gestattet.
!
Herstellerangaben
Musikhaus Kirstein GmbH
Bernbeurener Strasse 11
86956 Schongau
Telefon: 0049-909494-0
Telefax: 0049-909494-19
www.kirstein.de
!
30