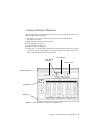
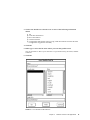
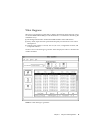
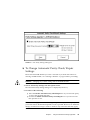
1
RAID Manager 6.1 User’s
Guide
Sun Microsystems Computer Company
A Sun Microsystems, Inc. Business
901 San Antonio Road
Palo Alto, CA 94303 USA
415 960-1300
fax 415 969-9131
Part No.: 805-2781-10
Revision A, October 1997
Copyright 1997 Sun Microsystems, Inc., 901 San Antonio Road • Palo Alto, CA 94303 USA. All rights reserved.
Portions copyright 1997 Symbios Logic, Inc. All rights reserved.
This product or document is protected by copyright and distributed under licenses restricting its use, copying, distribution, and decompilation.
No part of this product or document may be reproduced in any form by any means without prior written authorization of Sun and its licensors,
if any. Third-party software, including font technology, is copyrighted and licensed from Sun suppliers.
Parts of the product may be derived from Berkeley BSD systems, licensed from the University of California. UNIX is a registered trademark in
the U.S. and other countries, exclusively licensed through X/Open Company, Ltd.
Sun, Sun Microsystems, the Sun logo, AnswerBook, SunDocs, and Solaris are trademarks, registered trademarks, or service marks of Sun
Microsystems, Inc. in the U.S. and other countries. All SPARC trademarks are used under license and are trademarks or registered trademarks
of SPARC International, Inc. in the U.S. and other countries. Products bearing SPARC trademarks are based upon an architecture developed by
Sun Microsystems, Inc. The OPEN LOOK and Sun™ Graphical User Interface was developed by Sun Microsystems, Inc. for its users and
licensees. Sun acknowledges the pioneering efforts of Xerox in researching and developing the concept of visual or graphical user interfaces for
the computer industry. Sun holds a non-exclusive license from Xerox to the Xerox Graphical User Interface, which license also covers Sun’s
licensees who implement OPEN LOOK GUIs and otherwise comply with Sun’s written license agreements.
RESTRICTED RIGHTS: Use, duplication, or disclosure by the U.S. Government is subject to restrictions of FAR 52.227-14(g)(2)(6/87) and
FAR 52.227-19(6/87), or DFAR 252.227-7015(b)(6/95) and DFAR 227.7202-3(a).
DOCUMENTATION IS PROVIDED “AS IS” AND ALL EXPRESS OR IMPLIED CONDITIONS, REPRESENTATIONS AND WARRANTIES,
INCLUDING ANY IMPLIED WARRANTY OF MERCHANTABILITY, FITNESS FOR A PARTICULAR PURPOSE OR NONINFRINGEMENT, ARE DISCLAIMED, EXCEPT TO THE EXTENT THAT SUCH DISCLAIMERS ARE HELD TO BE LEGALLY INVALID.
Copyright 1997 Sun Microsystems, Inc., 901 San Antonio Road • Palo Alto, CA 94303 Etats-Unis. Tous droits réservés.
Des portions de ce produit sont protégées par un copyright (1997) de Symbios Logic, Inc. Tous droits réservés.
Ce produit ou document est protégé par un copyright et distribué avec des licences qui en restreignent l’utilisation, la copie, la distribution, et la
décompilation. Aucune partie de ce produit ou document ne peut être reproduite sous aucune forme, par quelque moyen que ce soit, sans
l’autorisation préalable et écrite de Sun et de ses bailleurs de licence, s’il y en a. Le logiciel détenu par des tiers, et qui comprend la technologie
relative aux polices de caractères, est protégé par un copyright et licencié par des fournisseurs de Sun.
Des parties de ce produit pourront être dérivées des systèmes Berkeley BSD licenciés par l’Université de Californie. UNIX est une marque
déposée aux Etats-Unis et dans d’autres pays et licenciée exclusivement par X/Open Company, Ltd.
Sun, Sun Microsystems, le logo Sun, AnswerBook, SunDocs, et Solaris sont des marques de fabrique ou des marques déposées, ou marques de
service, de Sun Microsystems, Inc. aux Etats-Unis et dans d’autres pays. Toutes les marques SPARC sont utilisées sous licence et sont des
marques de fabrique ou des marques déposées de SPARC International, Inc. aux Etats-Unis et dans d’autres pays. Les produits portant les
marques SPARC sont basés sur une architecture développée par Sun Microsystems, Inc. L’interface d’utilisation graphique OPEN LOOK et
Sun™ a été développée par Sun Microsystems, Inc. pour ses utilisateurs et licenciés. Sun reconnaît les efforts de pionniers de Xerox pour la
recherche et le développement du concept des interfaces d’utilisation visuelle ou graphique pour l’industrie de l’informatique. Sun détient une
licence non exclusive de Xerox sur l’interface d’utilisation graphique Xerox, cette licence couvrant également les licenciés de Sun qui mettent en
place l’interface d’utilisation graphique OPEN LOOK et qui en outre se conforment aux licences écrites de Sun.
CETTE PUBLICATION EST FOURNIE "EN L’ETAT" ET AUCUNE GARANTIE, EXPRESSE OU IMPLICITE, N’EST ACCORDEE, Y
COMPRIS DES GARANTIES CONCERNANT LA VALEUR MARCHANDE, L’APTITUDE DE LA PUBLICATION A REPONDRE A UNE
UTILISATION PARTICULIERE, OU LE FAIT QU’ELLE NE SOIT PAS CONTREFAISANTE DE PRODUIT DE TIERS. CE DENI DE
GARANTIE NE S’APPLIQUERAIT PAS, DANS LA MESURE OU IL SERAIT TENU JURIDIQUEMENT NUL ET NON AVENU.
Contents
1.
Program Application Overview
1
Types of Host-RAID Module Configurations Supported
Single-Host Configuration
Multi-host Configuration
2
2
Independent Controller Configuration
Special Network Considerations
About This Software
Task Summary Charts
4
6
10
Features Common to All Applications
17
Common Definitions and Explanations
17
RAID Module
18
Drive Group
19
Logical Unit
19
Hot Spare Drive
20
Drive Group Numbering
RAID Level
3
6
Application Summary
2.
1
21
23
Reconstruction
23
Contents
iii
Parity
24
Device Name
24
Cache Memory
SNMP
25
RDAC
25
25
Recovery Guru
26
Common Navigating Features
Common Tasks
27
28
Starting an Application
28
Common Window Elements
Exiting an Application
Using Online Help
30
Selecting a Module
33
Locating a Module
36
29
30
Viewing A Module Profile
37
Saving Module Profile Information
3.
Using the Configuration Application
Overview
▼
To Start the Configuration Application
When to Use
What Happens
52
52
52
To List or Locate a Drive Group
Creating Logical Units (LUNs)
When to Use
What Happens
55
55
Check For Restrictions
iv
45
46
List/Locate Drives
▼
42
RAID Manager 6.1 User’s Guide • October 1997
56
55
53
47
▼
To Create or Add LUNs
Changing LUN Parameters
When to Use
What Happens
What Happens
▼
66
66
66
Creating Hot Spare Drives
When to Use
56
68
68
68
To Create a Hot Spare Drive
69
Deleting Drive Groups/ LUNs or Hot Spare Drives
When to Use
What Happens
▼
71
72
To Delete Drive Groups/LUNs or Hot Spare Drives
Resetting the Configuration
When to Use
What Happens
75
75
Using the Status Application
Overview
▼
75
77
78
To Start the Status Application
Using Message Log
When to Use
What Happens
▼
78
82
82
83
To Use Message Log
85
Listing Different Types of Messages
Opening an Existing Log File
87
88
Saving Log as Another File Name
▼
72
75
To Reset the Configuration
4.
71
To Save a Log to a Different File
90
90
Contents
v
Refreshing Message Log
Changing Log Settings
91
92
Performing a Health Check for RAID Modules
When to Use
What Happens
▼
97
97
97
To Perform a Health Check
99
Viewing LUN Reconstruction Progress and Changing the Reconstruction
Rate 103
When to Use
What Happens
▼
5.
103
103
To Change the Reconstruction Rate
Using the Recovery Application
Overview
▼
105
107
108
To Start the Recovery Application
108
Recovering From Failures on a RAID Module
Benefits of Recovery Guru
111
112
Possible Component Statuses
112
Example – Recovering From Drive Failures
115
Checking for Component Failures Using Recovery Guru
When to Use
What Happens
▼
118
118
To Check for Component Failures
Possible Failures Detected
121
122
Manually Checking and Repairing Parity
When to Use
What Happens
125
125
What Parity Check/Repair Does
vi
RAID Manager 6.1 User’s Guide • October 1997
125
125
118
▼
To Manually Check and Repair Parity
Performing Manual Recovery for Drives
When to Use
129
129
What Happens
129
Failing a Drive
132
Reconstructing a Drive
Reviving a Drive
133
134
Performing Manual Recovery for LUNs
When to Use
127
135
135
What Happens
135
Formatting a LUN
Reviving a LUN
137
138
Performing Manual Recovery for Controller Pairs
When to Use
What Happens
6.
140
140
Placing a Controller Offline
142
Placing a Controller Online
143
Using the Maintenance/Tuning Application
Overview
145
146
Starting Maintenance/Tuning
146
Changing the LUN Reconstruction Rate
When to Use
What Happens
▼
140
150
150
150
To Change the LUN Reconstruction Rate
152
Balancing LUNs Between Active/Active Controllers
When to Use
What Happens
153
153
153
Contents
vii
Balancing LUNs on One RAID Module
154
Balancing LUNs on All RAID Modules
156
Changing Controller Mode
When to Use
160
160
What Happens
160
Before You Begin
160
Changing To Active/Active Controllers
Swapping Active/Passive Controllers
Viewing and Setting Caching Parameters
When to Use
166
166
To View and Set Caching Parameters
Upgrading Controller Firmware
When to Use
168
170
170
What Happens
170
Before You Begin
▼
164
166
What Happens
▼
162
170
To Upgrade Controller Firmware
172
Confirming the Firmware Upgrade
177
Changing Automatic Parity Check/Repair Settings
When to Use
180
What Happens
▼
7.
180
To Change Automatic Parity Check/Repair Settings
Common Questions and Troubleshooting
Common Questions
Troubleshooting
183
184
190
Common Troubleshooting (All Applications)
Configuration Troubleshooting
viii
180
RAID Manager 6.1 User’s Guide • October 1997
196
190
181
Status Troubleshooting
199
Recovery Troubleshooting
203
Maintenance/Tuning Troubleshooting
209
Contents
ix
x
RAID Manager 6.1 User’s Guide • October 1997
CHAPTER
1
Program Application Overview
■
Types of Host-RAID Module Configurations Supported — page 1
■
About This Software — page 6
■
Task Summary Charts — page 10
Types of Host-RAID Module
Configurations Supported
The storage management software supports three main configurations of host
machines connected by SCSI Buses to the RAID Modules.
Caution – No configurations or combinations are supported beyond those
described in this section. Furthermore, the software’s operation cannot be
guaranteed to work as intended/described in the RAID Manager Installation and
Support Guide, this User’s Guide, or the online help, if other configurations are used.
Note – The Networked version of the RAID Manager software always sees both
controllers in a dual-controller RAID Module, regardless of the configurations
mentioned in this section. However, the Networked version (under the Select
Module option) will be able to tell if the RAID Module is in an independent
controller configuration.
Each drive group/LUN number is owned by only one of the active controllers in a
RAID Module. Furthermore, the combined total of LUNs configured for both
controllers cannot exceed the maximum number of LUNs that the module can
1
handle (that is, 8, 16, or 32) regardless of which configuration is used. For
information on LUN limits per module, refer to the RAID Manager Installation and
Support Guide.
Single-Host Configuration
In this configuration, one host machine is connected by two SCSI Buses to each
controller in a RAID Module. The two SCSI Buses are required for maximum RDAC
failover support for redundant controllers. Refer to the documentation that is
shipped with the storage device for more hardware information.
Note – This the recommended configuration with the RAID Manager software
installed on the host for fullest functionality and complete RDAC failover support
with dual controllers. However, this configuration also supports single-controller
RAID Modules or dual-controllers connected by a single SCSI Bus RAID Modules.
You do not have RDAC protection with either of these configurations.
Multi-host Configuration
In this configuration, two host machines are each connected by two SCSI Buses to
both of the controllers in a RAID Module. Refer to the documentation that is shipped
with the storage device for more hardware information.
Caution – Not every operating system supports this configuration. Be sure to
consult the restrictions in the RAID Manager Installation and Support Guide for more
information. Also, the host machines and operating systems must be able to handle
the multi-host configuration. Refer to the appropriate hardware documentation.
With the RAID Manager software installed on each host machine, both hosts have
complete visibility of both controllers, all data paths, and all configured drive
groups/logical units(LUNs) in a RAID Module, plus RDAC failover support for the
redundant controllers. However, in this configuration, use caution when performing
storage management tasks (especially creation and deletion of LUNs) to ensure the
two hosts do not send conflicting commands to the controllers in the RAID Modules.
The following items are unique to this configuration:
■
2
Both hosts must have the same operating system and RAID Manager software
versions installed.
RAID Manager 6.1 User’s Guide • October 1997
■
Both host machines should have the same LUNs-per-host adapter capacity (that
is, either both are limited to eight LUNs or both can have 16-32 LUNs). This is
important for RDAC failover situations so that each controller can take over for
the other and display all configured drive groups/LUNs.
■
If the operating system on the host machine is capable of creating reservations,
the software will honor them. This means that each host could have reservations
to specified drive groups/logical units (LUNs) and only that host’s software can
perform operations on the reserved drive group/LUN. Without reservations, the
software on either host machine is able to begin any operation. Therefore, you
must use caution when performing certain tasks that need exclusive access
(especially creation and deletion of LUNs) to ensure the two hosts do not send
conflicting commands to the controllers in the RAID Modules.
■
This software does not provide failover protection at the host level. That feature
requires third-party software.
Independent Controller Configuration
In this configuration, two host machines are connected to a dual-controller RAID
Module. One host machine is connected by a SCSI Bus to one controller, and a
second host machine is connected by another SCSI Bus to the other controller. Refer
to the documentation that is shipped with the storage device for more hardware
information.
Each host machine and its software see the controller and the drive groups/LUNs
that it owns as independent of the other (alternate) controller. That is, each host
machine acts as if it is connected to a single-controller RAID Module.
Also, with Independent Controller selected (as part of RAID Module information in
Select Module), the storage management software has knowledge of the alternate
controller and displays all configured drive groups/LUNs. It only reports real-time
statuses for the host-controller data path on which it is installed, but displays and
reports an “Inaccessible” status for drive groups/LUNs owned by the alternate
controller.
The following items are unique to this configuration:
■
Both hosts must have the same operating system and the same RAID Manager
software versions installed.
■
Both host machines should have the same LUNs-per-host adapter capacity (that
is, either both are limited to eight LUNs or both can have 16-32 LUNs). This is
important for failed-controller situations so that each controller can take over and
display all configured drive groups/LUNs for the alternate controller.
■
A special setting is required in Select Module (the “Indep. Cntrls?” column says
Yes).
■
The controllers in the RAID Module do not have RDAC failover protection.
Chapter 1
Program Application Overview
3
■
The RAID Manager software reports the alternate controller and its drive group/
LUNs as “Inaccessible.”
■
Health Check (Status Application) and Recovery Guru (Recovery Application)
detect data-path-related failures only for the controller that is connected to the
host machine running the storage management software. For example, if host 1
has a controller (data path) failure, host 1 reports the failure, but host 2 will not
report a data path failure using its Health Check or Recovery Guru. Also, these
applications detect drive-related failures only for configured drive groups/LUNs
that are owned by the controller (connected to the host machine running the
storage management software) or for any unassigned or hot spare (Spare-Stdby)
drive.
Special Network Considerations
The Networked version of the RAID Manager software always sees both controllers
in a dual-controller RAID Module, regardless of which configuration you have.
However, the Networked version will be able to tell if the RAID Module it is
connected to has an independent controller configuration if independent controllers
was selected using the Select Module option.
If you are using the Networked version of this software, the following restrictions
apply to any of the host-RAID Module configurations:
4
■
Your RAID Modules do not have RDAC failover protection unless there is SCSIbased failover protection installed on the host connected to the modules through
the SCSI Bus.
■
This software does not provide SCSI-related data path failure detection or
recovery. However, any problems with a network connection to the controllers or
a problem with the controllers themselves are shown as a data path failure.
Recovery Guru provides assistance for these problems.
■
This software has no way to recognize any exclusive access operations that may
be performed by other software installed on the host machine (not even another
storage management package). This requires you to use caution before starting
certain operations that need exclusive access because without it file systems are
not detected and multiple operations could be launched without logical units
being protected.
RAID Manager 6.1 User’s Guide • October 1997
Caution – Drive groups/LUNs and their data can be lost if more than one
“destructive” operation is launched. No other operations should be attempted on the
same drive group/LUN if one of these operations is still being completed.
Operations requiring exclusive access to the LUNs include Delete for LUNs and File
➔ Reset Configuration (Configuration); fixing Multiple Drive Failures with Recovery
Guru and formatting a LUN with Options ➔ Manual Recovery ➔ Logical Units
(Recovery); and Firmware Upgrade ➔ Offline method (Maintenance/Tuning).
Chapter 1
Program Application Overview
5
About This Software
Before using this software, check for a README file on any installation media. This
file may contain important information that was not available at the time this User’s
Guide was prepared.
Application Summary
Once you have started the software, the application icons are available ( FIGURE 1-1).
The collection of applications allows you to perform all the necessary RAID
Management tasks.
FIGURE 1-1
Application Icons
FIGURE 1-2 shows a list of the tasks within each application. A brief overview of these
applications is provided in TABLE 1-1.
All applications share some common tasks (Select Module, Locate Module, Module
Profile, and Save Module Profile). Information and procedures for these commons
tasks are in Chapter 2.
6
RAID Manager 6.1 User’s Guide • October 1997
Applications
Configuration
Status
Recovery
Maintenance/
Tuning
Recovery Guru
List/Locate Drives
Create LUN
Create Hot Spare
Delete Drive Groups/
LUNs or Hot Spares
About
Software Version
Information
Manual Parity
Check/Repair
Manual Recovery
Message Log
Health Check
LUN Reconstruction
FIGURE 1-2
LUN Reconstruction Rate
LUN Balancing
Controller Mode
Caching Parameters
Firmware Upgrade
Options, Automatic Parity
Program Applications
Chapter 1
Program Application Overview
7
TABLE 1-1
Application Descriptions
Program Application
Options
Common Across
all Applications
Configuration
8
Options/Tasks You Can Perform
Refer To
Each application has an area near the top of the
window that has the following options:
Help – Access online information for any
application.
page 30
RAID Module Selection box – Select a particular
RAID Module (every application except
Configuration also has an All RAID Modules
selection).
page 33
Select Module – Select or find a specific RAID
Module; add or remove RAID Modules; or edit the
information (module name, independent controller
setting, or other comments) about a RAID Module.
page 33
Locate Module – Physically locate and identify a
RAID Module.
page 36
Module Profile – Obtain specific details about the
controllers, drives, and LUNs for a selected RAID
Module.
page 37
List/Locate Drives – List individual drives in a
selected drive group. Also, physically locate drives
in a selected drive group by the flashing activity
lights.
page 52
Create LUN – Create LUNs from unassigned drives
or add LUNs to an existing drive group that has
remaining capacity.
page 55
Create Hot Spare – Create hot spare drives from
unassigned drives to act as standbys in case a drive
fails in the RAID Module.
page 68
Delete – Delete individual LUNs, all LUNs in a drive
group, or a hot spare drive.
page 71
RAID Manager 6.1 User’s Guide • October 1997
TABLE 1-1
Application Descriptions (Continued)
Program Application
Status
Recovery
Maintenance/
Tuning
Options/Tasks You Can Perform
Refer To
Message Log – View the log files containing
information about events (such as failures, general
events, and results of parity check/repair).
page 82
Health Check – Perform an immediate health check
on a specific RAID Module or all RAID Modules and
view the results.
page 97
LUN Reconstruction – View the status of any LUNs
currently reconstructing and, if desired, change the
rate of reconstruction for those LUNs.
page 103
Recovery Guru – Perform an immediate check of
selected RAID Module(s) and obtain step-by-step
procedures for recovering from component failures
in the RAID Module.
page 118
Manual Parity Check/Repair – Start an immediate
parity check/repair on selected LUNs.
page 125
Options ➔ Manual Recovery – Perform various
recovery options manually on drives (fail,
reconstruct, and revive), LUNs (format and revive),
and controller pairs (place offline and online).
page 129
LUN Reconstruction Rate – Change the rate of
reconstruction for any LUN in the selected RAID
Module.
page 150
LUN Balancing – Transfer LUN ownership between
active/active controllers on a drive group basis.
page 153
Controller Mode – Change controller pairs from
active/passive to active/active or from active/
passive to passive/active.
page 160
Caching Parameters – Change the caching
parameters for individual LUNs.
page 166
Firmware Upgrade – Perform an upgrade of
controller firmware (online or offline) and/or
NVSRAM files.
page 170
Options ➔ Auto Parity Settings – Enable/disable the
automatic Parity Check/Repair function and set the
time at which you want the check to occur each day.
page 180
Chapter 1
Program Application Overview
9
Task Summary Charts
FIGURE 1-3 through FIGURE 1-6 contain charts showing the tasks in each program
application. Use these charts as a quick reference to review the options you can use
to perform the tasks.
Save Module Profile
File
Reset Configuration
Exit
Help
RAID Module
Selection Box
Select
Module
Configuration
Locate
Module
Application
Controllers
Module
Profile
Drives
LUNs
Drive
Selection
List/Locate
Drives
Caching
Parameters
Create
Options
Segment
Size
Create
LUN
Assignment
Create LUN
Create
Hot Spare
Delete
FIGURE 1-3
10
Configuration Task Summary Chart
RAID Manager 6.1 User’s Guide • October 1997
LUN
Capacity
Options
Drive Selection
Open Log
File
Save Log As
Save Module Profile
Exit
Edit
Copy To Clipboard
Select All
Options
Refresh All
Status
Application
Help
Log Settings
Default Log
Log Size
Threshold
RAID Module
Selection Box
Checking
Frequency
Select Module
Locate
Module
Controllers
Drives
Module
Profile
Message Log
LUNs
All
Show Details
Select All
List Type
Health Check
General
Show Details
Select All
LUN
Reconstruction
FIGURE 1-4
Parity
Hardware
ASC/ASCQ
Code
Status Task Summary Chart
Chapter 1
Program Application Overview
11
Save Module Profile
File
Fail
Exit
Drives
Options
Manual
Recovery
Revive
Help
Logical
Units
RAID Module
Selection Box
Select Module
Recovery
Application
Controller
Pairs
Locate Module
Controllers
Module
Profile
Drives
LUNs
Recovery
Guru
Manual Parity
Check/Repair
FIGURE 1-5
12
Fix
Start Parity
Check/Repair
Recovery Task Summary Chart
RAID Manager 6.1 User’s Guide • October 1997
Reconstruct
Format
Revive
Place
Offline
Place
Online
File
Save Module Profile
Exit
Options
Auto Parity
Settings
Help
RAID Module
Selection Box
Select Module
Locate Module
Maintenance/
Tuning
Controllers
Module
Profile
Drives
LUNs
Application
LUN
Reconstruction
Rate
LUN
Balancing
Controller
Mode
Caching
Parameters
Firmware
Upgrade
FIGURE 1-6
Save (single RAID Module)
Balance (all RAID Modules)
Change to Active/Active
Swap Active/Passive
Save
Online
Offline
Maintenance/Tuning Task Summary Chart
Chapter 1
Program Application Overview
13
TABLE 1-2
Option
Files With Information About Command Line Utilities And Programs
Description
Information
symsm
rdac
rmevent
raidcode.txt
Overviews the software’s graphical user interface (GUI), command line programs,
background process programs and driver modules, and customizable elements.
Describes the software’s support for rdac (Redundant Disk Array Controller), including
details on any applicable drivers and daemons.
The RAID Event File Format. This is the file format used by the applications to dispatch
an event to the rmscript notification script. It also is the format for Message Log’s log
file (the default is rmlog.log).
A text file containing information about the various RAID events and error codes.
Command Line Programs
drivutil
fwutil
healthck
lad
logutil
nvutil
parityck
raidutil
rdacutil
storutil
symping
(Networked
version only)
14
The drive/LUN utility. This program helps manage drives/LUNs. It allows you to obtain
drive/LUN information, revive a LUN, fail/unfail a drive, and obtain LUN
reconstruction progress.
The controller firmware download utility. This program downloads appware, bootware,
fibre channel code, or an NVSRAM file to a specified controller.
The health check utility. This program performs a health check on the indicated RAID
module(s) and displays a report to standard output.
The list array devices utility. This program identifies what RAID controllers and logical
units are connected to the system.
The log format utility. This program formats the error log file and displays a formatted
version to the standard output.
The NVSRAM display/modification utility. This program permits the viewing and
changing of RAID controller non-volatile RAM settings, allowing for some customization
of controller behavior. It verifies and fixes any NVSRAM settings that are not compatible
with the storage management software.
The parity check/repair utility. This program checks, and if necessary, repairs the parity
information stored on the array. (While correct parity is vital to the operation of the
array, the possibility of damage to parity is extremely unlikely.)
The RAID configuration utility. This program is the command line counterpart to the
graphical configuration application. It permits RAID logical unit and hot spare creation
and deletion to be performed from a command line or script.
The redundant disk array controller management utility. This program permits certain
redundant controller operations such as LUN load balancing and controller failover and
restoration to be performed from a command line or script.
The host store utility. This program performs certain operations on a region of the
controller called host store. You can use this utility to set an independent controller
configuration, change RAID Module’s names, and clear information in the host store
region.
The network connection verification utility. This program verifies that the network
connection between the Networked storage manager software’s host and a RAID
Module's controller(s) is operational. If a failure occurs, the symping utility will display
possible reasons.
RAID Manager 6.1 User’s Guide • October 1997
TABLE 1-2
Files With Information About Command Line Utilities And Programs
Background Process Programs and Driver Modules
arraymon
rdaemon
rdriver
The array monitor background process. The primary function of the array monitor is to
watch for the occurrence of exception conditions in the array and provide administrator
notification when they happen.
The redundant I/O path error resolution daemon. The primary function of rdaemon is to
receive and react to redundant controller exception events and to participate in the
application-transparent recovery of those events through error analysis and, if necessary,
controller failover.
The redundant I/O path routing driver. The rdriver module works in cooperation with
rdaemon in handling the transparent recovery of I/O path failures. Its primary
responsibilities include routing I/Os down the proper path and communicating with the
rdaemon about errors and their resolution.
Customizable Elements
rmparams
rmscript
This software’s parameter file. This ASCII file has a number of parameter settings, such
as the array monitor poll interval, what time to perform the daily array parity check, and
so on. The applications read this file on startup or at select times during their execution.
A subset of the parameters in rmparams are changeable under the graphical interface.
The notification script. A program that is called by the array monitor and other programs
whenever an important event is reported. The file has certain standard actions, including
posting the event to the message log (rmlog.log), sending e-mail to the superuser/
administrator, and, in some cases, sending an SNMP trap. Although you can edit
rmscript, make certain that you do not disturb any of the standard actions.
Chapter 1
Program Application Overview
15
16
RAID Manager 6.1 User’s Guide • October 1997
CHAPTER
2
Features Common to All
Applications
This chapter contains concepts, navigational functions, and procedures common to
each application in this User’s Guide.
■
Common Definitions and Explanations — page 17
■
Common Navigating Features — page 27
■
Common Tasks — page 28
Common Definitions and Explanations
The information in this section is common across all of the applications. You should
become familiar with the terms, definitions, and concepts provided in this section.
■
■
■
■
■
■
■
■
■
■
■
■
■
RAID Module—page 18
Drive Groups—page 19
Logical Unit—page 19
Hot Spare Drive—page 20
Drive Group Numberings—page 21
RAID Level—page 23
Reconstructions—page 23
Parity—page 24
Device Name—page 24
Cache Memory—page 25
SNMP—page 25
RDAC—page 25
Recovery Guru—page 26
17
RAID Module
A redundant array of inexpensive disks (RAID) module is a set of drives, a set of
controllers (single active, active/passive, or active/active), and applicable power
supplies and fans. You select a RAID Module to perform the various RAID tasks
(such as configuring, obtaining status, recovering, and so on). For example, a unit
with 5 drive trays, 35 disk drives and 2 controllers would be considered one RAID
Module (FIGURE 2-1).
By default, RAID Module numbers are assigned in the order in which the system
detects them (SCSI versions), or the order in which you define them (Networked
versions). The default name displayed is derived from the name of the host machine
where the RAID Manager software is installed. For example, you see
<hostname>_001, <hostname>_002, and so on.
FIGURE 2-1
18
A RAID Module
RAID Manager 6.1 User’s Guide • October 1997
Drive Group
A drive group is a physical set of drives in the RAID Module ( FIGURE 2-2). Drive
groups are defined during configuration. You perform all configuration tasks (for
example, LUN creation/deletion, and hot spare creation) on a RAID Module and its
associated drive groups. The drive groups are identified in the Drive Groups area of
the main Configuration window. There are three types of drive groups:
■
An unassigned drive group has not been configured into LUNs or hot spares. This
drive group is displayed only in the Drive Groups area of the Configuration
Application main window.
■
A hot spare drive group has been assigned as hot spares. This drive group is
displayed only in the Drive Groups area of the Configuration Application main
window.
■
A configured drive group has been configured into one or more LUNs with the
same RAID Level. Each configured drive group is designated with a number (for
example, 1, 2, 3, and so on). These drive groups are displayed by number in all
applications.
Logical Unit
A logical unit (LUN) is the basic structure you create on the RAID Modules to store
and retrieve data. A LUN spans one or more drives and is configured into either
RAID Level 0, 1, 3, or 5. More than one LUN may reside within a drive group, and
all LUNs in the same drive group share the same physical drives and RAID Level.
Each LUN is seen by the operating system as one drive. If you create only one LUN
on a drive group, the terms “LUN” and “drive group” are synonymous. However,
their designated number may be different. For example, drive group 2 may contain
only one LUN, but its number could be LUN 3. FIGURE 2-2 is a representation of
LUNs in drive groups.
Chapter 2
Features Common to All Applications
19
Configured Drive Group
of 10 drives with 1 LUN
Unassigned Drive Group
of 23 drives
Two hot spare drives
FIGURE 2-2
Drive Groups and LUNs
Hot Spare Drive
A hot spare drive is a drive that contains no data and acts as a standby in case a
drive fails in a RAID 1, 3, or 5 LUN. The hot spare drive adds another level of
redundancy to your RAID Module. If a drive (of the same or smaller capacity) fails,
the hot spare automatically takes over for the failed drive until you replace it. Once
you replace the failed drive, the hot spare automatically returns to a Spare-Stdby
(standby) status after reconstruction (copy-back) is completed on the new
replacement drive. Depending on how many hot spares you configure, a LUN could
remain Optimal and still have several Failed drives (each one being covered by a hot
spare).
20
RAID Manager 6.1 User’s Guide • October 1997
A hot spare drive is not dedicated to a specific drive group, but instead can be used
for any failed drive in the RAID Module with the same or smaller capacity. Each
RAID Module can support as many hot spare drives as there are SCSI Channels
(probably either 2 or 5, depending on the model of your RAID Module).
You can determine the status of the hot spares by highlighting the hot spare drive
group in the main Configuration window and selecting List/Locate Drives or by
selecting Module Profile ➔ Drives.
Drive Group Numbering
The numbering of drive groups is based on the specific LUN numbers associated
with each drive group. Drive group numbering starts with the lowest numbered
LUN.
For example, the drive group containing LUN 0 would always be drive group 1.
When you delete LUNs and then add new LUNs, the drive group numbers can
change to reflect the new LUN numbers associated with it.
For example, suppose you had the following drive groups:
Drive Group #
LUN #
1
0, 1
2
2
3
3, 4, 5
Now, you delete LUN 1. In this case, renumbering would not occur. The drive
groups would be as follows:
Drive Group #
LUN #
1
0
2
2
3
3, 4, 5
Chapter 2
Features Common to All Applications
21
Next, you create a new drive group. The new drive group would use the first
available LUN, which in this case is 1. The drive groups would be renumbered as
follows:
Drive Group #
LUN #
1
0
2
1
3
2
4
3, 4, 5
As you can see, LUN 1 is now part of drive group 2. The old drive group 2 has been
renumbered to 3, and the old drive group 3 has been renumbered to 4.
Caution – Keep in mind that the drive group numbering can change when you are
creating and deleting LUNs.
22
RAID Manager 6.1 User’s Guide • October 1997
RAID Level
A RAID Level determines how data is stored on the drives in your RAID Modules.
The RAID Level indicates the way the controller reads and writes data and parity on
the drives. The controller can create RAID Level 0, 1, 3, and 5 LUNs. TABLE 2-1
describes these RAID Levels.
TABLE 2-1
RAID Level Descriptions
RAID Level
Description
RAID 0
Non-redundant RAID Level where data, without parity, is striped across
a drive group. All drives are available for storing user data. Any single
drive failure in a drive group causes data loss and a LUN status of Dead.
RAID 1
Redundant RAID Level where identical copies of data are maintained on
drive pairs, also known as mirrored pairs. Half of the drives are available
for storing user data. Drive pair failure causes data loss.
(Also known
as RAID 0/1
or RAID 0+1)
You can view mirrored pairs using List/Locate Drives (in the
Configuration Application). The mirrored-pair drives are indicated by a
number appearing in front of the drive location information. For
example, (1) appears in front of the first drive in the first mirrored pair,
(2) appears in front of the first drive in the second mirrored pair, and so
on.
RAID 3
Redundant RAID Level where data and parity are striped across a drive
group. One drive’s worth is for redundancy; all other drives are available
for storing user data. Best used for high I/O mode. Any two-drive failure
in the same drive group causes data loss.
RAID 5
Redundant RAID Level where data and parity are striped across a drive
group. One drive’s worth is for redundancy; all other drives are available
for storing user data. Best used for small/medium, random I/Os. Any
two-drive failure in the same drive group causes data loss.
Reconstruction
Reconstruction is the process used to restore a degraded RAID 1, 3, or 5 LUN to its
original state after you replace a single, failed drive.
During reconstruction, the controller recalculates data on the replaced drive by using
data and parity from the other drives in the LUN. The controller then writes this
data to this replaced drive.
Chapter 2
Features Common to All Applications
23
Reconstruction should start automatically when you physically replace a single
failed drive in a RAID 1, 3, or 5 LUN. The drive’s fault light comes on momentarily
at the beginning of reconstruction, but then turns off, and the drive activity lights
flash steadily throughout the reconstruction process.
Parity
Parity is additional information stored along with the data that enables the controller
to reconstruct lost data on RAID Level 1, 3, or 5 LUNs if a single drive fails.
The software performs an Automatic Parity Check/Repair operation (if enabled)
that helps guarantee data integrity of LUNs by scanning and repairing any damaged
parity. You can also perform a Manual Parity Check/Repair if desired. Parity
Check/Repair performs the following functions:
■
Scans optimal RAID 1, 3, and 5 LUNs and checks the parity for each block in the
LUN. RAID 1 (striping and mirroring) does not have true parity, but parity check
compares data on each mirrored pair, block by block.
■
Repairs any parity inconsistencies found during the parity check. On a RAID 1
LUN, the controller changes the data on the mirror disk to make it match the data
on the data disk. On RAID 3 or 5 LUNs, the controller changes the parity so that
it is consistent with the data.
Caution – RAID Level 0 does not have parity and, therefore, cannot be checked and
repaired. Additionally, you cannot run a parity check/repair on RAID 1, 3, or 5
LUNs with a status other than Optimal. Parity check/repair fixes parity, not data. If
the parity inconsistencies resulted from corrupted data, the data is still corrupted,
but the parity is correct. Parity inconsistencies might indicate corrupt data. You may
be able to use your operating system to verify your data.
Device Name
The software uses the device name as an address to access controllers in a RAID
Module. These addresses are determined by the location of the RAID Module
hardware and can vary according to the operating system you are using.
For example, most UNIX operating systems use a cXtXdXsX scheme. Refer to the
RAID Manager Installation and Support Guide for details.
24
RAID Manager 6.1 User’s Guide • October 1997
Cache Memory
Cache memory is an area on the controller used for intermediate storage of read and
write data. By using cache, you can increase overall performance because the data
for a read operation from the host may already be in the cache from a previous
operation (thus the need to access the drive itself is eliminated), or the write
operation is considered completed once it is written to the cache.
When you create a LUN, you can specify various caching parameters for the LUNs.
If you need to change any caching parameters after LUN creation, use the
Maintenance/Tuning Application (Caching Parameters).
Note – You can also use the raidutil command line utility for setting these and
other more advanced caching parameters.
SNMP
The Simple Network Management Protocol (SNMP) notification is an option that
you may enable when installing this software. It allows this software to send remote
notification of RAID events to a designated network management station (NMS)
using SNMP traps.
See “SNMP Notification” in the RAID Manager Installation and Support Guide for
details on enabling this option.
RDAC
The Redundant Disk Array Controller (RDAC) Driver is part of the RAID
Management software package. For RAID Modules with redundant controllers, this
host-based driver manages the I/O data path(s). If a component fails on the data
path (interface cable, controller, host adapter, and so on) that causes the host to lose
communication with a controller, the RDAC driver automatically reroutes all I/O
operations to the other controller.
Caution – You do not have RDAC failover protection if you are using the
Networked version of this software, or if the RAID Module is using the independent
controller configuration.
Chapter 2
Features Common to All Applications
25
Note – Your operating system may have special requirements for supporting RDAC
which will be described as part of this software’s installation process. See the rdac
man page for details, and to determine how RDAC provides redundant path
protection for your system.
Recovery Guru
Ideally, your RAID Module(s) are operating normally; thus, status information
reported for modules, LUNs, drives, and controllers is Optimal. However, if your
module has operating problems you may notice error messages on your console or
in Message Log. Therefore, any time you suspect a component problem or failure,
select Recovery Guru.
Caution – Always select Recovery Guru before attempting any manual recovery
procedure. Incorrectly performing a procedure or performing the wrong procedure
could cause equipment damage or data loss. Recovery Guru analyzes the problem
and provides the appropriate steps to correct the problem.
Because Recovery Guru's diagnosis takes into account each RAID Module's
configuration (that is, the number and type of controllers, and the relationship
between RAID Level and drive groups), its step-by-step instructions ensure that you
are correcting the right problem. For an example of using Recovery Guru to recover
from two drive failures, see “Example – Recovering From Drive Failures.”
26
RAID Manager 6.1 User’s Guide • October 1997
Common Navigating Features
This software requires that you use a mouse for full functionality; however, you can
also use your keyboard to access the taskoptions. TABLE 2-2 describes basic
navigation features you should understand before using the RAID Manager
software.
TABLE 2-2
Mouse and Keyboard Navigation
When using a
Mouse. . .
To select an option, place the pointer over the desired option and
single-click.
To receive information about a top menu option, you must click on
the option and hold down the left-mouse button.
To receive information about a particular button option, move the
mouse over the appropriate button and read the description near
the bottom of the window.
To highlight items, do one of the following:
• Single-click to highlight a single item.
• Press Shift + click to highlight a series of items. For example,
single-click to highlight the top item in a list, then press Shift +
click on the last item in the list to highlight all the items in that list.
• Press Control + click to highlight items not in a series. For
example, single-click to highlight one item in a list, then press
Control + click on another item to highlight it as well. Do this for
every item you want to highlight.
When using a
keyboard. . .
To select an option using the keyboard (such as Locate Module),
press Alt and the key for the underlined letter that appears on the
screen.
If selecting a task button, the associated screen is launched. For
example, Alt + L brings up the Locate Module screen.
If selecting from the top-menu items, a drop-down menu displays
the second-level menu options that are available. To select a
second-level menu item, press the key for the underlined letter in
that option. For example, to select Save Module Profile from the
File menu, press Alt + F, then either press S, or use the arrow key
to highlight Save Module Profile and press Enter.
Chapter 2
Features Common to All Applications
27
Common Tasks
The following tasks are common to each application. You should become familiar
with these tasks because they apply to each application and will be helpful as you
perform the tasks in Chapter 3 through Chapter 6.
■
■
■
■
■
■
■
■
Starting an Application
Common Window Elements
Exiting an Application
Using Online Help
Selecting a Module
Locating a Module
Viewing a Module Profile
Saving Module Profile Information
Starting an Application
To start an application:
● From the application icons, ( FIGURE 2-3), double-click the appropriate icon for the
program application you want to start.
FIGURE 2-3
28
Application Icons
RAID Manager 6.1 User’s Guide • October 1997
Common Window Elements
When an application is first started, the top portion of the window ( FIGURE 2-4) has
the following common elements:
■
■
■
■
■
■
File Menu – A top menu item with options that vary depending on the
application you open.
RAID Module selection list (see page 33).
Select Module (see page 33
Locate Module (see page 36).
Module Profile (see page 37).
Status Line – A text box that provides information about each option as you move
the mouse over the option button. For top menu options, you must click on the
option and hold down the left mouse button.
Locate Module
RAID Module
selection
Module Profile
Top Menu Options
Task buttons
Status line
FIGURE 2-4
Window Elements Common to All Applications
Chapter 2
Features Common to All Applications
29
Exiting an Application
To exit any application:
● Choose File ➔ Exit.
The application icon window is displayed.
Using Online Help
A powerful, hypertext online Help system is available with this software. This help
has information about features common to all the applications, as well as topics that
are specific to each application (Configuration, Status, Recovery, and Maintenance/
Tuning).
You can access all of the help topics from any application. However, in situations
where a new screen is overlayed on top of the main application screen, you cannot
access help from within that specific application. Fortunately, it is still possible to
obtain help by selecting Help from another application.
● Click on the Help menu at the top of the window.
The Help window is displayed ( FIGURE 2-5). TABLE 2-3 details the features common to
each application’s online Help.
30
RAID Manager 6.1 User’s Guide • October 1997
FIGURE 2-5
Main Online Help Window
Chapter 2
Features Common to All Applications
31
TABLE 2-3
Selection
File
Edit
Main Online Help Window Description
Description
Enables you to:
• Print the currently displayed topic to a file or to a printer.
• Set up your printer (landscape/portrait, margins, and so on).
• Exit Online Help.
Copies text to a clipboard.
From the top menu choose Edit ➔ Copy to Clipboard to copy the topic
in the window you are viewing.
Home
Returns you to the Home Page.
This window displays whenever you select Help from the top menu in
an application.
Contents
Displays all the help topics organized by hierarchy and appearance on
the Home Page.
Press a letter to quickly advance through the list of topics. For example,
pressing M will take you to the first topic that begins with M. You can
also use the Home and End keys on your keyboard to move through
this list.
Index
Lists key words or phrases in alphabetical order in the top of the Index
window. The bottom of the window displays the topics in which the
highlighted index term appears.
Press a letter to quickly advance through this alphabetical list. For
example, pressing M will take you to the first word that begins with M.
You can also use the Home and End keys on your keyboard to move
through this list. To view one of these topics, you can either double-click
the topic or simply highlight the topic and select Go To.
Back
Goes back (one topic at a time) through the topics you have viewed
since selecting Help.
History
Creates a list of all topics you view in the order you have selected them.
A new list is created each time you enter Help. To return to one of these
topics, either double-click the topic or simply highlight the topic and
select Go To. You can also use the Home and End keys on your
keyboard to move through this list.
32
RAID Manager 6.1 User’s Guide • October 1997
TABLE 2-3
Main Online Help Window Description (Continued)
Selection
Glossary
Description
Displays an alphabetical list of terms you can select to view a definition.
Press a letter to quickly advance through this alphabetical list. For
example, pressing M will take you to the first word that begins with M.
To view a definition, click and hold the mouse button while pointing to
a glossary term. You can use the Home and End keys on your keyboard
to quickly move to the beginning and end of the glossary.
Same Level
Topics
Displays topics of the same level using the << and >> keys to move
forward or backward.
You can also select this button, then All Topics from the drop-down
menu to make the arrow buttons move you through every topic in help.
<< and >>
If you are in Same Level Topics, these buttons move you to the
previous/next topic within the level you are currently viewing.
If you are in All Topics, these buttons move you to the previous/next
topic across all levels.
Up
Moves you to the next higher level of topics.
In many cases, the online help offers more specific information than is given in this
User’s Guide. If you have questions concerning a specific procedure, check the online
help before coming back to this manual.
Selecting a Module
When to Use
Use the Select Module option to select or view information about a specific RAID
Module, to add or remove modules in your system, or to change a module's
information (module name, independent controllers, or comments area).
See FIGURE 2-6 for a window similar to the one you see when you start Select
Module. TABLE 2-4 describes the window elements.
Note – If you want to change whether the Select Module main window appears
every time you first start an application, edit the rmparams file to change the
System_DefaultModuleSelect parameter. TRUE means the window will appear each
time, and FALSE means that it will not appear automatically.
Chapter 2
Features Common to All Applications
33
FIGURE 2-6
Select Module Main Window
What Happens
The following are common to all applications, except where noted:
■
■
■
■
Any options or tasks you perform will apply to the RAID Module you select.
Appropriate information for the selected RAID Module is provided in the various
options (such as Module Profile).
In the Configuration Application, configuration information for the selected RAID
Module is displayed.
In all applications except Configuration, a window is displayed instructing you to
select an option.
▼ To Select a RAID Module
You perform all tasks (for example, performing a Health Check or creating logical
units) on a RAID Module. Select a RAID Module before selecting the option you wish
to perform. You can easily select specific RAID Modules for performing storage
management operations in either of two ways:
■
Use the Drop-Down List at the far left of the Module Information area in each
application's main screen.
This is the quickest selection method if you have only a few modules and are
familiar with the module names that will appear in the list.
34
RAID Manager 6.1 User’s Guide • October 1997
■
Choose Select Module for a more detailed list of all RAID Modules. Highlight the
module you want and select OK. This module is now selected in the RAID
Module Selection box.
If you re-select the RAID Module that is currently displayed in the list box, you are
returned to the main screen. Additionally, the component statuses have been
updated at this time.
TABLE 2-4
Window
Element
Find
Select Module Main Window Description
Description
Allows you to quickly locate a RAID Module. It will probably be most useful when you
have many modules.
At the pop-up screen enter the search term you want to use. Remember that the search
item must be contained in one of the fields on this screen.
Add
Applicable for the Networked version only. Allows you to add new modules to your
system so that this software can access and monitor it.
See the RAID Manager Installation and Support Guide for details on adding new modules to
your system through a SCSI connection.
Remove
Allows you to remove RAID Modules from your system. You can only remove one module
at a time. This option will be dimmed if All RAID Modules is selected.
Important
• If you physically remove RAID Modules from your system, but do not use this Remove
option, the software will continue trying to contact the controllers in that module. This is
especially important in the networked environment, because missing modules could cause
the software to have long delays or even system hangs while trying to contact the removed
module.
• If you are operating on a system with SCSI connections and want to remove a RAID
Module, be sure you have physically removed it from the system first. Otherwise, the
module will be added again when this software detects it on the SCSI Bus.
Edit
Allows you to add or change information (module name and comments) about a RAID
Module that has already been defined. You can only edit information for one module at a
time and this option will be dimmed if All RAID Modules is selected. Use the comments
area to provide detailed information about the RAID Module to help you identify it, such
as location information, independent controllers, and so on.
Chapter 2
Features Common to All Applications
35
Locating a Module
When to Use
Use this option to physically locate and identify a RAID Module if you have several
RAID modules connected to your system. For best results, use Locate Module when
no I/O activity is occurring on the selected module so that the flashing of the
activity lights can be distinguished from normal I/O activity.
What Happens
The activity lights on the drive canisters flash sequentially (one at a time) until you
select Stop. Some RAID modules also have a summary activity indicator light that
flashes.
▼ To Locate a Module
You can locate only one RAID Module at a time. If you choose All RAID Modules,
Locate Module is grayed out and not selectable.
Note – The distinctive pattern of the flashing lights differ depending on the RAID
Level of the drive: RAID 0 — the activity lights on each drive flash sequentially.
RAID 1, 3, 5 — the activity lights on all drives in a drive group flash simultaneously.
Ensure that the RAID Module you want is selected. For instructions on how to select
a RAID Module, see page 34.
1. Click Locate Module.
2. From the new window that is displayed, click Start.
Any drives with a status other than Optimal are skipped (that is, the activity light
does not flash).
Note – If all the logical units in the module are Dead, only the summary activity
light flashes.
3. When the flashing lights have helped you identify the module, place a label on it
that includes its name for future reference.
4. Click Stop.
36
RAID Manager 6.1 User’s Guide • October 1997
Viewing A Module Profile
When to Use
Use this option to find specific details about the controllers, drives, or LUNs for the
selected RAID Module. This profile can help you identify:
■
Which LUNs are assigned to the controller(s) in the RAID Module.
■
Manufacturing details about the controller, including its type and firmware
version.
■
Specifics about the drives, including location, status, and manufacturing details.
■
LUN parameter settings.
Caution – It is very important to save the information (see “Saving Module Profile
Information”) contained in the Module Profile during initial installation and any
time you change your configuration. You can use this information if you need to
perform any recovery or maintenance tasks. It does not, however, copy configuration
information that you could later use to automatically restore your module. Once the
file is saved, you can print it using the print utility available on your system.
What Happens
The software displays a summary profile of the selected RAID Module, including
information on its controller(s), disk drives, and LUNs.
When you click Module Profile, the Module Profile window is displayed
(FIGURE 2-7). TABLE 2-5 describes the window elements.
Chapter 2
Features Common to All Applications
37
FIGURE 2-7
38
Module Profile Summary Information Window
RAID Manager 6.1 User’s Guide • October 1997
TABLE 2-5
Module Profile Summary Information Window Description
Window Element
Description
Name
Identifies the controller(s) in the selected RAID Module by an A or B
designation and, where applicable, includes a system device name. The
A and B are relative names to identify the controllers.
Serial Number
Identifies the controller by a number assigned by the manufacturer.
Mode
Identifies the operating state of the controller. Possible modes are Active,
Passive, or Offline. You can also see (Inaccessible) with these statuses if
the RAID Module has an independent controller configuration.
!
Caution
If you do not see Mode information or other information in this screen is
incomplete, there may be a problem on the data path. Select Recovery
Guru and correct any problems indicated.
Number of
LUNs
Indicates how many LUNs are owned by the particular controller.
Disk Drives
Indicates how many drives make up the selected RAID Module.
Detailed
Information
Controllers — See TABLE 2-6 for window details.
Drives — See TABLE 2-7 for window details.
LUNs — See TABLE 2-8 for window details.
▼ To View a Module Profile
You can view a profile on only one RAID module at a time. If you choose All RAID
Modules, this option is dimmed and not selectable.
1. Ensure that the RAID Module you want is selected.
For instructions on how to select a RAID Module, see “Selecting a Module.”
2. Click Module Profile.
The Module Profile window is displayed ( FIGURE 2-7).
3. Click Controllers, Drives, or LUNs to obtain more detailed information on each.
You may want to view this information as a reference if you need to perform any
maintenance or troubleshooting procedures. TABLE 2-6 through TABLE 2-8 describe
what information appears in the window when you click Detailed Information for
any of the these components.
4. Click OK.
The Module Profile summary information window is displayed.
5. Click OK.
Chapter 2
Features Common to All Applications
39
Note – After exiting Module Profile, you can save the profile to a specific file. See
“Saving Module Profile Information.”
TABLE 2-6
Detailed Information for Controllers
Column Heading
Description
Board Name
Controller type designation.
Board ID
Controller model number.
Board Serial
Number
Unique identification for the controller assigned by the
manufacturer.
Product ID
Controller manufacturer's product code.
Product Serial
Number
Usually the same as Board Serial Number.
Vendor ID
Controller manufacturer's name.
Date of
Manufacture
Date controller was assembled.
SCSI ID
Address assigned to the controller for its connection to the bus (not
applicable for Networked versions).
Boot Level
Number indicating the release version of controller bootware.
Firmware Level
Number indicating the release of controller firmware.
Cache/Processor
Size (MB)
Amount (in megabytes) of total available cache and processor
memory on the controller.
TABLE 2-7
Detailed Information for Disk Drives
Column Heading
Description
Location
Designation indicating the unique location of the drive in the
selected RAID Module.
This designation includes the SCSI Channel and SCSI ID unique to
the drive. For example, [2,8] indicates the drive is on channel 2 and
has a SCSI ID of 8.
Capacity (MB)
Amount of storage space on the drive (in megabytes).
Status
Operating condition of the drive.
For an explanation of possible drive statuses and any recommended
action to follow, see TABLE 5-2.
40
RAID Manager 6.1 User’s Guide • October 1997
TABLE 2-7
Detailed Information for Disk Drives
Column Heading
Description
Vendor
Drive manufacturer's name to identify a drive's location, capacity, or
serial number.
Product ID
Drive manufacturer's product code.
Firmware Version
Number indicating the release of drive firmware.
Serial Number
Drive manufacturer's serial number.
Date Code
Date of manufacture.
TABLE 2-8
Detailed Information for LUNs
Column Heading
Description
LUN
Identifies the number of the LUN.
Controller
Identifies controllers that the LUN owns.
Capacity (MB)
Shows the amount of storage space (in megabytes).
RAID Level
Indicates the way the controller reads and writes both data and
parity on the drives.
Possible RAID Levels are 0, 1, 3, and 5.
Segment Size
Indicates the amount of data (in blocks) that the controller writes on
a single drive in a LUN before writing data on the next drive.
Write Cache
Indicates whether the write caching option has been enabled for a
particular LUN.
Cache Mirroring
Indicates whether the write cache mirroring option has been
enabled for a particular LUN.
Cache Without
Batteries
Indicates whether the cache without batteries option has been
enabled for a particular LUN.
Status
Indicates the operating condition of the LUN.
For an explanation of possible LUN statuses and any recommended
action to follow, see TABLE 5-3..
Note – You might see an asterisk next to the caching parameters column. This
indicates that the parameter is enabled, but is currently not active. The controller has
disabled the parameter for some reason (such as low batteries). If you see this
condition, use Message Log (Status Application) to determine the correct action to
take.
Chapter 2
Features Common to All Applications
41
Saving Module Profile Information
When to Use
Use this option for any of the following reasons:
■
■
■
When you want a copy for quick reference
If you want a permanent record
To send information to your Customer Services Representative for
troubleshooting
Caution – It is very important that you save the profile of each RAID Module
during initial installation and anytime you change your configuration. You can use
this information if you need to perform any recovery or maintenance tasks.
What Happens
Saving profile information copies the information found in Module Profile and the
main Configuration Application window to a file for your reference. It does not,
however, copy configuration information that you could later use to automatically
restore your module. Once you have the file saved, you can then print it using the
printer utility available on your system.
▼ To Save Module Profile Information
If All RAID Modules is selected, this option is dimmed and not selectable.
Note – You cannot perform these procedures while you are viewing a Module
Profile.
1. Ensure that the RAID Module you want is selected.
For instructions on how to select a RAID Module, see “Selecting a Module” on
page 33.
2. Choose Save Module Profile from the File menu.
The window displays a list of information types that you can save. The default is All
(all checkboxes selected).
42
RAID Manager 6.1 User’s Guide • October 1997
3. Click in the checkboxes to deselect one or more of the following information
details:
■
■
■
■
■
All
Controller Information
Drive Information
LUN Information
Configuration Information (drive group/LUN information found in the main
Configuration Application window)
4. Click OK.
5. Either type or select the file name where you want this profile stored.
You can use Filter to direct your selection to a specific directory, file name, and file
extension.
6. Click OK.
FIGURE 2-8
Save Module Profile Window
Chapter 2
Features Common to All Applications
43
TABLE 2-9
Save Module Profile Window Description
Window Elements
44
Description
Filter
Enables you to narrow the path parameters to specific directories,
file names, and file extension.
Using this box and the Filter button updates the directories and
files.
Directories/Files
Lists directories and files you can scroll through to select a specific
file name.
Selecting directories and files updates the Selection field.
Selection
Lists the specific file name you type or updates to show the path
parameters selected by using Filter.
RAID Manager 6.1 User’s Guide • October 1997
CHAPTER
3
Using the Configuration
Application
■
List/Locate Drives — page 52
■
Creating Logical Units (LUNs) — page 55
■
Changing LUN Parameters — page 66
■
Creating Hot Spare Drives — page 68
■
Deleting Drive Groups/ LUNs or Hot Spare Drives — page 71
■
Resetting the Configuration — page 75
45
Overview
Use the Configuration Application to group your RAID Module drives into logical
units. Normally, when you receive a RAID Module, there will be default logical units
(LUNs) and drive groups already defined. This factory default configuration may
work for your environment; however, if the logical units are not set up according to
your needs (for example, you require more LUNs, a different RAID Level, and so
on), you can change the configuration by using this application.
Use the Configuration Application to accomplish the following tasks:
■
■
■
■
List and locate drives contained in a RAID Module
Create LUNs on unassigned or existing drive groups
Create hot spare drives as failed drive protection
Delete a drive group/ LUN or hot spare drive
Before you begin the procedures in this chapter, you should be familiar with the
information in Chapter 2, “Features Common to All Applications.” These common
concepts, navigational functions, and procedures are the same in Configuration as
they are in the other applications.
A task summary chart of the Configuration Application is shown in FIGURE 1-3. Stepby-step procedures for each task in Configuration begin on page 52.
46
RAID Manager 6.1 User’s Guide • October 1997
▼
To Start the Configuration Application
● Double-click the Configuration icon.
The main Configuration window is displayed ( FIGURE 3-1). TABLE 3-1 describes the
window elements.
Caution – To prevent any possible configuration conflicts, you can open only one
Configuration window at one time from any one host machine. However, use
caution in a multi-host configuration or Networked environment to not start a
second Configuration window from another host machine. It is permissable to open
multiple instances of the other applications.
FIGURE 3-1
Main Configuration Window
Chapter 3
Using the Configuration Application
47
TABLE 3-1
Main Configuration Window Description
Window Element
Description
Procedures
File
Provides three options:
Save Module Profile – Saves profile information to a
file for a selected RAID Module.
page 42
Important
Save the profile of each RAID Module during initial
installation and anytime you change your
configuration. You can use this information if you
need to perform any recovery or maintenance tasks.
48
Reset Configuration – Resets the RAID Module back
to a default configuration. Use only as a last resort!
page 75
Exit – Quits Configuration.
page 30
Help
Gives you access to Online Help topics for all
applications.
page 30
RAID Module
Selection Box
Enables you to select a specific RAID Module before
selecting the option you want to perform.
page 33
Select Module
Allows you to select or find a specific RAID Module;
add or remove RAID Modules; or edit the
information (module name, controller information,
independent controllers, and comments) about a
RAID module.
page 33
Locate Module
Flashes the activity lights on the drive canisters in
the selected RAID Module to identify the module’s
location.
page 36
Module Profile
Provides information about the controllers, drives,
and LUNs for the selected RAID Module.
page 37
RAID Manager 6.1 User’s Guide • October 1997
TABLE 3-1
Main Configuration Window Description (Continued)
Window Element
Description
Drive Groups
Area
Group
Identifies the type of drive group. There are three
types of drive groups:
Lists and
identifies drive
groups in the
RAID Module
you selected.
You perform all
configuration
tasks on a RAID
Module and its
associated
drive groups.
Procedures
• Unassigned – drives that have not been configured
into LUNs or hot spares.
• Hot spare – drives that have been assigned as hot
spares.
• Configured – drives (designated with a number,
such as 1, 2, 3, and so on) that have one or more LUNs
with the same RAID Level.
As you highlight a drive group in the list on the left
side of the window, the corresponding LUNs are
highlighted in the LUN Information area on the right
side of the window. You can only highlight one drive
group at a time.
Number of LUNs
Indicates how many LUNs are currently configured
on the set of drives (drive group). Applicable only
for configured drive groups.
Chapter 3
Using the Configuration Application
49
TABLE 3-1
Main Configuration Window Description (Continued)
Window Element
Description
Drive Groups
Area
(Continued)
RAID Level
Shows the RAID Level of the drive group.
Possible RAID Levels are 0, 1, 3, and 5. This is only
applicable for configured drive groups. Each LUN in
a drive group has the same RAID Level.
Drives
Shows how may drives comprise the drive group.
Total Capacity (MB)
Indicates how much capacity, in megabytes, is
available on the drive group.
The capacity reflects any redundancy or RAID 1
mirroring factors. For example, a drive group
composed of RAID 1 LUNs has half the capacity of
one with RAID 0 LUNs. The total capacity for an
unassigned drive group does not reflect any
redundancy or mirroring factors.
Remaining Capacity (MB)
Indicates the largest contiguous capacity, in
megabytes, still available for configuring LUNs on
the drive group.
The capacity reflects any redundancy or RAID 1
mirroring factors (except for an unassigned drive
group).
50
RAID Manager 6.1 User’s Guide • October 1997
Procedures
TABLE 3-1
Main Configuration Window Description (Continued)
Window Element
Description
Logical Unit
(LUN)
Information
Area
LUN
Shows the number assigned to the Logical Unit
(LUN).
Provides LUN
information for
the drive group
you highlight in
the Drive
Groups area.
Procedures
Group
Shows the number assigned to a configured drive
group, consisting of one or more LUNs.
Device Name
Indicates a system-designated name that identifies
the controllers/LUNs in the selected RAID Module.
RAID Level
Shows the RAID Level of the LUN.
Capacity (MB)
Indicates how much capacity (in megabytes) is
available on the LUN. The capacity reflects any
redundancy or RAID 1 mirroring factors. For
example, a RAID 1 LUN has half the capacity of a
RAID 0 LUN.
Status
Gives the operating condition of the LUN.
For an explanation of possible statuses and any
recommended action to take, see TABLE 5-3.
List/Locate
Drives
Lists the drives comprising the drive group that you
select from the Drive Groups area. The list shows
location, capacity, and status of each drive.
page 52
Locates the drives comprising the drive group by
flashing drive activity lights.
Note: If you select a RAID 1 drive group, the
mirrored-pair drives are indicated by a number
appearing in front of the drive location information.
For example, (1) appears in front of the first drive in
the first mirrored pair, (2) appears in front of the first
drive in the second mirrored pair, and so on.
Create LUN
Enables you to create new LUNs from unassigned
drives or add LUNs on existing drive groups with
remaining capacity.
Chapter 3
page 55
Using the Configuration Application
51
TABLE 3-1
Main Configuration Window Description (Continued)
Window Element
Description
Procedures
Create Hot
Spare
Enables you to create hot spare drives if the
controller in the RAID Module you select supports it.
page 68
Delete
Enables you to delete individual LUNs, all LUNs in a
drive group, or any hot spare drive.
page 71
Status Line
Provides information about an option when you
move the mouse over the option button. For topmenu options, you must click on the option and hold
down the left mouse button.
List/Locate Drives
When to Use
Use this option to view a list of the drives in a drive group (unassigned, hot spare, or
configured) and to flash the activity lights so you can physically locate the drives in
the RAID Module.
One of the best times to use this option is right after you have installed your RAID
Module. By doing so, you can determine the initial LUN/drive group configuration
and the associated physical drives.
For best results when you want to locate drives, use List/Locate when no I/O
activity is occurring so that you can distinguish the flashing of the activity lights
from normal I/O activity.
What Happens
A list of drives (including their location, capacity, and status) is displayed for the
drive group you highlighted in the main Configuration window.
52
RAID Manager 6.1 User’s Guide • October 1997
■
The drive location corresponds to a specific drive in the RAID Module, and
indicates the channel number and SCSI ID for that drive, where the channel
number is always listed first. (For example, [2,1] corresponds to the drive at
location SCSI Channel 2 and SCSI ID 1.) Use the location information to match a
unique drive to help locate that drive in the RAID Module.
■
If a drive shows a status of Failed or Unresponsive, go to the Recovery
Application and select Recovery Guru.
■
If you select the hot spare drive group, the list shows the hot spare drives and a
status of In Use or Standby.
■
■
■
▼
In Use – the hot spare is currently being used as a replacement for a failed
drive. The location of the drive being covered by this hot spare is indicated in
brackets. For example, [4, 1].
Standby – the hot spare is ready if a drive fails.
If you select a RAID 1 drive group, the mirrored-pair drives are indicated by a
number appearing in front of the drive location information.
To List or Locate a Drive Group
1. Ensure that the RAID Module you want is selected.
For instructions on how to select a RAID Module, see “Selecting a Module” on
page 33.
2. Highlight the drive group containing the drives you want to list or locate.
3. Click List/Locate Drives.
A list of corresponding drives is displayed.
Chapter 3
Using the Configuration Application
53
FIGURE 3-2
List/Locate Drives Main Window
4. Click Locate. In the pop-up window, click Start.
The lights on the selected drive group will flash in a distinctive pattern (either
sequentially or simultaneously, depending on the type and RAID Level of the
selected drive group). Physically locate the drives in the RAID Module.
5. Click Stop and the lights stop flashing.
The main Configuration window is displayed.
54
RAID Manager 6.1 User’s Guide • October 1997
Creating Logical Units (LUNs)
When to Use
Use this option to either create new LUNs from unassigned drives or create additional
LUNs on an existing (configured) drive group that has remaining capacity. A logical
unit (LUN) is the basic structure you create on the RAID Modules to store and
retrieve your data.
Note – A RAID Module can support multiple RAID Levels, but each logical unit
configured on the same physical drives (drive group) must use the same RAID
Level.
Note – If you need to change any LUN parameters (for example, RAID Level,
segment size, and so on) after the LUNs have been created, see “Changing LUN
Parameters”.
Once you create LUNs, you must make them available to the operating system.
Refer to your operating system documentation for details on adding a drive.
Remember, each LUN (not the drive group) is seen by the operating system as one
drive.
What Happens
You can create new logical units/drive groups from unassigned drives or from
existing drive groups that have remaining capacity. You can choose to quickly and
easily create LUNs of equal capacity (you specify only RAID Level, number of
drives, and number of logical units) or you can define additional logical unit
parameters using Create LUN - Options (such as segment size, capacity, and drive
selection).
Chapter 3
Using the Configuration Application
55
Check For Restrictions
See the RAID Manager Installation and Support Guide for restrictions and Chapter 7 for
troubleshooting information that might apply when creating LUNs. For example, to
determine:
■
■
■
▼
If your operating system has special requirements in order to recognize the new
configuration (such as adding a drive or rebooting after any configuration
changes).
When the unassigned drive group contains drives of different capacities. See
“Drive Selection” for more details.
If you are creating LUNs on more than one drive group after deleting all LUNs.
To Create or Add LUNs
1. Ensure that the RAID Module you want is selected.
For instructions on how to select a RAID Module, see Chapter 2.
2. Do one of the following:
■
For a new LUN/drive group, highlight the unassigned drive group from the
Drive Groups area.
Note – When you create LUNs from the unassigned drive group, you also create a
corresponding drive group.
■
For a new LUN on an existing (configured) drive group, highlight an existing
drive group from the Drive Group area that has remaining capacity.
3. Click Create LUN.
The Create LUN window is displayed ( FIGURE 3-3). TABLE 3-2 describes the window
and default settings you might see.
Note – The time it takes to create a LUN depends on the capacity of the LUN you
specified (the larger the capacity, the more time it takes). The creation of the LUN
occurs in the background so you can perform other tasks except on the LUNs/Drive
Group that is currently formatting.
56
RAID Manager 6.1 User’s Guide • October 1997
FIGURE 3-3
Creating LUNs
Chapter 3
Using the Configuration Application
57
TABLE 3-2
Creating LUN Window Description
Selection
Description
Create
Begins the LUN creation process.
Cancel
Returns to the main Configuration screen.
Options
Displays the Options screen for Create LUN.
RAID Level
When you select the different RAID Levels, a brief description of that
RAID Level displays. Use this description to determine which RAID
Level is best for the LUNs you are creating. The default settings are
RAID 5 for new LUNs (RAID 0 if less than 3 unassigned drives are
available), or the RAID Level of the existing drive group. You can
specify a RAID Level only if you are creating a LUN from unassigned
drives.
Note:
All RAID Levels except RAID 0 use part of the drives’ capacity for
redundancy.
If a RAID Level is dimmed, it means that the current number of drives
shown in the Number of Drives field is not a valid number for that
RAID Level. For example, RAID 1 must always use an even number of
drives.
58
RAID Manager 6.1 User’s Guide • October 1997
TABLE 3-2
Creating LUN Window Description (Continued)
Selection
Description
Available
Capacity
This field changes to reflect the RAID Level and number of drives you
selected and the actual capacity that is available for creation.
Note:
If the unassigned drive group contains drives with different capacities,
such as 2 GB or 4 GB, this field initially reports capacity based on the
smaller capacity drives. Be sure to use the Options ➔ Drive Selection to
select drives of the same capacity.
Number of
Drives
This field lists the number of drives you can use to create LUNs. For
new drive group/LUNs, the default setting usually equals the number
of unassigned drives. You can select number of drives only if you are
creating a new LUN from unassigned drives.
Note: The drives provided in the Number of Drives list can be less than
the number shown in the unassigned drive group for two main reasons:
• There are limitations on how many drives can comprise a single drive
group; therefore, the list shows only the maximum allowed.
• If there are drives in the unassigned drive group that have failed, they
are not available for configuration, and therefore will not be provided in
the list.
Number of
LUNs
The values allowed in this field depend on the following:
• The maximum LUNs allowed by the operating system (installed on
the host machine connected to your RAID Modules via SCSI cable).
• The number of LUNs already configured.
• The number of LUNs that the controllers in the RAID Module can
own.
The default setting is one LUN.
Chapter 3
Using the Configuration Application
59
4. Do one of the following:
■
■
For a new LUN, select RAID Level, number of drives, and number of LUNs.
TABLE 3-2 describes what happens when you select these parameters.
To add a LUN to an existing drive group, select the number of additional LUNs
you want to add to the existing drive group. See “Number of LUNs” in
TABLE 3-2.
5. Complete the configuration process by doing one of the following:
■
■
To create LUNs without changing additional LUN parameters, go to Step 8.
To set additional LUNs parameters (for example, segment size, capacity, or
selecting specific drives, and so on), continue with Step 6.
Caution – If you make any changes on the main Create window after you have
made changes in the Options window (Step 6. and Step 7.), all changes in the
Options window are undone. For example, if you changed the segment size of a
LUN from 16 to 32 but then changed the number of LUNs in the main Create
window, the segment size would return to 16.
6. Click Options to view or change any LUN configuration options (LUN capacity,
drive selection, caching parameters, segment size, or LUN assignment).
The Create LUN - Options window is displayed ( FIGURE 3-4). TABLE 3-3 describes the
window elements.
7. Make your changes to the options and click OK when done.
You can switch between options without losing your changes.
Note – Available Capacity shown in the main Create LUN window changes
depending on the RAID Level and number of drives you select, and reflects the
actual capacity that is available for creation. Remember that all RAID Levels (except
RAID 0) use part of the drive’s capacity for redundancy.
8. Click Create.
9. Click OK at the Confirm Create window.
The confirmation screen allows you to review the LUNs being created with their
number, RAID Level, and capacity. Select Cancel if this information is not correct.
Note – After you click Create and then OK, the main Configuration window
displays “Formatting” until the operation is complete. You can perform other
configuration tasks or select another program application. However, you cannot
perform any tasks on the new drive group while it is being created.
60
RAID Manager 6.1 User’s Guide • October 1997
Caution – If you are creating the first drive group/LUN on the module (from all
unassigned drives in the module), wait for the create/format to finish before
creating LUNs on additional drive groups.
10. Make the LUNs part of your operating system.
Your operating system may have additional requirements to complete the
configuration process so that it can recognize the new LUNs, including adding
drives and possibly rebooting your system. See the RAID Manager Installation and
Support Guide for restrictions and Chapter 7 for troubleshooting information, and the
appropriate system documentation for specific details.
FIGURE 3-4
Create LUN Options Window
Chapter 3
Using the Configuration Application
61
TABLE 3-3
Create LUN Options Window Description
Option
Use
Reset
Returns the settings for the option currently displayed to the same
values they had when you first entered the Options window; however,
Caching Parameters disables all parameters.
OK
Returns to the main Create LUN window.
Therefore, make changes to any options you want before selecting OK.
You can switch between options without losing changes.
Cancel
Cancels all option settings and returns you to the main Create LUN
window.
LUN Capacity
Enables you to change the default capacities for the LUNs you are
creating.
Normally, you should use all of the available capacity. That is, the
Remaining Group Capacity should be 0 after changing the capacities of
the LUNs.
Important
The capacities of the LUNs must not exceed the total remaining
capacity. If they do, the Remaining Group Capacity field indicates the
amount exceeded (in red).
62
RAID Manager 6.1 User’s Guide • October 1997
TABLE 3-3
Create LUN Options Window Description (Continued)
Option
Use
Drive Selection
Enables you to change the set of drives used in the drive group.
Normally, you should use the default drives shown.
Important
This option is dimmed if you are adding LUNs to an existing drive
group because you must use the same set of drives when adding LUNs.
Move is dimmed if you specified the maximum number of remaining
(unassigned) drives in the main Create window.
If you make any changes, make sure that the number of drives shown in
the “Selected Drives” list matches the number of drives you specified in
the main Create window. If the numbers do not match, you see an error
message and cannot continue until these numbers match.
You can highlight drives in both the Unselected and Selected lists and
then select Move.
For best performance, you should specify drives over as many drive
channels as you can. If possible, do not select drives that share the same
channel (for example, do not select drive [1,1], [1,2], and [1,3] because
these are all on drive channel 1). However, this is a valid configuration;
the only risk is that you would lose access to these drives if the drive
channel fails.
If your unassigned drive group contains drives with different capacities
(such as, some 4-GB and some 7-GB), use this option to select either the
smaller capacity drives only, or the larger capacity drives only.
Important
With mixed capacity drives in this drive group, the main Create LUN
window initially bases the available capacity on the capacity of the
smaller drives. For example, if the unassigned drive group consists of
five drives (three 2-GB drives and two 4-GB drives), then the available
capacity field would show 10 GB (5 x 2-GB). Furthermore, if you create
LUNs using mixed capacity drives, you are only using the smallest
capacity available (2-GB) and you cannot access the additional capacity
of the larger drives.
If you are configuring a RAID 1 drive group, the mirrored-pair drives
are indicated by a number appearing in front of the drive location
information. For example, (1) appears in front of the first drive in the
first mirrored pair, (2) appears in front of the first drive in the second
mirrored pair, and so on.
Chapter 3
Using the Configuration Application
63
TABLE 3-3
Create LUN Options Window Description (Continued)
Option
Use
Caching
Parameters
Enables you to change write caching, write cache mirroring, and cache
without batteries parameters for each LUN you create.
Important
This option is dimmed if the controller(s) in the RAID Module do not
support caching.
There are several conditions (such as low battery power) where the
controller may temporarily turn off the cache settings until the
condition is back to normal unless you have enabled the cache without
batteries option. In such cases, Module Profile ➔ LUNs indicates when
caching is enabled, but inactive.
Use the Maintenance/Tuning Application (Caching Parameters) if you
need to change any caching parameters after creating the LUNs.
Important
Selecting Cache Without Batteries allows write caching to continue even
without battery backup or if the batteries are discharged completely or
not fully charged. Normally, write caching is temporarily turned off if
no batteries are detected or until the batteries are charged. However,
enabling this parameter overrides the controller’s safeguard. Therefore,
if you select Cache Without Batteries without an uninterruptible power
supply (UPS) for protection, you could lose data if a power failure
occurs.
Segment Size
64
Enables you to change the segment size for each LUN you create. A
segment is the amount of data the controller writes on a single drive in
a LUN before writing data on the next drive. The segment size is
composed of blocks; one block equals 512 bytes.
Normally, you should use the default segment size shown because the
values provided are based on the RAID Level specified for the drive
group/LUNs.
RAID Manager 6.1 User’s Guide • October 1997
TABLE 3-3
Create LUN Options Window Description (Continued)
Option
Use
LUN
Assignment
Enables you to change which controller owns the new drive group/
LUN(s) you create.
Important
This option is dimmed if there are not two active controllers in the RAID
Module, if you are creating additional LUNs on an existing drive group,
or if the module has an independent controller configuration.
The display shows you which controller owns the current drive groups/
LUNs.
Normally, you should use the default controller selected under the
Assign New Group/LUNs To Controller area. The only reason to
change the default is to be sure that a particular controller owns a
specific drive group/LUNs.
The capacity shown is the total capacity available on the drive group. It
is not the total capacity of the LUNs configured on the drive group
unless the LUNs have used all of the capacity.
Unless you use this option, the logical units are balanced across active
controller pairs on a drive group-basis. The odd-numbered drive groups
are assigned to one active controller and the even-numbered drive
groups are assigned to the other active controller.
Use the Maintenance/Tuning Application (LUN Balancing) if you want
to change any LUN ownership between controllers after creating the
LUNs.
Note: If you create or add new LUNs and have two active controllers,
the software automatically balances LUNs between the two controllers.
However, you can control the LUN assignment:
During LUN creation (in Configuration) use Create LUN ➔ Options ➔
LUN Assignment.
After LUN creation, use Maintenance/Tuning (LUN Balancing).
Chapter 3
Using the Configuration Application
65
Changing LUN Parameters
When to Use
Use the information in TABLE 3-4 to determine which option to use to change the
various parameters (RAID Level, segment size, caching, and so on) of the LUNs after
LUNs are created. Most of the changes require that you delete the LUN using Delete
and then recreate it using Create LUN.
TABLE 3-3 describes each LUN parameter.
What Happens
When you make changes to LUN parameters, remember that certain changes destroy
your data.
TABLE 3-4 indicates each LUN parameter, whether changing it destroys data, and
what application or option you use to change it.
Note – Your operating system may have special requirements or considerations if
you create or delete LUNs/groups. Therefore, be sure to consult the RAID Manager
Installation and Support Guide before changing LUN parameters that require using
Delete or Create LUN.
66
RAID Manager 6.1 User’s Guide • October 1997
TABLE 3-4
Changing LUN Parameters
Will My Data Be
Destroyed
If I change. . .
Answer/Action
Yes, you will lose data on all LUNs in the drive group.
RAID Level or
Number of Drives
1. From the top menu, select File ➔ Save Module Profile to save all of
the Module Profile information for the RAID Module you want to
change. You can use this information as a reference when you are
creating new LUNs.
2. Back up the data on all the LUNs you want to delete.
3. Use Delete to delete all of the LUNs in the drive group. This also
deletes the drive group and the drives are returned to the unassigned
drive group.
4. Use Create LUN to recreate the new drive group/LUNs from the
unassigned drive group.
Yes, you will lose data only on the LUN you are changing.
Segment Size or
Individual LUN
Capacity
1. From the top menu, select File ➔ Save Module Profile to save all of
the Module Profile information for the RAID Module you want to
change. You can use this information as a reference when you are
creating new LUNs.
2. Back up the data on all the LUNs you want to delete.
3. Use Delete to delete the individual LUN in the drive group. If there
is more than one LUN on the drive group, then deleting an individual
LUN gives remaining capacity for the existing drive group. However,
if there is only one LUN on the drive group, the drive group is also
deleted and the drives are returned to the unassigned drive group.
4. Use Create LUN to recreate the LUN on the existing drive group or
the unassigned drive group.
No, you will not lose data.
Caching
Parameters
Use Caching Parameters in the Maintenance/Tuning Application.
LUN Assignment
No, you will not lose data.
Use LUN Balancing in the Maintenance/Tuning Application.
Reconstruction
Rate
No, you will not lose data.
Use LUN Reconstruction Rate in the Maintenance/ Tuning
Application.
Chapter 3
Using the Configuration Application
67
Creating Hot Spare Drives
When to Use
Use this option to create hot spare drives from unassigned drives. These drives
contain no data and act as standbys in case any drive fails in a RAID 1, 3, or 5 LUN
in the RAID Module. The hot spare drive adds another level of redundancy to your
RAID Module. Each RAID Module can support as many hot spare drives as there are
SCSI Channels (probably either 2 or 5, depending on the model of your RAID
Module).
Caution – Hot spares cannot cover for drives with a larger capacity (that is, a
2 GB hot spare drive cannot stand in for a 4 GB failed drive). If your unassigned
drive group contains drives with different capacities, then the Configuration
Application selects the first available drive when you select Create Hot Spare, which
may not be the largest capacity.
What Happens
If a drive fails, the hot spare drive automatically takes over for the failed drive until
you replace it. Once you replace the failed drive, the hot spare drive automatically
returns to a Standby status after reconstruction is completed on the new replacement
drive. A hot spare drive is not dedicated to a specific drive group or LUN, but
instead can be used for any failed drive in the RAID Module with the same or
smaller capacity.
Note – When you assign a drive as a hot spare, it is used for any configured RAID
1, 3, or 5 LUN that may fail in the RAID Module. You cannot specify a hot spare for
a particular drive group/LUN.
68
RAID Manager 6.1 User’s Guide • October 1997
You can determine the status of the hot spare drives by highlighting the hot spare
drive group in the main Configuration window and selecting List/Locate Drives.
After you create a hot spare drive, the Drive Groups area of the main Configuration
window displays the following:
▼
■
A new hot spare drive group displays if there was not an existing hot spare drive
group.
■
The Drives column increases to add the new hot spare if there was an existing hot
spare drive group.
To Create a Hot Spare Drive
The Create Hot Spare option is dimmed if you do not highlight the unassigned drive
group. You can only create new or additional hot spares from the unassigned drive
group.
1. Ensure that the RAID Module you want is selected.
For instructions on how to select a RAID Module, see “Selecting a Module” on
page 33 before proceeding.
Caution – Hot spares cannot cover for a drive with a larger capacity (that is, a 2 GB
hot spare drive cannot stand in for a 4-GB failed drive). If your unassigned drive
group contains drives with different capacities, then the Configuration Application
selects the first available drive, which may not be the largest capacity. Therefore, before
you create a hot spare drive, use List/Locate Drives to record the capacities and
location of the larger-capacity drives in the unassigned drive group to ensure the hot
spare can cover for any failed drive in the RAID Module.
2. Highlight the unassigned drive group.
3. Click Create Hot Spare.
The Create window is displayed.
4. Select the number of hot spare drives you want to create.
The numbers provided in the list are based on the maximum number of hot spares
allowed and the number of hot spares that have already been created.
Note – Each RAID Module can support as many hot spare drives as there are SCSI
Channels (probably either 2 or 5, depending on the model of your RAID Module).
5. Do one of the following:
Chapter 3
Using the Configuration Application
69
■
■
If you want to use drives automatically selected by the software, click Create.
Click Options. The window displays two lists:
■
■
Unselected Drives – Indicates the unassigned drives that are not currently
designated to be hot spares.
Selected Drives – Indicates the drives that have been automatically designated
to be hot spares. The total number is based on the number of drives you
specified in the previous window.
6. Highlight drives(s) from the Unselected Drives list and/or the Selected Drives list,
then click Move.
Both lists show the new choices. The Move button is dimmed if you specified the
maximum number of remaining (unassigned) drives shown in the main Create
window.
Note – Make sure that the number of drives listed in the Selected Drives list equals
the number you specified in the previous window. If the numbers differ, you cannot
continue.
7. Click OK when finished selecting drives.
8. Click Create.
The main Configuration window is displayed. The Drive Groups area of the window
displays the following:
■
■
A new hot spare drive group displays if there was not an existing hot spare
drive group.
The Drives column increases to add the new hot spare if there was an existing
hot spare drive group.
Note – Once you create a hot spare, you can determine its status (In Use or Standby)
by highlighting the hot spare drive group in the main Configuration window and
selecting List/Locate Drives. Depending on how many hot spares you have
configured for a module, a logical unit’s status could remain Optimal and still have
several failed drives (each one being covered by a hot spare).
70
RAID Manager 6.1 User’s Guide • October 1997
Deleting Drive Groups/ LUNs or Hot
Spare Drives
When to Use
You can use this option to delete all the LUNs in a drive group, individual LUNs
within a drive group, or Standby hot spare drives (if supported).
Caution – Before deleting any LUNs, see the RAID Manager Installation and Support
Guide and Chapter 7 to see if there are restrictions or troubleshooting information for
special requirements (such as deleting partitions or unmounting file systems).
Caution – Deleting all LUNs in a drive group causes the loss of all data on each
LUN in that drive group. Deleting one LUN in the drive group (for example, to
change segment size or capacity), causes data loss on only that one LUN.
Caution – Because deleting LUNs causes data loss, back up data on all the LUNs in
any drive group you are deleting. This operation also deletes any file systems
mounted on the LUNs.
Caution – You must first stop I/Os to the affected RAID Module and ensure no
other users are on the system.
You delete all LUNs or the only LUN in a drive group if you want to:
■
■
Change the RAID Level or number of drives of that drive group. You delete the
LUNs and then use Create LUN to recreate them.
Free up capacity.
Chapter 3
Using the Configuration Application
71
You delete individual LUNs in a drive group if you want to:
■
■
Change the segment size or capacity of an individual LUN. You delete the
individual LUN and then use Create LUN to recreate them.
Free up capacity.
You delete a standby hot spare drive if you want to return it to an unassigned status
and make it available for LUN creation.
Delete is dimmed for either of the following reasons:
■
■
You selected an unassigned drive group. You cannot delete an unassigned drive
group.
You selected a hot spare drive group and all of the hot spares are currently being
used. You cannot delete a hot spare drive that is being used because doing so
would delete the data contained on it, and would cause the LUN to have a
Degraded or Dead status.
What Happens
After selecting Delete, a list of LUNs displays for the drive group you highlighted.
You can select any or all of these LUNs to delete.
Once you have deleted LUNs or hot spare drives, the Drive Groups area of the main
Configuration window displays one of the following:
■
The drives return to the unassigned drive group if you did any of the following:
■
■
■
■
▼
Deleted all of the LUNs in a drive group
Deleted the only LUN in the drive group
Deleted a hot spare drive
There will be additional remaining capacity on the drive group if you deleted
some, but not all, of the LUNs in a drive group.
To Delete Drive Groups/LUNs or Hot Spare
Drives
Delete is dimmed for one of the following reasons:
72
■
You selected an unassigned drive group. You cannot delete an unassigned drive
group.
■
You selected a hot spare drive group and all of the hot spares are currently being
used. You cannot delete a hot spare drive that is being used because doing so
would delete the data contained on it, and would cause the logical unit to have a
Degraded or Dead status.
RAID Manager 6.1 User’s Guide • October 1997
■
You selected a configured drive group that is not owned by the controller-host
machine you are working from (this can occur if the module has an independent
controller configuration).
1. Ensure that the RAID Module you want is selected.
For instructions on how to select a RAID Module, see “Selecting a Module” on
page 33.
Caution – Before deleting any LUNs, see the RAID Manager Installation and Support
Guide and Chapter 7 to see if there are restrictions or troubleshooting information for
special requirements (such as deleting partitions or unmounting file systems).
Caution – Deleting all LUNs in a drive group causes the loss of all data on each
LUN in that drive group. However, if you delete an individual LUN in the drive
group (for example, to change segment size or capacity of that LUN), only that one
LUN loses data.
Caution – Because deleting LUNs causes data loss, back up data on all the LUNs in
any drive group you are deleting. This operation also deletes any file systems
mounted on the LUNs.
Caution – You must first stop I/Os to the affected RAID Module and ensure no
other users are on the system.
2. Back up the data on all the LUNs for every drive group you want to delete.
3. Highlight the drive group containing the LUN(s) or hot spare drive(s) you want to
delete.
Note – You cannot highlight more than one drive group at the same time.
4. Click Delete.
A list of LUNs or hot spare drives is displayed.
Chapter 3
Using the Configuration Application
73
FIGURE 3-5
Delete LUN Main Window
5. Highlight the LUN(s) or hot spare drive(s) you want to delete and click Delete
again.
6. Click OK at the Confirm Delete window.
The confirmation screen asks if you want to delete the selected LUNs and warns that
you will lose all data on those LUNs. Select Cancel if you do not wish to delete the
LUNs.
After deletion, one of the following will be displayed in the Drive Groups area of the
main Configuration window:
■
The drive(s) will return to an unassigned state if you did any of the following:
■
■
■
■
Deleted all of the LUNs in a drive group
Deleted the only LUN in the drive group
Deleted a hot spare drive
There will be additional remaining capacity on the drive group if you deleted
some, but not all, of the LUNs in a drive group.
Caution – Your operating system may require that you reboot your system after
making any configuration changes so that the operating system can recognize the
new configuration. See the RAID Manager Installation and Support Guide for details.
74
RAID Manager 6.1 User’s Guide • October 1997
Note – When you delete all LUNs in the drive group, the drive group is deleted and
returns to the unassigned drive group. Now you can create new LUNs from the
unassigned drives and specify new parameters (RAID Level, capacity, number of
drives, and so on).
Resetting the Configuration
When to Use
Use this option only as a last resort if either your configuration is totally inaccessible or
you want to start completely over with your configuration.
Caution – Because deleting LUNs causes data loss, back up data on all the drive
group/LUNs in the RAID Module. This operation also deletes any file systems
mounted on the LUNs.
Caution – You must first stop I/Os to the affected RAID Module and ensure no
other users are on the system.
What Happens
The selected RAID Module (drive groups and their LUNs) is reset back to a default
configuration based on NVRAM settings specified in the controller.
To Reset the Configuration
File ➔ Reset Configuration is dimmed if the selected RAID Module has an
independent controller configuration.
This operation could also fail if the RAID Manager software cannot gain exclusive
access to the drive groups/LUNs, such as if file systems are mounted.
Chapter 3
Using the Configuration Application
75
1. Ensure that the RAID Module you want is selected.
For instructions on selecting a RAID Module, see “Selecting a Module” on page 33.
Caution – You will lose all data on the selected RAID Module. Use this option only
as a last resort.
Caution – You must first stop I/Os to the affected RAID Module and ensure no
other users are on the system.
2. Choose Reset Configuration from the File menu.
3. Click OK to confirm that you want to reset your configuration.
Note – Step 4. is your last chance to Cancel!
4. Click OK to confirm again that you want to reset your configuration.
A default configuration displays in the main Configuration window.
Note – This does not necessarily mean that you have all unassigned drives; you may
have a small LUN configured.
5. Click OK at the reset was successful confirmation window.
6. You will have to redefine all of your LUNs and drive groups using the Create LUN
option.
Note – Your operating system may have additional requirements to complete the
configuration process so that it can recognize the new LUNs, including adding
drives and possibly rebooting your system. See the RAID Manager Installation and
Support Guide and Chapter 7, in addition to the appropriate system documentation
for specific details.
76
RAID Manager 6.1 User’s Guide • October 1997
CHAPTER
4
Using the Status Application
■
Using Message Log — page 82
■
Performing a Health Check for RAID Modules — page 97
■
Viewing LUN Reconstruction Progress and Changing the Reconstruction Rate
— page 103
77
Overview
Before you begin, you should be familiar with Chapter 2. These common concepts,
navigational functions, and procedures are the same in Status as they are in the other
applications.
A task summary chart of the Status Application is shown in FIGURE 1-4. Step-by-step
procedures for each task in Status begin on page 82.
▼
To Start the Status Application
● Double-click the Status icon.
The main Status window is displayed ( FIGURE 4-1). TABLE 4-1 describes the primary
elements of that window.
Note – The default window for the Status Application shows All RAID Modules
selected and Message Log – Summary Information.
78
RAID Manager 6.1 User’s Guide • October 1997
FIGURE 4-1
Main Status Window
Chapter 4
Using the Status Application
79
TABLE 4-1
Main Status Window Description
Window Element
Description
Procedures
File
Gives you four options:
Open Log – Opens a selected log file and displays the
information in the Message Log.
page 88
Edit
Save Log As – Saves information from a selected log
file to another file name when you are in Message
Log.
page 90
Save Module Profile – Saves profile information for a
selected RAID Module to a file.
page 42
Exit – Quits Status.
page 30
Gives you two options:
Copy To Clipboard – Copies the contents of a
detailed message to a clipboard when you are in
either Message Log or Health Check, Show Details.
page 85
Select All – Selects all the messages in the summary
information window or highlights the text of a
detailed message when you are in either Message Log
or Health Check.
Gives you two options:
Refresh All – Updates Message Log to show any new
messages for all message types (the default setting)
when you are in Message Log.
page 91
Log Settings – Changes the default settings for three
Message Log parameters (default log file, log size
threshold, and checking interval).
page 92
Help
Gives you access to Online Help topics for all
applications.
page 30
RAID Module
Selection Box
Enables you to select a specific RAID Module or All
RAID Modules before selecting the option you want
to perform.
page 33
Select Module
Allows you to select or find a specific RAID Module,
add or remove RAID Modules, or edit the information
(module name, controller information, independent
controllers, and comments) about a RAID module.
page 33
Locate Module
Flashes the activity lights on the drive canisters in the
selected RAID Module to identify the module’s
location.
page 36
Options
80
RAID Manager 6.1 User’s Guide • October 1997
TABLE 4-1
Main Status Window Description (Continued)
Window Element
Description
Procedures
Module Profile
Provides information about the controllers, drives,
and LUNs for the selected RAID Module.
page 37
Message Log
Displays historical messages for RAID Module events,
such as component failures, parity check/repair
results, and general status changes.
page 82
Health Check
Performs an immediate check of the selected RAID
Module(s) and displays the results, including
recommended Action To Take when appropriate.
page 97
LUN
Reconstruction
Displays reconstruction progress and enables you to
change the reconstruction rate for LUNs undergoing
reconstruction on a selected RAID Module.
page 103
Status Line
Provides information about an option when you
move the mouse over the option button. For top menu
options, you must click on the option and hold down
the left mouse button.
Chapter 4
Using the Status Application
81
Using Message Log
When to Use
Use this option to view historical information for a RAID Module:
■
■
■
When you are notified of a component failure
If a parity check has been performed and parity inconsistencies were found and
repaired
When you are aware of a general status change
Message Log identifies the date/time an event was detected, what RAID Module
and controller are affected, and what type of event has occurred, including any
relevant code data.
While in Message Log, you can perform several tasks:
If you want:
Click
For more details, see:
To view more detailed messages
Show Details
“Using Message Log”
page 82
To change what types of messages
are displayed
List Type
“Listing Different Types of
Messages”
page 87
To open a different log file
File ➔ Open Log
“Opening an Existing Log
File”
page 88
To save a selected log to another file
File ➔ Save Log As
“Saving Log as Another File
Name”
page 90
To update the display
Options ➔ Refresh All
“Refreshing Message Log”
page 91
To change three log parameters:
• default log file
• log size threshold
• checking interval
Options ➔ Log Settings
“Changing Log Settings”
page 92
82
RAID Manager 6.1 User’s Guide • October 1997
What Happens
Message Log formats the log file data to display information about historical events
for the selected RAID Module(s). Event information is recorded in the default log file
in different ways:
■
■
■
The background monitor checked the RAID Modules and found failures.
Parity check/repair has been performed and parity inconsistencies were found
and repaired.
General status changes occurred, such as I/O errors, configuration formats, and
component failures.
FIGURE 4-2 shows the message log window that is displayed. TABLE 4-2 describes the
window elements.
FIGURE 4-2
Main Message Log Window
Chapter 4
Using the Status Application
83
TABLE 4-2
Main Message Log Window
Window Element
Description
Date & Time
Indicates when the detected event was logged into Message Log.
If the event is a component failure detected by the background monitor,
it indicates that the error actually occurred since the last checking
interval as set in Log Settings. The default setting for this checking
interval is five minutes.
If the message reflects a parity event, it indicates that detection and
repair occurred the last time that parity was run either manually or
through Automatic Parity Check/Repair.
If the message indicates a general status change, you have a history of
when changes were made.
RAID Module
Identifies the specific module where the event occurred.
Type
Indicates what type of RAID Module event occurred: Parity, General, or
Hardware.
Code
Displays an ASC/ASCQ code for hardware messages, when applicable.
The code indicates that a specific problem has occurred. Click Show
Details for the recommended Action to Take.
Controller
Identifies the affected controller by its system device name.
Show Details
Displays more detailed information for the messages you select in the
summary information window. TABLE 4-3 explains the detailed
information that each type of message provides when you click on Show
Details.
Select All
Selects all the messages in the summary information window.
List Type
Changes what message types are displayed (all types, parity, general, or
hardware).
See the procedure on page 87. TABLE 4-3 explains the detailed
information that each type of message provides when you click Show
Details.
Message Line
Current Log – Indicates what log is open for viewing. Normally, this is
the default log file, unless you open another log file.
Total Messages – Indicates the number of messages displayed in the
current log file.
Total Selected – Indicates the total number of messages that you have
selected or highlighted in the summary information window.
84
RAID Manager 6.1 User’s Guide • October 1997
▼
To Use Message Log
1. Ensure that the RAID Module you want is selected.
For instructions on how to select a RAID Module, see “Selecting a Module” on
page 33.
2. Click Message Log.
The Status window is displayed ( FIGURE 4-2).
Note – When you first start the Status Application, Message Log is displayed for All
RAID Modules.
3. To view more detailed information, highlight one or more messages, then click
Show Details.
TABLE 4-3 describes the information that is displayed, which depends on the type of
message selected (parity, general, or hardware).
4. To copy detailed message information, choose Copy To Clipboard from the Edit
menu.
This automatically highlights the message’s text and copies it to a clipboard.
Caution – Before copying additional messages or exiting this program, use an
appropriate application to save the clipboard contents into an editor or desired file.
TABLE 4-3
Main Message Log Window Show Details
Window Element
Description
Common Information for All Message Types
Message Type
Parity, General, or Hardware.
Date
The month, day, and year the event details were written to Message Log.
RAID Module
The specific RAID Module affected.
Time
The time the event details were written to Message Log.
Controller
The system device name of the controller assigned to the specified RAID
Module.
Message Index
(lower right
portion of the
window)
The number of messages you highlighted in the summary information
window before clicking Show Details. Use to track how many messages
you have to view. For example, if the index reads 1 of 4, then you are
viewing the first of four messages that you selected in the summary
information window.
Chapter 4
Using the Status Application
85
TABLE 4-3
Main Message Log Window Show Details (Continued)
Window Element
Description
Parity Message Details
Affected Logical
Unit
The specific LUN where the parity problem occurred.
Block Begin
The code for the initial data block on the affected LUN.
Block End
The code for the final data block on the affected LUN.
Note: The Block Begin and End numbers provide a range that identifies
the logical address where the parity inconsistencies were found and
repaired.
Number Of
Bad Blocks
Repaired
The total number of blocks on the LUN where parity inconsistencies
were found and repaired.
Important
Parity check/repair fixes parity, not data. If the parity inconsistencies
resulted from corrupted data, the data is still corrupted, but the parity is
correct. Therefore, parity inconsistencies might indicate corrupt data.
You may be able to use your operating system to verify your data.
General Message Details
Description
Information about what event or problem may have occurred.
Hardware Message Details
86
ASC/ASQ
ASC/ASCQ Code for the event/problem that occurred.
ASC is a SCSI Additional Sense Code and an ASCQ is an ASC Qualifier.
ASC/ASCQ codes are sent by the controller to provide further
information about the event/problem that occurred.
Affected
Component
Component where the event/problem occurred, when applicable.
Affected Logical
Unit
Logical unit where the event/problem occurred; given when applicable.
Probable Cause
When available, information about why this event/problem may have
occurred.
Action To Take
The steps you should take to correct the event/problem that occurred.
RAID Manager 6.1 User’s Guide • October 1997
Listing Different Types of Messages
When to Use
Use this option to change the type of messages displayed in Message Log. You can
include one or all message types: parity, general, and hardware. Additionally, when
you select All or Hardware, you can specify a particular range of ASC/ASCQ codes.
▼ To List Different Types of Messages
1. Ensure that the RAID Module you want is selected.
For instructions on how to select a RAID Module, see “Selecting a Module” on
page 33.
2. Click Message Log.
The Main Message Log window is displayed ( FIGURE 4-2).
Note – If you are first starting the Status Application, Message Log is already
displayed for All RAID Modules.
3. Click List Type.
A window displays the different message types.
4. Click each box for the type(s) you want to view.
■
■
■
■
All – to view all of the message types
Parity – to view only messages associated with parity check/repair events
General – to view only general status change messages (format complete, and
so on)
Hardware – to view only component information and failure messages
You can select more than one message type. Selecting All automatically selects
every type. You must select either All or Hardware before you can specify an
ASC/ASCQ range. TABLE 4-3 describes the information that is displayed for each
of the three message types.
5. Click OK.
The summary information window displays the specific message types for the
selected RAID Module.
Chapter 4
Using the Status Application
87
Opening an Existing Log File
When to Use
Use this top-menu option to view a selected log file, other than the default log file,
which displays automatically each time you select Message Log.
Note – Opening another log file does not change the default log that the software
writes messages to. It changes only the log that Message Log displays until you
select another log file (using Open Log) or you exit the Status Application. To change
the default log file, see “Changing Log Settings” on page 92.
▼ To Open an Existing Log File
If you are not in Message Log, this option is not available.
1. Choose Open Log from the File menu.
The Open Log window is displayed ( FIGURE 4-3). TABLE 4-4 describes the window
elements.
2. Enter or select the file name for the log you want to view in the Selection box.
You can use Filter to direct your selection to a specific directory, file name, and file
extension.
3. Click OK.
Message Log displays the log file you selected. This file continues to display until
you open another log or you exit the Status Application.
Caution – If you see the Log file is corrupted message, it could mean that
either the file is bad or you have not selected an appropriate log file. Try selecting
another file name. Also, be sure that the Selection box contains the file name you
want.
88
RAID Manager 6.1 User’s Guide • October 1997
FIGURE 4-3
Main Open Log Window
Chapter 4
Using the Status Application
89
TABLE 4-4
Main Open Log Window Description
Window Element
Description
Filter
Enables you to narrow the path parameters to specific directories, file
names, and even file extension.
Using this Filter box and the Filter button updates the Directories and
Files.
Directories/
Files
Lists directories and files you can scroll through to select a specific file
name.
Selecting directories and files updates the Selection field.
Selection
Lists the specific file name you enter or selected. Selecting OK opens the
log file displayed here.
Saving Log as Another File Name
When to Use
Use this top-menu option to save a selected log to another file. For example, you
may want to save the default log file to a different file name when:
■
■
■
The log file is getting too large.
The log has exceeded the log size threshold level.
You want to capture a specific time frame for analysis.
Note – The Save Log As option maintains the original file and creates a duplicate,
which it identifies with the new file name that you assign. Saving a log file to
another file name does not delete the original file or change the default log that the
software writes messages to. Use “Changing Log Settings” on page 92 to do this.
▼
To Save a Log to a Different File
If you are not in Message Log, this option is not available.
1. Choose Save Log As from the File menu.
The Open Log window is displayed ( FIGURE 4-3).
90
RAID Manager 6.1 User’s Guide • October 1997
2. Enter or select the file name you want to save the log as in the Selection box.
You can use Filter to direct your selection to a specific directory, file name, and file
extension.
3. Click OK.
The log is saved to the file name that appeared in the Selection box. The entire
contents of the file are saved regardless of what RAID Module is selected or what
type of message is displayed. A confirmation box appears if the save was successful.
Note – If you select or enter a file name that already exists, clicking OK at that
window overwrites the existing data in that file.
Note – If you see the Selection Is Not A File message, the file name you
entered is not valid. Try entering another file name. Also, be sure that the Selection
box contains the file name you want.
4. Click OK.
The Message Log’s summary information window is displayed; its log display
remains unchanged.
Note – If you save the log to a different file name because the default log file is
getting too large, then you need to delete the contents of the default log file as soon
as possible after using this option. You can use a standard editor to delete the
contents. For example, if rmlog.log is the current default log, it continues to have
messages written to it. Thus, if you do not delete the contents, it continues to be too
large.
Refreshing Message Log
When to Use
Use this top-menu option to update Message Log with any new messages for RAID
Module events that have occurred since you opened the current log. You may want
to refresh when you stay in Message Log any longer than your checking interval (the
default is five minutes).
▼ To Refresh Message Log
If you are not in Message Log, this option is not available (dimmed).
Chapter 4
Using the Status Application
91
● Choose Refresh All from the Options menu.
Message Log displays new messages for any RAID events that occurred since you
first selected Message Log.
Note – All message types are again displayed. If you want to change the types of
messages displayed, see “Listing Different Types of Messages” on page 87.
Changing Log Settings
When to Use
Use this top-menu option to change default settings for the three log parameters
described in TABLE 4-5. Use the descriptions in TABLE 4-5 to determine if you want to
change these settings.
92
RAID Manager 6.1 User’s Guide • October 1997
TABLE 4-5
Options, Log Settings Window Description
Window Element
Description (Log Parameters)
Default Log
File:
Why To Use
If you want the data logged into a different file.
As one of the actions you can take if the “Threshold Level Reached”
message displays.
To control the size of the log file and provide better performance of
Message Log's activities. The larger the log becomes, the longer it takes
to display Message Log when you select or update it.
What Happens
The software automatically writes future RAID events data to the file
named here. The default path is the installation directory and the file
name is rmlog.log. When you select Message Log, this file displays for
All RAID Modules.
Note: Changing the default log does not automatically change which log
Message Log displays until you exit the Status Application. To view a
different log file, see “Opening an Existing Log File” on page 88.
Log Size Before
Notification:
Increase this value:
1. If you want your log size threshold to be larger than the default
setting of 40K.
2. This does not set the actual size that the log can become; instead, it
increases the size the log can reach before the Threshold Level
Reached message appears.
What Happens
The Threshold Level Reached message displays when you start any
application if the size of the default log file exceeds the value set here.
Check RAID
Module Every:
Why To Use
Increase this value if you want the background monitor to check the
RAID Modules less frequently.
Decrease this value if you want the background monitor to check the
RAID Modules more frequently.
For best results, use the default value or smaller to ensure that you are
notified about problems/events as soon as possible to the time that they
occur.
What Happens
A background monitor checks all RAID Modules for problems/events at
the frequency set here (default is 5 minutes). If any problems or events
are detected, the information is written to the default log file. Thus, the
log entry shows the date and time that the background monitor detected
the problem/event, and not necessarily the time the event occurred.
Chapter 4
Using the Status Application
93
▼ To Change Log Settings
The Log Settings option is selectable no matter what window is displayed or what
RAID Module is selected.
1. Choose Log Settings from the Options menu.
The Log Settings window is displayed ( FIGURE 4-4). TABLE 4-6 describes the window
parameters.
Note – Changing any parameters in Log Settings applies to all RAID Modules even
if you have only one RAID Module selected.
2. Use TABLE 4-6 to change any of the three Message Log parameters.
3. Click Save.
Note – If you exit Message Log, it automatically updates when you re-select it.
Note – When you select Options Refresh All, Message Log again shows all
message types.
Note – The size of the log file can affect the time it takes for refresh to update the
window.
Note – You cannot disable the “Threshold Level Reached” notification, but you can
set the log size before notification to the maximum value (1000K) to reduce the
frequency of notification.
94
RAID Manager 6.1 User’s Guide • October 1997
FIGURE 4-4
Main Log Settings Window
Chapter 4
Using the Status Application
95
TABLE 4-6
Main Log Settings Window Description
Parameter
Procedure For Changing
Default Setting
Default Log
File:
Enter the new file name you want future RAID
events data logged to. Be sure to include the
correct directory/path if different from the
current default log file.
rmlog.log
Log Size
Before
Notification:
Enter the value you want the log size to be
before notification.
Default: 40 K
Minimum: 1K
Maximum: 1000K
NOTE: Setting the log size threshold at a high
or low value does not improve or detract from
performance. Also, the log size threshold does
not limit the size a log file can become; instead,
it increases the size the log can reach before the
Threshold Level Reached message appears.
Check RAID
Module
Every:
Enter the frequency (in minutes) that you want
the background monitor to check the RAID
Modules.
Caution
Setting this value too small could cause the
check to affect system I/O performance.
Setting this value too large could delay
notification of serious problems.
96
RAID Manager 6.1 User’s Guide • October 1997
Default: 5 minutes
Minimum: 1 minute
Maximum: 59 minutes
Performing a Health Check for RAID
Modules
When to Use
Use this option to immediately check selected RAID Module(s) for failures on the
I/O data path, drives, LUNs, and other components.
Note – A background check occurs at regular intervals for all RAID Modules; the
default setting is five minutes. You can change the frequency of this check by using
“Changing Log Settings” on page 92.
What Happens
The software performs an immediate check of the selected RAID Module(s) and
displays a summary of the results.
FIGURE 4-5 shows the Health Check Status window. TABLE 4-7 describes the window
elements.
Note – It is possible to detect and correct problems using Health Check before the
background monitor detects them, especially if you change the checking interval to a
time larger than the default setting (5 minutes). In cases where you have corrected
problems before the background monitor detects them, these events are not written
to Message Log.
Chapter 4
Using the Status Application
97
98
FIGURE 4-5
Main Health Check Window
TABLE 4-7
Main Health Check Window Elements
Health Status
Description
RAID Module
Identifies the specific RAID Module checked.
A RAID Module may be listed more than once when it has multiple
failures. For example, if RAID Module 1 has both a failed drive and a
failed fan, two entries appear for this module: Drive Failure on one line
and Module Component Failure on another line. Also, you see two Drive
Failure entries on separate lines when failed drives exist on more than
one drive group.
RAID Manager 6.1 User’s Guide • October 1997
TABLE 4-7
▼
Main Health Check Window Elements (Continued)
Health Status
Description
Results
Indicates the operating condition of the specific RAID Module.
See TABLE 4-8 for a list and description of possible results.
Show Details
Displays more detailed information for the exceptions you select in the
summary information window.
Select All
Selects all the non-optimal exceptions in the summary information
window.
To Perform a Health Check
1. Ensure that the RAID Module you want is selected.
For instructions on how to select a RAID Module, see “Selecting a Module” on
page 33.
2. Click Health Check.
The Health Check Status window is displayed ( FIGURE 4-5). Checking displays until
the check is completed. TABLE 4-8 describes the results this check could display.
3. To view more detailed information, highlight one or more messages, then click
Show Details.
TABLE 4-9 describes the information that is displayed.
Note – You can view more detailed information only when Health Check detects
exceptions. Show Details and Edit, Select All are dimmed for modules with an
Optimal status.
4. To copy detailed message information, choose Copy To Clipboard from the Edit
menu.
This automatically highlights the message’s text and copies it to a clipboard.
Caution – Before copying additional messages or exiting this program, use an
appropriate application to save the clipboard contents into an editor or desired file.
Caution – For any result other than Optimal, you should click Show Details and
view the Action To Take. When recommended, use Recovery Guru in the Recovery
Application to correct the problem before more serious errors occur or you could
lose data.
Chapter 4
Using the Status Application
99
Caution – If a series of drive failures and/or unresponsive drives are reported at
the same time, the condition may be caused by a channel failure. See the description
for Channel Failure in this table before attempting any recovery procedures.
TABLE 4-8
RAID Module Health Status Results
Result Module’s
Health Status
Description
Channel Failure
Indicates that all the drives on the same drive channel have Failed
and/or are Unresponsive. Depending on how the logical units have
been configured across these drives, the status of the logical units may
be Dead, Degraded, or Optimal (if hot spare drives are in use).
Data Path Failure
Some component along the data path has failed. For example, the host
adapter, cable, or controller could have failed.
Important
If you do not have RDAC protection, this failure type may not be
displayed for every condition. Therefore, verify that the interface
cable/terminator or network card is not removed or damaged before
proceeding with any controller-related recovery procedure.
Drive Failure
A single drive has failed in a drive group.
Drive Tray –Fan
Failure
A fan in one of the disk drive trays has failed.
The remaining fan should be able to maintain an acceptable operating
temperature for a short period of time.
Drive Tray –Fan
Failures
Indicates both fans in one of the disk drive trays have failed.
!
This is a critical condition that may cause the drive tray to reach
unsafe operating temperatures.
Drive Tray –Pwr
Supp Failure
A power supply in one of the disk drive trays has failed.
The remaining power supply should be able to maintain sufficient
power to the drives; however, operating in this condition for a long
period of time is not recommended.
Drive Tray –Pwr
Supp Failures
Both power supplies in one of the disk drive trays has failed.
!
100
Caution
Caution
This is a critical condition that requires immediate action.
RAID Manager 6.1 User’s Guide • October 1997
TABLE 4-8
RAID Module Health Status Results (Continued)
Result Module’s
Health Status
Description
Drive Tray –Temp.
Exceeded
The maximum critical temperature allowed within a disk drive tray
has been exceeded.
Caution
This is a critical condition that may cause the drive tray to be
automatically turned off if you do not resolve this condition within a
short time.
!
Environmental
Card Failure
Indicates loss of communication with an environmental card in one of
the disk drive trays.
Important
Use Recovery Guru to fix this failure type first, and not for correcting any
associated channel or drive failures.
Hot Spare Failure
A hot spare drive has failed while being used in a LUN.
Multiple Drive
Failure
More than one drive has failed in a drive group.
Multiple Offline/
Failed Drives
Indicates that the controller has placed one or more drives Offline
because data reconstruction failed and a read error occurred for one or
more failed drives in the LUN.
Multiple
Unresponsive
Drives
Indicates that multiple drives in the selected RAID Module are no
longer accessible to the controller.
Unresponsive
Drive
Indicates that a drive in the selected RAID Module is no longer
accessible to the controller.
Optimal
All components are functioning normally.
Module
Component
Failure
Some component (power supply or fan) has failed.
TABLE 4-9
Health Check Show Details Window Elements
Window Elements
Description
RAID Module
The specific RAID Module affected.
Affected
Component
The specific component where the event/problem occurred.
Affected Logical
Unit
The specific LUN where the event/problem occurred; given when
applicable.
Chapter 4
Using the Status Application
101
TABLE 4-9
Health Check Show Details Window Elements (Continued)
Window Elements
Description
RAID Level
The RAID Level of the affected LUN; given when applicable.
Possible RAID Levels are 0, 1, 3, and 5.
Logical Unit
Status
The operating condition of the affected LUN; given when applicable.
For an explanation of possible statuses and any recommended action to
take, see TABLE 5-3.
Probable Cause
When available, information about what has occurred and why.
Action To Take
The steps you should take to correct the problem and restore the module
to an Optimal status.
Exception Index
(lower right
portion of
window)
The number of exceptions you highlighted in the summary information
window before clicking Show Details.
Use to track how many exceptions you have to view. For example, if the
index reads 1 of 4, then you are viewing the first of four messages that
you selected in the summary information window.
Important
When recommended in Action To Take, you should use Recovery Guru
in the Recovery Application to correct the problem before more serious
errors occur or you could lose data.
102
RAID Manager 6.1 User’s Guide • October 1997
Viewing LUN Reconstruction Progress
and Changing the Reconstruction Rate
When to Use
Use this option to view reconstruction progress or to change the reconstruction rate
for the LUNs undergoing reconstruction on a selected RAID Module. You can
change the reconstruction rate even when LUNs are undergoing reconstruction.
However, with this option, you can change the rate only for LUNs that are currently
reconstructing. For more information about reconstruction, see “Reconstruction” on
page 23.
Note – Use the Maintenance/Tuning Application to change the reconstruction rate
for all LUNs, whether they are reconstructing or not. See “Changing the LUN
Reconstruction Rate” on page 150.
What Happens
The software displays the drive group/LUNs that will be reconstructing. Once
reconstruction begins for a LUN, a histogram shows the percentage of progress.
LUNs that have completed reconstruction show 100%; LUNs not yet reconstructing
show “Waiting To Reconstruct.”Also, a Slider bar shows the current setting for each
LUN’s reconstruction rate.
See FIGURE 4-6 for a window similar to the one you see when you select LUN
Reconstruction. TABLE 4-10 describes the window elements.
Chapter 4
Using the Status Application
103
FIGURE 4-6
Main LUN Reconstruction Window
TABLE 4-10
Main LUN Reconstruction Window Elements
Window Elements
Description
Drive Group
Provides the drive group number for the selected RAID Module.
LUN
Provides the LUN number (LUN) on a particular drive group.
Reconstruction
Progress
Displays histograms for each LUN undergoing reconstruction that
indicate the percentage of reconstruction progress.
Logical units that have completed reconstruction show 100%; LUNs
not yet reconstructing show “Waiting To Reconstruct.”.
Reconstruction Rate Optimize For:
104
System
Performance
Indicates the rate that favors system performance over reconstruction
speed.
Reconstruction
Performance
Indicates the rate that favors reconstruction speed over system
performance.
RAID Manager 6.1 User’s Guide • October 1997
▼
To Change the Reconstruction Rate
If you select All RAID Modules, the option is not available (dimmed).
1. Ensure that the RAID Module you want is selected.
For instructions on how to select a RAID Module, see “Selecting a Module” on
page 33.
2. Click LUN Reconstruction.
The Reconstruction Status window is displayed ( FIGURE 4-6).
Note – If no LUNs are currently reconstructing on the selected RAID Module, click
OK in the message box, then select another module or option.
Each histogram shows the amount of reconstruction accomplished as a percentage.
The response time for updating these histograms depends on the number and size of
the LUNs undergoing reconstruction and the rate setting for the reconstruction
operation. Furthermore, if you exit LUN Reconstruction, any LUNs that have
completed reconstruction (show 100%) are not displayed the next time you select
LUN Reconstruction.
3. Change the reconstruction rate, if you want, by moving the slider bar.
Choose either:
■
System performance – to speed up system I/O and slow reconstruction.
■
Reconstruction performance – to speed up the reconstruction rate and slow
system I/O.
The rate is automatically set when you move the Slider bar; however, you may
notice some delay in the system’s response if many or very large LUNs are
reconstructing.
Note – To change the reconstruction rate for all LUNs, whether they are
reconstructing or not, use the Maintenance/Tuning Application. See “Changing the
LUN Reconstruction Rate” on page 150.
Reconstruction rate settings each correspond to a different interval based on the
number of blocks reconstructed and the number of seconds delay between
reconstruction operations for system I/O operations to take place.
Chapter 4
Using the Status Application
105
From left to right the points on the Slider bar indicate the following reconstruction
rates (blocks/seconds delay):
■
■
■
■
■
106
Slow – 256/0.8
Slow medium – 256/0.4
Medium – 512/0.4
Medium fast – 512/0.2
Fast – 1024/0.1
RAID Manager 6.1 User’s Guide • October 1997
CHAPTER
5
Using the Recovery Application
■
Recovering From Failures on a RAID Module — page 111
■
Checking for Component Failures Using Recovery Guru — page 118
■
Manually Checking and Repairing Parity — page 125
■
Performing Manual Recovery for Drives — page 129
■
Performing Manual Recovery for LUNs — page 135
■
Performing Manual Recovery for Controller Pairs — page 140
107
Overview
Use the Recovery Application to restore RAID Module(s) to an Optimal operating
status after any component failure. Specifically, Recovery Guru analyzes each RAID
Module’s configuration and provides step-by-step procedures to ensure that you
correct the right problem.
Use the Recovery Application to accomplish the following tasks:
■
Check selected RAID Modules for failures and then recover from these failures by
following the step-by-step instructions that Recovery Guru provides.
■
Check and repair parity manually on selected LUNs.
■
Perform recovery steps manually for drives, LUNs, and controller pairs. In most
cases, however, you should select Recovery Guru and follow the step-by-step
instructions it provides before attempting any manual recovery procedure.
Before you begin, you should be familiar with Chapter 2. These common concepts,
navigational functions, and procedures are the same in Recovery as they are in the
other applications.
A task summary chart of the Recovery Application is shown in FIGURE 1-5. Step-bystep procedures for each task in Recovery begin on page 118.
▼
To Start the Recovery Application
● Double-click the Recovery icon.
The main Recovery window is displayed ( FIGURE 5-1). TABLE 5-1 describes the
window elements.
108
RAID Manager 6.1 User’s Guide • October 1997
FIGURE 5-1
Main Recovery Window
Chapter 5
Using the Recovery Application
109
TABLE 5-1
Main Recovery Window Elements
Window Element
Description
Procedures
File
Gives you two options:
Save Module Profile – Saves profile information to a
file for a selected RAID Module.
page 42
Exit — Quits Recovery.
page 30
Manual Recovery gives you three options:
Drives – Provides options for manually performing
specific drive recovery operations, such as fail,
reconstruct, and revive.
page 129
Logical Units – Provides options for manually
performing specific LUN recovery operations, such as
format and revive.
page 135
Controller Pairs – Provides options for manually
performing specific controller pair recovery
operations, such as placing controllers offline or
online.
page 140
Help
Gives you access to Online Help topics for all
applications.
page 30
RAID Module
Selection Box
Enables you to select a specific RAID Module or All
RAID Modules before selecting the option you want
to perform.
page 33
Select Module
Enables you to select or find a specific RAID Module,
add or remove RAID Modules, or edit the information
(module name, controller information, independent
controllers, and comments) about a RAID module.
page 33
Locate Module
Flashes the activity lights on the drive canisters in the
selected RAID Module to identify the module’s
location.
page 36
Module Profile
Provides information about the controllers, drives,
and LUNs for the selected RAID Module.
page 37
Options
110
RAID Manager 6.1 User’s Guide • October 1997
TABLE 5-1
Main Recovery Window Elements (Continued)
Window Element
Description
Procedures
Recovery Guru
Performs an immediate check of the selected RAID
Module(s) and displays the operating status for each
module. Also, provides step-by-step instructions to fix
failures.
page 118
Manual Parity
Check/Repair
Lists LUNs for the selected RAID Module(s) and
enables you to run parity check/repair on one or
more LUNs with Optimal statuses.
page 125
Status Line
Provides information about an option when you
move the mouse over the option button. For topmenu options, you must click on the option and hold
down the left mouse button.
Note – Some options on the main Recovery window may be dimmed out if you
select All RAID Modules.
OR
The RAID Module you selected does not meet the requirements for performing that
option.
Recovering From Failures on a RAID
Module
Ideally, your RAID Modules are operating normally; thus, status information
reported for modules, LUNs, drives, and controllers is Optimal. However, if a
module has operating problems, you may notice error messages on your console or
in Message Log. Therefore, any time you suspect a component problem or failure,
select Recovery Guru.
Caution – Always select Recovery Guru before attempting any manual recovery
procedure. Incorrectly performing a procedure or performing the wrong procedure
could cause equipment damage or data loss. Recovery Guru takes you through
every step and includes checks to make sure that you are correcting the right
problem.
Chapter 5
Using the Recovery Application
111
Benefits of Recovery Guru
The proper procedure for recovering from a component failure depends on many
different things. For example, restoring LUNs to an Optimal status depends on the
RAID Level of the affected LUN and the number of drives that have failed in the
same drive group.
Because Recovery Guru’s diagnosis takes into account each RAID Module’s
configuration (that is, the relationship between RAID Level and drive groups,
independent controllers, etc.), its step-by-step procedure ensures that you are
correcting the right problem.
Possible Component Statuses
In the event some component fails, the software reports a status other than Optimal.
The quickest way to determine a module’s status is to use Recovery Guru (or Health
Check in the Status Application). You can also use Module Profile to view the
Detailed Information for the desired component.
■
■
■
TABLE 5-2 shows the possible drive statuses.
TABLE 5-3 shows the possible LUN statuses.
TABLE 5-4 shows the possible controller statuses.
TABLE 5-2
Possible Drive Status
Drive Status
Indication
Action to Take
Optimal
The drive is functioning normally.
No action required.
Failed
The drive has failed and is no longer
functioning.
Use Recovery guru to
replace the drive as
soon as possible (see
page 118).
In Use or Spare
The hot spare drive is currently in use and is
taking over for the drive specified in the
brackets.
No action required for
the hot spare drive;
however, if the drive is
being used, it means
that the affected logical
unit has at least one
Failed drive. Use
Recovery Guru to
correct the problem
drive as soon as
possible.
• The In Use [x,y] status is shown only in
List/Locate Drives when you select the hot
spare group.
• The Spare [x,y] status is the same as In
Use but is shown in all other screens where
drives are displayed (for example, Module
Profile ➔ Drives).
112
RAID Manager 6.1 User’s Guide • October 1997
TABLE 5-2
Possible Drive Status (Continued)
Drive Status
Indication
Action to Take
Offline
The controller has placed the drive Offline
because data reconstruction failed and a
read error occurred for one or more drives
in the LUN. The affected logical unit is
Dead, and all its drives are probably either
Failed or Offline.
Use Recovery Guru to
correct the problem.
Standby or SpareStdby
The hot spare drive is currently not in use.
No action required.
• The Standby status is shown only in List/
Locate Drives when you select the hot spare
group.
• The Spare-Stdby status is the same as
Standby but is shown in all other screens
where drives are displayed (for example,
Module Profile ➔ Drives).
Replaced
The drive has been replaced, is being
formatted, or is reconstructing.
No action required.
Mismatch
The controller has sensed that the drive has
some parameters different than expected,
such as sector size, SCSI Channel, or ID.
Verify that the drive is
the correct kind.
(Recovery Guru will
detect these problems
for you. See page 118).
Unresponsive
The controller is unable to communicate
with a drive that is part of a drive group
containing LUNs.
Determine which
drive is Unresponsive,
then manually fail it,
using Manual
Recovery ➔ Drives
(see the procedure on
page 132).
You can determine which drive is
Unresponsive using Module Profile ➔
Drives in all applications, List/Locate Drives
in the Configuration Application, Recovery
Guru or Options ➔ Manual Recovery ➔
Drives in the Recovery Application, or
Health Check in the Status Application.
Chapter 5
Using the Recovery Application
113
Note – If you have hot spares configured for a RAID Module, the hot spare contains
no data and acts as a standby in case a drive fails in a RAID 1, 3, or 5 LUN.
Depending on how many hot spares you have configured, a LUN could remain
Optimal and still have several failed drives (each one being covered by a hot spare).
TABLE 5-3
Logical Unit Status
Indication
Action to Take
Optimal
The LUN is operating normally.
No action required.
Formatting
The LUN is not available because it is being
formatted.
No action required.
Reconstructing
The controller is currently reconstructing a
drive on the LUN.
No action required.
Degraded
A single drive in a drive group has failed on
a RAID Level 1, 3, or 5 LUN and the LUN is
now functioning in a degraded mode.
You can still access
your data; however,
use Recovery Guru to
replace the failed drive
as soon as possible (see
page 118).
Dead
The LUN is no longer functioning.
Furthermore, all the LUNs in the drive
group are Dead also.
Use Recovery Guru
and follow the step-bystep instructions
provided (see
page 118).
!
114
Possible LUN Status
Caution
This is the most serious status a LUN can
have and you will lose data unless the LUN
status changed from Degraded because you
replaced the wrong drive accidentally.
Inaccessible
The LUN is not available because it is part
of a drive group/LUN owned by the
alternate controller in an independent
controller RAID Module. It cannot be
accessed using this software from the
current host.
If you need to perform
an operation on this
drive group/LUN, you
need to use the
software on the host
machine connected to
the controller that
owns that drive group.
Locked
The LUN is not available because an
operation has obtained exclusive access to it
(such as LUN creation).
No action required.
RAID Manager 6.1 User’s Guide • October 1997
Note – Depending on how many hot spares you have configured, a LUN could
remain Optimal and still have several Failed drives (each one being covered by a hot
spare).
TABLE 5-4
Possible Controller Status
Controller Status
Indication
Action to Take
Optimal
The controller is operating normally.
No action required.
Offline
The controller is not receiving I/O data.
Either it has been manually placed offline or
the driver for redundant software support
has placed it offline (if you have RDAC
protection).
If you did not
manually place the
controller offline, it
may need to be
replaced. Use Recovery
Guru and follow the
step-by-step
instructions provided.
Dead
There is a problem on the data path
(interface cable/terminator, network card,
controller, or the host adapter).
Use Recovery Guru to
diagnose and correct
the problem.
Note – You could also see (Inaccessible) with these statuses if the RAID Module has
an independent controller configuration.
Example – Recovering From Drive Failures
The following scenario provides an example of how to recover from two drive
failures by using Recovery Guru.
Scenario
You notice that two drives on RAID Module 1 have fault lights lit. Furthermore, the
drives are side-by-side in the module at locations [1,1] and [2,1]. Your concern is that
the LUNs/drive group is Dead because there are two failed drives. Instead of
immediately replacing the drives, you select Recovery Guru and follow the step-bystep instructions provided.
Chapter 5
Using the Recovery Application
115
▼ To Fix the Drive Failures With Recovery Guru
1. Start the Recovery Application.
RAID Module 1 is already selected.
2. Click Recovery Guru.
Checking displays until its diagnosis of the module’s condition is complete. You see
two separate Drive Failure entries instead of one Multiple Drive Failure in the
Failure column. Also, the first Drive Failure entry is highlighted and NO is
displayed in the Fixed? column.
3. Click Fix.
The Summary Report displays for this drive failure that provides the drive’s location
([1,1]; the affected LUN’s number, status, and RAID Level; and a summary of what
the recovery procedure will involve. You see that the LUN is Degraded and not
Dead; therefore, the failed drives are not in the same drive group. Furthermore, you
see that the LUN’s data should still be accessible.
4. Click OK.
Important Notes displays to summarize what you should consider before removing
the failed drive
Note – The type of recovery procedure required for drive failures depends on the
RAID Level of the affected logical unit and the number of drives failed in the same
drive group. Therefore, it is best to use Recovery Guru. For example, in a RAID 0
LUN, one drive failure causes the loss of all data. In a RAID 1, 3, or 5 LUN, one
drive failure causes the LUN to go to Degraded, but data is still accessible.
5. Click OK.
The Replacement Procedure For Drive At Location [1,1] provides a step-by-step
procedure to walk you through removing and replacing the failed drive. Carefully
follow each step to benefit from Recovery Guru’s analysis and verifications:
a. Verify that the new drive’s capacity matches the failed drive’s capacity.
b. Remove the failed drive.
c. Wait 30 seconds.
d. Insert the new drive into the drive canister.
116
RAID Manager 6.1 User’s Guide • October 1997
Caution – Do not click OK in the Replacement Procedure window unless you have
physically replaced the failed drive. However, when you click OK, Recovery Guru
verifies whether or not the drive has been replaced. If Recovery Guru detects the
drive as not replaced, it displays a Drive Replacement Condition message that
suggests you verify the following:
The drive has indeed been physically replaced.
The drive does not have an incorrect capacity; that is, a capacity smaller than the
drive it is replacing.
Reconstruction has not yet started.
6. Click OK.
A display tells you that reconstruction has automatically started on the new drive
and you can click LUN Reconstruction in the Status Application to view the
reconstruction progress. For more information on what reconstruction involves, see
“Reconstruction” on page 23.
7. Click OK.
You return to the main Recovery Guru window. The Fixed? column updates to say
YES for the first Drive Failure entry and the second Drive Failure entry is
highlighted.
8. Click Fix.
The Summary Report for this drive failure shows the drive’s location is [2,1]. The
LUN is also Degraded.
Note – It is possible to have more than one failed drive in a RAID Module and the
logical unit(s) remain in the degraded mode. This occurs if the failed drives are not
in the same drive group. Also, it is possible to have more than one drive fail in a
RAID 1 logical unit and the logical unit remain Degraded, as long as the failed
drives are not in the same mirrored pair.
9. Continue following Recovery Guru’s instructions to replace this second failed
drive as you did for the first.
When you return to the main Recovery Guru window, the Fixed? column now
shows YES for both Drive Failure entries and neither entry is highlighted.
10. Click Recovery Guru again to verify that RAID Module 1 is now Optimal.
The display shows Optimal in the failure column. The Fix option is dimmed and you
cannot highlight the module for any action. Your module is again operating in a
normal condition.
Chapter 5
Using the Recovery Application
117
Checking for Component Failures Using
Recovery Guru
When to Use
Use this option to check selected RAID Modules for component failures and then
recover from them by following step-by-step instructions.
Select Recovery Guru when:
■
■
■
■
■
An alarm sounds on your module.
You see fault lights on any module component.
Health Check (Status Application) indicates you should.
Message Log ➔ Show Details (Status Application) indicates you should.
You see a non-optimal status reported for any module component.
Caution – Always select Recovery Guru before attempting any manual recovery
procedure. Incorrectly performing a procedure or performing the wrong procedure
could cause equipment damage or data loss. Recovery Guru takes you through
every step and necessary check to make sure that you are correcting the right
problem.
What Happens
The software analyzes the selected RAID Modules and displays the status for each
module. Recovery Guru also provides step-by-step instructions to fix failures when a
module’s status is other than Optimal.
When you select Recovery Guru, you see a window similar to FIGURE 5-2. TABLE 5-5
describes the window elements.
118
RAID Manager 6.1 User’s Guide • October 1997
FIGURE 5-2
Main Recovery Guru Window
Chapter 5
Using the Recovery Application
119
TABLE 5-5
Main Recovery Guru Window Description
Window Element
Description
RAID Module
Identifies the specific module.
It is possible to see a RAID Module listed more than once when it has
multiple failures. For example, if RAID Module 1 has both a failed drive
and a failed fan, two entries appear for this module: Drive Failure on one
line and Module Component Failure on another line. Also, you see two
Drive Failure entries on separate lines when failed drives exist on more
than one drive group, as shown in FIGURE 5-2.
Failure
Lists the component failure for the particular module.
Possible failures appear for drives/LUNs, data path (cables, terminators,
controllers, or host adapters), other component failures (fan/power
supply), and LUN create/formats that fail.
See TABLE 5-6 for a list and description of possible failures.
Fixed?
Indicates whether you have fixed that failure:
The column appears blank if the RAID Module is Optimal (that is, there
are no failures).
NO in the column means that the failure has not been fixed. Highlight
this module and click Fix to follow the step-by-step instructions for
fixing this failure.
YES in the column means that you selected Fix and performed the stepby-step instructions. The next time you select Recovery Guru, any items
that had YES should appear as Optimal and this column is blank.
Fix
Enables you to perform recovery procedures for modules with statuses
other than Optimal. You can only select one failure at a time to perform a
recovery procedure.
See the procedure on page 121.
Note – You should always use Recovery Guru before attempting any Manual
Recovery procedure.
120
RAID Manager 6.1 User’s Guide • October 1997
▼
To Check for Component Failures
Ensure that the RAID Module you want is selected. If you need instructions for
selecting a RAID Module, see page 33 before proceeding.
1. Click Recovery Guru.
The Main Recovery Guru window ( FIGURE 5-2) is displayed.
2. Highlight one failure, and do either of the following:
■
■
Click Fix. This option is dimmed if all modules have Optimal statuses. Also,
you cannot highlight any module unless NO appears in the Fixed? column.
Double-click on the item.
Note – See
TABLE 5-6 for a list of possible failure types that Recovery Guru might
display in the Failure column.
3. Follow the step-by-step instructions shown in the window very carefully.
When you complete the recovery procedure, notice that the Fixed? column in the
main window shows YES.
Note – Click Cancel, when offered, if you want to stop the recovery procedure.
However, you are not correcting the failure.
Caution – Do not click OK at any time unless you have completed all the steps as
instructed. Be sure to replace any failed component when instructed. Once a Failure
type is marked as fixed (YES), you cannot re-select it until the next time you click
Recovery Guru and it reports a failure on the module again.
Note – When you see more than one failure listed, click the first item in the list. In
such cases, Recovery Guru lists failures in the order (top to bottom) that you should
fix them. For example, it is best to fix a Drive Path failure before any drive failures.
4. Select any of the following:
■
For each additional failure, repeat these steps starting at Step 2.
■
Click Manual Parity Check/Repair to check parity when recommended.
■
Exit Recovery and click the Status Application to view reconstruction progress
when recommended.
Chapter 5
Using the Recovery Application
121
Possible Failures Detected
TABLE 5-6 describes the possible failure types that Recovery Guru could display in
the Failure column. Each failure detected for a module appears on a single line. You
can see individual drive or LUN statuses using Module Profile ➔ Drive or LUNs
detailed information. See “Possible Component Statuses” on page 112 for
information on individual drive, LUN, or controller statuses.
TABLE 5-6
Possible Failure Types
Failure Type
Probable Cause
Drives
Drive Failure
!
One drive in a drive group has failed.
A RAID Module could show this failure on more than one line, as long
as the failed drives belong to different drive groups.
Caution
On a RAID 0 LUN, a single drive failure causes the loss of all data.
Multiple Drive
Failure
More than one drive in the same drive group has failed on a RAID
Module.
Multiple Offline/
Failed Drives
One or more drives has been placed Offline because data
reconstruction failed and a read error occurred for one or more Failed
drives in the LUN.
Hot Spare Failure
A hot spare drive has failed while being used by a LUN on the RAID
Module.
Note: This means that the drive the hot spare was covering for is also
still Failed, and the LUN has probably become Degraded.
Multiple
Unresponsive
Drives
The controller is unable to communicate with multiple drives in the
selected RAID Module.
Important
If you see this result, the drives’ status in Module Profile ➔ Drives is
most likely Unresponsive. If the drives receive any I/O, the controller
will fail them. You may want to determine which drives are
Unresponsive; then, if you want to manually fail them, use Options ➔
Manual Recovery ➔ Drives.
Unresponsive
Drive
The controller is unable to communicate with a drive in the selected
RAID Module.
Important
If you see this result, the drive status in Module Profile ➔ Drives is
most likely Unresponsive. If the drive receives any I/O, the controller
will fail it. You may want to determine which drive is Unresponsive;
then, if you want to manually fail it, use Options ➔ Manual Recovery
➔ Drives.
122
RAID Manager 6.1 User’s Guide • October 1997
TABLE 5-6
Possible Failure Types (Continued)
Failure Type
Probable Cause
Drive Trays
Drive Tray — Fan
Failure
A fan in one of the disk drive trays has failed.
Replace the fan as soon as possible to keep the drives from
overheating.
Drive Tray — Fan
Failures
Both fans in one of the disk drive trays have failed.
Replace the fans as soon as possible to keep the drives from
overheating.
Drive Tray —
Pwr Supp Failure
A power supply in one of the disk drive trays has failed.
Replace the power supply as soon as possible because a failure to a
second power supply may cause the drive tray to shut down.
Drive Tray —
Pwr Supp Failures
Both power supplies in one of the disk drive trays has failed.
Replace the power supplies as soon as possible; the drive tray most
likely has been shut down.
Drive Tray —
Temp. Exceeded
The maximum temperature allowed within a disk drive tray has been
exceeded.
Caution
!
This is a critical condition that may cause the drive tray to be
automatically turned off if you do not resolve this condition within a
short time.
Other Failures
Channel Failure
Indicates that all the drives on the same drive channel have Failed
and/or are Unresponsive. Depending on how the logical units have
been configured across these drives, the status of the logical units may
be Dead, Degraded, or Optimal (if hot spare drives are in use).
Chapter 5
Using the Recovery Application
123
TABLE 5-6
Possible Failure Types (Continued)
Failure Type
Probable Cause
Data Path Failure
A controller is not receiving I/O, which indicates some component
along the data path has failed. For Networked versions, this means
that the controller is not responding to the RAID Manager software.
This failure could be the result of a problem with the interface cable/
terminator, controller, or the host adapter. The correct procedure for
recovering from a data path failure varies depending on where the
failure occurred. For example, the correct procedure for recovering
from a controller failure depends on how many and what type of
controllers the affected module has.
Important
If you do not have RDAC protection, this failure type may not be
displayed for every condition. Therefore, verify that the interface
cable/terminator or network card is not removed or damaged before
proceeding with any controller-related recovery procedure.
Environmental
Card Failure
An environmental card in one of the disk drive trays has failed.
Caution
!
Module
Component
Failure
124
You may see a series of disk drive failures or a channel failure reported
as well. You must service the environmental card first using
Recovery Guru. This recovery procedure will instruct you on how to
fix the corresponding drive or channel failures; therefore, you should
not use Recovery Guru for the associated drive or channel failure
entries.
Either single or multiple fans or power supplies have failed.
Important
When recovering from a Module Component Failure, wait for the
controller to poll the module (default is ten minutes) before reselecting Recovery Guru. Otherwise, this condition may continue to be
reported as a failure.
RAID Manager 6.1 User’s Guide • October 1997
Manually Checking and Repairing
Parity
When to Use
Use this option to manually check and repair parity on selected LUNs.
Note – Because an automatic parity check/repair is performed daily (if enabled),
checking parity manually is necessary only when some recovery procedure has been
performed that could result in parity inconsistencies. For example, you may be
instructed to check parity after performing most Manual Recovery procedures.
What Happens
This option displays a list of LUNs for the selected RAID Module(s) and enables you
to run parity check/repair on one or more LUNs with Optimal statuses. Once you
start the parity check/repair operation, a histogram shows the percentage of
progress for each selected LUN.
See FIGURE 5-3 for a window similar to the one you see when you click Manual Parity
Check/Repair. TABLE 5-7 describes the window elements.
What Parity Check/Repair Does
When you highlight LUNs and click Start Parity Check/Repair, the selected LUNs
are scanned for parity inconsistencies. This operation only applies to selected LUNs
with an Optimal status. When the parity operation is finished, you see whether
inconsistencies were found and repaired for each LUN.
Chapter 5
Using the Recovery Application
125
Caution – RAID 0 does not have parity and therefore cannot be checked and
repaired. Additionally, you cannot run parity check/repair on RAID 1, 3, or 5 LUNs
with a status other than Optimal. Parity check/repair fixes parity, not data. If the
parity inconsistencies resulted from corrupted data, the data is still corrupted, but
the parity is correct. Parity inconsistencies might indicate corrupt data. You may be
able to use your operating system to verify your data.
See “Parity” on page 24 for a general description of parity. You can also use Message
Log in the Status Application to view more detailed information about the affected
data blocks if parity inconsistencies are found and corrected.
FIGURE 5-3
126
Main Manual Parity Check Repair Window
RAID Manager 6.1 User’s Guide • October 1997
TABLE 5-7
Main Manual Parity Check Repair Window Elements
Window Elements
Description
RAID Module
Identifies the specific module containing the LUN.
It is possible to see a RAID Module listed more than once because each
LUN is listed separately.
Logical Unit
Identifies the LUNs configured for the particular RAID Module.
Each line shows only one LUN.
RAID Level
Indicates the RAID Level of the LUN.
Possible RAID Levels are 0, 1, 3, and 5.
Logical Unit
Status
Shows the operating condition of the affected LUNs.
For an explanation of possible statuses and any recommended action to
take, see TABLE 5-3.
Parity Check/
Repair Progress
Displays a histogram when parity check/repair begins.
This graphic shows the amount of parity check/repair accomplished as a
percentage, and starts over from 0% as each new LUN begins parity
check. The response time for updating this histogram depends on the
number and size of the LUNs undergoing parity check/repair.
Start Parity
Check/
Repair
Begins the parity operation for selected LUNs with Optimal statuses.
See the procedure below.
Note – You can enable/disable or change the automatic parity settings using
Options Auto Parity Settings from the top menu in the Maintenance/Tuning
Application. It is recommend that you enable this automatic option so that parity is
checked daily. However, see the RAID Manager Installation and Support Guide for any
restrictions that may apply.
▼
To Manually Check and Repair Parity
Make certain that the RAID Module you want is selected. If you need instructions
for selecting a RAID Module, see page 33 before proceeding.
1. Click Manual Parity Check/Repair.
The Recovery Window is displayed ( FIGURE 5-3).
2. Highlight one or more LUNs in the list with a status of Optimal.
Chapter 5
Using the Recovery Application
127
3. Click Start Parity Check/Repair.
This option is dimmed if you select one or more LUNs that either are RAID Level 0,
or have a LUN status other than Optimal.
4. View the progress of the parity check/repair operation.
A new histogram is displayed for each selected LUN when its check begins. When
parity check/repair is complete, one of two confirmation boxes is displayed:
■
■
Parity is complete and no inconsistencies were found.
Parity is complete and inconsistencies were found and repaired on specific
LUNs.
Note – While parity check/repair is in progress, you cannot perform other Recovery
tasks. You can click Cancel at any time during parity check. However, if you stop
this operation, your parity has not been completely checked or repaired.
5. Click OK at the “parity is complete” confirmation box.
The LUNs list is displayed.
128
RAID Manager 6.1 User’s Guide • October 1997
Performing Manual Recovery for Drives
When to Use
Use this option to view drive and LUN status information for a selected RAID
Module and to manually perform recovery steps for drives. In most cases, however,
you should click Recovery Guru and follow the step-by-step instructions provided
there.
Caution – Do not use Manual Recovery unless specifically directed by Recovery
Guru or a Customer Services Representative. To do so could result in the loss of
data.
Caution – Do not attempt to manually recover from a drive failure without
understanding the circumstances of the failure. The correct procedure varies
depending on the RAID Level of the affected LUN and the number of drives in one
drive group that have failed. Because of this, it is best to use Recovery Guru.
Note – You can quickly find drive status information using Module Profile, Drive
Details, too. See TABLE 5-2 for possible drive statuses and action to take.
What Happens
Status information displays for all the drives and LUNs in the selected RAID
Module. Also, you have options to manually fail a drive, begin drive reconstruction,
or revive a drive.
See FIGURE 5-4 for a window similar to the one you see when you click Options from
the top menu, then Manual Recovery-Drives. TABLE 5-8 describes the window
elements.
Chapter 5
Using the Recovery Application
129
FIGURE 5-4
130
Main Manual Recovery — Drives Window
RAID Manager 6.1 User’s Guide • October 1997
Note – It is possible for all columns in this window to be blank except for Location
and Drive Status. This would occur if the drives are unassigned (that is, they are not
part of a configured drive group). For these drives, there is no LUN under logical
units, RAID Level, or logical unit status to report.
TABLE 5-8
Main Manual Recovery — Window Description
Window Element
Location
Description
The location of the drive in the selected RAID Module.
This identifier corresponds to the drive’s SCSI Channel number and SCSI
ID unique to the drive. The location information is displayed as [x,y] on
screen where the channel number is always listed first. For example, [2,8]
corresponds to the drive at location SCSI Channel 2 and SCSI ID 8.
Drive Status
The operating condition of the drive.
For an explanation of possible drive statuses and any recommended
action to take, see TABLE 5-2.
Logical Units
The LUNs (by number) contained on the drive group.
The number is displayed for each drive in the drive group.
RAID Level
The RAID Level of the LUN.
Possible RAID Levels are 0, 1, 3, and 5.
Logical Unit
Status
The operating condition of the LUN.
For an explanation of possible LUN statuses and any recommended
action to take, see TABLE 5-3.
Fail
Enables you to manually fail drives.
See the procedure on page 132.
Reconstruct
Enables you to manually begin reconstruction for drives.
See the procedure on page 133.
Revive
Enables you to manually revive drives.
See the procedure on page 134.
Chapter 5
Using the Recovery Application
131
Failing a Drive
When to Use
It is best to wait and let the controller fail a drive; however, you may want to use this
option if you want to replace a drive before the controller fails it. For example, if
Recovery Guru is unable to complete a Health Check because a drive is
Unresponsive, click Options ➔ Manual Recovery ➔ Drives to determine which drive
is affected, then use this option to fail and replace it.
Caution – Do not use Manual Recovery unless specifically directed by Recovery
Guru or a Customer Services Representative. Doing so could result in the loss of
data.
▼ To Fail a Drive
This option is dimmed if you select All RAID Modules. You cannot fail drives that
have a status of Replaced or that contain LUNs that are currently Reconstructing or
Formatting.
Caution – Failing drives can cause data loss. Do not attempt to manually fail a
drive without understanding the circumstances of your module’s operating
condition. Because of this, it is best to use Recovery Guru.
Ensure that the RAID Module you want is selected. If you need instructions for
selecting a RAID Module, see page 33 before proceeding.
1. Click Options ➔ Manual Recovery ➔ Drives.
The Recovery Window is displayed ( FIGURE 5-4).
2. Highlight the drive you want to fail.
The Fail option is dimmed if you highlight any drive that has a drive status of
Replaced, or a LUN status of Formatting or Reconstructing.
3. Click Fail, then OK.
An hourglass appears until the fail drive is failed, then the drive list shows updated
status information.
4. Use Recovery Guru to replace the drive.
132
RAID Manager 6.1 User’s Guide • October 1997
Reconstructing a Drive
When to Use
Normally, drive reconstruction begins automatically once you replace a failed drive.
However, if it does not begin automatically, you may want to use this option. For
more general information about the reconstruction process, see “Reconstruction” on
page 23.
Caution – Do not use Manual Recovery unless specifically directed by Recovery
Guru or a Customer Services Representative. Doing so could result in the loss of
data.
▼ To Reconstruct a Drive
This option is dimmed if you select All RAID Modules or if the LUN status is
Reconstructing or Formatting. You can only reconstruct drives with Failed or
Replaced drive statuses in a RAID Level 1, 3, or 5 LUN.
Caution – Do not attempt to manually begin reconstruction on a drive without
following the correct procedure. Because drive reconstruction normally begins when
you replace a failed drive, it is best to use Recovery Guru.
1. Ensure that the RAID Module you want is selected. If you need instructions for
selecting a RAID Module, see page 33 before proceeding.
2. Click Options ➔ Manual Recovery ➔ Drives.
The Recovery Window is displayed ( FIGURE 5-4).
3. Highlight the drive you want to reconstruct.
The Reconstruct option is dimmed if you highlight any drive that either contains a
RAID Level 0 LUN, or has a drive status other than Failed or Replaced.
4. Click Reconstruct, then OK.
The drive status changes to Replaced and the LUN status changes to Reconstructing
until reconstruction is complete.
Note – You can view reconstruction progress using the Status Application (LUN
Reconstruction).
Chapter 5
Using the Recovery Application
133
Reviving a Drive
When to Use
You may be able to recover from certain types of drive failures using this option. For
example, if you remove a wrong drive that was Optimal, this procedure may work.
Caution – Never use this procedure if the controller has marked the drive as failed.
Doing so could result in the loss of data because parity calculations made during
subsequent writes are made without the Failed Drive.
Caution – Do not use Manual Recovery unless specifically directed by Recovery
Guru or a Customer Services Representative.
▼ To Revive a Drive
This option is dimmed if you select All RAID Modules. You can only revive drives
with Failed drive statuses and the affected LUNs cannot be Reconstructing or
Formatting. Use this procedure only if you accidentally removed the wrong drive
and it was Optimal.
Caution – Do not attempt to manually revive a drive without understanding the
circumstances of the drive failure. For example, if you mistakenly removed or failed
a drive with an Optimal status and have now returned the Optimal drive to its
correct location, this procedure may work. Because of this, it is best to use Recovery
Guru.
1. Ensure that the RAID Module you want is selected. If you need instructions for
selecting a RAID Module, see page 33 before proceeding.
2. Click Options ➔ Manual Recovery ➔ Drives.
The Recovery Window is displayed ( FIGURE 5-4).
3. Highlight the drive(s) you want to revive.
The Revive option is dimmed if you highlight any drive that has a drive status other
than Failed.
4. Click Revive, then OK.
5. When the drive is revived, click OK.
The drive list shows updated status information.
134
RAID Manager 6.1 User’s Guide • October 1997
Note – Click Manual Parity Check/Repair to check parity on the LUNs that the
revived drives contain.
Performing Manual Recovery for LUNs
When to Use
Use this option to view LUN status information for selected RAID Modules and to
manually perform recovery steps for LUNs. In most cases, however, you should
click Recovery Guru and follow the step-by-step instructions provided there.
Caution – Do not use Manual Recovery unless specifically directed by Recovery
Guru or a Customer Services Representative. Doing so could result in the loss of
data.
Caution – Do not attempt to manually recover LUNs without understanding the
circumstances of the Degraded or Dead status. The correct procedure varies
depending on the RAID Level of the affected LUN and the number of drives in the
same drive group that have failed. Because of this, it is best to use Recovery Guru.
Note – You can quickly find LUN status informa-tion using Module Profile, Logical
Unit Details, too. See TABLE 5-3 for possible LUN statuses and action to take.
What Happens
Status information displays for all the LUNs configured for the selected RAID
Module. Also, you have options to manually format or revive LUNs.
See FIGURE 5-5 for a window similar to the one you see when you click Options from
the top-menu, then Manual Recovery-Logical Units. TABLE 5-9 describes the window
elements.
Chapter 5
Using the Recovery Application
135
FIGURE 5-5
136
Main Manual Recovery — Logical Units Window
RAID Manager 6.1 User’s Guide • October 1997
TABLE 5-9
Main Manual Recovery — Logical Units Window Description
Window Element
Description
Logical Units
Identifies the LUNs contained on a particular drive group.
In the case of a Dead LUN, you see all the LUNs for the affected drive
group on the same line.
Drive Group
Identifies the drive groups configured for the selected RAID Module.
RAID Level
Indicates the RAID Level of the LUNs.
Possible RAID Levels are 0, 1, 3, and 5.
Logical Unit
Status
Shows the operating condition of the affected LUN.
For an explanation of possible LUN statuses and any recommended
action to take, see TABLE 5-3.
Format
Enables you to manually format a LUN.
See the procedure on page 137.
Revive
Enables you to manually revive a LUN.
See the procedure on page 138.
Note – If there are no configured LUNs for the selected RAID Module (that is, all
drives are unassigned), the window would appear blank. There is no LUN, drive
group, RAID Level, or LUN status to report.
Formatting a LUN
When to Use
Use this option to manually reformat a Dead LUN after you have replaced all the
failed drives in the drive group.
Caution – Do not use Manual Recovery unless specifically directed by Recovery
Guru or a Customer Services Representative. Doing so could result in the loss of
data.
Chapter 5
Using the Recovery Application
137
▼ To Format a LUN
This option is not available (dimmed) if you select All RAID Modules.
Caution – Do not attempt to manually format a LUN without first correcting any
failures. The correct procedure varies depending on the RAID Level of the affected
LUN and the number of drives in one drive group that have failed. Because of this it
is best to use Recovery Guru.
Ensure that the RAID Module you want is selected. If you need instructions for
selecting a RAID Module, see page 33 before proceeding.
1. Click Options ➔ Manual Recovery ➔ Logical Units.
The Recovery Window is displayed ( FIGURE 5-5).
2. Highlight the LUN(s)/drive group you want to format.
Caution – In the case of a Dead LUN, you see all the LUNs for the affected drive
group on a single line. Thus, highlighting that line selects all those LUNs, and you
are formatting every LUN in the drive group.
Caution – Choosing the Format option in Step 3 destroys all data on every LUN in
the drive group. Therefore you lose all data in the drive group and must use a
backup copy to restore data after the format completes.
3. Click Format, then OK.
You return to the LUNs list, which shows updated LUN status information. The
LUNs have a status of Formatting, then Optimal when the format completes.
Reviving a LUN
When to Use
Use this option only when instructed to by Recovery Guru, such as to revive LUNs
when you have replaced a failed drive channel.
138
RAID Manager 6.1 User’s Guide • October 1997
Caution – Do not use Manual Recovery unless specifically directed to by Recovery
Guru or a Customer Services Representative. Doing so could result in the loss of
data.
▼ To Revive a LUN
This option is dimmed if you select All RAID Modules.
Caution – Do not attempt to manually revive a LUN without understanding the
nature of the Dead status. Use this procedure only when a drive channel has failed,
causing all of the drives on that same drive channel to fail. Because of this, is it best
to use Recovery Guru.
Ensure that the RAID Module you want is selected. If you need instructions for
selecting a RAID Module, see page 33 before proceeding.
1. Click Options ➔ Manual Recovery ➔ Logical Units.
The Recovery Window is displayed ( FIGURE 5-5).
2. Highlight the LUN(s)/drive group you want to revive.
Note – In the case of a Dead LUN, you see all the LUNs for the affected drive group
on a single line. Thus, highlighting that line selects all those LUNs, and this revive
procedure affects every LUN for the drive group.
Caution – Selecting the Revive option may corrupt data on every LUN in the drive
group. Therefore, you could lose all data in the drive group and would need to use
a backup copy to restore data after the revive is completed.
3. Click Revive, then OK.
One of two information boxes appear:
■
■
Reviving the LUN was successful.
Click OK. The LUN list shows updated status information.
An error occurred while attempting to perform this procedure.
Try the procedure again.
Note – When revive successfully completes, you should manually check parity on
the LUNs that the revived drive group(s) contained.
Chapter 5
Using the Recovery Application
139
Performing Manual Recovery for
Controller Pairs
When to Use
Use this option to view controller status information for selected RAID Modules and
to manually perform recovery steps for controllers. In most cases, however, you
should click Recovery Guru and follow the step-by-step instructions provided there.
Caution – Do not use these options unless specifically directed by Recovery Guru
or a Customer Service Representative. Doing so could result in the loss of data.
Caution – Do not attempt to manually recover from controller failures without
understanding the circumstances of the controller failure. Also, do not attempt to
replace a controller without following the proper hardware documentation. Because
of this, it is best to use Recovery Guru.
Note – You can quickly find controller status information using Module Profile ➔
Controller details, too. See TABLE 5-4 for possible controller statuses and action to
take.
What Happens
Status information displays for the controllers on the selected RAID Module. Also,
you have options for manually placing a controller offline or online.
See FIGURE 5-6 for a window similar to the one you see when you click Options from
the top menu, then Manual Recovery ➔ Controller Pairs. TABLE 5-10 describes the
window elements.
140
RAID Manager 6.1 User’s Guide • October 1997
FIGURE 5-6
Main Manual Recovery — Controller Pairs Window
Chapter 5
Using the Recovery Application
141
TABLE 5-10
Main Manual Recovery — Controller Pairs Window Description
Window Element
Description
Controller
Identifies one controller per line for the selected RAID Module by an A
or B designation and, where applicable, includes a system device name.
The A and B are relative names to identify the controllers.
Status
Shows the operating condition of the controller.
For an explanation of possible statuses and any recommended action to
take, see TABLE 5-4.
Place Offline
Enables you to manually place a controller offline, which stops the
controller from accepting I/O requests.
See the procedure below.
Place Online
Enables you to manually place a controller online, which returns the
controller to operating condition.
See the procedure on page 143.
Placing a Controller Offline
When to Use
Use this option to stop a selected controller from accepting I/O requests. For
example, to replace a controller, you want it to be offline. When you place a
controller offline, its LUNs are reassigned to the other controller and it stops
accepting any I/O.
Caution – Do not use Manual Recovery unless specifically directed to by Recovery
Guru or a Customer Services Representative. Doing so could result in the loss of
data.
▼ To Place a Controller Offline
This option is not available (dimmed) if you select All RAID Modules, or if the
selected RAID Module has only one controller.
142
RAID Manager 6.1 User’s Guide • October 1997
Caution – Do not attempt to manually place a controller offline without following
the correct procedure, especially if you are replacing a failed controller. Because of
this, it is best to use Recovery Guru.
Ensure that the RAID Module you want is selected. If you need instructions for
selecting a RAID Module, see page 33 before proceeding.
1. Click Options ➔ Manual Recovery ➔ Controller Pairs.
The Recovery Window is displayed ( FIGURE 5-6).
2. Highlight the controller you want to place offline.
The Place Offline option is dimmed if one controller on the selected RAID Module is
already offline. You can place only one controller for a module offline at a time.
3. Click Place Offline, then OK.
Caution – If you are using this option to replace the controller, wait one minute
before inserting a new controller.
4. Click OK when the controller list updates the status to Offline.
You can also visually see the controller is offline by checking the LED and fault
lights on the controller. See your hardware manual for the location and function of
these LEDs.
Placing a Controller Online
When to Use
Use this option to place a controller online; that is, to return it to ready-for-operating
condition. For example, if you have placed a controller offline to replace it, you need
to place it online before it can function again for the selected RAID Module.
Caution – Do not use Manual Recovery unless specifically directed by Recovery
Guru or a Customer Services Representative. Doing so could result in the loss of
data.
Chapter 5
Using the Recovery Application
143
▼ To Place a Controller Online
This option is dimmed if you select All RAID Modules, or if the selected RAID
Module has only one controller.
Caution – Do not attempt to manually place a controller online without following
the correct procedure, especially if you are replacing a failed controller. Because of
this, it is best to use Recovery Guru.
Make certain that the RAID Module you want is selected. If you need instructions
for selecting a RAID Module, see page 33 before proceeding.
1. Click Options ➔ Manual Recovery ➔ Controller Pairs.
The Recovery Window is displayed ( FIGURE 5-6).
2. Highlight the controller you want to place online.
The Place Online option is dimmed unless there is one controller on the selected
RAID Module with an Offline status. Also, there can be only one controller offline
for the selected module.
3. Click Place Online, then OK.
4. Click OK when the controller list updates the controller’s status to Optimal.
144
RAID Manager 6.1 User’s Guide • October 1997
CHAPTER
6
Using the Maintenance/Tuning
Application
■
Changing the LUN Reconstruction Rate — page 150
■
Balancing LUNs Between Active/Active Controllers — page 153
■
Changing Controller Mode — page 160
■
Viewing and Setting Caching Parameters — page 166
■
Upgrading Controller Firmware — page 170
■
Changing Automatic Parity Check/Repair Settings — page 180
145
Overview
Use Maintenance/Tuning after initial installation and after changing your module
configuration to accomplish the following tasks:
■
■
■
■
■
■
Change the reconstruction rate for LUNs on a selected RAID Module.
Balance LUN assignments between active/active controller pairs of one or all
RAID Modules.
Change an active/passive controller pair to active/active.
Swap an active/passive controller pair to passive/active.
View or change caching parameters for LUNs on a selected RAID Module.
Upgrade the controller firmware for one or all RAID Modules.
Before you begin the procedures in this chapter, you should be familiar with the
information in Chapter 2, “Features Common to All Applications.” These common
concepts, navigational functions, and procedures are the same in Maintenance/
Tuning as they are in the other applications.
A task summary chart of the Maintenance/Tuning Application is shown in
FIGURE 1-6. Step-by-step procedures for each task in Maintenance/Tuning begin in
“Changing the LUN Reconstruction Rate” in this chapter.
Starting Maintenance/Tuning
To start the Maintenance/Tuning Application, double-click the Maintenance/Tuning
icon in the program group. FIGURE 6-1 shows the main Maintenance/Tuning window
that is displayed. TABLE 6-1 describes the elements of that window.
146
RAID Manager 6.1 User’s Guide • October 1997
FIGURE 6-1
Main Maintenance/Tuning Window
Chapter 6
Using the Maintenance/Tuning Application
147
TABLE 6-1
Main Maintenance/Tuning Window Elements
Window Element
Description
Procedure
File
Gives you two options:
Save Module Profile—Saves profile information to a
file for a selected RAID Module.
page 42
Exit—Quits Maintenance/Tuning.
page 30
Options
Auto Parity Settings—Allows you to enable or
disable automatic parity check/repair, or change the
daily time at which it starts.
page 180
Help
Gives you access to Online Help topics for all
applications.
page 30
RAID Module
Selection Box
Enables you to select a specific RAID Module or All
RAID Modules before selecting the option you want
to perform.
page 33
Select Module
Allows you to select or find a specific RAID Module,
add or remove RAID Modules, or edit the information
(module name, controller information, independent
controllers, and comments) about a RAID module.
page 33
Locate Module
Flashes the activity lights on the drive canisters in the
selected RAID Module to identify the module’s
location.
page 36
Module Profile
Provides information about the controllers, drives,
and LUNs for the selected RAID Module.
page 37
LUN
Reconstruction
Rate
Enables you to change the reconstruction rate for
LUNs on a RAID Module whether or not they are
undergoing reconstruction.
page 150
LUN Balancing
Enables you to balance LUN ownership between
active/active controller pairs for a single or all RAID
Modules.
page 153
Controller
Mode
Enables you to do one of the following on selected
modules with active/passive controller pairs:
page 160
Change active/passive controller pairs to active/active.
Swap the active controller to “passive,” and the passive
controller to “active.”
148
RAID Manager 6.1 User’s Guide • October 1997
TABLE 6-1
Main Maintenance/Tuning Window Elements (Continued)
Window Element
Description
Procedure
Caching
Parameters
Allows you to display the settings for three caching
parameters, which you can enable or disable for
LUNs on a selected module:
page 166
Write caching
Write cache mirroring
Cache without batteries
Firmware
Upgrade
Enables you to upgrade controller firmware and/or
NVSRAM files on a single or all RAID Modules, using
either the online or offline procedures.
Status Line
Provides information about an option when you
move the mouse over the option button. For topmenu options, you must click on the option and hold
down the left-mouse button.
page 170
Note – Some options on the main Maintenance/Tuning window may be dimmed if:
You select All RAID Modules.
OR
The RAID Module you select does not meet the requirements for performing that
option.
Chapter 6
Using the Maintenance/Tuning Application
149
Changing the LUN Reconstruction Rate
When to Use
Use this option to change the reconstruction rate for the LUNs on a selected RAID
Module. You can change the reconstruction rate even when LUNs are undergoing
reconstruction.
Note – If you need to view the reconstruction progress for LUNs currently
reconstructing, use the Status Application. See “Viewing LUN Reconstruction
Progress and Changing the Reconstruction Rate” on page 103.
What Happens
The display shows the drive group/LUNs for the selected RAID Module. A Slider
bar shows the current setting for each LUN’s reconstruction rate.
See FIGURE 6-2 for a window similar to the one displayed when you select LUN
Reconstruction Rate. TABLE 6-2 describes the window elements.
Reconstruction rate settings each correspond to a different interval based on the
number of blocks reconstructed and the number of seconds delay between
reconstruction operations for system I/O operations to take place.
From left to right the points on the Slider bar indicate the following reconstruction
rates (blocks/seconds delay):
■
■
■
■
■
150
Slow — 256/0.8
Slow medium — 256/0.4
Medium — 512/0.4
Medium fast — 512/0.2
Fast — 1024/0.1
RAID Manager 6.1 User’s Guide • October 1997
FIGURE 6-2
Main LUN Reconstruction Window
TABLE 6-2
Main LUN Reconstruction Window Elements
Window Element
Description
Drive Group
Provides the drive group number for the selected RAID Module.
LUN
Provides the LUN number (LUN) on a particular drive group.
Save
Saves any reconstruction rate changes you make.
Reconstruction Rate Optimize For:
System
Performance
Indicates the rate that favors system performance over reconstruction
speed.
Reconstruction
Performance
Indicates the rate that favors reconstruction speed over system
performance.
Chapter 6
Using the Maintenance/Tuning Application
151
▼
To Change the LUN Reconstruction Rate
If you select All RAID Modules, this option is dimmed.
Make certain that the RAID Module you want is selected. If you need instructions
for selecting a RAID Module, see page 33 before proceeding.
1. Select LUN Reconstruction Rate.
The Main LUN Reconstruction window is displayed ( FIGURE 6-2).
2. Change the reconstruction rate, if you want, by moving the Slider bar toward
either:
■
■
System performance — to speed system I/O and slow reconstruction.
Reconstruction performance — to speed reconstruction rate and slow system
I/O.
3. Click Save for your rate changes to take effect.
152
RAID Manager 6.1 User’s Guide • October 1997
Balancing LUNs Between Active/Active
Controllers
When to Use
Use this option to balance LUN ownership (on a drive group basis) between active/
active controller pairs in selected RAID Modules.
To quickly view the drive group/LUN assignments for all your RAID Modules,
select All RAID Modules, then LUN Balancing. This display includes all modules
regardless of the number of controllers or their modes.
Caution – If you do not have RDAC protection, you must stop I/Os to the RAID
Module before changing LUN ownership. Otherwise, you could hang the system.
What Happens
The software displays the LUNs configured for a particular drive group and shows
which controller owns them. The procedure you use depends on whether you select
a single RAID Module or All RAID Modules.
■
■
If you select a single RAID Module, you control which drive group/LUNs are
assigned to each controller. Use the procedures that follow for “Balancing LUNs
on One RAID Module.”
If you select All RAID Modules, the software automatically balances drive
groups/LUNs for the modules you select. Use the procedures on page 156.
Chapter 6
Using the Maintenance/Tuning Application
153
Balancing LUNs on One RAID Module
When to Use
Use this option to manually assign specific drive groups/LUNs to each active
controller (in the pair) on a single RAID Module. This option is available for any
RAID Module with an active/active controller pair.
What Happens
The software displays two boxes, one for each controller. The information in the
boxes indicates which LUNs (configured for a particular drive group) are assigned
to each controller.
Caution – If the selected RAID Module has an independent controller
configuration, you are able to move drive group/LUNs from the “Inaccessible”
controller to the active controller. However, you will not be able to give them back.
You should not use this procedure unless directed by Recovery Guru or a Customer
Service Representative.
See FIGURE 6-3 for a window similar to the one you see when you select one RAID
Module, then LUN Balancing. TABLE 6-3 describes the window elements.
154
RAID Manager 6.1 User’s Guide • October 1997
FIGURE 6-3
Balancing LUNs on One RAID Module Window
TABLE 6-3
Balancing LUNs on One RAID Module Window Description
Name
Description
Controller
Displays two boxes, one for each controller for the selected RAID
Module. These boxes indicate which drive groups and LUNs are
assigned to which controller.
The controllers are identified by an A or B designation and, where
applicable, a system device name. The A and B are relative names to
identify the controllers.
Drive Group
Provides the number of the drive group assigned to that controller.
LUNs
Lists all the LUNs that belong to the particular drive group.
Group
Capacity (MB)
Shows the total capacity (in megabytes) available on the particular drive
group. This is not the total capacity of the configured LUNs in the drive
group unless you configured them to use all of the capacity.
Chapter 6
Using the Maintenance/Tuning Application
155
TABLE 6-3
Balancing LUNs on One RAID Module Window Description (Continued)
Name
Description
Move << - >>
Button
Moves drive groups/LUNs to the opposite controller.
Save
Saves the new settings for balancing the LUNs.
Cancel
Returns you to the main Maintenance/Tuning Window without
changing any LUN assignments.
▼ To Balance LUNs Between Active/Active Controllers
LUN Balancing is dimmed if you select a module that has only one controller or an
active/passive controller pair.
Ensure that the RAID Module you want is selected. If you need instructions for
selecting a RAID Module, see page 33 before proceeding.
1. Select LUN Balancing.
The Balancing LUNs on One RAID Module window is displayed ( FIGURE 6-3).
2. Highlight each drive group you want to assign to the other controller in the pair.
You can highlight items in both lists. If you want to view the LUN Assignment for
the selected RAID Module without making any changes, select Cancel after you are
finished viewing.
3. Click Move (<< - >>).
The selected drive group/LUNs move to the other controller.
4. Click Save to actually balance the drive group/LUNs (save any new settings).
Balancing LUNs on All RAID Modules
When to Use
Use this option to view the LUN Assignments for all your RAID Modules at once,
and to have this software balance the drive group/LUNs between active/active
controller pairs on modules you select.
156
RAID Manager 6.1 User’s Guide • October 1997
What Happens
The software displays all the RAID Modules and their controllers, showing which
ones own specific drive group/LUNs. Highlighting modules and selecting Balance
automatically assigns the LUNs associated with the odd-numbered drive groups to
one active controller and the LUNs associated with even-numbered drive groups to
the other active controller for those modules.
See FIGURE 6-4 for a window similar to the one you see when you select one RAID
Module, then LUN Balancing. TABLE 6-4 describes the window elements.
Note – You can highlight multiple items in a list when using either LUN Balancing
or Controller Mode:
Single-click on an item to select that item. Press Shift + click to highlight a series of
items. Press Control + click to highlight items not in a series.
FIGURE 6-4
Balancing LUNs On All RAID Modules Window
Chapter 6
Using the Maintenance/Tuning Application
157
TABLE 6-4
Balancing LUNs On All RAID Modules Window Description
Name
Description
RAID Module
Identifies specific modules.
Controllers,
Logical Units
Owned
Displays two columns, one for each controller in the RAID Modules.
These columns list the LUNs owned by that controller for each module
in the list.
The controllers are identified by an A or B designation and, where
applicable, a system device name. The A and B are relative names to
identify the controllers. You see either a number for every logical unit
configured for the selected RAID Module, or a reason why no LUNs are
owned.
Note
When no logical units (LUNs) are assigned to one of the controllers,
instead of seeing a LUN, you see one of the following reasons why no
LUNs are assigned to that controller:
• None (No controller) — usually means the module has only one
controller
• Active (No LUNs owned)
• None (Passive controller) — only active controllers can have LUNs
assigned to them
• (Inaccessible) — indicates the RAID Module has an independent
controller configuration (may own LUNs).
Balance
Automatically balances the LUNs in the selected RAID Module.
▼ To Balance LUNs on All RAID Modules
1. Select All RAID Modules.
2. Select LUN Balancing.
The Balance LUNs on All RAID Modules window is displayed ( FIGURE 6-4). If a
controller does not have any LUNs assigned to it, a reason is shown (See TABLE 6-4).
3. Highlight the modules with active/active controllers for which you want to
balance the LUNs.
Note – You cannot highlight a RAID Module that has an independent controller
configuration.
158
RAID Manager 6.1 User’s Guide • October 1997
4. Click Balance.
A confirmation box displays a message that the LUNs are about to be balanced for
the selected RAID Modules.
5. Click OK to proceed.
Then, the LUN Balancing list updates to show the new LUN Assignments for each
module you highlighted. The odd-numbered drive groups are assigned to one active
controller and the even-numbered drive groups are assigned to the other controller.
Caution – If it appears that no balancing occurred, verify that the LUNs for the
selected module are not all in the same drive group. For example, assume that RAID
Module 1 has only three LUNs, but they are all in the same drive group. Those
LUNs always belong to the same controller because LUNs are assigned on a drive
group basis.
Chapter 6
Using the Maintenance/Tuning Application
159
Changing Controller Mode
When to Use
Use this option to change the controllers’ modes for selected RAID Module(s). You
can change an active/passive controller pair to active/active to improve your I/O
performance or you can swap an active/passive controller pair to passive/active.
To quickly view the controller modes for all your RAID Modules without making
any changes, you can select All RAID Modules, then Controller Mode.
Caution – If you do not have RDAC protection, you must stop I/Os to the RAID
Module before changing a controller’s mode. Otherwise, you could hang the system.
What Happens
The software displays the controllers and mode for the selected RAID Module(s).
See FIGURE 6-5 for a window similar to the one you see when you select Controller
Mode. TABLE 6-5 describes the window elements.
Before You Begin
Select one of the following procedures for RAID Modules with redundant controller
pairs:
■
■
160
If you want to change an active/passive controller pair to active/active, see
page 162.
If you want to swap an active/passive controller pair to passive/active, see
page 164.
RAID Manager 6.1 User’s Guide • October 1997
FIGURE 6-5
Main Controller Mode Window
Chapter 6
Using the Maintenance/Tuning Application
161
TABLE 6-5
Main Controller Mode Window Description
Name
Description
RAID Module
Identifies the specific RAID Module.
Controller A/B
Identifies the mode for Controller A/B for each RAID Module in the
list.
The column heading includes, where applicable, a system device
name. A and B are relative names to identify the controllers.
Possible controller modes are Active, Passive, Offline, or No
Controller. You could also see (Inaccessible) with these statuses if the
RAID Module has an independent controller configuration.
Change To
Active/Active
Changes active/passive controller pairs to active/active.
See procedures on page 162.
Swap Active/
Passive
Changes active/passive controller pairs to passive/active.
See procedures on page 164.
Changing To Active/Active Controllers
When to Use
Use this option to change the controller modes for selected RAID Module(s).
Changing an active/passive controller pair to active/active improves your I/O
performance.
▼ To Change to Active/Active Controllers
Controller Mode is dimmed if you select RAID Modules with only one controller or
an active/active controller pair.
Note – You can, however, select All RAID Modules, then Controller Mode to
quickly view the controller modes for all your RAID Modules.
Ensure that the RAID Module you want is selected. If you need instructions for
selecting a RAID Module, see page 33 before proceeding.
1. Select Controller Mode.
The Main Controller Mode window is displayed ( FIGURE 6-5).
162
RAID Manager 6.1 User’s Guide • October 1997
2. Highlight the active/passive controller pair(s) you want to make active/active.
3. Click Change To Active/Active.
You see a confirmation box similar to FIGURE 6-6. The option to automatically balance
the LUNs across the newly active/active controllers is selected by default, unless the
RAID Module has independent controllers. In the latter case, the original active
controller continues to own all the LUNs.
FIGURE 6-6
Change to Active/Active Confirmation Box
4. Do one of the following:
■
■
Leave the automatic LUN Balancing option selected if you want the LUNs for
the selected module(s) to automatically balance (the LUNs associated with the
odd-numbered drive groups are assigned to one active controller and the
LUNs associated with the even-numbered drive groups are assigned to the
other active controller). For maximum performance benefits, each controller
must own some of the LUNs.
Deselect the automatic LUN Balancing option if you do not want the LUN
Assignment changed. The currently active controller continues to own all of the
LUNs. You can assign some of the LUNs to the other active controller later
using LUN Balancing (see page 153).
Caution – Choosing OK in Step 5 changes the controller pairs to active/active. This
change cannot be undone through this interface. You can use the command line utility
rdacutil to revert to an active/passive configuration if desired.
Chapter 6
Using the Maintenance/Tuning Application
163
Note – You must use the command line utility, rdacutil, if you want to change an
active/active controller pair to active/passive.
For example, to change RAID Module 1’s controller pair to active/passive, type:
rdacutil -m 1 “RAID Module 001”
5. Click OK.
■
■
If successful, the list updates to show the new controller mode of the selected
RAID Module(s).
If a problem occurs, you receive notification.
Swapping Active/Passive Controllers
When to Use
Use to switch the controller modes in an active/passive pair (that is, change the
active controller to passive, and the passive controller to active).
You may want to swap an active/passive controller pair:
■
■
When a Recovery procedure requires it.
If you have multiple RAID Modules; you may want to use this option to swap
controller modes so that all your active controllers are not assigned to the same
SCSI bus.
▼ To Swap Active/Passive Controllers
Controller Mode is dimmed if you select RAID Modules with only one controller or
an active/active controller pair.
Ensure that the RAID Module you want is selected. If you need instructions for
selecting a RAID Module, see page 33 before proceeding.
1. Select Controller Mode.
The Main Controller Mode window is displayed ( FIGURE 6-5).
2. Highlight the active/passive controller pair(s) you want to swap.
3. Click Swap Active/Passive.
The window displays one of two possible confirmation boxes:
■
164
The controller mode is about to change for the selected RAID Module(s).
RAID Manager 6.1 User’s Guide • October 1997
■
The selected RAID Module is receiving I/O. You might see this message if the
driver for redundant controller support is not installed. Click OK. You return to
the main Maintenance/ Tuning window. Stop all I/O to this module, then start
this procedure again.
4. Click OK.
■
■
If successful, the list updates to show the new controller mode of the selected
RAID Module(s).
If a problem occurs, you receive notification.
Chapter 6
Using the Maintenance/Tuning Application
165
Viewing and Setting Caching Parameters
When to Use
Use this option to view or modify three caching parameters for LUNs on a selected
RAID Module:
■
Write Caching—Enables write operations from the host to be stored in the
controller’s cache memory. The use of write caching increases overall
performance because a write operation from the host machine is considered
completed once it is written to the cache.
■
Write Cache Mirroring—Enables cached data to be mirrored across two
redundant controllers with the same size cache. The data written to the cache
memory of one controller is also written to the cache memory of the other
controller. Therefore, if one controller fails, the other can complete all outstanding
write operations.
■
Cache Without Batteries—Enables write caching to continue even if the batteries
are discharged completely, not fully charged, or if there are not batteries present.
If you select this option without a UPS for additional protection, you could lose
data if a power failure occurs.
Note – You can quickly determine whether cache settings are enabled for the LUNs
on a particular RAID Module or determine how much processor or cache memory
the controllers have by selecting Module Profile ➔ Controllers detailed information.
What Happens
The software displays the current settings for these caching parameters for each
LUN in the selected RAID Module. Keep in mind that the parameters are
interdependent. Consequently, when you make a change to one parameter, another
parameter could also become enabled or disabled.
166
RAID Manager 6.1 User’s Guide • October 1997
See FIGURE 6-7 for a window similar to the one you see when you select Caching
Parameters. TABLE 6-6 describes the window elements.
Note – There may be other caching parameters you can set using the command line
utility, raidutil. See Chapter 1 for information on these parameters and this utility.
FIGURE 6-7
Main Caching Parameters Window
Chapter 6
Using the Maintenance/Tuning Application
167
TABLE 6-6
Main Caching Parameters Window Description
Window Element
Description
LUN
Identifies the number of the LUN for the selected RAID Module.
Each LUN shows on a separate line.
Write Caching
Allows you to select check boxes to indicate whether to enable/disable
the write caching option for a particular LUN.
Write Cache
Mirroring
Allows you to select check boxes to indicate whether to enable/disable
the write cache mirroring option for a particular LUN.
Cache Without
Batteries
Allows you to select check boxes to indicate whether to enable/disable
the cache without batteries option for a particular LUN.
Caution
Selecting Cache Without Batteries enables write caching to continue
even without battery backup or if the batteries are discharged
completely or not fully charged. Normally, write caching is temporarily
turned off if no batteries are detected or until the batteries are charged.
However, enabling this parameter overrides the controller’s safeguard.
Therefore, if you select Cache Without Batteries without an
uninterruptible power supply (UPS) for protection, you could lose data
if a power failure occurs.
Save
Saves any changes you make to the caching parameters.
Cancel
Returns you to the main Maintenance/Tuning window without
changing any settings.
Note – You might see an asterisk next to the caching parameters columns. This
indicates that the parameter is enabled, but is currently not active. The controller has
disabled the parameter for some reason (such as low batteries). If you see this
condition, use Message Log (Status Application) to determine the correct action to
take.
▼
To View and Set Caching Parameters
Caching Parameters is dimmed:
168
■
If you select a module that has a controller earlier than the Series 3.
■
If All RAID Modules is selected.
■
If both controllers in the RAID Module do not have the same or the minimum
required processor and cache size.
RAID Manager 6.1 User’s Guide • October 1997
■
If you select a RAID Module with only one controller, write cache mirroring is
dimmed. This parameter is only available for modules with redundant controller
pairs that have the same cache size.
Ensure that the RAID Module you want is selected. If you need instructions for
selecting a RAID Module, see page 33 before proceeding.
1. Select Caching Parameters.
The Main Caching Parameters window is displayed ( FIGURE 6-7).
2. Click in the check boxes to enable/disable caching parameters as desired for any
or all LUNs on the selected RAID Module.
TABLE 6-7 shows the interdependencies that these parameters share.
Caution – Any changes you make do not take effect until you click Save.
3. Select Save to change the parameters as you set them in Step 2.
TABLE 6-7
Caching Parameter Interdependencies
If you select. . .
The following parameters are also enabled:
Write Caching
Write Cache
Mirroring
On
On
Write Cache
Mirroring1
On
On
Cache Without
Batteries
On
If you unselect
The following parameters are also disabled:
Write Caching
Write Caching
Cache Without
Batteries
On
Write Caching
Write Cache
Mirroring
Cache Without
Batteries
Off
Off
Off
Write Cache
Mirroring1
Off
Cache Without
Batteries
Off
1. If you select a RAID Module with only one controller, Write Cache Mirroring is
dimmed. Write Cache Mirroring is only effective for modules with redundant
controller pairs that have the same size cache. Use Module Profile ➔ Controllers to
determine if both controllers in the pair have the same cache size before enabling this
parameter.
Chapter 6
Using the Maintenance/Tuning Application
169
Upgrading Controller Firmware
When to Use
Use Firmware Upgrade to upgrade controller firmware for one or all RAID Modules.
The upgrade can be done either online or offline.
Caution – Controller firmware is different from the drive firmware. Use this option
only to upgrade controller firmware when you receive new firmware upgrade files.
If you need to upgrade drive firmware, call your Customer Services Representative.
What Happens
Enables you to choose whether you want to perform the upgrade online (while I/Os
continue) or offline (when I/Os are stopped), and presents a series of information/
selection windows to perform the upgrade procedure.
Before You Begin
Installing Controller Firmware Files
When you receive new firmware upgrade files, copy them to your host system before
attempting to perform the upgrade procedure. This software automatically searches
a default subdirectory in the installation directory. With any new controller firmware
upgrade, you should receive one to three firmware files and the fwcompat.def file.
170
RAID Manager 6.1 User’s Guide • October 1997
The fwcompat.def file enables this software to compare the firmware files for
compatibility during the upgrade process, providing you with a list of compatible
files to select for downloading. Also, this software searches the default installation
directory for these firmware files.
Caution – If you do not copy the fwcompat.def file to the host system, the
software is unable to check the files for compatibility. Although you can still enter
firmware file names, the software is unable to check the firmware files for
compatibility or to provide you with a list of compatible files to select for
downloading.
Identifying Controller Firmware Version
Use the following procedure to identify your current firmware version:
1. From the RAID Manager program group, select Maintenance/Tuning.
2. Click RAID Module, Module Profile, Controllers.
3. Verify Bootware and Firmware levels are at least version 2.4.4 or later.
4. Click OK when finished viewing.
Note – The NVSRAM file specifies certain default settings for the controller. NVSRAM
is pre-configured for the controller at the factory. There is typically no reason to
change NVSRAM settings, therefore the NVSRAM file is not included with the firmware
upgrade.
Selecting Controllers
Whether or not you can select specific controllers for downloading NVSRAM or
upgrading controller firmware depends on the RAID Module you select:
■
When you select All RAID Modules ➔ Firmware Upgrade or one RAID Module
and the Online method, you will be downloading NVSRAM files or upgrading
controller firmware files to every controller in those modules. You cannot select
individual controllers in this case.
■
If you select a single RAID Module that has only one controller, you must use the
Offline method. The controller is automatically selected in this case.
■
If you select one RAID Module that has a pair of redundant controllers and the
Offline method, you need to select the controllers on which you want to upgrade
firmware in addition to highlighting the version level you want to download.
Chapter 6
Using the Maintenance/Tuning Application
171
Caution – Remember that both controllers in a redundant pair must have the same
version of controller firmware installed. Therefore, we strongly recommend selecting
both controllers to ensure that they have compatible versions of controller firmware
unless you are replacing a failed controller and the replacement controller has an
earlier firmware version than the original pair was using.
Online/Offline Upgrade Restrictions
During the firmware upgrade process, you must select either the Online or Offline
upgrade method. There are some restrictions to consider when using either method:
The Online option:
■
Is dimmed if you select a RAID Module that:
■
■
■
Does not have two Series 3 controllers and you do not have the (RDAC) driver
installed for redundant controller support.
Has an independent controller configuration.
Does not work on a module that has any LUN with a status other than Optimal.
The Offline option:
▼
■
Does not work unless you have stopped I/O to the selected RAID Module
because you cannot perform the Offline upgrade until you stop the I/O. This
option is useful if several of your modules have only one controller; you may
want to upgrade firmware on only one RAID Module at a time so that you do not
have to stop all I/O.
■
This option also requires exclusive access to the logical units in the selected RAID
Modules; that is, no other operations can be running on the RAID Module. See
Chapter 1 for details on LUNs with file systems.
To Upgrade Controller Firmware
1. Ensure you have copied the firmware files to the default subdirectory in the
installation directory.
2. Ensure that the RAID Module you want is selected. If you need instructions for
selecting a RAID Module, see page 33 before proceeding.
172
RAID Manager 6.1 User’s Guide • October 1997
Note – When you select Firmware Upgrade, another window overlays the main
display area without changing any information in the display area. In this additional
window, you may click Cancel any time to exit without changing any module
settings or executing any operation.
3. Select Firmware Upgrade.
A window displays for you to select the online or offline procedure.
4. Read the “Before You Begin” Important notes, and select OK.
A window displays for you to select the online or offline procedure.
5. Select either:
■
■
Online to upgrade firmware while the selected RAID Module(s) receives I/O.
Offline to upgrade firmware when the selected RAID Module(s) is not
receiving I/O.
After selecting Online or Offline, the window displays Verifying the
controller state while the software checks the selected RAID Modules for
restrictions based on the type of firmware upgrade you selected.
If there are no restrictions, the Offline Firmware Upgrade window is displayed
(FIGURE 6-8). TABLE 6-8 describes the window elements.
6. Highlight the version level you want to download.
The path box updates to show the file names associated with the version you
selected.
Note – It is recommend that the version line you select has both Firmware Level
and Bootware Level versions specified.
Chapter 6
Using the Maintenance/Tuning Application
173
FIGURE 6-8
Firmware Upgrade Window
Note – If the Compatible Files/Version(s) area is blank after you select file(s) for
downloading firmware, then the current directory does not contain all the necessary
firmware files. Remember that the software searches the default subdirectory in the
installation directory for the firmware files and the fwcompat.def file. Although
you can still enter firmware file names, without the fwcompat.def file, the software
is unable to check the firmware files for compatibility or to provide you with a list of
compatible files to select for downloading. Click Cancel and read “Installing
Controller Firmware Files”.
174
RAID Manager 6.1 User’s Guide • October 1997
TABLE 6-8
Firmware Upgrade Window Elements
Window Element
Description
Current Firmware Version
RAID Module
Identifies the specific RAID Module.
Controller
Identifies the controller(s) in the selected RAID Module by an A or B
designation and, where applicable, includes a system device name. The
A and B are relative names to simplify identification of the controllers.
Important
If you selected only one RAID Module with redundant controllers and
the Offline method, this area is selectable, and you must highlight each
controller that you want to upgrade.
Firmware Level
Indicates the release of controller firmware currently installed on the
controllers.
Boot Level
Indicates the controller type and release version of controller bootware
currently installed on the controllers.
Fibre Channel
Level
Indicates the controller type and release version of driver for fibre
channel firmware currently installed on the controllers, if applicable.
Compatible Files/Versions
Selectable Area
Displays compatible versions for Firmware, Bootware, and (if applicable)
Fibre Channel Level.
Path
Updates to show the specific file name for versions you highlight in the
selectable area, or use to enter the NVSRAM file’s path to download.
Note – Once you click OK at the Firmware is about to start prompt, you
can follow the firmware upgrade progress. Watch the histogram for the selected
RAID Module. It monitors the progress of downloading for each file as a percentage
and starts over at 0% for each file. If you select All RAID Modules, the module
number updates as each module begins its download process.
7. Select the controllers you want to upgrade if you selected only one RAID Module
and the Offline method to begin this procedure and it has a redundant controller
pair. It is strongly recommend to select both controllers to ensure that they have
compatible versions of firmware.
8. Depending on whether you are downloading NVSRAM files or upgrading controller
firmware, do one of the following:
Chapter 6
Using the Maintenance/Tuning Application
175
■
To download NVSRAM files, type the path information in the path box and click
OK. Continue with Step 10.
■
To select controller firmware, highlight the version level you want to download:
■
■
It is recommend that the version line you select has both Firmware Level and
Bootware Level versions specified.
The path box updates to show the file names associated with the version you
selected.
9. Click OK when the correct version level is highlighted.
Either you receive notification if some problem occurs, or you have a final
confirmation that the upgrade process is about to begin.
Caution – Once you click OK at the Firmware is about to start prompt, do
not select any other options or exit the Maintenance/Tuning Application until the
upgrade process is complete. You can, however, monitor the upgrade progress.
10. Click OK and follow the upgrade process.
A histogram for the selected RAID Module indicates the progress of downloading
the NVSRAM or firmware files. This graphic shows the amount of progress as a
percentage and starts over at 0% for each file if you have more than one. If you
selected All RAID Modules, the module number updates as each module begins its
upgrade process.
When the NVSRAM download or the firmware upgrade is finished, a confirmation
box is displayed indicating whether the upgrade is Successful or Failed. TABLE 6-9
shows the information this window displays.
Note – Once you click OK at the Firmware is about to start prompt, you
can follow the firmware upgrade progress. Watch the histogram for the selected
RAID Module. It indicates the progress (as a percentage) of downloading for each
file and starts over at 0% for each new file. If you have two controllers in a module,
the progress bar reaches 50% after the file is downloaded to the first controller. You
may notice the bar pauses at 50% before it reaches 100% while the file is downloaded
to the second controller. If you select All RAID Modules, the module number is
updated as each module begins the download process.
176
RAID Manager 6.1 User’s Guide • October 1997
Note – If you selected All RAID Modules, it is possible that the upgrade was
successful for some modules, but not for others. The final confirmation box should
indicate which modules were not successful and give an appropriate cause. For
more information, see “Confirming the Firmware Upgrade”.
TABLE 6-9
Firmware Upgrade Conformation Box
Window Elements
Description
Summary
Report for
Files(s)
Lists the files used to upgrade the firmware.
Lists the files loaded in the Path line when you selected files at the
Compatible Files/Versions window (FIGURE 6-8).
RAID Module
Identifies the specific RAID Module.
Download
Status
Indicates whether the download process was completed successfully.
Either you see “Successful” or “Failed” with a reason why the upgrade
was unsuccessful. See TABLE 6-10 if you see any Failed download
statuses.
11. Click OK.
The main Maintenance/Tuning window is displayed.
12. Depending on whether you are downloading NVSRAM files or upgrading controller
firmware, do one of the following:
■
■
If you have successfully downloaded NVSRAM files, continue with Step 13.
If you have successfully upgraded controller firmware, you are finished with
this procedure.
13. At the command line, type: nvutil -vf
This utility checks and corrects any settings on all controllers in your RAID Modules
to ensure that certain settings in the NVSRAM are set-up correctly for RAID Manager.
Confirming the Firmware Upgrade
At the final confirmation window of the NVSRAM or firmware download
procedure, you will see if the upgrade was Successful or Failed for each of the
selected RAID Modules.
■
If you see that the upgrade was Successful, you should still verify that all the
logical units (LUNs) are not assigned to only one controller.
Chapter 6
Using the Maintenance/Tuning Application
177
■
If you see “Failed” for any module, you should fix the specified failure and try
the firmware upgrade procedure again. See TABLE 6-10 for possible actions to take
to correct a failed upgrade.
TABLE 6-10
178
Corrective Actions for Fail Firmware Upgrades
Reasons For Failed Status
Actions
The selected module had
I/O activity occurring or
file systems mounted
(Offline download).
Stop I/O to that module and be sure file systems are
unmounted, then try to upgrade the firmware again.
At least one of the selected
firmware files had bad file
contents.
Copy the firmware files to the default subdirectory in the
installation directory again. If you see this message a second
time, one or more of your files are most likely corrupt.
Obtain a new copy of the firmware upgrade files.
The SCSI command write
buffer failed.
Try to perform the upgrade again for this module. If it fails a
second time, call your Customer Services Representative.
The software was unable to
reset the controller.
Try to upgrade the firmware again.
One or more LUNs for the
selected module were not
Optimal.
Use Recovery Guru in the Recovery Application to restore
the LUNs to an Optimal status, then try to upgrade the
firmware again. See “Checking for Component Failures
Using Recovery Guru” on page 118.
Upgrading to the selected
firmware version requires
that you use the Offline
method.
Try to upgrade the firmware again and this time be sure to
select Offline.
The current firmware
version is unable to
upgrade to the files you
selected.
Most likely, you need to upgrade to an intermediate version
of firmware. Try to upgrade to a version earlier than the one
you selected. If that upgrade is successful, perform a second
upgrade for this latest firmware version.
The files you selected are
not compatible with the
current firmware version(s)
on the selected module's
controller(s).
Most likely, the current directory does not contain all the
necessary firmware files. Copy the firmware files and the
fwcompat.def file to the default subdirectory in the
installation directory and try again. Be sure the version you
select has both Firmware Level and Bootware Level versions
specified. If the upgrade fails a second time, obtain a new
copy of the firmware upgrade files.
RAID Manager 6.1 User’s Guide • October 1997
TABLE 6-10
Corrective Actions for Fail Firmware Upgrades (Continued)
Reasons For Failed Status
Actions
The software was unable to
access the controller(s)
during the upgrade process.
Use Recovery Guru in the Recovery Application to
determine if the module has a failure. See “Checking for
Component Failures Using Recovery Guru” on page 118.
If a failure is indicated, fix it and try to upgrade the firmware
again.
If Recovery Guru does not indicate a failure, try to upgrade
the firmware again.
You tried to load a pre-2.04
firmware version, which is
not supported by this
software or the redundant
controller configuration.
Do not try to load this firmware version again.
The selected firmware
file(s) are not compatible
with your controller model.
Use Module Profile and view Controller Details to check
your controller type and model, and obtain the correct
firmware version file(s).
The online upgrade cannot
be performed because
either the selected module
has only one controller or
one of the controllers in the
pair is not accessible.
Use Module Profile and view Controller Details to determine
how many controllers the module has.
If there is only one controller, try to upgrade the firmware
again and be sure to select Offline.
An unknown failure
occurred.
Use the Status Application to select Message Log for
component information (see “Using Message Log” on
page 82).
NVSRAM downloads
could fail if you selected All
RAID Modules and had
copied the NVSRAM files to
the same directory as the
firmware files. This causes
the fwcompat.def file to
check for compatibility on
the NVSRAM files;
however, it does not
recognize NVSRAM files
and returns a no
compatible files
found message.
Copy the NVSRAM files to some directory other than the
default installation subdirectory and try again,
OR
Download the NVSRAM files to one RAID Module at a time
and select OK at the no compatible files found message
to continue the download process.
If you have two controllers, use the Status application to
select Health Check and follow the recommended Action To
Take to fix the controller problem before attempting to
upgrade the firmware again (see “Performing a Health Check
for RAID Modules” on page 97).
Chapter 6
Using the Maintenance/Tuning Application
179
Changing Automatic Parity Check/
Repair Settings
When to Use
Use this option to enable/disable the auto parity check/repair or to change its start
time.
Caution – Changing any of these settings affects all RAID Modules.
Note – Use the Recovery Application to run a one-time parity check/repair
manually. See “Manually Checking and Repairing Parity” on page 125.
Note – You can run an immediate parity check/repair manually by using Manual
Parity Check/Repair in the Recovery Application.
What Happens
The current settings display for the automatic parity check/repair operation. See
FIGURE 6-9 for a window similar to the one you see when you select Options from the
top menu, then Auto Parity Settings.
See “Parity” in Chapter 2 for a general description of parity.
180
RAID Manager 6.1 User’s Guide • October 1997
FIGURE 6-9
▼
Auto Parity Settings Dialog Box
To Change Automatic Parity Check/Repair
Settings
Ensure that the RAID Module you want is selected. If you need instructions for
selecting a RAID Module, see “Selecting a Module” on page 33 before proceeding.
Caution – Changing any of these settings affects all RAID Modules.
1. Choose Auto Parity Settings from the Options menu.
The Automatic Parity Settings dialog box is displayed ( FIGURE 6-9).
2. Do either of the following:
■
■
Select the Enable Automatic Parity Check/Repair box if you want auto parity
to run at the specified start time.
Unselect the Enable Automatic Parity Check/Repair box if you do not want
this operation to run.
Note – It is strongly recommend enabling this option in Step 2, so that parity on
your LUNs can be checked and repaired as soon as possible. However, see the RAID
Manager Installation and Support Guide to check for any restrictions that may apply.
Chapter 6
Using the Maintenance/Tuning Application
181
Caution – Select a time of slow system use, in Step 3, for the Automatic Parity
Check/Repair to run so that the system performance is not adversely affected while
parity is checked and repaired.
3. Type in or use the spinner buttons to enter the start time you want auto parity to
begin each day.
Note – The time must be in a 24-hour format; therefore, the time you can set ranges
from 00 00 (midnight) to 23 59 (11:59 PM). For example, the default setting, two
o'clock in the morning, is set as 02 00. If you want the check/repair to run at three
o'clock in the afternoon, set the boxes to read 15 00.
4. Click Save to keep the changes you have made.
182
RAID Manager 6.1 User’s Guide • October 1997
CHAPTER
7
Common Questions and
Troubleshooting
This chapter contains answers to common questions about using and
troubleshooting the RAID Manager software.
Note – If you cannot find the question you are looking for, consult the RAID
Manager Installation and Support Guide. That guide’s common questions are specific to
operating this software with the Solaris operating system environment.
■
Common Questions — page 184
■
Troubleshooting — page 190
183
Common Questions
This section contains answers to some frequently asked questions about using the
RAID Manager software.
TABLE 7-1
Frequently Asked Questions
Common Questions (All Applications)
How can I check for component failures on RAID Modules?
Use either Health Check in the Status Application or Recovery Guru in the Recovery
Application to perform an immediate check of the selected RAID Module(s). If you have
component failures, Recovery Guru provides step-by-step instructions for fixing the failure.
If you want to check for past failures on your module(s), go to the Status Application and
use Message Log.
What does the Detected a change. . . updating the information on
screen message mean?
An application is performing an operation (such as creating or deleting LUNs, changing
controller modes, etc.) that results in a status change, and the software is updating the
status information in the application you are viewing (or just started).
Can I restore my configuration with Save Module Profile information?
No, you cannot use this information to automatically restore your module’s configuration;
however, saving a Module’s Profile copies that data to a file for your reference. Using this
file, you could determine the specifics of a module’s configuration. Once you have saved the
profile, you can print it using the printer utility available on your system.
Important
You should save a module’s profile to a file when you first install it and any time you
change your configuration. You can use this information if you need to perform any
recovery or maintenance tasks. Also, this file is useful when you want a copy for a quick
reference, if you want a permanent record, or you want to send information to your
Customer Services Representative for troubleshooting.
184
RAID Manager 6.1 User’s Guide • October 1997
TABLE 7-1
Frequently Asked Questions (Continued)
Common Questions (All Applications)
Can I confirm my current configuration?
Yes. You can view a module’s configuration details by using Module Profile. This provides
you with a quick overview of any selected RAID Module. Also, you can save the profile
information to a file, then print a copy of the file to have a “snapshot” of your configuration
(see “Saving Module Profile Information” on page 42).
Important
You should save a module’s profile to a file any time you change your configuration. You
can use this information if you need to perform any recovery or maintenance tasks. Also,
this file is useful when you want a copy for a quick reference, if you want a permanent
record, or you want to send information to your Customer Services Representative for
troubleshooting.
When should I change a RAID Module’s configuration?
Normally, when you receive the RAID Module, there are default LUNs and drive groups
already configured. This default configuration may work for your environment. However,
you may want to create a hot spare and/or the LUNs may not be set according to your
needs (for example, number of LUNs, RAID Level, etc.).
Are there any operations that do not allow other operations to be performed at
the same time?
Yes. Certain operations in RAID Manager require exclusive access to the RAID Module in
order to complete successfully; that is, no other operations can be performed. Such
operations include:
• Configuration — Delete for LUNs and Reset Configuration
• Recovery — Fixing Multiple Drive Failures with Recovery Guru and formatting a LUN
with Options ➔ Manual Recovery ➔ Logical Units
• Maintenance/Tuning — Firmware Upgrade ➔ Offline method
Wait for the operation that has exclusive access to complete before performing another
operation in the same RAID Module, or select another RAID Module. Also, consult the
RAID Manager Installation and Support Guide for additional considerations; such as, if LUNs
on the RAID Module have file systems, partitions, or drive letters on them.
Caution
If you are using the Networked version (with the storage management software installed on
more than one station) or the RAID Module has a multi-host configuration, you must use
caution when performing the tasks that need exclusive access to ensure the two hosts do not
send conflicting commands to the controllers in the RAID Modules.
Chapter 7
Common Questions and Troubleshooting
185
TABLE 7-1
Frequently Asked Questions (Continued)
Common Questions (All Applications)
When should I use the Reset Configuration option of the File menu?
Hopefully never! Use this option only as a last resort if your configuration is totally
inaccessible or you want to start completely over. This option allows you to reset the drive
groups and LUNs on the RAID Module back to a default configuration based on settings
specified in the controller.
Caution
You will lose all data on the selected RAID Module.
Are there any special considerations for a RAID Module with two active
controllers?
Yes, but only if you want to manually assign/balance the LUNs. The software automatically
assigns all LUNs on a new drive group to one of the active controllers during LUN creation.
The LUNs are balanced across active controller pairs on a drive-group basis, not an
individual-LUN basis. The odd-numbered drive groups are assigned to one active controller
and the even-numbered drive groups are assigned to the other active controller.
There are two applications where you can manually assign/balance the LUNs:
• If you are creating LUNs, you can use Create LUN, Options - LUN Assignment if you
want to assign the new drive group and its corresponding LUNs to a specific controller.
• If the LUNs are already created, you can balance the LUNs by using LUN Balancing in
the Maintenance/Tuning Application.
Note
Remember that for a RAID Module with an independent controller configuration, each
controller owns specific drive groups/LUNs. The LUN Assignment option in Create LUN is
dimmed.
186
RAID Manager 6.1 User’s Guide • October 1997
TABLE 7-1
Frequently Asked Questions (Continued)
Common Questions (All Applications)
What is the difference between capacities: Total, Remaining, and Available?
Total Capacity
Shown in the main Configuration window. This value indicates how much capacity, in
megabytes, is available on the drive group. The capacity reflects any redundancy or RAID 1
mirroring factors. For example, a drive group composed of RAID 1 LUNs has half of the
capacity of one with RAID 0 LUNs. The total capacity for an unassigned drive group shows
the entire capacity of the drives and does not reflect any redundancy or mirroring factors.
Remaining Capacity
Shown in the main Configuration window. This value indicates the largest contiguous
capacity, in megabytes, still available for configuring LUNs on the drive group. The capacity
reflects any redundancy or RAID 1 mirroring factors (except for an unassigned drive
group).
Available Capacity
Shown in the main Create window after you select Create LUN. This value indicates the
actual capacity that is available for use and changes depending on the RAID Level and
number of drives you select. Remember that all RAID Levels (except RAID 0) use part of the
drive group’s' capacity for redundancy.
Important
Use all the available capacity when you configure LUNs/drive groups. If a RAID Module
contains drives with different capacities, see the RAID Manager Installation and Support Guide
for additional troubleshooting tips.
How many hot spare drives can I configure?
Each RAID Module can support as many hot spare drives as there are SCSI Channels
(probably either 2 or 5, depending on the model of your RAID Module). You can select any
drive from the unassigned drive group to be a hot spare.
Caution
• Hot spares cannot cover for drives with a larger capacity (that is, a 2 GB hot spare drive
cannot stand in for a 4 GB failed drive).
• It is not recommended to place all your hot spares on the same drive channel. If the drive
channel were to fail, these drives would be unable to cover for other failed drives in the
RAID Module.
Chapter 7
Common Questions and Troubleshooting
187
TABLE 7-1
Frequently Asked Questions (Continued)
Common Questions (All Applications)
What can I do during LUN creation/formatting?
You can perform other Configuration tasks (such as creating LUNs on another drive group)
or select another application while the LUN is being created because the creation/format
occurs in the background. However, you cannot select the drive group that is being created
until the format has completed.
Caution
If you have deleted all the LUNs on a RAID Module and are re-creating new LUNs, wait for
the format to finish on the first LUN/drive group before creating additional new drive
groups to make sure the operation completes successfully. If you do not wait, the status for
the first LUN currently formatting (in the first drive group) changes to Dead until the
format is complete. While the first LUN eventually shows an Optimal status, subsequent
LUNs in that drive group could fail to be created. However, the second drive group/LUNs
should be created.
How long does it take to create/format a LUN?
The time it takes to create a LUN depends on the capacity of the LUN you specified (the
larger the capacity, the more time it takes). The software creates the LUN in the background
so that you can perform other Configuration tasks or use another application (such as
Status, etc.). The main Configuration window displays “Formatting” until the operation is
complete.
188
RAID Manager 6.1 User’s Guide • October 1997
TABLE 7-1
Frequently Asked Questions (Continued)
Common Questions (All Applications)
Can I change the log file that Message Log displays?
Message Log displays the log file designated as default (set in Options, Log Settings) each
time you start the Status Application. You have two options for changing this display:
Change the default log file. Choose Options, then Log Settings from the File menu and
specify a new log file (including the full path name). See “To Change Log Settings” in
Chapter 4 “Using the Status Application.”
Change the display temporarily to view a selected log file. Choose Open Log from the File
menu, and select the file name you want to view (see FIGURE 4-3). This log continues to
display until you open another log file or exit the Status Application
When should I run parity check/repair?
You may want to run a manual parity check/repair if you notice parity error reports in the
Status Application’s Message Log. If you want early warning that there might be data
problems, running the automatic parity check/repair check provides such notice.
Action: Use the Maintenance/Tuning Application to enable the Automatic Parity Check/
Repair to run at a specific time every day. See “Changing Automatic Parity Check/Repair
Settings” on page 180.
Can I upgrade controller firmware to only one controller in a RAID Module?
Yes. However, remember that both controllers in a redundant pair must have the same
version of controller firmware installed. Therefore, it is strongly recommended to select both
controllers to ensure they have compatible versions of firmware unless you are replacing a
failed controller that has a different firmware version than the original pair was using.
Caution
In most cases, you will need to download a new NVSRAM file before upgrading controller
firmware, especially if you are upgrading from one major firmware release to another. If
you do not, certain features of this software or the controller may not work.
1. Select one RAID Module that has a pair of redundant controllers.
2. Select Firmware Upgrade ➔ Offline method.
Remember that you must stop I/Os to the selected RAID Module when using the Offline
method.
3. Select the controller on which you want to upgrade firmware (remember both controllers
are highlighted by default).
4. Highlight the version level you want to download, and select OK.
Chapter 7
Common Questions and Troubleshooting
189
Troubleshooting
The troubleshooting tables that follow provide probable cause and action to take for
common problems you may have as you use this software.
The first section includes general topics that you might encounter using any of the
applications. The sections that follow are organized by application (in the same
order that they appear in this User’s Guide).
Note – If you cannot find the problem you are looking for, consult the RAID
Manager Installation and Support Guide. That guide’s common questions are specific to
operating this software with the Solaris operating system environment.
■
Common Troubleshooting (All Applications) — page 190
■
Configuration Troubleshooting — page 196
■
Status Troubleshooting — page 199
■
Recovery Troubleshooting — page 203
■
Maintenance/Tuning Troubleshooting — page 209
Common Troubleshooting (All Applications)
This section provides information to help you determine the probable cause and
action to take for common problems you may encounter as you use any application,
and includes the following sections:
190
■
General Troubleshooting — page 191
■
Online Help — page 194
■
Locate Module — page 195
■
Module Profile — page 195
RAID Manager 6.1 User’s Guide • October 1997
General Troubleshooting
TABLE 7-2
General Troubleshooting (All Applications)
A RAID Module is listed that I have removed from my system.
Cause: This software does not automatically remove modules from configuration; thus, a
module you remove will continue to be listed in the RAID Module Selection box and the
Select Module main window..
Action: If you want to remove a RAID Module, do the following:
1.
2.
3.
4.
Physically remove the module from your host system.
Choose Select Module.
Highlight the module you wish to remove.
Select Remove. The RAID Module no longer appears in the Select Module list or the
RAID Module Selection Box.
Component/module status other than Optimal.
Cause: Any status other than Optimal can usually warrant attention because the module is
not operating in a normal condition.
The most common causes are:
•
•
•
•
•
At least one drive has failed.
A drive has been replaced and is reconstructing.
A LUN is formatting.
A controller has been placed offline or has failed.
A module component had failed, such as a power supply or fan.
Action: For Failed drives, Dead or Degraded LUNs, or Dead controllers (or Offline
controllers that you did not place offline), select Recovery Guru and follow the step-by-step
procedure it provides.
Important
Do not rely only on LUN status information to determine if a recovery procedure is
necessary. For example, if you have hot spares configured for a RAID Module and a drive
fails, the hot spare takes over for the failed drive. Therefore, you have an Optimal LUN with
a failed drive. Depending on how many hot spares you have configured for the module,
you can have multiple failed drives and still have an Optimal LUN or only a degraded
LUN.
Chapter 7
Common Questions and Troubleshooting
191
TABLE 7-2
General Troubleshooting (All Applications) (Continued)
Logical units and controllers are marked Inaccessible.
You will see the Inaccessible status if the RAID Module has an independent controller
configuration. Select Module shows Yes in the “Indep. Cntrls?” column.
• For logical units (LUNs), this status indicates that the logical unit is not available because
it is part of a drive group/LUN owned by the alternate controller.
• For a controller, this status indicates that it is the alternate controller.
Neither the controller nor the LUNs marked Inaccessible can be accessed using this software
from the current host. If you need to perform an operation on this drive group/LUN, you
need to use the software on the host machine connected to the controller that owns that
drive group.
I cannot select some options.
Cause: Some options are grayed out or are unavailable because:
•
•
•
•
The
The
The
The
selected RAID Module does not support that option.
option cannot be performed for the item you selected.
option is not active until you select some item.
option is no longer applicable because a maximum has been reached.
Action: Recheck your selection and try again.
For more specific information, see the Procedures section in this User’s Guide that describes
the particular option, or consult Online Help, “Why Are Some Options Grayed Out?”
Selection Is Not A File message.
Cause: You might see this message in any application when you are saving a module
profile, or in the Status Application where you could also be opening a log file or saving the
log as another file. This message indicates that the file name you entered is not valid.
Action: Try again using another file name. Also, be sure that you are entering the file name
on the Selection line and not the Filter line.
Threshold Level Reached message.
Cause: The default log file storing messages has exceeded the specified “log size threshold”
value.
Action: Go to the Status Application and perform one of the following:
Change the default log file so that future events are written to this new log. (Click Options
from the top menu, then Log Settings.)
Increase the log size threshold value so that the log is larger before you are notified again.
(Click Options from the top menu, then Log Settings.)
Save the log file to another file name. (Click File from the top menu, then Save Log As; you
must then delete the contents of the current log file to reduce its size.)
192
RAID Manager 6.1 User’s Guide • October 1997
TABLE 7-2
General Troubleshooting (All Applications) (Continued)
An asterisk appears next to the Caching Parameters.
Cause: You might see an asterisk next to the caching parameters column in either of these
screens because the controller has disabled the parameter for some reason (such as low
batteries). This means that the parameter is enabled, but currently is not active.
Action: If you see this condition, use Message Log (Status Application) to determine the
correct action to take.
Chapter 7
Common Questions and Troubleshooting
193
Online Help
TABLE 7-3
TroubleShooting for Online Help (All Applications)
Cannot access Online Help.
Cause: You cannot open Help with the current option selected.
Action: Exit the option you are in, click Help and position the topic you want to refer to in
the window. Then, select that option again.
For more specific information, see “Using Online Help” on page 30, or consult Online Help,
“Limitations Of The Online Help.”
Top-menu File — Print Topic option failed.
Cause: An Error Window appears. Most likely you do not have a default printer defined or
did not provide the full path name for the print file.
Action:
If you selected Send to Printer,
Click OK in the Error Window.
Define a default printer (refer to your operating system documentation if needed).
Re-select Help and try to print again.
If you selected Write to File,
Click OK in the Error Window.
Re-select File, Print Topic.
Specify the full path name (on your local file system) for the print file before selecting OK.
Help files are missing or corrupted message (Online Help).
Action: Check that the correct Help files are installed in the installation directory (see the
Installation And Support Guide for default directory information. You should have two
help files: symhelp.txt and glossary.txt. Re-install them if necessary.
194
RAID Manager 6.1 User’s Guide • October 1997
Locate Module
TABLE 7-4
Troubleshooting for Locate Module (All Applications)
Locate Module takes a long time to start flashing activity lights.
If you have heavy I/O or are currently making configuration changes, you might notice a
delay when you click Locate Module.
Locate Module doesn’t work.
Locate Module may not help you identify a RAID Module under two conditions:
If All RAID Modules is selected, this option is dimmed.
If all LUNs involved have a Dead status, the software cannot flash the activity lights on the
drives.
Note: If there are any failed drives in the drive group, these drives are skipped and their
activity lights do not flash.
Module Profile
TABLE 7-5
Troubleshooting for Module Profile (All Applications)
The controller board name (under Detailed Information, Controllers) is
incomplete.
The controller board names (both A and B) are limited to 32 characters. If your controller
board name is longer, you will see only the first 32 characters displayed in Module Profile.
Chapter 7
Common Questions and Troubleshooting
195
Configuration Troubleshooting
This section provides information to help you determine the probable cause and
action to take for common problems you may encounter as you use the
Configuration Application.
TABLE 7-6
Configuration Troubleshooting
Less capacity shows than I selected during configuration.
When using 5+ drives to create a LUN, you could see a capacity slightly less than you
selected during configuration; for example, you see 1.97 GB instead of 2 GB on a RAID 5, 9drive LUN. This can occur because the capacity you select is based on stripe size, which
depends on segment size times the number of drives.
Cannot add LUNs to an existing drive group.
Cause: Either the drive group does not have any remaining capacity, or you have created
the maximum number of LUNs allowed.
Action: If your existing configuration does not meet your needs, you may have to delete all
the LUNs in the drive group that you want to change, then use Create LUN to re-create the
LUNs/drive group you want.
Important
If you only want to change certain LUN parameters, see “Changing LUN Parameters” on
page 66.
Number of Drives field (in the main Create LUN window) shows less than the
number of drives in the unassigned drive group.
There are two main reasons this number could be different than expected:
• This list shows only the maximum number allowed, which is a maximum of 30 drives in
a drive group.
• There could be failed drives in the unassigned drive group. Failed drives are not available
for configuration; therefore, they are not displayed in this list.
196
RAID Manager 6.1 User’s Guide • October 1997
TABLE 7-6
Configuration Troubleshooting (Continued)
Remaining capacity (in the main Configuration window) is less than expected.
Cause: Remaining capacity reflects the largest contiguous storage space available for
creating LUNs on a drive group. Because of this, it is possible for this amount not to include
the capacity of LUNs deleted from the drive group if the deleted LUNs were noncontiguous or not the largest contiguous amount.
For example, assume that drive group one has LUNs 0, 1, and 2 configured at 1000 Mbyte
capacity each and that this drive group shows 1500 Mbyte remaining capacity in the Drive
Groups area of the main Configuration window. If you delete LUN 1, the remaining
capacity still shows only 1500 Mbyte until you configure that space into additional LUN(s)
on the drive group. Once you use the 1500 Mbyte, the drive group will show remaining
capacity of 1000 Mbyte (from the deleted LUN 1).
Action: It is best to use all the remaining/available capacity when creating new drive
group/LUNs. However, if you do not and this condition occurs, use Create LUN to add
LUN(s) to the drive group using all the remaining capacity that shows. Then, you can add
more LUNs with the new remaining capacity (from the deleted LUN).
Chapter 7
Common Questions and Troubleshooting
197
TABLE 7-6
Configuration Troubleshooting (Continued)
Format process fails before a LUN is created.
Once you click “Create” during the LUN Creation process, the main Configuration window
displays “Formatting” until the operation is complete. However, if this format operation
fails, Configuration displays a message that the LUN was not created and a message is
written to Message Log in the Status Application. Most likely, the LUN creation failed
because a drive or some module component has failed. If you see this message, you should
use the Status Application to select Health Check and follow the recommended Action To
Take in the detailed information window.
List/Locate Drives — Locate doesn’t work.
Cause: It is not possible to flash the drive activity lights for a particular drive group if any
of the drives has a status other than Optimal.
Action: Use Module Profile to verify that all drives are Optimal and try again. If any of the
drives are not Optimal, select Recovery Guru (in the Recovery Application) to correct the
problem.
Reset Configuration doesn’t work.
Cause: If this software detects any drives as removed or unresponsive, Reset
Configuration will not work. Also, if the selected RAID Module has an independent
controller configuration, this option is dimmed.
Action: Use Module Profile to verify that all drives are Optimal and that the controller is
not in an independent controller configuration (neither controller is marked Inaccessible).
Try File ➔ Reset Configuration again.
Caution
Any time you use Reset Configuration, you will lose all data on your drives. Only select this
option as a last resort if your configuration is inaccessible or you want to start over. You will
need to use Create LUN to re-configure your drive groups/LUNs.
198
RAID Manager 6.1 User’s Guide • October 1997
Status Troubleshooting
This section provides information to help you determine the probable cause and
action to take for common problems you may encounter as you use the Status
Application, and includes the following sections:
■
Message Log — page 199
■
Health Check — page 201
■
LUN Reconstruction — page 203
Message Log
TABLE 7-7
Troubleshooting for Message Log
It takes a long time to display or update the Message Log.
Cause: Normally, when you select Message Log or Options, Refresh All (to update the log),
you should see the display in a few seconds. However, if the log file is very large, you might
notice a delay.
Note: If your default log file is large, you could notice a delay when starting the Status
Application because Message Log will show this file for All RAID Modules (the default
selection).
Action: Reduce the size of the log file or select a new default log file:
Change the default log file so that future events are written to this new log. (Choose
Options, Log Settings from the File menu.)
Save the log file to another file name. (Choose Save Log As from the File menu. You must
then delete the contents of the current log file to reduce its size.)
Chapter 7
Common Questions and Troubleshooting
199
TABLE 7-7
Troubleshooting for Message Log (Continued)
Default log file not found message.
Cause: The log file designated as the default cannot be found. Most likely this file has been
deleted, but is still entered as the default in Log Settings.
Action: If you see this message, you also are asked if you want the software to create a
default log file.
If you click OK, an empty log file is created using the default log's file name.
If you click NO, you exit Message Log.
Important
The software creates the default log file again the next time the software writes messages to
this file. If you want to rename the default log file, change this parameter using Options,
Log Settings (see “To Change Log Settings” in Chapter 4 “Using the Status Application”).
No Match Found message.
Cause: This message means that the RAID Module no longer exists or is no longer
connected to the host system (the software cannot detect it). This message might display:
Instead of the default log file if you selected one RAID Module, or
In the message line for a specific RAID Module if you selected All RAID Modules.
Action: Check to be sure that the selected module is connected. If the RAID Module is one
that no longer exists, try selecting another module.
Note: If the module has been removed from a subsystem, the software does not
automatically remove it from the configuration. You can select Recovery Guru for that RAID
Module and click YES at the “last resort” option asking if you want to remove the module
from the configuration. This does not cause the remaining modules to be renumbered.
200
RAID Manager 6.1 User’s Guide • October 1997
Health Check
TABLE 7-8
Troubleshooting for Health Check
Health Check results take a long time to display.
Cause: Normally you see Health Check’s results in a few seconds. However, if you have
selected All RAID Modules or there are I/O operations running, you might notice a delay.
Also, there could be instances where an unresponsive component or other status change
affects the controller's ability to provide a result in Health Check, although such occurrences
are rare.
Action: If you experience long delays in performing Health Check, you might try checking
one RAID Module at a time or selecting Health Check at a time of low system I/O.
Note: A background check occurs at regular intervals for all RAID Modules (results are
logged to Message Log); the default setting is five minutes. You can change the frequency of
this check by choosing Options from the Log Settings menu (see “To Change Log Settings”
in Chapter 4 “Using the Status Application”).
Chapter 7
Common Questions and Troubleshooting
201
TABLE 7-8
Troubleshooting for Health Check
Optimal (Health Check Not Done) message.
Cause: This could occur if all the logical units are busy because some RAID Manager
operation has them locked under exclusive access. For example, if you had no LUNs
configured on your RAID Module and are currently creating the first LUN, you could see
this result if you run Health Check on that RAID Module before the LUN’s format is
complete.
Action: Select a different RAID Module, or wait for the operation that has exclusive access
to complete before performing another operation on the same RAID Module.
Unresponsive Drive or Multiple Unresponsive Drives message.
Cause: The controller was unable to communicate with one or more drives that are part of
a drive group containing logical units. In this case, the software marks the drive status as
Unresponsive. If the drive receives I/O, the controller will fail it.
Important
If a series of drive failures and/or unresponsive drives are reported at the same time, the
condition may be caused by a channel failure. See Chapter 5 “Using the Recovery
Application” for a description before attempting any recovery procedures.
Action: Click Module Profile ➔ Drives to determine which drive is Unresponsive. If there
are no I/Os and you want to manually fail it, use the Recovery Application.
Health Check doesn’t report a drive failure when I remove a drive.
If there is no I/O occurring for that drive, Health Check reports an unresponsive drive. If
there is I/O occurring, the controller will fail the drive (also reported by Health Check)..
Caution
You should never remove drives from a module unless the controller has marked them as
failed. Doing so could result in data loss for the affected LUN/drive group. If you suspect
problems with a drive, select Recovery Guru and follow the instructions provided.
202
RAID Manager 6.1 User’s Guide • October 1997
LUN Reconstruction
TABLE 7-9
Troubleshooting for LUN Reconstruction
Reconstruction takes a long time.
Cause: The amount of time that reconstruction takes depends on the number and size of
the LUNs that may be reconstructing and on the rate setting for the reconstruction
operation.
Action: Consider changing the reconstruction rate to better optimize reconstruction. Use
LUN Reconstruction to change the rate setting while reconstruction is occurring.
Cannot change the reconstruction rate for all LUNs.
You can only change the reconstruction rate for LUNs that are currently reconstructing with
this option. If a LUN shows “Waiting to reconstruct,” you will be able to change its rate
when the reconstruction operation begins.
Note: Use the Maintenance/Tuning Application to change the rate for all LUNs, whether
they are reconstructing or not (see “Changing the LUN Reconstruction Rate” on page 150).
Recovery Troubleshooting
This section provides information to help you determine the probable cause and
action to take for common problems you may encounter as you use the Recovery
Application, and includes the following sections:
■
General Recovery — page 204
■
Recovery Guru — page 206
■
Manual Parity Check/Repair — page 207
■
Manual Recovery — page 207
Chapter 7
Common Questions and Troubleshooting
203
General Recovery
TABLE 7-10
Recovery Troubleshooting (General)
Drive status other than Optimal.
Cause: You have a Failed, Offline, or Replaced drive (which is reconstructing), or a LUN is
being formatted.
Action: For Failed or Offline drives, select Recovery Guru and follow the step-by-step
procedures it provides. No action is required if the drives are Replaced or the LUN is
Reconstructing or Formatting.
Drive fault light came on after I replaced a failed drive.
Cause: This light may come on momentarily when a drive in a RAID 1, 3, or 5 LUN begins
reconstruction.
Action: Wait a few minutes for the fault light to go off and the drive activity lights to begin
flashing steadily. This indicates that reconstruction is occurring. The drive’s status changes
to Replaced and the LUN’s status changes to Reconstructing.
However, if the fault remains on, select Recovery Guru and follow the step-by-step
procedures it provides.
Logical unit status other than Optimal.
Cause: You have a Failed drive or a Replaced drive which is reconstructing, a logical unit
is being formatted, or the LUN is Inaccessible because it is owned by the other controller
(possible if the RAID Module has an independent controller configuration).
Action: For Dead or Degraded LUNs, select Recovery Guru and follow the step-by-step
procedures it provides for restoring the LUNs.
Failed Drive status appears, but LUN status is still Optimal.
Cause: A drive on the LUN has failed and a hot spare has taken over for it.
Note: To see if a hot spare is being used, use List/Locate Drives in the Configuration
Application. The hot spare’s drive status is either In Use or Standby (not being used).
Action: Select Recovery Guru and follow the step-by-step procedures it provides for
replacing the failed drive.
LUN status changed to Reconstructing, but no drives have been replaced.
A hot spare has taken over for a failed drive and the data is being reconstructed on it. This
LUN’s status returns to Optimal as soon as reconstruction completes.
204
RAID Manager 6.1 User’s Guide • October 1997
TABLE 7-10
Recovery Troubleshooting (General)
LUN status doesn’t change from Reconstructing.
Cause: This could occur after a Manual Recovery task is completed, especially LUN
Reconstruction, or because data was reconstructed on a hot spare (the hot spare drive
becomes In Use, the LUN status changes to Reconstructing, but may not return to Optimal
when reconstruction is completed).
Important
If reconstruction was interrupted on a hot spare drive because another drive failed in the
same drive group/LUN, the LUN is probably Dead (with two Failed drives) and you have
lost data. You should select Recovery Guru and follow the procedure provided to replace
the newly failed drive.
Action:
Wait for the background monitor to run (default is five minutes) and to update the status,
OR
To update immediately, do one of the following:
• Re-select the RAID Module.
• Exit and re-enter the application.
Controller status other than Optimal.
Cause: A controller has been placed offline or has failed.
Action: Select Recovery Guru and follow the step-by-step procedures it provides for
restoring the controller (see “Checking for Component Failures Using Recovery Guru” in
Chapter 5 “Using the Recovery Application”).
Component status doesn’t update after a recovery procedure has been
performed.
Cause: A configuration change may not be detected yet.
Action: If you use Recovery Guru, the Fixed? column updates to YES when you
successfully complete a recovery procedure. However, the module’s status in the Failure
column does not update until you re-select Recovery Guru.
If you are using Manual Recovery, or some other application, exit, then re-select the
application where you are checking the status.
Chapter 7
Common Questions and Troubleshooting
205
Recovery Guru
TABLE 7-11
Troubleshooting for Recovery Guru
Software detects a failure even after I replaced a fan or power supply (recover
from a Module Component Failure).
Cause: The software continues to report the condition as a failure for approximately 10
minutes after replacing a fan or power supply due to the controller’s poll interval.
Action: Wait for the controller to poll the module (default is 10 minutes) after performing
this recovery procedure before re-selecting Recovery Guru.
Optimal (Health Check Not Done) message.
Cause: This could occur if all the logical units are busy because some RAID Manager
operation has them locked under exclusive access. For example, if you had no LUNs
configured on your RAID Module and are currently creating the first LUN, you could see
this result if you select Recovery Guru for that RAID Module before the LUN’s format is
complete.
Action: Select a different RAID Module, or wait for the operation that has exclusive access
to complete before performing another operation on the same RAID Module.
Unresponsive Drive or Multiple Unresponsive Drives message.
Cause: The controller was unable to communicate with one or more drives that are part of
a drive group containing logical units. In this case, the software marks the drive status as
Unresponsive. If the drive receives I/O, the controller will fail it.
Important
If a series of drive failures and/or unresponsive drives are reported at the same time, the
condition may be caused by a channel failure. See Chapter 5 “Using the Recovery
Application” for a description before attempting any recovery procedures.
Action: Click Module Profile ➔ Drives to determine which drive is Unresponsive. Then, if
there are no I/Os and you want to manually fail it, use the Recovery Application.
206
RAID Manager 6.1 User’s Guide • October 1997
TABLE 7-11
Troubleshooting for Recovery Guru
Recovery Guru doesn’t report a drive failure when I remove a drive.
If there is no I/O occurring for that drive, Recovery Guru reports an Unresponsive Drive. If
there is I/O occurring, the controller will fail the drive (and Recovery Guru reports this,
slso).
Caution
Never remove drives from a module unless the controller has marked them as Failed. Doing
so could result in data loss for the affected LUN/drive group. Use Recovery Guru if you
suspect problems with a drive.
Manual Parity Check/Repair
TABLE 7-12
Troubleshooting for Manual Parity Check/Repair
Parity check/repair takes a long time.
Cause: How long parity check/repair takes depends on your I/O load, the number and
size of the LUNs you have selected, and the number of parity errors it finds and corrects.
For example, parity check/repair for a 1 Gbyte LUN takes approximately two minutes.
(When you start the manual parity operation, you may notice some performance slowdown for other applications you are running.)
Action: Run manual parity on a few LUNs at a time or when there is no heavy I/O
occurring on the selected RAID Module.
Manual Recovery
TABLE 7-13
Troubleshooting for Manual Recovery
Manual parity check/repair terminated message.
Cause: Remember that the LUNs must be Optimal in order to perform this check. This
message indicates that the parity check/repair operation has been aborted. This most likely
will occur if the affected LUN has changed to a status other than Optimal.
Action: Select Recovery Guru for the RAID Module and follow the Fix procedure for any
component problems detected. After the problem is corrected, you may want to run the
Manual Parity Check/Repair operation again.
Chapter 7
Common Questions and Troubleshooting
207
TABLE 7-13
Troubleshooting for Manual Recovery (Continued)
Information is missing in the Manual Recovery — Drives window.
Cause: The drives for the selected RAID Module are unassigned (that is, they are not part
of a configured drive group). For these drives, there is no LUN, RAID Level, or LUN status
to report. However, you should still see information for the drives’ location and status.
Action: Select another module, or use the Configuration Application to create LUNs using
those unassigned drives.
No LUN information appears in the Manual Recovery — Logical Units window.
Cause: There are no configured LUNs for the selected RAID Module (that is, all the drives
are unassigned). There is no LUN, drive group, RAID Level, or LUN status to report.
Action: Select another module, or use the Configuration Application to create LUNs using
those unassigned drives.
Reconstruction takes a long time.
Cause: The amount of time that reconstruction takes depends on the number and size of
the LUNs that are reconstructing and the rate setting for the reconstruction operation.
Important
Increasing the reconstruction rate may impact the performance of other applications
running on the same drive group.
Action: Use the Status Application or the Maintenance/Tuning Application to change the
reconstruction rate to better optimize reconstruction.
Component status doesn’t update after a Manual Recovery procedure has been
performed.
Cause: A configuration change may not be detected yet. For example, a drive is failed, then
replaced and its status becomes Replaced, but does not return to Optimal after
reconstruction completes.
Action: Try selecting a different RAID Module, then switching back and re-selecting
Manual Recovery, or exit, then re-select the Recovery application.
208
RAID Manager 6.1 User’s Guide • October 1997
Maintenance/Tuning Troubleshooting
This section provides information to help you determine the probable cause and
action to take for common problems you may encounter as you use the
Maintenance/Tuning Application, and includes the following sections:
■
General Maintenance/Tuning — page 209
■
LUN Reconstruction Rate — page 209
■
Caching Parameters — page 210
■
Firmware Upgrade — page 210
General Maintenance/Tuning
TABLE 7-14
Troubleshooting for General Maintenance/Tuning
No Controller given for mode (in either LUN Balancing or Controller Mode).
Cause: With All RAID Modules selected, this message usually means that the indicated
RAID Module has only one controller. However, it could also indicate that the controller is
no longer detected, which could mean that there is a bad connection (interface cable/
terminator, network card, or host adapter) or that the controller is offline.
Action: Verify how many controllers the module has using Module Profile. If the module has
two controllers, select Recovery Guru and follow the instructions provided to restore the
module to Optimal status.
LUN Reconstruction Rate
TABLE 7-15
Troubleshooting for LUN Reconstruction Rate
Reconstruction takes a long time.
Cause: The amount of time that reconstruction takes depends on the number and size of
the LUNs that may be reconstructing and on the rate setting for the reconstruction
operation.
Action: Consider changing the reconstruction rate to better optimize reconstruction. Use
LUN Reconstruction to change the rate setting while reconstruction is occurring.
Chapter 7
Common Questions and Troubleshooting
209
Caching Parameters
TABLE 7-16
Troubleshooting for Caching Parameters
Can’t select Write Cache Mirroring.
This caching parameter is only available if the module has a redundant controller pair.
Important
This parameter is only effective for modules with redundant controller pairs that have the
same size cache. Use Module Profile ➔ Controllers to determine if both controllers in the
pair have the same cache size before enabling this parameter. If they do not, write cache
mirroring will not occur even though you appear to enable the option.
Firmware Upgrade
TABLE 7-17
Troubleshooting for Upgrading Controller Firmware
Upgrading firmware takes a long time.
The firmware upgrade process takes approximately 2 minutes per module to upgrade two
controllers. Therefore, if you select All RAID Modules and you have 8 modules, the upgrade
process takes approximately 16 minutes.
Controller hangs up during a firmware upgrade.
Cause: This should not happen unless you try to perform some other activity on the
module while upgrading controller firmware. If you are upgrading firmware to a redundant
controller pair, the progress bar reaches 50% very quickly after downloading a file to the
first controller. However, it may take another couple of minutes to reach 100% if it is
downloading to a second controller in the module. Do not assume the controller has hung
up unless the firmware upgrade has not completed after ten minutes or so.
Action:
To avoid this problem, wait for the Firmware Upgrade to complete before selecting any
other option or exiting Maintenance/Tuning.
If it occurs, cycle power to the RAID Module, then immediately try to upgrade the firmware
again.
Important
If you are not upgrading the firmware again immediately, check the firmware version of the
module’s controllers using Module Profile. The controller firmware could be in an unusable
state if some files completed the download process before the controller hung. In this case,
your module will not perform properly until the firmware is upgraded.
210
RAID Manager 6.1 User’s Guide • October 1997
TABLE 7-17
Troubleshooting for Upgrading Controller Firmware (Continued)
Firmware File Error message.
Cause: You might see a Firmware File Error message after selecting file(s) for
downloading the firmware. This message means that the selected file(s) is not a firmware
file or is corrupted.
Action: Perform one of the following steps:
Click Cancel to exit Firmware Upgrade without performing any procedure. Obtain a new
copy of the desired firmware release and begin the firmware upgrade procedure again.
Click OK to return to the “select file(s) for downloading” box again. Try selecting a new file.
If that does not work, exit Firmware Upgrade, obtain a new copy of the desired firmware
release, and begin this procedure again.
Restrictions that might prevent a firmware upgrade.
After you select the Online or Offline upgrade option, the software determines whether the
selected RAID Module(s) is ready for the type of upgrade you selected. It is possible that
the software may find restrictions for performing the upgrade. For example:
You cannot perform an offline upgrade with a module that is receiving I/O.
You can only perform an online upgrade on a module that has two functioning Series 3
controllers with the RDAC driver installed. Also, you cannot perform the online upgrade on
a module with any LUNs that have statuses other than Optimal.
If such restrictions are found, you receive notification:
If you selected a single RAID Module, you receive an Upgrade Restriction message
indicating what problem you should fix before attempting to upgrade the firmware again
for that module.
If you selected All RAID Modules, the firmware upgrade continues for each possible
module. At the end of the firmware upgrade process, you see a list of which modules were
upgraded and which were not. For each module that was not upgraded, you should see a
reason why the upgrade did not occur. If you see a download status of Failed, refer to
TABLE 6-10 for the recommended action to take.
Chapter 7
Common Questions and Troubleshooting
211
212
RAID Manager 6.1 User’s Guide • October 1997
Index
A
About icon, 7
active controllers
assigning LUNs/drive groups, 153
changing to, 162
configuration considerations, 186
active/passive controllers
changing to active/active, 164
swapping modes, 164
activity lights, drives, 36, 52
adding
RAID Modules, 35
adding hot spare drives, 68
adding logical units to existing drive groups, 55
alarm sounding, 118
applications
common features, 17
common screen elements, 29
exiting, 30
online help in, 30
starting, 28
summary of, 6
task charts, 10
arraymon
see command line utilities
ASC/ASCQ
displayed, 84
hardware message type, 86
Auto Parity Settings
main screen, 181
what happens, 180
when to use, 180
available capacity
defined, 187
displayed, 59
B
balancing logical units, 65, 153
blank screen
Firmware Upgrade, 174
Manual Recovery
Drives, 208
Logical Units, 208
blocks, parity, 86
board ID, controllers, 40
board name, controllers, 40, 195
board serial number, controllers, 40
bootware
level displayed, 40, 175
C
cache memory
defined, 25
size displayed, 40
Caching Parameters
cache without batteries
defined, 166
described, 168
changing, 67
LUN parameter, 64
main screen, 167
Index
213
settings
displayed, 41
troubleshooting, 210
what happens, 166
when to use, 166
write cache mirroring
defined, 166
described, 168
write caching
defined, 166
described, 168
see also raidutil
capacity
configuration considerations, 55
differences between types, 187
drive group, 155
drives, 40
incorrect size, 117
less than expected, 196
logical units, 41, 51
changing, 67
LUN parameter, 62
see also available capacity
see also remaining capacity
see also total capacity
Change To Active/Active Controllers
procedures, 162
when to use, 162
changing
caching parameters, 166
controller assignment for LUNs, 153
controller mode, 160
default Message Log file, 96
log size before notification, 96
logical unit parameters, 66
Message Log display, 82
module checking interval, 96
parity settings, 180
RAID Module name/information, 35
reconstruction rate, 103, 150
channel failure, 123
checking
module status, 97
parity progress, 127
reconstruction progress, 104
checking interval
changing, 96
described, 93
214
RAID Manager 6.1 User’s Guide • October 1997
command line utilities
arraymon, described, 15
drivutil, described, 14
fwutil, described, 14
healthck, described, 14
lad, described, 14
logutil, described, 14
nvutil, described, 14
parityck, described, 14
raidcode.txt, described, 14
raidutil, described, 14
rdac, described, 14
rdacutil, described, 14
rdaemon, described, 15
rdriver, described, 15
rmevent, described, 14
rmparams, described, 15
rmscript, described, 15
storutil, described, 14
symping, described, 14
sysmsm, described, 14
common features, 17
definitions and explanations, 17
navigating, 27
screen elements
described, 29
illustrated, 29
tasks, 28
component failure
module, 101, 124
component failures
how to check for, 99, 111, 184
possible statuses, 112
recovering from, 26
unexpected, 206
component status
described, 112
unexpected, 205, 208
viewing, 37
configuration
change detected, 184
resetting, 186
with two active controllers, 186
Configuration Application
capacities, 187
changing LUN parameters, 66
Create Hot Spare, 68
Create LUN, 55
Delete, 71
drive groups/LUNs displayed, 49, 51
File menu, 48
List/Locate Drives, 52
options summary, 8
overview, 46
Reset Configuration, 75
see also command line utilities
task summary chart, 10
configured drive group
defined, 19
displayed, 49
Controller Mode
before you begin, 160
changing to active/active controllers, 162
changing to passive/active controllers, 164
main screen, 161
what happens, 160
when to use, 160
controller status
displayed, 142
non-optimal, 205
controllers
changing modes, 162, 164
character limit, 195
Dead status, 115
determining
firmware version, 40
number and kind, 40
failure on data path, 124
fault light on, 143
manual recovery, 140
mode displayed, 39
model number displayed, 40
no controller mode, 209
Offline status, 115
Optimal status, 115
placing offline manually, 142
placing online manually, 143
replacing
see Recovery Guru
selecting for Firmware Upgrade, 171
type displayed, 40
upgrading firmware, 170
see also Controller Mode
see also Firmware Upgrade
Copy To Clipboard
using, 85, 99
using with Help, 32
Create Hot Spare
procedures, 69
what happens, 68
when to use, 68
Create LUN
main screen, 57
Options
screen display, 61
procedures, 56
what happens, 55
when to use, 55
creating
hot spare drives, 68
logical units/drive groups, 55
format fail, 198
how long it takes, 188
D
DARDAC, see RDAC
data path failure, 100, 124
date code, drives, 41
date of manufacture
controllers, 40
drives, 41
dead
controller status, 115
logical unit status, 114
default log file
changing, 96
described, 93
definitions, common, 17
degraded mode, 114
Delete
procedures, 72
what happens, 72
when to use, 71
deleting
drive groups/LUNs or hot spares, 71
detailed messages
copying, 85, 99
device name, defined, 24
download status
displayed, 177
see also Firmware Upgrade
Index
215
drive capacity
displayed, 40
incorrect, 117
drive failure
fixing with Recovery Guru
example, 115
procedures, 121
hot spare, 101, 122
multiple, 101, 122
multiple unresponsive, 101, 122
single, 100, 122
unresponsive drive, 101, 122
drive group
capacity, 155
defined, 19
deleting, 71
displayed, 49
existing
adding LUNs, 55
changing LUN
assignment, 67
illustrated, 20
number of LUNs in, 49
when they renumber, 21
drive selection
LUN parameter, 63
drive status
displayed, 40, 131
non-optimal, 204
unresponsive, 113, 122, 202, 206
Drive tray
fan failure, 100, 123
power supply failure, 100, 123
temperature exceeded, 101, 123
drives
activity lights, 36
Failed status, 112
failing manually, 132
fault light on, 204
firmware version, 41
hot spare, 68
list/locate, 52
location displayed, 40, 53, 131
manual recovery, 129
Mismatch status, 113
number for drive group displayed, 50
number for module displayed, 39
number of drives for drive group
216
RAID Manager 6.1 User’s Guide • October 1997
unexpected, 196
Optimal status, 112
reconstructing manually, 133
Replaced status, 113
reviving manually, 134
selecting for hot spares, 70
selecting number for configuration, 59
serial number displayed, 41
unresponsive, 198
drvutil
see command line utilities
dual controllers
see active controllers
E
Edit menu
online help, 32
Status, 80, 85, 99
environmental card failure, 101, 124
error messages
see messages
error window
printing online help, 194
exclusive access
defined, 185
exiting, 30
F
failed, drive status, 112
failing a drive, manually
procedures, 132
when to use, 132
Failure type
channel failure, 123
data path failure, 100, 124
drive failure, 100, 122
drive tray
fan failure, 100, 123
power supply failure, 100, 123
temperature exceeded, 101, 123
environmental card, 101, 124
format fail, 198
hot spare failure, 101, 122
module component failure, 101, 124
multiple drive failure, 101, 122
multiple unresponsive drives, 101, 122
possible in
Recovery Guru, 122
recovering from, 26, 111
unresponsive drive, 101, 122
fan
dual failures on drive tray, 100, 123
failure on drive tray, 100, 123
fault light
controllers, 143
drives, 204
recovering, 118
features, common
navigation, 27
tasks, 28
to all applications, 17
fibre channel
level displayed, 175
File menu
Configuration, 48, 75
location, 29
Maintenance/Tuning, 148
online help, 32
Open Log, 88
Recovery, 110
Reset Configuration, 75
Save Log As, 90
Save Module Profile, 42
Status, 80
files
about this software, 14
firmware, 170
log files
default, 93
opening, 88
saving, 90
see also command line utilities
filter, described, 44, 90
firmware
bootware level, 40
file error message, 211
level displayed, 40, 175
see also Firmware Upgrade
Firmware Upgrade
before you begin, 170
blank screen, 174
compatible files/versions
screen, 174
determining success of procedure, 177
files needed, 170
how long it takes, 210
progress, 176
restrictions, 172, 211
see also command line utilities
selecting controllers, 171
troubleshooting, 210
what happens, 170
when to use, 170
fixing component problems, 118
flashing lights
see List/Locate Drives
see Locate Module
Format
see formatting logical units
formatting logical units
format fail, 198
how long it takes, 188
manually
procedures, 138
when to use, 137
status, 114
fwcompat.def file, 171
fwutil
see also command line utilities
G
general message type
details, 86
glossary, online help, 33
group capacity
configured drives, 155
Guru, recovery
see Recovery Guru
H
hardware message type
details, 86
Health Check
copying exception details, 99
main screen, 98
not performed, 202
Index
217
procedures, 99
results
see Failure type
troubleshooting, 201
unresponsive drives, 202, 206
what happens, 97
when to use, 97
see also command line utilities
healthck
see command line utilities
Help menu
see online help
highlighting items in a list, 27
hot spare
creating, 68
defined, 20
deleting, 71
drive capacity considerations, 68
drive failure, 101, 122
drive group displayed, 49
in use, 204
logical unit status and, 114, 204
troubleshooting, 205
I
I/O path
see data path
L
lad
see command line utilities
List Type
procedures, 87
when to use, 87
see also Message Log
List/Locate Drives
procedures, 53
what happens, 52
when to use, 52
Locate Module
doesn’t work, 195
troubleshooting, 195
what happens, 36
when to use, 36
218
RAID Manager 6.1 User’s Guide • October 1997
log file
changing display, 88, 189
default, 93
default not found, 200
is corrupted message, 88
opening, 88
saving, 90
viewing, 85
Log Settings
changing, 92
main screen, 95
when to use, 92
log size threshold
changing, 96
described, 93
logical block address
parity message details, 86
logical unit
defined, 19
illustrated, 20
logical unit capacity
changing, 67
displayed, 41, 51
less than expected, 196
see also available capacity
see also remaining capacity
see also total capacity
logical unit parameters
caching parameters
changing, 67
described, 64
drive selection
described, 63
LUN Assignment
changing, 67
described, 65
LUN capacity
changing, 67
described, 62
number of drives
changing, 67
described, 59
limitation, 196
RAID Level
changing, 67
described, 41
reconstruction rate
changing, 105
segment size
changing, 67
described, 64
what happens, 66
when to change, 66
logical unit status, 114
displayed, 51, 102, 127, 131, 137
non-optimal, 191, 204
remains at Reconstructing, 205
shows Reconstructing, 204
logical units
"LUNs busy" message, 185
assigning to a controller
all RAID Modules, 156
one RAID Module, 154
available capacity, 59
balancing between active controllers, 153, 163
configured drive groups, 49
controller assignment displayed, 41
creating, 55
Dead status, 114
Degraded status, 114
deleting, 71
formatting manually
Formatting status, 114
information display area, 51
manual recovery, 135
operating system limits, 196
Optimal status, 114
Reconstructing status, 114
reviving manually, 138
selecting number for configuration, 59
logutil
see command line utilities
LUN Assignment
changing on existing drive groups, 67
LUN parameter, 65
LUN Balancing
all RAID Modules
main screen, 157
what happens, 157
when to use, 156
one RAID Module
main screen, 155
what happens, 154
when to use, 154
what happens, 153
when to use, 153
LUN Reconstruction
main screen, 104
procedures, 105
troubleshooting, 203
what happens, 103
when to use, 103
LUN Reconstruction Rate
main screen, 151
troubleshooting, 209
what happens, 150
when to use, 150
M
Maintenance/Tuning Application
Auto Parity Settings, 180
Caching Parameters, 166
Controller Mode, 160
File menu, 148
Firmware Upgrade, 170, 210
LUN Balancing, 153
LUN Reconstruction Rate, 150
main screen, 146
Options menu, 148
options summary, 9
overview, 146
task summary chart, 13
troubleshooting
Caching Parameters, 210
general, 209
LUN Reconstruction Rate, 209
Manual Parity Check/Repair
main screen, 126
procedures, 127
terminated message, 207
troubleshooting, 207
what happens, 125
when to use, 125
Manual Recovery
Controller Pairs
main screen, 141
Place Offline
when to use, 142
Place Online
procedures, 144
when to use, 143
what happens, 140
Index
219
when to use, 140
Drives
blank screen, 208
Fail
procedures, 132
when to use, 132
main screen, 130
Reconstruct
procedures, 133
when to use, 133
Revive
procedures, 134
when to use, 134
what happens, 129
when to use, 129
Logical Units
blank screen, 208
Format
procedures, 138
when to use, 137
main screen, 136
Revive
procedures, 139
when to use, 138
what happens, 135
when to use, 135
troubleshooting, 207
memory
see cache memory
menu items
selecting, 27
Message Log
changing log display, 189
changing log settings, 92
copying message details, 85
default log file
not found, 200
delay in displaying, 199
listing different types of messages, 87
Log Settings
main screen, 95
main window, 83
message type
general details, 86
hardware details, 86
parity details, 86
220
RAID Manager 6.1 User’s Guide • October 1997
no match found message, 200
Open Log
main screen, 89
procedures, 85
see also command line utilities
troubleshooting, 199
updating, 91
what happens, 83
when to use, 82
messages
configuration change detected, 184
copying details, 85, 99
default log file not found, 200
firmware file error, 211
format fail, 198
log file is corrupted, 88
Manual Parity Check/Repair terminated, 207
no match found, 200
optimal (Health Check not done), 202, 206
selection is not a file, 91, 192
temperature exceeded, 101, 123
threshold level reached, 192
troubleshooting, 190
unresponsive drives, 202, 206
mirrored-pair drives
listed, 51
see also RAID 1
mismatch, drive status, 113
mode
displayed for a module, 39
no controller mode, 209
modifying LUNs/drive groups, 66
module
see RAID Module
Module Profile
controller name troubleshooting, 195
how to determine
controller number and type, 40
firmware version, 40
procedures, 39
summary information
screen, 38
troubleshooting, 195
viewing configuration details, 185
what happens, 37
when to use, 37
see also Save Module Profile
module status
non-optimal, 191
unexpected, 205, 208
multiple drive failure, 101, 122
multiple unresponsive drives, 101, 122
multiple unresponsive drives message, 202, 206
N
navigating, 27
network version
see also command line utilities
no controller mode, 209
no match found message, 200
notification
log size reached, 93
see also SNMP
number of drives
changing, 67
configuration limitation, 196
described, 59
displayed for drive group, 50
selecting for configuration, 59
number of logical units
selecting for configuration, 59
numbering drive groups, 21
nvutil
see command line utilities
O
Offline
controller status, 115
see also Manual Recovery
Controller Pairs
Online
see Manual Recovery
Controller Pairs
online help
can’t access, 194
can’t print, 194
copying topics, 32
main screen, 31
overview, 30
printing topics, 32
troubleshooting, 194
Open Log
main screen, 89
procedures, 88
when to use, 88
operating condition
see status
optimal
drive status, 112
logical unit status, 114
Optimal (Health Check not done) message, 202,
206
Options
menu
Auto Parity Settings, 180
Log Settings, 92
Maintenance/Tuning, 148
Recovery, 110
Refresh All, 91
Status, 80
selection in
Create Hot Spare, 69
Create LUN, 60
P
parameters
see Caching Parameters
see logical unit parameters
parity
defined, 24
message type details, 86
progress of manual described, 127
see also Auto Parity Settings
see also Manual Parity Check/Repair
parity check/repair
affected data blocks, 86
automatic described, 180
described, 24
how log it takes, 207
manual described, 125
see also command line utilities
stopping the operation, 128
parityck
see command line utilities
path
display for firmware upgrade, 175
performing
Index
221
see procedures
placing a controller offline, manually
when to use, 142
placing a controller online, manually
procedures, 144
when to use, 143
power supply
dual failure on drive tray, 100, 123
failure on drive tray, 100, 123
procedures
changing
controller modes, 162, 164
Log Settings, 94
reconstruction rate, 105
creating
hot spares, 69
LUNs/drive groups, 56
deleting drive groups/LUNs or hot spares, 72
failing a drive, 132
formatting logical units manually, 138
listing different types of messages, 87
listing/locating drives, 53
manually checking/repairing parity, 127
opening an existing log file, 88
performing an immediate check, 99
performing manual recovery for
controller pairs, 140
drives, 129
logical units, 135
placing a controller
online, 144
reconstructing a drive, 133
recovering from component failures, 121
refreshing Message Log, 91
resetting a module’s configuration, 75
reviving
drives, 134
logical units, 139
saving
module profile information, 42
selecting a module, 34
viewing
Message Log, 85
module profile, 39
product ID
controllers, 40
drives, 41
product serial number, controllers, 40
222
RAID Manager 6.1 User’s Guide • October 1997
program group
application chart, 7
task summary charts, 10
Q
quit, 30
R
RAID 0
described, 23
RAID 1
can’t select, 58
described, 23
viewing mirrored-pair drives, 51
RAID 3
described, 23
RAID 5
described, 23
RAID Level
changing, 67
defined, 23
displayed
for drive group, 50
for LUNs, 41
selecting for configuration, 58
RAID Module
adding new, 35
balancing LUNs between active/active
controllers, 154, 156
changing name/information, 35
checking interval, 93
checking status, 97
component failure, 101, 124
controllers on
displayed, 41
defined, 18
drives on
capacity, 40
location, 40
number of drives displayed, 39
status, 40
illustrated, 18
locating, 36
logical units on
capacity, 41
removing, 35
removing from configuration, 191
resetting configuration, 75
saving profile information, 42
selection
what happens, 34
when to use, 33
serial number displayed, 39
using Select Module, 35
viewing a profile, 37
raidcode.txt
see command line utilities
raidutil
see command line utilities
RDAC
defined, 25
see also command line utilities
rdacutil
see command line utilities
rdaemon
see command line utilities
rdriver
see command line utilities
reconstructing
logical unit status, 114
reconstructing a drive, manually
procedures, 133
when to use, 133
reconstruction
defined, 23
drive fault light, 204
how long it takes, 203, 208, 209
optimizing performance, 104
progress described, 104
troubleshooting, 203, 209
reconstruction rate
can’t change, 203
changing, 67, 150
see also LUN Reconstruction
see also LUN Reconstruction Rate
recovery
correcting drive failures, 115
correcting failures, 26, 111, 118
Recovery Application
File menu, 110
Manual Parity Check/Repair, 125
Manual Recovery
Controller Pairs, 140
Drives, 129
Logical Units, 135
Options menu, 110
options summary, 9
overview, 108
Recovery Guru, 118
task summary chart, 12
troubleshooting
general, 204
Manual Parity Check/Repair, 207
Manual Recovery, 207
Recovery Guru, 206
Recovery Guru
benefits, 112
check not performed, 206
example of using, 115
failure types possible, 122
Fixed? described, 120
main screen, 119
procedures, 121
removing modules from configuration, 191
troubleshooting, 206
what happens, 118
when to use, 118
Refresh All
delay in updating Message Log, 199
procedures, 91
updating Message Log, 91
when to use, 91
remaining capacity
defined, 187
displayed for drive group, 50
less than expected, 197
removing RAID Modules, 35
replaced
drive status, 113
replacing controllers
see Recovery Guru
Reset Configuration
procedures, 75
what happens, 75
when to use, 75, 186
restrictions
configuration, 196
performing manual recovery for
controller pairs, 140
Index
223
online help, 31
program group icons, 6, 28
Recovery
Manual Parity Check/Repair, 126
Manual Recovery
Controller Pairs, 141
drives, 129
logical units, 135
swapping controller modes, 165
upgrading controller firmware, 172, 211
reviving a drive, manually
procedures, 134
when to use, 134
reviving logical units, manually
procedures, 139
when to use, 138
rmevent
see command line utilities
rmparams
see command line utilities
rmscript
see command line utilities
Drives, 130
S
Save Log As
when to use, 90
Save Module Profile
file selection
screen, 43
procedures, 42
troubleshooting, 184
what happens, 42
when to use, 42, 184
screen displays and elements
applications overview, 7
common elements, 29
Configuration
Create LUN, 57
Create LUN, Options, 61
Maintenance/Tuning, 146
Auto Parity Settings, 181
Caching Parameters, 167
Controller Mode, 161
changing confirmation, 163
Firmware Upgrade, compatible
versions, 174
LUN Balancing
all RAID Modules, 157
files/
one RAID Module, 155
LUN Reconstruction Rate, 151
Module Profile, 38
224
RAID Manager 6.1 User’s Guide • October 1997
Logical Units, 136
Recovery Guru, 119
Save Module Profile, 43
Status
Health Check, 98
Log Settings, 95
LUN Reconstruction, 104
Message Log, 83
Open Log, 89
SCSI ID, displayed
controllers, 40
segment size
changing, 67
displayed, 41
LUN parameter, 64
Select Module
add, described, 35
edit, described, 35
find, described, 35
remove, described, 35
selecting
hot spare drives, 70
manual parity, 125
multiple items, 27
options with keyboard, 27
RAID Level, 58
RAID Modules, 33
Recovery Guru, 118
types of messages, 87
selection not a file message, 91, 192
serial number
drives, 41
module, 39
settings
see procedures
SNMP
defined, 25
software
common options, 8
common tasks, 28
navigating, 27
overview, 6
program group icons, 6, 28
task summary, 10
see also command line utilities
Solaris
rdaemon utility, 15
rdriver utility, 15
starting, applications, 28
status
controllers
displayed, 142
drives
displayed, 40, 131
firmware download, 177
logical units, 51, 102
displayed, 131, 137
non-optimal, 204, 205
Optimal, 101
possible for components, 112
unexpected, 205, 208
unresponsive, 113, 122, 202, 206
viewing event details, 82
Status Application
delay in displaying, 199
Edit menu, 80
File menu, 80
Health Check, 97
LUN Reconstruction, 103
Message Log, 82
Options menu, 80
options summary, 9
overview, 78
task summary chart, 11
troubleshooting
Health Check, 201
LUN Reconstruction, 203
Message Log, 199
Status line, described, 29
storutil
see command line utilities
subsystem
see RAID Module
Swap Active/Passive Controllers
procedures, 164
when to use, 164
symping
see command line utilities
symsm
see command line utilities
system performance
optimizing in reconstruction, 104
T
task charts
Configuration, 10
Maintenance/Tuning, 13
Recovery, 12
Status, 11
temperature exceeded
failure type on drive tray, 101, 123
threshold level reached, 192
total capacity
defined, 187
displayed for drive group, 50
troubleshooting
Caching Parameters, 210
common to all applications, 190
Configuration Application, 196
Firmware Upgrade, 210
Health Check, 201
Locate Module, 195
LUN Reconstruction, 203
LUN Reconstruction Rate, 209
Maintenance/Tuning Application, 209
Manual Parity Check/Repair, 207
Manual Recovery, 207
Message Log, 199
Module Profile, 195
online help, 194
overview, 190
Recovery Application, 203
Recovery Guru, 206
Save Module Profile, 184
Status Application, 199
U
unassigned drives
defined, 19
drive group displayed, 49
failed, 196
unresponsive drive message, 202, 206
Index
225
unresponsive drives, 101, 113, 122, 198, 202, 206
updating Message Log, 91
upgrading controller firmware, 170
before you begin, 170
determining success of procedure, 177
download status, 177
file error message, 211
following progress, 176
how long it takes, 210
no files/version displayed, 174
restrictions, 211
selecting one controller, 171
troubleshooting, 210
V
vendor ID
controllers, 40
drives, 41
viewing
caching parameters, 166
component statuses, 37
list of drives, 52
manual parity progress, 127
Message Log, 82
module’s profile, 37
reconstruction progress, 103
W
write cache mirroring parameter
defined, 166
described, 168
write caching parameter
defined, 166
described, 168
wrong drive capacity, 117
226
RAID Manager 6.1 User’s Guide • October 1997