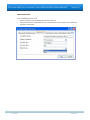
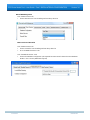
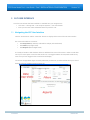
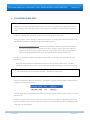
1
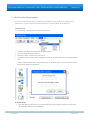
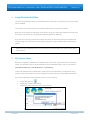
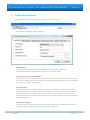
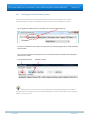
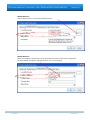
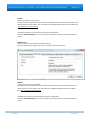
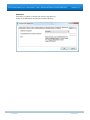
PCS Clinical Audit Tool – User Guide
Version 3.4
PART 1
INSTALLATION AND CONFIGURATION
PCS Clinical Audit Tool – User Guide – Part 1 INSTALLATION & CONFIGURATION
Version 3.4
Company Contacts
Sydney (Head Office)
Pen Computer Systems
Level 6, The Barrington
Document Contact
Contact:
Project Officer
10-14 Smith St
PARRAMATTA NSW 2150
Phone: +61 2 9635 8955
Fax:
+61 2 9635 8966
Email:
[email protected]
Web:
www.pencs.com.au
Christine Chidgey
Phone:
+61 3 9866 8477
Email:
[email protected]
Melbourne Office
Pen Computer Systems
Level 5
434 St Kilda Rd
MELBOURNE VIC 3004
Phone: +61 3 9866 8477
Fax:
+61 3 9866 5699
13 June 2012
PAGE 2 of 33
PCS Clinical Audit Tool – User Guide – Part 1 INSTALLATION & CONFIGURATION
Version 3.4
Document Control
Version
Date
Modified By
Description
2.4
16/02/2009
Christine Chidgey
Initial Document for Installation and Configuration
instructions. The CAT User Guide has been split into 2
parts – this is Part 1.
2.4.1
26/03/2009
Christine Chidgey
Updates for
• changes to login screen and license key information
• configuration of Billing Software – available for MD
users with Pracsoft3
2.5
28/05/2009
Christine Chidgey
No changes this release
2.5.1
23/06/2009
Christine Chidgey
Updates for new logos on screens
2.5.2
20/07/2009
Christine Chidgey
Add Zedmed compatibility
2.6
12/10/2009
Christine Chidgey
No changes this release
2.7
30/11/2009
Christine Chidgey
No changes this release
2.8
09/02/2010
Christine Chidgey
Update document template.
No changes this release.
2.9
17/05/2010
Christine Chidgey
Updates to System Requirements:
• .NET 2.0 SP2
• Increased memory is required for very large
database
• ‘Send Data To’ email function requires a mail
client to be installed
2.9.3
17/08/2010
Christine Chidgey
Updates to Best Practice configuration and preferences –
a password is now required to be set
2.10
06/09/2010
Christine Chidgey
Best Practice billing configuration
2.11
04/01/2011
Christine Chidgey
Add practiX compatibility
Disclaimer added on login to new update
2.12
27/07/2011
Christine Chidgey
Add Communicare compatibility
3.1
02/11/2011
Christine Chidgey
3.4
12/06/2012
Christine Chidgey
13 June 2012
Add Medinet compatibility
CAT v3 requires pre-requisite of Microsoft .NET
Framework 3.5 SP1
Update install link and associated screen shots
Add Best Practice and Pracsoft compatibility
Add MedTech32 configuration
PAGE 3 of 33
PCS Clinical Audit Tool – User Guide – Part 1 INSTALLATION & CONFIGURATION
Version 3.4
Contents
COMPANY CONTACTS ............................................................................................................................................................. 2
Sydney (Head Office) ..................................................................................................................................................... 2
Melbourne Office .......................................................................................................................................................... 2
DOCUMENT CONTACT ............................................................................................................................................................ 2
CONTENTS .....................................................................................................................................................................4
1
INTRODUCTION ......................................................................................................................................................6
1.1
1.2
1.3
1.4
1.5
2
SYSTEM REQUIREMENTS ........................................................................................................................................8
2.1
2.2
2.3
2.4
2.5
2.6
2.7
2.8
2.9
2.10
2.11
2.12
2.13
2.14
2.15
2.16
3
OPERATING SYSTEM ................................................................................................................................................... 8
MICROSOFT .NET FRAMEWORK ................................................................................................................................... 8
INTERNET EXPLORER ................................................................................................................................................... 8
INTERNET CONNECTION .............................................................................................................................................. 9
MEMORY ................................................................................................................................................................. 9
DISK SPACE............................................................................................................................................................... 9
MAIL CLIENT ............................................................................................................................................................. 9
CLINICAL DESKTOP SYSTEM COMPATIBILITY................................................................................................................... 10
BILLING SYSTEM COMPATIBILITY ................................................................................................................................. 10
BEST PRACTICE REQUIREMENTS .................................................................................................................................. 11
GENIE REQUIREMENTS .............................................................................................................................................. 12
ZEDMED REQUIREMENTS ........................................................................................................................................... 12
PRACTIX REQUIREMENTS ........................................................................................................................................... 12
COMMUNICARE REQUIREMENTS ................................................................................................................................. 13
MEDINET REQUIREMENTS ......................................................................................................................................... 13
MEDTECH32 REQUIREMENTS .................................................................................................................................... 13
INSTALLATION ......................................................................................................................................................14
3.1
3.2
3.3
3.4
3.5
4
CLINICAL AUDIT TOOL (CAT) ....................................................................................................................................... 6
USER GUIDE ............................................................................................................................................................. 6
NOTES ABOUT THIS USER GUIDE ................................................................................................................................... 7
DEFINITIONS, ACRONYMS AND ABBREVIATIONS ................................................................................................................ 7
RELATED DOCUMENTS ................................................................................................................................................ 7
INSTALLING TO A DESKTOP PC .................................................................................................................................... 17
INSTALLING TO TERMINAL SERVICES OR CITRIX ............................................................................................................... 17
PROXY SERVERS ....................................................................................................................................................... 18
USING CLINICAL AUDIT OFFLINE ................................................................................................................................. 19
CAT LICENSE TOKEN ................................................................................................................................................ 19
CONFIGURATION .................................................................................................................................................20
4.1
SETTING YOUR PREFERENCES ..................................................................................................................................... 21
4.1.1
Choosing your Clinical Desktop System ....................................................................................................... 22
4.1.2
Choosing a preferred Data Extract Directory .............................................................................................. 27
4.1.3
Choosing and configuring your Billing System ............................................................................................ 28
5
CAT USER INTERFACE ...........................................................................................................................................31
13 June 2012
PAGE 4 of 33
PCS Clinical Audit Tool – User Guide – Part 1 INSTALLATION & CONFIGURATION
5.1
6
NAVIGATING THE CAT USER INTERFACE ....................................................................................................................... 31
COLLECTING DATA SETS .......................................................................................................................................32
6.1
6.2
6.3
7
Version 3.4
WHAT DATA IS COLLECTED ......................................................................................................................................... 33
HOW IS THE DATA STORED ......................................................................................................................................... 33
EXISTING DATA SET COMPATIBILITY WITH CHANGES TO CAT ............................................................................................. 33
DATA FILTERING AND DATA SET ANALYSIS ..........................................................................................................33
13 June 2012
PAGE 5 of 33
PCS Clinical Audit Tool – User Guide – Part 1 INSTALLATION & CONFIGURATION
Version 3.4
1 Introduction
1.1 Clinical Audit Tool (CAT)
The Clinical Audit Tool (CAT) analyses clinical information from GP Clinical Desktop Systems. It translates
data into real statistical and graphical information that is easy to understand and action. This allows
practitioners to assess and improve the quality and completeness of patient information. The benefit to
the practice is to assist with its ongoing accreditation and provide opportunities to grow practice
income. The emphasis of the tool is to help practice staff to take specific action to improve patient
coverage in chronic disease management and prevention.
Other benefits of CAT are many and include:
•
targeting patients with particular needs
•
targeting patients with specific health risk profiles
•
improved compliance with statistical data collections
•
extracting data to meet the needs of others
•
meeting reporting requirements
Statistics that are required for the Australia Primary Care Collaboratives (APCC) program and the DoHA
Future Directions Key Performance Indicators for Divisions are a by-product of the use of the system.
1.2 User Guide
The purpose of this document is to provide instructions on how to install and use the functionality
provided by the CAT.
This manual is split into 2 parts:
Part 1: Installation and Configuration including how to collect data sets
Part 2: Functionality
13 June 2012
PAGE 6 of 33
PCS Clinical Audit Tool – User Guide – Part 1 INSTALLATION & CONFIGURATION
Version 3.4
1.3 Notes about this User Guide
This User Guide describes the use of the PCS Clinical Audit Tool with reference to the HCN Medical
Director, Best Practice and Genie Clinical Desktop Systems.
Wherever Medical Director is used in this document we are referring to the Health Communications
Network – Medical Director ™ Clinical Desktop System.
Wherever Best Practice is used in the document we are referring to the Clinical Desktop System
produced by Best Practice Software.
Wherever Genie is referred to we are referring to the Clinical Desktop System produced by Genie
Solutions.
Wherever Zedmed is referred to we are referring to the Clinical Desktop System produced by Zedmed
Medical Software Solutions.
There are other Clinical Desktop Systems that may interoperate with the PCS Clinical Audit Tool in the
future and additions will be made to this User Guide when they are available.
1.4 Definitions, acronyms and abbreviations
Term
CAT
Description
Clinical Audit Tool
MD
Medical Director
PCS
Pen Computer Systems
RACGP
Royal Australian College of General Practitioners
1.5 Related Documents
‘PCS Clinical Audit Tool – User Guide Part 2 – Functionality’
This User Guide provides instructions on how to use install and configure CAT.
This guide is available from
http://help.pencs.com.au/cat.htm
13 June 2012
PAGE 7 of 33
PCS Clinical Audit Tool – User Guide – Part 1 INSTALLATION & CONFIGURATION
Version 3.4
2 SYSTEM REQUIREMENTS
The minimum and recommended system requirements to be able to run the Clinical Audit tool are
provided in this section.
2.1 Operating System
Clinical Audit runs under the following environments (maintained to latest Microsoft patch levels);
Microsoft Windows VISTA
Microsoft Windows XP
Microsoft Windows 2003 Server
Microsoft Windows 2003 R2 Server
Microsoft Windows 2008
Microsoft Windows 7
2.2 Microsoft .NET Framework
PCS Clinical Audit version 3 requires the Microsoft .NET Framework version 3.5 SP1 to be installed
prior to installing PCS Clinical Audit. This can be downloaded from the Microsoft website.
Practices should contact their IT administrator if this is not already installed.
How to check which version of .NET you have installed:
Go to Start > Control Panel
Open ‘Add or Remove Programs’
Check to see that ‘Microsoft .NET Framework 3.5 Service Pack 1’ appears in the list
2.3 Internet Explorer
To install PCS Clinical Audit you must use Internet Explorer version 5.5 or later. Clinical Audit can be
installed by going to the following URL
http://install.pencs.com.au/ClickOnce/ClinicalAudit/publish.htm
13 June 2012
PAGE 8 of 33
PCS Clinical Audit Tool – User Guide – Part 1 INSTALLATION & CONFIGURATION
Version 3.4
2.4 Internet Connection
PCS Clinical Audit uses an authentication mechanism that requires a persistent internet connection. It is
recommended that you have a broadband internet connection to operate PCS Clinical Audit.
2.5 Memory
Clinical Audit requires at least 196MB of available memory for a typical Clinical Desktop System
installation (eg. Medical Director with approximately 10,000 patient records). It is recommended that
you use Clinical Audit on a system with at least 512MB of RAM installed.
Very large databases will require more RAM. It is recommended practices inactivate patients who are no
longer attending the practice as the extract process only runs over active patients.
2.6 Disk Space
The program itself is relatively small; however, each snapshot for a typical Clinical Desktop System (eg.
Medical Director) installation1 will require around 25MB of disk space.
2.7 Mail Client
If you will be using the CAT ‘Send Data To’ email function you will need to have a mail client installed on
the PC you are sending from.
13 June 2012
PAGE 9 of 33
PCS Clinical Audit Tool – User Guide – Part 1 INSTALLATION & CONFIGURATION
Version 3.4
2.8 Clinical Desktop System Compatibility
Clinical Audit is compatible with the following clinical application and versions. As new versions are
released, PCS Clinical Audit will be validated and, if required, updated to maintain compatibility.
•
Medical Director
Clinical Audit is compatible with Medical Director Versions 2 and 3.
•
Best Practice
Clinical Audit is compatible with Best Practice version 1.6.0.395 and later.
•
Genie
Clinical Audit is compatible with Genie Version 7.5.3 and later.
•
Zedmed
Clinical Audit is compatible with Zedmed Version 11 and later.
•
practiX
Clinical Audit is compatible with practiX Version 1.36 build 2 and later.
•
Communicare
Clinical Audit is compatible with Communicare Version 11.2 and later.
•
Medinet
Clinical Audit is compatible with Medinet Version released July 2011 and later.
•
MedTech32
Clinical Audit is compatible with MedTech32 Version 8.1 and later.
2.9 Billing System Compatibility
Billing is compatible when the clinical and billing systems are provided by the same vendor and the
data extract for the clinical system is version 1_5 or above. Currently the following billing is
supported:
• MD2 or MD3 and Pracsoft
• BP and BP Management
• practiX
• Communicare
• Zedmed
• MedTech32
13 June 2012
PAGE 10 of 33
PCS Clinical Audit Tool – User Guide – Part 1 INSTALLATION & CONFIGURATION
Version 3.4
2.10 Best Practice Requirements
Best Practice Software data extract requires that a database browser password is configured. This
password is set in Best Practice and must be entered in the Clinical Audit Tool Preferences.
In Best Practice:
•
Select Setup > Configuration from the top menu bar.
•
Select the ‘Database’ option from the left hand tool bar
•
Click the ‘Database browser’ button
•
Enter and confirm a password of your choice
•
If a password has previously been configured you will be required to enter the current password as
well
NOTE: If a password has been configured and you do not know what it is you will need to contact
Best Practice Support for assistance.
\
In Clinical Audit:
•
Enter the password you have set up in the CAT Best Practice Preferences. Refer to the section in
this document ‘Setting Your Preferences’.
13 June 2012
PAGE 11 of 33
PCS Clinical Audit Tool – User Guide – Part 1 INSTALLATION & CONFIGURATION
Version 3.4
2.11 Genie Requirements
The Genie software application provides a new Reports menu option that performs the data extraction
for Clinical Audit. The data extraction process is described in the Genie Mappings document available
from http://help.pencs.com.au/cat.htm.
2.12 Zedmed Requirements
Zedmed provides an executable file (PenDataExtract.exe) that must exist in your local Zedmed
installation directory in order for Clinical Audit to be able to collect data. The local Zedmed installation
directory is usually C:\Zedmed or C:\Patients.
If this file is not installed you will receive the following error message when you click the Clinical Audit
‘Collect’ button.
If you receive this message you can download the executable file from http://help.pencs.com.au/cat.htm
> click on the CAT Zedmed extractor link. Updates to the extractor are available from this link.
2.13 practiX Requirements
The practiX software application requires practiX Support to upgrade the practiX application to provide
the Custom PENEXTRACT Administration option. The data extraction process is described in the practiX
Mappings document available from http://help.pencs.com.au/cat.htm.
13 June 2012
PAGE 12 of 33
PCS Clinical Audit Tool – User Guide – Part 1 INSTALLATION & CONFIGURATION
Version 3.4
2.14 Communicare Requirements
Communicare provides an executable file (ccCATExport.exe) that must exist in your local Communicare
installation directory in order for Clinical Audit to be able to collect data. The local Communicare
installation directory is usually C:\Program Files\Communicare.
If this file is not installed you will receive the following error message when you click the Clinical Audit
‘Collect’ button.
If you receive this message contact Communicare for assistance.
2.15 Medinet Requirements
The Medinet software application provides a new Reports menu option that performs the data
extraction for Clinical Audit. The data extraction process is described in the Medinet Mappings
document available from http://help.pencs.com.au/cat.htm
2.16 MedTech32 Requirements
MedTech32 provides an executable file (MT2PenCAT.exe) that must exist in a special MedTech32 CAT
extractor installation directory in order for Clinical Audit to be able to collect data. The installation
directory is usually C:\Program Files\Medtech Global Limited\MT2PENCAT.
If this file is not installed you will receive the an error message when you click the Clinical Audit ‘Collect’
button advising the file is missing.
If you receive this message contact MedTech32 for assistance.
13 June 2012
PAGE 13 of 33
PCS Clinical Audit Tool – User Guide – Part 1 INSTALLATION & CONFIGURATION
Version 3.4
3 INSTALLATION
The Clinical Audit Tool is available using Microsoft ClickOnce technology.
Using Internet Explorer and go to the URL
http://install.pencs.com.au/clickonce/clinicalaudit/publish.htm
Note: ClickOnce technology is not compatible with FireFox.
Click the ‘Install’ button
The application will be launched.
13 June 2012
PAGE 14 of 33
PCS Clinical Audit Tool – User Guide – Part 1 INSTALLATION & CONFIGURATION
Version 3.4
A dialog box will display showing you the progress of the install.
Once the install has completed the Clinical Audit Tool Login screen will appear.
Username and Password – enter the details provided to you.
Click ‘Ok’
13 June 2012
PAGE 15 of 33
PCS Clinical Audit Tool – User Guide – Part 1 INSTALLATION & CONFIGURATION
Version 3.4
The first time you login the Default Data Directory dialog box below will pop up.
This lets you know that the folder ‘C:\ClinicalAudit’ on your PC will be used to store the ‘snap-shots’ of
your data for analysis by the Clinical Audit Tool. If you prefer to store them somewhere else you can
change this by selecting Edit > Preferences from the top menu. Setting your preferences is explained in
the next section: ‘Setting Your Preferences’.
Click ‘Ok’
Each time you install a new update of Clinical Audit a Disclaimer dialogue box will be displayed.
Tick that you accept the disclaimer (the ‘OK’ button will become active)
Click ‘OK’ to continue or ‘Cancel’
Each time you install a new release of Clinical Audit a Release Notes dialogue box will be displayed.
Click ‘OK’ to continue
13 June 2012
PAGE 16 of 33
PCS Clinical Audit Tool – User Guide – Part 1 INSTALLATION & CONFIGURATION
Version 3.4
3.1 Installing to a Desktop PC
Clinical Audit needs to be installed under each profile (login) that will be using it on the PC.
That is, if multiple people log on to the one PC and they each want to use Clinical Audit the installation
needs to be repeated for each login. The application generally only installs once but ‘activates’ itself for
the other logins on additional installs.
3.2 Installing to Terminal Services or Citrix
The only differences to the preceding installation instructions are the following:
1.
Clinical Audit needs to be installed on the SERVER
•
Log on as the user via a Terminal Services or Citrix session and you will automatically be on
the server. Follow the installation instructions in the preceding section.
2.
Clinical Audit needs to be installed under each profile (login) that will be using it.
That is, if multiple people will be using it, the installation needs to be repeated for each login. The
application generally only installs once but ‘activates’ itself for the other logins on additional installs.
•
Log on as each user that will be using CAT and repeat the install instructions.
NOTE: If access privileges are an issue, then you will need to elevate the user’s privileges to install and
then restore them afterwards. This is a Microsoft configuration.
13 June 2012
PAGE 17 of 33
PCS Clinical Audit Tool – User Guide – Part 1 INSTALLATION & CONFIGURATION
Version 3.4
3.3 Proxy Servers
If you are having trouble installing the Clinical Audit Tool it may be because you a behind a Proxy
Server. Some Proxy Servers will prevent you from installing the Clinical Audit Tool which uses a very new
deployment technology developed by Microsoft.
When attempting to install one of the following may occur
•
you get a message like “the application failed to install”
•
you get a message indicating a “CGI error”
•
you can’t login even though you have the correct user name and password
These problems are most likely caused by your system’s Proxy Server.
If you cannot install the Tool, please contact your Network Administrator or IT support person and
advise them of this issue. There is a hot-fix supplied by Microsoft that may help in allowing installation
to occur behind your Proxy Server.
The hot-fix can be downloaded here:
http://www.myhealthepractice.com.au/DOTNETHOTFIX_Proxy_KB917952.zip
If your Network Administrator or IT support contact is unable to help please contact your division.
Follow these steps
1.
13 June 2012
Logon to the computer you are installing CAT onto as Administrator
2.
Download the zip file and extract the files
3.
Run the extracted .exe file
4.
Reboot the computer
PAGE 18 of 33
PCS Clinical Audit Tool – User Guide – Part 1 INSTALLATION & CONFIGURATION
Version 3.4
3.4 Using Clinical Audit Offline
You must install and login initially to Clinical Audit while connected to the Internet so your login details
can be validated.
You can then use CAT without being connected to the Internet for a period of 1 month.
When you are connected to the Internet CAT is able to verify your registration credentials are still valid
and check to see if there are any application updates available for download.
If you use CAT for a long period of time without connecting to the Internet then your credentials will
eventually expire. You will need to connect again and go to the CAT installation URL to download an
update.
Note: If you have a Desktop Shortcut to CAT and it does not work offline you simply need to delete
and recreate it.
3.5 CAT License Token
When your registration credentials are validated a CAT license token is generated for you ‘behind the
scenes’. This provides access to all the standard CAT functionality described in Part 2 of this manual:
‘PCS Clinical Audit Tool – User Guide Part 2 - Functionality’.
Custom CAT modules may be developed to meet specific user requirements. License tokens can be
issued to users that provide access to the standard functionality and the required additional modules.
If you are provided with a custom license token you can enter this by
13 June 2012
•
clicking the Help icon
•
clicking the ‘License Token’ button
•
pasting the license token into the License Token box.
PAGE 19 of 33
PCS Clinical Audit Tool – User Guide – Part 1 INSTALLATION & CONFIGURATION
Version 3.4
4 CONFIGURATION
Once the CAT software has been installed it is available from your Programs List.
Click Start > All Programs > Pen Computer Systems > PCS Clinical Audit
Enter your Account name and Authorisation key and click ‘OK’.
Once you have logged in the screen below will display. You will see the population figure is initially 0
because you have not yet collected data from your clinical desktop system.
13 June 2012
PAGE 20 of 33
PCS Clinical Audit Tool – User Guide – Part 1 INSTALLATION & CONFIGURATION
Version 3.4
4.1 Setting Your Preferences
Your Preferences are set by selecting Edit > Preferences from the top menu.
The Preferences Dialog box will be displayed.
GP Application
From the drop down list select the Clinical Desktop System you wish to collect from.
Then click the tab for that Clinical Desktop System to enter further values.
Practice Name and Practice ID Number
Fill in the values for these fields with your practice details. At a future time these values will be used if
your practice decides to participate in projects that send consented, de-identified patient clinical data
to your Division or other data repository.
Extract Directory
This folder is used to store the ‘snap-shots’ of your data for analysis by the Clinical Audit Tool. By
default the data will be stored in the folder ‘C:\ClinicalAudit’ on your PC. If you prefer to store them
somewhere else you can change this by clicking the ‘Browse’ button and choosing another Data
Folder Location. Click ‘OK’ when you have selected a new location. Click ‘OK’ to save this location and
close the Dialog box.
Saved Filters Directory
This folder is uses to store your saved filter criteria. Saved filters can be reloaded and run at a later
time. Details are provided in the ‘PCS Clinical Audit User Guide Part 2’.
13 June 2012
PAGE 21 of 33
PCS Clinical Audit Tool – User Guide – Part 1 INSTALLATION & CONFIGURATION
Version 3.4
4.1.1 Choosing your Clinical Desktop System
Once you have selected your Clinical Desktop System from the ‘Clinical Audit’ tab, click the
corresponding tab for that Clinical Desktop System to enter further configuration options.
Eg. GP Application ‘Medical Director’ selected, now click the corresponding tab
The options available for each system are explained in the following pages. Values will be defaulted
where possible.
Once you have selected and configured your Clinical Desktop system the details will be displayed
above the row of tabs.
Clinical Desktop System
Database Location
Medical Director users who are also using Pracsoft3 as their Billing software can configure
their preferences to include Pracsoft3 and collect billing data as well as clinical data. This is explained
further in the section 4.1.3.
13 June 2012
PAGE 22 of 33
PCS Clinical Audit Tool – User Guide – Part 1 INSTALLATION & CONFIGURATION
Version 3.4
Medical Director 2
Click the browse button to locate the Database Directory.
Medical Director 3
Select your Database Configuration from the drop-down list. These will match the configurations
you have available through the ‘HCN Maintenance’ icon on your desktop.
13 June 2012
PAGE 23 of 33
PCS Clinical Audit Tool – User Guide – Part 1 INSTALLATION & CONFIGURATION
Version 3.4
Best Practice
Select either ‘Live Data’ or ‘Sample Data’ from the drop down list.
Enter the BP Database Browser password that has been configured in BP.
Genie
There is no further set up for Genie.
The Genie software application itself provides a new Reports menu option that performs the data
extraction for Clinical Audit. This is described in the Genie Mappings document available from
http://help.pencs.com.au/cat.htm.
The Genie preference tab summarises the steps you should follow.
Ensure the Extract Directory on the ‘Clinical Audit’ tab matches the extract folder chosen in Genie.
Zedmed
Browse to the local Zedmed installation directory.
13 June 2012
PAGE 24 of 33
PCS Clinical Audit Tool – User Guide – Part 1 INSTALLATION & CONFIGURATION
Version 3.4
practiX
There is no further set up for practix.
The practiX software application itself provides a new Administration menu option that performs the
data extraction for Clinical Audit. This is described in the practiX Mappings document available from
http://help.pencs.com.au/cat.htm.
The practiX preference tab summarises the steps you should follow.
Ensure the Extract Directory on the ‘Clinical Audit’ tab matches the extract folder determined by
practiX.
Communicare
Browse to the local Communicare installation directory.
Enter your Communicare login details to allow automatic login to the exporter.
Medinet
There is no further set up for Medinet.
The Medinet software application itself provides a new Resources menu option that performs the
data extraction for Clinical Audit. This is described in the Medinet Mappings document available
from http://help.pencs.com.au/cat.htm.
The Medinet preference tab summarises the steps you should follow.
Ensure the Extract Directory on the ‘Clinical Audit’ tab matches the extract folder determined by
practiX.
13 June 2012
PAGE 25 of 33
PCS Clinical Audit Tool – User Guide – Part 1 INSTALLATION & CONFIGURATION
Version 3.4
MedTech32
Select either ‘Live Data’ or ‘Sample Data’ from the drop down list.
Browse to the MedTech32 CAT extractor installation directory.
13 June 2012
PAGE 26 of 33
PCS Clinical Audit Tool – User Guide – Part 1 INSTALLATION & CONFIGURATION
Version 3.4
4.1.2 Choosing a preferred Data Extract Directory
If there are a few clinicians in the practice that are using CAT then choose a network drive that is
accessible to all.
Use the ‘Edit > Preferences’ option to set the same ‘Extract Directory’ for each user.
More than 1 user can work with the same snapshot at the same time.
Genie/practiX users will need to make sure this folder matches the folder they select from the
Genie/practiX application when they do the extract.
This is described in the Appendices section of this manual.
13 June 2012
PAGE 27 of 33
PCS Clinical Audit Tool – User Guide – Part 1 INSTALLATION & CONFIGURATION
Version 3.4
4.1.3 Choosing and configuring your Billing System
The following billing is supported:
• MD2 or MD3 and Pracsoft
• BP and BP Management
• practiX
• Communicare
• Zedmed
• MedTech32
MD and BP users will need to configure their preferences for their Billing Software.
MD2 and Pracsoft3
From the Medical Director 2 tab:
• Choose ‘Pracsoft3’ from the Billing Software drop-down list
• Go to the Medical Director 3 tab
From the Medical Director 3 tab:
• Choose the Database Configuration (this required because Pracsoft3 shares the same database
as MD3 - this is the only MD3 field required)
13 June 2012
PAGE 28 of 33
PCS Clinical Audit Tool – User Guide – Part 1 INSTALLATION & CONFIGURATION
Version 3.4
MD3 and Pracsoft3
From the Medical Director 3 tab:
• Choose ‘Pracsoft3’ from the Billing Software drop-down list
• The Document Server and Document Library should default correctly (these can be updated if
required at a later date)
13 June 2012
PAGE 29 of 33
PCS Clinical Audit Tool – User Guide – Part 1 INSTALLATION & CONFIGURATION
Version 3.4
BP and BP Management
From the Best Practice tab:
• Choose ‘Best Practice’ from the Billing Software drop-down list
Best Practice and Pracsoft3
From the Best Practice tab:
• Choose ‘Pracsoft3’ from the Billing Software drop-down list
• Go to the Medical Director 3 tab
From the Medical Director 3 tab:
• Choose the Database Configuration (this required because Pracsoft3 shares the same database
as MD3 - this is the only MD3 field required)
13 June 2012
PAGE 30 of 33
PCS Clinical Audit Tool – User Guide – Part 1 INSTALLATION & CONFIGURATION
Version 3.4
5 CAT USER INTERFACE
Once the CAT software has been installed it is available from your Programs List.
•
Click Start > All Programs > Pen Computer Systems > PCS Clinical Audit
•
Enter your Account name and Authorisation key and click ‘OK’.
5.1 Navigating the CAT User Interface
Click the ‘View Extracts’ and the ‘View Filter’ buttons to display all the areas of the CAT user interface.
The screen is divided into 3 sections:
•
Data Snap-shots (or Extracts) collected for analysis (Left Hand Panel)
•
Data Filters (Top Right Panel)
•
Data Reports (Bottom Right Panel)
It is handy to be able to hide the data collection and data filter areas of the screen in order to make best
use of your screen space to view the data results. You can toggle between the View/Hide modes at any
time. Once you have logged in the screen below will display.
You will see the population figure is initially 0 because you have not yet collected data from your clinical
desktop system or loaded an existing extract file.
13 June 2012
PAGE 31 of 33
PCS Clinical Audit Tool – User Guide – Part 1 INSTALLATION & CONFIGURATION
Version 3.4
6 COLLECTING DATA SETS
NOTE:
Before you start collecting data sets ensure you have set up your preferences to point to the correct
clinical desktop system for your practice. (See ‘Setting Your Preferences’ for details about how to do
this.)
A data set is collected by clicking the ‘Collect’ button at the top left of the screen.
Once you click the ‘Collect’ button you will see the ‘status bar’ in the top right hand corner of the screen
flashing while the data is retrieved from the clinical desktop system.
•
Genie, practiX and Medinet users please note that the data collection is performed from within
the your clinical application. Clicking the CAT ‘Collect’ button at the top left of the screen will
provide you with the summary steps on how this is done within Genie. Step by step details are
provided in the Appendices section of the ‘PCS Clinical Audit Tool User Guide Part 2’.
The data set collected is saved in your preferred data folder (see ‘Setting Your Preferences’ for more
information).
When the data retrieval has completed you will see an entry in the left hand column. The data is
stored as a ‘snap-shot’ on your PC. You can use this ‘snap-shot’ for analysis at any time in the future.
Tip: To refresh the list of ‘snap-shots’ click Edit > Preferences and click ‘OK’.
Each entry displays the date/time of collection, the number of records retrieved and the machine name
on which the collection was done.
You can collect as many data sets as you wish over time. Each data set will be listed as an entry in the left
hand column.
To analyse a specific data set click on the entry for that data set. It will become highlighted and you will
see the ‘status bar’ in the top right hand corner of the screen flashing while the data is reloaded from the
‘snap-shot’ into Clinical Audit.
13 June 2012
PAGE 32 of 33
PCS Clinical Audit Tool – User Guide – Part 1 INSTALLATION & CONFIGURATION
Version 3.4
6.1 What data is collected
Data is only collected for patients who are active in your Clinical system. Data for patients who are
deceased or have been made inactive is not collected unless it is required for reporting and the practice
has set this option on (available MD/BP only)
This means when you are analysing your data using CAT you are only seeing patients who are currently
marked as active in your Clinical system. You may find patients in CAT that you know are no longer
active at your practice. If you inactivate them in your Clinical system they will be excluded from future
data collections.
6.2 How is the data stored
The collect saves 2 xml data files to your preferred data folder. One file is pure Clinical data and has no
identifiable patient information. This is called the DATA file. The other file is the LINK file and contains
all the patient identifiable data. The LINK file is only used when you want to re-identify a list of patients
that make up a segment of a graph.
In your preferred data folder the files look like this:
6.3 Existing data set compatibility with changes to CAT
CAT version 2 has new filters and reports. Additional data is collected by version 2 for these new
functions. Your CAT version 1 extracts will not have the additional data needed to make these functions
work.
You can load up your version 1 extracts and analyse them as before - the new functionality will
inactivated for these extracts by being greyed out.
7 DATA FILTERING AND DATA SET ANALYSIS
These sections are included in the ‘PCS Clinical Audit User Guide Part 2’.
13 June 2012
PAGE 33 of 33