1
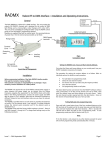
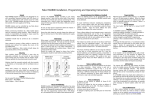
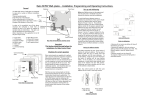
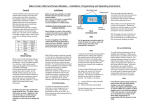
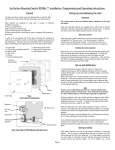
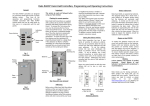
RAV232
Rako RS232 to Rakom RF Interface – Installation and Operating Instructions.
General
Note:
The Rako RS232 to Rakom RF interface is designed to be connected to
the serial output of a PC or RS232 output from audio visual controllers.
This can be used from a PC to set up and program a Rako system in
conjunction with the Rakosoft software package or stand alone as part of
an audio visual installation.
Modules are supplied fitted with an internal aerial. For transmission
distances of greater than 15m or for audio visual installations the external
aerial provided should be fitted.
When the RAV232 is powered up the blue LED remains on and goes off
when a message is being sent. If this does not occur an external power
supply maybe required. Rako ref: RAPSU or equivalent. (please contact
Rako for further details. Tel 01634 226666)
Mounting Holes
Clamping bar
Fixing Screws
Terminal
Cover
Protective
Insert
Interface
Housing
Ext aerial &
PSU Terminals
9 way D type
connector
9 way D Type
connector
Fig 2.
Termination Area
RAPSU
power
Supply unit
+12V DC
0V
Fig 1.
Front View of Components
Installation
External Aerial
To be mounted at 90° to the direction of the receivers
Before commencing installation of the Rako RS232 interface module first
read this instruction manual carefully.
Rako Controls Ltd accepts no responsibility for any damage or injury
caused by incorrect installation of a Rako product.
The Rako RS232 to Rakom radio interface is designed to be used in one
of two ways. The first is for the set-up and programming of the Rako
system from a PC and second, as part of an audio visual system.
D Type connector
Fig 3.
Connection Detail
Using the RAV232 with a PC
The RAV232 can be used to set-up and program a Rako system in
conjunction with the RASOFT software package (see separate software
user guide). The 9 way D type connector is plugged into the serial out
put or USB port (using a separate serial to USB adaptor) on your PC.
Depending on your PC , sufficient power will be derived without the
requirement for an additional power supply.
The RAV232 is provided with an in built aerial so providing the distances
are within 15m the external aerial is not required. For greater distances
remove the internal aerial connection and fit the external aerial as
detailed in Fig 3.
Your Rako wireless interface is now ready for operation.
Using the RAV232 as part of an Audio Visual System
The RAV232 can be used as a wireless interface from the RS232 output
of an audio visual controller to the Rako lighting control system. It is
recommended that in this mode, the external power supply unit (Rako
ref: RAPSU or equivalent) is used and that the external aerial be fitted,
see Fig 3.
Baud Rates
The RAV232 is configured to run at a Baud rate of 9600 bps. This can be
changed to 1200 bps using Rasoft or Hyperterminal. To change the Baud
rate using Hyperterminal connect the RAV232 and enter the following
command: Baud 12.
Page 1
To convert the unit back to operation at 9600 enter: Baud 96.
To activate the changes the unit must then undergo a power cycle by
disconnecting the power and then reconnecting before use.
The same function can be performed from RASOFT, with the RAV232
connected open the diagnostic window in HELP/DIAGNOSTIC and type
either Baud 12 or Baud 96 in the command line and then hit enter or
carriage return.
Many functions within the Rako system can be selected from the AV
controller using the configuration and ASCII codes as detailed in the Rako
RS232 Command Line document. (for further information please contact
Rako controls on Tel: 01634 226666 or visit our website:
www.rakocontrols.com)
Page 2