1
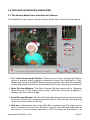
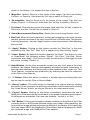
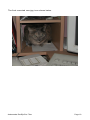
RedEyePro
FILTER
USER’S MANUAL
Copyright © 2002
Andromeda Software Inc.
Licensing and Copyright Agreement
Copyright ©2002 by Andromeda Software Inc. All rights reserved. Except as
permitted under copyright law, no part of the program or this user manual may be
reproduced or distributed in any form or by any means without the prior written
permission of Andromeda Software Inc. The program, and this manual, are licensed
only for individual use on a single computer.
Limitations on Warranty and Liability
Neither Andromeda Software Inc., nor its distributors and dealers, make any
warranties or representations, either expressed or implied, as to the software and
documentation, including without limitation, the condition of software and implied
warranties of its merchantability or fitness for a particular purpose. Andromeda
Software Inc. shall not be liable for any lost profits or for any direct, indirect, incidental,
consequential or other damages suffered by licensee or others resulting from the
use of the program or arising out of any breach or warranty.
Trademarks
Series 1 Photography Filters, Series 2 Three-D Filter, Series Three-D Luxe Filter,
Series 3 Screens Filter, Series 4 Techtures Filter, Andromeda Shadow Filter,
Andromeda Velociraptor Filter, Andromeda Varifocus Filter, Andromeda Cutline
Filter, Andromeda Measurement Filter, Andromeda Lens Doc Filter, Andromeda
Perspective Filter, Andromeda Etch Filter, Andromeda PhotoTiler Plug-in,
Andromeda ScatterLight Filter, Andromeda Series and Suite Filters are trademarks
of Andromeda Software Inc. Adobe Photoshop is a trademark of Adobe Systems
Inc. All other products are trademarks of their respective companies.
Andromeda RedEyePro Filter developed by:
Dave Dyer, Donn Gladstone, Lou Ann Barbeau, Sumeet Pasricha
UI Design: Lou Ann Barbeau
Technical Completion: Lou Ann Barbeau
Quality Assurance: Third Eye Consultancy, Guy McCool
Documentation: Third Eye Consultancy
Sales & Marketing Support: Jane Narramore, Lee Soriano, Jason Zazzi, Skylar
Brazell
©2002
Andromeda Software Inc.
699 Hampshire Rd., Suite 109
Thousand Oaks, CA 91361 USA.
www.andromeda.com
Tel No. (805) 379 4109
Fax No. (805) 379 5253
Andromeda RedEyePro Filter
Page 2
Table of Contents
1.0 INTRODUCTION ................................................................................ 4
1.1 About the filter ..................................................................... 4
1.2 Features ............................................................................... 4
2.0 INSTALLATION & REGISTRATION ................................................... 5
2.1 Installation (Macintosh and Windows versions) ................ 5
3.0 THE USER INTERFACES ANNOTATED ............................................ 6
3.1 The Novice Mode User Interface at a Glance ...................... 6
3.2 The Expert Mode User Interface at a Glance ...................... 8
4.0 NOVICE MODE FILTER SESSION .................................................. 10
5.0 EXPERT MODE FILTER SESSION ................................................. 14
Andromeda RedEyePro Filter
Page 3
1.0 INTRODUCTION
Andromeda Software Inc., Westlake Village, CA, has released a new multi-platform,
Adobe Photoshop compatible plug-in: the new Andromeda RedEyePro Filter.
RedEyePro Filter is included in the Photographic Tools & Lens Effects Software
collection. RedEyePro will be compatible with Photoshop 7.0 and all versions of
Windows and Mac including OSX.
1.1 About the filter
The RedEyePro Filter is a Photoshop compatible “Plug-in” that provides the
capability for the user to digitally correct the “Red Eye” caused in photographs.
Red Eye is caused by light reflected off the subjects retina when a flash picture is
taken in low light. While some cameras offer “Red Eye” reduction as a feature, it
can only reduce the problem, not eliminate it. To get rid of “Red Eye” completely,
RedEyePro comes to the rescue. Finally, RedEyePro is the direct method for easy
removal of “Red Eye” for Photoshop users.
1.2 Features
- Professional Quality
- Novice & Expert Mode
- Re-sizable Box & Paintbrush tools
- Fixes Human and Animal Eyes
- Fixes Circular and Non-circular “Red Eye”
- Preserves remaining Iris color and transitions
- Preserves glints and reflective details
- Selective Unapply and Unpaint tools
- Corrects RGB and CMYK files
Andromeda RedEyePro Filter
Page 4
2.0 INSTALLATION & REGISTRATION
Note : The “Plug-in” cannot be installed by dragging or copying it to the appropriate
Photoshop Folder or Directory. Use the Andromeda installer.
2.1 Installation (Macintosh and Windows versions)
1. Install Adobe Photoshop by following the installation instructions provided by
Adobe.
2. Start RedEyePro installation: Insert the Andromeda RedEyePro Product disk in
the drive or download the product from www.andromeda.com and double click the
Andromeda installer icon.
3. The Andromeda RedEyePro setup window appears. Click “Next”. A Welcome
window appears which will ask the user to exit all windows programs before
running the setup. Click “Cancel” to quit setup or click “Next” to continue with the
setup program.
4. The next window displays important notes about the plug-in. Click “Next” to
continue. This displays the Sofware Licence Agreement. Click “Yes” to accept the
agreement and proceed with the setup or click “No” to decline the agreement and
quit setup.
5. The installer searches your computer for Photoshop. If it is found, the installer
looks for and will display the directory path into Photoshop plug-ins folder and ask
where you want to install the filter showing you the path it found. If you are using
another compatible host application, or if Photoshop is not found, or if you want to
change the directory where the filter will be installed, use the navigation window to
instruct the installer where to install the filter and click the install button. If you are
not sure, check the manual of your host program to find out how to install plug-ins.
6. On successful installation click “OK” to exit the installer. Previous versions of the
Andromeda RedEyePro Filter or any demo versions will be overwritten if installed
IN THE SAME LOCATION. After installation has completed, restart your host
program.
To confirm the installation:
- Open Photoshop
- Open any file
- Select “Filters/Andromeda”
The Plug-in RedEyePro should be seen.
7. Enter the filter. A dialog box appears; input Name, Company and Serial Number.
(Hit the TAB key to move to the next field). The Registration Number will be provided
on the RedEyePro Box, back of the Disk, on the license agreement envelope, or
as part of the on-line purchase procedure. Click OK or hit Return key when done.
You will be able to enter the filter.
Andromeda RedEyePro Filter
Page 5
3.0 THE USER INTERFACES ANNOTATED
3.1 The Novice Mode User Interface at a Glance
The RedEyePro filter opens with the Novice Mode User Interface shown below:
1. The “About Andromeda” Button: Clicking on the “About Andromeda” Button
opens a window which displays information about the RedEyePro Filter.
Additionally, there is a PREFS button that provides the User with the capability
to set preferences for the Filter, customized to the User’s computing environment.
2. Main Preview Window: The Main Preview Window opens with a “Sampled
Down Preview” of the original input image. When the correction is applied, it
displays the final output image.
3. Small Preview Window: The Small Preview Window previews the area covered
by the box or the brush. It also previews the effect. In box mode, click and drag
to fine tune the position of the box.
4. Box size: Indicates the size of the “Red Eye” removal circle. The slider can be
used to change the size of the “Red Eye” removal circle. Minimum diameter of
the circle is 1 and maximum diameter is 120. Can also use the Hotkey ‘z’ to
Andromeda RedEyePro Filter
Page 6
shrink or the Hotkey ‘x’ to expand the size of the box.
5. Magnifier: Used to Zoom-in to the center of the image. Can also use Hotkey
‘Control+’ to Zoom-in. Hold down the ‘Alt’ key to switch to Zoom-out.
6. De-magnifier: Used to Zoom-out to the center of the image. Can also use
Hotkey ‘Control-’ to Zoom-out. Hold down the ‘Alt’ key to switch to Zoom-in.
7. The Hand: Click and drag to pan the image. Hold down the ‘Alt’ key to switch to
Zoom-out, and the ‘Control’ key to switch to Zoom-in.
8. Zoom Measurement Display Box: Shows the current magnification level.
9. Box Tool: When this tool is selected, clicking and dragging in the main preview
window places a preview of the color removal from a circular area. The preview
is strictly temporary. Use the “Apply” button to make it permanent, after adjusting
the box size.
10. “Apply” Button: Clicking on this button corrects the “Red Eye” in the area
selected by the “Box Tool”. “Box Tool” is applied only after clicking “Apply”.
11. “Undo” Button: By default this button displays “No Undo”. This button is used
to “Undo/Redo” the following actions: ‘Revert’, ‘Set Color’, ‘Set Red’, ‘Brush
corrections’ and ‘Apply’. Click once to undo the last action. Click again to redo
the action. (Hotkey: ‘Control z’)
12. Help Window: As the User moves the cursor over any “Hot” area in the User
Interface, the Helper Window automatically provides valuable information to
the User that describes the functionality of the enabled button, slider, etc. This
“Auto Feature” increases user productivity by reducing the need for reference
to the Filter’s User Manual.
13. “?” Button: When this button is clicked, a window opens providing hints and
tips on how to use the Filter in Novice Mode.
14. “Revert” button: The entire image is reverted to its original state by clicking
this button. Once reverted, the previous corrections can be restored by clicking
the “Undo Revert” button, as long as Revert is the most recent action.
15. “Cancel” Button: Clicking on this button immediately terminates the use of
RedEyePro Filter and returns control back to the graphic software host program.
All changes are discarded. Can also use Hotkeys: ‘ control q’ or ‘Esc’.
16. “OK” Button: Clicking on this button initiates rendering of the effect of the Filter
currently shown in the Preview Window on the input image. After rendering, the
host program image window will show the effects of the render. At this point the
User can either UNDO the RedEyePro Filter effects that are displayed or SAVE
the rendered image with RedEyePro Filter applied.
Andromeda RedEyePro Filter
Page 7
3.2 The Expert Mode User Interface at a Glance
Clicking on the “Expert Mode” button converts the “Novice Mode” User Interface
as shown below.
In addition to the buttons present in the “Novice Mode” the “Expert Mode” has the
following additional buttons.
1. Box / Brush size: Indicates the size of the “Red Eye” removal circle. The slider
can be used to change the size of the “Red Eye” removal circle. Minimum
diameter of the circle is 1 and maximum diameter is 120. Can also use the
Hotkey ‘z’ to shrink or the Hotkey ‘x’ to expand the size of the Box or Brush.
2. Box Group: This group consists of “Box” and “Unbox” tools. The controls in
this box affect the actual corrections being performed.
2.1. Box - When this tool is selected, clicking and dragging in the main preview
window places a preview of the color removal from the circular area. The
preview is strictly temporary. Use the “Apply” button to make it permanent,
after adjusting the brush size.
Andromeda RedEyePro Filter
Page 8
2.2. Unbox - When this tool is selected, clicking and dragging in the main preview
window places a preview of restoring the original image from a circular area.
The preview is strictly temporary. To make it permanent click on “Apply”.
3. “Apply” Button: Clicking on this button corrects the “Red Eye” in the area
selected by the “Box Tool” or “Brush Tool”. “Box Tool” is applied only after
clicking “Apply”. The “Brush Tool” is applied by clicking the mouse.
4. Brush group: Only available in expert mode. When a brush is selected,
moving the mouse over the main preview window gives a continuous preview
of the effect of a brush stroke and the effect is applied.
4.1. Brush - In this mode, a brush stroke removes the selected color from a circular
area.
4.2. Unbrush - In this mode, the unbrush restores the original content in areas
where it has been removed by the brush. Use this mode to restore areas
accidentally smeared by the brush or the box by dragging the brush over the
area.
5. Color group: Only available or relevant in expert mode. Allows to see and
select the color to be removed. In novice mode, the color is always pure red.
5.1. Eyedropper - Puts the main preview in color select mode. Clicking will set the
color to be removed.
5.2. Swatch - Displays the color to be removed. Clicking on this control brings up
a color picker.
5.3. Reset Eyedropper - Resets the Eyedropper color to pure red.
Andromeda RedEyePro Filter
Page 9
4.0 NOVICE MODE FILTER SESSION
OBJECTIVE: The objective of this session is to digitally correct the red eye caused
in photographs.
1. Open the child.jpg provided in the Session Images Folder with this product.
2. The RedEyePro Filter is opened by clicking on the Filter Pull-down Menu and
selecting Filters --> Andromeda --> RedEyePro. The child.jpg is displayed in the
Filter’s Preview Window.
Andromeda RedEyePro Filter
Page 10
3. Click the Zoom-in tool and click on the eyes of the boy to Zoom-in so that the
area requiring correction can be seen clearly. Also use the pan tool to center the
image.
Andromeda RedEyePro Filter
Page 11
4. Click on the RedEye Box tool and position the tool exactly on the red portion of
the eye to be corrected and click to preview the correction. Adjust the size of the
box with the slider so that the red part of the eye is fully treated without affecting the
other areas. Adjust the slider by dragging the “Box Size” slider or by using the
Hotkeys ‘z’ or ‘x’ to shrink or expand respectively.
5. Click on “Apply” to correct the Red Eye. Repeat the same procedure for the other
eye also.
6. If the correction looks satisfactory in the Main Preview Window, click “OK” and
the corrected image file will be rendered. Otherwise, click “Undo” to undo the most
recent correction applied or click “Revert” to return the image to its original input
state.
In Novice Mode the color to be corrected can only be pure red.
Andromeda RedEyePro Filter
Page 12
The final corrected Red Eye of the child.jpg is shown below.
Andromeda RedEyePro Filter
Page 13
5.0 EXPERT MODE FILTER SESSION
Novice Mode vs. Expert Mode. When should Expert Mode be used?
a. The Novice Mode can be used in cases where the entire iris is red and needs
correction. Novice mode has only the “Box Tool” and the “Box Tool” applies
correction in a circular area. But in cases where only a portion of the iris needs
correction (non-circular areas), the Expert Mode Brush Tool should be used.
b. The Novice Mode can be used in cases where the color to be corrected is only
red. But in Expert Mode, using the Color Group Tools, colors other than red can be
corrected.
OBJECTIVE : The objective of this session is to digitally correct the “Red Eye”
caused in cat’s eyes and to explain the use of the Brush, Unbrush and the
Eyedropper tool in correcting the Red Eye.
1. Open the coco.jpg provided in the Session Images Folder with this product.
Andromeda RedEyePro Filter
Page 14
2. The RedEyePro Filter is opened by clicking on the filter pull-down menu and
selecting Filters --> Andromeda --> RedEyePro. The coco.jpg is displayed in the
Filter’s Preview Window. Click on “Expert Mode”.
3. Click the Zoom-in tool and click on the eyes to Zoom-in so that the area requiring
correction can be clearly seen. Use the Pan tool to center the eye.
Andromeda RedEyePro Filter
Page 15
4. Here the color to be corrected is green. Select the Eye Dropper tool. Click on the
eye in the Main Preview window and it sets the color to be removed. Here the color
of the swatch is set to green.
Andromeda RedEyePro Filter
Page 16
4. Select the RedEye Brush Tool. Adjust the tool radius to be smaller than the area
requiring correction. Click and drag on the eyes with the Brush Tool to correct the
color.
Repeat the above steps for the other eye also.
Andromeda RedEyePro Filter
Page 17
5. Areas accidentally smeared by the brush or the box can be restored by dragging
the “Unbrush” tool over the area. In these areas the “Unbrush” restores the original
content where it had been modified by the brush.
6. If the correction looks satisfactory in the Main Preview Window, click “OK” and
the corrected image file will be rendered. Otherwise, click “Undo” to undo the most
recent correction applied or click “Revert” to return the image to its original input
state.
Andromeda RedEyePro Filter
Page 18
The final corrected coco.jpg is as shown below.
Andromeda RedEyePro Filter
Page 19