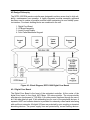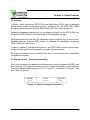
1
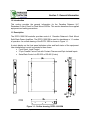
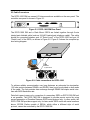
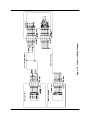
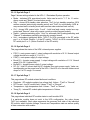
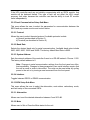
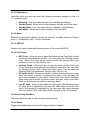
Operations Manual
RCP2-1000 Remote Controller
for Rack Mount SSPAs
PARADISE
DATACOM
RCP2-1000
SSPA REMOTE
CONTROLLER
Paradise Datacom LLC
328 Innovation Blvd.
State College, PA 16803 USA
Email: [email protected]
203987 Rev A
Phone:
(814) 238-3450
Fax:
(814) 238-3829
Web: www.paradisedata.com
ECO 3171
11/28/2005
PROPRIETARY NOTICE
Paradise Datacom has made every effort to ensure that the instructions contained in
this document are adequate and free of errors and omissions. Paradise Datacom will, if
necessary, explain issues, which may not be covered by this document. Paradise
Datacom’s liability for any errors in this document is limited to the correction of errors
and the aforementioned advisory services.
This document has been prepared to be used by professional and properly trained
personnel, and the customer assumes full responsibility when using this document.
Paradise Datacom welcomes customer comments as part of the process of continual
development and improvement of the documentation in the best way possible from the
user’s viewpoint. Please submit your comments to your Paradise Datacom sales
representative at the following address:
328 Innovation Blvd.
State College, PA 16803 USA
Telephone: 814-238-3450
Fax: 814-238-3829
E-mail: [email protected]
To allow for the introduction of design improvements, specifications are subject to
change without notice.
© 2005 Paradise Datacom LLC
Printed in the USA
2
203987 Rev A
RCP2-1000 RM Remote Controller Operations Manual
Table of Contents
Table of Contents ........................................................................................................ 3
Section 1: General Information .................................................................................. 7
1.0 Introduction ................................................................................................... 7
1.1 Description.................................................................................................... 7
1.2 Equipment Supplied...................................................................................... 8
1.3 Safety Considerations................................................................................... 8
1.3.1 High Voltage Hazards................................................................................ 8
1.3.2 Electrical Discharge Hazards..................................................................... 9
1.4 Specification Summary ................................................................................. 9
Section 2: Installation ............................................................................................... 11
2.0 Introduction ................................................................................................. 11
2.1 Inspection ................................................................................................... 11
2.2 Mounting..................................................................................................... 11
2.3 Storage and Shipment ................................................................................ 11
2.4 Prime Power Connection ............................................................................ 11
2.5 Cable Connectors ....................................................................................... 12
2.5.1 Serial Port, Main (J4) ............................................................................... 14
2.5.2 Serial Port, Local (J5) .............................................................................. 15
2.5.3 Program Port (J6) .................................................................................... 15
2.5.4 Parallel I/O Connector (J7) ...................................................................... 15
Section 3: RCP2-1000 RM Front Panel Operation .................................................. 17
3.0 Introduction ................................................................................................. 17
3.1 RCP2-1000 RM Front Panel Description .................................................... 17
3.1.1 System Identification................................................................................ 17
3.1.2 Fault Indicators ........................................................................................ 17
3.1.3 SSPA Online Indicator ............................................................................. 17
3.1.4 Liquid Crystal Display .............................................................................. 18
3.1.5 Main Menu Key........................................................................................ 18
3.1.6 Local / Remote Key ................................................................................. 18
3.1.7 Mute / Unmute Key .................................................................................. 18
3.1.8 Navigation Keys....................................................................................... 18
3.1.9 Enter Key ................................................................................................. 18
3.2 Main Menu .................................................................................................. 19
3.2.1 Sys Info.................................................................................................... 20
3.2.1.1 Sys Info Page 1 .................................................................................... 20
3.2.1.2 Sys Info Page 2 .................................................................................... 21
3.2.1.3 Sys Info Page 3 .................................................................................... 21
3.2.1.4 Sys Info Page 4 .................................................................................... 21
3.2.1.5 Sys Info Page 5 .................................................................................... 22
RCP2-1000 RM Remote Controller Operations Manual
203987 Rev A
3
3.2.1.6 Sys Info Page 6 .................................................................................... 22
3.2.1.7 Sys Info Page 7 .................................................................................... 22
3.2.1.8 Sys Info Page 8 .................................................................................... 22
3.2.2 Panel Communication Setup Sub-Menu.................................................. 23
3.2.2.1 Protocol................................................................................................. 23
3.2.2.2 Baud Rate............................................................................................. 23
3.2.2.3 System Address.................................................................................... 23
3.2.2.4 Interface................................................................................................ 23
3.2.3 SSPA Setup Sub-Menu ........................................................................... 23
3.2.3.1 Attenuation............................................................................................ 23
3.2.3.2 Mute...................................................................................................... 23
3.2.3.3 Redundancy.......................................................................................... 24
3.2.3.4 Mode..................................................................................................... 24
3.2.3.5 SSPA ID................................................................................................ 24
3.2.3.6 Fault Setup ........................................................................................... 24
3.2.4 Panel Setup Sub-Menu............................................................................ 24
3.2.4.1 Buzzer .................................................................................................. 24
3.2.4.2 Fault Latch ............................................................................................ 25
3.2.4.3 Control Mode ........................................................................................ 25
3.2.4.4 Panel ID ................................................................................................ 25
3.2.5 Options Sub-Menu................................................................................... 25
3.2.5.1 Backup User Settings ........................................................................... 25
3.2.5.2 Restore ................................................................................................. 25
3.2.5.3 Lamp Test............................................................................................. 25
3.2.5.4 Password .............................................................................................. 25
3.2.5.5 Reset .................................................................................................... 25
Section 4: Theory of Operation ................................................................................ 27
4.0 Introduction ................................................................................................. 27
4.1 Fault Analysis and Condition Tracking........................................................ 27
4.1.1 Summary Fault ........................................................................................ 27
4.1.2 Power Supply Fault.................................................................................. 27
4.1.3 Voltage Regulator Output Low Fault........................................................ 28
4.1.4 High Temperature Fault ........................................................................... 28
4.1.5 Low DC Current Fault .............................................................................. 28
4.1.6 Low Forward RF Fault ............................................................................. 28
4.1.7 BUC Fault ................................................................................................ 28
4.1.8 Auxiliary Fault .......................................................................................... 28
4.1.9 RF Switch Fault ....................................................................................... 29
4.1.10 Serial Connection Fault ......................................................................... 29
4.2 Design Philosophy ...................................................................................... 29
4.2.1 Digital Core Board ................................................................................... 30
4.2.2 I/O Board Assembly................................................................................. 30
4.2.3 Liquid Crystal Display .............................................................................. 31
4.2.4 Front Panel Membrane Keypad ............................................................... 31
4
203987 Rev A
RCP2-1000 RM Remote Controller Operations Manual
Section 5: Serial Protocol ......................................................................................... 33
5.0 Introduction ................................................................................................. 33
5.1 Remote Control - Serial Communication .................................................... 34
5.1.1 Header Packet ......................................................................................... 34
5.1.1.1 Frame Sync Word................................................................................. 34
5.1.1.2 Destination Address.............................................................................. 34
5.1.1.3 Source Address .................................................................................... 34
5.1.2 Data Packet ............................................................................................. 35
5.1.2.1 Protocol ID ............................................................................................ 35
5.1.2.2 Request ID............................................................................................ 35
5.1.2.3 Command ............................................................................................. 35
5.1.2.4 Data Tag ............................................................................................... 36
5.1.2.5 Error Status / Data Address .................................................................. 36
5.1.2.6 Data Length .......................................................................................... 37
5.1.2.7 Data Field ............................................................................................. 37
5.1.3 Trailer Packet........................................................................................... 37
5.1.3.1 Frame Check ........................................................................................ 38
5.1.4 Timing Issues........................................................................................... 38
Section 6: Terminal Mode ......................................................................................... 39
Appendix A Specifications ...................................................................................... 43
RCP2-1000 RM Remote Controller Operations Manual
203987 Rev A
5
Figures
Figure 1-1: Outline Drawing of RCP2-1000 RM ................................................. 7
Figure 2-1: RCP2-1000 RM Rear Panel ........................................................... 12
Figure 2-2: Cable Connections for RCP2-1000 RM ......................................... 12
Figure 2-3: Top Level Wiring Diagram .............................................................. 13
Figure 3-1: RCP2-1000 RM Front Panel........................................................... 17
Figure 3-2: RCP2-1000 Menu Structure ........................................................... 19
Figure 3-3: RCP2-1000 SysInfo Page Structure............................................... 20
Figure 4-1: Block Diagram, RCP2-1000 Digital Core Board ............................. 30
Figure 5-1: Basic Communication Packet......................................................... 33
Figure 5-2: Header Packet................................................................................ 35
Figure 5-3: Data Packet.................................................................................... 35
Figure 5-4: Trailer Packet ................................................................................. 38
Figure 6-1: Connection Description Window..................................................... 40
Figure 6-2: Connection Window ....................................................................... 40
Figure 6-3: COM3 Properties Window .............................................................. 41
Figure 6-4: ASCII Setup Window ...................................................................... 41
Figure 6-5: Hyperterminal Example .................................................................. 42
Tables
Table 1-1: RCP2-1000 RM Specification Summary............................................ 9
Table 2-1: Main Serial Port Pin Out .................................................................. 14
Table 2-2: Local Serial Port Pin Out ................................................................. 15
Table 2-3: Parallel I/O Connector Pin Out ........................................................ 16
Table 5-1: Command Byte Values .................................................................... 35
Table 5-2: Data Tag Byte Values...................................................................... 36
Table 5-3: Error Status Bytes ........................................................................... 37
6
203987 Rev A
RCP2-1000 RM Remote Controller Operations Manual
Section 1: General Information
1.0 Introduction
This section provides the general information for the Paradise Datacom LLC
Redundant Control Panel for Rack Mount SSPAs. This section describes the supplied
equipment and safety precautions.
1.1 Description
The RCP2-1000 RM controller provides control of Paradise Datacom’s Rack Mount
Solid State Power Amplifiers. The RCP2-1000 RM is used for standalone or 1:1 modes
of operation. An outline drawing of the RCP2-1000 is shown in Figure 1-1.
A mimic display on the front panel indicates online and fault status of the equipment.
User interface and control is provided in three forms:
• Front Panel, Local Control
• 37-pin Parallel Control Port with Contact Closures and Opto Isolated Inputs
• Serial Data Control via RS-232 or RS-485 (2-wire)
J1
PS1
J5 SERIAL LOCAL
J7 PARALLEL I/O
J4 SERIAL MAIN
J6 PROGRAM
PARADISE
DATACOM
RCP2-1000
SSPA REMOTE
CONTROLLER
J9 ETHERNET
Figure 1-1: Outline drawing, RCP2-1000-RM
RCP2-1000 RM Remote Controller Operations Manual
203987 Rev A
7
1.2 Equipment Supplied
The following equipment is supplied with each unit:
•
•
•
RCP2-1000 RM Redundant System Controller (1 RU high)
(2) IEC Line Cord Sets
Operations Manual (203987) RCP2-1000 RM System Controller
Paradise Data can provide the following optional equipment:
•
•
Rack Slides
Mating cable for Rack Mount SSPA and RCP2-1000, (Part Number
L201777).
1.3 Safety Considerations
Potential safety hazards exist unless proper precautions are observed when working
with this unit. To ensure safe operation, the user must follow the information, cautions
and warnings provided in this manual as well as the warning labels placed on the unit
itself.
1.3.1 High Voltage Hazards
High Voltage for the purpose of this section is any voltage in excess of 30 volts. Voltages above this value can be hazardous and even lethal under certain circumstances.
Care should be taken when working with devices that operate at high voltage.
•
•
•
•
All probes and tools that contact the equipment should be properly insulated
to prevent the operator from coming into contact with the voltage.
The work area should be secure and free from non-essential items.
Operators should never work alone on high voltage devices. There should
always be another person present in the same work area to assist in the
event of an emergency.
Operators should be familiar with procedures to employ in the event of an
emergency, i.e. remove all power, CPR, etc.
An AC powered unit will have 115 VAC or 230 VAC entering through the AC power
connector. Caution is required when working near this connector, the AC circuit
breaker, or the internal power supply.
8
203987 Rev A
RCP2-1000 RM Remote Controller Operations Manual
1.3.2 Electrical Discharge Hazards
A spark can not only create ESD reliability problems, it can also cause serious safety
hazards. The following precautions should be taken when there is a risk of electrical
discharge:
•
•
•
•
•
•
Follow all ESD guidelines.
Remove all flammable material and solvents from the area.
All probes and tools that contact the equipment should be properly insulated
to prevent electrical discharge.
The work area should be secure and clear from non-essential items.
Operators should never work alone on high voltage devices. There should
always be another person present in the same work area to assist in the
event of an emergency.
Operators should be familiar with procedures to employ in the event of an
emergency, i.e. remove all power, CPR, etc.
1.4 Specification Summary
Table 1-1 contains a summary of the specifications of the RCP2-1000 RM redundant
system controller.
Table 1-1: RCP2-1000 RM Specification Summary
Configurations
RCP2-1000 RM; 1:1 Redundant System
Switch Time
Fault Detection, 20-50 msec
Total switchover, 100 msec maximum
Switch Drive
26 VDC @ 4 amps
Alarm Input
Closure to Ground, (Ground = OK / Open = Fault)
Parallel I/O
Status Outputs
Control Inputs
Form C Relay Contacts (10 sets)
Contact Closure to Ground
AC Input Power
85-265 VAC, 47-63 Hz, 1 A max, > 0.93 power factor
Mechanical Dimensions
1.75 in. H x 19 in. W x 13.3 in. D [1 RU]
(89 mm H x 483 mm W x 338 mm D)
Weight
5 lb (2.3 kg)
Environmental Temperature
0 - 50 oC
RCP2-1000 RM Remote Controller Operations Manual
203987 Rev A
9
THIS PAGE LEFT INTENTIONALLY BLANK
10
203987 Rev A
RCP2-1000 RM Remote Controller Operations Manual
Section 2: Installation
2.0 Introduction
This section provides information for the initial inspection, installation and external
connections for the RCP2-1000 RM redundant system controller.
2.1 Inspection
When the unit is received, an initial inspection should be completed. First, ensure that
the shipping container is not damaged. If it is, have a representative from the shipping
company present when the container is opened. Perform a visual inspection of the
equipment to make sure that all items on the packing list are enclosed. If any damage
has occurred or if items are missing, contact:
Paradise Datacom LLC
328 Innovation Blvd.
State College, PA 16803
Phone: +1 (814) 238-3450
Fax: +1 (814) 238-3829
2.2 Mounting
The RCP2-1000 RM Redundant Control Panel is designed to be mounted in a
standard EIA 9 inch equipment rack. The depth of the unit, excluding rear panel
connectors, is 13.3 inches (338 mm). The height is 1.75 inches (89 mm) or 1 rack unit.
2.3 Storage and Shipment
To protect the RCP2-1000 during storage or shipping, use high quality commercial
packing methods. Reliable commercial packing and shipping companies have facilities
and materials to adequately repack the equipment.
2.4 Prime Power Connection
An AC power connector (J1) is provided on the rear panel and provides universal AC
input by using auto-sensing power supplies. The AC input can operate over a range of
85-265 VAC, at 47-63 Hz. An On/Off switch is located adjacent to the AC input connector.
RCP2-1000 RM Remote Controller Operations Manual
203987 Rev A
11
2.5 Cable Connectors
The RCP2-1000 RM has several I/O interconnections available on the rear panel. The
controller rear panel is shown in Figure 2-1.
J1
PS1
J4 SERIAL MAIN
J5 SERIAL LOCAL
J6 PROGRAM
J7 PARALLEL I/O
J9 ETHERNET
Figure 2-1: RCP2-1000 RM Rear Panel
The RCP2-1000 RM and a Rack Mount SSPA are linked together through 2-wire
twisted pair shielded cable (such as 24 AWG twisted pair telephone cable). The cable
should be connected between port J5 "Serial Local" of the RCP2-1000 and port J5
“Serial Local” of the SSPA, as shown in Figure 2-2. Figure 2-3 shows the complete top
level wiring diagram.
RCP2-1000CO
J4 SERIAL MAIN
J6 PROG
J5 SERIAL LOCAL
J7 PARALLEL I/O
RS232 or
RS485
RS485
9600 Baud
To (J5) Serial Local
Compact Outdoor SSPA
C-Band
Solid State Power Amplifier
J2 RF Out
J4 M&C
Figure 2-2: Cable connections for RCP2-1000
To achieve reliable communication over long distances an adequate line termination
(120 ohm resistor between RS485+ and RS485- lines) must be provided on both ends
of the cable. The link provides data exchange through RS485 half-duplex serial interface with 9600 Baud data rate.
Data link is peer-to-peer only; connection of a secondary SSPA or RCP2-1000 RM unit
is not possible. The RCP2-1000 RM is designed to provide remote control by using
second generation of Paradise Datacom SSPA serial protocol only. In other words, the
RCP2-1000 RM provides support only for later model SSPA units with serial numbers
above 100,000. Earlier models of SSPAs, which utilize a different style of serial
protocol, cannot be controlled by the RCP2-1000 RM.
12
203987 Rev A
RCP2-1000 RM Remote Controller Operations Manual
Figure 2-3: Top Level Wiring Diagram
RCP2-1000 RM Remote Controller Operations Manual
203987 Rev A
13
In order to achieve successful operation of the RCP2-1000 RM, the SSPA must be
configured with the following parameters: Baud Rate - 9600; Serial Interface - RS485;
Network Address - any. See your SSPA manual for details. Maximum cable length is
4000 feet (1.3 km).
2.5.1 Serial Port, Main (J4)
A DB9 female connector serves as primary remote control interface connector. This
interface allows the user to connect a PC to the RCP unit in order to access its advanced features as well as access a remote SSPA unit through its serial port. Interface
is re-configurable through the front panel menu, and can be used as RS-232 or RS485 interface (2 or 4 wires). The RS-485 TX and RX pairs must be twisted for maximum transmission distance. A user configurable 120-Ohm termination resistor is provided on the same connector. Table 2-1 shows the main serial port pin-out.
Table 2-1: Main Serial Port Pin Out
Pin #
1
2
3
4
5
6
7
8
9
14
Function Description
RS485 TX+ (HPA Transmit +)
RS485 TX- (HPA Transmit -)/RS232 TX
RS485 RX+ (HPA Receive -)/RS 232 RX
RS485 RX- (HPA Receive +)
GND
Service Request 1 Form C relay NC contact (Closed on HPA Summary Fault)
Service Request Common Form C relay common contact
Service Request 2 Form C relay NO contact (Opened on HPA Summary Fault)
120 Ohm termination (must be connected to pin 4 in order to enable termination)
203987 Rev A
RCP2-1000 RM Remote Controller Operations Manual
2.5.2 Serial Port, Local (J5)
A DB9 male connector serves as a serial interface with a remote SSPA. Interface
parameters are set by internal RCP hardware and can't be reconfigured by user. The
remote SSPA serial interface must be properly set to provide connection with the RCP
unit. Table 2-2 shows the local serial port pin-out.
Table 2-2: Local Serial Port Pin Out
Pin #
1
2
3
4
5
6
7
8
9
Function Description
RS485 RX+
RS485 RXRS485 TXRS485 TX+
GND
120 Ohm termination (must be connected to pin 1 in order to enable termination)
2.5.3 Program Port (J6)
A DB25 male connector is used to provide on field flash re-programmability for the
RCP controller card. In order to reload controller board firmware, connect this port to
the PC Parallel port via a straight through cable.
2.5.4 Parallel I/O Connector (J7)
A DB37 Female type connector contains a series of contact closures for monitoring remote SSPA faults as well as opto-isolated inputs for controlling some of the SSPA
functions. Inputs react on the closure to ground. Minimal closure time - 50mS. Table 23 shows details of the parallel I/O pin-out.
RCP2-1000 RM Remote Controller Operations Manual
203987 Rev A
15
Table 2-3: Parallel I/O Pin Out
Pin #
Function Description
1
Closed on Power Supply Fault Form C relay NC
2
Opened on Power Supply Fault Form C relay NO
20
Power Supply Fault Common
3
22
1. Standalone mode. Closed on Auxiliary Fault
2. 1:1 Redundancy Mode. Closed on Automatic switchover mode. Form C relay NC
1. Standalone Mode. Opened on Auxiliary Fault
2. 1:1 Redundancy Mode. Closed on Manual switchover mode. Form C relay NO
Auxiliary Fault\Auto-Manual Common
4
Closed on Mute. Form C Relay NC
5
Opened on Mute. Form C Relay NO
23
Mute Status Common
6
Closed on BUC Fault. Form C Relay NC
24
Opened on BUC Fault. Form C Relay NO
25
BUC Fault Common
7
Closed on High Temperature Fault. Form C Relay NC
8
Opened on High Temperature Fault. Form C Relay NO
26
High Temperature Fault Common
9
28
1. Standalone mode. Closed on Regulator Low Voltage Fault
2. 1:1 Redundancy Mode. Closed on HPA Standby. Form C relay NC
1. Standalone Mode. Opened on Regulator Low Voltage Fault.
2. 1:1 Redundancy Mode. Closed on HPA Online Mode. Form C relay NO
Regulator Low Voltage Fault\Standby-Online Common
10
Closed on DC Current Low Fault. Form C Relay NC
11
Opened on DC Current Low Fault. Form C Relay NO
29
DC Current Low Fault Common
12
Closed on Low Output RF Fault. Form C Relay NC
30
Opened on Low Output RF Fault Form C Relay NO
31
Low Output RF Fault Common
17
Mute/Unmute toggle input. 50mS Closure to ground to activate
35
SSPA Standby input. 50mS Closure to ground to activate
36
RCP Local/Remote toggle. 50mS Closure to ground to activate
37
Fault clear. 50mS Closure to ground to activate
19
Ground
21
27
34, 33, Reserved. Make No Connection.
32, 18,
16, 15,
14, 13
16
203987 Rev A
RCP2-1000 RM Remote Controller Operations Manual
Section 3: RCP2-1000 RM Front Panel Operation
3.0 Introduction
Control of the RCP2-1000 RM can be handled through Front Panel operation, or
remotely through Parallel or Serial communication to a computer.
For Local (front panel) operation of the controller, simply toggle the Local/Remote button until the yellow LED indicator is illuminated on Local. When in Remote mode, the
front panel buttons will be inoperative. The indicators and LCD display will still show
the status of the system. The Local/Remote key is always operative so that the appropriate mode can be selected. Remote operation enables the serial communication and
parallel I/O control.
3.1 RCP2-1000 Front Panel Description
The RCP2-1000 front panel includes ten (10) LEDs to indicate the internal state of the
SSPA. Five (5) fault condition LEDs on left side of the front panel reflect some of the
SSPA major faults plus summary fault state. SSPA online LED will turn green when
SSPA is in Online mode (1:1 Mode) or serves as AC power indicator in standalone
mode. Local/Remote and Mute/Unmute LEDs show the current control mode and mute
state of the SSPA.
A diagram of the Front Panel is shown in Figure 3-1.
PARADISE
DATACOM
RCP2-1000
SSPA REMOTE
CONTROLLER
Figure 3-1: RCP2-1000 RM Front Panel
3.1.1 System Identification
A label on the lower left corner of the controller displays the model number and a brief
description of the unit. The serial number is located on the rear panel of the controller.
3.1.2 Fault Indicators
The fault indicator LEDs illuminate RED when the corresponding fault condition occurs.
There are fault lights for Summary, Voltage, Temperature, Current and Power Supply.
3.1.3 SSPA Online Indicator
The SSPA Online LED will turn green when the SSPA is in Online mode (1:1 Mode) or
serves as an AC power indicator in standalone mode.
RCP2-1000 RM Remote Controller Operations Manual
203987 Rev A
17
3.1.4 Liquid Crystal Display
The 40 character by 2 line front panel liquid crystal display (LCD) provides a convenient method of selecting various operating parameters of the controller. All internal settings can be achieved via the LCD and menu structure. There is no need to access the
interior of the controller to adjust or reconfigure hardware settings. The LCD also provides detailed information on fault conditions.
3.1.5 Main Menu Key
The main menu key is a convenient method for instantly returning to the LCD main
menu. No matter what menu screen is currently displayed on the LCD, pressing this
key returns the user to the main menu, eliminating the need to scroll backward through
several menu levels. See Section 3.2 for a complete description of the Main Menu.
3.1.6 Local / Remote Key
The Local/Remote key allows the user to disable or enable the local control keypad
console. If the SSPA is in "Remote Only" mode, the unit will not react to any keystrokes except the "Local/Remote" key.
3.1.7 Mute / Unmute Key
The Mute/Unmute key provides an easy way to change the Mute state of the remote
SSPA.
3.1.8 Display Navigation Keys
The display navigation keys allow easy movement through the LCD menu. Up and
Down keys display the attenuation adjustment screen; Left and Right keys provide
menu navigation.
3.1.9 Enter Key
The enter key is used to select a given menu item. In conjunction with the navigation
keys, it is easy to locate and select a desired function.
18
203987 Rev A
RCP2-1000 RM Remote Controller Operations Manual
3.2 Main Menu
The Main Menu organized in several functional subgroups, diagramed in Figure 3-2.
1. Sys.Info - System Information menu sublevel
2. PanelCom - Serial Communication-related settings
3. SSPA Setup - System operation-related settings
4. Panel Setup - Fault handling settings
5. Options - Backup/restore and password settings
Main Menu
Sys. Info
Normal
Terminal
0..20dB
ON/OFF
2400
4800
9600
19200
38400
Auto
Manual
Hot
Cold
1-255
RS232/485
HPA1
HPA2
Protocol
BaudRate
Sys.Address
Interface
PanelCom
Attenuation
Switching
Mute
Redundancy
Stby.Select
Mode
StandAlone
StbyMode
SSPA ID
1:1
Status
Flt.Setup
SSPA Setup
BUC Flt.
AUX Flt.
RFSW Flt.
Fault
Alert
LowRF Flt.
0...60dBm
Fault on High
Fault on Low
Action
Logic
Logic
Action
Fault
Fault+Mute
Fault
Alert
Fault on High
Ignore
Fault on Low
Fault+Mute
Enable/Disabl
e
Panel Setup
Enable/Disabl
e
Fault
Local/Remote
Alert
Ignore
Set Level
Alert
Ignore
Buzzer
Latch
Control
Panel ID
Factory
Backup
User
1-255
Restore
Set
LampTest
Clear
Change
Password
Options
Reset
Figure 3-2: RCP2-1000 RM Main Menu Structure
RCP2-1000 RM Remote Controller Operations Manual
203987 Rev A
19
3.2.1 Sys Info
The informative sublevel of the menu structure contains 8 pages, shown in Figure 3-3.
The "Up" and "Down" keys allow the user to navigate through the pages. Pressing the
"Left" and "Right" buttons will display the attenuation adjustment screen. Press "Enter"
to return to the first informative page.
Main
Menu
General System Info Menus
Sys.Info
Atten.(dB):XX.X
Alarms:XXXXXX
FrwrdRF(dBm):XX.X
Ref.RF(dBm):XX.X
PS:XXXXXX LowRF:XXXXXX Fan:XXXXXX
AUX:XXXXXX VSWR:XXXXXX BUC:XXXXXX
RFSW1:XXXXXX
RFSW2:XXXXXX
State:XXXXXX
Mute:XXXXXX
Prtcl:XXXXXX Intrfc:XXXXX Buzzer:XXX
Baud:XXXXX
Addrs.:XXX
Latch:XXX
SysMode:XXXXXXX Stby:XXXX Unit:XXXX
Switch:XXXXX
Ctrl:XXXXXX
PS1(V):XX.X Boost1(V):XX.X DC(A):XX.X
PS2(V):XX.X
Boost2(V):XX.X
Reg.Low:XXXXXX
Cur.Low:XXXXXX
OverTemp:XXXXXX
Temp.(C):XXX
Module1:XXXXXX
Module2:XXXXXX
Module3:XXXXXX
Module4:XXXXXX
Figure 3-3: RCP2-1000 SysInfo Page Structure
The user can also browse between these pages by pressing the enter button on the
keypad (Note this function will not work if "Fault Latch" option is selected. Pressing the
"Enter" button will clear all system faults under this mode).
3.2.1.1 Sys Info Page 1
This is the HPA main status information page. The page shows:
•
•
•
•
20
HPA attenuation measured in dB ( Atten. (dB): XX.X) with accuracy of 0.1dB;
Forward RF Power in dBm with resolution of 0.1dBm;
Alarms presence, "FAULT!" or "None" will be displayed depending on the state of
HPA;
Reflected RF Power (if available) dB with resolution of 0.1dBm;
203987 Rev A
RCP2-1000 RM Remote Controller Operations Manual
3.2.1.2 Sys Info Page 2
This page shows a variety of alarm states which may be present within the HPA. Fault
values could be "Fault", "Normal" and "N/A"
• PS - power supply alarm, displays "Normal" if HPA power supplies are normally operational and "Fault" if one or more power supplies failed.
• LowRF - low RF fault;
• Fan - cooling system failures;
• Aux. - Auxiliary fault condition;
• VSWR - High Reflected power fault;
• BUC - Block Up converter fault.
If the fault condition doesn't apply to the HPA configuration it will display "N/A" for "Not
Available".
3.2.1.3 Sys Info Page 3
This page displays miscellaneous information related to the redundancy operation and
the HPA mute status.
•
•
•
•
•
•
RFSW1 - state of RF switch 1, possible values - "Pos1" Pos2" "N/A", "Fault";
RFSW2 - state of RF switch 2, possible values - "Pos1" Pos2" "N/A", "Fault";
State - HPA online state, possible values "Online", "Standby";
Mute - HPA mute state, possible values "Clear", "Set";
Prior - Priority polarization select (1:2 Mode Only);
PolSel - Current Polarization output (1:2 Mode Only)
3.2.1.4 Sys Info Page 4
This page displays various HPA settings:
•
•
•
•
•
•
Prtcl. - current HPA remote control protocol. The value can be set to "Terminal", if
terminal mode protocol is currently active and "Normal" for string I/O type protocol.
Baud - selected baud rate for remote control serial port. Selection: "2400", "4800",
"9600", "19200", "38400";
Intrfc. - selected serial port interface. Selection: "RS232", "RS485".
Addrs. - HPA remote control network address. Value could be in range from 0 to
254. Note: address 255 is reserved for global calls and shouldn't be used for individual units addressing.
Buzzer - Audible alarm availability. "Dis" if alarm disabled and "Enb" if enabled.
Latch - Fault latch option selection. "Dis," indicates disabled option and "Enb" - enabled.
RCP2-1000 RM Remote Controller Operations Manual
203987 Rev A
21
3.2.1.5 Sys Info Page 5
Page 5 shows settings related to the HPA 1:1 Redundant System operation.
•
•
•
•
•
Mode - indicates HPA operational mode. Value can be set to "1:1" for 1:1 redundancy mode and "Stdaln" for stand alone mode;
Stby. - shows HPA standby state selection. "Hot" for hot standby operation (HPA
retains unmuted state during standby period) and "Cold" for cold standby (HPA always mutes itself in standby mode and unmutes when switched back on-line).
Ctrl. - shows HPA control style. "Local" - both local and remote control are supported and "Remote" when only remote control provided (keypad locked);
Switch - indicates switching style. "Auto" for automatic fault tracking/switching and
"Manual" if redundancy switching provides by operator himself.
Unit - redundancy topological factor. "HPA1" for HPA connected to the RF switch
port 1 or 4 (Online Position 1 of the RF switch). "HPA2" for HPA connected to the
RF switch port 2 or 3 (Online Position2 of the RF switch).
3.2.1.6 Sys Info Page 6
This page shows the status of the HPA’s internal power supplies
•
•
•
•
•
PS1(V) - main power supply 1 output voltage with resolution of 0.1V. Normal output
voltage should be in range of 11 to 13 V.
PS2(V) - main power supply 2 output voltage.
Boost1(V) - booster power supply 1 output voltage with resolution of 0.1V. Normal
range 24 to 30 V (typical 28V);
Boost2(V) - booster power supply 2 output voltage.
DC (A) - total DC current draw by RF modules from main power supply. Value varies depending on the power level of the HPA. If the HPA is in the mute state current
drops to 0 to 5 A range. It's normal.
3.2.1.7 Sys Info Page 7
This page shows RF module related faults and conditions.
•
•
•
•
Regulator - RF module regulator low voltage fault. Values - "Fault" or "Normal";
DC Current - low DC current fault. Values -"Fault" or "Normal";
Temperature - high temperature fault. Values - "Fault" or "Normal";
Temp.(C) - internal RF module plate temperature in Celsius.
3.2.1.8 Sys Info Page 8
This page shows individual RF module states in multi-module HPA.
If a particular module does not exist in the HPA configuration, the value shows
"N/A" (not available). Each value represents the summary fault state of the individual
RF module, which includes Voltage, Current and Temperature state as well as quality
of data connection with module.
22
203987 Rev A
RCP2-1000 RM Remote Controller Operations Manual
If the HPA controller card can not reliably communicate with an SSPA module, that
module will be declared faulted. This type of fault will not affect the HPA overall
summary fault state, because the controller card has the ability to track RF module
faults independently.
3.2.2 Panel Communication Setup Sub-Menu
This menu allows the user to select the parameters for communication between the
SSPA and any remote monitor and control station.
3.2.2.1 Protocol
Allows the user to select the serial protocol. Available protocols include:
a) Normal (as described in Section 5)
b) Terminal (as described in Section 6)
3.2.2.2 Baud Rate
Selects the desired baud rate for serial communication. Available baud rates include
2400, 4800, 9600, 19200 and 38400. The factory default Baud Rate is 9600.
3.2.2.3 System Address
Sets the network address of the controller if used on a RS-485 network. Choose 1-255.
The factory default address is 0.
Note: Changes in serial communication settings from the front panel are effective immediately. Changes to these parameters from serial interface require that
the unit be reset in order to take effect. The units can be reset either by cycling
power to the unit or by issuing a reset command from the front panel.
3.2.2.4 Interface
Toggles between RS232 or RS485 communication.
3.2.3 SSPA Setup Sub-Menu
This menu allows the user to select the attenuation, mute status, redundancy mode,
and fault setup of the connected SSPA.
3.2.3.1 Attenuation
Allows user to set the desired attenuation between 0 and 20.0 dB.
3.2.3.2 Mute
Allows user to Set or Clear the Mute status for the unit.
RCP2-1000 RM Remote Controller Operations Manual
203987 Rev A
23
3.2.3.3 Redundancy
Under this menu, the user may select the following redundancy settings for units in a
1:1 redundant mode.
•
•
•
•
Switching - User may select between Auto and Manual switching.
Standby Select - Allows user to select between Standby and Online states.
Standby Mode - User may select either Hot Standby or Cold Standby.
Unit Status - Allows user to select between HPA1 and HPA2.
3.2.3.4 Mode
Selects the logical state machine used by the controller. Available choices are Standalone; 1:1 Redundancy; and 1:1 Phase Combined.
3.2.3.5 SSPA ID
Retrieves the serial number and firmware version of the connected SSPA.
3.2.3.6 Fault Setup
•
•
•
•
BUC Fault - Allows the user to select the Action and the Fault Logic for fault
conditions associated with the BUC. User can select the following Actions:
Fault + Mute; Fault; Alert; Ignore. User can select the following Fault Logic
parameters: Fault on High; Fault on Low.
Auxiliary Faults - Allows the user to select the Action and the Fault Logic
for fault conditions associated with the Auxiliary connections. User can select
the following Actions: Fault + Mute; Fault; Alert; Ignore. User can select the
following Fault Logic parameters: Fault on High; Fault on Low.
RF Switch Faults - Determines whether a switch fault should cause a major
alarm and attempt to switch, or simply show an alert on the front panel, the
latter case considered a minor alarm. Choices are: Fault, which is the Major
Alarm mode and produces a summary alarm; and Alert, which is the Minor
Alarm mode and does not produce a summary alarm.
Low RF Fault - Alerts the user when the output power falls below the threshold value, which is adjustable by the user with 1dBm steps via the Set Level
menu. Fault handling is adjustable by the user, who may choose between
Alert Only (Minor Fault), Fault (Major Fault), and Ignore (No Fault tracking).
3.2.4 Panel Setup Sub-Menu
This menu allows the user to select system-specific options.
3.2.4.1 Buzzer
Toggles the audible alarm buzzer on/off. Factory default is Enabled.
24
203987 Rev A
RCP2-1000 RM Remote Controller Operations Manual
3.2.4.2 Fault Latch
Determines the alarm reporting condition. A latched alarm will remain indicated on the
front panel until the operator clears the alarm by pressing the “Enter” button. Unlatched
alarms will allow the summary alarm indicator to stop displaying the alarm condition if
the circumstance creating the alarm has been cleared or corrected.
3.2.4.3 Control Mode
Selects between Local and Remote mode.
3.2.4.4 Panel ID
Displays the serial number and firmware revision of the RCP unit.
3.2.5 Options Sub-Menu
This menu makes available functions to backup or restore settings, set a password or
the brightness of the LCD, and test the LED lamps on the front panel.
3.2.5.1 Backup User Settings
Allows the user to backup all settings to nonvolatile memory.
3.2.5.2 Restore
Restores saved settings, either those from a previous backup (User), or to those as
shipped from the factory (Factory).
3.2.5.3 Lamp Test
This selection activates all LED indicators on the front panel, including the Fault Indicators, Amplifier Selection, Signal Path Mimic Display, Local/Remote Key and Auto/
Manual Key. Press “Enter” to exit the Lamp Test.
3.2.5.4 Password
Allows the user to set (Enable), change or clear (Disable) a password that prohibits
others from changing controller settings. A number from 1-255 can be selected. Use
front panel navigation keys to set the number. Up/Down arrows change the number by
factors of 10. Left/Right arrows change the number in increments of 1.
3.2.5.5 Reset
Cycles power to the RCP2-1000.
RCP2-1000 RM Remote Controller Operations Manual
203987 Rev A
25
THIS PAGE LEFT INTENTIONALLY BLANK
26
203987 Rev A
RCP2-1000 RM Remote Controller Operations Manual
Section 4: Theory of Operation
4.0 Introduction
The RCP2-1000 RM was designed to provide easy Remote Monitor and Control for the
Paradise Datacom Rack Mount Solid State Power Amplifier (SSPA). The unit is
designed to fit a standard 1 rack unit high, 19'' wide EIA rack. The RCP2-1000 allows
the user to remotely access the Rack Mount SSPA to verify its internal conditions and
provide necessary adjustments.
4.1 Fault analysis and condition tracking
RCP2-1000 RM provides detection and display of the Rack Mount SSPA as well as
provides ability of tracking faults locally. RCP2-1000 RM outputs the following SSPA
faults: Low Regulator Voltage Fault, High Temperature Fault, Low DC Current Fault,
Auxiliary Fault, RF Switch, BUC fault (if applied) and Summary fault. Faults that are
local to the RCP2-1000 RM unit (not implemented on the SSPA itself) provide
additional control over remote interface: Low RF Fault, Power Supply Fault.
RCP2-1000 RM also provides monitoring of the various internal conditions of the
remote SSPA. These include: Base plate temperature, Power supply output voltage,
SSPA DC Current consumption, Regulator output voltage, RF Output level, Gate Drive
Voltage, Muting, Attenuation and internal redundancy control (if applied).
As an addition, some popular features are provided on the RCP2-1000 RM such as
audible alarm and fault latching. Fault output varies and is provided in different forms:
relay contact closure, front panel LED and (or) LCD indication Serial data protocol field.
4.1.1 Summary Fault
Fault reflects overall state of the remote SSPA. Only "major" faults affect the summary
fault state. Some faults may or may not affect the summary fault depending on the remote SSPA settings as well as RCP2-1000 RM settings. Fault state signaling: Front
Panel LED; Front Panel LCD; Serial Protocol Field, Form C contact closure.
4.1.2 Power Supply Fault
Major fault. Fault implemented on the RCP2-1000 RM only. Remote SSPA won't track
this condition. Fault effective, if SSPA internal power supply has output voltage lower
then 10 volts. The fault threshold value is factory fixed and can't be changed by the
user. Fault state signaling: Front Panel LED; Front Panel LCD; Serial Protocol Field,
Form C contact closure.
RCP2-1000 RM Remote Controller Operations Manual
203987 Rev A
27
4.1.3 Voltage Regulator Output Low Fault
Fault effective when remote SSPA internal voltage regulators drop output voltage
below 8 volts. Fault always retains its last state when SSPA is muted. Fault threshold
value is factory fixed and can't be changed by the user. Fault state signaling: Front
Panel LED; Front Panel LCD; Serial Protocol Field, Form C contact closure (in Standalone mode only).
4.1.4 High Temperature Fault
Fault is set when the remote SSPA's base plate reaches dangerously high temperatures. Fault state signaling: Front Panel LED; Front Panel LCD; Serial Protocol Field,
Form C contact closure.
4.1.5 Low DC Current Fault
Major Fault. Fault is set when the remote SSPA indicates abnormally low current
consumption. Fault always retains its last state when the SSPA is muted. Fault threshold value is factory fixed and can't be changed by the user. Fault state signaling: Front
Panel LED; Front Panel LCD; Serial Protocol Field, Form C contact closure.
4.1.6 Low Forward RF Fault
Fault is local to the RCP2-1000 RM unit. Fault alerts the user when the output power
falls below the threshold value. Threshold value is adjustable by the user with 1dBm
steps. Fault handling is adjustable by user. Selection for fault handling: Alert Only
(Minor Fault), Fault (Major Fault), Ignore (No Fault tracking) are available for user
through front panel menu and remote control protocol. Fault state signaling: Front
Panel LCD; Serial Protocol Field, Form C contact closure.
4.1.7 BUC Fault
Fault available only for Rack Mount SSPAs with the internal BUC option. In general a
BUC fault is a major fault. Fault state signaling: Front Panel LCD; Serial Protocol Field,
Form C relay contact closure.
4.1.8 Auxiliary Fault
User configurable fault. Fault condition occurs when HPA senses change of the state
on external auxiliary fault input line. Fault effect depends from the costumer settings for
this fault. Fault state signaling: Front Panel LCD; Serial Protocol Field, Form C contact
closure (in Standalone mode only).
28
203987 Rev A
RCP2-1000 RM Remote Controller Operations Manual
4.1.9 RF Switch Fault
In Redundant mode, the SSPA always tracks position of RF switch(es). The user is
informed about the RF switch state through the front panel LCD and serial protocol. If
the switch position for any reason can't reliably be determined, the SSPA declares a
RF switch fault state.
4.1.10 Serial Connection Fault
If serial communication can't be reliably established with remote SSPA unit, RCP21000 will declare Serial Connection fault condition. This condition set all major alarms
and the summary state to the fault state. In addition, front panel LCD will display "No
Connection!!" sign. The sign will automatically goes away if connection been successfully reestablished. Of course, this condition won't prevent user from browsing through
RCP2-1000 menus to observe last red parameters of the remote unit.
RCP2-1000 RM Remote Controller Operations Manual
203987 Rev A
29
4.2 Design Philosophy
The RCP2-1000 RM remote controller was designed to achieve a new level in high reliability, maintenance free operation. A tightly integrated modular assembly approach
has been used to realize a versatile controller while maintaining its user friendly operator interface. Four basic building blocks are combined in the unit:
1. Digital Core Board
2. I/O Board Assembly
3. Liquid Crystal Display
4. Front Panel Membrane Keypad
Figure 4-1: Block Diagram, RCP2-1000 Digital Core Board
4.2.1 Digital Core Board
The Digital Core Board is the heart of the redundant controller. At the center of the
digital core board is the Atmel AVR Mega 128 microcontroller. The microcontroller
operates at a clock speed of 7.68 MHz. It provides control functions through the use of
an 8 bit wide data bus and 16 bit addressing bus for most of the peripheral devices. A
separate UART and collision detector is provided for extremely robust serial interfacing
with multi-host networks. All digital I/O lines are protected by opto-coupling or transient
absorbing devices. The power supply lines are protected by current limiting devices.
30
203987 Rev A
RCP2-1000 RM Remote Controller Operations Manual
The digital core board also contains the interface circuitry that allows the RCP2-1000
RM to be firmware upgradeable in the field. A block diagram of the Digital Core Board
is shown in Figure 4-1.
4.2.2 I/O Board Assembly
The I/O Board Assembly contains the primary (hardware) interface circuitry of the controller. It is physically attached to the Digital Core Board by two 40-pin headers. The
ten (10) Form C relays and opto isolated inputs for the parallel I/O interface are included on this board assembly. The board also provides a physical connection between the liquid crystal display (LCD), front panel membrane keypad, and the Digital
Core Board.
4.2.3 Liquid Crystal Display
The RCP2-1000 RM provides a large 2 line by 40 character alphanumeric display. This
provides an extremely user friendly interface. The LCD is directly interfaced to the microcontroller via the address and data bus. Virtually all of the controller’s setup and adjustments are accessible from the LCD display. There is no need to access the interior
of the controller to make any setup changes.
4.2.4 Front Panel Membrane Keypad
The front panel membrane keypad is a densely integrated array of LEDs and switches
that comprise an important part of the user friendly interface. A great deal of human
engineering has gone into the design of this membrane panel. A full complement of
alarm indicators are provided along with the display. Four separate navigation buttons
along with a separate “Enter” button allow the user to easily navigate the firmware
menu on the Liquid Crystal Display. Separate buttons have been provided for frequently used functions further enhancing the controller’s ease of use.
RCP2-1000 RM Remote Controller Operations Manual
203987 Rev A
31
THIS PAGE LEFT INTENTIONALLY BLANK
32
XXXXXX
203987 Rev
RevA- RCP2-1000 RM Remote Controller Operations
Xyxyxyxy
Manual
Section 5: Serial Protocol
5.0 Overview
A system, which includes an RCP2-1000 and Rack Mount SSPA, can be managed
from a remote computer over serial interface. To achieve this, the RCP2-1000 utilizes
the same serial protocol as the Rack Mount SSPA with some minor exceptions.
Requested parameter changes will not be reflected instantly on the RCP2-1000 unit
because the RCP2-1000 is not a final target for the parameter changes.
Some parameters are read only (all parameters under conditions tag). In other words,
Paradise Datacom Universal M&C utilities for Windows will seamlessly incorporate
RCP2-1000 in its control setup.
In case of selecting Terminal mode protocol, the RCP2-1000 provides remote menu
access through HyperTerminal program or actual hardware terminal.
Serial protocol format is set at no parity, 8 bit with 1 stop bit. Baud rate is selectable
through the front panel.
5.1 Remote Control - Serial Communication
This section describes the basic serial communication protocol between the SSPA and
host computer. The amplifier will only respond to properly formatted protocol packets.
The basic communication packet is shown in Figure 5-1. It consists of a Header, Data
and Trailer sub-packet.
HEADER
DATA
(4 Bytes)
(6 - 32 Bytes)
TRAILER
(1 Byte)
Figure 5-1: Basic Communication Packet
RCP2-1000 RM Remote Controller Operations Manual
203987 Rev A
33
5.1.1 Header Packet
The Header packet is divided into 3 sub-packets which are the Frame Sync, Destination Address and Source Address packets (See Figure 5-2).
Frame Sync
HEADER
DATA
(4 Bytes)
(6 - 32 Bytes)
(2 Bytes)
0xAA55
Destination Address
1 Byte
TRAILER
(1 Byte)
Source Address
1 Byte
Figure 5-2: Header Packet
5.1.1.1 Frame Sync Word
The Frame Sync word is a two byte field that marks the beginning of a packet. This
value is always 0xAA55. This field provides a means of designating a specific amplifier
packet from others that may exist on the same network. It also provides a mechanism
for a node to synchronize to a known point of transmission.
5.1.1.2 Destination Address
The destination address field specifies the node for which the packet is intended. It
may be an individual or broadcast address. The broadcast address is 0xFF. This is
used when a packet of information is intended for several nodes on the network. The
broadcast address can be used in a single device connection when the host needs to
determine the address of the amplifier. The amplifier will reply with its unique address.
5.1.1.3 Source Address
The source address specifies the address of the node that is sending the packet. All
unique addresses, except the broadcast address, are equal and can be assigned to
individual units. The host computer must also have a unique network address.
34
203987 Rev A
RCP2-1000 RM Remote Controller Operations Manual
5.1.2 Data Packet
The data sub-packet is comprised of 6 to 32 bytes of information. It is further divided
into seven (7) fields as shown in Figure 5-3. The first six (6) fields comprise the command preamble while the last field is the actual data.
HEADER
DATA
(4 Bytes)
(6 - 32 Bytes)
TRAILER
(1 Byte)
COMMAND PREAMBLE
Protocol ID
Request ID
1 Byte
1 Byte
Command
1 Byte
DATA FIELD
Error Status / Data Length
Data Tag
Data Address
1 Byte
1 Byte
1 Byte
Command Data Sub Structure
0 - 26 Bytes
Figure 5-3: Data Packet
5.1.2.1 Protocol ID
This field provides backward compatibility with older generation equipment protocol. It
should normally be set to zero. This field allows the amplifier to auto-detect other firmware versions.
5.1.2.2 Request ID
This is an application specific field. The amplifier will echo this byte back in the response frame without change. This byte serves as a request tracking feature.
5.1.2.3 Command
This one byte field tells the receiver how to use the attached data. There are only four
(4) possible values for this field. The sender and receiver are limited to two commands.
For example: if the sender issued “Set Request” command, receiver must answer with
“Get Request” and “Get Response” form of the command. The byte value for each
command is given in Table 5-1.
Table 5-1: Command Byte Values
Command Name
Command Byte Value
Set Request
Get Request
Set Response
Get Response
0
1
2
3
RCP2-1000 RM Remote Controller Operations Manual
203987 Rev A
35
5.1.2.4 Data Tag
The data tag specifies the type of internal resource of information needed to be accessed on the amplifier. The data associated with certain tags is read only. Therefore,
only the “Get” command byte would be associated with these data tags. The data tag
byte values are given in Table 5-2.
Table 5-2: Data Tag Byte Values
Tag Name
DataTag
Byte
Value
Minimum
valid length
of the Data
Field
System
Settings Tag
0
1 Byte
System
Thresholds Tag
1
2 Bytes
System
Conditions Tag
3
1 Byte
Description
This tag allows accessing various system
settings on remote unit. Host access status: Full
Read/Write access. Settings can be modified at
any time. Some of the settings may
require
hardware reset of the remote RCP unit.
This tag allows access to the critical unit
thresholds. Host access status: Full Read/Write
access. New thresholds are in effect
immediately after change.
This tag allows access to the unit’s internal
conditions flags, such as fault status or current
system status. Host access status: Read only.
This type of the data can not be set or modified
remotely.
ADC Channels
Access Tag
4
2 Bytes
This tag allows access to the unit’s internal
Analog to Digital converter. Host access status:
Read only. This type of the data cannot be set or
modified remotely.
Reserved
2
N/A
This tag is reserved and not used for RCP2
applications.
5.1.2.5 Error Status / Data Address
This byte is a tag extension byte and specifies the first data element of the tagged
data. If the Data Length is more than 1 byte, then all subsequent data fields must be
accessed starting from the specified address. For example, if the requester wants to
access the amplifier’s unique network address, it should set data tag 0 (Systems settings tag) and data address 8 (see Systems Settings Details table). If the following
Data Length field is more than one (1), then all subsequent Settings will be accessed
after the Unique Network Address. When the Response Frame Data Address is omitted, this byte position is replaced with the Error Status fields. The various error codes
are given in Table 5-3. Note that the Request and Response frames are different.
36
203987 Rev A
RCP2-1000 RM Remote Controller Operations Manual
Table 5-3: Error Status Bytes
Error Code
name
No Errors
Data Frame Too
Big
Byte
Value
0
No Such Data
2
Bad Value
3
Read Only
4
Bad Checksum
5
Trailer checksum not matched to calculated checksum
Unrecognizable
error
6
Error presented in incoming framed, but RCP unit failed
to recognize it. All data aborted.
1
Possible Cause
Normal Condition, no errors detected
Specified Data length is to big for RCP2 buffer to accept
Specified Data Address is out off bounds for this tag
data
Specified value not suitable for this particular data type
Originator tried to set a value which has read only
status
5.1.2.6 Data Length
This byte contains different information for Request and Response frames. In a Request frame, it specifies the number of data bytes that are to be accessed starting from
the first byte of the value specified in the Data Address byte. That byte must not exceed the maximum data bytes from a particular tag. The maximum data length for the
Settings tag is 26 bytes. The maximum data length for the System Threshold tag is six
(6) bytes.
5.1.2.7 Data Field
The actual data contained in the packet must be placed in this field. The “Get Request”
type of command must not contain any Data Field. Any “Get Request” will be rejected if
any data is present in the Data Field. Generally, the Bad Checksum error code will be
added to the response from the amplifier if the word size of the information is 16-bits or
2-bytes. Each data word is placed in the frame with its least significant byte first. All
data with length of 2 bytes must be represented as integer type with maximum value
range from 32767 to (-32767).
5.1.3 Trailer Packet
The trailer component contains only one (1) byte called the Frame Check Sequence
(See Figure 5-4).
RCP2-1000 RM Remote Controller Operations Manual
203987 Rev A
37
HEADER
DATA
(4 Bytes)
(6 - 32 Bytes)
TRAILER
(1 Byte)
FRAME CHECK
Checksum
1 Bytes
Figure 5-4: Trailer Sub-Packet
5.1.3.1 Frame Check
The Frame Check field provides a checksum during packet transmission. This value is
computed as a function of the content of the destination address, source address and
all Command Data Substructure bytes.
In general, the sender formats a message frame, calculates the check sequence, appends it to the frame, then transmits the packet. Upon receipt, the destination node recalculates the check sequence and compares it to the check sequence embedded in
the frame. If the check sequences are the same, the data was transmitted without error. Otherwise an error has occurred and some form of recovery should take place. In
this case, the amplifier will return a packet with the “Bad Checksum” error code set.
Checksums are generated by summing the value of each byte in the packet while ignoring any carry bits.
A simple algorithm is given as:
Chksum=0
FOR byte_index=0 TO byte_index=packet_len-1
Chksum=(chksum+BYTE[byte_index]) MOD 256
NEXT byte_index
5.1.4 Timing issues
There is no maximum specification on the inter-character spacing in messages. Bytes
in messages to amplifier units may be spaced as far apart as you wish. The amplifier
will respond as soon as it has collected enough bytes to determine the message. Generally, there will be no spacing between characters in replies generated by unites. The
maximum length of the packet sent to the amplifier node should not exceed 64 bytes,
including checksum and frame sync bytes. Inter-message spacing must be provided
for good data transmission. The minimum spacing should be as long as the time required for transmitting five (5) bytes at the current baud rate. This time is required for
the controller to detect a “Line Cleared” condition with half duplex communications.
For more information, see the Paradise Datacom Solid State Power Amplifier 4RU
Chassis Operations Manual, document number 201627.
38
203987 Rev A
RCP2-1000 RM Remote Controller Operations Manual
Section 6: Terminal Mode
The Paradise Datacom RCP2-1000 utilizes Terminal Mode Serial Protocol (TMSP) as
a secondary serial protocol for Management and Control through a Remote Serial Interface.
TMSP allows the user to access internal SSPA functions via a remote ASCII Terminal
or its equivalent (such as HyperTerminal for Windows). TMSP is accomplished through
either the RS-232 or RS-485, half duplex, serial communication link.
US ASCII encoded character strings are used to represent commands and data
messages. A remote terminal or controller initiates a communication session and the
RCP2 takes action and returns a report of requested status. The RCP2 will not initiate
communication and will transmit data only when commanded to do so. Prior to establishing the session with the RCP2, this mode must be enabled through the main menu.
The remote terminal must be configured with serial settings that match the RCP2’s
serial port settings. For example, if the RCP2 is set at 9600 Baud, the remote terminal
must be also configured as ASCII terminal at 9600 Baud, no parity, 8 bit data with
1 stop bit serial connection. The SSPA will not echo back any incoming characters, so
local echo must be enabled on the remote terminal.
To establish a remote control session with the RCP2, the user must type “UNIT#XXX”
in the terminal window (all letters must be in upper case), where XXX is the RCP2’s
unique network address or the global call address (255). Press the "Enter" key on
Remote Terminal keyboard.
The RCP2 should answer with words "Unit#XXX OnLine" with the first menu screen on
the following lines. After a remote session is successfully established, the unit will stay
connected as long as needed. The session interface mimics the RCP2's front panel
menu. To help the user navigate through the menu, the help string with the list of
active keys always follows the menu strings.
For example:
"Active Keys:(U)p+Enter;(D)own+Enter;(C)lrearFlt; (M)enu+Enter; (E)nd+Enter"
will be the last transmission string on all informative menu screens. Note that all letters
must be typed in upper case!
To refresh current screen on the Remote Terminal simply press "Enter" key. To end a
session with RM SSPA, press "E" and then "Enter" keys.
Important! If multiple SSPA units are networked on the same serial link, DO NOT
ESTABLISH A SESSION WITH MORE THAN ONE SSPA AT THE SAME TIME. If
you do so you will not get a valid response from the SSPA!
RCP2-1000 RM Remote Controller Operations Manual
203987 Rev A
39
The following procedure will guide the user through the remote terminal setup, using
the Windows 95/98 HyperTerminal software. The RCP2 must be connected to a PC
com port and configured to use TMSP with 9600 Baud rate prior to setting up the PC
configurations.
•
•
Start the Windows HyperTerminal Program (default Windows location at Programs — Accessories — HyperTerminal).
Enter the name of your serial connection (“Compact Outdoor SSPA” for example), and then click “Ok” button. See Figure 6-1.
Figure 6-1: Connection Description window
•
Select direct connection to the PC communication port (Com1 for example),
which meant to be used for communication with SSPA unit, and then click
“OK” Button. See Figure 6-2.
Figure 6-2: Connection window
40
203987 Rev A
RCP2-1000 RM Remote Controller Operations Manual
•
In the next window, select the following as shown in Figure 6-3: Bits per
Second: 9600; Data bits: 8; Parity: None; Stop bits: 1; Flow control: none.
Click “OK”.
Figure 6-3: COM3 Properties window
•
Normally, the SSPA will not echo back characters typed by the user in
Terminal window. For added security and convenience, turn on Local Echo
in the HyperTerminal application. To do so, select the following from the
HyperTerminal menu: File -> Properties -> Settings -> ASCII setup. This will
bring up a window similar to that shown in Figure 37. In this window, check
the box marked “Echo typed characters locally” and click “OK”.
Note: Due to a software bug on some versions, this feature may not work.
Do not use versions prior to 6.3. Download the latest version of HyperTerminal at http://www.hilgraeve.com.
Figure 6-4: ASCII Setup window
RCP2-1000 RM Remote Controller Operations Manual
203987 Rev A
41
•
Your PC is now configured to work with the RCP2 in Terminal mode. To establish a session with the RCP2, type “UNIT#170”
Note: When using a RS485 connection, avoid using the global address (170).
Instead, use the unique RCP2 address.
An example of a terminal mode session shown on Figure 6-5.
Figure 6-5: Hyperterminal example
42
203987 Rev A
RCP2-1000 RM Remote Controller Operations Manual
Appendix A: Specifications
The following pages comprise the specification sheet (203211) for the RCP2-1000
Remote Controller for Rack Mount SSPAs. For the latest revision of this document,
refer to the Paradise Datacom web site (http://www.paradisedata.com).
RCP2-1000 RM Remote Controller Operations Manual
203987 Rev A
43
THIS PAGE LEFT INTENTIONALLY BLANK
44
203987 Rev A
RCP2-1000 RM Remote Controller Operations Manual
RCP2-1000
Remote Control Panel
for Rack Mount SSPAs
PARADISE
DATACOM
RCP2-1000
SSPA REMOTE
CONTROLLER
RCP2-1000 Remote Control Panel
DESCRIPTION
The Paradise Datacom Remote Control
Panel (RCP2-1000-RM) was designed to
provide easy remote monitor and control of
Paradise Datacom’s Rack Mount Solid State
Power Amplifier.
Control of the RCP2-1000-RM can be
handled through Front Panel operation, or
remotely through Parallel or Serial
communication to a remote computer.
The RCP2-1000-RM front panel includes
ten LEDs that indicate the internal state of
the Rack Mount SSPA. Five fault condition
LEDs on left side of the front panel indicate
the SSPA major faults plus a summary fault
state.
FEATURES
• Front panel or remote operation.
• Parallel and serial (RS232 / RS485)
connections
• Flash firmware is field programmable
• 2 line x 40 character LCD
• Easy-to-navigate firmware menu
structure
• 1 Rack Unit high
Paradise Datacom LLC
328 Innovation Blvd.
State College, PA 16803
1 OF 4
A 2 line by 40 character LCD provides an
extremely user friendly interface. Virtually all
of the controller’s setup and adjustments are
accessible from the LCD.
Four navigation buttons and a separate
Enter key allow the user to navigate the
firmware menu on the LCD. Separate buttons
have been provided for frequently used
functions.
Common feed interfaces are offered as
standard and isolation is provided at all RF
interfaces.
A range of RF hardware options is offered
to meet specific system requirements.
AT A GLANCE
The front panel displays the Mute and Online
statuses of the Rack Mount SSPA, and allows
monitoring of the following fault states:
• Summary
• Voltage
• Temperature
• Current
• Power Supply
Phone:
(814) 238-3450
Fax:
(814) 238-3829
Email:[email protected]
203211 Rev C
ECO 3171
RCP2-1000
Remote Control Panel
for Rack Mount SSPAs
RCP2-1000 FRONT PANEL DESCRIPTION
Local / Remote Key
Main Menu
Key
Enter Key
PARADISE
DATACOM
RCP2-1000
SSPA REMOTE
CONTROLLER
System
Identification
Fault
Indicators
Signal Path
mimic display
LCD Display
Auto / Manual
Mode Key
Display Navigation
Keys
GENERAL SPECIFICATIONS
2 OF 4
Characteristic
Specification
Configurations
RCP2-1000-RM; Remote Control Panel for RM SSPA
Serial Communications
RS-232 / RS-485 2-wire
Parallel I/O
Status Outputs
Control Inputs
Form C Relay Contacts (10 sets)
Contact Closure to Ground
AC Input Power
85-265 VAC, 47-63 Hz, 1 A max, >0.93 power factor
Mechanical Dimensions
1.75 in. H x 19 in. W x 13.3 in. D [1 RU]
45 mm H x 483 mm W x 338 mm D
Weight
5 lb. (2.3 kg)
Environmental Temperature
0 - 50o C
203211 Rev C
ECO 3171
RCP2-1000
Remote Control Panel
for Rack Mount SSPAs
Rear Panel Connectors and Pin Identification
J1
PS1
J4 SERIAL MAIN
J5 SERIAL LOCAL
J6 PROGRAM
J7 PARALLEL I/O
J9 ETHERNET
The RCP2-1000-RM includes two serial communications ports (J4 and J5). The Main Serial
Port (J4) allows remote communication with a personal computer. The Local Serial Port (J5)
allows a serial interface with a remote Rack Mount SSPA. Interface parameters are set by internal RCP hardware and cannot be reconfigured by user.
In addition, the RCP2-1000-RM features a 37-pin Parallel I/O port that contains a series of
contact closures for monitoring remote SSPA faults as well as opto-isolated inputs for controlling some of the SSPA functions. Inputs react on the closure to ground.
The following tables show the pin outs for the Main Serial Port (J4), Local Serial Port (J5) and
Parallel I/O Port (J7).
Main Serial Port (J4) Pin Outs
Pin
Function
1
RS485 TX+ (HPA Transmit +)
2
RS485 TX- (HPA Transmit -)/RS232 TX
3
RS485 RX+ (HPA Receive -)/RS 232 RX
4
RS485 RX- (HPA Receive +)
5
GND
6
Service Request 1 Form C relay NC contact (Closed on HPA Summary Fault)
7
Service Request Common Form C relay common contact
8
Service Request 2 Form C relay NO contact (Opened on HPA Summary Fault)
9
120 Ohm termination (must be connected to pin 4 in order to enable termination)
Local Serial Port (J5) Pin Outs
3 OF 4
Pin
Function
1
RS485 RX+
2
RS485 RX-
3
RS485 TX-
4
RS485 TX+
5
GND
6,7,8
Not Used
9
120 Ohm termination (must be connected to pin 1 in order to enable termination)
203211 Rev C
ECO 3171
RCP2-1000
Remote Control Panel
for Rack Mount SSPAs
J7, Parallel I/O Connector Pin-out
Pin #
1
Closed on Power Supply Fault Form C relay NC
2
Opened on Power Supply Fault Form C relay NO
20
Power Supply Fault Common
21
22
1. Standalone mode. Closed on Auxiliary Fault
2. 1:1 Redundancy Mode. Closed on Automatic switchover mode. Form C relay NC
1. Standalone Mode. Opened on Auxiliary Fault
2. 1:1 Redundancy Mode. Closed on Manual switchover mode. Form C relay NO
3
Auxiliary Fault\Auto-Manual Common
4
Closed on Mute. Form C Relay NC
5
Opened on Mute. Form C Relay NO
23
Mute Status Common
24
Closed on BUC Fault. Form C Relay NC
25
Opened on BUC Fault. Form C Relay NO
6
BUC Fault Common
7
Closed on High Temperature Fault. Form C Relay NC
8
Opened on High Temperature Fault. Form C Relay NO
26
High Temperature Fault Common
27
28
1. Standalone mode. Closed on Regulator Low Voltage Fault
2. 1:1 Redundancy Mode. Closed on HPA Standby. Form C relay NC
1. Standalone Mode. Opened on Regulator Low Voltage Fault.
2. 1:1 Redundancy Mode. Closed on HPA Online Mode. Form C relay NO
9
Regulator Low Voltage Fault\Standby-Online Common
10
Closed on DC Current Low Fault. Form C Relay NC
11
Opened on DC Current Low Fault. Form C Relay NO
29
DC Current Low Fault Common
30
Closed on Low Forward RF Fault. Form C Relay NC
31
Opened on Low Forward RF Form C Relay NO
12
Low Forward RF Fault Common
17
Mute/Unmute toggle input. 50mS Closure to ground to activate
35
HPA Standby input. 50mS Closure to ground to activate
36
Local/Remote toggle. 50mS Closure to ground to activate
37
Fault clear. 50mS Closure to ground to activate
19
Ground
34, 33, 32, 18,
16, 15, 14, 13
4 OF 4
Function / Description
+5V Pull Up. 5mA Maximum output current
203211 Rev C
ECO 3171