1
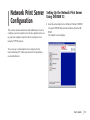
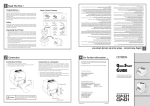
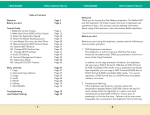
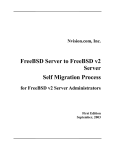
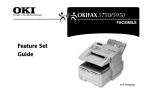
User’s
Guide
59324102
User’s Guide: English
|
1
Every effort has been made to ensure that the information in
this document is complete, accurate, and up-to-date. Oki Data
assumes no responsibility for the results of errors beyond its
control. Oki Data also cannot guarantee that changes in
software and equipment made by other manufacturers and
referred to in this guide will not affect the applicability of the
information in it. Mention of software products manufactured
by other companies does not necessarily constitute
endorsement by Oki Data.
Copyright 2000, 2001 by Oki Data Americas, Inc. All rights
reserved.
Second edition December 2001.
Written and produced by the Oki Data Training &
Publications Dept. Please address any comments on this
publication
• by mail to:
Training & Publications Department
Oki Data Americas, Inc.
2000 Bishops Gate Blvd.
Mount Laurel, New Jersey 08054-4620
• or by email to:
[email protected]
We welcome you to visit us on the World-Wide Web at
2
|
Network print server
http://www.okidata.com
Oki, OKILAN, and OKIVIEW are registered trademarks of Oki
Electric Industry Company, Ltd.; Marque dÈsposÈs de Oki
Electric Industry Company, Ltd.; Marca Registrada, Oki
Electric Industry Company, Ltd.
OKIFAX is a trademark of Oki Data Americas, Inc.
Microsoft, Windows, and Windows NT are registered
trademarks and Windows 95 is a trademark of Microsoft
Corporation in the U.S. and other countries.
Contents
Overview
Introduction .................................................................5
Components ........................................................................... 5
Network print server ............................................................. 5
Adapter Card ........................................................................ 5
Software Utilities CD-ROM ................................................. 5
OKIVIEW 32 ...................................................................... 5
Network Print Driver .......................................................... 5
OKI Print Monitor Utility .................................................. 6
HP JetAdmin and Web JetAdmin Support ............................. 6
Network print server Installation ............................7
Network Print Server Part Names ............................................ 9
Network Print Server Configuration ................... 11
Setting Up the Network Print Server Using OKIVIEW 32 ...11
Setting Up the Network Print ServerUsing the Front Panel
(LCD Display) .....................................................................14
IP Address Setup .................................................................14
Printing a Configuration Page from the fax machine Front
Panel .................................................................................14
Using the Network print server Web Page ............................15
Settings ..............................................................................17
Network Connection .......................................................17
TCP/IP Settings ............................................................... 17
NetWare Settings .............................................................17
NetBEUI Settings ............................................................18
EtherTalk Settings ........................................................... 18
SNMP Settings ................................................................. 19
Printer Menu ....................................................................19
Connecting Using TCP/IP .................................................... 19
Connecting One Printer and One Computer ...................20
Using Telnet .........................................................................20
Settings ............................................................................ 21
Main screen ..................................................................... 21
TCP/IP setup screen ......................................................... 22
SNMP setup screen .......................................................... 22
NetWare setup screen .......................................................23
NetWare print server mode setup screen ..........................23
NetWare remote printer mode setup screen ..................... 24
EtherTalk setup screen ..................................................... 24
Printer port setup screen ..................................................24
Printer trap setup screen ................................................... 25
Resetting the fax machine .................................................25
Windows Printing .................................................... 26
Overview ..............................................................................26
Add Printer Driver ................................................................ 26
Network Print Server Setup for Windows ............................. 27
Add the LPR Port ..................................................................31
User’s Guide
|
3
Pop-Up Monitor ................................................................... 33
Task Tray ............................................................................ 33
Printer Selection ................................................................. 33
Monitor Screen .................................................................. 34
Setup Dialog ...................................................................... 35
Status Monitoring ..............................................................35
Pop-Up Conditions .......................................................... 36
Display ............................................................................... 36
Novell NetWare ....................................................... 38
Introduction ..........................................................................38
About NetWare ..................................................................... 38
Print Server Mode ............................................................ 38
Remote Printer Mode ...................................................... 38
Bindery Printing ................................................................... 39
Setting up the Network Print Server Using OKIVIEW 32 . 39
Verifying that the Printer is Connected ............................. 40
Novell Directory Services (NDS) .......................................... 40
Setting up the Network Print Server using OKIVIEW 32 ..40
Setting up the Clients ........................................................42
Novell Distributed Print Services (NDPS) ............................ 42
Troubleshooting ....................................................... 43
Problems printing via TCP/IP in a Microsoft Windows
Environment ........................................................................ 43
The fax machine cannot find the network print server ..... 43
The fax machine does not print via lpr or ftp ....................43
User name in banner page ..................................................44
4
|
Network print server
Problems printing via NetWare ............................................44
The fax machine cannot find the network print server ......44
The fax machine is recognized by utility but cannot
establish connection with NetWare server ........................45
Fax machine does not print ...............................................45
Problems printing self diagnostics test and configuration ..46
Fax machine does not print ................................................46
NG printed in self-diagnostics test results .........................46
If the ROM check or RAM check result is NG (no good).46
If the EEPROM check result is NG. ................................. 46
If NIC Check is marked with NG. ....................................46
If the fax machine prints a different network format from
that of the network to which it is connected. .................46
Network print server Status Lights ....................................... 47
Specifications ............................................................ 48
Index .......................................................................... 49
Introduction
Overview
The OKILAN 7100e+ Network Print Server enables Ethernet
network users to use an OKIFAX 5700/5900 Series fax machine
(OKIFAX 5700, 5750, 5780, 5900, 5950, and 5980) as a network
printer. In this environment, you can print documents from the
fax machine even while sending faxes.
The Network print server enables you to use the fax machine
as an Ethernet network printer only. To use the PC scan and
fax capabilities of the fax machine, you must connect the
machine directly to your computerís parallel port and use MFP
software. For more information , contact your authorized OKI
dealer.
Components
Your Network Print Server kit includes the following
components:
Network print server
This card enables you to use the fax machine as an Ethernet
network printer.
Adapter Card
The Adapter Card provides the proper hardware interface
between the Network print server and the fax machine.
Software Utilities CD-ROM
The Software Utilities CD-ROM includes the following
software:
OKIVIEW 32
The OKIVIEW 32 Utility provides a simple, quick way of
configuring and maintaining Oki network printers on a Novell
network. The main screen contains the OKIVIEW Printer List
of network printers. The main screen also provides the
starting point to select and manage print devices from
Windows 95, 98 and NT workstations on the network.
Network Print Driver
The Network Print Driver enables network printing from your
fax machine.
!
The Network Print Driver supports only network
printing. Network faxing is not supported. You can
print and fax locally through the parallel port
using a print driver supplied with OKI MFP software.
User’s Guide
|
5
OKI Print Monitor Utility
The OKI Print Monitor Utility enables printing from a
Windows 95, 98 or NT server. OKI Print Monitor provides you
with bi-directional communication over a network.
HP JetAdmin and Web JetAdmin
Support
While Hewlett-Packardís JetAdmin or Web JetAdmin may
detect the Network print server card in the network, you may
experience unexpected results. Use the methods described in
the following sections to modify or fine tune the print server.
6
|
Network print server
Network
print server
Overview
Installation
After opening the package, check that you have all the parts
listed below.
• Network Print Server
• Adapter Card
• Mounting screws (2)
• Network print server Software Utilities CD-ROM
1 Remove the fax machineís rear cover (1), rear plate (2), and
the two dummy plates (3).
3
2
1
User’s Guide
|
7
2 Connect the Network print server (4) to the adapter card
(5), then mount into the fax machine.
4
3 Re-attach the rear plate:
a. Attach the rear plate, and fasten it with two screws (7).
b. Fasten the adapter card with two screws (8).
c. Fasten the Network print server with two screws (9).
2
9
5
7
7
8
|
Network print server
9
8
4 Re-attach the rear cover, and fasten it with two screws.
Network Print Server Part Names
CAUTION: Be careful not to pinch the left parallel cable
clamp.
100BASE-TX/10BASE-T Connector
This should be connected using a twisted pair cable.
Switching between 100BASETX and 10BASE-T is
automatic.
STAT Light (red LED)
Flashes when the network print server receives data. If the
network print server detects an abnormality, the STAT light
performs one of the following:
∑Flashes at fixed intervals
∑Stays on
∑Stays off.
User’s Guide: English
|
9
LINK 100M Light (green LED, center)
Lights when the network print server is connected using
100BASE-TX.
LINK 10M Light (green LED, near cable)
Lights when the network print server is connected using
10BASE-T.
See the Troubleshooting section in this guide for more details.
10
|
Network print server
Network Print Server
Configuration
Overview
This section contains instructions and information on how to
configure your network print server. It also explains how to set
up your host computer to print to the network print server
using the TCP/IP protocol.
Setting Up the Network Print Server
Using OKIVIEW 32
1 Insert the network print server Software Utilities CD-ROM
into your CD-ROM drive and run install.exe from the CDROM.
The installer screen displays.
You can set up a network print server connected to the
network from any PC on the same network. The procedures
are described below.
User’s Guide
|
11
2 Click OKIVIEW 32. Follow the installation instructions.
The following is a summary of OKIVIEW 32ís features. For
more details, see the OKIVIEW on-line Help.
OKIVIEW 32 Printer Panel
The Printer Panel (shown above) is the OKIVIEW 32 main
display. The display is divided into two smaller panels: the
Printer Filters Panel and the Printer Information Panel. The
Printer Information Panel, on the right hand side of the main
display, shows a list of all the printers currently available for
status and configuration. Printer name and status information
appears to the right of the printer icon.
12
|
Network print server
OKIVIEW 32 Printer Properties Menu
The Printer Properties menu allows you to get detailed status
information and to configure printers. To enter the Printer
Properties menu:
1 Select a printer on the Printer Information Panel.
2 From the Printer menu, click Printer Properties, or click the
Printer Properties icon, or double-click the selected
printer.
You can access configuration and status information from the
following Printer Properties tabs:
Status
The Status tab provides descriptive information about the
printer, as well as its online/offline status and the actual status
text displayed on the printerís LCD display.
Network Properties
The Network Properties tab allows the user to configure
network protocols, network frames, SNMP traps events and
destination addresses. Information includes:
• Protocols
- TCP/IP
- NetWare
- EtherTalk (not supported by Network print server)
• Frame Types
• SNMP Traps
Novell Configuration
!
Novell Client for Windows 95/98 or Windows NT/2000
must be pre-installed on the administratorís computer.
The Novell Configuration screen is reached from the Printer
Properties menu. This screen allows you to configure Novell
NetWare without accessing standard DOS-based NetWare
utilities such as Pconsole.
The Novell Configuration screen is separated into two panels:
Novell List Panel
This panel displays the following information:
• QueueServer/PServer in bindery mode
• QueueServer/PServer in NDS mode
• Remote Printer/NPrinter mode
Novell Information Panel
This panel allows you to change the settings displayed in the
Novell List Panel.
Changing the Printerís Name and Location
1 Select a printer on the Printer Information Panel.
2 From the Printer menu, click Printer Properties.
3 Change the text in the name and location fields.
4 Click OK.
OKIVIEW 32 Discovery Preferences
This screen allows you to customize these settings:
· Network Protocols- sets which protocol (TCP/IP or
NetWare) is used to discover a network printer.
· TCP/IP Subnets-allows you to search one or more subnets
to discover a network printer.
· IPX/SPX Segments-allows you to search one or more
NetWare segments to discover a network printer.
· Printer Refresh Polling Interval-sets the rate at which the
network print server polls the network for new print jobs.
User’s Guide: English
|
13
back, then re-enter the desired number. Press Enter to
register the value.
Setting Up the Network Print
ServerUsing the Front Panel (LCD
Display)
If an IP address octet is less than three digits, use the
shift arrow key to move to the next octet.
You can configure the IP Address, Subnet Mask and Gateway
address for the network print server from the fax machineís
front panel. The front panel procedure is described below.
5 Repeat step 4 for 84:SUBNET MASK and 85:DEFAULT
GATEWAY.
6 Press MENU/EXIT.
IP Address Setup
!
!
When printing with a NetWare server, the IP Address
configuration may not be necessary if Novellís IPX/SPX
protocol is used, since there will be auto-discovery of
the print server.
The network print server automatically uses DHCP to discover
the IP address if your network has a DHCP server running. If
not, check with your network administrator for the correct IP
address, subnet mask and default gateway values to use.
1 At the fax machineís front panel, press the MENU key.
2 Using the arrow keys, select 10:SETUP, then press Enter.
3 Using the arrow keys, select 7:LAN OPTIONS, then press
Enter.
4 Using the arrow keys, select 83:IP ADDRESS, then press
Enter. Type in the correct IP address using the numeric
keypad. To correct an entry, press the ìleftî key to move
14
!
|
Network print server
The fax machine takes 5 seconds to reconfigure
after pressing the MENU/EXIT key. Do not turn the
machine off during this period. If you select another
setting during the configuration period, ìFUNC. NOT
AVAIL.î displays.
Printing a Configuration Page from the fax
machine Front Panel
1 At the fax machine front panel, press the MENU key.
2 Use the arrow keys to select 8:REPORT PRINT, then
press Enter, then move the cursor to 9:NIC
CONFIGURATION.
3 Press ENTER.
The configuration page prints.
Using the Network print server Web
Page
4 Press Menu/Exit to clear the menu.
If you are connected to a network with TCP/IP, you can set up
the network print server menu using web browsers such as
Microsoft Internet Explorer and Netscape Navigator. For
browser installation and operation, see the documentation for
each browser. The requirements for accessing the Network
print server Web page are:
· Microsoft Internet Explorer Ver. 3.0 or later
· Netscape Navigator Ver. 3.0 or later
User’s Guide: English
|
15
!
Notes:
Operation with any web browser other than the above
cannot be guaranteed.
The printer must be connected to the network via TCP/
IP and configured with a valid IP address.
To change the configurations, log in as a ìrootî user.
The password for a ìrootî user when using a web
browser is the last 6 digits of the OKI print serverís
MAC Address, which cannot be changed. The MAC
address can be found on the fax machine configuration
page (see Printing a Configuration Page from the fax
machine Front Panel, above).
The following description is an example for the setting of the
fax machine using Microsoft Internet Explorer Ver. 4.0 on
Windows 98. The configuration method varies depending on
your web browser.
1 Configure an IP Address, subnet mask and gateway to the
network print server.
2 Start up the web browser and enter the IP address of the
network print server in [Address (Location)], then press
Enter. The Printer Status Screen displays.
For example, if the IP address is 193.132.3.80, then enter the
following:
16
|
Network print server
http://193.132.3.80
3 Click the item to be changed in the left frame. A detailed
screen for each item displays. For details, see ìSettingsî
below.
!
If frames cannot be seen, you may be using a browser
that does not support frames. In this case, use the
links below the printer status window.
4 After the changes, click Submit.
5 Enter ìrootî in [User Name] and the last six digits of the
print serverís MAC address in [Password], then click [OK].
The MAC address can be found on the ìNetwork
Connectionî page.
!
Notes:
For example, if the MAC address is
ì00:80:92:00:11:BCî, input
ì0011BCî in [Password]. The screen will display
******.
The MAC address displays on the network print
server configuration page (see ìPrinting a
Configuration Page from the fax machine Front
Panel,î above).
Settings
!
Only some of the following settings may be applicable
to your specific network environment.
Network Connection
Protocol Option–Lets you enable/disable each protocol.
Frame Options–Lets you set the frame type of the network.
TCP/IP Settings
DHCP/BOOTP–For the IP address to be dynamically
configured using a DHCP/BOOTP server, set to
[ENABLE]. To enter the IP address manually, set to
[DISABLE].
RARP–For the IP address to be dynamically configured
using a RARP server, set to [ENABLE]. To enter the IP
address manually, set to [DISABLE].
IP Address, Subnet Mask, Default GateWay–Enter the IP
address, subnet mask and default gateway assigned to the
network print server using the decimal system in the
following format: “***.***.***.***” If you use a DHCP/
BOOTP or RARP Server, these settings may not be
required.
NetWare Settings
Printer Name–name of the fax machine.
NetWare Mode–Sets the network print server operating
mode to print server mode (PSERVER) or remote printer
mode (RPRINTER).
Print Server Mode
NetWare Print Server Name–Enter the print server name
stored on the file server in print server mode. Make sure
this name matches the “Print Server Name” stored on the
file server. Maximum length: 31 characters.
Password–This is a password to log in to the file server in
print server mode. Make sure this password is identical to
that configured on the file server. Maximum length: 31
characters.
Job Polling Rate–Set the interval for polling the print queue
in print server mode. The smaller the value, the greater the
load on the network. The larger the value, the worse the
printing response. The default value should normally be
used. The setting may be between 2 –255 seconds.
Maximum Number of File Servers–Enter the number of file
servers on the network.
Bindery Mode–In print server mode, if printing with NW4.1
bindery service or NW3.1, always set the bindery mode to
[ENABLE]. If printing only with NW4.1 NDS service, set
the bindery mode to [Disable].
User’s Guide: English
|
17
NDS
Tree Name–In print server mode, enter the name of the tree
in which the file server is located. Maximum length: 31
characters.
Context–In print server mode, enter the name of the context
in which the Print Server was created. Maximum length:
77 characters. For example, LAB.OKI. Field is case
sensitive!
File Servers per Pserver Mode
File Server Name–Enter the name of the file server
controlling the NETWORK PRINT SERVER in print
server mode. A maximum of eight file servers may be
designated. Maximum length: 31 characters.
set value is too low, any packet delay may stop printing
part way through. The default value should normally be
used. The setting may be between 4 - 255 seconds.
Print Server Name–Enter the print server name controlling
the network print server in remote printer mode. A
maximum of eight print servers may be designated.
Maximum length: 31 characters.
NetBEUI Settings
Computer Name–Enter the name of the computer. Maximum
length: 15 characters.
Workgroup Name–Enter the name of the workgroup.
Maximum length: 15 characters.
Comment–Enter user information relating to the computer.
Maximum length: 48 characters.
EtherTalk Settings
Remote Printer Mode
Printer Name for R-Printer Mode–Enter the printer name
stored on the print server in remote printer mode. Make
sure that this name is identical to the “Printer Name”
stored on the print server. Maximum length: 31 characters.
Job Timeout–This is the time from receiving the last print
packet to releasing the NETWORK PRINT SERVER port
at the end of the print job, in remote printer mode. If the
18
|
Network print server
Note: EtherTalk settings are not supported by the fax
machine.
EtherTalk Zone Name–Enter the new zone name if you
change the zone to which your printer belongs.
EtherTalk Printer Name–Enter the new printer name if you
change the printer name used by Chooser. Maximum
length: 31 characters.
SNMP Settings
MIB-II Category
Authentic Community–Sets the authentic community name.
Maximum length: 15 characters.
Trap Community–Enter the trap community name.
Maximum length: 15 characters.
Trap IP Address–Enter the trap notice address. If the IP
address is 0.0.0.0, traps will not be issued.
SysContact–Sets MIB-II SysContact (the administrator
name). Maximum length: 79 characters.
SysName–Sets MIB-II SysName (the product name).
Maximum length: 79 characters.
SysLocation–Sets MIB-II SysLocation (the system location).
Maximum length: 79 characters.
Default TTL–Sets the IP packet survival time (TTL value).
The value should be between 0 - 255 seconds.
Enable Authen Trap–Enter whether AuthenTrap is permitted
or not. Select “1” for yes, “2” for no.
Printer Trap Category Trap–Sets PrinterTrap to ENABLE
or DISABLE.
Trap Type–Select the trap type from LOCAL, UDP and IPX.
UDP Trap Address, IPX Trap Address–Enter each trap
notice address. If the value is “0.0.0.0” or
“00000000:000000000000”, traps will not be issued.
Printer Menu
!
These settings cannot be changed using the Web page.
Make changes from the printerís front panel.
Paper and trays–Select the paper size, paper thickness, etc.,
for each tray. Machine cannot be configured from this
menu.
Timers and alarms–Set the auto page eject time (timeout),
power save time, etc. Not functional with fax machines.
Emulations–Set the printer emulation. Not functional with
fax machines.
Connecting Using TCP/IP
In order to use TCP/IP, first configure an IP address on the
network print server. You can configure its IP address:
· Via the printer’s front panel (if no DHCP server is
available)
· Using TELNET
· Through the network print server Web Page using a Web
browser.
Please consult your network administrator concerning
the right IP address to use.
!
User’s Guide: English
|
19
Connecting One Printer and One Computer
If you are constructing a small-scale LAN linking one printer
and one computer, you can use the following settings, but
please make sure that it is not connected to another network.
PC Address : 192.168.0.1(fixed)
Subnet Mask : 255.255.255.0 (fixed)
Gateway : 0.0.0.0 (fixed)
Printer Address : 192.168.0.2
Subnet Mask : 255.255.255.0
!
If the network does not have DHCP/BOOTP/RARP, then
the IP address and subnet mask default to
192.168.99.99 and 255.255.255.0, respectively. Use the
front panel to assign a valid address.
Using Telnet
!
!
Telnet is recommended for advanced users or network
administrators only.
Only some of the settings accessed with Telnet may be
applicable to your specific network environment.
The network print server may be configured using TELNET
supplied with UNIX or TCP/IP software for PC.
20
!
For changing settings, log in with the user name ìroot.î
Leave the password blank and press carriage return.
|
Network print server
The following procedure uses SunSolaris2.4 as an example.
The setup method for each command may vary. For details,
see the documentation for your UNIX or TCP/IP software.
1 Log in as a root user.
!
If you do not have superuser authorization, consult
your systems administrator.
2 Set up a temporary IP address on the network print server,
using the ARP command. Example: If the IP address is
ì192.168.20.127î and the Ethernet address is
ì00:80:92:00:11:BC.
arp -s 192.168.20.127 00:80:92:00:11:BC temp
The Ethernet address is displayed on the network print
server configuration page. If the IP Address has already
been configured, the temporary setting with the ARP
command is not required.
3 Check the network connection, using the ping command.
Example: If the IP address is ì192.168.20.127î,
ping 192.168.20.127
If there is no response, it means there is a problem with the
IP address and/or MAC address configured in step 2, or
with the network status. Please consult you systems
administrator.
4 Log in to the network print server with TELNET. Example:
Logging in to a network print server whose address is
192.168.20.127.
telnet 192.168.20.127
Trying 192.168.20.127 ...
Connected to 192.168.20.127
Escape character is ‘^]’.
EthernetBoard MLETB07 Ver 1.0.0 TELNET server.
Copyright 1998(C) Japan Computer Industry Inc.
login: root
‘root’ user needs password to login. password:
User ‘root’ logged in.
No.
Message
Value (level.1)
1 : Setup TCP/IP
2 : Setup SNMP
3 : Setup NetWare
4 : Setup EtherTalk – not applicable
5 : Setup NetBeui
6 : Setup printer port
7 : Display status
8 : Setup printer trap
97 :
Reset to factory set
98 :
Quit setup
99 :
Exit setup
Please select(1-99)?
5 Enter the number for the item you wish to alter. A detailed
screen for the item displays. For the detailed screens, see
ìSettings.î
6 Log out from the network print server. To enable the new
setting, turn the FAX MACHINE off and on.
!
If you do not turn it off and then back on again, the
NETWORK PRINT SERVER will continue to operate
with the previous settings.
Settings
Main screen
No.
Message
Value
1 : Setup TCP/IP
2 : Setup SNMP
3 : Setup NetWare
4 : Setup EtherTalk
5 : Setup NetBeui
6 : Setup printer port
7 : Display status
8 : Setup printer trap
97 :
Reset to factory set
98 :
Quit setup
99 :
Exit setup
Please select(1 - 99)? _
(level.1)
Display status
1 : prn1
2 : system
Please select(1-2)?_
User’s Guide: English
|
21
Please select(1 - 2)? _1
[prn1]
Ready
Please select(1 - 2)? _2
[system]
MLETB07 Version 1.0.0
TCP/IP status
IP address : 192.168.20.127
Subnet Mask : 255.255.255.0
Gateway addr : 192.168.20.254
NetWare status
NWPrint mode : Failed
EtherTalk status
Zone Name : *
Type Name : LaserWriter
Object Name : ML0011BC
97: For resetting the network print server to factory default.
98: For returning to the previous screen without changing
network print server settings.
99: For returning to the previous screen after changing
network print server settings.
22
|
Network print server
TCP/IP setup screen
Select [1] on the Main Screen to display this screen.
Configure if using TCP/IP.
Please select (1-99)? _1
No.
Message
Value
1 : TCP/IP protocol
: ENABLE
2 : IP address
: 192.168.20.127
3 : Subnet mask
: 255.255.255.0
4 : Gateway address
: 192.168.20.254
5 : RARP protocol
: DISABLE
6 : DHCP/BOOTP protocol
: DISABLE
7 : ROOT password
: “”
99 :
Back to prior menu
Please select (1 - 99)? _
SNMP setup screen
Select [2] on the Main Screen to display this screen.
Configure if using SNMP.
Please select (1-99)? _2
No.
Message
Value
1 : Authentic community :”******”
2 : Trap community
:”public”
3 : Trap address
:0.0.0.0
4 : SysContact
:””
5 : SysName
:””
6 : SysLocation
:””
7 : DefaultTTL
:255
8 : EnableAuthenTrap
:2
99 :
Back to prior menu
Please select (1 - 99)? _
NetWare setup screen
Select [3] on the Main Screen to display this screen.
Configure if using NetWare.
Please select (1-99)? _3
No.
Message
Value
1 : NetWare protocol
: ENABLE
2 : Packet type
: 802.3
3 : NetWare mode
: RPRINTER
4 : Setup PSERVER mode
5 : Setup RPRINTER mode
99 : Back to prior menu
Please select (1 - 99)? _
NetWare print server mode setup screen
Select [4] on the NetWare Setup Screen to display this screen.
Configure if using NetWare print server mode.
Please select (1-99)? _4
No.
Message
Value
1 : FSERVER name 1
: “”
2 : FSERVER name 2
: “”
3 : FSERVER name 3
: “”
4 : FSERVER name 4
: “”
5 : FSERVER name 5
: “”
6 : FSERVER name 6
: “”
7 : FSERVER name 7
: “”
8 : FSERVER name 8
: “”
9 : Machine name
: “ML0011BC”
10 :
Password
: “”
11 :
Job polling interval
:4
12 :
Bindery mode
: ENABLE
13 :
NDS tree
: “”
14 :
NDS context
: “”
99 :
Back to prior menu
Please select (1 - 99)? _
User’s Guide: English
|
23
NetWare remote printer mode setup screen
Select [5] on the NetWare Setup Screen to display this screen.
Configure if using NetWare remote printer mode.
Please select (1-99)? _5
No.
Message
Value
1 : PSERVER name 1
: “”
2 : PSERVER name 2
: “”
3 : PSERVER name 3
: “”
4 : PSERVER name 4
: “”
5 : PSERVER name 5
: “”
6 : PSERVER name 6
: “”
7 : PSERVER name 7
: “”
8 : PSERVER name 8
: “”
9 : Job timeout
: 10
99 :
Back to prior menu
Please select (1 - 99)? _
24
|
Network print server
EtherTalk setup screen
!
The fax machines do not support EtherTalk.
Select [4] on the Main Screen to display this screen.
Configure if using EtherTalk.
Please select (1-99)? _4
No.
Message
Value
1 : EtherTalk protocol : ENABLE
2 : Zone Name
: “*”
99 :
Back to prior menu
Please select (1 - 99)? _
Printer port setup screen
Select [5] on the Main Screen to display this screen.
Configure the printer port.
Please select (1-99)? _5
No.
Message
Value
1 : NetWare port name : “ML0011BC-prn1
2 : EtherTalk port name : “ML0011BC”
3 : BOJ string
: “”
4 : EOJ string
: “”
5 : BOJ string(KANJI) : “”
6 : EOJ string(KANJI) : “\x04”
7 : Printer type
: PS
8 : TAB size (char.)
:8
9 : Page width (char.)
: 78
10 :
Page length(line.)
11 :
Banner output
99 :
Back to prior menu
Please select (1 - 99)? _
: 66
: NO
Printer trap setup screen
Select [7] on the Main Screen to display this screen.
Configure the printer trap.
Please select (1-99)? _7
No.
Message
Value
1 : Trap enable
: DISABLE
2 : Trap type
: LOCAL
3 : Trap address (UDP) : 0.0.0.0
4 : Trap address (IPX)
: “00000000:000000000000”
99 :
Back to prior menu
Please select (1 - 99)? _
Resetting the fax machine
After selecting applicable settings through Telnet and exiting,
reset the fax machine to make sure that your preferences were
activated. To do this, simply turn it off, then turn it back on.
Then go to the front panel and print the diagnostics page to
make sure your settings are correct.
User’s Guide: English
|
25
Add Printer Driver
Windows Printing
Overview
Overview
This section contains instructions on how to set up your
Network print server for a Microsoft Networking environment.
To print from a Windows 95/98, Windows NT Server 4.0 or
Windows NT Workstation 4.0 (hereafter, Windows NT4.0)
TCP/IP network, you must set up both the network print
server
Service Pack 3 or higher is required for proper operation
in Windows NT. Service packs should be installed by a
network administrator.
The Network Print Driver does not support the
“EtherTalk Printing Devices” option.
To print by TCP/IP with your NETWORK PRINT SERVER in
Windows, use OKI Print Monitor included in the Software
Utilities CD-ROM. OKI Print Monitor provides you with bidirectional communication to your NETWORK PRINT
SERVER print server. Since OKI Print Monitor creates a
Windows NT Custom Printing Port, you do not have to load
Microsoftís Optional TCP/IP Printing Services onto every
Windows NT Workstation.
1 Insert the Network print server Software Utilities CD-ROM
into your CD-ROM drive.
The installer screen displays.
!
!
26
|
Network print server
2 Click Printer Driver. Follow the online instructions for
installing the driver in either a Windows 95/98 or Windows
NT environment.
When designating your printer driver through Settings,
Printers, examine the Printer Properties, Ports tab to confirm
that your printer is connected to the proper driver.
!
You can check this by going to the Windows Control
Panel, Printers icon, and selecting the fax machine’s icon.
NETWORK PRINT SERVER Setup for
Windows
The OKI Print Monitor Utility enables printing from a
Windows 95, 98 or NT server. OKI Print Monitor provides
you with bi-directional communication over a network.
OKI Print Monitor installation is the same regardless of the
Windows version. The installer automatically determines
which Windows version is installed on your computer.
Before beginning, please close all other running
applications.
1 Insert the Network print server Software Utilities CD-ROM
into your CD-ROM drive and run install.exe on the CDROM.
The installer screen appears.
!
User’s Guide: English
|
27
2 Click OKI Print Monitor. The following screen appears:
This screen tells you what you should do prior to the
installation.
3 Click Next. The License Agreement appears.
This screen prompts you to agree to the conditions shown
on the screen.
4 Click Yes.
28
|
Network print server
This screen prompts you to select either the Pop-Up
Monitor or the OKI Print Port (LPR). You must select the
OKI Print Port to enable communication between your
computer and the print server. The Pop-Up Monitor is
optional. It provides current printer status on your
computer screen.
5 Click Next.
If you are installing the Pop-Up Monitor, this screen lets
you select whether to register the Pop-Up Monitor in the
Startup, enabling it to run automatically when you start up
the PC.
If you want the Pop-Up Monitor to run automatically, click
Yes. Otherwise, click No.
This screen shows the default folder where this application
is to be installed. To select a folder of your own choice,
click Browse, and the install path input dialog appears.
7 Click Next.
If only the OKI Print Port is installed, this screen
does not appear.
6 Click Next.
User’s Guide: English
|
29
This screen lets you select where in the Start Menu you
can place the shortcut to the OKI Print Monitor.
8 Click Next. The OKI Print Monitor files are
copied into your computer. When copying is
completed, the following screen appears.
This screen notifies you that the installation is complete
and asks if you wish to add the LPR port now.
If you click Yes and Finish, you will be prompted to add an
LPR Port (see ìAdd the LPR Portî below).
If you click No and Finish, the installation process ends.
30
|
Network print server
Add the LPR Port
1 After the OKI Print Monitor is installed, the
port setting function is activated.
Enter the IP address or host name of the print server. If you
click Search, the list of OKI Device printers on the network
appears.
Select the OKI device from the list (machine type for the
NETWORK PRINT SERVER is ìMLETB08î). Then click
OK.
2 Click Next. OKI Print Monitor attempts to
communicate with the NETWORK PRINT SERVER at the
specified address. If the physical port name is ìlp,î the
screen shifts to the print port name input screen (see next
step). Otherwise if there is no response, the following
screen appears.
User’s Guide: English
|
31
Enter the physical port name and click Next.
3 In the above screen, enter the name displayed in Printerís
Properties. The default name is the IP address or host name
+ ì:î + the physical port name (normally this is ìlpî).
4 Click Next.
32
|
Network print server
The IP address or host name and port name of the print
destination display. Click Finish.
Pop-Up Monitor
Task Tray
Printer Selection
When you click Select Printer… in the Task Tray menu, the
following screen appears:
The Pop-Up Monitor shows current printer status on your
computer screen.
When active, the Pop-Up Monitor resides in the Task Tray. If
you have already designated the printer(s) to be monitored,
the printer status and the host name (or just the IP address if
the host name is not assigned) are shown on the Pop-Up
menu. If you select the host name (or IP address) in the menu,
the Monitor screen appears (see “Monitor Screen” below).
If you want to add a printer to the menu, click Select
Printer… to select the printer to be monitored.
In this screen you select which printer(s) you want to monitor.
You cannot select the IP address that is already selected. If
you click Search, OKI Print Monitor searches for new OKI
print devices on the network.
To set the Broadcast IP address of the network to search, click
Search Path…. The following screen appears.
If you select Quit, Pop-Up Monitor is removed from the Task
Tray.
User’s Guide: English
|
33
Monitor Screen
This screen appears when the Pop-Up Monitor is selected or
popped up from the Task Bar Menu. The screen shows the
printer status graphically.
To minimize the monitor, click X in the upper right corner.
To close this monitor screen, select View, Quit. To display the
Pop-Up Monitor on top of all other windows, check View,
Always display on top.
To add an IP address, enter the new IP address in the box next
to Add and click Add. The maximum number of IP addresses
that can be monitored is 16.
If you wish to delete an IP address, enter that IP address in the
search list next to Delete and click Delete.
34
|
Network print server
To select the print server to be monitored, select Option,
Environment Setup…. The Setup Dialog appears (see “Setup
Dialog” below).
To view program version information about OKI Print
Monitor, select Help, About….
Setup Dialog
The setup dialog lets you select a print server to monitor, set
the Pop-Up Monitor configuration and screen related
settings.
Status Monitoring
In this screen, you can select the print server you wish to
monitor. You cannot select the IP address that is already
selected. If you click Search, OKI Print Monitor searches for
new OKI Devices on the network.
To set the Broadcast IP address of the network to search, click
Search Path…. The following screen appears.
To add an IP address, enter the new IP address in the box next
to Add and click Add. The maximum number of IP addresses
that can be monitored is 16.
If you wish to delete an IP address, enter that IP address from
the search list next to Delete and click Delete.
User’s Guide: English
|
35
Pop-Up Conditions
In this screen, you can set the conditions under which the
Pop-Up Monitor pops up or is minimized to an icon.
If you check an item inside the Launch PopUp Monitor
upon frame, the Pop-Up Monitor automatically pops up when
the printer being monitored enters the state shown by the
checked item.
If you check an item inside the Return to Icon, upon frame,
the Pop-Up Monitor automatically becomes an icon when the
printer being monitored enters the state shown by the
checked item.
36
|
Network print server
Display
In this screen, you can set the following items relevant to the
Pop-Up Monitor screen:
Add to Windows Startup Menu: If you check this item, the
Pop-Up Monitor is registered in the Windows Start up Menu
and starts each time Windows starts. If you clear it, the PopUp Monitor is deleted from the Windows Start up Menu.
If you check the item Save location of window, the monitor’s
current position is saved and its dialog box opens in the same
screen position each time that it is run.
The item Always display on top is linked to Always display
on top in the View menu of the monitor screen (see “Monitor
Screen” above). If you check this item, the Pop-Up Monitor
always displays on top of all other windows.
If you check Start up as icon, Pop-Up Monitor starts up as an
icon in the task tray when it is launched, and the monitor
screen does not display automatically.
If you check Display print status bar, the print job status is
shown on the monitor screen.
The Please set the interval to refresh item, designates how
often the monitor retrieves and displays the status of your
printer. The default is 1000ms (1 second).
User’s Guide: English
|
37
About NetWare
Novell NetWare
Overview
Introduction
!
This section is for NetWare administrators with a basic
knowledge of NetWare and its operating procedures. We
suggest you read this in conjunction with the Novell
NetWare Documentation.
This section contains instructions and information on how to
configure your network print server in the NetWare
environment.
There are three connection methods for Novell NetWare:
• Bindery
• Novell Directory Services (NDS)
• Novell Distributed Print Services (NDPS)
To print using a Novell network environment, configure the
NetWare server and thenetwork print server.
To make the configuration changes, you must have
Administrator (NetWare 4.x and 5.x) and Supervisor (NetWare
3.x) authorization.
38
|
Network print server
The network print server supports both NDS and Bindery
printing. NDPS printing is supported in Novell’s gateway.
For printing using Novell Directory Services (NDS) or
Bindery Connections, the network print server supports the
following modes.
Print Server Mode
In print server mode:
1 A print job is stored in a print queue on the file server.
2 A printer running in print server mode directly accesses
the print queue and takes the job.
3 The printing process is performed immediately.
You do not need to have a print server on the file server.
Remote Printer Mode
In remote printer mode:
1 A job is stored in a print queue on the file server.
2 The print server (on the file server) takes the job, and
3 Transfers it to the printer allocated to the print queue.
4 The printer receives the job and the printing operation is
performed.
This mode uses the standard NetWare print function
(PSERVER.NLM). The existing print server can be used. For
PSERVER.NLM, the file server functions as a print server.
1 Open OKIVIEW 32. The main screen displays all of the
print servers on the network, along with their status.
Bindery Printing
This connection method is common with NetWare 3.x, but is
also supported by NetWare 4.x and NetWare5.
Setting up the Network Print Server Using
OKIVIEW 32
Log onto the network from a Windows 95, 98 or Windows NT
NetWare client while using Novell’s NetWare Client, a
bindery connection, and an account with administrative
privileges.
2 Highlight the new target printer, then double-click it. The
Printer Properties dialog appears.
3 Click Novell.
4 Select Q-Server as the Print Server Type.
5 Highlight Bindery in the tree.
6 Click Modify Name or use the default name.
7 Click Add File Server. The Add File Server dialog
appears.
8 Check the desired server and click OK.
User’s Guide: English
|
39
9 Highlight the server you created and click Add/Delete
Queue. The Add Queue dialog appears.
10 Check the desired queue or click New Queue to create a
new queue and click OK.
11 Click Apply.
12 Click OK.
13 Click Yes to reset the printer.
The fax machine must be reset for your setup to take
effect.
It may take a few minutes for the configuration to become
valid. The queue’s icon changes from gray to full color when
the configuration is complete.
OKIVIEW 32, creates the Print Server, Print Queues and
Printer objects for you to make setting up you printer
effortless.
NDS is not supported by NetWare 3.x and lower versions.
!
!
Setting up the Network Print Server using
OKIVIEW 32
Verifying that the Printer is Connected
You must log on to the NDS network from a Windows 95/98
or NT NetWare client with an account with administrative
privileges.
1 Open OKIVIEW 32. The main screen displays all of the
print servers on the network, along with their status.
After you configure the network print server, you can verify
that your fax machine has made a connection to the NetWare
server. You can do this at the NetWare server itself.
1 At the server prompt type LOAD MONITOR.
2 When the NetWare monitor loads under Available
Options, select Connection Information.
3 The Active Connections box opens. In this box, look for
the Print Server name that was specified in OKIVIEW 32.
4 If the Print Server name is there, your connection is made
and you are ready to set up your clients.
40
Novell Directory Services (NDS)
|
Network print server
11 Select a container. Click OK.
12 Click OK.
13 Under NDS, select the container.
14 Click Add/Delete Queue.
15 Select a queue or click New Queue to create a new queue.
16 Click OK. Then Click OK in the Printer Properties.
The fax machine must be reset for your setup to take
effect.
It may take a few minutes for the configuration to become
valid. OKIVIEW 32 creates the printer objects for you in
NDS. The queue’s icon changes from gray to full color when
the configuration is complete. Novell’s NetWare
Administrator is the most common way to verify that the
printer objects were successfully created and to administer
access rights to the new printer objects. NetWare
Administrator can be found on your NetWare server in the
Public directory or sub-directory below Public. For more
information on NetWare Administrator and access rights,
please refer to your NetWare documentation.
!
2 Highlight the new target machine, then double-click it.
The Printer Properties dialog appears.
3 Click Novell.
4 Select Q-Server as the Print Server Type.
5 Highlight NDS.
6 Click Modify Name or use the default name
(recommended).
7 Click Change Context.
8 In the Set and Change Context window click the “Tree”
icon.
9 Select a tree. Click OK
10 Click the “Container” icon.
User’s Guide: English
|
41
Setting up the Clients
Take the following steps to set up the network printers on
your clients. These steps are the same for both Bindery and
NDS connections for Windows 95/98 and NT4.0 operating
systems.
1 Double click Network Neighborhood on the clients.
2 Browse to the Printer Queue and double click.
3 You will be asked to install driver for the printer. Click
YES.
4 The Add Printer Wizard will start.
5 Install the printer driver and print the test page.
Novell Distributed Print Services
(NDPS)
Novell Distributed Print Services or NDPS is Novell’s latest
addition for connecting and administering printers across the
NDS network. Introduced as a separate service available for
NetWare 4.11, NDPS has four components, the NDPS
Manager, which is installed on a NetWare server, the printer
Agent, the printer Gateway, and the NDPS Broker, which can
be installed using NetWare Administrator. For more
information on NDPS, please consult your NetWare
documentation.
42
|
Network print server
!
The network print server is NOT NDPS aware. However,
NDPS printing can be done on Novellís gateway.
Troubleshooting
This section describes typical problems when using the
Network print server and tips for solving them.
DIP switches cannot be accessed when the fax machine
is assembled. Disassembly must be performed to access
the card. Switches must be switched off when done. The
DIP switch information below is intended for reference
only. Disassembly must be performed only by
experienced technicians or authorized OKI service
personnel.
!
Problems printing via TCP/IP in a
Microsoft Windows Environment
The fax machine cannot find the network
print server
• Check that the fax machine is switched on. If it is on,
switch it off and then on.
• TCP/IP Protocol for the network print server may be set
to DISABLE. If DISABLE has been selected, change the
setting to ENABLE using the utility that comes with the
network print server or by initializing the network print
server.
• Check that the settings for “IP Address,” “Subnet Mask,”
and “Gateway Address” are correct by printing an network
print server configuration page. If any of the values are
incorrect, reset them.
• Check that thenetwork print server responds to a ping.
• Check that the network cable is properly connected.
Replace the cable if necessary.
• Switch the fax machine off and move DIP switch 2 to the
ON position, and then switch the fax machine on. This
resets the network print server to default values, resetting
the IP address and other settings. The switch must be
turned off after resetting.
The fax machine does not print via lpr or
ftp
• Check that the fax machineis switched on. If it is on,
switch it off and then on.
• Check the host name and IP address for the network print
server.
User’s Guide: English
|
43
• Check the fax machine port name for the network print
server. The port name may be selected from lp, euc and
sjis. Any other name is invalid. If you print via the printer
driver, you should select “lp.”
• Check that the network print server responds to a ping.
• Check that the network cable is properly connected.
Replace the cable if necessary.
User name in banner page
• If you print through LPD, the user name is commonly
printed as “unknown” and the file name as the spool file
name used.
• If printing through FTP, the user name is printed as the
user name input at FTP login and the file name as the
name of the transmitted file. If you have specified the
name of the directory for printing using the put command,
the file name will not be printed. The fax machine name
will be the logical directory name.
44
|
Network print server
Problems printing via NetWare
The fax machine cannot find the network
print server
• Print the configuration page.
• Check that the fax machine is switched on. If it is on,
switch the fax machine off and then on.
• Check that the network cable is properly connected.
Replace the cable if necessary.
• If you use the attached utility, check that the NetWare
network number is a valid value for its environmental
configuration. If an incorrect value has been entered, the
network print server cannot be recognized. In a large-scale
network environment, input the NetWare network number
where the network print server is located.
• NetWare Protocol for the network print server may be set
to DISABLE. If DISABLE has been selected, change the
setting to ENABLE using the utility attached to the
network print server or by initializing the network print
server.
• Check the frametype on the NetWare server.
• Switch the fax machine off and move DIP switch 2 to the
ON position, and then switch the fax machine on. Reset the
network print server to default settings. Reset the NetWare
port name and other settings.
The fax machine is recognized by utility
but cannot establish connection with
NetWare server
Remote printer mode
• Check that the print server for which the unit has been
registered has been started up.
• Check that the correct print server name has been
selected. Check that the name of the print server operating
on the file server is the same as the print server name set
on the fax machine’s print server.
• Check that the correct NetWare port name has been
selected. Check that the fax machine name (shown on the
print server monitor of the file server) is the same as the
NetWare port name set on the print server card in the fax
machine. If there are several network print servers, set the
NetWare port names so that they are different from each
other.
• Make sure that the correct NetWare port name has been
selected. Check that the fax machine name set on the file
server is the same as the NetWare port name set on the
network print server. If there are several network print
servers, set the NetWare port names so that they are
different from each other.
• Check that the NetWare login password matches the set
password.
• Check that the machine name for the network print server
is the same as the print server name set on the file server.
Fax machine does not print
• Make sure that the network cable is properly connected.
Replace it if necessary.
• Make sure that the fax machine is switched on. If it is on,
switch it off and then on.
Print server mode
• Check to see that the network print server is logged onto
the NetWare server.
• Make sure that the correct file server name has been
selected. Check that the file server name you use is the
same as the file server name selected for the network print
server.
User’s Guide: English
|
45
Problems printing self diagnostics
test and configuration
Fax machine does not print
• Check that DIP switches 3 (configuration printing) and 4
(self-diagnostics testing) have been turned on. Turn the
fax machine off before changing the DIP switch settings.
• If the fax machine is on-line, turn the power switch off and
then on.
NG printed in self-diagnostics test results
If the ROM check or RAM check result is NG (no
good).
• After checking that the network print server is installed
correctly, switch the fax machine off and then on.
If the EEPROM check result is NG.
• After checking that the network print server is installed
correctly, switch the fax machine off and then on.
• Turn DIP switch 2 to the ON position to initialize the
network print server print server. Retest after resetting.
If NIC Check is marked with NG.
46
|
Network print server
• After checking that the network print server is installed
correctly, switch the fax machine off and then on.
• Check that the network cable is properly connected. Try
connecting the fax machine to a network in another
segment if possible. Also, try another cable.
If the fax machine prints a different network format
from that of the network to which it is connected.
• After checking that the network cable is properly
connected, switch the fax machine off and then on.
• Replace the network cable connected to the fax machine
and switch the fax machine off and then on.
Network print server Status Lights
Three status lights (LED’s) on the network print server card
indicate print server status for troubleshooting.
LINK 100M Light (green LED, center)
Lights when the NETWORK PRINT SERVER is connected
using 100BASE-TX.
LINK 10M Light (green LED, near cable)
Lights when the NETWORK PRINT SERVER is connected
using 10BASE-T.
STAT Light (red LED)
Flashes when the NETWORK PRINT SERVER receives
data. If the NETWORK PRINT SERVER detects an
abnormality, the STAT LED performs one of the
following:
• Flashes at fixed intervals
• Stays on
• Stays off.
Turn the machine off and then on to reset the error
condition. If this does not work, then do the self
diagnostics test.
User’s Guide: English
|
47
Specifications
CPU:
NEC V53A 20MHz
Network Interface:
100BASE-TX or 10BASE-T
Network Protocol:
IPX/SPX (NetWare)
Remote printer mode
Print server mode
EtherTalk
TCP/IP
NetBEUI
Functions:
Banner printing function (FTP, LPD)
Kanji filter function (FTP, LPD)
48
|
Network print server
Index
Overview
A
Adapter Card 5
adding LPR port 31
C
Components 5
configuration page, printing 14
configuration problems 46
Configuring the Network Print Server
introduction 11
using OKIVIEW 32 11
using TCP/IP 19
using Telnet 20
using the OKIFAX front panel 14
using the Web Page 15
F
front panel, configuring using 14
H
HP JetAdmin and Web JetAdmin Support 6
I
installation procedure 7
IP addres 35
IP address setup 14
L
LPR Port, adding 31
N
Network Print Driver
description 5
installation 26
Novell NetWare
Bindery Printing 39
introduction 38
Novell Client and OKIVIEW 32 13
Novell Directory Services (NDS) 40
Novell Distributed Print Services (NDPS) 42
printing problems 44
setting up the clients 42
O
OKI Print Monitor
description 6
installation 27
Network print server
configuration 11
User’s Guide
|
49
description 5
Installation procedure 7
part names 9
specifications 48
status lights 47
troubleshooting 43
OKIVIEW 32
configuring using 11
description 5
features 12
using for NetWare setup 39, 40
P
Pop-Up Monitor
monitor screen 34
overview 33
printer selection 33
setting up display items 36
setting up pop-up conditions 36
setup dialog 35
status monitoring 35
task tray 33
printing a configuration page 14
S
self-diagnostics test printing problems 46
Software Utilities CD-ROM 5
50
|
Network print server
specifications 48
status lights 47
T
TCP/IP, configuring using 19
TCP/IP printing problems 43
Telnet, configuring using 20
troubleshooting
configuration problems 46
introduction 43
NetWare printing problems 44
self diagnostics test printing problems 46
status lights 47
TCP/IP printing problems 43
W
Web Page
configuring using 15
introduction 15
settings 17
Windows printing 26