1
BCM Rls 6.0
Message Networking
Task Based Guide
Message Networking
Copyright © 2010 Avaya Inc.
All Rights Reserved.
Notices
While reasonable efforts have been made to ensure that the information in this document is complete and accurate
at the time of printing, Avaya assumes no liability for any errors. Avaya reserves the right to make changes and
corrections to the information in this document without the obligation to notify any person or organization of such
changes.
Documentation disclaimer
Avaya shall not be responsible for any modifications, additions, or deletions to the original published version of
this documentation unless such modifications, additions, or deletions were performed by Avaya. End User agree to
indemnify and hold harmless Avaya, Avaya’s agents, servants and employees against all claims, lawsuits, demands
and judgments arising out of, or in connection with, subsequent modifications, additions or deletions to this
documentation, to the extent made by End User.
Link disclaimer
Avaya is not responsible for the contents or reliability of any linked Web sites referenced within this site or
documentation(s) provided by Avaya. Avaya is not responsible for the accuracy of any information, statement or
content provided on these sites and does not necessarily endorse the products, services, or information described or
offered within them. Avaya does not guarantee that these links will work all the time and has no control over the
availability of the linked pages.
Warranty
Avaya provides a limited warranty on this product. Refer to your sales agreement to establish the terms of the
limited warranty. In addition, Avaya’s standard warranty language, as well as information regarding support for
this product, while under warranty, is available to Avaya customers and other parties through the Avaya Support
Web site: http://www.avaya.com/support
Please note that if you acquired the product from an authorized reseller, the warranty is provided to you by said
reseller and not by Avaya.
Licenses
THE SOFTWARE LICENSE TERMS AVAILABLE ON THE AVAYA WEBSITE,
HTTP://SUPPORT.AVAYA.COM/LICENSEINFO/ ARE APPLICABLE TO ANYONE WHO DOWNLOADS,
USES AND/OR INSTALLS AVAYA SOFTWARE, PURCHASED FROM AVAYA INC., ANY AVAYA
AFFILIATE, OR AN AUTHORIZED AVAYA RESELLER (AS APPLICABLE) UNDER A COMMERCIAL
AGREEMENT WITH AVAYA OR AN AUTHORIZED AVAYA RESELLER. UNLESS OTHERWISE
AGREED TO BY AVAYA IN WRITING, AVAYA DOES NOT EXTEND THIS LICENSE IF THE
SOFTWARE WAS OBTAINED FROM ANYONE OTHER THAN AVAYA, AN AVAYA AFFILIATE OR AN
AVAYA AUTHORIZED RESELLER, AND AVAYA RESERVES THE RIGHT TO TAKE LEGAL ACTION
AGAINST YOU AND ANYONE ELSE USING OR SELLING THE SOFTWARE WITHOUT A LICENSE. BY
INSTALLING, DOWNLOADING OR USING THE SOFTWARE, OR AUTHORIZING OTHERS TO DO SO,
YOU, ON BEHALF OF YOURSELF AND THE ENTITY FOR WHOM YOU ARE INSTALLING,
DOWNLOADING OR USING THE SOFTWARE (HEREINAFTER REFERRED TO INTERCHANGEABLY
AS "YOU" AND "END USER"), AGREE TO THESE TERMS AND CONDITIONS AND CREATE A
BINDING CONTRACT BETWEEN YOU AND AVAYA INC. OR THE APPLICABLE AVAYA AFFILIATE
("AVAYA").
Copyright
Except where expressly stated otherwise, no use should be made of the Documentation(s) and Product(s) provided
by Avaya. All content in this documentation(s) and the product(s) provided by Avaya including the selection,
arrangement and design of the content is owned either by Avaya or its licensors and is protected by copyright and
other intellectual property laws including the sui generis rights relating to the protection of databases. You may not
modify, copy, reproduce, republish, upload, post, transmit or distribute in any way any content, in whole or in part,
including any code and software. Unauthorized reproduction, transmission, dissemination, storage, and or use
without the express written consent of Avaya can be a criminal, as well as a civil offense under the applicable law.
Third Party Components
Certain software programs or portions thereof included in the Product may contain software distributed under third
party agreements ("Third Party Components"), which may contain terms that expand or limit rights to use certain
portions of the Product ("Third Party Terms"). Information regarding distributed Linux OS source code (for those
Products that have distributed the Linux OS source code), and identifying the copyright holders of the Third Party
Components and the Third Party Terms that apply to them is available on the Avaya Support Web site:
http://support.avaya.com/Copyright.
Trademarks
The trademarks, logos and service marks ("Marks") displayed in this site, the documentation(s) and product(s)
provided by Avaya are the registered or unregistered Marks of Avaya, its affiliates, or other third parties. Users
are not permitted to use such Marks without prior written consent from Avaya or such third party which may own
the Mark. Nothing contained in this site, the documentation(s) and product(s) should be construed as granting, by
implication, estoppel, or otherwise, any license or right in and to the Marks without the express written permission
of Avaya or the applicable third party. Avaya is a registered trademark of Avaya Inc. All non-Avaya trademarks
are the property of their respective owners.
2
NN40011-021 Issue 1.2 BCM Rls 6.0
Message Networking
Downloading documents
For the most current versions of documentation, see the Avaya Support. Web site: http://www.avaya.com/support
Contact Avaya Support
Avaya provides a telephone number for you to use to report problems or to ask questions about your product. The
support telephone number is 1-800-242-2121 in the United States. For additional support telephone numbers, see
the Avaya Web site: http://www.avaya.com/support
Copyright © 2010 ITEL, All Rights Reserved
The copyright in the material belongs to ITEL and no part of the material may
be reproduced in any form without the prior written permission of a duly
authorised representative of ITEL.
NN40011-021 Issue 1.2 BCM Rls 6.0
3
Message Networking
Table of Contents
Message Networking ........................................................ 5
Overview .......................................................................................... 5
Required Information ....................................................................... 5
Flow Chart ....................................................................................... 6
Accessing CallPilot Manager ........................................................... 7
Accessing CallPilot Manager from Element Manager .......................................7
Accessing CallPilot Manager from Internet Explorer .......................................11
General Properties ......................................................................... 13
Configuring General Properties .......................................................................13
General Networking Properties Settings .......................................................14
Digital Networking Configuration .................................................... 15
Digital Networking Properties ..........................................................................16
Digital Networking Properties Settings ..........................................................17
Digital Networking Sites ...................................................................................18
Network Site Properties Settings ...................................................................19
Recording the Site Name ...............................................................................19
Recording Prompts ..........................................................................................21
Network (Site) Mailboxes .................................................................................22
Recording a Network (Site) Mailbox Name .....................................................24
AMIS Configuration ........................................................................ 25
AMIS Networking Properties ............................................................................25
AMIS Networking Properties Settings ...........................................................25
AMIS Call Blocking Periods .............................................................................26
AMIS Sites .......................................................................................................28
AMIS Site Properties Settings .......................................................................28
Network (AMIS) Mailboxes ..............................................................................29
Recording a Network (AMIS) Mailbox Name ...................................................31
Sending Messages ........................................................................ 31
Sending a Message Using a Network Delivery Mailbox ..................................31
Norstar Voice Mail Interface (NVM) ...............................................................31
CallPilot Interface (CP) ..................................................................................32
Sending a Message Using Site-Based Addressing .........................................32
Norstar Voice Mail Interface (NVM) ...............................................................32
CallPilot Interface (CP) ..................................................................................33
Sending a Message Using Direct Addressing .................................................34
Norstar Voice Mail Interface (NVM) ...............................................................34
CallPilot Interface (CP) ..................................................................................35
Avaya Documentation Links .......................................... 36
4
NN40011-021 Issue 1.2 BCM Rls 6.0
Message Networking
Message Networking
Overview
Message Networking links CallPilot or other voicemail systems at different
locations. Message Networking uses Digital Networking and/or Audio
Message Interchange Specification (AMIS) to let subscribers exchange
messages with subscribers at other locations.
Note: You must apply the Message Networking Software Authorisation Code
before your system can receive or send network messages. This applies to all
networked sites.
Using Message Networking, local subscribers can send messages to mailbox
owners at remote sites as if they were on the local site. Message Networking
also has the facility to allow subscribers to reply to messages sent from
remote sites.
Note: Before commencing Digital Networking configuration, you should
ensure that your system has been configured with the correct networking
settings (e.g. DNS settings, Gateways etc.) as required.
Required Information
Before commencing with Message Networking configuration, it would be
useful to obtain/plan the following information:
AMIS
o
o
o
o
Remote site Auto-Attendant number
Local site telephone number
Logical site prefixes for all sites to be networked
Mailbox numbers on all remote sites
Digital Networking
o Fully Qualified Domain Name OR IP Address of each site
o Remote site prefix (this should be the same as the remote site
mailbox prefix)
o Local SMTP Proxy (if relevant)
o Local site prefix
o Mailbox numbers on all remote sites
NN40011-021 Issue 1.2 BCM Rls 6.0
5
Message Networking
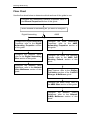
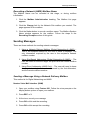
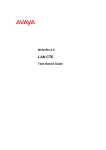
Flow Chart
Use the flow chart below to determine which sections of the guide to use.
Configure the Networking General Properties: refer to
the General Properties section of this guide.
Which method of Networking do you want to configure?
Digital Networking
AMIS
Configure the Digital Networking
Properties: refer to the Digital
Networking Properties section
of this guide.
Configure the AMIS Networking
Properties: refer to the AMIS
Networking Properties section of
this guide.
Configure the Network Sites:
refer to the Digital Networking
Sites section of this guide.
Configure the AMIS Call Blocking
Periods: refer to the AMIS Call
Blocking Periods section of this
guide.
Configure the Network (Site)
Mailboxes: refer to the Network
(Site) Mailboxes section of this
guide.
Configure Dialling Translation for the
Reply feature: refer to the Dialling
Translation section of the CallPilot
Manager & Mailboxes guide.
Configure the AMIS Sites: refer to
the AMIS Sites section of this guide.
Configure the Network (AMIS)
Mailboxes: refer to the Network
(AMIS) Mailboxes section of this
guide.
6
NN40011-021 Issue 1.2 BCM Rls 6.0
Message Networking
Accessing CallPilot Manager
CallPilot Manager is used to configure Message Networking, and can be
accessed using various methods.
Accessing CallPilot Manager from Element Manager
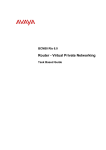
1. To access the Business Element Manager application from the Start
Menu,
navigate
to
Start,
Programs,
Avaya,
Business
Communications Manager, Business Element Manager.
2. Alternatively, double-click on the Business Element Manager desktop
icon.
NN40011-021 Issue 1.2 BCM Rls 6.0
7
Message Networking
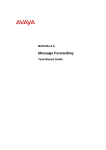
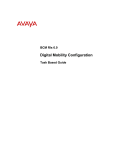
3. You will be presented with the Element Manager interface.
4. Open the Network Elements folder and select the IP Address of the
BCM.
5. Enter the User Name of the BCM in the User Name field, by default this
is nnadmin. Then enter the Password in the Password field, by default
the password is PlsChgMe!. Click the Connect button.
8
NN40011-021 Issue 1.2 BCM Rls 6.0
Message Networking
6. A warning screen will appear, read the warning and click OK.
7. You will be presented with the Element Manager interface.
NN40011-021 Issue 1.2 BCM Rls 6.0
9
Message Networking
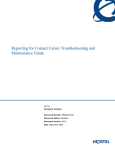
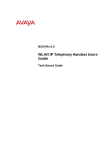
8. To access CallPilot Manager: Select the Configuration tab, open the
Applications folder, select the Voice Messaging / Contact Center
link, and then click to Launch CallPilot Manager.
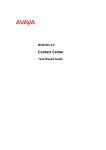
9. You will be presented with a Security Alert Screen. Read the alert and
click Continue to this website to continue.
10
NN40011-021 Issue 1.2 BCM Rls 6.0
Message Networking
10. The Main Menu of CallPilot Manager will be launched.
Accessing CallPilot Manager from Internet Explorer
CallPilot Manager can also be accessed directly from Internet Explorer. This
method of access is an alternative if you cannot gain access via Element
Manager.
1. Open Internet Explorer. In the address bar enter http://<IP Address of
BCM>/CallPilotManager.
2. If you are presented with the Certificate Error window, click Continue
to this website (not recommended).
NN40011-021 Issue 1.2 BCM Rls 6.0
11
Message Networking
3. You will be presented with Administration Login screen. Enter the
user ID and password. By default the User ID is nnadmin and the
Password is PlsChgMe!.
4. Click the Submit button. The Main Menu of CallPilot Manager will be
displayed.
12
NN40011-021 Issue 1.2 BCM Rls 6.0
Message Networking
General Properties
The General Properties section applies to both Digital and AMIS Networking.
Configuring General Properties
1. Access CallPilot Manager.
2. Click the Networking heading.
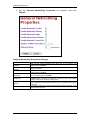
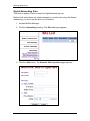
3. Click General Properties link. The General Networking Properties
page appears.
NN40011-021 Issue 1.2 BCM Rls 6.0
13
Message Networking
4. Set the General Networking Properties as required, and click
Submit.
General Networking Properties Settings
Attribute
Enable
Network
Receive
Enable
Network
Delivery
Enable Network Reply
Enable
Broadcast
Enable
Group List
Network
Number
Retries
Network
of
Network
Network Delay
14
Description
Lets your site receive messages from other sites on the network. The
default setting is enabled.
Lets your site send messages to other sites on the network. The default
setting is enabled.
Lets your site reply to messages sent from other sites on the network. The
default setting is enabled.
Lets you send Broadcast Messages to Network Delivery Mailboxes at your
site. The default setting is disabled.
Lets you add Network Mailboxes to a Group List. The default setting is
disabled. When you send a message to a Group List all of the network
delivery mailboxes on the Group List receive it.
1-9, default 3. Sets the maximum number of times the system attempts to
send a network message before abandoning it and sending a Non Delivery
Notification.
1-60 minutes, default 10. Sets the period between delivery attempts of the
same network message.
NN40011-021 Issue 1.2 BCM Rls 6.0
Message Networking
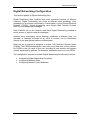
Digital Networking Configuration
This section applies to Digital Networking only.
Digital Networking links CallPilot and other voicemail systems at different
locations. Digital Networking lets users at different sites exchange voice
messages on a network connected by Transmission Control Protocol/Internet
Protocol (TCP/IP). Digital Networking uses Simple Mail Transfer Protocol
(SMTP) to exchange the messages.
Each CallPilot site on the network must have Digital Networking installed to
send, receive or reply to network messages.
Network voice messaging occurs between mailboxes at different sites. For
example, a message recorded at an office in London can be transferred
directly to the appropriate mailbox at Manchester.
Each site on a network is assigned a unique Fully Qualified Domain Name
(FQDN). The FQDN distinguishes a site from every other site on the network.
An FQDN is the full name of the site, including all sub domain and domain
names, separated by periods. For example, arabians.horse.com is an FQDN.
The configuration required to enable Digital Networking functionality involves:
Configuring Digital Networking Properties
Configuring Network Sites
Configuring Network (site) Mailboxes
NN40011-021 Issue 1.2 BCM Rls 6.0
15
Message Networking
Digital Networking Properties
The details entered in this section should be made available to the CallPilot
Administrators on the other networked sites.
1. Access CallPilot Manager.
2. Click the Networking heading.
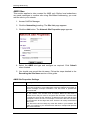
3. Click the Digital Networking Properties link. The Digital Networking
Properties page appears.
4. Configure as required and then click Submit.
16
NN40011-021 Issue 1.2 BCM Rls 6.0
Message Networking
Digital Networking Properties Settings
Attribute
Local
Prefix
SMTP
Proxy
Name (if
relevant)
Description
Before your site can receive messages from other sites, you must enter a local
prefix for your site.
The local prefix is the sequence of digits that must be prefixed to local mailbox
numbers to make them unique across your network. The prefix is usually the
same at your site prefix in the network numbering plan.
The local prefix is a number from one to nine digits. This prefix can be the same
as your site’s area code and three-digit exchange prefix. For example, if
customers dial 403-246-xxxx to reach your site, 403246 can be your local prefix.
You must give your local prefix number to the Network Administrator and
System Administrator at each digital site. If you change it, give them your new
prefix. They can update your local prefix in their Site Tables.
Before you can use Digital Networking, you must find out from the Network
Administrator whether the network has an SMTP proxy. SMTP proxies restrict
access to a company’s internal network from the Internet. A proxy provides
network security and prevents unauthorized access.
If your network has a direct connection to the Internet or Intranet, it does not
have an SMTP proxy and you do not have to enter an SMTP proxy name. If
your network has an SMTP proxy, you must enter the domain name of the
SMTP proxy of your site. Contact your Network Administrator for more
information.
The FQDN* of the SMTP proxy can be a maximum of 128 alphanumeric
characters. The domain name cannot have any spaces or punctuation except
for characters such as periods, dashes or underscores that are part of the
name.
Displays the IP Address of your system. This displays only if DNS is not used on
your system.
IP
Address
(read-only)
Domain
If you use a DNS your system displays the domain name. If you do not use a
Name
DNS the IP address is displayed.
(read-only)
* The FQDN is the domain name used for referring to your site and is added to all outgoing
messages. For example Avaya.com is a domain name.
NN40011-021 Issue 1.2 BCM Rls 6.0
17
Message Networking
Digital Networking Sites
This section applies to sites created for Digital Networking only.
Before local subscribers can send messages to another site using Site-Based
Addressing, you must add the site to your network.
1. AccessCallPilot Manager.
2. Click the Networking heading. The Site List page appears.
3. Click the Add button. The Network Site Properties page appears.
18
NN40011-021 Issue 1.2 BCM Rls 6.0
Message Networking
4. Select the Digital (VPIM) site type and configure as required. Click
Submit when finished.
Network Site Properties Settings
Attribute
Site name
Site prefix
Host name (for digital
networking sites only)
Mailbox prefix (for
digital networking sites
only)
Phone number
AMIS sites only)
Outdial
(for
Description
The Site Name is a text name for the site that can be up to 16
characters.
This name is shown to local subscribers when they address a
message or review message envelope information. The site name is
optional but recommended.
The Site Prefix is a number one to nine digits long that identifies the
site on the network. This number must be unique. Make the Site
Prefix a number that is easy for users to recognize and remember.
The Site Prefix is usually the same as the sequence of digits that
local users dial to place a telephone call to the site. For example, if
local users dial 403-123-4567 to call someone at the target site,
then 403123 is an easily remembered Site Prefix.
The Site Prefix cannot overlap any other Site Prefix in your Network
Site Table. For example, if you use Site Prefix 403123, it overlaps
with prefixes 40312 and 4031234.
The Host Name is the text name (FQDN) for the host site. It can be
up to 128 characters long.
If DNS is not used, enter the destination site IP Address.
The Mailbox Prefix is the Local Mailbox Prefix of the target site.
Message Networking ensures that all messages sent to the target
site are prefixed with this number. The Mailbox Prefix ensures
uniqueness for the receiving proxy or networking equipment.
Do not use this setting for Digital Networking.
Do not use this settings for Digital Networking
Recording the Site Name
After the site has been created, you should record the site name.
1. Start CallPilot Manager.
2. Click the Networking heading. The Site List page appears.
NN40011-021 Issue 1.2 BCM Rls 6.0
19
Message Networking
3. Select the site you want to record a name for and click the Change
link. The Network Site Properties page appears for the site you select.
4. Click on the Voice button and follow the steps in the Recording
Prompts section of this guide.
20
NN40011-021 Issue 1.2 BCM Rls 6.0
Message Networking
Recording Prompts
For best results, use a telephone that is attached to the same BCM as your
voicemail system. Avoid using cordless telephones.
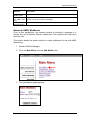
1. When displayed, click the Voice link. The page you can record
greetings and prompts from appears.
2. In the Connect to box, type the extension number or telephone
number you are using to record the greeting or prompt. For a local
extension, just type the extension number. For a telephone number that
is not a local extension, type the sequence of digits that dial the
telephone number from the voicemail system. For example, you might
need to dial 9, the area code, and then the telephone number.
3. Click the Dial button.
4. The telephone rings.
5. Pick up the handset. Do not use Handsfree.
6. Click Record. After the tone, record your prompt.
7. After you finish recording your prompt, click the Stop button.
8. To listen to the prompt, click the Play button or to save the recording,
click the Save button.
9. Click the Close button and replace your telephone handset.
NN40011-021 Issue 1.2 BCM Rls 6.0
21
Message Networking
Network (Site) Mailboxes
From a user perspective, the easiest method of sending a message to a
remote site is via Network Delivery Mailboxes. This requires the least input
from the user.
This section details the steps required to create mailboxes for use with Digital
Networking.
1. Access CallPilot Manager.
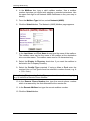
2. Click the Add Mailbox link.
3. The Add Mailbox page appears. Enter a Mailbox number, and select
Network (Site) from the Mailbox Type option list.
22
NN40011-021 Issue 1.2 BCM Rls 6.0
Message Networking
4. Click the Submit button.
5. The mailbox can now be configured.
NN40011-021 Issue 1.2 BCM Rls 6.0
23
Message Networking
6. Enter:
a. The name of the mailbox owner in the Last Name and First
Name fields.
b. Select the Display in Directory check box if you want the name
of the mailbox to appear in the Company Directory.
c. Enter the Site Prefix relating to the site where this mailbox is
located (refer to the Network (Site) list for the relevant site
information).
d. Enter the Remote Mailbox number. This is the actual mailbox
number on the remote site.
7. Click the Submit button.
Recording a Network (Site) Mailbox Name
The Mailbox Name can be recorded at this stage, or during mailbox
initialisation.
1. Click the Mailbox Administration heading. The Mailbox List page
appears.
2. Click the Change link for the Network Site mailbox you created. The
page appears for the mailbox.
3. Click the Voice button to record a mailbox name. The Mailbox Spoken
Name window appears for the mailbox. Follow the steps in the
Recording Prompts section of this guide.
24
NN40011-021 Issue 1.2 BCM Rls 6.0
Message Networking
AMIS Configuration
This section refers to AMIS only.
Audio Messaging Interchange Specification (AMIS) provides voice messaging
to mailboxes at different sites on a communication network. A network is a
collection of offices, locations or sites connected by telecommunication links.
Each site on the network must have AMIS to send, receive and reply to
network messages. Direct AMIS addressing lets local subscribers send a
voice message to any subscriber inside or outside the company who has an
AMIS voicemail address. No formal network interconnection is required. AMIS
networking uses ordinary telephone lines to exchange voice messages. An
AMIS address consists of a telephone number and a mailbox number.
AMIS Networking Properties
Use the following procedure to configure the AMIS Networking Properties.
1. Access CallPilot Manager.
2. Open the Networking menu and click on the AMIS Networking
Properties link. The AMIS Networking Properties page appears.
3. Configure the AMIS properties as required and click the Submit button.
AMIS Networking Properties Settings
Field
International
Access code
Country code
Description
This code identifies the country where your site is. This code allows
international calling capability. In Canada and the United States, the
International Access code is 011. This number can have a maximum of
four digits.
This code is assigned to the country where your site is located. In
Canada and the United States, the Country code is 1. This code can
NN40011-021 Issue 1.2 BCM Rls 6.0
25
Message Networking
Field
Area code
Telephone number
Outdial route
Enable Loopback
mailbox
Include System
name
Include Sender
name
Description
have a maximum of four digits. This information is used to generate the
return address of your location.
This code is assigned to your calling area. For example, the area code
for Kansas City is 816 and the area code for Calgary is 403. Each
province, state, and, sometimes city has a specific area code. This
number can have a maximum of six digits. This information is used to
generate the return address of your location.
The system telephone number at your site is the number assigned to
the Automated Attendant. This number can have a maximum of 16
digits. This information is used to generate the return address of your
location.
The numbers your site uses to access Line, Pool or Route codes. The
Outdial route is the Line or Pool number that AMIS uses to make an
outgoing call or the Route code used to call a specific site.
You use a Loopback Mailbox to test if two sites are communicating.
When a Loopback mailbox receives a message, it sends it back to the
originating mailbox. Before you can test network message capability,
you must enable the Loopback Mailbox.
The Loopback mailbox is not enabled by default. Enable the Loopback
mailbox while you set up and test your network. Disable the Loopback
mailbox after you know that it is working.
You can record a system name. When you include the system name,
the recorded system name is added to all messages sent from your site.
The system name plays as part of the recorded message.
To record the System Name, click on the Voice link and follow the steps
in the Recording Prompts section of this guide.
The sender’s recorded name can be attached to each message sent
from your site. The sender’s name plays as part of the recorded
message. The normal default setting is disabled.
AMIS Call Blocking Periods
After you create AMIS sites you can set up call blocking. Call Blocking
establishes times when AMIS Network Delivery Messages are prohibited. You
can limit non-urgent calls during peak periods or when long distance rates are
highest. You can establish Call Blocking for every day of the week.
There are four Call Blocking periods per day. For example, you can establish
a period on Monday from 08:00 to 11:00 a.m., and from noon until 4:00 p.m.
The available time for network calls to occur is before 08:00 a.m., between
11:00 a.m. and 12:00 p.m., and any time after 4:00 p.m.
1. Access CallPilot Manager.
2. Click the Networking heading.
26
NN40011-021 Issue 1.2 BCM Rls 6.0
Message Networking
3. Click the AMIS Call Blocking Periods link. The AMIS Call Blocking
Periods page appears.
4. Select the day you want to set up call blocking times for.
5. In the From box type the time call blocking begins and select AM or
PM.
Note: Any single-digit hour or minute must be preceded by a zero. For
example, type 8:00 as 08:00.
6. In the To box type the time of day call blocking ends and select AM or
PM.
7. You can select the Same As Previous Day check box if you want to
use the previous day's settings for the call blocking period.
8. Click the Submit button.
Note: If there is an overlap in the call blocking periods established for the
same day, AMIS determines the time band from the earliest and latest times
of the overlapping time bands and treats the times as one call blocking period.
NN40011-021 Issue 1.2 BCM Rls 6.0
27
Message Networking
AMIS Sites
This section applies to sites created for AMIS only. Before local subscribers
can send messages to another site using Site-Based Addressing, you must
add the site to your network.
1. Access CallPilot Manager.
2. Click the Networking heading. The Site List page appears.
3. Click the Add button. The Network Site Properties page appears.
4. Select the AMIS site type and configure as required. Click Submit
when finished.
5. You should now record the site name. Follow the steps detailed in the
Recording the Site Name section of this guide.
AMIS Site Properties Settings
Attribute
Description
Site name
The Site Name is a text name for the site that can be up to 16 characters.
This name is shown to local subscribers when they address a message or
review message envelope information. The site name is optional but
recommended.
The Site Prefix is a number one to nine digits long that identifies the site
on the network. This number must be unique. Make the Site Prefix a
number that is easy for users to recognize and remember. The Site Prefix
is usually the same as the sequence of digits that local users dial to place
a telephone call to the site. For example, if local users dial 403-123-4567
to call someone at the target site, then 403123 is an easily remembered
Site Prefix.
The Site Prefix cannot overlap any other Site Prefix in your Network Site
Table. For example, if you use Site Prefix 403123, it overlaps with prefixes
40312 and 4031234.
Site prefix
28
NN40011-021 Issue 1.2 BCM Rls 6.0
Message Networking
Attribute
Description
IP Address &
Mailbox prefix
Phone number
(for AMIS sites
only)
Outdial route (for
AMIS sites only )
Do not use these settings for AMIS.
The phone number is the phone number of the destination site. The phone
number can be a maximum of 30 digits.
Do not use this setting for Digital Networking.
Network (AMIS) Mailboxes
From a user perspective, the easiest method of sending a message to a
remote site is via Network Delivery Mailboxes. This requires the least input
from the user.
This section details the steps required to create mailboxes for use with AMIS
Networking.
1. Access CallPilot Manager.
2. From the Main Menu click the Add Mailbox link.
3. The Add Mailbox page appears.
NN40011-021 Issue 1.2 BCM Rls 6.0
29
Message Networking
4. In the Mailbox box, type a valid mailbox number. Use a mailbox
number that does not conflict with existing or potential extensions. Use
the same first digit for all Network AMIS mailboxes so they are easy to
identify.
5. From the Mailbox Type list box, select Network (AMIS).
6. Click the Submit button. The Network (AMIS) Mailbox page appears.
7. In the Last Name and First Name boxes type the name of the mailbox.
The mailbox name can be the name of the mailbox at the destination
site or another name. The mailbox name can be 16 characters long.
8. Select the Display in Directory check box if you want the mailbox to
be listed in the Company Directory.
9. Select the Outdial Type required. If using a Line or Pool enter the
required Line or Pool (pools must be entered in number format, e.g. A
= 1, B = 2 etc.).
Note: If using Route as the Outdial Type, you should enter the routing digits
(e.g. 9) before the Remote Phone Number.
10. In the Remote Phone Number box type the remote phone number
which is answered by the Auto-Attendant at the remote site.
11. In the Remote Mailbox box type the remote mailbox number.
12. Click the Submit button.
30
NN40011-021 Issue 1.2 BCM Rls 6.0
Message Networking
Recording a Network (AMIS) Mailbox Name
The Mailbox Name can be recorded at this stage, or during mailbox
initialisation.
1. Click the Mailbox Administration heading. The Mailbox List page
appears.
2. Click the Change link for the Network Site mailbox you created. The
page appears for the mailbox.
3. Click the Voice button to record a mailbox name. The Mailbox Spoken
Name window appears for the mailbox. Follow the steps in the
Recording Prompts section of this guide.
Sending Messages
There are three methods for sending network messages:
1. Using a Network Delivery Mailbox (Digital Networking & AMIS) –
This is the simplest method for the user to send a message. The
only information required by the user is the recipient’s network
mailbox number.
2. Using Site-Based Addressing (Digital Networking & AMIS) – The
user will need to know the target site prefix and the remote mailbox
number.
3. Using Direct Addressing (AMIS Only) – The user will need to know
the target site telephone number answered by the Auto-Attendant,
and the remote mailbox number.
Sending a Message Using a Network Delivery Mailbox
This method is for Digital Networking and AMIS.
Norstar Voice Mail Interface (NVM)
1. Open your mailbox using Feature 981. Follow the voice prompts or the
display button options to open your mailbox.
2. Press REC or 3.
3. At the tone, record your message
4. Press OK or # to end the recording.
5. Press OK or # to accept the recording.
NN40011-021 Issue 1.2 BCM Rls 6.0
31
Message Networking
6. Enter the Network Delivery Mailbox number.
7. Press SEND to send the message
or
press OPTS to assign message Delivery Options Certified, Urgent or
Timed Delivery, or Private (for VPIM destinations only)
or
press CC to send the message to another recipient.
8. Press the Release key to end the session.
CallPilot Interface (CP)
1. Open your mailbox using Feature 981. Follow the voice prompts or the
display button options to open your mailbox.
2. Press COMP or 75 to open the Compose Message menu.
3. Enter the Network Delivery Mailbox number and press DONE or #.
4. Press REC or 5 to begin recording.
5. Press OK or # when you are done. You can press 70 to add message
options.
6. Press SEND or 79 to send the message.
7. Press the Release key to end the session.
Sending a Message Using Site-Based Addressing
This method is for Digital Networking and AMIS.
Norstar Voice Mail Interface (NVM)
1. Open your mailbox using Feature 981. Follow the voice prompts or the
display button options to open your mailbox.
2. Press REC or 3.
3. At the tone, record your message. The message you record must be
longer than three seconds. The system times out after five seconds of
silence.
4. Press OK or # to end the recording.
5. Press OK or # to accept the recording.
32
NN40011-021 Issue 1.2 BCM Rls 6.0
Message Networking
6. Press ##.
7. Press NETW .
8. Enter the destination site prefix and mailbox number, press OK or #.
9. Press SEND to send the message as it is
or
press OPTS to assign message Delivery Options Certified, Urgent or
Timed Delivery, or Private (for VPIM messages only)
or
press CC to send the message to another recipient.
10. Press SEND to transmit the message.
11. Press the Release key to end the session.
CallPilot Interface (CP)
1. Open your mailbox using Feature 981. Follow the voice prompts or the
display button options to open your mailbox.
2. Press COMP or 75 to open the Compose Message option.
3. Enter the site prefix and the mailbox number and press OK or #.
4. The display shows the destination mailbox name and mailbox number.
5. You can enter another address or press DONE or # if you are finished
entering addresses.
6. Press REC or 5 and record your message at the tone. The message
you record must be longer than three seconds. The system times out
after five seconds of silence.
7. Press OK or # to end your recording or press REREC to erase and rerecord your message. You can press 70 to add message options.
8. Press SEND or 79 to send the message.
9. Press the Release key to end the session.
NN40011-021 Issue 1.2 BCM Rls 6.0
33
Message Networking
Sending a Message Using Direct Addressing
This method is for AMIS only.
Norstar Voice Mail Interface (NVM)
1. Press Feature 981. Follow the voice prompts or the display button
options to open your mailbox.
2. Enter your mailbox password and press OK or #.
3. Press REC or 3.
4. At the tone, record your message. The message you record must be
longer than three seconds. The system times out after five seconds of
silence.
5. Press OK or # to end the recording.
6. Press OK or # to accept the recording.
7. Press ##.
8. Press AMIS.
9. Enter the destination site phone number and press OK.
10. Press OK or # to continue or press ADD or 2 to add special characters.
Press OK or # when you are done adding special characters.
11. Enter the destination mailbox number and press OK.
12. Press OTHR to review or send the message
or
press OPTS to assign message Certified, or Urgent.
or
press CC to send the message to another recipient.
13. Press SEND to transmit the message.
14. Press the Release key to end the session.
34
NN40011-021 Issue 1.2 BCM Rls 6.0
Message Networking
CallPilot Interface (CP)
1. Open your mailbox using Feature 981. Follow the voice prompts or the
display button options to open your mailbox.
2. Press COMP or 75 to open the Compose Message menu.
3. Press SPEC or 19. This is the default number for special addressing
and can be changed in the System Properties section of CallPilot
Manager.
4. Enter the phone number of the remote site and press OK or #.
5. Press OK or # to continue, or press ADD or 2 to add special
characters. Press OK or # when you are done adding special
characters.
6. Enter the mailbox number at the remote site.
7. Press OK or # to accept the mailbox number.
8. You can enter another address, or press DONE or # if you are finished
adding addresses.
9. Press REC or 5 to record your message. The message you record
must be longer than three seconds. The system times out after five
seconds of silence.
10. Press # when you are done recording or press REREC or 5 to rerecord
your message.
11. Press SEND or 79 to send the message.
12. Press the Release key to end the session.
NN40011-021 Issue 1.2 BCM Rls 6.0
35
Message Networking
Avaya Documentation Links
36
CallPilot Message Networking Set Up and Operation Guide
CallPilot Message Networking User Guide
NN40011-021 Issue 1.2 BCM Rls 6.0