1
a
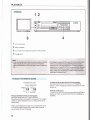
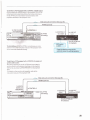
STEREO VIDEO CASSHTE RECORDER I
thoroughly, and retainIt fur
4-
clrrwstsb
bu
k
Im
C
.-",C
i CU
C
I*
P
.U
d
..,-
-
w m m v . . . 3 - m
-
F
"
-
"
~
-
------".*
4
~
r*lld*arW-$-,
m--L--
w
-
p
--.-w
~
B
-
g
w~
-*
-*,
*.
,. ,', -. .
r..
,
k
~
-
-
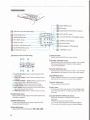
1 ADJUSTMENTS 1
.........................................................................-.38
area ...-..,-.,
-37
....................................
3
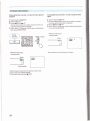
AdJustingthe TV
Rmaefth~~
the taetiw channels 1
rClock setting
GENERAL
e
This unlt can be used with any vldeo cassettetapes having
the mark
It is cwnpaWewlth the m I s , mand WB type mmding
and playback formats, and will play back tapes mmded in
the CW format.
m.
t.
1
-.
n
1
.C--
.-
--
*
A
To prevent fire or shock hazard, do not expose the unit to rain or rnolsture.
II
CAUT1ON : TO REDUCE M E RISK OF ELECTRIC SHOCK,
DO N M REMOVE COVER (OR BACK).
1
NO USERSERVICEABLEPARTS INSIDE.
REFER SERVICING TO WAURED SERVICE PERSONNEL
This symbol is intended to alert the
user to the presence of uninsulated
"dangerous voltage" within the product's enclosure that may be of sufficient magnitude to constitute a risk of
electric shock to persons.
A
Thls symbol is intended to alert the
user to the presence of important
operating and maintenance (servicing)
instructions in the literature accompanylng the appliance.
INFORMATION
This equipment generates and uses radio frequency
energy and if not installedand used properly, that is, in
stri~t
-am
with the manufacturer's Instructions,
may muse Interferenceto radio and television reception. It
has been typatested and fwnd to m p l y wRh the limits
for a Class Bsxxnputingd w i i in accordance wlth the
specifldlons inSubpart J of Part I 5 of FCC Rules, which
are &signed toprovide reasonable protection against
such interference kt a resldentlal installation. However,
there is no guaranteethat interfere- wlll not occur in a
particular hsfallation.
If this equipment does cause interferenceto radioor
television reception, which can be determined by turning
the equipment o f and on, tha user Is encouragedto try to
correct the interference by one or more of the foltowing
mure:
--reorhI the receivingantenna
-relocate thisequipment with respect to the receiver
-move this equipment away from the receiver
-plug this equipment into a d l f f m t outlet so that
equipment and receiver are on different branchctrcults.
If necesmy,the user should consult the dealer or an
experienoedradidtelevisiontechnician for additional
Suggestions.The user may tind the following booklet
prepared by the federal CMnrnunications Commission
helpful:
"How to identify and R d v e RadbfV Interference
Problems': This booklet Is availablefmthe U.S.
Govemmt Wntlng Ottlce, Washi@on DC, 20402, Stodr
No.
.-
CAlmON:
TO PREVENT ELECTRICSHOCK, DO NOT USE THlS
POLARED AC PLUG WITH AN EXTENSIONCORD,
RECEPTACLEOR OTHER OUTLETTUNES mE BLAB
CAN BE FULLY INSERTEDTO PREVENT BLADE
MIXSURE
REMOVAL OF THE TRANSIT SCREWS
Rear view
Screwhok
Thecassetlecomparbmnt is secured with three transh
screwsto prevent it from slkllngout whlle the unit k being
transported
~OPerathgIheurqbewmta~ths~
using a screwdrhrer. Storethe screws in the screw
holes at the mar, and put them beck In the dglnal posltlona,
when transportingthe unlt.
~rans\tscrews
PRECAUTIONS
r
\
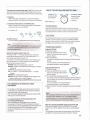
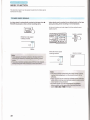
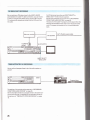
WHAT IS BETA HCR RECORDING?
rating, check that the operating powervaltage
and frequency of the unit are Mentlcal wlth tfioseof ywr
local power supply.
Should any mlld object or llquld fall intoWcaMnet, unplug
In conventional recording,audio signals are reccndedon
the audio track and vtdeo signals on the video track. In Bela
hi-ft recording, audio signals are recordedon the video track
W e unit and have It checked by quallfled pmor~rselbefwe
together wlth Ihevideosignals using2 rotary Mdeo heads.
operating itany further.
The Beta hi-fi audlo signals are frequency-modulatedand
O n e bladeof theplug Iswlderthan UteothertorPheprmrpose
recordedon 2 channels, so that you can recorda stereo
o f s a f e t y ~ w l H ~ l l n t o ~ p o w e r o u l l e t O n l y ~ w ~ . A program with sound qualityfar superior to that of the
you we un* to hwithe plug fully inlp9rmiW,contact
conventional audio recording.
your dealer.
Unplug t h e u n t t f m t h e w a l l ~ W I s n o t b h e U b
Beta hi-firecording patternon the video tape
an extenckd p&od of
cord,pull It
Conventional audio track
autbytheplugI
Allow adequelsairci
m
monaural)
V i b +audio FM track
-
nt Internal heat bulldMankets,etc.) or
may Wock the
Control track
Do not hs&Il lbL94IAUt nearheatsoufcm such as radiatorsor
air dlrdsor in a m subject to dlrect sunlight excesstve
dust,rnedw&d vlbratlon or shock
T h e unit kthdgned for operation In a horizontalposition.
Do not InstallIf 1TI an Lntlnedposition.
Keep the unit and cassette tapes away from e q u l m t with
strong magnets,asfor example a mlcrawaveovenor a large
video and Beta hi-fi
loudspeaker.
Do not place any h a v y object on the unlt.
of conventlonal audlo
signals and control
pnap#atkql
When the BETA HI-FIswitch is set to ON, this recon&
records audio signals on the video track @etahi-fi
recording) and on the conventionalaudio track at thesame
time, so that these tapes can also be played beck on any
ordtnerry video cassette recorder without a Beta hEfI systm.
+When theunitbnst huae,turnoffthepowectoconserve
energy and to extend its usaful Ufe.
~andslorevideo~esaftwrecordlngor
playback
Storethe casettes in theircaaesmdbep them in an
upright position to prevent Intrusionof dust and uneven
wind~ng
Clean thct cabinet, panel and controls with a soft dty cloth, or
a sbft cloth lightly moistened w4th a mild detewgmt solution.
Do not use any type of solvent, such as alcohol or b m h e
whkh rnbghtdamagetheflnlsh.
Do not throw away the cartonand packing materials.
They makean Ideal container in which to bansport the unlt.
When shlpplng the unlt to another tocation, repack It as
fllustratsdon the carton.
L
/
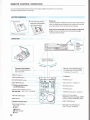
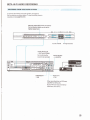
LOCATION AND FUNCTION OF CONTROLS
For details on the use of each control, refer to the pages Indicated in the Mack circles (a).
0
Variable speed playbeck
buttonsand lndicaturs
aWEFIELOSE
Ress slide out ttw cassetie compartment. Press again
to
to slide in the cassette compartment.
REMOTESENSOR
Detects the signals transmitted from the Remote
Corn mander.
m+ ~ ~ C T b u t t o n
Press to eject the cassette.
~ ~ a ~ ~ e ~ ~ ~ b u t t o n s a n c i i n d c a t o r s @
SILL, l f l O , l E , XI, X2, SCAN
4 I FRAME11) buttonsand lndkatom @
REV < (revem), > FWD (forward)
@ TIMER REG hdfoatw
0 W R lndlortw
Q Week lndlcator
Day of the we8k Indlcator
@ SC (sirnutcast) indlcator
CATV (cable TV) indicator
8 SAP (Seccmd Audio Program) Indicator
@ Chrnnet number
0 INDEX indhtonr
d Cassette indicator
Tape speed indicator
O Twnon time setttng lndlcatar
Q Timer -ram
poshion
O T u m a time of a Plrner d i n g
@ Tape wunter
T u d tlme setting hdkator
Q Turn-off time of a timer rscordlng
STEREO indlcator
a
STlUAW(~}buttan
@
0 ADD-@
ERASE~~I@
@ CATVINORM(nonrral)bdh @
a AUTO STEREO !switch
Normallyset to ON. When the signal Is weak on a
particularcharmel set to OFF.
o RFUNIT-&
@
6 ) COMMAND MODE ~ e i ~ c t ~
CHANNEUTIMER +I- buttons
RECORDbutton
Tape transport buttons and
indicators
lNDM button
TAPE RETURN button
COUNTER RESET buttan
TVMV button
-.EW,
,*
--~ H E A ~ ~ a n d L ~ L c o n t r d
Connect s t e m headphums(with stereo phone lack) to
the HEADPHONESmThe vdume can be adjusted with
the LEVELcontrol.
~
~
M
i
i
~
Li~htsdurinqrecording
with the BETA HI-FI sw1lch set to
ON. When playing beck a Beta hM1recarded tape,the
indi~tw-
HI-FI Meh.
mPEAK PIWQ MEER
Qftttepg;glflw
~f t h B~R A
*-*.
Used for the index scan or index search operation.
@TAPE REIURN brttan
In stop mode, presstoadMnceor M n d the tape
approximately to the counter "OHOOMOOS" point.
@COUNT€RRMM
Ress to reset the tape counter to " O H O O ~ '
?
-7
R
--+
9):'
A
,a-
* -;&,A
+
;
Shows tM peak input k d sof tha dgM and I& cb-~nels
durlq Beta hi-fi recording,and r e c m # WM~n g
playback.
.
I .
flREC LEVELcankols
the 8-A WFI
used to adjust t~ recording level
switch Is set 1oON. Normally keep at thecenterdetent
posliion 0.
~ C H M N E ~ M E +I-buttona
R
Pressto selecj W ct!annel and tr, s@ the cbck w timer
Pwm-
O
@IN~JMbutton
RECORD~UWI
F m s to start recording.
~ T a p ~ r a ~ k n t o n s a n d ~ m
rrREW@wwh%, PLAY,FF(fadfarnard),
STOP, IIP A U S U H s f l U
@TvM-Rbutbl
Press to view the program selectedon the mcc&r.The
VTR indicator appmm in the display window.
(TheVTR Indicator appears automatically when t
hw
PLAY button Is p d . )
To view adiffemnt TV programwhile recwding another,
press thls button agaln. The VTR indicator diseppears.
QUlCKlMER button
EDIT switch
Buttons for clock and timer setting\-
AUDIO MONITOR STEREWUR selector
INDEX MARK button
INPUTSELECTswitch
AUDIO MONITOR HI-FVNORMALseWor
INDEX ERASE button
REC MODE button
NORMAL AUDIO sdector
D W Y fwrlton
BITA HI-FIswitch
NORMAL TRACKING cunlrol
MPX (multiplex) FILTER selector
SCOW TRACKING control
SHARPNESS control
SUPER BETA switch
pFJWSPLAYbuHon
Used to turn on and df the omreen display.
aNORMALTRACKING
eartrd
Normally keep at the center detent poaltion.Turn to obtain
the besf possiblepicture ifstdurlng normal playback
or srmw appears
~SCOwTRBCKINQeontrd
Normally keep at the center detent position. Turn if a noise
band appears in the freezepiclure or slow motion picture.
CLOCK
krtton:Press lo start the setting of the
current time.
@ TIMER S t 3 b u m : Press to start the settlng of timer
programs.
Q CHANNEMMEWHuUam Presgtoset the clock or
t l m program and to select the channel.
CLEAR bttar Press to dear the timer setting.
@ CHeCK button: Press to check the timer settings.
0 NMkrtton:Pressto~vancetothenexiltemtobe
set during clock or timer setting.
4B TlMEFt REC butbm Press to activate timer recording
INDEX MARK Ilutlon
Press to mark an Index signal at the desired point durlng
reowdingor playback.
~~JSHARFNESSW~~
Used to adjust the sharpnessof the picture if necextary.
Normally set thecontrol at the oenterdetent position.
QUICKTIMERbutton
Pressto activate thequick timer.
EDITSNormally keep at the upper pwltian.When &ng stape,
set to the lower p l t l o n . Thftededited picturequality wl1 be
Improved.
AUDIO MONITOR STERKUUR selector
Select the channel@)of the 38ta hi-fi sound to be
mcmltored.
INDEX ERASE buttan
To erase a prerecorded index signal, locatethe index
slgnal and pressthis button.
~E~RECNIODE~~I~WI
Usedtoselect the warding speed:IBIs,RIarlBm+
STEREO:Normally set to ttlls position.
L: To monitor the Lflefkjchannel of a s t e m program
A: To monitorthe R (rlght)&channel of a stem program
[381AC OUTLET
UNEOUT2VlDH)IPCMjeck
@horntype1
UNE OUT2AUMO jaclts
Ipt'lMKItype)
INPVTSLECTswlteh
Select the program to be recorded.
TUNER: To recordTV programs
SIMULCAST: To recwd the sound from the UNE IN AUDIO
jacks andthe picture of aTV program (FM slrnukast
recording)
LINUPCM:To &card signals from the UNE IN
VIDEORM and AUMOjadrs
AUWO MONtTOR HkFVNORMALwb?or
Select the sound to be monltord.
HI-FI:Ncmdlyset to this pittan.
NORMAL: To monitor the sound mcofdedon the
conventional audb track
@NORMALAUOIO sdect#
Select the w
nd to be recardedon the m t i u n a l audio
track. Normallyset to MAIN. To recordSAP sMmd, set to
SAP.
@ BETA H1.nSWM
ON: Normally set to thls podtion. M l n g wlll be carried
out In Beta hi-fi system.
OFF: Set to this pesltlon to record only in the conventional
system.
~hwxfl~m#kd#
OFF: Normallyato this poslth.
ON: For reoordlng FM bmadc@ programs (If your FM
tunes has an internal MPX filter, set thls selector to
OFF.)
PCM: For PCM reoording
~ s u ~ a r m ~ ~ @
Normally keep thisswbh at ON.
~CO~~~~~~lnptftjadc(rn~jmckl@
Connect to the CONTROLSoutput jack of other Sony
products for various system opsmtions.
COWR ROLL^(^^^^)@
Connect ta the CONTROL L connectorof other Sony
products for various system operations.
mACOMSupplies AC power to video or audlo equipment with
power consumptionof under400watts.
Do not connect here any electrical home appliances
whose power consumptionexceeds 400watts, such as
an electric iron or tan.
HANDLING THE VlDEO CASSElTES
Safety tab
The safety tab on the rear of the cassette should not be
removedfor recording. When a new recording is made on a
pre-recordedcassette,the previous recordingwill be erased
automdlcally.
To avoid erasing a recopding,break ofl the safety tab using a
screwdriver or similar object.
If you covet the open(ng with a plece of plastlc tape, w t i m
the safety tab has been removled, you can m r d on the
Recording time available ineach mode
By selecting the recordingspaed, mIs IDQorlOm,with the
REG MODE button, you can dectde the recordingtime.
15 mln.
30 rnin
cassette.
30 min.
L.750
The playback speed is automathlly set.
Ifyou actlvate RECORDor TIMER REC when the Inserted
cassette has Its safety tab remwed, the casettewHI be
automaticallyejected.
45 min.
7 hr, 30 min.
CASSElTE INSERTION
\
#-
1 PressPOWER
2
3
Press& EJECT.
The ca5sette c o m p r t m t stout and the cawstto
holder is dsed.
Insert a cassettewith the arrow on the cassatte toward
the front.
Cassette holder
4~
0
F
E ' d
The ca8s&@ @fJ&mmt slides h.
In plaoed -4,
you may press any of the tape transport
butt7 b masetk mpartrnent slides in and the
r e c l l W y goes into theselected tape operation
mode.
*The power can be automatically turned on wlthout pressing
POW€Rwhen&WECTIspmssed.
J
fow-crrsgetae
PmssiDECT.Thecass&Mcpmpartment slldesoutand
ths cassette b W is raisedTake out the cassette by hand.
Mah
*The & EJECT button functsm e m tf the mmiw Isturned
off.
T h e & WECTbutlondoesnothnctionduringd n g .
ToapmWEehmPress OPENKXOSE The cassetk oMlrpartment s l ; h out
vmether the tape is runningor not This allows check of the
remaining tape amaunt
MoleQonthecPgsettecom~
Be careful not to trap your hand m
n them3sette
compartment and the cabinet when the compartment Is
maving. If you should do so, the wssetle compartment will
automatically stop and mow in theopposite directbn In
several seconds
Do not insert any-thingotherthan a cassette lnsldethe
cassette holderand compartment.
Do not push down on the casette holder forcibly when it is
raised. If excessive force is applied, the protective devlce is
activated ta stop the cassette compartment tnovemnt and
recorder operation. In this case, press OPENICLOSE.
Frequent movingof thecassette compartment durlng
m r d l n g Is not recommended, since this may aflect the
recording.
@+
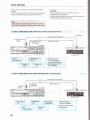
RECORDING TV PROGRAMS (Beta hi-fi recording)
&
Caution
Television programs, films, video tapes and other materials may be copyrighted.
Unauthorized recording of such material may be contrary to the provisions of the
*
copyright laws.
Also, use of this recorder with cable television transmission may require authorization
from the cable television transmitter andlor program owner.
OPERATlON
AUTO STEREO
MPX FlLTER I
+OFF
B W A HI-FI
4ON
--re#wrdhrg
Turn on the TV and select the channel for the mwrder.
G b c k the positions of the selectors.
*
1 Tumon the power.
2 Select the recordingspeed with REC MODE.
3 Insert a -tie.
4 Press TV#TR to select the VTR mode.
5 Select the channd to be recodedwith CHANNELI
TIMER +I-.
6
Press
RECORD. Reaxding wfll begin.
4
Chedronthmawlitwsaeen~
If the display does not appear, press DtSPLAY insidethe front
panel or on the Commander.
Channel to be recwded
mWJW=d
00.
r53
L
rn
3:56
o : Displayed for several
secondswhen RECORD
is
OH:
1
-0.mm:
is pressed.
ReMwding pause mode
fape counter
10: Channel number
Displayedfo srweral seconds
To stop Feoardlng,press H STOP.
When the tape reaches Its end, it wlH be rewound to the
beginning.
To turn off the povrer, press POWER.
Ifthe cassette comparbnent is open,it will be closed
automatically and then the power will be turned off.
In the years to come, an increasingnumber of prrqrams
will be broadcast& in stereo.Called Multichannel TV
Soundof MTS, the new technology will greatly enhance TV
viewing by bringing you programswith highfidelity stereo
sound.
To*---%'
Press 11PAUSEThe TV p r q r a m can Nt be seen an W T V ,
but the picturewill not be recorded.
To resume recording, press 11 PA^^.
To protect the video heads and the tap, the pausa mode will
be automatically r e k d afkrabd8 minutes and
recordingwill stop.
MTS also provldes fw an extrachannel catled the Sword
Audio Program or SAP which broadcasters can use to
transmit a second language for bilingual transmissions or
any other sound track.
Make sum AUTO STEREO in thetuningcompartment is set
to ON.
.The recarding p r d u r e is the same as usual.
baokonanoeher~fiantheverybeginningofthe
tape, run the -tor
about 15 seconds before starting
recordin@OIhww&@p u may missthe starting point
Insidethe front panel
BETA
HI-FI
NORMAL
AUDIO
Y o r r r e w r d a ~ ~
Set BETA HI-FIto ON. When the STERK) indicator lights up,
a stereo broadcast is b l n g received.
To m a d a SAP (SecardAuclio Frognun) hadcad
S t NORMALAUDLO to SAP. The SAP Indicator will light up.
If recording Is made when there O a SAP broadcast, theSAP
sound will be recordedon the conventionalaudlo track while
theMAlN soundis recorded on thevideo trackin Beta hi-fl.
To listento the SAP sound, set AUDIO MONITOR
HI-FUNORMALto NORMAL
TomordaMAIN~anly
Set NORMALAUDIO to MAIN. The MAIN sound wlll be
recorded on the video track and the conventbnal audiotrack.
-
.L.-
Yw can Wde the starting point for recordingwhile
watchlrrg the plctuw.
1 Locate the point where you wish tostart mordlng on the
tapebyplarllngbkthetapeorusingtheW m n m M
BetaSklpScan fundon.
2 RBssIIPAUsEbstaphtapwhereyauwi~tostart
recording.
3 Ress RECORD.The rwmder wlll enter m i n g pause
mode.
4 Press IIPAUSE at the desired point to release the pause
mode. Remrdlng will begin.
-
""I
PressT V m so that the VTR indicator disappearsfrom the
display window. S e k t the channel you want to view on the
TV.
PLAYBACK
1 TO S
E
L
m THE MONITOR W I Y D
-
Inddethe fmnt panel
AUDIO MONITOR
PlaybsekofBaaM.fl~~pnograms
Set AUDIO MONITOR to H I R and to STEREO.
When the recorder Isconnected to a Component TV, a stereo
system or stereo headphones,you can enjoy s t e m wund
repmductlan.
When a convent i d(monaural) TV Is connected, the sound
of the left and rlgM channelsare mixedso that monaural
sound c o w from the TV s p e a k
T ~ r e l e c t t h e l e f t o r r l g M ~ o f ~ ~
Set AUDIO MONITOR to HI-FI and to Lor R. Seiect the
position Loeft)or R (right) acceding to the channelyou wish
to listento.
~ d S A P s a w r d
To listen to the SAP scwnd that was recorded with NORMAL
AUDIO set to SAP, set AUDIO MONTOR HI-FVNORMALto
NORMAL
VARIOUS PLAYBACK MODES
-
BACK A TAPE RECORDED ON
If the VCR on which the tape was m r d e d is not equipped
with the 8eta hi-fi systwn, the recorder will play back the
tape in the convantionel way.
If streaks orsnow appears,adjust MORMALTFVGKINGfm
thsbest possible picture, %turn the control to thecanter
positton after viewing that tape.
To get e sharp picture, turn WARPNESSbw&SHARP.
Insidethe front panel
TRACKING
SHARPNESS
4
NORMAL
AUTO pm~ -
SOFT
L
SHARP
,2
F
'.IC:'
-To play back a tape hwn the beginning of the tape after
- Viewtn6J the pictureat a fast speed to find a particular
SCBnct
Keep pressing m h FF or u REW during playback.
When you release the button, normal playback will be
resumed.
M d n g
Press) PLAY, kmping the 4 REW depressed. After the
tape is m p i e t e l y rewound, it will be automatically played
back
Keep pressing w FFor uREW durlng fast-forwardor
rewind mcde.
When you release fhe button, the fast-forwardor rewind mode
wlll beresumedStreaks wilt a m r and swnd will be muted in the Betascan
and Beta SklpScan pictures.
F R W PICTURE myback pause)
Rgss PAUSE I l l S T l U Hduring playback (in normal or slow
mode). The sound is muted.
Press PAUSE IllSfILLMagain or press )PLAY to resume
normal playback
To protect the video heads and the tape,the pause mode will
be automatically released afterabout 8minutes and playback
wilt be resumed.
TO O W N B€fTER PLAYBACK PICTURE
- in variable playback modes
O
4 FRAME II,
If hfrwze plchrmappearsbshakePress STIUADJ in the tuning cornparhnent until the
plcture stabilizes.
As long as the same TV or color monitor is used,
readjustment should not IE necessary.
I f sbwtbornalse bandsa#rearinfmzeIstqm&m
~orlflOar115spedbward~Adjust SLUW TRACKING inside the front panel.
I f streaksormba b a n d s ~ I n n o r m a l ~ ) o r ~
sped $4)
w a r d pkture.,
Adjust NORMALTRACKINGinside the front panel.
Press > FWD (forward)or <REV (reverse) in freeze picture
m.
Chedc on the monitorscreen(in various playback modes)
If the display does not appear, press DISPLAY inside the front
panel or on the Commander.
Press)PLAY to resume mrmd playback
VA
rBLl
- -
PEED PICTURE
Pressthe desired speed button during pfayt>ackor in freeze:
picturemode. The sound is muted (except in 4 and ~2
forward picttim).
w STILL: fmze picture
1/70: sbw motion pictureat In0 normal speed
115:slow motin pictureat 115 normal speed
XI:
normal speed picturn
& @uMe speed picture*
SCAN: continuous
picture
Tape operation mode ifhicator
T+ w u n t ~
~~
Torevrsrsrrtlmd~ofthe~sped~
press REV <. To resume forward playback, press> FWD.
To
Ihs playbadsped, simply pressthe desired
speedbutton,
To mmetKwmal plqbck press) PLAY.
I
(44)-Reverse
Betascan and Beta Sklpscan
IPPI -Forward Betascanand Bata Skipscan
I I P ---Stop-action advance picture
F,5iLJ-
Varlable speed
E7zZ
i kF
The tape operation mode indicators will disappear in ~
seconds.
~
a
USE OF THE TAPE COUNTER
The tape counter indicates theapproximaterunning time of
the tape and the relativep o s i t i of programson the tape.
TO INDEX M E TAPE
Before starting W i n g or playback, press COUNTER
RESET to set the counter to 'YIOIlMOQs". By noting ths
counter reading at #re desired point, you ean M i y flnd that
polnt later by refenlng to the counter. lkre the label on the
cassetteto list the programs and their counter r d i ~
1 During recording or playback, press COUNTER RESET at
the poinl you want to locate later,
2 When recording or playback is finished, stoptha tape and
pressTAPE RETURN.
The tape will be rewound or advanced close to the paint
where the counter reads "On00MMXs".
TAPE RETURN
-5
COUNTER RESET
T+
T0stsrtplaybadr~Heallyfrommg~poM
Press) PLAY after pressing TAPE RITURN.
T h e caunterm8ding isaukmatically reset tozerowhen
casswebW l y I&d.
.v The cdunmr d i n g will be mtdned in the m r y e v e ~
,. after thta power C tumed off,aslong as the cassette is Ic
th~mQtsetbcompartmentmt.
*5frs oounter wUI not advanoedurin
'. .that is blankor un
TAPE RETURN
T+-
_
Noae
Thertape rehmam¶tape returnplay camlot be actlmied
~ t h e ~ r e a d ~ n g I s w l C h l n ~ ~ 1 0 s
REMOTE CONTROL OPERATION
You can control almost all the functions of this video cassette reader hnm your armchair
usingthe supplied Remote Commander.
Battery I I
In n o m l operation, battales will last for about t h r e e m h s .
When the battetlm areexhausted,the indicator wlll nat light
when the buttonson the Commander are pressed.
IftheRemote~bnotWbusedWabng~
of tlme, remove the batteries to avoid possible damage
caused by battery leakage.
Select
COMMAND
MODE:
m 1 or
m 2
POWER switch *
VOL (volume)+I- buttons* *
MUTINGbutton* *
TVMT button*
Varlabte speed playback buttons
4II,MI l b , x 1114x115,xl,>Q,
TIMERICH (channel)+-buttons*
Buttons fortlmersettlng
TAPE RETURN button
TIMER REC{tirn& recording),TIMER
CHECK, CLEAR, TIMER Sm,
NEXT
QUICK TIMER button
Tape transport buttons
I1muse1
@laYl
,
-
See "Use of the JOG dlal and
SHUrnE ring" on page 17.
The buttawand controlsotherthan~to~
will function the
same a3 ttrose on the recorder wirh a similar name or mark.
(Auto play cannot be activated with the Remote Carnmander,)
Indimtor
Blinks when any of the buttons on the Commander is
pressed. While it is blirlking, other buttonsdo not function.
Channel number bultfms and ENTER butts
Select channels. Affer pressing the digits of the deslred
channel one by one, press ENTER
Ex. Channel 12
REC buttons
To start recording,
these buttons drnultaneously.
I Channel selection [
Press the CHANNEUTIMER funct~onbutton and turnthe
JOG dial clockwise to select a hlgher-numberedchannel, and
counterclockwise to select a lower-numberedchannel.
To set the day of the week,turn-on and turn-off times and
channel of a tirner program, press the CHANNEVTIMER
function buttonand turn theJOG dial clockwise to advance
the diglts, and counterclockwiseto reverse them.
I~
B u t m a for mmte control af Sony TV5
The buttons with " *" mark can be used alw to operate
certain Sony remde control W s .The buttons with " "
mark will be used only for those TVs.
To operate a TV, set the remote control T V M R selector on
the Commander tom.The functionsof the buttons are
Ilmitd by the functronsof theTV.
POWER: Press to turn the power on and off.
MmINQ: Press to mute the sound. Press again to restare
the sound.
TVNTR: Ress to select the Input mode.
VOL +kPressv+" for m e volume, andu-" for less
wlum.
TIMEFKH+: Select the channel.
DISPLAY: Press to retain or extinguish h a display of the
channel numbr, etc. on the TV s c m .
Chamel nurnberbutlonsand ENTER:Select the channel.
**
FOR OWNERSOF OTHER SONY VIDEO
EQUIPMENT
To remotety control otherequlpment,set the command
rnode selector on the Remote Commander according to
command mode of the eqd pment.
VTR?: Most Sony Betamax infraredremote control VCRs
VlR2Sorry 8 mm format VCRs
To avold h a w the SL-HF750and the other VCR
functronlnahS t tM COMMANDMODE Wwtor in the tunlng
compartment of the S t - H m 0 to a different command
mode position from the m m a n d mode of the other VCR.
Simply by switching the V l R 1 M R 2 mlectw on the
Remote Commander, you can control two VCRs
separately.
CHANNELmMER
function button
and indicator
JOG dial
functlon button
I
m w speed
e
Pla-
Ushrgthe JOG dial
1 Play back a t a p .
2 Press the JOG SHLllTLE function
button.The indtcator lights and the
picture trwes.
3 Turn the JOG dlal.
The tape will beplay& b-ackatthe speed youareturning
the dial.
Turn it clockwise for forward playhck,or
cwnterdockwisefor r e v m playback.
Using the SHUITLE ring
Play back a tape.
2 Press the JOGSHUTTLEfunction
button.The indicator lights and the
nicture freezes.
1
3 +urn the SHUlTLEring and hold it at
the position where the desired playback speed Is obfalned.
You can select 115, normal PI),&uble 0 or continuous
Betascan speed.
Tum it clockwise for forward playback, or
counterclockwisefor reverseplayback
4 When the SHUTTLE ring Is released, the picturewill fre8ze
again.
M e
The JOG dial and SHUITE ring can be actlvatBdwhen th
indicator of the JOGSt-lUrnE or CHANNELmfER
.
, functbn button is lit. If the indicator has been turnadoff,
press the correspondingfunction button again.
88
8"
-
-
>
i
WhenthsJOGdirrland~~ringmnbttobe~
Pressthe CHANN€UiMER or J O G S H W functlon
button to turn off its indicator.This prevents undue battery
wear.
The indicator will be turned off autornaticalty If the JOG dial
and SHUITLE ring are not usad for mow than 1 minute.
TIMEn-ACTIVATED RECORDING
Six recordingscan be preset to be made on every day, any
day this week, next week orthe week after next, or on the
same day e w y week
The day yew set set timer
(12
13
14
15
16
26
27
28
29
30
17
18
Chedtbe)oresetHngthetlmer
Make sure the cassettetape is long enough to rword
programs.
Be sure the safety tab of the cassette has not been
removed.-If removed,the cassette will beautomatically
ejected when TIMER REG is pres4ed.
Press POWER to turn the poweron.
4 Set SUPER B K A to ON.
4 Set INFUT SELECT to TUNER fof recafdlq TV programs.
Nextweek
The week after next
The clock must be set to the correct current time. To set the
clock, see page 38.
w
aaau-
CHANNEUTIMER
functionbutton
an--=
JOG dial
11 0
nMER G I 3
NEXT
a
NEXT
0
You can use the buttonseither on the recorder or on the
Remote Commander.
NO(Tbutton
Every time you press the NEXT butlon. the item to be
preset will blink.
CHANNWMER +I- buttons(orTIMERICH +I- buttons
0nthaCommander)
To set the day of the week, the tumon and t u r n 4 times
and thechannel, press "+" to advance, and "-"to go
back.
JOG dial
To set the day of the week, the turnan and turn-off times
and the channel, press the CHANNELTIMER function
button and turn the JOG dial clockwise to advance, and
c w nterclockwise to go back.
Week and day tndicath in tfw dlsptay window
R e week and day indicationschange in sequence as
Ex. Today rs Friday,
-THIS WEEK
Su Ma Tu WeTh Fr Sa
Su+Mo-..
Fr
Sa
WEEK AFTER NEXT
--Sa--,SudMo+
...
Su+Mo --... --Sa
To record at the same time every day, select "SuMoTu We
Th Fr Sa.
To r w r d at the same time and day every week, select the
desired day indicationtogether with "EVERY WEEK".
Week krdlcatkncatthe scram
follows:
EVR ( e w y day)
1 (this week)
2 (next week)
3 (we& after next]
*(
e v w ~ w
-:-I)
--
;
.
I
RessTIMER REC.
mpcmferwlllbetumedoffand the
lmxwder will ented the standby mode.
M i n g will start at the pesettlm and will automatically
>s t o p w h e n t h e ~ i n g I s ~ .
T h b m e m o r y o f t h e p ~ ~ e a p t ~ ~ s v e r y ~
setting will beemmi and tbe tfmer program numbers wfll
advanoeone by one.
I
BEFORE THE TIMER.ACmrATED RHX)RMNQ
% 4 .
-7.-
-
A
~ ~ ~ T I M E R R E C t s ~
Tochsekthethrer~~
Press CHECK.
Every time you press CHECK,each program wlll ke displayed
in the display wlndow.
If the DISPLAY button isactivated,the ifst 01 tlmersettings
wRl a@pewonthemonltor s c m when CHECKIS pressed.
Evely time CHECK is pressed,each tlrner pmgm number
will blink.
T h e m m t t ~ w l lbe
l
e$cted automatkaily.
c3
The cassetteoompamnent
slidesout.
c5
Thecessettelnserted
has the safety tab
remcmd.
No caseette is l m e d .
I M E R REC indicator
bllnksand disappears
The tape 1s at Its end.
mwrdws
When the presettlngs of your thner-
o=w
There wtll be no error indicationto informyou of the overlap.
Even if there Is an overlap, a recording will be made.
will be cut off
I
Program 1
Toehrmgeths-mw
1 PressTIMER REG .ThenMER REC indicator goes off.
2 PressCHECK to select the programto be changed.
3 -TIMER
SET.
4 Press NEXT until the item to be changed blinks.
5 Change the setting with +I- or JOG.
6 Press NEXTso that t h e w counter and the current time
a
p
W in the displaywlndow.
7 PressTlMER REG agaln to motivate the Ilmer.
TomcodthQdrstq~
S t the turneff tlme to exactly the same Hme as the t u m n
time. f?ecordlng will bbnt lnue to the end of the t a p
T o e m w t h s ~ oapartkdarflmgaIn
f
1 PressTIMER REG.The TIMER REC indicator goes off.
2 P m sCHECK to s e k t the prqrarntobe erased.
3 RessCLEARThem r y o f ttle programwlll be
ellminated,
4 IfottierprogramshavebeenpresetformxYCling,press
TIMER RECegain to reactivatethe timer.
10:00 pm
timpm
program 2
i
w
The reoordingof program2 wlll begin before program 1 Is
finished.
Itthetumontimeof~~msare#esame
The r e d i n g of the program havingthe lower program
numberwill be made. The memory af the prqram havlng the
higher number will be cleared.
1400pm
Program 1
10:mpm
hogram2 p
L
113lO pm
1200 pm
-------------------I
Y
Recording will not be made.
HapowerkrkMIptknocarrs~#merraEorrlkrgandthe
?!,i
.I
,.
TomdulngwwRasTlMER REG.Ths racordlng wlII atop an6 the powawill
be turned off.
URlenthetaps-durln(l-m~~tnrtthet~wlllnotberewoundtothe
beginning
cbck ltKms "AM 1200" and blhks
When the recwder was in the standby mode, all the tfmW
settlngs merased. Reset theclock and timer setting.
When the t l m e r d l n g was activated, the reoarding will
QUICK TIMER RECORDING
Use this function to begin recording a program immediately.
You can start tlmerrecwdlng just by presslng QUICKTIMER.
The recordfngduration can be be for up to 5 hours by 30
minutes. You can also use this function to stop the non-timer
recording by p ~ t t l n the
g recording duratlon.
Eteforecqmating,set the clock and press POWER once.
Make sum that the cassette is-i
3 Press QUlCK TIMER so that the recordlng starts.
1 Press QUICK TIMER.
Now declde the recording duration.
1
The power will be turned on, it lt was turned off.
Appears.
Record ng duratlon
Every time you press QUICKTIMER, the recordlng duration
lndlcationchanges as follows
2 Choose the qhannel to be reoosdedwRh
CnANNErnMERtd-.
If you & not advance to the next $tep wlthin 30 seconds,
the power will be turned off.
a30 -. 1m
1:m -- 2m
30
am
qneenda hue
minutes
hwr
half h r
4
havs
+
..... 5:m
Rve
hours
-+
CMX)
rer0
tl@Jr
I
When the recording starts, the duration indicationdecrwws
minute by mlnvte to (MW] and the power will be turned off
automatically ahout 30 seconds atter the W i n g l?as
finished.
I
TO USE QUCK TIMER WHILE RECORDING
By pressing QUICK TIMER, you can set the duratisn so that
the recording stops and power turns off after the preset
duration.
Oncethe qukk timer d n g has started
Only the following function buttonscan be activated:
QUICKTIMER......... to change recording duration
TIMER REC ............. to interrupt quick timer recording
PAUSE...................... to stop quick timer recordingmomentarily
CHECK ..................... to check timer programspreset
INDEX FUNCTION
The desired program can be easily losated by the index signal
rnat-kedon the tape.
An [ndsx -1
Is automatically marked on the tape when
RECORD k pressed orwhen a thnermcoding starts.
m
Index signets can be marked at any desiredpoint on the tape
duhg d n & tlmerrecordb.lg or m a 1plaAt the point where an index signal is to be marked, press
INDEX MARK.
RECORD
Whlle the index signal
is being marked
srik
Wfrlle the index signal
is being marked.
Monitor screen
7
1
I
Blinks.
mWkd&W#k@ek,
but the rmWMgMImat*
INDEX SEARCH
lNDM SCAN
- To play back the beglnnhgof e
d program
~
In sequence
1 Insert a cassette that has index signals marked.
2 PresslNDEXomse.
Blinkalternately.
-TolocateWmdefhdprogsm
You can b t e the desired programand play it back
automatically by designating the number of its index slgnal.
Up to the 15th index signal f m the present posltionon the
tape can be located.
I
Rewlnd
Fast-forward
u!
w
lndex
number
Index
number
1
:5
3
Z
f
hs%rttposl'hn
1 Insert a cassette that has Index slgds madad.
2 Press I N D E X ~timesuntll
l
the Index numberofthe
3 To scan the previousprograms, press uREW.
To scan the programs ahead, pressW FF.
Ttre tape will be rewound w rapidly advanced to the next
index signal marked.
X i n k simultarnusly.
n
desired program is displayed.
For instance, to locatethe second program ahead, two
index signals should be detected, so press I N D a until "2"
is displayed. On the other hand, to locate the second
program M i n d , three signals should be detected, so press
the button until "3" is displayed.
Lights steadily.
1
U
The tape will be played back tor approximately IOseconds,
and then rqmund or rapidly advanced to the next index
signal.
Every time an Ifdmsignal Isdetwkd and playback
begins, the displayed indax numb& Immaes
4 At the a t r e d program, press rn PLAY.
Normal playback of that program will begin.
INDEX
If you enter an incorrect index number, press ISTOP to
reset the display.
3 To locate a previous program on the tape, press 4 REW.
To h a t e a programahead, press
FF.
The tape will be rewoundor rapidly advanced. Every time an
index slgnai Is detected,the displayed Index nurnbrwlll
decrease. When the nwnber reaches 0,playback of your
desired program will begin.
Whenthedeslred~canotbeplayedbeck~the
mdexfumcth, check the following:
The nearest Index signal may not have been counted.
If the point where you pressed u REW or m e FF is fairly
close (within2 minutesof the normal taperun) tothe
nearest Index signal, that signal will not ke counted. in such
a case, designale one number less than the actual number.
Isthem a space of mwe than 2 minutes betweentwo Index
signals? If there is more than am index signal marked
within an interval of 2 mlnutes of the normal t-n,
the
mechanism may mt function propefiy.
POERASE INW( SIGNALS
ErasingW l e sndex d n g - T o
whlC index seaccMng--To emsa a pdudar index
srassthe index signals in
w-
srnl
1 Stop the tape wlth 4 STOP.
1 Stop the tape with rn STOP.
2 Pressthe INDEX button several times until the number of
2 Press lNDMonce.
3 PressuREIMormFF.
the Index signal to be erased is displayed.
The tape will be m u n d or rapidly advanced to the next
index slgnal and playback will begin.
4 Within approx.f 0 -ndq while the tape is being played
back, press INDEX ERASE
3 Press uREW or m+ FF.
4 Within approx. IOseconds, while the tape is being played
back, press INDM. ERASE.
While the index signal
is beingerased
Blinks.
,
ERAS
While ttw index signal
isbelngd
After the erasure, index scan wlll resume. At each index
signat located, press INDEX ERASE
To stop Index scanning, press STOP.
3
After the erasure, m a 1 playback will begin.
BETA HI-FI AUDIO RECORDING
RECOROlNG FROM YOUR AUMl
To connect t h VCR to your audio system, see page35.
Set the selectors as shown below.To start r d l n g , insert a
cassette and p m RECORD.
Mmudly adfuslREC LEVEL so that the
ffrstredelementli@ltsuponlyatthe
W-sranalM.(
6
I
I
MIN o 1 2 3 4 m e 7 8 9 t o M u
for left channel
AUDIO MONITOR
-.HKIand STEREO
for monitoringthe
m n d to be reoorded
rdrtlsht channel
INPUT SELECT
-.UNUPCM
J L,,
SUPER BET
-ON
;
+ON
when recording from an FM tuner,
set MPX F l L m to ON.
(lf your FM tuner has and Internal
MPX filter, set to OFF.)
AULCAST RECORDING
By connectingan FM stem tuner to the UNE IN AUDIO
jacks besidesthe cable TV cable connection, you can record
a cable TV programwith sbmo sound, such as MTV (music
TV), whose audio signals are dMded Into the Ntuner fm
the cable.
For FM simulcast recording, set INPUTSELECT to
SIMULCAST. The SC indicator appears,
Set the other switches and controls as in "RECORDING
FROM YOUR AUDIO SYSTEM" on page 25.
The pictureof the cablelV program and the sound from the
FM tuner are remded on thevldeo track. The sound of the
cable TV program is recordedon the conventional audio
track
FM tuner, m l w
RF v a t o r
CATV 75ohm coaxial cable
#
to UNE IN
AUDIO 9 9
I
INP~TSELECT
--. SIMULCAST
Use an optional pmgm W t o turn the wdb system an
and off.
-Audio system
Programtimer
The settingof thecontrols is the same as in "RECORDING
FROM YOUR AUDIO SYSTEM" on page 25.
Set the m r W s tlmer and a program timsr to the same turnon and lumoff time. The settlngs onthe reawder'stimer are
the same as in "TIMER-ACTIVATEDRECORDING"on petge
10.
PCM RECORDING AND PLAYBACK
Connect a PCM digital audlo processor as shown blow.
PCM diglM audlo
to VIDEO OUT
to LINE OUT VlDEOmCM
Amplifier
-+OFF
-. PCM
UNElPCM
BETA HI-FI
--ON
+
with a model
.) and select tape
dhsdruction manual furnished with the
CAMERA RECORDING
When connecting a Sony cdorvideo camm, the useaf the
Sony HVA-220AC adaptor is required.
For detailson connectloris, referto the instruction manual
furnished with the AC adaptor.
TAPE EDITING
To edit a home movle tape, you need two video cassette
CAUTlON
recwders.
To stat recording,set the VCR for playback in the playback
mode, then press the m r d buttonon the other VCR.
Television programs, films, video tapes and other
rnaWialsmay be oopyrighted.
UnauthortEedduplication of such materialmay be cantrary
to the p m v k mof the copyright laws.
A HOME MOVIE
TAPE FROM THE SL-Hm0 TO ANOTHER VCR
-- -
(TO ! €
-
-
-
-
-
*
- ,
"
,),
L
-
Slgnalftow
Connectingcord (supplied)
t o L I N E ~ w2
1
AUDIO
1
A
to UNEOUf1 or2
VIDHXPCM
VNIC1S (optional)
3
SL-HF750
BETA HI-FI
i s
1
A
wlth a-ral
VCR,
to NORMAL
I
Connectina cord (su~plled)
to LINE IN
AUDIO
to LINE IN
VlDEOlPCM
VMGtS (optional)
1
Ano'ther VCR
t o edit trom a VCR equipped wkh a CONTROL S (EDIT)output
Only the particular Scenes preset on the playback VCR will be
edited (aulomaticassemble editing). Recording starVslop on
the SL-HR50 can be activated in synchronizationwith
playback starVstop on the playback VCR.
VMeo and audio connection(Seepage 28.)
t
to GONTROLS
Om(EDTTJ
*
to LINE OUT
f or2
To start M n g , B&.fh&L-ttF750 in recording pause mode
and then follow the instructionmanual of the playback VCR
for the automaticBssembkedltlng.
To edit from a VCR equipped wiih a CONTROL S artput and
synchro edit function
Recording stagtlstop on the SL-HRSOcan beact~vatedin
synchronization with playback starVstoponthe playback
VCR simply by pressing SYNCHRO EMT on
playback
VCR.
For details on the synchro edit operation. re*
instruction manual of the playback VCFI.
P
to ihe
/L, V W md audio mnectlon (See page 28.)
SL-Hrn
(far editing)
to CO
*
to U N E W
AUDIO and WDKI
- - -
Only the particular ~csnes
(up to 8)of the original tapepreset
in the controller can be edited automaticallyin the order
m t .
For details on the conneetionand opmtlon, refer to the
instnictlonmanual of the RMEtWE100V.
to WNTROL S
IN or
CONTROL L
recorder
CCDVB,etc.
&
Vldeo and audio connection
d
*Turn off theTV.
Do not connect the AC power cord to a wall a m untilall
the connectionsof the video cassette recorder and tha,TV
have been completed.
Make theconnections firmly. Looere
a distorted plctum.
-
Use the removed separator to connect the recarder and the
and connect
lv.
[ UHFantema 1
1 Attach an optional EAC68 UIV band separator to the
VHFNHF OUTconnector of the recorder.
2 Connect the separator to the VHF and UHFantenna
terminals of the TV.
I W h m b o t h and~~~antemasan,e##rected
~~~
I
1 Attach an optional EAGGB WV bend separator(mixer)to
the VHFlLlHF IN connector of the rw;order.
2 Connectthe antennas to the UN bandseparator.
3 Attach anotheroptional UN band wpmtr to the
VHFRIHF OUT connector of the muder.
4 Conmi it to theVHF and UHF antmnataminalsof the
When a TV has a 7 5 d m UHFNHFantenna tsrminel
Easy connection of the recorderto the TV can made with the
supplied 750hm coaxial cable regardless of the types of
antenna.
TV.
~~
Comtlona betwaenthe mmderWFIC1HFOUf
amneatorand theanbi~nabmMalsofaTV receW
Bhoufdbe~~asshovlmh~Irwrtructlans.
F a i l u r e t o d o s o m a y ~ lInoperationthatvidataattw
l
regulationof the FardePalCommunicatbmCommission
regardingthewreandopmth ofrf devices.
Ne#~con~theoutputdtheFecordertoanantennaoc
~ s h u ~ ( p e r a l l e I ) ~ n a a n ! d ~
mnactlon at theantennatwmlnals of yam W v e r .
Once themnactlonsexplained above have bean made, the
antenna TV signals, as wall as the signal from the recorder,
will befed t o t h e T V a n d y o u c a n ~ T Vprogmsinltre
usual way.
We recommend you to consult your cable company to make
sure that the cable is pmpdy connected.
r r
-.
I
*.-
750hm -laJ
caMe (supplied)
cable TV program while recording one cable TV program. (lie
T V m button Isset to TV.)
Toobtain a betterqualitypicture, connect a color Ntonito~,
such as the Sony ProfeelTttnltm Component TV.
When a comprmt TV is combined with the spaakersystem
as illustrated,you can enjoy tapes wwnhd with Beta hi-fi
stereo.
To use acomponent TV tuner together with the rnonbm,
make thesame connectionas in thecaseof ltw recortlePand
the conventionalTV meiver deswbd on pages 31 and 32
Far detailson the connectionof the TV tuner and the monitor,
refer to the instruction manual of the TV tuner.
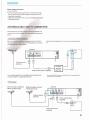
CONNECTION TO AN AUDIO SYSTEM
You can enjoy tapes recorded with Beta hi-fi stereo when the recorder is connected to your audio system.
Connecting cord
toUNEOuT1arP
&Canneoting&{supplied)
3
to LINE 1M AUDIO
CD player
to recording
outputs
Amplifier
D
D
FM tuner
Conmcth to the recehrer equippedwtth VIDEO mneclors
to UNE IN VIDEOIPCM
to VIDEO Otrr
UNEOCrrl or2
ComponentTV
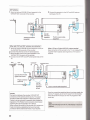
AwUSTING THE TV
Your TV receiver must be adjusted to m d v e the signal from
your recorder. If you connect a color monitor, it does not need
adjusting.
@Set RF UNIT lccated In the tuning compartment to 3 CH or
4 CH whi*
channel is not active in your area
@~~ERThelndioatorligMs.
7
@ FmsTVNTR to display the
VTR lndlcatorin the widow.
Q Check that INPUTSEW Is
set toTUNW,thmaelaetan.
actlvechannelhyowma
with CHANNUmMER
$3 lnserl the cassette.
0 Press,
PLAY.
+.
k
b
@Tmonthelv.
@SetthelVm&ertoeittwrVHF chartnsl3or4toagtw
with the RF UNITsetting.
ThelV programselected on the #corder or the tape program
wlH be dwayed on the TV screen. Ifa picturedoes mt appear
on theTV acreenor H the dlsplay Isnot clear, flwtune the
~r!8lmtfielv.
Fordetails about 7V channel a d w , see the instruction
rMnuaI0ftfielv~~
I
chdtl
Chebt!
Check that the program
displayed on the screen changes
when a d l h m t channel is
selected on the reooder. If the
pmgmmdoes not change,
Check that the display on the
screen changes when you stop
the tape by pressing STOP on
the murder. (To eject the
repeat the pmxdlng steps.
cassette, press EJECT.)
If the pcogtam does not change,
repeatthe preceding steps.
NowyowTV w a e t v e r i s t ~ t o t h e ~ d e r .
Whenererp use the video reoorder, you should set the TV
to the charmel which you have chosen &me.
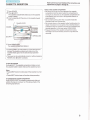
PRESrnING THE ACTIVE CHANNELS IN YOUR AREA
Your recwder is capable of receivingVHF channels 2 - 13,
UHF cbnnels 14 - 69 and cable TV channels 74 - 36(AtoW),
86-94(W+30ta W+56)andgB- 125(A-2toW+84). See
cableTVchannelchart on below.
By adding and erasing channels, you can preset the recorder
so that only the desiredchannelswlll appear in sequence
when you select a channel later with CtlANNUmMER +Ion the recorder, or TIMERICH +/-or JOG dial on the Remote
Commander.
I
rr eet m
Wmm
--7
w-y-i
number
-
,
*Turn on the recorder and the TV.
Make sure that the TV Is set to the comect channel (channel
3 or4) for the recorcier.
Set IMPLlTSELECTont ~ r ~ t o T U N E R .
For presettingcableTV dmMa,p m s CATWORM to
display theCATV Lndlcator in tWcOIsp!aywindow. FaroffM r TV channels,
Itagainto tum off the CATV
1 Selectthechannet tobemas&.
2 F m s ERASE
The "-"
indicationappears momentarliy, indlcatlngthat
the channel hasbeen erased.
Repeat steps 1 and2fwotherchannelsto beerased
IrKkatm.
ADDING
-CHANNELS
---
1 Select the channel to be added with t b n u d b u t t o n s
and ENTER buttonon the Commander.
CaMe TV systems uw lettersor numbersto deslpnate
channels. TO tune in a channel, refer to thls chart,
CATVchannelslnnumbers
1
98 99 14 15 16 17 18
Ex. To select channel 16
2 RessADD.
The "-'' indlcatlon appeam momentarily, lndicatlngthat
the channelfias been added.
Repgat steps 1 and 2 for ather channelsto be added.
19 20
21
22
23
24
25
28
27
28 29 30
31
F
H
I
J
K
L
M
N
O
R
Q
P
Q
Check wm flur local cable TV oompany for more m p l e t e
infmatloo on the availablechnels.
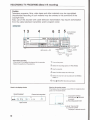
CLUCK SETnNG
When you connect the AC power cord to a wall wtbt, the
clock Indicates "Su AM 12W and R will Mink to show that
theclock is ready to beset.
CHANNELmMER
to advance
-: to go back
+:
*-
-tasetOOTWBCheSdayamat3c58
1 Press CLOCK SET.
Set the day wlth the +or - button until 'We"
@appears.
2 PrssNDCT,
Set the minute with the -t or - button until "PM956"
a p m
4 -NEXT.
(Furaccurate setting,press NEXT at the same time with an
announcedtime signal.)
The clock will now show the c u m t time.
Set the how with the +or- button wrtil "PM3W'appm.
AM 1200= midnight
PM 12AKk nobn
The dots of the colon(:) alternately blink every 30s6mnds.
---
SPECIFICATIONS
RotarytwPhsadMicalscennl~
A u o rewrdingYystsm
Beta hUi system (2 c h a n d )
(RecoFangontheconven~PuaOrBpkR$
Clodc
Tlme indication
flmsrSemng
Pawer b& up
-l)
FJA*tandard,m*
'iT-*G-eWcassettes ~ h e ~ g t h e m e d r ~ ~ ~ ' ' ~
Synchnxlhedwith the pmwrfrequency
12-hwr cycle
Cnlyfwreawding
6 programs 3 weeks at max.
Sslfcharglngbattery InmpmtacI
Backup duratlm up to38eoondsat onellme
(afterthebattefyhasbeenchargedat~40
hm)
m ~ i, n ~ s : ~ o ~ m
~ g.p e.~ p e e d
mm :20cmhc.
Pawerrequlmts
120Vac~10%,80Hr~0.5%
Maximumreoordi
Rwercmsurnptlon
ACwtbt
Fast-lorwardaKf
v
Audio frequenoyl
wowandw W h i . W
~
~
W
w
F
I
M
p tempsrat
5OC to40aC(41°F to 1W09
Storagetemperature
to +m°C ( d ° F to 4- 1400f)
Dimions
Approx.450~95x420rnm(HclNd)
f17xR4x tBY;r inches)
incl. w i n g parts md oontrols
W W
Approx.llBkg(25Ib5@net
-mc
wmn,mY:m-ww
g
Betahi.R@PB
# srB
OyRUniw
n
49 W
Unswltchedmaw. 400W
1(
-
ITuner section
-'"
Channel-
-
VHFohwhwISPtot3
UHFEtlarmelat4to@
wemmmnels latciwmtow,
BBtof25
WFoutputsfgnal ChennelSor4(sslate@
75 ohms, muenced
An75&n antermatermlnalfwVHFandUHF
.
Ranotemtralsystem
lnfraredcontrd
commandmade m.10rm2sslecta~e
Powor requirements
#Vdc,l~hAAb&t&~
fl=d=bnakn R8)
Wmenslm
Appmx 1 0 6 x 4 0 x 1 8 0 m m ( w ~
W h x lLhx6%inches)
incl. pmjectingpatts eml Cwrols
w w
Approx.~g(80z)
not inci.bmmb
m m cwld CaMe wiih Ftype connectam.........-,........ ......
....,...,",,,..1
.Antenna connector ........................................................................................ I
CwKsecting card .....,........................................................................................ 1
&mote Commander RMT-143 wlth three e
b
AA battwles ...........................................................................................
Desifjmand speclflcatlonssubject to change withoulnotia
1
TROUBLE CHECKS
Ifany difficulty should arise durlngoperation, fW chwk i h e w e r Cord Oormection,then go through the followingIlsl.
Shouldtfw difficw persist. umlum the unit and contact y o w w y dealer or local authorlad Sony service facility,
-Tiwe has bwn a pnwer intermptlwr.
Res84h c W tlme and t l m mttlngs.
he dock h& stopped at "&AM 32KKl".
+
TImer setting ¬
be made.
.,
i
I
*Theclo&lsnotW
T
h
g
t
i
mcannot be set during recording.
T V p m g m m & t ~ ~ d l ~ g y e d o n t h s Z*~chwnelforvideo;bFwder~sncrtaorrectfy
tunedon theTV
TVsGrem.
,c'
TBCBtVBT.
T
ThsTV signal is weak Adjust the direetlon of the antenna
T h e AC power cord of the recorder b dkcmnected.
S t e m ~ m s a r e ~ i n m w r a t . *'UTOSTEHEOissettoOFF.
b
&"Dl0
MONITOR (STEREOIuF1)is set to L or;R
A
* T h e ~ ~ c h a nisnnot
e l set to that preset for & d m d e r .
~ ~ o p k t w e o ~ ~ ~ T V w m ~ d, ,n~ g
-1ng
w p m
'
PmssTVMTR so that the VTR ~ndicatorappears in the wlndaw.
Thdvldeo iWa& may Mcontaminated.Clean the Mads usingthe
Sany L-2SXvidao head cleaning cassette. For detailson cleaning,
Wta the hstnietimsfurnishedwith thecleaning caswtte.
the SAP, S& AUDIO
Is M n g playd backwfthAUDIO WITORIHI-FUNORMAL)sdBo
W A L Set It to HKI.
Wise band in the sbw motion picturn,
r
Adjust S'LOWTR4I;KINGto move i t
The~emtrdTV~~wmhCdmmanderk~DoW.
T h e c o m ~ m o d e ~ w o n t h e ~ t e ~ r n ~ ~ n o t s e t r a t
tktsemepoWmasthatontheVCR.
*Theb8mfhmc&ilawted
c a w m ~ b ~ .
he d m t b cannot be afecaed.
~dsplascdoesnatap~.
t t w i t l w & ~ w t t h t h e ~ p a r t b o t e ~
. T h a ~ ~ ~ a d r s ~ .
~ R t r s s ~ ~ t b r a l s e t h e ~ ~ .
-Qbskrgm.
-MPxmmlssgtfoPCM.
* m y bsattoOFFmsda Pmsita$min.