Download H-LCDVD701

Transcript
H-LCDVD701
7" PORTABLE LCD MONITOR WITH BUILT-IN DVD-RECEIVER
Instruction manual
7"
LCD
DVD-
Table of contents
Table of contents ..........................................................................................................................................................................2
Precautions ...................................................................................................................................................................................3
Description ...................................................................................................................................................................................6
Disc features .................................................................................................................................................................................7
Control functions ........................................................................................................................................................................11
Remote control ...........................................................................................................................................................................14
Connecting .................................................................................................................................................................................18
Using the battery.........................................................................................................................................................................22
Basic operations..........................................................................................................................................................................24
Settings .......................................................................................................................................................................................31
Troubleshooting..........................................................................................................................................................................35
Specifications .............................................................................................................................................................................36
2
Precautions
PLEASE READ THROUGH THE MANUAL CAREFULLY BEFORE CONNECTION AND OPERATION.
CAUTION
RISC OF ELECTRIC SHOCK
DO NOT OPEN
CAUTION: TO PREVENT THE RISK OF ELECTRIC SHOCK, DO NOT REMOVE
COVER (OR BACK). NO USER SERVICEABLE PARTS INSIDE. REFER SERVICING
TO QUALOFIED SERVICE PERSONNEL.
The lightning flash is intended to alert the user to the presence of dangerous voltage within the product's enclosure,
and touching the inner parts may result in a risk of electric shock to persons.
The exclamatory mark is intended to alert the user to the presence of important operating instructions.
This mark indicates this unit belongs to class 1 laser product. The laser beam may produce radiation harm to the
directly touching human body. No harm radiation outside the machine.
Laser product:
DO NOT OPEN COVERS AND DO NOT REPAIR YOURSELF. REFER SERVICING TO QUALIFIED PERSONEL.
This product is equipped with low power laser equipment inside, for using safely, don't take apart any covers or try to take apart
the product inside. Please contact the qualified personnel for repairing.
Don't open the laser radiation protective equipment. Don't look at the laser radiation district when the equipment is operating.
3
Caution:
Use of controls or adjustments or performance of procedures other than those specified here may result in hazardous radiation
exposure. The use of Optical instruments with this product will increase eye hazard.
Warning:
To reduce the risk of fire, electric shock or product damage, do not expose this apparatus to rain, moisture, dripping or splashing
and that no objects filled with liquids, such as vase, shall be placed on the apparatus.
Macrovision:
This product incorporates copyright protection technology that is protected by method claims of certain U.S. Patents and other
intellectual property rights owned by Macrovision Corporation and other rights owners. Use of this copyright protection
technology must be authorized by Macrovision Corporation, and is intended for home and other limited viewing uses only unless
otherwise authorized by Macrovision Corporation. Reverse engineering or disassembly is prohibited.
Important notes
·
·
·
·
·
·
·
·
·
·
·
Please read through the manual carefully before connection and operation.
Do not open the cover or touch any internal components for non-professional.
During playback, the disc spins at high speed, so do not lift or move the player. Doing so may damage the disc.
When transporting the player, be sure to remove the disc and turn off the power, then unplug the power cord.
Do not put the player on top of a TV or color monitor. Install the player away from cassette decks or other devices that are
easily affected by magnetic forces.
Do not put any objects on top of the player.
Strongly advise against using the player while driving.
Turn off the power when the unit is not being used.
Don't expose this unit to direct sunlight. Keep away the heating sources or equipments.
Don't expose this unit to the rain or moisture.
Clean the player with soft cloth. Detergent, benzene, alcohol etc are forbidden. To clean dirt off the liquid crystal display,
wipe the display gently with a soft, dry cloth (such as an eyeglass cleaning cloth). Note that leaving water droplets on the
4
·
display for long periods of time may result in discoloration or stains.
This book is only a guide for user s operation, not a criterion for configuration.
Precautions for battery pack operation
Operation of the battery pack
Charge the battery pack fully before using it for the first time.
When the surrounding temperature is high, the battery pack may sometimes be unusable due to activation of protective circuitry.
When the portable DVD player is powered from the battery pack and if the player has not been operated for about 5 minutes with
the power switched on, the player will turn off automatically.
The battery pack becomes hot after use and the portable DVD player also becomes hot during use. This is not malfunction.
If the portable DVD player is switched on while the battery pack is not fully charged, the operation may sometimes be unstable.
Be sure to charge the battery pack fully before use.
Service life and disposal
When the charging time or available operation time becomes extremely short, the battery may be reaching the end of its life. The
battery pack can be used for about 300 cycles of recharging and operations.
Caution:
There is danger of explosion if battery is incorrectly replaced. Replace only with the same or equivalent type.
Don t charge the battery by the player when using the adapter of power supply or the DC IN faucet of the battery when the power
supply of the player comes from the battery.
Storage
The battery pack should be stored under room temperature. Don t put it on the place of too high temperature or too low
temperature and in a place with high temperature and high humidity or in a place subject to soot, etc.
The battery is kept for a long time. It is advised that the battery is electrified or discharged for over two months. When it
electrifies, it should be connected with the player and let the player play until the electricity of the battery is exhausted at first.
Then it should be electrified for an hour again, and then it is kept.
5
Description
Accessories
AC/DC adaptor
Unit bag
AV cable
Earphone
Car power connector
Battery pack
Head-rest unit bag
Remote control
User manual
This unit can play the following types of discs:
Disc types
Symbol
Contents
DVD
Audio + Video
AC-3
Dolby Digital Audio
MP3
Audio
Video-CD
(VCD)
Audio + Video
CD-DA
Audio
Kodak Picture
CD
Electronic Photo
MP4
Audio + Video
MPEG4
Audio + Video
DivX
Audio + Video
6
Note:
· This unit can also playback the SD/MMC cards and USB storage devices. CAN T READ THE 8 CM DISCS.
· Support of MPEG4 Standard: playback of digital video compressed in DivX 3.11, DivX 4.0, DivX5.0, DivX 6.0. (It may
not be possible to play certain DivX disc due to the configuration and characteristics of the disc or condition of the
recording).
Disc features
Disc information
Type
Record format
Capacity
Disc size
Horizontal
resolution
Subtitle
Language
DVD
MPEG 2
Single side
Single layer
4.7 GB = 2 Hr
Double side
Single layer
8.5 GB = 4 Hr
12 cm / 8 cm
Single side
Single layer
9.4 GB = 4.5 Hr
Double side
Double layer
17 GB = 9 Hr
VCD
MPEG I
SVCD
MPEG II
DIGIT
650 M
74 min.
650 M
45 min.
650 M
74 min.
12 cm
12 cm
12 cm / 8 cm
500 lines
Up to 32 kinds
Up to 8 kinds
240 lines
2
Symbol
7
350 lines
8
4
CD
Features for DVD disc
Different DVD discs have different combination of features, this is because of the different design created by the order and
manufacturer, the following symbols indicate some features of the DVD disc.
Regional code and the video output
system
5.1 sound channel output
Dolby digital surround
Hiding subtitle
DTS digital cinema surround
Two channel cinema
Subtitle
Restriction
Audio track
Video aspect ratio
Parental lock
Angle
8
Handling discs
When holding discs, please hold it by its rim.
When holding discs, be sure the label side should be upwards.
Do not grasp the non-label side of the disc.
Disc storage
Never store disc in the place with high temperature, strong light or humidity.
Put the disc back to the case after playback.
Cleaning
Wipe the discs from time using a soft cloth. Always wipe from the center towards the edge.
Do not use daily used detergent to clean the disc.
Protect discs against any fingerprint, do not stick or white anything on the surface of the disc.
9
About Disc Terms
Title
Generally, pictures or music compressed on a DVD are divided into several sections that is TITLE .
Chapter
The smaller section unit of picture or music in a DVD under the title, usually one title is comprised of one or more chapters
and each of them is numbered for easy searching. But some discs may not have a recording chapter.
Track
A segment of picture or music on SVCD, VCD or CD. Each track is numbered for searching.
Scene
VCD with playback control function, on which active and stillness picture divided into certain portion is called scene, and
every scene will be showed on screen menu with a scene number, that can be easily found while on playing. A scene usually is
formed with one or several tracks.
PBC function ( SVCD, VCD)
If a SVCD or a VCD is played a content menu may be showed on screen, this is what we called Play back control viz. PBC
function.
Disc sort
Functions
VCD without PBC function
Exhibiting both music and images.
(1.1 version)
SVCD/VCD with PBC
function (2.0 version)
Besides VCD picture playing on screen menu can be used for PBC
playback, and if stillness function is made in a disc it also can be
played with high definition.
10
Control functions
Front and bottom panels
1. LCD
2. Speakers
3. IR receiver
4. Power LED indicator
LED light: - when connecting AC-DC adapter or battery
- when main unit is in standby mode
LED flash: when playing CD/ MP3 audio disc and LCD is off
LED off: when main unit is turning on
5.
6.
7.
Control buttons
Discs slot
Memory card socket
Control buttons:
1. ON/ PLAY/ PAUSE button
Keep pressing it for about 1.5 seconds to power on the unit. Press it to
play. When pressing during playback, pause mode is set. Press again to
resume playback.
2. STOP/OFF button
Press it to stop playback. Keep pressing it for about 1.5 seconds to turn
off the unit.
3. PREVIOUS/NEXT buttons
Use it to locate at the beginning of previous/next tracks or chapters.
Keep pressing it for about 1.5 seconds during playback to switch playing
speed of backward/forward through X2, X4, X8, X20.
11
4.
5.
6.
MODE button
Press MODE button to enter mode, use +/- key to adjust relevant function:
BRIGHTNESS: level 0-12
COLOR: level 0-12
CONTRAST LCD: level 0-12
LCD Display: switch screen size 16:94:3
REVERSE: switch screen normal or reverse
AV OUTPUT/ INPUT MODE: press +/- buttons in AV output mode or AV IN mode
VOLUME: level 0-15.
-/+ and VOLUME buttons
Press it to adjust volume. When entering MODE, press it to adjust relevant function.
EJECT button
Press it to pop out the disc.
Left side of the unit
1. Phone jack
For connecting stereo headphone or an amplifier.
2. USB socket
For connecting USB storage.
3. Video in/out jack
Input or output video signal to connected device by setting AV IN/OUT mode. The included AV cable is connected here.
4. Audio in/out and optical output jack
Input or output audio signal to connected device by setting AV IN/OUT mode.
Output optical audio signal to connected device.
The included AV cable or optical digital cable is connected here.
5. DC in
Connect to the AC/DC adapter.
12
Rear panel
1. Supporting bracket
Can open and uphold the main unit.
2. Main unit power connecting port
3. Main unit battery connectors
Match the main unit and the battery.
4. Battery lock
Battery parts and their functions
1. Supporting bracket
Can open and uphold the main unit and the battery.
2. Fix up battery button
Work with main unit battery button kerf to lock the main unit and the battery.
3. Battery LED indicator
Install the battery to the main unit and plug in AC-DC adapter.
The indicator light is off when the battery is fully charged or when the battery
powers the unit or battery is removed.
The indicator light shows red color when the battery is being charged.
4. Power connect port
Connect with the main unit power port.
5. Battery connectors
Match the main unit and the battery.
6. Battery locking key
Loosen or locking the main unit and the battery.
Caution:
Do not short-circuit the terminals.
13
Remote control
1.
POWER button
Press this button to switch on or off the power.
2. SETUP button
Press this button to enter system setup screen.
3. RETURN button
4. Cursor buttons
Use these buttons to move the cursor up, down, left and right when
selecting setting items.
5. REV button
Press this button to fast backward play during playback.
6. PREVIOUS button
Use this button to search for the beginnings of the previous tracks or
chapters.
7. PLAY/ PAUSE button
Use this button to play or pause playback.
8. Number buttons
Press these buttons to input numbers.
9. 10+ button
Input tens digit. For example, to select track 35 you should push the
10+ button for 3 times and then push the 5 button.
10. REPEAT button
For DVD: use this button to play titles or chapters repeatedly.
For CD/ VCD: use this button to play tracks or the entire disc repeatedly.
(If some discs have photo and music use this button to select between
photo and music.)
14
11. GOTO button
Use this button to select the title, chapter or time to play.
12. A-B button
Press this button during playback to set two points and play the section between them repeatedly. Press again to cancel the AB playback.
13. PGM button
Press this button to program the play sequence.
14. EJECT button
Press this button to eject disc.
15. MUTE button
Press this button to enter or exit mute status.
16. OSD button
Press this button to display the disc and playback information on the screen.
17. MENU PBC button
Press this button to display the DVD's menu screen.
18. VOL + button
Use this button to increase the volume level.
19. ENTER PLAY button
Use this button to confirm the settings.
20. VOL button
Use this button to decrease volume level.
21. FORWARD button
Press this button to fast forward play during playback.
22. STOP button
Press this button to stop playback.
23. NEXT button
Use this button to search for the beginnings of the next tracks or chapters.
24. AUDIO button
Press this button to switch the audio language in DVD play status, and to switch audio channel in other status.
15
25. TITLE button
Press this button to display the DVD title.
26. SUB-TITLE button
Press it to switch the DVD's subtitle language.
27. ANGLE button
Press it to switch angle.
28. CLEAR button
Clear the numbers inputted before.
29. RDM button
Use this button to start random play.
30. STEP button
Press this button to step one frame when the unit is in paused mode.
31. ZOOM button
Zoom the picture on screen.
32. SLOW button
Press this button to start slow playing during playback.
Caution:
Do not drop or step on the remote control unit or subject it to shocks.
Note that the remote control unit may not work if there are obstacles between it and the remote sensor.
Do not expose the remote sensor to fierce light.
Use the remote control unit within the specified operating range.
16
Replacing the battery
1. Insert your finger nails into the gap between
and
on the diagram below, press
according to the direction, then pull out the battery holder.
2.
Remove the old battery, then insert the new battery into the battery holder
with the + side
facing upwards.
3.
Fit the battery holder back to its place.
Note:
To prevent leakage of fluid from the lithium battery, remove the battery when
not using the remote control unit for a long period of time (one month or more).
If the battery leaks fluid, carefully wipe it out of the battery case, then replaced
by a new lithium battery.
The remote control unit can operate within a distance of approximately 5 meters.
17
b
a
Connecting
Before connecting turn off the power of the player and the TV set to be connected.
Connecting to a TV set
Before connecting turn off the power of the player and the
TV set to be connected.
Connecting to AC-DC adapter
Connect the AC-DC adapter to AC power socket.
Connect the DC output of adapter to DC in of the main unit.
Note: AC-DC adapter specification: 12 V/ 1.5 A. Us the
adapter that is the standard accessory of the main unit.
Connecting earphone
Be careful not to set the volume to too high level when using
earphone.
18
Connecting to a Dolby Digital/ DTS/ MPEG decoder
With this player, you can enjoy powerful Dolby Digital,
DTS or MPEG sound. Output the digital signal from the
player's digital output to decoder or amplifier with built-in
decoder.
Connecting to an amplifier with built-in decoder
For a compatible decoder or amplifier, 5 speakers (front left/
right, center and surround left/ right) and a subwoofer are
required to enjoy Dolby Digital/ DTS 5.1-channel sound.
19
Connecting to active speaker system
Set the unit to AV output mode.
Connecting to an audio/ video player system
Set the unit to AV output mode.
20
Connecting to USB storage device
The USB terminal of the main unit support USB 1.1.
The main unit can read the contents of USB storage when
there is no disc in the main unit.
Connecting to the memory card (SD/MMC/MS)
Insert the memory card in right direction.
The main unit can read the contents of memory card when
there is no disc in the main unit.
21
Using the battery
Before using the battery
Please fully charge the battery unit before using it for the first time.
The battery unit becomes hot after recharging, but this is not malfunction.
Battery storage
Please place the battery in a proper environment (15ºC-25ºC). Recharge one time every year if the battery is not used in a long
time.
Battery life
The battery unit can be used for about 300 cycles of recharging and operations, though this is variable depending o nthe operating
conditions.
Using the battery
The main unit can be playing over 3 hours if the battery is fully recharged.
The picture may be unstable if the battery power is not enough.
Please recharge the battery when the main unit is power off. Otherwise the battery recharge will take about 8-9 hours.
Press OSD button when the unit is in play mode, the battery power can be shown in the OSD.
- shows battery capacity,
- shows the battery power is worm out.
Please remove the battery unit from the main unit when it is not used in a long period of time.
Hints:
The included AC/DC adapter is compatible with voltage from 100 to 240 V, you can use it on trips overseas.
Note that you need a converter plug (available in stores) suited for the region in which you are traveling.
22
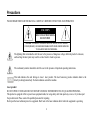
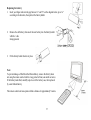
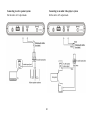
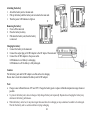
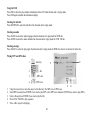
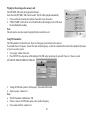
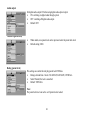
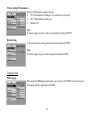
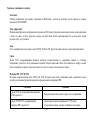
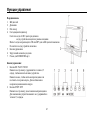
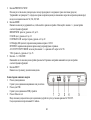
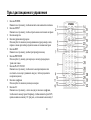
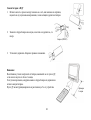
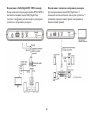
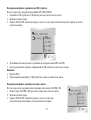
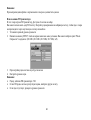
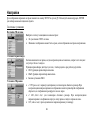
Attaching the battery
1. Attach the battery unit to the main unit.
1. Pull up the battery until the battery unit is locked to the main unit.
2. Then the power LED indicator is light on.
2
Removing the battery
1. Power off the main unit
3
2. Press the battery lock key
3. Pull down the battery unit, then the battery
is removed.
1
2
Charging the battery
1. Connect the battery to the main unit.
2. Connect the output plug of AC/DC adapter to the DC input of the main unit.
3. Connect the AC/DC adapter to the power outlet.
LED indicator is red: battery is recharging.
LED indicator is off: the battery is fully recharged.
Caution:
Put the battery pack and AC/DC adapter on a flat surface for charging.
Do not short-circuit the terminal of the battery and AC/DC adapter.
Note:
· Charge is most efficient between 10ºC and 30ºC. Charge the battery pack at a place within this temperature range whenever
possible.
· To protect the battery unit, do not recharge a fully charged battery unit repeatedly. Repeated overcharging the battery may
deteriorate the battery performance.
· When the battery unit is hot, it may take longer than usual time for recharging or may sometimes be unable to be recharged.
Wait for the battery unit to cool down before retrying recharging.
23
Basic operations
Turning On/Off the unit
· The unit is in standby mode when the unit is powered.
· Press the ON button on the unit or POWER button on the RC during 1,5 seconds to turn the unit on. Power indicator LED will
be off.
· Press it again to turn the unit off. Power indicator LED will light.
Auto power off
The unit will be auto power off and in standby mode when the unit is stay over 5 minutes which is no disc in the unit or stop
status.
Loading
1. Push ON/POWER button to switch on the set.
2
2. Press EJECT to open the disc slot.
3. Push the disc into disc slot. The disc will be slotted in automatically.
Notes:
· Insert the disc carefully. Failure to set it securely could result in damage.
· Do not use cracked or warped discs. Doing so could lead to damage.
· Push single-sided DVDs or CDs in with the label (printed)side up facing to you.
· For double-side DVDs, check each side carefully, then push the disc in securely.
· For CDs or one-sided DVDs, you do not have to worry about touching the label
(printed) side of the disc with your fingers. Since two-sided DVDs, however,
have signal recorded on both sides, so be careful not to scratch them when
removing them from the player.
3
4. The player starts loading.
5. Press STOP to stop playback, press EJECT button to remove the disc from the unit.
24
Mode settings
1. When the unit is in play mode press MODE on the main unit. Set the color, brightness, contrast, LCD display mode, reverse
mode and AV output/input mode.
Note:
· The unit will stop playing the disc when it is in AV input mode.
· Do not connect signal input when the unit is in AV output mode.
· AV output mode is default mode.
2. Press MODE for 1.5 seconds, then the unit will come back to AV output mode.
3. Press MODE to set the volume.
Note: The volume setting is the default mode. Press +/- to adjust the volume directly.
Playback, pause
1. Load the disc
· One of the following messages appears on the screen: DVD, VCD, CD.
· For some discs, playback starts automatically when the disc is slotted in.
· For the disc which had been programmed and stored in memories, playback starts automatically in the programmed order.
2. Press the PLAY/ PAUSE button to start playback.
3. Press it again to pause the playback. To start the playback press it again.
Stop
1. During playback press STOP button to pause the playing, the unit can memorize the play point.
2. Press PLAY/ PAUSE to continue playing from the pausing point.
3. Press STOP to stop the disc.
Scanning forward and backward
1. Press PREVIOUS/NEXT (on the main unit) for 1.5 seconds to fast the playing when playing in forward/ backward direction.
2. Change the playing speed to X2, X4, X8, X20 and normal for every pressing PREVIOUS/NEXT on the main unit for
1.5seconds.
25
Note:
The REV/ FORWARD on the remote control unit may do fast playing.
Returning to the previous/ next chapter or track (DVDs, video CDs and CDs)
1. Press the PREVIOUS button during playback. Playback returns to the beginning of the previous chapter or track.
2. Press the NEXT button during playback. Playback moves forward to the beginning of the next chapter or track.
Slow playing the disc
1. Press STEP/ SLOW on the remote control unit to slow playing. Change the playing speed to1/2, 1/3, 1/4, 1/5, 1/6 and 1/7 for
every pressing STEP/ SLOW.
2. Press STEP/ SLOW to skip frame when the unit is in pause mode.
Note:
The sound is mute when the main unit is in fast or slow playing except CD and MP3 disc.
Please press PLAY to resume normal playing.
Repeating of the playback
1. A-B play mode
· Press A-B, the LCD will show Repeat A.
· Press A-B again, the main unit will repeat the play from A to B.
· Press A-B again, the unit will resume normal playing.
2. Repeat playing the title, chapter or track.
· Press REPEAT to select the title, chapter or track when the unit is in play mode.
· DVD: title, chapter; VCD or CD: track.
Note:
Press SHIFT to select the FUNCTION mode of the remote control first.
26
Searching the disc
1. Press SEARCH.
2. Use cursor key and ENTER to select the proper playing item.
3. Input digit to select playing time, title, chapter or track.
4. Press ENTER to confirm the playing item.
5. Press SEARCH to resume the play mode.
Zoom playing
Press ZOOM every time, the picture will change to 2X, 3X, 4X, 1/2X, 1/3X, 1/4X and normal.
Programming the playback
The main unit may play the list according to the following program list:
1. Press PROGRAM, the menu will be shown in the LCD.
Hint:
T is for Title, C is for Chapter for DVD disc.
T for track for CD, VCD.
Note: There is no title, chapter or track for some disc.
2.
3.
Use digit and cursor buttons to select the list what you want. See the picture.
Use the cursor key to move the cursor to the PLAY icon, and press ENTER to
start to play the list.
4. Use the cursor key to move the cursor to the CLEAR icon, and press ENTER to
clear the play list.
5. Press PLAY/ PAUSE or select the EXIT icon and press ENTER to exit program
menu.
Note:
· The program list will be cancel when the main unit is power off or eject the disc.
· There is no program function for some disc.
· The unit can not play the list if you select the item that does not exit on the disc.
27
Using the OSD
Press OSD to show the play and disc information on the LCD when the main unit is in play mode.
Press OSD again to disable the information display.
Selecting the sub-title
Press SUBTITLE to select the sub-title when the main unit is in play mode.
Selecting an audio
Press AUDIO to select the audio language when the main unit is in play mode for DVD disc.
Press AUDIO to select the audio channel when the main unit is in play mode for VCD, CD disc.
Selecting an angle
Press ANGLE to select the play angle when the main unit is in play mode for DVD disc, there is no function for other disc.
Playing MP3 and JPEG discs
1.
2.
3.
4.
5.
1.
- directory
2.
- file
3.
- MP3 icon
4.
- JPEG icon
1
2
3
4
Using the cursor key to move the cursor to the directory, file, MP3 icon or JPEG icon.
Select MP3 icon and press ENTER if you want to play MP3, select JPEG icon and press ENTER if you want to play JPEG.
Select a file and press ENTER if you want to play the file.
Press PLAY/ PAUSE to play sequence.
Press A-B to repeat A-B playing.
28
Note:
· The LCD will be off if there is no operation on the unit over 3 minutes when playing CD, MP3. The Power LED will
beflash in the status.
· LCD will be on for any operation on the unit.
Playing the files storing on the USB storage device
The MP3, JPEG, MPEG4 files can be played on this unit.
Connect the USB storage to the USB socket of the main unit, the files to be red in the storage will be read automatically.
1. Power on the unit, connecting the USB storage to USB socket (in no disc mode).
2. READ USB will be shown on LCD and the files will be displayed on the LCD when the unit finished the reading.
3. Operating is like play MP3 or JPEG.
4. Remove the USB storage directly when do not play the USB storage.
Note:
· USB in this unit is USB1.1.
· The unit must be in no disc mode when play the files to be red on the USB storage.
29
Playing the file storing on the memory card
The SD, MMC, MS cards can be played on this unit.
Insert the card (SD, MMC, MS) into the socket. The file will be played automatically.
1. Power on the unit, inserting the card into the socket (in no disc mode).
2. READ CARD will be shown on LCD and the files will be display on the LCD when
the unit finished the reading.
Note:
The unit must be in no disc mode when play the file stored in the card.
Using FM transmitter
The FM transmitter is built in this unit. There are 4 frequency point which can be selected.
You should choose 1 frequency, then set the radio on this frequency, so that the sound from this unit will be reproduced by means
of your car acoustic system.
1. Set a proper volume of this unit.
2. Press SETUP, the setup menu will be displayed. The FM output option may be selected. There are 5 choice to select
(88.1MHz/88.3MHz/88.5MHz/88.7MHz/off).
3. Tuning the FM radio system to the frequency, the sound will be heard.
4. Adjust a proper volume level.
Note:
· The FM transmitter valid distance: 5M.
· If there is noise in the FM radio system, select another frequency.
· If no sound, check the volume level.
30
Settings
Press SETUP when the main unit is in play mode. The setup menu will be displayed on LCD.
System setup
TV system
Select the proper video signal system if you want to see on a TV set.
·
Default: NTSC.
Note:
The picture may be a grey picture if the system is not correctly set.
Screensaver
This function can save the TFT life if the unit stay in stop, no disc over 1 minute.
·
ON: screensaver enabled.
·
OFF: screensaver disabled.
·
Default: ON.
TV type
16:9: select this item when connecting this unit to a 16:9 TV set.
4:3LB:select this item when connecting this unit to a normal TV set.
4:3PS:select this item when connecting this unit to a normal TV set.
Note:
Picture scale depends on the disc.
31
Audio output
Set digital audio output ON when using digital audio optical output.
·
ON: switching on digital audio through optical.
·
OFF: switching off digital audio output.
·
Default: OFF.
Password (parent lock)
·
·
When unlock, new parent lock can be input and select the parent lock level.
Default setting: 0000.
Rating (parent level)
This setting can control the unit play parent lock DVD disc.
·
Rating is divided into 3 levels: NO ADULT, KID SAFE, VIEWALL.
·
Select Wiewall, the lock is cancelled.
·
Default: VIEWALL.
Note:
The parent lock level can not be set if parent lock is locked.
32
FM out (setting FM transmitter)
There are 4 FM frequency points in this unit.
·
ON: FM transmitter switching on. You can choose any frequency.
·
OFF: FM transmitter switching off.
·
Default: OFF.
Note:
To enter last page set, please select previous page item and press ENTER.
Default setting
To restore the factory setting, please select this item and press ENTER.
Note:
To enter last page set, please select last page item and press ENTER.
Language setup
OSD language
Please enter the OSD language select menu, use cursor keys UP, DOWN to move the cursor to
the language what you want and press ENTER.
33
Audio language
Please enter the audio language select menu, use cursor keys UP, DOWN to move the cursor to
the language what you want and press ENTER.
Sub-title language
Enter the sub-title language select menu, use cursor keys UP, DOWN to move the cursor to the
language what you want and press ENTER.
Menu language
Enter the menu language select menu, use cursor keys UP, DOWN to move the cursor to the
language what you want and press ENTER.
Note:
· The language will be the disc default language if the language you want is not visible.
· Default language: English.
34
Troubleshooting
Symptom
Picture is disturbed when playing a DVD
recorded by a VCR
Remote control unit not working
No sound is produced from speakers or sound is
distorted
Volume is different from DVDs and CDs
The player crashes
8 cm disc can not be popped out
No sound is produced or sound is distorted when
connected to a TV, an amplifier, etc
Bad play quality
The temperature of the player can hoist a little
when the player plays back
Comments
This player incorporates copyright Protection technology. Some discs include signal protected
against copied by a VCR. Such recorded discs can not be played properly.
Remote control unit is too far from the main unit or has too large angle with the remote
sensor. Remote control unit's battery is worn out.
For some discs, 96 kHz digital output of linear PCM audio signal is prohibited.
Disc is dirty.
It is in the state of pausing, fast forward or fast backward.
Main unit's volume is set to minimum.
Earphone is plugged in.
This is due to the different recording methods.
Turn off the player and turn on again.
Press OPEN button when Loading appears on screen to pop out the disc.
Ask qualified technician.
Slap on the player with disc window downward.
Ask qualified technician.
Connection cables are not firmly plugged in or not contacted well.
Connection plugs or jacks are dirty.
Audio cables are not properly connected.
Audio digital output is connected to a non-compatible AV amplifier, etc.
Incorrect DTS setting.
The player is set to AV OUT but there are other AV signal inputs from AV jack.
This is normal.
Note:
The player may stop operation properly due to static electricity or other external influences. In this case, usually solve the problem by unplugging the power
cord and then plugging it in again. If still can not solve it, consult with the nearest service centre.
Liquid crystal display
A few picture elements may be black or a particular color displayed on the LCD screen. This is normal.
35
Specifications
DVD player
Video
Audio
Power supply
Power consumption
Battery pack capacity
Battery pack discharge time
Display Screen
External dimensions (L x W x T)/ Weight
Video formats
Output level (RL=75)
Horizontal resolution
Luminance amp-fre response
Chroma amp-fre response
Luminance non-linear distortion
Luminance wave distortion
Luminance S/N ratio
Chroma S/N ratio
Output impedance/ Video input impedance
Video input amplitude
Output level (RL=10k)
Amp-fre respons (20Hz- -20KHz)
S/N ratio
Distortion and noise (1 kHz)
Dynamic range (1kHz)
Output impedance/ Audio input impedance
Audio input amplitude
DC 9 V~12 V
< 10 W
7.4 V/ 3000 mAh
> 3 hours
TFT-LCD color display
203 x 155 x 28 mm/ about 680 g (except battery pack)
NTSC/PAL (including input, output and display) display)
1.0 ± 0.2 V
450 TV Line
5.5 MHZ (-6dB)
1.5 MHz (-6dB)
5%
10%
50 dB(No-Weighted)
AM: 60, PM: 50
75 / 75
1V
2.00 ± 2 V
± 1 dB
90 dB
-65 dB
80 dB
600 / 600
1V
Specifications are subject to change without notice.
Mass and dimension are approximate.
36
...............................................................................................................................................................................37
..........................................................................................................................................................38
...................................................................................................................................................................................41
.............................................................................................................................................................43
................................................................................................................................................................47
..........................................................................................................................................51
.............................................................................................................................................................................55
.............................................................................................................................................................59
..................................................................................................................................................................61
..................................................................................................................................................................................69
.......................................................................................................................................73
...................................................................................................................................................74
37
,
,
.
.
.
:
,
.
.
.
.
.
,
1
,
.
.
.
:
.
,
.
.
,
.
38
:
,
,
.
,
.
:
,
,
,
,
,
,
,
,
,
.
Macrovision:
,
,
Macrovision Corporation
.
.
.
·
,
DVD-
,
,
.
·
·
,
.
,
.
·
·
·
·
,
,
.
.
,
.
.
.
39
,
·
·
,
.
,
.
·
·
.
;
.
,
,
,
.
·
.
.
,
.
DVD
5
,
.
DVD
.
.
DVD
.
,
.
,
300
, . .
.
.
:
,
.
,
.
.
40
.
,
.
.
2
.
,
/DC
,
,
,
.
,
/
41
.
:
DVD
+
AC-3
Dolby Digital
MP3
Video-CD
(VCD)
+
CD-DA
Kodak Picture
CD
MP4
+
MPEG4
+
DivX
+
:
·
·
SD/ MMC
USB
.
.
MPEG4:
,
,
DivX 3.11, DivX 4.0, DivX5.0, DivX 6.0
DivX
).
42
8
DVD
VCD
MPEG 2
CD
MPEG I
MPEG II
DIGIT
650
74
650
45
650
74
12/8
12
12
12/8
$500
$240
$350
-
32
-
8
-
8
2
4
-
,
4,7
2
,
9,4
4,5
,
8,5
,
SVCD
4
,
17
9
43
DVD
DVD-
,
:
5.1 -
DTS
2
Dolby digital surround
44
.
.
(
)
.
.
.
.
.
,
.
45
,
,
DVD-
,
,
.
(
)
DVD-
,
.
,
.
SVCD, VCD
VCD,
,
CD.
.
«
,
»
.
.
.
PBC (SVCD,VCD)
SVCD
VCD
,
.
VCD,
PBC (
(
1.1)
SVCD/VCD,
PBC (
),
.
VCD
2.0)
,
46
.
1.
2.
3.
4.
:
:
AC-DC
.
.
:
CD
:
5.
6.
7.
SD/MMC/MS
1.
:
ON/ PLAY/ PAUSE
MP3
.
.
1,5
,
.
,
.
.
2.
STOP/ OFF
.
1,5
.
47
3.
PREVIOUS/ NEXT
/
(
).
1,5
/
2, 4, 8, 20.
4.
MODE
,
.
+/
:
5.
BRIGHTNESS:
,
0
COLOR:
,
0
12.
CONTRAST LCD:
,
LCD display:
,
REVERSE:
AV OUTPUT/INPUT MODE:
VOL:
,
0
15.
/+ VOLUME
12.
0
12.
: 16:94:3.
.
AV output
+/-
AV IN.
.
.
6.
EJECT
.
1.
.
2.
USB
USB
3.
.
Video in/ out
AV IN/OUT.
AV
.
48
4.
Audio in/out
AV IN/OUT.
.
AV
5.
DC in (
.
)
AC/DC
.
1.
.
2.
3.
,
.
4.
1.
.
2.
.
3.
AC-DC
.
,
.
.
49
4.
.
5.
,
6.
.
:
.
50
.
1.
POWER
2.
SETUP
,
.
,
.
3.
4.
,
,
.
5.
REV
6.
PREVIOUS
7.
.
PLAY/ PAUSE
.
,
(
,
).
8.
.
9.
10+
,
,
.
10+
,
,
35,
5.
51
10.
REPEAT
DVD:
CD/ VCD:
.
.
,
11.
.)
GOTO
,
,
.
12.
A-B
,
,
.
13.
PGM
,
14.
.
EJECT
,
15.
MUTE
16.
OSD
17.
MENU PBC
18.
VOL+
19.
ENTER PLAY
20.
VOL-
21.
FORWARD
.
,
.
.
,
DVD
.
,
.
,
.
,
.
.
52
22.
STOP
23.
NEXT
24.
AUDIO
,
.
.
,
DVD
.
25.
TITLE
26.
SUB-TITLE
27.
ANGLE
28.
CLEAR
29.
RDM
,
DVD
,
DVD.
,
.
,
.
,
30.
.
.
STEP
STEP
31.
.
ZOOM
,
32.
.
SLOW
,
.
:
.
,
,
.
.
.
53
b
1.
« »
(a)
« »,
,
2.
a
,
.
,
, «+»
.
(CR2025)
3.
.
:
,
1
,
.
,
.
5
.
5
54
.
AC-DC
AC-DC
DC
.
.
DC
.
Note:
AC-DC
,
: 12 / 1.5 A.
.
Video
)
)
,
)
.
55
Dolby Digital/ DTS/ MPEG
DTS
Dolby Digital.
MPEG
Dolby Digital
5,5
(
.
/
/
56
).
,
/
AV
(AV output).
AV
/
57
(AV output).
USB
(SD/MMC/MS)
USB
USB 1.1.
.
USB
,
,
.
.
58
.
.
.
(15ºC-25ºC ).
,
.
300
.
.
3
.
,
,
OSD,
-
,
.
.
8-9
,
,
-
.
,
.
,
.
:
AC/DC
,
- 100 - 240 ,
.
(
.
59
.
),
1.
.
,
.
2.
,
.
.
3.
1.
2.
3.
.
,
4.
5.
6.
,
.
.
AC/DC
AC/DC
:
:
LED
LED
·
·
·
.
DC
.
.
.
.
:
AC/DC
.
.
+10°
+30° .
.
·
.
.
·
,
,
.
.
60
/
·
·
.
ON
. LED
,
1,5
·
POWER
.
. LED
,
.
5
.
1.
ON/ POWER,
EJECT.
.
2.
3.
·
.
.
.
:
.
.
·
·
·
·
DVD
.
CD
.
.
DVD
,
.
CD
DVD
.
,
DVD
.
4.
.
61
1.
MODE.
AV
·
·
·
/
,
,
,
,
.
:
,
AV
AV
AV
2.
3.
.
.
.
1,5
MODE.
AV
MODE,
.
.
:
.
+/-,
.
,
1.
·
·
·
.
: DVD, VCD, CD.
.
,
,
.
PLAY/ PAUSE,
PLAY/ PAUSE
.
2.
3.
1.
,
.
,
STOP,
»
2.
3.
.
.
.
PLAY/ PAUSE,
STOP
,
.
.
62
1.
PREVIOUS/NEXT
1,5
,
.
2.
PREVIOUS/NEXT
X2, X4, X8, X20
:
:
.
REW/FORWARD.
1.
(DVD,
PREVIOUS
PREVIOUS
.
NEXT
2.
CD
CD)
NEXT
.
1.
STEP/ SLOW
,
.
: 1/2, 1/3, 1/4, 1/5, 1/6, 1/7.
STEP/ SLOW,
2.
.
:
,
.
CD
PLAY,
.
.
1.
A-B
·
·
·
2.
MP3
A-B,
A-B
Repeat A (
,
).
,
.
,
.
,
·
REPEAT,
.
63
,
,
·
DVD:
:
,
; VCD
CD:
.
SHIFT,
1.
2.
3.
4.
5.
FUNCTION
.
SEARCH.
ENTER
,
.
,
.
ENTER,
SEARC,
.
.
(Zoom)
ZOOM
.
1/3X, 1/4X,
,
: 2X, 3X, 4X, 1/2X,
:
1.
PROGRAM,
:
,CDVD
CD, VCD
.
TT
.
.
:
,
.
2.
,
.
.).
3.
,
ENTER,
LAY,
.
64
4.
,
CLEAR,
.
ENTER,
PLAY/ PAUSE
.
5.
EXIT
ENTER
:
·
·
·
.
.
,
.
OSD,
.
OSD
,
.
SUBTITLE,
.
AUDIO,
AUDIO,
.
VCD, CD.
ANGLE,
.
DVD.
65
MP3
JPEG
1.
1.
2.
-
3.
- MP3
4.
- JPEG
3
,
MP3,
JPEG
MP3
ENTER.
JPEG
, MP3
ENTER,
4
JPEG.
ENTER.
PLAY/ PAUSE,
A-B,
.
.
:
MP3, CD
,
·
2.
,
3.
4.
5.
·
2
1
-
3
CD, MP3.
.
.
66
,
1.
2.
3.
USB
USB
USB
MP3, JPEG, MPEG4.
(
.
READ USB
.
,
4.
5.
·
·
).
,
,
MP3
USB
JPEG.
,
USB1.1.
USB
.
,
1.
2.
3.
.
:
(SD, MMC, MS)
.
READ USB
: SD, MMC, MS.
).
(
,
,
,
.
67
:
.
FM
FM
.
FM
4
.
.
,
.
1.
2.
.
5
SETUP,
: (88.1
3.
4.
·
·
·
/ 88.3
/ 88.5
/ 88.7
.
/ off).
.
.
:
FM
: 5M.
FM
,
,
.
.
68
FM out.
SETUP
.
, ENTER
.
:
·
·
: NTSC
.
:
,
.
,
1
·
·
·
,
.
,
.
:
:
.
.
:
·
4: 3PS (pan scan):
·
,
4: 3LB (letter box):
.
.
.
.
.
·
16:9 (wide screen):
.
69
·
·
·
ON.
ON:
OFF:
.
.
: OFF.
«
».
.
«0000» (
,
).
,
ENTER
.
ENTER,
4-
ENTER
.
,
.
(VIEWALL),
ADULT)
·
·
(NO
(KID SAFE):
(VIEWALL)
VIEWALL.
70
.
FM
·
·
·
4
ON: FM
OFF: FM
:
.
.
.
: OFF.
(
).
:
ENTER.
ENTER
ENTER,
.
.
71
,
DVD-
,
.
ENTER,
,
.
DVD-
,
ENTER,
,
.
.
DVDENTER,
,
.
.
72
.
DVD
,
.
.
.
96
.
.
,
.
.
.
DVD CD
The player crashes
.
.
LOADING
,
OPEN,
.
.
8
.
.
,
.
,
.
.
.
.
DTS.
AV OUT,
AV
AV
.
.
:
.
,
.
,
:
.
.
73
.
DC 9 ~12
< 10
7.4 / 3000
>3
DVD
( x
x
)/
(RL=75
(20
)
(RL = 10
20
)
(1
)
(1
)
)
203 x 155 x 28 /
NTSC/ PAL (
1.0 ± 0.2
450
5.5
(-6 )
1.5
(-6 )
5%
10%
50
(
AM: 60, PM:
75 / 75
1
2.00 ± 2
±1
90
-65
80
600 / 600
1
. 680 (
,
)
)
)
50
.
.
74