1
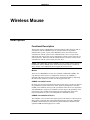
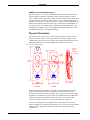
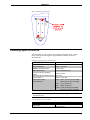
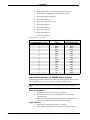
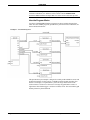
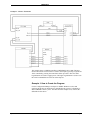
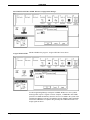
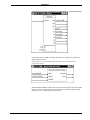
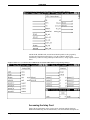
CRESTRON
Contents
Wireless Mouse
Description
Functional Description
Physical Description
Leading Specifications
Setup
General Use and Safety
RF Identity Code
Programming (Cresnet and SmarTouch systems)
Programming in SIMPL Windows (Cresnet and SmarTouch systems)
Accessing the Inlay Card
Problem Solving
Troubleshooting
Further Inquiries
Return and Warranty Policies
Merchandise Returns / Repair Service
CRESTRON Limited Warranty
Appendix A: AT Scan Code
Operations Guide - DOC. 5700A
1
1
1
2
3
4
4
4
9
11
18
20
20
21
22
22
22
23
Contents • i
CRESTRON
Wireless Mouse
Description
Functional Description
The wireless mouse is a hand-held user interface that uses radio frequency (RF) to
communicate with the CRESNET system, SmarTouch STS or the portable
SmartPresenter system. As part of the CRESNET system, the wireless mouse
communicates with the system via the CNRFGWA, RF receiver. As part of the
SmarTouch STS, the wireless mouse communicates with the system via the ST-CP,
control processor. When used with the SmartPresenter system, the wireless mouse
communicates with the system control processor, SP-1.
NOTE: The CNRFGWA must have PROM # 2251 for wireless mouse support. A
CNRFGWA with this PROM reports on the network with software version 2.00.
Early versions of the CNRFGWA do not support the wireless mouse.
Models
There are two CRESTRON wireless mice available: CNWM and CNWML. The
only difference between the two configurations is that one, the CNWML, is
equipped with a laser pointer. The laser can be turned ON and OFF by depressing
the center button (button 5) or button 4 on the keypad of the unit.
CNWM/L used with Cresnet
By design, the most logical application for the wireless mouse is as the user interface
in a presentation system. The wireless mouse and PC keyboard/mouse controller,
CNMK, can be added to control your PC presentation. These devices in conjunction
with CRESTRON’s simple-to-use Windows software improve the portability of the
user interface. They facilitate the transmission of programmed PC mouse and
keyboard operations as well as serial and IR device commands remotely.
CNWM/L used with SmarTouch™
The CNWM/L can be used in a SmarTouch system. SmarTouch is a radio frequency
(RF) control system that offers unprecedented performance and value. Adding the
CNWML to the SmarTouch system offers keyboard and mouse emulation (with
optional CNMK) and multi-purpose AV control.
Operations Guide - DOC. 5700A
Wireless Mouse • 1
CRESTRON
CNWM/L used with SmartPresenter™
The wireless mouse serves as the RF transmitter for the SmartPresenter™ system.
This is a unique presentation system that is fully operational using the wireless
mouse. With only the compact SP-1 control processor and the wireless mouse, users
can control up to four IR devices and one RS-232 device. SmartPresenter has the
potential to control up to six functions per device. Functions are assigned to the four
positions of the mouse button, the mouse trigger, and the center keypad button on
the wireless mouse. The SmartPresenter system can be programmed easily in the
field using the CNWM/L. Refer to the SmartPresenter Quick Guide (DOC. 5742)
for additional information on field programming.
Physical Description
The wireless mouse, shown below, is housed in a black plastic enclosure that can
easily fit in the user’s palm. Nearly all the buttons, except for the trigger, can be
found on the topside of the unit. The trigger can be found on the bottom of the unit.
Button placement has been carefully designed into the unit for ease of use.
Wireless Mouse Physical Views
Trigger
(button 6)
Mouse
Button
Lazer
Button
6.036"
153.31mm
Device
Buttons
(lg. btn. 5)
5.331"
135.41mm
1.775"
45.09mm
1.775"
45.09mm
CNWML
CNWM
1.362"
34.59mm
Notice the lined paper beneath the clear plastic cover that surrounds the keypad
buttons. Once functionality has been assigned to the keypad buttons, a brief
description can be written on the lined paper. For a more professional look, a label
kit (SP-LK) is available for the wireless mice. The SP-LK label kit provides a sheet
of the most common control functions and several pre-cut mouse inlay cards.
To access the inlay card, refer to "Accessing the Inlay Card" on page 18.
Two AAA-sized batteries are provided with the wireless mouse. Access to the
battery compartment is permitted after the battery cover is removed. A sensor (photo
transistor) used to program the RF identity code is also located in the battery
compartment.
2 • Wireless Mouse
Operations Guide - DOC. 5700A
CRESTRON
Battery Compartment (Rear View)
Leading Specifications
The table below provides a summary of leading specifications for the wireless
mouse. Dimensions and weight are approximations rounded to the nearest
thousandth unit.
Leading Specifications of the Wireless Mouse
SPECIFICATION
Battery
SIMPL™ Windows®
CRESNET Operating System
CNRFGWA Software
SmarTouch (ST-CP) Operating
System*
SmarTouch (ST-CP) Monitor Version*
VisionTools Pro™
Dimensions & Weight
(without batteries)
DETAILS
2 disposable "AAA" cells
Version 1.18 or later
3.17.29 or later
version 2.00/PROM # 2251
4.00.38-s or later
1.29 or later
Version 1.1.3 or later
Height: 5.331 in (13.541 cm) for CN-WM
6.036 in (15.33 cm) for CN-WML
Width: 1.775 in (4.509 cm)
Depth: 1.380 in (3.505 cm)
Weight: 0.140 lb (0.064 kg) for CN-WM
0.270 lb (0.122 kg) for CN-WML
* NOTE: Upload the SmarTouch Monitor before uploading the SmarTouch
Operating System.
Laser Specifications of the CNWML
SPECIFICATION
Wavelength
Output Power
Operations Guide - DOC. 5700A
DETAILS
670 nm (Class IIIa Product)
Less than 5 mW
Wireless Mouse • 3
CRESTRON
NOTE: This equipment has been tested and found to comply with the limits for a
Class B digital device, pursuant to part 15 of the FCC Rules. These limits are
designed to provide reasonable protection against harmful interference in a
residential installation. The equipment generates, uses and can radiate radio
frequency energy and, if not installed and used in accordance with the instructions,
may cause harmful interference to radio communications. However, there is no
guarantee that interference will not occur in a particular installation. If this
equipment does cause harmful interference to radio or television reception, which
can determined by turning the equipment off and on, the user is encouraged to try to
correct the interference by one or more of the following measures:
Reorient or relocate the receiving antenna.
Increase the separation between the equipment and receiver.
Connect the equipment into an outlet on a circuit different from that to which
the receiver is connected.
Consult the dealer or an experienced radio/TV technician for help.
As of the date of manufacture, the unit has been tested and found to comply with
specifications for CE marking.
Setup
General Use and Safety
DANGER: The CNWML contains a Class IIIa laser. Avoid direct eye exposure.
Compliance to the following suggestions may extend the life of the wireless mouse
and laser.
•
If the unit is not going to be used for a month or longer, remove
batteries. Never leave weak or dead batteries in the unit; they might
leak chemicals that can damage the unit.
•
Use care when handling the unit. Dropping the unit can unfocus the
lens, damage circuit boards, and cause the unit to work improperly.
•
Operate and store the unit in moderate temperatures. Do not place the
unit in environments below freezing or exceeding 110°F. Temperature
extremes can shorten the life of electrical devices, damage the batteries,
and distort or melt plastic parts.
•
Keep the unit away from dust and dirt that can cause premature wear
on parts. Use a damp cloth to wipe the unit. Do not use harsh
chemicals, cleaning solvents, or strong detergents to clean the device.
RF Identity Code
Every hand-held wireless transmitter communicating with either the SmartPresenter,
ST-CP or CNRFGWA requires a unique RF identity (ID) code. The code is a two4 • Wireless Mouse
Operations Guide - DOC. 5700A
CRESTRON
digit hexadecimal number. To maintain code diversity within a system, use codes
between 10 and FE for the transmitters. There are two methods to change the RF ID
code on the wireless mouse: via the CNIDC (Identity Code Cable) and Viewport
software or depressing buttons on the unit that represent a binary code.
NOTES: The RF ID CODE on the wireless mouse is factory set to 30.
Only use 10 through FE as RF ID code.
Do not confuse RF ID with network (NET) ID.
Match CNWM/L ID to SP-1 Receiver
(SmartPresenter)
Depress and hold the recessed button #1 on the SP-1 for at least 5 seconds (use a
paper clip or similar object) or until the red RF LED flashes on the SP-1.
Depress (position A) button on the CNWM/L while the RF LED flashes.
Observe that RF LED stops flashing and remains illuminated for about 4 seconds.
NOTE: An extinguished LED indicates a match of CNWM/L ID to that of the SP-1.
If the RF ID does not match, refer to "Change RF ID via CNWM/L Button Presses"
on page 7.
Verify RF ID with Crestron Software
(not required for SmartPresenter)
Use the Crestron Performance VeiwPort to view transmitter ID codes. Using either
SIMPL Windows or VisionTools Pro, select ViewPort from the Tools menu; the
“Crestron Performance Viewport” dialog box, shown below, appears.
From the Diagnostics menu in the dialog box, select Identify Transmitter ID to
open the “Transmitter Identification” dialog box. Press a button on the transmitter,
ViewPort will display the transmitter ID in hexadecimal format.
Operations Guide - DOC. 5700A
Wireless Mouse • 5
CRESTRON
Change RF ID Crestron Software
(not required for SmartPresenter)
Use the Crestron Performance ViewPort to set a RF ID CODE. Using either SIMPL
Windows or VisionTools Pro, select ViewPort from the Tools menu; the “Crestron
Performance Viewport” dialog box, shown below, appears.
Crestron Performance Viewport Dialog Box
From the Options menu in the dialog box, select Set Transmitter ID to open the
“Set Transmitter ID” dialog box. Enter a two-digit hexadecimal number ranging
from 10 to FE. Click OK to confirm.
Set Transmitter ID Dialog Box
6 • Wireless Mouse
Operations Guide - DOC. 5700A
CRESTRON
The "Transmitter ID" dialog box is displayed. It prompts the user to properly
position the CNIDC (IR probe). Connect the 9-pin DIN connector from the CNIDC
to the proper COM port on the back of the PC.
Position the wireless mouse button-side down so the battery compartment is
accessible. Remove the battery compartment cover to expose the battery
compartment.
Place the LED probe from the CNIDC over the sensor (photo transistor), as shown
below. The probe should rest between the battery compartment and the sensor
opening so that it completely covers the opening.
Probe Placement
In the "Transmitter ID" dialog box, click OK to program the transmitter.
When the LED stops blinking, secure the battery cover over the battery
compartment. Disconnect the CNIDC from the PC.
Change RF ID via CNWM/L Button Presses
A procedure to change the RF ID using button presses has an advantage over the
CNIDC/Software method, because no extraneous items (i.e., software and probe) are
required. All that is needed is the unit itself and knowledge of representing an
alphanumeric hex digit as a four-digit binary code. Select buttons 2 and 4 on the
wireless mouse correspond to the binary digits 0 and 1, respectively. If your recall of
binary coding is rusty, refer to the table that follows the procedure. It provides the
four-digit binary code and sequential four button press/release on the unit for each
single alphanumeric digit. For example, if the RF ID needs to be changed to 40, a
hexadecimal “4” is represented as 0100 in binary code or by pressing and releasing
the select buttons in the following sequence 2422. Likewise, hexadecimal “0” is
represented as 0000 in binary or a sequential button press/release of 2222. Complete
the following procedure to set a RF ID of 25. (Steps 1 through 3 must precede any
eight button sequence to initialize the unit.)
1.
Operations Guide - DOC. 5700A
Open battery compartment and remove one battery.
Wireless Mouse • 7
CRESTRON
2.
Press and hold button 1 on the unit while replacing battery.
3.
Replace battery compartment cover and release button 1.
4.
Press/release button 2 (binary 0).
5.
Press/release button 2.
6.
Press/release button 4 (binary 1).
7.
Press/release button 2.
8.
Press/release button 2.
9.
Press/release button 4.
10. Press/release button 2.
11. Press/release button 4.
RF ID CODE Conversion Table
HEX
(ALPHANUMERIC DIGIT)
BINARY
CODE
BUTTON
PRESS/RELEASE
0
1
2
3
4
5
6
7
8
9
A
B
C
D
E
F
0000
0001
0010
0011
0100
0101
0110
0111
1000
1001
1010
1011
1100
1101
1110
1111
2222
2224
2242
2244
2422
2424
2442
2444
4222
4224
4242
4244
4422
4424
4442
4444
Laser Button Selection via CNWML Button Presses
The following procedures describe how either the center keypad button or button 4
can be assigned to the laser pointer and how to disable the laser pointer.
NOTE: A button that is assigned the laser pointing function does not transmit a
code.
Center Keypad Button
1. Open battery compartment and remove one battery.
2. Press and hold the large center keypad button on the unit while
replacing battery.
3. Release center keypad button and replace battery compartment cover.
The center keypad button is assigned to the laser pointer.
Keypad Button 4
1. Open battery compartment and remove one battery.
2. Press and hold keypad button 4 on the unit while replacing battery.
8 • Wireless Mouse
Operations Guide - DOC. 5700A
CRESTRON
3.
Release keypad button 4 and replace battery compartment cover. The
keypad button 4 is assigned to the laser pointer.
Disable Laser Pointer
1. Open battery compartment and remove one battery.
2. Press and hold keypad button 3 on the unit while replacing battery.
3. Release keypad button 3 and replace battery compartment cover. The
laser pointer is disabled.
NOTE: If no buttons are pressed while replacing the batteries, then the previous ID
and laser pointer button assignment is restored.
Programming (Cresnet and SmarTouch systems)
Note: the sample project
"sample mouse project.vtp" is
available in VisionTools Pro
v1.1.4 or later.
The wireless mouse is unlike any other user interface available from CRESTRON. It
permits the user full mobility about a given area while providing remote control of
the system PC (via mouse and keyboard operation) and other controllable devices
such as a TV and VCR. The wireless mouse has clearly been designed, although not
limited, to simplify the task of orchestrating a presentation. Due to its uniqueness,
CRESTRON provides a sample project (wireless mouse sample project.vtp) for the
wireless mouse with VisionTools Pro software.
CRESTRON recommends that the user does not create a wireless mouse project
from scratch, but rather copy the sample available from VT Pro software and use it
as a platform on which the user builds their own custom programming. Select Open
| Project from the File menu. Choose "wireless mouse sample project.vtp" and click
Open.
Open "wireless mouse sample project.vtp"
Once the sample project is open, select Save Project As from the File menu. This
will make a copy of the file that can be used as the foundation of a new project. In
the "Save Project As…" dialog box, enter a file name and click Save.
Operations Guide - DOC. 5700A
Wireless Mouse • 9
CRESTRON
The CNWM sample project has one page, shown below, and is designed to control
predetermined PC mouse and keyboard operations and certain VCR and TV
transport functions. If the particular devices in the custom system do not match those
in the sample, alterations are necessary. Changes can be easily made by simply
opening up certain dialog boxes and modifying some of the fields. For example, to
access the functional properties of the button, simply right-click on the object and
select Function from the pop-up menu. The “Function” dialog box appears. The
more the system devices differ from the sample project, the more extensive changes
become.
NOTE: The CNWM is not limited to the functions and device control portrayed in
the sample project. The unit can be programmed as a wireless transmitter capable of
controlling multiple serial and IR devices remotely.
10 • Wireless Mouse
Operations Guide - DOC. 5700A
CRESTRON
Open Page of "wireless mouse sample project.vtp"
If you draw your own project, remember to change the target type to CNWM in the
dialog box after selecting New and Project from the File menu.
Programming in SIMPL Windows
(Cresnet and SmarTouch systems)
SIMPL (Symbol Intensive Master Programming Language) is an easy-to-use
programming language that is completely integrated and compatible with all
Crestron system hardware. The objects that are used in SIMPL are called symbols.
SIMPL Windows is Crestron Electronics' software for programming Crestron
control systems. It provides a well-designed graphical environment with a number
of workspaces (i.e., windows) in which a programmer can select, configure,
program, test, and monitor a Crestron control system. SIMPL Windows offers drag
and drop functionality in a familiar Windows® environment.
The next two subsections describe a sample SIMPL Windows program that utilizes a
CNWM mouse. The first subsection details how the sample program works with a
textual description and block diagram. The second subsection provides a broad
description of how to actually create the SIMPL Windows program.
NOTE: The following description assumes that the reader has knowledge of
SIMPL Windows. If not, please refer to the extensive help information provided
with the software.
Operations Guide - DOC. 5700A
Wireless Mouse • 11
CRESTRON
NOTE: The following SIMPL Windows sample programs are available on
Crestron's ControlCD (v5.1 and later) or the Crestron website crestron.com.
Search the SIMPL Windows Example Base for cnwm-ctl.smw and cnwm-prs.smw
How the Program Works
Two basic CNWM SIMPL Windows programs are shown in block diagram form.
These two basic SIMPL programs (presentation system and wireless transmitter) are
shown and described below.
Example 1 - Presentation System
This presentation system sample is designed to control predetermined PC mouse and
keyboard operations. For this purpose, a CNMK, mouse/keyboard controller (also
known as a "Wedge") is required in the system. The large mouse button on the
wireless mouse is used to move the cursor. The larger keypad button is used as a
right mouse click and the trigger is used as a left mouse click. The four small keypad
buttons perform keyboard functions.
12 • Wireless Mouse
Operations Guide - DOC. 5700A
CRESTRON
Example 2 - Wireless Transmitter
This example shows a CNWM controlling a CRESTRON CPC-CAMI. The large
mouse button on the wireless mouse is used to control pan by pressing it right or left.
Tilt is controlled by pressing the same button either up or down. The four small
keypad buttons are used to engage presets. The larger keypad button is used to issue
the SAVE command that saves the last selected preset.
Example 1: How to Create the Program
Use the Configuration Manager workspace in SIMPL Windows to select and
configure all the devices that need to be included into the system. For Example #1,
add a CNRFGWA to the system. The NET ID in this example is 24, which is the
default ID for this device.
Operations Guide - DOC. 5700A
Wireless Mouse • 13
CRESTRON
Set CNRFGWA NET ID in SIMPL Windows’ Configuration Manager
Add the CNMK to the program. Assign a NET ID of 28 as shown.
Assign CNWM NET ID
Use the Programming Manager workspace in SIMPL Windows to select symbols
and assign their respective signals. For these examples, a CNRFGWA and CNMK
symbols were added automatically when the devices were added to the system in the
Configuration Manager workspace. Expand the Network Modules folder and double
click on the CNRFGWA to expand it. Drag and drop the CNWM into Detail View.
Assign signals as shown.
14 • Wireless Mouse
Operations Guide - DOC. 5700A
CRESTRON
Graphical Detail View of the CNWM (Mouse) in SIMPL Windows’ Programming Manager
Double click on the CNMK () to display in Detail View (alternatively CTRL+D).
Assign signals as shown.
Graphical Detail View of the CNMK (Mouse/Keyboard Wedge) in SIMPL Windows’
Programming Manager
Add the SERIAL SEND symbols to this program by selecting them from the Symbol
Library. View the symbol in Detail View (alternatively CTRL+D or drag and drop
into Detail View). Assign signals as shown below.
Operations Guide - DOC. 5700A
Wireless Mouse • 15
CRESTRON
Graphical Detail View of SERIAL SEND (signals S-1 through S-4) in SIMPL Windows’ Programming Manager
Example 2: How to Create the Program
Use the Configuration Manager workspace in SIMPL Windows to select and
configure all the devices that need to be included into the system. For Example #2
add a CPC-CAMI to the system. For this example, the NET ID for this device is 03.
Set CPC-CAMI NET ID in SIMPL Windows’ Configuration Manager
Add the CNRFGWA to the program. Assign a NET ID of 24 as shown. Add a
CNWM (mouse) to RF ID 30 of the CNRFGWA.
16 • Wireless Mouse
Operations Guide - DOC. 5700A
CRESTRON
Assign CNWM NET ID
Use the Programming Manager workspace in SIMPL Windows to select symbols
and assign their respective signals. For these examples, the CPC-CAMI,
CNRFGWA, and CNMK symbols were added automatically when the devices were
added to the system in the Configuration Manager workspace. Expand the Network
Modules folder and double click on the CNRFGWA. Drag and drop the CNWM into
Detail View. Assign signals as shown.
Graphical Detail View of the CNWM (Mouse) in SIMPL Windows’ Programming Manager
Double click on the CPC-CAMI to display it in Detail View (alternatively
CTRL+D). Assign signals as shown.
Operations Guide - DOC. 5700A
Wireless Mouse • 17
CRESTRON
Graphical Detail View of the CPC-CAMI in SIMPL Windows’ Programming Manager
Add the NOR, INTERLOCK, and ANALOG RAM symbols to this program by
selecting them from the Symbol Library. View the symbols in Detail View
(alternatively CTRL+D or drag and drop into Detail View). Assign signals as shown
below.
Graphical Detail View of ANALOG RAM, INTERLOCK, and NOR in SIMPL Windows’ Programming Manager
Accessing the Inlay Card
Each of the keypad buttons on the wireless mouse performs multiple functions.
Rather than memorizing what each button does, write the functional descriptions on
18 • Wireless Mouse
Operations Guide - DOC. 5700A
CRESTRON
the paper that surrounds the buttons. It is possible that the CNWM can be
reprogrammed and thus the description labels on the Inlay Card beneath the plastic
cover no longer apply. The SP-LK label kit can be used to create professional
looking mouse inlay cards.
Remove Cover
Simply remove the clear plastic cover by inserting a flat lever such as a small
flathead screwdriver into the opening above the largest keypad button. Apply a small
amount of pressure with the flat lever to disengage the tongue and groove
connections of the plastic cover with the rest of the unit. Write functional
descriptions on the paper with a ball point pen or replace the existing sheet with one
that has been printed with typed descriptions using the aforementioned .DXF file.
Fasten Cover
The first step to fasten the cover is to insert the curved-end tongue of the plastic
cover into the appropriate groove of the unit. Lower the cover inserting the tongue
from one side of the plastic cover into the appropriate groove of the unit. Slightly
bend the plastic cover and simultaneously apply pressure down to insert the
remaining tongue into place.
Operations Guide - DOC. 5700A
Wireless Mouse • 19
CRESTRON
Problem Solving
Troubleshooting
The table below provides corrective action for possible trouble situations. If further
assistance is required, please contact a CRESTRON technical support representative.
Wireless Mouse Troubleshooting
TROUBLE
Intermittent
response
during
transmission.
No response
from system.
POSSIBLE
CAUSE(S)
Batteries in unit are
low or dead.
Receiver is blocked or
moved.
Receiver is in vicinity
of metal.
Refer to causes for
intermittent response
during transmission.
NET ID of receiver is
incorrectly set.
CORRECTIVE ACTION
Install new batteries.
Verify that heavy metal is not in vicinity of
transmission.
Verify that large amount of metal is not
blocking transmission.
Refer to corrective actions for intermittent
response during transmission.
Enter Performance Viewport from the
STS/VTW software. Depress the F4 key to
poll the network. Verify that the NET ID for
the receiver is properly set to match the
SIMPL WIndows program.
NOTE: After changing the identity code,
disconnect and reconnect the network
connector.
RF ID is incorrectly
Verify that the RF ID is properly set to match
set.
the SIMPL program.
NOTE: NET ID and RF ID are separate
parameters.
Program does not
Verify correct program is loaded in system
match hardware.
via Performance Viewport.
Receiver is unplugged Verify power to the receiver.
(no power).
Two or more receivers Verify that multiple receivers are properly
are too close together. spaced (>50 feet) from each other.
Wrong transmitter in
If multiple transmitters are accessible, verify
use.
proper unit is used.
20 • Wireless Mouse
Operations Guide - DOC. 5700A
CRESTRON
Further Inquiries
If you cannot locate specific information or have questions, please take advantage of
Crestron's award winning customer service team by calling:
•
In the US and Canada, call Crestron’s corporate headquarters at
1-888-CRESTRON [1-888-273-7876] or 1-201-767-3400.
•
In Europe, call Crestron International at +32-15-50-99-50.
•
In Asia, call Crestron Asia at +852-2341-2016.
•
In Latin America, call Crestron Latin America at +5255-5093-2160.
•
In Australia, call Crestron Pacific at +613-9480-2999.
For local support from exclusive Crestron factory-trained personnel in New Zealand
call Amber Technologies at +649-410-8382.
Operations Guide - DOC. 5700A
Wireless Mouse • 21
CRESTRON
Return and Warranty Policies
Merchandise Returns / Repair Service
1.
No merchandise may be returned for credit, exchange, or service without prior authorization
from CRESTRON. To obtain warranty service for CRESTRON products, contact the factory
and request an RMA (Return Merchandise Authorization) number. Enclose a note specifying
the nature of the problem, name and phone number of contact person, RMA number, and
return address.
2.
Products may be returned for credit, exchange, or service with a CRESTRON Return
Merchandise Authorization (RMA) number. Authorized returns must be shipped freight
prepaid to CRESTRON, Cresskill, N.J., or its authorized subsidiaries, with RMA number
clearly marked on the outside of all cartons. Shipments arriving freight collect or without an
RMA number shall be subject to refusal. CRESTRON reserves the right in its sole and
absolute discretion to charge a 15% restocking fee, plus shipping costs, on any products
returned with an RMA.
3.
Return freight charges following repair of items under warranty shall be paid by
CRESTRON, shipping by standard ground carrier. In the event repairs are found to be nonwarranty, return freight costs shall be paid by the purchaser.
CRESTRON Limited Warranty
CRESTRON ELECTRONICS, Inc. warrants its products to be free from manufacturing defects in
materials and workmanship under normal use for a period of three (3) years from the date of
purchase from CRESTRON, with the following exceptions: disk drives and any other moving or
rotating mechanical parts, pan/tilt heads and power supplies are covered for a period of one (1)
year; touchscreen display and overlay components are covered for 90 days; batteries and
incandescent lamps are not covered.
This warranty extends to products purchased directly from CRESTRON or an authorized
CRESTRON dealer. Purchasers should inquire of the dealer regarding the nature and extent of the
dealer's warranty, if any.
CRESTRON shall not be liable to honor the terms of this warranty if the product has been used in
any application other than that for which it was intended, or if it has been subjected to misuse,
accidental damage, modification, or improper installation procedures. Furthermore, this warranty
does not cover any product that has had the serial number altered, defaced, or removed.
This warranty shall be the sole and exclusive remedy to the original purchaser. In no event shall
CRESTRON be liable for incidental or consequential damages of any kind (property or economic
damages inclusive) arising from the sale or use of this equipment. CRESTRON is not liable for
any claim made by a third party or made by the purchaser for a third party.
CRESTRON shall, at its option, repair or replace any product found defective, without charge for
parts or labor. Repaired or replaced equipment and parts supplied under this warranty shall be
covered only by the unexpired portion of the warranty.
Except as expressly set forth in this warranty, CRESTRON makes no other warranties, expressed
or implied, nor authorizes any other party to offer any other party to offer any warranty, including
any implied warranties of merchantability or fitness for a particular purpose. Any implied
warranties that may be imposed by law are limited to the terms of this limited warranty. This
warranty statement supercedes all previous warranties.
Trademark Information
All brand names, product names, and trademarks are the sole property of their respective owners. Windows is a registered
trademark of Microsoft Corporation. Windows95/98/Me/XP and WindowsNT/2000 are trademarks of Microsoft
Corporation.
22 • Wireless Mouse
Operations Guide - DOC. 5700A
CRESTRON
Appendix A: AT Scan Code
The PC interface is designed so the system software has maximum flexibility in
defining certain keyboard operations. This is accomplished by having the keyboard
return scan codes rather than ASCII codes. Each key generates a “make” scan code
when pressed and a “break” scan code when released. The computer system
interprets the scan codes to determine what operation it is to perform.
The illustration of the PC keyboard, shown below, in conjunction with the AT scan
code table, on the following page, provides the “make” and “break” scan codes.
Simply identify the specific key on the keyboard illustration. Notice that each key
has a “find #” printed in the lower right corner. Locate the “find #” in the AT scan
code table to determine the “make” and “break” scan codes. For example, from the
keyboard illustration, notice that the “S” key has an “find #” of “32”. From the AT
scan code table, notice that “find #” 32 has a “make” scan code of “\x1B” and a
“break” scan code of “\xF0\x1B”. Although typical “break” scan code is simply the
“make” code preceded by hex F0, there are exceptions. Therefore, refer to the
enclosed table for accurate scan codes.
PC Keyboard with Find #s
Operations Guide - DOC. 5700A
Wireless Mouse • 23
CRESTRON
AT Scan Code Table
FIND DESCRIPTION/
"MAKE"
"BREAK"
#
SYMBOL
SCAN CODE SCAN CODE
1
~
\x0E
\xF0\x0E
2
1
\x16
\xF0\x16
3
2
\x1E
\xF0\x1E
4
3
\x26
\xF0\x26
5
4
\x25
\xF0\x25
6
5
\x2E
\xF0\x2E
7
6
\x36
\xF0\x36
8
7
\x3D
\xF0\x3D
9
8
\x3E
\xF0\x3E
10
9
\x46
\xF0\x46
11
0
\x45
\xF0\x45
12
\x4E
\xF0\x4E
13
=
\x55
\xF0\x55
15
Backspace
\x66
\xF0\x66
16
Tab
\x0D
\xF0\x0D
17
Q
\x15
\xF0\x15
18
W
\x1D
\xF0\x1D
19
E
\x24
\xF0\x24
20
R
\x2D
\xF0\x2D
21
T
\x2C
\xF0\x2C
22
Y
\x35
\xF0\x35
23
U
\x3C
\xF0\x3C
24
I
\x43
\xF0\x43
25
O
\x44
\xF0\x44
26
P
\x4D
\xF0\x4D
27
[
\x54
\xF0\x54
28
]
\x5B
\xF0\x5B
29
\
\x5D
\xF0\x5D
30
Cap Lock
\x58
\xF0\x58
31
A
\x1C
\xF0\x1C
32
S
\x1B
\xF0\x1B
33
D
\x23
\xF0\x23
34
F
\x2B
\xF0\x2B
35
G
\x34
\xF0\x34
36
H
\x33
\xF0\x33
37
J
\x3B
\xF0\x3B
38
K
\x42
\xF0\x42
39
L
\x4B
\xF0\x4B
40
;
\x4C
\xF0\x4C
41
'
\x52
\xF0\x52
43
Enter
\x5A
\xF0\x5A
44 Shift (left-most)
\x12
\xF0\x12
46
Z
\x1A
\xF0\x1A
47
X
\x22
\xF0\x22
48
C
\x21
\xF0\x21
49
V
\x2A
\xF0\x2A
50
B
\x32
\xF0\x32
51
N
\x31
\xF0\x31
52
M
\x3A
\xF0\x3A
53
,
\x41
\xF0\x41
54
.
\x49
\xF0\x49
24 • Wireless Mouse
FIND DESCRIPTION/ "MAKE" SCAN
"BREAK" SCAN CODE
#
SYMBOL
CODE
55
/
\x4A
\xF0\x4A
57 Shift (right-most)
\x59
\xF0\x59
58
Ctrl (left-most)
\x14
\xF0\x14
60
Alt (left-most)
\x11
\xF0\x11
61
Space Bar
\x29
\xF0\x29
62
Alt (right-most)
\xE0\x11
\xE0\xF0\x11
64 CTRL (right-most)
\xE0\x14
\xE0\xF0\x14
75
Insert
\xE0\x70
\xE0\xF0\x70
76
Delete
\xE0\x71
\xE0\xF0\x71
79
Left Arrow
\xE0\x6B
\xE0\xF0\x6B
80
Home
\xE0\x6C
\xE0\xF0\x6C
81
End
\xE0\x69
\xE0\xF0\x69
83
Up Arrow
\xE0\x75
\xE0\xF0\x75
84
Down Arrow
\xE0\x72
\xE0\xF0\x72
85
Page Up
\xE0\x7D
\xE0\xF0\x7D
86
Page Down
\xE0\x7A
\xE0\xF0\x7A
89
Right Arrow
\xE0\x74
\xE0\xF0\x74
90
Num Lock
\x77
\xF0\x77
91
7 (Keypad)
\x6C
\xF0\x6C
92
4 (Keypad)
\x6B
\xF0\x6B
93
1 (Keypad)
\x69
\xF0\x69
95
/ (Keypad)
\xE0\x4A
\xE0\xF0\x4A
96
8 (Keypad)
\x75
\xF0\x75
97
5 (Keypad)
\x73
\xF0\x73
98
2 (Keypad)
\x72
\xF0\x72
99
0 (Keypad)
\x70
\xF0\x70
100
* (Keypad)
\x7C
\xF0\x7C
101
9 (Keypad)
\x7D
\xF0\x7D
102
6 (Keypad)
\x74
\xF0\x74
103
3 (Keypad)
\x7A
\xF0\x7A
104
. (Keypad)
\x71
\xF0\x71
105
- (Keypad)
\x7B
\xF0\x7B
106
+ (Keypad)
\x79
\xF0\x79
108 Enter (Keypad)
\xE0\x5A
\xE0\xF0\x5A
110
Esc
\x76
\xF0\x76
112
F1
\x05
\xF0\x05
113
F2
\x06
\xF0\x06
114
F3
\x04
\xF0\x04
115
F4
\x0C
\xF0\x0C
116
F5
\x03
\xF0\x03
117
F6
\x0B
\xF0\x0B
118
F7
\x83
\xF0\x83
119
F8
\x0A
\xF0\x0A
120
F9
\x01
\xF0\x01
121
F10
\x09
\xF0\x09
122
F11
\x78
\xF0\x78
123
F12
\x07
\xF0\x07
124
Print Screen
\xE0\x12\xE0\x7C E0\xF0\x7C\xE0\xF0\x12
125
Scroll Lock
\x7E
\xF0\x7E
126
Pause
\xE1\x14\x77\xE1
\xF0\x14\xF0\x77
Operations Guide - DOC. 5700A
CRESTRON
This page intentionally left blank.
Operations Guide - DOC. 5700A
Wireless Mouse • 25
CRESTRON
This page intentionally left blank.
26 • Wireless Mouse
Operations Guide - DOC. 5700A
CRESTRON
This page intentionally left blank.
Operations Guide - DOC. 5700A
Wireless Mouse • 27